Category: Photography

  • How To Freeze Moving Subjects in a Long Exposure Photo

    So you have this idea for a photograph where you’ve smoothed out the water on a lake using a long exposure, but want to capture the wildlife swimming on said lake frozen in place – or something similar?  I had that same vision and I’m going to show you how I accomplished it below, so you can follow along.
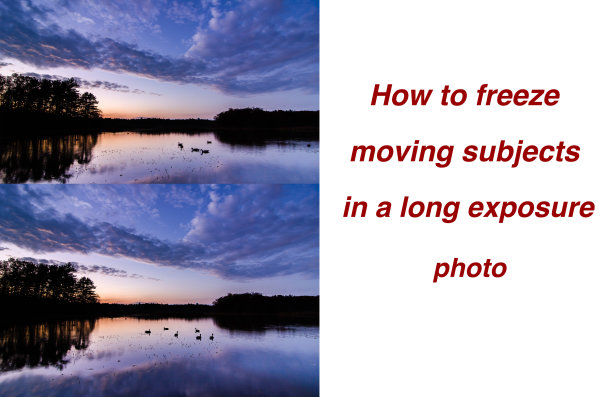
    freeze subjects in long exposure photo

    When trying to capture this kind of photograph in a single frame you’re pretty much out of luck. You can either capture a long exposure shot to smooth out the water, OR increase your ISO and capture a shot using a faster shutter speed to freeze your subject. No matter what you do in camera though, one piece of this puzzle will be out of line with the other.

    So how do you freeze your subjects in a long exposure scene? Simple – with a little bit of post production.

    Part One – Photograph Two Different Images

    You will need two frames to work with in post production; one with a fast shutter speed to freeze the moving subjects, and one with a long exposure to smooth out the water in the scene. You don’t want to change the Depth of Field between the two frames, and need to make sure that the overall exposure remains the same, so you are left with changing the ISO setting to achieve the results you want.

    The long exposure shot will be taken at ISO 100 and whatever settings will be required to get the optimal exposure for the scene in front of you and the faster shutter speed shot will be taken with a higher ISO setting allowing you to achieve a fast enough shutter speed to freeze the motion of the subject you want stationary.

    In the example photograph the long exposure was taken at 1.3 seconds, and the high ISO photograph was shot at ISO 4000. This allowed me to get an exposure of 1/30th of a second (still fairly slow, but workable for the desired result).

    Part Two – Combining the Images in Photoshop

    Here’s the first, unprocessed image, straight out of camera. Before you get to freezing the moving subjects you need process the original photo. I will be working in Lightroom 4 to demonstrate.
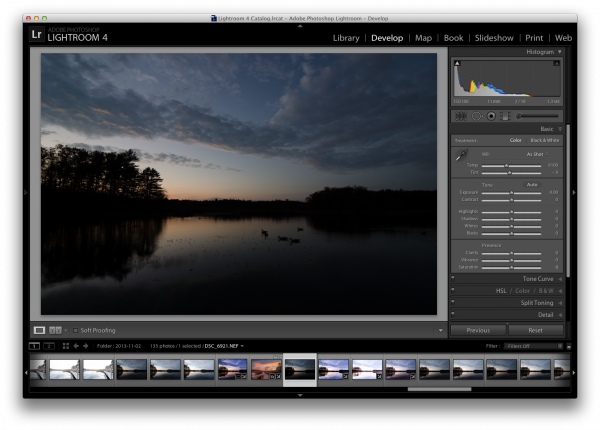
    Original Long Exposure

    Original long exposure photo in Lightroom

    After applying a few graduated filters, some adjustment brushes, and playing with the basic sliders I was able to achieve a result that is pleasing. If you’d like to see exactly how I created this – you can watch the entire process here.

    Now that you’ve got the photograph properly exposed you’ll notice that the problem is very evident in the photograph – the moving subjects just wouldn’t sit still for the long exposure. So it’s up to post production magic to solve this issue.
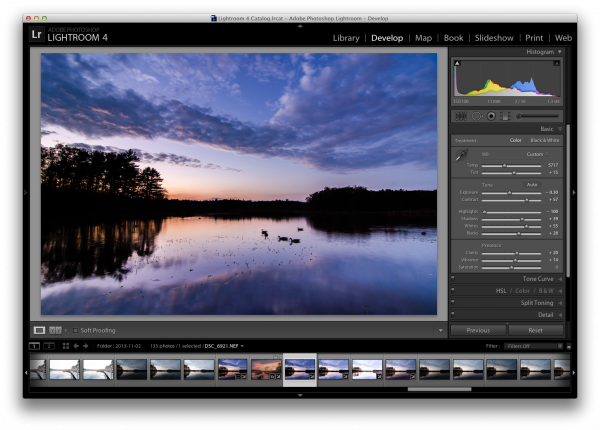
    Processed Photo

    Process the long exposure image to your liking

    Use Lightroom’s “sync” feature in the Develop Module to bring the settings from the photo above over to the high ISO photo that you will be using . This will allow you to make sure everything stays the same (color, contrast, tone, etc.) between the two images when you get to creating the composite later.
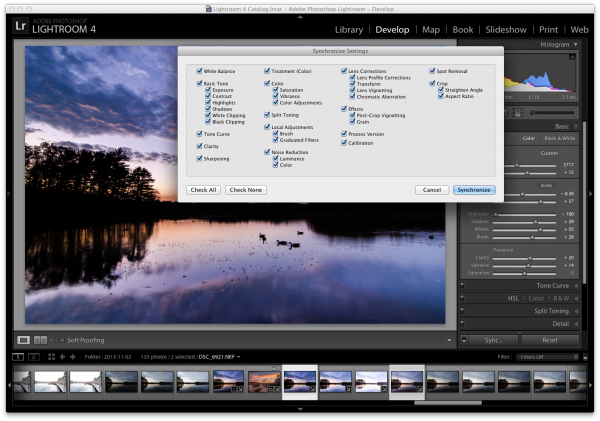
    sync

    Sync settings from the processed long exposure shot with the high ISO shot used to freeze the subject

    I suggest applying some minor adjustments to the high ISO image to get the subjects to stand out more (as they are going to be the only piece of the high ISO used in the final version).

    One of the main areas of focus for this example image was to create lines that are as hard as possible for the subjects, so that they stand out very nicely in the composite. To do this, go into Lightroom’s detail section and push up the sharpening quite a bit. You may also want to do some noise reduction to try and compensate for the high ISO exposure with increased noise.
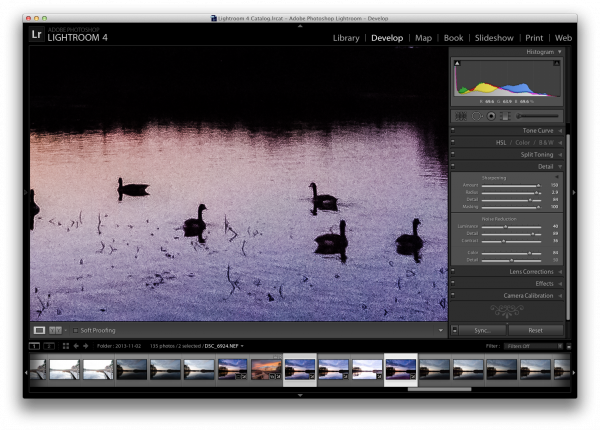
    High ISO Exposure

    Make some minor adjustments to the high ISO shot and export both images for further processing in Photoshop

    While Lightroom is great for processing photos, it is limited in that you can not create composites or work with layers, which is exactly what is needed to finish this project.

    Therefore it’s time to bring out the big guns and jump on over to Photoshop. Below, I’ve loaded the two files as layers, (select the two thumbnails in LR, right click on them, and choose “edit in>Open as layers in PS) with the long exposure layer on top and the high ISO layer on the bottom.
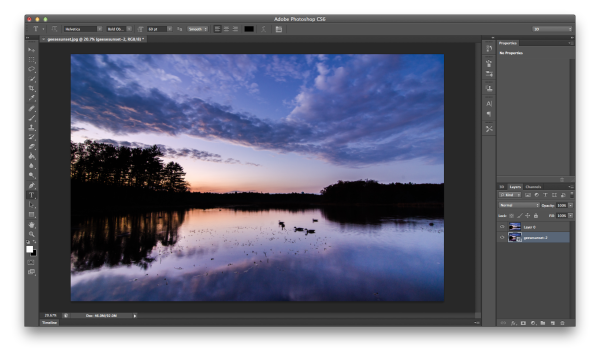
    Jump into Photoshop

    Open both photos as layers in Photoshop – I typically put the high ISO image on the bottom as we will be using less of that image in most cases.

    I like to clean up the long exposure shot as well as I can first, so I went ahead and got rid of the blurry geese by performing a simple clone job. Go ahead and do that on your image as well if suitable.
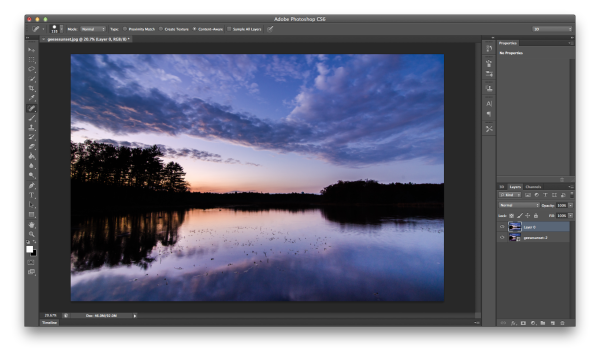
    Clone

    Clone the blurred subject from the long exposure shot

    Next reduce the opacity of the long exposure layer (which I’ve arranged as the top layer). This will allow you to see the high ISO layer as a reference point, while still being able to see most of the long exposure shot as well.
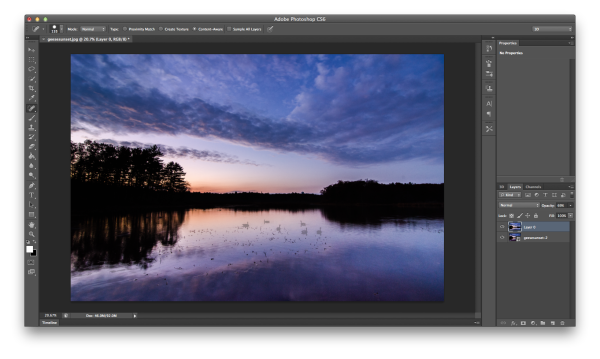
    Reduce Opacity

    Reduce the opacity of the long exposure layer allowing you to see the high ISO layer below

    With the high ISO layer selected, use Photoshop’s selection tool to make a rough selection of the subjects in the frame. Next add a layer mask to the long exposure layer, which you will be using in the next step.
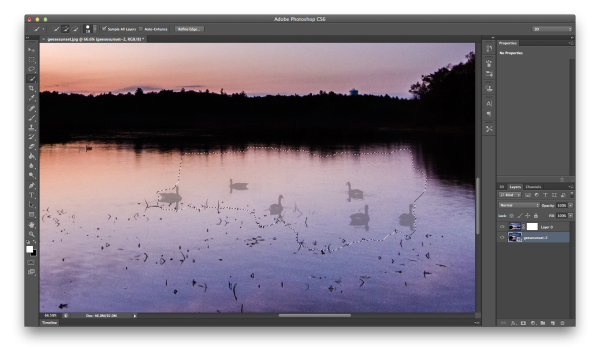
    Select high iso subject and add layer mask

    With high ISO layer selected, select your ‘frozen’ subject and add a layer mask to the long exposure layer

    Once the subjects have been roughly selected, fine tune the edges of the selection to make sure you’ve got everything you need. Then select the layer mask you added to the long exposure layer and fill in the selection with a black paint bucket fill (make sure your swatches are set to default black/white and use the tool at 100%). This is a very crude way of getting the geese into the long exposure shot, but does the job quickly and it works.
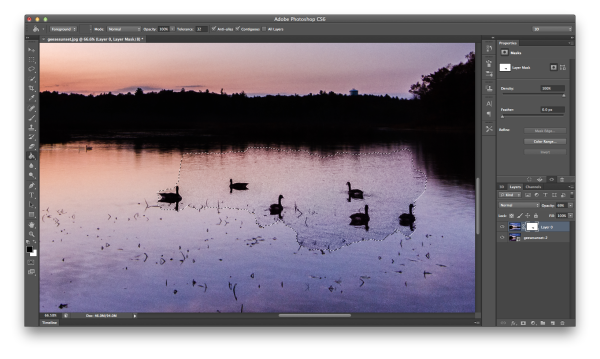
    Bring Frozen Subject Forward

    With the layer mask selected for the long exposure layer, use the paint bucket to fill in the selected region

    Now that you have your subjects visible within your frame, bring the opacity of the long exposure layer back to 100% and start the clean up. I recommend you work in broad strokes first using a wide brush with the color white selected. This will allow you to get most of the areas between the subjects from long exposure frame back, instead of the noisy high ISO frame.
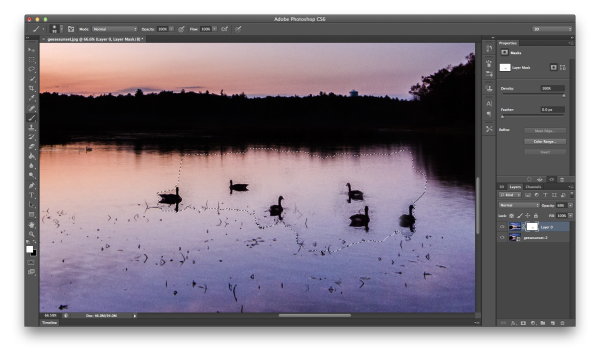
    Clean Up part one

    Using a white paint brush clean up the areas in between and around the subject in broad strokes first

    Once you have a basic rough clean up done, it’s time to zoom closer and use a finer point brush to do the detail work. It’s a time consuming process. But, this must be done, or the final image will end up looking like two images put on top of one another, and not one cohesive, final image.
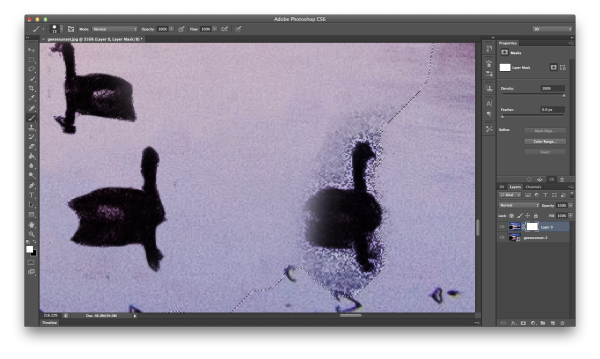
    Detail Work

    Once you’ve roughed out the clean up – zoom in with a small brush and continue the clean up on a more detailed level

    You’re on the home stretch now!

    Do one final check of the image by hiding the high ISO image (click the little eyeball next to the layer). By doing this, places the mask has been applied will now be transparent, and you’ll easily be able to tell if there were small areas that need fixing.
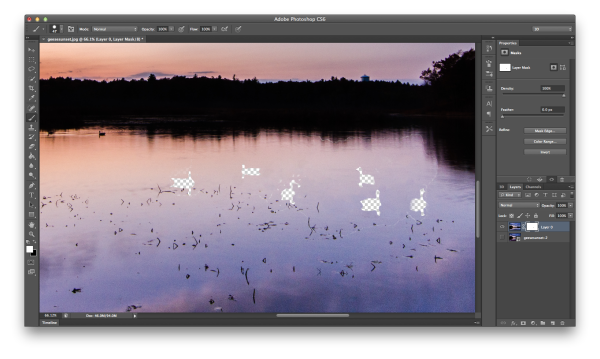
    Final Clean Up

    As a final clean up – hide the subject layer and see if there were any spots that need a final adjustment

    After the final touch up and a few other minor tweaks in photoshop you’re ready to merge layers, save the image and show your friends. (you can also save a layered version if you think you might want to edit it more later)
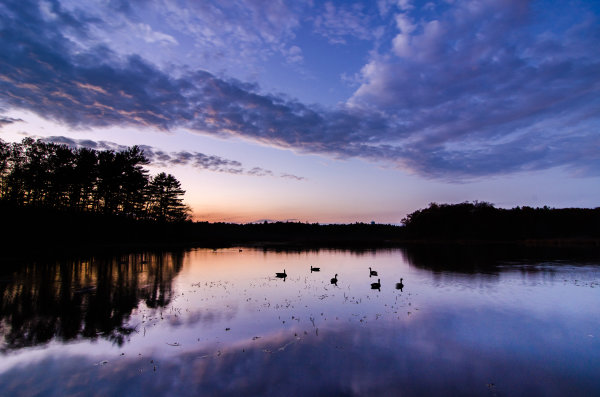
    geesesunsefinal

    Save and share your final shot

    Summary and more reading

    I hope you got something out of this step by step walkthrough – for more information on how to mask in Photoshop, which is really what this entire process boils down to, check Photoshop Masks 101. If you’ve ever created a long exposure, high ISO composite, I’d love to see it in the comments!

    Post originally from: Digital Photography Tips.

    Check out our more Photography Tips at Photography Tips for Beginners, Portrait Photography Tips and Wedding Photography Tips.

    How To Freeze Moving Subjects in a Long Exposure Photo

    The post How To Freeze Moving Subjects in a Long Exposure Photo by John Davenport appeared first on Digital Photography School.

    Digital Photography School

  • Start To See Photographically In Six Easy Steps

    We are living in a time of unlimited free shutter clicks. This is both an advantage, and a disadvantage for you as a photographer. On one hand, the learning curve is faster, easier and definitely a lot cheaper. On the other hand, many photographers have a tendency to shoot without taking much care in their composition and rely on the occasional lucky shot.

    Stop shooting randomly and start photographing with intent. Before you click that shutter, ask yourself: “What do I want to convey? What story do I want to tell?” There are many ways to achieve this, here are few easy steps to help you step up your game, no matter what camera or lens you use.

    Six Steps to Start Seeing Photographically

    1 – See the light

    Play with light and shadows. Be aware of the quality of light around you (hard versus soft light) and its effect on objects, buildings, etc. The more aware you become of the quality and quantity of light, the better you will be at harnessing it and making it work for you, no matter the time of day.

    See the light, its effect on building and objects around you.

    See the light, its effect on buildings and objects around you ©Valérie Jardin

    When you see light, any ordinary object will become a wonderful subject. ©Valérie Jardin

    When you see light, any ordinary object will become a wonderful subject ©Valérie Jardin

    2 – Express your vision with basic composition rules

    There are many ways to express your vision and they all start with the decisions you make before you press the shutter.

    Use focus point and depth of field

    The obvious way to lead the eye of the viewer is by focussing on the subject and using the right depth of field so that there is no mistake as to where the eye should go. It only takes a fraction of a second to lock your focus and recompose. You have to put some thought into it and soon you will make quick decisions that will make your images stronger.

    Use focus point and depth of field to lead the eye to your subject ©Valérie Jardin

    Leading lines

    Too often ignored, the use of lines is a powerful tool to lead the eye.

    Use leading lines in your composition. ©Valérie Jardin

    Use leading lines in your composition ©Valérie Jardin

    The rule of thirds

    Positioning your subject in your frame is one of the most important decisions you will make in regards to your composition. You cannot overuse the rule of thirds, but it’s okay to break it as long as it is done intentionally.

    The rule of thirds works, use it! ©Valérie Jardin

    The rule of thirds works, use it! ©Valérie Jardin

    Break the rule of thirds as much as you want, as long as you know why you’re breaking it. ©Valérie Jardin

    Using color

    Just like using focus point to draw the eye, using color is another powerful compositional tool. Alternatively, because color draws the eye, it is also a reason to convert your color image into B&W to remove distracting colorful elements and make stronger images!

    Negative space

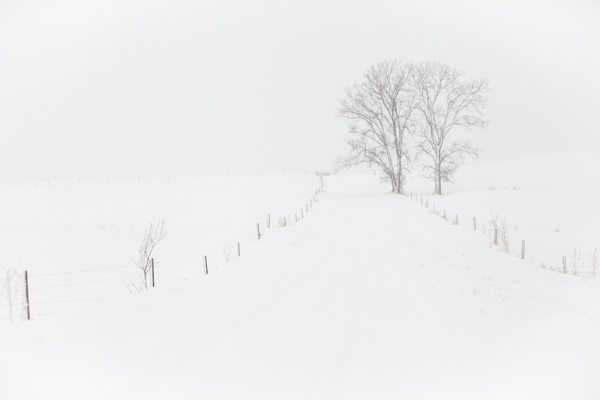
    The clever use of negative space makes stronger images as it puts more emphasis on the subject (positive space).

    Use negative space to give more impact to your images. ©Valérie Jardin

    Use negative space to give more impact to your images. ©Valérie Jardin

    Patterns

    See and use repeated patterns or, even better, look for breaks in the pattern!

    See repeated patterns. Even better: a break in the pattern!  ©Valérie Jardin

    See repeated patterns. Even better: a break in the pattern! ©Valérie Jardin

    Soon you will see stronger images that incorporate several element such as repeated patterns, leading lines, rule of thirds and color that draws your eye to the main subject. Use focus point and depth of field to lead the eye to your subject. ©Valérie Jardin

    Soon you will see stronger images that incorporate several elements such as repeated patterns, leading lines, rule of thirds and color that draws your eye to the main subject. ©Valérie Jardin

    3 – Less is more

    Learn to make stronger images by leaving unnecessary elements out of the frame. One thing I notice all the time when I look at my students’ work is that they tend to include too much in their frame. What you decide to leave out of the frame during your composition will make or break the image. Keep it simple. Learn to see and crop in camera.

    You don't need the subject in it's entirety to have a strong image. Practice cropping in camera. The use of a fixed lens will help you! ©Valérie Jardin

    You don’t need the subject in its entirety to have a strong image. Practice cropping in camera. The use of a fixed lens will help you! ©Valérie Jardin

    Less is more, think minimalist and give more impact to your images! ©Valérie Jardin

    4 – Get close and fill your frame

    Objects, even the most ordinary ones, look more interesting if you frame them tight. Get close. You think you’re close enough? Now get closer!

    Fill your frame! ©Valérie Jardin

    Fill your frame! ©Valérie Jardin

    Get close, and then get closer! ©Valérie Jardin

    Get close, and then get closer! ©Valérie Jardin

    5 – Work your frame

    Try shooting from different perspectives, shoot high, shoot low. Tilt your camera for more dynamic images.

    Work your frame: Shoot high, Shoot low... Things don't look very interesting at eye level. ©Valérie Jardin

    Work your frame: shoot high, shoot low… things don’t look very interesting at eye level. ©Valérie Jardin

    6- Watch your background!

    It only takes a second to scan the edges of your frame and check your background for distracting elements. It also only takes a quick second to move one step in either direction to get rid of a distracting element or avoid a branch to stick out of someone’s ear.

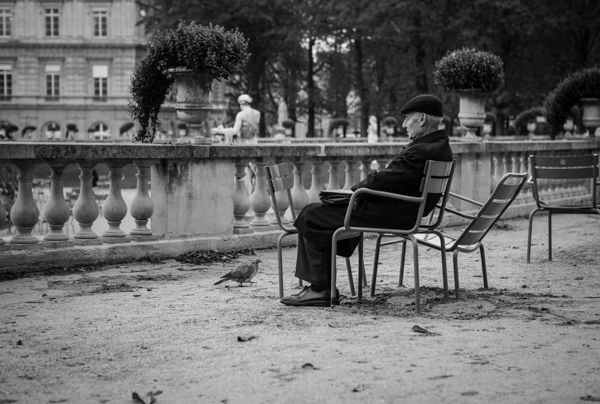
    This image would have been ruined had I not stepped slightly to the right to avoid the potted plant to be directly on top of the gentleman's head...  ©Valérie Jardin

    This image would have been ruined had I not stepped slightly to the right to avoid the potted plant to be directly on top of the gentleman’s head… ©Valérie Jardin

    Next time you go out with your camera, try to slow down and think more about what you want to convey with your images. Unless you are photographing birds, busy toddlers or action sports, try to make every shutter click count!

    Soon these composition rules will become second nature. You will see them without having to even think about them, you will learn to see photographically, and your work will improve.

    Have fun!

    Post originally from: Digital Photography Tips.

    Check out our more Photography Tips at Photography Tips for Beginners, Portrait Photography Tips and Wedding Photography Tips.

    Start To See Photographically In Six Easy Steps

    The post Start To See Photographically In Six Easy Steps by Valerie Jardin appeared first on Digital Photography School.

    Digital Photography School

  • Low Frequency, High Amplitude

    I’ve been doing a lot of thinking recently about the next step in my weird, one-off career. And this tweet, by a man who I truly admire, summed up my thoughts in just four words.

    As a photographer, you could hardly ask for better advice. I’m taking it to heart, both for myself and for Strobist.

    Read more »
    Strobist

  • Playing With Fire: Steel Wool Spinning in the Landscape

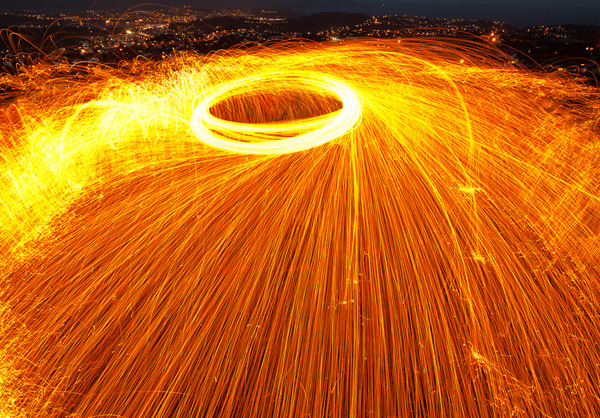
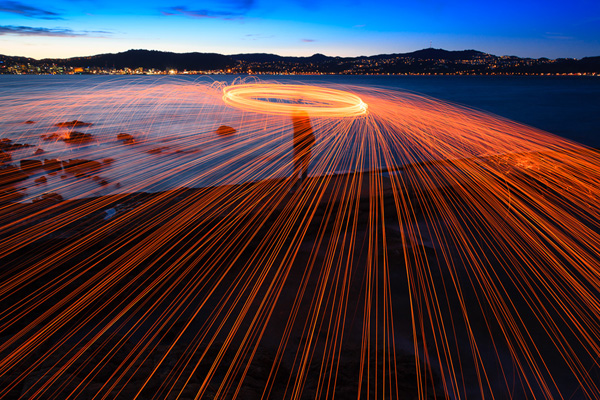
    Focal length 21mm, shutter speed 15 seconds.

    Focal length 21mm, shutter speed 15 seconds.

    If you’ve been following my articles no doubt you have tried painting with light or using a wide-angle lens for landscape photography. You may have found some interesting ways to exploit the colour contrast between blue and orange and are definitely aware of the magical quality of the light during twilight.

    Today’s technique brings all these elements together in a way that creates beautiful, dramatic and unusual images. It’s called steel wool spinning. The photos may look complicated but in reality it is easy to try out if you have the right equipment, a willing partner and pay attention to safety.

    Here’s what you need:

    • Steel wool (you can get this from hardware stores, the finer grades are best).
    • A stainless steel whisk and a length of strong cord to tie it to.
    • Protective clothing, fire extinguisher and safety goggles. Burning steel wool is potentially dangerous. Don’t underestimate the potential danger – this article summarises the precautions you need to take. We are not responsible if you get burnt or set something alight.
    • A willing helper. You can use your camera’s self-timer and spin the steel wool yourself, but getting somebody to do it for you is much easier.
    • A dramatic location. One that looks good when viewed through a wide-angle lens. Also one where people are unlikely to suddenly walk into the immediate area and be hit by flying sparks, or with anything that is likely to catch alight.
    • Calm weather. The less wind the better.
    • A camera with a manual mode, a cable release or remote (the self-timer will do in a pinch), good tripod, wide-angle lens, UV filter and lens hood. Live View is also useful.

    How to do it

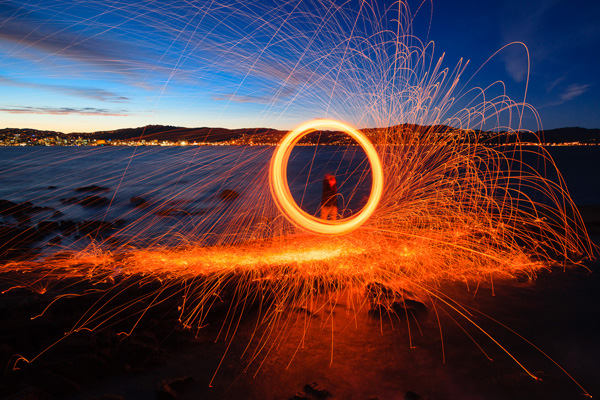
    Steel wool spinning really is very simple. Simply stuff the steel wool inside the whisk (I use masking tape to hold it in place), set it alight with the cigarette lighter, and get your helper to whirl it around in a circular motion. The burning sparks of steel wool fly out and fall to the ground, creating bright orange trails of light.

    Steel wool spinning

    Focal length 21mm, shutter speed 15 seconds. Here, my helper span the whisk in a circle around her head.


    Steel wool spinning

    Focal length 19mm, shutter speed 15 seconds. My helper span the whisk in a circle in front of her, creating a different shape.


    Put your camera on a tripod, and set your exposure using manual mode. Aim for a shutter speed of around eight to 15 seconds – there’s no harm in underexposing the background for dramatic effect (I find the steel wool burns for about ten seconds). You’ll need to be shooting at twilight, otherwise it will be too bright. The sparks won’t show up in daylight.

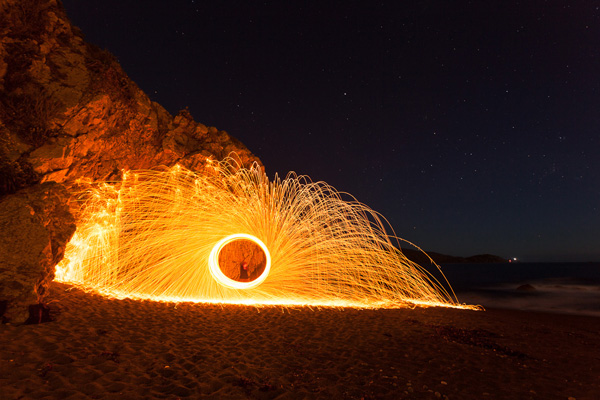
    If you shoot while there’s still a little light left you the sky will have a nice deep blue colour. Some people use this technique at night and combine it with painting with light (using either torchlight or portable flash) to build up an image or to capture star trails.

    Steel wool spinning

    Focal length 17mm, shutter speed 30 seconds. This photo was taken after the light had faded from the sky. The 30 second shutter speed was required to capture the stars. Note that it doesn’t matter if the steel wool burns for less than the 30 second shutter speed. The idea of using a longer shutter speed is to reveal detail in the background. If I had used a shutter speed of 15 seconds, the burning steel wool would look the same (as it burns for around 10 seconds) but the background would be darker.


    Steel wool spinning

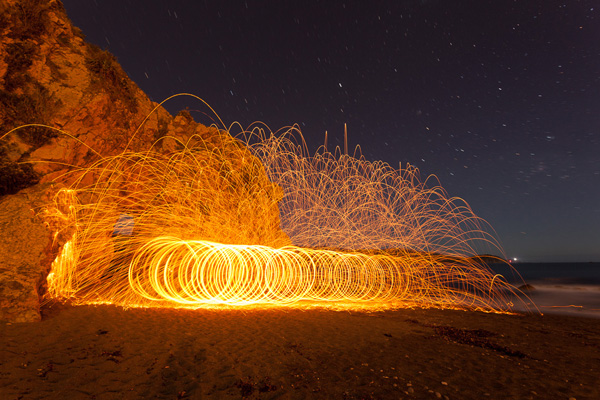
    Focal length 17mm, shutter speed 215 seconds. The longer shutter speed has captured the movement of the stars. I asked my helper to spin the whisk in a circle as she walked along the beach, creating a different pattern.


    Live View (if your camera has it) helps with focusing, as it may be too dark for you to focus on your subject properly. On my camera, there is enough detail in Live View to focus manually, even when it is too dark to see anything through the viewfinder. Set your camera to manual focus, focus on the person doing the steel wool spinning, and use a small aperture (f8-16) to compensate for any focusing errors. As this is a kind of landscape photo you’ll no doubt want the entire scene in focus anyway.

    Shoot Raw so you can make fine adjustments to colour temperature and exposure in post-processing. In the meantime, set white balance to daylight – that will help the camera record the colours accurately.

    If you’re using a wide-angle lens (recommended for the dramatic perspective) then move as close as you can to the arc of the burning sparks of steel wool for a strong composition. It is wise to wear clothing that covers as much skin as possible, plus a hat and safety goggles, in case one of those sparks lands on you. You should also use a UV filter to protect the front element of your lens from burning sparks.

    Steel wool spinning inspiration

    Take a look at these links for some more inspiration:

    Flick Steel Wool Spinning group

    Steel wool spinning at 500px

    Raining Fire Photography (article)

    Hopefully this article has inspired you to give steel wool spinning a try. Ultimately, it’s another form of painting with light – the light from the burning steel wool illuminates the landscape in a new and interesting way.

    Have fun.

    Mastering Photography

    Mastering Photography ebook by Andrew S Gibson

    My ebook Mastering Photography: A Beginner’s Guide to Using Digital Cameras introduces you to photography and helps you make the most out of your digital cameras. It covers concepts such as lighting and composition as well as the camera settings you need to master manual mode and take photos like the ones in this article.

    Post originally from: Digital Photography Tips.

    Check out our more Photography Tips at Photography Tips for Beginners, Portrait Photography Tips and Wedding Photography Tips.

    Playing With Fire: Steel Wool Spinning in the Landscape

    The post Playing With Fire: Steel Wool Spinning in the Landscape by Andrew Gibson appeared first on Digital Photography School.


    Digital Photography School

  • Introducing our New Managing Editor – Darlene Hildebrandt

    Today I’d like to introduce you to the new editor of dPS. But first… a little backstory.

    The Evolution of dPS

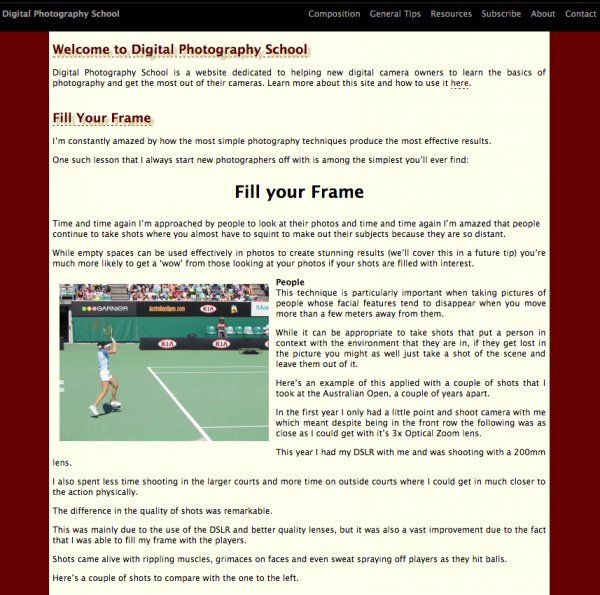
    Back in 2006 when I started Digital Photography School I did so because I was ‘that guy’ in my friendship circle who friends came to for advice on how to use their digital cameras (and to bring my camera along to every party, wedding and other gathering).

    Our first day on dps back in 2006.

    Our first day on dps back in 2006. Yes, our first design was ‘Maroon’!

    While I’d done a few weddings and other paid photography gigs I didn’t consider myself a pro – but wanted to create a place online to share what I did know to help those at the beginning of their photography journey.

    In 2008 we went through a bit of a 'blue' stage with our design.

    In 2008 we went through a bit of a ‘blue’ stage with our design.

    The content in the early days was unashamedly for beginners but in time we began to explore more intermediate level teaching. Early on I did all the writing myself but as the site grew I began to approach more experienced and professional photographers to write more and more of the content.

    In 2009 we did a major redesign and expanded the site with new sections on 'camera reviews' and 'post production'.

    In 2009 we did a major redesign and expanded the site with new sections on ‘camera reviews’ and ‘post production’.

    Today at dPS

    Fast forward to 2013 and we now have a team of 15 regular writers in our core team and a group of almost 20 other semi-regular writers submitting guest posts.

    While in the early days I published 2-3 posts per week we now post two tutorials per day.

    While I was happy in the early days of the site to get 100 visitors in a day, today we regularly see over 100,000 in a day!

    As of today we’ve had over 158,934,066 visitors to the dPS blog and forum area since we started! I can hardly believe where dPS has grown to and feel like the luckiest man in the world to have been a part of it.

    You will have noticed some changes here on the site in the last couple of months. The blog area had a complete redesign (and the forum will be redesigned shortly to match), we’ve been hard at work on delivering you a much requested mobile friendly theme too – but behind the scenes there have been many changes of late.

    6 weeks ago we launched our brand new design.

    6 weeks ago we launched our brand new design.

    A lot of the backend of the site has been reengineered but in the last couple of years I’ve been developing our team also and have recruited a number of people to help take dPS to the next level. These include:

    • Jasmin who produces our eBooks and other products
    • Simon who works on customer support and moderating the forum
    • Jade who helps with our social media accounts – she’s the one curating our popular Pinterest Account
    • Shayne who works on marketing but also heads up our dev team. He also helps with our SnapnDeals and SnapnGuides sister sites
    • Luke and his team who works with site advertisers/sponsors to help us keep the site free
    • Mario and 3 other developers to work on the back end of the site (they did the redesign but are also working on numerous other behind the scenes technologies to streamline what we do but also help our servers to work faster and more reliably).
    • Lastly we’ve engaged the services quite a few great professionals who have helped us with authoring, editing, design and production of our eBooks.

    Most of the above team have come on in the last 2 years (our end of year Christmas party suddenly is becoming a little more fun…) so we’ve seen some significant changes around here – however I’ve also been on the look out for some help with the editorial aspects of the site.

    While our writers have consistently had great feedback I know that there is always room for improvement and am very aware of my own limitations as a photography educator. I’ve been blogging for 10 years and so have experience in that – but lately I’ve been on the look out for a Pro Photographer to help us develop our editorial strategy.

    Introducing Darlene Hildebrandt

    Today I’m pleased to announce the appointment of Darlene Hildebrandt as our new editor. I feel a little strange ‘introducing’ her to you as regular readers will know her work already as she’s been one of our regular authors for 18 months.

    Darlene headshot May13 162 web 2Darlene has been a professional photographer for over 26 years having worked in many different genres in the industry including: commercial, food photography, portraits, weddings, fine art, and travel photography. She still does portraits by referral, and special events for charities on a volunteer basis.

    Her fine art work is shown and sold in a local gallery in her city, Edmonton, Alberta, Canada and she’s participated in many group and solo art shows and exhibitions over the last eight years. Since 2011 she has turned her focus towards teaching photography, and sharing her passion for the craft with others. She teaches weekend classes locally, as well as photography weekend workshops in Alberta and Washington state (USA).

    New for 2014 she will also be leading photography travel tours with a fully booked trip to Cuba scheduled for January, and Nicaragua in February/March that is quickly filling up as well. Her tours will have emphasis on interacting with and helping out the locals in that country, and a schedule that is flexible and adaptable as the participants see fit. Photography at optimal times of day will be one of the goals on the tours and photography coaching in the field will allow Darlene to assist tour members in getting their very best images.

    In April of 2012 Darlene started writing for Digital Photography School. Her articles quickly became popular, consistently among the top articles each quarter, and she became a regular author on the site. You can view Darlene’s author page here.

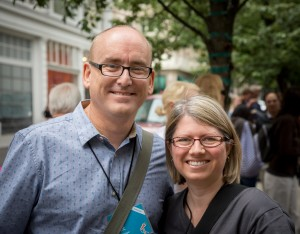
    NewImageIn July last year I spent a little time with Darlene in Portland Oregon at a conference (that’s us on the right) and in the last couple of weeks Darlene flew out to spend time with the rest of the dPS team here in Melbourne Australia.

    Today, Darlene comes on board as the Managing Editor to help us take DPS to the next level.

    A Few Words From Darlene

    You’ll no doubt continue to hear from Darlene regularly here on dPS but I asked her to say a few words today!

    From Darlene:

    “I am really happy to be joining the dPS team as Managing Editor! Working with Darren and the team has endless possibilities for the future, one that it is exciting and inspiring to me.

    Being a photography teacher and writer allows me to share my passion for photography with liked minded people like you. I thrive on comments from students and readers who have break through moments and create images they never dreamed possible. These moments drive my energy and enthusiasm for teaching photography. Through you, the valued readers of DPS, I will be able to connect with more people and spread creativity through photography, a subject which is so close to my heart.

    There are some great new things coming soon for dPS and I’m really excited to be a part of the team bringing them to you. I look forward to connecting with you soon and seeing your images for the weekly challenges and articles!”

    The Future of dPS

    I’m really excited about the future of dPS. Darlene coming into the team will continue to lift the quality of our tutorials but will also enable us to do some new things.

    I can’t say too much about what’s coming yet but you can expect some new types of teaching and content to start appearing on dPS in the coming months! We’re also hard at work getting our popular 12 Deals of Christmas together for next month!

    Darlene coming onto the team will also free me up to work on improving other aspects of the site too. I’ll still be very hands on with all areas of dPS but am also very excited to have a little extra time to work on some new related projects that I’ve been wanting to get my teeth into that I think will make dPS even more useful to our community.

    That’s enough from me for today – please welcome Darlene!

    Post originally from: Digital Photography Tips.

    Check out our more Photography Tips at Photography Tips for Beginners, Portrait Photography Tips and Wedding Photography Tips.

    Introducing our New Managing Editor – Darlene Hildebrandt

    The post Introducing our New Managing Editor – Darlene Hildebrandt by Darren Rowse appeared first on Digital Photography School.

    Digital Photography School

  • 50 Brilliant Photo Manipulation Tutorials to Understand Photoshop Like a Pro

    When it comes to photo editing, the first thing that comes to my mind is Photoshop. Photoshop is the second name of creativity. Photo manipulation may be one of the funniest things you can do with Photoshop. Of course, a person should have lots of patience and time to create some truly stunning artwork, but it’s worth a try. Today, Continue Reading

    The post 50 Brilliant Photo Manipulation Tutorials to Understand Photoshop Like a Pro appeared first on Photodoto.


    Photodoto

  • Nightscapes: Photographing the City at Night

    By Joseph Eckert

    Eckert_NightScape_1.jpg

    The idea of taking photographs at night can be counterintuitive to the novice photographer. After all, photography is an art, a craft, a technology that is wholly built on light. Film or digital, it doesn’t matter: we need light to make a photograph—it is as simple as that.

    Night, of course, by very definition lacks the pervasive light of day, and therefore doesn’t seem like a good time for photography. In the broadest sense, this intuitive understanding of light and its importance to photography is absolutely correct. Night does represent a more challenging time to take pictures, because we lack all those wonderful photons barreling down from the sun and reflecting off everything interesting and into our waiting lenses.

    However, note that I said “challenging” but not “impossible.” Indeed, nighttime photography is not only possible; it is wonderfully ripe for creative expression and can help you create genuinely unique looks in your work.

    The Night in General

    Eckert_NightScape_2.jpg

    Take a moment, tonight, or whenever you have a chance, and go outside into the darkness long after the sun has gone down. Really open your eyes and observe, noting all the differences, all the unique things that set night apart from day. It is as simple as the lack of sunlight, but infinitely more complex than that breezy statement would suggest.

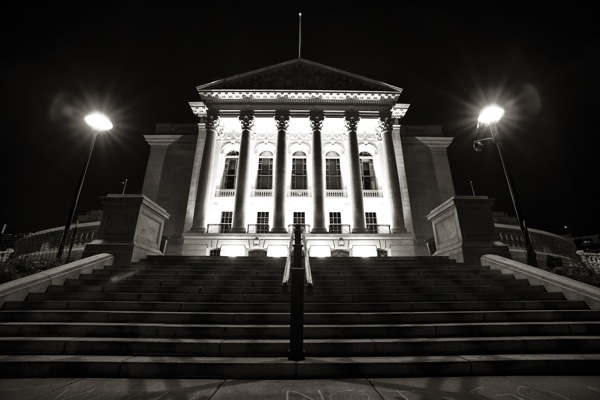
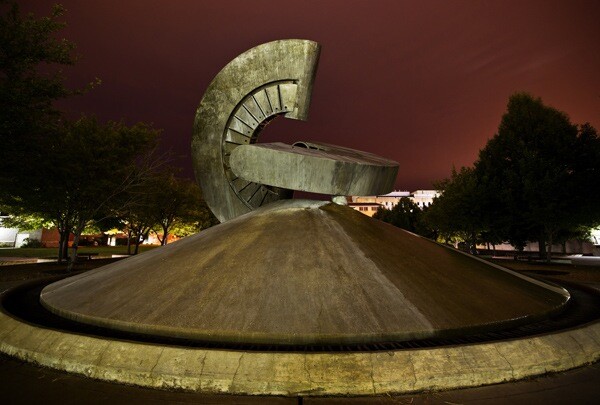
    Pay attention to the way the shadows have deepened and pooled, how colors are muted or rendered differently by the artificial light of streetlamps or the exposed bulb on your backyard porch. Notice how things feel, how significant just changing the time of day can be. That old oak tree that seems so friendly and comforting in the day can turn into a gnarled, malevolent specter at night. Or a car that during the day is simple and boring might become a gleaming chariot in the darkness. The possibilities are endless.

    The City at Night

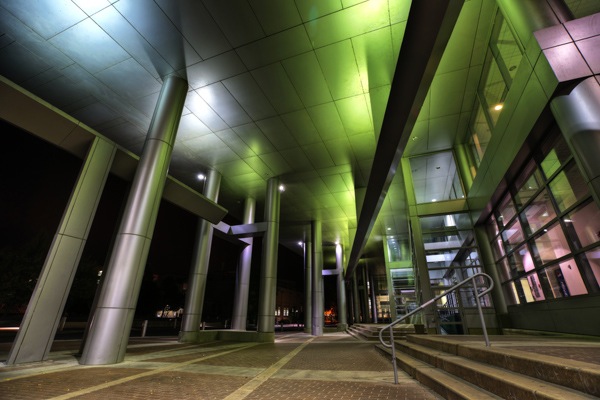
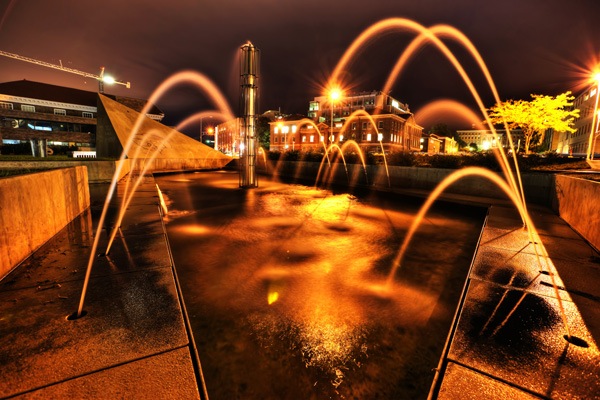
    Eckert_NightScape_3.jpg

    Cities are wonderful engines of creative possibility for the nighttime photographer. We lose the sunlight, but we gain thousands (or millions) of individual points of artificial light of every different color and tonal quality. We can (literally and figuratively) view our city in an entirely new light. The old and staid can become fascinating again as the changes in lighting shift the shadows and alter the textures and wring out, or completely change, the colors.

    And all these bright points of artificial light give our cameras something to gather and turn into a photograph.

    Great. So…What Do I Do?

    Eckert_NightScape_4.jpg

    I’m going to try to distill my experiences from my nighttime cityscape photography outings into a series of recommendations, aimed at giving you the best possible chance to get that shot, the one you really want, full of color and deep shadows and crazy lighting that showcases your city in a whole new way.

    Bring the Right Gear

    I’m not going to categorically deny that you can take great nightscapes with a compact digital camera. I will say that using a point and shoot is going to make getting that fantastic image of your dreams a lot harder.

    I recommend the following:

    • Tripod, sturdy but lightweight enough for you to carry around easily
    • DSLR
    • Remote shutter release
    • Relatively fast wide angle lens (the wide angle part is optional, but what I recommend to get the most dramatic shots of the architecture and streets of your city)
    • Lens hood (to reduce lens flare from outside-the-frame light sources)

    Note that I didn’t say “flashlight.” This article assumes you are in the city, which, barring unforeseen power outages, should have light enough for you to see by and make your way around. That may vary by city, however, so bring a flashlight if you feel you’ll need one, or if you plan on doing “light painting” with it.

    Know the Gear You Brought

    Things will be dark. It’s nighttime. So make sure you know how to operate your DSLR in minimum light and with little fuss. If your camera has the ability, make use of custom modes to have your settings in place and ready to go ahead of time. Also be able to fit your remote shutter cable onto your camera, and your camera onto your tripod, in the dark (and both of those back off again).

    Going further, try to get to know your lens(es) and your camera with regard to how they behave in low light. Some DSLRs are better at autofocusing in dim light than others; you may need to manually focus for best results if the AF ends up endlessly searching (alternatively, point the camera the moon or some other distant light, let AF put the focus at infinity, recompose and shoot). DSLRs will also vary a great deal on how well they handle high ISO values and/or very long exposures (in terms of the level of noise in the resultant image). If you are looking to capture fast action in freeze-frame in a nighttime shot, you will inevitably need a high ISO level and probably a very wide aperture lens. Remember, a tripod can hold your camera solid and in place, but it has no effect on the movement of the subject matter.

    This brings us to:

    Know What You Want

    Are you looking for a freeze-frame in the darkness? This is going to be tough – a technologically demanding task for your camera. You’ll have to set the ISO quite high and have a “fast” lens (one with a wide aperture, as noted above, like f/2.8 or f/1.7, etc). The result will necessarily have a very shallow depth of focus with potentially a lot of noise – things to keep in mind as you are shooting. You will also need a high ISO and fast aperture if you are trying to shoot handheld (without a tripod), something that is very possible, especially with newer, less noisy digital cameras, but be prepared to have do noise reduction in post!

    If, instead, as is more commonly done, you want to create light trails from passing cars or use long exposures to really capture the fantastically different nighttime lighting, you can get away with using much lower ISO (e.g. 100) and a smaller aperture (f/8, for example) to enlarge your depth of field and minimize the ISO-induced noise. This will mean, commensurately, a longer exposure time: the shutter will remain open longer, letting those light trails form and also filling the frame with more detail as more photons are gathered by the imaging sensor. Bear in mind, however, that most DSLRs have an automatic shutter time cutoff of 30 seconds, so if you need longer to get a proper exposure you’ll need to know how to use the Bulb mode on your camera (where the shutter speed is determined by how long you hold down the shutter release button). In either case, you will need a tripod, because the exposure time will be much too long to keep still when hand-holding.

    Also, keep in mind a fact of all digital sensors (so far): the longer the shutter is open, the more noise creeps up, regardless of ISO setting. To combat this you can set your camera to apply in-camera noise reduction. Many DSLRs do this automatically on longer exposures, and usually the time it takes to apply the NR is equivalent to however long the shutter was open. This is important to remember when you are out and about, because it means your camera is unusable for however long the NR is being applied.

    Know Your City

    Every city is different, in layout, points of interest, people and the overall character, and all of those elements (except the layout) change, sometimes drastically, when night falls.

    You should be at least decently knowledgeable about the city you are attempting to shoot in before you make an excursion at night – or, at least, be with someone who does know. Big cities present nearly endless opportunities for architectural and artistic delights, delights that change and morph and become radically different when no longer lit by the sun, but by artificial lights. However, big cities can also be more dangerous, particularly at night, and especially for a photographer who is lugging around two to ten thousand dollars (or more) worth of equipment with them.

    Therefore, for reasons of safety and for practicality, get to know your city before you tromp out with DSLRs hanging around your necks, tripods in hand and release shutter cables dangling. Go out in the day and get to know the streets and where the interesting buildings and parks and monuments and statues are; go out at night, without your camera, and see how all of those things look in the light of night.

    Then, when you do take all your equipment out for the shoot, make sure to keep your eyes open. Be cognizant of your surroundings. Walk confidently, even assertively, so as not to be pegged as a tourist, mark or target for potential predators. Work in a group, or at least go with one other person who can watch your back, even if that other person is not a fellow photographer.

    Or, do as I often do: go at times when most of the rest of the city is asleep. There are such times, even in those big cities that “never sleep.” When? I’ve found early—and I mean really early—Sunday mornings are the quietest possible times to tramp around the downtown. At 3:30 or 4:00 AM, after bar-close but well before sunrise (for most of the year), the night is just as dark and the light just as good—unless you are trying to shoot nightlife and people and cars, rather than architecture and light and shadow.

    Shooting in the early morning also lets you capture a series that progresses from a pure black sky (or one with the moon and stars) to one of deepening purples and blues as the sun begins to rise, and finally gives you a chance to partake in the Magic Hour of sunrise itself. Yep, it means an early morning on a Sunday, but it’s the best time to go out if you want to encounter as few people as possible.

    Know the Weather

    Another important consideration in nightscape photography is the weather.

    Cities at night can look absolutely amazing after a downpour has left the roads wet and gleaming with columns of reflected light. Snow can render a city almost post-apocalyptic at night, blanketing everything and colored by the lights of storefronts and parking lamps. But rain and snow, as they are coming down, are not great for cameras or lenses (or photographers, for that matter) if you aren’t probably prepared.

    So be aware of what the skies are doing, and plan ahead. If it’s going to rain, bring waterproof clothing for you and protection for your camera. Watch the weather reports on the night you want to go out and see if you can time it so you hit the streets just after the rain has stopped, so you capture all the magical wetness without it fouling up your camera or lens. If it’s snowing, be prepared for the cold and, again, protect your gear.

    Conclusion

    Eckert_NightScape_5.jpg

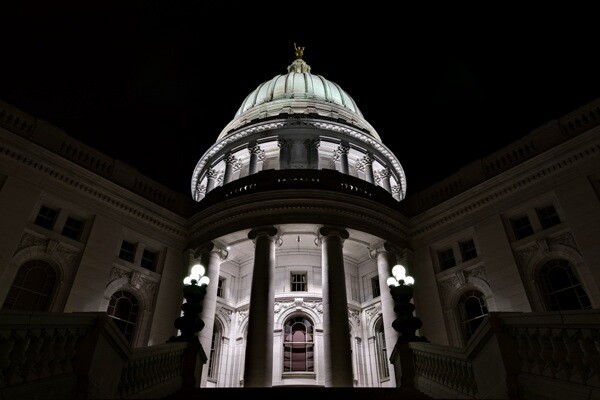
    Nighttime cityscape photography can be a fantastic avenue for creative expression, and a way to make your images pop with unique feeling and life. The light and the shadow behave differently without the sun overhead, and the world, as a result, changes in tone and mood and expression. Streets turn black and shiny and are broken by orange circles of light from streetlamps. Shadows pool in alleys and the corners of buildings, and are stretched into new, looming figures and shapes by the bright light from a gas station or convenience store.

    As a photographer, out at night in the city, the most important thing to remember is to stay safe. After that, keep your eyes open and your imagination working, and go after those amazing low-light shots. Try new things, bend and break the rules, have fun, and let the magic flow.

    You might be surprised just how much you like what you come home with.See more of Joseph Eckert’s work his website.

    Post originally from: Digital Photography Tips.

    Check out our more Photography Tips at Photography Tips for Beginners, Portrait Photography Tips and Wedding Photography Tips.

    Nightscapes: Photographing the City at Night

    The post Nightscapes: Photographing the City at Night by Guest Contributor appeared first on Digital Photography School.

    Digital Photography School

  • How to Optimize Photos for Search Engines

    When I first started in journalism a few lifetimes and two careers ago, a writer had three things to worry about: writing a solid story, getting it in on time, and keeping your editor happy. That was basically it. Today, that list of concerns has grown to include things like keywords, meta tags, headings, titles, internal links, externals links, and– of course– images. It’s almost enough to make someone who typed NBC news copy in the early 80s on a manual typewriter shake his head and abandon all hope of reaching any kind of audience.

    seo optimization for photos

    Since I’m not that fresh-out-of-college journalist anymore, writing for online photography magazines requires a pretty firm grasp of search engine optimization (SEO)– that is if I hope for anything resembling a decent-sized audience to read my ramblings once I click the “publish” button. If you write your own blog or are responsible for any kind of website content, SEO should be at the top of your list of priorities, too. By now, most people understand the idea and importance of keywords in their web content. A search engine’s basic function is to match your website or blog with peoples’ searches in order of relevance. It accomplishes this task, in part, based on keywords and text from throughout your site. You may think you have a fantastic headline for a post, for instance, but it may not be enough to drive traffic to your site if the language doesn’t match up with typical searches. While sensational headlines may attract print readers, it might be the boring, just-the-facts-ma’am headline that attracts web readers through effective SEO. Had I named this article “Finding a Needle in a Haystack,” nobody researching photography SEO would ever be able to find it.

    Since we are photographers, though, making sure our text is SEO-friendly is only half the battle. Yes, we want people to read our blogs or find our professional websites, but we have an added hurdle to cross. We need people to find our photos as well. Think about the millions upon millions of websites dancing around on the web in all of their binary glory. Our SEO choices help search engines like Google understand what is on our websites, hopefully drawing the distinctions that will place our sites above the competition’s in the results list. In order for photographers to do that effectively, however, we also have to be careful about how we name our images.

    Search engines primarily work from text and links. Words. That makes it difficult– but not impossible– for them to differentiate between photographs. Think about the last time you searched Google Images and wondered by something totally unrelated to your search popped up in the results. It was, in all likelihood, a result of poorly named images. Since the name may contain the only words associated with an image, it is vital that you give it a name which is optimized for search engines. Let’s face it– IMG_2468.jpg isn’t going to cut it. There is absolutely nothing unique about it, and chances are there a lot of other images out there with the same ineffective name. Even if you rename your photos for your own archival purposes, their new names aren’t going to be much more helpful. When you stop to think about how many searches take place on the internet every day– and how many of them are for images only– you might as well do what you can to make sure they find you and not somebody else.

    While this is not an exact science, there are some tried-and-true steps you can take to help your images get the notice they deserve, and– by extension– help direct the traffic to your website that will hopefully lead to more business.

    What’s in a Name?

    Like I said, DSC_0042.jpg is not your friend. This is, unfortunately, not one of those situations where less is more. When it comes to optimizing your photos for the web, more is more. You have to give each image on your site a unique name which is specific for its intended use. Since DSC_0042.jpg doesn’t tell Google anything about the photo’s content, I have to name it in such a way that the search engine knows (1) something about the content, (2) that I took it, and (3) where it can be found on the web. Suddenly, a simple cookbook photo is no longer DSC_0042.jpg, but has assumed its new identity as “guyer-photography-atlanta-food-photographer-polenta-recipe,” or something similar. Even rearranging the words can have an impact. Choose your words and their order carefully.

    guyer-photography-atlanta-food-photographer-polenta-recipe

    Word Separators: Hyphen/Dash v. Underscore.

    Word separators help make sure that search engines know what you are trying to tell them. Obviously, we type our searches with spaces between words. The problem is that search engines don’t really know what to do with spaces, so they close them. That’s why things like URLs and image titles (which get linked to URLs) need a dash/hyphen between words. So “food photography” becomes “food-photography,” rather than foodphotography. Until last year, there had been a debate over whether dashes/hyphens were preferable over underscores. In 2012, however, Google definitively answered the question, stating that their search engines treated underscores like spaces, turning “food_photography” into the spaceless “foodphotography.” While it does not have a huge impact on search results, it does have one, so it obviously makes a difference. This, apparently, is one of the few SEO debates that truly does have a right or wrong answer.

    Alt Text

    Sites like WordPress, and other platforms with visual editors allow you to insert Alt Text into your photos. You should use this field to attach key words, helping to ensure that your images pop up when people search for those words or phrases.

    Talk About the Photo on the Page Where it Appears.

    Search engines pull data not only from the image URL itself, but also from surrounding text. This is why you may have a better chance of your blog images finding their way to a higher ranking on a search than portfolio or gallery images. If you’re blogging about them you’re talking about them, adding more information for the search to find, rather than gallery images which have no accompanying text.

    Size Does Matter.

    This is one of those areas where bigger is better. Larger images rate higher in search engine rankings than thumbnails. You should have a good working knowledge of how your site displays images, as well as what its optimum pixel dimensions are. Besides taking full advantage of your site’s ability to display images at their best, you want to make sure you are doing all you can to promote your photos.

    Don’t Forget About Social Media.

    If you are managing your social media presence properly, it should be a natural extension of your website. Before Facebook, someone looking for a photographer sat down at the computer and used a search engine. While that is still true today, just as many people begin their search on social media, quite often not getting to a photographer’s website until after they’ve checked out their Facebook page. Make sure that you’re not only discussing your photos on social media, but make sure that it points back to the original images on your website as well.

    Google Changes Things Up.

    Do you remember how in January of this year Google changed how it displays images in it search results?  Suddenly, we went from low-res thumbnails that took you straight to the web pages on which they appeared, to sleek grids of high-quality thumbnails. Gone are the embedded links that automatically launch the pages that host and license the images, offering the best of both world to photographers and the people looking for them. Now, in an effort to make things easier for the person typing in the search, clicking on an image search result opens a second window that gives the choice of whether to click through to the full site. While this might make things easier for people searching for images, it adds another layer of necessity for the photographer to make sure that images are properly optimized for search. If not, the potential client may never click through to the main site.

    Google Images' new layout adds another hurdle to cross for effective photo SEO.

    Google Images’ new layout adds another hurdle to cross for effective photo SEO.

    Wrap-Up

    If you’ve ever asked a photographer to pick their favorite photo from their archives, you probably got some reply along the lines of, “That would be like picking my favorite child.” We can debate the accuracy of the metaphor, but it carries a lot of weight. We protect our photos with copyright laws. yet we are so proud of them that we want to share them with the world. It’s a great goal, but one that has to be approached with an eye towards making sure they are properly optimized to show up in the very searches that can meet– and hopefully exceed– the goal. Optimize photos on your site and you should see a marked difference in where you rank on search engine results.

    Post originally from: Digital Photography Tips.

    Check out our more Photography Tips at Photography Tips for Beginners, Portrait Photography Tips and Wedding Photography Tips.

    How to Optimize Photos for Search Engines

    The post How to Optimize Photos for Search Engines by Jeff Guyer appeared first on Digital Photography School.

    Digital Photography School

  • Photographing the World’s Most Secluded Tribes: Before they Pass Away

    Got 12 minutes? Check out this TED talk by photographer Jimmy Nelson who tells the story behind his amazing project ‘Before they Pass Away‘. A project where Jimmy sets out to photograph 35 of the world’s most secluded tribes.

    In this video Jimmy shares 3 lessons (through story) that he’s learned through meeting and photographing these tribes.

    Learn more about Jimmy’s project and meet the tribes he photographed at his website and grab a copy of his book of the same name to see the amazing images he’s created.

    Post originally from: Digital Photography Tips.

    Check out our more Photography Tips at Photography Tips for Beginners, Portrait Photography Tips and Wedding Photography Tips.

    Photographing the World’s Most Secluded Tribes: Before they Pass Away

    The post Photographing the World’s Most Secluded Tribes: Before they Pass Away by Darren Rowse appeared first on Digital Photography School.


    Digital Photography School

  • Creating a Black and White High Contrast Portrait Edit in Lightroom

    Introduction

    The Following is an excerpt from the SLR Lounge Lightroom Preset System v5 and accompanying workshop from the Lightroom Workshop Collection v5.  The Lightroom Preset System is designed to take you from Ordinary to Extraordinary photos in just a few seconds and clicks within Lightroom 4 and Lightroom 5.

    Overview

    In this tutorial we’re going to go over how to turn a regular color portrait into a nice high contrast black and white image. For this tutorial we have a portrait of a baby out in a field. The overalls, details in the field, and overall background blur will be complimented by a high contrast black and white edit. The SLR Lounge Lightroom Preset System v5 has presets specifically for high contrast black and white portraits which we are going to apply to this photo. If you don’t have the preset system, we’ll list all of our Develop settings so you can achieve the same look.

    Here’s what our photo will look like before and after we’re done with the edit.

    beforeafter

    Unedited Photo on Left | High Contrast Black and White on Right

    Lightroom Preset System v5 Mixology

    For those who have the Preset System, you can follow the Mixology Recipe below to get to the same results. If you don’t have the Preset System, please read the article or watch the video below to see exactly how this look was achieved.

    Develop Mixology

    • 01-10 BASE – SOFT: 13b. Light Crush – B&W
    • 03-70 ADJUST – VIGNETTING: 71c. Neutral – Zeroed

    Written Tutorial

    Step 1: Checking The EXIF Data

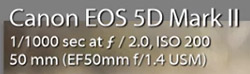
    exifdata

    We press “i” to pull up our EXIF data so we can see exactly how this image was shot. This image was shot with a 50mm lens at f/2. We want to keep in mind that the depth of field is shallow, and we may have to add sharpening to this image.

    Step 2: Apply Preset

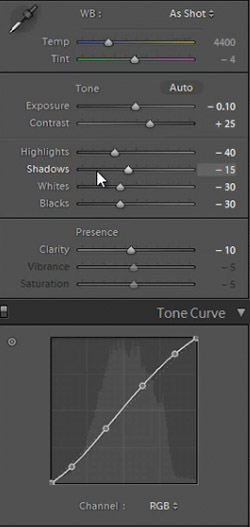
    We’re starting with our “01-10 BASE – SOFT: 13b. Light Crush – B&W” preset, and after we lower the Exposure to -0.10 we have a nice high contrast black and white look. Then we apply a “03-70 ADJUST – VIGNETTING: 71c. Neutral – Zeroed” vignette preset so we can get a subtle edge darkening.

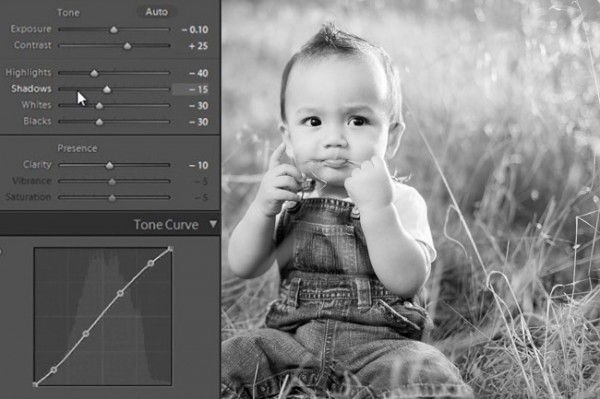
    In the develop settings the Contrast was raised and the Shadows and Blacks have been dropped. This is giving our nice deep shadows and blacks, and adding to the high contrast look we’re editing for. The Highlights and Whites have also been dropped in order to bring the highlights in the skin closer to the mid tones.

    developpanel1

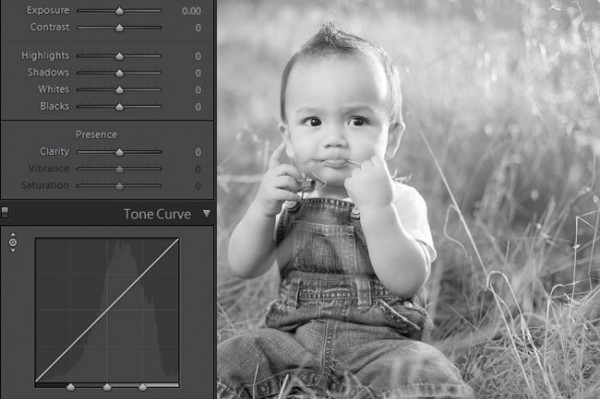
    With Settings Zeroed Out

    Here’s what our image looks like with a simple black and white conversion (convert by hitting “V”), without the adjustments in Contrast, Highlights, Shadows, Whites, Blacks, and Tone Curve.

    Before High Contrast Settings

    With High Contrast Settings

    Here’s our image with Contrast, Highlights, Shadows, Whites, Blacks, and Tone Curve adjustments applied.

    High Contrast Develop Settings

    In the image below you can see a huge difference that the adjustments make. The eyes stand out, there’s more details in the hair and grass, and there’s more texture in the clothes.  All these subtle details combined add quality to an otherwise flat black and white image.

    beforeandafter

    All Settings Zeroed On Left. High Contrast Adjustments on Right


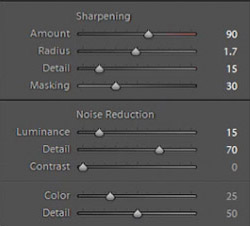
    In our Sharpening settings our preset applied our standard amount, but the image is still a bit soft because of the shallow depth of field caused by shooting this image at f/2.0. To get a nice sharp portrait we raise the Amount, Radius, and Detail. The preset also adjusted our Noise Reduction settings, giving the subject in our portrait nice soft skin. All of the “SOFT” presets have this standard amount of Noise Reduction applied in order to soften and smooth out skin without going so far to kill fine details.

    sharpening settings

    Here’s what our image looks like before and after our presets are applied.

    Before

    lightroom-5-tutorial-high-contrast-b&w-newborn-0001

    After

    lightroom-5-tutorial-high-contrast-b&w-newborn-0002

    Watch the Video Tutorial

    If you would like to see exactly how all of the settings and adjustments were applied, please watch the video from the SLRLounge YouTube Channel.

    Conclusion and Learn More

    We hope you all enjoyed this tutorial. If you are interested in learning more or purchasing the SLR Lounge Lightroom Preset System v5 or the newly released Lightroom Workshop Collection v5, please click any of the links in this article.

    Post originally from: Digital Photography Tips.

    Check out our more Photography Tips at Photography Tips for Beginners, Portrait Photography Tips and Wedding Photography Tips.

    Creating a Black and White High Contrast Portrait Edit in Lightroom

    The post Creating a Black and White High Contrast Portrait Edit in Lightroom by Post Production Pye appeared first on Digital Photography School.

    Digital Photography School