Category: Photography

  • Jumpstart Your Photography: Start a 365 Project

    With the beginning of a new year, many people around the world take time to reflect on the past year and set goals or resolutions for the upcoming year.
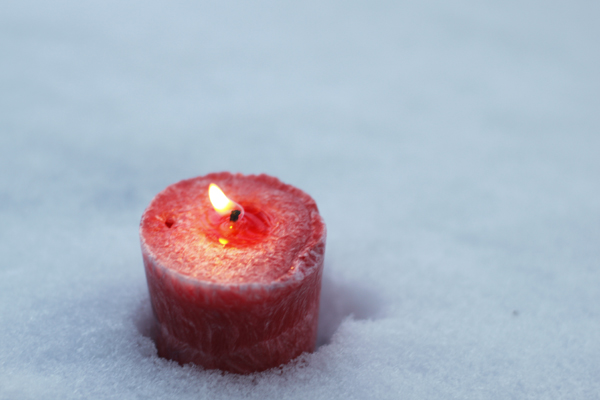
    McEnaney candle

    It’s a good time to ask yourself; “What do I want out of my photography this year?” For most of us, the response might be to improve our skills, to be inspired, and to find more time and energy to pursue our passions. No matter what you want out of your photography, your path to accomplishing your goals will require dedicated time and effort.

    If you are looking for a way to dramatically improve your photography this year, now is an excellent time to consider starting a 365 project.

    What is a 365 Project?

    There are many different 365 projects, but they all share one goal in common: taking at least one photograph every single day, for a full year. Many photographers take that idea one step further to including taking, and posting, at least one photograph a day for an entire year. Some people start 365 projects on January 1st, but you can begin one at any time.
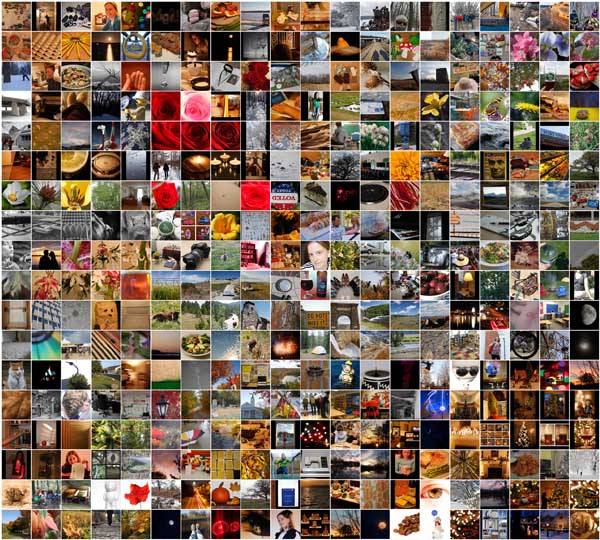
    McEnaney 365 2012

    A 365 project is an important commitment that will make an immediate and lasting impact in your photography. While the idea of daily photography sounds deceptively simple, such a project will push and stretch you, and your photography.

    There are many different online communities that support 365 projects including 365 Project, Capture Your 365, and many, many 365-themed groups on Flickr and Google+. Joining a community will help you in your 365 journey by providing encouragement and accountability. You will also find many ideas, challenges, themes, and examples for inspiration and motivation.

    Why Do a 365 Project?

    The most important part of a 365 project is the commitment to daily photography. If you truly want to improve your photography and push yourself, then you need to be using your camera, often! Accepting the challenge of using your camera everyday will help make photography a commitment and even a habit for you.

    Using your camera every day will also open your eyes to the photographic possibilities that abound in your everyday life. I find myself noticing so much more now that I would have just passed by without comment before: the way the shadows on the wall change with the hours, or the tiny details of fallen pollen on the inside of a flower. Daily photography has made me keenly aware of the passing of the seasons and the small differences in each day.
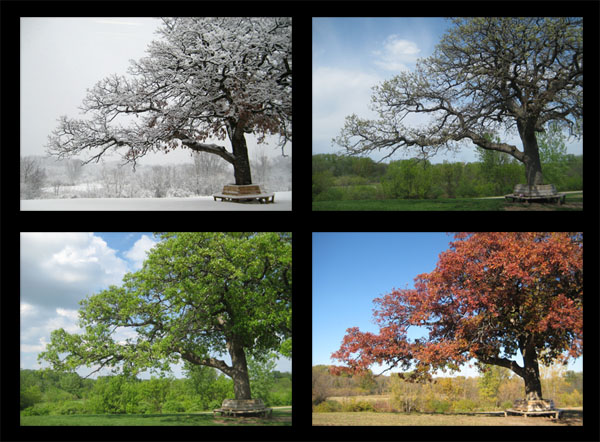
    McEnaney oak seasons

    Daily photography will push you out of your comfort zone and force you to engage with other types and styles of photography. You may love shooting macro (close-up) shots of insects, but will now have to deal with rainy days and changing seasons. You may love shooting portraits of people but will need to find new ways and places for finding willing subjects. Whatever photography you ‘do’ now, you will find yourself in situations or late nights when you simply must find something to photograph. You may find that these more desperate times led to your most productive photographic ideas and images.
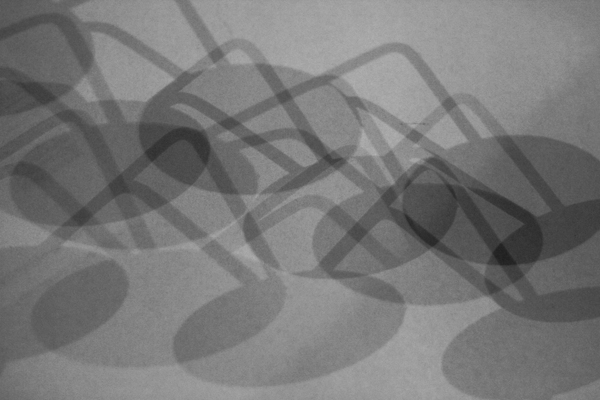
    McEnaney abstract

    Daily photography will also help you better plan your day or your time. I have found that waking up fifteen minutes earlier allows me to leave the house earlier in the morning, to spend those fifteen minutes taking a photography break along my commute. Watching the sun rise over one of the many lakes in town is an amazing joy and privilege, but it is a commitment I would never had made on my own, without 365.

    Tackling a 365 Project

    I highly encourage you to try a 365 project, as there is no better way to keep yourself taking pictures and making progress in your photography. While a 365 project is a huge commitment, there are some steps you can take to keep yourself (and your friends and family) sane and motivated along the way.

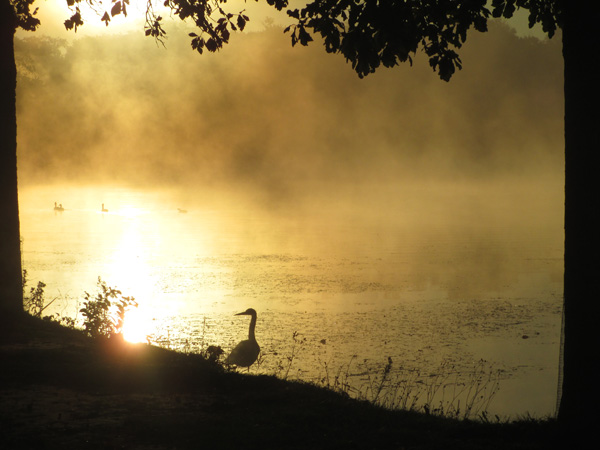
    • Plan for photography. Make a commitment to scheduling time for daily photography. Think about the subjects and situations you are attracted to, and plan for how to include those in your day. Maybe it is waking up 15 minutes earlier, or picking up your camera as soon as you get home in the evening, or taking a walk during your lunch break. Or it could be something more elaborate, like planning a photography outing to bucket list locations near or far.McEnaney heron
    • Plan for posting, viewing, and commenting. If you want to get the most out of your 365 project, then you will want to get involved in a photography community. Viewing photographs and leaving comments will keep you inspired, while receiving comments and feedback from others will help you improve and motivate you to keep going. I found early on that it was much easier for me if I was taking a photograph every day, but was posting and sharing yesterday’s photograph each day. That gave me a day in-between to look back and select the previous day’s picture as well as a chance to do any editing or post-processing.
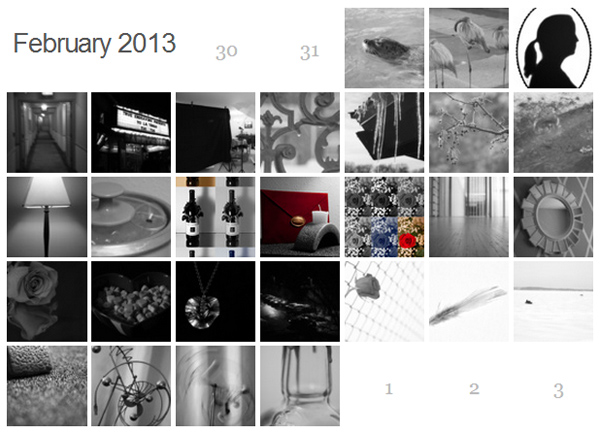
    • Pick a theme or try a challenge. At some point (or, more likely, many points) during your project, you will find yourself in a slump. Pushing through the low points will teach you a great deal about commitment and motivation. Think about picking a theme for a week or a month or perhaps trying a challenge offered by other 365ers. Last year in February, I was part of a “Flash of Red February” challenge that involved taking black and white photographs for the entire month, except for a red photograph on the 14th for Valentine’s Day. This was a creative twist, and black and white was a great choice for a potentially dull winter month.McEnaney flashofred
    • Seek out balance. A 365 project is a large commitment and one that can occasionally be draining on your friends and family. Remember that taking a photograph a day does not mean you have to be taking a photograph every moment of the day. Your children, pets, spouses, and friends will thank you.

    Interested in starting your own 365 project?

    All you have to do is pick up your camera and get started. Think about joining a 365 photography community too, as the motivation and support along the way will be priceless. You can find my project at Archaeofrog.

    The post Jumpstart Your Photography: Start a 365 Project by Katie McEnaney appeared first on Digital Photography School.
    Digital Photography School

  • Manipulating Natural Light in Wildlife Photography


    back-light-wildlife-photography-1-edit

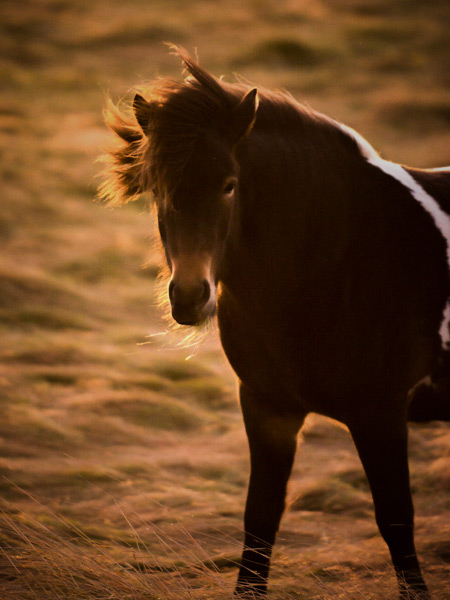
    An Icelandic pony, shot against a setting sun

    When photographing wildlife, the sun is one of the most useful tools that enables you to create something different or add impact to your images.  By taking control of your position relative to your subject, and to the sun, you can manipulate the available light to your advantage.

    Favourable times of day for wildlife photography are at the beginning and end of the day when the sun is low in the sky.  This often coincides with periods of heightened activity of many animals, but also with a warmer directional light from the sun being lower in the sky.  When the sun is low in this way, it lends itself to a number of key natural lighting techniques.

    side lighting wildlife photography

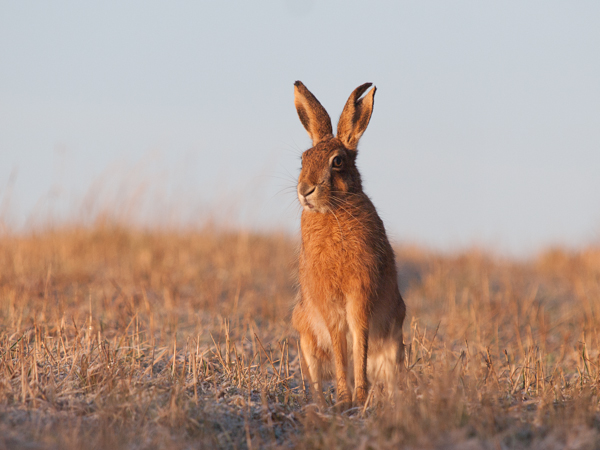
    A side lit brown hare (Lepus europaeus)

    Side lighting

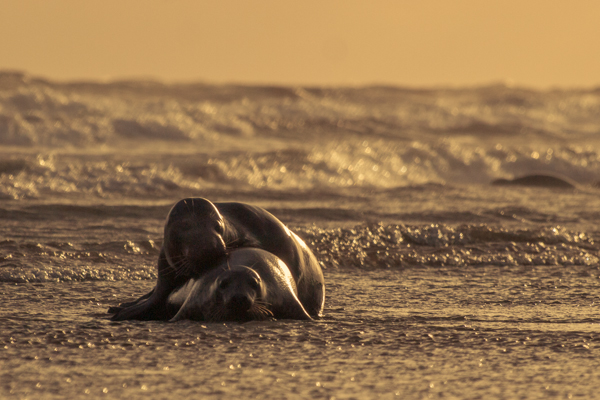
    You can naturally side light your subject by keeping the sun at approximately 90 degrees to the direction that you are facing.  The sunlight will then be lighting your subject from the side which can result in a greater sense of shape, form, and texture from the contrast between the soft light and shadows across the subject.

    side lighting wildlife photography

    Side lit grey seals (Halichoerus grypus) courting at sunrise

    It can add a sense of three dimensionality that full-on front lighting cannot do, and because of the soft nature of the light, the highlights and shadows are not too intense and can be easily captured.

    side lighting wildlife photography

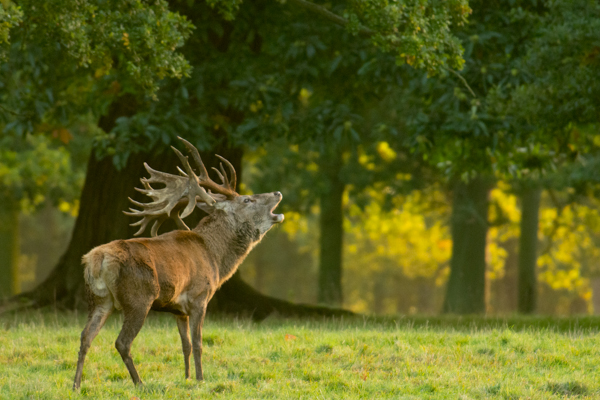
    A bellowing red deer stag (Cervus elaphus) with light from the side

    Back lighting

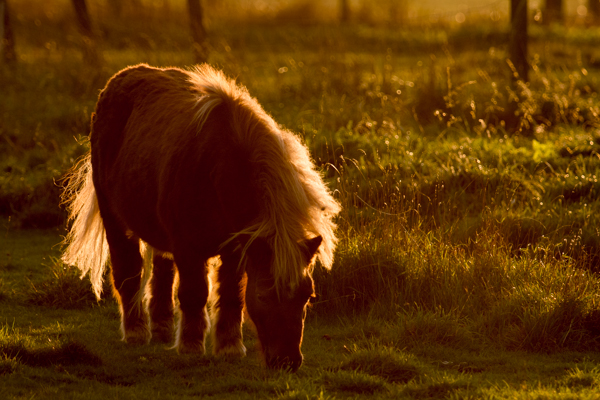
    One of the first tips you often hear when starting in photography is not to shoot into the sun. However, by doing just that you can create striking images.  By positioning yourself so that your subject is directly between you and the sun, you can capture a strong backlit outline of your subject that is almost like a halo of light.  This works best when there are fur or feathers to capture the light, and it is preferable that the outline of your subject is easily recognizable.

    back lighting wildlife photography

    The hair of this pony create a golden outline when backlit by the low sun

    Exposing for backlit subjects can be difficult, as you will be dealing with areas of extreme brightness and shadow. It is best to ensure you retain detail in the highlights (as that will be forming the main detail of the image) by manually underexposing.

    Silhouettes

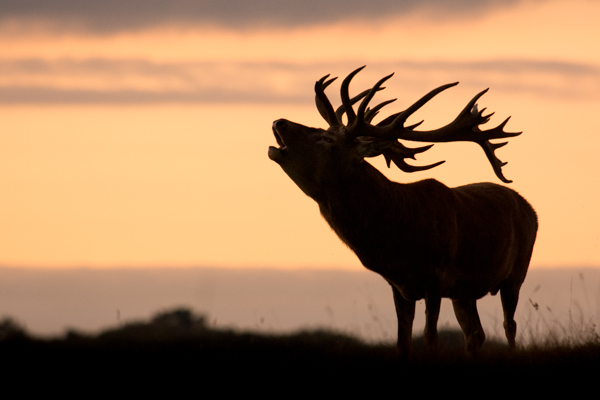
    Silhouettes are another way of capturing the strong outline of your subject, but in this instance it is achieved by shooting your subject against a bright background, often the sky.  Just after the sun has gone down is a great time for this technique.  There can often be far more colour in the sky once the sun is below the horizon, and the sky will still be bright enough to easily cast your subject into silhouette.

    One tip for shooting wildlife silhouettes is that sometimes it can be good to ensure you retain some detail in the shadows, for example an eye. This can help retain some interest in the large area of black, and to keep a connection between the subject and the viewer.  If you want to do this, you will need to ensure that you do not underexpose the subject too far, such that the shadow detail is lost, to give you flexibility during post-processing.

    silhouette wildlife photography

    A silhouette of a red deer stag (Cervus elaphus) is an instantly identifiable form against a sunset sky

    To conclude

    It can be difficult to motivate yourself to get up for sunrise or to be out photographing at sunset, but those times of day give you much more flexibility to use the natural light as a powerful tool in your wildlife photography.  By understanding how the position of the sun relative to you or your subject will influence the final image, you can create images that aren’t possible at other times of day.

    So get out there and see how you can use natural light to make you images stand out!

    Further reading on wildlife photography:

    • How Low Can you Go? An Illustration of Camera Angle for Wildlife Photography
    • Making Sharper Wildlife Photographs – [Part 1 of 2]
    • Making Sharper Wildlife Photographs – [Part 2 of 2]
    • 5  Big Tips to add Impact and Variety to your Wildlife Images

    The post Manipulating Natural Light in Wildlife Photography by Elliot Hook appeared first on Digital Photography School.

    Digital Photography School

  • Winter Photography Tips and Ideas to Make You Master the Season

    Winter is an amazing time of the year, especially if you live in a region that produces tons of snow. Don’t hibernate even if there is no snow outside since winter is the best season for outdoor photography. Cold weather is not an excuse for sitting at home. Warm, comfortable clothes and special, cropped gloves could help you easily overcome Continue Reading

    The post Winter Photography Tips and Ideas to Make You Master the Season appeared first on Photodoto.


    Photodoto

  • Lost your Photo Mojo? Ten Tips to Bring Back the Magic

    We all go through creative blocks. Is it such a bad thing? Or, on the contrary, is it a sign that we need to push ourselves, and grow in the process? I think that a loss of passion may be an opportunity to renew and refresh your vision and turn it in a positive experience, instead of staying in a rut and feeling sorry for yourself.

    Ten Tips to Get your Photo Mojo Back

    1 – Get out of your comfort zone

    You may hear this one often, but have you done it yet? I’m not suggesting that you go out and shoot your first wedding, but try something that may seem out of character for you. I consider myself more of an urban photographer than anything else. But I have experimented with other genres, such as B&W flower photography. Did I enjoy it? Sure I did, tremendously! But I also realized that I’m happier shooting street photography. That realization alone gave me a boost to get out and do more of what I love most.

    I'm mostly a street photographer but I enjoy trying new genres and techniques. It gets my creative juices flowing! ©Valérie Jardin

    I’m mostly a street photographer but I enjoy trying new genres and techniques. It gets my creative juices flowing!
    ©Valérie Jardin

    2 – Hang out with other photographers

    Hanging out with like minded people is like therapy. Admit it, you often experience some frustration when you are on an outing with non-photographers. Being able to enjoy a photo walk without having to justify why you need to take your time to get the shot is priceless. Join a group or start your own. The latter option is a good way to make sure that you will show up for all the photo walks!

    3- Start a new project

    Before you embark on a long project, make sure you’ll be able to handle the commitment. For example, a 365 project is a great way to grow as a photographer but it can also become a burden and be counterproductive. If you end up quitting after a few weeks, you may end up feeling worse about yourself and photography in general. If you decide to go for the 365, don’t be too hard on yourself. Don’t get to the point where you’ll shoot just about anything to get your pic of the day. Remember, it’s supposed to be fun! You may also consider starting something a little bit more manageable such as a 52-week project, a short term photo essay, a series of portraits of strangers or selfies, etc. Whatever you decide to do, make sure you share with the world! Which leads to the next point…

    Some project ideas to help you out

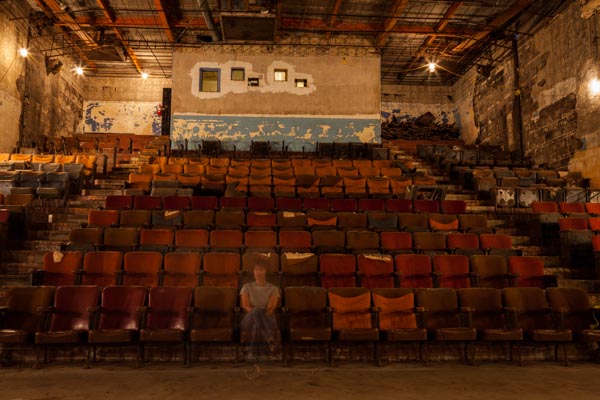
    Don't forget that you are your most readily available subject. Have fun with selfies! Here I played with long exposures and ghost images in an old theater.  ©Valérie Jardin

    Don’t forget that you are your most readily available subject. Have fun with selfies! Here I played with long exposures and ghost images in an old theater.
    ©Valérie Jardin

    4 – Try a new lens

    Rent or borrow something completely different such as a fish eye, a macro lens or a Lensbaby Composer for a few days, see the world differently and embrace the new possibilities.

    See a list of the most popular lenses – survey of dPS readers

    5 – Share your work, start a blog!

    Share your work on social media, or consider starting a photography blog. You don’t need to be a writer to start a photography blog, think of it as a journal in pictures. It’s so much more fun than keeping your images in your hard drive. It will also give you a boost in your confidence and push you to shoot more and better.

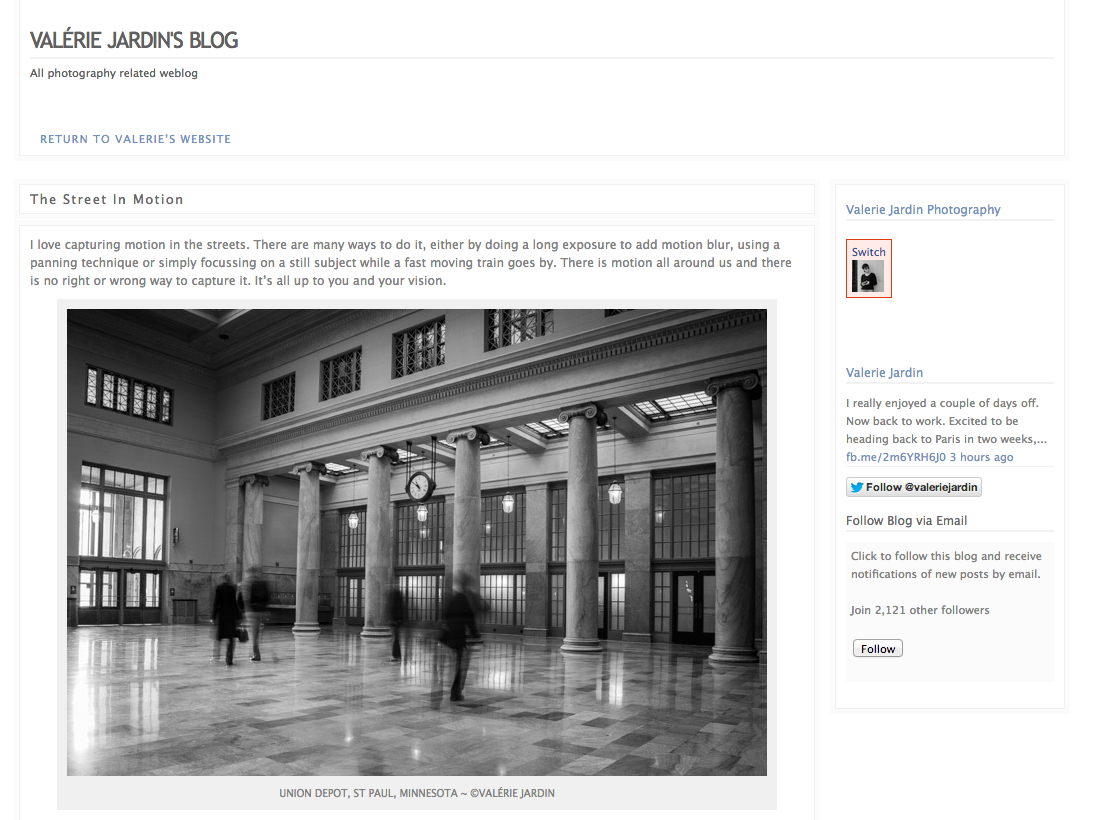
    This is my personal blog where I write about projects and things I'm working on outside of my photography business.

    This is my personal blog where I write about projects and things I’m working on outside of my photography business.

    You can get a free, or inexpensive blog using resources like:

    • Square Space – starts at $ 8/month
    • WordPress.com – starts at free

    6 – Page through a good photography book

    We get inspiration online all the time. Everything we do seems to be online. The Internet is a wonderful thing and we are exposed to the work of so many amazing artists from all over the world and in real time. Sometimes we need to slow down and sit down with a big beautiful book of photographs. Visit a real book store or a library for a change of pace and for renewed inspiration.

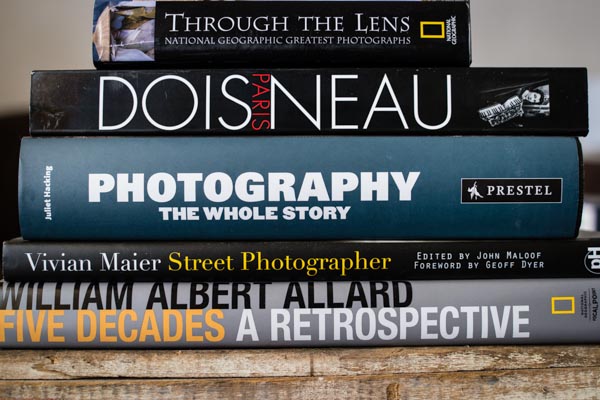
    Valerie Jardin Photography - books-1

    Take the time to page through a real book once in a while.

    7 – Visit museums

    Photography exhibits are a wonderful way to get some inspiration, but do not neglect looking at art in general. Sculptures, paintings, etc. See the passion that fueled the works of art showcased at your local museum.

    8 – Teach a child

    Give a camera to a child and go on a photo walk. You’ll be amazed to discover the world from a child’s perspective. Better yet, this could ignite a life-long passion thanks to you!

    9 – Write a list of techniques you’ve never tried and give it a shot!

    There isn’t a single technique that is not explained in detail online, so you have no excuse for not experimenting with something new. You never know, this light painting thing may just be what you need to feel inspired again, so get to work!

    10 – Simply pick up your camera and photograph something in your house

    There is no reason to stay in a rut, all you need to do is pick up a camera, any camera. You can even stay home and do it. Pick an ordinary object and make it look extraordinary! This simple step will get the creative juices flowing again.

    Just pick up the camera and photograph something, anything, around your house!  ©Valérie Jardin

    Just pick up the camera and photograph something, anything, around your house!
    ©Valérie Jardin

    Okay it’s your turn

    It’s okay to feel down and uninspired, it’s all part of being an artist. Turn it around and use it as an excuse to push yourself and try something new!

    Please take a minute to share your experience dealing with creative block and how you found your muse again.


    Books mentioned above and in Valerie’s stack:

    • Through the Lens: National Geographic Greatest Photographs (National Geographic Collectors Series)
    • Paris – Robert Doisneu
    • Photography: The Whole Story
    • Vivian Maier
    • William Albert Allard: Five Decades

    The post Lost your Photo Mojo? Ten Tips to Bring Back the Magic by Valerie Jardin appeared first on Digital Photography School.

    Digital Photography School

  • Some Reasons Why to Shoot High ISO

    1/125th at F2, ISO 6400 (Fuji X100s)

    Fuji X100s: 1/125th at F2, ISO 6400.

    The most common photographic fear that I come across these days is when people are afraid to raise the ISO setting on their cameras.

    Just a handful of years ago, these fears were justified.  Raising your ISO to 1600 or 3200 was a no-go for a majority of cameras.

    But no longer. Things are changing.

    Some Reasons Why to Shoot High ISO  

    The improvements in camera technology have been such that you can now photograph at ISO 1600, 3200, and even 6400 with many of the newer SLRs, micro four-thirds, and mirrorless cameras.

    Before you move on, if you are unclear about what ISO is, read more on the subject here:

    • Introduction to ISO
    • Photography 101.7 – ISO
    • Moving Toward Manual Settings: Understanding ISO (a beginner’s guide)

    But doesn’t a lower ISO mean better image quality?

    Canon 5D Mark II: 1/320th at F6.3, ISO 1600 (135mm). The high ISO allowed for a 1/320th shutter speed to account for both the motion in the scene and for the long focal length used.

    Canon 5D Mark II: 1/320th at F6.3, ISO 1600 (135mm). The high ISO allowed for a 1/320th shutter speed to account for both the motion in the scene and for the long focal length used.

    Well yes – and no.

    Yes, if you are setting up a studio shot and controlling the lighting.  Yes, if you are using a tripod, if you are a landscape photographer, or if there is very strong natural light.  Yes, if you don’t have to compromise your shutter or aperture settings to expose the shot correctly.  ISO 200 will always create a significantly sharper and cleaner image than a shot at ISO 1600 when the aperture and shutter settings are the same.

    In every other case the answer is no.

    Raising your ISO will give you the ability to capture a higher quality photograph in many situations because it gives you the ability to use a faster shutter speed and smaller aperture (a larger aperture number) to get a sharper scene.  Getting the aperture and shutter settings correct are much more important than using a low ISO in creating a technically great photograph.

    If you want to know how great event photographers consistently create such bright and beautiful images, it’s not only because they use fast lenses and flashes.  It’s because they are not afraid to raise the ISO to very high levels to capture the natural light in a scene.

    In addition, the look of grain at high ISOs in digital cameras has become more pleasing.  The newer camera models have not only reduced the strength of grain (noise) at high ISOs, but they have given that grain a more pleasing look.

    ISO has now become a luxury instead of an obstacle.  We can photograph in dark areas while handholding the camera when we need to.

    Detail Shot of the 5D Mark II at ISO 1600. Minimal, pleasing grain.

    Detail Shot of the 5D Mark II (released in 2008) at ISO 1600. Minimal, pleasing grain.

    When shooting at a high ISO, get the exposure right

    The major problem with photographing at a high ISO is that raising the exposure in post production significantly will ruin the look of the grain.  Raising the exposure a small amount is usually okay, but if you are photographing with a high ISO, you need to be even more diligent than usual about exposing your images correctly in the camera.

    Pay attention to colour noise versus black and white noise

    You also want to pay attention to how your camera handles the look of noise in your colour images.  The Fuji X100S, for instance, handles colour noise exceptionally well, where as other cameras do not do so well with colour noise at very high ISO levels.  However, in many cases, the problem can often be solved by simply turning the photo into black and white.

    Fuji X100S, tiny detail at 6400.  Excellent color noise.

    Fuji X100S, detail shot at ISO 6400. Very significant grain but excellent colour noise.

    Take a look at the image detail above.  This was taken with a compact mirrorless camera at the very extreme end of its ISO range, 6400.  Yes, there is a lot of grain but it still looks good.   I prefer not to go over 3200 with this camera when I can avoid it, but without using ISO 6400 here I probably would not have been able to capture this image.

    How do I test my camera’s ISO?

    I wish I could talk about specific cameras here, but the list is too long.  I use the Canon 5D Mark II (released in 2008) and Fuji X100S and regularly shoot at ISO 1600, 3200, and even 6400 when capturing the city streets at night.  The Canon 5D Mark III does an even better job with noise at high ISO.

    Each camera has different noise (grain) levels, so the first step is to research reviews on the noise levels of your camera or potential purchase.

    If you own the camera already, the next step is to test it out yourself.  Make sure you are using a fast shutter speed and an aperture of somewhere between F8 and F16, so that each image you take is guaranteed to be sharp.  Then take the same shot at ISO 200 all the way through 6400.  Look at the images zoomed in to 100% (1:1 in Lightroom) on your monitor in both black and white and colour.

    If you have a photo printer, I highly suggest printing out those images to see how the grain looks in real life and to see the differences between each image.

    It is also important to remember, if you are regularly printing at smaller sizes, such as 5×7 or 8×10, then you will likely not notice a significant difference between ISO 200 and 1600.  If you prefer to print at larger sizes, such as 13×19 or 20×30, then there will be a noticeable difference.  So test it out.

    Canon 5D Mark II: 1/500th at F9, ISO 800 (28mm).

    Canon 5D Mark II: 1/500th at F9, ISO 800 (28mm).

    Zoomed in - insignificant grain at ISO 800.

    Zoomed in – insignificant grain at ISO 800

    Fuji X100S: 1/250th at F9, ISO 1600.

    Fuji X100S: 1/250th at F9, ISO 1600.

    Insignificant and pleasing grain.

    Zoomed in – insignificant and pleasing grain

    Grain is beautiful!

    Do you remember the last old, grainy photograph that you saw in person?  It was gorgeous, right?  Digital technology is getting there.  Now is the time to get over your fear and try out shooting at higher ISO!

    The post Some Reasons Why to Shoot High ISO by James Maher appeared first on Digital Photography School.

    Digital Photography School

  • Top 10 Ways to Sabotage your Professional Photography Aspirations

    Through the various classes and workshops I teach, I inevitably run into a number of students with professional photography aspirations.  More than a few of them however, seem doggedly determined to do everything they can to make their dream of professional photography impossible.

    I’m nothing, if not a helper.  So if you really want to sabotage your pro photography aspirations, here, presented in traditional count-down order, are 10 ways to make sure you’ll never turn your dream into a profession.

    © Paul Burwell Photography | www.bsop.ca

    Red Fox Kits playing outside their den

    In no particular order how to sabotage your professional photography aspirations

    1. Don’t show your work to anyone other than family or friends

    • Family and friends are great for moral support, and can really help pick you up when you’re down, but do they really know what makes a great picture and what sort of stuff is going to sell?
    • You need to get professional opinions about your work if you want to know if it is good, or what you might need to work on improving.

    2. Design your web site so that it’s impossible for a photo buyer to do business with you

    • Through fear of protecting their images from being “stolen” from their web site, many photographers make it so you can’t right-click to save a picture or use flash web sites that make it almost impossible to easily save images to a local hard drive.
    • While none of these methods truly protect the images from “theft” they are a really great deterrent to the editor or photo buyer looking for images.  They can’t easily save them to run past other people, and they’ll usually just move onto the next web site.
    • While we’re at it, don’t put those huge ugly copyright notices over the center of the photo.  If you need to add a copyright watermark, add it to somewhere where it intrudes on the photograph’s story as little as possible.
    © Paul Burwell Photography | www.bsop.ca

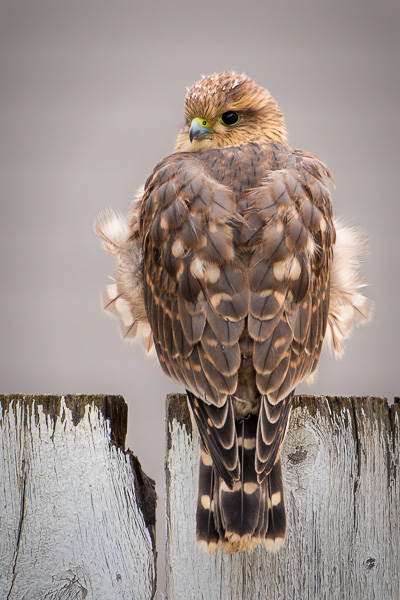
    Juvenile Merlin perched on an old fence

    3. Only post your “second-tier” images on your web site

    • Many folks operate under the mistaken belief that they should save their “good” stuff for when they get that National Geographic offer.  Sorry, but that isn’t going to happen until people can see the sort of great photos you can produce.

    4. Bring only your best images to an image critique

    • During my photography workshops I always set aside time for people to bring some images for myself and the rest of the group to comment on.  Many folks only bring their best stuff.  I guess it’s fun to hear for the umpteenth time what a great image that is, but wouldn’t it be more useful to bring some images that you’re not sure are great?  An image you haven’t already been told 10 or 100 times that it’s a great image?  Take a risk and learn a bit.

    5. Just do photography

    • I hear from some of the long-time professional nature photographers how they used to be able to make a living out of just selling images.  I wish my life were so simple.
    • The most likely way someone starting out is going to sell an image, is along with some writing.  So, you’ll want to learn how to put some words together that can support the images you’ve got.  While you’re at it, you might want to take some business management and marketing courses along the way.
    © Paul Burwell Photography | www.bsop.ca

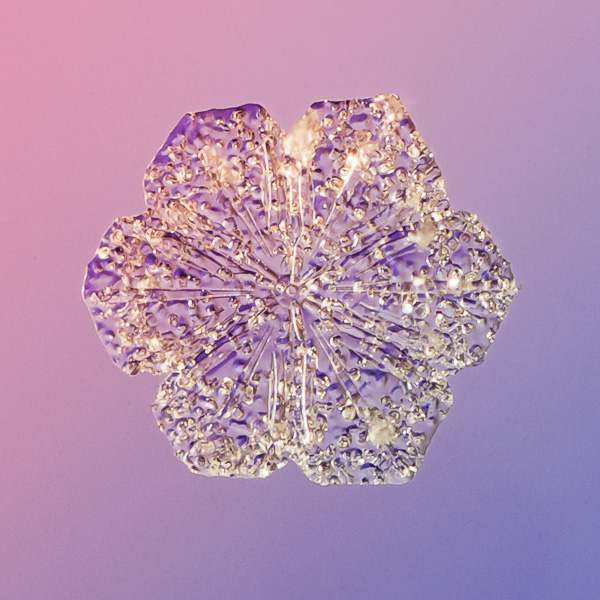
    Hexagonal Plate Snowflake

    6. Stop learning

    • Unfortunately, some folks figure that they’ve learned it all, they’ve got it all figured out.
    • Sorry, but in today’s digital world that just isn’t possible.  New techniques, software and equipment are constantly being developed.  You need to devote a significant portion of your time into educating yourself and keeping current.

    7. Don’t look at other people’s images

    • I’ve run into a few people who can’t seem to appreciate any photos other than those they’ve created.  Holy narcissism batman!
    • If you don’t look at what your contemporaries are doing, you’re really short-changing yourself and sabotaging your aspirations.  Look around at what sells (because if you’re a pro, you NEED to care about what sells) and hang some of that on your wall.  Learn why it sells and try to use that within your own photography.

    8. Don’t treat your photography like a business

    • If you want to remain an amateur, that’s great.  But if you want to be professional photographer, you have to start thinking like a professional.  Covering a subject as a pro is totally different than just going out and shooting a few snap shots.  You need to prepare in advance and have your gear and attitude ready to go.  When you start shooting, you work it until you get what you need.
    • If you’re under the mistaken impression that you need to be a great, or “one of the best” photographers in your area of interest to be a professional, get over it.  At least as important as the photography skills are your business and self-marketing skills.  Make sure you work on those non-photography skills at least as much as you do on your photography skills.

    9.  Just take photos, don’t tell stories

    • For me, a great photo is one that tells a story.  If someone were to ask you about a photo and you couldn’t immediately come up with the story being told, I would argue that it isn’t a great photo.
    • Use image compositional techniques to make your photos tell great stories.

    10. Treat ethics as an inconvenience to be avoided

    • While ethics are a personal matter and we all have to determine what is, and isn’t ethical for ourselves, the surest path to disaster is to have others view you as unethical.
    • Treat people the way you expect to be treated.  Be above board in all your business dealings.  Your clients should never experience negative surprises.  Follow through on your promises.

    So, if you’re an aspiring pro, and bound and determined to stymie your chances of making it, I think I’ve outlined a pretty clear road map for you.

    Do you have some comments or additional items to add to the list?  We’d all love to hear from you.

    The post Top 10 Ways to Sabotage your Professional Photography Aspirations by Paul Burwell appeared first on Digital Photography School.

    Digital Photography School

  • 5 Ways to Create Detail Photos

    Want more creative photography tips and insight? Download Dan’s entire photography ebook bundle and get four titles for only $ 29. Dan’s 3-eBook bundle: Going Fast With Light, How to Become a PRO, Making the Image is on sale now for only $ 29 at SnapnDeals!

    Like any form of art, compelling photography is not simply about reproducing your subject, it’s about representing your subject with visual hints and clues that suggest the larger scene. Accuracy isn’t what’s going to excite your viewer and draw them into your image, it’s feel, style and message.

    details-photography-01.jpgWhen composing your photos, you don’t just want to show your audience what they can already see when they look at things in real life. Instead, you want to give them an abbreviated version of the scene that will make them try to visualize what lies beyond the borders of your frame. Your goal is to make a creative depiction of the world that invokes the imagination and emotions of your viewer. If you can activate not just their eyes, but also their brains, you’ll go further towards holding their attention with your shot.

    One way to shoot abbreviated scenes is to accentuate details that your viewers might not notice as they speed through life. These kinds of shots often make for powerful photographs because it’s an easy way to fire up your viewer’s imagination. Let’s explore a few different examples of how you might approach shooting these kinds of detail photos.

    5 Ways to shoot detail photos

    1. The single detail

    Sometimes can show a single aspect of the scene without giving away any other information about the rest of the scene, other than what is clearly apparent in your image. Just about every type of subject lends itself to this type of photograph: architecture, travel, environmental features, landscapes and even action.

    When shooting the single detail, make sure you focus on creating a simple yet powerful image. Since your subject matter will be limited, the strength of your image will depend on a good composition and the strong use of light, colour and form. (see photos above and below as example)

    Details photography 02

    2. Details that give a sense of place

    Including more elements in your shot often hints about how the subject relates with its surroundings. This can really add depth to your shot, because it starts to imply reference and narrative, instead of just being about a single thing. You’ll want to include enough information in the image that suggests a greater story about the scene to your viewers, without giving away too much information or weighing down your photograph.

    Details photography 03 Details photography 04

    3. Larger details

    Detail shots don’t always have to be photographs of smaller objects and they don’t always have to be taken up close. There is enough detail of different sizes in the world that you can focus on nearly anything, as long as you can accentuate that particular subject matter in a visually appealing way.

    This is where long lenses really shine. I love shooting long, suggestive shots, of distant subjects with my telephoto zoom lens. The narrow angle of view lets me focus on just two or three elements, and the shallow depth of field creates a soft background that doesn’t distract from the main subjects.

    Details photography 05

    Details photography 06

    4. Lines and textures

    Sometimes your shot will be more about simple graphic form and texture, instead of a physical object. When done right, you can still tell a powerful visual story with limited subject matter. Experiment with lines, shapes, colours, patterns and other abstract subject matter that appeals to you. Shadows can be powerful compositional elements because they suggest how your subject relates with other tangible objects around them.

    Details photography 07

    Details photography 08

    5. Human details

    People often make for the most powerful subjects, because as humans, we all relate with and respond to each other on some level. There is an unending variety of details that you can capture when shooting humans and their actions. Try focusing on elements such as interaction, motion, emotion and their association with others and with the world in general.

    Details photography 09

    Details photography 10

    Less is more

    Remember, you don’t always have to show the whole thing. Sometimes even a single abbreviated detail can be a powerful image. Experiment with cropping and zooming in on your subjects, to show the minimum amount of visual information needed to make a good photograph. You might be surprised at how little you need to show in order to create a compelling image.

    As I like to say, any time you can invoke your viewer’s imagination, you’ve gone a long way towards creating a successful image. Strive for simplicity with your photography and see how far you can take this concept to its fullest potential.

    What is your message?

    Accuracy isn’t what’s going to excite your viewer and draw them into your image, it’s feel, style and message.


    Want more creative photography tips and insight? Download my entire photography ebook bundle and get four titles for only $ 29 right now at SnapnDeals.

    The post 5 Ways to Create Detail Photos by Dan Bailey appeared first on Digital Photography School.

    Digital Photography School

  • Infographic Feature: Capturing Perfect Wedding Photos

    There are many wedding photographers (or people who merely think they can shoot weddings), but there are also many who could brush up on their skills. That’s putting it lightly. We believe that wedding photography is basically a category onto itself because of the high degree of skill and specificity required to pull off shooting any wedding successfully. We’ve covered Continue Reading

    The post Infographic Feature: Capturing Perfect Wedding Photos appeared first on Photodoto.


    Photodoto

  • Lightroom How To – One Tip and One Trick

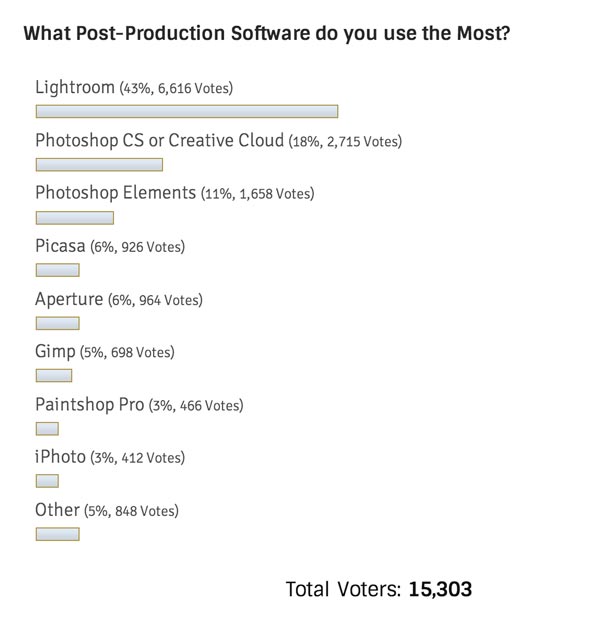
    Recently we asked what post-production software to you use the most often?

    So far of the over 15,000 of you that have voted on the poll (use the link above if you wish to vote), the overwhelming winner is Lightroom with a whopping 43%!

    what-processing-software

    Today I want to share with you a couple of short videos by Adobe Photoshop Lightroom expert, Matt Kloskowski. Matt is one of “The Photoshop guys”, runs a website called Lightroom Killer Tips and teacher with NAPP and Photoshop World. He really knows his stuff!  So take it away Matt:

    Lightroom how to – one tip and one trick

    QUICK TIP – THE MOST USEFUL BUTTON IN LIGHTROOM

    QUICK TRICK – WORKING WITH SKIES

     Want more? You can find more Lightroom articles here:

    • Lightroom Tips for the Develop Module – the Magic Alt Key
    • 3 Lightroom History Tips
    • 4 Quick Tips For Getting The Most Out of Lightroom Presets
    • How to use the new Radial Filter Tool in Lightroom 5

    The post Lightroom How To – One Tip and One Trick by Darlene Hildebrandt appeared first on Digital Photography School.


    Digital Photography School

  • A Concise Guide to Lightroom Develop Presets

     Lightroom develop presets

    The Presets panel (found in the left-hand panels in the Develop module) is one of the most useful in Lightroom. The most obvious benefit of Develop Presets is that they can save you time, which is always a good thing. But they do more than that, including help you maintain a consistent approach to post-processing and using creative effects.

    Develop Presets tend to fall into one of two categories. The first are what you might call one-shot presets, which seem to work well on one or two images but not many others. A good example is Develop Presets intended to create a vintage or cross-processed look. They tend to improve some photos, but look horrible on most others.

    The second category is what you could call genuinely useful presets. They are a bit better thought out, and designed to make post-processing an easier and quicker task. Usually they are created by a photographer that has put them to use over a long period of time and tweaked them until they work well. I will give you some examples of these at the end of the article.

    In this guide to Lightroom Develop Presets we’ll go over some your options.

    Free Develop Presets

    If you haven’t used Develop Presets before then you likely don’t have many to play with. There are some included already with Lightroom, but there are also plenty of websites where you can download good Develop Presets for free. The problem is, as with anything free, sorting out the rubbish, especially as most of these fall into the first category of Develop Presets. We can save you some time by making some recommendations:

    OnOne Software Signature Collection

    • One of my favourites is made by OnOne Software. There are a lot of Develop Presets in their set. Some of them will be a bit over the top for most photographers, but there are some good ones, including a set that imitate the filters in the Instagram app. If you’ve ever wanted to use Instagram on photos taken with your digital camera, this is the easiest way to do it. By the way, the link takes you through to OnOne Software’s Lightroom Presets page, where you’ll find lots more free Lightroom Presets.
    Lightroom-develop-presets-09

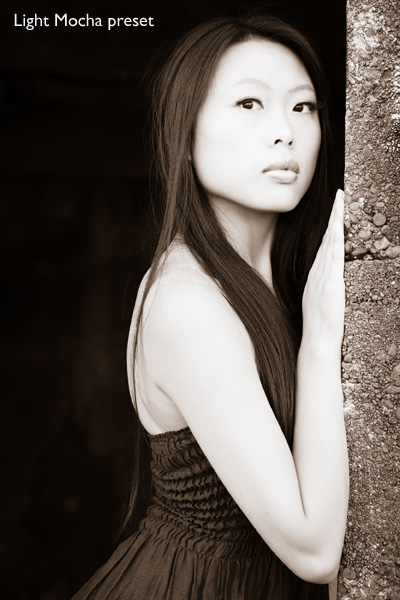
    This photo was created with the Light Mocha Preset from OnOneSoftware

    Presets Heaven Vintage Presets

    • A nice collection of seven vintage effects for Lightroom 4 and 5. The opening photo above was processed with one of these.

    Delicious Freebies

    • A set of free Lightroom Presets from Delicious Presets.

    Installing Lightroom Develop Presets

    Develop presets are easy to install, follow these steps:

    • Start by downloading them to your computer (the folder you save them in isn’t important at this stage)
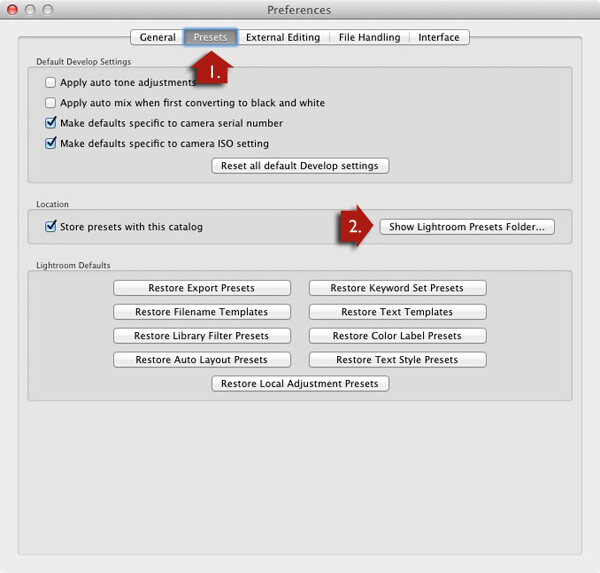
    • Open Preferences, go to the Presets tab (see red arrow #1 below) and click on the Show Lightroom Presets Folder button (see red arrow #2 below)
    • Inside this folder is another called Lightroom Settings, and inside that is one called Develop Presets. Drag the Develop Presets you downloaded earlier to this folder
    • You will need to restart Lightroom before they appear in the Presets panel

    Lightroom develop presets

    Using Develop Presets

    Develop Presets are easy to use:

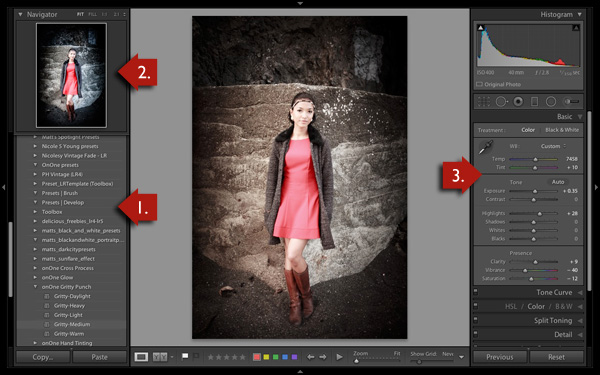
    • The Presets panel contains all Develop Presets that come with Lightroom, ones you have created yourself (listed under the heading User Presets) or downloaded from other sources (see red arrow #1 below).
    • If you hover over any of the presets, the thumbnail in the Navigator panel shows you what your photo will look like with that preset applied (see red arrow #2 below).
    • Click on the preset name to apply it to your photo. The Develop settings in the right-hand panel are updated when you do so (red arrow #3 below).

    Lightroom develop presets

    You can’t always tell much from the thumbnail in the Navigator panel as it’s so small. You’ll get a better view if you click on the Before/After View icon (#1 below) – the backslash key “\” is the keyboard shortcut, and will toggle before/after on the entire image by turning it off and on. Set the Zoom slider to Fit to show the entire image on the screen (see #2 below).

    When you click on a Develop Preset to apply it to your image you will see the original photo and the new version displayed side by side. If you don’t like the result, Undo it using the Cmd+Z (Mac) or  Ctrl+Z (PC) keyboard shortcut.

    Lightroom develop presets

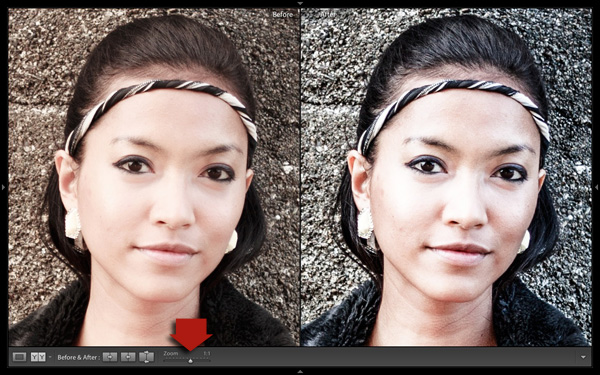
    For a close-up look at the effect the Develop Preset has had on your photo, set the Zoom slider to 1:1 (below). Make sure you check important parts of the photo, such as the model’s face in this portrait, to make sure that the newly applied preset hasn’t created any undesirable effects. Some presets do go a little over the top with settings such as Clarity, so it’s wise to double check. You can make adjustments to the appropriate sliders if required.

    Lightroom develop presets

    One of the interesting things about Develop Presets you download from other sources is that you can look at how the settings have changed after you have applied the new preset to see how the effect is achieved. It’s an easy way to learn new processing techniques.

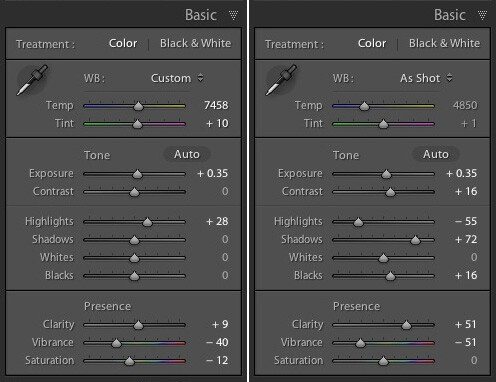
    In the example above (the Gritty-Medium preset from OnOne Software), the Develop Preset made all the changes in the Basic Panel. It boosted the contrast by moving the Contrast and Clarity sliders to the right, then negated that effect somewhat in the mid-tones by moving the Highlights slider left and the Shadows slider right (see screenshot below). It also reduced Vibrance and Saturation. The end result is gritty and dramatic, but not so harsh that it’s unsuitable for portraits.

    Lightroom develop presets

    Settings before preset applied on the left, and after it was applied on the right

    Create Your Own Develop Presets

    It’s very easy to create your own Develop Presets:

    • Select a photo and make the required adjustments using the right-hand panels of the Develop Module.
    • Go to Develop > New Preset. Alternatively, click the Create New Preset icon in the Presets panel (below)

    Lightroom develop presets

    • Give the Preset a name (#1 below) and select the settings that you want to include in the Develop Preset in the New Develop Preset window (#2 below). You don’t have to include every setting. If you did, the Develop Preset would probably only be useful for that specific photo.
    • Press the Create button (#3 below) when you are done. The new Develop Preset appears in the User Presets category in the Presets panel.

    Lightroom develop presets

    Other Develop Presets

    Here is a list of other Develop Presets you may find useful. These are different from the ones listed above as they are not free. If you have any recommendations yourself, please leave them in the comments.

    The first two are from the Craft & Vision website

    • David duChemin’s Lightroom Presets
    • Dave Delnea’s Lightroom Presets

    The next one is from SLR Lounge

    • It’s a comprehensive system, and so costs more than the others. You can watch the video on the page to see how it works: Lightroom Preset System V5

    key-11Mastering Lightroom Book One: The Library Module

    My latest ebook Mastering Lightroom Book One: The Library Module is a complete guide to using Lightroom’s Library module to import, organise and search your photo files. You’ll learn how to tame your growing photo collection using Collections and Collection Sets, and how to save time so you can spend more time in the Develop module processing your photos.


    The post A Concise Guide to Lightroom Develop Presets by Andrew Gibson appeared first on Digital Photography School.


    Digital Photography School