Att välja Bitcoin Forum med 250 € de bästa kryptosystem som finns på marknaden är en mycket viktig aspekt av handeln. Om du inte är medveten om detta kan det sluta med att du förlorar mycket pengar i det långa loppet. Om du vill göra mest vinst på kortast möjliga tid måste du göra din hemläxa väl. Här är några av de grunder som du bör känna till innan du väljer de bästa mynten att handla på marknaden med.
Bitcoin Forum med 250 €
En av de första sakerna du måste titta efter i de bästa valutorna som finns på marknaden är deras inflationsgrad. För att förstå detta måste du först förstå vad inflation är. Inflation är helt enkelt en ökning av priserna utan att varor och tjänster minskar. Till exempel är en enårig dollar värd mycket mer om några månader, eller hur? Så om du väljer att investera i de bästa råvarorna för det här århundradet vore det klokt att hålla utkik efter de valutor som enligt prognoserna kommer att uppleva den högsta inflationen under de kommande tio åren.
Ett annat grundläggande övervägande när det gäller att investera i de bästa valutorna är deras historik när det gäller handel och gruvdrift. Man kan inte bara välja vilket gammalt system som helst att investera i idag. Det finns hundratusentals valutor som handlas på marknaden och endast ett fåtal utvalda är lönsamma. Därför är det nödvändigt att du forskar väl om de olika systemen som finns tillgängliga för att veta vilket av de tillgängliga kryptosystemen som är det bästa att investera i.
Ett av de enklaste sätten att avgöra vilken av de bästa valutorna att investera i är genom att titta på den underliggande tillgångens egenskaper. Detta kallas tillgångens egenskaper och de är kända som Ripples. Låt oss ta en titt på två exempel på de bästa valutorna att investera i under det kommande decenniet. Den första typen av tillgång är aktier. Ett index som följer värdet av olika typer av företag kallas aktier. Så om vi tittar på de tio främsta valutorna som kommer att styra aktiemarknadens värde i framtiden är det troligt att dollarn kommer att fortsätta sin uppgång eftersom värdet på aktier i USA och Europa förväntas stiga.
Den andra typen av tillgångar är guld. Det finns en stor sannolikhet för att guldpriset kommer att stiga under det kommande decenniet. Om du håller på med handel och inte har teknisk kunskap om vilken av de bästa valutorna du ska investera i bör du prova de bästa kryptovalutorna som sannolikt kommer att öka i värde under detta årtionde. Bland de möjliga valutorna att investera i Bitcoin Forum med 250 € finns euron, den japanska yenen, den australiska dollarn, schweiziska francen, den kanadensiska dollarn och det brittiska pundet. Var och en av dessa valutor har sina egna för- och nackdelar och du bör noggrant studera dem innan du investerar i dem.
Även om det är lätt att bli lockad av de dåliga nyheterna om att investera i kryptovalutor finns det ingen dålig investering när det gäller mynt. Anledningen till detta är att de flesta investerare som är nya i den här branschen slutar med att förlora sina pengar eftersom de inte har rätt kunskap om vilka av de bästa valutorna de ska investera i. Så när du letar efter de bästa valutorna att investera i är det viktigt att du blir bekant med alla dessa. Detta beror på att endast genom att bli en registrerad användare av en onlinehandelsplats kan du få tillgång till alla de bästa kryptovalutorna som finns tillgängliga i världen idag.
Det finns många fördelar som är förknippade med att investera i de bästa kryptokurvorna, bland annat det faktum att de handlas på den globala marknaden. Därför är det lätt att handla med de bästa valutorna och du kan också förvänta dig god avkastning. Att investera i de bästa valutorna kräver dock att du lär dig hur systemet fungerar, grunderna i ekonomi och företagsledning. Om du till exempel är en investerare som är ny på att investera på altcoin-marknaden, är det bättre om du får hjälp av professionella personer som experter och handlare.
Det finns många fördelar som du kan njuta av när du investerar i de bästa valutorna i världen. En av dessa är att när du väljer de bästa kryptosurferna kan du vara säker på att värdet på din investering alltid kommer att vara stabilt. Eftersom värdet på varje mynt varierar beroende på utbud och efterfrågan är det viktigt att du investerar i de bästa valutorna och sedan handlar med dem enligt dina behov. När värdet på en valuta fluktuerar kan du alltså enkelt sälja dina tillgångar och investera i de nya.
Det bästa sättet att investera i de bästa kryptosurfarna är att se till att du är välinformerad om de olika faktorer som påverkar värdet på ett visst mynt och du har också en expert som kan lära dig hur du väljer de bästa valutorna att investera i. När du vill göra vinster från handeln med den bästa kryptosurf bör du alltså se till att du utbildar dig om marknadens ekonomi och affärsmodeller. Här är nästa intressanta blogginlägg: Programvara för Bitcoin-plånbok för Mac.
The post Bitcoin Forum med 250 € Erfarenheter first appeared on Hur man använder kryptovalutor på rätt sätt.
Att välja Kan du köpa Bitcoin och Bitcoin Cash nu? de bästa kryptosystem som finns på marknaden är en mycket viktig aspekt av handeln. Om du inte är medveten om detta kan det sluta med att du förlorar mycket pengar i det långa loppet. Om du vill göra mest vinst på kortast möjliga tid måste du göra din hemläxa väl. Här är några av de grunder som du bör känna till innan du väljer de bästa mynten att handla på marknaden med.
Kan du köpa Bitcoin och Bitcoin Cash nu?
En av de första sakerna du måste titta efter i de bästa valutorna som finns på marknaden är deras inflationsgrad. För att förstå detta måste du först förstå vad inflation är. Inflation är helt enkelt en ökning av priserna utan att varor och tjänster minskar. Till exempel är en enårig dollar värd mycket mer om några månader, eller hur? Så om du väljer att investera i de bästa råvarorna för det här århundradet vore det klokt att hålla utkik efter de valutor som enligt prognoserna kommer att uppleva den högsta inflationen under de kommande tio åren.
Ett annat grundläggande övervägande när det gäller att investera i de bästa valutorna är deras historik när det gäller handel och gruvdrift. Man kan inte bara välja vilket gammalt system som helst att investera i idag. Det finns hundratusentals valutor som handlas på marknaden och endast ett fåtal utvalda är lönsamma. Därför är det nödvändigt att du forskar väl om de olika systemen som finns tillgängliga för att veta vilket av de tillgängliga kryptosystemen som är det bästa att investera i.
Ett av de enklaste sätten att avgöra vilken av de bästa valutorna att investera i är genom att titta på den underliggande tillgångens egenskaper. Detta kallas tillgångens egenskaper och de är kända som Ripples. Låt oss ta en titt på två exempel på de bästa valutorna att investera i under det kommande decenniet. Den första typen av tillgång är aktier. Ett index som följer värdet av olika typer av företag kallas aktier. Så om vi tittar på de tio främsta valutorna som kommer att styra aktiemarknadens värde i framtiden är det troligt att dollarn kommer att fortsätta sin uppgång eftersom värdet på aktier i USA och Europa förväntas stiga.
Den andra typen av tillgångar är guld. Det finns en stor sannolikhet för att guldpriset kommer att stiga under det kommande decenniet. Om du håller på med handel och inte har teknisk kunskap om vilken av de bästa valutorna du ska investera i bör du prova de bästa kryptovalutorna som sannolikt kommer att öka i värde under detta årtionde. Bland de möjliga valutorna att investera i Kan du köpa Bitcoin och Bitcoin Cash nu? finns euron, den japanska yenen, den australiska dollarn, schweiziska francen, den kanadensiska dollarn och det brittiska pundet. Var och en av dessa valutor har sina egna för- och nackdelar och du bör noggrant studera dem innan du investerar i dem.
Även om det är lätt att bli lockad av de dåliga nyheterna om att investera i kryptovalutor finns det ingen dålig investering när det gäller mynt. Anledningen till detta är att de flesta investerare som är nya i den här branschen slutar med att förlora sina pengar eftersom de inte har rätt kunskap om vilka av de bästa valutorna de ska investera i. Så när du letar efter de bästa valutorna att investera i är det viktigt att du blir bekant med alla dessa. Detta beror på att endast genom att bli en registrerad användare av en onlinehandelsplats kan du få tillgång till alla de bästa kryptovalutorna som finns tillgängliga i världen idag.
Det finns många fördelar som är förknippade med att investera i de bästa kryptokurvorna, bland annat det faktum att de handlas på den globala marknaden. Därför är det lätt att handla med de bästa valutorna och du kan också förvänta dig god avkastning. Att investera i de bästa valutorna kräver dock att du lär dig hur systemet fungerar, grunderna i ekonomi och företagsledning. Om du till exempel är en investerare som är ny på att investera på altcoin-marknaden, är det bättre om du får hjälp av professionella personer som experter och handlare.
Det finns många fördelar som du kan njuta av när du investerar i de bästa valutorna i världen. En av dessa är att när du väljer de bästa kryptosurferna kan du vara säker på att värdet på din investering alltid kommer att vara stabilt. Eftersom värdet på varje mynt varierar beroende på utbud och efterfrågan är det viktigt att du investerar i de bästa valutorna och sedan handlar med dem enligt dina behov. När värdet på en valuta fluktuerar kan du alltså enkelt sälja dina tillgångar och investera i de nya.
Det bästa sättet att investera i de bästa kryptosurfarna är att se till att du är välinformerad om de olika faktorer som påverkar värdet på ett visst mynt och du har också en expert som kan lära dig hur du väljer de bästa valutorna att investera i. När du vill göra vinster från handeln med den bästa kryptosurf bör du alltså se till att du utbildar dig om marknadens ekonomi och affärsmodeller. Här är nästa intressanta blogginlägg: Fine Ounce Silver Bitcoin Coin Source Https Www Hardware Wallets De One Fine Ounce Silver Bitcoin Coin.
The post Kan du köpa Bitcoin och Bitcoin Cash nu? Erfarenheter first appeared on Hur man använder kryptovalutor på rätt sätt.
One of the most exciting things about the modern world is the high accessibility of professional tools for regular people. It provides us with a great chance to enjoy thousands of totally diverse pieces of art throughout the Web and beyond it. Now you can find hundreds of online offers to create impressive collages, apply beautiful filters, or add text Continue Reading Photodoto
Comments Off on How to Create Professional Photo Layouts If You Aren’t a Designer
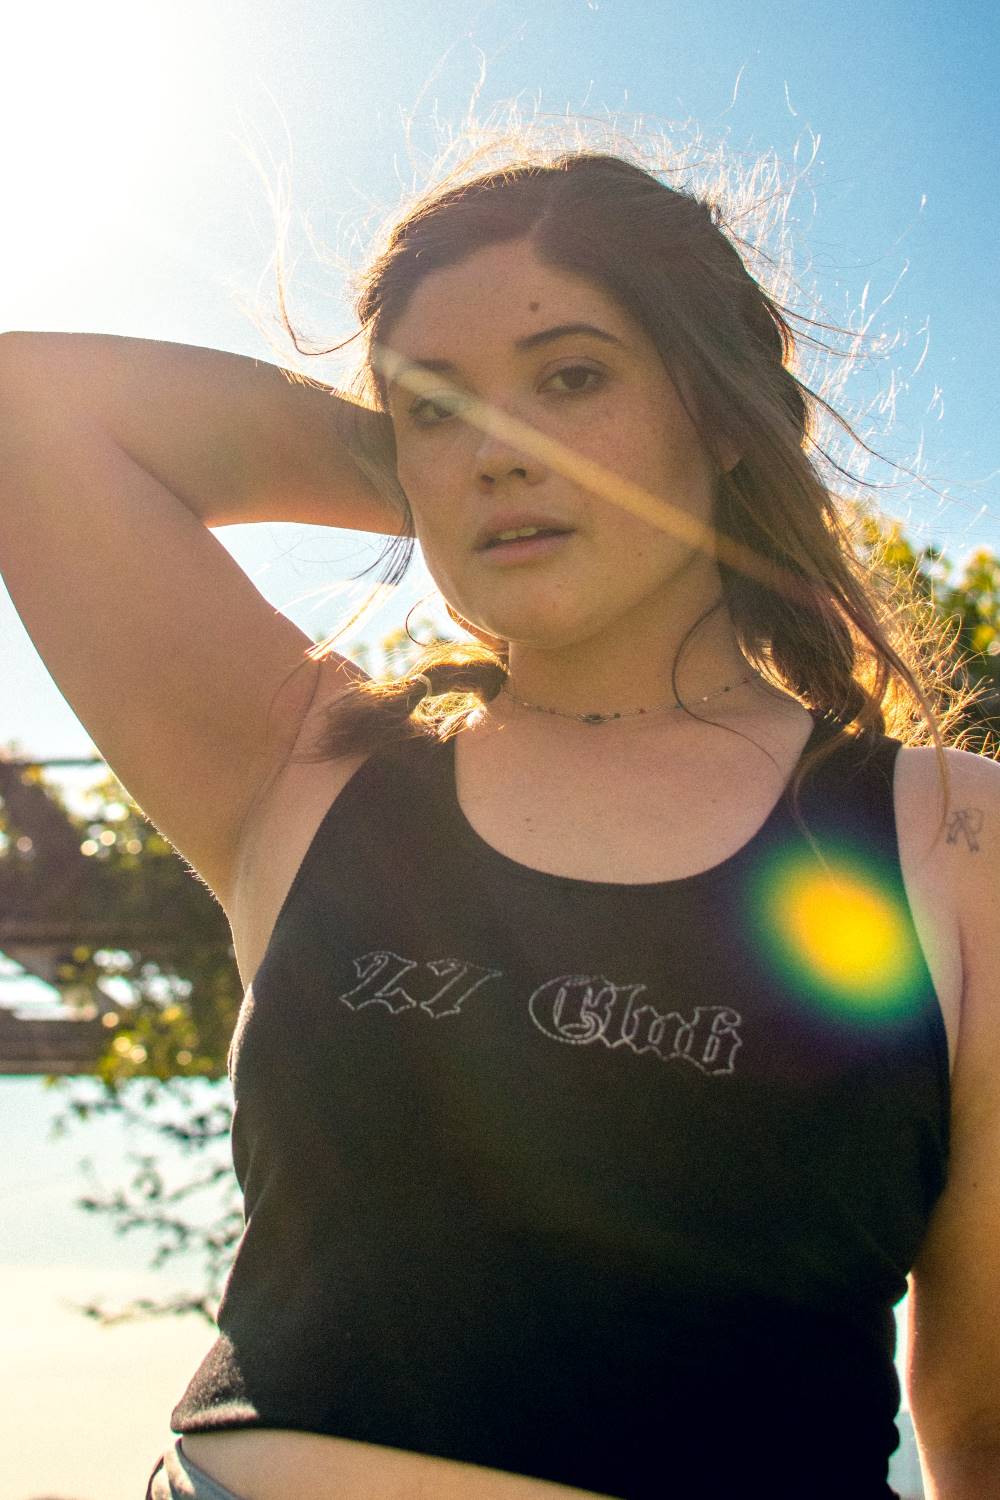
Would you prefer to see your subject’s face or have a sun flare where her head should be? No? Well, then that’s just one good reason why you should be shooting with a lens hood. However, many beginning photographers wonder what on earth the lens hood actually does? Is it just there to make your camera look more professional? Of Continue Reading Photodoto
Comments Off on This Is When To Use A Camera Lens Hood
The post How to Avoid and Reduce Noise in Your Photos (2021 Guide) appeared first on Digital Photography School. It was authored by Barry J Brady.
We’ve all seen it in our images: that uneven grainy look that makes our images unappealing.
But how can you avoid noise? And, in cases where it’s unavoidable, how do you reduce noise in photos?
In this article, I’m going to share plenty of tips and tricks for both preventing and removing noise. Specifically, I’ll share:
Why you’re actually dealing with noise in the first place
Five simple ways to stop noise from ever appearing in your images
A noise reduction workflow you can use to reduce noise in Lightroom and Adobe Camera Raw
Sound good? Let’s dive right in, starting with the important first question:
What is noise?
Generally speaking, noise is defined as aberrant pixels. In other words, noise is made up of pixels not correctly representing the color or exposure of the scene.
Why does noise happen?
Noise is introduced when you shoot a long-exposure image or use a high ISO setting on your camera.
(What counts as a high ISO setting? That depends on your camera model, but these days, most cameras start getting noisy around ISO 1600 or 3200.)
Does that mean you should never do long exposures or go over ISO 100?
No! There are times you may need – or even want – to use long exposures or raise the ISO. Landscape photographers, event photographers, and wildlife photographers shoot in low light all the time, which requires long exposures and/or a high ISO.
At the same time, there are simple ways to avoid too much noise in your photos, even when using the above techniques, which I’ll discuss in the next section:
Reducing noise in your images can make a huge difference to the overall quality.
5 ways to reduce noise in-camera
Below, I share the five methods for minimizing noise while out shooting.
Not every method will apply for every situation, which is why it pays to be familiar with all of them – and to carefully choose the right method for your particular shot.
1. Shoot at lower ISO settings
Yes, we’re starting with the most obvious method. But photographers often push their ISO too high, too fast, leading to bad image quality.
Now, if your camera is three years old or newer, the ISO functionality will be great. You shouldn’t see too much noise creeping into your images, even up to ISO 3200. However, there might still be some noise at the higher ISO numbers, such as ISO 6400, ISO 12800, and beyond.
So don’t raise your ISO with abandon. Instead, be aware of your exposure, and recognize that shooting at a high ISO will produce more noise in your images. Boost your ISO if necessary, but consider other options before dialing in ISO 12800.
Here are a few items to think about before increasing the ISO:
Open your aperture to its widest setting (e.g., f/2.8)
If you are shooting in low light, use a tripod and drop your shutter speed
If you are shooting a smaller subject (e.g., a person), use a flash
Each of these strategies will help you get a nice, bright exposure – without unnecessarily raising the ISO.
Of course, if your shots are still turning out dark, then you will need to push the ISO up higher. I’d recommend doing some test shots to find out your camera’s ISO capabilities and at what point the ISO settings start to really degrade image quality.
For many years, I shot on a Nikon D80, and I knew that anything above ISO 500 was really difficult to use. Noise at ISO 640 and beyond became difficult to remove. And if I was able to successfully remove it, the whole image looked like a watercolor painting thanks to the noise reduction process. So I worked within my constraints.
2. Shoot in RAW format
Does the idea of shooting in RAW intimidate you? It shouldn’t! RAW is a great way to get the best out of your images, so be sure to use it.
You don’t have to shoot RAW all the time. But when you notice that the light is becoming a little too dark, switch over to RAW.
Why is this so important?
JPEGs come with compression – a process during which noise becomes baked into your images. So removing noise in post-production becomes really tough (as does increasing exposure, which is often important in high-ISO situations).
3. Expose correctly from the start
Boosting a too-dark exposure will reveal noise – which is why it’s essential that you get your exposures right from the very beginning.
When out shooting, I highly recommend checking your camera’s LCD – including the histogram – to make sure you’ve nailed the exposure.
And don’t be afraid to take several shots at different exposures, especially if you’re dealing with a tricky scene; better to be safe than sorry!
Also, the higher your ISO, the more unforgiving the file. In other words: If you’re using a high ISO, you had better get the exposure right, because boosting an underexposed high-ISO image will result in a noisy mess.
(Of course, don’t overexpose, either. While overexposure won’t cause problems with noise, it will obliterate detail, which is never a good thing.)
4. Be careful when doing long exposures
Long exposures produce some of the most dramatic images.
But if the exposure is too long, the camera sensor may heat up, causing unwanted noise.
Don’t let this stop you from doing long exposures – if you love long exposures, then do long exposures – just be aware of how your camera handles the long exposure time.
In fact, you might consider shooting a series of long exposures, then checking each file on your computer for noise.
Then, once you’ve determined your camera’s limitations, make sure you don’t set your shutter speed for longer than your camera can handle.
The key point here is to know the limits of your gear and to shoot within those limits. You’ll end up with great images and have an easy time when editing.
Long exposure images can increase noise in a scene.
5. Use in-camera noise reduction
Most cameras offer a function called Long Exposure Noise Reduction, and if you’re doing long exposures, it’s a good idea to turn it on.
Why?
Well, as discussed above, long exposure photos are especially prone to noise. A long exposure noise reduction option is designed to counteract this issue – by taking a second shot after the first, then using the noise profile of the second image to subtract noise from the first.
Long exposure noise reduction comes with a serious drawback, though: it takes time, usually as long as the original exposure. So if you use a 30-second shutter speed, the camera will take an additional 30 seconds to get rid of the noise. And if you shoot for an hour, you’ll need another hour to reduce the noise, which is an annoyingly long time to wait!
So yes, it may be impractical if you are doing 10-minute shots. But for medium-length long exposures, it’s often worth doing.
(And if you do have the timed, do it on the very long exposures too, as it can dramatically improve the image quality.)
Use in-camera noise reduction for long exposures!
Reducing noise in Lightroom or Adobe Camera Raw
Even with the best techniques, you’ll still end up with noise in your photos – at least on occasion.
Which is where post-processing noise reduction techniques come in handy!
Here’s my recommended workflow using Lightroom Classic or Adobe Camera Raw (but note that you’ll be able to use very similar methods in other programs):
Step 1: Open your image and view at 100 percent
Start by opening your image in Lightroom or Photoshop.
Note that RAW images opened in Photoshop will first go through Adobe Camera Raw, which is what you want. Also note that the controls in Adobe Camera Raw and in Lightroom are identical, so while the photos below are taken from ACR, the instructions are equally applicable to Lightroom users.
The noise reduction sliders in Adobe Camera Raw are identical in Lightroom.
I recommend viewing your image full screen, then zooming into 100 percent. The goal is to look for noise; after all, not all images require noise reduction.
Adobe Camera Raw has some powerful noise reduction tools.
Step 2: Adjust the Luminance slider
The Luminance slider reduces luminance noise (i.e., noise resulting from over- or underexposed pixels).
And many, many high-ISO images suffer from excessive luminance noise.
So zoom in to 100 percent, then boost the Luminance slider until the noise starts to disappear.
Don’t go too far, however,
Step 3: Fine-tune your result with the Luminance Detail and Luminance Contrast sliders
The Luminance Detail and Luminance Contrast sliders control the amount of detail and contrast preserved in your photos following luminance noise reduction.
You see, noise reduction smooths out noisy pixels, which automatically reduces detail and contrast. But by boosting these sliders, you’ll retain detail and contrast.
As you’d expect, the sliders do come with a drawback:
When you increase the values, you decrease the strength of the noise reduction. So while you’ll end up with a sharper image, you’ll also see more noise.
Step 4: Adjust the Color slider
The Color slider reduces color noise – which is the second type of noise you’ll find in your photos (often in the underexposed shadow areas).
So boost the Color noise slider, and zoom into 100 percent to see its effects.
Step 5: Fine-tune your result with the Color Detail and Color Smoothness sliders
As with luminance noise reduction (above), you can further adjust your image with the Color Detail and Color Smoothness sliders.
Want more detail in your photo? Boost the Color Detail slider. Higher values will protect thin, detailed color edges, but can also result in color speckles. Lower values remove color speckles but can result in color bleeding.
Want to keep colors nice and smooth? Boost the Color Smoothness slider.
And you’re done!
A final note on noise reduction
While I wish I could give you standard, one-size-fits-all settings for noise reduction, it just doesn’t work that way. Every image is different, so you’ll need to slide each adjustment around until you get your desired result.
I tend to increase Luminance and Color to about 50, then work from there. I slide each option up and down, carefully watching how it affects the image while zoomed in to 100 percent.
Then, after each adjustment, I zoom out to see the effect it has on the overall image. And if I’m happy with an adjustment, I move onto the next slider.
Is the process a little tedious? Sure. But if done properly, you’ll eliminate most of the unsightly noise in just about any image.
Practice is also important here, so try this on as many images as you can. Pretty soon, you’ll be able to predict the effect of each change.
How to avoid and reduce noise in your photos: conclusion
Now that you’ve finished this article, you know that avoiding and reducing noise shouldn’t be too complicated. Just follow the steps I’ve given, and your images will turn out great.
Now over to you:
Do you have any other tips for noise reduction and removal? Share your thoughts in the comments below!
The post How to Avoid and Reduce Noise in Your Photos (2021 Guide) appeared first on Digital Photography School. It was authored by Barry J Brady.
Att välja Bitcoin Kurs 1 Bitcoin de bästa kryptosystem som finns på marknaden är en mycket viktig aspekt av handeln. Om du inte är medveten om detta kan det sluta med att du förlorar mycket pengar i det långa loppet. Om du vill göra mest vinst på kortast möjliga tid måste du göra din hemläxa väl. Här är några av de grunder som du bör känna till innan du väljer de bästa mynten att handla på marknaden med.
Bitcoin Kurs 1 Bitcoin
En av de första sakerna du måste titta efter i de bästa valutorna som finns på marknaden är deras inflationsgrad. För att förstå detta måste du först förstå vad inflation är. Inflation är helt enkelt en ökning av priserna utan att varor och tjänster minskar. Till exempel är en enårig dollar värd mycket mer om några månader, eller hur? Så om du väljer att investera i de bästa råvarorna för det här århundradet vore det klokt att hålla utkik efter de valutor som enligt prognoserna kommer att uppleva den högsta inflationen under de kommande tio åren.
Ett annat grundläggande övervägande när det gäller att investera i de bästa valutorna är deras historik när det gäller handel och gruvdrift. Man kan inte bara välja vilket gammalt system som helst att investera i idag. Det finns hundratusentals valutor som handlas på marknaden och endast ett fåtal utvalda är lönsamma. Därför är det nödvändigt att du forskar väl om de olika systemen som finns tillgängliga för att veta vilket av de tillgängliga kryptosystemen som är det bästa att investera i.
Ett av de enklaste sätten att avgöra vilken av de bästa valutorna att investera i är genom att titta på den underliggande tillgångens egenskaper. Detta kallas tillgångens egenskaper och de är kända som Ripples. Låt oss ta en titt på två exempel på de bästa valutorna att investera i under det kommande decenniet. Den första typen av tillgång är aktier. Ett index som följer värdet av olika typer av företag kallas aktier. Så om vi tittar på de tio främsta valutorna som kommer att styra aktiemarknadens värde i framtiden är det troligt att dollarn kommer att fortsätta sin uppgång eftersom värdet på aktier i USA och Europa förväntas stiga.
Den andra typen av tillgångar är guld. Det finns en stor sannolikhet för att guldpriset kommer att stiga under det kommande decenniet. Om du håller på med handel och inte har teknisk kunskap om vilken av de bästa valutorna du ska investera i bör du prova de bästa kryptovalutorna som sannolikt kommer att öka i värde under detta årtionde. Bland de möjliga valutorna att investera i Bitcoin Kurs 1 Bitcoin finns euron, den japanska yenen, den australiska dollarn, schweiziska francen, den kanadensiska dollarn och det brittiska pundet. Var och en av dessa valutor har sina egna för- och nackdelar och du bör noggrant studera dem innan du investerar i dem.
Även om det är lätt att bli lockad av de dåliga nyheterna om att investera i kryptovalutor finns det ingen dålig investering när det gäller mynt. Anledningen till detta är att de flesta investerare som är nya i den här branschen slutar med att förlora sina pengar eftersom de inte har rätt kunskap om vilka av de bästa valutorna de ska investera i. Så när du letar efter de bästa valutorna att investera i är det viktigt att du blir bekant med alla dessa. Detta beror på att endast genom att bli en registrerad användare av en onlinehandelsplats kan du få tillgång till alla de bästa kryptovalutorna som finns tillgängliga i världen idag.
Det finns många fördelar som är förknippade med att investera i de bästa kryptokurvorna, bland annat det faktum att de handlas på den globala marknaden. Därför är det lätt att handla med de bästa valutorna och du kan också förvänta dig god avkastning. Att investera i de bästa valutorna kräver dock att du lär dig hur systemet fungerar, grunderna i ekonomi och företagsledning. Om du till exempel är en investerare som är ny på att investera på altcoin-marknaden, är det bättre om du får hjälp av professionella personer som experter och handlare.
Det finns många fördelar som du kan njuta av när du investerar i de bästa valutorna i världen. En av dessa är att när du väljer de bästa kryptosurferna kan du vara säker på att värdet på din investering alltid kommer att vara stabilt. Eftersom värdet på varje mynt varierar beroende på utbud och efterfrågan är det viktigt att du investerar i de bästa valutorna och sedan handlar med dem enligt dina behov. När värdet på en valuta fluktuerar kan du alltså enkelt sälja dina tillgångar och investera i de nya.
Det bästa sättet att investera i de bästa kryptosurfarna är att se till att du är välinformerad om de olika faktorer som påverkar värdet på ett visst mynt och du har också en expert som kan lära dig hur du väljer de bästa valutorna att investera i. När du vill göra vinster från handeln med den bästa kryptosurf bör du alltså se till att du utbildar dig om marknadens ekonomi och affärsmodeller. Här är nästa intressanta blogginlägg: Information om Bitcoin.
The post Bitcoin Kurs 1 Bitcoin Erfarenheter first appeared on Hur man använder kryptovalutor på rätt sätt.
Att välja Bästa Bitcoin-plånböcker för Ios och Os kombinerat de bästa kryptosystem som finns på marknaden är en mycket viktig aspekt av handeln. Om du inte är medveten om detta kan det sluta med att du förlorar mycket pengar i det långa loppet. Om du vill göra mest vinst på kortast möjliga tid måste du göra din hemläxa väl. Här är några av de grunder som du bör känna till innan du väljer de bästa mynten att handla på marknaden med.
Bästa Bitcoin-plånböcker för Ios och Os kombinerat
En av de första sakerna du måste titta efter i de bästa valutorna som finns på marknaden är deras inflationsgrad. För att förstå detta måste du först förstå vad inflation är. Inflation är helt enkelt en ökning av priserna utan att varor och tjänster minskar. Till exempel är en enårig dollar värd mycket mer om några månader, eller hur? Så om du väljer att investera i de bästa råvarorna för det här århundradet vore det klokt att hålla utkik efter de valutor som enligt prognoserna kommer att uppleva den högsta inflationen under de kommande tio åren.
Ett annat grundläggande övervägande när det gäller att investera i de bästa valutorna är deras historik när det gäller handel och gruvdrift. Man kan inte bara välja vilket gammalt system som helst att investera i idag. Det finns hundratusentals valutor som handlas på marknaden och endast ett fåtal utvalda är lönsamma. Därför är det nödvändigt att du forskar väl om de olika systemen som finns tillgängliga för att veta vilket av de tillgängliga kryptosystemen som är det bästa att investera i.
Ett av de enklaste sätten att avgöra vilken av de bästa valutorna att investera i är genom att titta på den underliggande tillgångens egenskaper. Detta kallas tillgångens egenskaper och de är kända som Ripples. Låt oss ta en titt på två exempel på de bästa valutorna att investera i under det kommande decenniet. Den första typen av tillgång är aktier. Ett index som följer värdet av olika typer av företag kallas aktier. Så om vi tittar på de tio främsta valutorna som kommer att styra aktiemarknadens värde i framtiden är det troligt att dollarn kommer att fortsätta sin uppgång eftersom värdet på aktier i USA och Europa förväntas stiga.
Den andra typen av tillgångar är guld. Det finns en stor sannolikhet för att guldpriset kommer att stiga under det kommande decenniet. Om du håller på med handel och inte har teknisk kunskap om vilken av de bästa valutorna du ska investera i bör du prova de bästa kryptovalutorna som sannolikt kommer att öka i värde under detta årtionde. Bland de möjliga valutorna att investera i Bästa Bitcoin-plånböcker för Ios och Os kombinerat finns euron, den japanska yenen, den australiska dollarn, schweiziska francen, den kanadensiska dollarn och det brittiska pundet. Var och en av dessa valutor har sina egna för- och nackdelar och du bör noggrant studera dem innan du investerar i dem.
Även om det är lätt att bli lockad av de dåliga nyheterna om att investera i kryptovalutor finns det ingen dålig investering när det gäller mynt. Anledningen till detta är att de flesta investerare som är nya i den här branschen slutar med att förlora sina pengar eftersom de inte har rätt kunskap om vilka av de bästa valutorna de ska investera i. Så när du letar efter de bästa valutorna att investera i är det viktigt att du blir bekant med alla dessa. Detta beror på att endast genom att bli en registrerad användare av en onlinehandelsplats kan du få tillgång till alla de bästa kryptovalutorna som finns tillgängliga i världen idag.
Det finns många fördelar som är förknippade med att investera i de bästa kryptokurvorna, bland annat det faktum att de handlas på den globala marknaden. Därför är det lätt att handla med de bästa valutorna och du kan också förvänta dig god avkastning. Att investera i de bästa valutorna kräver dock att du lär dig hur systemet fungerar, grunderna i ekonomi och företagsledning. Om du till exempel är en investerare som är ny på att investera på altcoin-marknaden, är det bättre om du får hjälp av professionella personer som experter och handlare.
Det finns många fördelar som du kan njuta av när du investerar i de bästa valutorna i världen. En av dessa är att när du väljer de bästa kryptosurferna kan du vara säker på att värdet på din investering alltid kommer att vara stabilt. Eftersom värdet på varje mynt varierar beroende på utbud och efterfrågan är det viktigt att du investerar i de bästa valutorna och sedan handlar med dem enligt dina behov. När värdet på en valuta fluktuerar kan du alltså enkelt sälja dina tillgångar och investera i de nya.
Det bästa sättet att investera i de bästa kryptosurfarna är att se till att du är välinformerad om de olika faktorer som påverkar värdet på ett visst mynt och du har också en expert som kan lära dig hur du väljer de bästa valutorna att investera i. När du vill göra vinster från handeln med den bästa kryptosurf bör du alltså se till att du utbildar dig om marknadens ekonomi och affärsmodeller. Här är nästa intressanta blogginlägg: Köp Bitcoin Sverige.
The post Bästa Bitcoin-plånböcker för Ios och Os kombinerat Erfarenheter first appeared on Hur man använder kryptovalutor på rätt sätt.
The post The 10 Best Camera Phones You Can Buy in 2021 appeared first on Digital Photography School. It was authored by Ana Mireles.
If you’re eager to dive into smartphone photography and you’re looking for the best camera phone on the market, you’ve come to the right place.
It can be difficult to decide which phone to buy when there are so many good options. In my opinion, it’s a matter of deciding which features you want to prioritize and ensuring a good balance with the rest of the specs.
For example, if you do a lot of selfies, then you’d want a phone with an excellent front camera. If you like night photography, then you should search for a phone that performs best in low-light conditions. Obviously, you’ll also need to take your budget into account.
On this list, I’ve included the best camera phones for different needs – from the best point-and-shoot camera phones to the best phones for post-processing, from the phone with the best performance overall to the best budget smartphone.
Let’s get started.
1. Samsung Galaxy S21 Ultra
When you buy a camera, you’ll want to be able to change lenses – and that’s the idea behind adding more cameras to a phone: it gives you a wider variety of focal lengths.
The Samsung Galaxy S21 Ultra has an impressive four-camera setup on the back: A wide 26mm camera with 108 MP and an f/1.8 aperture; an ultra-wide 12 MP camera with a 13mm lens and an f/2.2 aperture; a 10 MP telephoto camera with an f/2.4 aperture and 3x optical zoom; and a 10 MP telephoto camera with an f/4.9 aperture and 10x optical zoom. (The front camera is 40 MP, with a 26mm field of view and an f/2.2 aperture.)
All in all, the S21 has a fantastic camera system. As for the display, it has a high-resolution 6.8-inch (17.3 cm) screen. It supports the use of any S Pen, including future releases and options from third-party manufacturers.
While the S21 doesn’t have a microSD slot, it does come with several different storage capacity options: 128 GB and 256 GB.
2. Huawei P40 Pro
Some people are hesitant to buy Huawei phones because they don’t have Google Play services, but photographically speaking, the Huawei P40 Pro is one of the best camera phones on the market.
With the P40 Pro, the slogan “Visionary Photography” is more than a catchphrase; the phone is equipped with a Leica quad-camera, including an ultra-vision sensor that offers beautiful results in daylight and at night.
The P40 Pro features a 12 MP telephoto camera with 50x digital zoom and 5x optical zoom; a 40 MP, ultra-wide Cine Camera; a 12 MP telephoto camera with an f/3.4 aperture; and a 3D depth-sensing camera.
On the front, you’ll find a 32 MP camera with an aperture of f/2.2, plus a depth camera. As for the software perks, the P40 Pro incorporates an AI function that removes unwanted passersby from your picture.
The P40 Pro display is rounded and supports AI gesture control. You can share the screen with your laptop and download content just by touching both devices. And even with the beautiful display, it has excellent battery life.
So if you’re interested in leveling up your smartphone photography, the Huawei P40 Pro is a great pick.
3. iPhone 12 Pro Max
Apple has made a point of staying on top of smartphone photography, and the iPhone 12 Pro Max, with its amazing camera system and quality display, is further proof. It features a 6.7-inch (17 cm) edge-to-edge Super Retina XDR display protected by a ceramic shield.
The iPhone 12 Pro Max has three rear cameras, each offering 12 MP: an ultra-wide 13mm camera, a wide 26mm camera, and a 52mm telephoto camera. The front camera is 12 MP and packs TrueDepth technology (which captures 3D information and is useful for face ID).
The 12 Pro Max supports Apple ProRAW format, and it’s powered by a super-fast A14 Bionic chip. It also offers impressive battery life (so you don’t have to worry about your phone dying in the middle of a photoshoot!), and it’s water resistant up to 6 m (19.7 ft) for 30 minutes.
The iPhone 12 Pro is another excellent camera phone if you’re looking for something a little less pricey – and smaller – than the iPhone 12 Pro Max. The biggest downgrade is the camera sensor size (though the resolution remains the same).
4. Oppo Find X3 Pro
The Oppo Find X3 Pro has a 50 MP ultra-wide camera with an aperture of f/2.2. And thanks to a large sensor, you get brighter pictures with better color depth, ideal for photographs in low light. A second camera packs 50 MP and an aperture of f/1.8.
The X3 Pro also has a microlens with a 60x magnification and an aperture of f/3, as well as a 13 MP telephoto camera with 5x hybrid optical zoom and 20x digital zoom. The smartphone features one of the best night modes in photography and video.
The Oppo Find X3 Pro includes a 6.7 in (17 cm) display that covers the full color gamut and offers 10-bit color depth. Its AI Scene Enhancement reads the scene and automatically shifts tones to fit.
5. Samsung Galaxy Note 20 Ultra
The potent Samsung Galaxy Note 20 Ultra is not only great for photography, but also for photo editing. With a 6.9 in (17.5 cm) edge display and an S Pen, you can do precise photo and video editing on the go. And for detail work, you can connect your desktop or TV as a second monitor.
The Note 20 Ultra packs a 12 MP ultra-wide camera, a 108 MP wide-angle camera, and a 12 MP telephoto camera. The latter features a 5x optical zoom and a 50x digital zoom. Plus, it has a laser AF sensor to improve focusing precision and speed.
You get multiple shooting modes such as Food, Night, Hyperlapse, and some extra features like Motion Photos and AR Doodle. In the Single Take mode, you can capture a scene from different angles, formats, and styles with one touch of the shutter.
You can record 8K video and extract any frame as a 33 MP image. The front 10 MP camera has a 26mm lens and an f/2.2 aperture.
If you’re looking for a more budget-friendly option, there’s also the Galaxy Note 20. It’s slightly smaller (6.7 in/17 cm display) and the camera array is different, but the smartphone is still top-notch.
6. Sony Xperia 1 II
The Sony Xperia 1 II is an excellent smartphone for both photography and videography. For one, it uses the same technology as the Sony Alpha cameras to capture up to 20 frames per second; it also supports Real-Time Eye AF for people and animals.
Battery life is highly improved from its predecessor, so you can enjoy the 4K display without concerns. The screen has a 21:9 ratio, a feature that appeals to those who frequently stream video.
The Xperia 1 II includes three rear 12 MP cameras with different Zeiss lenses: a 24mm wide-angle lens, an ultra-wide 16mm lens, and a 70mm telephoto lens. (The front camera packs 8 MP.)
The smartphone comes with 256 MB of storage and a microSD slot for storage expansion. If you’re a creator who toggles between photography and video, the Sony Xperia 1 II is the best camera phone available.
7. Google Pixel 5
In a world where phones keep getting bigger and heavier, the Google Pixel 5 is a refreshing change of pace.
Its design might seem basic compared to its competitors, but it’s lighter and more comfortable to use while still delivering high-quality pictures. Sure, the 6 in (15.2 cm) display might be on the small side, but it comes with great battery life, plus a 90 Hz refresh rate and HDR10+ with three color profiles to choose from.
You get two cameras: a 12.2 MP wide-angle camera with an f/1.7 aperture and a 16 MP ultra-wide camera with an f/2.2 aperture. Unfortunately, the native camera app doesn’t offer Manual mode, but you can adjust the highlights and shadows using sliders. And the Pixel 5 supports HDR but is a little slow when processing it.
The front camera offers 8 MP and an f/2 aperture. In Portrait mode, you can capture subjects with beautifully blurred backgrounds (and you can also add this effect at a later time!).
8. OnePlus 8 Pro
Looking for a smartphone camera that’s both powerful and versatile? The OnePlus 8 Pro is a stellar option.
Battery life is extremely good – it can last for over a day with heavy use (and over two days with light use). Impressively, this doesn’t come at the expense of the display; it’s bright enough to be used in direct sunlight and features accurate colors. Also, the recharging time is quite fast.
The main camera has a 48 MP sensor with great dynamic range and an f/1.8 aperture. You also get an 8 MP telephoto camera, plus a 48 MP ultra-wide camera with excellent macro capabilities.
The front camera is 16 MP, and while the later-released OnePlus 8T may have more cameras, the overall performance of the OnePlus 8 Pro is better.
9. Google Pixel 4A
If you’re not ready to invest in the pricier options from this list, don’t worry – there are some good choices that are also budget-friendly, such as the Google Pixel 4A.
What makes this smartphone special? For one, while you only get a single rear camera, it’s surprisingly great. It packs 12.2 MP, and images are far better than you would expect from reading its specs. The front camera is 8 MP and uses an f/2 aperture.
The Pixel 4A has many of the features on higher-end Google phones, including Live HDR+ (which lets you preview the HDR effect before you take the picture). The display is 5.81 in (14.8 cm) and full HD for a bright picture with realistic colors.
Storage is only 128 GB and the battery life isn’t great – but at such a low price, the 4A remains appealing.
10. iPhone SE
For Apple fans after a budget smartphone, the iPhone SE is equipped with a 12 MP, 28mm rear camera and a 7 MP front camera, perfect for spur-of-the-moment shots, portraits, and more.
The SE combines the camera from the iPhone 8 with the software of the iPhone 11. As a result, you get great photographs, plus videos with image stabilization.
The iPhone SE also packs a 4.7 in (11.9 in) HD Retina screen; paired with the A13 Bionic chip, you can expect great battery life. And you still get Portrait mode, including a slider to manually control the blurred background (you also get Portrait Lighting!).
This is the most affordable iOS smartphone yet, and the quality is what you’d expect from a standard iPhone. Yes, the SE has fewer cameras and features, but it offers great value for money.
Best camera phone: conclusion
As you can see, there are many wonderful camera phone options – all of which allow you to capture professional-quality smartphone photography.
So it’s not so much about finding the best camera phone as finding the one that best fits your needs and means.
Now over to you:
Do you have any questions? Which camera phone do you like the best? Which one will you buy? Share your thoughts in the comments below!
The post The 10 Best Camera Phones You Can Buy in 2021 appeared first on Digital Photography School. It was authored by Ana Mireles.
The post How to Take Good Pictures in Bright Sunlight: 11 Easy Tips appeared first on Digital Photography School. It was authored by Darren Rowse.
How can you take good pictures in bright sunlight? As you may be aware, harsh lighting can lead to unwanted contrast, blown-out highlights, lens flare, and colors that look overly saturated. (If you’re shooting portraits, direct sunlight can also lead to the “squint factor.”)
So what’s a photographer to do?
It turns out there are simple methods of capturing stunning shots in bright light. You just have to choose your compositions and camera settings carefully – and at times, get a bit creative.
So to discover 11 quick and simple tips for combating problems caused by bright sunlight, read on:
1. Move into the shade
The simplest way to take beautiful images in direct sunlight?
Just move into the shade.
Obviously, this isn’t always feasible – you certainly can’t move an entire seascape! – but with some subjects, heading into the shade is quick and easy. It’s a good solution when shooting portraits, assuming you’re not tied to a particular location.
After all, sometimes the simplest solutions are best!
2. Make your own shade
For small subjects that aren’t movable – for instance, a small flower in a field – create your own shade!
You have a few different options, some more convenient than others:
Block the light with your body
Ask an assistant to stand between the flower and the light
Hold a piece of cardboard or an umbrella above the flower
Use a pop-up diffuser
Note that some of these options will be more effective depending on the direction of the light (e.g., if the bright sun is directly overhead, it’ll be tough to block it with your own body).
And a diffuser, because it softens the light rather than blocks it, will give you the most balanced, flattering results.
3. Use fill flash
One of the biggest problems with shooting in direct sunlight is the harsh shadows. For instance, portrait subjects will get unwanted shadows under the chin, flowers will get heavy shadows underneath the petals, and pets will get dark shadows under their head and body.
In general, these harsh shadows look bad, but there’s an easy solution:
Fill flash.
Simply point a flash toward the dark shadows and fire away! Make sure the flash is on a low power setting – after all, you don’t want to make the underside of your subject brighter than its top! – and experiment with different flash angles for the best results.
You also might try putting the sun behind your subject, then using the fill flash to brighten up your subject’s front. It can look really good, though watch out for lens flare.
4. Use a reflector
Want to fill in harsh shadows but don’t like using flash?
You have another easy option:
A reflector.
Reflectors are white or metallic items that bounce light back into darker areas, and they’re really easy to use. Simply point the reflector at the area you want to brighten up, then adjust it until you get some nice fill (by angling the reflector back and forth, you’ll see the reflected light change position, and you can use this “preview” to fine-tune the effect).
Note that you can also try the same tactic I mentioned in the previous section, where you position your subject in front of the sun and bounce light back onto their front. A reflector isn’t as powerful as a fill flash, so you’ll need to carefully angle it for maximum effect – but if you get it right, the results will be amazing.
5. Change your perspective
Sometimes, moving your subject into the shade isn’t possible – but moving around your subject can give the same effect.
For instance, if you’re shooting an interesting tree in the forest, you might move to the tree’s other side, you might find an interesting part of the tree that’s shrouded in shadow, or you might get low and shoot up.
The idea is to observe your subject carefully, looking for ways to maximize shade and minimize bright highlights and annoying contrast.
6. Use a lens hood
Suffering from lens flare?
While flare can be artistic, it can also be very annoying, especially if you’re after a clean, straightforward image.
Fortunately, many lenses come with hoods, which block flare-causing light and keep your photos flare-free.
If you don’t have a lens hood, don’t fret; it’s not that difficult to construct a hood out of cardboard or to use your hand to shield your lens from the sun.
(Just make sure you keep your makeshift lens hood and your hand out of the shot – otherwise, you’ll be doing a lot of cropping in post-production!)
7. Consider using a filter
Unfortunately, filters don’t offer a magical solution for bright sunlight – there’s no “avoid direct sunlight” filter, at least not currently – but filters can be handy for direct sunlight photography.
For instance, a polarizing filter will help cut down on reflections, plus it’ll help you achieve vibrant colors (including a beautiful blue sky).
And a neutral density filter will reduce the light hitting your camera sensor, allowing for slower shutter speeds and smaller apertures at midday.
(Why might that be useful? Sometimes, you’ll want to shoot with a wide aperture for the shallow depth of field effect, or you’ll want a slow shutter speed to convey motion blur.)
8. Play with your white balance settings
These days, pretty much every digital camera lets you choose between different white balance settings (for instance, you can dial in a white balance preset, such as Cloudy or Daylight, or you can set a custom white balance based on your scene).
Now, you can adjust the white balance later on in post-processing, assuming you’re shooting in RAW. But if you shoot in JPEG, or you simply prefer to get things right in-camera, you’ll want to carefully set your white balance from the start.
How is this helpful for taking good pictures in bright sunlight?
Well, white balances can offer artistic effects that enhance the look of highlights and shadows. A cooler white balance, for instance, can give a neat effect to more monochrome images – while a warm white balance will make bright sunlight appear softer and more inviting.
9. Use spot metering for the best results
Harsh sunlight makes correct metering tricky. So here’s my advice:
Use spot metering. This will force your camera to expose based on a targeted portion of your scene; you can aim at your main subject, then dial in the recommended exposure settings.
Alternatively, you can spot meter off a midtone in your shot – this will ensure the entire scene is exposed relatively well (as opposed to the former technique, which will ensure you expose for your subject).
After taking an image, check the back of your camera for a preview; you may need to adjust your technique depending on the result. Here, your histogram can be very handy, especially because it’s tough to accurately evaluate an LCD preview in bright sunlight.
Also, if you have the luxury of time, try metering off different parts of the scene while taking multiple shots – that way, you can choose the best option later on.
10. Carefully choose the time of day you shoot
Most of us don’t have the luxury of sitting around all day waiting for the perfect light.
But heading out an hour or two earlier or waiting until an hour or two later might be feasible – and if that’s manageable, I highly recommend you consider it.
You see, the time of day can dramatically impact your shot. Midday offers unpleasant, harsh light, but if you go out in the early morning or late afternoon, even direct sunlight starts to look good. You’ll lose the unwanted contrast, you’ll lose the ugly shadows, and you’ll get soft, golden light that’ll flatter your subjects.
Make sense?
11. Shoot silhouettes
As the saying goes:
If you can’t beat ’em, join ’em!
And that applies when photographing subjects in bright sunlight. If the sun is causing you problems, just use it to your advantage; make your subject stand in front of the bright light, then capture stunning silhouettes all day long.
I recommend getting down low (so that you’re shooting against the bright sky). And compose so your subject is clearly defined against the background.
How to take good pictures in bright sunlight: conclusion
Well, there you have it:
Eleven easy tips for shooting in bright sunlight.
Capturing beautiful photos in harsh light might seem difficult – but remember these tips, and your photos will turn out great!
Now over to you:
Do you struggle to shoot in bright sunlight? Do you have any tips or tricks for dealing with these issues? Share your thoughts (and images) in the comments below.
The post How to Take Good Pictures in Bright Sunlight: 11 Easy Tips appeared first on Digital Photography School. It was authored by Darren Rowse.
The post 10 Must-Know Camera Settings for Concert Photography appeared first on Digital Photography School. It was authored by Matthias Hombauer.
What are the best concert photography settings, and how can you use them for great results?
Settings are a key part of getting awesome concert photos, especially in low-light situations. If you get your settings right, the results will be spectacular. But if you get them wrong? Your shots will be blurry, unpleasant, and just all-around bad.
That’s why, in this article, I’m going to share 10 settings for concert photography. These are the exact camera settings I use in my own concert shooting, so you know they work. (And I promise: They’ll help you immediately boost your career!)
Let’s dive right in.
The Rolling Stones Nikon D800 | 185mm | f/4 | 1/320s | ISO 1600
1. Use Manual mode orAperture Priority
When I started off doing concert photography, I used Aperture Priority mode. I would dial in the aperture, my camera would set the shutter speed accordingly, and I’d hit the shutter button.
And in general, Aperture Priority works well. It’s great for beginners because it partially automates the exposure process, giving you one less thing to worry about.
But after shooting for a while, I recognized that only Manual mode would give me the flexibility I was after. I wanted to set the aperture, shutter speed, and ISO – and then change each setting on the fly based on my requirements.
So depending on your level of experience and comfort, pick one of these two options.
(Also, if you do choose Manual mode, make sure to frequently check your LCD preview and your histogram to ensure your exposure is correct!)
Struggling to decide which lens to use for concert photography? I always give the same advice: use fast lenses and shoot them wide open.
Set your aperture to the smallest f-number your lens allows, which will give you the biggest aperture opening. That way, the most possible light hits your sensor.
A wide aperture is especially important in low-light concert photography. If possible, shoot with an f/2.8, f/1.8, f/1.4, or f/1.2 lens.
If you’re a beginner on a budget, I’d recommend grabbing a 50mm f/1.8 lens, which is cheap, features a wide maximum aperture, and offers surprisingly nice image quality.
3. Use a fast shutter speed
Have you ever been to a concert where the artist was running and jumping from one side of the stage to the other?
This type of action makes for some great photography – but to freeze such movement, you must use a fast shutter speed.
In general, I set my shutter speed to 1/200s or faster (and depending on the level of action, you may want to push this even higher.)
Miley Cyrus Nikon D800 | 340mm | f/4.8 | 1/320s | ISO 1600
4. Boost your ISO
The higher your ISO, the less light you need for a proper exposure – and in concert photography, where light is generally limited, this is a key setting to get right.
Your camera’s ISO range likely starts at 100. But if you’re shooting a low-light concert, I’d recommend kicking this up to 1600, 3200, or even 6400. Otherwise, your shots will end up far too dark (or you’ll be forced to drop your shutter speed, which will introduce blur).
Unfortunately, a high ISO does come with a significant tradeoff:
Noise.
As you push your ISO from 400 to 800 to 1600, you start to get little flecks of color and light that look pretty bad. The specifics will depend on your camera (modern sensors do a very good job of minimizing high-ISO noise!), but you should always be cautious when boosting the ISO. Only raise it when absolutely necessary, and be mindful of your particular camera’s high-ISO capabilities.
5. Use spot metering
Spot metering limits your camera’s exposure readings to the center of the scene – which allows you to determine the exposure based on a small subject (e.g., a face). It works especially well when your subject and background are differently lit.
And when shooting concerts, the artist will often be lit by a spotlight while the rest of the stage remains dark.
So here’s what you do:
First, switch your camera to spot metering mode.
Then place the artist’s face in the middle of your viewfinder and memorize the recommended exposure settings.
Finally, if you’re using Manual mode, you can dial in the settings, then compose without worrying about fluctuating meter readings. If you’re using Aperture Priority, you’ll need to lock in the exposure; that way, you don’t end up with varied exposures as the performers jump around your viewfinder.
If you don’t like spot metering and it’s giving you bad results, you can try the matrix/evaluative metering mode. The camera will take a light reading at several points in the scene, and this can work – but you’ll want to be on the lookout for overexposed faces, especially when the background is dark.
Did you know that different autofocus points feature different levels of accuracy?
It’s true. Peripheral autofocus points tend to work fine in good light, but the performance weakens as the light drops.
Whereas the center autofocus point remains effective in both good light and bad.
That’s why I recommend you use the central focus point in low-light situations. It’ll be the most accurate, and it’ll ensure you get the sharpest results, no matter what the artist is doing on stage.
If you don’t want the artist to sit smack-dab in the center of the frame, you’ll need to use a focus-and-recompose technique; simply push your shutter button halfway down to focus on the artist’s face – this will lock focus – then adjust your composition until you get the desired framing. Once you’ve nailed both focus and composition, press the shutter button the rest of the way.
Note: To use this focus-and-recompose technique, you’ll need to set your camera to One-Shot AF, also known as AF-S. Otherwise, the camera will focus continuously while you reframe your picture.
(You can also set up back-button focus, which many shooters – myself included! – love. With back-button AF, you use a button on the rear of your camera to lock focus, then use the shutter button to take the shot.)
7. Use Auto White Balance
White balance combats unwanted color casts in your scene, and it’s important to use if you want good-looking photos.
However, I highly recommend you deal with white balance after taking your photos, during post-processing. So set your camera to Auto White Balance, then ignore the WB setting until you’re back at home.
You see, if you shoot in RAW, the white balance is completely flexible. Whether you determine the white balance setting at the time of capture or whether you wait until you’ve opened up Lightroom days later makes zero difference.
Except that setting the white balance during a concert is difficult to do, especially when you have different lights flashing all around the stage. So do yourself a favor and leave the white balance setting for another time.
Your camera’s burst mode setting, also referred to as continuous shooting, lets you do rapid-fire photography.
With burst mode activated, you can shoot five, ten, or even sixty frames per second, depending on your camera.
And this is hugely helpful in concert photography, for two reasons:
If you take several shots in a row, at least one of them will probably turn out sharp even if the others aren’t in focus.
Multiple photos increase your chances of nailing the perfect frame.
Now, I don’t recommend you set your camera to its high-speed continuous shooting mode and use it nonstop. You’ll run out of storage space pretty quickly, plus you’ll just end up with thousands of unnecessary photos.
But I do recommend analyzing the situation, then – when you’re ready to capture split-second action shots – turn on burst mode and use it judiciously.
Make sense?
9. Never use flash
This is a quick tip:
Don’t use flash at a concert.
For one, you’re not allowed; imagine ten photographers bursting their flashes all at the same time.
And straight flash pictures don’t look great. For good flash photography, you’ll need to position your flash off to the side of the artist (i.e., you’ll need an off-camera flash), which isn’t really feasible in a concert setting.
Here’s your final concert photography setting, and it’s a big one:
Always, always, always shoot in RAW.
If you shoot in JPEG, your camera will automatically add processing, such as contrast, saturation, and sharpness. And while it might look nice, it’ll limit your post-production freedom, so you won’t be able to further enhance your concert photos.
On the other hand, if you shoot in RAW, the camera won’t process your photo at all. That way, you can change parameters such as exposure, white balance, saturation, contrast, and clarity long after you hit the shutter button.
(In other words: If you’re careful and deliberate with your editing, you can make your photos look a lot better!)
Must-know concert photography settings: final words
Now that you’ve finished this article, you’re well-equipped to capture some stunning concert photos. And for quick reference, here are the concert settings I recommend:
Manual mode
Your lens’s widest aperture
A fast shutter speed
A high ISO
Spot metering
The middle autofocus point
Auto White Balance
Burst mode
No flash
RAW format
So the next time you’re out shooting a concert, make sure to dial in those settings. Your photos will instantly improve!
Now over to you:
Which of my recommended settings do you use for concert photography? Do you have any additional settings you love to use for concerts? Share your thoughts in the comments below!
The Prodigy Nikon D800 | 85mm | f/1.8 | 1/320s | ISO 1600
Zola Jesus Nikon D700 | 50mm | f/1.8 | 1/200s | ISO 1600
The post 10 Must-Know Camera Settings for Concert Photography appeared first on Digital Photography School. It was authored by Matthias Hombauer.


You must be logged in to post a comment.