Category: Photography

  • Black and White Still Life Photography: How to Do It (And Why It Matters)

    The post Black and White Still Life Photography: How to Do It (And Why It Matters) appeared first on Digital Photography School. It was authored by Rick Ohnsman.

    black and white still life photography: how to do it and why it matters

    In the quest to improve your photography, sometimes the best approach is to slow down, concentrate on the basics, and be purposeful and deliberate. Working in black and white will do that. Making still life images will do that.

    Combine the two, and you get black and white still life photography – which is an excellent way to make some great images and become a better photographer while you’re at it.

    black and white still life of an hourglass
    One of my most successful images of all time is this very minimalistic monochrome composition. It taps into the power of black and white and still life.

    The power of monochrome

    I will often use the terms monochrome and black and white interchangeably, but there is a subtle difference.

    Black and white photos are just that: images with tones from white through black and all shades of gray, but with no color information whatsoever.

    A monochrome image, on the other hand, might have a color tint. For instance, you can create a warm, sepia-toned shot or a cool, cyanotype photo. A single color – with various shades – would be present in the image.

    black and white boot in sepia
    A sepia-toned image is monochrome, but not black and white in the purest sense.

    But note that this article applies to both black and white photography and monochrome photography equally.

    Why black and white?

    Early photographers had no choice because they couldn’t shoot in color. Monochrome images were all they could make.

    Of course, this ultimately was not a serious limitation; many of the most iconic photographs ever taken are black and white. Surely even non-photographers have seen what might be one of the most famous black and white still life photos of all time, “Pepper No. 30” by Edward Weston. And I can confidently say that Weston’s photo would not be better if it had been made in color.

    Today, the default choice of most photographers is color. Because our world is in color – as are most of the photos we encounter – “seeing” in black and white is a skill you must develop.

    You must learn to look at a subject with an eye toward the basics – the “bones” of an image, if you will. Shape, form, tone, and texture are those bones, and the best black and white images play to those strengths, where color is unnecessary and even a distraction.

    black and white still life photography of a road
    Is this the yellow brick road? Perhaps, but the strength of the shot is “good bones” in all the areas monochrome excels: shape, form, tone, and texture. It also utilizes some good compositional elements. Color is not needed.

    Learning to see in black and white will, of course, make you a better black and white photographer. But if you can see in black and white while recognizing and taking advantage of the structural elements of a subject, you’ll become a better color photographer, as well.

    Color then becomes an enhancement to an already-good image – one with a solid “bone structure” of shape, form, tone, and texture.

    Why still life?

    My two favorite genres of photography are probably still life and landscape.

    Why?

    It could be because they are so opposite. In landscape photography, you can rarely move the subjects in your scene, you compose by where you stand, and you don’t have much control over the light. Often, you must wait for the light to be just right, and you must be ready if and when such a moment happens.

    shells in black and white
    The elements, the layout, the composition, the lighting, the camera position; you’re in control of everything when you make a still life photo.

    Still life photography makes you the master. You set the scene, deciding what to add in and take out. You arrange the objects for the best composition, you choose the camera position, the lighting, and any additional components comprising your shot.

    Then, when you’re satisfied and ready, you take the photo.

    In a word, still life photography give you complete control.

    forks and shadows
    Where can you find subjects for black and white still life photography? Where can’t you?! How about the silverware drawer? Here are some creative still lifes with a few forks.
    onion still life
    You might also find good still life subjects in the vegetable bin….
    still life of root vegetables
    …or get back to the “roots of photography” with a subject like this.
    wood abstract
    When considering subjects for black and white still life photography, remember what gives an image “good bones:”
    abstract still life
    Shape, form…
    droplets in black and white
    …tone…
    leaf close-up
    …and texture.

    Then add another distinct advantage. Consider this definition:

    “A still life is a work of art depicting mostly inanimate subject matter, typically commonplace objects which are either natural (food, flowers, dead animals, plants, rocks, shells, etc.) or man-made (drinking glasses, books, vases, jewelry, coins, pipes, etc.).”

    A real advantage of still life photography is that your subjects are still. They don’t move.

    So in still life photography, it won’t matter if your shutter speed is 1/30s or 30 seconds. Being able to have such flexibility over your choice of aperture, shutter speed, and ISO is huge, and it opens up all kinds of possibilities that other genres of photography don’t offer.

    Light painting is one of those unique possibilities. Since you don’t have to deal with a moving subject, you’re free to “paint” a subject with light during an extended exposure.

    And this makes for some dramatic still life shots:

    tabletop still life with grapes and glasses in black and white
    A still life subject that doesn’t move lends itself well to light painting. If you need a 15-second exposure and still want to stick with ISO 100, it’s no problem.

    Lighting

    Lighting for black and white still life photography comes back to the advantage we already identified:

    Control.

    The lighting instruments you choose, the modifiers you use, the number of lights and their placement – it’s all within your control.

    Let’s break this down a bit more:

    • White balance – Since you’re processing in black and white, you can ignore the color temperature of your lighting instruments. And this frees you up to use all kinds of light sources, from flashlights, LEDs, and daylight to candlelight, fluorescent lights, and incandescent lights. Yes, as you convert an image into black and white, the color tones will respond differently. But you can handle adjusting your black and white tones if your white balance is initially off. I’ve often “rescued” impossibly bad color images simply by converting to black and white.
    • Placement – We spoke about the “bones” of shape, form, tone, and texture, which exist in all photos but are more readily apparent in black and white. In black and white still life photography, you get the opportunity to accentuate these “bones” with your careful consideration of lighting placement and control. Want to emphasize texture? Rake a hard light across the subject from the back or side at a low angle. Do you want a soft look? Try a broad light source, like a softbox, that illuminates the subject from the front. You can light your subject to create the look and mood you’re after. As the saying goes, “No rules, just right.”
    football with light and shadow
    Want to create some dramatic texture? Use a single hard light source – in this case, a simple flashlight – and rake it across your subject’s surface from the side.
    ping pong paddle in black and white
    Or you could have the low, late afternoon sun backlight your subject, again to emphasize texture.

    A camera trick to help your visualization

    In order to make this trick work, you must shoot in RAW.

    (Also, I highly recommend you shoot in RAW all the time. Here’s why this is important.)

    Now, when shooting in a RAW format, your camera will always capture a color image (and that is what you want).

    The playback image you see on the rear LCD, however, will not be the RAW file. Instead, it’ll be a JPEG representation of the image.

    So if you want to get better at seeing in black and white, why not switch the JPEG to black and white while keeping the RAW image in color? That way, after taking an image, you can immediately see it in monochrome – but you’ll still keep all the color details for post-processing later.

    Bruce Wunderlich, a fellow dPS writer, describes how to set up your camera to do this. He promotes it as a way to better compose color photos, and it is good for that – but if monochrome is where you’re headed, it’s even more beneficial.

    So read Bruce’s piece, set up your camera accordingly, and you will have a real aid in making black and white photos.

    pattern of circles
    A still life doesn’t have to be a tabletop object, nor must it be shot under artificial light. This agricultural implement was shot outdoors in bright sunlight. The story of the shot is the repeating patterns. The yellow and red colors of the machine would only have distracted the viewer. Having my LCD set to preview the image in black and white helped me visualize the shot!

    Editing for black and white

    After a session of black and white still life photography, you’ll bring the images into post-processing as RAW color images.

    Color?

    Yes. Even if you’ve set up your camera using the recommendation above – where the LCD displays your images in black and white – your actual RAW images are still in color.

    That’s a good thing. It’s during editing that you will convert your photos to black and white.

    This will allow you to determine how various colors will be converted to monochrome. For instance, back in the black and white film days, you could darken the sky by shooting with a red filter. Because the red filter would block most of the blue light, the sky was rendered very dark on the black and white film.

    Today we can create those effects during editing. When converting from color to monochrome, you can adjust the luminance of specific colors (e.g., you can darken the reds, the blues, and the yellows), thus affecting the overall look of the image.

    Lightroom offers a nice black and white conversion tool, and there are a number of good articles on black and white conversion in Lightroom, such as this one by Andrew Gibson. You may also wish to try other methods of black and white conversion. A popular option is the Nik Silver Efex Pro plug-in from DxO, but there are dozens of other programs and methods for converting from color to black and white.

    Without the limitations of having to make the color in a photo “look right,” you are free to creatively take the tonality in your black and white images wherever your creativity leads you.

    apples converted to black and white
    The original image at left; a black and white conversion with boosted green luminance in the center; a black and white conversion with decreased green luminance on the right.

    Age your photo

    Here’s another fun black and white still life photography trick:

    Replicate a vintage black and white look!

    First, make sure you find the right subject. I recommend working with old collectible objects. Then capture the shot and enhance it afterward with effects such as sepia toning.

    It can be a fun and instructional exercise to gather some objects, set up a pleasing composition, light it, photograph it, and create a monochrome file complete with sepia toning.

    period still life
    Collect some items to create a theme, make your still life black and white image, then edit it to produce a “period look.”
    bottles with faded edit
    Take your “aged” still life even further with some special effects!
    black and white still life photography light and old book
    Gather some objects, decide how you want to set your scene, light it, take your shot, then go for an antique look with a sepia tone.
    Canon 50D | Canon 50mm f/1.8 | 1/15s | f/22 | ISO 800

    Black and white still life photography: Now go do it!

    You can and should read up on the concepts and techniques of photography, but there’s only so far “book learning” will take you.

    Black and white still life photography will slow you down, make you think, concentrate your efforts, and force you to really study things.

    You just have to dive in and do it!

    So gather some subjects, decide how to arrange and light them, determine where you want to place your camera, what focal length you will use, how you will expose the image – all of those things.

    Think about what you’re doing, what you’re trying to communicate, and why you’re making the photo.

    Take your shot, evaluate it, consider what might make it better, and shoot it again.

    Then repeat! There’s no hurry. You’re making photographs, not taking snapshots. You are the master when you practice black and white still life photography.

    And that, as they say, is the beauty of it. Go make some great shots!

    As always, leave your comments, questions, and photos in the comments section below. Best wishes!

    water droplets on a plant
    This was shot outdoors after the early morning dew beaded up on this lupine leaf. I put a piece of black cardboard behind the leaf, then did some further clean-up in the edit.

    The post Black and White Still Life Photography: How to Do It (And Why It Matters) appeared first on Digital Photography School. It was authored by Rick Ohnsman.


    Digital Photography School

  • How to Create Cool Effects Using Displacement Maps in Affinity Photo

    The post How to Create Cool Effects Using Displacement Maps in Affinity Photo appeared first on Digital Photography School. It was authored by Kevin Landwer-Johan.

    create cool effects with displacement maps in Affinity Photo

    Adding natural-looking text to a photo can be challenging. But with displacement maps in Affinity Photo, you can easily produce awesome-looking text blends.

    In fact, it takes just a few clicks to merge text with a second photo, so that it looks like the text was there all along.

    There are a couple of different ways to achieve this look in Affinity Photo. If you’re used to other image manipulation software, you may be familiar with some of the steps. And if you’re new to Affinity Photo, you may not be aware of the features that make creating cool effects using displacement maps even easier.

    So let’s dive right in!

    Blend overlay example of displacement maps in Affinity

    What are displacement maps in Affinity Photo?

    Displacement maps in Affinity Photo allow the texture of an image to be mapped onto another layer.

    Displacement maps are commonly used to add natural-looking text to an image. You can use them when you want to place a logo or text on a t-shirt or make text look like a natural part of a scene.

    example of displacement maps in Affinity

    How to create a displacement map: Step-by-step instructions

    As with pretty much any editing effect, there is more than one way to reach your end goal.

    In this article, I will show you a simple, step-by-step method I use to create displacement maps in Affinity Photo.

    Specifically, I’ll use Affinity Photo’s Displace filter.

    Using the Displace filter is a great way to work with displacement maps. It’s quick, easy, and non-destructive.

    This means you have a great deal of control. You can apply your Displace filter and tweak it as much as you like – without permanently altering the underlying photo.

    Step 1: Open your mapping image

    Select the image you plan to modify. Open it in Affinity Photo.

    Locate the file with your text or logo, then drag and drop it onto the underlying image file.

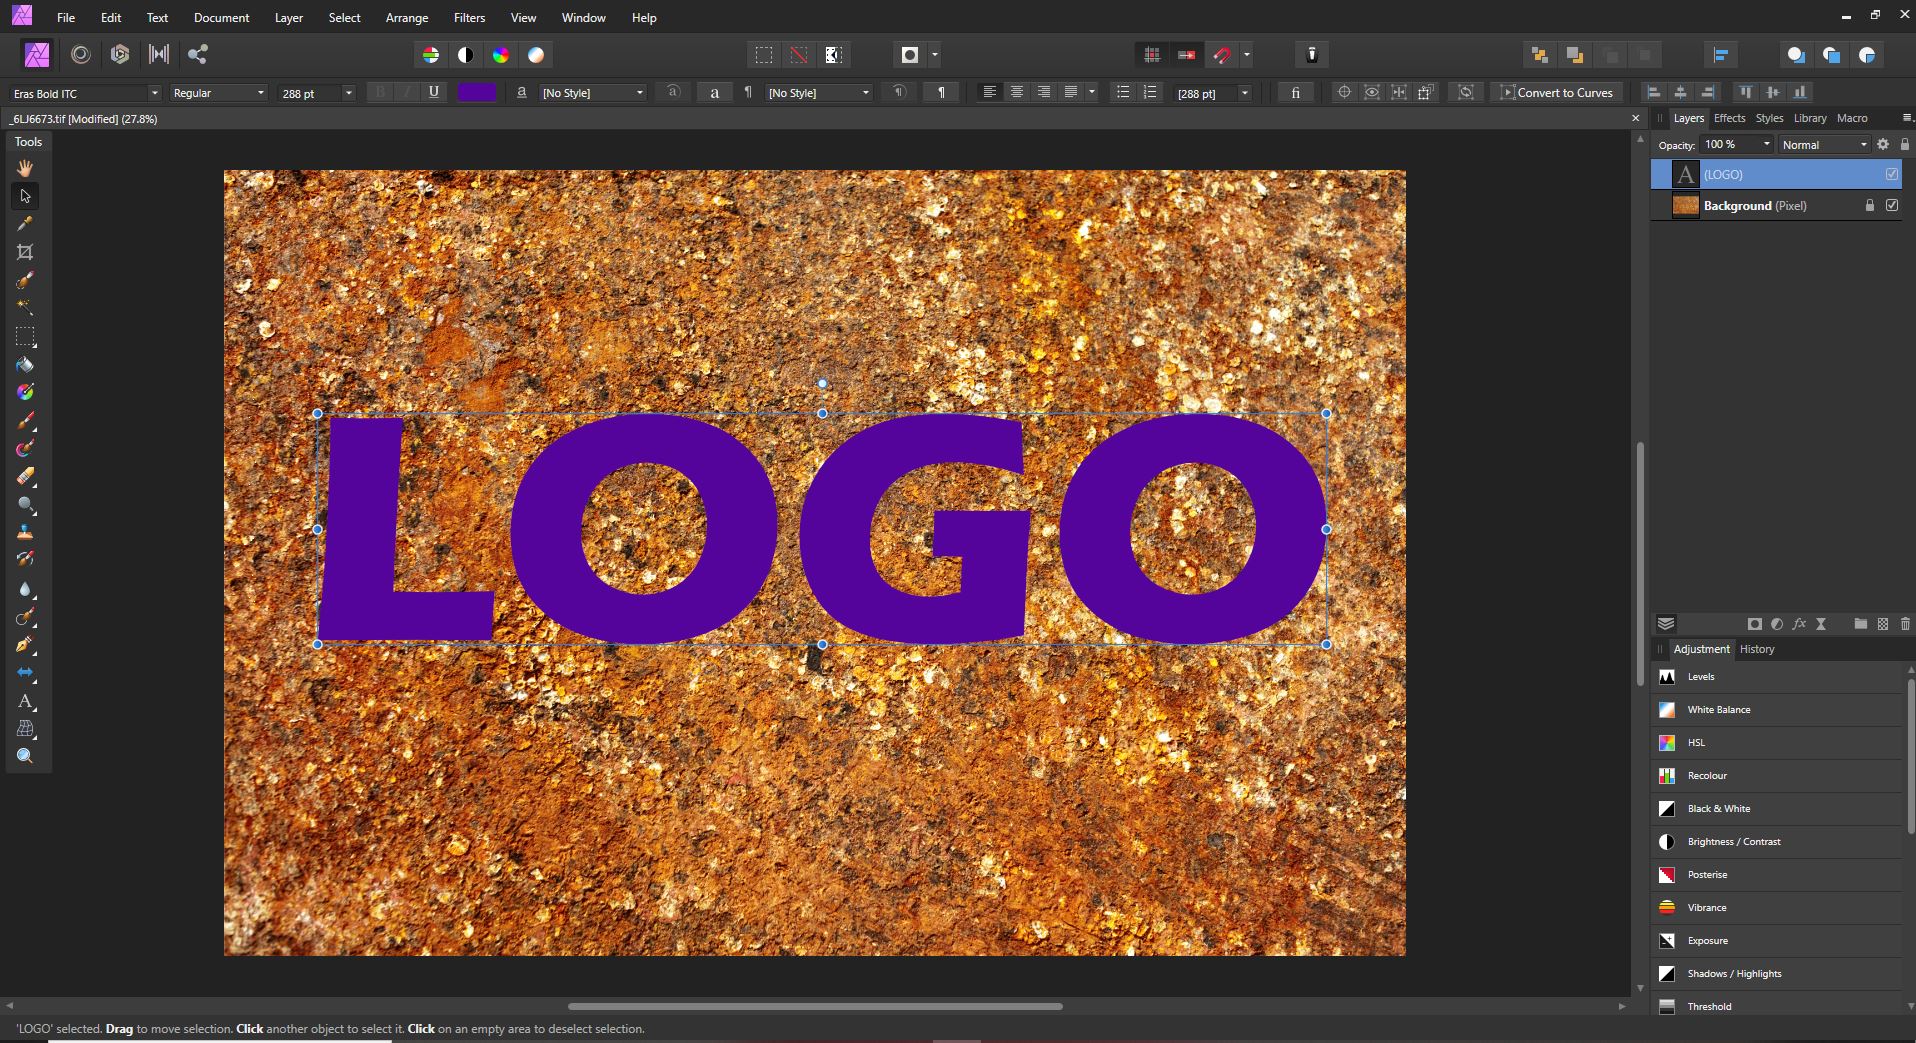
    You can use a TIFF or PNG file with transparency. Alternatively, type in the text you want to use, as I’ve done in my example file (below).

    Position your image or text where you want it to appear. If you’ve chosen to type your text, pick the font and color you think will best suit your needs.

    Screen grab from Affinity Photo showing displacement maps in Affinity

    Step 3: Create a live filter layer

    In the top menu, choose Layer.

    Then go down to New Live Filter Layer>Distort>Displace Filter

    Screen grab from Affinity Photo

    In the Layers panel, you will now see a live displacement map filter added to your logo or text layer. 

    Screen grab from Affinity Photo showing displacement maps in Affinity

    Step 4: Choose a displacement map

    In the displacement map dialog box, you will have the option of loading a map from a file or loading it from other layers. Sometimes you may have a separate image you want to use as your mapping layer. In this example, I will show you how to use the lower layer to create a displacement map, because this is what will typically provide you with a great result.

    Click on the option to Load Map From Layers Beneath. At this point, depending on the resolution of the photo you are working with, you may begin to see the effects of the mapping filter.

    (But don’t worry if you can’t yet see this; we’ll work on the effect in the next steps.)

    Step 5: Adjust the displacement strength

    Use the slider in the Displace filter dialog box to increase or decrease the strength of the filter.

    Adjust the filter intensity until your top layer merges naturally with the image below.

    Note that this is just the first level of adjustment. In the next steps, you’ll discover how to fine-tune the result, so don’t be concerned if you can’t yet get your image looking exactly how you want.

    Screen grab from Affinity Photo

    Step 6: Rasterize the text layer

    At this point, if you are working with a text layer or some other non-rasterized layer, you need to rasterize it so the next step will work.

    Right-click on the text layer and select Rasterize.

    Step 7: Control your blending options

    Now it’s time to further adjust how your text or logo blends with the layer beneath it.

    Click on the cog icon in the Layers panel. (It’s between the blend mode drop-down and the padlock icon.)

    A new dialog box will appear; this lets you control the blending options for your layer. Note the two curves graphs:

    Screen grab from Affinity Photo

    You’ll want to use the rightmost curve, labeled Underlying Composition Ranges. But before you start, make sure to uncheck the Linear box below it. 

    Now click and drag from the top left of this curve. Watch as your text or logo further blends with the layer beneath. Continue to click and drag on the curve until you have a look you’re happy with.

    Step 8: Tweak the displacement amount

    If you’ve merged an image rather than text, you can now go back and tweak the Displace filter.

    (If you merged text, this option won’t be available, because the filter is combined with the text layer when it’s rasterized.)

    Step 9: Change the blend mode

    For further control, you can select a different blend mode for your text or logo layer.

    Scroll through the options in the blend mode drop-down box until you find one that best fits the look you want.

    You can also decrease the opacity of the top layer so the underlying texture shows through more.

    displacement maps in Affinity example

    Using displacement maps in Affinity Photo: Conclusion

    The key to success in all photo manipulation is experimentation.

    So if you want to create a stunning result, use these steps as guidelines, but don’t be afraid to play around. Push the boundaries!

    Using displacement maps in Affinity Photo is fun and non-destructive. This means you can try as many options as you like without permanently affecting your images!

    Now over to you:

    How do you plan to use displacement maps? Share your thoughts (and images) in the comments below!

    The post How to Create Cool Effects Using Displacement Maps in Affinity Photo appeared first on Digital Photography School. It was authored by Kevin Landwer-Johan.


    Digital Photography School

  • 7 Tips – How to Add Depth and Dimension into Your Photos

    The post 7 Tips – How to Add Depth and Dimension into Your Photos appeared first on Digital Photography School. It was authored by Andrew S. Gibson.

    tips to add depth in your photography

    How can you add depth in photography? And how can you make your photos look stunningly three-dimensional?

    Depth helps create a sense of place, and it draws the viewer into your images. Plus, it’s a great way to take your compositions to the next level, fast.

    In this article, you’ll find seven techniques and tips, all designed to help you convey a stronger sense of depth in your photos.

    Let’s get started!

    1. Use leading lines

    Here’s one of the easiest ways to convey depth in photography:

    Use a wide-angle lens and include leading lines that move from the bottom of the frame to the top.

    This technique is mainly used in landscape and architectural photos, but you can also incorporate leading lines into portraits, street shots, and more.

    The lines don’t have to be obvious. For instance, take a look at this photo:

    how to add depth and dimension in photography seascape long exposure

    The rocks form natural lines that lead the eye from the foreground to the island on the horizon.

    how to add depth and dimension in photography leading lines

    This photo has a similarly subtle set of leading lines:

    plains with mountains

    The waterways in the middle distance lead the eye to the mountains. But the lines are meandering, rather than straight, which helps give the image a more organic feel – one that fits well with the theme of the landscape.

    2. Use perspective

    This photo demonstrates how lines can add depth in a different way:

    how to add depth and dimension in photography with perspective

    The buildings form converging lines that disappear towards the horizon, creating an effective sense of depth.

    Note that this technique is similar to an artist’s use of perspective. I’ve added an overlay so you can see how it works:

    how to add depth and dimension in composition with perspective

    3. Think foreground, middle ground, and background

    Most photographers are familiar with the rule of thirds, but when it comes to conveying a sense of depth, it is helpful to break the photo up into a different set of thirds:

    The foreground, middle ground, and background.

    What you’re looking for is a way of connecting each portion of the photo while pulling the viewer’s eye from foreground to background. Having three zones in the image – zones that are distinct but linked – will help create a sense of depth and three-dimensionality.

    Leading lines are one way of linking the three zones, but lines are not always present in a scene. So when there are no lines to be found, you’ll need to work with some other compositional element.

    Often, this simply means including something interesting in the foreground.

    For example, in the photo below, there are some buildings in the background, a concrete jetty in the middle ground, and the edge of another jetty in the foreground. I included the foreground jetty to help create a sense of depth.

    how to add depth and dimension in composition long exposure seascape

    Here’s another example:

    seascape with a clear foreground for depth

    Do you see how adding the rocks to the foreground creates a composition with three distinct zones (foreground, middle ground, and background)?

    And once the zones are present, you get a sense of depth, with the viewer’s eye moving through the shot.

    It helps that the wide-angle lens makes the rocks seem quite large in comparison to the distant cliffs.

    4. Use aerial perspective

    Another technique that helps convey a sense of depth in photography is aerial (or atmospheric) perspective.

    This is where the atmospheric conditions make objects in the distance appear hazy.

    Of course, you’re often limited by the environmental conditions – but as soon as you see haze in the distance, I highly recommend you try to find a way to include it in your composition.

    In the photo below, you can see that the trees in the distance on the left side are obscured by atmospheric haze, which adds depth:

    an aerial perspective on a building

    And the depth is further enhanced by the converging lines formed by the walls. So the two techniques actually work together to give increased depth to the final shot:

    how to add depth and dimension in composition - aerial perspective and lines

    5. Shoot through a foreground object

    The techniques I’ve shared above work well with wide-angle lenses, but are less helpful if you’re using telephoto lenses.

    You see, telephoto lenses put distance between you and your subject, which leads to a flatter perspective overall (i.e., a perspective with less depth).

    That said, there are still some techniques you can use with telephoto lenses to create a sense of depth.

    One method is to shoot through something that is between you and the subject (such as grass, twigs, or windows).

    In the photo below, the subject is the setting sun. I shot through the grass (and I actually focused on the grass, throwing the sun slightly out of focus) to add a sense of depth to what otherwise would have been a very flat image.

    shooting through grasses at sunset

    You can also use this technique with portraits. I created the portrait below by shooting through the branches of a tree:

    shooting through a tree for a portrait

    So the next time you’re shooting a subject with a telephoto lens, look around for objects to shoot through. I guarantee you’ll find an object or two – which you can then use to create depth!

    6. Use selective focus

    Selective focus is a technique where you deliberately set a wide aperture and focus on the subject (and create a blurry background in the process).

    It’s especially effective with portraits, as the blur helps separate the model from the background – and ultimately creates a sense of depth.

    The following portrait was taken at f/2.0 with the lens focused on the model’s eyes:

    how to add depth and dimension in photography with selective focus

    Do you see how the blurry background and the sharp subject creates a three-dimensional image?

    That’s the power of selective focus!

    7. Convey depth through color

    Here’s a question to ask yourself:

    What happens to colors in the background when you use a selective focus technique (as discussed in the previous tip)?

    You see, when the background is out of focus, colors merge into each other.

    And if you arrange your colors carefully, you can achieve a nice contrast between the colors in the background and those on the subject.

    What does this do?

    It conveys depth!

    For example, check out the colors in this portrait:

    Depth and composition portrait with subtle colors

    The background is nearly white, whereas the man’s sweater and hair is a darker red; this separates him from the background.

    In fact, you can take this idea to its extreme by using an off-camera flash fitted with an orange gel. When you do this, the model will be lit by orange light (from the gelled flash), but the background will be lit by colder ambient light.

    (This technique works well at dusk when the ambient light has a natural blue color.)

    Ultimately, you’ll get a nice contrast between the warmer model and the cooler background. For the example below, the model was lit by a single speedlight fitted with a 60 cm softbox and an orange gel.

    Depth and composition portrait with lots of color

    How to add dimension and depth in photography: Conclusion

    Now that you’ve finished this article, you should be well-prepared to create photos with plenty of depth and dimension!

    So go out and practice some of the techniques I’ve discussed.

    Now over to you:

    What other ideas do you have for creating and adding depth in photography? Please let us know in the comments below!

    The post 7 Tips – How to Add Depth and Dimension into Your Photos appeared first on Digital Photography School. It was authored by Andrew S. Gibson.


    Digital Photography School

  • Is the Online Photography Community Toxic?

    The post Is the Online Photography Community Toxic? appeared first on Digital Photography School. It was authored by Carl Spring.

    is the online photography community toxic?

    Is the online photography community toxic? It certainly feels like it sometimes.

    There seems to be a lot of toxicity to go around right now – and not just in photography.

    Every time I look at social media these days, things get angry very quickly. You only have to look at anything political on Twitter and it generally takes just a few tweets before everything descends into accusations and hatred. 

    When I look at the photography groups I follow, I’m sad to say I tend to find similar issues. Not in every group, but you only have to look at news of any camera release before things generally descend into tribalism:

    “My brand is way better! What were they thinking? This is garbage!”

    And my personal favorite:

    “You call yourself a professional with opinions like that?”

    Sometimes it’s easy to drop the popcorn meme and sit back and enjoy the fireworks. But it does make me question whether there is value in staying in these groups and reading these sites (and comment threads). For pretty much all of us, photography is a hobby that some of us have been lucky enough to turn into our career.

    So we need to think about why the photography community can be so toxic.

    And we need to ask ourselves:

    How can we do better?

    Why are online communities toxic?

    There any many in-depth essays from people way more qualified than I who have looked into this. It tends to boil down to the fact that not looking in someone’s eyes when you are talking to them removes inhibitions. There is no person and no feelings to be seen, just text on a screen.

    That, combined with the ability to hide behind a username, gives people the power to be the vilest version of themselves without consequence. 

    It’s hard not to retaliate when faced with somebody sniping at you, whether you’re talking online or in person. However, what makes things harder is the fact that, when talking online, we lose the subtlety of delivery and expression.

    I am sure everyone reading this has received an email, got the tone completely wrong, and sent a blunt reply. Our ability to articulate through speech is much more advanced and allows for many more subtleties than the written word.

    This inability to read tone can get amplified when people from different backgrounds and cultures clash. The internet is worldwide, and as such, cultural differences can be misunderstood and can lead to innocent comments being taken the wrong way.

    Finally, we need to take into account the stresses of real life. These days, we tend to lead less social lives. We work longer hours in incredibly stressful jobs where we cannot always say what we want to due to the repercussions.

    So we need an outlet for our frustration.

    Each of us responds in a different way. For some, it may be going for a run, whereas others may blast away their stresses on the latest first-person shooter video game.

    But some people haven’t found a healthy outlet for their frustration, and the release of their anger occurs in online conversations.

    With photography, every discussion tends to have two opposite viewpoints. And so, depending on the way your brain is wired, you may struggle to see other community members’ points of view.

    Let me explain what I mean in the next section:

    crooked horizon boat image
    The horizon is crooked. What a joke! Idiot!

    Two schools of thought: technical and artistic

    Have you ever seen someone from an arts background make conversation with someone from an academic background?

    It’s usually very awkward, and both individuals will struggle to find some common ground.

    Because while artists tend to deal with unquantifiable factors such as feeling and emotion, academics prefer to work with facts and theory.

    Photography, however, is the point at which science and art meet. This brings in two distinct schools of thought – which tend to be polar opposites of each other.

    Those who prefer the academic side of photography enjoy technical perfection. The fact that engineers made sensors with the ability to capture so much detail and lenses that are so amazingly sharp is fascinating to them. They look at composition based on mathematical formulae, and past this, they may struggle to make sense of their art.

    On the other hand, there are artistic photographers. Those who like lenses that have character, those who do not mind blur in photographs. Those for whom the feeling and the moment are the keys to the perfect photograph, not how sharp it is or whether it follows the golden ratio.

    These photographers feel the confines of technology should not stop them from capturing the perfect moment.

    Who is right in this argument depends on where you sit on the scale. Without getting too psychological about it, people generally fall into one of two character types: academic or creative. This is due to the makeup of each person’s brain and goes some way toward explaining these differing schools of thought and why people don’t see eye to eye.

    In other words:

    People are approaching the same problem from different angles.

    But this doesn’t explain why there can be so many arguments about photography brands. For this, we need to look at sports teams and the problems of tribalism. 

    Is the online photo community toxic?
    What the hell is this?! Are you trying to be Banksy or something?

    Tribalism

    Tribalism is clearly present in sports. But is it also rife in photography?

    As photographers, we tend to find a brand that we like, and we stick with it. If the company (and their marketing team) do their job properly, we become loyal to that brand.

    Now, we invest a lot in photography from an emotional standpoint. We all know that feeling when you get a shot that turns out better than you expected. It releases the same chemicals in the brain as when your favorite sports team scores.

    And the camera you used to take the photograph becomes your team. Your investment in the camera (both emotionally and financially) means it plays a part in your victories.

    Ultimately, your camera brand becomes part of your photography and therefore part of you.

    Canon EOS R5
    They should have called it the H5 for “hot.” Canon sucks!

    Over time, this can lead to tribalism. You love your brand, your brand has helped you in many photographic victories, and in many cases, it has been with you since your youth. So hearing someone talk badly about the brand you shoot with becomes associated with them talking badly about you. You feel the need to defend yourself and your team.

    We also tend to surround ourselves with people who love the same brands that we do, which reinforces our opinions. Canon users frequent Canon groups, where Canon is the best and everyone else sucks. The same with Sony, with Nikon, and with every brand. This leads to our opinions becoming reinforced by those we surround ourselves with, cementing the inevitable tribalism. 

    No brand seems to personify this tribalism more than Sony. If Sony were a football team (or soccer, depending on where you’re from), it would be Manchester United – a team with incredibly adoring fans, but that is also despised by many others.

    I have wasted too much of my life reading comment sections of Sony releases (and every brand!) that erupt into arguments about how much Sony rules or Sony sucks. Each time fans attack, then defend their side until the final whistle. 

    However, unlike sports, these arguments always end in a draw. Nobody wins, nobody loses. It just creates a deeper rivalry between those on either side of the argument and increases tensions for the next meeting. 

    Also, when you’ve invested thousands into a system, you don’t want to feel like you’ve made the wrong decision. You need to be secure in the knowledge that you have made the right choice, which leads nicely to my next point:

    Sony a7S
    Do Sony users have their own chant yet?

    Insecurity

    It’s scary to put something that you are so passionate about out into the world.

    Sharing a photograph you are proud of is like putting a part of yourself out there for people to talk about. And to have people pick your photo apart can be soul-destroying. It can feel like people are saying that they don’t like you

    How people deal with this critique differs. Some people get depressed and withdraw. Others don’t take criticism very well and lash out toward those giving the critique. It depends on the person, their mood, and a multitude of factors that, quite frankly, are none of anyone else’s business.

    A photo similar to yours getting more likes doesn’t mean anything. Unfortunately, thanks to social media, we are now conditioned to associate likes with validation.

    Personally, I feel this is shallow, meaningless, and only serves to stroke the ego rather than nourish the soul. However, some see likes and positive comments as the holy grail of photography. It all comes back to our cultural values and our personal belief system.

    Art is subjective by nature; remember, we are allowed to have different opinions. It’s not a bad thing to disagree with other people, but it is important that you respect other opinions. It is okay to agree to disagree.

    And always try to remember:

    Different is good.

    Otherwise, there would only be one camera brand, one style of photography, one editing style. It’s also fine to be passionate and argue your case, but always keep it civil. Your bad day, boredom, and whatever else you have going on have nothing to do with your “opponent” or their creativity. 

    Remember that ripping something to pieces just to make yourself feel better is a pretty lousy way to interact with other people.

    Which brings me to my final point:

    Autumn Leaf
    It’s just a nice-colored leaf. It sucks, right? I mean, how many leaf photos does one article need?

    Some people are simply not very nice

    All groups have people that are amazing, kind, and like helping others out.

    Unfortunately, all groups also contain people who are simply not nice.

    And these are the ones who make the online photography community toxic.

    There is nothing much you can do about it, apart from blocking those who you simply cannot agree with and trying not to let them bother you. Life is too short.

    For some, going online to try and get a reaction from people is almost like a sport. And what better place to spark a reaction than a creative space where people are giving something of themselves?

    seagull on a cloudy day
    A seagull! Jeez, you can’t even find a rare bird of prey to photograph. Give up as a bird photographer!

    What’s it like having to moderate all of this?

    While websites and forums may seem full of hate, remember that there are moderators behind these pages trying their hardest to make people’s experience the best it can be.

    I caught up with Simon, who moderates the Digital Photography School Facebook page and works with other camera companies’ social media, to see what it is like trying to keep a photography community a nice place for users to interact. 

    Here’s our exchange:

    Can you describe your job and how it works?

    I’ve been a social media/community manager for about 12 years now – 10 full time, and part-time for the two prior. I manage all aspects of social media, from content creation to community management to customer support.

    Have things gotten better or worse over that time?

    When Digital Photography School was in its infancy, I was working in the VBulletin forums that we had back then. I don’t think things have become particularly worse or better. I think, ever since people had a platform where they could speak their mind with little (to them) consequence, we’ve seen people talking without thinking.

    How much toxicity do you deal with on a day-to-day basis in your work?

    I see negativity on many levels every day: commentary on politics and religion, right through to “your horizon is crooked, are you stupid?” The sad part of what I see is that, with minor wording changes in the photography space, I think there’s potential for a lot less online anger and toxicity. From “Your horizon’s crooked, idiot!” to “I wonder how this photo would look if you straightened up that horizon?”

    What is the most common thing that sparks arguments/toxicity in your experience?

    In my opinion, insensitivity is what sparks most negative sentiment online. From insulting someone’s photography skills to insulting their way of life, we never can know what someone’s going through on the other end of that interaction; someone has a bad day and takes a comment badly, and up and up it goes until someone’s very upset. I see it daily. 

    Do you feel that photography is better or worse than other communities for this type of behavior?

    I feel like photography is similar to any other, but I’ve always asked myself why. (I mean, I feel like I know the answer! We are making our vision come to life through photography, and when someone leaves an insensitive comment, we respond passionately…)

    As someone who sees the worst of the photography community, does it depress you how bad it has become? Do you tend to avoid parts of the community due to this?

    It does depress me. Obviously, it’s a little different for me than I guess most people, as it’s my job to wade into those conversations where it has an impact on a community that I manage or a brand that I manage, so I can’t avoid it. If I were a reader or contributor in one of our groups or on the blog, after seeing the conversations that I have seen spiral out of control so many times, I’d teach myself to have patience with people and to skip through threads that made me angry or sad; life is too short for that stuff! 

    What one thing would you ask of dPS readers when they are posting comments that could be considered obnoxious/rude/toxic?

    I don’t want to ever control people’s commentary on a topic; sometimes I need to close and remove threads or give people little “timeouts.” But I’d ask that, if they were replying to something that made them angry, to maybe take a minute and think through what is happening in that thread; find a different way to respond. Don’t use incendiary phrases like “You’re an idiot!” It never achieves anything. Be kind. 

    Blurry Seascape
    You didn’t use a tripod for a long exposure?! How can you call yourself a photographer?

    How can we do better?

    To conclude, I wanted to find a way to try and help the photography community. After many hours of thought, I came up with four simple words you should think about before you post to a website. They are as follows:

    Don’t be a jerk!

    I hope that helps.

    Now over to you:

    How do you feel about the photography community? Do you think that things are pretty toxic? How does that make you feel, and what can be done to make things better? Share your thoughts in the comments below!

    The post Is the Online Photography Community Toxic? appeared first on Digital Photography School. It was authored by Carl Spring.


    Digital Photography School

  • 20 Dos and Don’ts for Shooting the Moon

    The post 20 Dos and Don’ts for Shooting the Moon appeared first on Digital Photography School. It was authored by Bruce Wunderlich.

    20 dos and don'ts for shooting the moon

    If you’ve ever tried shooting the moon, you’ve probably discovered that it’s actually a pretty tricky subject!

    But don’t worry; there are some tips and techniques you can use to quickly improve your moon photography.

    In this article, let’s look at some dos and don’ts to take your moon images from snapshots to stunning art.

    city with rising moon
    The April moon, called the “Pink Moon,” rising over Marietta, Ohio. The setting sun lit the city with a warm glow.

    1. Do use a tripod

    One of the most important pieces of equipment for shooting the moon is a good tripod.

    Since the moon is so small, it is very important to have a sturdy foundation, because even the most minute movement of the camera will cause your image to blur. 

    You might think that, if you use a fast-enough shutter speed, you can handhold the camera. But since your subject is so small in the frame, even small movements will be exaggerated.

    2. Don’t use a slow shutter speed

    While it’s a good idea to use a tripod, you must avoid using a slow shutter speed.

    Why?

    Because the moon is actually moving very quickly around the earth. The moon is so distant, it doesn’t appear to be traveling very fast. But if you let your shutter speed relax too much, you’ll end up with all sorts of unwanted motion blur.

    A good rule of thumb for tack-sharp moon photography is to shoot at 1/125s or faster.

    3. Do use a telephoto lens

    To successfully capture any kind of detail on the moon, you need at least a 300mm telephoto lens.

    If you want the moon to take up the entire frame, you will need around an 800mm lens.

    shooting the moon with a telephoto lens

    4. Don’t use any filters on your lens

    To prevent any chance of a blurry image, don’t use any filters.

    Yes, even remove the UV filter. This may sound scary if you never remove the UV filter from your lens, but in this case, it’s best to set it aside.

    Some may suggest using a neutral density (ND) filter for moon photography to cut back on the bright light of the moon. But all this will do is require a slower shutter speed, and you want to use the fastest shutter speed possible to get that crisp, tack-sharp image.

    5. Do try the Looney 11 Rule

    The Looney 11 Rule is similar to the Sunny 16 Rule. It’s designed to help you exposure properly when shooting the moon, while also ensuring you get a fast-enough shutter speed for sharp shots.

    Here’s how it works:

    Set your f-stop to f/11.

    Then match the shutter speed to your ISO. 

    For example, if your ISO is set at 200, set your shutter speed to 1/200s.

    (This is not an exact science, but it should give you a good starting point.)

    6. Don’t use the shutter button to start your exposure

    Do not manually press the shutter button or even touch your tripod when initiating your moon shot.

    Remember that even the slightest touch could add enough vibration to blur the image.

    Instead, use a cable release or remote trigger to start your exposure. If you don’t have either of these gadgets, use the self-timer feature on your camera.

    7. Do use mirror lock-up

    If you’re working with a DSLR and it has the option, lock up your mirror. This can greatly increase your chances of getting a tack-sharp moon image.

    You see, even the slightest shake of your camera’s mirror can be enough to blur the shot. So if your camera has this option, use it!

    Lock the mirror up and wait a few seconds to allow any vibrations to settle before beginning your exposure.

    (If your camera doesn’t have a mirror lock-up option, you can always shoot in Live View, which will have the same effect!)

    8. Don’t use image stabilization

    Your lens’s (and camera’s) image stabilization technology must be turned off as soon as you put your camera on a tripod.

    Turning on an image stabilization feature with your camera mounted on a tripod will actually create blur in your image!

    9. Do know the cycles of the moon

    shooting the moon over a barn
    Use The Photographer’s Ephemeris app to predict the location of the moonrise.

    There are 29.5 days between full moons.

    And by learning when the full moon will come, you can ensure you get the best-looking moon in your shots!

    There are many online and smartphone applications that can help you track the phases of the moon. One must-have app is The Photographer’s Ephemeris, which will give you the phases of the moon, and also show you when and where the moon will appear in the sky.

    This is especially useful when planning your moon shoots. The full moon is very popular and photogenic, but it’s also the brightest and the most difficult to expose correctly.

    The side lighting of a gibbous moon produces some interesting shadows which may allow you to capture craters and mountains. The crescent moon is, of course, the darkest stage, but one that may offer some interesting effects when added to a nighttime landscape.

    10. Don’t always place the moon in the center of the frame

    Putting the moon in the center of the frame – especially if there’s nothing else in the shot – is boring.

    It’s been done a million times before. So try to put the moon off-center.

    Oh, and make sure to include other interesting objects in the frame!

    That’s how you’ll end up with a truly impressive moon photo.

    moon photography with a foreground object
    Don’t just place the moon in an empty sky. Including a foreground object will create a more dramatic image.

    11. Do switch to manual focus

    There are a couple of different methods you can use to focus on the moon.

    First, try using your camera’s autofocus to make the moon tack sharp. Then, once you have a desirable point of focus, turn off the autofocus and switch to manual focus.

    Alternatively, you can start by setting your lens to manual focus. With your camera’s Live View feature turned on, zoom in on the moon and turn the manual focus ring until the moon becomes sharp. Then do not touch the ring again.

    12. Don’t just shoot the moon at night

    The best time to photograph the moon is just after it rises or just before it sets, when it’s low in the sky.

    Why is this important?

    For one, when the moon is near the horizon, it will appear larger in your images (due to a trick of the eye).

    Also, as the full moon rises, the sun will be setting, and as the full moon sets, the sun will be rising. This can give you great lighting to accentuate foreground objects.

    Note that shooting the moon in the daytime (e.g., in the late afternoon) will give you the opportunity to include foreground objects, and you may also be able to capture some craters on the moon’s surface.

    moon photography with a tree in the foreground
    The June full moon, called the “Honey Moon,” captured as it sets at sunrise.

    13. Do use exposure bracketing

    Once you have found an exposure that you’re happy with, it’s best to bracket around that setting.

    You see, the view of your images in the dark, on the back of your camera, can often be deceiving. In the dark, images always appear brighter on the camera LCD than they are when opened on your computer.

    So after you’re satisfied with the exposure you have dialed in, bracket two stops under and two stops over, just to ensure that you get a result you’ll be happy with later.

    14. Don’t use Auto White Balance

    Using Auto White Balance will give you very inconsistent results.

    Instead, I recommend you try the daylight white balance preset. And if you’re looking for a different effect, try the tungsten or cloudy presets.

    Don’t be afraid to experiment.

    And remember:

    If you are shooting in RAW, you can change the white balance in post-production.

    15. Don’t depend on your meter

    In general, your camera’s light meter will be fooled by the amount of light reflecting off the moon.

    So make sure you constantly check your LCD and histogram to ensure you’ve nailed the exposure.

    Also, it is important to note that, as the moon rises, the exposure will change. The moon gets brighter as it rises, so you’ll need to keep adjusting your shutter speed to compensate.

    16. Do shoot the moon in RAW

    Shooting in RAW will allow you to capture more details of the moon’s surface, and also give you more latitude for adjustments in Lightroom and Photoshop.

    So, unless you are not at all comfortable with using camera RAW software, always shoot the moon in RAW.

    17. Don’t be afraid to crop your images

    Unless you are shooting with a very large telephoto lens, you will want to crop your image to display the moon at a decent size.

    But remember:

    The more you crop, the more you reduce your ability to print at a high resolution.

    18. Do tweak and sharpen

    Most moon photography is going to require some post-processing in Photoshop or other photo editing software. Adding clarity and contrast will help bring out details, and this will enhance the craters and mountains of the moon.

    As mentioned above, the white balance and exposure may also be adjusted to achieve a nice result, as both are somewhat difficult to perfect in-camera.

    19. Don’t be afraid to get creative

    Here’s the truth:

    Most great moon photography has been manipulated in post-production, because of the difficulty of capturing a great moon shot in one image.

    So don’t be afraid to get creative.

    For instance, you might create a composite, as I did for this image:

    the moon and a flying seagull
    Be creative! I combined two images to make this composite.

    A popular method used by many photographers is to combine two exposures: one set to bring out the best of the foreground landscape, and a second exposed for the moon. 

    When combining these two images, try enlarging the moon slightly to achieve a more dramatic effect, but don’t overdo it to the point that it looks fake. The moon needs to look believable, unless you are going for a science fiction effect (which isn’t always a bad idea, creatively speaking!).

    shooting the moon above a bridge at night
    Two exposures were combined to make this final image. One image was exposed for the landscape and the other for the moon. The moon was enlarged slightly for dramatic effect.

    20. Do practice, practice, practice

    You now know everything you need to get started with moon photography.

    So get out there and shoot the moon!

    Remember that moon photography is not as easy as it looks, so if your first results are not as dramatic as you expected, then keep trying!

    Now I’d like to see some of your moon images! Please share any moon shots in the comments below.

    The post 20 Dos and Don’ts for Shooting the Moon appeared first on Digital Photography School. It was authored by Bruce Wunderlich.


    Digital Photography School

  • Weekly Photo Challenge – Mirrors

    The post Weekly Photo Challenge – Mirrors appeared first on Digital Photography School. It was authored by Sime.

    Mirror mirror on the wall… or, in my case, in a train station! Where will you find a mirror and how will you make a creative photo with it! I have a couple of ideas in mind and will be out and about making my photo to submit in the Facebook group, during the week! Meanwhile, here are a couple from yesteryear!

    Weekly Photo Challenge – Mirrors
    Find a mirror in a train station and make a self portrait.

    Here are 19 more creative mirror self-portraits if you’d like to try!

    A couple more great examples for you, below.

    Weekly Photo Challenge – Mirrors
    Photo by Caroline Veronez on Unsplash
    Weekly Photo Challenge – Mirrors
    Photo by Marc-Olivier Jodoin on Unsplash

    Don’t forget, you can go back and try ALL of our CHALLENGES over HERE!

    You can upload your photograph here (comments down below) or over in our Facebook Group.

    Share them on Instagram or Twitter and use the hashtag #dPSMirror so we can see them!

    Great! Where do I upload my photos?

    Simply upload your shot into the comments field (look for the little camera icon in the Disqus comments section) and they’ll get embedded for us all to see. Or, if you’d prefer, upload them to your favourite photo-sharing site and leave the link to them.

    Weekly Photography Challenge – Looking Up

    The post Weekly Photo Challenge – Mirrors appeared first on Digital Photography School. It was authored by Sime.


    Digital Photography School

  • A Beginner’s Guide to Working With Flash Off-Camera

    The post A Beginner’s Guide to Working With Flash Off-Camera appeared first on Digital Photography School. It was authored by Gina Milicia.

    a beginner's guide to off-camera flash

    I spent the first three years of my photography career avoiding the use of off-camera flash.

    Why?

    Because I couldn’t wrap my head around the concepts and science behind it.

    I tried to cover up my struggles by saying things like “I’m a natural light photographer,” or “I really don’t like the aesthetics of flash photography.”

    But I eventually – reluctantly! – invested in a flash for my first Nikon. This was the ’90s, pre-digital, pre-autofocus, and pre-TTL. I had to calculate how much power to use via a chart on top of the flash.

    Each photoshoot I went on that required flash was preceded by a sleepless night filled with anxious dreams about turning up to the shoot naked. And the thought of having to use flash also had a mild to moderate laxative effect on me.

    Luckily, those days are long gone and shooting flash off-camera has never been easier! In this tutorial, I’ll show you the quick and easy steps I take to shoot portraits using off-camera speedlights.

    The gear essentials

    If you’re going to use off-camera flash, here’s what you’ll need:

    1. Speedlights

    I use speedlights most often when I’m traveling and need light, portable flashes, when I’m working on location without access to power, or when I’m working in small, confined locations where studio flashes would be too powerful or cramped.

    I work with two Canon speedlights. A great alternative if you are looking to save a few bucks is the Yongnuo YN560 IV. It has a very similar look to Canon speedlights as well as Nikon’s SB speedlight series.

    2. Remote triggers

    Remote triggers allow you to fire speedlights when they’re not mounted to your camera. As you can imagine, this is essential when using off-camera flash.

    The cheapest and most reliable way to fire your speedlights off-camera is by using a sync cord — basically, you connect your speedlight to your camera via a long cable.

    The drawbacks of using a cable are that it reduces the distance you can be away from your flash, and it can create a tripping hazard. That said, I still carry a couple of spare sync cables in my kit; remote triggers do fail from time to time, and the sync cords have saved me on a few occasions.

    The next option for firing off-camera flashes is cheap infrared triggers. These do the job of setting your flash off remotely, but they’re sensitive to bright sunlight and affected by external factors such as alert lights on emergency vehicles and forklifts, etc., so they can go off without warning. I started out with a $ 30 set of triggers and used them for a couple of years before trading up to PocketWizards, which I’ve been using for the last eight years.

    Fill Flash Diagram

    3. Light stands

    Speedlights don’t float in the air – which means you need something to hold them up!

    Now, there are three options when it comes to mounting speedlights off-camera:

    1. First, you can use a light stand. Light stands vary in price from $ 20 to $ 200+ dollars, depending on the make and construction.
    2. Second, you can use a GorillaPod and mount your speedlight to a door or place it on top of something near your model.
    3. Third, you can mount your speedlight to an extension pole (or monopod) and have someone hold the light above your model. I like to do this because it gives me more options when shooting, and it also means there aren’t any light stands that get in the way of my shot.

    4. Light shapers

    Using a speedlight as a bare light source creates a very hard style of lighting similar to harsh sunlight. This looks great in certain situations, but I prefer to soften and control the light source with a small or medium softbox. This creates a much softer, more flattering, and more realistic-looking light source.

    A good softbox to start with is the LumiQuest Mini Softbox. It’ll attach to your speedlight with velcro and can fold flat for easy storage.

    5. Camera with a hot shoe

    Finally, you will need a camera that works in Manual mode. It must also have a hot shoe.

    Note that the “hot shoe” is just a square bit of metal on top of the camera that an external flash or wireless trigger slides into.

    Working with off-camera flash

    Once I got over my fear of off-camera flash, I started to believe that great portraits needed artificial lighting regardless of the environment. I often added two or three lights to my portrait shoots because I thought that anything less was lazy or unprofessional. I actually felt guilty when I shot with natural light because I thought it was cheating.

    Fortunately, I’ve gotten over those thoughts. Here’s what I know now:

    Finding great light and being able to use it are learned skills – and so is knowing when to use fill-flash in a portrait.

    Nowadays, whenever I set up portrait shoots, I always look for opportunities to use great natural lighting first. It’s the most beautiful and flattering light for portraits, so if it ain’t broke, no need to fix it.

    Having said that, there are many times when natural lighting is only just okay or even terrible – and sometimes a portrait needs more mood or drama than the available light can provide.

    The following is an example of how I used off-camera flash to light a heavily backlit image. My objective was to create a shot that looked naturally lit. This technique can be used for any portrait that requires off-camera fill flash.

    Daylight 001 Daylight 800ISO 001
    on-camera flash photo of man on a motorcycle

    In the first shot (A), you can see that my model was heavily backlit, which makes a great silhouette but not such a great portrait.

    For the second shot (B), I attempted to correct the lighting by increasing my ISO, which overexposed the background and brought more detail to the motorbike, but leaves the model’s skin tones flat, dull, and underexposed. It also added extra noise to the shadows. At this stage, I could have used a reflector to bounce light back onto the model to help create better skin tones.

    Finally, for the third shot (C), I used an on-camera flash. As you can see in my example, the Canon speedlight did an okay job of lighting my model, given that I was about five meters (sixteen feet) away using a 200mm lens.

    But the thing I don’t like about using flash on-camera for portraits is that it tends to make the subject look unnatural and have a flat appearance. On the other hand, by using a flash off-camera, you can control the direction and amount of light going onto your model to achieve a more natural look.

    Which leads me to my off-camera flash setup:

    off-camera flash diagram
    Here’s a bird’s-eye view of my setup.

    My speedlight was positioned approximately one meter (three feet) from the model. I set it at a 45-degree angle because I wanted to make my model look like he was lit from the side.

    I was working with a 70-200mm zoom lens set to a focal length of 200mm because I wanted to blur all the details in the background.

    My camera was approximately six meters (20 feet) from my model.

    My ISO was set at 100, and my aperture was set to f/4. I was working at f/4 rather than wide open at f/2.8 because I find it very difficult to make eyes look sharp at f/2.8 at that distance and in such extreme lighting conditions.

    Setting up the gear

    off-camera flash setup diagram
    Setting up speedlights and radio slaves.

    For this motorbike model shoot, I mounted my speedlight to a light stand via an adapter and used a small LumiQuest Softbox to soften and shape my light.

    dialing in flash settings
    flash remote in action

    To manually adjust the flash output of your speedlight, first switch the setting from its default of TTL to M (Manual mode). I recommend you start with the following settings:

    • First, if you’re shooting in full sunlight and you need an aperture of f/16 or higher, use a power setting of 1/1 (full).
    • If you are shooting at f/2.8 or f/4, start at around 1/16-1/32 power.

    The diagram above is based on Canon’s 580EX II speedlight. For any other flash, check your manual for instructions on how to increase and decrease power. It should be very similar.

    Now take a look at how I set my flash power:

    six shots of a man on a motorcycle with increasing flash power
    • Flash set at 1/32 power is underexposed, skin tones look muddy, and there’s no detail in the blacks.
    • Flash set at 1/16 power is starting to look better.
    • Flash set at 1/8 power is looking good, but I prefer slightly brighter skin tones.
    • Flash set at ¼ power is the correct reading for the look I was going for.
    • Flash set at ½ power gives slightly overexposed skin tones, which is perfect for many portraits, as it creates a very flattering light (no model will ever tell you they love seeing all the detail in their pores and skin tones!).
    • Flash set at full power is overexposed; there’s very little detail in the skin tones and the blacks are too light (gray).

    A step-by-step guide to how I lit this shot with off-camera flash

    Now that you know how to set up your flash and how to determine a good exposure, I’d like to run through my motorcycle photoshoot.

    How did I get a nice final result?

    Let me take you through the step-by-step process:

    man on a motorcycle as a silhouette
    My ambient reading was f/4 at 1/125s with ISO 100.
    1. Take an ambient reading to determine the correct exposure for the background (without any flash). In this case, my ambient reading was f/4 at 1/125s and ISO 100. This exposure was set for the entire shoot.
    2. Ask yourself if adding flash will improve or detract from the shot. In this case, the answer is a definite yes – it will improve the shot.
    3. Bring in your flash and set it up as per the diagrams above.
    4. The quickest and easiest way to figure out the best flash power settings is to use a light meter. (If you don’t have a light meter, you can still work with off-camera flash. It will just take a bit longer to work out your exposure.) I believe a light meter is an essential tool in good portrait photography, and I would never leave home without one. When you use a light meter, you know you’ll end up with the most accurate readings and lighting becomes easy. I suggest you set up your lights per the diagram above, start at a power setting of 1/32, and gradually increase your power in small increments (1/32, 1/16, 1/8, 1/4, etc.) until you get your desired result.
    5. Set your light meter to non-sync and press the button on the side of the meter. The non-sync button will flash on and off indicating that it’s ready. If you don’t have an assistant, I suggest taking a radio slave off-camera and using it to test-fire your flash so you can take a reading. Hold the meter in front of your subject’s face and point the sensor dome toward the camera.
    6. Keep increasing or decreasing the amount of light until you have it a half stop to one stop over the ambient setting.
    7. If you want a clean, beauty-style shot with lots of shadow detail, add one stop of fill-flash and shoot at your ambient meter settings.

    This is something I strongly urge you to practice with as many patient friends, family members, and pets as possible. That way, you can build up your confidence and really get to know your equipment.

    And here’s my final image:

    final image of a man on a motorcycle
    Glauco Junior Solleri. Vespa courtesy of Glow Studios.

    Notice the different background? It’s from a shoot I did in St Mark’s Square, Venice last year. I merged the two images together using Photoshop.

    Working with off-camera flash: Conclusion

    Now that you’ve finished this article, you should be ready to capture some beautiful shots using off-camera flash!

    So make sure you have the right equipment. And make sure you follow my process carefully.

    You’ll come away with amazing results.

    What are your experiences working with off-camera flash? Have you tried it? Does it intimidate you? Share your thoughts in the comments below!

    The post A Beginner’s Guide to Working With Flash Off-Camera appeared first on Digital Photography School. It was authored by Gina Milicia.


    Digital Photography School

  • See the Wildlife Photographer of the Year People’s Choice Award Winners

    The post See the Wildlife Photographer of the Year People’s Choice Award Winners appeared first on Digital Photography School. It was authored by Jaymes Dempsey.

    The Natural History Museum in London just announced their Wildlife Photographer of the Year People’s Choice Award winner plus four highly commended images, and they are stunning.

    Over 55,000 votes were cast. Here is the overall favorite photo, “Bushfire,” by Robert Irwin:

    Robert Irwin / Wildlife Photographer of the Year
    Robert Irwin / Wildlife Photographer of the Year

    As explained by the Natural History Museum:

    “After spotting smoke billowing out of the horizon, Robert knew he had a prime opportunity. Launching his drone, he sent it straight over to the location of the fire. With only a few minutes of battery left, he knew he had to act fast. Taking it right into the thick of the smoke, he managed to frame a clear 50:50 shot, with a pristine natural conservation area on one side juxtaposed with the blackened, devastated remains on the other. Taken near the Steve Irwin Wildlife Reserve in Cape York, Queensland, the area is of high conservation value and is home to over 30 different ecosystems with many endangered species.”

    Robert goes on to comment:

    “I am incredibly excited to win the Wildlife Photographer of The Year People’s Choice Award. For me, nature photography is about telling a story to make a difference for the environment and our planet. I feel it is particularly special for this image to be awarded, not only as a profound personal honor but also as a reminder of our effect on the natural world and our responsibility to care for it.”

    The four “Highly Commended” images are equally inspiring.

    First, Ami Vitale’s heartbreaking photo, entitled “The Last Goodbye:”

    Ami Vitale / Wildlife Photographer of the Year
    Ami Vitale / Wildlife Photographer of the Year

    “Joseph Wachira comforts Sudan, the last male northern white rhino left on the planet, moments before he passed away at Ol Pejeta Wildlife Conservancy in northern Kenya. Suffering from age-related complications, he died surrounded by the people who had cared for him. With every extinction we suffer more than loss of ecosystem health. When we see ourselves as part of nature, we understand that saving nature is really about saving ourselves. Ami’s hope is that Sudan’s legacy will serve as a catalyst to awaken humanity to this reality.”

    Then Andy Parkinson’s gorgeous image, called “Hare Ball:”

    Andy Parkinson / Wildlife Photographer of the Year
    Andy Parkinson / Wildlife Photographer of the Year

    “Andy spent five weeks watching the mountain hares near Tomatin in the Scottish Highlands, waiting patiently for any movement – a stretch, a yawn or a shake – which typically came every 30 to 45 minutes. As he watched, frozen and prostrate, with 50 to 60 mph winds surging relentlessly around him, the cold started to distract and his fingers clasping the icy metal camera body and lens began to burn. Then relief came as this little female moved her body into a perfect spherical shape. A movement of sheer joy. Andy craves such moments: the isolation, the physical challenge and, most importantly, time with nature.”

    Next, Guillermo Esteves’s “Close Encounter:”

    Guillermo Esteves / Wildlife Photographer of the Year
    Guillermo Esteves / Wildlife Photographer of the Year

    “The worried-looking expression on this dog’s face speaks volumes and is a reminder that moose are large, unpredictable wild animals. Guillermo was photographing moose on the side of the road at Antelope Flats in Grand Teton National Park, Wyoming, USA, when this large bull took an interest in the furry visitor – the driver of the car unable to move it before the moose made its approach. Luckily, the moose lost interest and went on its way after a few moments.”

    And finally, Neil Parkinson’s “Drey Dreaming:”

    Neil Parkinson / Wildlife Photographer of the Year
    Neil Parkinson / Wildlife Photographer of the Year

    “As the weather grew colder, two Eurasian red squirrels (only one is clearly visible) found comfort and warmth in a box Neil had put up in one of the pine trees near his home in the Scottish Highlands. In the colder months, it’s common for the squirrels, even when unrelated, to share dreys. After discovering the box full of nesting material and in frequent use, Neil installed a camera and LED light with a diffuser on a dimmer. The box had a lot of natural light so he slowly increased the light to highlight his subjects – and using the WiFi app on his phone he was able take stills from the ground.”

    The Natural History Museum in London is currently closed. But when it reopens, you’ll be able to view the physical images – along with other Wildlife Photographer of the Year photos – in person.

    Wildlife Photographer of the Year is developed and produced by the Natural History Museum, London.

    The post See the Wildlife Photographer of the Year People’s Choice Award Winners appeared first on Digital Photography School. It was authored by Jaymes Dempsey.


    Digital Photography School

  • Review of Amazon Prime Photo Storage: The Good and the Bad

    Who doesn’t love Amazon? Come on, where else can you buy live ladybugs, a ready-made shipping container home or tiny house kit, and a bacon-scented mustache all in one place? Amazon’s Prime membership is pretty sweet too. It allows you to take advantage of free delivery, as fast as same-day delivery for some products. You can also take advantage of Continue Reading
    Photodoto

  • 10 Tips to Boost Your Creativity

    The post 10 Tips to Boost Your Creativity appeared first on Digital Photography School. It was authored by Simon Bond.

    tips to boost your creativity

    Do you want to capture more creative photos?

    In this article, you’ll discover tips to boost your creativity so that you can start taking photos that stand out from the crowd.

    There are a number of different approaches you can use for creative images, each with its own benefits.

    Read on to find out how you can be even more creative!

    1. Try a new technique

    A great way to boost your creativity is to learn a new photographic technique.

    The choices available to you are vast, so there really is no limit to your creative potential here. And the great thing about learning a new concept is that it’ll generally offer plenty of options for experimentation!

    Plus, you can apply what you’ve learned to areas of photography you already know; that way, you can grow in genres you thought you’d already mastered.

    Here are a few creative techniques for you to try:

    • Light painting – Transform your scene using tools such as a flashlight or a programmable LED lightstick.
    • Flash – Up your game in both portrait and still life photography by learning how to use off-camera flash.
    • Drone – Get dramatic angles from the sky, once only available to the select few who could hire a helicopter.
    tips to boost your creativity woman with light painting
    Light painting is a very popular creative technique.

    2. Constrain yourself

    The best way to really master something is to add constraints.

    Too many techniques, ideas, or pieces of equipment can negatively affect the way you approach a subject.

    But if you allow yourself to only start taking photos once limitations are in place…

    …the results are often much more creative.

    For instance, if you only shoot with a 50mm lens, you’ll need to think more creatively about how you’re going to use it.

    How about limiting the area you can photograph to 100 meters from your house? You’ll have to work with what you have and think about how you can apply techniques to get creatively interesting photos near your home.

    The key here is that, when you’re forced to work with limits, you’ll find different ways to express your vision. Those lessons you learn can then be applied to all of your general photography.

    tips to boost your creativity festival
    Here, the festival happened to be 100 meters from my house, literally just down the street!

    3. Increase your knowledge

    Of course, increasing your knowledge of photography is a good way to improve your creativity.

    After all, you can only get so far by learning on your own through experimentation. There are many times when reading a photography book, visiting a website like Digital Photography School, or downloading digital resources will make a big difference.

    This often happens when you experiment with a new technique and you initially get better, but you then hit the intermediate plateau.

    At such a point, looking for expert outside help on the topic you’re learning is a good idea.

    4. Use new equipment

    Using new equipment is in essence learning a new photography style.

    The first time you use a wide-angle lens, your photography will change forever. That’s why getting new equipment is one of my top tips to boost your creativity.

    Of course, you need to keep your Gear Acquisition Syndrome under control; going out and buying something new every time you run out of creative ideas is not the way forward.

    Also, if you do decide to purchase new equipment, choose something that will really add value to your photography. A wide-angle lens, a tripod, or a flash are all good investments. Then take the time to really learn what the new equipment brings to the table.

    tree shot through a lensball
    Why not try a lensball? This photo combines a creative zooming technique with a lensball.

    5. Explore a new location

    You’ve learned a new technique or mastered some more equipment, so what is the next challenge?

    Indulge your wanderlust and try a brand new destination!

    Going somewhere new is the equivalent of a painter starting with a blank canvas; you have so many possibilities. Once you know the area to which you’ll be traveling, I recommend you plan your trip beforehand. Start by researching the iconic photography locations that are worth visiting. Then go beyond the iconic photos and see how you can photograph the locations in a way that is uniquely yours.

    lensball composition in Greece
    This photo was taken on a visit to Greece the first time I visited there.

    6. Revisit places

    It’s also possible to capture creative photos of places you’ve visited before!

    There are several reasons you might get different – and perhaps even better – results by revisiting a place.

    First of all, you will know where the locations with the best angles are (though the challenge is to reinterpret compositions you’ve found in the past).

    Here’s some advice for getting creative shots when revisiting locations:

    • Go during different seasons – Locations can have a dramatically different feel from one season to the next, such as summer to autumn.
    • Try a new technique – If you’ve learned a new skill since last shooting a location, why not try it out?
    • Wait before revisiting – Sometimes, you simply need time to think about a location before revisiting with fresh ideas.
    South Korean village
    This local folk village is a short drive from where I live in South Korea.

    7. Join a photography club

    One of the best ways to learn from other photographers is to join a photography community. So consider joining your local photography club or an online photography group.

    Clubs and groups are a great place to be inspired by other photographers and to learn from their experience. You may also get the chance to collaborate on creative projects. You might even get to run a joint exhibition.

    go on photowalks to boost your creativity
    Joining other photographers for club meet-ups like photowalks is a great experience.

    8. Start a project

    A great way to bring focus and direction to your photography is to start a project.

    There are plenty of options, though a successful project will take some time commitment. The benefits are huge, though, as your mind will be focused on how to enhance your project, which will then increase your creativity.

    sunset landscape tips to boost your creativity
    Why not begin a project by photographing the same location repeatedly?

    9. Combine techniques

    Here’s another tip to boost your creativity:

    Combine different techniques or photographic styles. This might give you a fresh take on a style of photography you’ve been practicing for years.

    For instance, why not try combining light painting with lensball photography? Or you could try flash photography and light painting (which is another excellent combination!).

    Think about the techniques you know and how they complement each other. That way, you can combine them to create a new style of image.

    10. Get feedback on your work

    There are plenty of benefits to getting feedback on your photography.

    First of all, it will improve your work! However, remember that you’ll be getting other people’s opinions – people who may not understand the creative vision you have.

    You need to ensure you keep your own unique creative drive, while also taking on board the ways you can improve your game.

    Ideally, you’ll find someone whose feedback encourages your creativity and pushes you to get the best results.

    Tips to boost your creativity: Conclusion

    Now that you’ve read this article, you should be ready to try some creative photography.

    So pick your favorite tip and get creative!

    Now I’d like to know your thoughts:

    How do you stay creative? Are there any tips you can give to the community? Please share your thoughts in the comments section below!

    The post 10 Tips to Boost Your Creativity appeared first on Digital Photography School. It was authored by Simon Bond.


    Digital Photography School