Category: Photography

  • Three Methods of Making Stunning Photographs in Bright Sunlight

    Location Lighting Masterclass – The Art Of Shooting Into The Sun

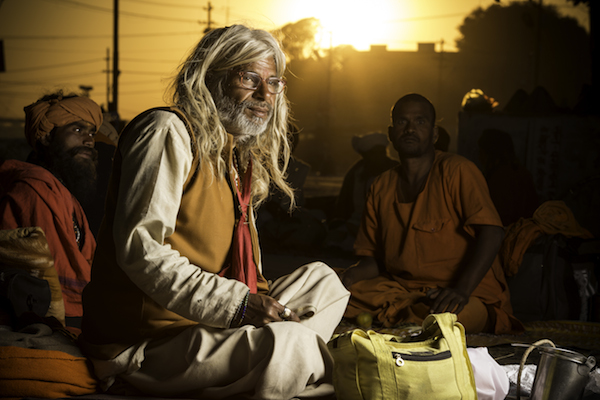
    Shooting directly into the sun may not be the first thing that pops into your mind when creating a photograph, but the effects it can have on your final image when done correctly can border on magical.
    1

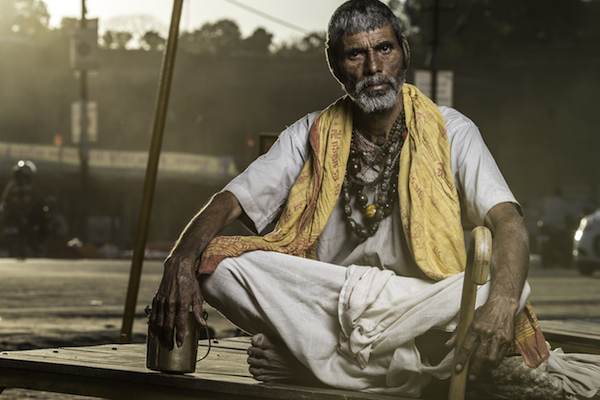
    #2 The Dreamy Look

    There are three primary looks that can be achieved by shooting into the sun.

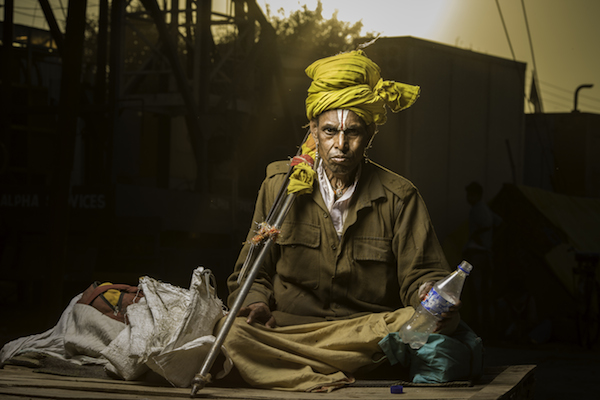
    1. The first of these takes advantage of lens flare and aims to over-expose the image drastically, creating a ‘dreamy’, almost glowing look. (see image above)
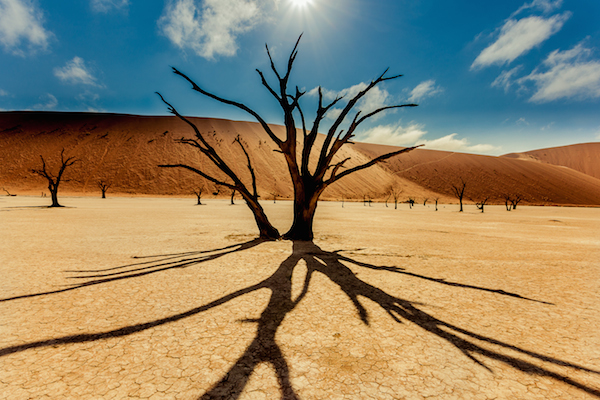
    2. The second ignores the foreground entirely, exposing only for the brightly lit sky and creating foreground silhouettes.
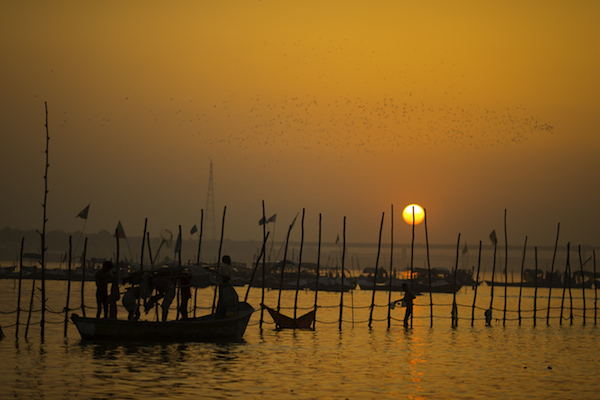
    3. The third comes somewhere in between, exposing for the brightly lit sky and simultaneously using reflection or fill flash to overpower the foreground shadows.
    The Silhouette Look

    #2 The Silhouette Look

    #3 The Balanced Look

    #3 The Balanced Look

    Let’s work through each of these in turn, how to make stunning photographs in bright sunlight.

    #1 – the Dreamy Look

    This is not a photographic style I typically aim to produce, however it is nonetheless popular with many photographers. The style aims to expose for the skin tones predominantly, allowing the background to become significantly overexposed; and in the process, create a soft glow around the subject. This style can also take advantage of lens flare (the rings of light that appear in your shot when you shoot directly at bright sunlight) and the varying types of lens flare that different lenses create. To achieve this look, ensure that you have spot metering selected on your camera and measure directly for the skin (you will need to be in aperture priority mode for this). It doesn’t matter if the background overexposes; the primary aim is to expose for the skin and facial features. The brightness of the background will typically create a haze across the rest of the image.

    4

    #2 – the Silhouette Look

    Again, using the camera’s spot meter in Aperture Priority mode, you will need to meter and expose for the background. Select an area (not directly on the sun itself) of sky near to the sun. You can lock the exposure using the AE lock function (usually the “*” button on Canon cameras) to enable recomposition of the image. Alternatively, note the shutter speed reading where you metered on the sky, switch to manual mode and set the camera up with the given shutter speed and aperture manually. Here, the aim is to darken everything in the foreground so be sure to think about the kind of silhouette you’re creating. Less is usually more. Too much in the foreground just creates clutter and loses the focal point.
    5

    #3 – the Balanced Look

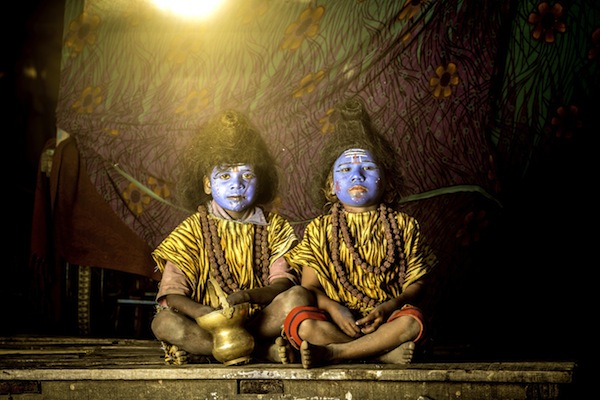
    The final, and arguably the most powerful is partway in between, and utilizes flash to fill the image exposure correctly.
    Just like the silhouette style, you should meter on the background sky. If you don’t use flash, you’d end up with another silhouette. Instead, crank up the power of the flash as far as it will go (it takes a fair amount of flash power to overcome direct sunlight). About 600w (watt seconds) is preferable, and ensure that the subject you want to light up remains relatively close (due to the inverse square law, light fall-off will very quickly erode the power of the flash). Some post-production boost to the shadows and recovery of the background highlights may be necessary to properly balance the exposure.
    6

    A few general hints to help with direct sunlight shooting:

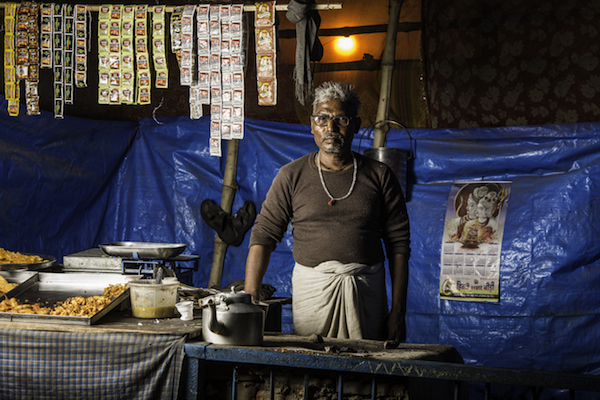
    1) Autofocus often struggles in direct sun. Try first shading the end of your lens with your hand, focussing on your subject, then switching off autofocus and taking the shot without shading the lens.

    2) Colors and white balance can often be thrown by bright sunlight. Be sure to shoot in RAW so that you can true up any color differentials later on.
    7

    3) Use a polarizer or ND (neutral density) filter where you can. Really bright direct sunlight and long exposures are not good for your camera’s sensor over time, just as they are not good to stare at with your naked eye.

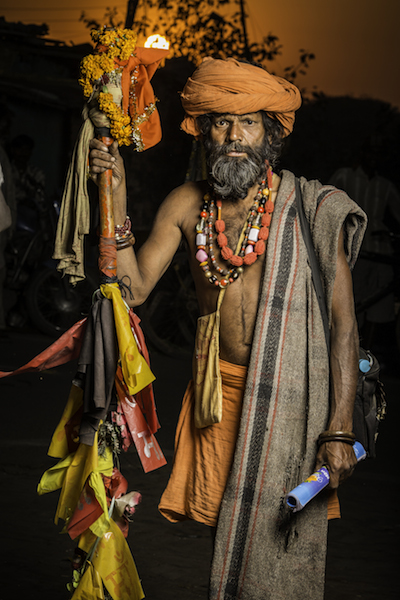
    4) Think about the time of day – you want light to fall behind your subject, not on top of it. Therefore, early mornings and late afternoons are best for this type of photography. It is also when the sunlight is weakest, resulting in less overexposure and less risk of damage to the sensor.
    8

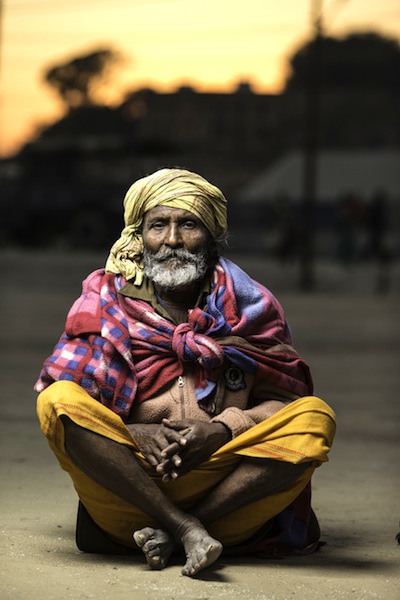
    5) Think about alternative fill light sources. Consider reflective windows, white walls, metallic surfaces – effectively anything that can bounce the direct sun back into the subject to naturally add fill light. This means you will need to have your back to the reflective source.
    10

    6) Consider some post-production magic, if too much flare is coming into the shot. Mount the camera on a tripod so that the image doesn’t shift, then take two shots of the same scene with the same exposure settings. For one shot, leave the image as is, but for the second, shade the end of the lens with your hand. It doesn’t matter if your hand appears in the image because during post production, you simply join the half from the shaded shot that doesn’t have your hand in it, with the bright half from the unshaded shot. This technique will leave the full effect of the flare around the sun, but enable you to remove the surplus flare from the rest of the image.
    9

    The post Three Methods of Making Stunning Photographs in Bright Sunlight by Leo Edwards appeared first on Digital Photography School.

    Digital Photography School

  • 35 Adorable Pet Images to Make You Say “Awww”

    Pets fill the places in our hearts really fast, and it’s always cool to have an adorable picture of your pet on your desktop. While pet photography is one of the most interesting subjects to shoot, it’s not always easy to capture their true, cute personality. Unlike humans, pets do not understand what we are going to do and will Continue Reading

    The post 35 Adorable Pet Images to Make You Say “Awww” appeared first on Photodoto.


    Photodoto

  • Review – Lensbaby Circular Fisheye

    A dedicated circular fisheye lens from Lensbaby for under $ 300.00 sounds great, but how does it perform?

    Lensbaby Circular Fisheye

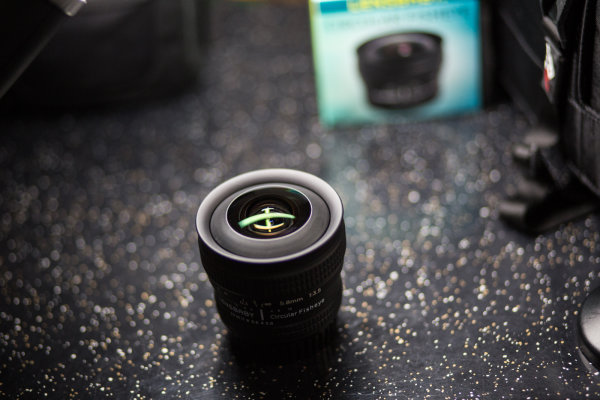
    Lensbaby Circular Fisheye 5.8mm f/3.5 Lens

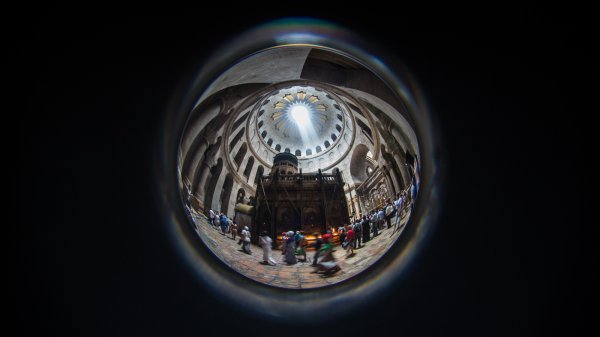
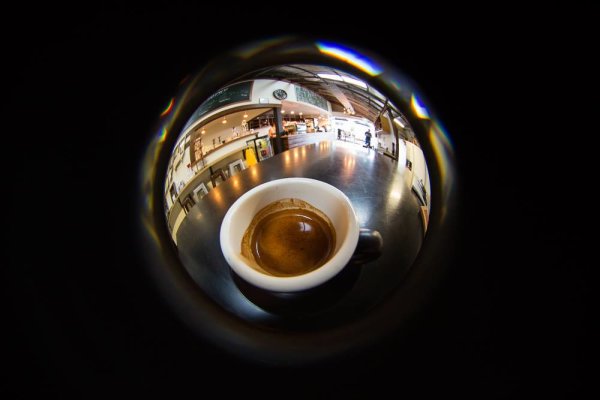
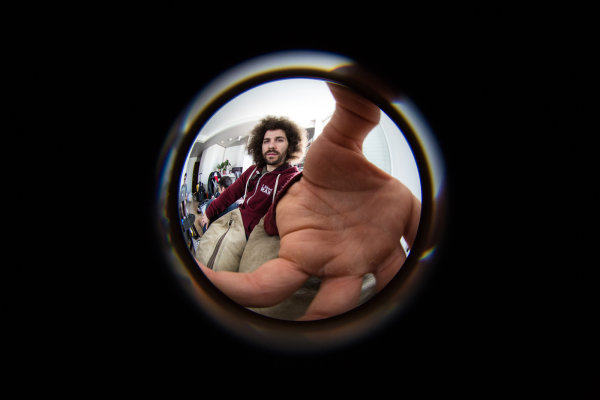
    Lensbaby kindly sent me their new Circular Fisheye lens (the Canon version) to review about four weeks ago, and I can tell you that I’ve had a load of fun with it since then! The Lensbaby Circular Fisheye is best used (or optimized for) APS-C sensor sized cameras. I’ve been using it on a full frame Canon 5D and actually quite like the results it gives. You can see in the photographs below that it is a full circle, you might also note the shiny outer ring in the photographs – this is because the little lens has a polished barrel. With the barrel being polished, you can mess about getting neat flare and shine into your images, but you can also avoid that by tilting the lens away from direct light and moving it around to suit.

    The 5.8mm f/3.5 circular fisheye from Lensbaby is a full manual lens, it doesn’t talk to your camera, it only talks to your hand – aperture ring and focus ring are within easy reach, feels good in your hand, sturdy and solid enough. The little lens has a pop-on, pop-off plastic lens cover and a plastic mount.

    lensbaby circular fisheye review

    The Lensbaby Circular Fisheye will focus (manually, remember everything is manual) really really close – 1/4″ close and then out to infinity.. Which means it’s hilariously perfect for when your baby decides to lick the lens – a photo series I thought about producing, but strangely nobody else wanted to lick it after baby slobber! Ah well.

    Lensbaby Circular Fisheye Review

    With a maximum aperture of f/3.5 it’s fast enough for most situations and with an ISO bump in dimly lit rooms, I wasn’t left wanting.

    Lensbaby Circular Fisheye Review

    The field of view is 185° which is very very wide… like, see behind you wide – well, almost!

    lensbaby circular fisheye fro knows photo

    Yes, that’s Fro Knows Photo, yes he was holding my lens… We were together for a week in Israel – more on that later!

    I’m not going to talk about edge to edge sharpness or chromatic aberration, I think we’re sort of missing the point if we’re looking at those factors in a $ 299 lens – this lens is about making fun photographs. It’s sharp enough, it’s well built and pretty sturdy – I’ve taken it from Melbourne, to Coffs Harbour, to Israel and back and it’s performed really well. Is it worth the price tag, yes absolutely. 

    Who would buy this lens?

    I’d say people that enjoy exploring different types of photography would enjoy this lens, people that like making fun pictures will love it. Sure, it’s not the Canon 8-15mm L series Fisheye, but then it’s not $ 1500 either.

    Who wouldn’t buy this lens?

    People that have a spare $ 1500 to drop on the L series Canon (or Nikon.. sorry, not sure which Nikon fits the bill)

    In closing…

    My opening line “how does it perform” is kind of a silly thing to ask on a cheap lens, and lets face it, this is a cheap lens by comparison to other available options. So for the fun the lens brings and for its affordable price point, Lensbaby, I give you five of the available five stars – good stuff! (And no, you can’t have your lens back!)

    The post Review – Lensbaby Circular Fisheye by Sime appeared first on Digital Photography School.

    Digital Photography School

  • 2 Night Photography Video Tutorials

    David Kingham

    David Kingham

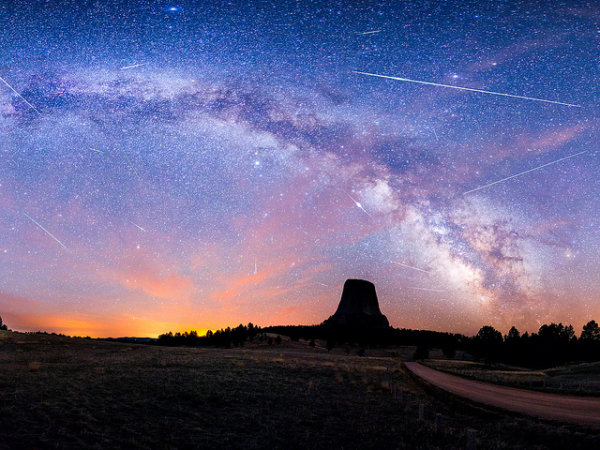
    This week’s collection of amazing images I shared a bunch of night photography, specifically those of the night starry sky, and hopefully you’re already thinking about how to shoot for this week’s photography challenge starry night photography.

    So I went and found a couple of video tutorials to help you out on this mission.

    First, this one by Adorama TV hosted by Mark Wallace. He walks through all the equipment he’s using, camera settings and it even includes a background serenade by some local coyotes.

    In this second video host Jim Harmer shows you how to photograph the starry night sky and the Milky Way including a little tip about how to get foreground objects sharp in your final image.

    I hope you enjoyed those. Please remember to hop over to the weekly challenge and show us your night photos there!

    The post 2 Night Photography Video Tutorials by Darlene Hildebrandt appeared first on Digital Photography School.

    Digital Photography School

  • Find the Perfect Photography Location Using Google Maps

    No matter if you’re planning your next photo road trip or you’re scouring the city streets looking for the perfect viewpoint, Google Maps and Google Earth are the most valuable tools to add to your arsenal for finding the perfect photography location.

    Planning to Shoot

    I usually travel for work, or with family, so I don’t have the luxury of as much time as I might want to search for the perfect vantage point in person. Nor to scout an area to compare locations that I want to dedicate to the one sunset that I’ll have time to shoot. Google Maps to the rescue!

    While planning a trip from home, you have much more time to explore the area in a virtual capacity instead of being out there with boots on the ground. Nothing can compare with actually being there, but the tools available to you are getting better every day and the ability to nearly frame your shot is a realistic time saver. Time to turn the volume on your pre-visualization up to 11.

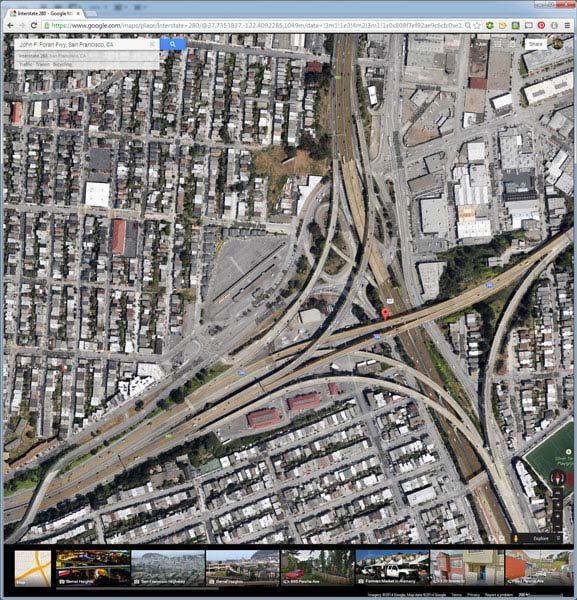
    If I’m planning a trip or have an idea for a shot, I’ll start with Google Maps and zero in on the area that I want to shoot. You probably already do this, too, but let’s just take it a step further. Click the icon in the lower left corner labeled “Earth” to start the Google Earth browser plugin. This has replaced the satellite or aerial view for much of the world’s map, but instead of only offering a flat, two dimensional view of the map directly overhead, you can now tilt the map and see an approximation of topography, texture, and elevation.

    Default Earth View

    Normal mouse controls on the map let you pan in all directions, and zoom in or out with the mouse wheel. In order to adjust to a view that will help you get a better idea of the terrain, hold down the shift key, click and drag upward. That will rotate your point of view (POV) so that you now have an aerial view looking toward the horizon instead of straight down. Dragging left or right while holding shift will rotate your point of view instead of panning.

    Rotated Earth View

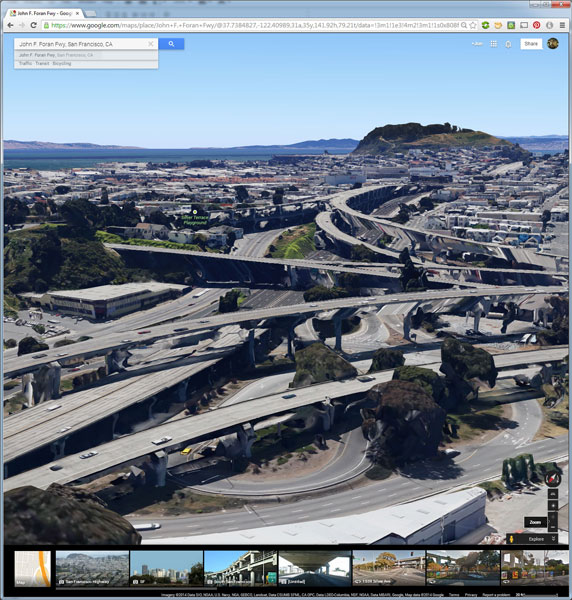
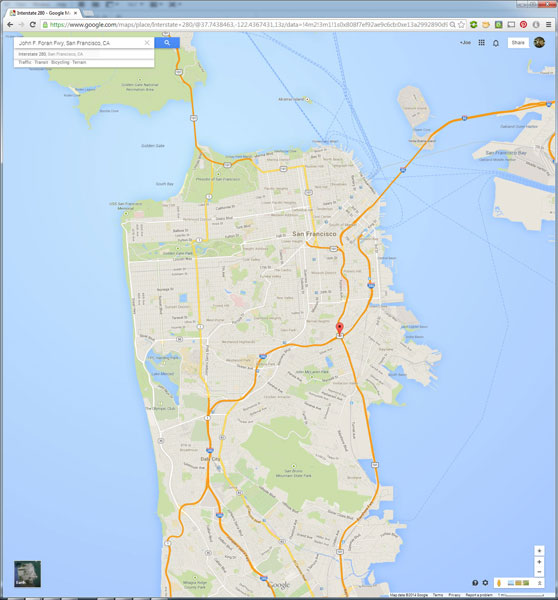
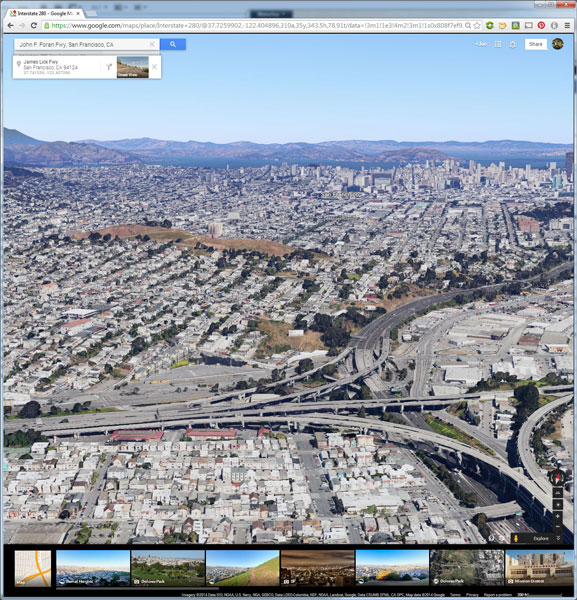
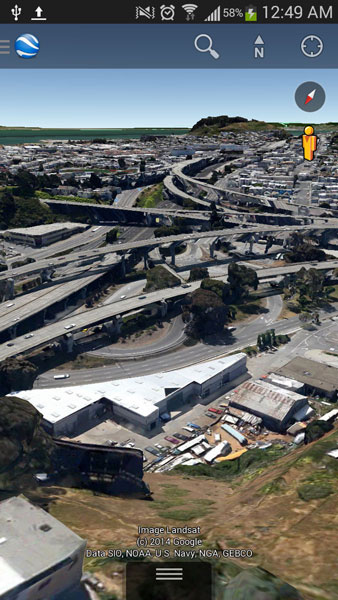
    But, you don’t have to be tied down to your desk to do this. Just two weeks ago, I was out with a friend exploring San Francisco and searching for a specific vantage point of the 101/280 freeway interchange. We knew the general area that we wanted to shoot from, but with so many streets winding around, using Google Earth on my mobile phone helped to eliminate some of the trial and error of driving around without a clue how to find what we wanted.

    101 280 Framing the Shot Mobile

    101 280 Framing the Shot

    Desktop interface Google Earth view looking south

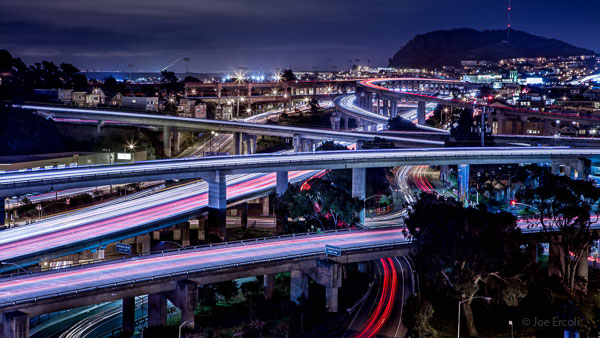
    Joe Ercoli Land of Confusion 600

    Finished image from location scouted using Google Maps/Earth

    The example images from this article show the area that we shot in, including a screenshot taken from the mobile interface, and the completed image. Of course the view that you can get from the map interface is never as good as what you’ll see in person, but it’s an excellent way to help you hit the ground running when you get on-site with your camera in hand.

    NOTE: The camera is facing South in the final composition, not North as in the initial Google Earth Point of View.

    Have you used Google Maps to find any cool locations? What other tips or tricks have you tried? Please share in the comments below.

    The post Find the Perfect Photography Location Using Google Maps by Joe Ercoli appeared first on Digital Photography School.

    Digital Photography School

  • Mastering Color in Lightroom using the HSL Tab

    Mastering colour in Lightroom

    Color in Camera

    Mastering color in Lightroom occurs in two steps. The first is when you take the photo. Successful color photography requires an awareness of the colors in the scene and how they work together. If you read about the topic of color composition you will come across a lot of advice, including articles about the emotional values of color. It’s all good background knowledge, but if there’s one tip I can give that will help you compose better color images right away it is to simplify. Color is powerful, and if there are too many colors in the photo they will either clash or weaken each other. Simplify the use of color to make your images stronger. This works because the colors you choose to leave in have more impact when there are fewer other hues in the frame to distract from them.

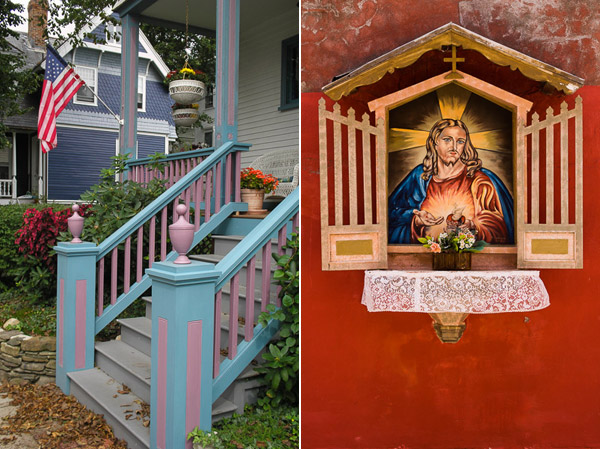
    Here’s an example below. In the photo on the left the use of color is not as good as it could be. There are too many conflicting hues. The red stripes on the flag compete with the orange flowers on the porch, and the blue and violet paintwork. It is more of a snapshot than a carefully composed image.

    In comparison the photo on the right is dominated by red and yellow, and the colors are much stronger.

    Mastering colour in Lightroom

    An easy way to simplify color is to use a telephoto lens to simplify the composition. Another is to  use a wide aperture to blur the background. Click the links to read my articles on those topics.

    You can go into the topic of color in more depth by reading Mitchell Kanashkevich’s ebook Captivating Color.

    Color in Lightroom

    The next step, after you have taken your photo, is to get the best out of it in Lightroom. Today I’m going to focus on the first two tabs in the HSL / Color / B&W panel, and show you how to use them. If you’re a Photoshop user, you will find the same sliders in Adobe Camera Raw.

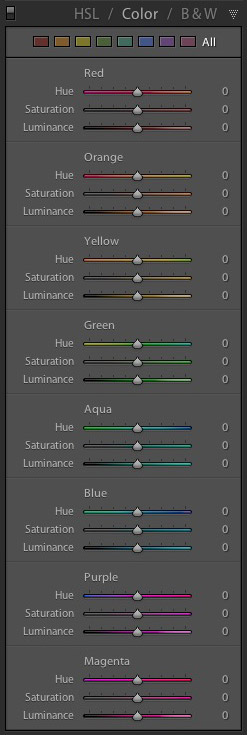
    The HSL and Color tabs are essentially the same, but with the sliders arranged in a different order. In the Color tab, the sliders are grouped in eight colors.

    Mastering colour in Lightroom

    Mastering colour in Lightroom

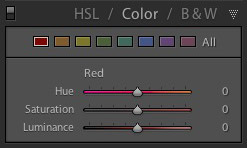
    Click on one of the colored squares at the top to show the sliders from a single color group.

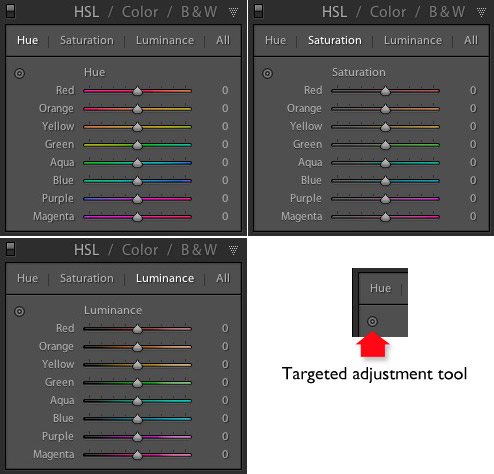
    The HSL tab groups the same eight color sliders into three categories: Hue, Saturation and Luminance. It is the tab I prefer to use as I find it easier to adjust by property (ie. hue, saturation or luminance) rather than color. It also has a Targeted Adjustment Tool (I will show you how to use that further on in the article), which the Color tab doesn’t.

    Mastering colour in Lightroom

    H=Hue, S=Saturation, L=Luminance

    Now it’s time to take a look at the sliders under the HSL and Color tabs to see what they do. You can carry out most of these adjustments within either tab, but the examples I show you will all use the HSL tab.

    Hue adjustment sliders

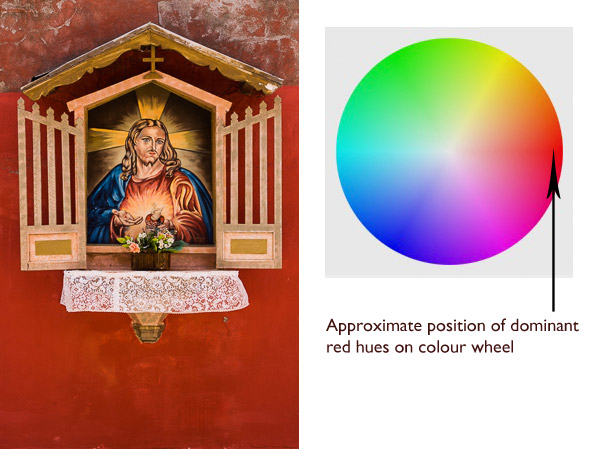
    Hue is another word for color. The Hue sliders let you replace colors in your photo with neighbouring hues from the color wheel. Let’s take a look at the earlier photo again to see how it works. The image is dominated by the color red. This diagram shows you approximately where those red hues occur on the color wheel.

    Mastering colour in Lightroom

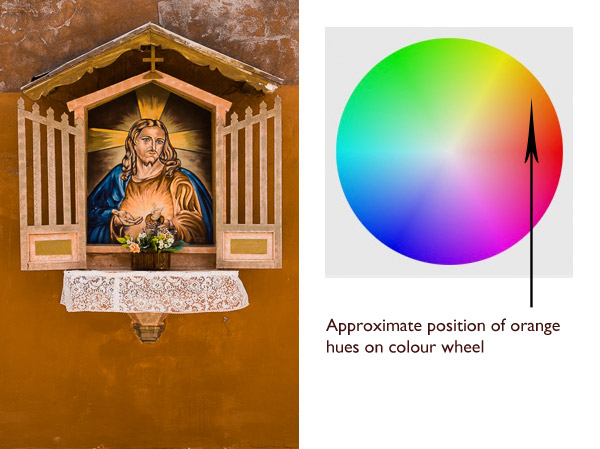
    When you move the Red slider under the Hue setting to +100 Lightroom replaces red with orange tones, located nearby on the color wheel.

    Mastering colour in Lightroom

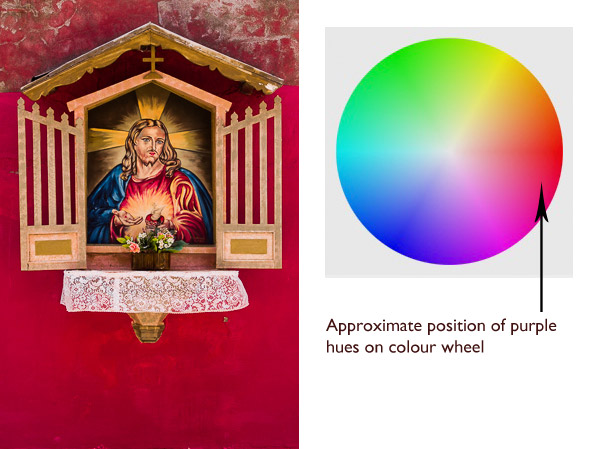
    When you move the Red slider to -100 Lightroom replaces red with purple tones, located in the other direction on the color wheel.

    Mastering colour in Lightroom

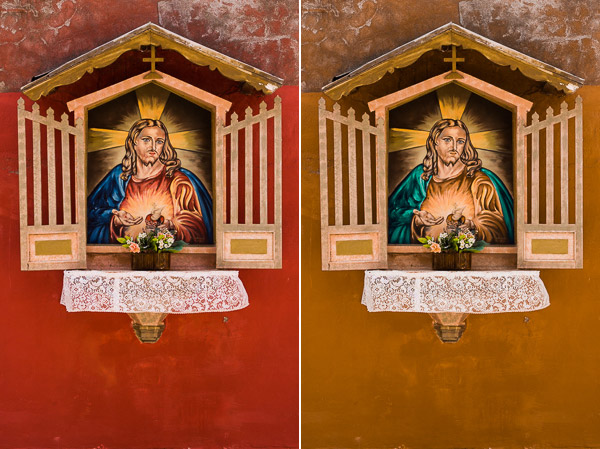
    It is possible to make dramatic differences to the colors in your images using just the Hue sliders. Here, the right hand version of the image was created by setting Red to +100 and Blue to -100. Lightroom replaced the red and blue tones in the photo with other colors.

    Mastering colour in Lightroom

    Before left – after Hues adjusted on the right.

    The Targeted Adjustment Tool

    The Targeted Adjustment Tool gives you an alternative way to do the same thing. It is more precise than the sliders because most of the hues within your photos will fall somewhere between the color sliders in the HSL tab. The Targeted Adjustment Tool lets you target those colors exactly.

    Start by clicking on the Targeted Adjustment Tool icon. Use the mouse to lay the crosshair over the hue you want to adjust. Click and hold the left mouse button down while you move the mouse upwards to replace the hues underneath the crosshair with neighbouring colors from the color wheel in one direction, and down to replace them with colors from the other direction.

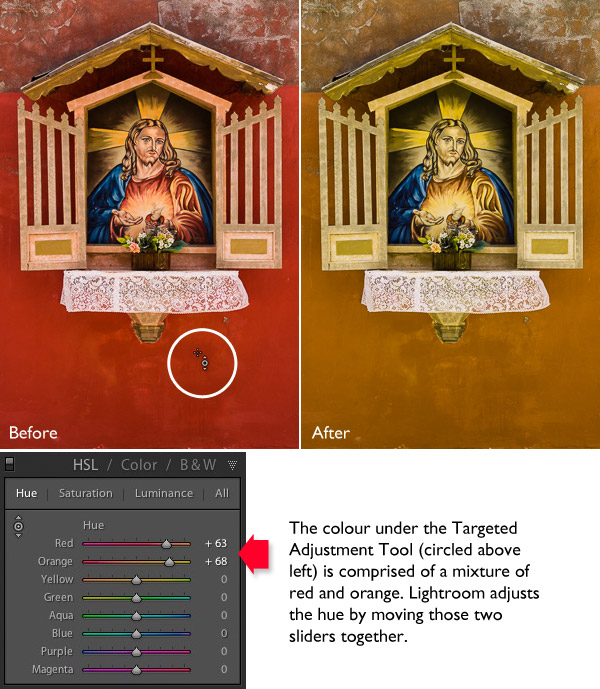
    When you do this, Lightroom moves colored sliders in whatever combination is required to adjust the color you have targeted. In the following example I used the Targeted Adjustment Tool to target the red colors in the wall. Lightroom moved both the Red and Orange sliders, indicating that the targeted color was comprised almost equally of those colors.

    Mastering colour in Lightroom

    You can use the Targeted Adjustment Tool to target colors with precision exactly the same way when you adjust Saturation and Luminance.

    Saturation adjustment sliders

    The term saturation refers to the strength of a color. If you increase Saturation, the color becomes stronger. Decrease it and it becomes weaker. Note: My article Color Composition: Using Subtle Color goes into the topic of using subtle colors in more detail.

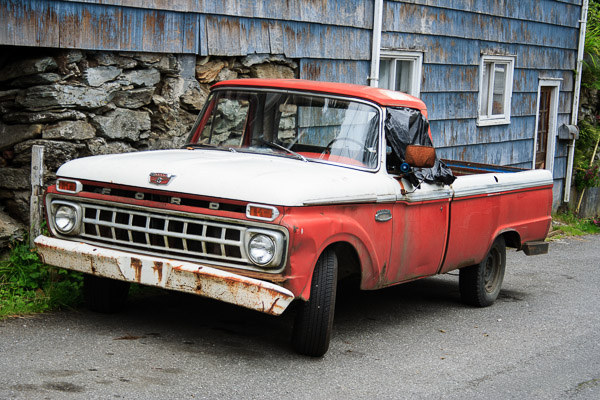
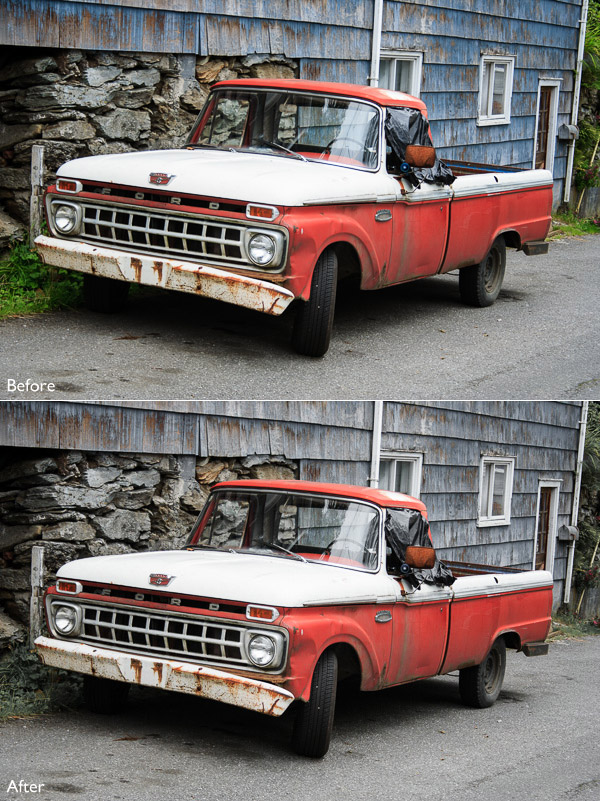
    One way to emphasize color in Lightroom is to desaturate surrounding colors. Here’s an example. The starting point is an image of an old car I took in Alaska. The composition is simple –  the red paintwork on the car contrasts against the blue wooden shingles on the house behind it and the patches of greenery.

    Mastering colour in Lightroom

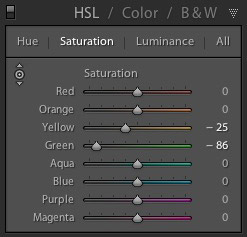
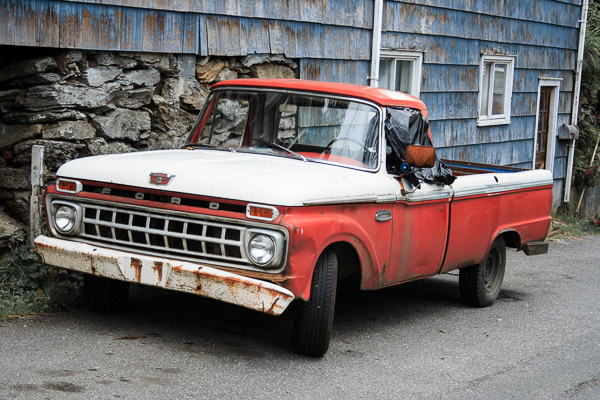
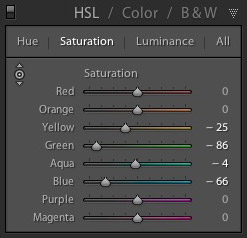
    First I used the Targeted Adjustment Tool to reduce the saturation of the green patches. Lightroom reduced Saturation in the Yellow and Green sliders accordingly.

    Mastering colour in Lightroom

    This simplifies the color composition even more, leaving red and blue as the dominant hues.

    Mastering colour in Lightroom

    Then I used the Targeted Adjustment Tool again to reduce the saturation of the blue paint. Lightroom reduced Saturation in the Aqua and Blue sliders.

    Mastering colour in Lightroom

    This is the result. I’ve placed the original and the final versions together so you can see the difference.

    Mastering colour in Lightroom

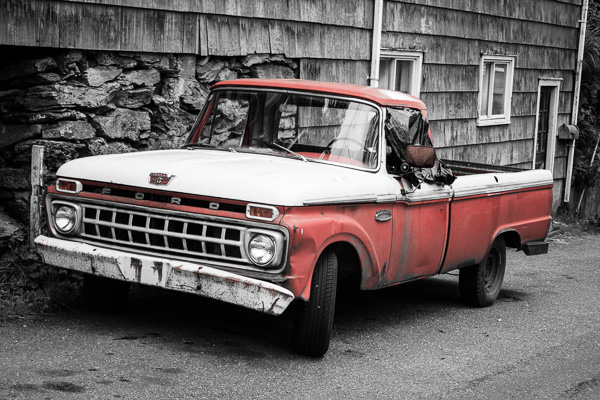
    Here’s another technique you can use. I set every Saturation slider except Red to zero. This desaturated most of the colors, turning the entire image black and white with the exception of the red paintwork on the car. I added a slight vignette using the Post-Crop Vignetting tool and increased Contrast and Clarity in the Basic panel to arrive at this black and white conversion.

    Mastering colour in Lightroom

    Luminance adjustment sliders

    Luminance is the brightness of a color. You can make colors brighter to make them stand out more, or darker to subdue them. Depending on how bright the color was to start with, reducing luminance may also increase saturation, and increasing it may reduce saturation.

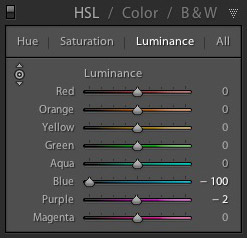
    Here’s a example showing the difference when I used the Targeted Adjustment Tool to reduce the luminance of the blue paintwork.

    Mastering colour in Lightroom

    Lightroom reduced luminance in the Blue and Purple sliders when I made this adjustment.

    Mastering colour in Lightroom

    Note that with some images the colors may go a little weird when you adjust luminance too much. Watch out for this and ease back on the luminance sliders if this happens to you.

    Your turn

    Now it’s your turn. How do use you use the HSL and Color tabs when processing your photos in Lightroom or Adobe Camera Raw? Have you come up with any interesting techniques you can share with our readers? Let us know in the comments.


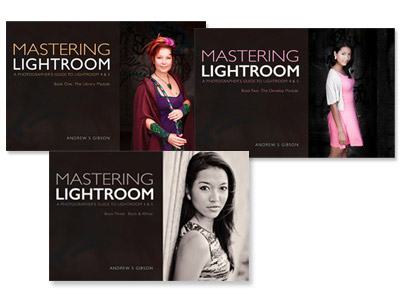
    Mastering Lightroom: Books One, Two and Three

    Mastering Lightroom ebook bundleMy Mastering Lightroom ebooks are a complete guide to using Lightroom’s Library and Develop modules. Written for Lightroom 4 & 5 books One and Two take you through every panel in both modules and show you how to import and organise your images, use Collections and creatively edit your photos. Book Three shows you how to create stunning black and white images in Lightroom.

    The post Mastering Color in Lightroom using the HSL Tab by Andrew S. Gibson appeared first on Digital Photography School.

    Digital Photography School

  • A Collection of Dreamy Star Photography

    Doing night photography is one of my favorite things to do. Photographing the stars is one of the toughest parts of night photography. We’ve had a few articles on night photography and specifically the stars here on dPS. Here are some tips on star photography for you:

    • Do you pack up and leave after sunset and miss the fun of night photography?
    • Nightscapes: Photographing the City at Night
    • How to Photograph the Stars

    To give you some ideas of what’s possible with night photography and shooting the stars, here is a collection of star photographs.

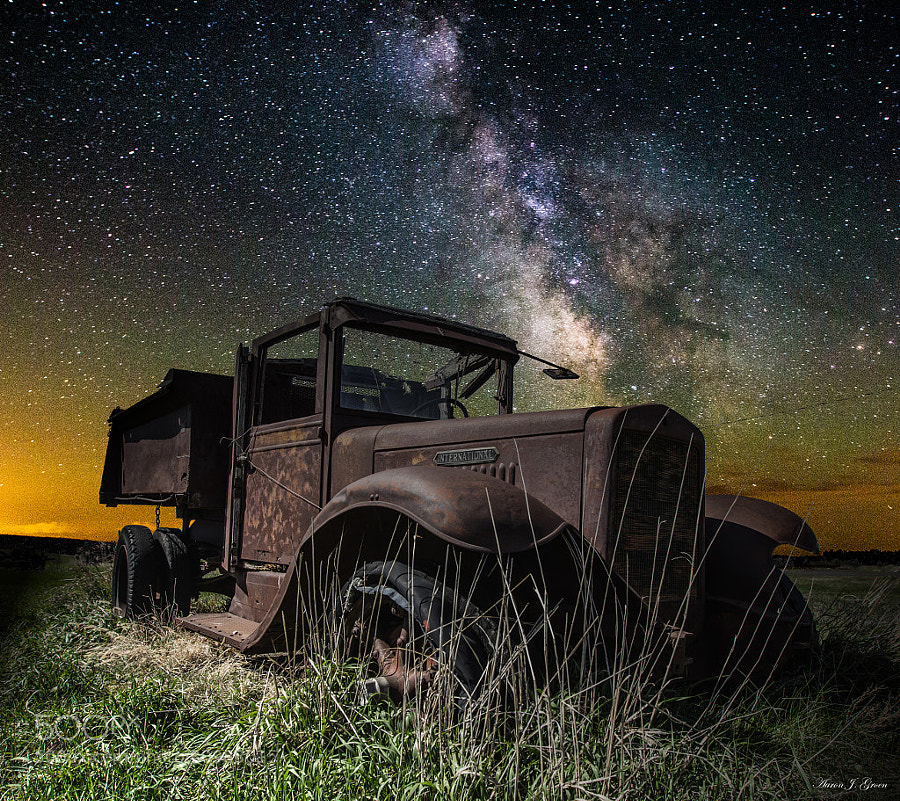
    Photograph International Milky Way by Aaron J. Groen on 500px

    International Milky Way by Aaron J. Groen on 500px

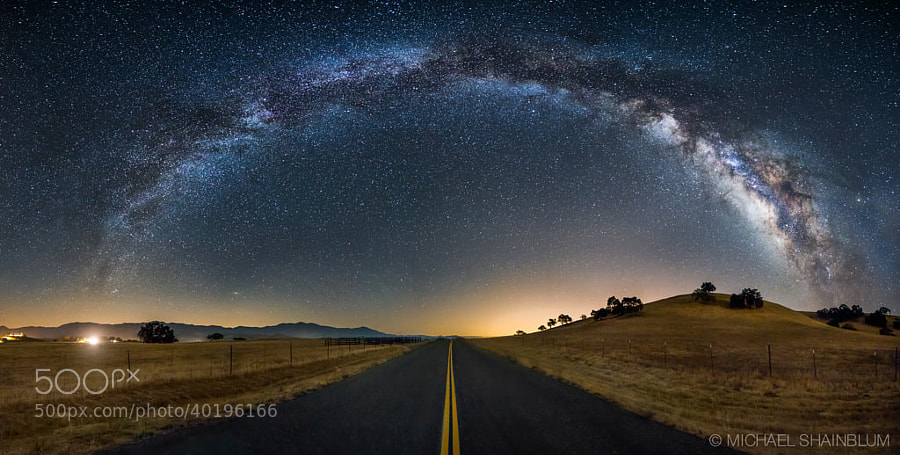
    Photograph The Galaxy Guides Us Home by Michael Shainblum on 500px

    The Galaxy Guides Us Home by Michael Shainblum on 500px

    Photograph What Once Was by Aaron J. Groen on 500px

    What Once Was by Aaron J. Groen on 500px

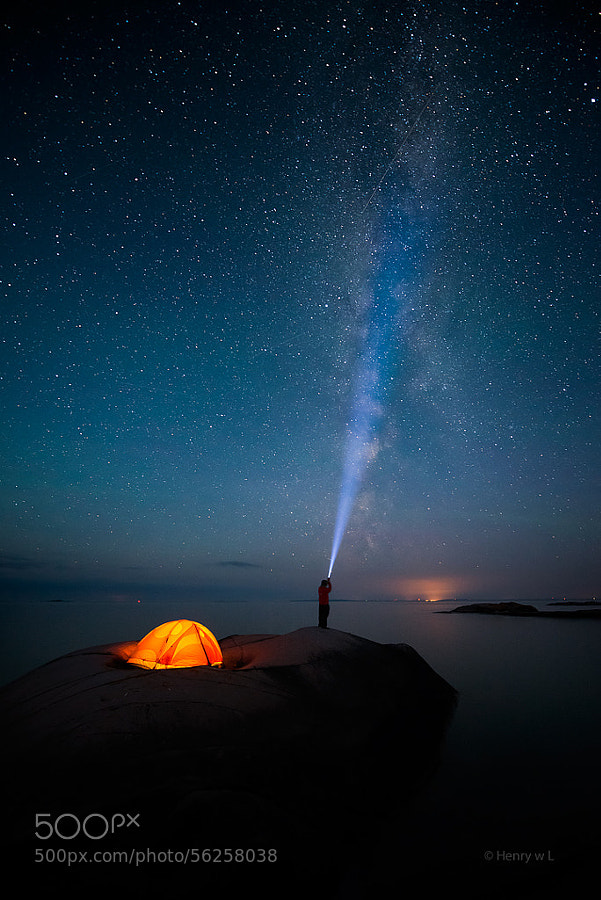
    Photograph Shooting the Stars by Henry Liu on 500px

    Shooting the Stars by Henry Liu on 500px

    Photograph Noctis by Lincoln Harrison on 500px

    Noctis by Lincoln Harrison on 500px

    Photograph Moraine Lake at night by Andrey Popov on 500px

    Moraine Lake at night by Andrey Popov on 500px

    Photograph Dolomites by Max Rive on 500px

    Dolomites by Max Rive on 500px

    Photograph Amid Myriads of Stars by AtomicZen : ) on 500px

    Amid Myriads of Stars by AtomicZen : ) on 500px

    Photograph *** by Lincoln Harrison on 500px

    *** by Lincoln Harrison on 500px

    Photograph Tree Of Life by Michael Shainblum on 500px

    Tree Of Life by Michael Shainblum on 500px

    Photograph Fossilized UFO by Sakhr Abdullah on 500px

    Fossilized UFO by Sakhr Abdullah on 500px

    Photograph Volcanoes of Kamchatka by ???????? ?????? on 500px

    Volcanoes of Kamchatka by ???????? ?????? on 500px

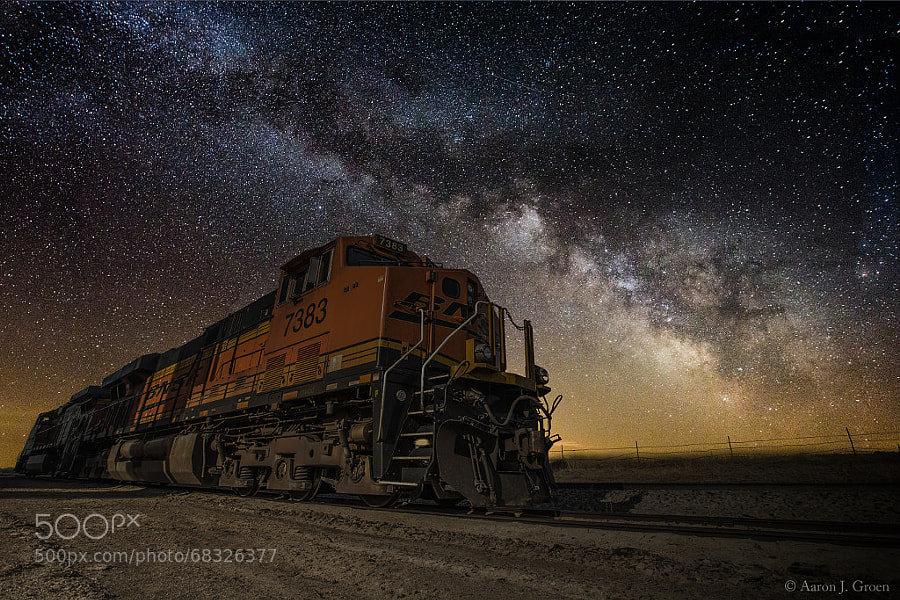
    Photograph Night Train by Aaron J. Groen on 500px

    Night Train by Aaron J. Groen on 500px

    Photograph Rainbow by Lincoln Harrison on 500px

    Rainbow by Lincoln Harrison on 500px

    Photograph Stars in Dead Vlei by Patrick Galibert on 500px

    Stars in Dead Vlei by Patrick Galibert on 500px

    Photograph Milky River From Pyramid to other ! by jamil ghanayem on 500px

    Milky River From Pyramid to other ! by jamil ghanayem on 500px

    Photograph Lonely Tree by Ajay George on 500px

    Lonely Tree by Ajay George on 500px

    Photograph Wagon Decay by Aaron J. Groen on 500px

    Wagon Decay by Aaron J. Groen on 500px

    Photograph Cottonwoods and Milky Way by Randy Halverson on 500px

    Cottonwoods and Milky Way by Randy Halverson on 500px

    Photograph In the Dream by Brad Goldpaint on 500px

    In the Dream by Brad Goldpaint on 500px

    Photograph Light painting Epupa Falls. by Patrick Galibert on 500px

    Light painting Epupa Falls. by Patrick Galibert on 500px

    Photograph Just a Dream by XeeShan Ch on 500px

    Just a Dream by XeeShan Ch on 500px

    Photograph Ancient Ruins V2 by Michael Shainblum on 500px

    Ancient Ruins V2 by Michael Shainblum on 500px

    Photograph Rendez-vous by David Keochkerian on 500px

    Rendez-vous by David Keochkerian on 500px

    Photograph Milky Way at Marshall Point Lighthouse by Mike Taylor on 500px

    Milky Way at Marshall Point Lighthouse by Mike Taylor on 500px

    Photograph Galileo's Muse by Brad Goldpaint on 500px

    Galileo's Muse by Brad Goldpaint on 500px

    The post A Collection of Dreamy Star Photography by Darlene Hildebrandt appeared first on Digital Photography School.

    Digital Photography School

  • dPS is 8 Years Old [And Here are Our Most Popular Tutorials Ever]

    Image by Ryan Pendleton

    Image by Ryan Pendleton

    Last month dPS passed it’s 8th birthday. While we usually have a little celebration at dPS HQ on such milestones we were so busy that week that not a single one of us noticed!

    So today I took a few minutes to reflect on the journey since our first post on 17 April 2006 – and what a ride it has been.

    When I hit publish on that first post I did so in the hope of helping a few of my family and friends improve their photography by writing down the tips that I found myself regularly telling them about how to use their cameras better.

    I had no idea that 8 years later the site would have published over 4500 tutorials, 19 photography eBooks, have a staff of writers, editors, designers, developers, producers, customer support and marketers running it and would have been visited by over 275 million people!

    Thanks so much to our wonderful community for sticking with us for another year here at dPS and a huge thanks to the dPS team for all your hard work!

    This past year we’ve seen a complete overhaul of our design and the addition to our team on numerous fronts. We hope you continue to enjoy what we do and are excited about the year ahead – we have some special stuff planned!

    While we’re in a mood to reminisce I thought I’d take a look back at the most tutorials we’ve published and I’ve compiled a list of our most popular 15 tutorials for those of you who might have joined us recently (or for those who want to look back).

    Many of these are from the early days but are still very relevant for today. Each tutorial has been read by over 1,000,000 readers (and up to 4,000,000).

    Enjoy!

    1. 10 Ways to Take Stunning Portraits
    2. Introduction to ISO Settings in Digital Photography
    3. How To Make Digital Photos Look Like Lomo Photography
    4. Learning about Exposure – The Exposure Triangle
    5. Wedding Photography – 21 Tips for Amateur Wedding Photographers
    6. Rule of Thirds
    7. How to Make An Inexpensive Light Tent – DIY
    8. Long Exposure Photography: 15 Stunning Examples
    9. Introduction to Aperture in Digital Photography
    10. Introduction to Shutter Speed in Digital Photography
    11. Posing Guide: 21 Sample Poses to Get You Started with Photographing Women
    12. 21 Settings, Techniques and Rules All New Camera Owners Should Know
    13. 11 Surefire Landscape Photography Tips
    14. How to Photograph Fireworks Displays
    15. DIY Lighting Hacks for Digital Photographers

    The post dPS is 8 Years Old [And Here are Our Most Popular Tutorials Ever] by Darren Rowse appeared first on Digital Photography School.

    Digital Photography School

  • Weekly Challenge – Starry Night Photography

    This week we had some Beginners Tips for Night Sky and Star Photography by one of our newest dPS writers, Phillip VanNostrand. Earlier today I shared a collection of Dreamy Star Photography.

    By Dennis Behm

    So, now it ‘s your turn. Get out into the night and photograph some stars for this week’s challenge:

    Starry Night Photography

    Here are a few more starry night photos to get you motivated, inspired and ready to go shoot.

    By Bill Shupp

    By Kris Williams

    By slworking2

    By Tom Bricker

    By David Kingham

    By Brian Hawkins

    Need more help with some tips and tutorials? Try these:

    • Lake Tekapo Under the Stars
    • The Night Sky In Landscape Photography
    • Tips for Photographing Star Trails
    • Photography Under the Stars

    Share your starry night photography

    Simply upload your shot into the comment field (look for the little camera icon in the Disqus comments section as pictured below) and they’ll get embedded for us all to see or if you’d prefer upload them to your favourite photo sharing site and leave the link to them. Okay, ready to impress us?


    The post Weekly Challenge – Starry Night Photography by Darlene Hildebrandt appeared first on Digital Photography School.

    Digital Photography School

  • Why the First DSLR You Buy Doesn’t Really Matter

    It’s about time! You finally made the decision to buy your first DSLR camera, you have saved a couple of bucks and started browsing around. Quickly, you realize the market is full of good (really good) cameras, and you start to feel overwhelmed. You ask your photographer friend or, even worse, a camera store salesman and end up feeling even Continue Reading

    The post Why the First DSLR You Buy Doesn’t Really Matter appeared first on Photodoto.


    Photodoto