Category: Photography

  • Stop Collecting Tips and Start Practicing Photography

    Young photographers are often better at digital photography than older photographers. This article will explain why this might be, and how you can improve your skills faster. You may be surprised to hear that IQ (Intelligence Quotient) apparently peaks at age fourteen.

    Now, IQ is a deeply flawed measure of intelligence, and fourteen year olds certainly shouldn’t take over the world; but the young brain has incredible processing power.
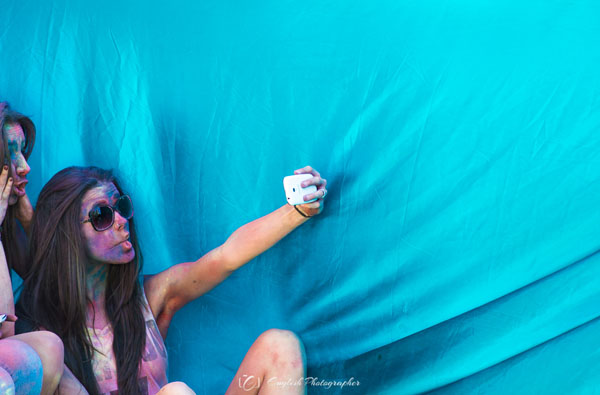
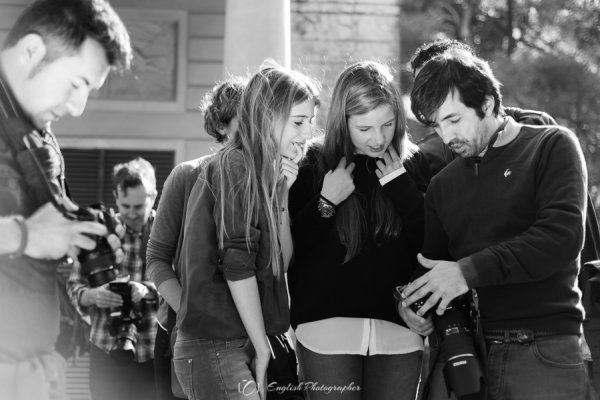
    young-photographers_8915-600

    As we age, we lose this raw speed and (hopefully) replace it with shortcuts, experience and ‘wisdom’. This allows us to make better choices and retain the illusion of intelligence, but it also limits our creativity. Incensed? Read on…

    Knowledge versus understanding

    A quick mathematics question; what’s 8 squared? Ask a child and they’ll have to work it out. You probably know it’s 64 without thinking. This is knowledge; remembered facts.

    Remember Pythagoras’ Theorem? Maybe you even know the same explanation, ‘the square of the hypotenuse is equal to the sum of the squares of the other two sides’. This is knowledge; a tool. Ask a mathematician and they’ll be able to prove it and explain why it’s true. This is understanding.
    art-photography_1712Ask a layperson about the white balance setting on your camera. They’ll probably have no clue what you mean. Ask an average photographer and they’ll be able to tell you it controls the colour cast. Ask a physicist and they’ll understand far more deeply what’s going on and why.

    Knowledge is very useful. It’s quick to learn by rote. How else can a young child pick up concepts that took the greatest geniuses years to develop? Most education equips us to slot into a role in a business. Understanding isn’t normally necessary. It’s enough to know that e=mc2 – only a few people need to understand the implications of this equation. Some of them for work; and others to satisfy a yearning to understand.

    Precisely because our society values superficial understanding, it doesn’t occur to us to make knowledge our own, to transform it into understanding. We think that by knowing the name of something that we understand it. A brown-throated thrush. Satori. Light.

    Make the leap from words to visuals

    Words are useful; they allow us to communicate. But they’re really quite limited, and the language you speak tends to limit what you can think. Philosophers are acutely aware of this. So are mystics, and as artists, we’re always seeking to move beyond the cage that words present. Try defining love – or even the smell of fresh roses.

    To communicate understandings, ideas and feelings, we have to package them up into sentences (parcels of knowledge) and share them with others, who then unpack them in the light of their own unique experience to create their personal understandings. I normally teach one-to-one, but when I teach bigger classes there’s a tendency for students to just collect the parcels and never unwrap them.

    We are particularly prone to this, because Holistic Photography is both a craft and an art. We can certainly learn the first bit; apertures, shutter speeds, the inverse square law; but we often falter with the latter. The Golden Mean? That’s just another technique.

    barcelona-sagrada-familia_1902

    Sagrada Familia in Barcelona, from a different point of view

    What ends up happening is that our head becomes so filled up with knowledge that it blinds us to the world around us. We’ll visit the famous cathedral that we read about in the guidebooks and have such a strong preconception about what it must be like that we fail to notice how it looks at the specific time that we’re there. When I’m teaching photography courses in Barcelona, the Sagrada Familia is a major attraction; but there are a myriad ways of photographing it that are overlooked. If we’re photographing people, we may get so stuck in our heads thinking about lighting ratios or the half-remembered tips of a ‘how to pose your model‘ article that we’re not available to make the human connection which leads to the poses that look best. We get stuck in our heads and cease feeling or seeing.

    Stand in front of Rothko’s multiforms in a gallery if you get the chance. You can’t quite explain why, but they move you, if you let them. Van Gogh isn’t treasured (now) because of his technique, but because of the way he expressed his internal world, which happened to match our own at moments. Because while we’re all different, we’re also all the same.

    There is a visual language. You can learn it in art school. Complementary colour schemes for emphasis, how different shapes can give different meanings, and where to put things in your frame and why. But to understand how to create, you’ll have to feel in your own body what works for you, and let your own mind tell you what’s right or wrong.
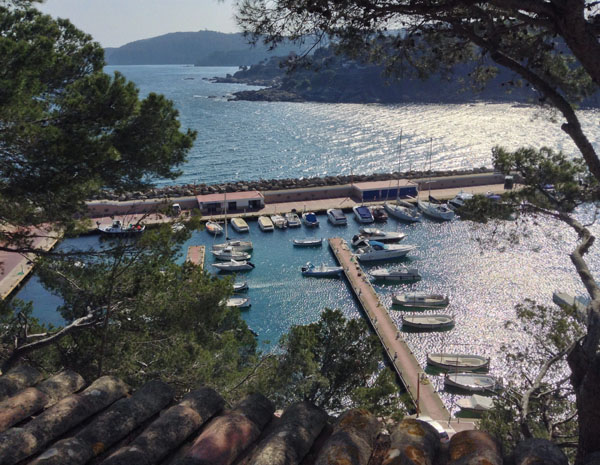
    image-1

    Theory versus action

    Young photographers look for knowledge online. They have access to more information than they can ever read. Most are open to learning, so they progress rapidly. Like the zen master said, your cup can’t be full if you want to put more in it.

    But they also have the benefit of few responsibilities, short attention spans and huge amounts of time. They underestimate the importance of learning from others. So they read a bit, get bored, and just play with the camera. Digital is free to experiment with, so they make thousands of mistakes and try things we never would. Then, when they reach a barrier, Google instantly provides the answer. It’s no wonder that they learn far faster.
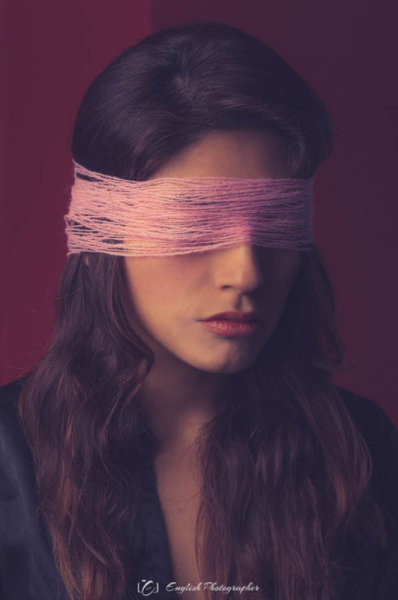
    imageCompare the contrary method. To get a big stack of books and methodically work your way through them, supplemented by overpriced photography magazines. Let’s not forget the millions of photography articles online as well. It’s addictive. Our brain rewards us for learning. We feel like we’re improving. But content is a trap, and too much information atrophies or paralyzes us.

    Information with application is different. If we can immediately use what we’re learning, we’ll assimilate it faster and retain more. I studied French for almost a decade and can hardly hold a conversation, but speaking Spanish with my Peruvian girlfriend makes it much easier to learn.

    There needs to be a balance. I see some photographers who learned a few techniques back when film was still popular, and have just stuck with them. If it’s not broken, don’t fix it, they reason. But no, you need to be constantly evolving, learning form others and letting your photography keep pace with your own evolution.

    But chances are if you’re reading this, you’re taking in too much information without applying it. Get a little bit of relevant theory and then practice, practice, practice until you understand it well enough to integrate it with your vision. Then seek out another bit of knowledge to turn into understanding.

    The takeaway from this is that we’re really not as capable as we might imagine. Nor do we understand how to best work with our psychology to make the most of our energies. We try to learn the ‘right’ settings by looking at the aperture, shutter speed and ISO used in photos we admire. But our brain hasn’t evolved to memorize numbers.
    photographers_9490

    It can however tell you if a drinks can is full or not just by picking it up. Far better it is then to develop the muscle memory associated with changing the settings on your camera. Work on specific areas until they’re second-nature and you’ll find your photography will improve far faster.

    Go forth and practice!

    So that’s enough theory for now. Here’s a test; set an alarm to ring in a couple of hours then carry on with whatever you were doing. Try and remember what this article was about. If you can’t remember what you read, then there was no point in spending your time to read it. There’s a wealth of knowledge available that can push your photography to the highest levels; but only you can unpack it into understandings. Make it applicable. Make it stick. Use it. Make it your own.

    The post Stop Collecting Tips and Start Practicing Photography by Ben Evans appeared first on Digital Photography School.
    Digital Photography School

  • No Telephoto Lens No Problem – Tips on Shooting for the Crop

    shoot-for-the-crop

    Maybe your photos are better than you think. Perhaps all you need to transform your images into keepers is to simply cut out the dead wood and get ruthless with the crop tool. While I’m not against getting your shot perfect ‘in camera’, I do believe that cropping like a boss during post-production can turn a ‘meh’ shot into a ‘whoa’ shot just by carefully placing those marching ants in Adobe Camera Raw and hitting ‘crop’.

    Why limit yourself to a mediocre image when there’s a little hidden gem inside your average shot, waiting to be teased out like a gleaming pearl?

    Get closer after the fact

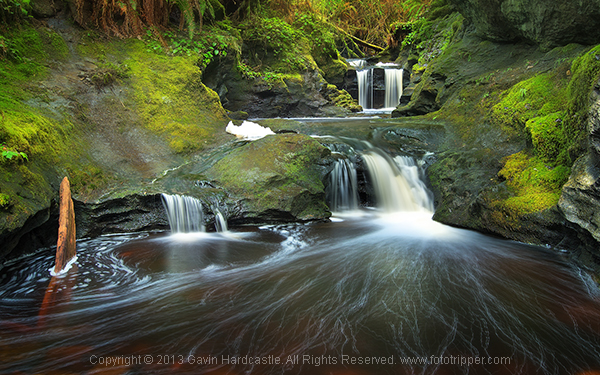
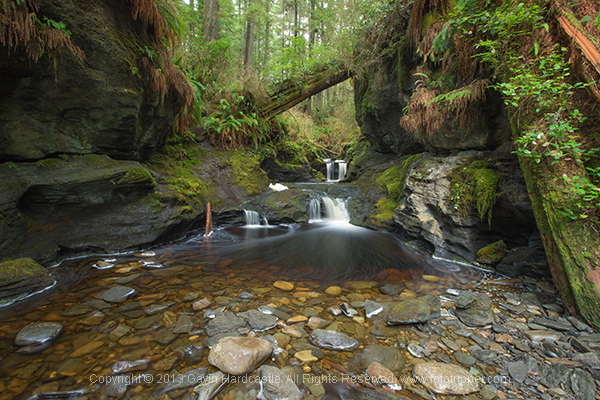
    Here’s an example of a cropped shot with the full frame shot below it. During the shoot I was happy with the original composition (below), but after studying the shot at home I decided that the scene needed to be more intimate, so in I went with the scissors of brutality.

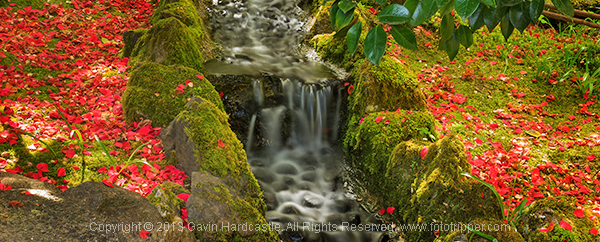
    Vancouver Island Waterfall Landscape Image Crop - Gavin Hardcastle

    Cropped version

    How to Shoot for the Crop

    Full image uncropped

    Tell the story

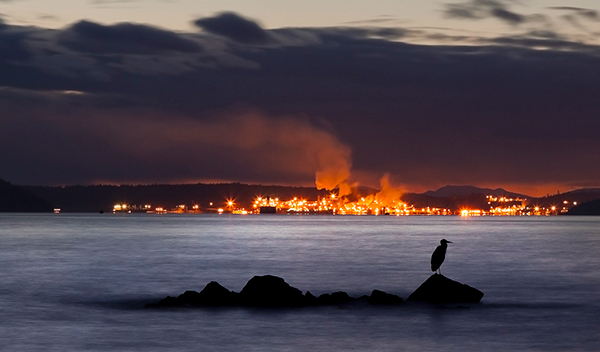
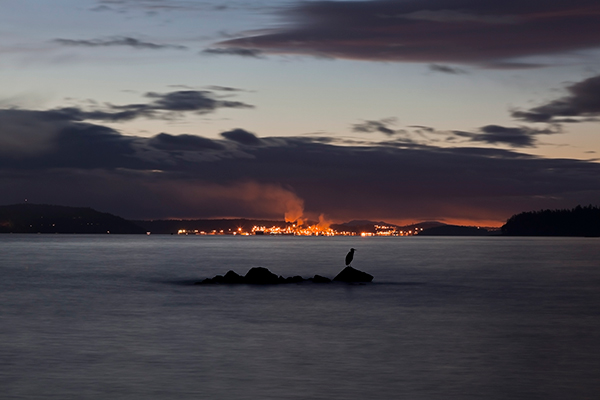
    When your image has an obvious story, it’s often wise to cut out any non-essential space to ignite a more immediate reaction in your audience. By discarding all distractions, you’ll direct their attention to what matters most. With the image below, I wanted to portray the resilience of nature under the menacing specter of toxic pollution. I knew I had the shot but the story had much more impact after I’d cropped out all of the wasted space in my image. Ideally I would have used a longer lens to achieve the same result but all I was carrying at the time was a 24-105mm and there was no way I was going to let that stop me. Shoot, crop, done, breakfast.

    'Held To Ransom' by Gavin Hardcastle

    held-to-ransom-full-gavin-hardcastle

    Use your megapixels

    You’ve doubtless heard grumpy old fossils whine on about why big megapixels are pointless unless you’re printing wall sized prints. I’m here to tell you that’s a load of old codswallop. Try cropping out a small section of a 16 megapixel image and let me know good it looks at the full size of your computer screen. Lacking in resolution, hmm? Well I guess it depends on the size of your crop, but chances are things are starting to look a little crusty if you’re not packing some heat in the megapixel department. Size, as they say, does matter.

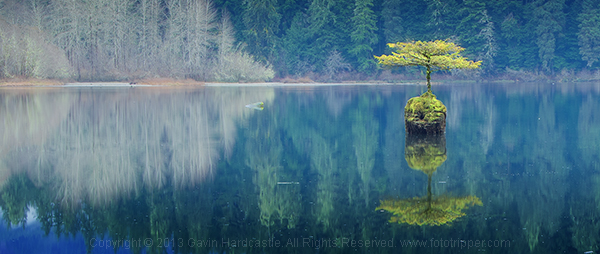
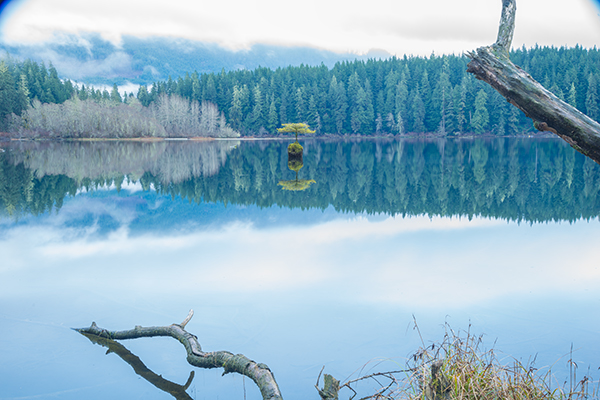
    Here’s another example of using my megapixels to get closer to my subject. As you can see from the full frame image below the crop, I made no attempt at composing a foreground because I knew I’d be cropping out everything but my main subject – the magic tree of Fairy Lake on Vancouver Island. You can even see a hideous vignette in the full frame shot caused by the polarizer rig. Crop, done, lunch.

    gavin-hardcastle-fairy-lake-port-renfrew-vancouver-island-crop

    gavin-hardcastle-fairy-lake-port-renfrew-vancouver-island-full

    If you can’t afford a big telephoto lens but have a good quality wide-angle lens and a decent megapixel count, it’s still worth taking that shot of the bird on the other side of the lake. You can crop it later and possibly come away with a keeper. Sometimes it’s not even the cost of long lenses that puts people off using them, it’s the chiropractors bills that come from dragging them around. That being said, a top notch telephoto lens creates a specific look and for serious wildlife shooters it’s a must-have lens. This isn’t an anti-telephoto article so don’t be leaving angry comments.

    A second chance at composition

    When you’re familiar with a location and you’ve shot there many times before, it’s easy to plan your compositions long in advance. But what if it’s your first time and you’re shooting under pressure? Sometimes you get lucky, but sometimes you won’t spot the perfect composition until you review your images back at home on a full size computer screen.  That’s when cropping will give you that second chance at getting the perfect shot.

    Butchart Gardens Vancouve Island Gavin Hardcastle

    Teach yourself composition

    I’m always telling my students that you can learn a huge amount about composition simply by reviewing and editing your images. Try and find two or more new compositions that are hiding in plain site right there in your existing images. This simple process teaches you a lot about balance, symmetry, framing, leading lines and whatever other compositional elements are right there in your images. Spend enough time doing this and you’ll become a better photographer when you’re out shooting. When cropping, you can start by asking yourself a few essential questions:

    • What is the main subject of my image?
    • What parts of the image do I love?
    • What parts of the image do I not like?
    • How can I focus the viewers attention?
    • What can I exclude?

    By answering these five simple questions you’ll quickly identify the strongest parts of your image and transform them from stale, forgotten megabytes, into beautiful memories you can share with the world. I hope you found this article helpful and please, get cropping and then share your best cropped images with me, I’d love to see your results.

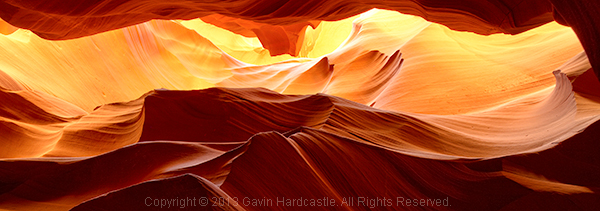
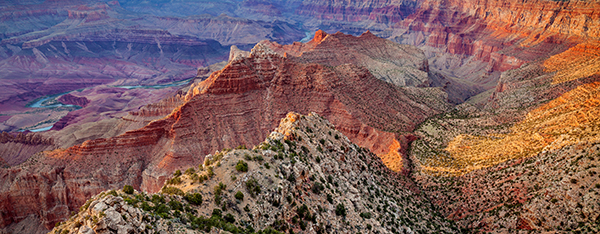
    grand-canyon-crop

    The post No Telephoto Lens No Problem – Tips on Shooting for the Crop by Gavin Hardcastle appeared first on Digital Photography School.

    Digital Photography School

  • Case Logic SLRC 205 Sling Camera Bag Review

    Case Logic SLRC 205 Sling Camera Bag Review

    If you’ve ever bought a case for a tablet or a hard drive then you’re probably familiar with Case Logic products. The ubiquitous logo is hard to miss in the accessories section of computer and electronics stores.

    Case Logic SLRC 205 Sling Camera Bag Review

    What you may not know is that Case Logic also make some very good camera bags, up there in quality and design with established brands such as Lowepro, Crumpler, Kata and Think Tank.

    So when David from Love Cases got in touch asking if I’d like to review a camera bag sold in his store, I selected the Case Logic SLRC 205 sling style backpack to test out.

    Why a sling bag?

    The type of camera bag I use depends on the nature of the shoot and the amount of equipment I need. For example, I like to use my ThinkTank Retrospective 20 on portrait shoots. It’s a shoulder bag into which I can easily fit everything I need. But, it’s a heavy bag and all the weight is on one shoulder. After a while it hurts, and becomes uncomfortable to walk with – that limits its use to shoots where I don’t have to walk very far.

    Sling bags are ideal when I need to walk some distance to arrive at the location of the shoot. I can put my gear in the bag, then take out what I need when I arrive.

    I like to use a Black Rapid RS-Sport camera strap, which leaves my camera hanging down by my right side ready to use. If I have a sling bag I can keep it on my back while I shoot, held in place by the straps so it doesn’t move around. I don’t have to worry about where it is, or someone stealing it if I put it down.

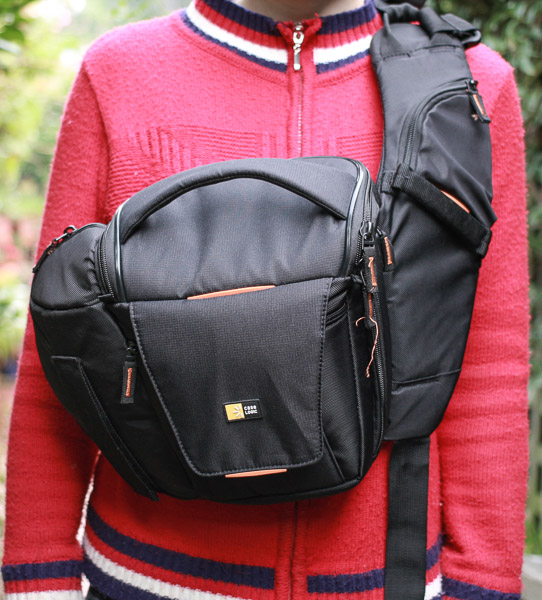
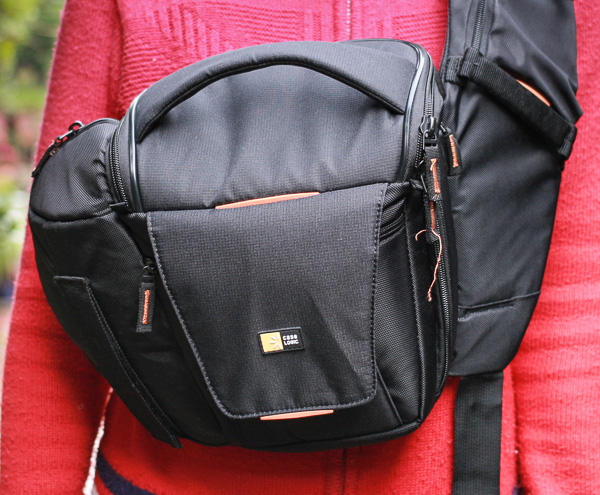
    However, I don’t use sling bags in one way they are intended. I never bring them around to the front to remove gear, as I find they are so high on my body that it’s an uncomfortable process. Not everybody feels this way, I’m sure. This photo shows where the camera bag lies when you swing it around to the front.

    Case Logic SLRC 205 Sling Camera Bag Review

    The Case Logic SLRC 205 bag

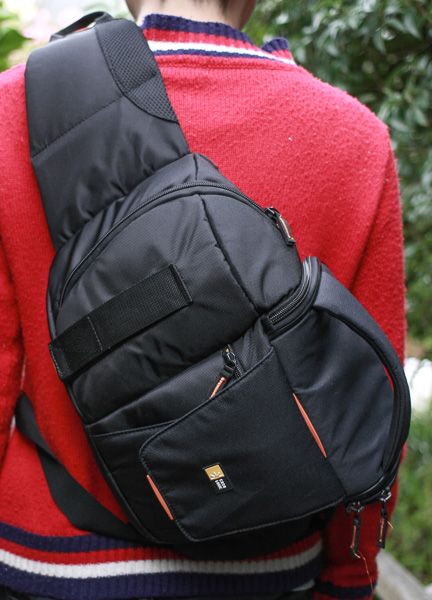
    I’ve used this Case Logic sling bag on several shoots and I’m very pleased with it. It would suit me better if the main camera compartment was a little bigger, and it would be nice if it had a waterproof cover. But apart from that I’m delighted with it.

    Case Logic SLRC 205 Sling Camera Bag Review

    The Case Logic SLRC 205 from the back.

    Case Logic SLRC 205 Sling Camera Bag Review

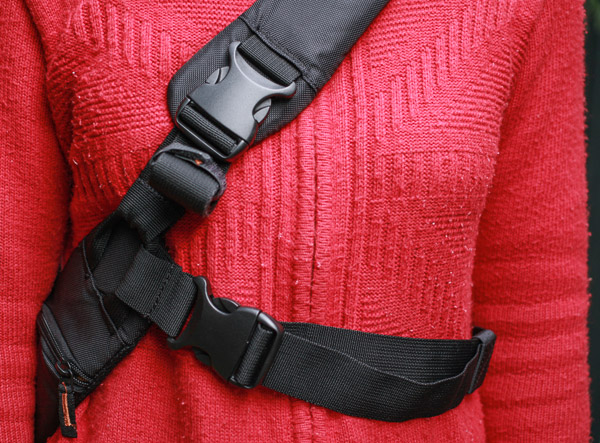
    The bag straps from the front. The waist strap (bottom right) provides extra support and prevents the bag from sliding around on your back.

    Features

    I really like the design of this camera bag. It has a number of well thought out features that make it easy to use.

    Main camera compartment

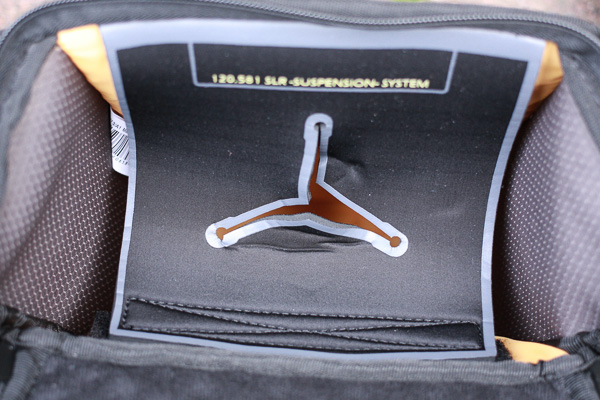
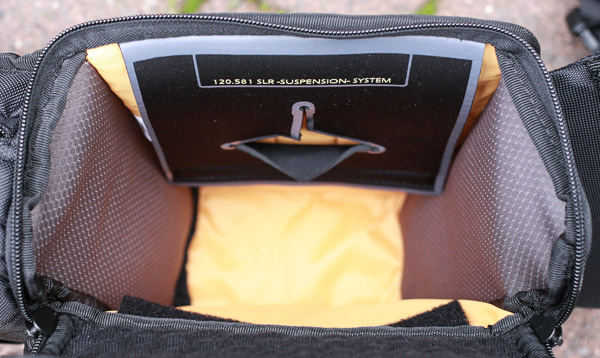
    This is for your camera and lens. Case Logic use a hammock system to support your camera. There is a flap with a hole in it at the top of the compartment, and you can place the lens through the hole and rest your camera on top. It keeps your camera ready to hand and provides extra protection if you drop the bag.

    Case Logic SLRC 205 Sling Camera Bag Review

    It’s a great idea, but the only drawback for me is that the compartment is too small for my camera, (an EOS 5D Mark II), when the hammock is in position. In terms of size, this bag is best suited for small digital SLRs or mirrorless cameras.

    However, if I fold the hammock down (it is supported by velcro) I can fit my camera inside. The camera rests on the lens in this position, so I attach the lens hood to prevent the lens cap being dislodged by rubbing against the side.

    Case Logic SLRC 205 Sling Camera Bag Review

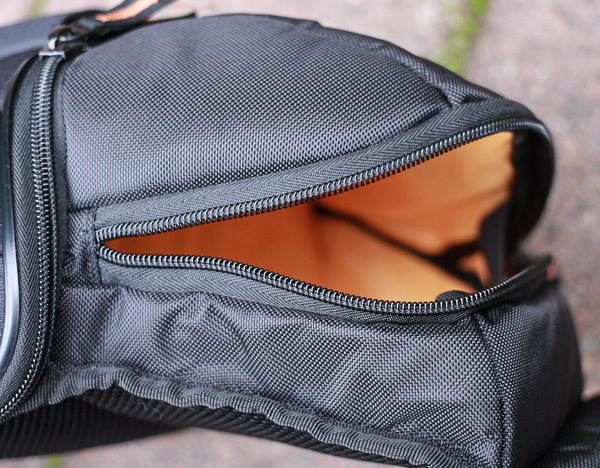
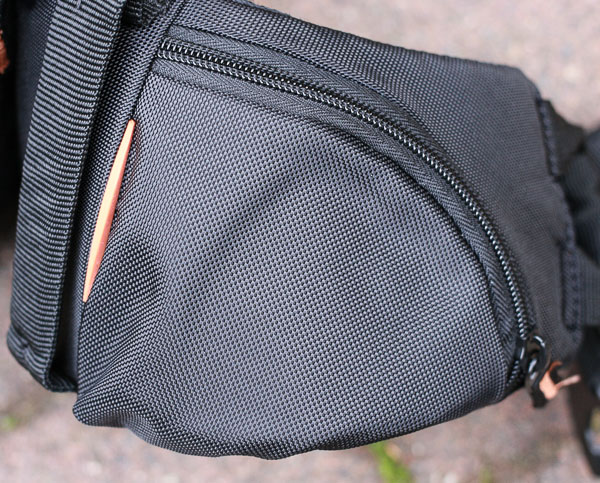
    Small side compartment

    This is big enough to store another lens or accessories. I use it for my Black Rapid camera strap and a small prime lens. It’s not designed for another body, so if you want to take two cameras on a shoot then you’ll need another bag.

    Case Logic SLRC 205 Sling Camera Bag Review

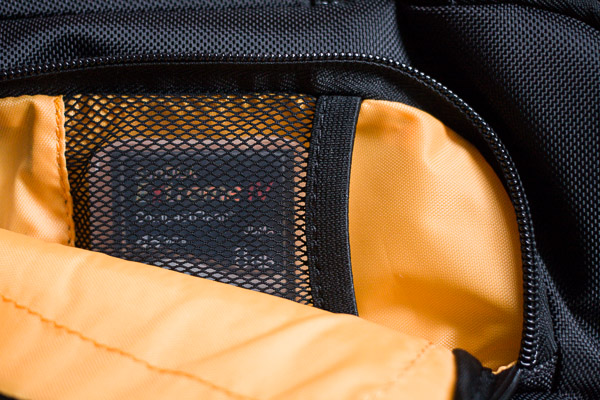
    Memory card storage

    On the other side is a zipped compartment that opens to reveal memory card space storage.

    Case Logic SLRC 205 Sling Camera Bag Review

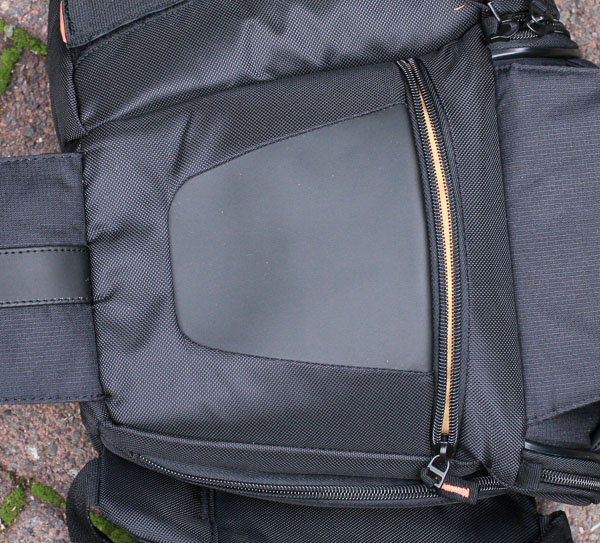
    Wallet compartment

    You can put anything that fits in here, but it’s ideal for a wallet. It’s hidden behind the velcro flaps used to support a tripod, making it virtually impossible for someone to steal the contents unnoticed.

    Case Logic SLRC 205 Sling Camera Bag Review

    Mobile phone compartment

    One of the straps has a small flap ideal for storing a small mobile phone. My iPhone 3Gs fits inside, just. If you have a larger phone than this you’ll need to find somewhere else to keep it.

    Case Logic SLRC 205 Sling Camera Bag Review

    Tripod support

    There’s a hook-n-loop strap to support a tripod. It’s a nice idea, best suited to small, lightweight carbon fibre tripods rather than heavier models.

    Case Logic SLRC 205 Sling Camera Bag Review

    Bag quality

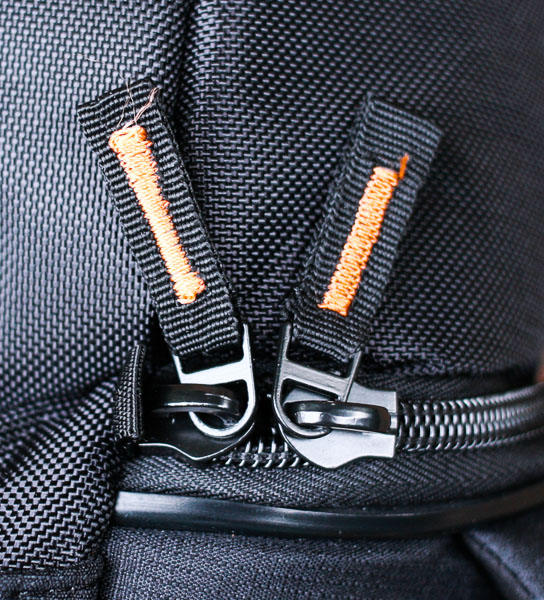
    The quality of this bag is excellent. The outside of the bag is made from hard-wearing nylon. The zips are strong and durable and have tags marked with orange thread, making it easy for you to see them.

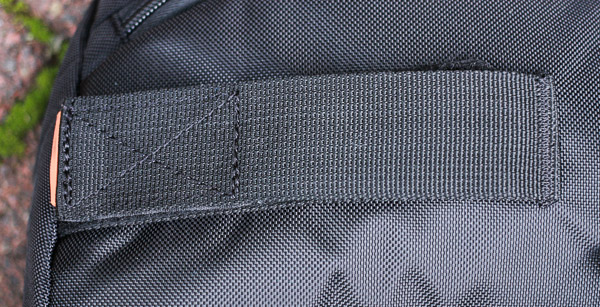
    There are three strong, conveniently placed, handles that make the bag easy to pick up. The shoulder strap is well padded and nice and wide to spread the weight. The interior is bright yellow, so it is easy to see your black accessories such as lens caps. The support straps come with velcro tabs so any unused straps don’t dangle down.

    Case Logic SLRC 205 Sling Camera Bag Review

    Conclusion

    This is a high quality camera bag ideal for anybody who takes a minimal amount of equipment on a shoot. It is most suited for photographers who use small SLR or mirrorless cameras. It is comfortable and easy to use. The only drawbacks are the size (if you have a large camera body) and lack of a waterproof cover.

    Thanks to David from Love Cases for supplying the bag for review. Love Cases is a UK based company with international delivery. You can also buy the Case Logic SLRC 205 from Amazon.

    Mastering Photography – additional learning

    Mastering Photography ebook

    My ebook Mastering Photography: A Beginner’s Guide to Using Digital Cameras introduces you to photography and helps you make the most out of your digital cameras. It covers concepts such as lighting and composition as well as all the camera settings you need to take beautiful photos like the professionals.

    The post Case Logic SLRC 205 Sling Camera Bag Review by Andrew S. Gibson appeared first on Digital Photography School.

    Digital Photography School

  • Beginners Tips for Night Sky and Star Photography

    Star Photography

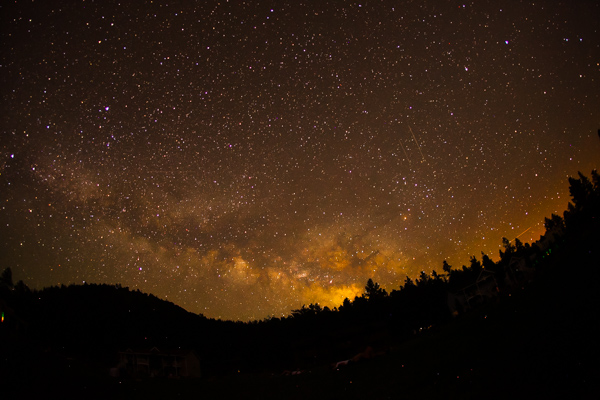
    My favorite type of personal photography is taking night shots of the stars (long exposure pictures). I am often busy shooting pictures of people at weddings, or apartments, or models, and it’s important for me to make sure I take pictures for fun regularly. Taking pictures for no one other than myself is highly rewarding, soul filling, and fun! I also love taking travel photos and HDR photos, in this article we will take a close look at exactly how you can take your own epic star photographs.

    star photography

    30 seconds at f/2.8, ISO 1250

    What you need to take jaw-dropping pictures of stars

    To take your star pictures, you only need three things:

    1. a full-frame camera (for better ISO capabilities)
    2. a fisheye lens (for the widest view of the sky)
    3. a tripod (for stability during 15 second photos)

    (Note: You can do this with a cropped sensor camera, without a tripod, and without a fisheye lens. It will just be a little harder and slightly less jaw-dropping)

    star photography

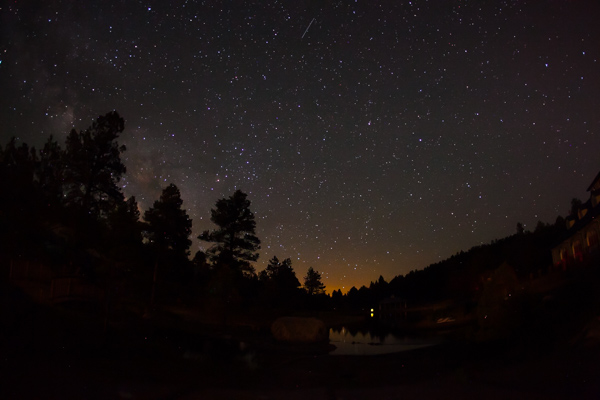
    25 seconds at f/2.8, ISO 1600

    Camera settings

    You can nail this shot almost every time with these settings:  25 second exposure, f/2.8, ISO 1600

    If your lens doesn’t open up to f/2.8 you can try 30 seconds at f/4 with ISO 1600.

    Note: this kind of photography won’t work if there is a full moon out (or even a half moon). Don’t compete with large light sources, the stars will be over powered. The best location for star photography is way out in nature, away from city lights that cause “light pollution.”

    star photography

    13.0 seconds at f/2.8, ISO 1600

    Why to use these settings

    The most important component of these settings is the 25 second exposure. An exposure longer than about 25 seconds will start to show star trails. Photographing star trails is a legitimate type of photographyon its own, but not the type of photography you are trying to do here. Since you are limited to about 15-25 seconds max shutter speed, you still need to let in more light. The largest aperture you can find on a fisheye lens is f/2.8, and still your picture might not be quite bright enough to look stunning. So this is where the ISO comes into play. On a full-frame camera like the 5D Mark III or the Nikon D800 you can bump the ISO up to around 2000 without seeing much noise. You’ll learn how to reduce noise in Lightroom in the next section for a super clean photo.

    star photography

    Editing in Lightroom

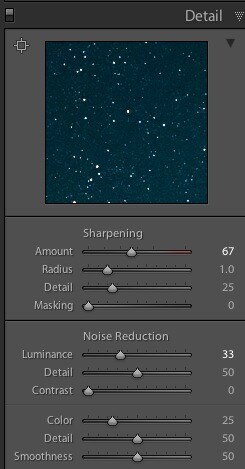
    I do extensive retouching in Lightroom after I take my photos. I’ll usually boost the exposure up by a stop or more and I’ll use Noise Reduction under the Detail section to reduce any unwanted “noise” (those pesky extra white, red or blue pixels that show up when you push the ISO too high). Here is a standard star photo of mine and the Lightroom settings I used to create it:

    star photography

    25 seconds at f/2.8, ISO 1600

    Here are the Lightroom settings I used to edit the above photo:

    star photographystar photography

    1) You can see in the first panel that I bumped the whites up to +46 and brought the blacks down to -52. I really wanted to emphasize the stars against the dark sky and this is a good way to do that. Pushing the clarity up to +55 also helps define the stars against the sky, making them nice and crispy. I boosted the saturation to bring out any colors that are in the sky.

    2) In the second panel you can see that I sharpened up the image a bit, also to emphasize the stars. At the same time, I brought up the noise reduction to 33 to smooth out some of the noise that might show up, and I brought up the color to 25 for the same reasons.

    Pro tips

    star photography

    Here is where you can have fun with the editing. Play around with the split toning sliders to make the colors in your sky appear magical. In the photo above you can see a little bit of turquoise in the lower part of the sky, and that comes from boosting that color in the Shadows of the Split Toning slider here:

    star photography

    You can also affect the color of the sky by playing around with the temperature and hue sliders to get some pretty magnificent looking star photos. Take a look at this one photo rendered three different ways:

    Another pro tip that you may have noticed in all of the photo examples I gave here is this – shoot your stars in context. It really tells a great story to see a silhouette of a pine tree or a house in the background, and it shows the magnitude of the scene when you have an object in the foreground to compare to the stars.

    Lastly, make sure you know which direction the Milky Way is. You can use an app like Sky Map to see exactly what stars are in the sky above you.

    Have fun shooting, and please share your pictures below!

    star photography

    The post Beginners Tips for Night Sky and Star Photography by Phillip VanNostrand appeared first on Digital Photography School.

    Digital Photography School

  • Master Easily Taking Candid Photos of Your Friends

    Taking photos of your friends is an accessible way to improve your picture-taking skills. But it can be difficult to do this well and get good photographs, improve your skills, and not offend your friends. It seems simple, of course… you and every person with a smartphone these days are taking photos of your lunches like it’s the top of Continue Reading

    The post Master Easily Taking Candid Photos of Your Friends appeared first on Photodoto.


    Photodoto

  • Save Tons of Editing Time with Lightroom Presets

    On now at SnapnDeals you can get 100 of my custom Presets 50% off. Deal ends soon, don’t miss out so grab it here. 

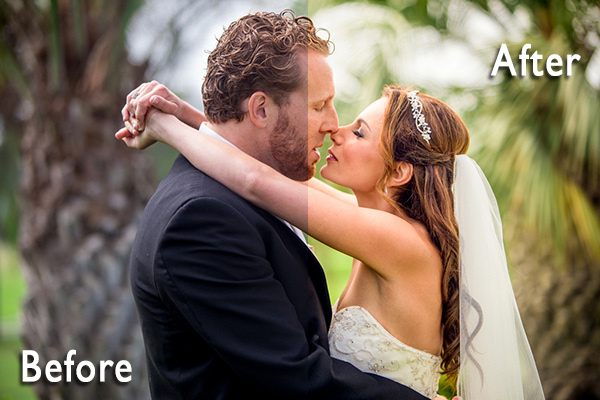
    before-after-lightroom-presets

    Photographers don’t have a lot of extra time to edit. As a full-time photographer myself, I rely heavily on any tools that save me time in the editing process. One of the tools I use is Lightroom presets.

    What are Lightroom presets?

    A preset is a pre-determined position all (or some) of the of sliders in Lightroom (they are pre-set, get it?) In other words, you can edit a photo to your liking, and then save that exactly combination of slider positions for future use on another image.

    First things first: how do you create a Lightroom preset?

    Very easily! Once you have a photo edited the way you want it you need to save those settings.

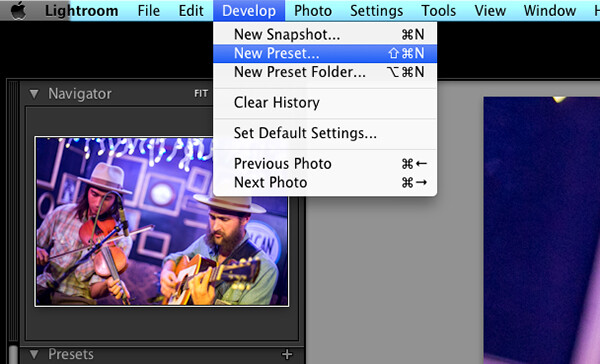
    Step 1:  Click “Develop” then “New Preset”

    presets-step-0

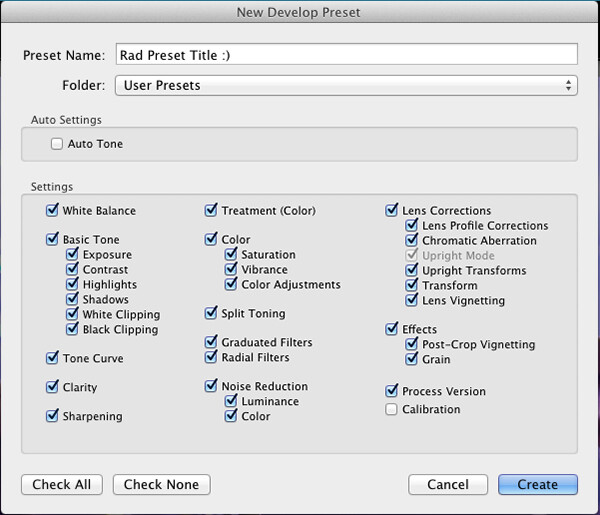
    Step 2: Give your preset a title

    Lightroom Presets Tutorial

    Name your new Preset

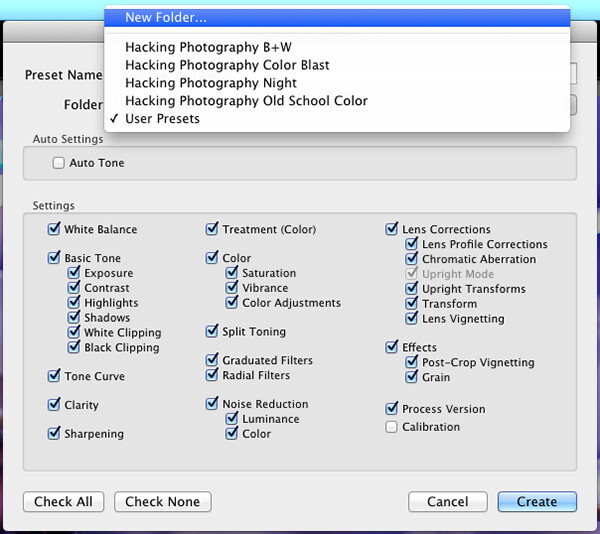
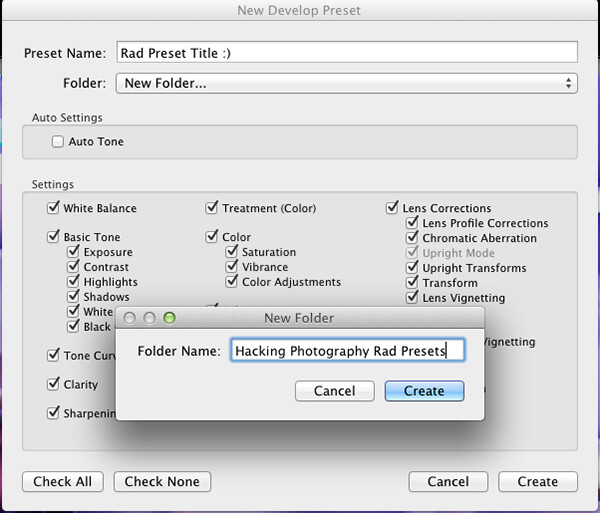
    Step 3: Choose the folder you want the preset stored in, or create a new folder.

    This is a good idea to separate your presets by type. You would be surprised how many random presets you end up with over a few years. Consider creating folders based on the type of edits they are.

    Lightroom Presets Tutorial 3

    Choose the folder to save it in

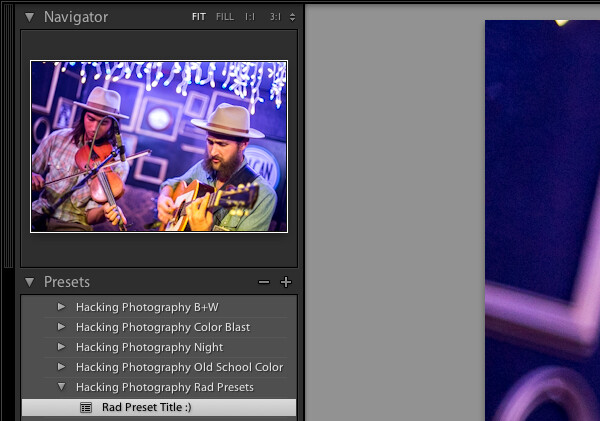
    You can see I’ve named my presets by color blast (big colors), night, old school color, and black and white. Now I can quickly find the preset I’m looking for based on what type of edit I want to do.

    preset-step-3-web

    Or make a new folder and give it a name

    Step 4: Click the boxes you want applied to this preset and click “create” to create your preset

    Sometimes you don’t want every box checked when you create a preset. Imagine you just edited an underexposed photo and had to increase the exposure two full stops (+2 on the exposure slider) to get it correct. This preset would look great on underexposed photos in that set, but would overexpose photos that had the correct exposure.

    Another scenario is that you create a preset that only applies a slight vignette to your photos. Unchecking every box except the “vignetting” box would create a preset that would keep the ‘look’ of any photo you are editing and only apply that vignette to it. Pretty cool!

    Step 5: You’re done, the preset is complete.

    preset-step-4-web

    There’s your new Preset

    The preset is complete and waiting in the folder you just created. Just open the folder and click the preset title to apply it to future photos.

    Lightroom presets save time by enabling batch editing

    Imagine shooting 300 images in an area where the lighting isn’t changing and stays consistent. You edit the first image to your liking and save the settings as a preset. Instead of individually editing the remaining 299 images one by one, you can apply that preset and achieve the same ‘look’ as the previous photos. 

    The next time you want that type of ‘look’ on a photo with a similar lighting setup you can just apply a preset in one click. It will move all the sliders to those exact positions so the edit style stays the same.

    The best part about this is batch editing your photos all at once. You can edit a single image and then apply that preset directly to as many photos as you would like in just one click.

    How do you batch edit photos?

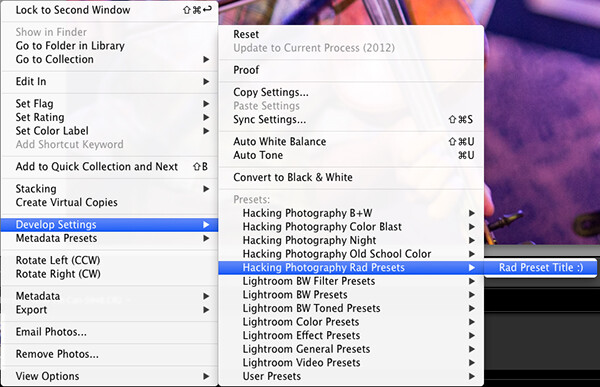
    Select all the photos you want to apply the preset to, right-click the any of the photo thumbnails, and follow this path:

    Lightroom Presets Tutorial 5

    That will apply the preset automatically to all the images you selected in one click.

    For a walk through on how to do this watch this video as I go through all the steps:

    Lightroom presets also save time with the live preview feature

    When you hover over the preset names the image thumbnail in the top left corner will give you a preview of what that image will look like with that preset. As you scan your mouse over the list you will be able to tell if a certain preset will look good or not. If it does, you can click once and be done with the image.

    Lightroom presets give you a great starting point

    Instead of manually editing a photo from scratch, you can apply a preset to make a big change and edit from there. It’s like getting a big head start.

    Lightroom presets can do a one-click edit

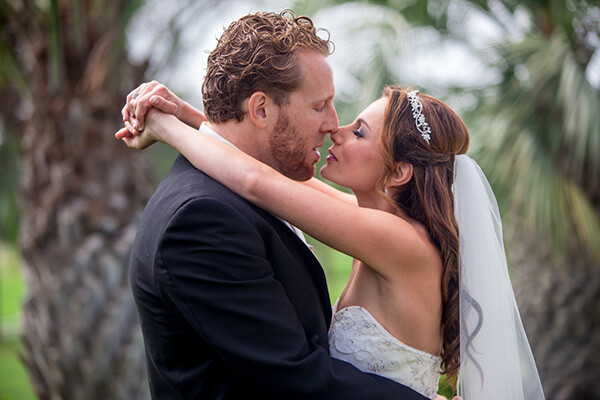
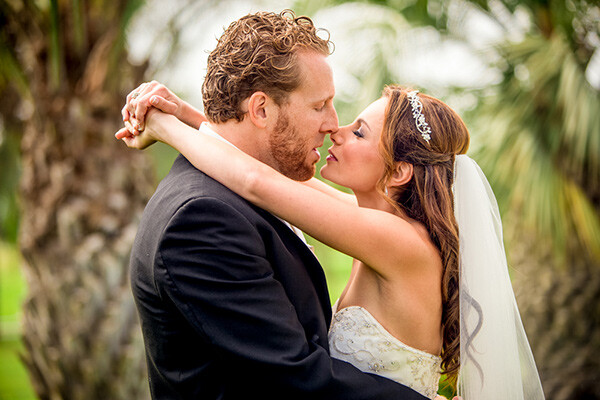
    If I’m hitting a blank spot on where I want to take an image I will hover over my presets and see if I like any of the previews. Sometimes I love it and it’s a one-click edit.  Sometimes I like the look but know it needs a little tweaking. Either way it can save a lot of time. Check out a few one-click edits below from some of my presets.

    Straight out of camera

    Straight out of camera

    After one-click Preset

    After one-click preset

    before-5968

    Straight out of camera

    After one-click Preset

    After one-click preset

    Hacking-Photography-Color-Pop-Presets---Fill-Light-Smooth-Pre

    Straight out of camera

    After one-click Preset

    After one-click preset

    I hope you’ve seen how much Lightroom presets can help speed up your editing time and supply you with some very creative edits. I’d love to hear your thoughts in the comments below.

    For more information on Lightroom presets check out these:

    • A Concise Guide to Lightroom Develop Presets
    • 4 Quick Tips For Getting The Most Out of Lightroom Presets
    • How to Add an Opacity Slider to Lightroom Develop Presets with The Fader Plug-In

    Don’t want to make your own presets? On now at SnapnDeals you can get 100 of my custom Presets 50% off. Deal ends soon, don’t miss out so grab it here. 

    The post Save Tons of Editing Time with Lightroom Presets by Mike Newton appeared first on Digital Photography School.

    Digital Photography School

  • Tips for Photographing Birds in Flight

    This article introduces some key concepts to photographing birds in flight. One of the most necessary ingredients is patience; you may often photograph an entire day and not get one usable image. In most cases there is some luck involved to being in the right place at the right time. Hopefully this article will provide some information to help you improve your luck.

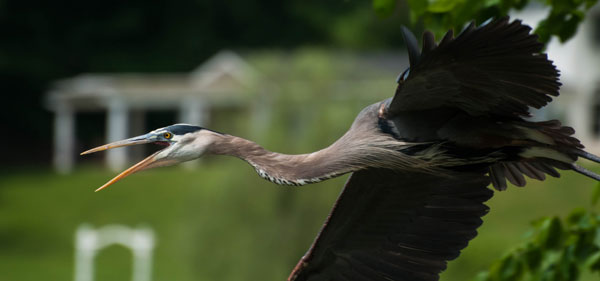
    heron3

    Choosing a Location

    Let’s begin with choosing the best location for your birds in flight shoot. Near rivers or lakes are great locations, because of the abundant food sources for the birds. Find a position on a hill that will put you at eye level with the birds.  Check out the position of the sun, because you should not be shooting into it. Light coming from behind you or from the left or the right of your position is preferred. Also, birds will generally take off and land into the wind, so knowing the wind direction of your location will help you predict the flight direction of the birds you are photographing.

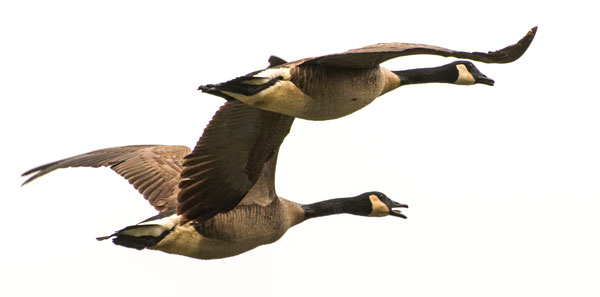
    canadians

    Lighting

    Good lighting plays an important part in successful birds in flight photography. As in any other kind of outdoor photography, the golden light of morning and evening are best; however, because you are shooting at birds in the sky, these times can be extended and still have nice lighting on your subject.

    Make Yourself Invisible

    Some birds will not venture near a human presence, so you need to make yourself the least visible as possible.  In some cases it might be as simple as not wearing brightly colored clothing, but avid bird photographers may also want to set up some kind of blind. These can be purchased inexpensively from most hunting stores. Also, sitting will make you less noticeable to the birds than if you are standing.

    Study Your Subject

    Study the birds you enjoy photographing to learn their habits. This can help you predict their movements. For instance, many birds, especially the larger species like herons or eagles, will relieve themselves just before they fly. Knowing this can help you be ready to shoot when they take off.

    fall-heron

    Lens

    Choosing your lens can be a challenge so be advised that you should use the fastest and largest mm lens you can afford. For your best chance at a great shot, you would want at least a 300mm lens, but a 500mm to 600mm prime lens is preferable. Unfortunately, these lenses don’t come cheap.

    Tripods

    A great tripod head for birds in flight, especially if you are using a large lens, is the Gimbal head. It balances your camera and lens and requires very little force to pan left and right, and up and down. A less expensive option is a Pan head, which also allows for movement in all directions on two different axes. The more common Ball head can be used with effect for birds in flight photography, but is not a very stable solution for very large lenses.

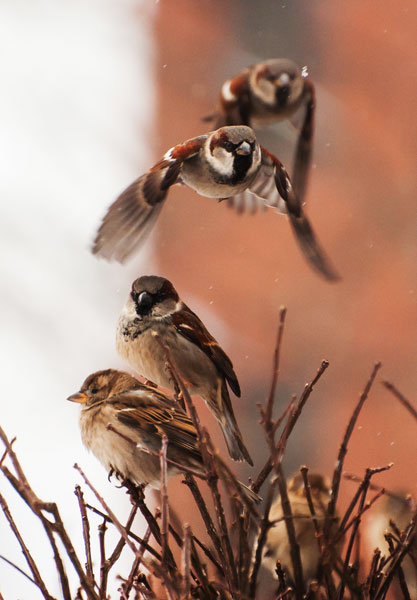
    sparrows

    Exposure

    When you consider setting up your camera to shoot birds in flight, keep in mind how  the “exposure triangle” of shutter speed, aperture, and ISO each play an important part in the getting the perfect exposure.

    • Shutter speed – You need the shutter speed to be fast enough to “freeze” the bird’s wings in your photo. While small birds’ wings may flap approximately 40 beats per second, larger birds like herons and eagles flap around 2 beats per second. Many species of duck are fairly fast flappers at around 5 to 10 beats per second. So the question remains, how fast should you set your shutter speed to freeze the wing motion? Go for at least 1/1000th of a second to 1/2000th of a second. Even faster is better, if possible!
    • Aperture – In order to gain as much depth of field as possible, you want to use the smallest aperture possible. Select your F-Stop (the aperture number) based on your lens’s sweet spot (where your lens focuses most clearly), probably around f/8.
    • ISO – You want to keep your ISO setting as low as possible to avoid digital noise (graininess) in your photos, although most of the latest models of digital SLR cameras these days do a decent job with higher ISO allowing very little noise.

    heron2

    So how do you bring all three elements of your exposure triangle together to find the best exposure? You may consider simply using your camera’s Shutter Priority Mode feature in which you set the shutter speed and the camera sets the aperture (and ISO on some models) but try this alternative method.

    1. Set your camera on Aperture Priority
    2. Set your aperture to f/8 (the sweet spot) to capture the sharpest image for your lens
    3. Next, using your camera’s light meter, check the exposures in the space you hope to photograph your birds in flight. You will probably find that you have some areas that are darker than others.
    4. Using the exposure you get in the darkest area, adjust your ISO to bring your shutter speed up to at least 1/1000. It follows that when your bird flies by and you are panning your camera into a lighter area, your shutter speed will increase to above 1/1000, and when your subject is in the darker area your exposure will still be appropriate.

    Now, one final step to tweak your exposure. Have you ever noticed how when photographing birds in flight your image will seem dark and missing detail, especially to those dark feathers? To bring out more detail in those dark areas, change your EV (exposure compensation) setting to +0.3 to add a little more light. Depending on the lighting, you may need to add more. On the other hand, what if you are photographing a white bird, perhaps a swan? The white bird’s image will tend to get “blown out”, also missing  detail, so adjust your EV value to -1.0 to -2.0 to pick up the detail in those white feathered birds. (If you are thinking your background will be underexposed, well, yes, it will be, but you are photographing the swan, not the background.)

    Focusing

    To keep your flying bird in focus, set your camera’s focusing mode to continuous focus. In this mode, as long as you have the shutter button depressed halfway and are focused on the bird, the camera will continuously focus with the movement of the bird. Canon calls this function “Al Servo”, while Nikon calls it “Continuous Servo” or AF-C. Also both Nikon and Cannon will allow expanding your focal points to look at adjacent points for movement to help you keep the moving subject in focus. Nikon also offers two additional options of Auto Focus – Area Modes that might work for birds in flight. Its 51-point Dynamic Area Auto Focus and 3D Tracking Mode will both search at all 51 focal points looking for the movement of your subject, though these methods may be a little too slow in focusing.

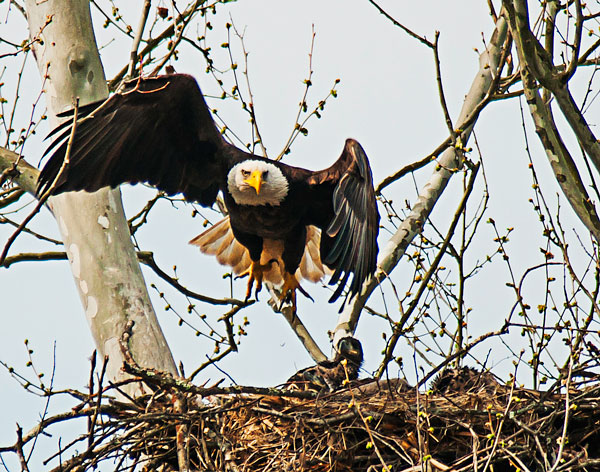
    eagle-nest

    Composition

    Composition can sometimes be the most difficult aspect of photographing birds in flight. Not only are you occupied with keeping your bird in sharp focus, you are also trying to make a pleasing composition. All the rules of composition applying to any photo remain valid here. You always want to have more space in front of the bird than behind; a good rule is to have a least two to three times the space in front of the bird. One practice that helps maintain this space is to place your focus point in the center and try to keep it on the bird’s eye. This method works really well on large beaked birds like the heron. While most birds in flight images are just one bird, look for those occasions where you may capture two or three birds for a great image.

    gull

    Technique

    As the bird is flying toward you, quickly get your focus lock. When the subject is close and in the position you like, fire away and keep panning even after you have stopped shooting. This follow-through motion will keep your last image in focus better than an abrupt stop. While panning as the bird flies by, you want to match your panning speed to that of the bird, and depending on your shutter speed, this will help keep the bird in focus while the background may be blurred.

    It’s a wildlife photography principle that you want to keep the bird’s eye in focus and sharp. If you are handholding your camera, try to keep your left hand under the barrel of your lens and your elbows close to your body, as this will help you maneuver the camera as steadily as possible. If you are standing, keep your legs spread out to give you a good sturdy base. If you are planning to hold your location and position for a time, using a tripod is recommended to help keep you steady, especially if you are using a very heavy lens.

    duck

    So stay alert, and look for opportunities to capture great birds in flight images. It will take lots of practice to get that perfect image, but when you do you will be hooked.

    Have you tried bird photography before? Want more bird tips, try these:

    • 10 Incredible Bird Photography Tips for Beginners
    • A Turn of the Head – Creating More Compelling Bird Portraits
    • An Introduction to Bird photography


    The post Tips for Photographing Birds in Flight by Bruce Wunderlich appeared first on Digital Photography School.

    Digital Photography School

  • Paddling Canoe through a Magic Forest

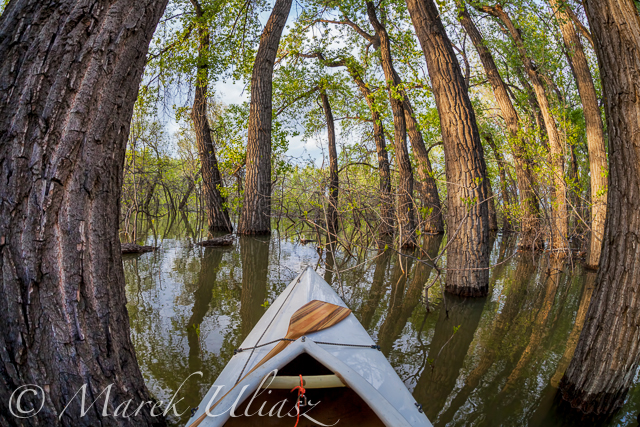
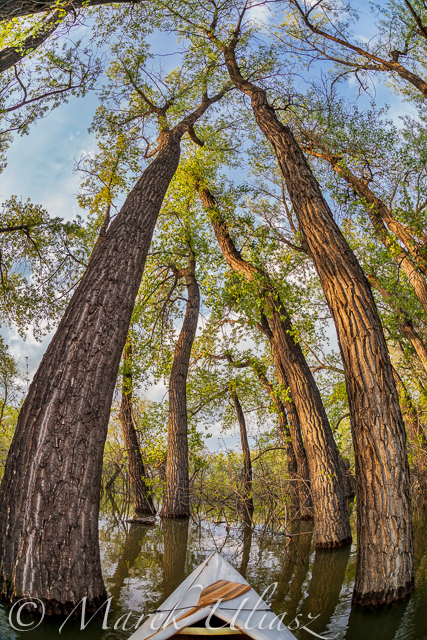
    canoe paddling in fisheye lens perspective

    Fish eye lens perspective when paddling through a submerged forest

    I love to paddle the Lonetree Reservoir southwest of Loveland during springtime. You can always enjoy a nice view of Rocky Mountains Front Range. It is a great spot to shoot sunsets over mountains. When water is high I like to paddle through submerged trees and bushes. Please keep in mind that the heron rookery is a restricted area during the nesting season, but there are other places where you can paddle into a forest.

    Picture featuring Sea Wind canoe in cottonwood forest was shot on May 15m 2014 with Canon 5D Mark II camera and Sigma 15 mm Fisheye lens. I confess … I spent a longer while gliding in a canoe between cottonwood tress and playing with that lens. I was shooting in both landscape and portrait formats.

    Which version do you prefer? Horizontal or vertical?

    canoe paddling in fisheye lens prespective

    Let’s look at this scene in a vertical format.

    Related posts:
    – Canoe paddling in fisheye perspective – royalty free pictures.
    – Paddling through Forest and Irrigation Ditches
    – Fisheye Lens Perspective for Paddling?
    – Horizontal or/and Vertical Format in Kayak Photography


    paddling with a camera

  • Real Estate Photography – a Guide to Getting Started

    real-estate-photography-home-front-lighting

    Photography has never been more important to selling real estate than it is today. The markets are heating up again and demand for real estate creates demand for photography. This is good news to photographers, but like any business, there is plenty of competition. If you are new to real estate and architecture photography, here are some general guidelines to start you on the right path.

    Camera Equipment

    A camera, lens, and tripod, are all that is required to get started, but you might quickly learn that many competitors are very proficient at using supplemental lighting and Photoshop techniques.

    Your camera should allow you to add a cable release, a flash, different lenses, and wireless triggers. Wide angle lenses are required. For cropped sensor cameras a lens around 10-22mm or 12-24mm is perfect, and for full frame sensor cameras, a lens around 16-35 mm will do the job.

    Tilt-shift lenses help avoid converging vertical lines such as wall edges and door frames leaning in or out. There are several tilt-shift lenses available from Canon’s 17mm, the 24mm from Canon and Nikon, and others. While these lenses are wonderful to use, they are fixed focal length so if you need  a perspective that is for example; 19 mm or 27 mm or somewhere in between, a 16-35mm zoom lens is a great companion to a tilt-shift lens.

    real-estate-photography-converging-lines

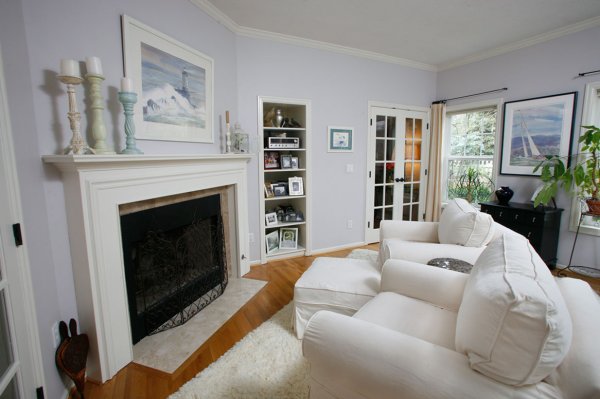
    This image before processing shows diverging vertical lines, seen best by the edge of the fireplace, from using a 16-35mm lens tilted down to add foreground and minimize ceiling.

    Shooting techniques vary from exposure blending, HDR, wireless flash, and light painting with multiple exposures. No matter your shooting style the camera should not be moved to guarantee image alignment of multiple exposures. The camera’s self-timer, a cable release, or wireless triggers insure no camera movement. The iOS App or Camranger also triggers the camera and provide a preview of the photo on a smart device.

    Approaching the Property

    The first image a potential buyer sees (usually) when reviewing properties online is an exterior photo. That photo is important so take the time to find the best angle and best light. Ask the realtor what are the important features to highlight. They usually want exterior photographs from front and rear, a deck or patio, landscaping and gardens, pool or hot tub, a barn, shop, or other outbuildings. Each feature should be emphasized in the composition by using the surroundings, like beautiful gardens leading to a cool garden shed.

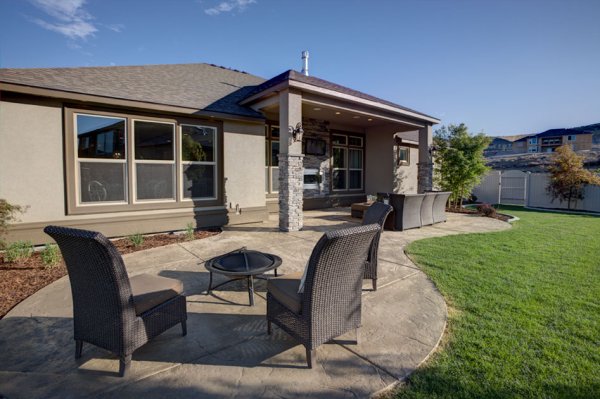
      The client was most interested in the outdoor theater under cover on the back porch, which I captured, but I also captured this image showing the patio furniture and giving a broader view of the backyard.

    The client was most interested in the outdoor theater under cover on the back porch, which I captured, but I also captured this image showing the patio furniture and giving a broader view of the backyard.

    Exterior Lighting

    Most outdoor subjects benefit from early or late day lighting, including real estate. Using Google Maps and Google Earth can help you determine the best time of day prior to the photo shoot.  Searching only takes minutes and provides an idea whether a home faces the sunrise or sunset, or neither.

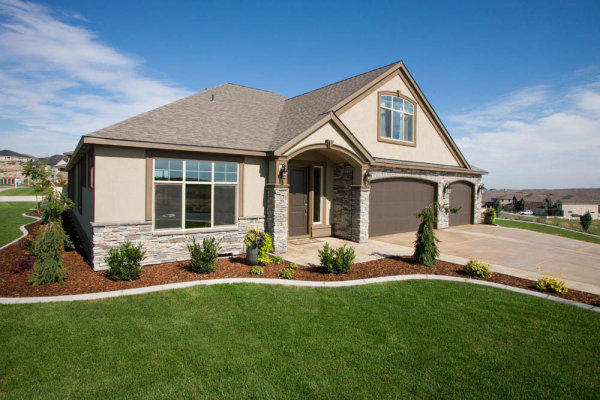
    Light hitting the front of a home is perfect as seen here after sunrise. In winter, some homes facing south never have the sun hitting the front of the home To avoid shooting into the sun, photograph from the same end of the house as the sun.

    Light hitting the front of a home is perfect as seen here after sunrise.

    In winter, some homes facing south never have the sun hitting the front of the home To avoid shooting into the sun, photograph from the same end of the house as the sun.

     This home has a huge yard and a street lined with cars. Photographing from the left put the sun right above the roof but moving to the right side was a better perspective and the sun was out of view.

    This home has a huge hedge behind the camera and a street lined with cars. Photographing from the left put the sun right above the roof but moving to the right side was a better perspective and the sun was out of view.

    Overcast skies can eliminate any problems with sun’s position, but shooting on poor days is a decision best discussed with the realtor.  The advantage is you can shoot any time of the day but the disadvantage is white skies can lessen the impact of an otherwise great exterior image.

    The dusk/dark technique

    The dusk/dark technique

    The dusk/dark technique is often requested by clients because it helps sell properties. The image is photographed outside and from the best angle to showcase the house. The technique is to turn on all the lights in a room and shoot at a certain time. After sunset the sky’s exposure will balance with the room lights’ exposure. A better approach is to add lights to the rooms creating even lighting, and working this way means not having to wait for that perfect balance between room lights and outdoor light.

    Interior Photography

    Homes come in all shapes, sizes, styles, and conditions. I always tell my clients that I am not in the house cleaning business, so I send them a task list with my suggestions on prepping the home prior to the photo session. Once inside, I set out to photograph the main rooms: the living room, kitchen, dining area, master bedroom, master bath, are all ‘must shoot’ rooms. There could also be a library, office, large walk-in closet, and more. The client can often tell you what they deem important. Next, seek the best perspective for each room.

    The master bathroom

    The master bathroom

    I describe my approach as using the inside elements: furniture, windows, and room layout, to create visual flow. I generally try to avoid composing something large in the foreground that prevents the eye from flowing through the room.

    This is the first test shot I took of this room and the foreground chair blocked the flow through the room.

    This is the first test shot I took of this room and the foreground chair blocked the flow through the room.

    real-estate-photography-interior-after

    By rotating the chair and lowering the camera height slightly, the eye can flow through the room easier. This image also has the vertical lines corrected.

    Camera Height and Vertical Edges

    There is broad agreement among clients and photographers, that if there is to be a rule it will state: verticals must be correct! In most interiors there are edges and corners of walls, door frames, and windows that have vertical sides and these edges need to truly be vertical. When you use a tilt-shift lens this problem is solved, but tilting the camera up or down with a non-TS wide angle lens makes vertical edges converge or diverge and they no longer appear straight.

    One widely used approach is to level the camera using a hot shoe bubble level, making edges straight. While this is a simple solution, it is not always the best solution when using a non-TS lens. A level camera at chest height can result in foreground subjects, like furniture being cutoff at the bottom with too much ceiling at the top. Lowering the camera height will improve this problem but how low can you go and still have an effective photo?

    This image by one of my online course students; Simone Brogini, illustrates this point. His camera is chest high and his camera is leveled to avoid diverging lines. The problem as I mentioned to him was that the foreground furniture is cutoff and there is too much ceiling that lacks interest.

    This image by one of my online course students; Simone Brogini, illustrates this point. His camera is chest high and is levelled to avoid diverging lines. The problem as I mentioned, is that the foreground furniture is cutoff and there is too much ceiling that lacks interest.

     Simone also shot this bedroom image the same way. It looks pretty good but I advised him again that in my that camera height might be just a little too low as the bed and furniture get only about 1/3 of the frame and the wall and windows uses 2/3 of the frame.

    Simone also shot this bedroom image the same way. It looks pretty good but I advised him again that in my opinion the camera height might be just a little too low, as the bed and furniture get only about 1/3 of the frame and the wall and windows use 2/3 of the frame.

    So what is the perfect camera height? There are many opinions. Some suggest chest height while others suggest door knob height or even lower, all to avoid diverging verticals lines. I prefer chest height or close and correcting vertical lines using other methods like a tilt-shift lens or the Lens Correction Tool in Photoshop (or Lightroom).

    This image shows the use of the Lens Correction Tool. The bed and furniture consume 2/3 of the frame and provide a fuller view of the room.

    This image shows the use of the Lens Correction Tool. The bed and furniture consume 2/3 of the frame and provide a fuller view of the room.

    Getting Good Exposure

    The perfect interior exposure is challenging when balancing bright window light, with darker interiors. You can deal with scene contrast many ways; one is to shoot when outdoor light levels are lower. Midday light will be much brighter outside than during or after sunset, or on a cloudy day. Turning on every light inside increases the interior brightness, and if the outdoor brightness is lower a RAW file can often capture the scene in one frame.

      This room has a dark ceiling, dark furniture, and window flare and hot spots. To much contrast for one capture.

    This room has a dark ceiling, a dark floor, a window flare and hot spots with too much contrast for one capture. (see corrected version below)

      On a overcast day, the interior exposure is quite good as well as the window exposure. A flash was bounced off the ceiling on the right.

    On a overcast day, the interior exposure is quite good as well as the window exposure. A flash was bounced off the ceiling on the right.

    To make sure I have all the exposures for a great image, I determine my ‘base exposure’, the image that has most of the data centred in the histogram. Then I bracket widely in +/- one stop increments of varied exposures so I have variety just in case I need them. Lightroom and Photoshop, and certainly other programs, allow selective lightening and darkening of shadows and highlights on a single image, but if the contrast is too much, I can blend those bracketed images into a great final image.

    The Adjustment Brush was used to bring down the brightness of the left window. There is still a little flare around the window, but this worked for the real estate website.

    The Adjustment Brush in Lightroom was used to bring down the brightness of the left window.

    Interior Lighting

    Just like a finely lit portrait, interiors can benefit greatly from nicely styled lighting. HDR can manage scene contrast but it does not create highlights and shadows in areas that have no directional light. If you have a dark cabinet against a dark wall, adding supplemental light can bring out that needed detail.

    Most interiors have two light sources: window light and interior lights, both constant light sources. You can add constant lights or use strobe or flash. Constant lights, unlike flash, are like the lamp on the table or window light. Changing your exposure to darken window light also changes the exposure brightness of your constant lights. Flash is not a constant light! If you change your shutter speed to darken the window light exposure, flash exposure will not change and for this reason; flash or strobe provides flexibility when lighting interiors.

    Photographers shooting for architects or magazines often have plenty of time to photograph a property with finely crafted lighting techniques, but a real estate photographer’s time is usually limited, making flash the perfect tool. Some photographers have mastered the balancing act of using direct on-camera flash to fill in a scene while others use on-camera flash in a bounce capacity.

    Here the only light is coming from a window on the left and the ceiling fixtures, leaving dark areas in front.

    Here the only light is coming from a window on the left and the ceiling fixtures, leaving dark areas in front.

    Adding bounce flash, hand held just to the right of the camera, filled in those darker areas effectively.

    Adding bounce flash, handheld just to the right of the camera, filled in those darker areas effectively.

    Also popular are multi-flash wireless set ups allowing the flash to be placed around a room for styled lighting. Also growing in popularity is the ‘light painting’ approach where areas are selectively lit and the exposures are blended.

    This image utilizes the Light Painting approach to interior lighting.

    This image utilizes the Light Painting approach to interior lighting.

    One side effect with outdoor lighting mixing with interior lighting is ‘lighting color balance‘. This is different than camera White Balance settings. Camera White Balance is set to either specific areas of your scene or set to average all light sources together.

    There is a blue color cast above and right side of the window as well as the floor on the left.

    There is a blue color cast above and right side of the window as well as the floor on the left.

    When you have mixed light, such as daylight colored window light mixing with tungsten colored ceiling lights, and then throw in a fluorescent kitchen light, you have a veritable palette of different colors mixing together. Walls closest to windows will be blue while the wall closest to a lamp will be amber and the ceiling in the kitchen will have a green tint.

    The final image shows color correction in those areas as well as verticals and window flare.

    The final image shows color correction in those areas as well as corrected verticals and removal of window flare.

    In some cases the effects of mixed light will be minimal and other times require attention. You can prevent mixed color in many cases by color matching the inside lights to the same color or use Photoshop color correction techniques to change color of specific areas.

    The End Product

    Once you have completed the assignment you will need to deliver the image files. Clients may have different preferences, but mine usually request low resolution for the web and high resolution for print publication.

    Be sure to save your files in the proper file format and size for the intended use. Most Multiple Listing Service’s specify what is accepted format and acceptable sizes. I use Photoshop and the Save for Web option for the low resolution and TIFF format for high resolution.  Then final delivery of the files is made by Dropbox or a comparable online service.

    Summary

    Things to remember doing real estate photography:

    • You are not photographing for yourself; you are photographing for clients who will expect professional quality work.
    • Don’t get ALL the best gear, get only what is required to do the job well.
    • Master the creative side of photography such as angles, perspectives, and composition.
    • Master the technical side of exposure, HDR, supplemental lighting, color matching, and exposure blending.
    • Be careful when processing real estate images, like removing power lines, to avoid misrepresenting the property. 

    There are many styles and techniques you can use to photograph architecture and real estate and you should master them all. Real estate photography is architecture photography and you can photograph a home for a real estate agent for $ 200 or photograph a model home for a home builder for $ 1000 or more.  Start small, plan big!

    The post Real Estate Photography – a Guide to Getting Started by Charlie Borland appeared first on Digital Photography School.

    Digital Photography School

  • Using Balance in Your Landscape Photography Composition

    How to use Balance in your landscape photography

    If you want to take your landscape photography to the next level, it’s time to start thinking about how you balance your subjects. The most powerful compositional tools that you have at your disposal are your knees, and your feet.

    Simply stepping to the side a couple of feet can change your landscape compositions drastically. Take things one step further (weak pun intended) and bend those old knees to get a lower point of view. Now things might start to look more interesting.

    The reason why I say this is because horizontal and vertical movement will allow you to achieve the ideal balance of subjects in your landscape images. If you’ve got a camera with one of those flippable LCD screens, you’ll be able to get right down on the ground or way up high on your tripod. Nice.

    So what do I mean by ‘balance’?

    Composition basics - using balance in your landscape photography

    Something Wicked

    I’m referring to how you balance subjects in your image on the horizontal and vertical planes. Simply plonking your interesting subject slap bang in the centre of your image might work, but there are times when you might get a better composition by placing it to one side of your image, and counter balancing that with something on the opposing side.

    With my image above ‘ Something Wicked’, I wanted the moody storm clouds to be the main subject but it was essential to capture it bearing down on the mesa. By devoting the lower third of the frame to the mesa and the upper two thirds to the menacing clouds above, I balanced the subjects to my liking.

    Subjects can’t move but you can

    There may be times when you actually use interesting space to counterbalance your main subject, don’t assume that your spaces have to be filled with obvious subjects. I like to invite my viewers to think about what’s in that space, drawing their eye to what at first appears to be nothing, but upon closer inspection reveals something interesting.

    Balancing subjects in images that feature reflections is really important. Perhaps you want to give more emphasis to the reflected elements? Movement from left to right, or up and down, can really place those elements exactly where they need to be. Moving one foot to the left might eliminate a pleasing mountain ridge in the distance. Dropping down a few inches might bring it back.

    How to balance reflections in landscape photography - Gavin Hardcastle

    With my image of Mono Lake above, I found that if I got too low to the ground, I lost some of the mass in the reflected clouds. The ideal vertical position was at an agonizing semi crouch that had my quads screaming. If I’d moved a little more to my right I would have lost the foreground tufa mound that you see in the lower left corner, which adds depth to the image.

    I’ve done this so many times that I no longer think about doing it, something just clicks and I know the shot is in the bag. When you’re starting out however, this might require a bit of conscious thought, so here are two tips I always teach to my workshop students.

    Do the Squat

    After you’ve taken a shot with your camera at normal height on the tripod, squat down for a few seconds and survey the scene from a lower perspective. Make it a habit and I can virtually guarantee* that you’ll see a better shot around 50% of the time.

    Do the Cobra

    Rather than shuffling left to right, I often like to crack out my Cobra impersonation and move my head from side to side while trying to maintain the same height. By doing this I can see how my foreground subjects move around the subjects in the distance. If you see some bloke with a tripod on a cliff edge who looks like he’s doing some type of shamanic dance, that’s me setting up a shot.

    This sounds really obvious, but I notice a lot of photographers don’t bother with these two basic moves. There’s more to composition than your standard tripod setup.

    Composition tips for landscape photography

    My shot of Los Arcos Park in Cabo San Lucas (Mexico) is a prime example of how ‘doing the Cobra’ helped me to visualize the ideal composition for having El Capitan (the central sea stack) positioned so that it fits just right in that gap. If I’d moved just 12 inches left or right I would have lost that pleasing ‘equidistant’ position. If I’d moved lower (the Squat), that foreground rock would have obscured the footsteps in the sand that lead your eye towards El Capitan.

    Go Handheld

    Yes, yes, I realize I’m a one man tripod enforcement unit but I’ll often start a shoot without the tripod so that I’ve got the freedom of movement to find the best compositions. Once I’ve discovered that ideal balance of subjects along the vertical and horizontal planes, I’ll grab the tripod and take the shot. This will save you a lot of fiddling around with the tripod, especially if you’re rocking one of those flimsy box store tripods that belong in the recycling bin.

    Try it out

    Go out and try the ‘Squat and Cobra’, then post your comments here to let me know your results. Being conscious of how you balance your subjects will give you better landscape images, and with practice, will become automatic.

    ** Guarantee is virtual and only worth the paper on which it is written.

    For more articles on composition try these:

    • Composition, Balance and Visual Mass
    • A New Photographer’s Guide to Composition
    • Perspective in Photography – Don’t just stand there move your feet!

    The post Using Balance in Your Landscape Photography Composition by Gavin Hardcastle appeared first on Digital Photography School.

    Digital Photography School