Category: Photography

  • Product Review: Macphun Tonality Black and White Photo Editor

    Macphun Software announces new program

    Macphun Software, a photography app developer with over 20 million users worldwide just recently released their latest photo editing software program, called Tonality. This is a program dedicated entirely to editing your photos in black and white, and it is so much fun to use!

    You may already be using a Macphun program – they have produced a whole suite of useful consumer photography editing tools, such as Intensify Pro, Snapheal Pro, and Focus Pro. This latest addition to their software collection is really a powerful one, for professionals and hobbyists alike.

    I played around with the software a bit and there are quite a few things I liked about it, and just a couple of things that I found non-intuitive. Read on to discover more about this program.
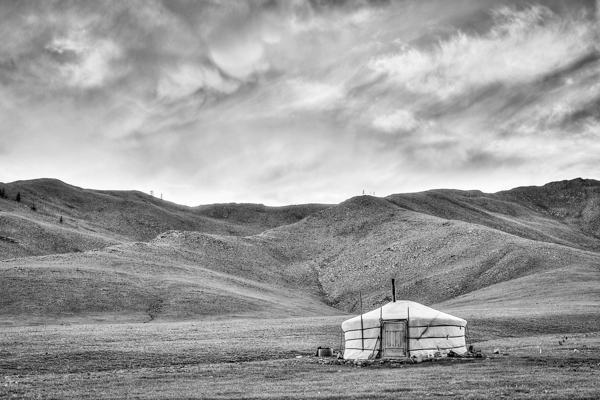
    Macphun Tonality

    From my recent trip to Mongolia

    Overview of Macphun Tonality
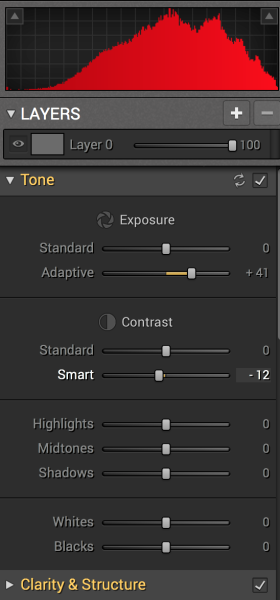
    Macphun TonalityTonality is easy to pick up right away if you are familiar with Lightroom or Photoshop RAW editing tools. The designers intentionally created an editing panel on the right hand side of your viewing window that looks almost exactly like Lightroom’s editing panel. It includes familiar tools like Exposure, Tone Curve, Split Toning, and Vignetting.

    There are some other effects here that are not so familiar, and do interesting things when you play with the sliders. Clarity & Structure is a section unto itself that provides the user with highly controlled clarity effects. In the Exposure section there is an ingenious slider titled Adaptive which allows you to adjust the exposure while preserving the highlights, something Lightroom should have had in place a long time ago. There is a section called Glow which does exactly what you think it would do; add glow to your images, like a balloon lit from the inside casting a nice glow over everything. You can add Grain, adjust the overall Opacity of the changes you are creating, and there are options for Texture Overlay and Frames, which are pretty fun with black and white images.
    Macphun Tonality

    Layers

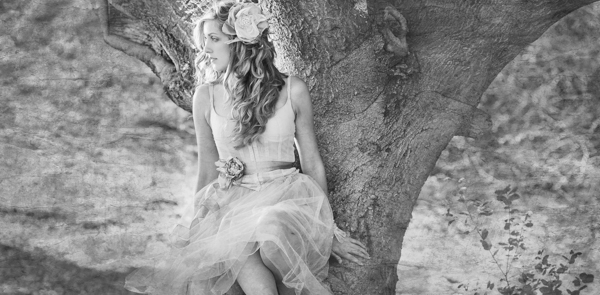
    One thing that is really fantastic is that ability to edit with layers. This is something that I found (and still find), rather non-intuitive, but allows for huge possibilities in editing, especially with textured layers.  When you add on a new layer and insert a texture via the Texture Overlay panel, you can brush through via masking and only texturize parts of the image, like the background in this image:
    Macphun Tonality

    Editing with the Textures Overlay panel. I added a metal texture in one layer and a paper texture in another layer, and painted through on the girl’s face using the layer mask so the texture didn’t affect the smoothness of her skin.

    Here I added a metal texture in one layer and a paper texture in another layer and painted through on the face using the layer mask so the texture didn’t affect the smoothness of the girl’s skin.

    The non-intuitive part for me is in actually using the layers and brushes to mask out parts of the image. If you have grown up on Adobe Photoshop then you might not find this familiar at all. It’s not impossible, it just requires a different way of thinking about how layers work and how the masking works. It will simply slow down your workflow slightly, but as with anything new, there is always a learning curve.

    Some thoughts

    When I first saw the software I thought to myself; “I can edit in black and white just fine with Lightroom. Why would I need another program to do such a simple thing?”. But just as Photomatix is brilliantly designed to do just one thing (tone-map HDR images), Tonality is designed to do just one thing perfectly: create black and white images like you could never do in Lightroom or Photoshop. I took a couple of black and white images from Lightroom that I was satisfied with, and tried them out in Tonality. Just using the presets alone as a jumping board for editing in Tonality shows an astounding difference in quality, sharpness, and texture.

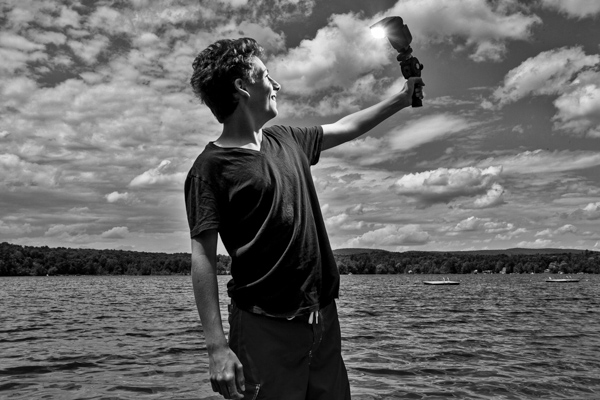
    See these two images side-by-side and notice what Tonality can do to really make a photo pop:

    Digital Photography School Review

    Edited in Lightroom for a simple black and white look

    Macphun Tonality

    Edited in Tonality for some movie poster “pop”

    Perhaps some won’t like that HDR look, but I happen to love it. It makes an otherwise bland black and white photo cause me to pause and take a second look. Which is what we are always trying to accomplish with our photos, aren’t we?

    Macphun Tonality Pro features:

    • Professional image quality with proprietary 16-bit RAW processing engine
    • Advanced algorithms and a streamlined user experience for superior results
    • Scores of inspiring professional presets provide a wide range of one-click image styles
    • Built-in organic-style overlay textures, plus user-loadable textures, for incredible creativity
    • Unique adaptive exposure and smart contrast tools for advanced tone control
    • Multiple effect layers, each with separate opacity controls, blending modes and preservation of color data offer true advancements in creative toolsetsTonalityPro
    • Adjustable, pressure-sensitive brushes and masking tools for precise selective edits
    • Advanced clarity and structure detail controls yield dramatic results
    • Proprietary grain engine with over 20 emulated film types
    • Selective color using color channel sliders for unique stylistic expressions
    • Glow, lens blur, vignette, photo frame and opacity controls for finishing touches
    • Easy image sharing to popular social networks, and via email, instant messaging, AirDrop and SmugMug
    • Macphun Print Lab services, powered by MILK
    • Runs as either a standalone app or, in the Pro version, as a plug-in to popular image editing software like Adobe® Photoshop®, Adobe Photoshop Lightroom®, Adobe Photoshop Elements® or Apple® Aperture®.

    Find Tonality Pro and Tonality here on the Macphun website, starting at $ 19.99, and for dPS readers they’ve given us 20% off so use this link to get that special price.

    Summary:

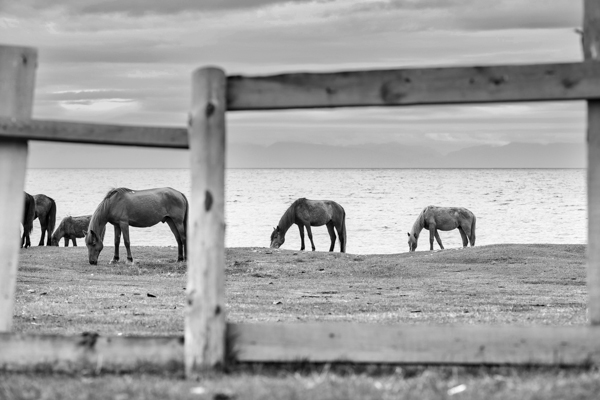
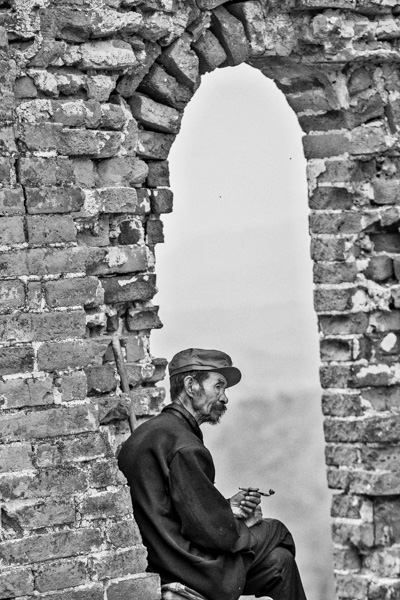
    In summary, I give this software product 5 stars. I can actually see myself using this in the future, and I think it will be a welcome addition to my limited number of tools that I use for editing photos. It’s fun, super easy, and I can use it to edit a lot of my future travel photos. Like these:
    Macphun TonalityPro

    Macphun TonalityPro

    Macphun TonalityPro

    You can also add in some coloring for sepia tints or different metallic effects

    The post Product Review: Macphun Tonality Black and White Photo Editor by Phillip VanNostrand appeared first on Digital Photography School.


    Digital Photography School

  • Follow our New Facebook Page & Find the Best Photography Tips from Around the Web

    I started Digital Photography School as a simple blog in April 2006. My goal was to share the things I knew about photography with those just starting out in their journey – in a time where digital photography was really gaining momentum.

    Since that time dPS has changed in many ways.

    One of the changes since starting dPS in 2006 is the rise in social media. We’ve embraced this early on by creating an active dPS Facebook page and Twitter account.

    These accounts are largely about highlighting new tutorials that we publish each day as well as highlighting some of the 4700+ posts in our archives that readers might have missed.

    Many of our readers appreciate these accounts but we’ve always been really aware that there’s a lot of great photography content on the web beyond what we produce at dPS.

    In response to this we started a dPS Pinterest page to curate the best content that we’re seeing around the web. This has been well received so we want to extend the idea further and just a few days ago started a new Facebook page which will largely about sharing content we like on other sites.

    Do you like photography

    The new Facebook page is at Do You Like Photography?

    Each day on this page we’ll post a variety of tutorials, inspirational images and ideas to help you in different types of photography. We’ll also occasionally share a post or two from our archives that we think might be relevant but it’ll largely be content from other photography blogs and sites.

    So if you’d like more photography tips and tutorials in your Facebook stream (in addition to the dPS page where we will continue to publish the same amount of posts each day as we’ve always done) follow our new page here and you’ll hopefully start seeing them in your feed shortly after.

    PS: it’s only been five days since we started our new page but we’ve already had over 43,000 people like it – thanks everyone for your support!

    The post Follow our New Facebook Page & Find the Best Photography Tips from Around the Web by Darren Rowse appeared first on Digital Photography School.


    Digital Photography School

  • 8 Quick Composition Tips to Help Improve Your Images

    Using different composition techniques can result in more dynamic images

    Using different composition techniques can result in more dynamic images

    You have likely heard of the Rule of Thirds, in fact it seems as if this is the only rule of composition. To be fair though, the Rule of Thirds is a good go to tool when you are unsure of how to put a scene together compositionally. There are many other techniques that can be used to improve your composition. Techniques like balance, leading lines, symmetry, depth of field, and so on, can all make a big difference to your image.

    In many ways a photograph is very similar to a painting. Photographers learned early on that composition is a key component to engage people in an image. Composition literally means to put together, so when you think about composing an image, you need to think about the visual elements that you will put together in your image.

    As a photographer, you need to decide when to use certain techniques, and when not to use them. Most compositional techniques are simply guidelines, or frameworks, there are very few hard and fast rules.  What they do offer is a starting point for putting an image together. Perhaps you may look at a scene and not know how to capture it. That is a good time to put some of the techniques into action and work the scene from there. They have been tried and tested by visual artists (painters, photographers and moviemakers) around the world for decades. The only constraint is don’t be dogmatic about applying them. Once you understand how to use the rules, you will then know how to break, and break out of them. By doing this, you will take your photographic creativity to a new level and your images will become that much better.

    As always, with anything photographic, you need to experiment and practice. Know your equipment, experiment by shooting different scenes under different lighting conditions. Find what works for you and hone that skill. The art of composition is not a particularly technical art, but it can make an amazing difference to your images.

    Good composition can make any subject interesting

    Good composition can make any subject interesting

    The great thing about composition is that you don’t need specialist equipment. The most important pieces of equipment are your camera and your tripod. I know, I know, we all sigh when we hear about the tripod. Once you see how much easier your photographic life becomes with a tripod, you will not be so reluctant to carry it around. There are also  better options for tripods nowadays (think Gorillapod and other travel-style ones). Remember though, a tripod is a key piece of equipment for successful composition. A tripod will help you to compose your image and keep that composition. Whenever possible, use a tripod to set up your shots, that way you can be sure that there is no movement when you photograph.

    A lot of the time, you will be shooting images handheld. That is perfectly fine, and you can apply the compositional techniques to handheld shots. Sometimes you may need to take more than one image and adjust your composition to correct or change it.

    Here are eight additional composition tips to help improve your images.

    The yellow funicular and the blue house add an element of balance to this scene

    The yellow funicular and the blue house add an element of balance to this scene

    1. Balance

    Often when you place an image on one of the thirds, the rest of the frame may be left without much in the way of anything of interest. This is often referred to as negative space, not because it is bad, it is simply to point out that it is not the centre of interest. In some images, negative space can work well, but in other images there may need to be another object in the frame, or even a colour to balance the centre of interest. Photographers use this compositional tool to do exactly that, balance the centre of interest with another object.

    2. Leading Lines

    We look at an image in the same way that we read a page of words. In the western world that means we look at an image from left to right. Our eyes are naturally drawn into the image by lines. If you have a road or a river winding through your image, the viewers eye will automatically run along those lines. If your centre of interest is at the end of that river or road, that is a good way to compose the image. Sometimes it is enough to have the river or road meandering through the image as it makes the image interesting to look at.

    The lines pull us into, and through the scene. The lines can be straight, diagonal, curving, zigzag, S – Shape and many other types. The important thing is to create as dynamic an entry point to an image if possible.

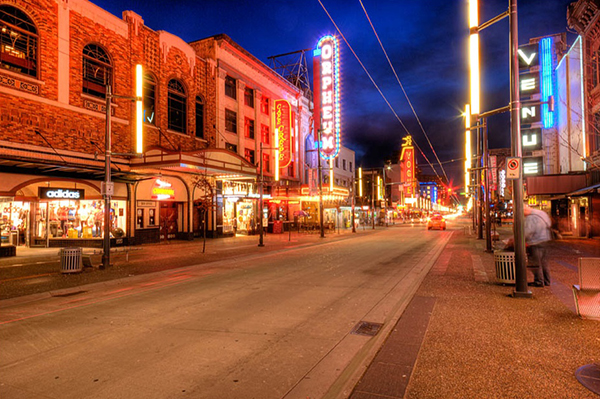
    The numerous lines in this scene direct your eyes down the street

    The numerous lines in this scene direct your eyes down the street

    3. Symmetry and Patterns

    We live in a world that is defined by symmetry and patterns. They are all around us in so many ways. There are natural patterns that are captivating to photograph and there are man-made objects that accentuate balance. It is very gratifying to photograph a perfectly uniform scene. The symmetry brings order to the scene and gives a sense of peace and harmony to your image. Sometimes it is good to break the symmetry, show it in a different way, and by doing so create a sense of tension.

    A symmetrical doorway

    A symmetrical doorway

    4. Viewpoint

    Kneel down or lie down to get the eye level of your subject

    Kneel or lie down to get to the eye level of your subject

    Changing your viewpoint when shooting a subject makes a huge difference to the visual impact. It is natural to shoot everything from your eye level. By doing that you tend to create images that have been seen before. By changing your viewpoint, you immediately give a different perspective on very familiar subjects. If you are taking photos of small children or pets and animals, try and get down to their eye level. This is a view that most adults won’t see very often and will make a big difference in the impact of your image. To change your viewpoint, try a few of these tips:

    • Stand on a chair or ladder to get up higher than your subject
    • Kneel or lie down to get underneath a subject, i.e. for shooting a field of flowers
    • Photograph the subject directly from the top
    • Shoot from a diagonal angle to emphasize shape or texture

    The important thing here is to make sure that you change YOUR viewpoint and by doing that, you will breathe new life into a well known subject.

    5. Background

    A distracting background can completely ruin an image. The human eye will naturally settle on the area of an image that is: the brightest, most colorful, sharpest and has the most contrast. Be aware of what is behind your centre of interest. If there is a pole, a distracting pattern, an awkward colour or some other object, you may need to reconsider your shooting angle. This is not always possible, but sometimes, taking two or three steps to the left or right can make all the difference. Look around for an unobtrusive background, or change your aperture settings to achieve a shallow depth of field and by doing so, soften the background.

    Move around your subject until the background is nit distracting to the rest of the image

    Move around your subject until the background is not distracting viewers from the subject

    6. Depth

    Photography is a two-dimensional art form. As a result, you use certain techniques to imply three-dimensionality. One way to do this is to have subject matter in the foreground, middle and background. This creates depth, and the eye will naturally walk through the image. This implies a deep depth of field from a technical point of view, so ensure that you use a smaller aperture (i.e. f/8, f/11 or f/16) making everything in the scene in focus. This technique is particularly important when photographing landscape images.

    Sometimes, it is great to have a whole scene in focus

    Sometimes, it is great to have a whole scene in focus

    7. Framing

    The world is full of natural objects that can be used to frame a subject (e.g., archways, tree lined streets, holes, and so on create natural frames). By placing your subject in the middle of these natural frames you will create a strong visual pull towards your centre of interest.

    Use natural elements to frame your scene

    Use natural elements to frame your scene

    8. Get in Tight

    Sometimes, closer is better and less distracting.

    Sometimes, closer is better and less distracting.

    It is often tempting to put more detail into a frame to show more about what was happening, but this can lead to confusion. The important maxim to remember is this: less is more. The art of simplifying an image is not easy, but if done correctly can make an image far more dramatic. When you find that your composition has more than one centre of interest, or seems confusing, try these steps:

    • Get in as close as you can to your subject
    • Simplify the composition
    • Be sure to avoid any distracting colours or objects in the background
    • Use a shallow depth of field

    Finally

    Composition and the rules around it are flexible. There really is no right or wrong way to compose an image, but there are better ways to do so. Some composition techniques can make a huge difference to an image and take it from being a snapshot to becoming a truly great photo. The important thing is to experiment with these techniques. Combine them wherever possible. Try them out as often as you can on different subject matter, and know when NOT to use them. The important part is to make sure that you master them. Use them when you need to. Find out what works for you and go from there. By doing this, not only will your images improve, so will your ability to see an image in a scene.

    This is the most important part of photography and very often what separates an average photographer from a great photographer. The ability to see an image in a scene makes all the difference and these compositional techniques help you to do that.

    Don't forget to experiment and break the rules where necessary

    Don’t forget to experiment and break the rules where necessary

    The post 8 Quick Composition Tips to Help Improve Your Images by Barry J Brady appeared first on Digital Photography School.

    Digital Photography School

  • How Apple Botched This Morning’s Livecast

    How Apple Botched This Morning's Livecast

    I’m a huge Apple fan. My wife and I both have an Apple iPhone 5s and both own MacBook Pros as our primary computers. We have 5 Apple TVs connected to the 5 TVs in our home. We have Mac minis in the kitchen and in the home office.

    I’ve pretty much purchased just about every iPhone ever sold. I waited in line overnight for the very first iPhone down in Palo Alto.

    So, as you can imagine, I was looking forward to the this morning’s livecast of Apple’s new announcement.

    Like millions of other Americans, however, the livecast took place at 10am on a Tuesday morning when I was at work. This is prime time as far as product announcements go. It doesn’t get any more prime time than Tuesdays at 10am.

    I tried to watch the livecast at apple.com this morning from work. Unfortunately for me, however, the Apple livecast was only available on Apple products. That’s right, in order to watch this morning’s Apple livecast you had to stream the video from Safari, an Apple browser. So anyone on a PC could not watch.

    Even though I’ve spent thousands of dollars buying Apple products for my home and for myself personally, like millions of other Americans, my work computer is a PC and that effectively locked me out of the Apple livecast. Why Apple can’t stream to Google Chrome, Firefox or Internet Explorer in 2014 boggles my mind, but for some reason this morning they could not.

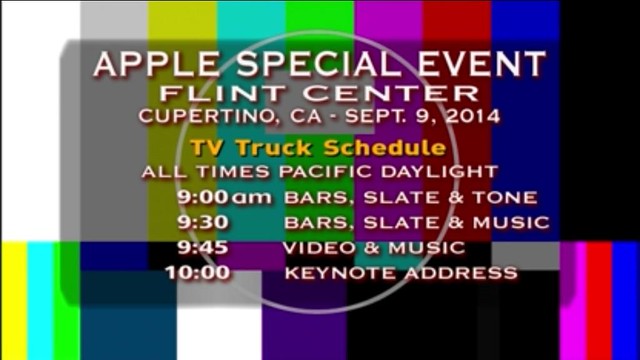
    This left me having to try and watch the livecast on my iPhone. Here I tried watching for about 30 minutes and then finally just gave up. The first 10 minutes or so it just gave me the weird Flint screen at the top of this post. After that it sort of connected, but it was hard to follow because the livecast was overdubbed with an annoying translator translating everything live into Chinese. I kept trying to relaunch the livecast and it would hang, or wouldn’t work, and after about a half hour I just gave up.

    I was watching CNBC and trying to follow the announcement on TV, but even there when they pulled to a clip of Tim Cook talking about the new product it was with the annoying Chinese overdubbed translator on it.

    Personally speaking I don’t think I’ll get an Apple Watch or an iPhone 6 — but Apple lost a great opportunity to try to sell me and millions of other people one by botching up their livecast so badly.

    As far as the watch goes, I’m just not sure why I’d want one. I asked my 13 year old son what he thought of the Apple watch and he told me he thought it was stupid. Why would you want a watch when it already shows the time on your phone, he asked. I guess I sort of feel the same way. I don’t know what the Apple Watch would do for me that would make me want to have an uncomfortable thing strapped to my wrist.

    As far as the iPhone 6 goes, the best I can tell is that it’s bigger and bigger is supposed to be, well, bigger? I don’t need bigger on my phone. The size is fine as it is. There was also something about payments in today’s livecast I think, but I’m not sure why I would want to use my iPhone to pay for things. These days I mostly use credit cards because I try to maximize my points/miles I get on purchases. I suppose it would be cool if my phone stored my reward credit cards, but that’s not really something that would make me buy a new phone.

    For future presentations, Apple should consider hiring a more reliable company to do the livecast for them. They should also be aware that if they are going to announce a new product at 10am on a Tuesday morning, that many of their potential customers will be at work and on PCs and they should consider allowing you to stream the livecast from your PC. It’s really not that difficult to stream video to a PC these days, certainly a technology company with Apple’s mad skillz can figure that out.


    Thomas Hawk Digital Connection

  • 6 Tips for More Unique Travel Photos in Busy Tourist Locations

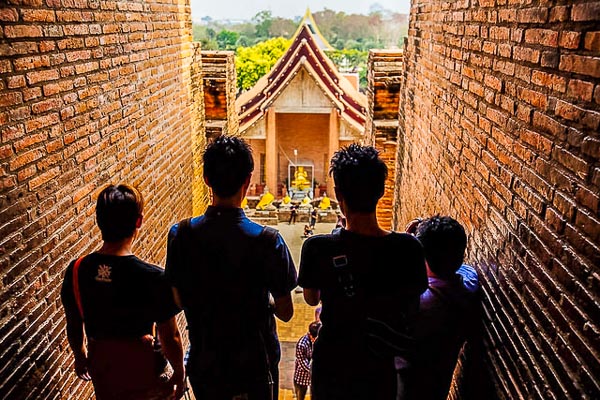
    Imagine this: you’ve scrimped and saved for months for your dream vacation, and a snazzy digital camera, hoping to capture some unique travel photography images along the way, only to be flustered by the hordes of other tourists with the same intentions. With the increased accessibility of cameras on devices of every kind, this is becoming a common scenario that can frustrate many photographers, both professional and amateur. But don’t lose hope! With these tips, I’ll show you some ways to think of travel photography in a new light so that you can take unique travel photos in busy tourist locations.

    DPS Travel Photography 03

    1. Take shots from different angles

    To get a unique photo, consider your subject from a wide variety of angles. Get down on your knees and shoot from below, or step up on a bench, or use a monopod to shoot from on high. Do whatever you can, within reason, to shoot from different perspectives; this will greatly increase the odds of capturing a unique image.

    2. Time your visits to outdoor attractions to coincide with the most ideal natural lighting available

    One of the biggest challenges to shooting outdoor attractions can be harsh shadows due to lack of lighting control. You obviously don’t want to bring strobes and excessive flashes with you when you travel, so it’s best to use the sun to your advantage. Do your research with apps, such as The Photographer’s Ephemeris, to see where the sun will be, and plan your trip accordingly. Sunrise and sunset are probably among the most ideal times, but be aware that you’ll likely get competition from other photographers thinking the same thing (see image above).

    3. Go where the crowds aren’t going

    DPS Travel Photography 05

    If the crowd in a tourist attraction is fixated on one particular part, turn around and see what is behind them. Look for details that are being passed by and not given attention. This gives you less competition, in addition to increasing the odds, of capturing a unique image that everyone else is overlooking. While you’re shooting in the opposite direction, this also gives you something to do while waiting for the crowd to thin out so that you have more time to capture a clean shot of the main attraction. Having patience, and waiting for breaks in the crowd, is also a key to shooting unique images.

    4. Pull out your zoom lens and focus in on details

    Challenge your photography skills and creativity by shooting exclusively with a macro, or zoom lens, for a while. Shooting with a longer focal length will encourage you to take in the intricate details of a place; something that is usually overlooked by other tourists who likely focus on taking selfies and wide-angle shots. There’s beauty in details, and zooming in close eliminates most of the risk of having other people block your shots.

    DPS Travel Photography 04

    5. Make other tourists part of your shot

    Instead of viewing the hundreds of other tourists around you as burdens, why not make them a part of your photo? Pull a fast one on other shooters by pointing your camera in their direction. Many tourists will likely duck or move out of your way, so act fast to catch them in natural poses. The point is, think like a photojournalist, or marketing photographer, and consider the idea that conveying the idea of a full, and popular, tourist attraction is a photo-worthy moment in itself.

    DPS Travel Photography 01

    6. Take candid shots or portraits of the locals

    In and around many tourist attractions, you’ll likely find lots of locals in the forms of security guards, vendors, taxi drivers, and more. If you’re searching for truly unique photo subjects, consider pointing your camera at some of these people who help run the tourist attraction, and making them a part of your photo. You could even get bold and approach some locals for a portrait. This might be tricky if you’re in an area where language barrier is a problem, but if you get creative with your body language, it’s fairly easy to get your point across. Portraits not only give you more opportunities to get creative, but also provide opportunities to chat with people, and perhaps find out other unique photo ideas in the area.

    DPS Travel Photography 02

    Have you got some great photos from crowded tourist locations? Please share them and your tips in the comments below.

    The post 6 Tips for More Unique Travel Photos in Busy Tourist Locations by Suzi Pratt appeared first on Digital Photography School.


    Digital Photography School

  • 8 Essential Tips for Travel Photographers

    #1 Great travel photos are planned

    Just think about what you are going to do, understand the scene, watch the light, the movement of people inside the image. When you take your pictures you have to consider all factors: from the time of day and the light, to the emotional preparation of the characters. It is true that luck exists, that someone at some time photographed just that smile, that you can collect stolen photos using a long lens. But few stolen photos have survived to become part of the history of travel photography.

    DPS Plan your photos 8953

    #2 The hair in your soup: An error for some people is something creative for others

    A hair is a hair, but one thing is having it on your head and another quite different story is finding it in your soup. An error for some people is something creative for others.

    Some questions customers usually ask me when traveling together are:

    • Is it okay if I use an aperture of f/8?
    • Hey, what is the right speed for this?
    • Does it matter if it comes out fuzzy?

    My answer is always the same: It depends on what you want to do and what you want to highlight.

    In sports photography you usually want to focus movement, and for this purpose you use high sensitivity (ISO) and high speed (shutter speed); but great photographers – specialists in their field – leave images fuzzy to emphasize movement, and get splendid results.

    The important thing is that viewers of your photo understand the way you have used the error: if you intended to show movement, the viewer must understand it that way. Otherwise the result is just a blurred picture.

    DPS  A hair 5636

    #3 Eyes are the magnet of every photo

    Look into people’s eyes, make personal contact. Eyes say a lot about people’s emotions, so much so that in many cultures people don’t want to look you in the eyes because they fear that you will be able to guess what they are thinking. Look for the light in the eyes – or total darkness. They are a magnificent photographic story line.

    DPS  Eye contact

    #4 One good photo a day – nothing else – nothing more

    There is no rush. You don’t have to go off shooting like crazy. One photo a day is much more than the greatest photographers achieve when traveling. Don’t rush when shooting the photo. Take your time to take a good photo rather than waiting for luck to achieve what you are not capable of doing calmly.

    #5 Forget about the long lenses if you are actually interested in real people on the street

    The long lens is the perfect instrument to get away from people, and keep them at a distance. It isn’t the best method to create emotions and capture them in a photo. Get close. Look into people’s eyes. Create an emotion! The vast majority of Magnum’s photographers specializing in people prefer 24mm, 28mm or 35mm lenses.

    If you want to grow as a photographer, use prime lenses: they force you to be fully aware of the frame and to take your time. If you are too far away, get closer. If you are too close, move away. I assure you that you will notice a tremendous improvement in your photos. If you don’t own fixed lenses, set your lens to the 35mm position using a band-aid.

    #6 Many good pictures are made on your knees

    Yes, on your knees. You’ll see how your whole concept of photography changes. I always get irritated by tourists taking pictures standing, from above, of a monk who is sitting on the floor. If you want people to have respect for you, the first thing you have to do is to show respect for others. Get down to their same height.

    DPS  On your knees

    #7 Find the best light and walk uphill or look for the worst light

    Get up very early or wait for dusk. The best light appears with sunrise and lasts for the next 20 minutes or at nightfall. Walk where nobody else walks. In cities and villages, you will most certainly find more opportunities than most photographers, by going uphill, because most people look for what is easiest and requires less effort.

    It always depends on what you want to show. Many great pictures are made at the worst moment: when the sun is at its zenith. This situation is exceptional for emphasizing shadows and highlighting hard heat conditions.

    DPS  The worst Light 88

    #8 Don’t act like a pro

    Don’t work, just take photos. Many professional photographers who have lost their way in the struggle to create saleable images come to my courses. Try to keep up your freshness. Remember what it was that originally attracted you to photography. Don’t be afraid of taking photos your colleagues don’t like, and especially don’t be afraid of taking photos that don’t sell.

    The post 8 Essential Tips for Travel Photographers by Harry Fisch appeared first on Digital Photography School.


    Digital Photography School

  • DIY How to Build and Use a Reflector to Take Better Portraits

    Photography is essentially capturing light. Beginners to photography can find the learning curve quite steep. To start with, there is the technical side. You need to understand what the camera can do and its limitations. Then there is the theory aspect, simply put you need to know what exposure is and how to achieve this with your camera if you want to get that creative shot.

    About four years ago, I was shooting a couple of models in my city of Dublin outdoors with a few fellow photographers. The day was overcast and I was just hoping it wouldn’t rain. Thankfully, it didn’t. One of the photographers had this big reflector, a 52 inch, translucent one. I was amazed at how effective it was, especially as it added these wonderful catchlights in the model’s eyes.

    Model with catchlights

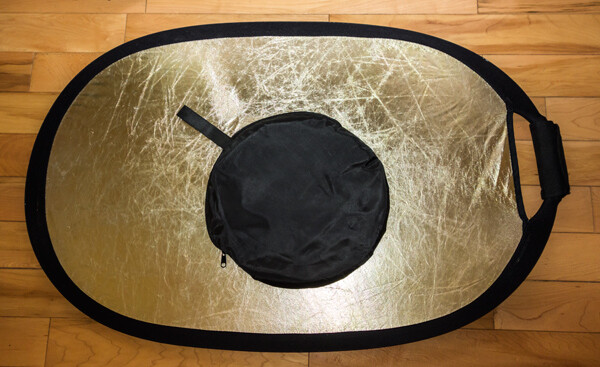
    Think in terms of directing the light when photographing your subject or object. This is why a collapsible reflector is an excellent piece of additional camera gear. They are relatively inexpensive to buy, so portable, and lightweight. They do come in various sizes but a 42″ 5-in-1 collapsible reflector can be bought online for under $ 40 USD.

    Collapsible Reflector 36x24 GoldSilver

    Recently, at a family get together, my sister wanted me to take some headshots of her. We were outdoors, it was early in the evening around 6 p.m., and the sun was a ball of amber. I positioned her with the sun behind and it had created a wonderful rim light on her hair. But I didn’t have enough fill-light on her face.

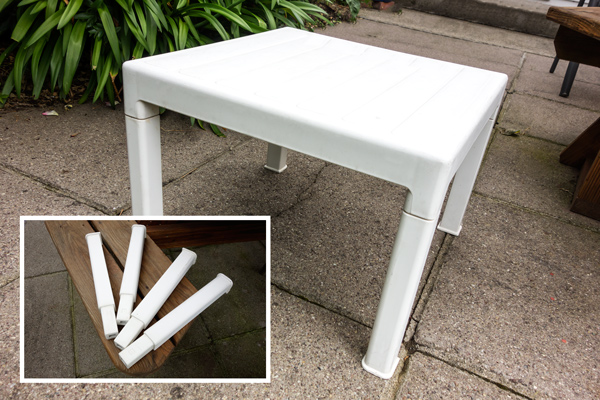
    Then I realized, I didn’t have my reflector with me. On this occasion I had simply forgotten to bring it with me. After all, I wasn’t on a professional assignment. Anyway, I saw the small white plastic garden table. I grabbed it, turned it upside down and yanked the legs off. I got my youngest daughter to hold the table top slightly to the right and below my sister’s face.

    Small white plastic garden table

    Technology is speeding along at a very fast pace. The latest DSLR/mirrorless camera of today is fast becoming yesterday’s news in a relatively short time. As a newcomer to photography, it can be difficult to choose what gear and accessories to buy.

    The basics of exposure havn’t changed with technology, nor has light. So practice with the camera that you have and learn to shoot with it in available light, and low light. Learn to see the different ways light can make a difference to your imagery.

    I came up with five DIY options to serve as a reflector and tested them out. Here are some tip on how to use a reflector to take better portraits:

    1. White mount card from an art or hobby craft shop, size A1(33.1 x 23.4inches) 300g
    2. Kitchen aluminum foil crumpled up before fixing it on the back of the white card using spray
      adhesive
    3. Radiator reflective foil
    4. White plastic garden table
    5. Silver car mats

    I still have, and use, the white card for demo purposes when I give workshops for beginners. It is so simple and affordable ,and the impact is quite dramatic. This option is the easiest to buy for a few dollars(USD). This piece of card can enhance your shots whether you are inside or outside. It’s great.

    A simple indoor set-up for a portrait shoot using the white card

    Have your model or subject seated (or stand) beside a large window. The model will be facing the camera, so one side of his or her face will be in shadow. Take a shot. Then have someone hold the white card near the model’s shadow side, at an angle so that a nice even light is cast across your subject’s face. Take numerous shots as you will need to direct your assistant on how close or far they hold the card up to the model. When you have taken a number of shots, you will get a clearer understanding of how to reflect the light upon your subject in a more pleasing manner. When you have uploaded your images to the computer, you will have the initial shot as your frame of reference to see the difference.

    Tip – if the surface of your card starts to get grubby, I have covered up dirt marks using white interior matt paint.

    Using kitchen aluminum foil is really simulating a silver reflector, which adds a cool light on your subject.

    Becky silver reflector

    If you don’t have spray adhesive or photo mount, an alternative method would be to water down a little PVC glue and paint this on one side of the white card. Then lay the aluminum foil (crumpled first) on top and smooth it out. This needs a good 24 hours to set. Also be careful when reflecting the light onto your model. Keep your distance as it reflects a large amount of light.

    This roll of radiator reflector foil was inexpensive to buy. I can’t remember exactly but I think it was less than ten dollars (USD). Similar to above, this option works in the same way.

    Becky radiator reflector foil

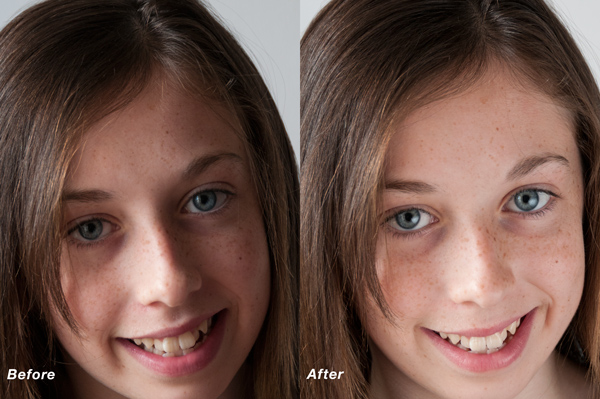
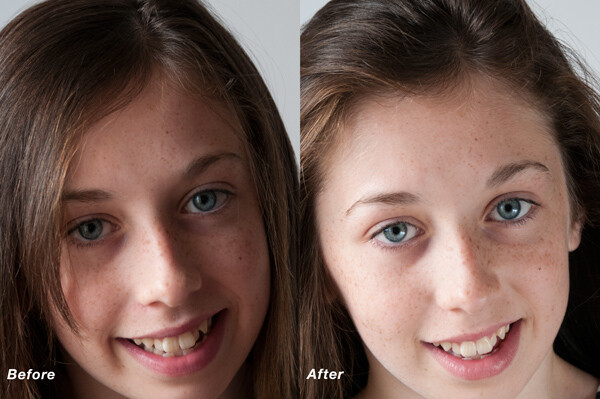
    I recreated a similar test of my daughter in my Mum’s back garden using the small white plastic table. Unfortunately, I didn’t have the wonderful sun shining in the background, like I had for my sister’s shot. This was a quick test but as you can see there is an improvement in the after image. The light was cast more evenly across her face. Catchlights were created in the eyes which are key to good portraiture and shadows were eliminated under the chin.

    Amy before and after small table

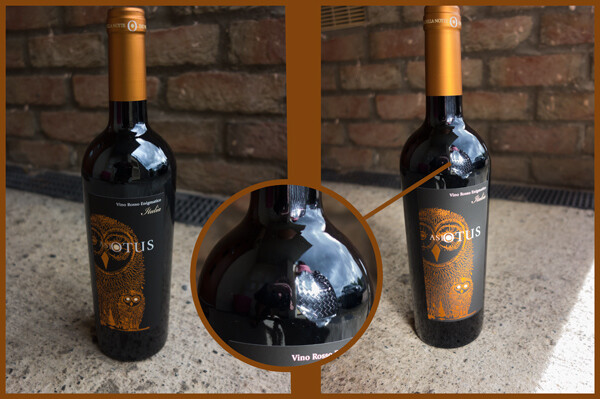
    I included the silver car mats more as a tongue-in-cheek test! However, I decided to test them out to see would they actually work. I chose a bottle of wine so that you could see the silver car matt reflected in the bottle.

    Wine bottle

    Have you tried using a reflector before? What are your thoughts? Please give it a try if you haven’t and share your results and comments below.

    The post DIY How to Build and Use a Reflector to Take Better Portraits by Sarah Hipwell appeared first on Digital Photography School.


    Digital Photography School

  • 5 Lessons from Rihanna to Learn for Your Photography Brand

    Rihanna is probably one of the world’s biggest pop stars right now. But along with her catchy songs and rough music videos, there is something else that gets her to the top of the music world. It’s unique marketing campaign. Today I’m going to talk about 5 lessons you can learn from Rihanna for your photography brand. Here you’ll get Continue Reading

    The post 5 Lessons from Rihanna to Learn for Your Photography Brand appeared first on Photodoto.


    Photodoto

  • How to do Noise Reduction in Lightroom

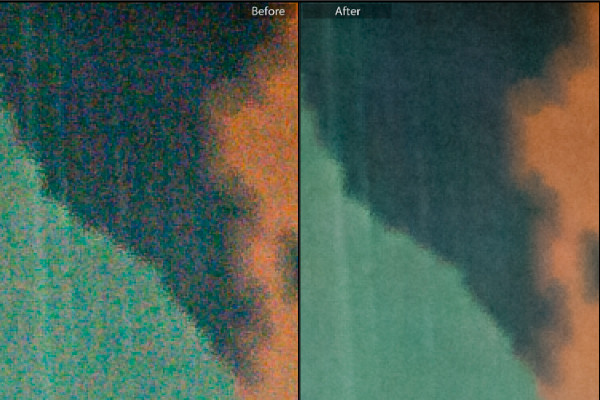
    Lightroom-noise-removal-before-after

    When you capture images using a high ISO setting you will invariably end up with some noise in your photos. If the noise is distracting and if you want to remove it, then Lightroom can help.

    A word of warning

    Before start using any noise removal tool it will pay to understand that noise removal is generally achieved at the expense of losing some detail in the photo. This is because the noise removal process involves smoothing the image pixels, and this in turn compromises fine detail. In addition, the main Lightroom noise removal tool applies the fix to the entire image not just the areas where it is most visible, meaning that you can’t mask the result and limit it to only those areas you want to apply it.

    Because of this, if you are a purist and noise reduction is an ongoing and significant need, then you may consider a dedicated and specialist noise reduction program such as Topaz DeNoise, Neat Image or Photo Ninja a worthwhile investment. However, for most photographers, the tools in Lightroom judiciously applied will suffice.

    Identifying noise

    Noise in photos comes in two types; color noise and luminance noise. Color noise is evidenced by multicolored pixels in an area of the photo that should show as a flat color. In the image below you can see that there are multicolor pixels in an area which should be solid blue.

    Lightroom-noise-removal-step1

    Luminance noise is monochromic so it will be less colorful and more like grain. Here is luminance noise in the sky of a photo captured at an ISO of 6400 in early morning light:

    Lightroom-noise-removal-step2

    Process versions

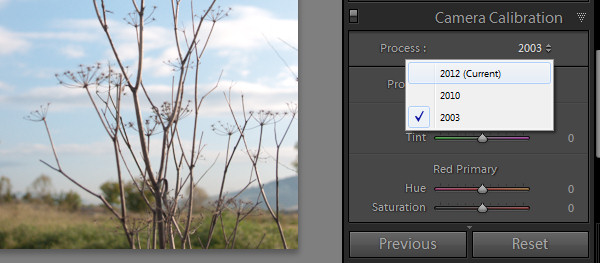
    Whenever you import an image into Lightroom some noise removal will be performed automatically by the process version which is the camera raw technology Lightroom uses to adjust and render your photos. In each process version the technology has improved over that of the earlier versions. So each will render your photos differently and, in particular, Process Version 2010 included better noise reduction technology than the earlier 2003 version. This was carried forward to the 2012 version.

    The current process version for Lightroom 4 and 5 users is 2012 so, if you have images in your catalog that you imported using an earlier version of Lightroom (versions 1, 2 or 3) which are still set to process version 2003 then you can achieve some immediate benefits in noise reduction by simply updating those images to the new process version. To do this select the images and in the Develop module from the Camera Calibration panel select 2012 (Current) as the process version (use the Sync option to copy the setting to all selected images).

    Lightroom-noise-removal-step3

    Removing noise

    To remove noise from a photo, open the Detail Panel in the Develop module to display the noise reduction sliders. There you will find sliders for Luminance noise and for Color noise.

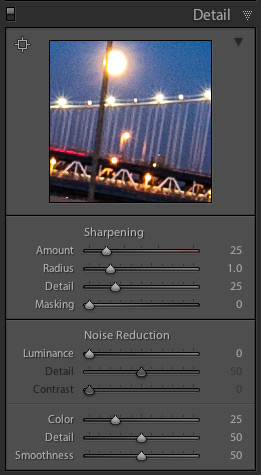
    noise-default-LRFor raw images Lightroom automatically applies color noise reduction in the import process. So the Color Noise Reduction slider will be set, by default, to 25 with Detail and Smoothness set at 50 for all raw images. The Luminance noise slider will be set at 0, with Detail at 50 (see screenshot on the right)

    Adjust the slider for the type of noise you are seeing in the image, either color or luminance. If you are unsure what type of noise you have, adjust each slider in turn to the maximum value to see which removes the noise. In some cases you may have both types of noise, in other cases one type may predominate.

    Once you know what type of noise you are trying to remove, adjust the slider for that type of noise by dragging it to the right. Aim to reduce the noise to an acceptable level, but avoid going beyond that point because, in doing so, you will lose some detail in the image.

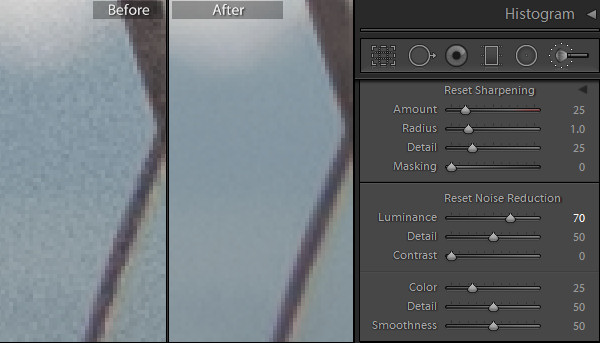
    Once you have adjusted the Luminance Noise slider you can then adjust its Detail and Contrast sliders. The Detail slider controls the luminance noise threshold – the higher the value the more detail in the image but, as a result, you may experience some residual noise. If you use a lower value you will get a smoother result but with less detail.

    Lightroom-noise-removal-step4

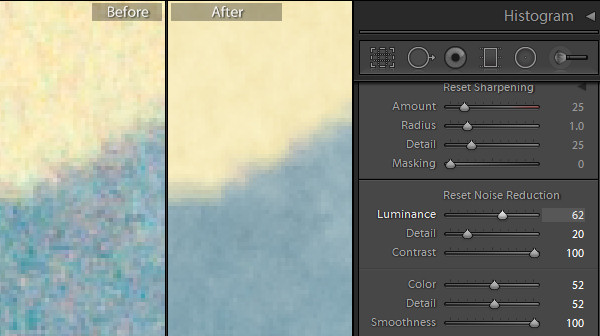
    The Contrast slider controls luminance contrast so high values will retain more contrast but you may also see more noise and mottling in the image. Lower values will give you a smoother result but again at the expense of reducing contrast.

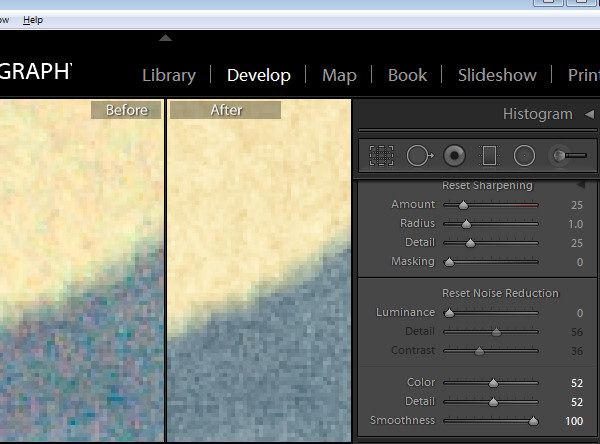
    For Color Noise there are two additional sliders: Detail and Smoothness (the latter was added in Lightroom 5.2). The Detail slider controls the color noise threshold, so adjusting this to a higher value will protect detail in thin colored edges but often at the expense of removing speckled color. Lower values will give you some added smoothing of the color noise but, as a result, you may notice that colors bleed into each other. Adjust the Smoothness slider to help reduce low-frequency color mottling artifacts.

    In this image, removing Color noise leaves some Luminance noise apparent:

    Lightroom-noise-removal-step5

    Once the color noise is removed, the Luminance slider will remove the remaining Luminance noise:

    Lightroom-noise-removal-step6

    When you are removing noise from an image it helps to be viewing the image at a 1:1 size ratio so you see clearly what is happening. Periodically zoom out to check the result.

    Local Noise Reduction

    If your image has luminance noise you can remove this from selected areas of the image using any of the three local adjustment tools: the Adjustment Brush, the Radial Filter or the Graduated Filter. These tools let you limit noise reduction to only those areas you want to affect, leaving other areas of the image unchanged. The downside to this feature is that there is no additional Detail or Contrast slider to fine tune the result, and it only works to remove luminance noise (not color noise).

    Lightroom-noise-removal-step7

    Using any of these tools select the area from which to remove noise, and then adjust the Noise adjustment slider. Drag to the right to remove luminance noise from the image. If you drag to the left then you will add noise to the image.

    When you go to sharpen an image that you have removed noise from, pay attention to the Masking slider in the Detail panel. Using this you can apply sharpening to only the edges in the image and avoid sharpening areas of flat color where the noise was most apparent.

    Here is a video tutorial showing how to reduce noise in photos in Lightroom:

    If you have questions or comments please leave them in the space below. Hope this helps you with removing some of the noise in your images.

    The post How to do Noise Reduction in Lightroom by Helen Bradley appeared first on Digital Photography School.


    Digital Photography School

  • Fine Tuning Autofocus on your DSLR

    Have you ever used a nice big aperture and got home only to find out the focus isn’t on the part you wanted? Or done a portrait and their ears are nice and sharp not their eyes?

    If so, you might have a lens focusing issue. There are ways to test for that and depending on your camera model you may be able to adjust it.

    I found a video where the host walks you through the process of fine tuning autofocus for your DSLR. I think her accent is great and I love knowing that people around the world have the same issues and there are great photographers and educators everywhere.

    Hopefully that solved your issues and everything is tack sharp now, exactly where you want it.

    The post Fine Tuning Autofocus on your DSLR by Darlene Hildebrandt appeared first on Digital Photography School.


    Digital Photography School