Category: Photography

  • Using Levels in Photoshop to Image Correct Color and Contrast

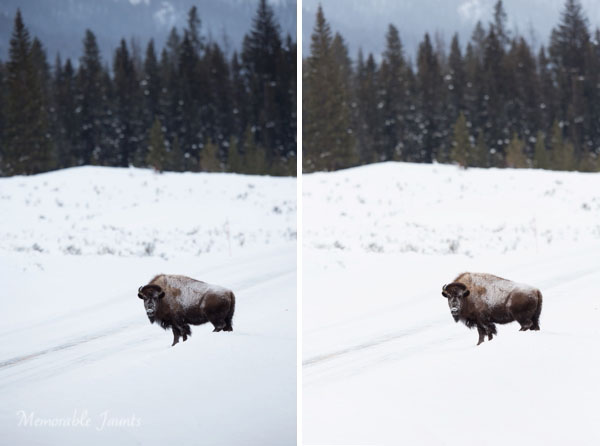
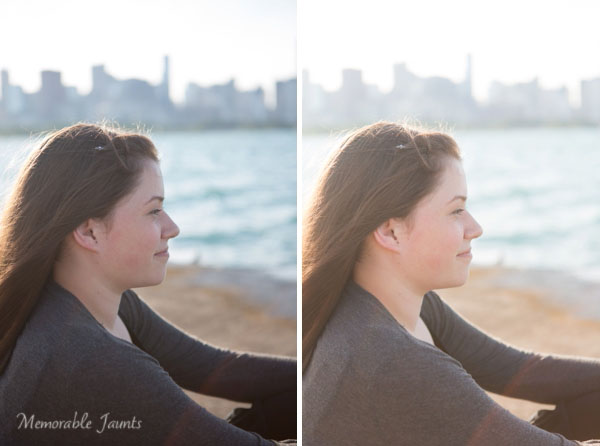
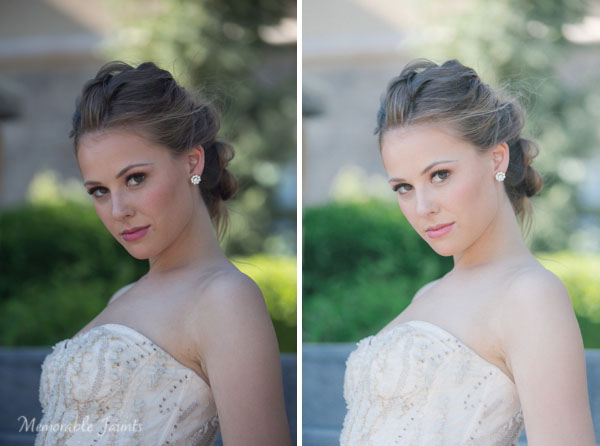
    Notice the difference some quick adjustments in the Levels tool can make

    Notice the difference some quick adjustments using the Levels tool can make

    Image editing is an important part of making your good images look spectacular. Photoshop and Lightroom are packed with tools to help you get your images to look great after you have downloaded them on to your computer. While there are many different tools in Photoshop to enhance your image, there are really only a handful of tools that you will use on just about every image; one of those is the levels tool. Photoshop has a levels tool, Lightroom doesn’t unfortunately. Each photographer has a different workflow when editing images, my suggestion is to follow a process that is the same for each image. When you open up an image in Photoshop or Lightroom, the first step is to look at the exposure. Is the image over or underexposed? At this stage of the workflow, you could be looking at a tool like the Shadow and Highlights adjustment, the next one to use would be Levels.

    What is the Levels tool?
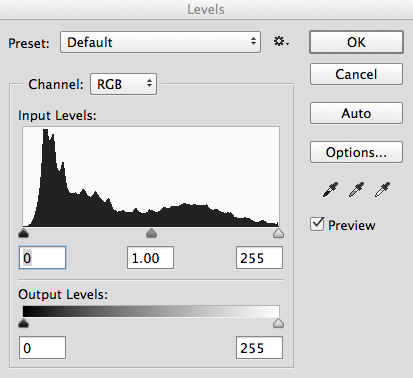
    Levels tool in Photoshop

    Levels tool in Photoshop

    Levels does two things in one tool, it corrects the tonal range in an image and it corrects the colour balance. Adjustments made using the Levels tool are not only about getting the exposure on your image correct; it also has a second function and that is, it can correct for colour too. Yes, there are other tools within Photoshop that can do this, but the Levels tool can make it really quick and easy.

    The Levels tool uses a histogram to show a visual representation of the tonal range in your image. There is a lot to be said about a histogram, but the most important thing to remember is that there is no right or wrong histogram. If you are unsure about how a histogram works, check out: How to read and use Histograms. On the histogram in the Levels tool, you will see a numerical range starting at zero on the left hand side of the graph, and 255 on the right. In the Levels function, zero represents black and if you have pixels that are at zero, that means there is no detail, they are totally black. The right hand side at 255 represents total white. If you have pixels at 255 that means they are totally white, with no detail. If the shape of your histogram is leaning to the left hand side, that means you have a lot of dark pixels in your image and your image is possibly underexposed. If the histogram is more on the right hand side that means you have a lot of bright highlights in your image and it is possibly overexposed. The middle slider is the mid-tone or gamma adjustment. All the pixels that are not highlights or shadows, fall into this category.

    How does the Levels tool work?

    When you open the Levels tool, very often your first instinct is to push the sliders into a position that makes the image look brighter. That can work, but I suggest that you do the following: Before you make any adjustments, take a look at your image and see if you can pick up a colour cast. This is a tint or colour that affects the whole image, and is often unwanted. For example, if you have a wedding photo of a bride shot on an overcast day and while everything looks okay, there may be a slight blue hue in the image from the overcast light. This means that her dress looks a little blue instead of white. In a case like this, a colour cast is something you want to get rid of. If however you have shot a summer sunset and the whole scene is bathed in warm orange light, this could also be seen as a colour cast, but in that case you would probably not want change it. One way to find colour casts in your images is to look at an area of the image that should be white and see if it has a tint. A colour cast will vary depending on the light you shot under; it could be green, magenta, blue, yellow, orange, or anything in between.

    How to use the Levels tool
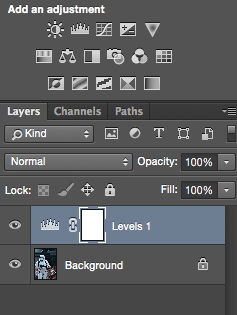
    Make and adjustment layer for Levels

    Make and adjustment layer for Levels

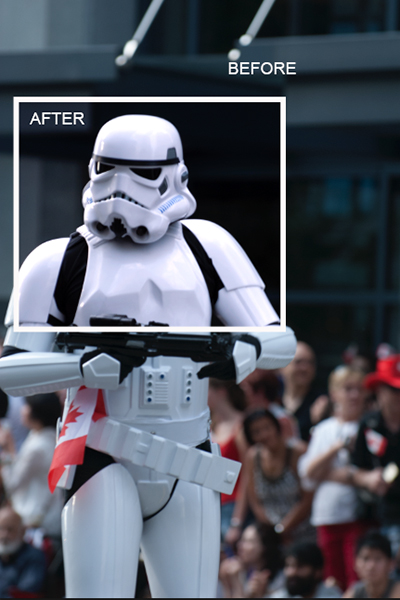
    You can use the Levels tool on any image that needs the colour or contrast corrected. If you have an image that needs to have the colour cast corrected, like my shot of the Star Wars Stormtrooper does, then do the following:

    1. Open your image in Photoshop.
    2. Click on the adjustment layer icon at the bottom of the Layer panel and create a Levels adjustment layer, or click on the Levels tool icon in the adjustments panel which is directly above the layers panel.

    Step 1 – If you need to do colour correction

    If your image has a colour cast (the example image does, as there is a slight blue colour because it was overcast weather that day), follow these steps. Not all images need to have the colour corrected, if you are happy with the colour in your image you won’t need to do this. If you do have a colour cast in your image, then do the following:
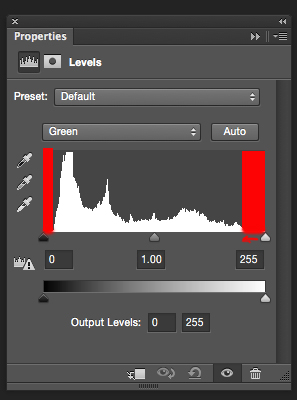
    Bring the white and black sliders to the point where the graph starts moving upwards

    Bring the white and black sliders to the point where the graph starts moving upward

    Part 1: In the levels tool, click on the drop down box above the histogram that says RGB. This will open up the three channels individually. Click on RED and bring the white slider and black slider in to part of the histogram where it starts to move upwards. Click on the the RGB drop down box again and click on GREEN and do the same, and finally click on BLUE and repeat one more time. This step will only work if there is a colour cast in your image. If there is no colour cast, the histogram will spread to the edges of the graph. In this image, there was a colour cast and this was how the GREEN channel histogram looked.

    The red areas in the screenshot above show you where there was no colour information. By sliding the sliders inward to the edge of the graph, you will start to neutralize the colour cast.
    Part 2: You will notice that as you make these adjustments, your image may have a very strong colour cast of the channel you are adjusting. Don’t be alarmed, this will all work out once you make the final adjustments.
    Part 3: Once you have adjusted for the colour correction in all three colors, you can now adjust the exposure and contrast
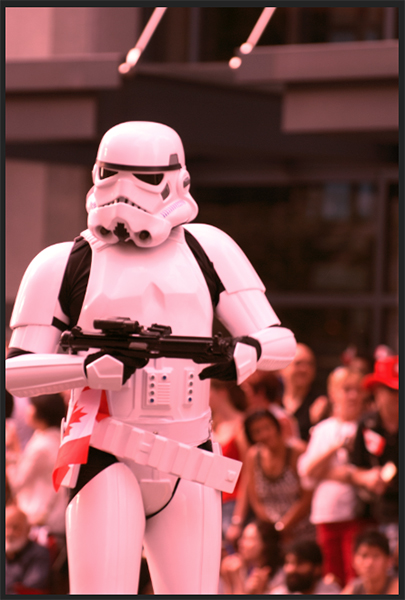
    Don't be alarmed at the crazy colours you might see during the colour cast adjustments, they will work out in the end.

    Don’t be alarmed at the crazy colours you might see during the colour cast adjustments, they will work out in the end.

    Step 2 – Adjusting for exposure and contrast

    The Levels tool can also adjust your image’s exposure and contrast. In other words, you can use it to make the highlights, shadows and mid-tones brighter or darker – an all-in-one tool. The levels tool is really great to make some quick adjustments to your image, here is how:

    Part 1: In the RGB channel, move the white slider in from the right to the edge of the histogram. Do the same for the black slider, adjusting it in to the edge of the histogram on the left. The important tip here is to make sure that you don’t overexpose the highlights and underexpose the shadows. This is called clipping and the best way to see if you are clipping any pixels is to hold down the ALT key when you are adjusting the white and black sliders.
    2. Once you have those two sliders adjusted, you can slide the mid tone slider to add some contrast to the scene and this will be the final touch to your levels adjustment.
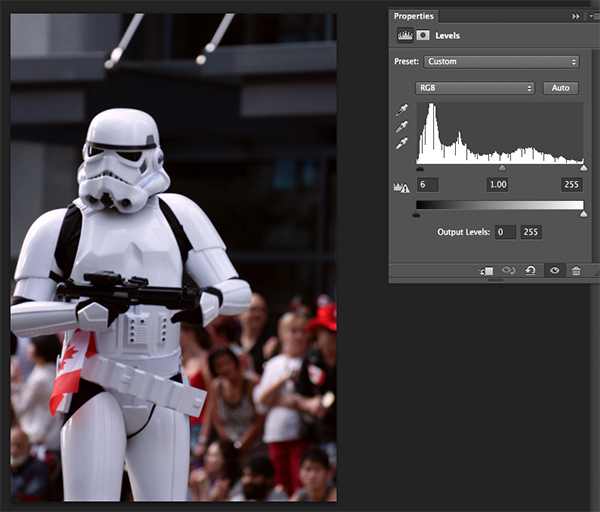
    The final adjustment showing colour correction and contrast correction

    The final adjustment showing colour correction and contrast correction

    Some final tips to remember

    1. Like any tool in Photoshop, if levels is overdone, you will be able to see it in the image. So, be aware of over adjusting your image.
    2. Small adjustments always work better than one big adjustment. Make small changes first and see if that works.
    3. Use the ALT key to make sure you aren’t losing detail in the shadows and the highlights by clipping your pixels.
    4. Add some contrast to your images in levels, that will give your image a bit more pop and will enrich the tones.

    The levels tool is a powerful ally to have in your image editing workflow. I use this tool on just about every image I edit. It can really add some contrast and punch to your images so try and use it as often as needed. These techniques take practice, but once you know what to do, the levels tool is quick and easy to use.
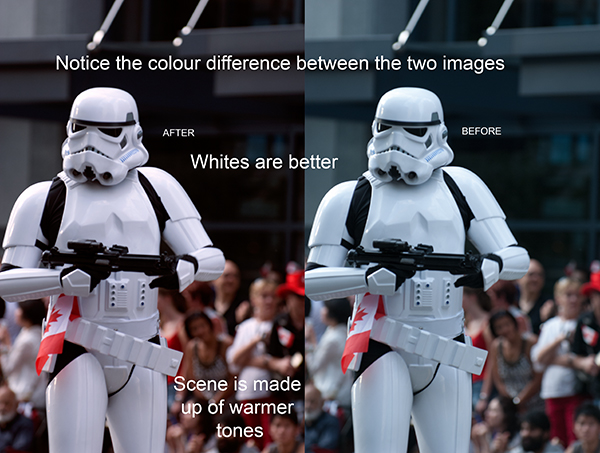
    Compare the images side by side, there is a subtle but real difference

    Compare the images side by side, there is a subtle but real difference

    The post Using Levels in Photoshop to Image Correct Color and Contrast by Barry J Brady appeared first on Digital Photography School.

    Digital Photography School

  • 7 Ways to Handle High Contrast Scenes

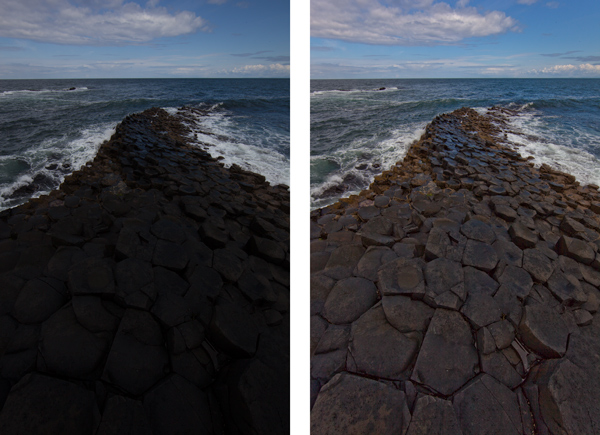
    Perhaps the greatest challenge you will face in outdoor photography is the high contrast created by the sun and the bright sky versus a darker foreground. That is one of the reason photographers try very hard to shoot at dawn or sunset. Otherwise, the sky is virtually always so much brighter than anything on the ground that it is hard for your camera to deal with the contrast. Either your camera exposes the sky correctly, which makes everything on the ground look black, or the camera exposes the foreground correctly resulting in a blown out (or pure white) sky. If you try to expose in the middle, you will have problems with both highlights and shadows.

    The challenge is constant and great, but there are some things you can do to create great pictures no matter what the light. This article will walk you through some ideas for doing that.

    1. Fix it in Post-Production

    GiantsCauseway

    The first thing you can do is try to fix the problem in post-processing. Both Lightroom and Adobe Camera Raw (used in Photoshop and Photoshop Elements) have sliders that can help bring your sky back or add detail to a dark foreground. They won’t bring back a truly blown out sky or pitch black foreground, but you might be surprised at what they can do.

    For an overly bright sky, try pulling the Highlights slider down (in other words, pull it to the left). That will usually add detail. If you have blue portions of your sky, another trick is to target the blue portion and make that darker, while keeping the clouds white.  To do that, go to the HSL/Color/B&W panel in Lightroom, or the HSL/Greyscale tab in ACR, and find the Blue slider.  Click on the Luminance tab, and pull the Blue slider down (to the left). That will preserve good highlight tones in the clouds but darken the blue tones to make the sky look much better.

    If your foreground is too dark, you can brighten it up using the Shadows slider in the Basic tab of Lightroom or ACR. Pull that slider up (to the right). That will brighten up the darker tones.  You may find, however, that lightening the shadows in this fashion makes the foreground look too flat or washed out. There is a simple cure for that though. Find the Blacks slider, which is just below the Shadows slider, and pull the Blacks slider down (to the left) a little bit. It may seem counter-intuitive to darken the Blacks since you just lightened the Shadows, but this adds contrast back to your foreground. So the foregound will be lighter due to the increase you made to the Shadows, but will still have contrast because of the decrease you made to the Blacks.

    2. Consider Converting to Black and White

    Horse

    The problem you’ll encounter most of the time when you convert your pictures to black and white is a lack of contrast. Very often, photographers convert their pictures to black-and-white only to find that they look dull and flat. You want tones ranging from pure white all the way to pure black. The high contrast you are combating can actually be an asset in black and white photography.

    One problem with shooting with a bright sky or at midday, of course, is usually the high contrast. In addition, people are just plain used to seeing the middle of the day, so when they see a picture taken at midday viewers can find it uninteresting. Converting to black and white can solve both of these problems. As mentioned above, the high contrast can be an asset in black and white. Further, black and white is not how people are used to seeing the world, so the photo may look more interesting to them. Of course, this is not a cure-all, and a blown out sky is still a blown out sky, but converting to black and white can occasionally save a really high contrast picture. So, try converting toblack and white if your picture is overly contrasty.

    3. Use Fill Flash

    People often think about using a flash only in low-light situations. But perhaps a better use for flash is in very bright situations like those we are talking about here. It doesn’t seem to make sense at first, but what you are doing is letting the flash fill in some of the harsh shadows and thereby deal with your high contrast problem.

    If you use fill flash, set your camera’s exposure settings so that the sky is properly exposed. You might take a shot or two without the flash to make sure you have it set properly. Then add the flash to brighten up the foreground and keep it from being black. Dial back on the power of the flash unit or the flash exposure compensation to make it look more natural. That should result in a properly lit subject with a sky or background that looks good as well.

    4. Use a Graduated Neutral Density Filter

    MarinCo

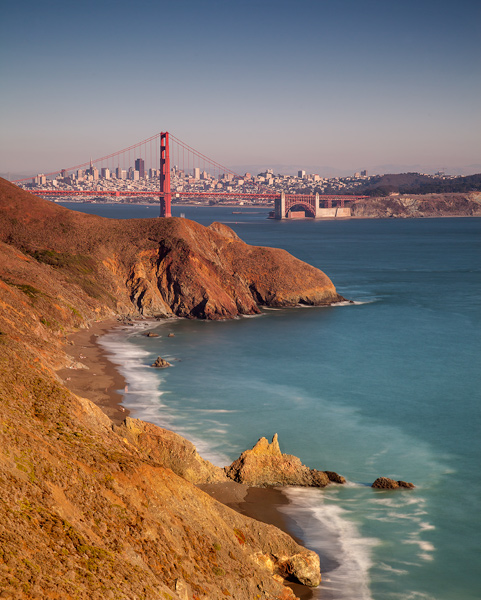
    The scenes we are talking about in this article stem from an overly bright background and a dark foreground. The previous tip addressed a way for you to brighten the foreground. Now let’s reverse that and talk about a way to darken the sky so that it is roughly the same exposure as your foreground.

    To do that to, you will want to buy a graduated neutral density filter. These are square filters that fit in holders attached to the front of your lens. The top portion of the filter is dark, and it fades to clear glass at the bottom. That way it darkens the sky while having no effect on the foreground. Use one to darken the sky and keep the brightness values within the dynamic range of your camera.

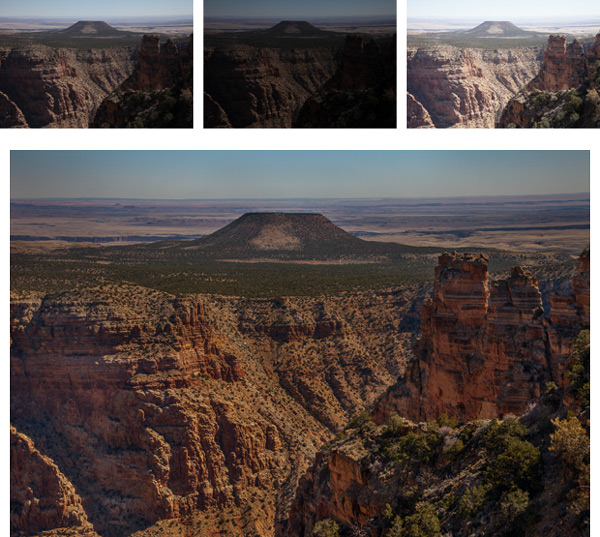
    5. Blend Your Exposures

    GrandCanyonAll

    Another way to deal with contrast that goes beyond the dynamic range of your camera is to bracket your pictures and blend them later. Most cameras have a function in the menu that allows you to set the amount you would like to overexpose or underexpose your pictures. That way when you press the shutter button it will take three pictures: One at normal exposure, one underexposed, and one overexposed. Some cameras will actually allow you to take five or even seven photos.

    You can blend these three pictures later in Photoshop by using parts of each exposure for your final photo. For example, you may want to use the sky from the darker, underexposed photo. You may want to use the foreground from the brighter, overexposed photo. There may be elements of each that you want to take from the normally exposed picture. By blending them all together in Photoshop, you will have a picture that is properly exposed across the board.

    To accomplish the blending, here’s a quick primer on the process:

    1. Open all your files as layers in the same picture. You can accomplish this in Lightroom by selecting your photos, and then going to Open as Layers in Photoshop (either Photo > Edit In > Open as Layers in Photoshop or right-click and select Open as Layers in Photoshop).  If you don’t have Lightroom, there is a similar function using Adobe Bridge. In addition, in Photoshop you can select photos and open them as layers by choosing File > Scripts > Load Files into Stack, and then using the resulting dialogue box to select the photos you want.
    2. From there, add a layer mask to your top layer (Layer > Layer Mask > Reveal All). The white layer mask you just created does not change anything, and all of this top layer will still show up in your picture. But you have created a mechanism to change that.
    3. To have Photoshop apply portions of the layer below, select your brush tool and set the color to black. Then just brush in where you want the layer below to appear. Remember, anywhere the mask shows white the top layer will show; anywhere the mask shows black it will reveal the layer underneath.
    4. If you want to combine a little of each layer, reduce the opacity of your brush to a lower percentage. Often this process works best by  setting the opacity very low (under 10%) and brushing in the layer below where you want it gradually with a large brush.
    5. When you are done with that process and the photo looks the way you want, merge these layers (Layer > Merge Down). Then repeat the process for the layer below, revealing whatever portions of that layer you want in your final picture.

    6. Blend into an HDR File

    Thus far, I’ve avoided the option of using High Dynamic Range (HDR) software to deal with the dynamic range problem you face. Of course, you can bracket your photos (as set forth above) and process them using Photomatic Pro, HDR Efex Pro, Photoshop, or other HDR software. That is a topic in and of itself.

    For purposes of this article, consider using an HDR file as part of the blending process discussed above. In other words, first bracket your exposures. When you are in front of your computer, create an HDR file using your preferred method. Now, bring your original three exposures and the HDR image into Photoshop using the method outlined above. When you bring them all in, you should have four layers showing.

    Then just do the blending process described above. Put the file you think looks the best on top. Next, follow the process set forth above for blending in each of the other layers. If it turns out you don’t want to use one of the layers you can just delete or hide it. Using this method, you should have complete control over the exposure levels in your picture. In addition, this process will provide you the benefit of HDR software without that HDR-look that many photographers try to avoid.

    7. Work with it

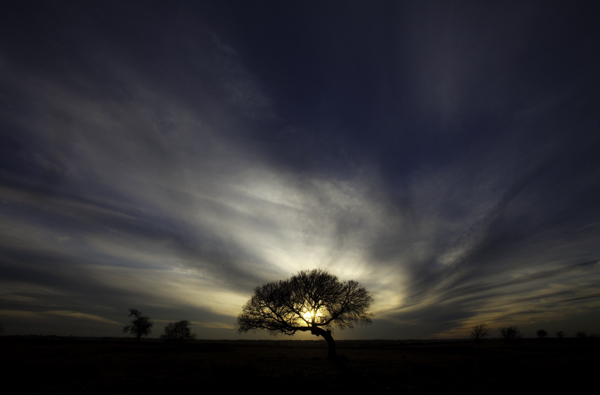
    Tree

    This might sound like giving up, but you might consider using the high contrast for effect. For example, you can use the brightness by adding sun’s rays into the picture. You can use the darkness by creating a sillouette. Think about effects like these at the time you are shooting. Sometimes you can turn a problem into an interesting feature of your photograph.

    Or, if there is no way to use the high contrast as an effect, you can sometimes minimize it by shooting away from the sun. Not having the sun in your picture will keep the sky from being too bright.  If you are lucky, the sun will lighten up the foreground enough to keep it within the dynamic range of your camera without creating any harsh shadows.

    Your Greatest Challenge

    Dealing with this problem of dynamic range is perhaps the greatest challenge of the digital photographer. Unless you have thousands of dollars to buy a medium format camera and get the increased dynamic range that the larger sensor size offers, you will need to take steps such as those above when you are shooting outside. Use these tips to overcome this obstacle and make your photos stand out.

    The post 7 Ways to Handle High Contrast Scenes by Jim Hamel appeared first on Digital Photography School.

    Digital Photography School

  • Sony A6000 Mirrorless Camera Review and Example Images

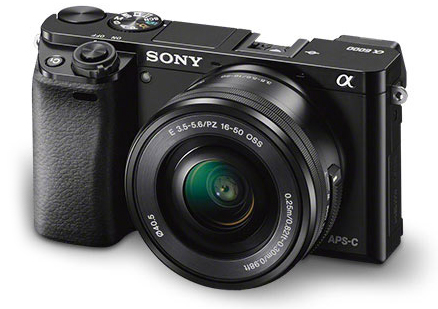
    The Sony A6000 Review by Gavin Hardcastle

    If the Sony A7R is a champion heavyweight in its prime, the Sony A6000 is the scrappy younger brother with a leaner frame, faster feet and a few tricks up its sleeve that big brother hasn’t bothered to learn.

    Having spent almost a year with the A7R as my main camera, I’ve become very familiar with the current Sony Alpha system, so I hit the ground running with the A6000. Here is my Sony A6000 review along with a load of example images from my most recent road trip.

    Sony A6000 Mirrorles Camera Rewview

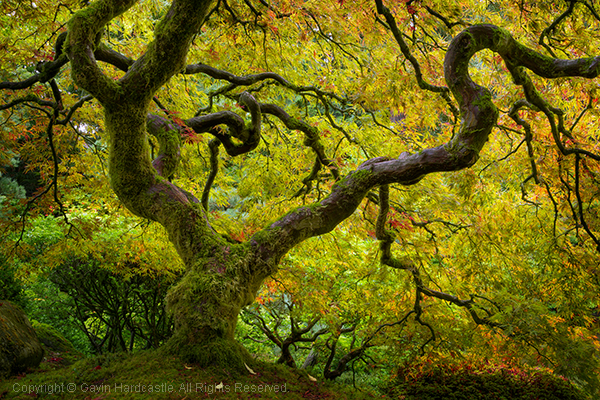
    For this shot I used my Canon 24-105mm with the hated Metabones Adapter.

    Sporting a 24.3 Megapixels APS-C sensor, this mirrorless camera crams a lot of horsepower into a tiny little box and the E-Mount (like the A7R) means you have some nice Sony/Zeiss glass to choose from. You can also use an adapter for the E-Mount which will allow you to use a wide variety of lenses. If you already own some nice Leica, Nikon, or Canon glass for APS-C cameras, you can throw those on the A6000 with the right adapter.

    The Price is Right

    For just under $ 800 you can walk away with the Sony A6000 and the 16-50mm kit lens, or get the body only for around $ 600. For image quality like this in a tiny package that boasts a lot of versatility, that’s a keen price. When you compare it to the likes of the full frame A7R and the A7S, it’s a total bargain.

    Image Quality

    Lets face it, Sony are the world leaders when it comes to image sensors and they know how to get the most out of them. While you won’t get ultra low noise, or A7R-like sharpness out of the A6000, you’ll certainly get great image quality and enough sharpness to suite most requirements. This sensor has the same ability to pull up shadow detail like the A7R (although with more noise than its counterpart), while keeping the file sizes at a much more manageable, yet very print-worthy level.

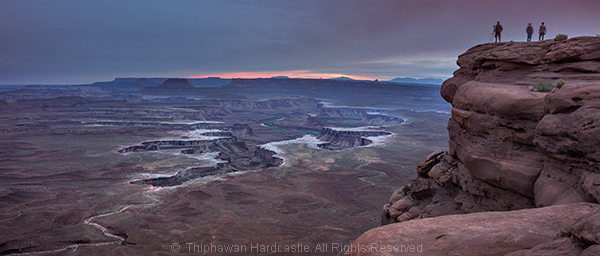
    The Sony a6000 reviewed by Gavin Hardcastle

    This shot was made with the E PZ 16-50mm F3.5-5.6 OSS kit lens

    Faster Focus

    One of the main selling features of the A6000 is its super fast hybrid autofocus and focus tracking. While these are features I would rarely use, I can see the attraction for sport, wildlife shooters and parents hoping to capture images of their kids at play. With a burst rate of 11 fps, you’ll have a good chance of catching those golden moments.

    Small Form Factor

    I actually prefer the feel of the A6000 to the A7R. This camera is clearly all about being small, lightweight, and discreet. The A7R was designed to take advantage of big wide angle and telephoto lenses so it never felt big enough. The A6000 however, feels exactly right for its purpose and for me, that is to get the best image quality out of the smallest package possible.

    With the 16-50mm kit lens this camera looks and feels wonderfully miniature. As more premium E-mount lenses become available from Sony/Ziess you’ll be able to get much better image quality but still retain that perfect small form factor. I doubt the prices of that premium glass will be small though.

    Sony A6000 Reviewed by Gavin Hardcastle

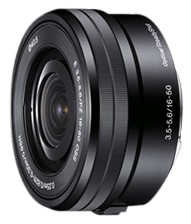
    The 16-50mm Kit Lens

    E PZ 16-50mm F3.5-5.6 OSS

    I often find that kit lenses get a bad rap. They are deliberately made to feel shabby next to their more deluxe siblings, but if you know how to squeeze the best out of your glass you’ll be able to get some decent image quality from the 16-50mm.

    The sharpest aperture was f/8 with a very noticeable drop in image quality when you select wider or narrower apertures. Sadly there is a very noticeable edge vignette even at f/8, which I thought very shabby of Sony. It’s not a great lens at this price but if you’re prepared to do a bit of tweaking in post, you’ll achieve some decent shots. The main challenge with this budget lens is getting tight focus with the pathetic focus ring of misery.

    OSS – Optical Steady Shot

    Apparently, image stabilization is performed inside the Sony lenses that have this feature but enabling/disabling the OSS has to be done in the menu. I much prefer a switch on the lens to turn this feature on and off.

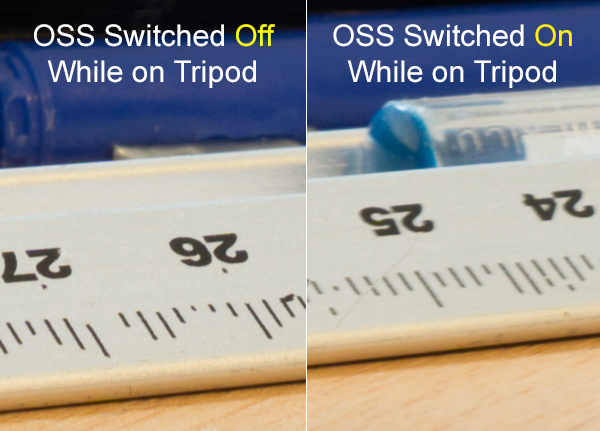
    If you plan on shooting on a tripod you’ll want OSS switched OFF. It’s really only any use for hand held shots. Here’s an example of the OSS on and off while used on a tripod. You can see that the numbers on the ruler look much sharper with OSS switched OFF. You’ll find the same results of most cameras that have some form of image stabilization.

    Sony A6000 Review by Gavin Hardcastle - OSS testing

    Video Quality

    While the A6000 records superior video to the A7R, it’s actually not as good as the video quality you can get with the even cheaper A5100 mirrorless camera which boasts the XVID codec. You’ve got to wonder what Sony is playing at with these silly configurations. I’m sure it would have been a small thing to include XVID video recording on the A6000 but Sony in their wisdom decided to forego it to make the A5100 more attractive.

    Sony A6000 Reviewed with Example Images

    The Sony A5100 as an Alternative

    The one thing that stopped me from choosing the A5100 over the A6000 was the lack of dedicated buttons and dials for controlling your settings. Although it has the exact same 24.3 MP sensor, the A5100 is even smaller than the A6000 and that means you’re forced to dig into the menu system in order to play with your settings. This would have resulted in me having a full blown frustration tantrum on a mountaintop and launching the A51000 off a cliff, so I chose the A6000 due to its two dials and three customizable buttons, way more user friendly but man I miss that XVID codec.

    The Viewfinder of Mediocrity

    If you’re switching from DSLR to a Sony Mirrorless, be prepared to be completely underwhelmed by the horrifically pixelated joke of an electronic viewfinder. DSLR users will look through that thing and feel that there is no chance their image will turn out well. Don’t be dismayed. Just use the viewfinder to set your focus and view your settings but don’t for one second think that your lovely RAW file will remotely resemble the grainy atrocity on display through that poxy peephole.

    Apparently the viewfinder on the RX1 is infinitely better, but at almost $ 2800 it should be. If you can live with the lame EVF of the A6000 which is the same as on the much more expensive A7R, you’ll be fine. It took me a bit of getting used to when I switched from DSLR but once you’ve seen those gorgeous RAW files, you’ll come around.

    Sony A6000 Example Images and Review

    Hot Shoe Accessories for the Sony A6000

    Flash fanatics will be delighted to learn that the A6000 has a multi-interface hot shoe slot on the top of the camera. This is also great for videographers who want to add the external mic. Sadly there are no software audio level controls when recording video on the A6000 and that is a MAJOR let down. Again, Sony could have included that software which is available on the A7R but in their wisdom, decided not to.

    Apps for the Sony A6000

    Like all of the current alpha range, the A6000 allows you to install Sony apps for extended functionality (and cost). The Time Lapse app had an update a few months ago that has made it much more usable. Other apps include remote control, star trails and a bunch of other awful ideas I’ll never bother to download or use.

    Review of the Sony A6000 Mirrorless Camera

    Built-in Flash

    The A6000 does have a built in flash that pops up dramatically. You can even angle the flash to point up at the ceiling to bounce the light.

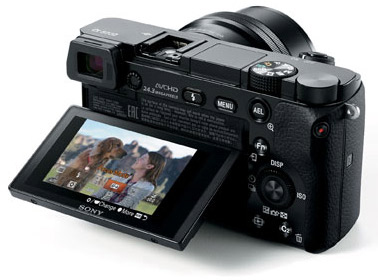
    Tilt Screen

    Sony A6000 Tilt Screen

    Like the A7, A7R and A7s, the A6000 has a tilt screen which you can angle for low or high shots and still be able to view the screen comfortably. I love this feature and although the A6000 has a smaller screen than the A7R, it works well while fitting into the smaller frame of the chassis. When cameras at this price point all seem to be able to include this technology it baffles me why the likes of Canon and Nikon exclude this feature on their high end cameras.

    While I’m delighted that the A6000 does have a tilt screen, it has to be said that the screens image quality is pretty shabby compared to the screens you’ll see on the likes of the Olympus OM-D EM1. I heard a rumour that Sony makes those screens for Olympus so why not include that technology in the A6000? Perhaps that would have jacked up the price to a place where Sony didn’t feel comfortable.

    Test images using the Sony A6000 in the Gavin Hardcastle Review

    Battery Life Woes

    Although nowhere near the longevity of a Canon DSLR battery, the FW50 batteries last longer in the A6000 than they do in the A7R. Just like the A7R, you won’t get a battery charger with the A6000 either so your options are to connect the charger cable directly to the camera or buy a third party charger. I’d recommend the latter as you’ll soon wear out the multi/charge socket on the camera.

    Shutter Noise

    This is a non-issue with the A6000. Unlike its noisy big brother the A7R, which has a super loud shutter noise (that I love), the A6000 has a very quiet shutter so you won’t startle the koala bears.

    What I love about the Sony A6000 Mirrorless Camera

    • Small form factor feels great in the hand – it’s discreet
    • Great image quality if you don’t need full frame
    • Uses the same batteries as the current Alpha family of mirrorless cameras
    • Tilt screen is really useful for low to the ground shots
    • Competitive price
    • Has a built-in flash
    • Shoots 59 fps video in AHVCD
    • Features the E-Mount lenses
    • MU hot shoe
    • I can assign any setting to the three custom function buttons

    What I hate about the Sony A6000 Mirrorless Camera

    • No digital level like on the A7R
    • No audio level control like on the A7R
    • No XVID codec like on the a5100 which is cheaper
    • Poor quality display on both the EVF and tilt screen
    • I can’t seem to reverse the EV dial operation
    • I hate the position of the mode dial, I keep hitting it by mistake when I change my aperture setting because that’s where my thumb falls naturally
    • There’s no C1, C2 setting on the mode dial. I have to dig into the menu to call these up.

    Should You Buy the A6000?

    Sony A6000 Camera Review

    Yours truly. Dynamic range is surprisingly good with great highlight recovery and shadow detail.

    That depends on your needs. If like me, you use the A7R as your main camera, the A6000 is the logical choice for your backup camera. It shares the same menu, batteries, lens mount and can be configured to be almost identical in operation to the A7R.

    If you’re a DSLR user that’s used to the APS-C sensor size, the main thing you’ll struggle with is the EVF. Once you’ve gotten used to that, you’ll enjoy the superior image quality, customizable controls and most of all, the adorably small size of this wrist saving camera. Shoot with one of these for a week and then try going back to your clunky DSLR. Your old camera will feel like a breeze block.

    Canon videographers will find little reason to switch due to the average codec and lack of audio level controls on the A6000.

    First time camera buyers will love this camera because of its image quality, portability and price.

    With that well considered summary, I’m awarding the Sony A6000 four out of five stars. They could have achieved five stars with a better quality LCD that included touch screen functionality.

    The post Sony A6000 Mirrorless Camera Review and Example Images by Gavin Hardcastle appeared first on Digital Photography School.

    Digital Photography School

  • 20 Dos and Don’ts for Shooting the Moon

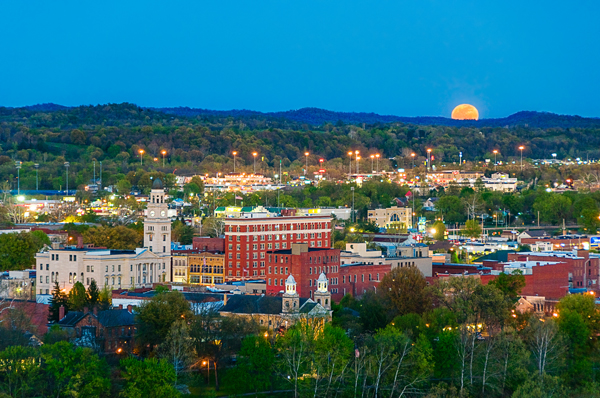
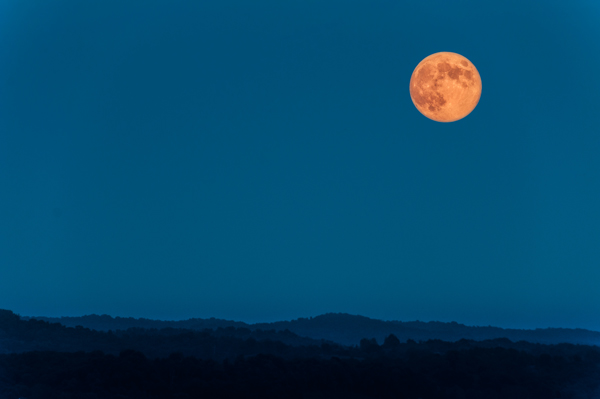
    Here the April moon called the "Pink Moon" rose over Marietta, Ohio. The setting sun lit the city in a warm glow.

    The April moon called the “Pink Moon” rose over Marietta, Ohio. The setting sun lit the city in a warm glow.

    The moon is a very popular subject for photographers of all skill levels to shoot. But if you’ve ever tried to photograph the moon, you’ve probably discovered that it’s not that easy to accomplish. In this article let’s look at some dos and don’ts to take your moon shots from snapshot to artwork.

    To begin, the first and most important DON’T is: Don’t assume that photographing the moon is going to be easy.

    #1 Do use a tripod

    One of the most important pieces of equipment for any low light photography is a good tripod. Since the moon is so far away, it is very important to have a sturdy base as even the smallest movement of the camera will cause your image to blur. You might be tempted to think that if you use a fast enough shutter speed you can hand-hold the camera, but you need to realize that your subject is 238,900 miles away and even the slightest movement will be exaggerated.

    #2 Don’t use a slow shutter speed

    The moon is actually moving very quickly around the earth at a speed of 2,288 miles per hour (3,683 kilometers per hour). The moon is so distant, it doesn’t appear to be traveling very quickly to the naked eye. Because of the moon’s speed and the long focal length necessary to capture an image of the moon, you need to use the fastest shutter speed possible. A good rule of thumb for tack sharp moon photos is nothing slower than 1/125th of a second.

    #3 Do use a telephoto lens

    To successfully shoot any kind of detail of the moon in your image, you need at least a 300mm telephoto. For a full frame image, you will need around an 800mm lens.

    Capture the moon

    #4 Don’t use any filters on your lens

    Remove ALL filters from your lens! To prevent any chance of distortion, don’t use any filters. Yes, even remove the UV filter. This may sound scary if you never remove the UV filter from your lens, but it’s best to remove to do so in this case. Some may suggest using a neutral density (ND) filter for moon photography to cut back the bright light of the moon. But, all this will do is require you to use a slower shutter speed, and you want to use the fastest shutter speed possible to get that crisp, tack sharp, image.

    #5 Do try the Looney 11 rule

    The Looney 11 rule is similar to the Sunny 16 rule. Set your f-stop to f/11, then match the shutter speed to your ISO. For example, if your ISO is set at 100, set your shutter speed to 1/125 of a second. (This is not an exact science but will give you a good starting point.)

    #6 Don’t touch the camera to start your exposure

    Do not manually press the shutter release or even touch your tripod when initiating your moon shot. Remember that even the slightest touch could add enough vibration motion to blur the image. Using a cable release or remote trigger is the best way to start your exposure. If you don’t have either of these gadgets, use the self-timer feature on your camera to begin your shot.

    #7 Do use Mirror Lock-up

    If your camera gives you the option to lock up your mirror this can greatly increase your chances of getting a tack sharp image. Even the slightest shake of your camera’s mirror can be enough to blur your image. If your camera has this option, use it! Lock the mirror up and wait a few seconds to allow any vibration to settle before beginning your exposure.

    #8 Don’t use Image Stabilization

    Canon’s IS (Image Stabilization) or Nikon’s VR (Vibration Reduction) must be turned off anytime your camera is on a tripod. Turning on any vibration reduction feature with your camera mounted on a tripod will actually create blur in your image.

    #9 Do know the cycles of the moon

    Use Photographers Ephemeris to predict the location of the moonrise

    Use The Photographer’s Ephemeris app to predict the location of the moonrise.

    There are 29.5 days between full moons. There are many online and smart phone applications that can help you track the phases of the moon. One must- have app is The Photographer’s Ephemeris which will not only give you the phases of the moon, but also show you when and where the moon will appear in the sky. This is especially useful when planning your moon shoots in advance. By far the most photographed stage is the full moon, which is also the brightest and the most difficult to expose correctly. The side lighting of the Gibbous stage produces some interesting shadows which may allow you to capture craters and mountains. The crescent moon is, of course, the darkest stage, but one which may create some interesting effects when added to a nighttime landscape.

    #10 Don’t always place the moon in the center

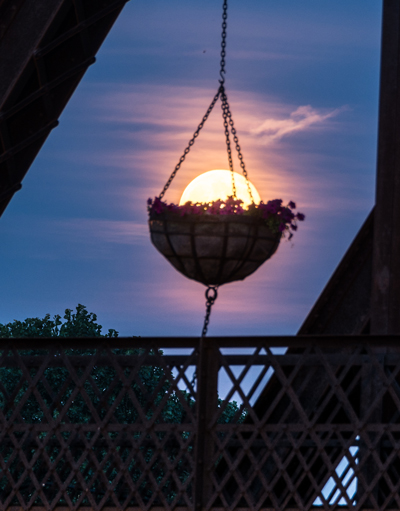
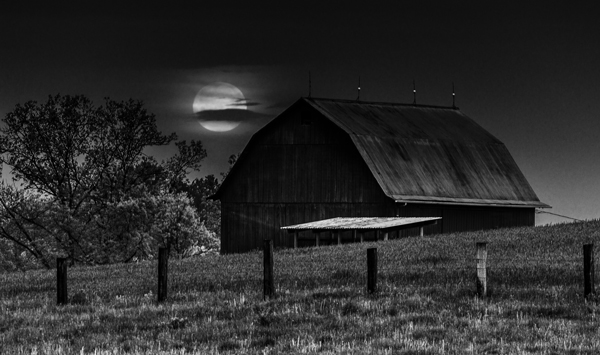
    While you can use all the usual rules of composition for your lunar photography, don’t be afraid to break the rules if the shot calls for it. Don’t just put the moon in the center of your image with nothing else –  it’s been done a million times before and there is nothing exciting about this. Try to include other objects in the frame with the moon.

    Don't just place the moon in an empty sky, including a foreground object will create a more dramatic image.

    Don’t just place the moon in an empty sky. Including a foreground object will create a more dramatic image.

    #11 Do switch to manual focus

    There are a couple of different methods you can use to focus on the moon: First, try using your camera’s autofocus, and once you have a desirable focus, turn off the autofocus and switch to manual focus. Alternatively, you can set your camera on manual focus, and with your live view feature turned on, zoom in on the moon and turn the focus ring until the moon becomes sharp. Then do not touch the ring again.

    #12 Don’t just shoot the moon at night

    The best time for photographing the moon is just after it rises or just before it sets, when it is very low in the sky. When the moon is near the horizon, it is closest to Earth and will appear larger in your images. Also, as the full moon rises the sun will be setting, and as the full moon sets the sun will be rising. This may give you great lighting to include or accentuate foreground or landscape objects. Shooting the moon in the day time will give you opportunity to include foreground objects, and you also may be able to capture some craters on the moon’s surface.

    The June full moon called the "Honey Moon" captured here setting at sunrise

    The June full moon, called the “Honey Moon”, captured as it sets at sunrise.

    #13 Do use exposure bracketing

    Once you have found the exposure that you feel happy with, it is best to bracket around that setting. The view of your images in the dark, on the back of your camera, can often be deceiving. In the dark, images always appear brighter on the LCD of camera than they actually are when opened on your computer. After you are satisfied with the exposure you have dialed in, bracket two stops under and two stops over, just to ensure that you get an exposure you will be happy with later.

    #14 Don’t use Auto White Balance

    Using auto white balance will give you very inconsistent results. What is the source for the light of the moon? That’s right, the sun! So try daylight white balance, but if you are looking for a different effect, try tungsten or cloudy. Don’t be afraid to experiment, but also remember that if you are shooting in RAW you can change the white balance in post-production.

    #15 Don’t depend on your meter

    Most likely your camera’s light meter will be fooled by the amount of light reflecting off the moon. Also it is important to note that as the moon rises, the exposure will continual change. It gets brighter as it rises, so you need to keep adjusting your shutter speed.

    #16 Do shoot in RAW mode

    Shooting in RAW will allow you to capture more details of the moon’s surface, and also give you more latitude for adjustments in retouching. So, unless you are not at all comfortable with using camera RAW software, always shoot the moon in RAW.

    #17 Don’t be afraid to crop your image

    Unless you are shooting with a very large telephoto lens, you will want to crop your image to display the moon at a decent size. But remember, the more you crop, the smaller the final image can be printed at high resolution.

    #18 Do tweak and sharpen

    Most moon photography is going to require some post exposure retouching in Photoshop or other photo editing software. Adding clarity and contrast will help bring out details which will enhance the craters and mountains of the moon. As mentioned above, white balance and exposure may also be tweaked to finish your optimal image, as both are somewhat difficult to perfect in camera.

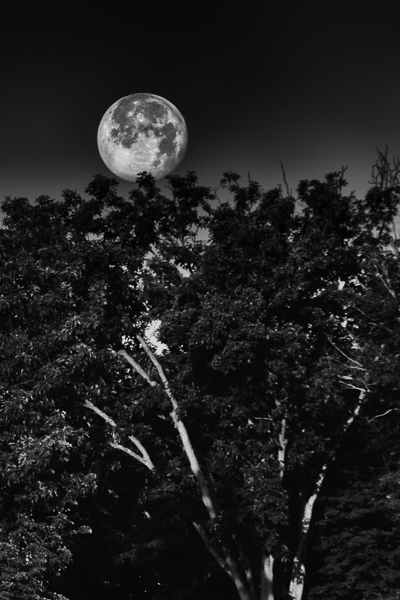
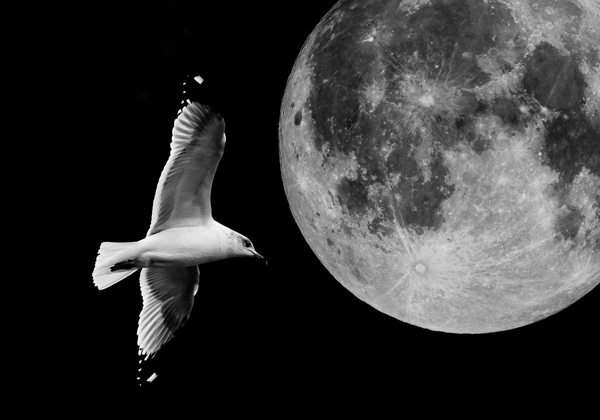
    Be creative: two images are combined together here to create this final image

    Be creative: two images are combined to create this final image.

    #19 Don’t be afraid to be creative

    Don’t be afraid to get creative with your images of the moon. Most great moon images have been manipulated in post-production because of the difficulty of capturing a great moon shot in one image. HDR or exposure blending are great methods to enhance the captures of otherwise impossible moon images. A popular method used by many photographers is to combine two exposures: one set to bring out the best of the foreground landscape and a second exposed for the moon only. When combining these two images, try enlarging the moon slightly to achieve a more dramatic effect, but don’t overdo it to the point that it looks fake. It needs to look believable unless you are going for a science fiction affect (which isn’t a bad idea, creatively speaking!).

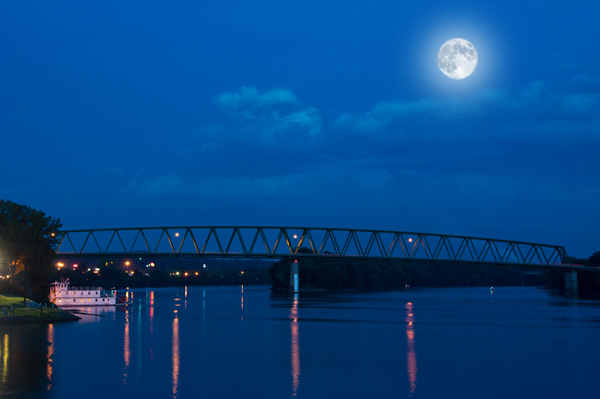
    Two exposures were combined to make this final image. One image was exposed for the landscape and the other for the moon. The moon was enlarged slightly for dramatic effect.

    Two exposures were combined to make this final image. One image was exposed for the landscape and the other for the moon. The moon was enlarged slightly for dramatic effect.

     #20 Do Practice, Practice, Practice

    Now get out there and shoot the moon! Remember it is not as easy as it looks, so keep trying if your first results are not as dramatic as you expected.

    If you have any moon images or other dos and don’ts that work for you, please share them in the comments below.

    The post 20 Dos and Don’ts for Shooting the Moon by Bruce Wunderlich appeared first on Digital Photography School.

    Digital Photography School

  • Review Of The Rugged Pelican 1510 Carry-On Case

    If you own a lot of photography gear, you’ll likely want to protect it from any environmental dangers as well as possible. Pelican claims that the 1510 is a hardcase that is water-, dust- and crushproof while still meeting carry-on restrictions of international airlines. The Pelican 1510 can be carried with a handle or rolled with the integrated wheels. Here’s Continue Reading

    The post Review Of The Rugged Pelican 1510 Carry-On Case appeared first on Photodoto.


    Photodoto

  • 7 Tips for Better Beach Photography

    The beach can be a great place for photography. You are in a scenic environment. You typically have friends or family members with you. You are usually there on nice days. All these can contribute to great photographs.

    But the degree of photography problems you will face on the beach might surprise you. Exposure can be tricky given the bright environment. Often, there is nothing but sand, so the composition can be dull. And of course there are elements like sand and salt-water that do not mix well with electronics. So I want to give you some tips for beach photography, dealing with these potential problems and make it a great place for photography.

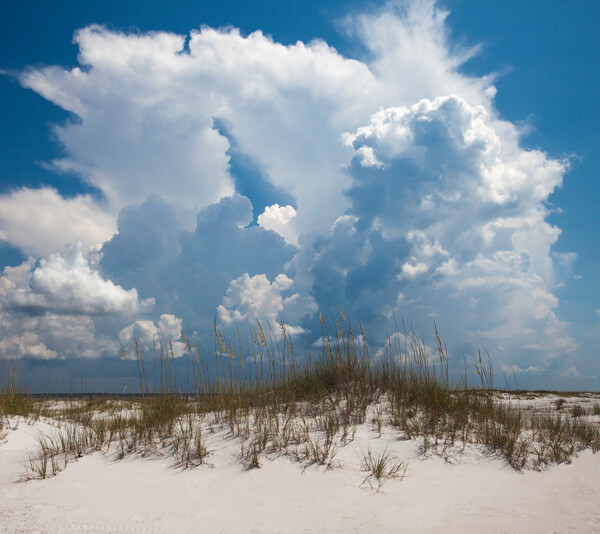
    SantaRosa

    1.  Control Your Exposure

    If you are shooting in automatic mode, you might find that your pictures are darker and flatter than you anticipated. That is because your camera will try to reduce all things to a middle grey. Try shooting in Manual or Aperture Priority mode, which will give you additional control over your exposure. Use that control to slightly overexpose your picture. Set the exposure so that the meter in your camera is a little to the right of zero. If your camera uses numbers instead of a scale to show your exposure, start by setting it at +1. This will make your picture accurately capture the bright scene that you see in front of you.

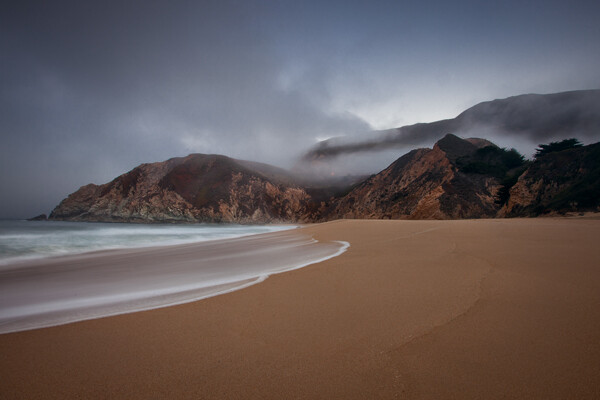
    GreyWhaleCove

    2.  Watch the Dynamic Range

    At the beach, you will almost always be looking at a bright sky. Even though the foreground may be well lit, the sky will usually be much, much brighter. That can cause a dynamic range problem and, if you are not careful, your sky will be blown out or pure white.

    To deal with this problem, break out a graduated neutral density filter. This is a square filter that fits on a holder in front of your lens. The top of the filter is be dark, while the bottom of the filter is clear glass. When you attach the filter to the front of your lens, it will darken the top portion of your picture while keeping the bottom portion at the same brightness level. This keeps everything within the dynamic range of your camera. The upshot for you is that it will darken your sky a bit to bring it in line with the foreground and keep the sky from blowing out. The beach is an ideal place to use these filters because the horizon is typically a straight line with nothing sticking up over it (such as trees or buildings).

    If you do not have such a filter, try bracketing your exposures. You can then merge them later using Photoshop or an HDR software.

    3.  Use Fill Flash

    It might seem counter-intuitive to you, but the beach on a bright sunny day is a great place to break out your flash unit. You can expose your picture with an eye on the brightness level of the sky, and brighten up the person or thing in the foreground using the flash. Because the overall scene is so bright, the flash should not overpower it. I personally find that the beach on a sunny day is one of the best times to use a flash unit. Adding fill flash can dramatically improve your beach photos.

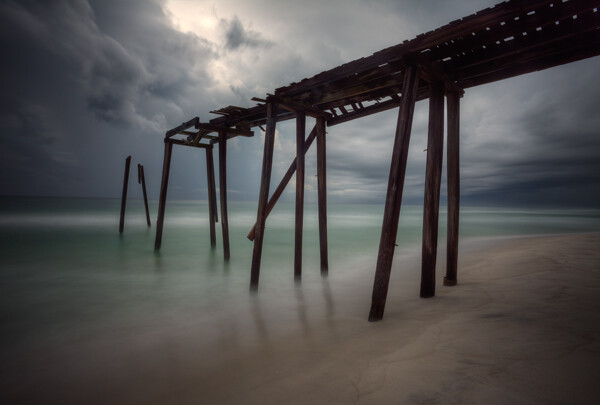
    Pier

    4.  Seek Out Subject Matter

    I once complained to a friend that I was having difficulty taking good pictures at the beach. He responded, “Of course you are, there’s nothing but a bunch of sand.” Sometimes, that sentiment is right. So you will have to work on finding a good subject to add to your composition. If you do so, you can turn your beach photos something great.  Some ideas to look for are:

    • Piers
    • Rocks
    • Driftwood
    • Beach chairs
    • Beach umbrellas
    • Fences
    • Sea oats
    • Abandoned boats
    • And, of course, people

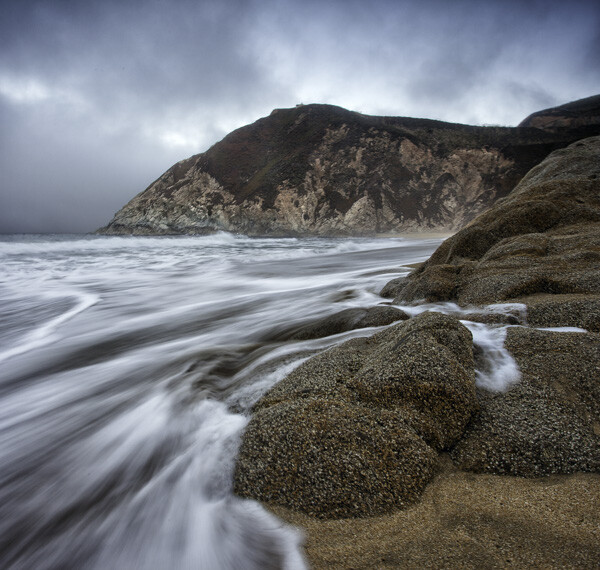
    GreyWhale

    5.  Work the Foreground

    At the beach, you already have a ready-made background for your photos; that being the ocean and the sky. What will separate a great photo from a snapshot will frequently be the foreground. Focus nearly all your energy on making the foreground look as good and as interesting as you possibly can.

    Using the subject matter set forth above can help you with your foreground. Having any of those elements in the frame will usually go a long way in making the foreground an interesting part of the photo. If none of those items are available, a lot of times interesting formations in the sand can also create a good foreground. Look for a pattern. They can be difficult to see though, sometimes you will need to have your eye to the viewfinder or be looking at the LCD to find them. Take a test shot if time permits.

    Once you find your subject matter, consider your angle of view. Very often, we tend to shoot directly out towards the ocean. However, there are usually much more interesting views looking down the coast. Sometimes it is actually best to put your back to the ocean and get the sand and land formations in your frame. Just be sure you’ve considered all the angles.

    PensacolaPanorama

    6.  Get the Best Light

    As with most other forms of outdoor photography, the best light is usually predawn, or just after sunset. Try to get up early or stay late. These are virtually always the best times for photography, and many serious shooters will not shoot at any other time of day.

    Of course, getting up before dawn or staying after sunset is not always possible. Rather than just put the camera away, you might want to try some midday shots. If you do, there are a few ways you can make your photos look as good as possible. I already talked about using a fill flash, and that can be a great way of cutting down on the harsh shadows you might encounter. In addition, to make your sky look as good as possible, consider using a polarizing filter. This will make your sky appear a deeper, richer, blue. Polarizers actually work best near midday, so you will get the maximum benefit from it if you are shooting at that time.

    One final tip if you are shooting at midday and dealing with harsh contrasts is to consider converting your photos to black and white; it loves contrast. The overly contrasty light of midday photography can go from a liability in a color photo to an asset in a black and white photo. Once you’re back in front of your computer, try converting a few photos to black and white and see how you like them.

    DestinChairs

    7.  Beware of the Elements

    Sand and salt water do not mix well with expensive electronics. It is difficult to keep them away from your camera sometimes. Sand seems to get in everything.

    Further, a crashing wave can send spray into the air and get into your camera. You will want to take a few precautions to avoid any such problems. You could actually buy a waterproof case for your camera, but these are amazingly expensive. The cases can cost more than the camera itself. They are often more than is necessary, particularly if you are making efforts to keep away from the water and sand. In normal situations, you can get a rain sleeve to cover your camera for just a few dollars. You might use one of these if there’s any chance that sand or spray get near your camera.

    Another idea is to purchase a waterproof point-and-shoot camera. I normally recommend that you steer clear of point-and-shoots because of the inherent problems with them, largely stemming from the small sensor size. However, because you are typically shooting in bright light at the beach, a lot of the limitations of point-and-shoots are somewhat muted. Further, you can use the camera with confidence, even taking it into the water. They can be a lot of fun, and they are pretty cheap (relatively speaking).

    Conclusion

    These tips should make photographing the beach the fun occasion that you expect. If you know how to deal with the bright light, your pictures will look better. Finding good subject matter and using an interesting angle will make them interesting. And finally remember to keep your equipment safe from the elements to keep your day from being ruined.

    The post 7 Tips for Better Beach Photography by Jim Hamel appeared first on Digital Photography School.

    Digital Photography School

  • How to Balance Off-Camera Flash and Ambient Light on Location

    In this Adorama TV video Gavin Hoey takes you on location to learn how to balance flash and ambient light to create some stunning portraits in the forest.

    After going through three different setups outdoors he takes you inside for the post-processing stage so see how he completes the images in Photoshop.

    Some of the items Gavin used and demonstrated in the video for your convenience:

    • Canon 70-200mm f/2.8L lens
    • BlackRapid Curve RS-7 camera strap
    • Flashpoint RoveLight 600ws monolight
    • Glow ParaPop 28″ R Series
    • Sekonic L-308S Flashmate light meter

    You can get the free light ray brushes he mentions in the video here.

    In Practice

    Have you tried any location portraits using both the natural or ambient light combined with flash? If you have any other tips or want to share your images, please do so in the comments below.

    The post How to Balance Off-Camera Flash and Ambient Light on Location by Darlene Hildebrandt appeared first on Digital Photography School.


    Digital Photography School

  • Review: The Filter Hive from Mindshift Gear

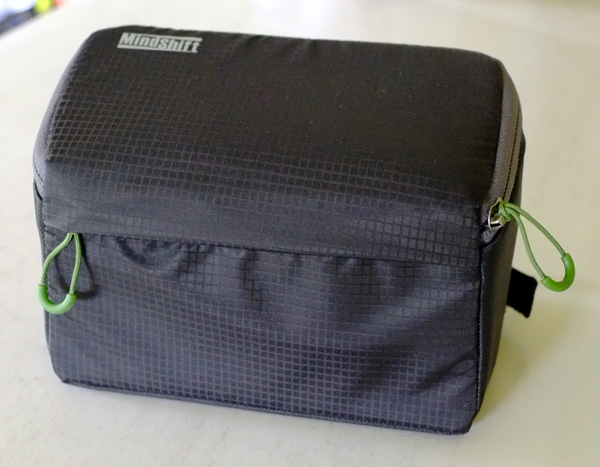
    Filter Nest by Mindshift Gear review

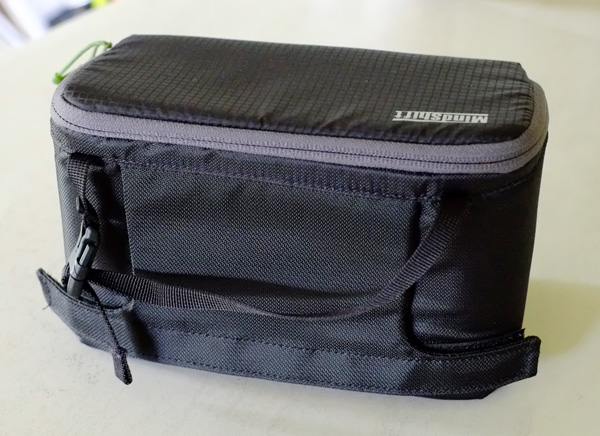
    The Filter Hive, made by Mindshift Gear. The fabric exterior is coated with a water resistant coating to help protect your filters in bad weather.

    If you are a landscape photographer it’s quite possible you own several filters that you use regularly. These may include a polarizing filter, three or four stop neutral density filters, graduated neutral density filters (you might have two or three of these) and, if you practice long exposure photography, a 10 stop neutral density filter such as the LEE Filters Big Stopper.

    Filters can be difficult to deal with. I’ve tried several solutions, like using a messenger style bag (so I can just reach down by my side and take out the filters I need) and a small waist pack to store them. The problem is that filters come in cases that need to be taken out of the bag, then opened, all without dropping the filter. It becomes even trickier when trying to change one filter for another.

    The bottom line – filters are essential for landscape photography, but handling them is a pain in the backside.

    Filter Hive

    That’s why I was so glad to come across the Filter Hive from Mindshift Gear. Essentially it’s a padded, charcoal coloured case with a removable insert that you use for storing your filters.

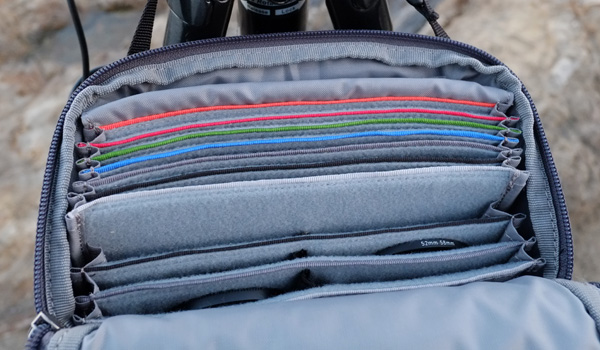
    The Filter Hive is an extremely well thought out product. There are six slots for storing large rectangular filters (such as those made by LEE filters) and another six for storing smaller circular filters. The large slots are colour coded, making it easy for you to find the filter you are looking for. All the slots have a soft lining that is designed not to scratch glass or plastic, so your filters are safe.

    Filter Nest by Mindshift Gear review

    A peek inside the Filter Hive shows the larger colour coded slots at the back (ideal for large rectangular filters) and smaller slots at the front. You can also see the soft lining that helps protect your filters from scratches.

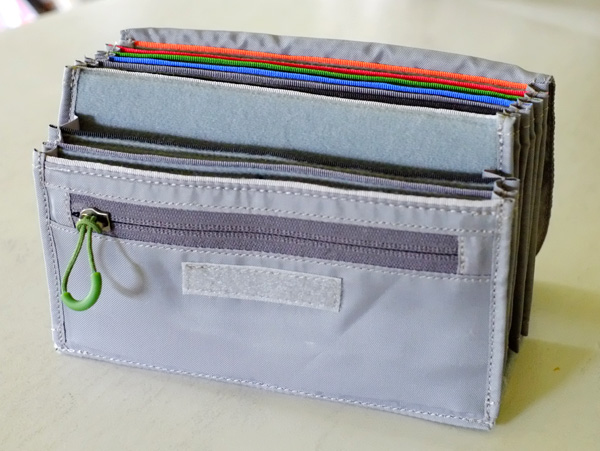
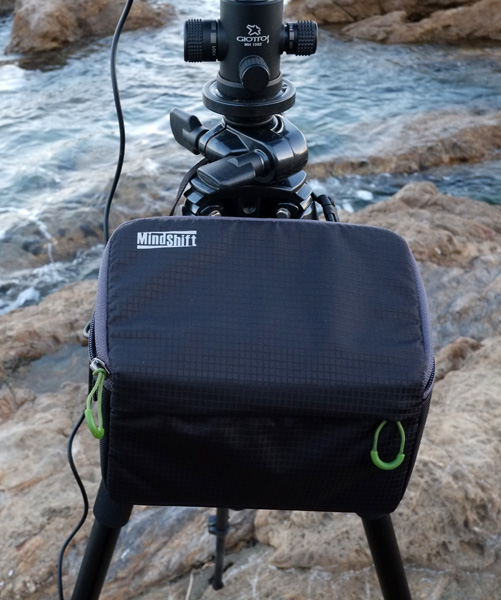
    The insert is removable and comes with a dust flap to help protect your filters from dirt. The case has a zippered pocket on the front, as does the insert. On the back of the case is a loop so you can attach the case to your belt or to the side belt of Mindshift Gear’s Rotation 180 Panorama Rotating Backpack. There’s also a grab handle with a release buckle that you can use to hang the Filter Hive on the side of your tripod while taking photos.

    Filter Nest by Mindshift Gear review

    The insert containing the lined and padded slots for filters is removeable.

    Filter Nest by Mindshift Gear review

    The rear of the Filter Hive shows the belt loop (secured by velcro) and the buckle strap for attaching it to a tripod.

    So, how does the Filter Hive perform in practise? The answer is brilliantly. I can store all my filters, removed from their cases, plus stepping rings in the Filter Hive. It’s easy to find and remove the filter that I need, and when I’m changing filters I can remove one from the lens and place it directly into the Filter Hive. It’s like the third hand that I’ve always felt I needed when changing filters up to now, and greatly reduces the chance that I will accidentally drop one.

    The Filter Hive hanging from my tripod.

    The Filter Hive hanging from my tripod.

    Another benefit of the Filter Hive is that there is plenty of space to include a sachet of silica gel, helping to ensure that the filters inside stay free of fungi during the colder, damper, months. There’s also room for lens cleaning accessories like micro-fibre cloths and lens tissues.

    Learn more

    You can learn more about the Filter Hive, and it’s smaller brother the Filter Nest, from Mindshift Gear’s website by clicking on the links. They are also available from retailers such as BH Photo & Video, Adorama and Amazon.

    This YouTube video will also give you a good idea of how the Filter Hive works.

    Editor’s disclaimer: this product was donated to the author by MindShiftGear. dPS has not received any compensation and the author’s review is unbiased.

    The post Review: The Filter Hive from Mindshift Gear by Andrew S. Gibson appeared first on Digital Photography School.

    Digital Photography School

  • Simple Post-Processing Tips For Minimalists

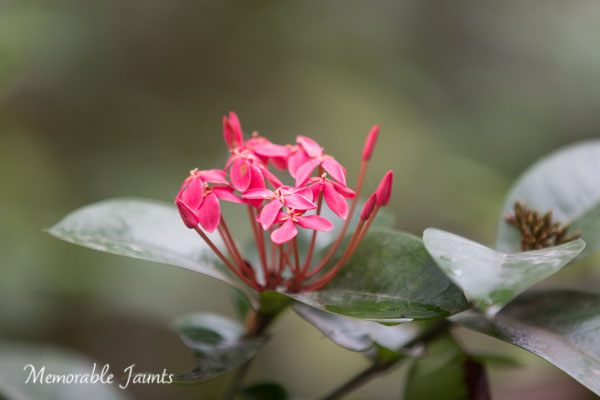
    Pink Flowers on a cloudy day

    Are you a minimalist in terms of your photography? Do you crave simple composition and clean lines in your images? There are many wonderful articles on minimalist photography and simple imagery. In fact Valerie Jardin has a fantastic article on Minimalist Photography – 4 Tips To Keep It Simple right here on Digital Photography School.
    This article encourages you to take that approach a step further into post-processing to achieve a clean, timeless look to your imagery. A clean, crisp image always stands the test of time. You don’t have to look very far, just dig into your own image archives from prior years and see which images appeal to you the most.

    As a photographer, your greatest achievement is when you are able to capture images exactly as you envision them or see them with your mind’s eye. When you import your images to your computer and the SOOC (Straight Out Of Camera) image simply takes your breath away, you know you’ve got what it takes. While all of us aim for that exact moment of shining glory, sometimes we need to add just a little bit of oomph to the image, simple adjustments that take the image from great to awesome.

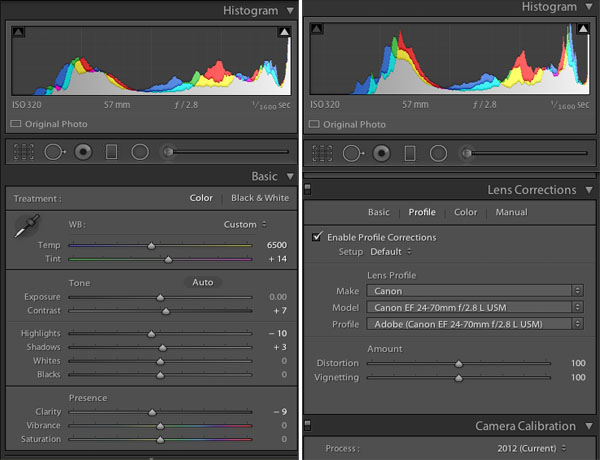
    Here are some post-processing tips on achieving a great look using simple adjustments. These are all done in Lightroom 5 – a great processing tool for you – using only the Basic and Lens Corrections Panels. The Basic Panel in LR contains adjustment sliders like: Temperature and Tint which adjust White Balance, Exposure and Contrast, Highlights, Shadows, Whites and Blacks which adjust Tone and Clarity, and Vibration and Saturation which adjust Presence. The Lens Correction Panel in LR primarily contains profile corrections for various Lenses.

    Lightroom 5 Basic Panel and Lens Profile Correction Panel

    Another point to note is: Use RAW format for your images if your camera has the ability to record images in that format. This type of file format has a lot more leeway in terms of post-processing adjustments. There are several articles in the Digital Photography School’s archives that discuss RAW file formats in great detail.

    Post-Processing Steps for Minimalist

    1) Enable the Lens Correction

    Certain lenses, particularly wide angles, introduce some distortion in the images, especially around the edges of the frame. This is generally more obvious in images that either have horizontal lines, curved lines  or the horizon in the frame. Lens Correction can be done in the Profile tab where you can Enable Profile Corrections. Selecting that box, should bring up the profile of the lens used for that particular image. With each new version of LR (we are currently in LR 5.6) more and more lens profiles are being added to the software.

    Note: if you cannot find your lens you can try looking on the manufacturers site or use one that is similar.

    In the Profile mode, LR automatically detects the lens used and corrects the distortion. Finer adjustments can be done using the sliders under the Lens Profile. You may have to drop down the list and find your particular lens. Enabling Profile Corrections first eliminates the distortion and sometimes brightens the images just a tad – which might be just what the image needs. For more control, switch to the Manual tab for individual profile correction adjustments.

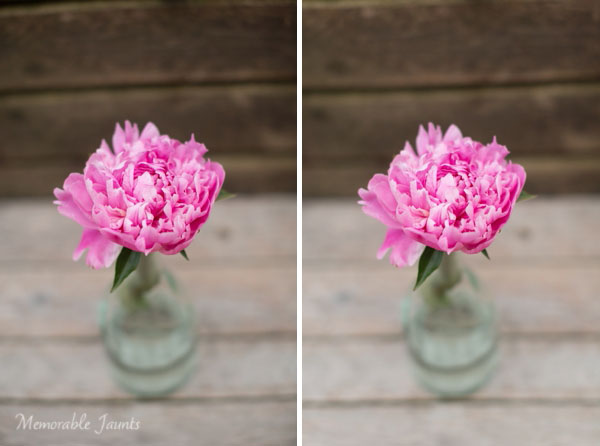
    Left is SOOC; Right is Lens Correction adjustment (notice the wood panel in the top of the image)

    The left image is SOOC; the right has Lens Correction adjustments done (notice the wood panel in the top of the image)

    2) The Basic Adjustment Panel is your BFF (best friend forever)

    80% of all minimalistic adjustments happen in the Basic Panel. White Balance (Temperature and Tint) are the most commonly used sliders. Most adjustments are quite minimal. A few stops up or down generally gives you exactly what you are looking for. Take note that small adjustments are very subtle. If your photograph has people, be cognizant of skin tones and colors as they can vary a lot among people and hence the WB slider numbers will also vary. Other variables that affect white balance are; the type of light (artificial versus natural) as well as the time of day (morning, high noon, or dusk). If your camera has the ability to do custom adjust white balance in camera, you can use that to further reduce this adjustment step. Photographing in Auto White Balance versus Custom White Balance is a personal choice.

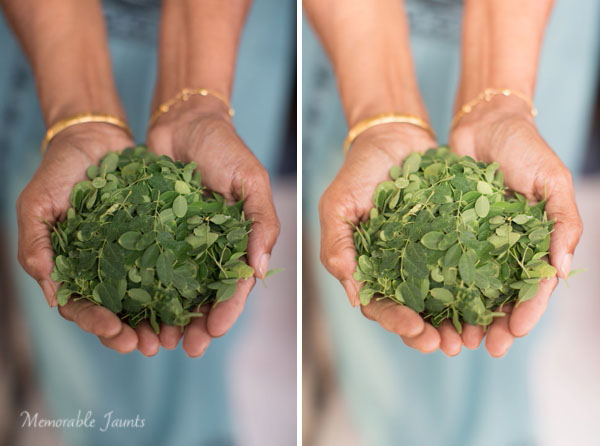
    Left is SOOC; Right has Lens Correction, White Balance (Temp/Tint) adjusted

    The left image is SOOC; the right has Lens Correction and White Balance (Temp/Tint) adjusted.

    3) Exposure and Contrast go hand-in-hand

    The easies way to explain exposure is its ability to brighten or darken an image. Moving it to the right (+) adds brightness to the overall image and moving it to the left (-) reduces brightness. Often times when adjusting exposure more than half or one full stop (i.e. adding more brightness) the overall contrast of the image is affected. The Contrast slider adds more definition between the darks and the lights in the image. Play with the contrast sliders (Contrast and Clarity); they provide an additional pop to the colors in the image that are generally blown out when exposure is drastically increased.

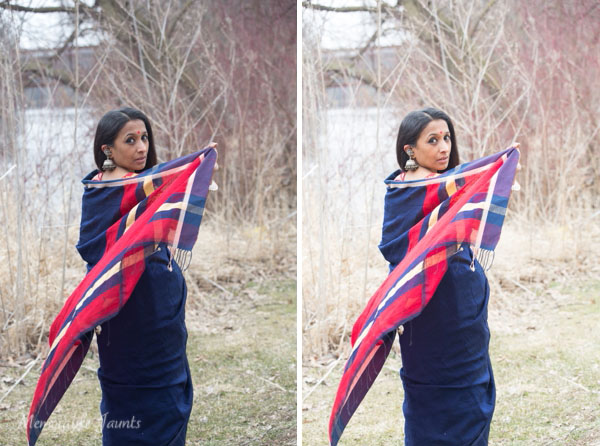
    Left is SOOC; Right has Lens Correction and White Balance (Temp/Tint) adjusted

    The left image is SOOC; the right has Lens Correction and White Balance (Temp/Tint) adjusted.

    Left is SOOC; Right has Lens Correction, White Balance and Contrast adjusted

    The left image is SOOC; the right has Lens Correction, White Balance, and Contrast adjusted.

    Left is SOOC; Right has Lens Correction, White Balance (Temp/Tint), Exposure and Contrast adjusted

    The left image is SOOC; the right has Lens Correction, White Balance (Temp/Tint), Exposure, and Contrast adjusted.

    In most cases, minimalistic editing is done at this point. Highlights/Shadows/Whites and Blacks can be adjusted to taste depending on the image. With Portraits, you can also adjust the Clarity slider a bit just to smooth out the skin. For more information on Clarity Slider check out Peter West Carey’s article Lightroom’s Clarity Slider – What Does it Do? in the dPS archives. The easiest thing to remember about the Clarity slider is that it adjusts the edge contrast in only the mid-tones of the image. Go easy with this slider because a little does go a long way and too much clarity, particularly on skin, can provide a very plastic looking skin.

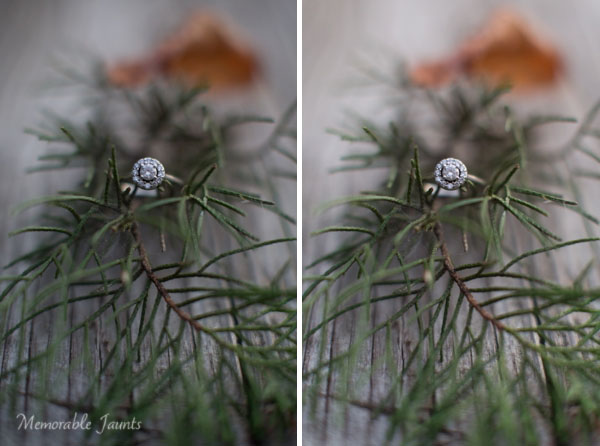
    Left is SOOC; Right has Lens Correction, White Balance (Temp/Tint), Exposure and Contrast, Clarity and Highlights adjusted

    The left image is SOOC; the right has Lens Correction, White Balance (Temp/Tint), Exposure, Contrast, Clarity and Highlights adjusted.

    Left is SOOC; Right has Lens Correction, White Balance (Temp/Tint), Exposure and Contrast, Clarity and Highlights adjusted

    The left image is SOOC; the right has Lens Correction, White Balance (Temp/Tint), Exposure, Contrast, Clarity and Highlights adjusted.

    As always, the amount of post-processing you do to an image is a personal choice, including the minimalistic option; but it definitely provides for a faster workflow – less than a few minutes per image. In most cases of minimalistic post-processing the adjustments are very subtle. Less time in front of the computer equals more time spent perfecting the art of photography to get those nearly perfect images right out of the camera.

    The post Simple Post-Processing Tips For Minimalists by Karthika Gupta appeared first on Digital Photography School.

    Digital Photography School

  • 37 Relaxing Cool Tone Images To Chill Out With

    This week’s image set is all about relaxing and getting to your zen place. Often cool tones relay that message really well as they feel less stressed and calming than warmer colors. Cool tones include blue, purple and even green. See how you feel after viewing these images:

    Relaxing cool tone images

    Photograph Misty Mono.... by Jay Sabapathy on 500px

    Misty Mono…. by Jay Sabapathy on 500px

    Photograph Arctic Symphony by Mikko Lagerstedt on 500px

    Arctic Symphony by Mikko Lagerstedt on 500px

    Photograph Nallo Night by Sander van der Werf on 500px

    Nallo Night by Sander van der Werf on 500px

    Photograph Feather-Light by Becky Fuller-Phillips on 500px

    Feather-Light by Becky Fuller-Phillips on 500px

    Photograph New buds by Allen Adnan on 500px

    New buds by Allen Adnan on 500px

    Photograph Beautiful Borage by kreativgrund on 500px

    Beautiful Borage by kreativgrund on 500px

    Photograph Wintery by Macro Marcie on 500px

    Wintery by Macro Marcie on 500px

    Photograph Taming the Storm by Kah Kit Yoong on 500px

    Taming the Storm by Kah Kit Yoong on 500px

    Photograph Forest Glow by John Center on 500px

    Forest Glow by John Center on 500px

    Photograph Joshua Tree - Hidden Valley by Steve Sieren on 500px

    Joshua Tree – Hidden Valley by Steve Sieren on 500px

    Photograph Blue Flowers by Rachel Friedman on 500px

    Blue Flowers by Rachel Friedman on 500px

    Photograph Split-Tone Chilling Rhino by Simon P on 500px

    Split-Tone Chilling Rhino by Simon P on 500px

    Photograph Cool Tone by Tony Haddow on 500px

    Cool Tone by Tony Haddow on 500px

    Photograph feeling cool by one2_three on 500px

    feeling cool by one2_three on 500px

    Photograph BREATHE by Joel Sossa on 500px

    BREATHE by Joel Sossa on 500px

    Photograph Frozen by Kumarov(Amkote) Michael on 500px

    Frozen by Kumarov(Amkote) Michael on 500px

    Photograph Possession by Sébastien DEL GROSSO on 500px

    Possession by Sébastien DEL GROSSO on 500px

    Photograph Italy – Piccoli Spiriti Blu by Fabrizio Fenoglio on 500px

    Italy – Piccoli Spiriti Blu by Fabrizio Fenoglio on 500px

    Photograph The Stairs by Frederic Ansermoz on 500px

    The Stairs by Frederic Ansermoz on 500px

    Photograph "the blue chapel" by Thomas Windisch on 500px

    "the blue chapel" by Thomas Windisch on 500px

    Photograph Way to Heaven. by Recesvintus Rex Gothorum on 500px

    Way to Heaven. by Recesvintus Rex Gothorum on 500px

    Photograph In the forest by Evans Lazar on 500px

    In the forest by Evans Lazar on 500px

    Photograph Ferragudo at dusk by Luis Mata on 500px

    Ferragudo at dusk by Luis Mata on 500px

    Photograph The Blue Temple by Conor MacNeill on 500px

    The Blue Temple by Conor MacNeill on 500px

    Photograph Blue Wall by Hesham Alhumaid on 500px

    Blue Wall by Hesham Alhumaid on 500px

    Photograph Blue on Blue by Roy Cheung on 500px

    Blue on Blue by Roy Cheung on 500px

    Photograph Going upstairs by Giannis Papanikos on 500px

    Going upstairs by Giannis Papanikos on 500px

    Photograph Newspaper relax by Carlo Cattani on 500px

    Newspaper relax by Carlo Cattani on 500px

    Photograph Blue Chefchaouen by Khanh Nguyen on 500px

    Blue Chefchaouen by Khanh Nguyen on 500px

    Photograph Light at the end of the tunnel by 911  on 500px

    Light at the end of the tunnel by 911 on 500px

    Photograph The Purple Hour by Tom Keller on 500px

    The Purple Hour by Tom Keller on 500px

    Photograph High Voltage by Michael Woloszynowicz on 500px

    High Voltage by Michael Woloszynowicz on 500px

    Photograph Fortress of Solitude by Dustin LeFevre on 500px

    Fortress of Solitude by Dustin LeFevre on 500px

    Photograph your mirror by neriman ozder on 500px

    your mirror by neriman ozder on 500px

    Photograph Refuge du Lac Blanc by Sven Müller on 500px

    Refuge du Lac Blanc by Sven Müller on 500px

    Photograph Gently Snuggle by Shihya Kowatari on 500px

    Gently Snuggle by Shihya Kowatari on 500px

    Photograph Talbot by Paul Marcellini on 500px

    Talbot by Paul Marcellini on 500px

    The post 37 Relaxing Cool Tone Images To Chill Out With by Darlene Hildebrandt appeared first on Digital Photography School.

    Digital Photography School