Category: Photography

  • Shooting Fast Moving Subjects – How to Stop the Blur

    In this article you will see how to deal with fast moving objects. For me shooting action is the most fun you can have with your photography. You can freeze that instant split second that the human eye couldn’t even comprehend, and capture it in an image for all time.
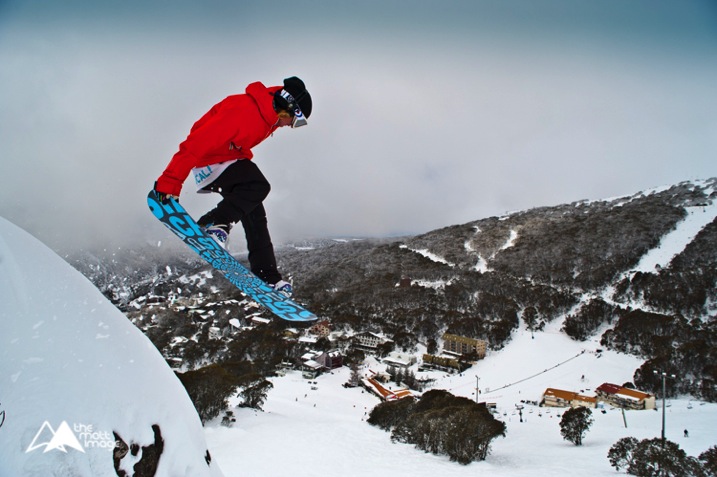
    Image 4

    1/6400, f/6.3. ISO 800

    Last weekend I was lucky enough to shoot a bicycle charity event in the countryside. The sun was out, the birds were singing and there was enough distractions for me to completely leave my imagination at home.

    As I was shooting fast moving road cyclists I had two lenses that I used. One which is the bread and butter lens of most photographers, the 70-200mm f/2.8. On a full frame body it has a good focal length that can capture subjects at a medium distances and the fast aperture allows for shooting in quite low light conditions. The second lens was a wide angle, for capturing some different looking shots. You don’t want to have a memory card with all the same style of shots, boring for you, and if this is for work, definitely not what the client wants to see.
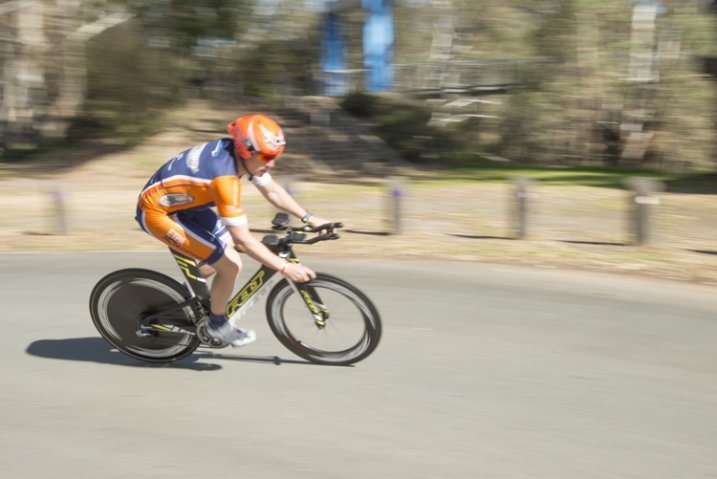
    image 7

    Shutter speed: 1/50th, f/16, ISO 200

    Although I just listed pro lenses, honestly you can do this with any kit zoom lens, a 55-200mm variable aperture or a 70-300mm like the Nikon VR which is a great value for money zoom lens.

    As with most shoots I make sure I get the classic shots that I KNOW I can nail first. For me this is frozen action, nice background, and the subject at approximately a 45 degree angle.
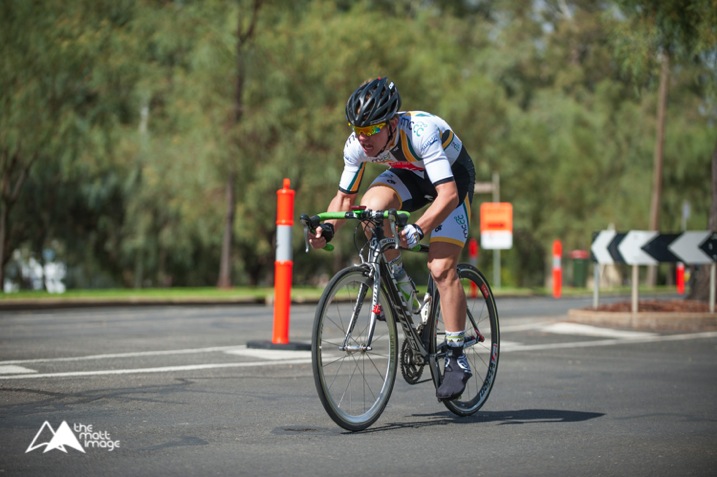
    Image 1

    1/2500, f/3.2, ISO 200

    As you can see in this image, it’s not mind blowing, however it has all the ingredients for a nice photograph that meets the criteria of what you are trying to capture. To create this type image, shoot with your zoom lens using the following settings as a rough starting point:

    • Camera mode: Aperture Priority (Av in Canon, A in Nikon and most other brands)
    • Aperture: As you want to freeze the action you need as much light entering the camera as possible, so choose a large aperture setting. With most kit lenses go down as low as possible, at this focal length that may be f/5.6.
    • Shutter speed: No need to worry about this as the camera will adjust this automatically in this mode.
    • ISO: If it is a sunny day like above, then ISO 100 or 200 is fine. However, if it is a little bit gloomy you may have to increase your ISO, I’ll talk about this in a minute.
    • Focus: Set your camera for on Continuous or Servo focus depending on your brand. This means that while your shutter button is held halfway down, or your AF on button is pressed, the camera will continue to adjust its focus, which is what you need when tracking moving objects.

    Your camera is now setup and ready to go. Get yourself in a position where the subject, in this case the cyclist, will be at approximately 45 degrees to you. Full side-on image and straight-on images can seem a bit odd unless it’s the style you are going for; at this angle you can see most of the rider and it’s more flattering.

    Smoothly follow the rider with your camera; this might be easier in a crouch or if you have a monopod, utilize it. Once they are in a good position click off a shot or two. With any luck you have a nice photo of the rider, somewhat frozen in time.
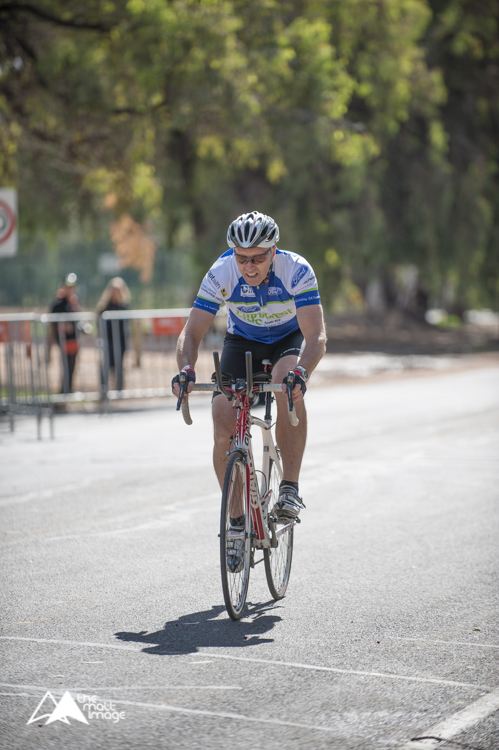
    Image 2

    1/1600, f/3.2, ISO 200

    It didn’t work? Okay, there are two main things that could trip you up here, firstly the shutter speed wasn’t fast enough and the rider is blurry (??? and secondly???). As you are using Aperture Priority (which means you set how much light is allowed in the camera and the camera adjusts the amount of time the shutter is open automatically) it’s possible that there just isn’t enough light. So the camera has slowed the shutter speed way down to let more light in to exposure your photo properly, which has caused blurring of the subject.

    When looking through your viewfinder. check your shutter speed down the bottom. You should be aiming for at least around 1/500th of a second. If it is slower than that, it’s time to bump your ISO up to compensate. Your ISO is how sensitive your camera sensor is to light. As a general rule you always want to keep this as low as possible to guarantee grain and noise-free images. However, it is a tool to be used, and on modern DSLRs shooting at ISO 800 yields incredible results over the older generation digital.
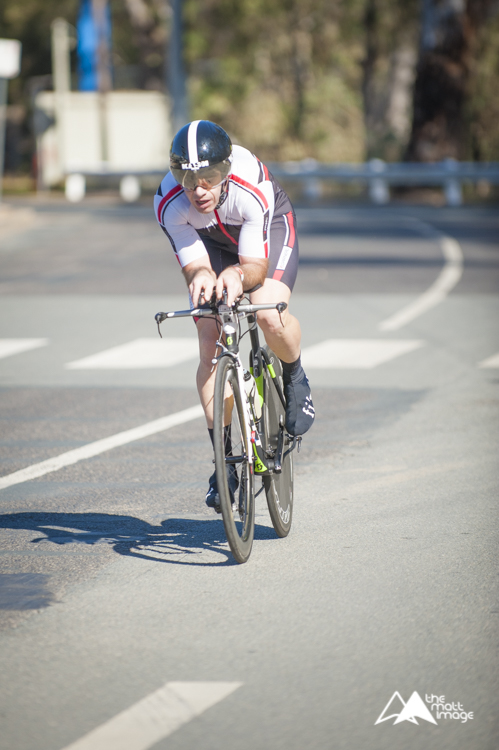
    image 6

    1/4000, f/3.2, ISO 400

    Adjust your ISO up to 400 and try again. If you are still experiencing motion blur bump it up to 800. Unless it’s a very dark and gloomy day this should give you a crisp clear image with a fast shutter speed.

    The next issue you might encounter is that the focus isn’t right. Maybe the rear wheel of the bike is in focus, but the riders face isn’t. Or even worse, the background is sharp and the rider is way out of focus. This is a simple fix.

    All DSLRs give you the ability to change focus points, the square which the autofocus uses to target the focal point. Move this point to where the riders head will be in your frame. You may have to change your focus mode to Single Point Focus, as many cameras have the ability to change which focus point they use automatically, depending on the situation. You will have to consult your manual to find out where this is located in your menu system.
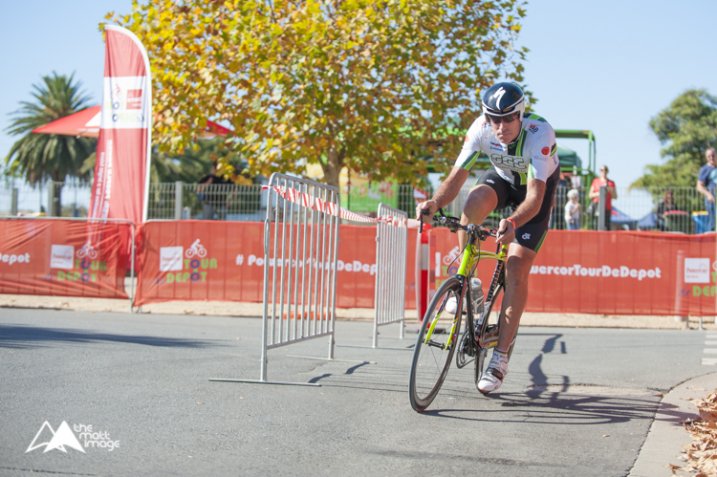
    image 5

    1/3200, f/3.5, ISO 400

    Now when your rider is in frame, and you are focusing, it will focus on the rider’s face. Honestly, as long as their face is in focus the rest could be a blur, it doesn’t matter, faces are the most import thing in nearly all photos.

    These guide lines should give you most of the info you need to shoot this type of photo. However, as with all photography, it’s trial and error to get things right and to get it looking the way YOU want.

    Practice this week. Get your kids out on their bikes, go to the park and try to get some photos of dogs running around (this is fantastic practice for tracking subjects) or head down your local racetrack and take photos of cars, motorbikes or horses!
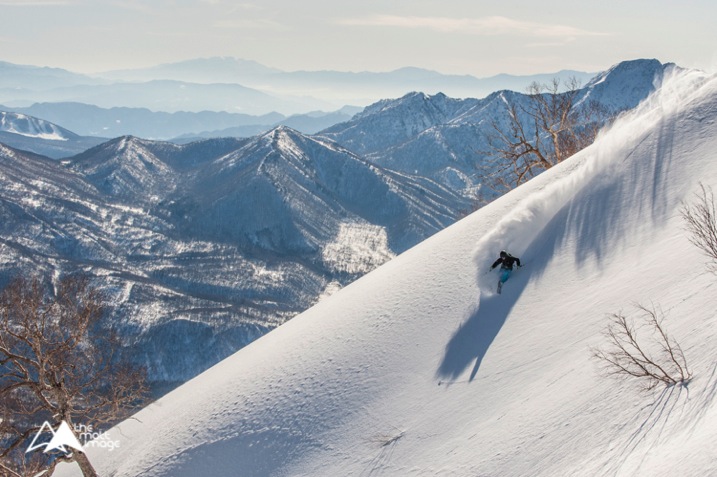
    Image 3

    1/2500, f/7.1, ISO 500

    Once you get this dialled in. it can be moved to many other subjects and situations, the photos of a skier (above) and snowboarder (top of article) were shot using exactly the same technique.

    Do not dismay if things aren’t working out straight away. A lot of learning photography is trial and error and practice. Any entry level, or higher DSLR setup, can do this. Learn your gear and practice, you will be surprised at the caliber of photos you can get from even the least expensive setup.

    Thank you for reading, I hope this helps you on your photography quest this week. Please post up your photos and practice shots, if you have any questions I will try to answer them all and get you on the right track to photography perfection. Happy snapping!

    googletag.cmd.push(function() {
    tablet_slots.push( googletag.defineSlot( “/1005424/_dPSv4_tab-all-article-bottom_(300×250)”, [300, 250], “pb-ad-78623” ).addService( googletag.pubads() ) ); } );

    googletag.cmd.push(function() {
    mobile_slots.push( googletag.defineSlot( “/1005424/_dPSv4_mob-all-article-bottom_(300×250)”, [300, 250], “pb-ad-78158” ).addService( googletag.pubads() ) ); } );

    The post Shooting Fast Moving Subjects – How to Stop the Blur by Matt Hull appeared first on Digital Photography School.

    Digital Photography School

  • Mirrorless, DSLR or Point and Shoot: Which Camera is Best for Macro Photography?

    Editor’s Note: This is part a series on macro photography this week. Look for a new one each day. The next newsletter will have them all if you miss any!

    Cameras

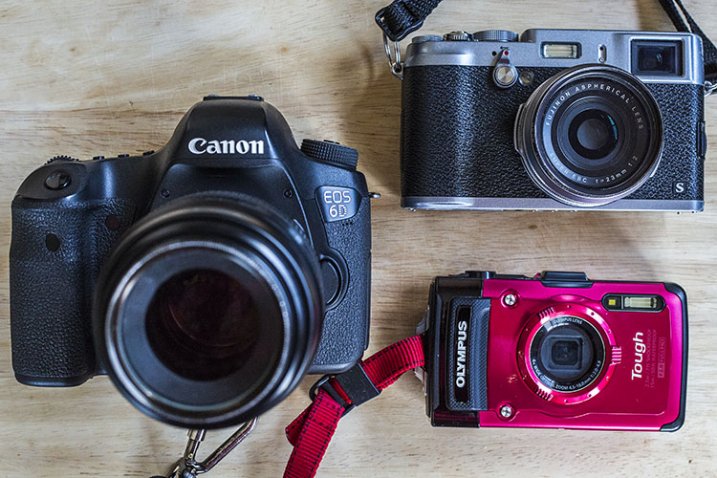
    Macro photographers have a plethora of choices when it comes to selecting a camera with this feature. From DSLRs to even cell phones, the macro function is becoming a standard add-on to most forms of digital photography. But, when put to the test, which type of camera will give you the best macro photography results? This article compares the macro photography functions of a DSLR, mirrorless, and point-and-shoot camera to evaluate the pros and cons of using each to shoot extreme close-ups.

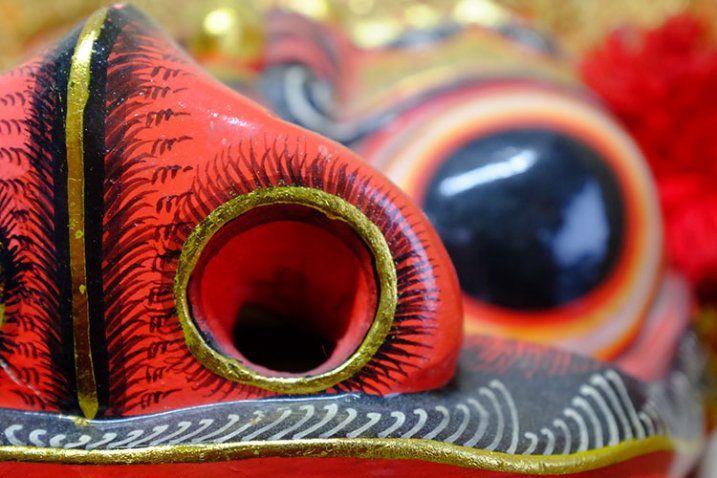
    To start, can you tell which of the below images were shot with either a DSLR (Canon 6D with 100mm f/2.8 macro lens), mirrorless (Fujifilm x100s), or point-and-shoot (Olympus Stylus TG-2 Tough)? The answers, listed in sequential order below the image, may surprise you.

    Fuj Oly Can

    1) Fujifilm x100s

    The image on the far left in the above montage was shot using the macro function of the Fujifilm x100s mirrorless camera. The x100s has a macro mode and can shoot images as close-up as 3.9 inches (10 cm). Accessing the macro mode is simple, requiring just a quick dial turn; the results can be seen below.

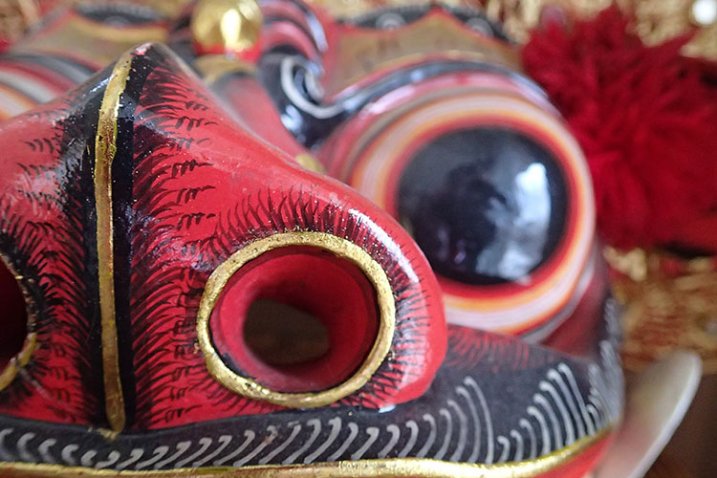
    Fuj Dragon

    Pros:

    Besides being an attractive camera with its retro body, the x100s has become popular among both professional and amateur photographers, thanks to its high quality features and ability to produce stunning images with its fixed Fujinon 23mm f/2.0 lens. At 15.7oz (445g), this camera is significantly smaller and lighter than a DSLR, yet it is relatively more affordable costing around $ 900. It also offers a unique hybrid viewfinder, meaning shots can be taken using the built-in optical viewfinder, or an electronic one.

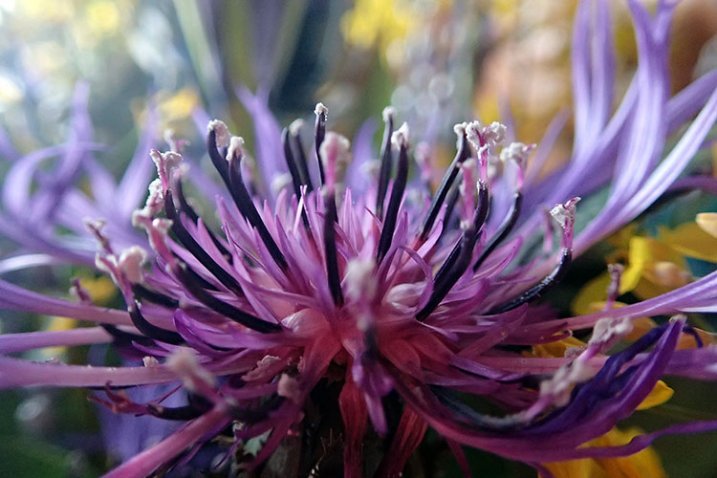
    Fuj Flowers

    Cons:

    The fixed lens might bug some photographers since it can’t be swapped out, and the 23mm focal range means you have to get really close to your photo subject. This could produce shadows or block natural lighting, which can’t be overridden without purchasing the optional external flash unit. An additional possible grievance is the 3.9 inch maximum focusing distance. Some of the other cameras mentioned below allow you to get much closer.

    These shots were taken at an aperture of f/2.8 using natural lighting, in JPG format (RAW shooting is also available) with no post-processing.

    2) Olympus Stylus TG-2 Tough

    This little camera shot the middle image in the above photo montage. One of the most sophisticated, prettiest, and most durable point-and-shoots on the market today is the Olympus Tough line. It is your best friend for taking high quality photos while engaging in extreme outdoor adventures, and it has a superb macro mode.

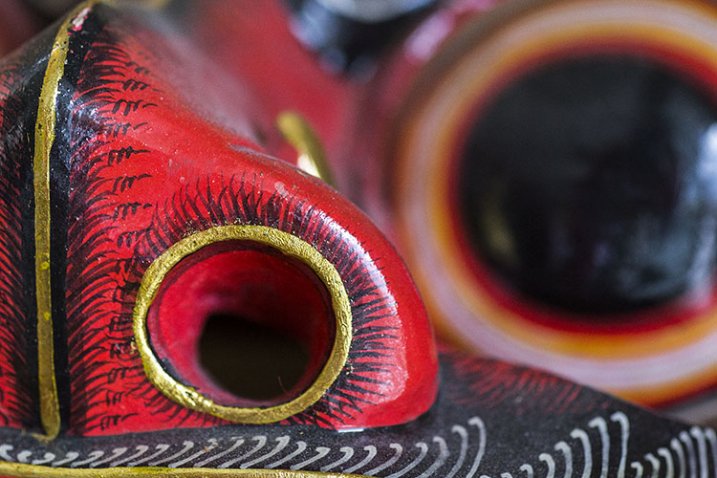
    Oly Dragon

    Pros:

    Waterproof, freeze-proof, crushproof, and shockproof, the TG-2 also has a 12 megapixel BSI CMOS sensor and a high-speed f/2.0 lens. It is pocket-sized, although a little bulkier than most other point-and-shoots, and it only costs around $ 350 (TG-4 is the current model). This camera also has many shooting modes including two macro options: Super Macro and Underwater Macro. Both allow you to get as close as 1 cm to the photo subject, and additional magnification of up to 7x with the optical zoom, and 14x with Super Resolution zoom, which is closer than either the x100s or Canon 100mm f/2.8 macro lens offer. Its unique 5:1 magnification really makes macro photography a joy on this little camera.

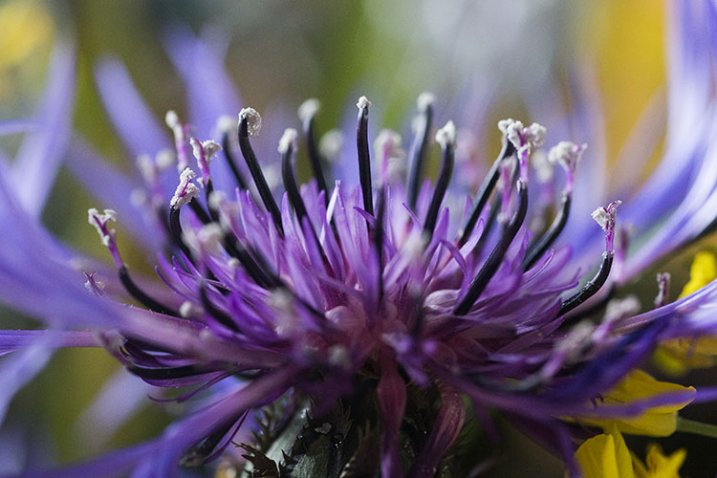
    Oly Flowers

    Cons:

    This is the only camera of the bunch that doesn’t offer RAW shooting or an optical viewfinder, but it is the only one that has a built-in flash. While the flash produces a balanced output in most situations, it isn’t helpful when shooting in macro mode since it tends to blow out the image due to being too close to the photo subject. Along those lines, shooting in macro mode on the TG-2 does require the camera to be very physically close to the subject, again making it easy to obstruct lighting.

    3) Canon 100mm f/2.8 Macro Lens

    The final image on the far right of the montage above was snapped with the Canon 100mm macro lens. A newer version of this lens recently debuted featuring Image Stabilization and extra goodies, but the older model still boasts spectacular, sharp optics at a relatively lower price ($ 549 versus $ 899).

    Can Dragon

    Pros:

    Canon has a small but mighty line of macro lenses, and the 100mm is arguably the best choice. Its longer focal length causes images to be rendered at 1:1 magnification, giving you more working distance so you don’t scare away your living photo subjects, or cast shadows. Since this lens is paired with a DSLR, image resolution can be up to an astounding 50.6 megapixels if it is used with the Canon 5DS. That’s a huge number compared to the 16.3 megapixels on the Fujifilm or 12 megapixels on the Olympus.

    Can Flowers

    Cons:

    At 20.6 oz (584.2 g), the 100mm macro lens is by far the bigger, heavier, option of the three. With a cost of $ 550-899, and the requirement of using it with a Canon DSLR, this is also the most expensive macro photography tool.

    Conclusion

    So which camera option is the best for macro photography? It truly depends on how you define “best.” In moments when you need a compact option, the Fujifilm x100s or Olympus Tough point and shoot are the better options, the latter being the better deal for budget or extreme sports shooters. However, if high-quality, professional imagery is your goal, a DSLR with a macro lens is your best bet.


    macro-coverWant to learn more about macro photography? Check out Ed Versosky’s Introduction to Close-Up & Macro Photography ebook – just $ 10 (over 30% off) this week with coupon code: DPS. You will need to enter the code to apply the discount.

    googletag.cmd.push(function() {
    tablet_slots.push( googletag.defineSlot( “/1005424/_dPSv4_tab-all-article-bottom_(300×250)”, [300, 250], “pb-ad-78623” ).addService( googletag.pubads() ) ); } );

    googletag.cmd.push(function() {
    mobile_slots.push( googletag.defineSlot( “/1005424/_dPSv4_mob-all-article-bottom_(300×250)”, [300, 250], “pb-ad-78158” ).addService( googletag.pubads() ) ); } );

    The post Mirrorless, DSLR or Point and Shoot: Which Camera is Best for Macro Photography? by Suzi Pratt appeared first on Digital Photography School.

    Digital Photography School

  • Weekly Photography Challenge – Get Buggy With It

    Editor’s Note: This is part a series on macro photography this week. Look for a new one each day. The next newsletter will have them all if you miss any!

    This week we’re focusing (pun intended) on one specialized area of photography, macro or close up photography. True macro photography means that you are close enough to reproduce the subject 1:1 or actual size on the camera sensor (or film). Usually that requires a special macro lens but there are other ways to do it – check out: 3 Ways to Try Macro Photography on a Budget for some ideas. See more examples of bug images here.

    Laurenz Bobke

    By Laurenz Bobke

    Weekly Photography Challenge – Bugs Close-up

    Your challenge this week is to get buggy with it – go find some creepy crawlers, multi-legged creatures, flying nuisances and photograph them. Get as close as you can with the equipment you have, perhaps give reverse lens macro a try if you haven’t got extension tubes or a macro lens.

    Here are a few examples:

    Mrholle

    By mrholle

    William Cho

    By William Cho

    François Reiniche

    By François Reiniche

    Special

    By Special 

    Think outside the box – use humor!

    Share your images here:

    Simply upload your shot into the comment field (look for the little camera icon in the Disqus comments section) and they’ll get embedded for us all to see or if you’d prefer upload them to your favourite photo sharing site and leave the link to them. Show me your best images in this week’s challenge. Sometimes it takes a while for an image to appear so be patient and try not to post the same image twice.

    Geert Orye

    By Geert Orye

    William Warby

    By William Warby

    William Warby

    By William Warby

    Thomas Hawk

    By Thomas Hawk


    macro-coverWant to learn more about macro photography? Check out Ed Versosky’s Introduction to Close-Up & Macro Photography ebook – just $ 10 (over 30% off) this week with coupon code: DPS. You will need to enter the code to apply the discount.

    googletag.cmd.push(function() {
    tablet_slots.push( googletag.defineSlot( “/1005424/_dPSv4_tab-all-article-bottom_(300×250)”, [300, 250], “pb-ad-78623” ).addService( googletag.pubads() ) ); } );

    googletag.cmd.push(function() {
    mobile_slots.push( googletag.defineSlot( “/1005424/_dPSv4_mob-all-article-bottom_(300×250)”, [300, 250], “pb-ad-78158” ).addService( googletag.pubads() ) ); } );

    The post Weekly Photography Challenge – Get Buggy With It by Darlene Hildebrandt appeared first on Digital Photography School.

    Digital Photography School

  • It’s a Bug’s Life – 27 Super Macro Photography Images

    Editor’s Note: This is part a series on macro photography this week. Look for a new one each day. The next newsletter will have them all if you miss any!

    Macro photography is all about getting close and photographing small things. The tiny world of bugs and insects is perfect for macro photographers as there are always an abundance of them no matter where you live.

    Let’s see some examples of images by photographers who have delved into the micro world of bugs:

    Photograph ngeblues by Alfian Ismail on 500px

    ngeblues by Alfian Ismail on 500px

    Photograph hey, it's my reflection by Abidin M Faiz Nur on 500px

    hey, it's my reflection by Abidin M Faiz Nur on 500px

    Photograph Share by Miki Asai on 500px

    Share by Miki Asai on 500px

    Photograph Kungfu Mantis by Boim Wahyudi on 500px

    Kungfu Mantis by Boim Wahyudi on 500px

    Photograph The eye by bug eye :) on 500px

    The eye by bug eye :) on 500px

    Photograph hi ! by bug eye :) on 500px

    hi ! by bug eye :) on 500px

    Photograph Red by Ondrej Pakan on 500px

    Red by Ondrej Pakan on 500px

    Photograph Sup Peeps! by Jay Capilo on 500px

    Sup Peeps! by Jay Capilo on 500px

    Photograph The Katydid by Steve Passlow on 500px

    The Katydid by Steve Passlow on 500px

    Photograph Bumble Bee 2 by Gustavo Restrepo on 500px

    Bumble Bee 2 by Gustavo Restrepo on 500px

    Photograph BIG HEAD by Yudy Sauw on 500px

    BIG HEAD by Yudy Sauw on 500px

    Photograph It's Me by Uda Dennie on 500px

    It's Me by Uda Dennie on 500px

    Photograph Big Drops by Mostafa Ghroz on 500px

    Big Drops by Mostafa Ghroz on 500px

    Photograph 4 vs 1 by Uda Dennie on 500px

    4 vs 1 by Uda Dennie on 500px

    Photograph Lantern Fly by Richard Nurse on 500px

    Lantern Fly by Richard Nurse on 500px

    Photograph Moth by Carlos Esteban Solís Fallas on 500px

    Moth by Carlos Esteban Solís Fallas on 500px

    Photograph Twilight Assassin by Chad  on 500px

    Twilight Assassin by Chad on 500px

    Photograph Sigmund, the Jumping Spider by Amine Fassi on 500px

    Sigmund, the Jumping Spider by Amine Fassi on 500px

    Photograph Green bug on white flower by Steen Rasmussen on 500px

    Green bug on white flower by Steen Rasmussen on 500px

    Photograph Taeniopoda maxima by Carlos Esteban Solís Fallas on 500px

    Taeniopoda maxima by Carlos Esteban Solís Fallas on 500px

    Photograph Portrait of An Alien 1 by Nhut Pham on 500px

    Portrait of An Alien 1 by Nhut Pham on 500px

    Photograph Le tre sorelline by Roberto Aldrovandi on 500px

    Le tre sorelline by Roberto Aldrovandi on 500px

    Photograph A dragonfly by Fabio Giarrizzo on 500px

    A dragonfly by Fabio Giarrizzo on 500px

    Photograph The predator by shikhei goh on 500px

    The predator by shikhei goh on 500px

    Photograph Next to you... by Yvonne Späne on 500px

    Next to you… by Yvonne Späne on 500px

    Photograph the dancing ants by Rhonny Dayusasono on 500px

    the dancing ants by Rhonny Dayusasono on 500px

    Photograph Nass erwischt by Leo Pöcksteiner on 500px

    Nass erwischt by Leo Pöcksteiner on 500px


    macro-coverWant to learn more about macro photography? Check out Ed Versosky’s Introduction to Close-Up & Macro Photography ebook – just $ 10 (over 30% off) this week with coupon code: DPS. You will need to enter the code to apply the discount.

    googletag.cmd.push(function() {
    tablet_slots.push( googletag.defineSlot( “/1005424/_dPSv4_tab-all-article-bottom_(300×250)”, [300, 250], “pb-ad-78623” ).addService( googletag.pubads() ) ); } );

    googletag.cmd.push(function() {
    mobile_slots.push( googletag.defineSlot( “/1005424/_dPSv4_mob-all-article-bottom_(300×250)”, [300, 250], “pb-ad-78158” ).addService( googletag.pubads() ) ); } );

    The post It’s a Bug’s Life – 27 Super Macro Photography Images by Darlene Hildebrandt appeared first on Digital Photography School.

    Digital Photography School

  • Indoor Photography: Ultimate Guide to Kids Portrait

    One of the things I have specialized in over the years is getting natural, great expressions from kids in photos. It’s not the easiest thing, and I’ll tell you why. Children are naturally curious, interested creatures. They move. They are used to interacting with people by looking at them in the eye, not down a scary round black hole, and Continue Reading

    The post Indoor Photography: Ultimate Guide to Kids Portrait appeared first on Photodoto.


    Photodoto

  • 5 Secrets to Create a Perfect Silhouette Portrait Outdoors

    DPS Silhouette 1

    1) SHOOT LOW AND HEAD TO TOE

    Place the subject’s entire body, from head to toe, against the sky. In order to do this, you will need to be lower than the subject. You can do this by laying on your back, or stomach, while taking the shot.

    If you are unable to get low enough, you may need to have your subjects get higher, such as on the very top of a rock, small hill or sand dune. This will hopefully allow you, in most circumstances, to get an angle that places the subject’s entire outline against the sky. You can see a variety of landscapes utilized in the examples below.

    DPS Silhouette 2

    Hint: It’s so, so, SO important that their feet are against the sky! Legs in a silhouette portrait that are cut off above the feet look like weird, short stumps. If you can’t find a suitably spot at a location, you can play with silhouettes of a closer composition.

    DPS Silhouette 3

    2) IT’S ALL IN THE TIMING

    Silhouettes work best around 20-30 minutes before sunset. However, it does vary with the angle you are able to achieve – the greater the height difference between you and the subject(s), the earlier you will need to take the shot.

    If you wait any longer, the sun will be hidden behind whatever your subjects are standing on, and the sky might not be bright enough to make a silhouette. If you do it too early, the sky’s colours can be a bit boring and you will be dealing with other issues, such as sun flare.

    DPS Silhouette 4

    Tip: Silhouettes can be taken earlier before sunset if the sun is partially blocked or filtered through strong clouds.

    3) SILHOUETTE SETTINGS ARE SIMPLE

    Set your camera to Aperture Priority (AV) mode, with an aperture of f/2.8, and ISO of 400. Have Evaluative Metering selected, which means that the camera will take into account the whole scene when deciding how to find a balanced exposure.

    If you fill the frame with your subjects’ faces or bodies, then the camera will expose for their skin, even with a bright background (see example below).

    If you fill the frame mostly with a very bright sky, than the camera will expose for the bright sky, brining out the natural sunset colors and making everything else in the photograph dark.

    So, if you place your subject directly against the sky (bright), than the subject (which is darker) will be heavily underexposed. The result – a silhouette!

    DPS Silhouette 5 DPS Silhouette 6

    Both photographs were taken on the exact same setting mentioned above, only seconds apart. The difference? Composition, and what is filling the frame – subject or sky.

    4) SILHOUETTE PORTRAIT POSING IS SPECIFIC

    Silhouettes are very forgiving of poor facial expressions (simply because you cannot see them), but very harsh when it comes to outlines. After taking each shot, check to make sure that nothing looks odd in the photograph.

    Here are a few things to keep in mind when posing subjects in a silhouette:

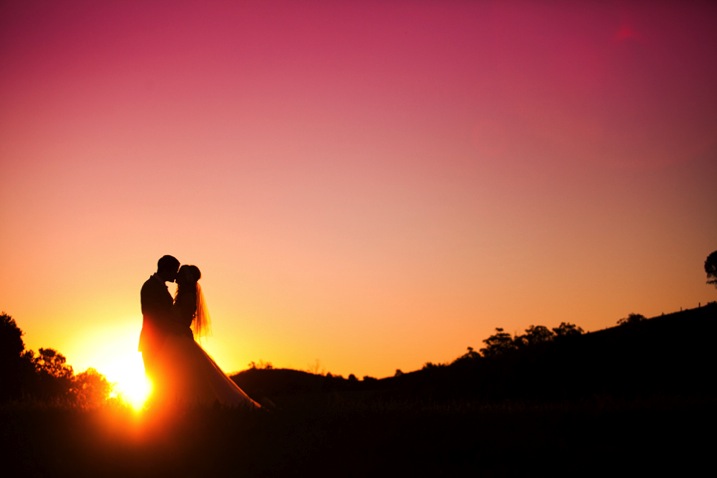
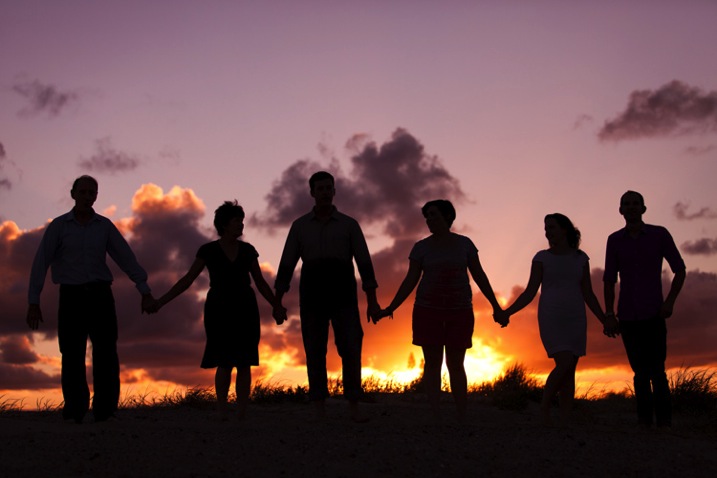
    1. Hugging poses do not work – A hug silhouette looks like a great big blob monster. All subjects need to be clearly defined, which means they need to be at least a couple of inches apart from each other. It’s nice for subjects to still be connected, through holding hands, or kissing, but their bodies should still be defined.
    2. Have your clients look away from camera – It’s much nicer and more natural to have poses where the faces are profiled.
    3. Watch the clothing – Very baggy clothing will not work as well for a silhouette, as the shape can become unflattering. It is best for females to wear dresses or skirts in silhouettes, as it brings a feminine shape and helps clearly define them against the male’s figure. – Very baggy clothing will not work as well for a silhouette, as the shape can become unflattering. It is best for females to wear dresses or skirts in silhouettes, as it brings a feminine shape and helps clearly define them against the male’s figure.

    DPS Silhouette 7

    5) SILHOUETTES SELL

    Try to capture at least one silhouette at every photo shoot, whether it is a family portrait, maternity, engagement or wedding. Why? Because they sell!

    Here are some reasons why clients love to purchase silhouettes:

    • Silhouettes add variety to your shoot. Silhouettes are so different in nature, in their colouring and style, that the variety they give instantly makes any shoot more interesting and saleable. As the silhouette is quite unique from all other photographs, it also makes it easy to sell individually as a unique piece of artwork.
    • Silhouettes are perfect for shy clients. Some clients hate the idea of their faces hanging up on their walls, making silhouettes the perfect objection handler. As the focus of the photograph is not on the subjects’ faces at all, it can be marketed to them as the perfect piece of personalized artwork, without battling their self-conscious nature.
    • Silhouettes look better bigger! If you capture silhouettes on a wide composition, it’s all too easy to sell them as very large piece of artwork. Because the subjects are relatively small within the frame, silhouettes can encourage a larger, more impressive piece of artwork for the client and a more profitable sale for you.

    DPS Silhouette 8

    We hope this guide gives you the confidence to go out and try your own silhouettes.

    googletag.cmd.push(function() {
    tablet_slots.push( googletag.defineSlot( “/1005424/_dPSv4_tab-all-article-bottom_(300×250)”, [300, 250], “pb-ad-78623” ).addService( googletag.pubads() ) ); } );

    googletag.cmd.push(function() {
    mobile_slots.push( googletag.defineSlot( “/1005424/_dPSv4_mob-all-article-bottom_(300×250)”, [300, 250], “pb-ad-78158” ).addService( googletag.pubads() ) ); } );

    The post 5 Secrets to Create a Perfect Silhouette Portrait Outdoors by Alana Orth appeared first on Digital Photography School.

    Digital Photography School

  • 3 Ways to Try Macro Photography on a Budget

    Editor’s Note: This is one of a series of article on macro photography this week. Look for a new one each day. The next newsletter will have them all if you miss any!

    Ranunculus1

    Has Macro Week here at DPS sparked your interest, but you’re still not sure whether you’re quite ready to invest in a macro lens of your own? If so, then this article is for you! I’ll outline three different ways that you can try out macro on a budget, and possibly even with gear that you already own.

    Now, before any macro-purists fall off their chairs in disgust, let me say that the techniques outlined in this post will produce pseudo-macro images. In a true macro image, the subject is projected onto the camera’s sensor at a 1:1 magnification, which means that the subject is exactly the same size in real life as it is on your camera’s sensor. That’s not the case, or the intent here. The intent here is to allow those of you who haven’t tried macro photography, the opportunity to test the waters and see if it is even something that interests you before making a big investment in a macro lens.

    1.  Use a Telephoto Lens

    DoubleTulip

    This image was shot about two feet away from this flower, using a telephoto lens at 220mm.

    My very first dslr camera came in a package with both an 18-55mm lens and a 75-300mm lens. I don’t tend to use the 75-300mm lens very often, but when I do, it’s usually in a pseudo-macro capacity. If you have a telephoto lens already in your bag, give this a try–stand about two feet away from your subject, with your zoom lens at about 250-300mm. If you have trouble getting your subject to come into focus, continue to move backwards with your feet until you find the sweet spot. It’s important to zoom with your legs rather than your lens, in this instance, so that you can keep the background nice and blurry, and the focus on your subject. Once you find that sweet spot, you may want to set your camera on a tripod at that spot to avoid camera-shake as you’re taking the photo. I’ve also tried it hand-held a few times with good results, so don’t be afraid to give that a try as well.

    Pollinator

    This image was shot using a telephoto lens at 300mm. This is about as sharp as I’m personally able to get when photographing living creatures with this method, and it isn’t sharp enough in my book.

    One of the benefits of this method is that it doesn’t require you to get particularly close to your subject, which is ideal if you’re interested in taking macro photos of living creatures. Personally, I find that it is still difficult for me to achieve sharp focus when it comes to photographing living creatures with this method (even with a tripod),  so I usually stick to more stationary objects like flowers. Still, if you already have a telephoto lens in your bag it may be worth your time to try this method first, before buying a macro lens. I say this only because I have more than one friend who thought they’d be really interested in macro photography of insects, only to discover that they actually couldn’t stomach seeing the insects up close in all their glory.

    2. Try Extension Tubes

    This image was taken with an 18-55mm kit lens + manual extension tubes.

    This image was taken with an 18-55mm kit lens + manual extension tubes.

    An extension tube is a nifty little invention that screws on in between your camera body and your lens. They come in different widths, and can often be stacked so that you are able to use more than one at a time. They do not contain any glass, but simply allow you to get closer to your subject than you would be able to normally, while still maintaining focus. When it comes to extension tubes, you can find something for nearly any budget. More expensive versions maintain the electrical connections that allow you to use the autofocus feature on your camera, while less expensive versions will not. Additionally, some extension tubes will limit your ability to control aperture in-camera. If you have a lens that has a manual aperture ring, you can control it that way, but otherwise you’ll be shooting wide open. Personally, I have one of the least expensive sets of tubes $ 15, and even though I don’t have the capacity to use autofocus or control my aperture, I have always really enjoyed my set of tubes for creating macro images.

    This image was taken with an 18-55mm kit lens + manual extension tubes.

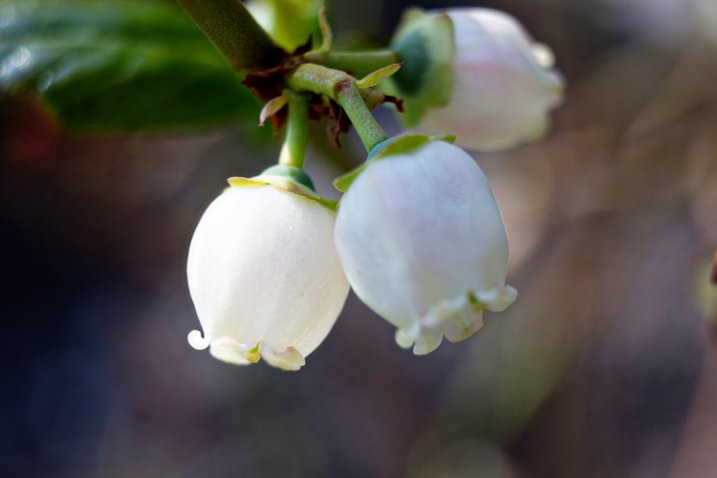
    This image of a blueberry bush was taken with an 18-55mm kit lens + manual extension tubes.

    That said, before you buy, you should know three things.

    First, some reviewers have reported that the less expensive tubes have gotten stuck on their camera body and/or lens. Others have reported that the tubes did not hook securely to their camera body and caused their lens to fall off during use. I have not experienced either issue, but generally use the tubes on my second body, with my kit lens, neither of which I would be devastated to lose. It is a trade-off though—using my kit lens means that I’m not able to control my aperture as I would be with other lenses, which is a bummer (but also not a major issue for me).

    Editors note: buyer beware, just be sure to shop around and read reviews (the good and the bad) before you buy any extension tubes. It may seem like a great deal but if they wreck your camera or your lens it won’t be.

    Second, be prepared to get close. Like, REALLY close. It will feel really strange to have the lens almost touching your subject, but that’s typically about as close as you will need to go in order to achieve focus. If you’re too close try using a longer focal length lens, that will help with this issue.

    Third, there is absolutely a learning curve with extension tubes, particularly those that don’t maintain the electrical connection with the camera. It’s not insurmountable, but you probably won’t be able to use them perfectly right out of the box. Just be prepared for some trial and error.

    3. Reverse Your Lens

    50mm lens hand-held in reverse up to an 18-55mm kit lens.

    50mm lens hand-held in reverse up to an 18-55mm kit lens.

    Did you know that you can turn any lens around and use it backwards? Well, you can! There are two different ways that you can reverse a lens to use it for macro photography.

    The first way to use your lens in reverse is to buy a macro reverse ring. These rings are usually around $ 15, and you would need to know which lens you plan to use in reverse (different lenses require different sized reversal rings), AND whether you’d like to reverse the lens directly to the camera, or on to another lens.

    Another instance of a 50mm lens being hand-held in reverse up to an 18-55mm kit lens. Note the major vignetting in this image--that was straight out of camera.

    Another instance of a 50mm lens being hand-held in reverse up to an 18-55mm kit lens. Note the major vignetting in this image, along with an almost tilt-shift effect. Both were straight out of the camera

    The second way that you can reverse a lens is to simply hand-hold it in backwards. If you have both a kit lens and a 50mm lens, attach your kit lens to your camera as usual, and then hold your 50mm lens backwards, up to the end of the other one. If you can, wrap your fingers around the place where the kit lens and the 50mm lens join together to minimize any accidental light leaks. Again, you’ll have to zoom with your feet, and you’ll probably have to get pretty close in order for things to come into focus. This method works best for creative macro—you’ll find that the focus is much softer than the other methods, and often includes unpredictable vignetting. That said, if I’m trying to create a macro image that feels ethereal, this is my go-to method.

    Are there any other techniques you’ve used to create macro or pseudo-macro images without a macro lens? If so, please share!


    macro-coverWant to learn more about macro photography? Check out Ed Versosky’s Introduction to Close-Up & Macro Photography ebook – just $ 10 (over 30% off) this week with coupon code: DPS. You will need to enter the code to apply the discount.

    googletag.cmd.push(function() {
    tablet_slots.push( googletag.defineSlot( “/1005424/_dPSv4_tab-all-article-bottom_(300×250)”, [300, 250], “pb-ad-78623” ).addService( googletag.pubads() ) ); } );

    googletag.cmd.push(function() {
    mobile_slots.push( googletag.defineSlot( “/1005424/_dPSv4_mob-all-article-bottom_(300×250)”, [300, 250], “pb-ad-78158” ).addService( googletag.pubads() ) ); } );

    The post 3 Ways to Try Macro Photography on a Budget by Meredith Clark appeared first on Digital Photography School.

    Digital Photography School

  • How to Give Your Macro Photography a Fine Art Touch in Post-Processing

    Editor’s Note: This is part a series on macro photography this week. Look for a new one each day. The next newsletter will have them all if you miss any!

    Macro photography is very popular and you will find lots of images, of all sorts of subjects on the internet. People spend a lot of time taking the photos, planning them, setting them up, and getting all the gear they need to get all the shots they want. Then the photos are loaded onto the computer and minimal processing is done to them.

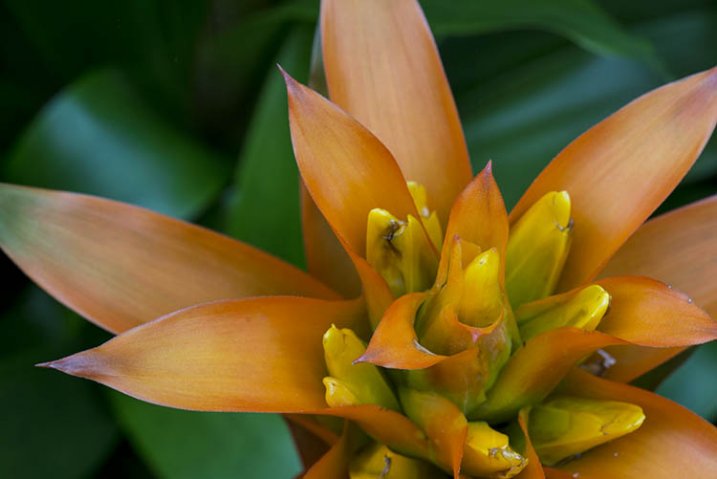
    With this tutorial we are going to look at how you can get your macro images from this:

    1-fitzroy-gardens-succulent-marco-original

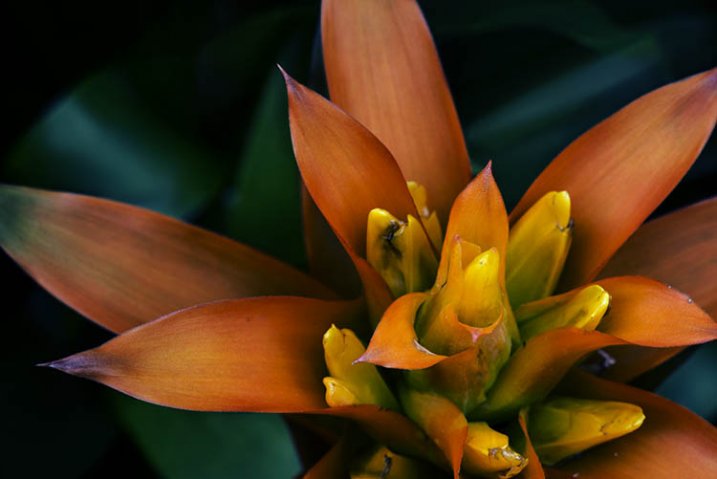
    To this:

    2-fitzroy-gardens-succulent-marco-fineart

    There are many things you can do to your images; what I’m going to show you is only one way. You can try anything really as it’s up to you, it’s your image.

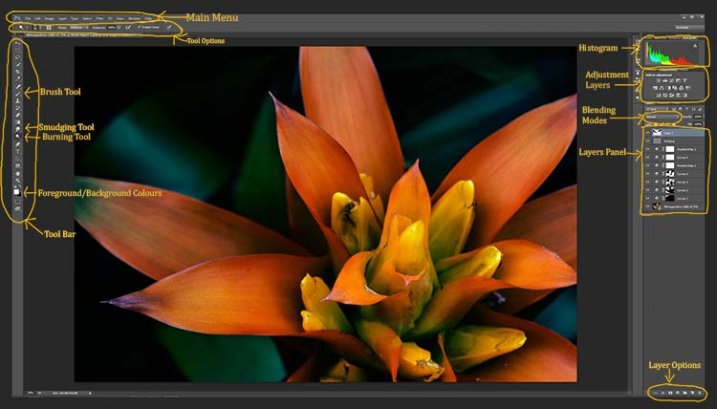
    This image was first opened in Adobe Camera Raw and some processing was done to it, just to get the exposure right. From there the macro was opened in Photoshop CC (2014). To explain what some of the instructions are for Photoshop I am including an image below that has the various areas of the interface pointed out, especially the sections that we will be using for this tutorial.

    Here is the screenshot of Photoshop with all the various places to find the tools, options, layers and adjustments that were used.

    photoshop-setup-2

    Step #1 – Curves

    At this stage we are going to do several adjustment layers using Curves to change the lighting and bring the centre of the flower out more.

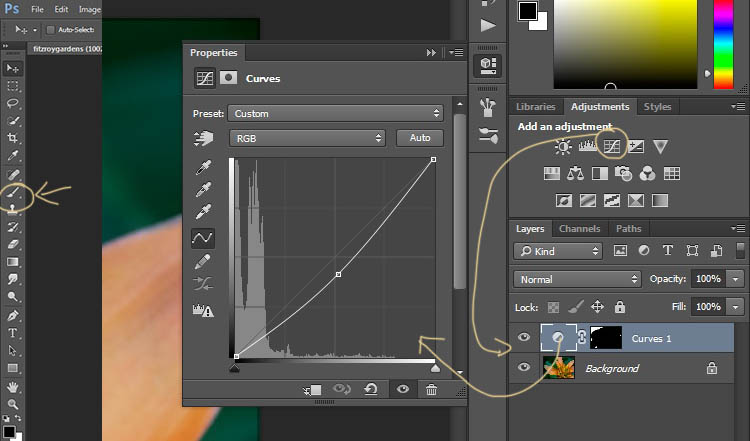
    Work in adjustment layers so if you decide further down the track that you should have changed something you did earlier, then you still can go back and fix it, change it or delete the layer. The best way to do this is to use adjustment layers. The adjustment layers are often found above the layers panel on the right of your screen or in the layers menu at the top of the Photoshop window (if you don’t see them go to Window > Adjustments and place it above your layers panel). You will also need the brush tool for this, which is in the tool panel, usually found on the left of the window.

    3-adjustment-layer-brush-tool

    Once you know where each one of those are, you can start doing your layers for the image.

    Click on the adjustment curves layer, as in the photo above. Then in the window that pops up, move the curve down to the dark area just a little, like the image above (just click on the straight line and hold the mouse button down while you drag to move it).

    Grab your brush tool from the tool panel. Make it the size that you will need for your image. You can change the size by using the square bracket keys on your keyboard – [ or ] , or right click and in the pop-up window moving the slider for the size. The same changes can be made in the options bar for the tool at the top. Click on the second option from the left, the one that has the size of the brush, and you will get the same panel to change the size and hardness of the brush. For this tutorial a brush towards the soft end was chosen so the edges wouldn’t be too hard (Hardness set to 30% or lower).

    You will need to click on the layer mask within the layer, it is the white rectangle in the curve layer. When the mask is white it means the adjustment is being applied to the image below, and when it is black it the change has been hidden. If you paint black onto the mask with the brush you are hiding the adjustment. Black on a mask conceals – white reveals. If you make a mistake and hide a bit you want, you can just paint it back in with the opposite color, white.

    Start brushing the image, if nothing changes, then the foreground color (which the brush uses) is likely set to white. You will need to change that colour to black. You can also press X on your keyboard too, it will swap the foreground and background colours around.

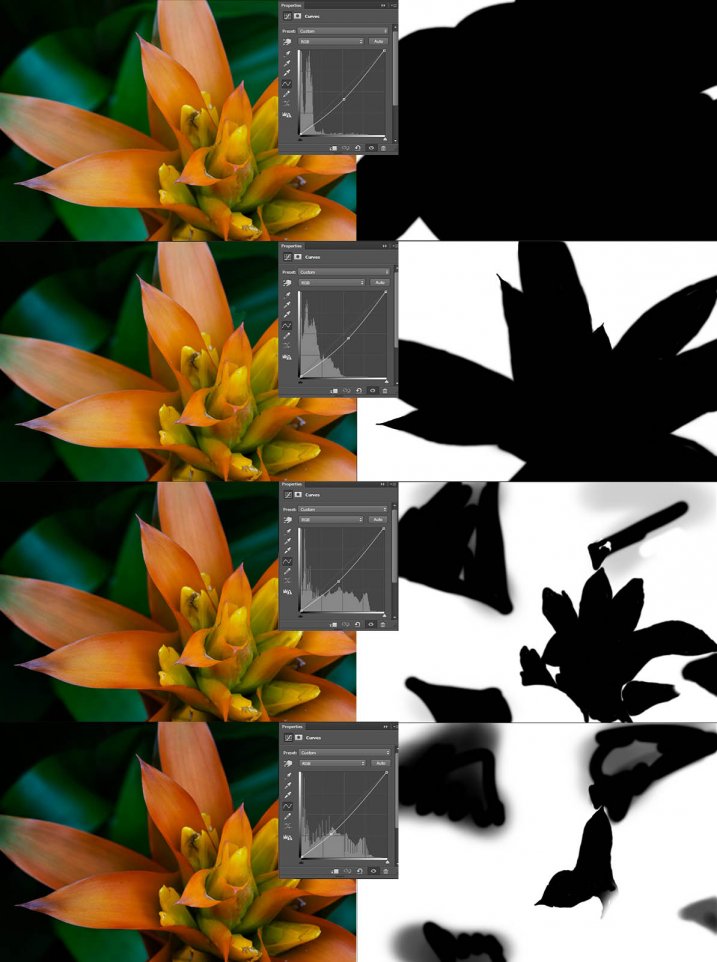
    For each different curves layer I took less and less of the adjustment from the image. The following image will show you what I did to each layer. The white areas are where the curves layer still applies, and the black shows where it was hidden.

    4-macro-curves-layer

    This image was done with curves layers. You don’t have to use the same number of layers, it is up to the image. Some of the background leaves were brought back in the last couple of layers as they were getting too dark. It is something you should be aware of, take notice of what is happening in the background as well.

    The centre of the flower is now the same as the original but everything else is darker. The changes should be subtle.

    Step #2 – Gradient Map Adjustment Layer

    Once the curves were done a gradient adjustment layer was added. The gradient adjustment will change the highlights and shadows; you can decide what colours you want to use.

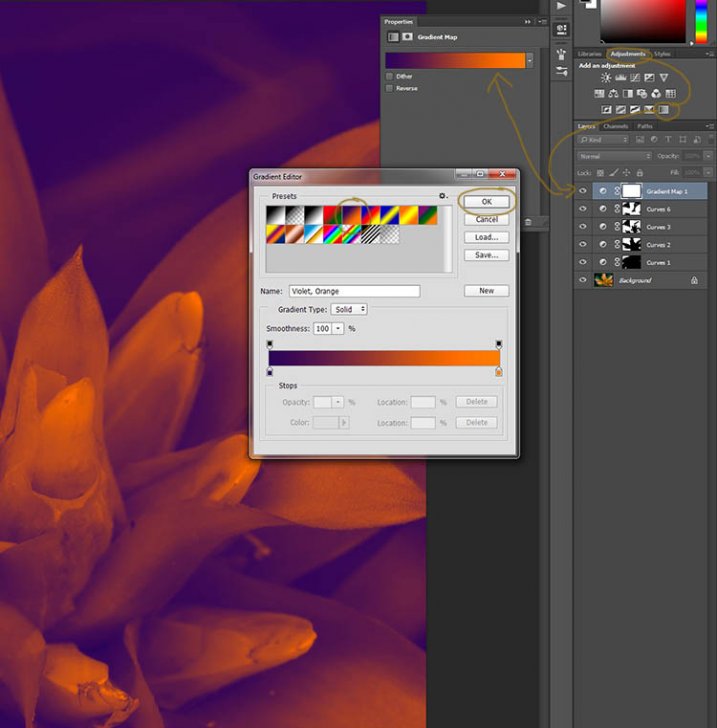
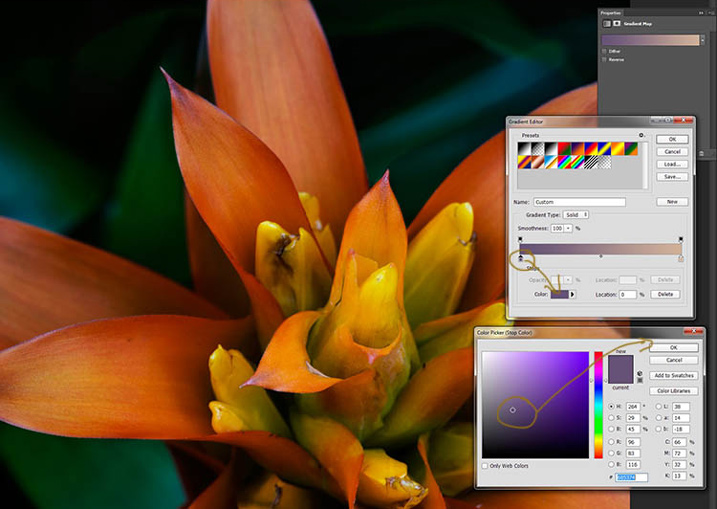
    When you click on the gradient adjustment layer often the black and white gradient comes up and you will notice your image turns to monochrome. If you click on that bar in the window that comes up, you will get a lot more options for the gradient. For this tutorial I used the orange and purple gradient.

    5-gradient-adjustment-layer-01

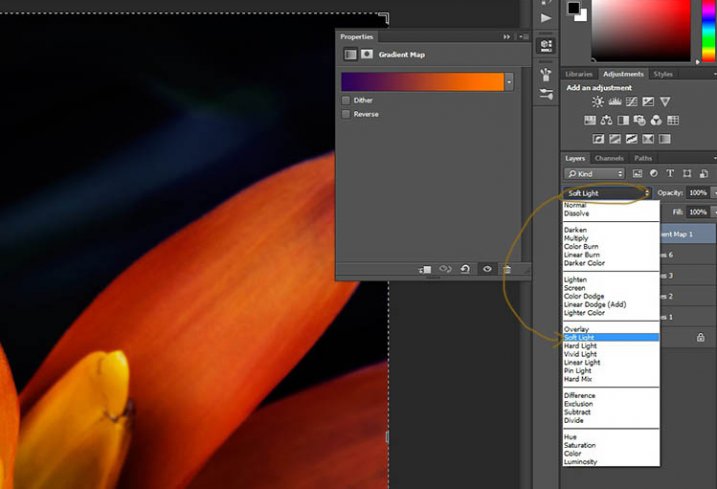
    You will see all your highlights turn orange and the dark areas will go purple. You don’t want your image to remain like this, so now you need to blend it. In the image above you can see the blending modes that are above the layers, normal is the default. Click on that and go down to select Soft Light. You will notice the gradient layer is now blended and doesn’t look so horrible.

    5-gradient-adjustment-layer-02

    Just because that gradient has those colours, doesn’t mean you have to stick with them. They are easy to change them to give your highlights and shadows the tones you want.

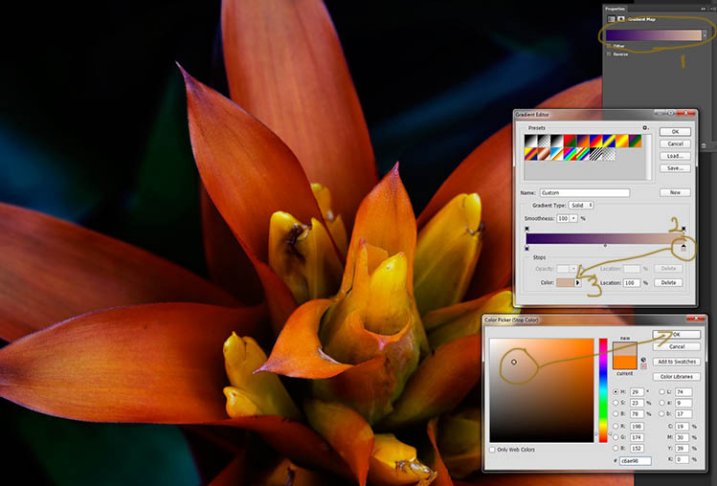
    In the bottom part of the gradient editor you can see the colour slider which is how the change goes from one colour to another, and directly underneath you can see little colours. If you click on one of those, the colour comes up at the bottom.

    6-gradient-adjustment-layer-2b

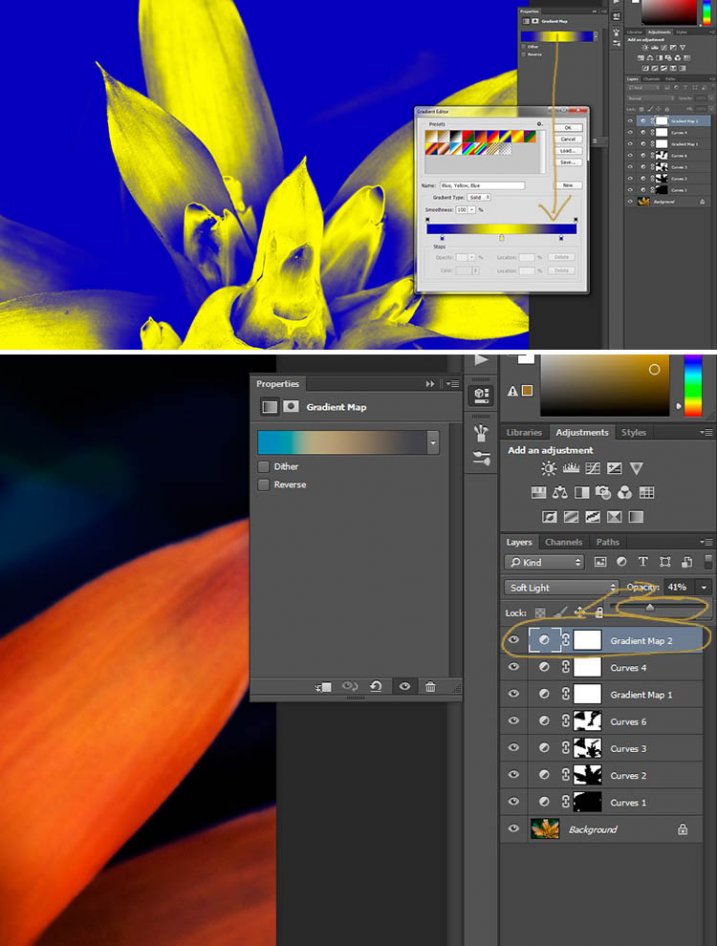
    Click on that, you will see the Colour Picker window open up. You can change the colour to whatever you want, and as you do so you should be able to see the effect on your image straight away. If you can’t, then it is likely because you forgot to blend the layer. See the following image.

    6-gradient-adjustment-layer-2c

    You can see from the images what I changed the colours to; you don’t have to use the same ones. I would recommend trying a few colours to see which ones you like. Purple is my favourite colour, so I use it a lot.

    The next step is not always necessary, but often nice to do. All the work that has been done can mean losing the highlights, so to help bring them back you can use a Curves Adjustment Layer.

    Step #3 – Adjusting the Highlights

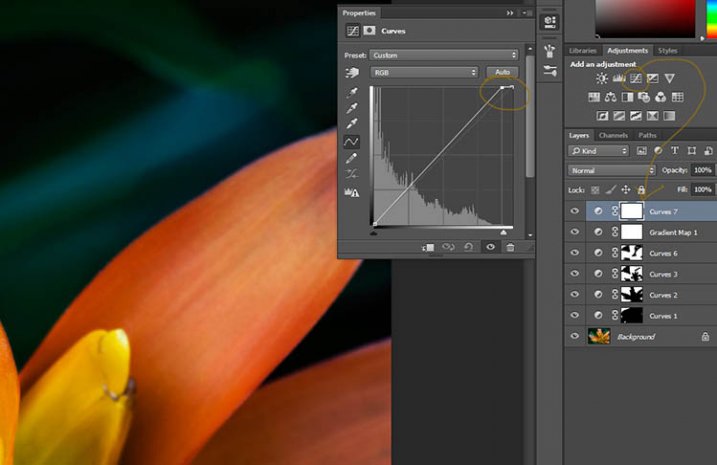
    Open a new Curves Adjustment Layer. In the Curves window go to the top right corner and move the line across the top. Watch as you do it and notice if you can see the highlights changing. Sometimes it is good to go too far and then bring it back, just to see what it does. Just be careful not to blow the the highlights out, making them solid white with no detail. Check out the image before to see what to change.

    7-curves-highlights

    Step #4 – Adding Another Gradient Map Adjustment

    Next another gradient map adjustment layer was added, time time using a different one.

    From the above image you should be able to see what colours I choose and follow along the same steps as previously. This time I chose a gradient that changed three areas.

    8-gradient-adjustment-layer-3

    Step #5 – Dodging the Highlights

    One thing that I like to do on many of my images is to bring out the highlights, in small ways, with the dodging tool. The dodging tool is a touchy one, to be used carefully.

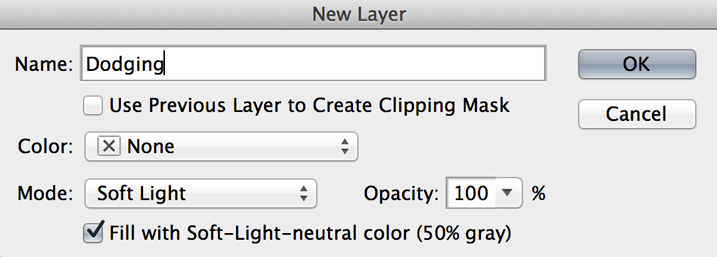
    It is always best never to do anything straight onto your original image layer, so like with everything we have done so far it’s going to be on a separate layer. Go to the top menu and click layer, then new layer. When the window appears you can name the layer, if you want to, I called it “Dodging”.

    Dodging

    There are a couple of things you need to do so you can use this layer with the Dodge tool. First change the layer blend mode to Soft Light, then under the mode drop down menu you will see a box you can check to “Fill with Soft-Light Neutral Colour 50% Grey”, so check that, then press okay (see above)

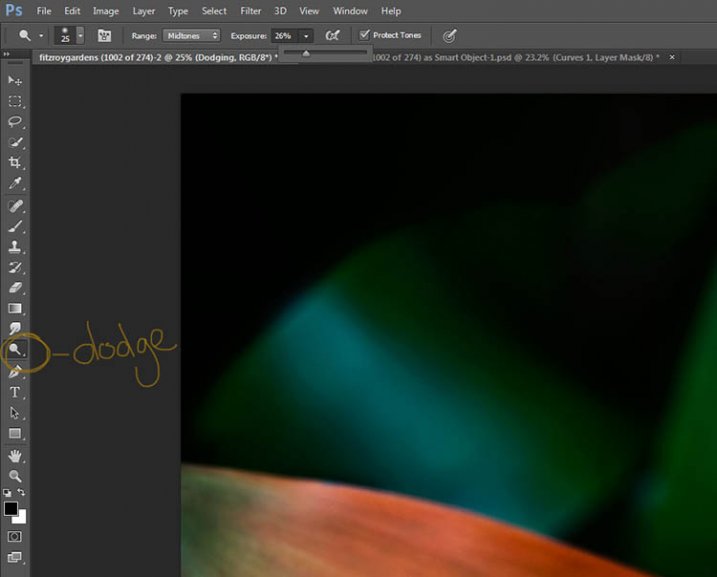
    Over in the layers panel you will see what looks like a grey box, this is what you will do the dodging on. Go over to the tool bar on the left and select the dodge tool.

    At the top under the main window you will see Exposure, I have set mine at 26% for this image, but you can set it to anything, it depends on how patient you are. In the options bar there is also a setting for the highlights, midtones and shadows, I tend to use midtones. The more you move over an area the more it will go white. In the days of the darkroom they would using dodging to stop the light from getting to certain parts of the area. In Photoshop you can use it to put a little of the highlights back into the image, or to make the highlight pop. It should not be obvious, again subtle is the way to go.

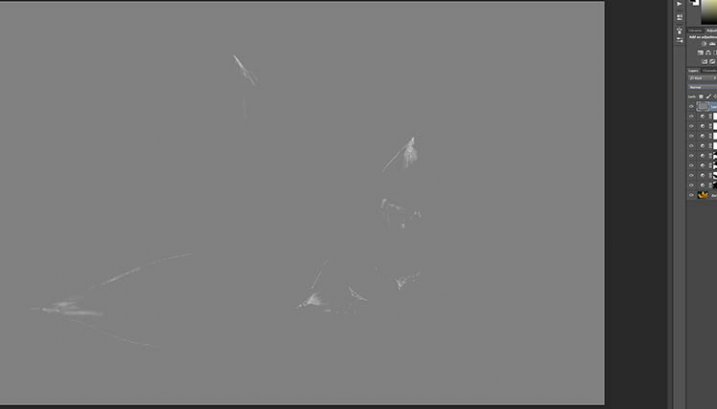
    I have changed the layer back to normal mode so you can see what I worked on. Dodging shows up as white on the layer.

    10-dodge-layer-2

    You can see that I haven’t done a lot, except bring up some of the highlights a little more.11-dodge-layer-3

    Step #6 – Smudging

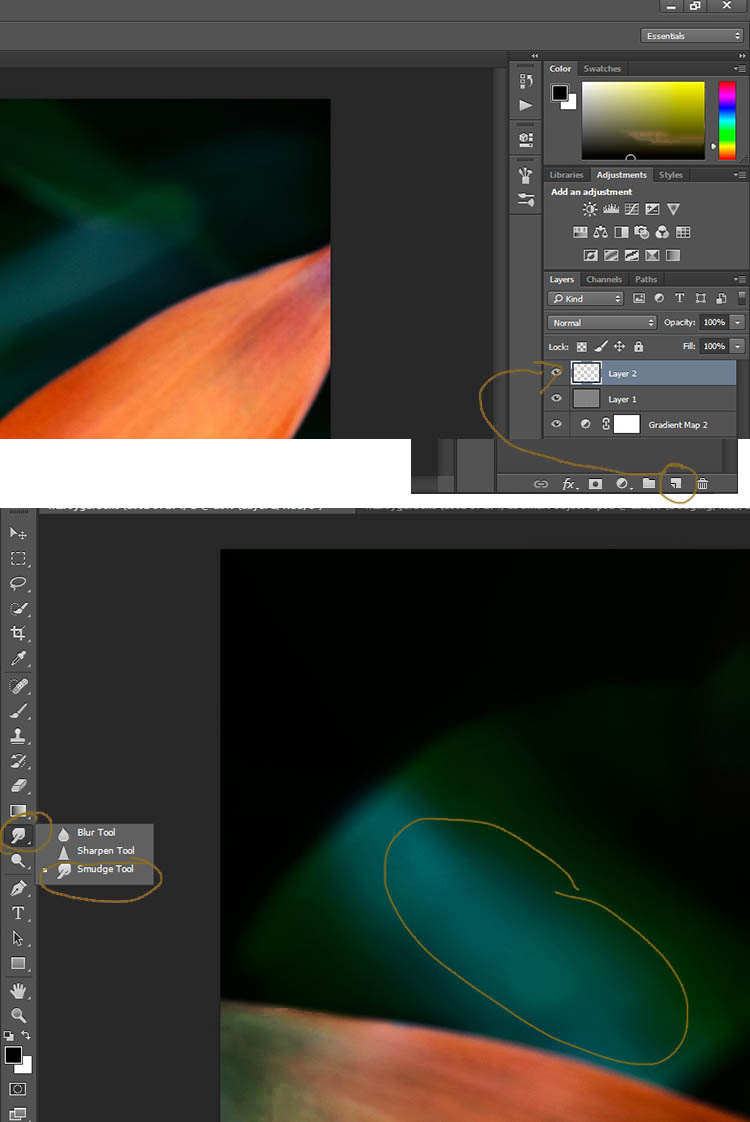
    Finally I did a little smudging. Sometimes when you do a lot of work to images it can start to look pixelated, or you get some colour separation. I’ve found that the smudge tool can help get rid of that. You will find it in the tools panel.

    I did this on a new transparent layer, again not working on the original image.

    12-smudge-layer

    Make sure you check the Sample all Layers in the options bar for the tool at the top, and for this tutorial I left the Strength at 50%. I went over the areas where I thought I had some colour separation to smudge them together. If it were a painting I would get my finger into it and smudge the colours together.

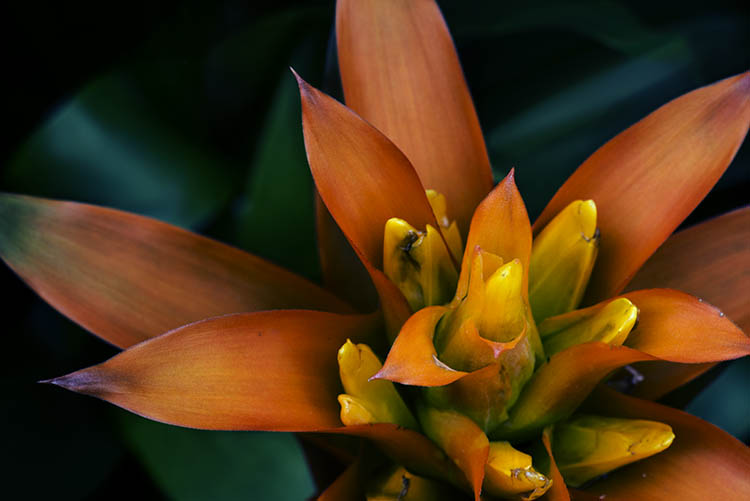
    Here is the final image.

    2-fitzroy-gardens-succulent-marco-fineart

    It is all about personal taste, so you should do it to your own style. I like it like this, but other people might find it too much, and others may think it isn’t enough. I like the way the flower seems to be coming out of the darkness.

    If you have any questions, please ask. I will do my best to answer them.


    macro-coverWant to learn more about macro photography? Check out Ed Versosky’s Introduction to Close-Up & Macro Photography ebook – just $ 10 (over 30% off) this week with coupon code: DPS. You will need to enter the code to apply the discount.

    googletag.cmd.push(function() {
    tablet_slots.push( googletag.defineSlot( “/1005424/_dPSv4_tab-all-article-bottom_(300×250)”, [300, 250], “pb-ad-78623” ).addService( googletag.pubads() ) ); } );

    googletag.cmd.push(function() {
    mobile_slots.push( googletag.defineSlot( “/1005424/_dPSv4_mob-all-article-bottom_(300×250)”, [300, 250], “pb-ad-78158” ).addService( googletag.pubads() ) ); } );

    The post How to Give Your Macro Photography a Fine Art Touch in Post-Processing by Leanne Cole appeared first on Digital Photography School.

    Digital Photography School

  • How to Make Your Photos More Interesting with a Human Element

    The human element in photography

    I believe that when someone asks how to improve their composition, that what they’re really asking is how they can make their photos more interesting.

    The skill of composition is in arranging the elements of the scene in such a way that the resulting image is aesthetically pleasing, and interesting to look at. Composition involves using techniques such as including leading lines, isolating the subject, exploiting tonal contrast, deciding what to leave out of the frame, and so on. But none of this matters much if your subject matter is boring.

    The most effective way to create interesting images is to find an interesting subject. Composition becomes much easier when your subject is interesting. You are more likely to be enthusiastic about the photos, and put more effort into finding a good composition, if you are engaged with, or passionate about the subject.

    Luckily, there are lots of interesting things to take photos of. But for me the most interesting subject of all is people.

    The human element in photography

    Unlike static subjects like the landscape, which change slowly or not at all, people are transient. They change. Jobs change. Towns and cities change. The ebb and flow of life creates many interesting and varied subjects for the curious photographer.

    Many of the great photographers (and yes, there are exceptions) built their reputations taking photos of people. Masters like Steve McCurry, Sebastião Salgado, David Bailey and Annie Leibovitz predominantly photograph people and their affect on the world.

    So, how do you add the human element in your photos? Here are some ideas.

    1. Include human figures in the landscape to show scale and context

    Including human figures in the landscape provides both a focal point and a guide to scale.

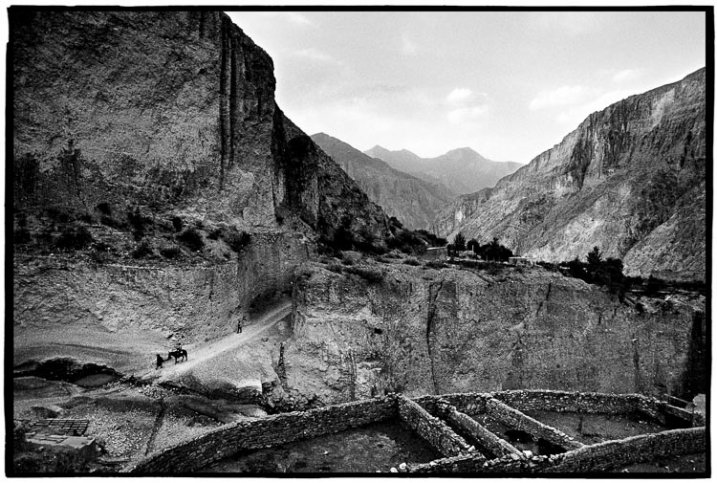
    I took the following photo in a remote region of northwest Argentina. The scene caught my eye not just because it is spectacular, but because of the people walking in the middle ground. The presence of the figures reveals the height of the cliff face behind them. We know how big it is because we can compare its size to the them.

    Even though the people are small in the frame they are still large enough for you to see they are wearing traditional dress. There are also some stone walls in the foreground, which are animal pens.

    The human figures, and evidence of human activity, adds information, providing context about the relationship between the individuals in it and the landscape.

    The human element in photography

    2. Take environmental portraits

    One way to create interesting photos of people is to take environmental portraits – photos that include information about the person’s surroundings. The person will be the focal point of the photo but really there are two stories being told here; one about the person, and another about their environment.

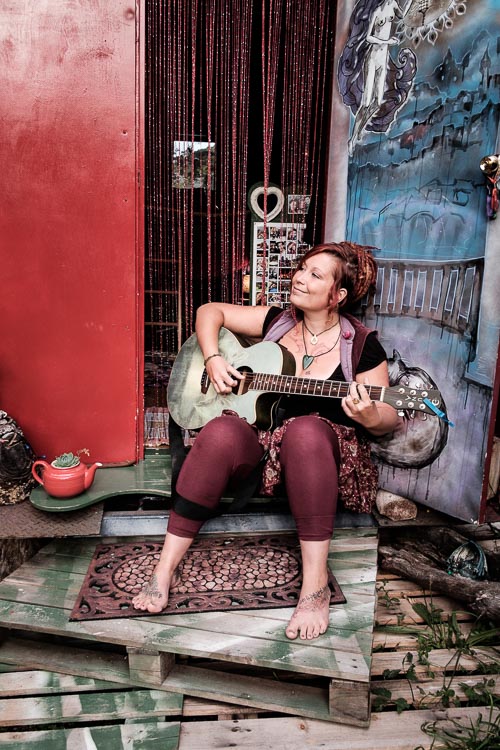
    The photo below came about after I asked a friend of mine if I could take some portraits with her new gypsy caravan that she built herself from scratch. She loved the idea. This photo is as much about her caravan and the way she created a unique place for herself to live, as it is about capturing her likeness.

    The human element in photography

    3. Find interesting people to photograph

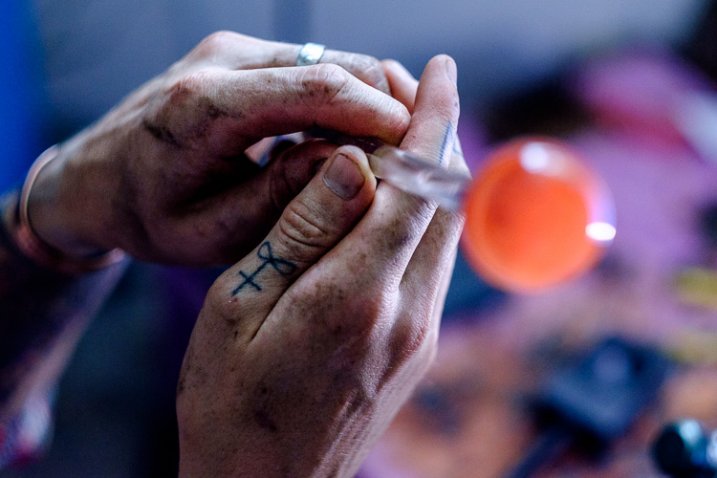
    The easiest way to find interesting people to take photos of is to set yourself a project. One of my current projects is to take photos of local craftsmen. This led me to take photos of Eoin in his glass blowing studio.

    After I had taken some photos of him blowing glass, we went outside to take some portraits. You can see one of the images below. He has a very interesting face, and was a great subject, but I would never have found him if it hadn’t been for the project.

    The human element in photography

    You may have read the story where a student asks photographer Jay Maisel how to take more interesting photos. The reply was,

    “If you want to make more interesting pictures, become a more interesting person.” – Jay Maisel

    Another way to find interesting people is to lead a more interesting life. The more hobbies and activities you participate in, the more people you will meet in everyday life. Some of them may make interesting subjects.

    Your turn

    Do you agree with my idea that people are the most interesting subject for photographers? Please let us know in the comments, I’m looking forward to hearing what you think.


    Mastering Composition ebookMastering Composition

    My new ebook Mastering Composition will help you learn to see and compose photos better. It takes you on a journey beyond the rule of thirds, exploring the principles of composition you need to understand in order to make beautiful images.

    googletag.cmd.push(function() {
    tablet_slots.push( googletag.defineSlot( “/1005424/_dPSv4_tab-all-article-bottom_(300×250)”, [300, 250], “pb-ad-78623” ).addService( googletag.pubads() ) ); } );

    googletag.cmd.push(function() {
    mobile_slots.push( googletag.defineSlot( “/1005424/_dPSv4_mob-all-article-bottom_(300×250)”, [300, 250], “pb-ad-78158” ).addService( googletag.pubads() ) ); } );

    The post How to Make Your Photos More Interesting with a Human Element by Andrew S. Gibson appeared first on Digital Photography School.


    Digital Photography School

  • Stock Photos That Don’t “Suck”: the Basics of Stock Photography

    As a freelance stock photographer, I have to admit I am insulted when I see articles written about how horrible the market is for stock photography. Has the bar been lowered so far that we are forcing consumers to seek out photographs that simply “don’t suck”? I don’t think so. Some people feel that the proliferation of digital cameras and Continue Reading

    The post Stock Photos That Don’t “Suck”: the Basics of Stock Photography appeared first on Photodoto.


    Photodoto