Category: Photography

  • 5 Tips That Will Make Your Food Photos Stand out from the Crowd

    1 Cornish Game Hen

    Food photography may be more popular now than ever before. The blogosphere is exploding with pictures of food, and social media sites like Pinterest and Instagram are flooding you with never-ending streams of food photos 24/7. Creating food images that stand out in this massive sea of content is a difficult task. Here are five tips to help you get your food photos noticed.

    #1 Don’t be afraid of shadows

    Shadows make a scene look realistic, give your food texture, and create mood, so don’t hesitate to make them part of your food photo. To create nice, dark shadows let your light fall onto your food either from the back or the side at a fairly low angle, from just a little bit above the surface of your set. Use reflectors sparingly, or not at all. Reflectors bounce light back into the areas of your photo that your light source doesn’t reach, in other words, into the shadows. So to keep the shadows dark, don’t reflect the light.

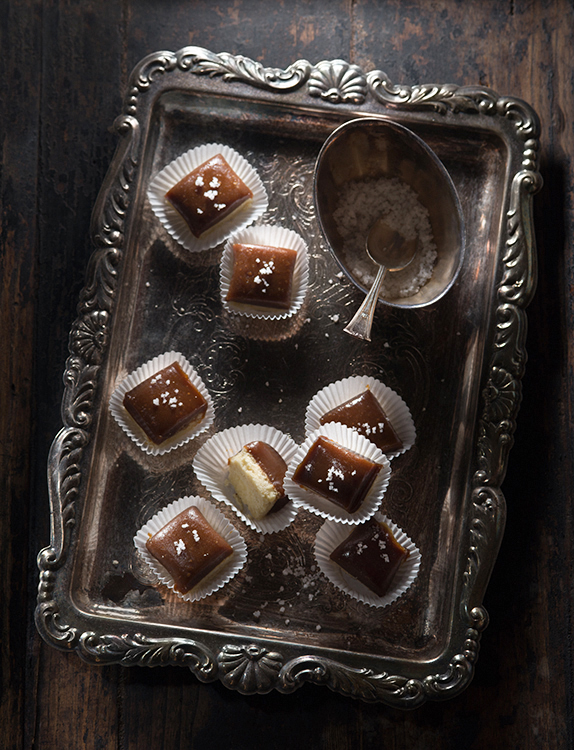
    1 Salted Caramel Candy

    In the salted caramel candy photo above my light was falling onto the set from the back at a low angle and I didn’t use any reflectors.

    #2 Imply action

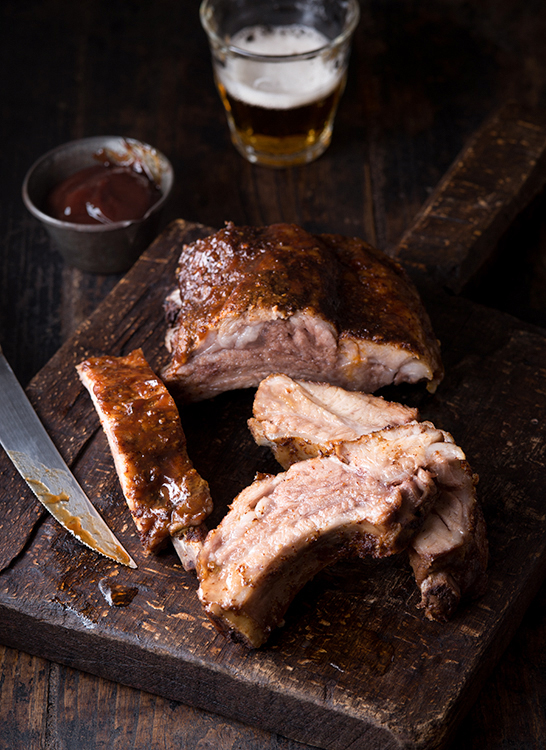
    Action makes your viewers feel as if they are part of your scene; that kind of engagement is always a good thing. Action can be literal, such as a hand holding a hamburger or pouring syrup over a stack of pancakes, but there are other (and actually easier) ways for you to suggest that something is happening in your photo. One example is a glass of freshly poured beer. Your viewers likely know that the lifespan of the foam top on a beer is only a minute, so seeing a fresh beer tells them that someone must have just been at the scene to pour it.

    2 BBQ Ribs

    #3 Point your lens up at food that is tall and stacked

    Shooting up from slightly below the food is an unusual angle for food photography; but it can create really compelling images of tall items such as cakes, and things that are stacked, like burgers or, as in the example below, shards of toffee. The food will be towering above the viewer which makes it look big and impressive. Needless to say this angle doesn’t work for flat food, so don’t shoot a pizza with this method.

    3 Toffee

    #4 Create visual contrast

    Contrast comes in many varieties and helps make your food photo look interesting. You can create contrast by incorporating different shapes into your photo, such as round and rectangular (or square). You can also create contrast by including colors in your photo that are on opposite sides of the color wheel (complementary), like red and green, or blue and orange. The lettuce cup photo below illustrates both of these concepts, the square dish contrasts the round lettuce cups and the red sauce provides contrast to the green lettuce.

    4 Lettuce Cups

    #5 Leave negative space in the image

    Don’t feel that you have to fill every square inch of the frame with food or props. A little negative (empty) space gives the food room to breathe, and will keep your viewers from getting overwhelmed and feeling claustrophobic. There are no hard and fast rules that dictate where to leave negative space in a food photo but the rule of thirds is always a good place to start. Imagine your photo dissected into thirds, both vertically and horizontally, and place your subject on or near one of the four points where those lines intersect. Leave the rest of your photo empty and take a test shot. Does the scene look good to you or is it too barren? If it looks like it’s missing something, add more elements to the frame, one by one and along the imaginary lines that dissect your frame, until you have a composition that looks pleasing to you. That’s how I went about composing the Thai curry ingredients shot below.

    5 Thai Curry Ingredients

    I hope these tips give you some new ideas for your food photography. If you have any others please share them in the comments below.

    googletag.cmd.push(function() {
    tablet_slots.push( googletag.defineSlot( “/1005424/_dPSv4_tab-all-article-bottom_(300×250)”, [300, 250], “pb-ad-78623” ).addService( googletag.pubads() ) ); } );

    googletag.cmd.push(function() {
    mobile_slots.push( googletag.defineSlot( “/1005424/_dPSv4_mob-all-article-bottom_(300×250)”, [300, 250], “pb-ad-78158” ).addService( googletag.pubads() ) ); } );

    The post 5 Tips That Will Make Your Food Photos Stand out from the Crowd by Nicole Branan appeared first on Digital Photography School.


    Digital Photography School

  • Writer’s Favorite Lens: Olympus Zuiko 12-40mm f/2.8

    One of the primary reasons I built my mirrorless kit with Olympus gear, was their wide array of high quality lenses. From fast primes to convenient zooms, they have all of the important focal lengths covered. It wasn’t until I picked up the Olympus Zuiko 12-40mm f/2.8 however that I really experienced the true potential of this micro four thirds system. Since purchasing the lens a few months ago, it has rarely left my camera body. Not only are the optics incredible, but it features many surprising benefits. Here are some of the main reasons it has become my favorite lens.

    Image Quality

    The Olympus 12-40mm has an effective focal length of 24-80mm making it extremely versatile. This fits my needs well, as I shoot a wide variety of subjects. With a constant aperture of f/2.8, it’s possible to shoot wide open throughout the entire range. Unlike other kit lenses, there is no need to stop down for optimal performance. Results are stellar wide open, with no noticeable chromatic aberration or diffraction. This makes it a workhorse for low light work, whether indoors or out.

    From corner to corner, the 12-40mm is the sharpest lens I’ve ever owned. That makes it invaluable for landscape and travel work, particularly when great depth of field and critical focus is desired. I have done side by side comparisons with DSLRs and pro lenses, and to my eye, the Olympus lens is sharper. Granted, these were not scientific tests, but for me, a real world study is perhaps more valuable than any static chart. While many zoom lenses compromise clarity for convenience, this lens has the rare combination of both.

    Size and Cost

    When compared with the equivalent offering for DSLRs, a number of additional benefits are revealed. For example, the Canon 24-70mm f/2.8 weighs 28.40 ounces (805 g), more than twice as much as the Olympus at 13.47 ounces (382 g). After a long day of hiking and traveling, with gear on by back, this makes a big difference. With the lighter kit, I’m ready to go further, and faster. It’s also small enough to keep with me everyday, greatly reducing any missed opportunities. In addition to the weight savings, it’s also quite reasonably priced. The Canon and Nikon version of this focal length averages $ 1899 while this Olympus model can be purchased for around $ 899.

    Macro Surprise

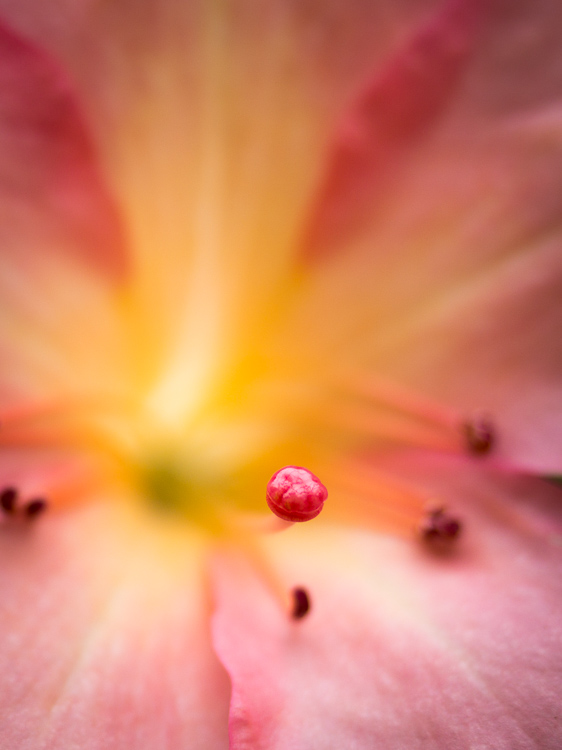
    Perhaps the most unexpected benefit is the ability to shoot extreme close-ups. In fact, I recently sold my 100mm Canon macro lens as this satisfies my macro needs. With a minimum focusing distance of 20 centimetres (7.9 inches), it is ideal for flowers, plant life, and butterflies. Having this type of capability in a single lens makes it possible to do more while traveling lighter.

    Shift into Manual Focus

    Manual focus is activated by gently pulling the lens barrel down. With no buttons to find or push, this can be done without taking your eye from the viewfinder. Coupled with focus peaking, it has never been easier to achieve sharp focus manually. I particularly enjoy this feature when doing creative multiple exposures. This involves auto focus for the first shot, followed by a shift to manual focus to purposely create an out of focus second frame.

    Built for Adventure

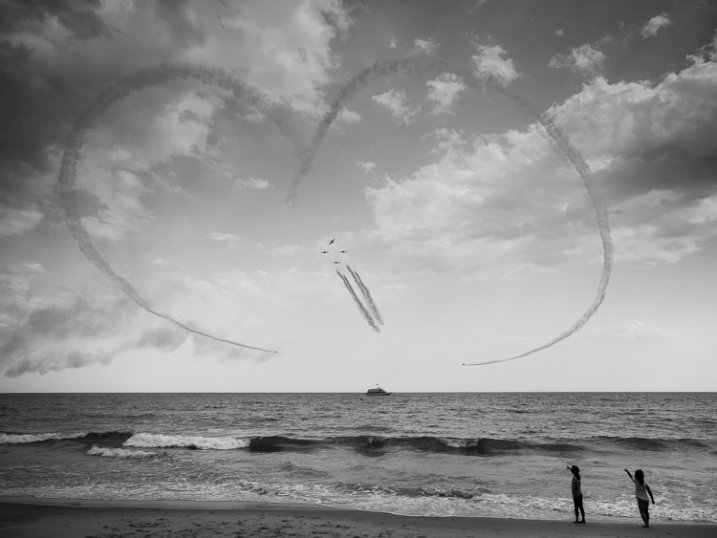
    When paired with a weatherproof body, the lens completes a rugged combo that can withstand heavy rain, snow, dust, and even freezing conditions. I was able to test the weatherproof capabilities of the system during an airshow at the beach. As rain fell from the stormy sky several DSLR users frantically packed away their gear and headed for cover. Meanwhile, I continued to shoot the action and captured some unique shots with ominous dark clouds. Sure I could purchase and use a rain cover which are reasonably effective. They are clumsy enough however, to negatively affect my shooting technique.

    Nice Bokeh

    Despite what some critics have reported, it is quite possible to achieve shallow depth of field with a micro 4/3 system. Admittedly, the background won’t be as out of focus as an equivalent lens on a full frame camera, but it absolutely gets the job done. With this particular lens at f/2.8 I’ve found the bokeh to be very pleasing. In fact, I have no problems reaching for this lens should shallow depth of field be necessary.

    Fast to Focus

    Perhaps there’s no worse feeling than struggling to find focus as the magic light fades. Unlike many zooms, this lens does not hunt for focus. Whether you are using a camera with contrast or phase detection, it locks onto the subject, and fast. Not only does this benefit outdoor work, but also those indoor situations when the light levels are very low.

    No Compromises

    I’ve used a great deal of lenses throughout my career, many of which were stellar. Still, this lens really shines not only for its optical quality, but its versatile focal range. You can use it for just about anything, making it the first lens you’ll grab for most situations. Typically a lens with this many features would come at the price of other compromises, but this in not the case with the 12-40mm. Olympus has done a stellar job in creating what I find to be the perfect lens for micro 4/3 users.

    googletag.cmd.push(function() {
    tablet_slots.push( googletag.defineSlot( “/1005424/_dPSv4_tab-all-article-bottom_(300×250)”, [300, 250], “pb-ad-78623” ).addService( googletag.pubads() ) ); } );

    googletag.cmd.push(function() {
    mobile_slots.push( googletag.defineSlot( “/1005424/_dPSv4_mob-all-article-bottom_(300×250)”, [300, 250], “pb-ad-78158” ).addService( googletag.pubads() ) ); } );

    The post Writer’s Favorite Lens: Olympus Zuiko 12-40mm f/2.8 by Chris Corradino appeared first on Digital Photography School.


    Digital Photography School

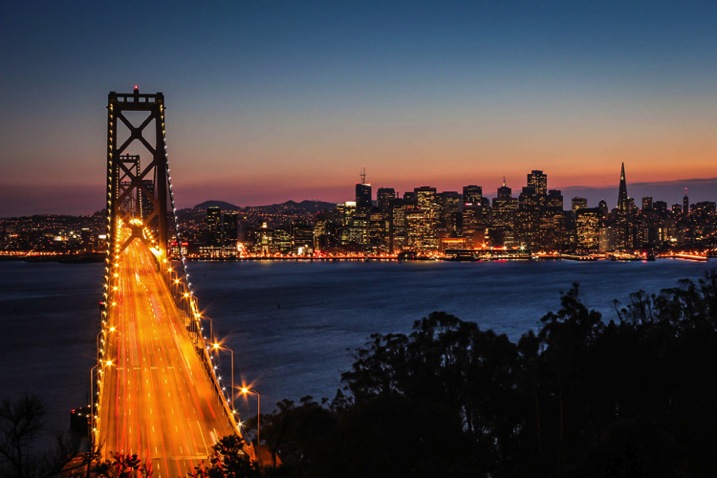
  • 7 Tips for Better Skyline Photography

    Reminder: now until July 7th (AUS EST) the Landscapes, Cityscapes & Photography Tricks eBook is on 50% off at Snapndeals.

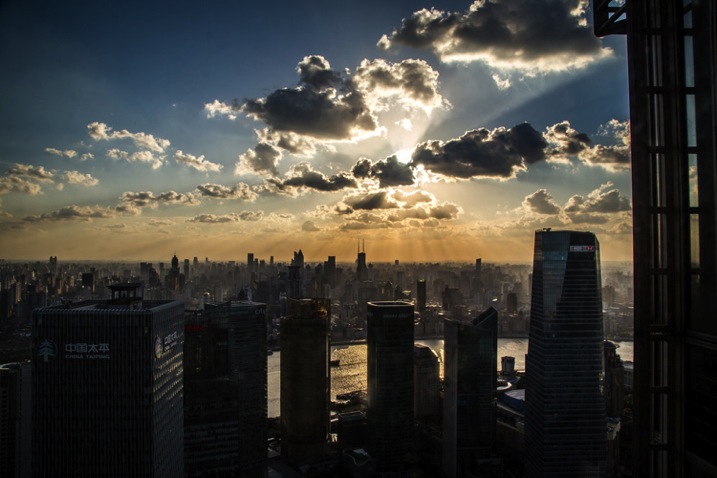
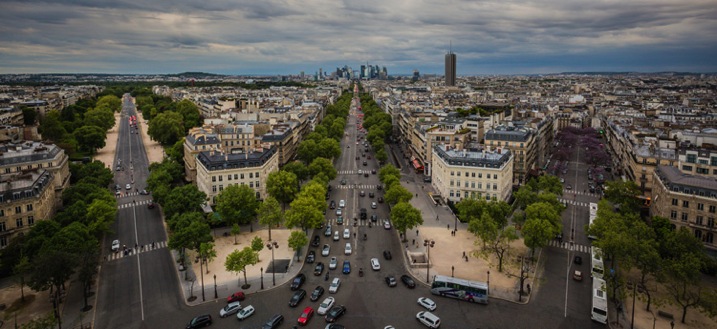
    When we talk about cityscape photography, one of the most basic and trademark shots is the full skyline; the artificial horizon, made of buildings and towers jutting up and down into the sky above. Skylines can be jagged and coarse, or faint and smooth, often depending on the nature of the city itself.

    Follow these tips for better skyline photography:

    1. Find a Good Vantage Point Outside the City

    Skyline image1

    To find the city, escape it. One surefire way to capture a city skyline is to leave the city itself. If it’s sitting on a river, hop across; if it’s in a valley, climb the mountain outside. There are terrific vantage points outside cities, like hills, islands and boats, but all will involve a fair bit of travel time and some physical stamina to keep moving until you find a wide enough angle.

    Take, for example, downtown Los Angeles: to capture this magnificent skyline, most photographers would hike up a nearby hill or visit the Griffith Observatory until they find a good angle. If you want to include major sites, you’ll need to go even farther: take a boat down to the islands south of Toronto, and you’ll find a clear shot of the CN Tower amid one of the world’s most recognizable downtown skylines. You’ll have to venture to uncommon places to find these angles.

    2. Focus on the Corner of a Building

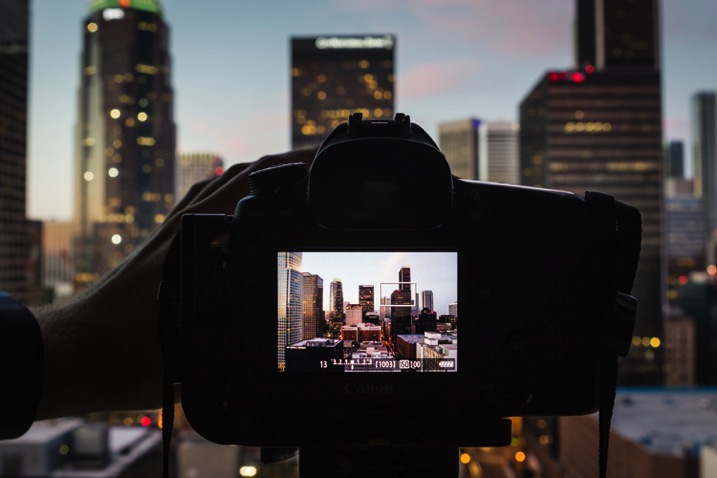
    Finding the right focus can be difficult with the city miles away, especially in low light. In LiveView mode, use the LCD screen to zoom in on the corner of a building, and then manually focus until it is crisp.

    Skyline image2

    This will help ensure that your skyline comes out crisp, and not fuzzy with the autofocus guessing game.

    3. Take Some Shots During the Blue Hour

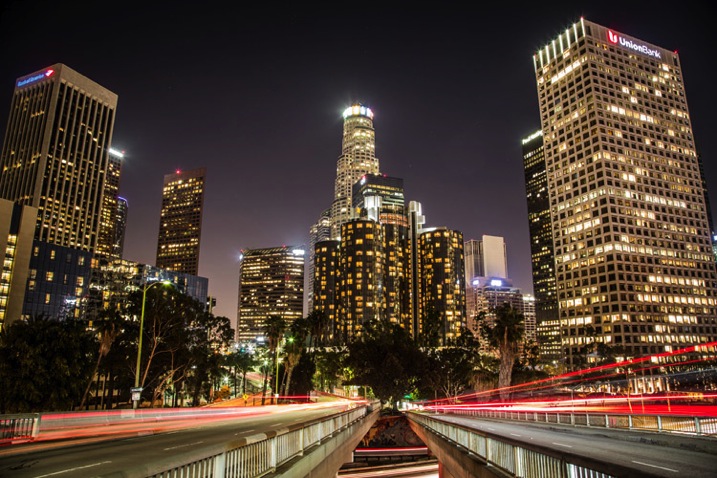
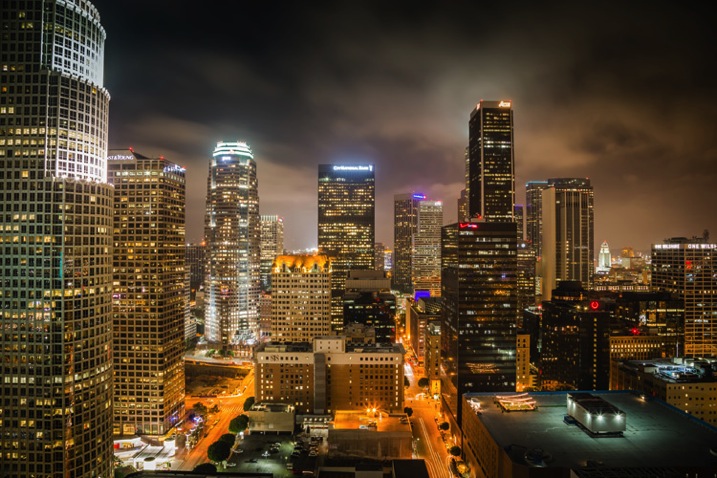
    Skylines can light up right after the golden hour, in what’s known as the Blue Hour, that short moment in twilight when the sky is still blue, but the city lights have already turned on. Shooting in pitch-blackness is harder to get good results, and not as visually stimulating, assuming you’re keeping your shot in color. Blue Hour will give your skyline a hearty azure backdrop, and make your image that much more interesting.

    Skyline image3

    4. Go Wide Angle

    For skylines and cityscapes, focal lengths between 12mm-35mm are a good bet. It’s not a necessity, but you will appreciate the wide angle more often than not. This will allow you to capture a nice skyline without having to be miles outside the city.

    Skyline image4

    5. Use a Deeper Depth of Field

    If you want a deeper depth of field, you’ll need a narrower aperture, something like f/11 – f/16, which will create a consistently detailed image.

    Skyline image5

    Typically, when capturing cities and landscapes, deeper depths of field is more desirable, so every detail of the frame appears in focus. This calls for a narrow aperture, or high f-stop.

    6. Consider a Panorama

    Sometimes even with a wide angle lens skylines are too long to fit in one photo, that’s when you’ll find a perfect opportunity to try capturing it as a panorama.

    Skyline image6

    A panorama is where you take multiple photos in a row with overlapping edges, then stitch them together to make a single image. Naturally, this shot is wider than most, long and narrow, it can capture a full skyline, bypassing adding in too much excess sky or ground.

    7. Use Your Self-Timer and Bracket at Night

    Just after sundown, I usually try and take five bracketed shot sequences in cities; the variety of light, between the bright street lights and the cooling sky, makes for a full palette of color and light that should be captured as accurately as possible. By capturing all these exposure levels you can ensure you are capturing all the light in the scene. You can choose which is best later or combine them with HDR processing techniques.

    Skyline image7

    Later into the evening, as shutter speeds get longer, I usually condense that to just three bracketed shots because of time. Sometimes even single exposures can do the trick, if I’m spending too long on a shot.

    If you set your 2-second self-timer, and use a DSLR with exposure bracketing features – you can click the shutter and the camera will fire off all the shots without you needing to hold it, which risks blur from shaky hands (very useful on a cold rooftop).

    Hope these tips have been helpful getting you started, have fun out there!


    For Further Training:

    SnapnDeals currently has a discount on this new in-depth eBook designed to help you master challenging lighting conditions no matter your experience level, take more compelling photos, post-process them to perfection, and delve even further into long exposure tricks so you know all the possibilities. Get Landscapes, Cityscapes & Photography Tricks at 50% Off now.

    googletag.cmd.push(function() {
    tablet_slots.push( googletag.defineSlot( “/1005424/_dPSv4_tab-all-article-bottom_(300×250)”, [300, 250], “pb-ad-78623” ).addService( googletag.pubads() ) ); } );

    googletag.cmd.push(function() {
    mobile_slots.push( googletag.defineSlot( “/1005424/_dPSv4_mob-all-article-bottom_(300×250)”, [300, 250], “pb-ad-78158” ).addService( googletag.pubads() ) ); } );

    The post 7 Tips for Better Skyline Photography by Richard Schneider appeared first on Digital Photography School.


    Digital Photography School

  • How to Photograph Fireworks: Happy 4th of July

    The hot dogs have all been eaten and the blazing hot sun is finally setting. Time to grab your blanket and head out to your community 4th of July fireworks display. This year instead of coming back with just fond memories, grab your camera and follow these simple tips to photograph fireworks as well. Use Tripod If you’re using a Continue Reading

    The post How to Photograph Fireworks: Happy 4th of July appeared first on Photodoto.


    Photodoto

  • How to Watermark Your Images Using Lightroom and Photoshop CC

    Watermarks, love them or hate them, are a way of protecting your images. Although, just because you have one on your image doesn’t mean it won’t be stolen. If you are like me, I do it as a deterrent.

    There are many ways to watermark your images. In this article I’m going to show you how to add a watermark to your images using Adobe Lightroom and Photoshop CC.

    Lightroom (6) CC

    Lightroom makes watermarking your images very easy, there are a couple of ways of doing it. Once you have processed your images and are ready to export them, then it is also time to watermark them.

    Exporting Your Images

    Select the images you want to export and watermark. You need to make sure you are in the Library module, then click on Export.

    The Export Window will come up. We aren’t going to go through how to export your images, there are other tutorials that will show you how to do that. For this purpose we are concerned with the section down near the bottom, so scroll down until you see Watermarking. Take a look at the following image.
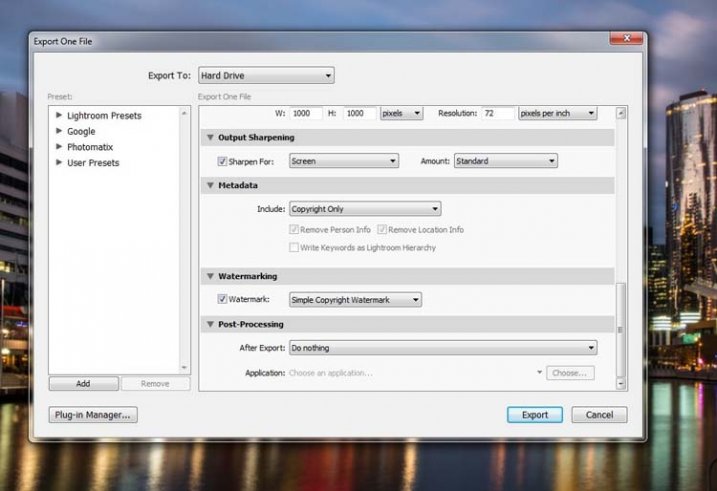
    watermarking-1

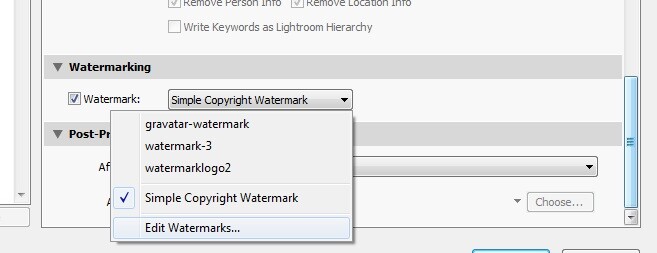
    If it hasn’t been ticked, then check the box for Watermark. Next to that is a drop down menu click on that.

    Simple Watermark
    watermarking-2

    If you’ve never watermarked anything before, then you could simply click on Simple Copyright Watermark and it will just put your name on the photos. Though you must be registered in order for Lightroom to know your name.

    Another option under that drop down menu is Edit Watermarks, so let’s go through that option.

    Edit Watermarks

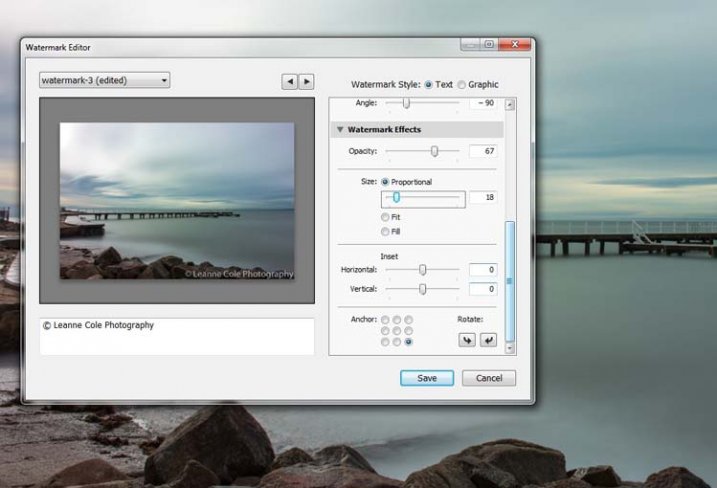
    In this section you can edit the text for the water, or what you want it to look like.

    Before you can change the simple watermark you will have to make sure that at the top where it says Watermark Style, you have selected Text. In the image below you can see the window for the Watermark Editor and in the top right corner you can see Watermark Style.
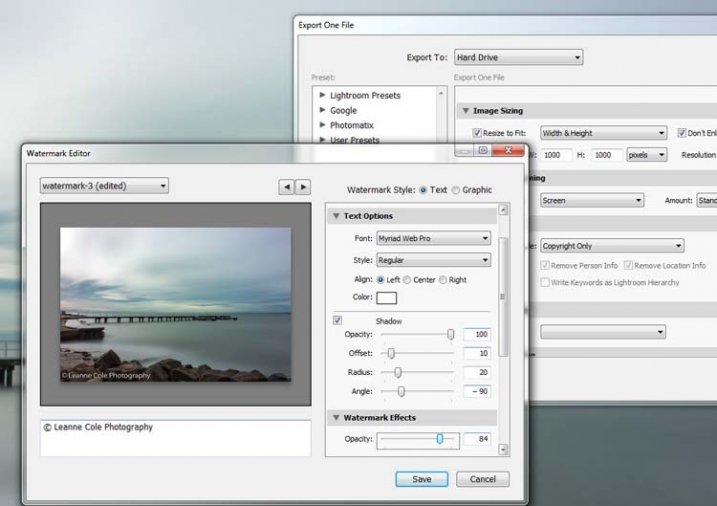
    watermarking-3

    In the box underneath the image you can see the simple watermark, you can now select that and delete it, and write anything you like. The most common thing to do is put the copyright symbol, ©, with your name or business name after it. To make the copyright character on Windows simply press the Alt key and type the number 0169, on a Mac press Option+G.

    There are various sliders in the Watermark editor as well, one allows you to change the opacity of the watermark. How opaque you make it is up to you. I like to make mine so that you can barely see it. A lot of people looking at images can find watermarks distracting, so it is something you should keep in mind when you are adding them to your images.

    There are different things you can do to adjust the watermark, for example changing its position. There is also a size slider to make it bigger or smaller.
    watermarking-4

    Add a Logo or Unique Watermark

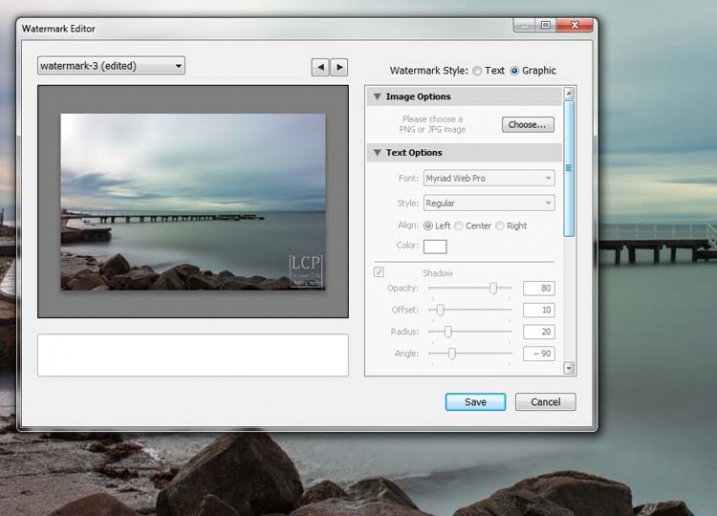
    If you have a logo or a special watermark you can use this in Lightroom too.

    In the same window that we have been using, go back to the top and select graphic. Directly underneath you will see Image Options where you can load your file. You can make the same changes in regards to size, opacity and location as you did with the text watermark.
    watermarking-5

    Saving the Watermark Preset

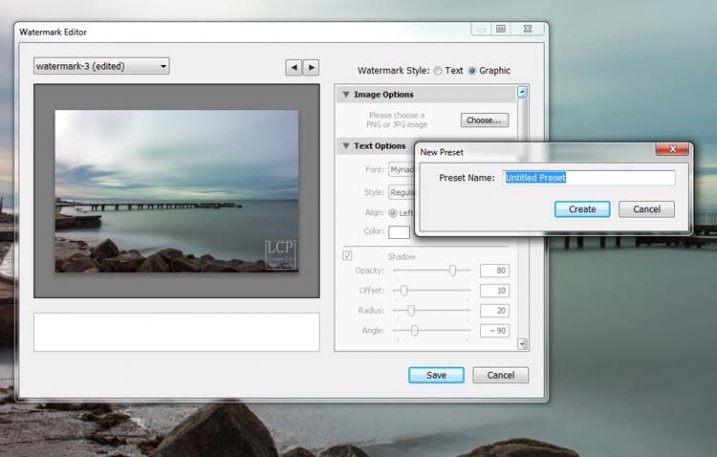
    Once you have worked it all out, you don’t have to do all that every time you want to export images. You can save what you have done as a watermark preset, and give it a name (pull down the menu top left where is says “Custom” to find Save Current Settings as New Preset – select that to see the pop-up box below) . The next time you want to watermark an image, just look in the same drop down menu that you used earlier to edit the watermark, and you will find your saved preset there.
    watermarking-6

    Here you can see that I have called one of my presets: watermark-3.

    Photoshop CC

    There are also some simple ways of watermarking in Photoshop CC as well. It is a little different, but not harder.

    Prepare your image as usual, then get it ready for its designated use and how you want to add a watermark to protect it. I resize every image I put online, that is my choice, it is up to you whether you decide to or not.

    Easy Watermark

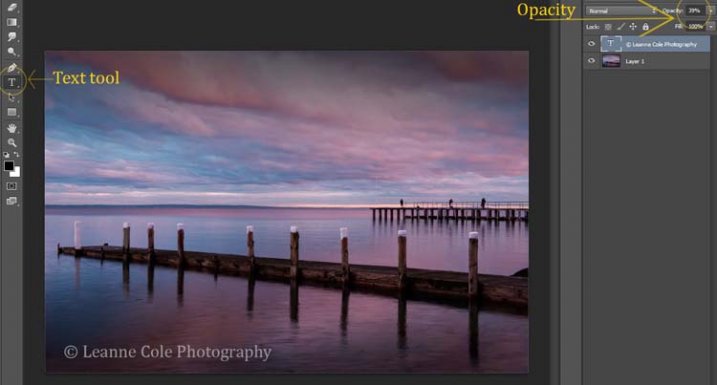
    Once you are ready to save your image, read for use, one of the easiest ways of watermarking it is to simply use the text tool, located in the tool bar on the left of your workspace. The image below shows where it is located.

    Click on the image where you want to put the watermark, and start typing. Remember you can also add the copyright symbol the same as you did using Lightroom.

    You can change the size and colour of the text at the top, in the tool options bar below the main menu (or choose Window>Character to show the text adjustment panel). Select the text to change it. You can also move it around when it is highlighted as well. The opacity slider is above the layers panel on the right, you can change it to suit your preference.
    watermarking-7

    Making Your Own Logo or Watermark

    You always have the option of making a custom watermark, which can be saved and used any time you need it, and can also be used in Lightroom.

    To start, go to File in the main menu and click New (File>New). I usually make the size of the new image match my final image size, so the longest side is 1000 pixels. Make the width that size for this example. For the height, it doesn’t have to be that big, it just depends on what you are going to do. For this one it was 300 pixels. You will also need to make sure the Background Contents setting is set to transparent, see below.
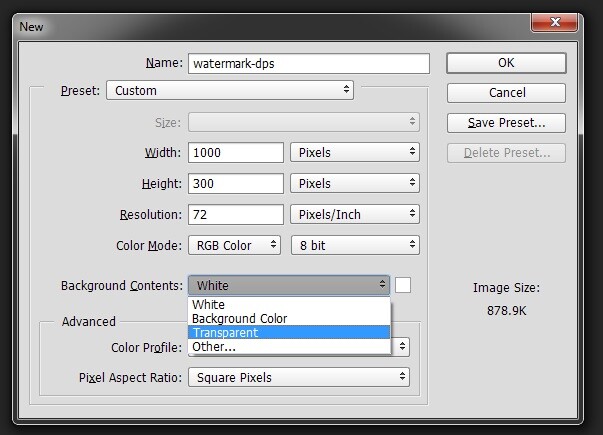
    watermarking-8

    So you can see what you are doing, you could add a new layer. Do that from the new layer icon at the bottom of the Layers Panel, or go to the main menu at the top and select Layer>New>Layer and click OK. Once that is in place use the Paint Bucket Tool which is in your tool bar, it is under the Gradient Tool icon. We are going to make the layer black, so make sure the foreground colour is black. The foreground and background colour selection is also in the tool bar, down near the bottom. There are two squares, one black and one white (click D on your keyboard which defaults the colors to black in the foreground, white in the background). Click on your new layer and it should be filled with all black.

    Select the text tool (T) and make sure that white is now the foreground colour (click X on your keyboard to switch the foreground/background colors so white is now on top). Click on your image and start typing. Like you did for the Easy Watermark you can highlight it, then change the size. Once you’ve done that, you can crop it further so just the text appears.

    Double click on text layer, towards the right side, and you should get the following window, Layer Style.
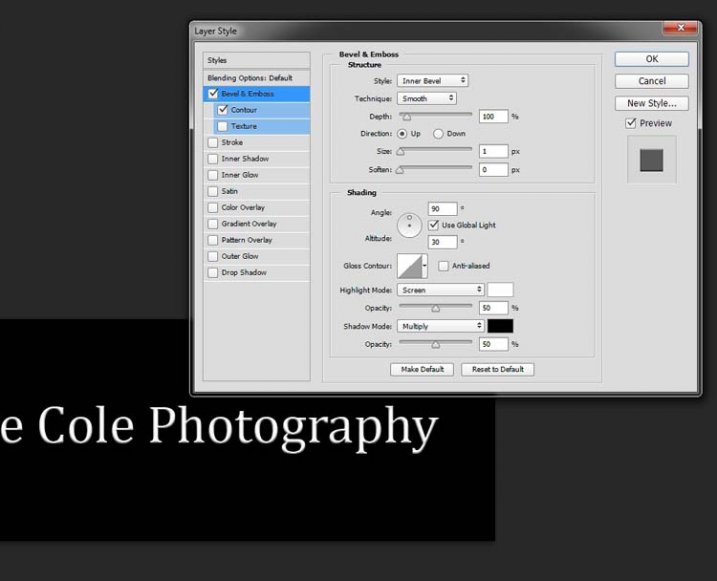
    watermarking-10

    You can see I have checked Bevel Emboss, and the Contour option underneath. You can play around with the sliders, but just ticking those did enough for this purpose. Then the black layer is deleted. You can do that by dragging it to the rubbish bin (trash can) in the bottom right corner. You can also right click on the layer and find delete. The easiest way is to highlight the layer by clicking on it, and pressing delete on the keyboard.

    It is very important when you save this file that you do so as a .png or a .psd, otherwise the transparent part of the layer will be made white and you will no longer have the watermark that you desired.
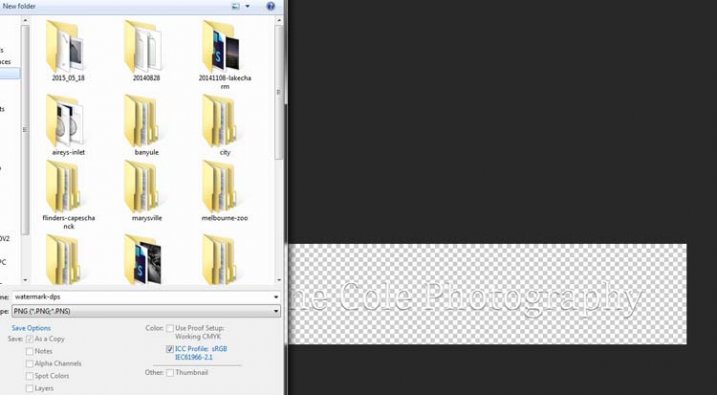
    watermarking-11

    That is an easy way of doing a watermark that you can save so you can use again, but you could make a logo or something similar as well. One thing that quite a few people do is add a signature, like below.
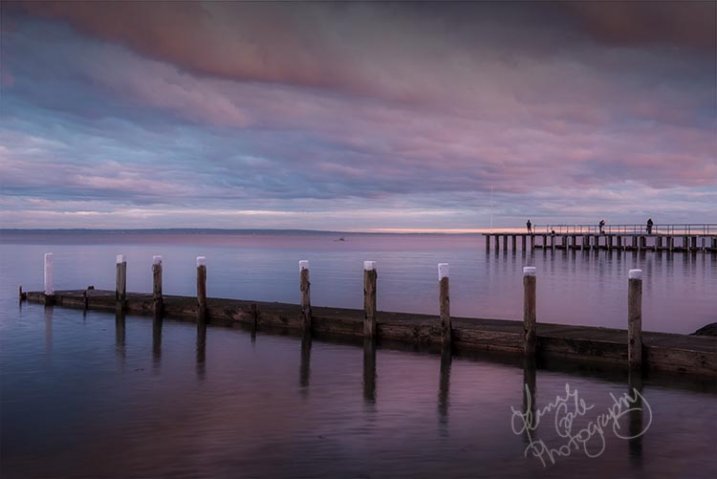
    signature-watermark

    There are a couple of ways of doing this, but the most common is using a tablet with a pen, I use a Wacom Intuos Pro. Do everything the same as you did for the last one, but instead of using the text tool, get your brush, make it small enough using the left square bracket key, then write your name.

    If you find the surface too slippery, try putting a piece of paper over the top, it will help add some resistance. You can also try doing it with a mouse or touch pad. Again, save it the same way.

    Easy Way of Adding Watermarks

    One of the easiest ways to use the watermark you have just created is to open it, then select all (Ctrl+A on a PC and Command+A on a Mac), then copy it, (Control+C on a PC and Command+C on a Mac). Go over to your image and press Ctrl+V or Command+V to paste it; the watermark should now be in the middle of your image.

    You can use the move tool (V), which is the first one in your tool panel, and move it to where you want, like you did with the Easy Watermark.

    Hiding Your Watermark in the Image

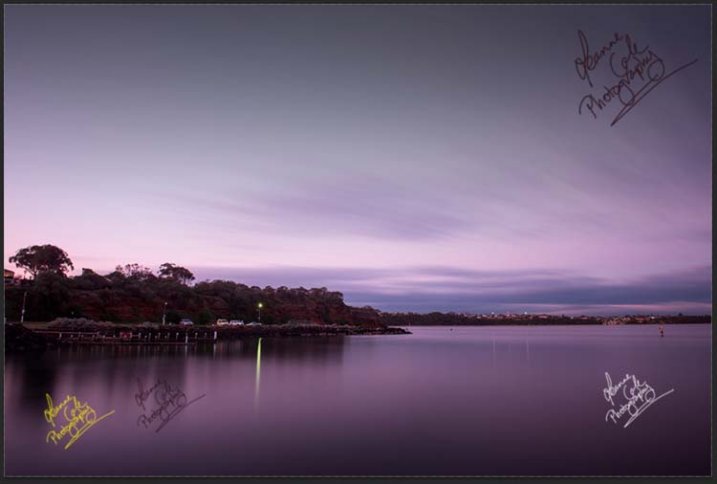
    With a simple watermark you can also put it into the image and sort of hide it. This is the method I use for many of my fine art images. I try to place it where it isn’t obvious, and where it could be more difficult to remove.

    Once your image is ready, copy and paste your watermark onto your image. Now you need Transform it; Edit>Transform in the main menu, or by pressing Ctrl+T/Command+T. You will notice a framework around your image, as shown below.
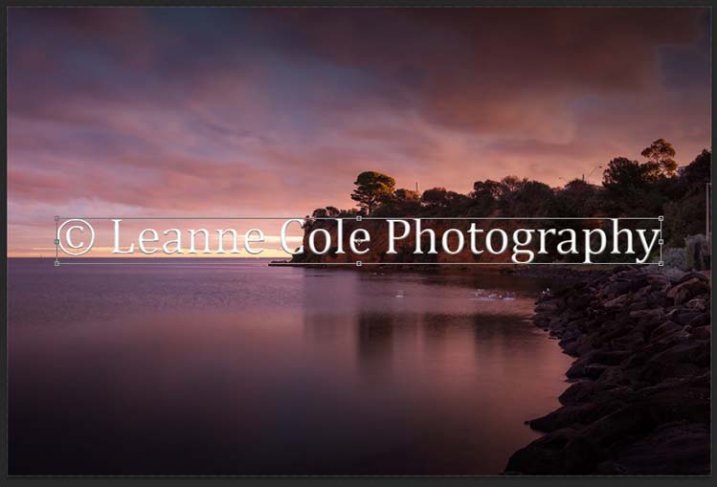
    watermarking-12

    By clicking and dragging on the corners, or in the middle of the lines, you can change the size. Click and drag to make it bigger or smaller (hold Shift down to keep the proportions the same, otherwise it will stretch out of shape). If you want to rotate it, hover around just outside a corner and a small curve arrow will appear, then you can turn it around. You can also move it by clicking in the middle and moving it where you want. As I said, find somewhere to hide your watermark in the image, hopefully somewhere not too noticeable, as demonstrated in the image below.
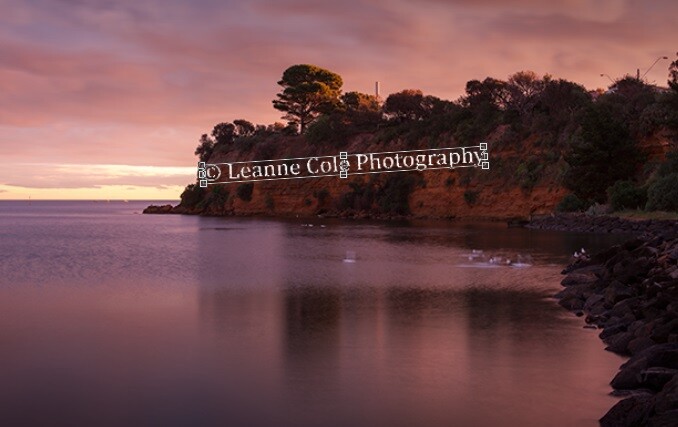
    watermarking-13

    To apply the Transform Tool you can double click inside the box, press Enter or click it with the move tool. Then the opacity of the watermark layer is changed to help it blend, see below.
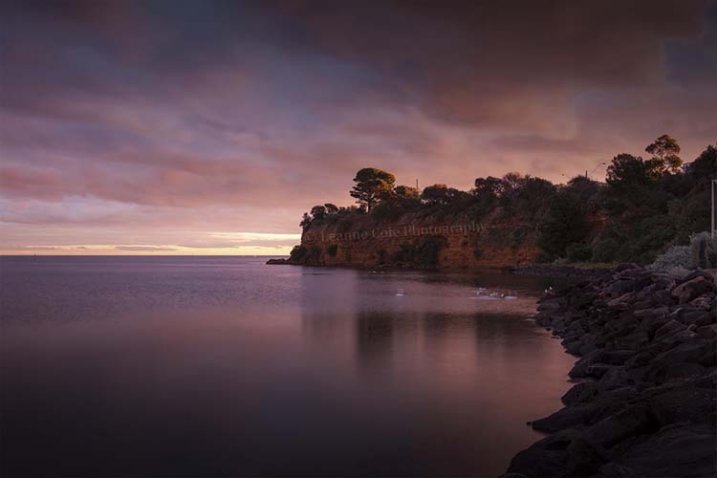
    watkinsbaywatermarked-2

    Once you get good using Transform, you can experiment with what else the tool does.

    Using a Brush to Watermark Your Images
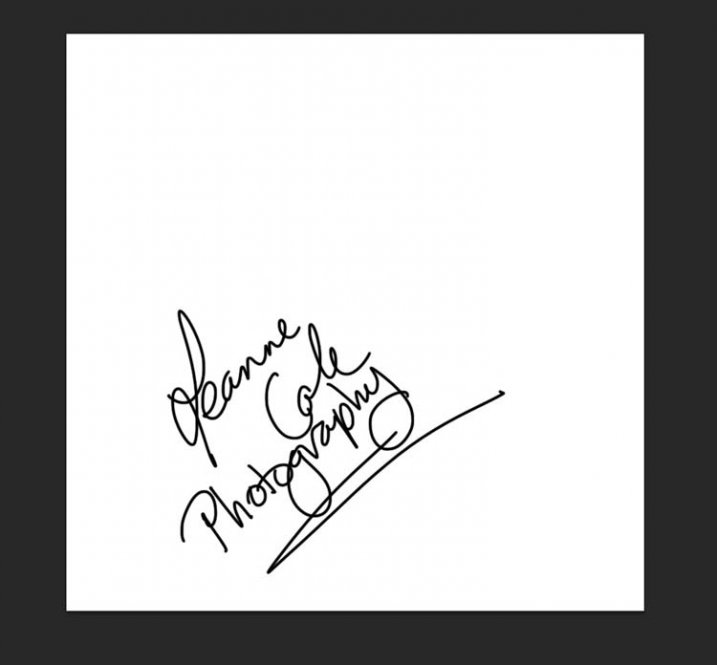
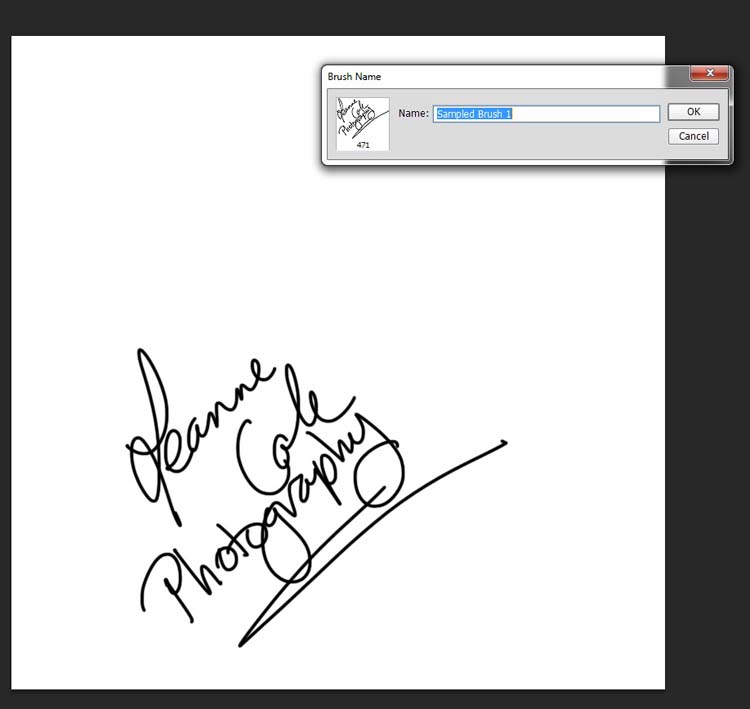
    watermarking-14There is a very easy way of doing your watermark, but it takes a bit to set it up. Getting the watermark ready pretty much works the same as before, only this time you want a white background, and you need to use black to create it. Take a look at the image on the right.

    Note: create your new file 2500 pixels wide as that is the maximum size for a brush. You can always make the brush smaller when you apply it to your image, but making it the largest size now will give you the best quality.

    I created the signature with my Wacom Tablet, but you could also use a pen or black marker on a piece of paper and scan it, that will work just as well.

    Once you have your signature, you can now make your custom brush. Go to the Edit menu and choose Define Brush Preset, and click on it.
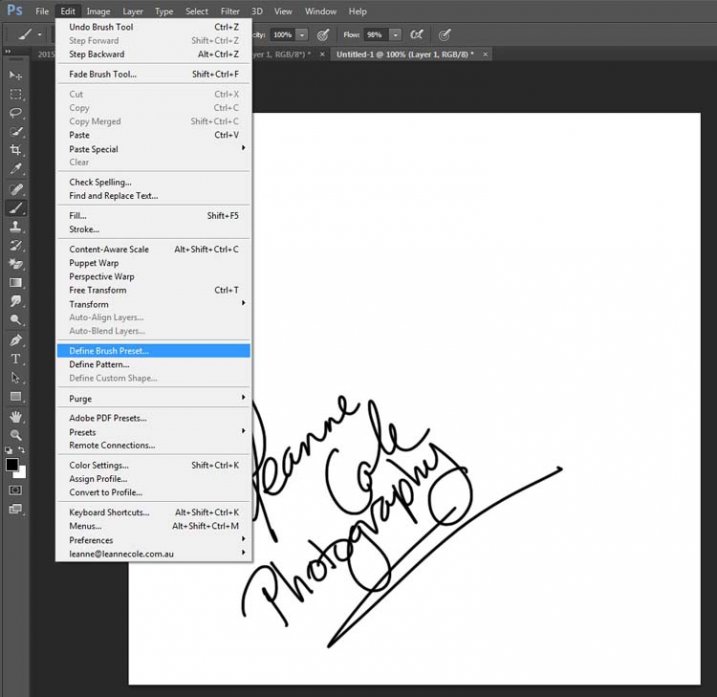
    watermarking-15

    watermarking-16Next, you will see another window pop up window ,asking you to give your brush a name. You can name it what you like, perhaps something that will remind you what it is later; I called mine Brush Signature Watermark.

    Now your watermark will work just like a brush, you can make it smaller or larger (remember if you made it 2500 pixels it will hold quality up to that size with out pixelating), you can also change the colour. It works exactly the same way as the normal brush does; use the square bracket keys to make it bigger or smaller. If you want to change the colour, click on the foreground colour and the Color Picker window will appear.

    I would suggest adding your watermark to a new transparent layer, so you can also change the opacity as needed.

    To find your new brush, go to your brush presets, they are over on the side of your layers panel, and click on the icon that looks like small lines at the top where a drop down menu should appear.
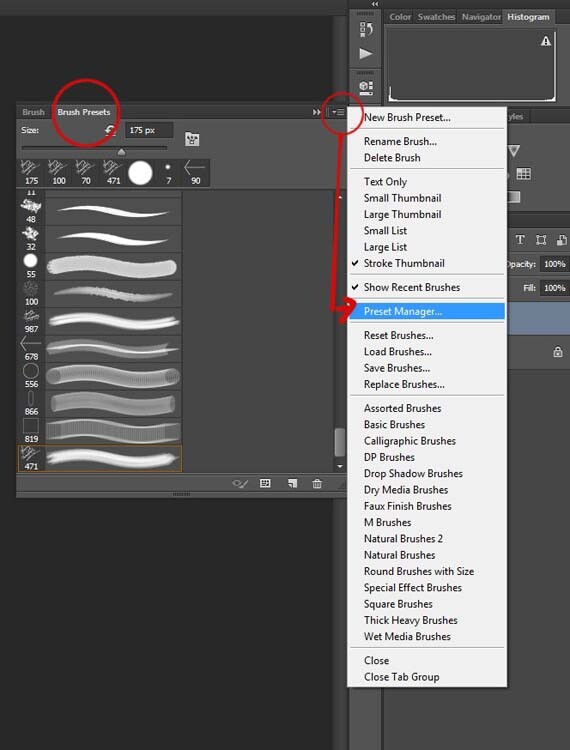
    watermarking-18

    Go down to Preset Manager and click. A new window will appear with all your brushes. Now you can click, and drag the brush you just created to a spot where it will be easier to find, like up to the top.
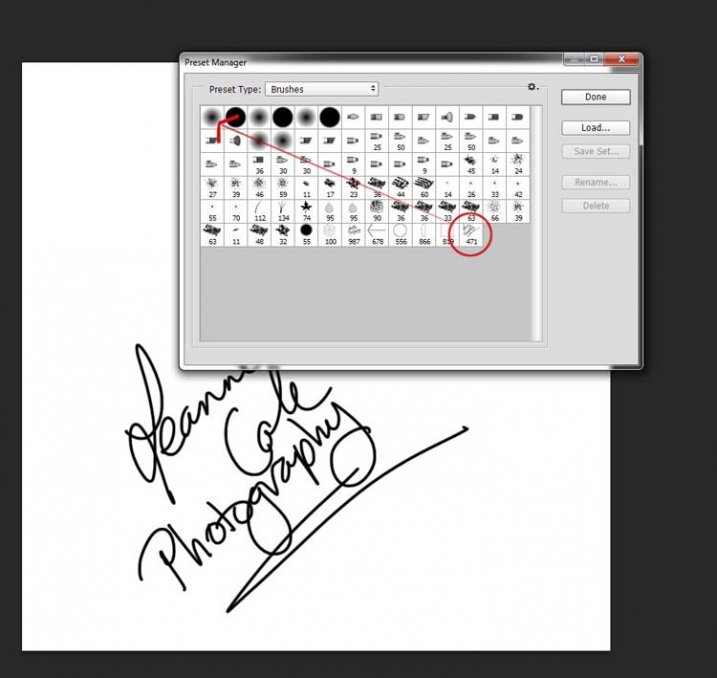
    watermarking-19

    You are now ready to use your new watermark brush any time you want.

    As I said, you can change the size of it using the square bracket keys [ ] on your keyboard. You can change its colour by clicking on the foreground colour in the tool panel and selecting a new one. You can also add layer effects like a drop shadow, emboss, etc., you can even make the text itself transparent and only leave behind the shadow.
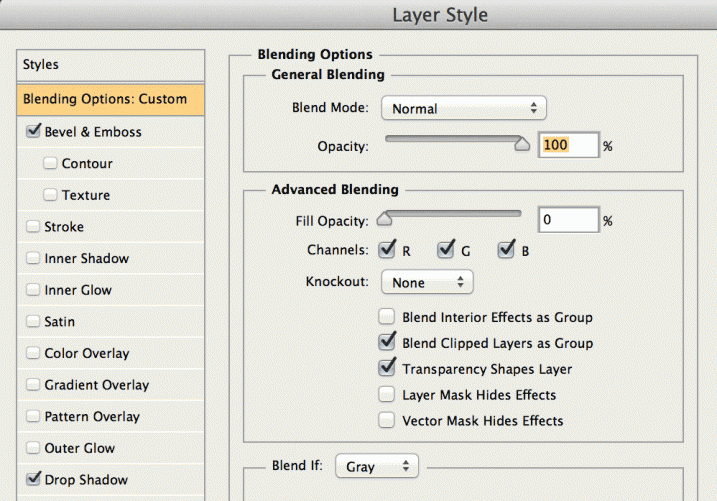
    layer-effects

    To make text “invisible” change the Fill Opacity Under Blending Options, in the Advanced Blending section to 0%.

    It will look something like this and will blend into any area:
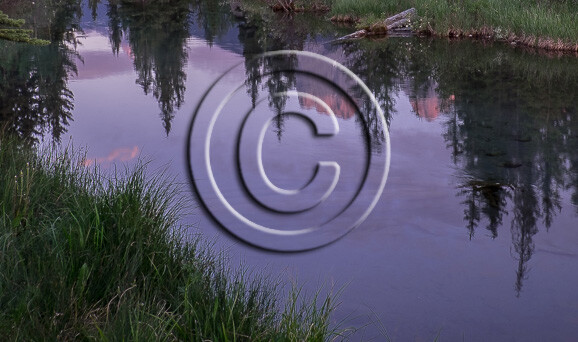
    layer-effects-transparent

    Here is one I played with:

    watermarking-17

    There are so many different ways to do a watermark and it is really up to you to work out which one will work best for you. Do you have any other tips for watermarks or methods  you use to make them? Please share in the comments below.

    googletag.cmd.push(function() {
    tablet_slots.push( googletag.defineSlot( “/1005424/_dPSv4_tab-all-article-bottom_(300×250)”, [300, 250], “pb-ad-78623” ).addService( googletag.pubads() ) ); } );

    googletag.cmd.push(function() {
    mobile_slots.push( googletag.defineSlot( “/1005424/_dPSv4_mob-all-article-bottom_(300×250)”, [300, 250], “pb-ad-78158” ).addService( googletag.pubads() ) ); } );

    The post How to Watermark Your Images Using Lightroom and Photoshop CC by Leanne Cole appeared first on Digital Photography School.


    Digital Photography School

  • Making the Mundane Magnificent: Finding Inspiration in Everyday Objects

    Chances are you have a tourist attraction in your town. Each day people crowd around and line up to take photographs of it. If you think of the most photographed tourist spots in the United States, you probably come up with the Statue of Liberty, San Francisco Golden Gate Bridge, or Grand Canyon.

    Thousands of pictures a year are taken at these destinations, however despite all of the mundane images some people can still produce incredibly unique and breathtaking photographs of these attractions.

    If you study the most impressive photos you will find consistent aspects that make the mundane magnificent. To fully appreciate the qualities of such fine art, you should consider working backwards, finding inspiration in everyday objects.

    A simple way to make better photos of ordinary objects

    Step one – pick something, anything

    Pick a simple object from around your house that you see everyday. It doesn’t have to be anything special, just something you use mindlessly each day. It could be anything from your car keys, to a spoon, or a pencil.

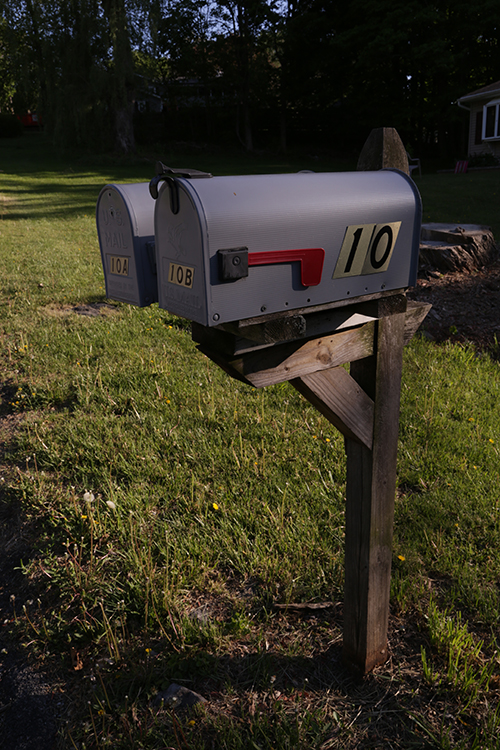
    PHOTO 1

    In this example we’ll try to make a picture of an ordinary mailbox unique and interesting. This first photo is an example of a mundane run-of-the-mill photograph of a mailbox (above). You should duplicate a similar photograph of your object. Use your camera or camera-phone, and without giving it much thought, just snap a picture of the scene.

    Step two – choose a unique camera angle

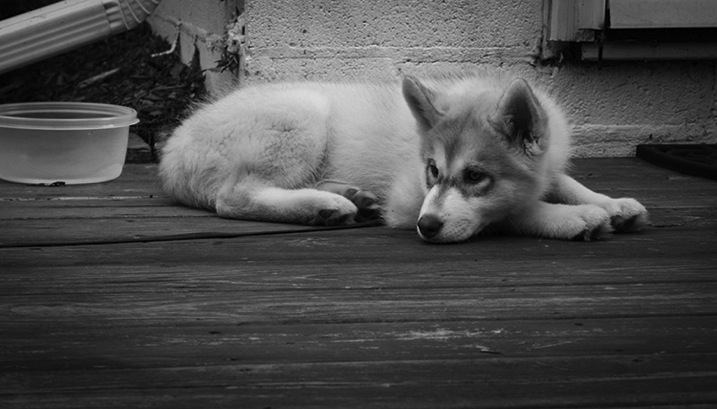
    There are a few variables involved in composing a unique image, but an important one we can explore is camera angle. Beginner and amateur photographers tend to take pictures at the angles in which we are used to naturally seeing things (eye level). One example is a photograph of a pet taken from a standing position looking down at the pet. This is the most common perspective of pet photographs, thus it also tends to be the least interesting or unique. While this is a often heard tip, it gets to the heart of why the angle of a photo is so important. Getting down at ground level provides a perspective that adults are not used to seeing of a pet.

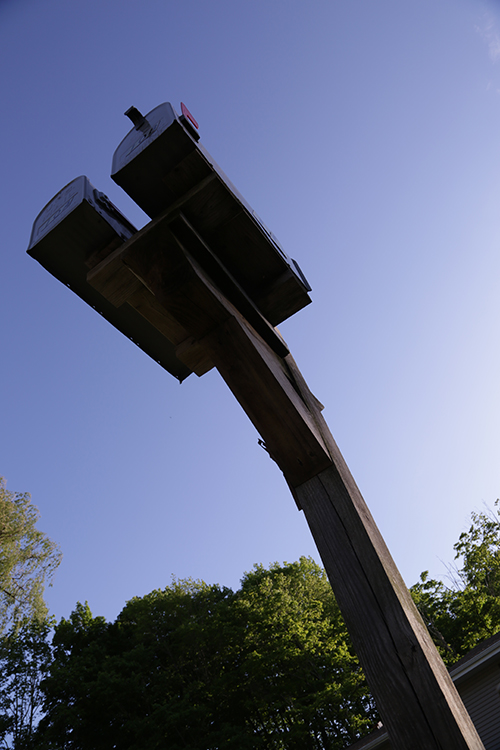
    PHOTO 2

    Start to think about atypical angles to which people are not generally accustomed. In the pet example, simply lying on the floor and taking a photograph from the perspective of the ground, creates a much more interesting perspective.

    In the mailbox example, this photograph (below) was taken from the ground, looking up. By shooting the mailbox at a wide angle, the post of the mailbox becomes slightly distorted and creates a powerful and aggressive look. The mailbox looks much farther away than it is in real life. Furthermore, who ever looks at their mailbox from the ground? It’s a perspective most people are not used to seeing so it creates a unique presentation.

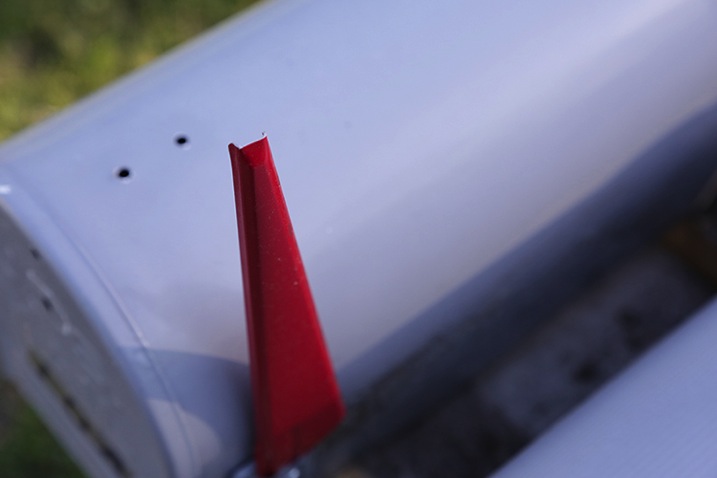
    PHOTO 3

    In this next image you are seeing the mailbox from the perspective of the flag. The subject becomes the flag, and creates a sensation that the flag has a meaningful and powerful purpose; there is mail that needs to be picked up!

    PHOTO 4

    That’s it!

    When taking pictures think about how you can present the photo in a unique fashion. Is there any interesting angle you can get? Can you lie on the ground and look up? Can you get far above and provide a birds-eye view? Look at the people around you, and try to do something different from what everyone else is doing. Often we might see photographers in these awkward positions and think they look silly, but the result is usually a great photograph.

    Go beyond just shooting the easy way

    Chances are if the picture you are taking is convenient and easy, it won’t be original and breathtaking. Try to get to a place no one else is willing to get to, like climbing a wall, or laying on the ground, or holding the camera high up above your head. These unique angles, blended with the willingness to get into positions others aren’t willing do, typically provides photographic results that are above and beyond the norm.

    Even with the most mundane objects, taking some time to think about how you can take the photo differently, can result in a stunning perspective, or unique angle, that makes the ordinary extraordinary and the mundane interesting.

    googletag.cmd.push(function() {
    tablet_slots.push( googletag.defineSlot( “/1005424/_dPSv4_tab-all-article-bottom_(300×250)”, [300, 250], “pb-ad-78623” ).addService( googletag.pubads() ) ); } );

    googletag.cmd.push(function() {
    mobile_slots.push( googletag.defineSlot( “/1005424/_dPSv4_mob-all-article-bottom_(300×250)”, [300, 250], “pb-ad-78158” ).addService( googletag.pubads() ) ); } );

    The post Making the Mundane Magnificent: Finding Inspiration in Everyday Objects by Justin Varuzzo appeared first on Digital Photography School.


    Digital Photography School
  • Do You Really Need the Latest Greatest Gear?

    If you’re like me, you enjoy reading and learning about the latest photography gear as soon as it comes out. Looking each month at popular photo magazines and online sites, reading the reviews, product articles, and ads, it’s hard not to head to your local camera shop and start spending money! But, really needing that new gear can be a very different issue. Let’s take a look at what you may, or may not, truly need as tools to create your art.

    BobbyBaker Wave

    Caught up in Marketing, or do you have a true need?

    Yes, those big number megapixel camera bodies can be very sexy, and every month it seems that there are new, better than ever, lenses to consider. Besides photography, I also have a passion for sports cars. I have often chuckled at what a friend and I call the “horsepower wars”. Auto manufacturers stoke up the fires of desire for their cars with the ever raising horsepower number – resulting in more power than you would ever need, unless you’re a racecar driver! Camera companies, to an extent, have done likewise with megapixel marketing causing some to jump to buy because more must always be better, right? Or is it? That all depends. Ask yourself these questions:

    #1 Are you happy with the results that you’re getting with your current camera body or system – for what you shoot?

    If you can say yes, great! Keep shooting and growing, and you’ll know when it’s time to upgrade gear.

    #2 Have you explored all settings and capabilities and understand them with your current camera?

    I bet very few of us have fully explored all the capabilities of our current cameras.

    #3 Do you have a clear understanding of megapixels, their size and relationship to sensors, and what that means to print sizes?

    It’s best to understand this before you jump to a new body just because it has more megapixels (read this article on sensor size).

    #4 Are you able to shoot the right size files for the size prints you need with consistently high quality results?

    If you need to create bigger high-quality prints than you are capable of now, consider upgrading.

    BobbyBaker Winter Tree

    #5 Are you making money and growing happy customers with your current gear if you are a pro?

    Then why mess with a good thing? Keep shooting and booking those gigs. Stay aware of updates and new gear. and you’ll know when you need a change.

    #6 Are you comfortably ready to spend another several thousand dollars for the latest new gear?

    The latest and greatest usually comes with a significant price tag. You may also need new batteries, memory cards or a computer upgrade. So factor it all in.

    #7 Do you feel you need to upgrade to be taken seriously as a photographer?

    Do you feel intimidated that you don’t own a “pro” body, and think that you need to in order to be a serious photographer – even though you may not really need a metal, sealed, or full-frame body?

    This is the worst reason to buy more gear! Keep learning, growing, and be confident that your work comes from your eye and brain – not from how cool your new gear may be.

    #8 What will the latest camera body, lens, etc., give you that you aren’t able to produce today with current gear?

    If you can point to something that would definitely result in better quality work, then it is worth considering investing in better, or more gear.

    If you answered: “yes, the latest, greatest new gear would make a significant difference in my work or business” then it would seem to make sense to jump in and spend what is needed to achieve that. But, if you feel the need to buy some new gear in order to feel more accomplished, or to keep up with your buddies, or think buying a new camera would be the main determinant of good work versus less than good work – or if your current gear is doing the job just fine and there are many settings/capabilities yet to explore with it, you should probably reconsider spending the money right now.

    BobbyBaker Setting The Stage

    Knowing when you NEED new gear

    If you just love to buy all the latest gear as soon as possible, and can afford to do so, that’s very cool, fun, and good for you – but to me it’s always been about what you see, how you see it, and how you capture it – not the gear used. Currently I own a Nikon D800, D700, and I still have my D300 (I traded my D80 and other stuff towards the D300). I was a late adopter of the D800, buying it nearly a year after it was released. I admit that all the hype and the reviews of this 36.3 megapixel marvel very nearly tempted me to immediately run out and spend the $ 3000 right away on the latest and greatest camera. Instead I looked at my needs, and at that time all they were served very well with my D700 – which I still love.

    As my fine art photography business grew, I became in need of providing larger files to produce much larger prints than I had been doing. It was only then that I really considered the D800, and eventually bought it – because I needed that tool. With regard to my lenses, I slowly but surely worked my way to a couple of professional level lens that cost a bunch, but really made a huge difference in my work. Once again, it wasn’t about buying gear because it was new, or well-known and on magazine covers, but because I had grown to need it. I worked alongside other photographers who used the latest pro level bodies and lenses, but I stayed the course using my 12.3 megapixel D300 body and DX lenses until I grew to where I had a sincere need for better gear, and not before.

    BobbyBaker If Only

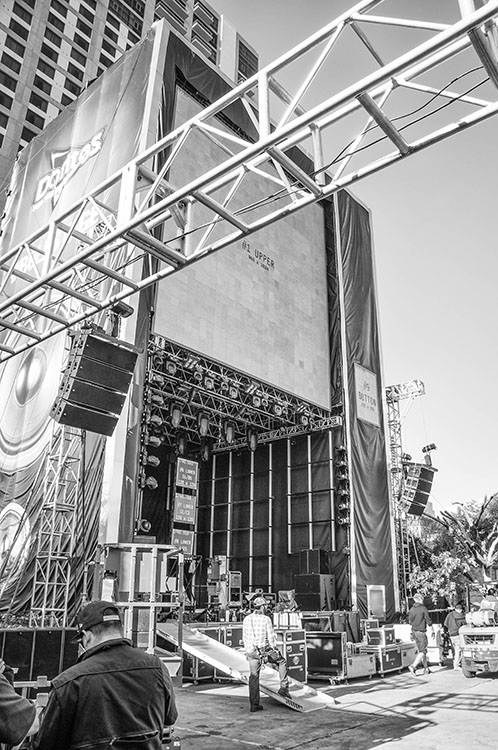
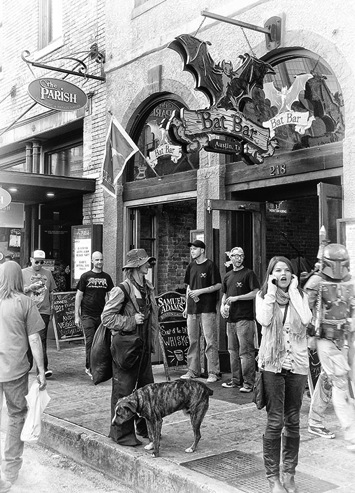
    A while back I visited Austin, Texas on non-photography business, and knowing that my visit coincided with the SXSW event, I wanted to be sure to take a camera along. I threw my trusty ol’ D300 in my suitcase with an 18-200mm DX lens. Yes, I took my oldest, non-full frame DX body and a lens that cost a third of my favorite FX lens to shoot SXSW. And you just know that everywhere I turned that week in Austin, I saw someone shooting with the latest greatest camera. That bothered me not one bit! You can see the results of this shoot on my website in SXSW Portfolio. The images were reviewed by Shutterbug Magazine which wrote of the collection, “it makes you want to be there, an interesting link to the musical nature of Bobby Baker’s remarkable photography.” I didn’t need the latest gear to successfully capture this opportunity, just a good, solid camera (one that happened to be discontinued for more than five years) the understanding of how to use it well, and a good eye.

    BobbyBaker Bat Bar BobbyBaker Upright on 6th

    I am not saying that you shouldn’t buy new gear when it hits the market; what I am saying is buy the gear that you need and can afford, and don’t get caught up in marketing numbers or worse, pressure because your buddy has a mega-megapixel camera and you feel you need one to keep up. It’s about what you see, and what you create when capturing it, not what you used to shoot it. I look at other photographers work all the time, not their gear.

    googletag.cmd.push(function() {
    tablet_slots.push( googletag.defineSlot( “/1005424/_dPSv4_tab-all-article-bottom_(300×250)”, [300, 250], “pb-ad-78623” ).addService( googletag.pubads() ) ); } );

    googletag.cmd.push(function() {
    mobile_slots.push( googletag.defineSlot( “/1005424/_dPSv4_mob-all-article-bottom_(300×250)”, [300, 250], “pb-ad-78158” ).addService( googletag.pubads() ) ); } );

    The post Do You Really Need the Latest Greatest Gear? by Bobby Baker appeared first on Digital Photography School.


    Digital Photography School
  • 4 Tips to Learn to Live Through Photography

    The magic of an instant

    What is photography anyway? It is a fraction of a second of eternity that you try to capture, with better or worse technique, with deeper or shallower depth of field. But, in short, that’s all about photography, and it is this magic what makes photography an art. The essence of why many of us like photography, goes beyond what we can capture with our DSLR and show to others. It is the experience of the moment, and how one learns through the years to be aware of the present. It was just a few months ago when I learned what mindfulness was about, and I immediately noticed the similitude with how I experience photography. It is all about being present in the moment that one is trying to capture.

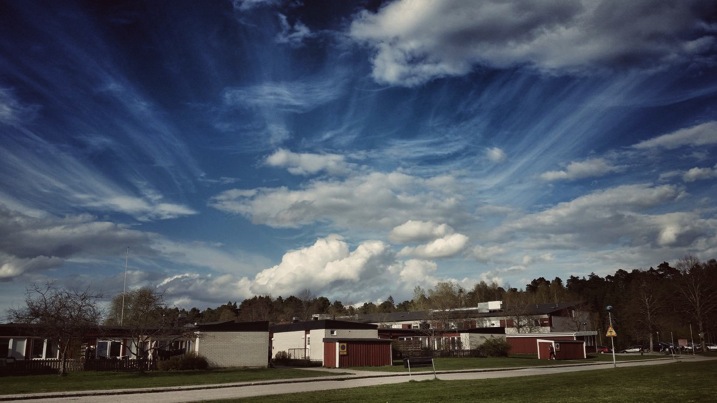
    The journey back home

    The journey back home – something so magnificent like ephemeral cloud formations could pass right away if you are immersed in past or future thoughts instead of being present.

    1) Be there

    To be present involves being aware of oneself in the present moment. The fact that one is observing and capturing a situation is not enough to take a great picture. I am a visual person. There is large chance that since you like photography, you are as well. That means that you learn better by watching a film than by reading a book. You then may prefer a figure or infographic, rather than its explanation. In my case, long before I got my first serious camera, and committed myself to learn the techniques and nuances to show other people the way I see the world, I already enjoyed looking at other people’s pictures. However, it was seldom that I actually observed the world around me.

    Photography teaches us that those amazing pictures we love viewing from other photographers, are actually out there if you dare to look. I don’t remember a particular moment when I realized I was alive. There was no such an experience. But I somehow learned through photography that the best camera obscura that I can count with is my eyes. The best film is my memory. And it is awesome because it also comes along with many other senses. Once you realize that, you discover that the difference between a snapshot and a great picture is that: for the latter you acknowledge all the angles of the scene, you walk your picture before you take it, you breathe it, you feel it, and then compose it. You ARE in the picture as the one capturing it. And you want somebody else to BE there with you seeing the same scene.

    2) Chase the moments

    Daddy when will it stop

    Daddy, when will it stop?: This is my daughter’s frustration for not being able to go outside on a long, boring summer Sunday. It wasn’t until I realized her feelings that I knew what to photograph.

    You have to be quick if you are for example, a street photographer, but that’s how life is in cities, right? However, there is not much difference than, let’s say, a fashion production in the sense that it is a fraction of a second, just a moment that you are able to transmit into a picture. We have to learn to chase the moments… to do so we have to BE in the scene.

    If you run out of battery, or you find yourself without your bulky DSLR with you, then simply capture it in your mind. I literally make the sound “click” in my mind. You don’t need to, that is my own mental issue. But whatever it is that you like to chase and capture, whether it is your cat, a pint of beer, or the garbage on a street – be there. Paraphrasing Henri Cartier-Bresson, most of the situations that you see around you will repeat if you wait long enough. Yes, even those pictures that you missed because you didn’t bring your camera with you. Be present to know what you are after. Learn about your subject, revisit the site and you will get the shot you want.

    3) Know what you feel

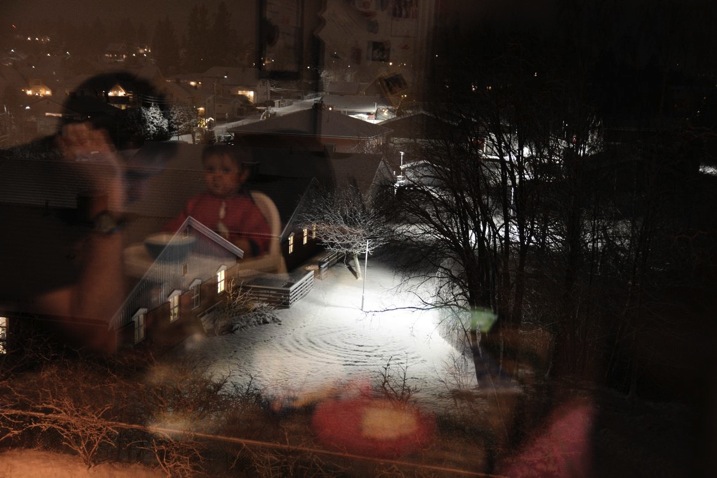
    Xmas eve in Oslo

    Christmas eve in Oslo – This time, it was my feeling of confinement on a cold Christmas eve that I tried to capture. Me and my friend (in the picture) are used to warm and sunny Christmas festivities. Not this time.

    If the scene you are watching makes you angry, then be angry and capture angriness. Be aware of the weight of the camera in your hands. Be aware of your finger pressing the shutter in the moment you do. Reflect about why did you choose to press it just then, and not before. Watch the object’s geometry, its beauty. Do you really want to be there? Does the marriage of that couple you are photographing make you happy? What is it that makes you happy? Their smiles? All the people celebrating together? You don’t need to do anything else with those feelings. Let them be in you, and let them go away. But just when you realize them, capture that moment in a picture. Capture with the camera the pictures you would like to share, but capture for yourself every fraction of a second of your life. BE there where you are.

    4) Use your other senses

    Smelly shoes

    Smelly shoes – When I see this picture I can’t stop feeling the heat coming from these shoes that have walked who knows how long under the sun.

    To some extent, you can also transmit with a picture, what your other senses were capturing. This is one of the biggest challenges of photography. Smell, listen, feel, taste. To me, the perfect picture is one that transmits all those other sensations, smells, noises, emotions, and temperature apart from what you are just watching. That takes a level of mastery that not everyone achieves. But if you are still there like me, on your long way to becoming a great photographer (even if we may never become a renown one), learning photography in its broader sense is an excellent way to learn to be present in that short lapse of time that our lives are meant to last.

    Rotten fly

    Rotten fly – What are your feelings about this dead fly?

    googletag.cmd.push(function() {
    tablet_slots.push( googletag.defineSlot( “/1005424/_dPSv4_tab-all-article-bottom_(300×250)”, [300, 250], “pb-ad-78623” ).addService( googletag.pubads() ) ); } );

    googletag.cmd.push(function() {
    mobile_slots.push( googletag.defineSlot( “/1005424/_dPSv4_mob-all-article-bottom_(300×250)”, [300, 250], “pb-ad-78158” ).addService( googletag.pubads() ) ); } );

    The post 4 Tips to Learn to Live Through Photography by Alejandro Ruete appeared first on Digital Photography School.


    Digital Photography School

  • 10 Reasons You Should be on Ello

    10 Reasons You Should be on Ello

    1. Because you are a leader not a follower. Because you pave the way. You are a trailblazer. You are like Lewis and Clark, like Henry Ford, like Jackie Robinson. Ride Sally Ride. You skate where the puck is going, not where it’s been. You do not stick around Europe for the Bubonic Plague. You hop on a boat and sail away. Far away. You’re like a pirate, or better yet, a pilgrim, albeit a very thirsty pilgrim who likes whiskey and is also much nicer to your American Indian friends.

    Who cares that your mother and your aunt and that guy from 2nd grade or the mailroom guy at work are not on Ello. You are, and when they finally get there you will be able to brag about being there first.

    2. Because ads suck. Are you tired of seeing those creepy ads that follow you around the internet? Yeah, you know the ones. You weren’t even going to buy the bikini you were just checking out the site for “artistic inspiration” and the next thing you know there it sticks for six months on your Facebook page, popping up each time you visit unless you uninstall and reinstall your browser. I don’t want to buy a BMW. I don’t want to go to Arby’s. I don’t want 40% off at Banana Republic. I don’t want to accidently click on a photo only to discover it’s a “sponsored post” from Dos Equis. Ads suck. Not only does Ello not have ads today, as a public benefit corporation they never will.

    Earlier this week what were top Facebook and Twitter execs pushing at Cannes Lions? Yep, you guessed it, how to advertise at you even more.

    Oh and that includes Instagram too. Things are about to get much, much worse there.

    What was Paul Budnitz, co-founder of Ello talking about during Cannes Lions? How to be a good husband and father.

    3. Because your life is not an algorithm. Are you tired of Facebook burying your posts and hiding them from your friends? You shouldn’t have to pay to sponsor your own posts to your own friends. Tired of missing important updates from the people that you care about or having to navigate complex settings just to try to see what you want to see?

    You are not a machine or a robot so why should your social network treat you like one — even though robots are super cool and you might like them, or movies or dreams about them, it doesn’t mean you are one.

    Take back control over Facebook’s secret algorithm and maintain your friends in two simple buckets, friends/noise. Oh and don’t be too noisy. :)

    4. Because everyone is a photographer and our photos deserve to be seen large. Bottom line, photos look better, bigger. Photos look better when they are the size that you upload them as, not compressed and miniturized and mixed in with a bunch of ads and game invites and dumb memes and other clutter.

    Your photos matter. Your art matters. Everyone is an artist and everyone should care about their art. You tell me, which site shows your photos better?

    5. Because variety is the spice of life. Tired of seeing the same posts by the same people over and over and over again on the Facebook algorithm? Why not make some new friends? Some of the most creative people in the universe are publishing some truly epic art on Ello right now, while you are reading this post.

    Tired of Facebook just recycling content from the same 15 people over and over again in your feed? Come to Ello and discover something fresh, something new, something inspiring. Do you like to travel? Check out Ello Travel. Do you like photography? Check out Ello Photography. Do you like food? Check out Ello cooking. Truly fine community curated content.

    Integrate yourself in some new verticals and open up your world a little bit.

    6. Because life should not have to be SFW. Humans are amazing creatures and the human body is a beautiful thing. Breastfeeding is natural. There’s nothing wrong with boobs. Ello will never censor or remove fine art celebrating the human body. In fact, Ello itself curates a super interesting feed of NSFW content.

    Facebook and Google won’t let you host or view the naked human body. Don’t worry though, if you are one of the more modest types there is a very easy setting on Ello to filter out any NSFW content from your Ello experience. The difference is that on Ello *you* choose what you want to see or not see.

    7. Because Ello is a super positive community. Tired of seeing hate and abuse on Twitter? Tired of seeing pointless arguments about politics and name calling on Facebook? Ello is one of the friendliest places on the web right now. The community is empowered. You are not a cog in a machine or fuel for the advertising furnace, you are part of a bigger social movement where people are committed and care about making Ello a welcoming place for all.

    People on Ello take this responsibility seriously and you will find some beautiful, generous people who want to build you up not tear you down. Abuse and hate has been non-existent on Ello. As Ello gets larger, undoubtedly some of this may creep in, but Ello has a strong blocking tool and a serious commitment to fighting internet harassment and abuse.

    8. Because the people who run Ello day in and day out care. One of the things you will find at Ello is that the folks running the show are not just nameless, faceless individuals. The people behind Ello are some of the most passionate, committed, thoughtful people dedicated to personal expression and social empowerment on the web.

    Who are the people behind Ello? They are publicly listed and I’d encourage you to check them out and learn a little bit more about who is running the most exciting and growing community on the web right now. The people who run Ello are accessible and care about what you think about your community. They themselves are as big a part of the community as any of us and contribute beautiful art and work every single day.

    9. Because the iOS app is awesome! Have you tried the new Ello iPhone app? It rocks (don’t worry Android users, an Android app is in the works too). The new Ello iOS app is elegant and beautiful, just like the web version. More on the Ello iOS app here.

    10. Because the web is a new virtual museum and Ello has the best art. You will find some of the best art being produced today on Ello. Not only will you find artists and photographers posting their own work, but you will find thoughtful curators also sharing and properly crediting amazing art all over the world.

    You can find me on Ello here. Stop by and say hi and lets be friends. :)


    Thomas Hawk Digital Connection

  • How to Shoot and Process a Time Lapse Movie – Quick Method

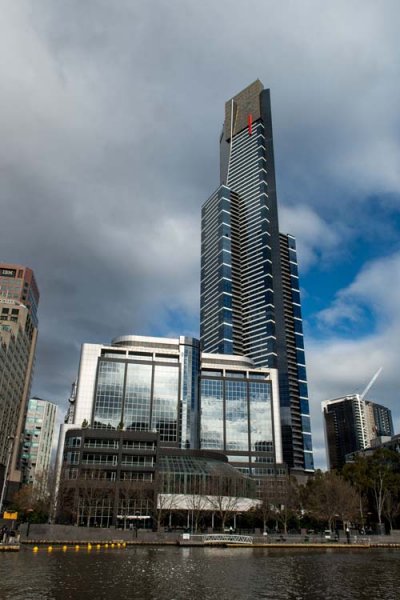
    The other day I was in the city and I was watching the clouds because they were moving so fast. It was a sign that bad weather was on the way, but I also knew the clouds would be a good opportunity to try some time lapse photography.

    Eureka Tower image for time lapse

    There are many ways of taking a series of images to use for time lapse photography. My camera was setup on a tripod and set to take a photo every five seconds over 10 minutes. In total 120 images were taken, however that number is up to you. The other day I took 300 images to use for one.

    You can do this in various ways and it is best to check your camera manual to see if you can take photos at intervals. If you can’t then you may have to use something like an intervalometer or just manually take a photo every five seconds or whatever interval you choose.

    When I got home I did some research and found a fairly easy way of putting the images together to get a quick time lapse. Follow along a I show you how you can do this as well.

    Lightroom

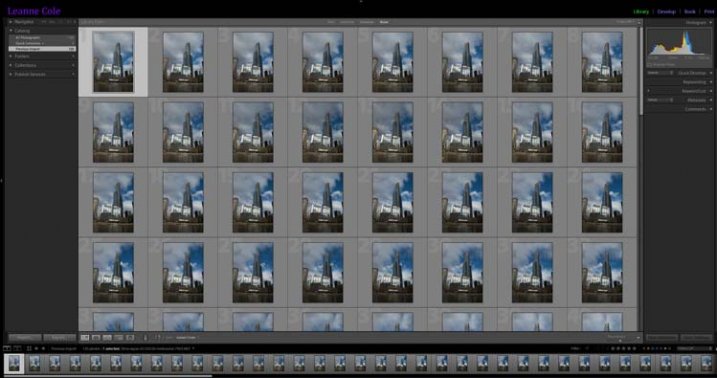
    The 120 images were imported into Lightroom. If you are unsure of how to Import photos then look at this article: Quick Tip: Importing to Lightroom Made Easier.

    The images for the time lapse in Lightroom

    The images for the time lapse in Lightroom

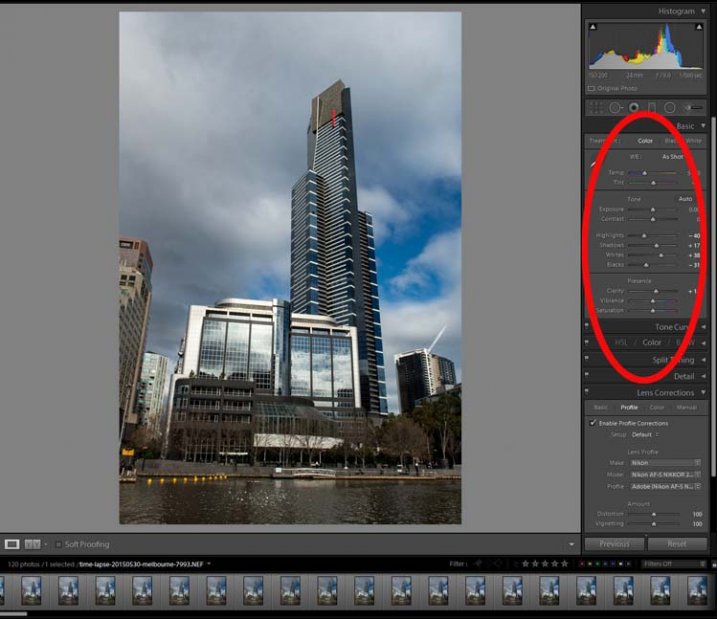
    Choose the first image and you do some basic processing to it in the develop module. I straightened, then cropped, a bit of a building out of the side of it, brought out the shadows and highlights.

    Processing done to the image.

    Processing done to the first image.

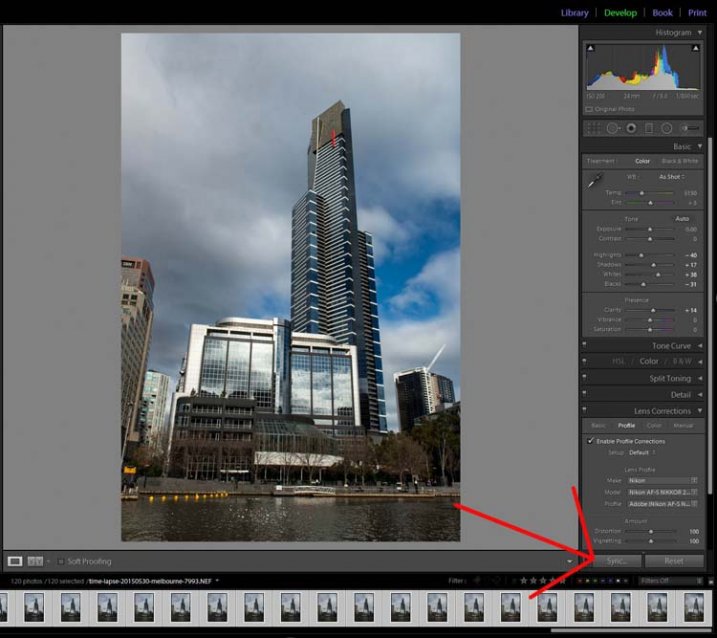
    Select all images for the time lapse and click Sync, in the bottom right of the Develop module.

    The Sync Button

    The Sync Button

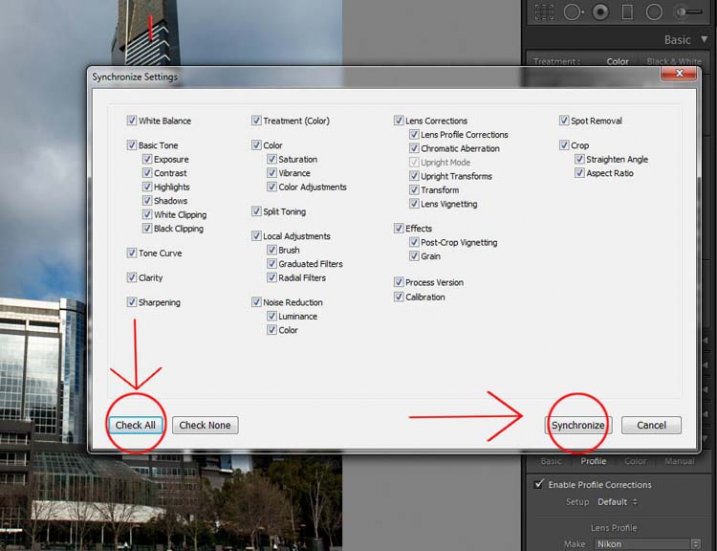
    When the window to Synchronize Settings comes up, tick the box at the bottom to Check All. You want all the changes that you made to the first image to be applied to all of them. They are basically all the same image except for the changes that you want to use for the time lapse.

    Press Synchronize in the bottom right of the window. You will see that all the images change and are now ready to be exported.

    Synchronizing the images.

    Synchronizing the images.

    Exporting the Sequence

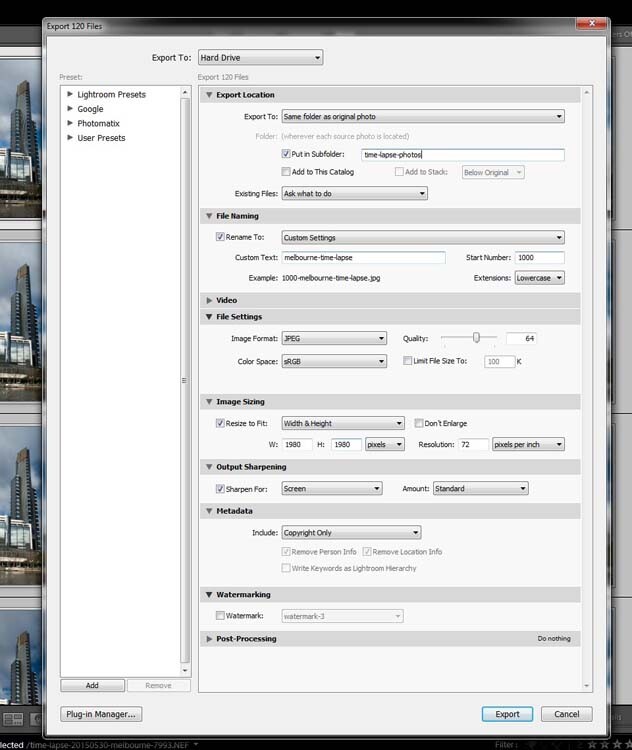
    There are a few things to consider when you export them, one is the way you rename them. If the number or sequence isn’t at the front of the file name then there may be software problems to put them in the right sequence. It doesn’t make a difference with Photoshop CC.

    The images should be changed to jpeg. It is only for the internet so you can use a low resolution, 72 dpi is okay. The size of the image was changed to 1980 pixels for the longest side, which is a good size for videos and for HD.

    In the following image you can see which export settings I used for the Time Lapse sequence images.

    Exporting the images.

    Exporting the images.

    Press Export. Then, to put the images together to make the time lapse you will need to move into Photoshop.

    Photoshop CC

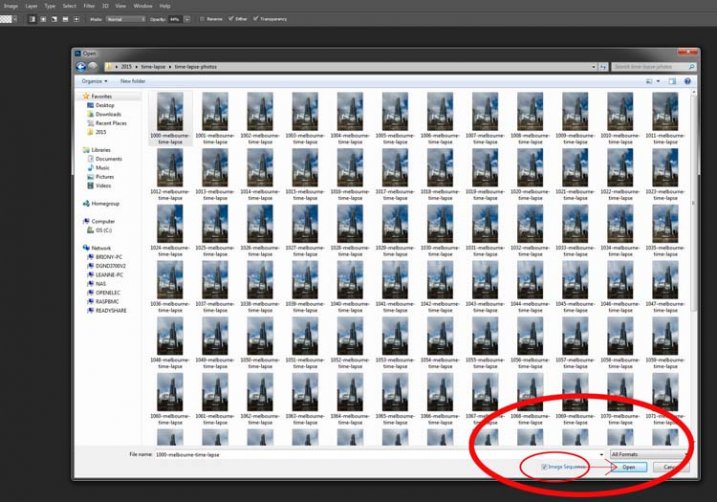
    In Photoshop you need to go to File and Open. (File > Open) Go to the folder with the exported images and select the first one in the sequence. In the same window, before you press Open, make sure you check the box that says Image Sequence which is down near the bottom.

    Getting the images ready for the time lapse.

    Getting the images ready for the time lapse.

    Once you have checked it, select Open.

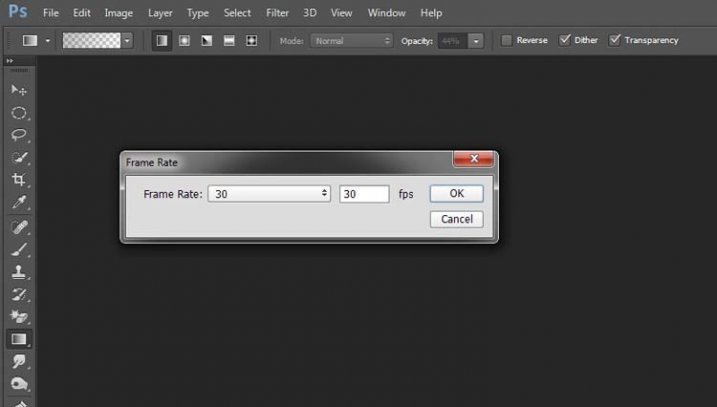
    Before Photoshop opens them a new window will come up asking you how many frames per second you want to use.

    Setting the frame rate.

    Setting the frame rate.

    At this stage you can just click OK; you will have a chance to change it later on if you want to make it slower or faster.

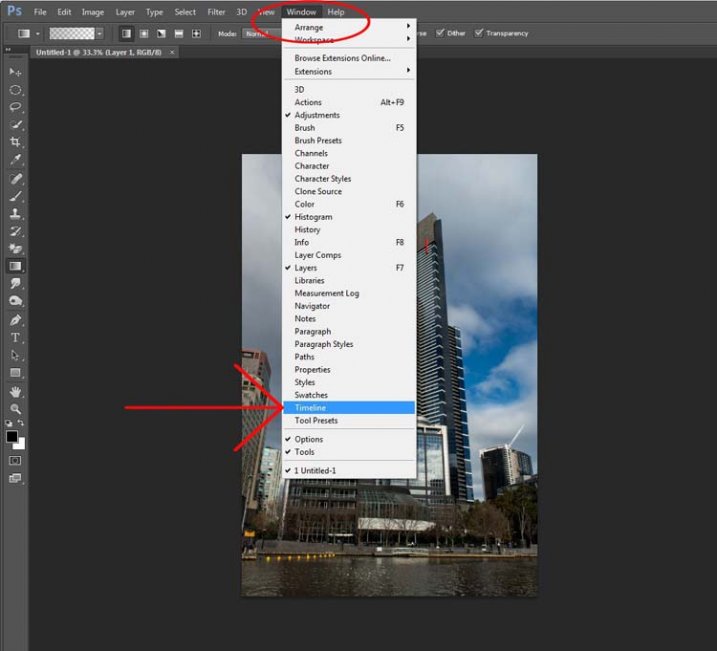
    To make it a time lapse you need to open another window in the Photoshop main window. Go up to Window in the main menu at the top, and then down to Timeline and select it. (Window > Timeline)

    Opening the Timeline.

    Opening the Timeline.

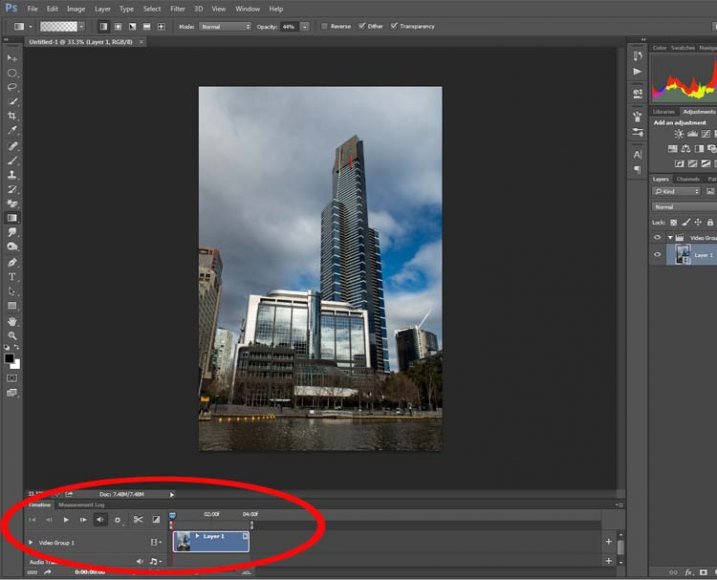
    You will see a new window appear down the bottom. Look at the following image:

    Looking at the Timeline.

    Looking at the Timeline.

    If you press the play button you will see your time lapse run.

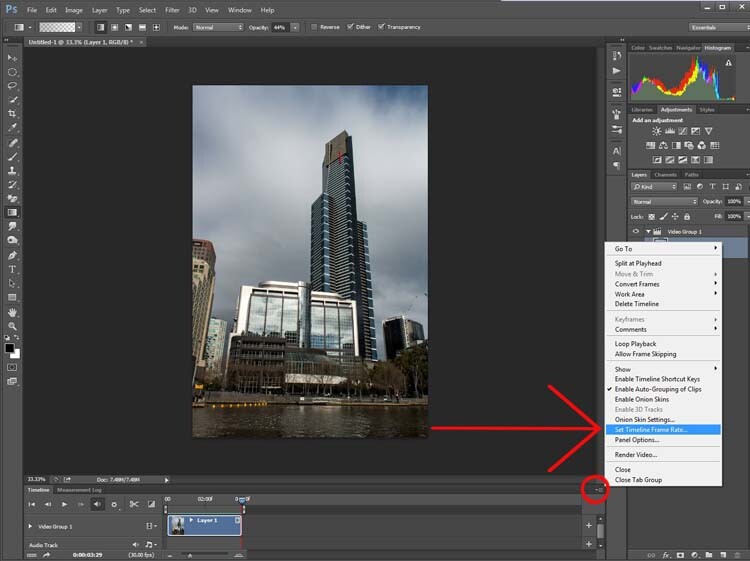
    If you want to change the Frame Rate this is the time to do it. In the Timeline Window, up in the top right corner, you should be able to see a down arrow with lines next to it, click on that and a drop-down menu will appear. Go down and select Select Timeline Frame Rate…

    Changing the frame rate.

    Changing the frame rate.

    You can change this as many times as you like. Keep doing it until you get a frame rate you like. Once you are happy with how long it runs for, you can render the video.

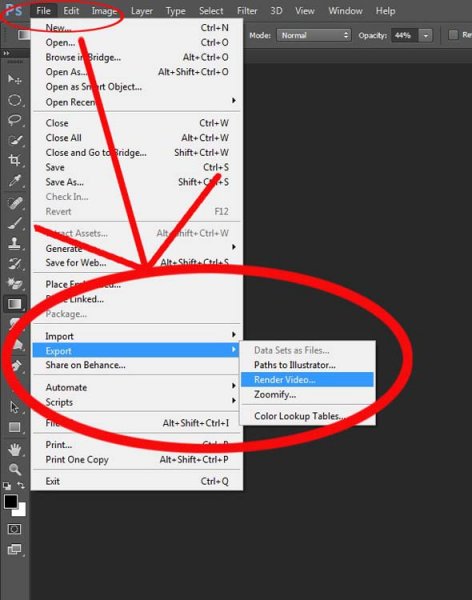
    Go up to File, then select Export. In the drop down menu choose Render Video. (File > Export > Render Video)

    Exporting the video.

    Exporting the video.

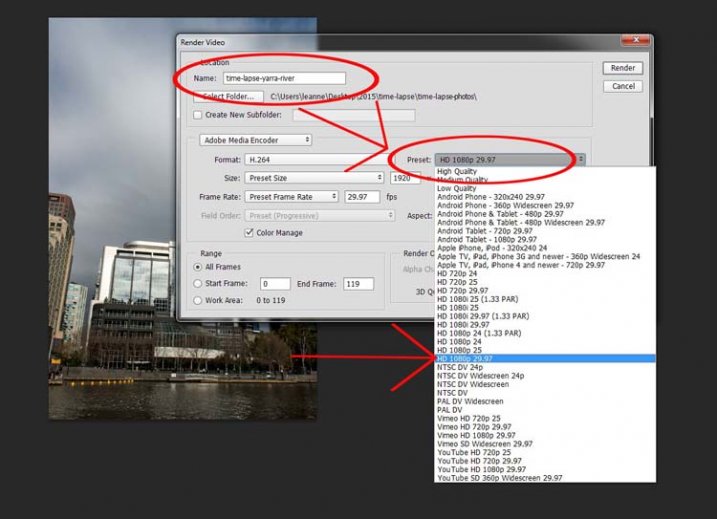
    After initializing, the Render Video window will come up. In this Window you can name your video and decide in what format you want it saved.

    Working out the video type.

    Working out the video type.

    Set it on one of the HD settings and you will get an MP4 video. It gives you quite a good video.

    If you decide you really like doing them there are lots of other methods, this is just a quick way to do time lapse movies using Lightroom and Photoshop CC.

    googletag.cmd.push(function() {
    tablet_slots.push( googletag.defineSlot( “/1005424/_dPSv4_tab-all-article-bottom_(300×250)”, [300, 250], “pb-ad-78623” ).addService( googletag.pubads() ) ); } );

    googletag.cmd.push(function() {
    mobile_slots.push( googletag.defineSlot( “/1005424/_dPSv4_mob-all-article-bottom_(300×250)”, [300, 250], “pb-ad-78158” ).addService( googletag.pubads() ) ); } );

    The post How to Shoot and Process a Time Lapse Movie – Quick Method by Leanne Cole appeared first on Digital Photography School.


    Digital Photography School