Category: Photography

  • How to Do a One Light Portrait Setup and Use it as Your Back-up Plan

    one-light-beauty-setup-3320

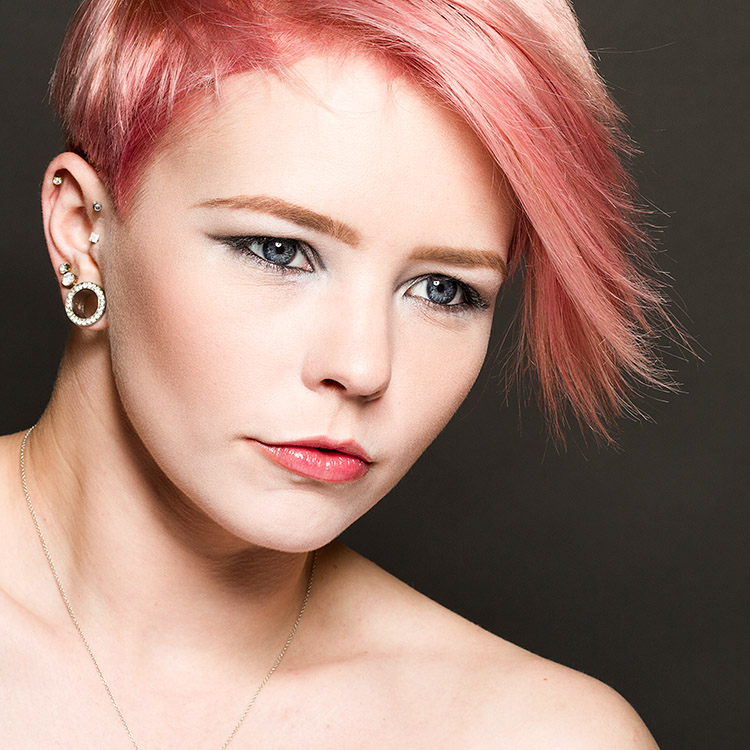
    When photographing people, every session is different and every subject is different. This leads to a lot of scope when it comes to lighting choices and experimentation. This variety is fantastic, and it’s a large part of why portraiture is such a rewarding pursuit.

    Unfortunately, with too much experimentation, it is all too possible to end a session with a collection of sub-standard images. Yes, this exactly how to grow and develop as a photographer, but where does that leave your subject? Often enough, this situation means that you’ve gotten what you need from the session, chiefly experience, but the subject is left with less than stellar photos for their time. This isn’t much of a problem if you’ve wrangled your kids to sit for you, or if you have paid someone else to pose for you. If you’ve been paid for this portrait session, however, this becomes problematic and can be devastating to your future efforts.

    A good way to alleviate this is to always include a technique that you’ve practiced thoroughly. Doing this may not ignite your creative spark, but once it’s done, you can experiment until your heart’s content, while safe in the knowledge that you will still have something usable at the end of the day.
    one-light-beauty-setup-3251

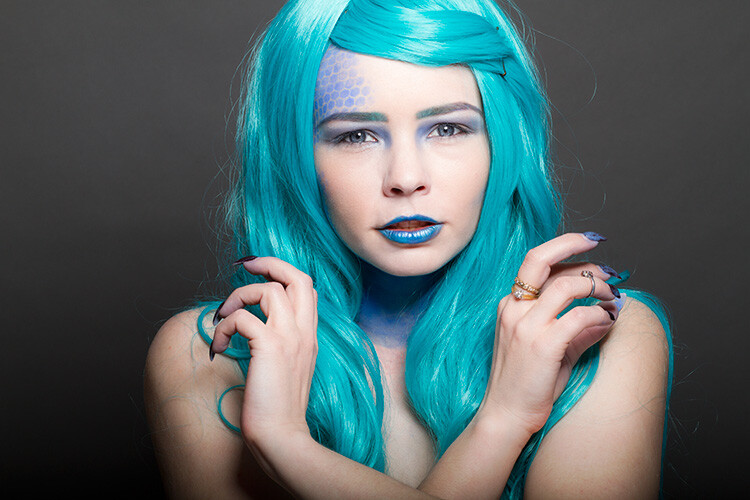
    This article will give you a simple, yet solid, one light technique that works with strobes, flashguns (speedlights) and even window light. It will work with just about any modifier and suits men, women, children, and other subjects just fine.

    Equipment

    Here’s a list of what you need:

    • A light source: Either flash or window light will work. In terms of modifiers, beauty dishes and softboxes are a great starting point.
    • A white reflector: Don’t have a dedicated reflector? A sheet of white poster board or foam core is a perfect and cheap substitute.

    Set up

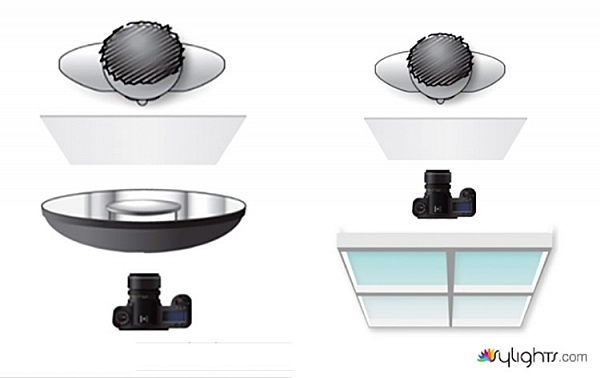
    First, have your subject stand or sit where you need them. If possible, keep them at least five feet from the background. Place your light source directly in front of them, between two and four feet away (60-120cm). Angle the light source (if using flash) so it’s pointing directly at your subject. Watch the shadows falling under their nose and mouth. For this technique, you’re looking to minimize the contrast on your subject’s skin. If the shadows are too long, lower your light source until they are minimized (also make sure you can see the light in their eyes as a catch-light).

    Place your reflector directly against your subject, and parallel to the ground at waist level. For ease, you can place it on a stool or a card table. If your subject is sitting, just have them hold it across their knees.
    one-light-beauty-setup-diagram

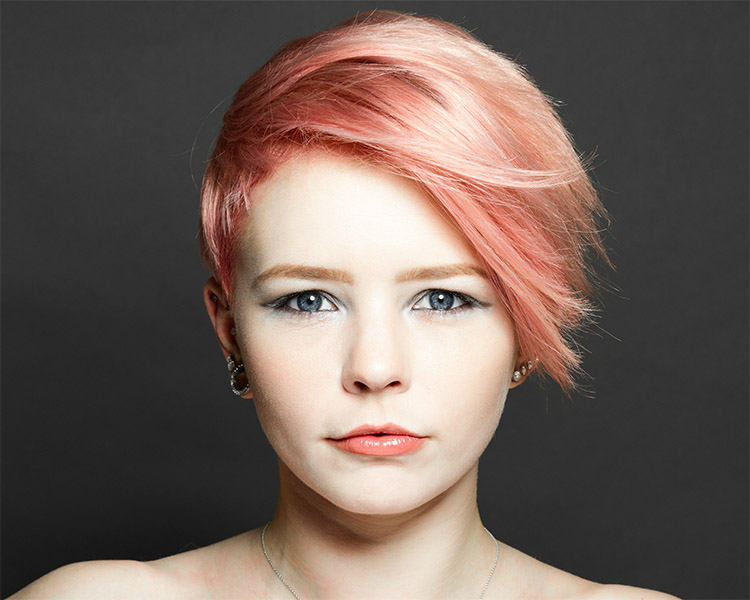
    Because the light source will be so close to your subject, you will need to shoot from directly underneath it. Calculate or meter your exposure and take a test shot. If all is well, you should have a good, clean portrait with soft light.
    one-light-beauty-setup-3205

    Backgrounds

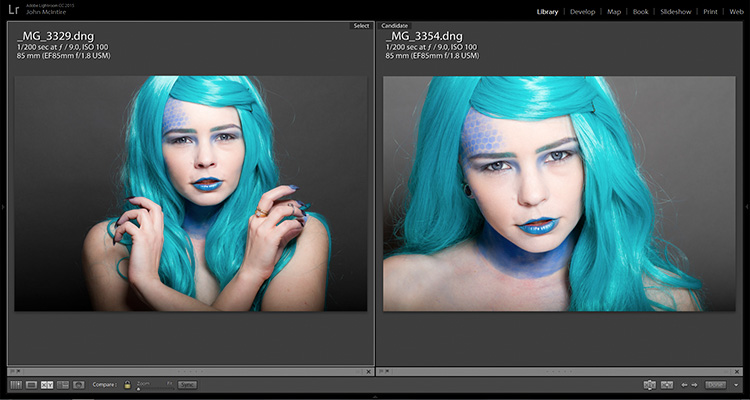
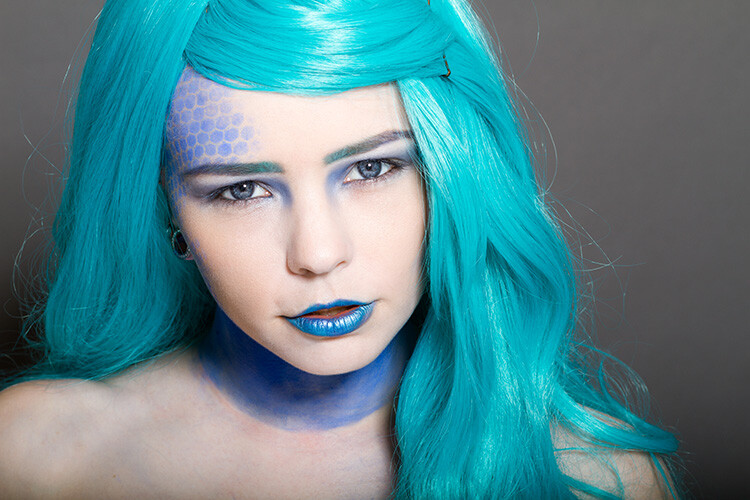
    You can change the way your background appears in the image by moving your light source if you’re using flash, or by moving your subject if you’re using window light.

    With flash, to get a darker background, you simply move your light source closer to your subject. To get a lighter background, move your light source away from your subject. Moving your light source will require you to change your exposure. You can do this with your aperture settings or on the flashes themselves (turn the power up or down accordingly); it’s your choice.

    With window light, you’re forced to move your subject instead. For a darker background move your subject closer to the window. For a lighter background, move them farther away. As with flash, this will also result in changes to your exposure. This time you can choose between shutter speed and aperture.
    one-light-beauty-setup-3354-2

    Farther from the window

    one-light-beauty-setup-3329

    Closer to the window

    one-light-beauty-setup-comp

    You should also be aware that the softness of the light is changed when you adjust the distance between your subject and the light source. If the distance between your light source and your subject decreases, the light will be softer. If that distance increases, the light will be harder.

    Tip: If there are shadows falling on the background in your frame, your subject is too close to the background. Try moving your whole setup away from the background a few feet.

    Angle of light

    You can place your light as high as you want and still get good results; however, for really soft, bright skin you will want to minimize the contrast in blemishes and skin texture. To do this, make sure your light is only slightly higher than your subject, and pointing directly at them. As above, watch for the shadows under the mouth and nose. If they’re long and pronounced, try lowering your light until they disappear.

    Window light

    If you’re using window light for this technique, the biggest thing to watch out for is you. Because you are lighting your subject from the front, it is all too easy to find yourself blocking your light source. With extremely large windows, this isn’t much of a problem, but with a window in an average home, it can be a pain. One way to sort this is to have your subject sit. That way you can sit, squat or kneel and avoid blocking any light.

    In the end
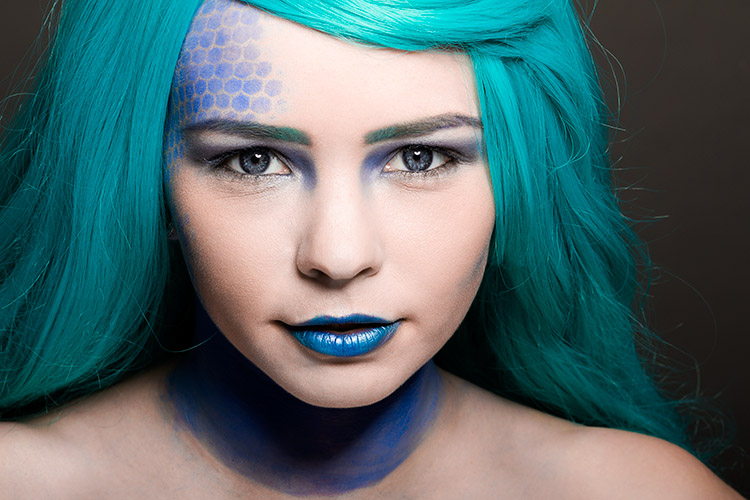
    one-light-beauty-setup-3318

    This technique may seem simplistic in writing, but it is effective and it yields good results. It also takes only a few attempts to nail down. By adding this technique to your toolkit, you’ll be giving yourself something solid to fall back on, should things not go to plan in other ways.

    If you decide to give it a go, please feel free to share your results or ask any questions you may have.

    People photography week

    This week on dPS we’re featuring articles all about different kinds of people photography including portrait, event and travel photography. See all the previous ones below, and watch for more people photography articles over the next few days.

    • How to Take Low Key Head-shots

    googletag.cmd.push(function() {
    tablet_slots.push( googletag.defineSlot( “/1005424/_dPSv4_tab-all-article-bottom_(300×250)”, [300, 250], “pb-ad-78623” ).addService( googletag.pubads() ) ); } );

    googletag.cmd.push(function() {
    mobile_slots.push( googletag.defineSlot( “/1005424/_dPSv4_mob-all-article-bottom_(300×250)”, [300, 250], “pb-ad-78158” ).addService( googletag.pubads() ) ); } );

    The post How to Do a One Light Portrait Setup and Use it as Your Back-up Plan by John McIntire appeared first on Digital Photography School.
    Digital Photography School

  • How to Take Low-Key Head Shots

    When talking about head shots, there are so many different types of lighting and styles, that there almost seem to be no hard and fast rules on how to take good ones. There are the basic lighting patterns for portraits that are applicable to head shots. The most commonly used lighting for head-shots is often the clean, classic corporate look; generally speaking a bright background and even lighting. The type of head shot also depends on what it’s for, or if there are prescribed guidelines which must be adhered to.

    moody-headshots-tutorial_0012

    Typical head shots: two light basic setup

    This article will show you how you can take more low-key head shots. By tweaking a few things in your setup and settings, starting from the commonly used lighting setup, you can achieve darker lighting and a moody look, while still looking very professional.

    moody-headshots-tutorial-photography

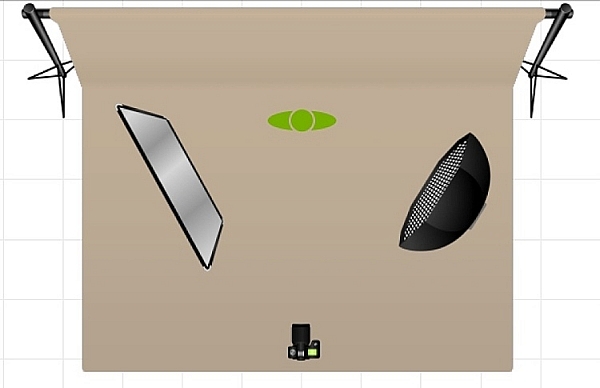
    The setup for this one is a light beige background, with a strobe attached on a gridded octabox as the main light, positioned 45 degrees to the subject. Opposite the the main light is a speedlight with a snoot, set up on a stand. The speedlight reduces any shadows on the background which may be cast by the main light, and also provides a hair light and a little backlight. A typical camera setting would be ISO 100, between f/2.8 – f/5.6 and a shutter speed of 1/125 – 1/200 (make sure you don’t go faster that your camera’s sync speed). Of course you adjust the power of the strobe, but the typical look is plenty of light, and pretty brightly illuminated faces (not much or deep shadows).

    moody-headshots-tutorial-photography

    Normal head-shots have the face more brightly and fully lit, with less shadows. If you want a more dramatic low-key head-shot you can play around with using more shadows and contrast on the face and a darker background. Try split lighting or Rembrandt style which both have more shadow.

    By stopping down to f/10, which is what I did on the photos above, still using exactly the same setup, you can cut out a huge amount of the main light, the background will be darker (less light will get to it), and there will be more shadows on the faces. You will have a more low-key look and feel to the image too, softer but with some light and shadow. However, this is still not low-key enough!

    moody-headshots-tutorial-photography

    Low-key head shots: one light

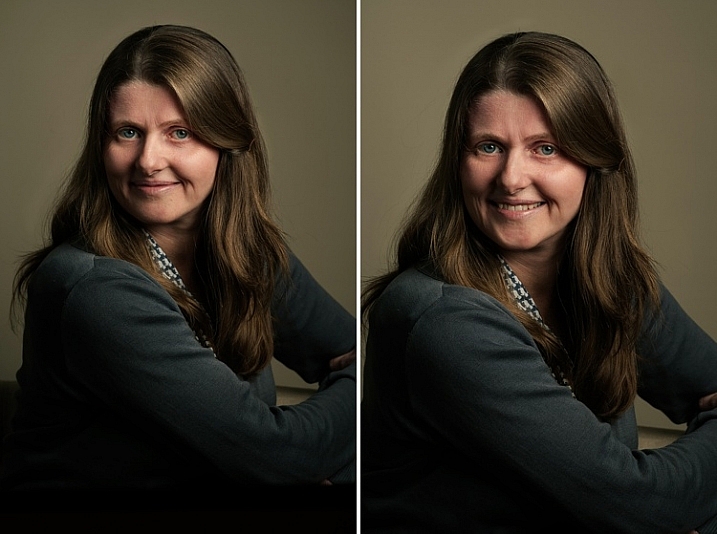
    Tweak the lighting setup further by removing the hair light, replacing it with a silver reflector (on the face), and stopping down to f/11 you will be cutting out more light. Now there is only one light, and any light that hits the reflector will bounce light back on the subject’s face. Remember, that the main light is gridded so there is not much spill at all. The background is so much darker, the catchlights are still visible on the eyes, but there are no more hotspots on the face. There is a lot more shadow on the unlit side, and no hair light. The result is almost painterly, as you can see below.

    moody-headshots-tutorial-photography

    More shadows in this Rembrandt lighting pattern produce a more low-key result.

    Low-key head shots: natural light and speedlight

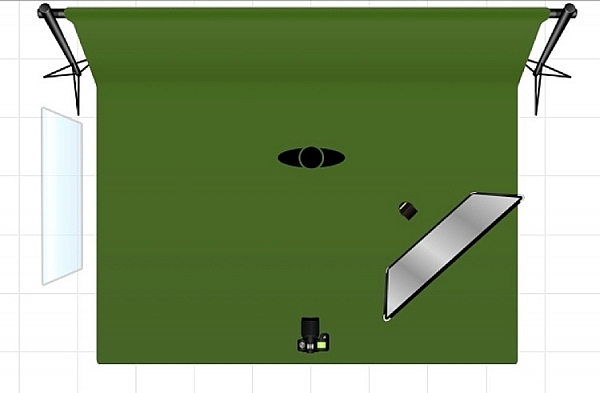
    I wanted to see if I could achieve this painterly look for head-shots by removing the strobe as the main light, and replacing it with a window light. The setup below shows the window light on camera left, and a speedlight, bounced into a silver reflector, as a secondary light on camera right. I also changed the background to dark green.

    moody-headshots-tutorial-photography

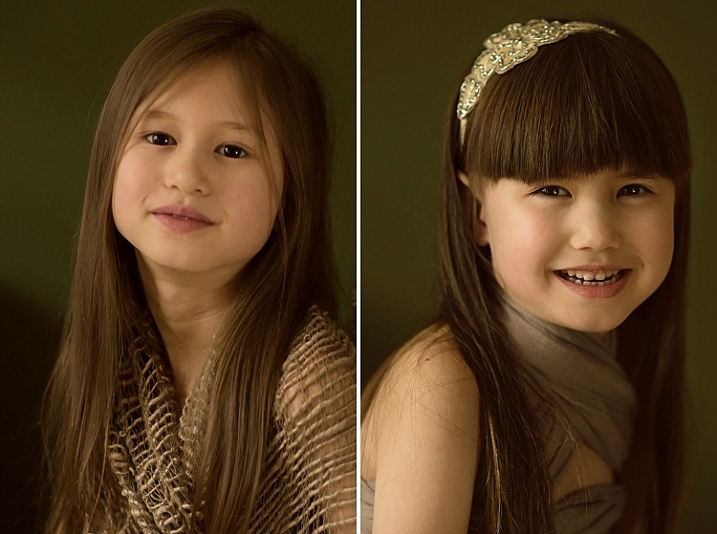
    The results below show two catchlights on the eyes from the window and reflector; the lighting is flatter (less contrast or ratio) but the mood is soft and painterly. If you want deeper shadows use a white reflector instead of silver, or take it away entirely.

    The portrait at the top of this article was taken using this setup. The lesson here is that by making small tweaks to your lighting setup you are able to achieve different looks for your images. Don’t be afraid to experiment.

    moody-headshots-tutorial-photography

    Here are a few examples of really moody low-key head shots I found on Flickr to give you some ideas to make your own:

    Scott Butner

    By Scott Butner

    Al Ibrahim

    By Al Ibrahim

    Stephen Poff

    By Stephen Poff

    Stefano Corso

    By Stefano Corso

    Jason Tan

    By Jason Tan

    Do you have any tips in getting moody low-key head shots and portraits? Please share them here.

    People photography week

    This week on dPS we’re featuring articles all about different kinds of people photography including portrait, event and travel photography. This is the first of the bunch, watch for more people photography articles over the next few days.

    googletag.cmd.push(function() {
    tablet_slots.push( googletag.defineSlot( “/1005424/_dPSv4_tab-all-article-bottom_(300×250)”, [300, 250], “pb-ad-78623” ).addService( googletag.pubads() ) ); } );

    googletag.cmd.push(function() {
    mobile_slots.push( googletag.defineSlot( “/1005424/_dPSv4_mob-all-article-bottom_(300×250)”, [300, 250], “pb-ad-78158” ).addService( googletag.pubads() ) ); } );

    The post How to Take Low-Key Head Shots by Lily Sawyer appeared first on Digital Photography School.

    Digital Photography School

  • My Favourite Travel Lens – The Tamron 28-300mm

    Last year I was given an incredible opportunity to travel to the US for three and half weeks just to take photos. My trip was sponsored by an amazing woman, which spurred me to try and get other sponsors for my photography. When you are travelling you can’t take everything with you, so being able to get a lens that could handle a lot of the scenes that I wanted to shoot was very handy. To be able to go from a wide angle view, then zoom right in, was going to be a great lens for travelling, I hoped.

    LeanneCole-tamronlens-28-300mm

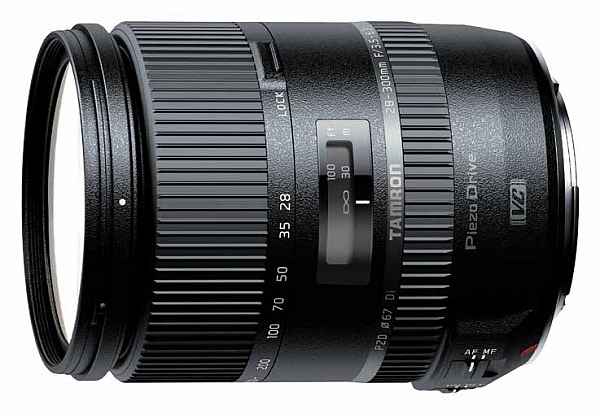
    Tamron 28-300mm Lens – image courtesy of Tamron for both Canon and Nikon mounts.

    I had read about the Tamron 28-300mm lens, and how it was a good for travelling. I decided to contact Tamron Australia to see if they would loan me the 28-300mm for my trip, and they did. It is a full frame lens and if you have a cropped sensor then you need to remember that you won’t be able to get 28mm (more like 42mm), and that it will be far longer than 300mm (similar to 450mm).

    LeanneCole-tamronlens-goldengatebridge-65mm

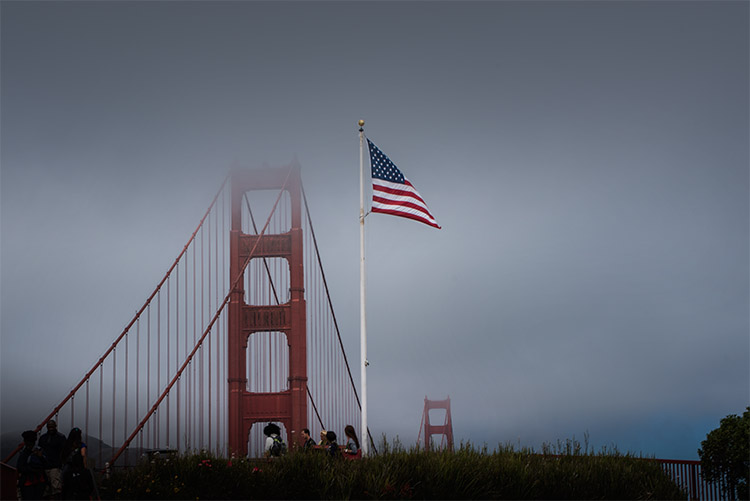
    Golden Gate Bridge with US Flag, taken through a car window. Focal length 65mm

    Physical Size

    The first thing I noticed when I opened the box was the size. For a lens with such a big zoom length, it’s quite small. It isn’t a heavy lens either. Straight away it seemed like the perfect lens to carry, that wouldn’t contribute to breaking my back.

    It fits nicely into any camera bag, due to its compact size. The bag I used on my trip was quite small, and it was easy to pack. The light weight meant I didn’t have to worry about making my bag heavier. Imagine how your back would feel if you had to carry a bunch of other lenses to cover that range!

    LeanneCole-tamronlens-bodieghosttown-122mm

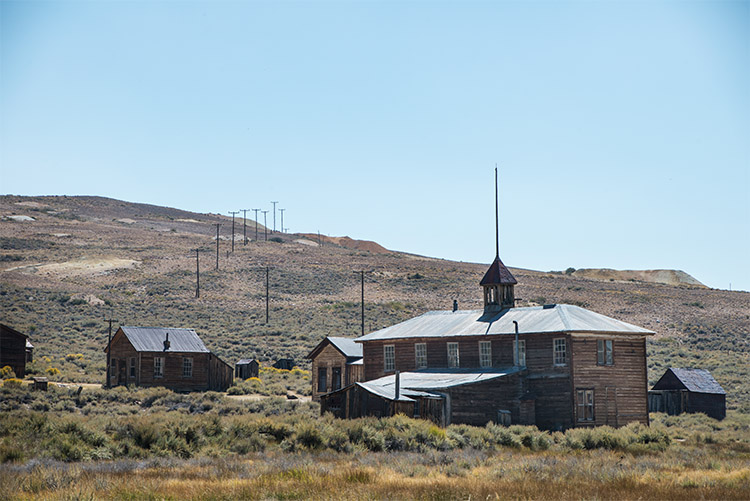
    Some of the old building at the ghost town in Bodie, CA, focal length 122mm.

    Versatility

    When travelling you can’t always get close to places to get the best angles, and having a lens that allows you to take photos when you are close, or far away, is an advantage. You can take an image of a building and get most of it in, then zoom in to get some details of it as well.

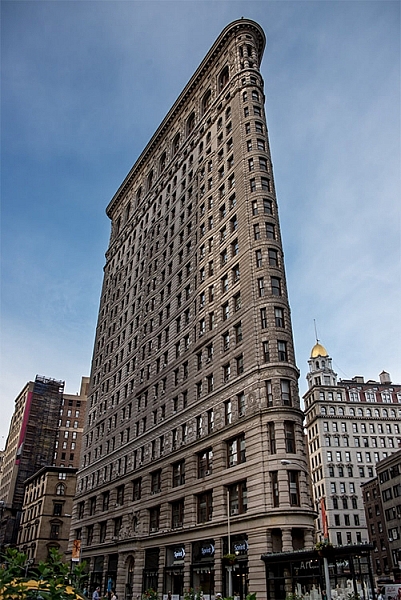
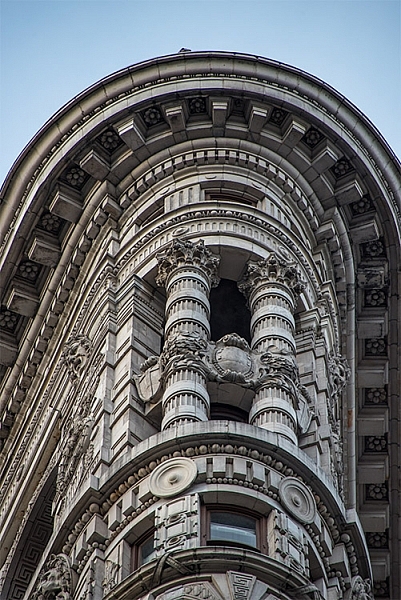
    The following images of the Flatiron Building in NYC, show how you can take a photo of the whole building, and then a close up of some detail using the 28-300mm lens.

    LeanneCole-tamronlens-flatiron-28mm

    The Flatiron Building in New York, focal length 28mm.

    LeanneCole-tamronlens-flatiron-300mm

    Detail of the Flatiron Building, focal length 300mm.

    There is also the advantage of not having to constantly change your lens. If it is busy, or crowded, you won’t have to stop, get out another lens and change it. This compact lens is great for most situations.

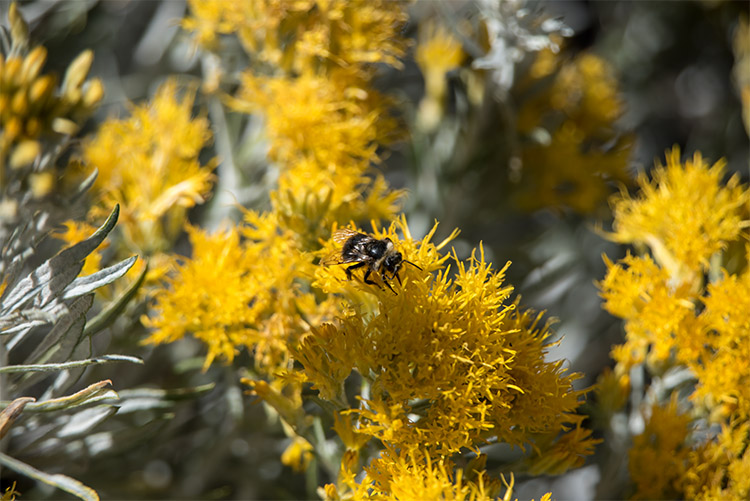
    LeanneCole-tamronlens-beemountain-300mm

    A bee on a flower, taken at 300mm.

    Compromises

    With any lens that has this kind of focal length range, you are going to have to compromise somewhere.

    Sharpness

    When you take photos at 300mm, the images are not as sharp as they are at 150mm. This is a common problem with most lenses, and more so with ones that have longer lengths such as the Tamron 28-300mm.

    Slower Lens

    A lens is judged by the size of the largest aperture. A fast lens has a large aperture of f/2.8 or, as is the case with some of the prime lenses, maybe f/1.4. The largest aperture means that when there is lower light you can get a faster shutter speed, which makes it a faster lens.

    This Tamron 28-300mm lens has an aperture range of f/3.5 – 6.3, which translates to being able to have the faster aperture of f3.5 at 28mm, but when you zoom out to 300mm the fastest (widest) one you can get is only f/6.3. Most of the time it isn’t a problem, and only becomes one when the light is low, or when shooting indoors. The compromise is, when those conditions arise you have to put up your ISO, which introduces noise into your images, or, in old terms, grain.

    Vignetting when zoomed out

    One of the things I found, was that there was some vignetting when the lens was zoomed all the way out to 300mm. I was a bit annoyed initially, but when I was given an opportunity to try out the Nikon 28-300mm I noticed it did the same. It is just one of the disadvantages working with lenses such as these.

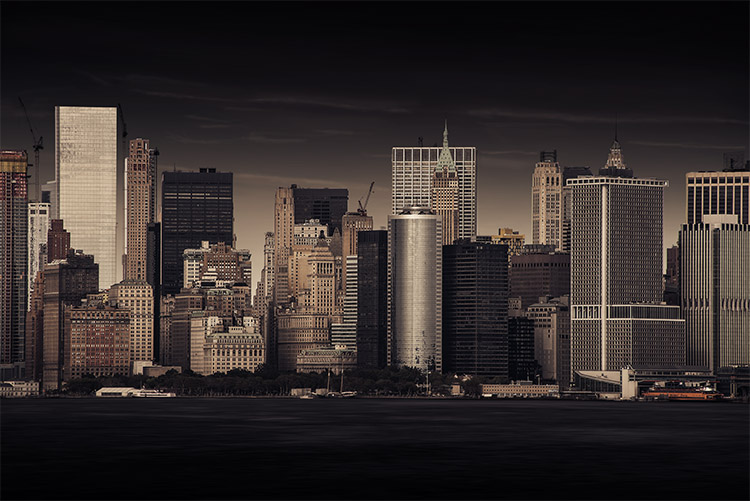
    LeanneCole-tamronlens-NewYork-300mm

    A view of New York Skyline from Staten Island ferry. Focal length 300mm,

    The Other Factors

    Weight

    The lens weighs just over half a kilogram or 19oz. Compare it with the Nikon lens which is 800 grams or 28.2oz. As stated previously, it is quite a light lens, and an easy one to carry around and store.

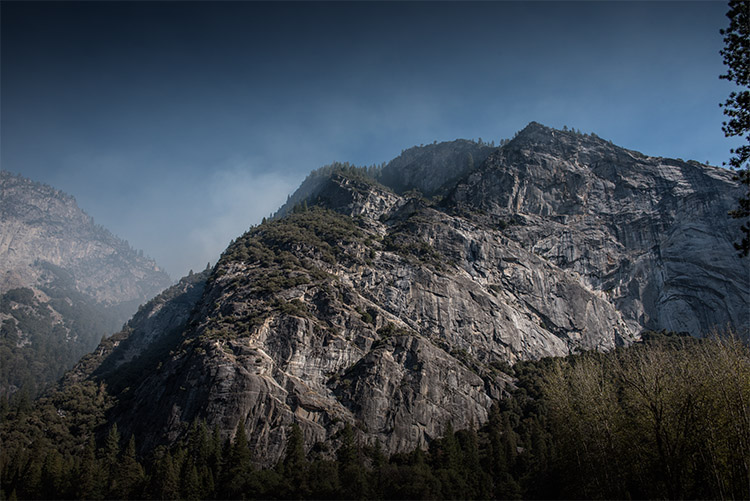
    LeanneCole-tamronlens-yosemite-28mm

    One of the many mountains at Yosemite, focal length 28mm.

    Price

    The lens is around US$ 850, which makes it a good price for the versatility that you get. It makes it an affordable lens, and a very good option for a beginner who wants to find one lens that will suit almost any situation or occasion.

    In conclusion

    This was a perfect lens for travelling. I found it so versatile, and to tell the truth, while I took a couple of other lenses, this one was on my camera 80% of the time. I didn’t want to take it off. It was very sad when the lens had to be returned to Tamron, I know when I can get the money together, it will be the next lens in my kit.

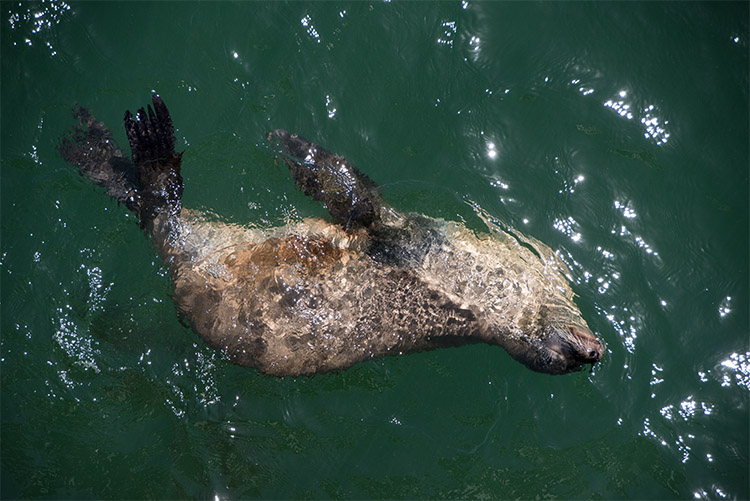
    LeanneCole-tamronlens-santacruz-135mm

    Seal at Santa Cruz Boardwalk. Focal length 135mm.

    googletag.cmd.push(function() {
    tablet_slots.push( googletag.defineSlot( “/1005424/_dPSv4_tab-all-article-bottom_(300×250)”, [300, 250], “pb-ad-78623” ).addService( googletag.pubads() ) ); } );

    googletag.cmd.push(function() {
    mobile_slots.push( googletag.defineSlot( “/1005424/_dPSv4_mob-all-article-bottom_(300×250)”, [300, 250], “pb-ad-78158” ).addService( googletag.pubads() ) ); } );

    The post My Favourite Travel Lens – The Tamron 28-300mm by Leanne Cole appeared first on Digital Photography School.

    Digital Photography School

  • Tips for Processing Winter Landscapes in Lightroom

    I see a lot of winter. The interior of Alaska, where I live, gets a solid six months, often seven, of the white stuff. Essentially anytime from October to mid-April, we are likely to have snow on the ground. Unless I put the camera down for most of the year (which I don’t), I end up with a lot of photos on my computer of snowy mountains, forest, and tundra. Come the early-spring, brown season, I have a lot of computer work to take care of.

    Kelly DONE-1

    Though the method of processing winter images is largely the same as many other types of outdoor images, you’ve got to approach snowy images with cold focus (insert laughter here). I jest, but actually the cold, and bright blue tones of winter, are elements that should not be forgotten (or overdone).

    My Approach

    When I come at an image in Lightroom, I don’t tackle it with a standard formula. Rather, I consider the time and place I made it, what the landscape looked like, and just as importantly, how it felt. Those memories play an important role in my vision for the final image.

    With that in mind let’s dive into the first of the three winter images I want to walk you through my processing steps.

    Brooks Range, Alaska – Early winter

    Kelly 1

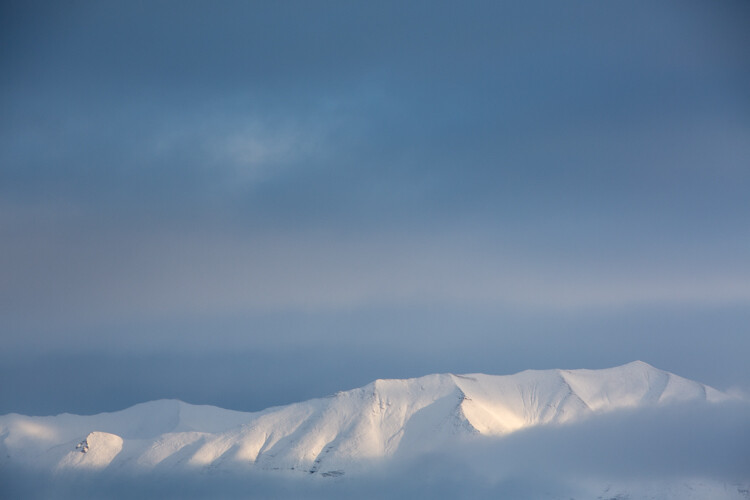
    On a river trip in early September, down the remote Kelly River of the western Brooks Range, my clients and I were hit by the first snowfall of winter. It started the evening before I made this image, with a few big, wet flakes falling from the overcast sky. By the following morning, my tent, the gravel bar on which we were camped, and the entire landscape, was covered in six inches of fresh snow. The snow was tapering off, and I could see breaks in the clouds where patches of blue sky shone through. It didn’t take long before those patches were turned into beams of sunlight on the mountains. I walked down to the river with my camera, and started making images of the shifting light on the land. This shot came out of that session.

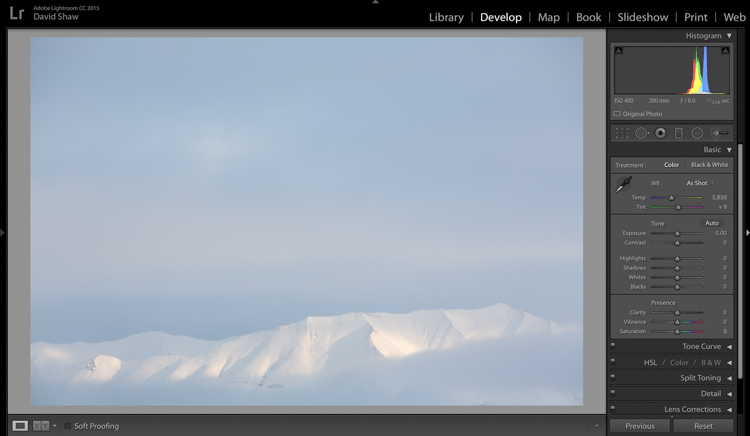
    The light and color is typical of many winter images, bright, with lots of blue. Take a look at the histogram in the upper right, and you can see how it’s pushed to the right, meaning the image is on the bright side (but no blown-out highlights), exactly what I want with an out-of-camera winter shot.

    Step One – White Balance

    The first thing to consider is the white balance. Cloudy days tend to cause warmer tones, and snow, particularly under-exposed snow, can take on a yellowish hue. This can be off-putting, so pushing your white balance toward the blues can help provide a more pleasing, and accurate tonality. In this case, my camera selected an appropriate White Balance in the field, and didn’t need any adjustment in Lightroom. But keep this in mind when processing your own images.

    Step Two – Exposure

    Kelly 2

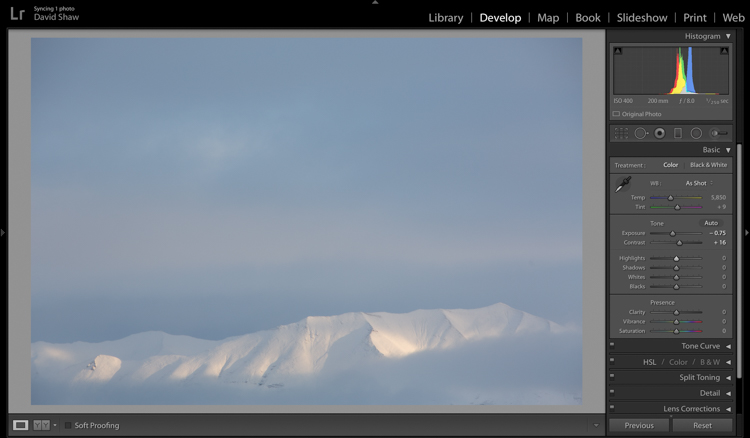
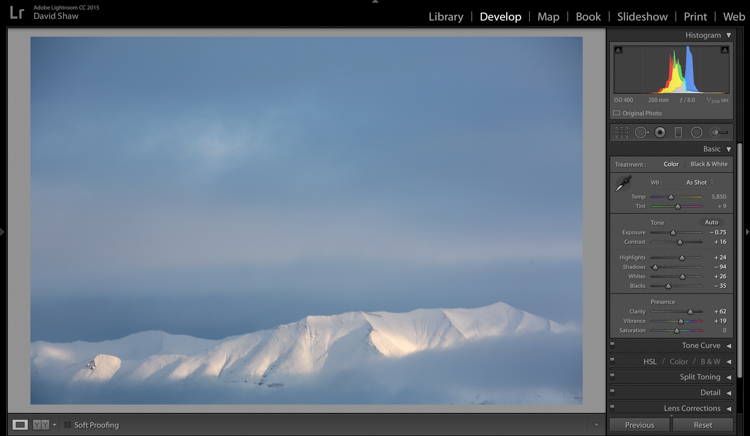
    The next step was to bring down the exposure by 0.75 stops, making the image a bit moodier, and less bright. I then bumped the contrast a hair to +16 just to make those highlights more clear before I dove into the more important contrast adjustments.

    As a quick note, I bet I do 85% of my Lightroom edits in the Basic panel. This very effective section of the program is one you should know intimately, before you go exploring too much of the huge variety of other tools provided by the software.

    Kelly 3

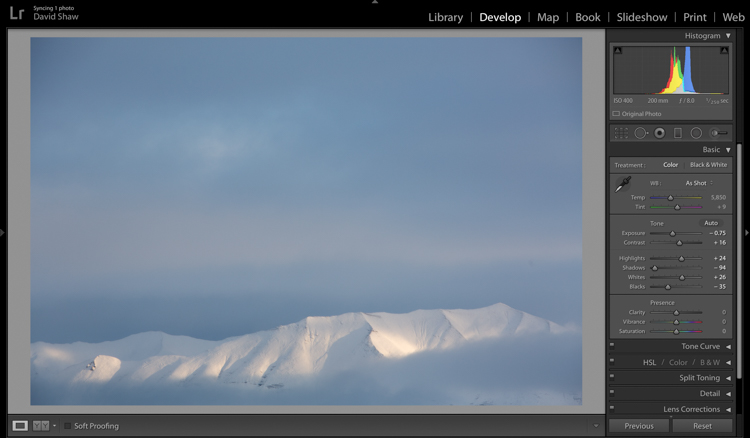
    The next four sliders provide a more specific modification of lighting in the image. In this case, I wanted to recollect some of the feeling of the dissipating storm by emphasizing the dark clouds. To do so, I pulled the Shadows slider down nearly all the way, making the dark blues and grays of the clouds appear more menacing. The Highlights, I bumped just a notch, adding some pop to the bright patch on the mountains. Whites and Blacks each got a nudge up (Whites) and down (Blacks) respectively, finishing the job I started with the first two sliders.

    Step Three – Clarity

    Kelly 4

    The first of the next three sliders is Clarity. This nifty tool, increases the contrast where dark and bright edges meet, and adds apparent sharpness to the image. On the morning I made the image, the clear morning light made the mountains very sharp to the eye. Wanting to emulate that effect in the image, I gave the Clarity a substantial boost to +62. That’s about as high as you can go on most images without appearing artificial.

    Step Four – Vibrance and Saturation

    The Vibrance and Saturation sliders are dangerous. Photographers tend to believe that bright colors mean a good image. I want to say this very clearly: Do NOT over-saturate your images. It doesn’t look as good as you think it does, so, you know, just don’t.

    Vibrance increases the intensity of the less saturated tones. When used in moderation it adds pop. In this image, I left the saturation slider completely alone.

    Kelly 5

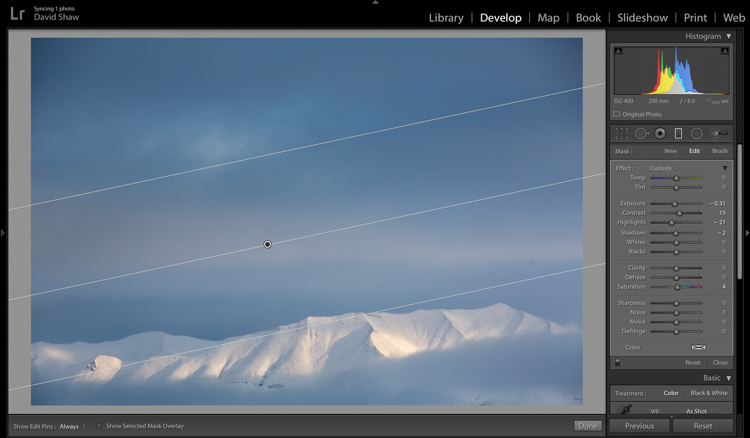
    The rectangular icon in the row below the histogram is the Graduated Filter. This useful tool allows you to adjust a portion of the frame, without affecting the other areas. Just as importantly, you can adjust the edge softness (transition area) as hard or soft as you like. In this case, I wanted my changes to taper naturally into the frame so made the filter edge fairly wide (set feather to a high number). Using this tool, I chose to darken the sky, and draw attention to the mountains at the bottom of the frame. After adjusting the placement, I lowered the exposure in the sky. This allowed me to subtly darken the sky, without affecting the brighter tones of the mountains.

    Kelly 6

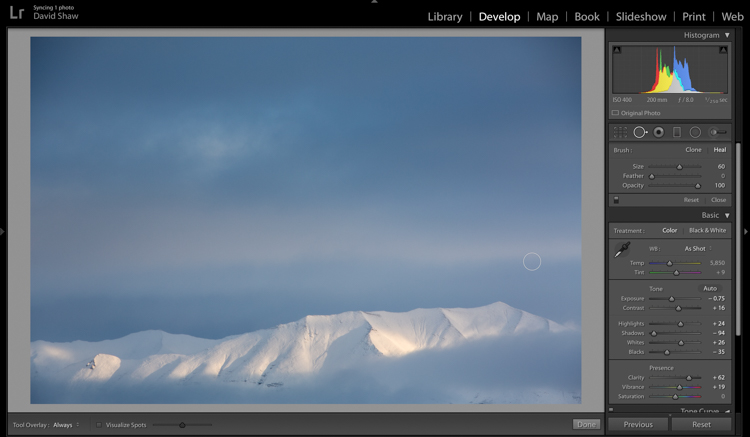
    Adjusting contrast can cause previously invisible imperfections to appear. In this case, it was a dust spot on my sensor, which I cloned out using the “Heal” tool.

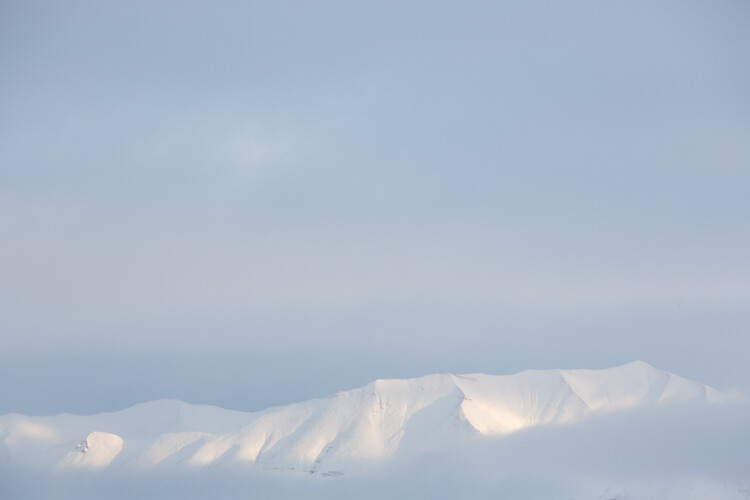
    The final image, as you can see, is a substantial improvement over the original, and holds true to the scene as I remember it.

    Before

    Before processing

    Kelly DONE-1

    After processing

    Color in the Cold

    Not all images of the winter rely on cool tones for their success. At times, it is the juxtaposition of those cool tones and bright warm colors that make an image.

    Beams 1

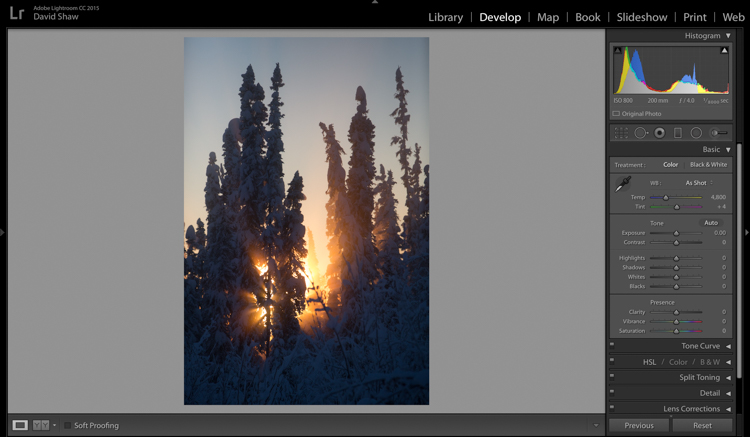
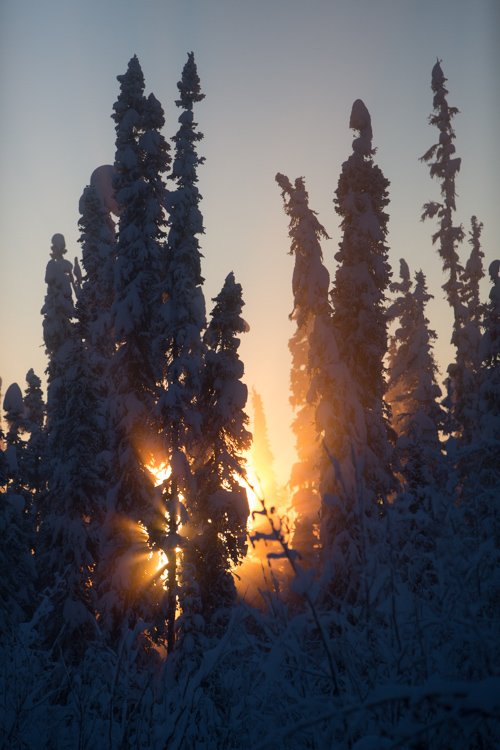
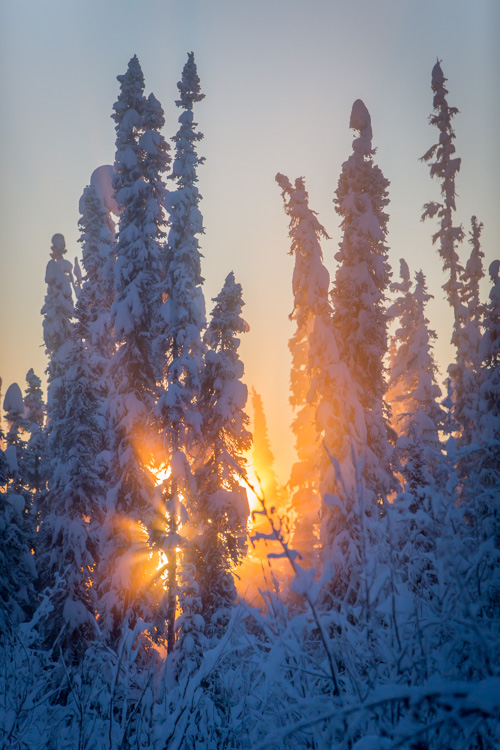
    This is one such image. I made it on an extremely cold mid-winter day, on the ice of the small creek that flows on the lower part of my property north of Fairbanks, Alaska. It was about -35f (-37c), and water, pushed up from the bottom of the creek by the pressure of the ice, was trickling out onto the surface where it steamed into the frigid air, before freezing. It was midday, and the sun, just a few ticks above the horizon to the south, was throwing orange beams through the branches of the snow-colored spruces. Fortunately, I had my camera, and managed this photo before the sun slipped away.

    Beams 2

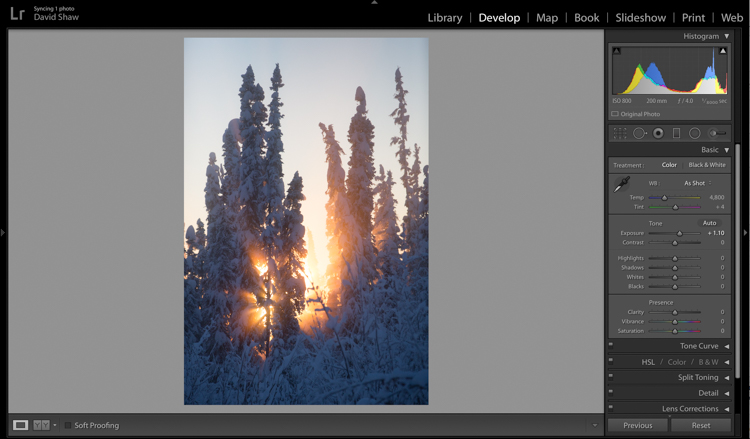
    On that cold day, I was forced to underexpose the image to keep the beams of sunlight and the sky from blowing out. My first step was to return some of that brightness to the image by raising the Exposure +1.10 stops.

    Beams 3

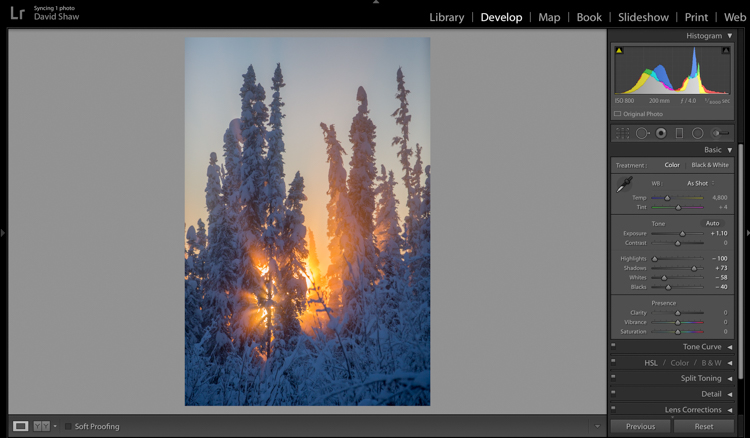
    In general, I dislike High Dynamic Range (HDR) images, particularly the over-processed ones that appear regularly on Facebook and Instagram feeds. That said, HDR, or my Lightroom version of it, can be helpful in highly contrasted images like this one. Here, I pulled the highlights all the way down, bringing the beams and the sky back to more appealing levels. The Shadows I brought up, which revealed details in the trees and shrubs which were previously too dark to see. The effect, when used appropriately, does not look artificial.

    Beams 4

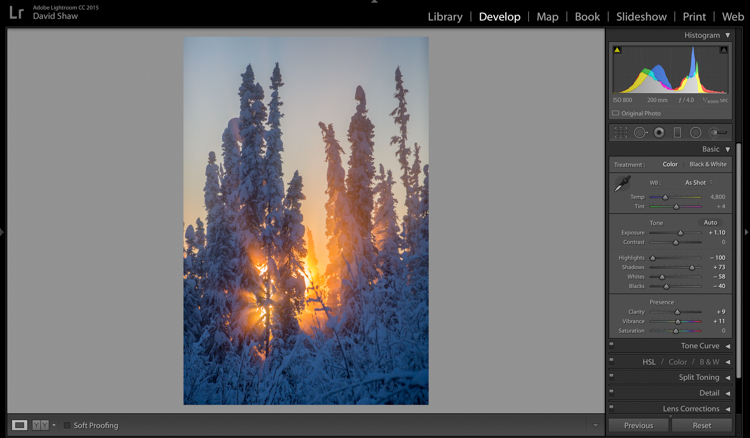
    The image was already colorful and sharp so required very little in the way of Clarity, Vibrance or Saturation. A small boost (+9) to Clarity, +11 to Vibrance, and no change in Saturation was all the image needed.

    Beams 6

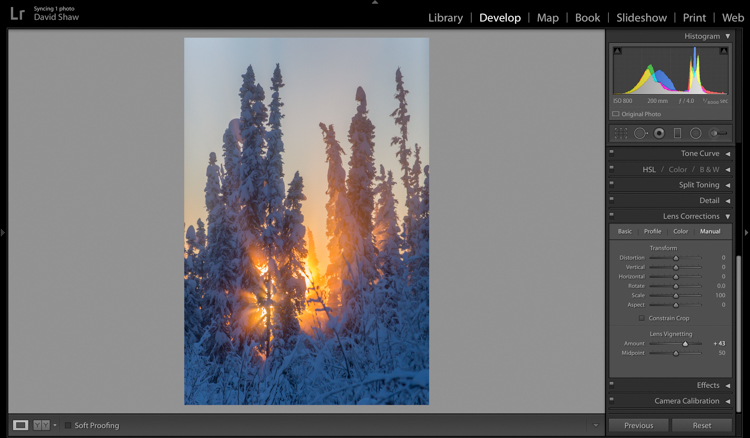
    The lens I used to make the image has a hood, which I realized after the fact, was slightly mis-aligned and threw a vignette over the corners of the photo. If I want a vignette (see next), it needs to be purposeful, not the accident of a poorly fitted hood. So, using the Lens Corrections module, I made a single adjustment, sliding the Lens Vignetting slider to the right, brightening the corners, and almost entirely eliminating the ugly dark area in the top right.

    Beams 7

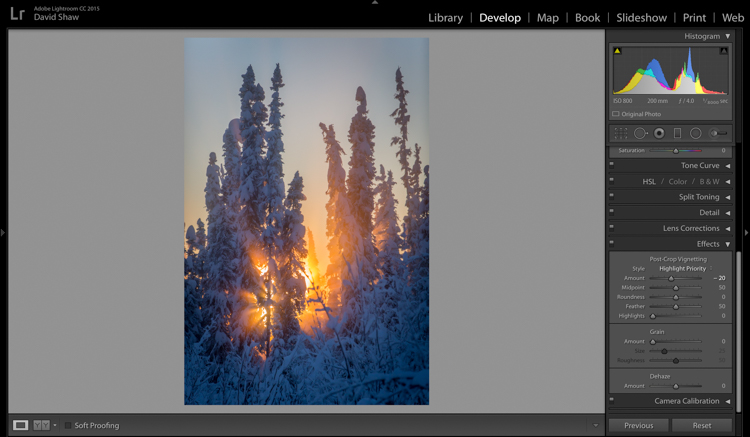
    The last thing I wanted to do was darken the sky a touch more, and bring further attention to the starburst of sunbeams coming through the trees. So, using the Effects Module, I added a -20 Post-crop Vignette, which effectively darkened the sky and lower corners.

    With that final change, the image was complete, a starburst of color on a brutal winter day.

    Before processing

    Before processing

    Beams Done-1

    After processing

    The Storm

    A number of years ago, I spent 10 days trekking through the Himalayas of Bhutan. It was October, the tail end of the trekking season for the little mountain kingdom. My group and I hiked up from the lowlands, to a high camp at over 13,000 feet, where we planned to cross over two 15,000 foot passes before making a long descent back to the city of Thimpu. It didn’t work out as planned. We’d scheduled two nights at the high camp to acclimatize before crossing the passes. Just before bed on the second night, a storm rolled in, and by the time we woke up the following morning, there were eight inches of snow on the ground. Any hopes of penetrating higher into the mountains were dashed. Making the best of it, I rose and made photos of the dark mountains and falling snow.

    Bhutan 1

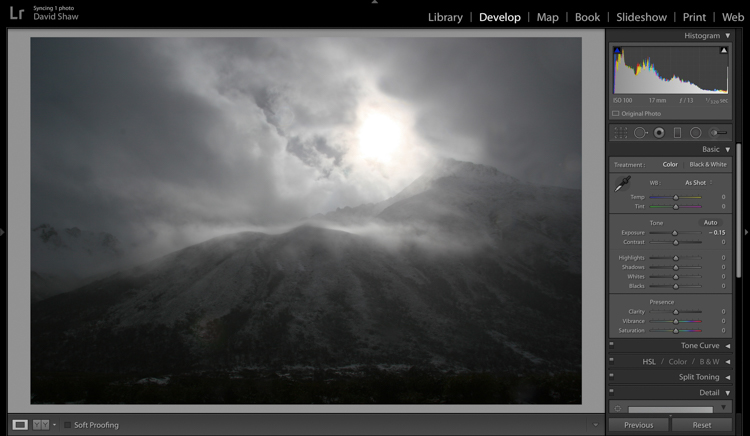
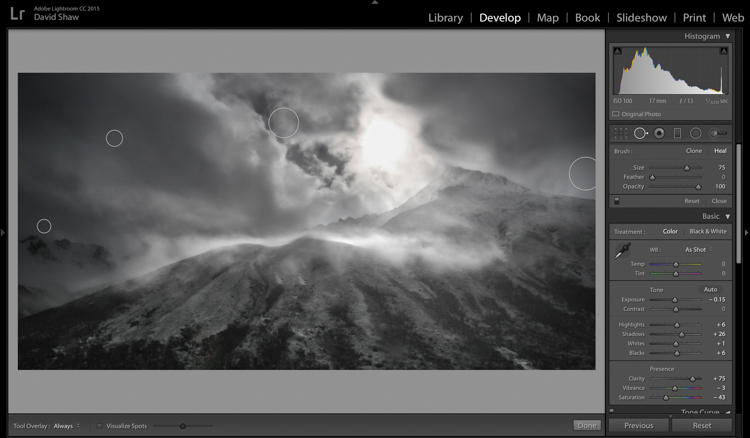
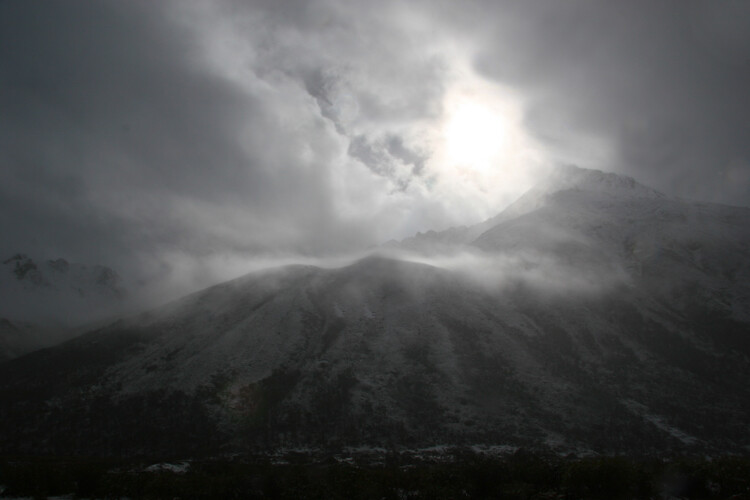
    In the field, I purposely underexposed to keep the small patch of bright sky surrounding the sun from blowing out entirely. The mountains ended up nearly black, and the sky dark gray. Though consistent with my desire to make a moody, foreboding image, I wanted to emphasize that feeling even more.

    Bhutan 2

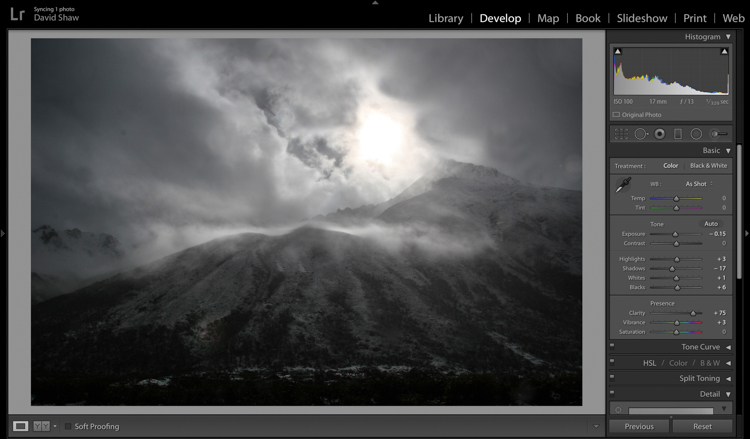
    In the Basic Module, you can see that I darkened the image a bit more, left the highlights more or less alone, darkened the shadows a hair, and bumped the blacks just a bit to bring some texture into the dark lower corners. The Clarity slider I pushed notably to the right, which made the textures in the sky and mountain pop against the otherwise soft grays. I left the color adjustments mostly alone.

    Bhutan 3

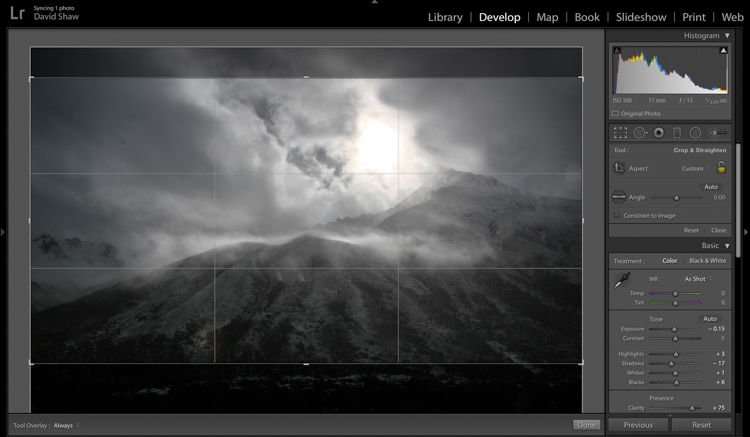
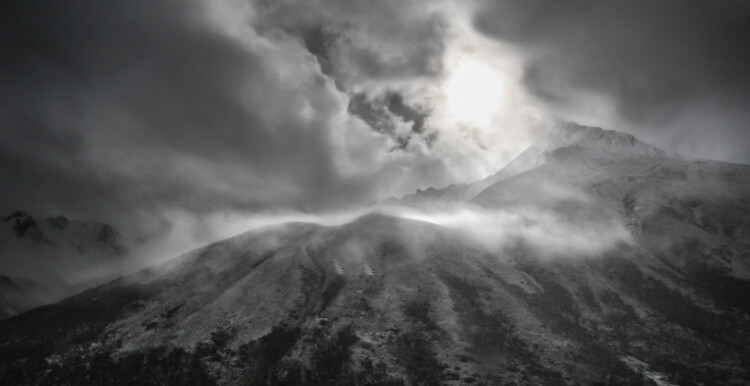
    The more I looked a the photo, the more I realized the top and bottom edges added nothing to the image. Using the crop tool, I nipped them off, bringing all the attention to the action in the central part of the frame.

    Bhutan 4

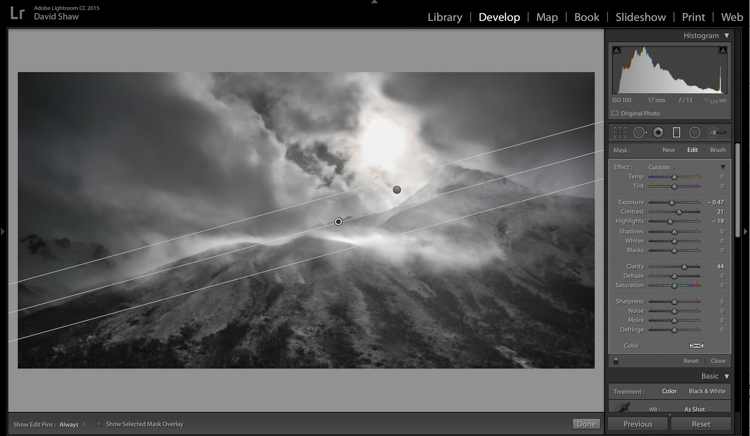
    At this point, the processing got a bit complicated. I wanted to deal with the sky and mountains separately. One I wanted to brighten, the other darken. There were two ways to deal with this:

    1. Use the Adjustment Brush tool to select and develop the two areas
    2. Use Graduated filters to accomplish the same thing. Because the Graduated filter allows more flexibility to change the softness of the adjustment edge, I decided to use that.

    The filter that adjusted the sky I darkened, and increased the clarity. The one for the mountains, I brightened, boosted the highlights, to make the scudding clouds pop, and added some clarity.

    Bhutan 5

    As noted earlier, the changes in contrast can emphasize imperfections, and I took a moment to remove lens flares and dust spots.

    Last, I did a second pass of the Vibrance and Saturation. The yellowish patch around the sun was annoying me, so I dropped both the color sliders down reducing the image to a near black-and-white.

    Bhutan-Jangothang-snowstorm-04

    Before processing

    Bhutan Done-1

    Finished image after processing

    I really like the final image. It provides a sense of the storm and the foreboding nature of mountain weather. Looking back, I can easily remember my nervousness that snowy morning, the uncertainty, and eventually, our retreat back the way we’d come.

    Conclusion

    Great images can come from snow. Many photographers put their cameras away during a winter storm, but I strongly recommend you don’t because there is great stuff out there if you’ve got the perseverance to suffer through some cold days. The images you gather, like these, can be optimized in your computer. Remember to take a moment before you begin, to recall how the scene looked and felt when you made the image, then use those memories as your guide.

    Do you have any winter images on your computer that are begging to be processed? Now’s the time to do it, please share your images and comments below.

    googletag.cmd.push(function() {
    tablet_slots.push( googletag.defineSlot( “/1005424/_dPSv4_tab-all-article-bottom_(300×250)”, [300, 250], “pb-ad-78623” ).addService( googletag.pubads() ) ); } );

    googletag.cmd.push(function() {
    mobile_slots.push( googletag.defineSlot( “/1005424/_dPSv4_mob-all-article-bottom_(300×250)”, [300, 250], “pb-ad-78158” ).addService( googletag.pubads() ) ); } );

    The post Tips for Processing Winter Landscapes in Lightroom by David Shaw appeared first on Digital Photography School.

    Digital Photography School

  • How to Choose the Right Digital Camera for a Specific Type of Photography

    Are you overwhelmed with the many digital camera options available in the market? This article will help you determine the right camera for your specific photography need. Whether it’s portrait, landscape, travel, sports and adventure, or aerial photography that you want to get into, you can’t just settle for the most popular. So before you go checking out what the Continue Reading

    The post How to Choose the Right Digital Camera for a Specific Type of Photography appeared first on Photodoto.


    Photodoto

  • How to do Light Painting Photography Art with Endless Possibilities

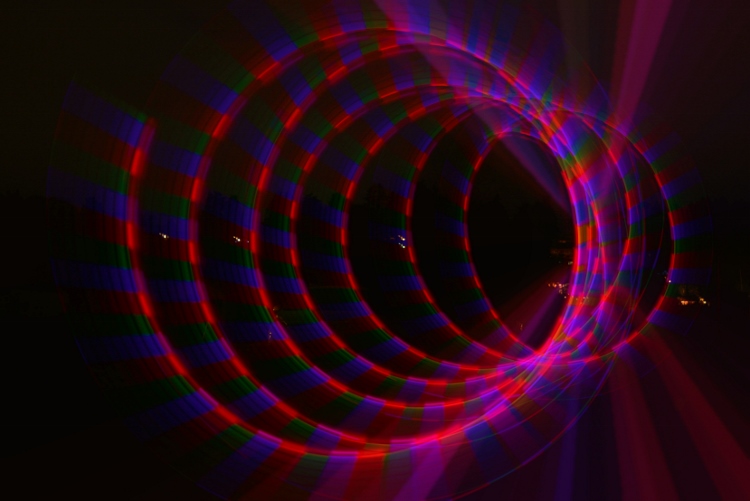
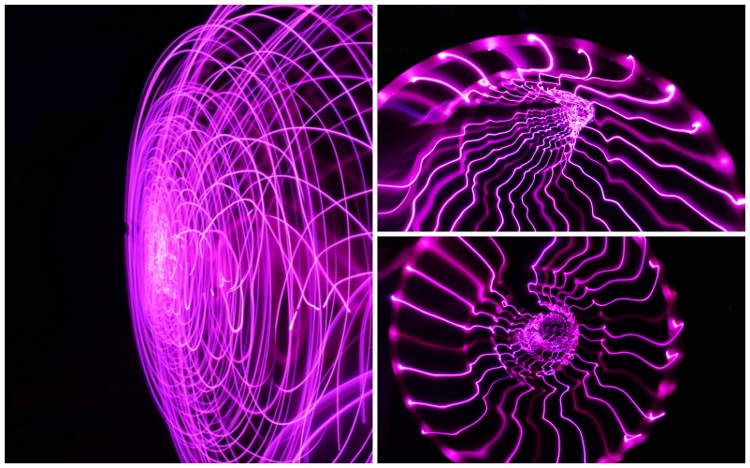
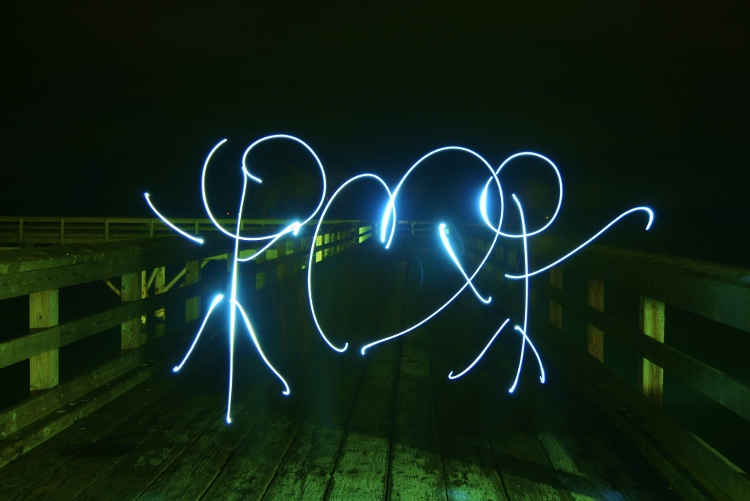
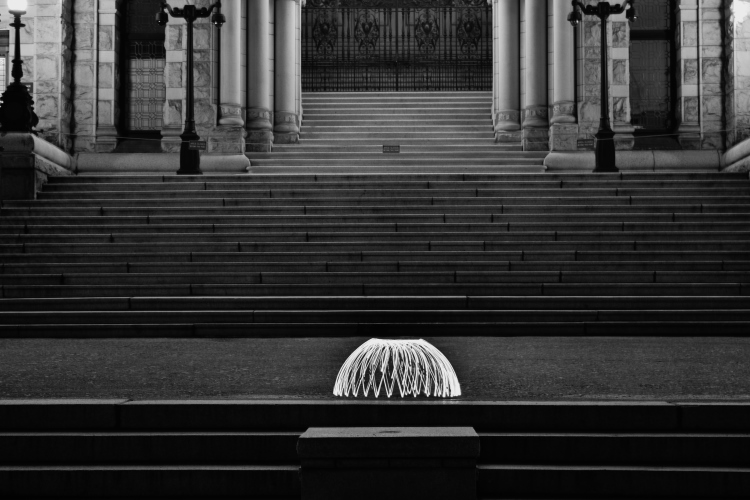
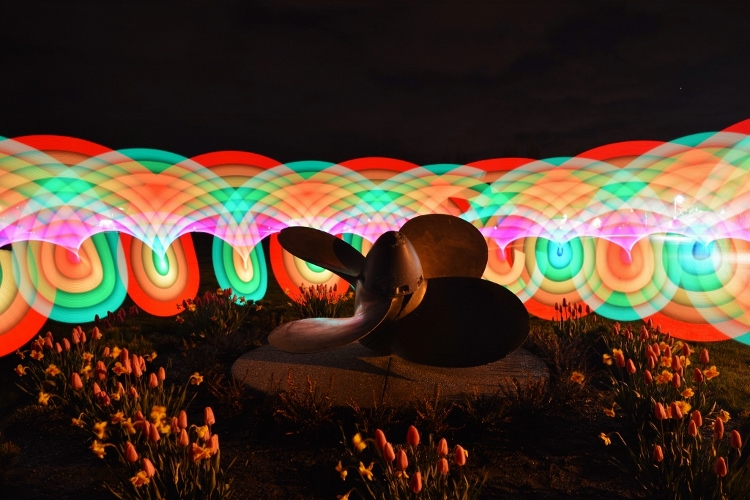
    Wikipedia defines light painting as “A photographic technique in which exposures are made by moving a hand-held light source while taking a long exposure photograph, either to illuminate a subject or to shine a point of light directly at the camera.” In essence, with a basic DSLR, a tripod, and a light source of some kind, you have endless possibilities to create unique images. This technique is a way to unleash your imagination and inner artist – this article will show you how to do it.

    Photo 7c (750x501)

    When I realized this artistry had endless possibilities and creativity, I was in. Who wouldn’t be, right? Light painting always amazes me as to how you can create beautiful photos by simply capturing light. I started doing light painting for fun, but then it became a very therapeutic regime for me. If I was having a tough or bad day I would grab my gear, wait for it to get dark, and start painting.

    Some basics before you begin:

    • You don’t need any fancy equipment.
    • Wear dark clothes if you don’t want to be seen in the image.
    • Typical camera settings for long exposure light painting are: Manual Mode, aperture f/3.5-5.6, exposure 10-30 seconds, ISO 100-125, lens 18-55mm.
    • Bring a friend. While you can do light painting solo (and I often do), it’s a lot more fun with a buddy.

    Beginner DIY light painting tools you can make

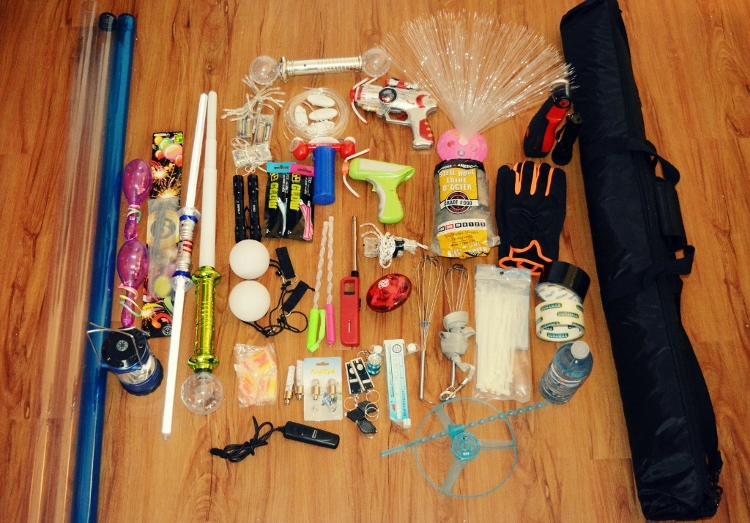
    I bought all of my supplies from the dollar store, ebay, or home depot. In my kit, I currently have:

    • Basic DSLR + wireless remote (optional) + tripod
    • Flashlights (all different sizes)
    • Mini keychain flashlights
    • Glow sticks
    • LED battery operated fairy lights (variety of colors)
    • Hoola-hoops (regular and small)
    • Sparklers (variety of sizes) + a lighter
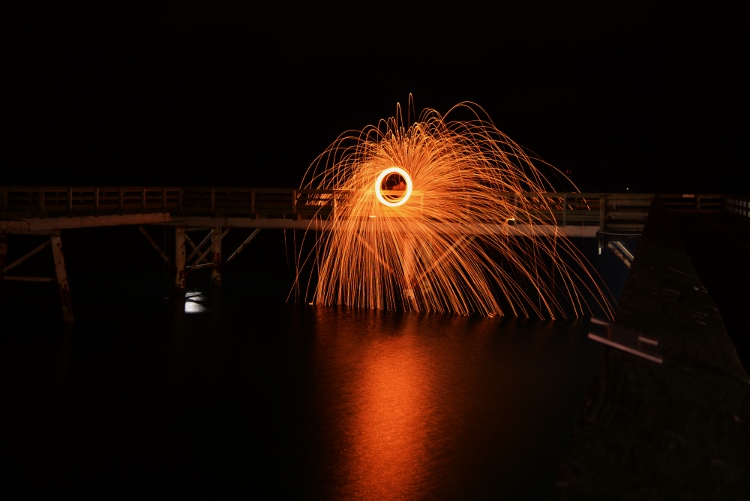
    • Steel wool kit (wire whisk, dog leash, gloves, lighter, steel wool grade #000)
    • A variety of light sabres and flashing rave toys

    Photo 1 750x523

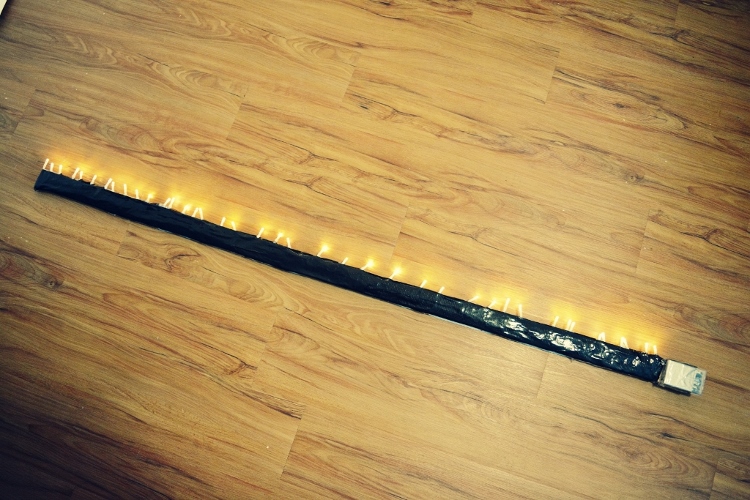
    The first two tools that I ever made were a light stick and a light hoola-hoop. They both serve me well. For the light stick you need a piece of wood (any size you want, mine is 57×2″), tape, and one string of battery operated fairy lights.

    Lay out your lights next to your piece of wood and tape them on. Viola! A home-made light stick. If you use white lights, you can tint your photo with your basic windows photo gallery editor. I have two, one with white lights and one with multi-colored lights.

    Photo 2 750x500

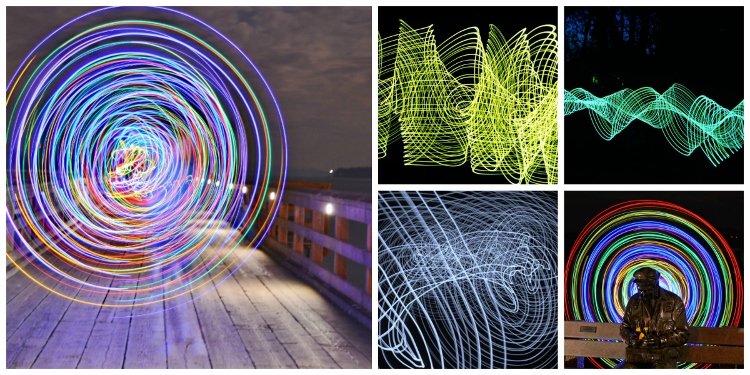
    Here are some of my top photos using just a light stick.

    Photo 3 750x375

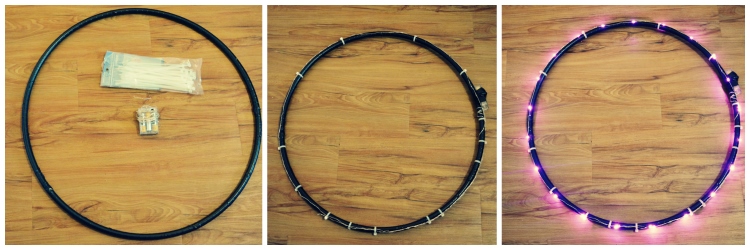
    For the second tool I made, the light hoola hoop you need: a hoop, one string of battery operated fairy lights (approximately eight feet long or less, depending on how big your hoop is) and some tape or zip ties. Tape or zip tie your lights around your hoola-hoop. Bam!

    Photo 4a 750x250

    Photo 4b 750x468

    Advanced light painting tools (The Pixelstick)

    For those of you who have had experience with light painting, you might be asking, what’s next? Well, that’s where the Pixel Stick from Bitbanger Labs comes in. I recently purchased one on sale from Photojojo.com (thank you Boxing Day sales!).

    Each one of pixelstick’s 200 LEDs acts like a pixel on a screen, displaying your image one vertical line at a time as you walk. These vertical lines, when captured by a long exposure, combine to recreate your image in mid-air leaving pixelstick (and the person using it) invisible. – according to Bitbanger Labs.

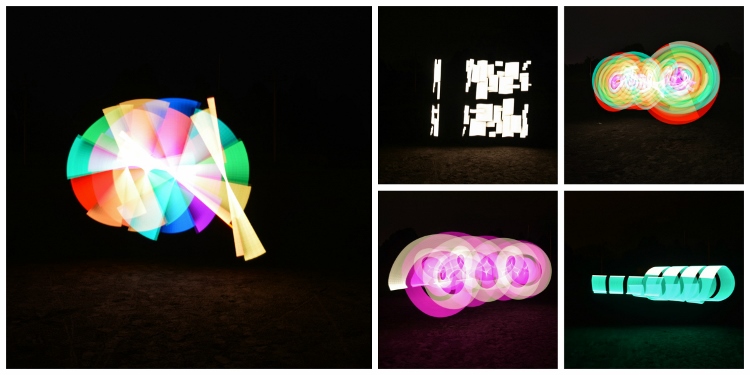
    Let’s just say, it’s the ultimate light painting artist’s tool. It takes a bit of practice to get used to, but once you have, you can create some pretty incredible photos. Here are a few of my favorite pictures that I was able to do with the pixelstick.

    Photo 5 750x375

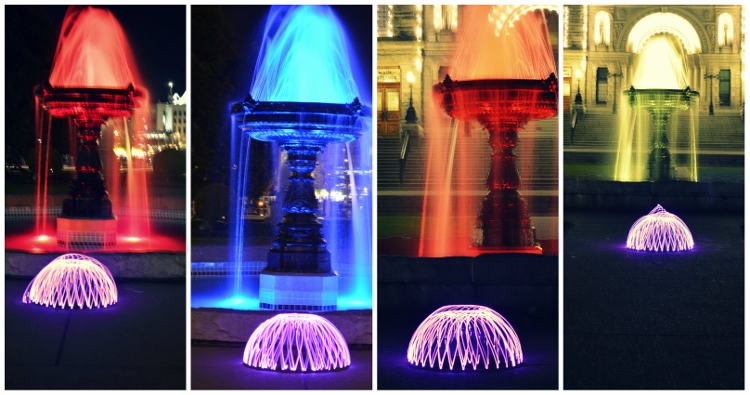
    Ideas for light painting from abstract to using your city as inspiration

    You can pretty much light paint anywhere however, please be respectful of your environment. Never damage, negatively impact, or harm a location in pursuit of light painting.

    Having the right background or location can give your picture the right ambience, and add some dimension and feel to your photo. My preference is to use a black background most times so I usually find an empty dark field, but sometimes it’s nice to incorporate your surroundings.

    Photo 6 750x395

    Photo 7a

    Photo 7b
    Photo 7d

    Photo 8 750x500

    As you can see in this photo, I used a local anchor to center my picture around.

    Inspiring light painting artists

    When I was getting into the light painting community, I came across some great resources and artists that you may not know about.

    • Light Painting World Alliance
    • Light Painting Photography
    • Rob Tourney Visuals
    • Darius Twin
    • Denis Smith creator of the ball of light

    So now that you know about light painting photography why not go out there and create some unique images yourself? Up for the challenge?

    See more light painting articles here on dPS:

    • How to Make Unique Portraits Using Light Painting
    • Beginner’s Guide to Light Painting
    • Light Painting Part One – the Photography
    • Light Painting Part Two – Photoshop
    • How to Build an LED Light and Make an Orb
    • Fire Spinning with Steel Wool – A Special Effects Tutorial

    googletag.cmd.push(function() {
    tablet_slots.push( googletag.defineSlot( “/1005424/_dPSv4_tab-all-article-bottom_(300×250)”, [300, 250], “pb-ad-78623” ).addService( googletag.pubads() ) ); } );

    googletag.cmd.push(function() {
    mobile_slots.push( googletag.defineSlot( “/1005424/_dPSv4_mob-all-article-bottom_(300×250)”, [300, 250], “pb-ad-78158” ).addService( googletag.pubads() ) ); } );

    The post How to do Light Painting Photography Art with Endless Possibilities by Jennifer Dowd appeared first on Digital Photography School.

    Digital Photography School

  • 4 Steps on How to Read Images and Learn to Replicate the Results

    Earlier, I wrote an article called: why asking what camera settings were used may not be as helpful as you think, and in it, I touched on the concept of reading an image.

    Learning to read images – from a technical perspective and not a conceptual one – is something that I believe all photographers must be able to do, as it allows you to get a rough guide on what settings may have been used to create an image. They won’t be the exact settings; but you’re most likely not going to have the exact same lighting environment as what a particular photo was taken in.

    Shallow Apeture 1

    A wide aperture was used her to achieve a shallow depth of field.

    Dive in to read an image

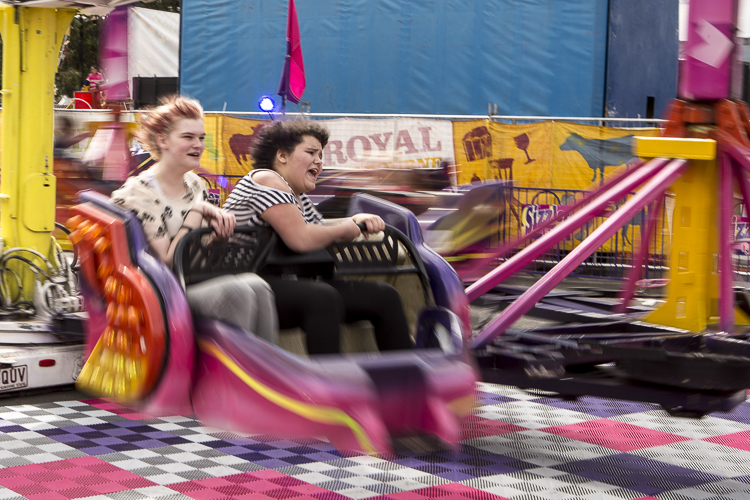
    To begin reading images you must have, at the very least, a good understanding of aperture, shutter speed and to a lesser extent, ISO. You’ll want to understand how these things affect the image in different ways. For example, if you saw an image with a lot of motion blur, you would know from your understanding of shutter speed that a slower shutter speed was used.

    As you become more proficient with lighting and off-camera flash, you can even read how the subject was lit with artificial lighting, and begin to replicate how it was done. But don’t worry! This article will be focussing on the three major aspects of photography exposure (aperture, shutter speed and ISO) to help you begin your journey to reading images.

    Slow Shutter 2

    What shutter speed was used here – a fast or slow one?

    Step 1: Shutter Speed – Fast or Slow?

    I find that determining whether a fast or slow shutter speed was used first, can help greatly when it comes to determining aperture and ISO later. The first thing you will want to ask yourself when assessing shutter speed is; was it fast or slow? This can be decided by how much, or how little, motion blur is present in the image, as that is what shutter speed controls.

    If everything in the image is pin sharp, and there is absolutely no motion blur at all, then a fast shutter speed would have been used. However, if there is a lot of motion blur, then a slow shutter speed was used.
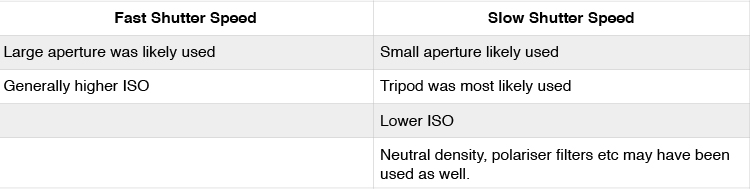
    Here are some points that you can take out of knowing if the shutter speed is fast or slow:

    Shutter Speed Table

    But how fast is a fast shutter speed, and at what point does the shutter speed become slow? To answer this, think of your shutter speed in relation to your subject’s speed. For example, when photographing sports or other fast action, you may find using a shutter speed of 1/1000th is required to freeze your subjects. This is because your subjects are moving quite fast. However, if you were to photograph people walking down the street, you would not need the same shutter speed, as your subjects are not moving as fast.

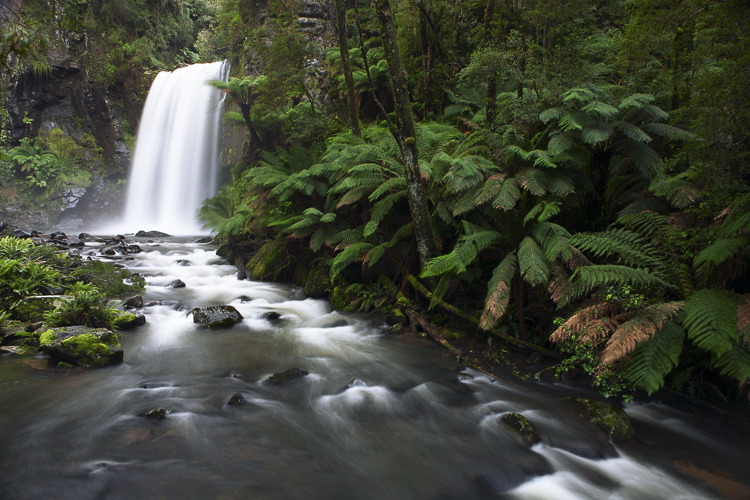
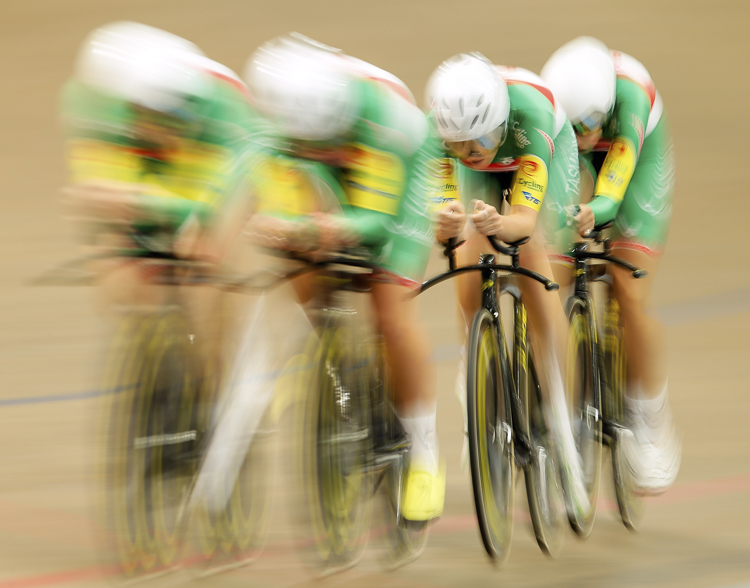
    Below are examples of slow and fast shutter speeds. Notice the presence of motion blur in the images where a slower shutter speed was used, but action is frozen with a fast shutter speed. In images that will use a slow shutter speed, it is often recommended you use a tripod to stabilize your camera, and prevent camera shake.

    What isn’t important is knowing the exact shutter speed; that is something that you will be able to experiment with to get the results you want. All you are doing here is identifying if a slow or fast shutter speed was used, to give you a starting point.

    Slow Shutter 3

    A tripod was used when taking this photograph to prevent blur that can be caused by camera shake. The shutter speed was 3.2 seconds.

    Slow Shutter 4

    The reason there is one rider sharper than the others in this frame, is because even though all riders are moving at the same speed, the rider who is sharpest is moving slower, relative to where I was positioned taking this photograph. The shutter speed used here was 1/6th.

    Fast Shutter 2

    Notice how everything is sharp in this image, and there is no blur? This means that a fast shutter speed was used (in this case 1/2000th), and because the subject is quite fast, a faster than normal shutter speed was needed.

    Fast Shutter 1

    Again, notice how everything is sharp and there is no blur? This means that a fast shutter speed (1/1250th) was once again used.

    Step 2: Aperture – Large or Small?

    In step one I mentioned that determining whether a fast or slow shutter speed was used first, can greatly help you in determining the aperture. Here’s why. If you are familiar with the exposure triangle you will know that in nearly all cases when a fast shutter speed is used, it is associated with a large aperture (small f-number). Conversely, the slower the shutter speed, the smaller the aperture becomes. So if you see a photo that has motion blur present, it is highly likely that the photographer used a smaller aperture; or if you see a photo where moving objects are frozen, the photographer has most likely used a larger aperture to enable a faster shutter speed.

    Another way you can determine the aperture is by looking for bokeh, or subject isolation. The more bokeh that is present in the image, the more the subject is isolated. To achieve this, the photographer would use a larger aperture. On the other hand, if everything in the image is in focus, then the photographer employed a smaller aperture to increase their depth of field.

    Small Aperture 1

    Everything in this photograph is in focus, which would mean that a small aperture (larger f-number; like f/11 in this image) was used to increase the depth of field.

    Shallow Aperture 2

    Notice how the background in this image is blurred out a lot, and the subject is very isolated? This is a sign that a larger aperture (small f-number; in this example f/3.5) was used to decrease the depth of field.

    Step 3: ISO

    ISO is one of the parameters that isn’t so important in determining what settings may have been used when reading an image. Use ISO to get the settings that you need to use, to create the shot you want. For example, if you want to use the slowest shutter speed you can, set your camera’s ISO to its lowest setting. Conversely, if you want to use a very fast shutter speed, you may find that you have to increase your ISO.

    Step 4: Focal Length

    Focal length is something that is often overlooked in images, but it is a very important element indeed. It does more than simply allow a photograph to add more in the frame, or zoom in closer. Different focal lengths evoke different emotions in the viewer when looking at an image. For instance, if a wide angle lens was used, it places the viewer in the scene and can make them feel like they were there; whereas a longer focal length places the viewer further away from the subject, and evokes a more voyeur emotion.

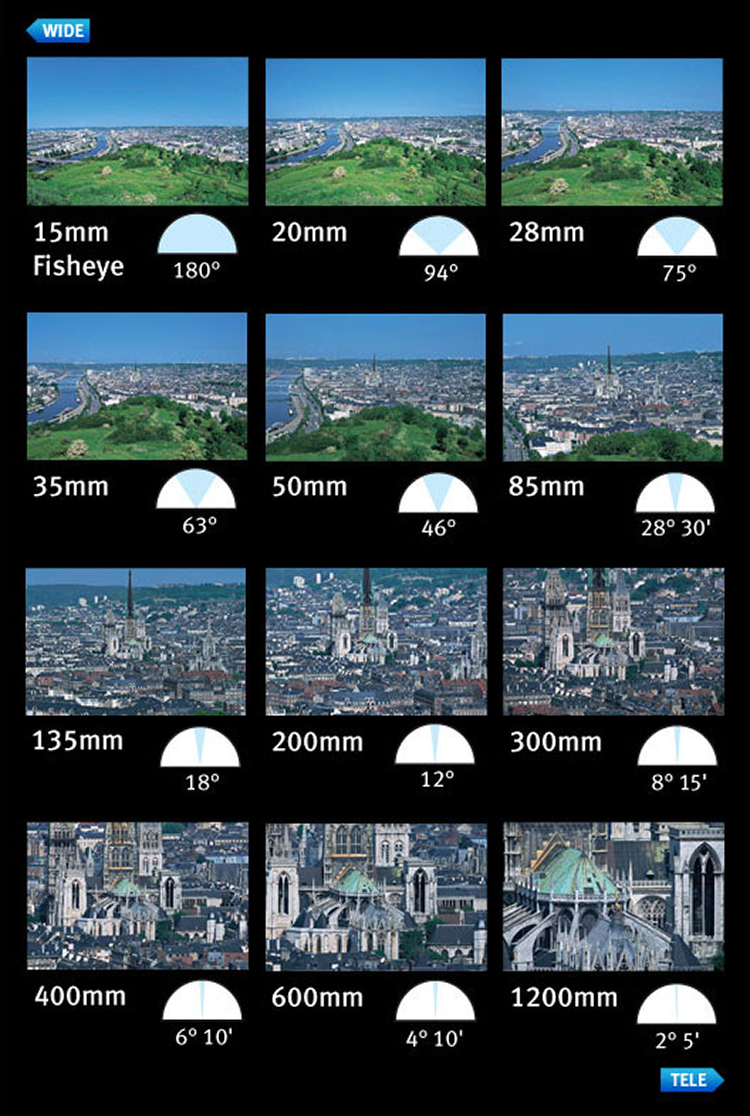
    The great thing about focal length is that it is quite easy to distinguish approximately which one was used. To make it simpler, breaking down focal lengths in to three groups can help greatly.

    • Wide: <50mm (i.e. 14-50mm on full frame, 10-35mm on cropped or APS-C sensor)
    • Normal: ~50mm-85mm (35-56mm cropped sensor)
    • Telephoto: 85mm+ (130mm+ on cropped sensor)

    You can use the presence of compression to distinguish the different types of focal length. A wide angle lens accentuates the foreground and increases distances in the frame, as well as having a very wide field of view. This effect increases as the focal length decreases – or gets wider. On the other end, a telephoto lens will give you much more compression, and make distances in the frame look shorter. Their field of view will decrease, and the affects of aperture, particularly larger apertures, will be more pronounced. That’s why f/2.8 at 16mm looks different than f/2.8 at 200mm, if your subject is kept the same size in the frame.

    Here is a small table with examples of the same scene photographed from the same point, but with different focal lengths.

    Image courtesy of Canon

    Image courtesy of Canon

    Now you have had a quick introduction on how to read images. Remember, knowing the exact settings is not important, but knowing how to get an approximate guess is better than not knowing anything at all! With experience, you will become more proficient at reading images, and will be able to guess with more precision. The more you understand aperture, shutter speed, and ISO, the better you will be at reading images.

    Along the way, you will also learn that different genres within photography use a different set of settings. For example, most landscape photographers will use smaller apertures, lower ISOs, and slower shutter speeds; whereas sports shooters for instance, will generally use higher ISOs, larger apertures, and faster shutter speeds.

    googletag.cmd.push(function() {
    tablet_slots.push( googletag.defineSlot( “/1005424/_dPSv4_tab-all-article-bottom_(300×250)”, [300, 250], “pb-ad-78623” ).addService( googletag.pubads() ) ); } );

    googletag.cmd.push(function() {
    mobile_slots.push( googletag.defineSlot( “/1005424/_dPSv4_mob-all-article-bottom_(300×250)”, [300, 250], “pb-ad-78158” ).addService( googletag.pubads() ) ); } );

    The post 4 Steps on How to Read Images and Learn to Replicate the Results by Daniel Smith appeared first on Digital Photography School.
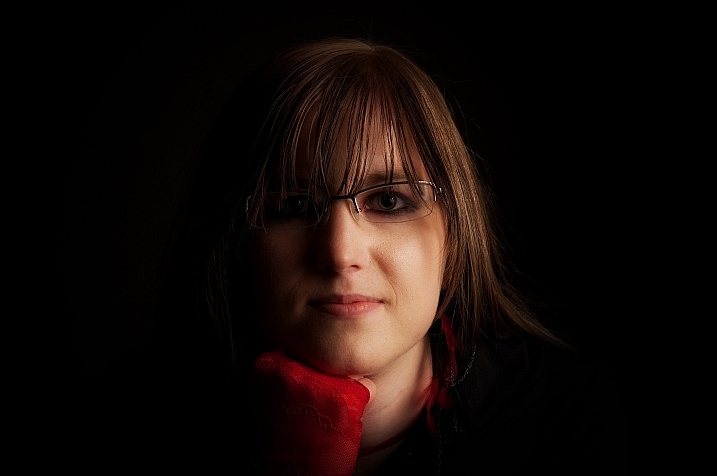

    Digital Photography School

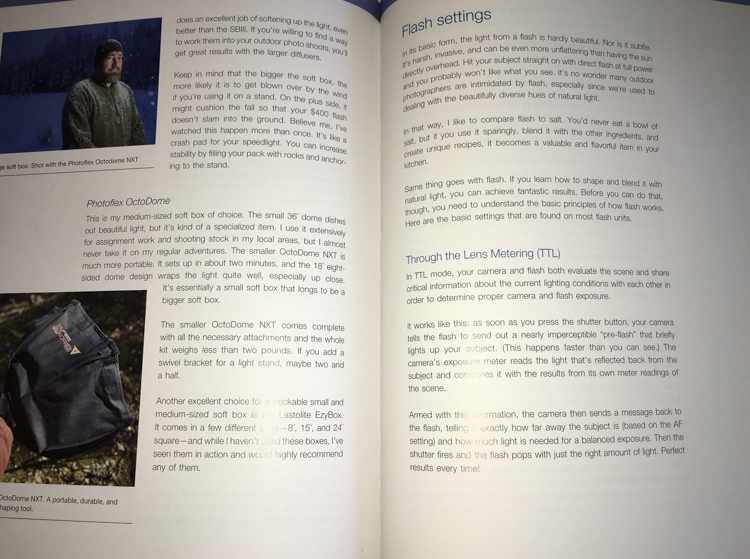
  • Review – Outdoor Action and Adventure Photography Paperback Book

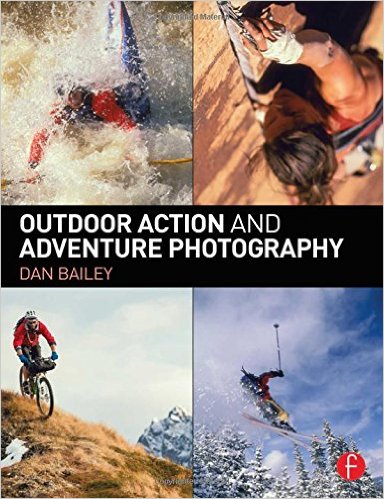
    outdoor action and aventure photographyOutdoor Action and Adventure Photography by Dan Bailey is a refreshing change of course in this digital age we live in – it’s actually a paperback book. It is a good thing that Dan had decided to go hardcopy with this book, because it is filled with information, and as a result I feel like many people will want to jot things down, highlight paragraphs, and refer back to it time and again.

    Overview

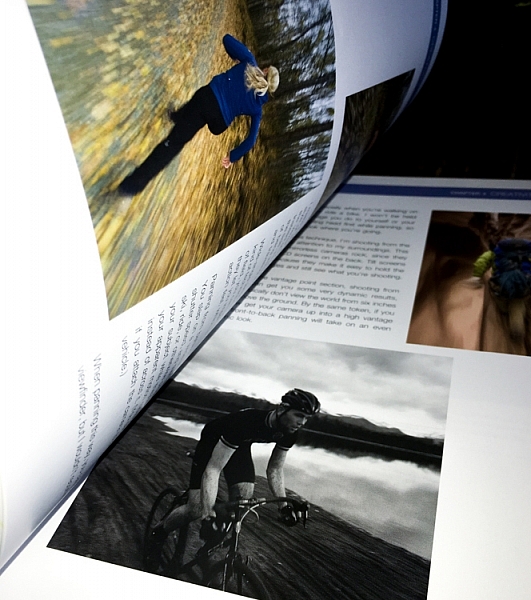
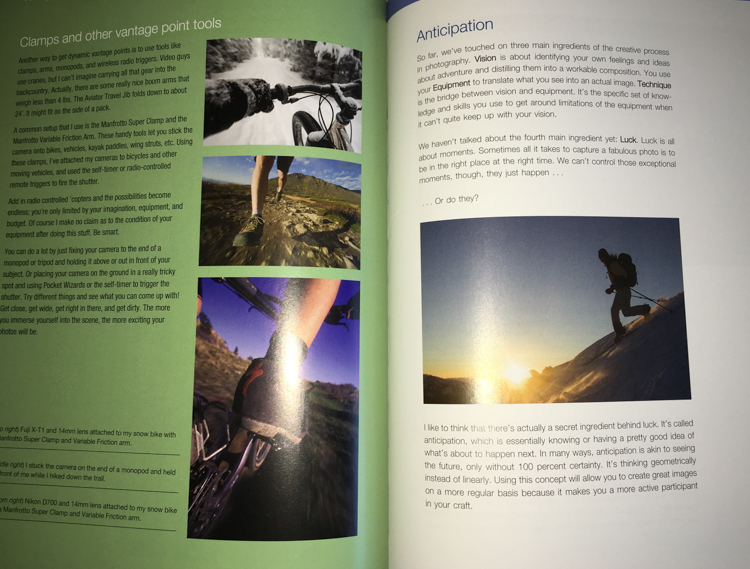
    The book starts out with a heartfelt acknowledgement section that truly shows you how much time, effort, and passion, Dan has put into this work. It’s not just something that he’s slapped together – and it shows! Not only is the book well written and informative, but it is beautifully illustrated with a number of photographs from Dan’s portfolio.

    After the acknowledgements, you’re given a general introduction to frame your mind for what you’re about to learn. Outdoor Action and Adventure Photography is geared to outdoor photographers, but I’d argue it’s geared even more so towards the outdoor enthusiast, who wants to take great photographs of their adventures.

    outdooraction

    What I mean is that this book is designed to show you how to take photographs, while you’re hitting a triple black diamond ski slope, or hiking up the side of a mountain. It’s geared more towards the extreme side of outdoor adventure, and the challenges that you would face if you were trying to photograph in those conditions.

    What You’ll Learn

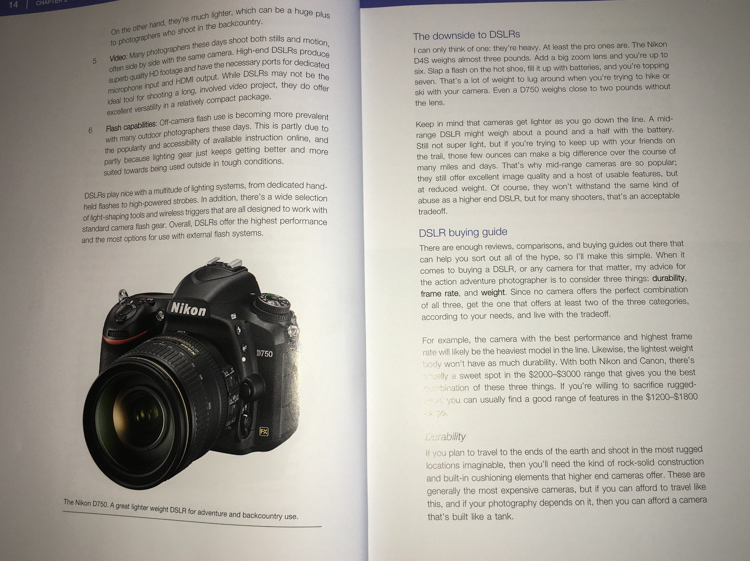
    After the general framework is set, the book is broken down into a fairly logical path. First you’re introduced to the types of gear that you’ll need. Dan makes a great point about how, for this type of work, expensive gear does make a difference. Not necessarily just for the image quality, but because higher quality professional gear is designed to take a beating, and in the conditions you’ll be facing, the gear you use will need to withstand a few bumps.

    outdooraction-3

    One of the largest problems faced by adventure photographers is the desire to pack light, but maintain a versatile and high quality kit. In the book, Dan addresses how he handles this challenge, and from what I can gather he is focused more on lightweight and ease of use, versus trying to carry every possible lens and body up the side of a mountain. He has a few different configurations of bodies and lenses that he brings, depending on how far and strenuous the adventure is expected to be.

    outdooraction-2

    Another big issue that is addressed in this book is regarding lighting. Light on the side of a mountain is not always going to be what you want it, and in this section Dan spends a great deal of time discussing different types of flashes, he provides a great step by step workflow, and talks about different use cases.

    outdooraction-4

    Finally, there’s a great section on weighing the decision to go pro. What does it mean, do you have what it takes, will you go full-time or part-time? A lot of what is discussed in this section can be applied to other fields of photography, but there are a few considerations specific to Dan’s field, that are worth considering if you’re thinking about making this a career choice.

    Final Thoughts

    Outdoor Action and Adventure Photography is a book that is designed for the outdoor enthusiast who wants to take great photographs in extreme conditions. While Dan keeps a fairly conversational tone throughout, the book is so packed with information, I’d equate it to more of a textbook than a simple informational guide.

    If you’re looking to take great photographs while hitting the slopes with your friends – this is the book for you!

    googletag.cmd.push(function() {
    tablet_slots.push( googletag.defineSlot( “/1005424/_dPSv4_tab-all-article-bottom_(300×250)”, [300, 250], “pb-ad-78623” ).addService( googletag.pubads() ) ); } );

    googletag.cmd.push(function() {
    mobile_slots.push( googletag.defineSlot( “/1005424/_dPSv4_mob-all-article-bottom_(300×250)”, [300, 250], “pb-ad-78158” ).addService( googletag.pubads() ) ); } );

    The post Review – Outdoor Action and Adventure Photography Paperback Book by John Davenport appeared first on Digital Photography School.
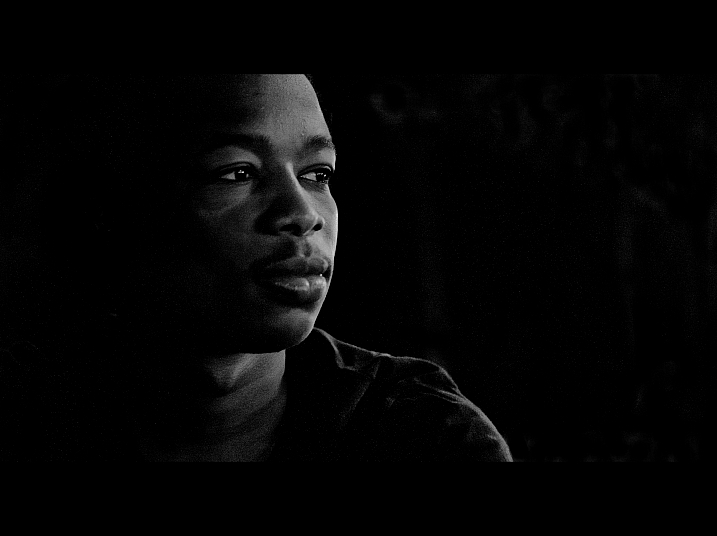

    Digital Photography School

  • The Top 10 Camera Features Wish List of dPS Readers and Writers

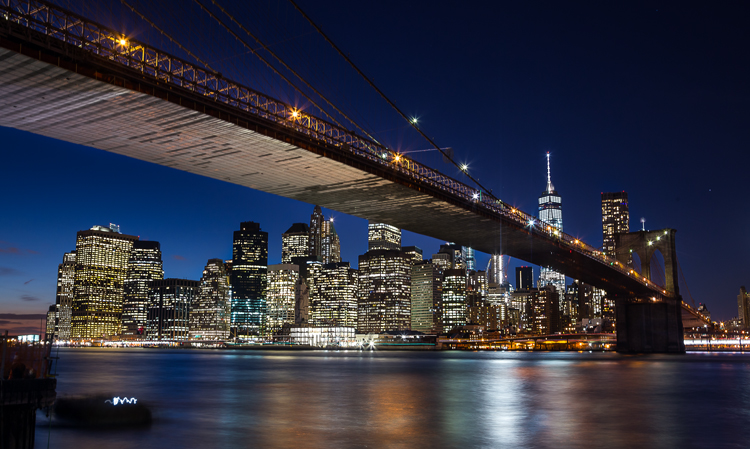
    Brooklyn Bridge picture taken using a remote shutter release and a neutral density filter, which could be eliminated with camera improvements.

    Brooklyn Bridge picture taken using a remote shutter release and a neutral density filter, which could be eliminated with camera improvements.

    It is becoming almost cliche, but there has never been a better time to be a photographer. What we can do now with modern digital cameras, without spending that much money, is incredible. Without breaking the bank, you can now get an extremely high resolution digital camera, with low light performance and a dynamic range unheard of just a few years ago, that shoots at speeds measured in multiple frames per second. If that isn’t enough, it will also double as a video camera with HD quality as a bare minimum. It will even send the pictures wirelessly to your phone. It seems ungrateful to ask for more. Still, everything can be improved, can’t it?

    And just to be clear – when I say improved, I don’t mean adding more megapixels. Or demanding even better low light performance and dynamic range. Or achieving even faster focus and shooting speeds. The manufacturers know everybody wants that stuff, and they seem to be putting all their energy into those areas.

    But doesn’t it seem like there are features that could be added to cameras that wouldn’t require a technological breakthrough? Or that wouldn’t make your camera cost a fortune? It always seemed that way to me. So I started asking around to other photographers, then I started asking readers, and finally I asked my fellow dPS writers.

    How would you improve digital cameras?

    I got some good answers, and have combined them with my own to create a list of 10 new features (a wish list) that could be added to digital cameras to make them better. Here they are, in no particular order:

    1. A Small LCD for the Histogram

    The first improvement is a separate, smaller LCD on the back of the camera. Why? Let me explain.

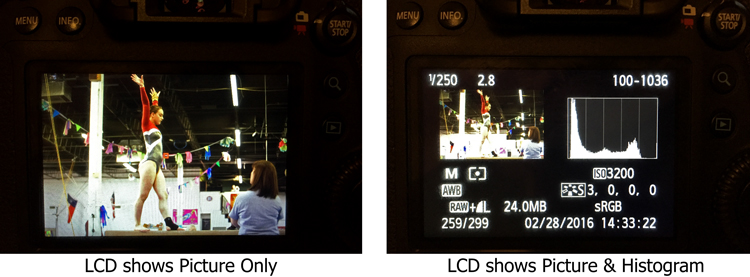
    We all know that the best way to evaluate exposure when you are shooting is to look at the histogram. Looking at just the picture on the LCD doesn’t work as well when you are trying to evaluate exposure. But look what happens to the picture on the screen when you add the histogram:

    LCD-graphic

    On the left, where you have the full picture, you can clearly see it. But once you add the histogram, the picture on the right becomes tiny. It is unusable and tells you nothing. We are essentially forced into a position of having to choose between a picture we can see, or just viewing the histogram (but not both). I’d like to do both.

    To fix that, you could just put another very small LCD on the back of the screen. It would show only the histogram, so that you could still have a full sized version of your picture.

    2. Three Dials

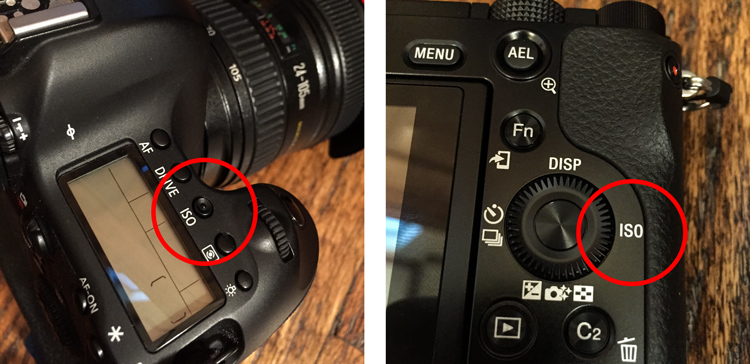
    When you set the exposure level of your pictures, there are three controls: shutter speed, aperture, and ISO.

    At the same time, how many dials do we have to set those three controls? Two – and that’s if we’re lucky. Entry level cameras often only have one. To change all three exposure controls with only two dials, means you have to press buttons while turning dials. It’s a rather cumbersome process, for the most important and commonly used functions of the camera. If we have three exposure settings, shouldn’t we have three dials to set them?

    The odd man out is always ISO, and I personally think this is a hold-over from the days of film. Back then, you couldn’t change the ISO except by changing your film. When digital came along, everyone was pretty happy to be able to change the ISO at all, so having to press a button didn’t seem like a big deal. In addition, at that time, available ISO ranges were extremely limited and if you raised the ISO much then digital noise quickly became a problem.

    But now? ISO ranges are huge! Even entry level cameras have ISO ranges up to 25,000. ISO is now truly a equal partner in the exposure triangle. It should be treated as such. That means it should have its own dial. You shouldn’t have to press buttons to adjust it.

    ISO-controls-graphic

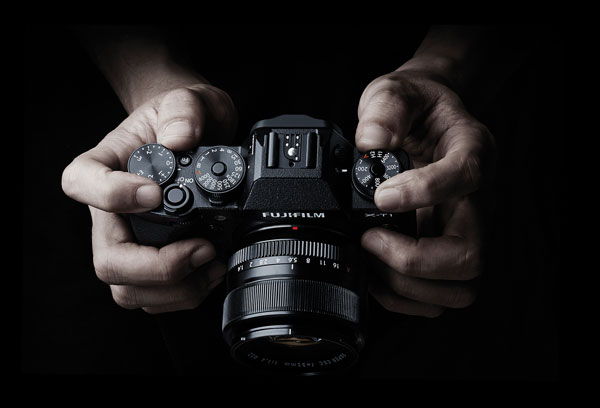
    Stop ISO discrimination! Let’s make it an equal member of the exposure triangle by giving ISO its own dial!

    Where would you put the extra dial? There are many places you could choose from, but one thought is to get rid of the mode dial. Having a dedicated dial to quickly change the mode is another hold-over from a time when there were fewer camera controls (and no menus). Who changes their modes so frequently that the most valuable real estate on the camera needs to be taken up with a dial for it? Don’t most people just pick a mode and use it most, or all of the time? Even those that change modes don’t do so often enough that it needs its own dial.

    Note: It actually appears that this change might be on the way. There are three dials on most Fujifilm mirrorless cameras and one of them is dedicated to ISO. Perhaps others will follow suit.

    Supplied by Fujifilm

    Supplied by Fujifilm

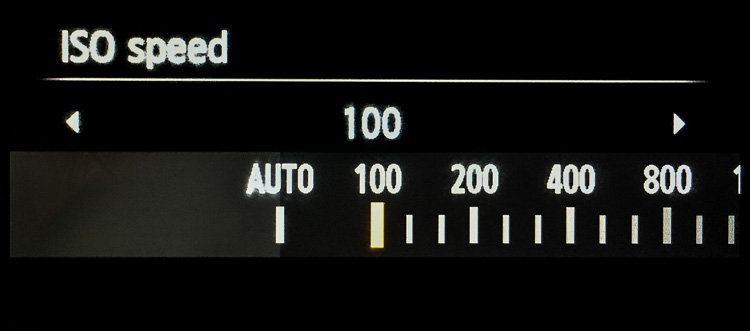
    3. Lower ISOs

    Speaking of ISO, in the rush to expand ISO values on the high side, the lower side of the ISO scale has been completely neglected. The camera manufacturers have worked very hard to make digital sensors more sensitive to light. It would seem like a simple thing to make the sensor less sensitive to light. Why couldn’t cameras have ISO levels of 50, 25, 12, and so on?

    Why would that matter? It would put us in more control over shutter speed, and avoid the necessity of carrying around neutral density filters. Why do landscape photographers need to carry around a bunch of neutral density filters to slow down their shutter speeds? If we could lower the ISO, that would require a longer shutter speed for a proper exposure. It seems like that could just be built in, and would make it much simpler. Instead of adding a 3-stop neutral density filter to your lens, you could then just reduce the ISO from 100 down to 12 (3 stops).

    Why stop at ISO 100? We should see ISO 50, 25, 12, 6, 3, and so on.

    Why stop at ISO 100? We should see ISO 50, 25, 12, 6, 3, and so on.

    Of course, we might need to talk about the numbering system for these low ISOs. Moving down 10 stops from ISO 100 would result in ISO .09 which may not work.

    4. Retractable Remote Shutter Release

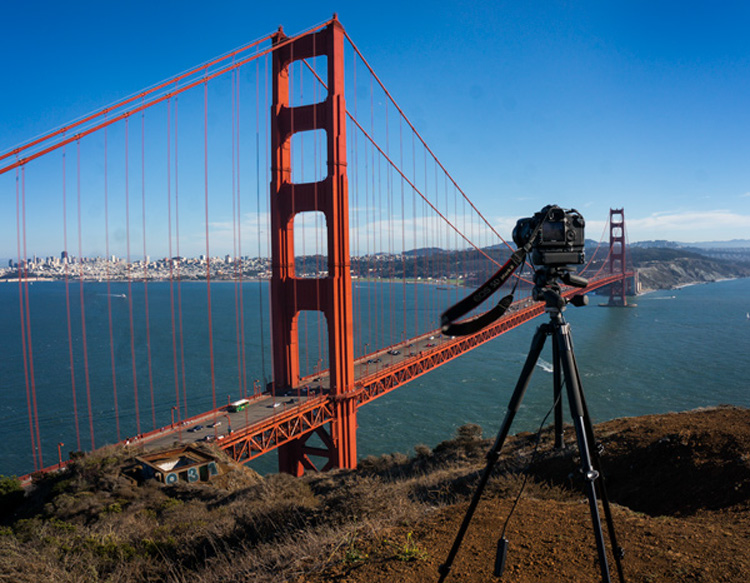
    Speaking of landscape photographers, something every one of them needs is a remote shutter release, or an intervalometer. It seems like the shutter release could detach from the camera with a retractable cable. That way you could pop it out and trip the shutter, without moving the camera or risking vibration.

    TripodAtGoldenGate

    Note the remote shutter release hanging down. Wouldn’t it be nice to have a retractable unit?

    It would mean that we wouldn’t have to carry around remote shutter releases.

    5. Allowing Longer Shutter Speeds

    Another improvement would be to allow longer shutter speeds without the need to switch over to Bulb mode. At present, most cameras limit the length of shutter speeds to 30 seconds. If you want to use a longer shutter speed than that you can, but you have to switch over to Bulb mode. It would be nice to be able to take exposures of a minute or longer without having to switch modes.

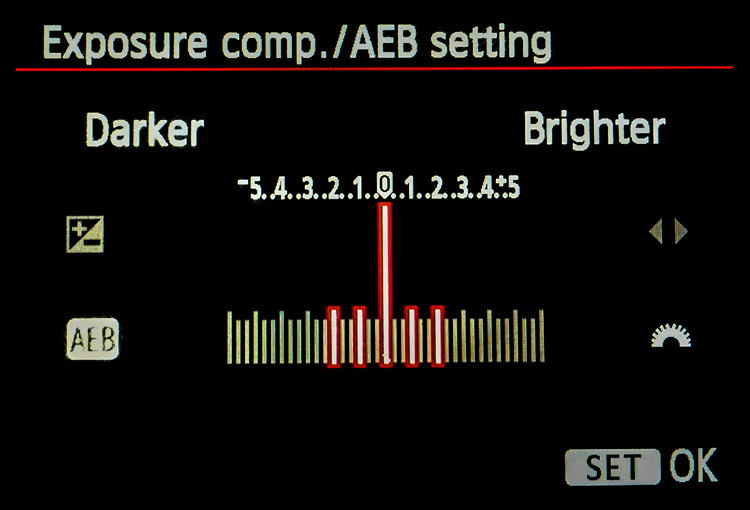
    Why is this important? Largely because of bracketing (or Auto Exposure Bracketing, or just AEB for short). When you bracket, you are taking three (or more) exposures: one at normal exposure, one underexposed, and one overexposed. If you are starting with a long shutter speed, then the longer shutter speed required for the overexposed picture will often need to be longer than 30 seconds.

    For example, if you are taking a bracket of three photos, with your starting shutter speed at 15 seconds, and you set the exposures 2 stops apart, the bracket won’t work as you hope. In this example, the overexposed picture of the bracket would need a shutter speed of one minute (starting at 15 seconds, adding one stop doubles your shutter speed to 30 seconds, and the second stop doubles it again to one minute). But your camera will only allow a shutter speed of 30 seconds, so that won’t work. Your camera will take the normal and underexposed photos, but the overexposed one will be limited to 30 seconds.

    Here is a pretty common bracket for those who use them (5-shots, with each shot separated by 1 stop). If the original shutter speed is longer than 6 seconds, the camera will not capture the entire bracket because the most overexposed picture would need longer than 30 seconds.

    Here is a pretty common bracket: 5-shots, with each shot separated by 1 stop. If the original shutter speed is longer than 6 seconds, the camera will not capture the entire bracket because the most overexposed picture would need longer than 30 seconds to expose.

    How often does this happen? A lot more than you might think. Landscape photographers are known for being out before the sun is up, and they all want to use a combination of a small aperture to maximize depth of field and a low ISO to minimize noise. The only way to get a proper exposure in these conditions is to use very long shutter speeds. These are the same people who have very little control over their lighting and often face dynamic range problems, so they are the most likely to bracket their photos.

    6. Self-Timers

    Why are self-timers on cameras limited to two and 10 seconds? A reader named Jeff Johnson wondered about this (as well as raising some of the other improvements mentioned in this article). Every $ 10 digital watch in the discount store will allow you to set timers of different ranges, why not our digital cameras?

    This is another one that seems to be a hold-over from a prior era. Timers were mechanical devices at one time, and it may have made a lot of sense to limit the options. Now, it doesn’t make sense. It seems like we ought to be able to set whatever length of timer we want, or at least have a few more options.

    7. Improved Wifi

    One exciting recent development in cameras has been the introduction of Wifi. It allows you to transfer your pictures to your phone or other device wirelessly. But it is usually clunky. You have to turn off your phone’s data connection to connect with your camera. Some have raised the idea of using bluetooth for connection to phones, tablets, and laptops (in addition to wifi). dPS writer John McIntire echoed that, and pointed out the smartphone and tablet control for things like timelapse and long exposures.

     8. Hyperfocal Distance Calculator

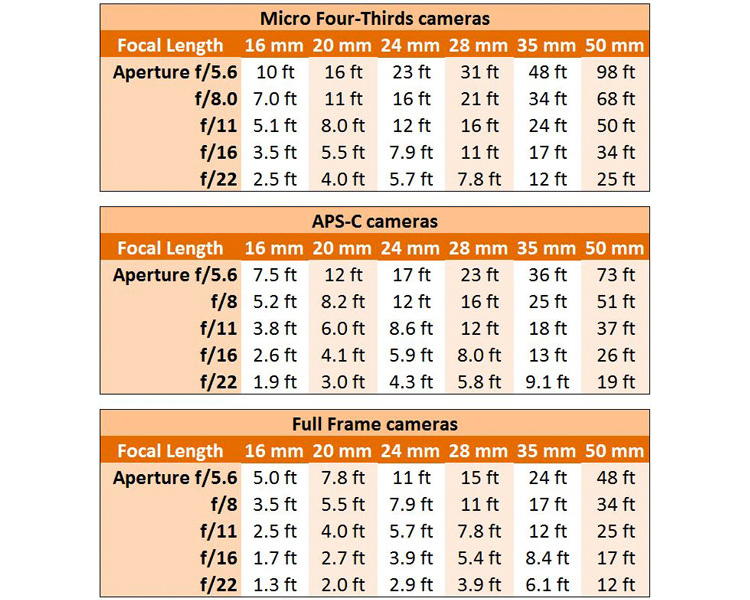
    Despite its name, the concept of hyperfocal distance is not that complicated. It is just the closest point at which you can focus, and still keep your entire background acceptably sharp. It depends on only three factors:

    1. The sensor size of your camera
    2. The focal length you are using
    3. Your aperture setting.

    There are charts and apps that will help you calculate the hyperfocal distance for your shot.

    Hyperfocal Distance Charts

    Hyperfocal Distance Charts

    But why should you be forced to calculate it at all? The aforementioned Jeff Johnson had another great idea of having the camera calculate it for you. After all, the camera is a computer. It already knows all three of the variables involved. Why couldn’t the camera just tell you the hyperfocal distance? It could be part of the camera’s display.

    Note: Once again the Fuji cameras lead the way, as the X-T1 and possibly others, do indeed have a hyperfocal distance display inside the viewfinder.

    9. Internal storage

    Storage has changed remarkably fast in a short period of time. Just a few years ago, you might have been carrying around a bunch of 4 GB memory cards with you. After a couple hundred pictures, you’d swap it out for another. But now, the sizes of memory cards are huge. 128 GB is commonplace, and not all that outrageously expensive. There are even 256 GB cards or even 512 GB cards available as well. As a result, most of us just buy a large card and leave it in the camera. We download the pictures periodically, and resume shooting with the same card.

    That’s already a better situation than what we had a few years ago, but doesn’t it seem weird that there is no storage at all in digital cameras (at least not in the mirrorless cameras and DSLRs we tend to use)? It did to Leanne Cole, who wondered why we are fooling around with memory cards at all at this point. Given how much storage can fit in a small place, haven’t we reached the point where storage should be built-in to the camera? Why not have a 500 GB drive already added?

    10. Your Changes

    These are some items we’d like to see. I think some of these are good ideas, but I suspect there are better ideas out there. So what would you change? Are there things you would add? Are there features you’d like to see put on the digital camera wish list?

    Please let us know in the comments below.

    googletag.cmd.push(function() {
    tablet_slots.push( googletag.defineSlot( “/1005424/_dPSv4_tab-all-article-bottom_(300×250)”, [300, 250], “pb-ad-78623” ).addService( googletag.pubads() ) ); } );

    googletag.cmd.push(function() {
    mobile_slots.push( googletag.defineSlot( “/1005424/_dPSv4_mob-all-article-bottom_(300×250)”, [300, 250], “pb-ad-78158” ).addService( googletag.pubads() ) ); } );

    The post The Top 10 Camera Features Wish List of dPS Readers and Writers by Jim Hamel appeared first on Digital Photography School.
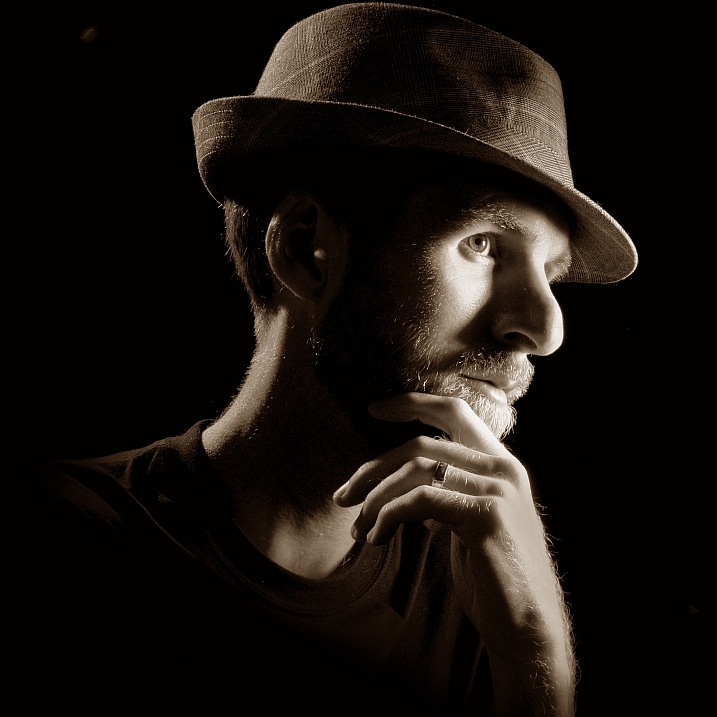

    Digital Photography School

  • 10 Tips for Photographing Wide-Angle Landscapes

    A wide-angle lens is considered an essential piece of gear for any landscape photographer because it gives you a perspective that you cannot achieve with any other lens. You’ll not only be able to photograph grand vistas, but you’ll see lines in a different way, and emphasize subjects by getting super close.

    So if you haven’t tried one yet, borrow or rent a wide angle lens and get ready to make images with a different flavour using these tips.

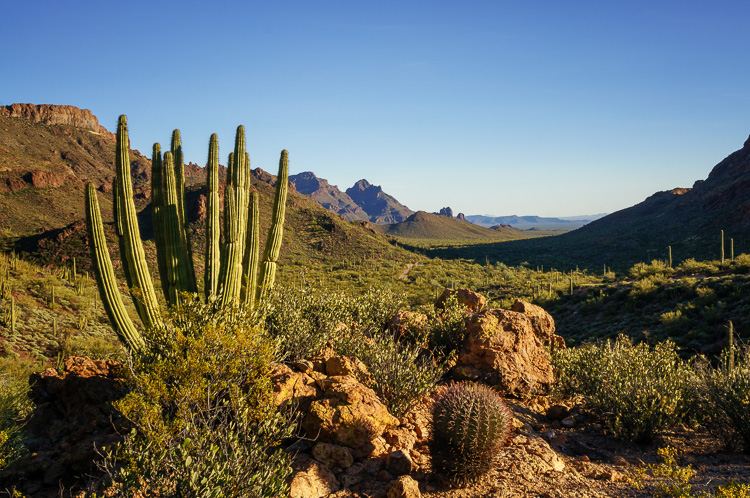
    Organ Pipe Cactus National Monument, Arizona

    21mm, ISO 100, f/18, 1/15 second

    What is a wide-angle lens?

    Camera lenses are defined by comparison to the field of view that the eye naturally sees – which is 50mm on a full frame camera or 35mm on a crop sensor camera. This is known as a normal focal length. Any wider than that is a considered wide-angle.

    My favourite wide-angle lens is in the 10-20mm range on my crop sensor camera, or 16-35mm on a full frame camera.

    When to use a wide-angle lens

    Many people think the purpose of a wide-angle lens is to photograph grand vistas and get a lot in the frame. While that is one purpose for a wide-angle lens, its real power is in using its perspective to emphasize objects that are very close to you and de-emphasizing objects that are farther away.

    1. Emphasize a foreground element

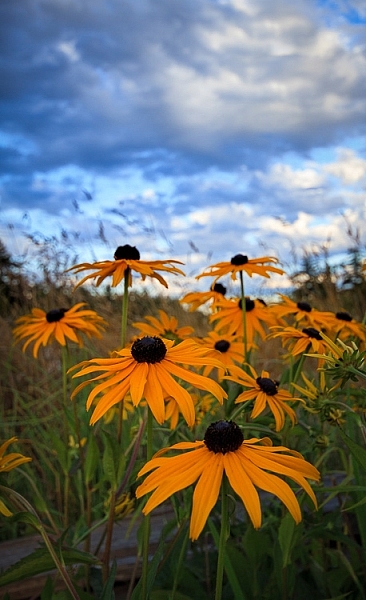
    Wide-angle lenses allow you to get really close to something in the foreground, which will emphasize it and make it look larger and more important than the background elements. A wide lens has a way of changing the relative size of the objects in the frame, so that things that are closer to the lens appear larger, and things in the background appear smaller proportionally.

    Black Eyed Susan by Anne McKinnell

    20mm, ISO 200. f/5.6, 1/160 second

    Try using a low angle and getting very close to your main subject. By close, I mean inches away. You’ll be surprised when you look through the viewfinder and discover that objects don’t appear quite so close through the lens.

    2. Photograph your subject and its environment

    My favourite way to use the lens is to get very close to my main subject so it is large in the frame, as mentioned above, but also include other elements in its environment in the frame. This is a great way to create a story-telling image that provides context for the main subject.

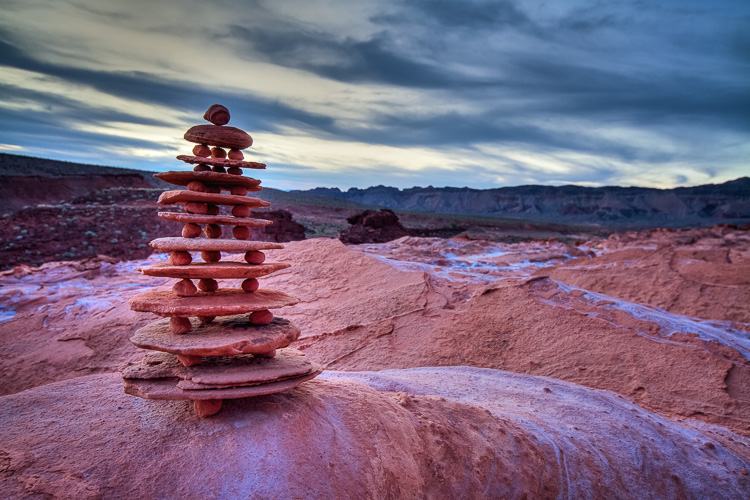
    Balancing Rocks at Little Finland, Nevada by Anne McKinnell

    16mm, ISO 200, f/8, 1.3 seconds

    3. Get everything in focus

    Another great power of a wide-angle lens is its ability to have incredible depth of field. You can get everything from two feet away to infinity in focus. Of course, this depends on the exact lens and the aperture you choose, but all wide-angle lenses have a greater ability to get more in focus than a telephoto lens (which is excellent at shallow depth of field by blurring the background). You’d be hard pressed to blur the background with a wide-angle lens.

    Whitney Pockets, Nevada by Anne McKinnell

    19mm, ISO 100, f/20, 1/20 second

    You can use a hyperfocal distance calculator to figure out exactly what will be in focus for your lens at the aperture you choose. But generally speaking, if you focus on something close to you and use a small aperture like f/18, everything from front to back will be in focus.

    4. Watch out for distractions

    Since wide-angle lenses include a lot in the frame, you’ll need to be extra vigilant to make sure there are no distractions. Everything that is in the frame should have a purpose.

    Check your composition to make sure there is nothing in the foreground that you didn’t notice, since objects just inches away from you will be in the frame. As well, check the background to make sure there you haven’t included something unintentional.

    Ideally, your composition should clearly show what the main subject is, what the supporting elements are using an interesting graphic design, and not include anything else. Simplify the composition as much as possible.

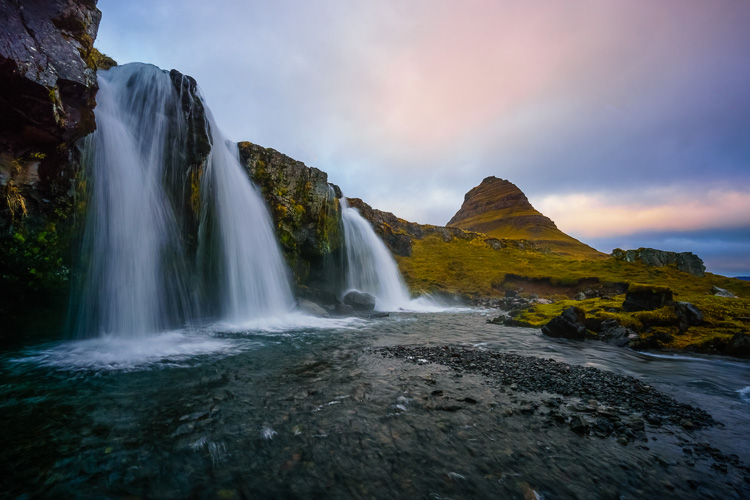
    Kirkjufellsfoss, Iceland by Anne McKinnell

    11mm, ISO 100, f/20, 1/6 second

    Because the frame contains such a wide field of view, it will have a lot in it, so it is especially important that the main subject is obvious.

    5. Keep the camera level

    Wide-angle lenses are notorious for displaying distortion around the edges. Anything with straight lines at the edges of the frame will appear to lean inwards. To avoid or minimize distortion, keep the camera level with the ground and don’t angle it up or down.

    6. Angle your camera upwards

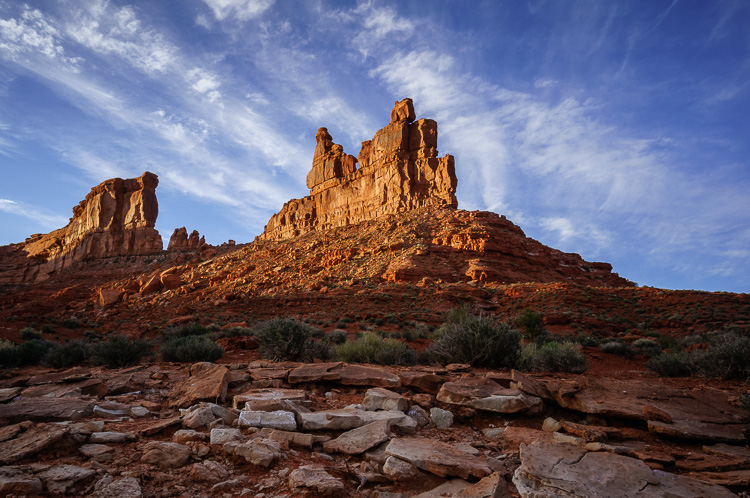
    On the other hand, you can use this distortion to your advantage! Just make sure it is intentional and you are using it to emphasize something. For example, by angling the camera upwards you can emphasize the sky, and any clouds in it will appear to point towards the center of the frame.

    Valley of the Gods, Utah by Anne McKinnell

    15mm, ISO 100, f/11, 1/60 second

    7. Angle your camera downwards

    Similarly, if you angle your camera downwards you can emphasize leading lines on the ground and create a perspective that really draws the viewer in.

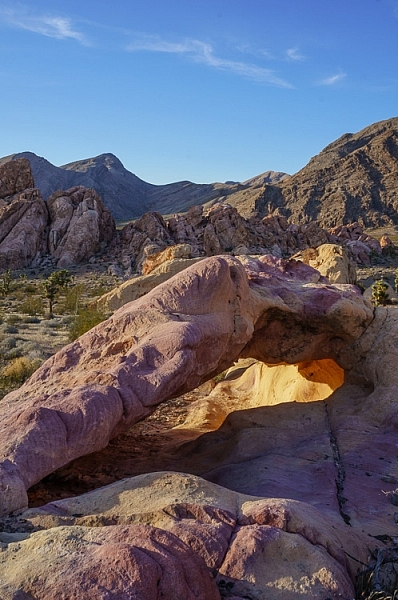
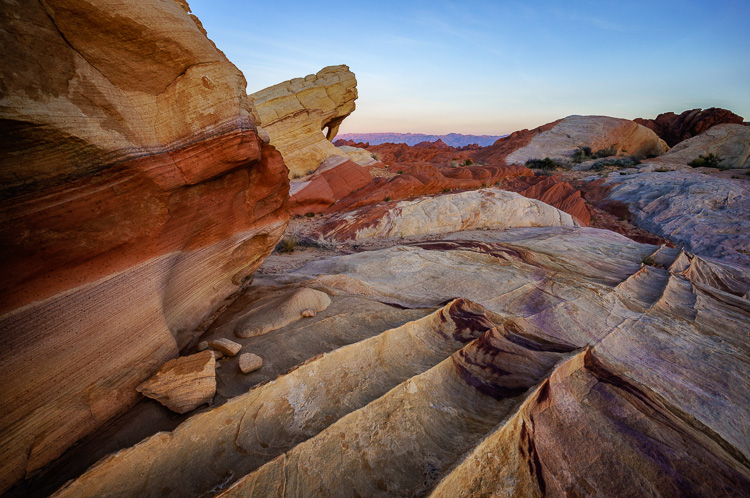
    Fire Canyon Arch in the Valley of Fire State Park, Nevada by Anne McKinnell

    10mm, ISO 200, f/11, 1/20 second

    8. Make images in close quarters

    Whenever you are in an enclosed space, making images with impact can become difficult, since you cannot get far enough away from your subject. If you are in a tight situation, a wide-angle lens is a necessity!

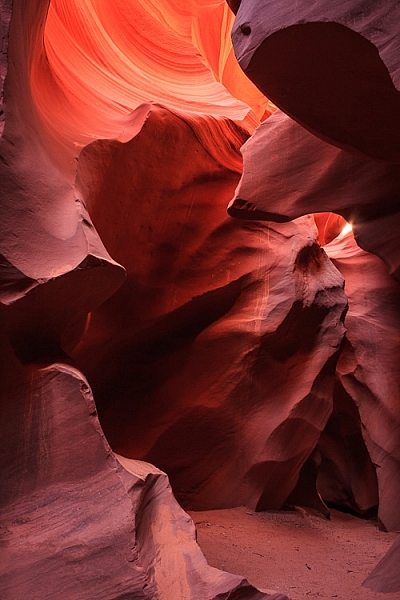
    Antelope Canyon, Arizona by Anne McKinnell

    21mm, ISO 100, f/11, 5.0 seconds

    9. Beware of polarizing filters

    You may already know that polarizing filters can darken skies, emphasize clouds, and saturate colours when you are photographing in a 90 degree angle to the sun. If you are photographing with the sun directly in front of you or behind you, the filter does not have this affect.

    With a wide-angle lens, you may find that part of the scene in the frame is at a 90 degree angle and is affected by the polarizing filter, and the other side is not. When this happens, it is better not to use the polarizing filter at all (it will give you an uneven sky which is darker on one side).

    10. Manage uneven light

    When photographing landscapes with a wide-angle lens you’ll frequently encounter varying amounts of light in the frame. Often the sky in the background is much brighter than your foreground. When this happens, you can use a graduated neutral density filter to darken the top portion of your image and even out the exposure.

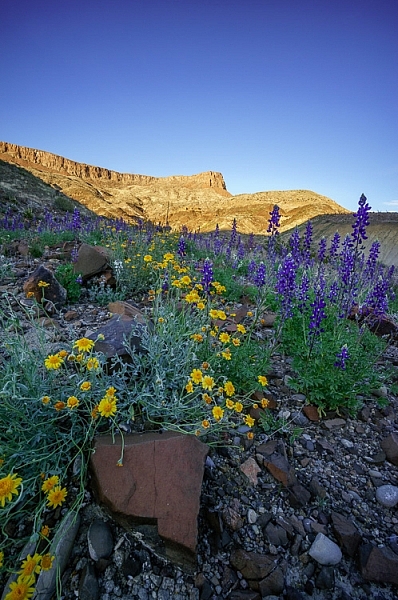
    Wildflowers in Big Bend Ranch State Park, Texas by Anne McKinnell

    10mm, ISO 200, f/11, 1/100 second

    A wide-angle lens is often the favourite lens in the kit for landscape photographers and with these tips it may become your favourite lens too.

    What do you like to shoot with your wide lens? Please share your tips and images below.

    googletag.cmd.push(function() {
    tablet_slots.push( googletag.defineSlot( “/1005424/_dPSv4_tab-all-article-bottom_(300×250)”, [300, 250], “pb-ad-78623” ).addService( googletag.pubads() ) ); } );

    googletag.cmd.push(function() {
    mobile_slots.push( googletag.defineSlot( “/1005424/_dPSv4_mob-all-article-bottom_(300×250)”, [300, 250], “pb-ad-78158” ).addService( googletag.pubads() ) ); } );

    The post 10 Tips for Photographing Wide-Angle Landscapes by Anne McKinnell appeared first on Digital Photography School.
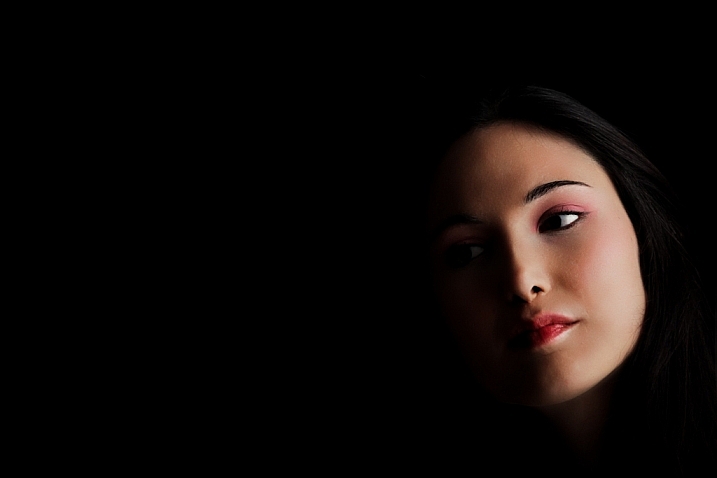

    Digital Photography School