Category: Photography

  • How Two Weeks in the Wilderness with One Prime Lens Restored My Love for Photography

    If you have read a few of my previous pieces here on the Digital Photography School like “5 Uncomfortable Truths about Photography“, or “How Making Horrible Photos Will Lead to More Keepers“, you’ll know that I have a much greater respect for learning, effort, and practice than I have for the latest and greatest gear. Good photography does not rely on equipment or rules.

    But what happens if you lose your will to produce? What happens when the desire to make images simply slips away?

    It happened to me last year, I just stopped wanting to make images. For most of the summer, my busiest and usually most productive season, I had no desire to shoot. Out of habit I still carried a camera on the wilderness trips I guide, and on personal trips across Alaska, but the images I made were few and lackluster. Now, a year later, I cringe to look through those, at the missed opportunities.

    I broke out of the funk, but not the way I expected. Tired of carrying along gear I wasn’t using, for the final trip of my summer season, a 17 day pack-rafting trip in the Arctic National Wildlife Refuge, I carried only a camera body and one single 24mm f/2.8 prime lens.
    AK-ANWR-Katakturuk-Canning-Packraft-1085-88

    It wasn’t a creative decision, I took that combo because it was the best way to make my kit as light possible and still get the quality I wanted, and the lens and camera fit easily in a small holster style case that I carried, attached to the chest straps of my pack.

    Toward the end of August my two clients and I flew from Fairbanks, Alaska north toward the Arctic National Wildlife Refuge. We passed little ranges of mountains in the interior, above the Yukon Flats, and over the rugged high peaks of the Brooks Range. Just to the north of the mountains on the arctic coastal plain of the refuge, the pilot descended, picked the unmarked strip out of the landscape, and settled the oversize wheels of the bush plane down onto the autumn tundra.

    Within a few minutes of landing, we’d unloaded our heavy packs and the pilot was rocketing down the grass and into the air. He was the last person we’d see for more than two weeks.

    The first 10 days of the trip were dedicating to hiking, though the mileage was such that we could take a day or two off periodically, which was good, because when the first snow storms of autumn hit a week into the trip, we were in no mood to walk.
    AK-ANWR-Katakturuk-Canning-Packraft-1085-102

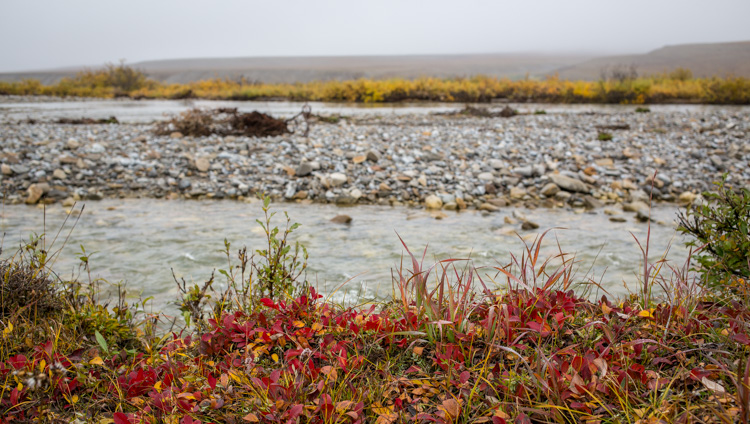
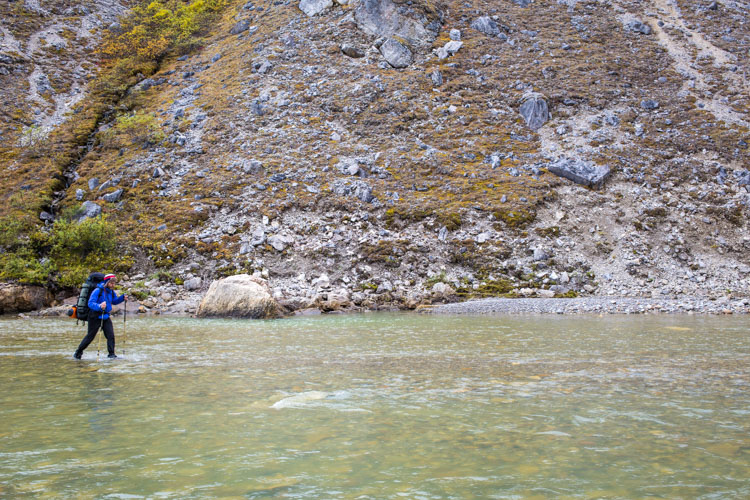
    The route carried us through a narrow gap in the mountains cut by a small river. We walked through that gap on a cold, windy day when low clouds obscured the tops of the mountains. We had to criss-cross the river, and our feet were constantly soggy. But the willows along the creek and the small patches of tundra were bright with autumn colors, and a much-needed distraction from the cold.

    Once on that first day, just once, I was stopped in my tracks by a scene that had to be photographed. I’d made photos earlier in the trip, but they’d been snapshots. This was a scene that inspired me; a rare thing.

    The simple camera and lens setup removed much of the tedious decision making. There was no easy compositional escape in the form of a zoom lens, rather I had to move about to make the scene come together. I worked within the restraints of the lens (which were numerous), and it was utterly liberating.
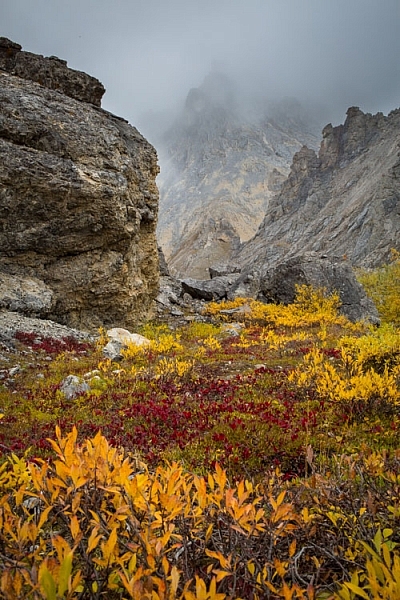
    AK-ANWR-Katakturuk-Canning-Packraft-1085-135

    I gave the image five whole minutes before the chill forced us on, and for the first time all summer, five minutes wasn’t enough.

    The following day, we woke to clouds, shredded by the previous day’s winds, and big patches of blue shone through, bright and optimistic. We hiked over a low pass, and watched a Grizzly sow and two young cubs graze in a sedge meadow a quarter mile and two hundred vertical feet below. My little lens didn’t have a prayer of making anything more than a token image of the brown specks on the tundra below. Instead I peered down through binoculars as the bears dug up sedges and combed berries from the bushes with their teeth.
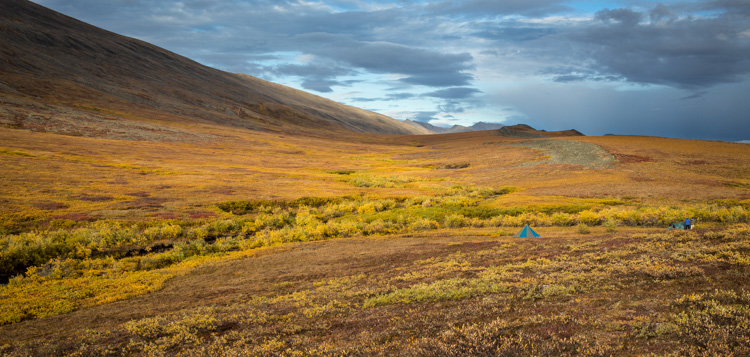
    AK-ANWR-Katakturuk-Canning-Packraft-1085-277

    On the sixth day, the storm hit. We were camped on a meadow of soft, dry tundra above a small creek when the winds shifted from a pleasing breeze from the east, to a howling gale from the west. It happened in moments, the speed of the weather change taking me completely by surprise. Rain, then pelletized snow arrived, followed by a genuine snow storm in the night. For two solid days we were battered by the strongest winds and most intense storm I’ve ever experienced in the Brooks Range. Just keeping our tents standing was a constant battle.
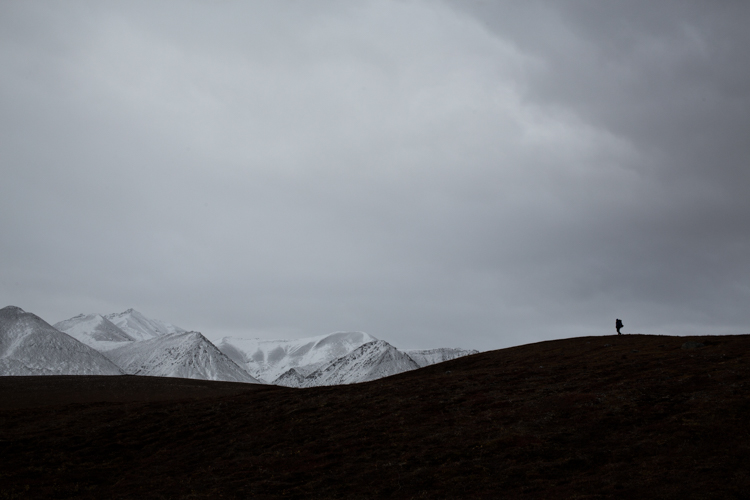
    AK-ANWR-Katakturuk-Canning-Packraft-1085-582

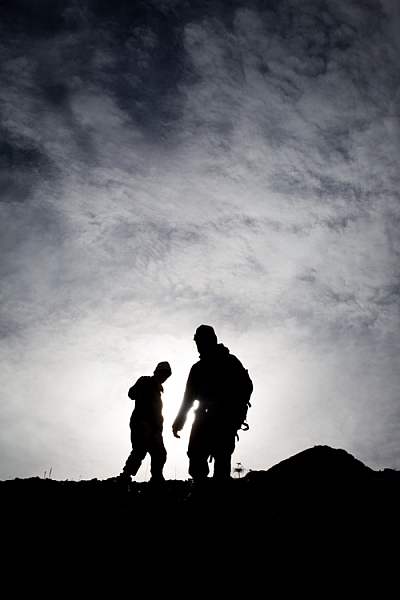
    Yet in that time, my clients and I managed a few excursions away from camp. We climbed up to a low ridge where the full brunt of the west wind hit us hard. There, we leaned into the gale and watched the falling snow tear across the tundra.

    It wasn’t a photogenic scene, at least not by traditional standards, and yet I made images because I wanted to. Creativity, quite suddenly, brightened up like a cartoon bulb over my head.
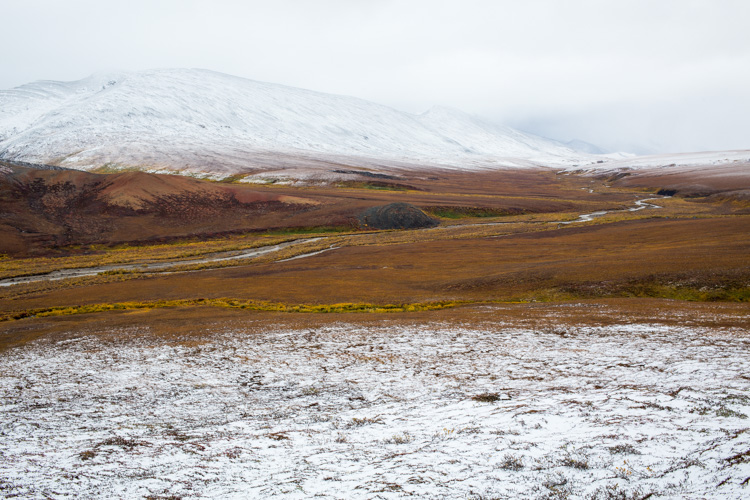
    AK-ANWR-Katakturuk-Canning-Packraft-1085-504

    On the third morning, before I even opened my eyes, I knew the storm had passed. My tent wasn’t shuddering in the wind, and when I did lift my eyelids, I could see the day was too bright to be dominated by clouds.

    Emerging from my tent, I saw that fresh snow cloaked the mountains and dusted the tundra around our camp, but blue dominated the sky above. I went for my camera and spent a happy hour making images as the drenched tents and rain gear steamed in the rising sun.
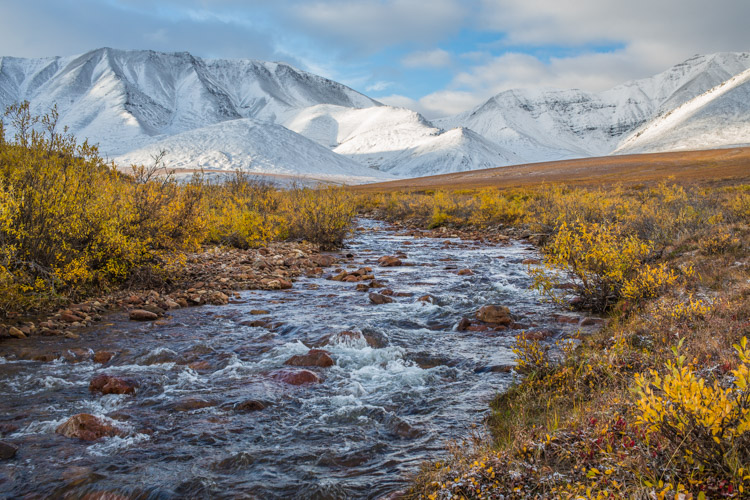
    AK-ANWR-Katakturuk-Canning-Packraft-1085-556

    Two days later we reached the river and our cache of food and boating gear that had been waiting for us. In those two final days before we traded in our hiking boots for pack-rafts, I think I made more images than I had in the previous three months combined. I couldn’t get enough of it.
    AK-ANWR-Katakturuk-Canning-Packraft-1085-384

    The 50 miles of paddling stole some of my photographic productivity. (It’s hard to paddle a small bouncing raft through swift, splashing water while taking photos). Nonetheless, as we descended the river out of the mountains and onto the coastal plain, my renewed love for photography stuck with me. Even when another storm hit and we were pinned down for two more days, even when the snow fell in heavy wet flakes, and when the wind tore the autumn colors from the vegetation and shifted the landscape from red and yellow to brown.
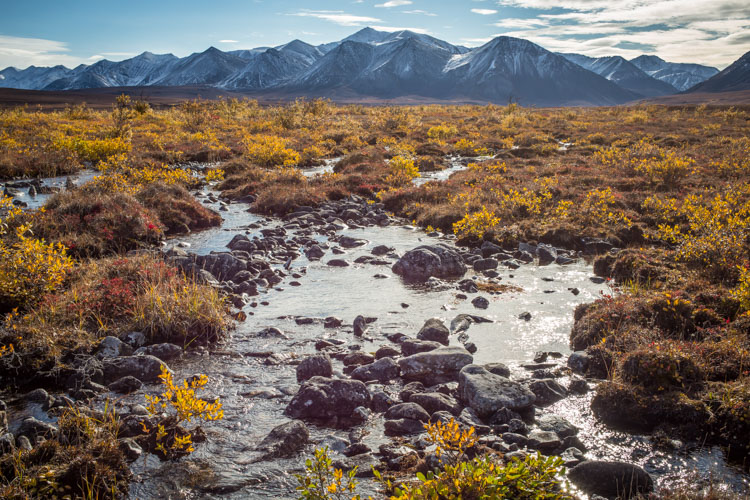
    AK-ANWR-Katakturuk-Canning-Packraft-1085-643

    Our final camp lay where the river met its coastal delta. Caribou criss-crossed the plain in small bands, and migrant birds were congregating in the many lakes. My little lens was no match for the distant wildlife, but it didn’t matter. I’d rediscovered photography, which meant that I was more aware of my surroundings, and the images that lay in it, than I had been for some time. Even if I didn’t have the right equipment to capture some of the photos I found, I recorded them mentally in sharp detail. As it turns out, those mental images are just as rewarding as the ones glowing on my computer screen.

    Paging through the images from the trip, I see an interesting evolution. The first images are mostly snapshots, but as time passed, and my inspiration picked up steam, the images become more purposeful, more composed… better, even.

    Conclusion

    Purposefully restricting yourself can be a great tool to boost creativity. It’s a little like playing charades: using limited tools to effectively get your message across. It can be fun, and a bit frustrating. It forces your mind outside its comfortable box, and into a place where creativity is far more important than gear. When, and if, you return to your diverse array of lenses and cameras, you will no longer take all those compositional possibilities for granted.

    If you are stuck in a rut, or just want to try something new, give up your zooms for a couple of weeks, only shoot black and white, use your camera exclusively in manual mode, or shoot some film. After, share your experiences in the comments below, I’d love to hear what happens.

    googletag.cmd.push(function() {
    tablet_slots.push( googletag.defineSlot( “/1005424/_dPSv4_tab-all-article-bottom_(300×250)”, [300, 250], “pb-ad-78623” ).addService( googletag.pubads() ) ); } );

    googletag.cmd.push(function() {
    mobile_slots.push( googletag.defineSlot( “/1005424/_dPSv4_mob-all-article-bottom_(300×250)”, [300, 250], “pb-ad-78158” ).addService( googletag.pubads() ) ); } );

    The post How Two Weeks in the Wilderness with One Prime Lens Restored My Love for Photography by David Shaw appeared first on Digital Photography School.


    Digital Photography School

  • How I Learned to Stop Worrying and Love Auto ISO

    ISO is one of the three critical elements of exposure, and yet among the people I have talked to it seems to cause the most confusion. Aperture can be physically represented by simply making a circle with your fingers to represent the size of the opening in your camera lens, and shutter speed can be mimicked by closing your eyes, opening them briefly, and then shutting them. Neither one is a perfect comparison but it helps get the point across, especially to those who are new to photography.

    ISO, in my experience, is a bit trickier to explain, and yet it can make or break a picture, even if you have the other two elements set just right. Or…it could make or break a picture in days gone by.

    We have reached somewhat of a unique time in the history of photography in that ISO is, to some degree, no longer relevant in the same way that aperture and shutter speed still are. While I certainly would not let my camera choose the aperture and shutter speed for most of my shots, I have all but abandoned my misgivings about Auto ISO, and now almost always let the camera choose for me. As a photographer it has not been an easy leap for me to make, but it has been incredibly liberating, and I think it could be for you too.

    A tack-sharp picture shot at ISO 4000 with minimal digital noise.

    A tack-sharp picture I shot at ISO 4000 with minimal digital noise.

    My first real digital camera, not counting a few point-and-shoot models I had in the early part of the previous decade, was a Nikon D200. It was a beast of a camera, with some features that outclassed even most modern models, like a maximum shutter speed of 1/8000 second and a weather-sealed body. One thing it did not do so well was high ISO values, specifically anything past 400. I could shoot at 800 in a pinch, but going all the way up to 1600 resulted in pictures that were a muddy mess and 3200, its maximum possible value, was an unmitigated disaster. This trained me to use the following thought process in virtually all shooting situations:

    • Shoot in Aperture Priority (I set the aperture and let my camera set the shutter speed)
    • Set the ISO to 100, 200, or 400 depending on the lighting
    • Select an aperture that would give me the depth of field or overall image sharpness I wanted
    • Hope the shutter speed wasn’t too slow so I didn’t get a blurry picture
    • If the shutter speed was too slow, raise the ISO to no more than 800
    • If the shutter speed was still too slow, compromise my artistic vision by opening up the aperture
    auto-iso-sunset

    Even my old D200 could produce some fine images, though things quickly went south above ISO 400.

    It was a process that worked somewhat successfully, but often resulted in images that were compromised in one way or another. When I finally upgraded to a much newer camera, a Nikon D7100, I still had the same mindset when it came to setting the ISO. I wanted to do it myself, lest my camera make some kind of silly decision on its own, that resulted in a picture with way too much noise for my taste. For a while I used the same thought process as shooting with my D200, even though the D7100 had vastly superior high ISO capabilities (which have since been surpassed by nearly every modern camera on the market today including its own successor, the D7200).

    At first I used the old rule that had been burned in my mind regarding anything higher than ISO 400, which was to avoid it at all costs. Despite the evidence right in front of my eyes I was still used to the old way of doing things, and mentally set my maximum threshold at ISO 800, which I told myself, could only be exceeded in the most dire of circumstances. It took me far too long to discard this line of thinking, and I’m hoping you won’t have to make the same mistakes I did to get there.

    Shot on my D200 at ISO 400.

    Shot on my D200 at ISO 400.

    A Brief History Lesson

    The term ISO is somewhat of a holdover from the days of analogue film, when you would go to a camera store and buy an entire roll of film with an ASA value of 100, 200, or 400. ASA 200 was twice as sensitive to light as 100, 400 was twice as sensitive as 200 (which made it four times as sensitive as 100), and so on. Once the film was loaded in your camera you could not simply change your mind and use a different value; you had to shoot the entire roll before changing to another ASA for different lighting conditions.

    ASA 100 film was great for outdoor situations or other scenarios where there was a lot of light, just like shooting at ISO 100 on a digital camera. ASA 400 was better for indoor situations when you needed film that was more sensitive to light, if there was simply not much to work with. If you looked hard enough you could get film that went up to ASA 800 or 1000, but anything beyond that was about as common as a polycephalous bos taurus (two-headed cow).

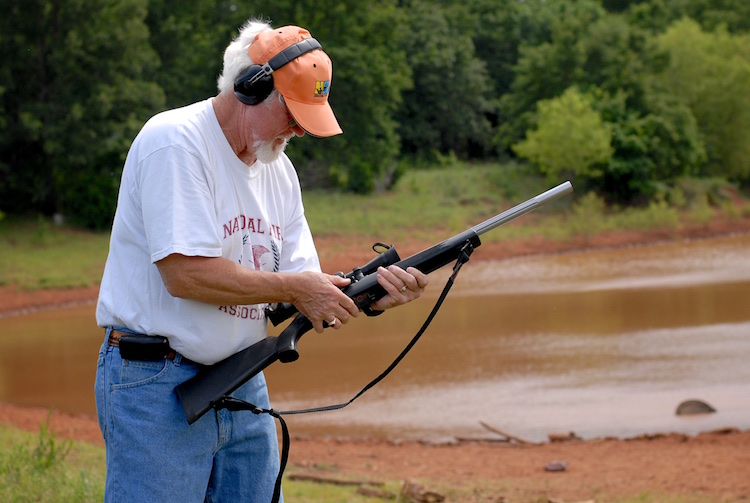
    I took this photo of a champion marksman on my old D200 at ISO 400. If you look super close at the trees you will see some noise in the image, but doing that kind of misses the point of the photo.

    I took this photo of a champion marksman on my old D200 at ISO 400. If you look super close at the trees you will see some noise in the image, but doing that kind of misses the point of the photo.

    Early digital cameras, not unlike my world-weary Nikon D200, did not offer much in the way of low-light shooting capabilities that their film-based counterparts didn’t already have. Even as recently as a decade ago if you wanted to shoot in a low-light situation you might as well just grab a roll of high-ASA film, since most digital cameras just weren’t very good at their (roughly) equivalent high ISO values. (ISO and ASA are not directly 1:1 equivalent, but the measurements can be treated as fairly similar for the purposes of comparison.)

    However, all this started to change rapidly as digital sensor technology advanced over the years, and now we are at the point where virtually any consumer camera can shoot up to ISO 3200 or even 6400 (a value that was unheard of with analog film) without much of a penalty in terms of overall color and luminance noise. In fact, most digital cameras are so good they can set the ISO automatically (hence the term Auto ISO), essentially removing a critical element of the exposure equation altogether, and freeing you so you only have to think about aperture and shutter speed.

    Why I Use Auto ISO

    This line of thinking was what used to stop me dead in my tracks as a photographer. The whole reason I learned to shoot in Manual mode was so I could have more control over my photos! Why on earth would I want to give control back to my camera, as if it knows better than I do what settings I want? The answer, I discovered over several years of shooting, is not as black and white as I once thought.

    In most situations, the primary element of exposure that concerns me is the aperture, since it dramatically affects things such as depth of field and image sharpness. Of course I also have to pay attention to the shutter speed, since I generally don’t want motion blur, which then leaves the question of ISO. After shooting with my D7100, and subsequently my full-frame D750, I have realized that in most cases, I’m happy to let my camera decide the ISO for me, because I simply don’t care about it anymore. This might sound a bit extreme, but I humbly submit that perhaps you shouldn’t either.

    Shot at ISO 2000 on a three-year-old Canon SL1 (EOS 100D)

    Shot at ISO 2000 on a three-year-old Canon SL1 (EOS 100D)

    Some photographers are prone to pixel-peeping, and I must admit I am certainly one of them. Zooming in on a picture to 100% magnification, in order to take note of barely-visible imperfections is a great way to compare various aspects of cameras, lenses, and even similar photographs. Shooting at high ISO values will often reveal noisy blemishes that stick out like a sore thumb when viewed up close. However, what I have come to realize, even when shooting with my D7100 which is over three years old, is that I simply don’t need to view my photos at ultra-close range to enjoy them, and for the most part don’t care about the noise that shows up when I see those ISO values skyrocketing. If I have to choose between a blurry picture and a noisy picture, I’ll take the latter every time, and twice on Sunday.

    How to Use Auto ISO

    The exact mechanics of enabling Auto ISO vary from one camera to the next, but on most models from major manufacturers like Canon, Nikon, Sony, Fuji, Olympus and their peers, there is usually an option in one of the menus that allows you to do a few things:

    • Enable Auto ISO
    • Choose a maximum ISO value
    • Choose a minimum shutter speed

    Once you learn to find your comfort zone with these settings, you might find yourself thinking less about ISO, and more about things like framing and composition. On my D7100 I’m comfortable shooting up to ISO 3200, so I set that as the maximum value. I have the minimum shutter speed set to 1/(2x lens focal length). This means if I’m using a 50mm lens and shooting in Aperture Priority, my camera will lower the shutter speed to no less than 1/100th in order to get a properly-exposed picture, and if that still doesn’t do the trick it will then automatically raise the ISO clear up to 3200.

    Learning to relinquish this amount of control has been incredibly freeing, so much so that for a while it actually felt like I was cheating because I was not manually selecting the ISO for every single shot. On my D750 I use similar settings but set the maximum value at 6400.

    As you play around with this on your gear you are going to have to find a solution that works for your individual needs and photographic taste. Some cameras only let you specify one single value for the minimum shutter speed (as opposed to calculating it based on the focal length of your lens) and your mileage for how effective this technique is may vary, but if you can learn to embrace Auto ISO and let your camera do some of this heavy lifting, you might find yourself getting a lot more keepers on your memory card.

    For this impromptu Easter photo I set the aperture at f/3.3 and let my camera do the rest. It chose a shutter speed of 1/100 and then raised the ISO as high as it needed to (2800) in order to get a good exposure.

    For this impromptu Easter photo I set the aperture at f/3.3 and let my camera do the rest. It chose a shutter speed of 1/100 and then raised the ISO as high as it needed to (2800) in order to get a good exposure.

    I would be remiss if I did not mention some of the downsides of Auto ISO as well, as not all is bright and sunny, and warm and fuzzy on this side of the fence.

    One of the most significant limitations of shooting at high ISO values is the lack of dynamic range – basically, how much data your image sensor is able to capture in a given picture. If you have a RAW file that was shot at ISO 5000, and you need to use Lightroom to recover detail from the shadows, or raise the exposure of the whole image, you will find you have much less room to work with than if you shot the photo at ISO 100.

    Also, depending on your camera, you may also find cases of severe banding, or ugly horizontal lines, that show up when you try to recover shadow detail at high ISO values. Finally, all things being equal a picture shot at ISO 4000 will generally have less vibrant colors, and skin tones will seem a little more artificial and false, than a similar picture shot at ISO 400.

    Selecting the ISO was the last thing on my mind; I used an aperture of f/4 and a minimum shutter speed of 1/100. My camera selected an ISO of 5000 and I could not be more pleased with the result. A year ago I would have never gone that high, and would have had a blurry photo instead.

    Selecting the ISO was the last thing on my mind when I made this image. I used an aperture of f/4 and a minimum shutter speed of 1/100, my camera selected an ISO of 5000, and I could not be more pleased with the result. A year ago I would have never gone that high, and would have had a blurry photo instead.

    Despite these limitations, shooting with Auto ISO has been a huge boon for me, and I think it could be for you too. If you have never tried Auto ISO, I recommend giving it a chance and see how you like the results. For me it was a little like enabling back-button focus, in that I was highly skeptical at first, but after a few weeks I was hooked and now I don’t think I could ever go back.

    Do you use Auto ISO? Share your thoughts in the comments below, and I’d love to see some of your favorite high-ISO images as well. Cameras today really are incredible imaging machines, and it’s fun to see what they can do if we push them a little bit.

    googletag.cmd.push(function() {
    tablet_slots.push( googletag.defineSlot( “/1005424/_dPSv4_tab-all-article-bottom_(300×250)”, [300, 250], “pb-ad-78623” ).addService( googletag.pubads() ) ); } );

    googletag.cmd.push(function() {
    mobile_slots.push( googletag.defineSlot( “/1005424/_dPSv4_mob-all-article-bottom_(300×250)”, [300, 250], “pb-ad-78158” ).addService( googletag.pubads() ) ); } );

    The post How I Learned to Stop Worrying and Love Auto ISO by Simon Ringsmuth appeared first on Digital Photography School.

    Digital Photography School

  • How to do Bulk Resize and Edit in Photoshop

    Have you ever found yourself with a batch of photos that you needed to have edited in the same way? Rather than editing each image one-by-one, Adobe Photoshop offers batch editing processes that can help you save time, while preserving consistent quality among your images.

    This tutorial will show you how to use Photoshop Actions to resize and edit multiple photos, along with a quick tip on how to replicate this process in Lightroom.

    What You Need

    The bulk editing process is pretty easy and straightforward, requiring just a handful of things:

    • A batch of images you want to bulk edit
    • Adobe Bridge
    • Adobe Photoshop
    • Basic Photoshop working knowledge

    Get Started: Record an Action in Photoshop

    The very first step is to determine the process or edit that you wish to have automated, and record it as an Action in Photoshop. In this case, let’s use the example of resizing an image. Then you’ll use Bridge to select your set of images and apply the Action to all of them at once.

    Step 1: Open Photoshop and have a sample image open to perform this action on. Go to the main menu bar and click Window > Actions.

    Photoshop bulk resizing edits


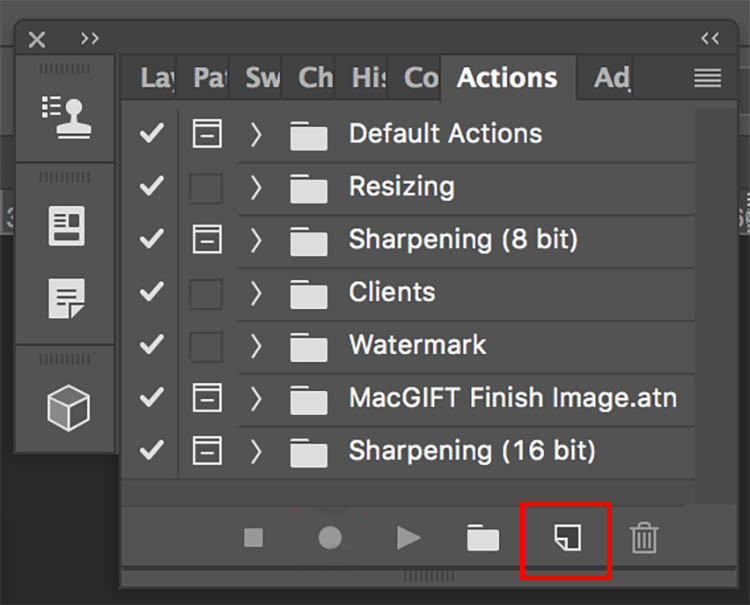
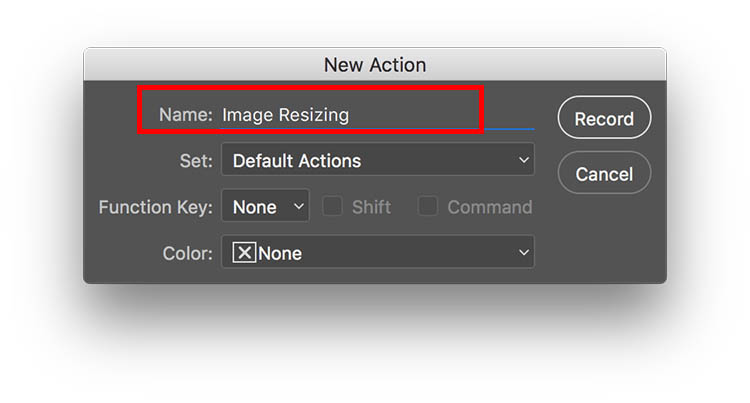
    Step 2: When the Actions panel pops up, click the bottom right button next to the trash can icon that says “Create New Action.” Enter a name for your action, such as “Image Resizing.” Then start recording your new action by clicking the “Record” button.

    Bulk edits new action

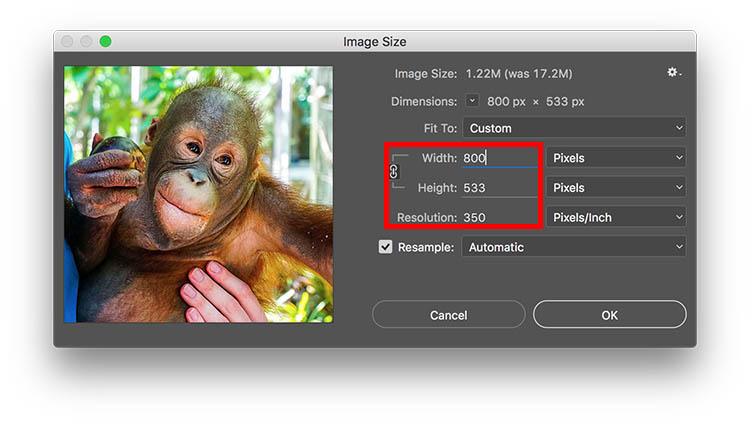
    Step 3: Now begin the series of steps that you want to have recorded. For resizing, head up to the main Photoshop menu bar and go to Image > Image Size. Input your ideal photo size, such as 800 pixels wide.

    Photoshop bulk resizing edits

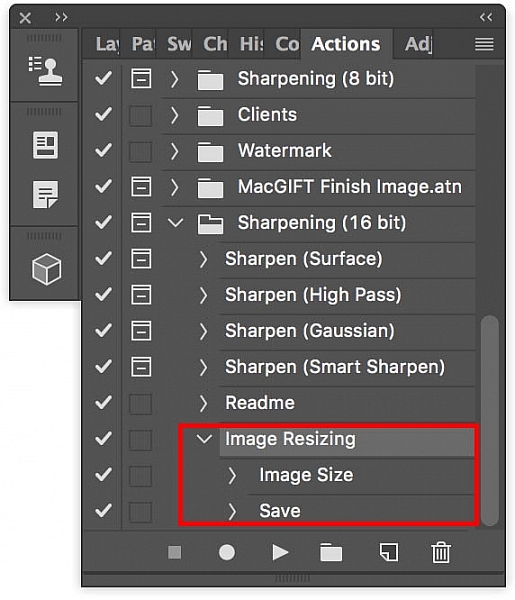
    Step 4: After you’ve completed all of the steps for your action, go back to the Actions panel and click on the Stop button to end recording. You should now see your saved action within the panel.

    Bulk edits image resizing

    Run A Batch of Images Through Photoshop

    After you’ve created your action, it’s time to apply it to your batch of images.

    Step 1: Put all of the photos you want to batch edit into one folder. Open Adobe Bridge and find your folder of images. Click on the folder and select all of the content.

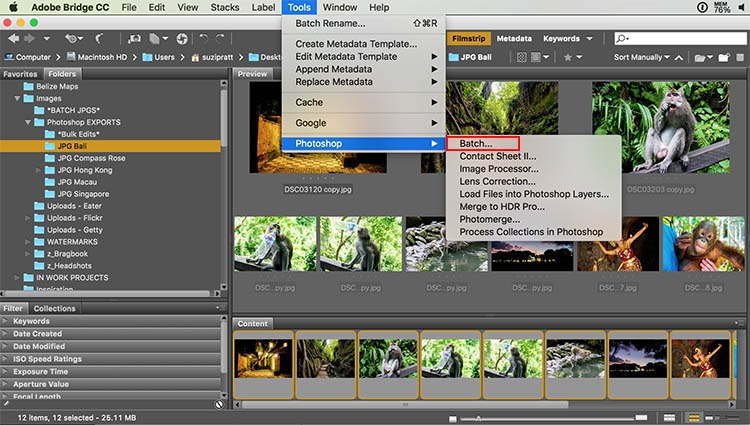
    Step 2: Within Bridge, go to Tools > Photoshop > Batch.

    Photoshop bulk resizing edits

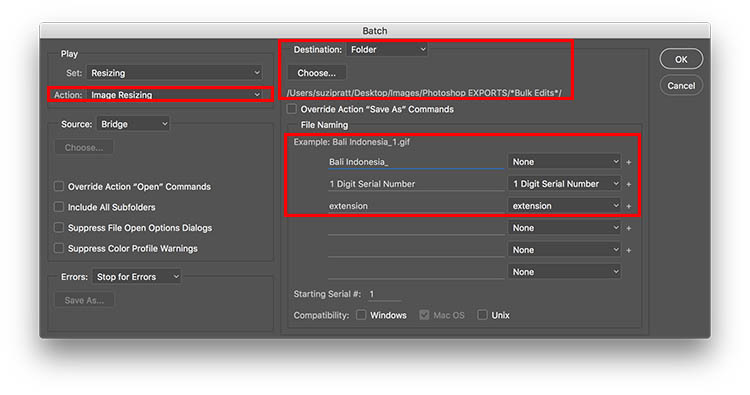
    Step 3: A Batch dialogue box will appear and you’ll want to adjust these settings in particular.

    • In the top left corner, select the action that you want applied to your images (in our case, “Image Resizing.”).
    • In the middle of the dialogue box, specify the folder where your bulk edits should end up. I always have a folder called *Bulk Edits* where I automatically have all of my bulk edited images saved.
    • Finally, you can specify a particular image name that you want to give to your batch of images, as well as assign unique identifiers, such as numeric order. Then click OK to have the action applied to your batch of photos.

    Photoshop bulk resizing edits

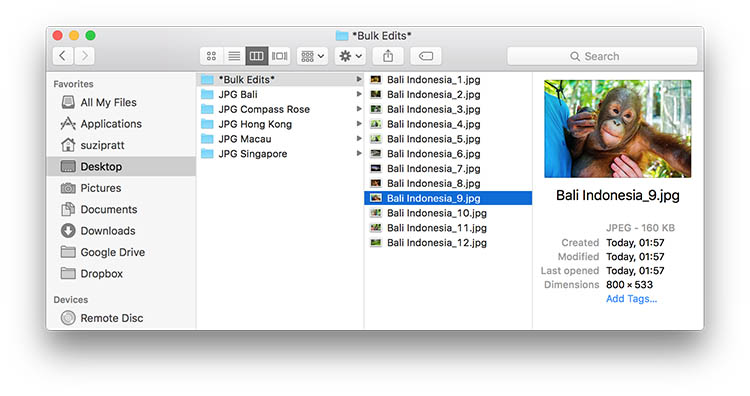
    Step 4: After your batch of images are processed, go to your specified folder to check out the results.

    Photoshop bulk resizing edits

    Making bulk edits in Lightroom

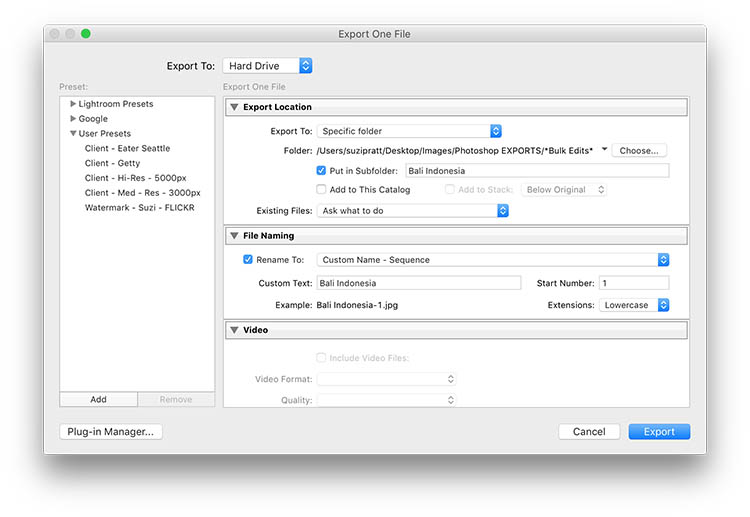
    While doing bulk edits in Photoshop is relatively easy to do, it’s even quicker in Adobe Lightroom. If using Lightroom, import your images and select them all. Then go to File > Export. A pop up dialogue box will then appear with fields where you can specify where to save the images and also rename, resize, and watermark the images (you can also save that as an export preset)

    Lightroom bulk resizing edits

    Over to You

    Do you perform many bulk edits in Photoshop or Lightroom? If so, what are the types of processes you tend to bulk edit? Let me know in the comments below!

    googletag.cmd.push(function() {
    tablet_slots.push( googletag.defineSlot( “/1005424/_dPSv4_tab-all-article-bottom_(300×250)”, [300, 250], “pb-ad-78623” ).addService( googletag.pubads() ) ); } );

    googletag.cmd.push(function() {
    mobile_slots.push( googletag.defineSlot( “/1005424/_dPSv4_mob-all-article-bottom_(300×250)”, [300, 250], “pb-ad-78158” ).addService( googletag.pubads() ) ); } );

    The post How to do Bulk Resize and Edit in Photoshop by Suzi Pratt appeared first on Digital Photography School.

    Digital Photography School

  • How to Get the Correct Exposure at Night with These Helpful Tips

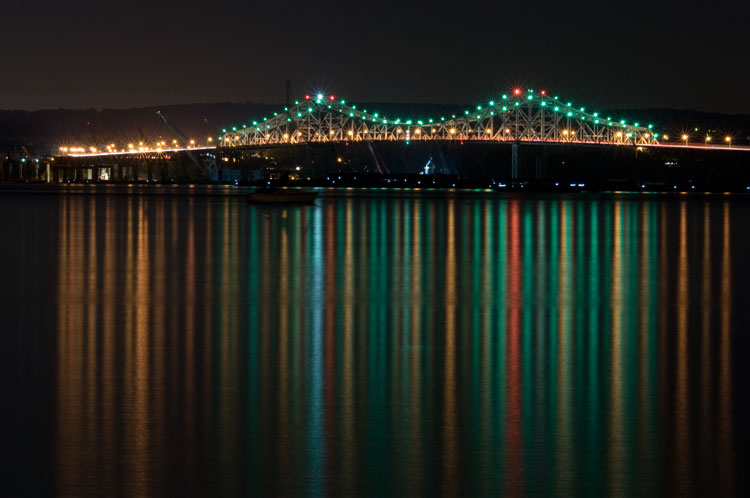
    Tappan zee bridge

    Colorful lights on the Tappan Zee Bridge reflected in the Hudson River at night. Behind the shot: ISO 200, aperture f/8, shutter speed 90 seconds, White Balance tungsten, lens used 80-200mm f/4.5 manual Nikkor zoom.

    Exposing your photos correctly at night can be a bit challenging, and will certainly require some trial and error. In this article, you will learn helpful information to minimize the learning curve. Follow the tips outlined below and you will be taking better night photographs in no time.

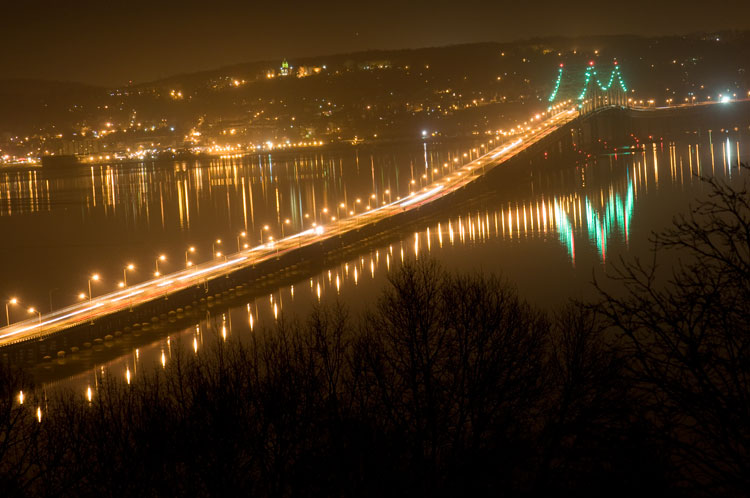
    Tappan zee bridge at night

    View of the Tappan Zee Bridge and surrounding landscape at night. Behind the shot: ISO 400, aperture f/8, shutter speed 10 seconds, White Balance auto, lens used 105mm f/2.8 Nikkor.

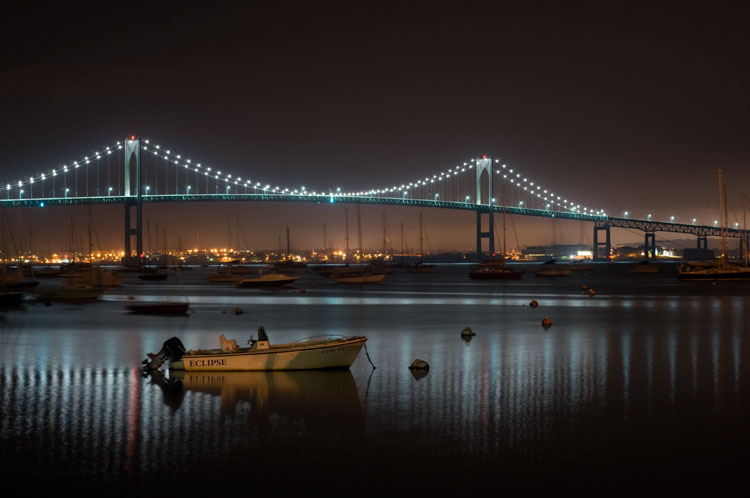
    Claiborne pell newport bridge

    Night-time view of the Claiborne-Pell Newport Bridge and Narragansett Bay, taken in Jamestown, Rhode Island. Behind the shot: ISO 200, aperture f/8, shutter speed 25 seconds, White Balance fluorescent, lens used 50mm f/1.8D Nikkor.

    Things You’ll Need

    A Tripod

    If you’re shooting at night, your exposures are going to be pretty long (anywhere from one to 30 seconds, or more). Since it is impossible to hold your camera perfectly still for that long, you will need a sturdy tripod, so that your camera does not move at all during the exposure. For added stability, you can hang your camera bag (or another somewhat heavy object) from the hook on your tripod’s center column. This is especially handy in windy conditions.

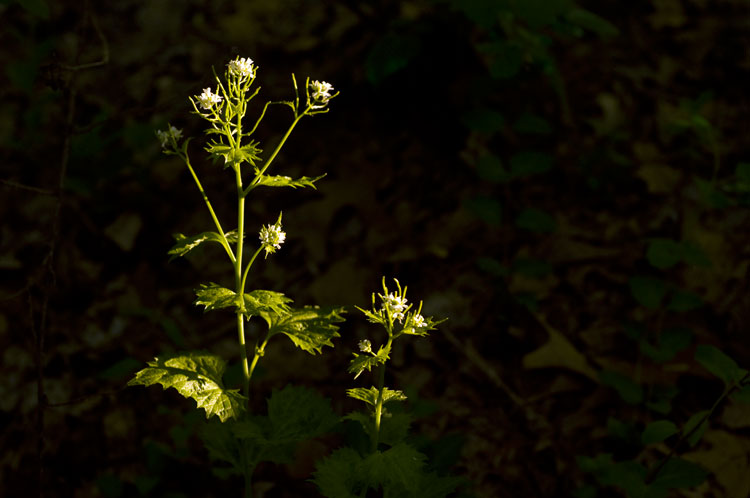
    Plants at night

    Long exposure of plants illuminated by streetlight at night in Nyack, New York. Behind the shot: ISO 400, aperture f/4, shutter speed 30 seconds, White Balance tungsten, lens used 50mm f/1.8D Nikkor.

    Illuminated plant at night

    Golden plant illuminated by streetlight at night in Nyack, New York. Behind the shot: ISO 400, aperture f/4, shutter speed 30 seconds, White Balance tungsten, lens used 50mm f/1.8D Nikkor.

    Remote Shutter Release

    With a long exposure, any camera movement can ruin the shot, making it soft or blurry. To ensure you get a sharp image, use a remote shutter release (remote trigger). The best type of shutter release to use is the kind that functions as a timer remote as well. If you don’t have a remote shutter release, you can use your camera’s self-timer. The only downside to using the self-timer is that you will have to keep your shutter speed at 30 seconds or less. If you don’t have too much light, you can always increase your aperture (decrease the f-stop) or increase your ISO to speed up your shutter speed.

    Colors of night

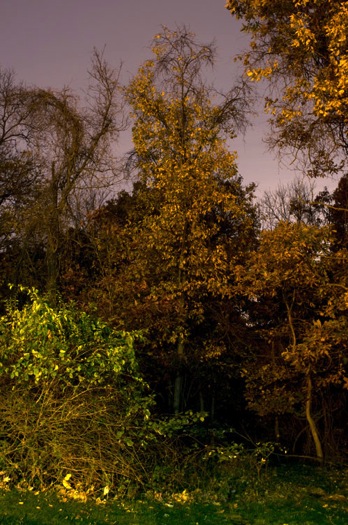
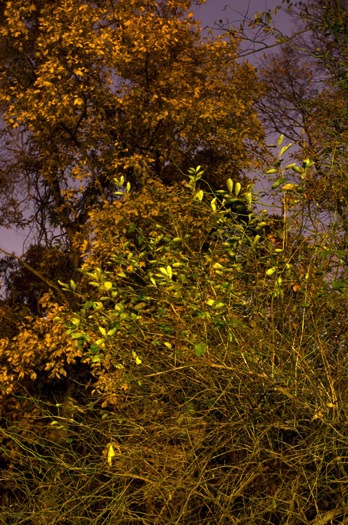
    Assorted foliage illuminated by streetlights in Nyack, New York. Behind the shot: ISO 200, aperture f/5.6, shutter speed 30 seconds, White Balance fluorescent, lens used 24mm f/2.8D Nikkor.

    Colorful night

    Colorful plants and trees in Nyack, New York. Behind the shot: ISO 200, aperture f/5.6, shutter speed 30 seconds, White Balance fluorescent, lens used 24mm f/2.8D Nikkor.

    Camera Settings

    Shoot RAW

    Keeping image quality in mind, you should always strive to shoot in RAW format. It records more pixel information, and does not compress your images at all. RAW provides you with more post-processing options, including white balance correction. If you happen to under or over expose an image, you can easily adjust the exposure if your image is in RAW format.

    ISO

    When taking photographs with little available light, you are better off using a low ISO (400 and below) and longer exposure times. This is important so you don’t get too much noise (or grain) in your images. Also, make sure you have Long Exposure Noise Reduction turned on in your camera’s settings.

    Yellow leaved tree moving clouds at night

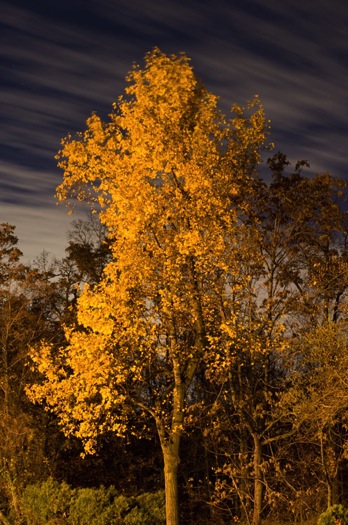
    Yellow-leaved tree and moving clouds at night in Nyack, New York. Behind the shot: ISO 200, aperture f/5.6, shutter speed 30 seconds, White Balance tungsten, lens used 50mm f/1.8D Nikkor.

    Tree in wind

    Tree in wind at night in Valley Cottage, New York. Behind the shot: ISO 400, aperture f/2.8, shutter speed 30 seconds, White Balance tungsten, lens used 50mm f/1.8D Nikkor.

    Use Manual Mode

    While shooting in very low light, your camera’s light meter may not read the scene too well. Your best bet is to use Manual mode, where you control both the aperture and the shutter speed. To find a baseline for the correct exposure, you can use the following trick (which I learned in this blog post):

    1. Set your ISO to 6400
    2. Set the aperture you would like to use
    3. Set your shutter speed at one second

    Take a test shot using these settings to get an idea of what your image will look like. Note, these settings are almost equivalent to a 1-minute exposure at ISO 100, a 30-second exposure at ISO 200 and a 15-second exposure at ISO 400, etc. If your scene is too bright with these settings, you can see what a half second exposure at 6400 looks like. This would equal a 30-second exposure at ISO 100, a 15-second exposure at ISO 200 and a 8-second exposure at ISO 400. This baseline is a great guide, you can easily take test shots to figure out what shutter speed to use.

    Autumn leaves in motion

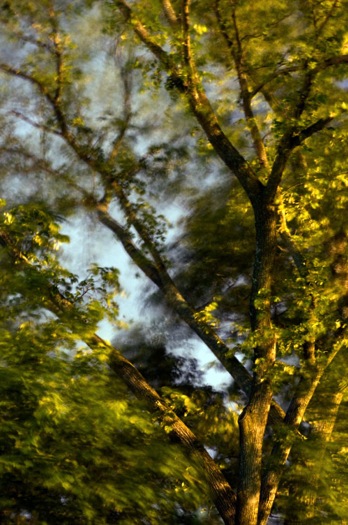
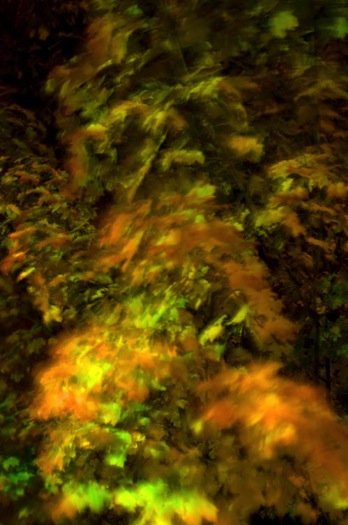
    Autumn leaves in motion at night in Valley Cottage, New York. Behind the shot: ISO 400, aperture f13, shutter speed 30 seconds, White Balance fluorescent, lens used 24mm f/2.8D Nikkor.

    Tree at night

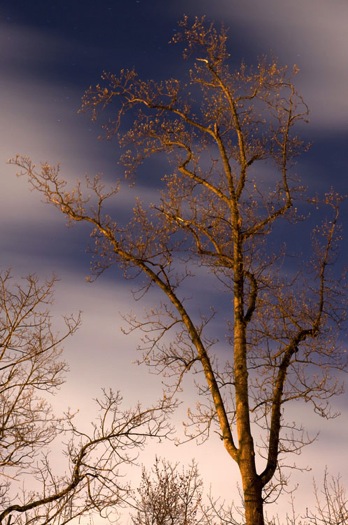
    Tree and clouds in motion at night in Nyack, New York. Behind the shot: ISO 400, aperture f/5.6, shutter speed 30 seconds, White Balance tungsten, lens used 50mm f/1.8 manual Nikkor.

    If you use the above trick, you won’t unnecessarily waste time taking a bunch of long test exposures. As it is, long exposure night photography is rather time-consuming. Make sure you switch your ISO back to 400, or below, before you start taking photos that you intend to keep.

    In scenes where you have a decent amount of available light (e.g. places with numerous streetlights), you may be able to use Aperture Priority mode instead of Manual mode.

    In Conclusion

    Night photography can be rather tricky, and requires a good amount of practice. In time, you will have a feel for the amount of light in various night scenes, and be able to figure out accurate camera settings with relative ease. Hopefully, the information contained in this post will help you capture great long exposure night shots, that don’t need much post-processing.


    googletag.cmd.push(function() {
    tablet_slots.push( googletag.defineSlot( “/1005424/_dPSv4_tab-all-article-bottom_(300×250)”, [300, 250], “pb-ad-78623” ).addService( googletag.pubads() ) ); } );

    googletag.cmd.push(function() {
    mobile_slots.push( googletag.defineSlot( “/1005424/_dPSv4_mob-all-article-bottom_(300×250)”, [300, 250], “pb-ad-78158” ).addService( googletag.pubads() ) ); } );

    The post How to Get the Correct Exposure at Night with These Helpful Tips by Marshall Reyher appeared first on Digital Photography School.


    Digital Photography School

  • How to Improve Your Night Photos – Add Reflections

    Reflections can be great things to add to your photographs at any time, but they are particularly cool at night. Adding reflections can solve compositional problems you face at night. Further, the steps you have to take to capture photos at night – such as having your camera on a tripod and using a slow shutter speed – actually make it easier to capture reflections.

    How so? I’m glad you asked. Let’s take a look at the use of reflections in night photography.

    Lakehouse2

    Why use reflections in your night photography?

    Why would you want to use reflections in your nighttime photos? There are many reasons, but in this article I want to concentrate on two.

    1 – Adding a reflection adds interest to the composition

    First adding a reflection allows you to turn a straight-ahead photo of a single thing, into an interesting composition. For example, common subjects of nighttime photos are things like well-lit buildings, bridges, and fountains. If you take a picture of just a building, it might not be terribly interesting. It’s just a building. The same goes for pictures of bridges and fountains.

    Adding other items to the picture can be a challenge. Everything around the subject is likely to be very dark. Adding more space just results in a sea of blackness around your subject that doesn’t add anything to your photo, it just detracts from your subject. If you add a reflection, however, it adds a compositional element to your picture. Now your picture isn’t just a single thing (like a building, bridge, or fountain). The reflection adds interest to the photo.

    2 – Adding a reflection gives you a good foreground element

    Secondly, adding a reflection to your picture also solves a common problem for all pictures. That problem is what to do with the foreground. Often the subject and background are clear, but the foreground can be difficult to ascertain. However, particularly when you are using water to create the reflection, the reflection will be on the bottom portion of the picture. Therefore it provide you with a ready-made foreground. Problem solved.

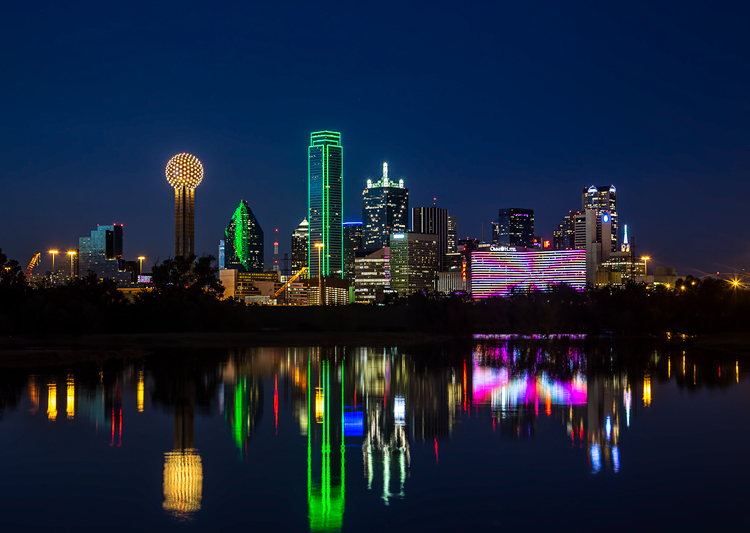
    Dallas

    When to use reflections

    You could use reflections in your nighttime photos whenever possible. The limitation on their use is typically not lack of desire, but lack of opportunity. There isn’t always a large shiny surface for you to use to capture a reflection.

    Note: if that is the case, you can always create one in Photoshop!

    So what circumstances create the opportunity to use reflections? Obviously, water works great. It is available for you to use in a lot of different contexts. Here are some of them:

    • Skylines: Most cities are built on a bay or a river that you can use to create a reflection. (By the way, don’t worry about making it a sharp reflection – just a blurry set of lights in the water can provide what you need.)
    • Bridges: A common nighttime photographic subject are bridges, which are almost always over water.
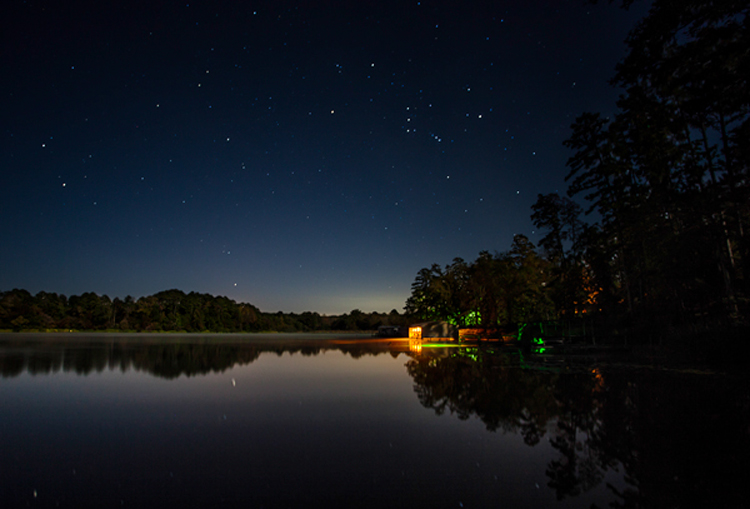
    • Lakes: There are lakes everywhere. You can capture reflections of nearby objects. On clear nights you can also capture the reflections of the stars.
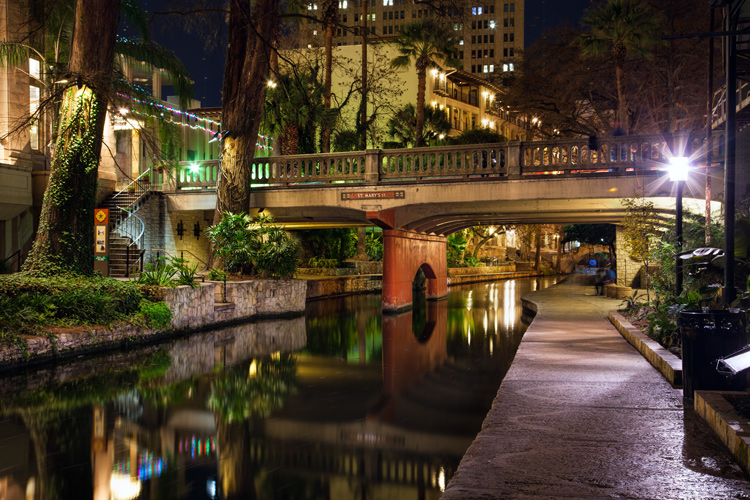
    • Puddles: They provide a great opportunity for using reflections where you might not otherwise expect them. Keep in mind there doesn’t actually need to be a puddle but often a wet surface will reflect light from nearby sources. See Using Rain Puddles to Create Unique Reflection Photos.
    • Fountains: Since fountains are filled with water, they also provide great opportunities for making reflections.

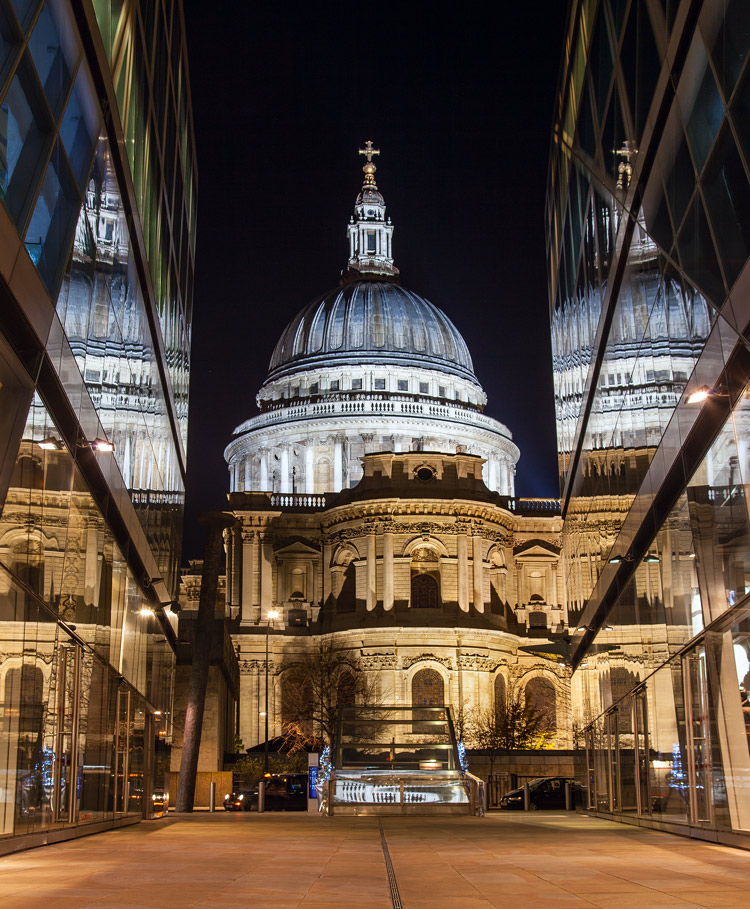
    Besides water, any shiny surface will do. Most cities have many modern office buildings built of steel and glass. While not generally sought out as photographic subjects in and of themselves, they do provide great opportunities for capturing reflections of anything nearby.

    StPaulMirror

    How to capture reflections

    Here is some good news: you probably don’t need to do anything different in terms of exposure to capture reflections in your picture. For reflections of most shiny surfaces, you simply set the exposure as you normally would, and take the picture. While using water to create the reflection does require that you smooth the water out, this is probably already happening because of the inherent challenges of exposure in night photography.

    Night photography requires slow shutter speeds. Because it is dark, your camera needs to hold the shutter open a long time in order to gather sufficient light for the exposure. This is true even if you are using a wide aperture and high ISO. This long shutter speed is what smooths out the water. Therefore, the mere fact that you are taking the photo at night, probably means you are already creating a picture with smooth water. If not, just be sure to slow down your shutter speed.

    Riverwalk

    Enhancing the effect

    The most common problem when using reflections in your nighttime photos, is that the reflection does not show up as much as you would like. The way to fix that is to brighten the reflection. If you apply a global brightening to the picture, however, you risk blowing out the highlights of other parts of your picture. In any case, you will probably end up brightening other parts of the picture more than you want. Therefore, you will need to apply selective brightening to the photo. Here is how to do that, depending on the software you are using:

    • Lightroom: In Lightroom, use the Adjustment Brush (keyboard shortcut K) to apply selective brightening to the reflection. Select the brush, and using the controls that appear, increase either the Exposure or the Whites slider (or both) to make the reflection stand out. At the same time, you will need to maintain contrast in your picture. Do that by decreasing the blacks in the picture (pull the Black slider to the left). Just paint it in and you are all set. You can also adjust the effect after you have painted it in.
    • Photoshop: In Photoshop or Photoshop Elements you can use the same process as described above in the Adobe Camera Raw (ACR) screen that pops up when you open the picture. Once you are in Photoshop, the best way is to use Curves adjustment layers and then mask out the effect everywhere except in the reflection. To do that, just create a Curves adjustment layer, then pull up the line on the right side of the curve (or pull in the white point) to increase the brightness of the reflection. To maintain contrast, pull down the left side of the line (or pull your black point to the right). If you’re not familiar with Curves adjustment layers or masking check out this or this tutorial to get you started with the process.

    Destin2

    The other common problem when using reflections in your night photography, is enhancing the clarity or sharpness of the reflection. Much of the work here is done in the capture phase, and keep in mind that you cannot fix a blurry picture. But you can enhance the effects a bit. Here are some ways to go about that:

    • Lightroom: As with the selective brightening above, use the Adjustment Brush (either in the same step or as a separate step as the brightening). Within the controls of the brush, increase the Clarity slider. Brush in the area of the reflection to add the clarity. You can also increase the Sharpness slider, but beware of doing this too much as it tends to increase digital noise.
    • Photoshop: Within Photoshop or Photoshop Elements, you can use the ACR screens to increase the clarity of the reflection. Once the image is opened in Photoshop though, there is no Clarity slider. The best way to increase clarity is to use the High Pass filter. This article explains how to increase clarity and walks you through the use of the High Pass filter.
    • Plug-Ins: There is also third-party software available that allows you to increase the clarity of your photos. One such program is Topaz Clarity, which works really well. For the best results, apply this effect on a new layer within Photoshop so that you can use masking to apply the effect exactly where and how you want.

    Of course, there will probably be other edits you want to make to the photo in addition to these. You can, and should apply your standard workflow to your pictures. These are just the common issues you will experience when you add reflections to your photos.

    Conclusion

    Reflections can add great compositional interest to your pictures. They also allow you to add context to your nighttime photos, which is not always easy since much of the surrounding area will be dark. They are readily available once you start looking for them. In addition, they are easy to apply. Once you start adding reflections, I think you will find they will help add interest to your night photos, and might even take them to the next level.

    googletag.cmd.push(function() {
    tablet_slots.push( googletag.defineSlot( “/1005424/_dPSv4_tab-all-article-bottom_(300×250)”, [300, 250], “pb-ad-78623” ).addService( googletag.pubads() ) ); } );

    googletag.cmd.push(function() {
    mobile_slots.push( googletag.defineSlot( “/1005424/_dPSv4_mob-all-article-bottom_(300×250)”, [300, 250], “pb-ad-78158” ).addService( googletag.pubads() ) ); } );

    The post How to Improve Your Night Photos – Add Reflections by Jim Hamel appeared first on Digital Photography School.

    Digital Photography School

  • How to Use the Healing Tool in Photoshop

    We all have those moments in our photographic careers where things just don’t pan out exactly how we imagined them. Our image is almost exactly as we imagined it to be, but perhaps there are some spots, blemishes, marks or distractions that just don’t fit in the frame.

    In most cases, all the elements of the image tend to work together to tell the story, but sometimes we just to clean the image up a tad, to get rid of some of the distracting elements that take away from that story. Luckily, most editing software, including Photoshop, have very easy, yet powerful tools, that you can use to clean up your image and get rid of the distractions.

    Memorable Jaunts Landscape Image cleaned using healing brush tools Artcile for DPS 01

    The Healing Tool in Photoshop

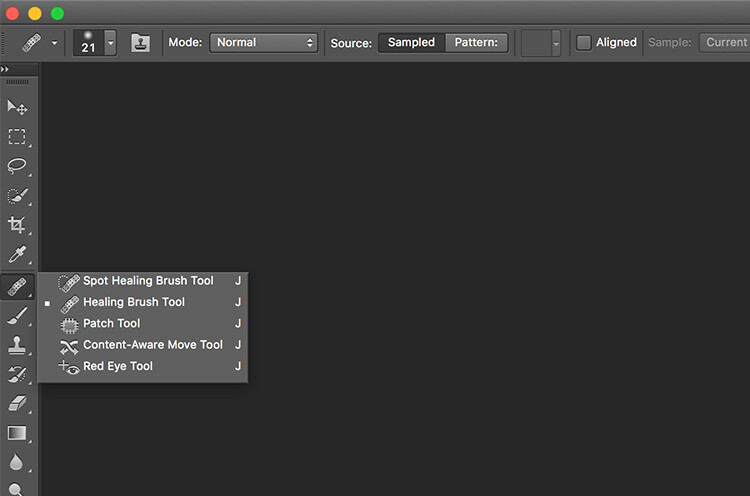
    This article provides a basic explanation of the Healing Tool in Photoshop, that is very effective in removing or cleaning out distracting elements in an image. For the purposes of this article, I am using Photoshop version CS6. The Healing Brush Tool in Photoshop is made of three parts. These are probably the most used tools in the healing tool family, and 90% of the time they get the job done.

    • Spot Healing Brush Tool
    • Healing Brush Tool
    • Patch Tool
    Memorable Jaunts Landscape Image cleaned using healing brush tools Artcile for DPS 07

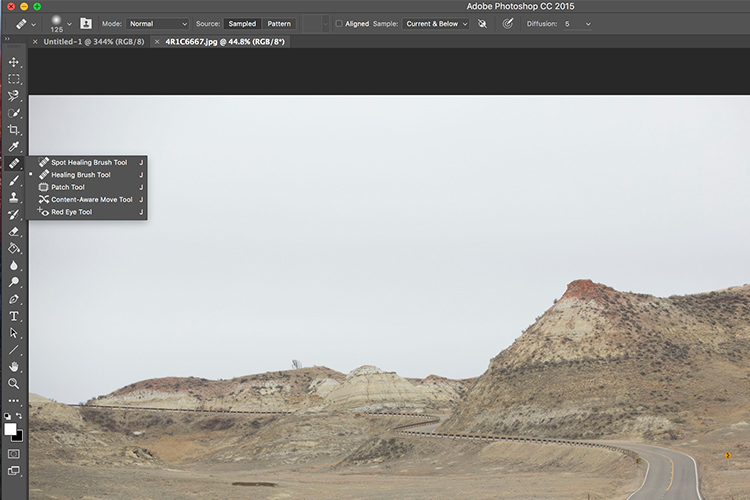
    The Healing tool in PS has the bandaid icon. When clicked, it opens up this menu. You can also click the J key on your keyboard to access this tool.

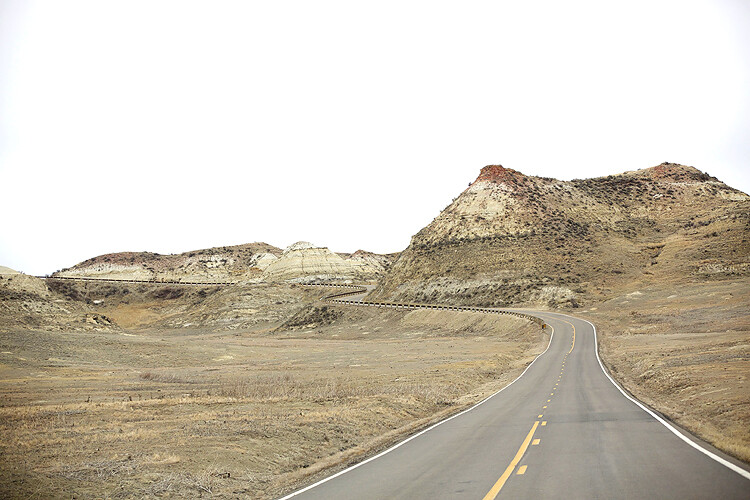
    Here is an example of a simple landscape image that was cleaned up using the Spot Healing Brush Tool, and the Healing Brush Tool.

    Memorable Jaunts Landscape Image cleaned using healing brush tools Artcile for DPS 02

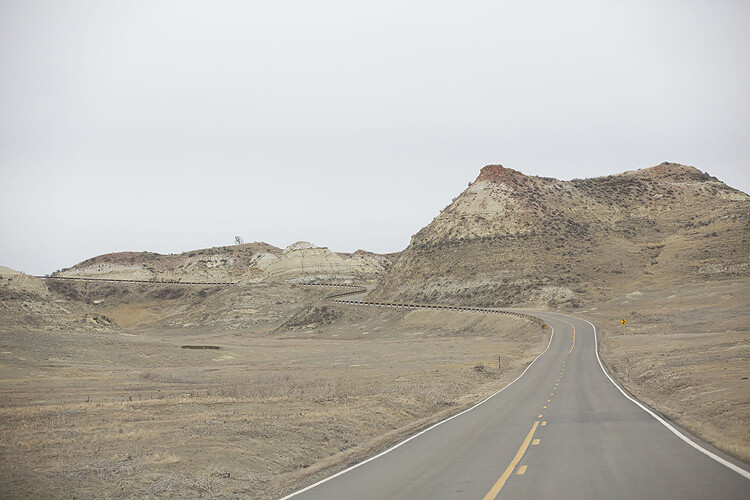
    Original Image – SOOC. I am looking to clean out some of the distracting elements here like the ‘Road curves’ sign on the right, the dead bushes on the left and the little tree on the top of the hill to the left of the image.

    The first step, before any cleanup is done, is to perform any basic edits to the image. I consider adjustments in exposure, contrast and temperature to be basic adjustments. For this image, I increased the exposure and added some contrast, to highlight the browns in the hillside. This image was taken from a stopped car because I really liked the curve in the road along the small hill on the top right side. But I wanted to get rid of the road sign and the dead branches on the sides of the road leading up to the hill.

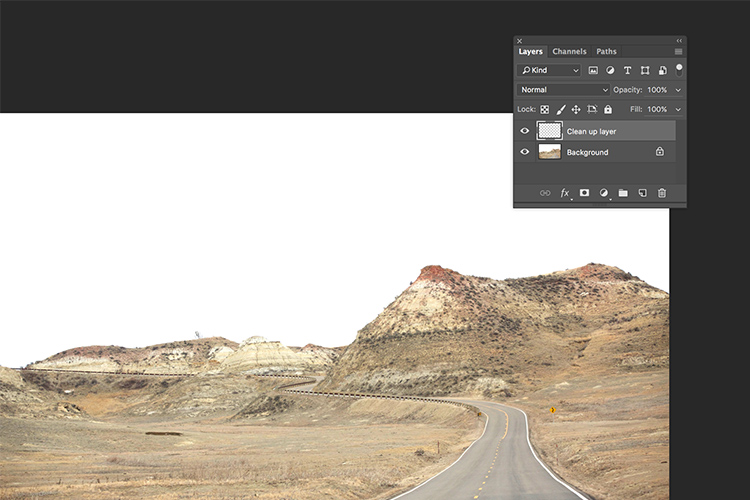
    Once I brightened and adjusted the contrast of the image, I created a new layer in PS to add my cleanup edits. I called it, “Clean up layer” for easy identification. This keeps all the cleanup elements together, so I can toggle between the On and Off to see the affects of the cleanup at any time (toggling a layer On and Off is done by clicking on the eyeball symbol to the left of the layer.)

    Memorable Jaunts Landscape Image cleaned using healing brush tools Artcile for DPS 06

    The Spot Healing Brush Tool is used for quick, easy cleanups. Once you select the it, and adjust the size of the brush (use the left square bracket key [ to decrease size of the brush and right square bracket key ] to increase the size), you simply click on the blemish to remove it. Also set Sample to “Current & Below” or “All Layers” so it will pull pixels from your base layer (otherwise you’re just healing with a blank layer).

    The Spot Healing Brush automatically selects the source area from which to clone. So sometimes it might not be completely accurate, because the software is making the judgement on where is the best source to take a sample. A good tip is to zoom in to the specific area and watch the pixels closely while making the adjustments. The Spot Healing Brush works best on small areas and easy cleanups.

    Memorable Jaunts Landscape Image cleaned using healing brush tools Artcile for DPS 05

    The Healing Brush Tool

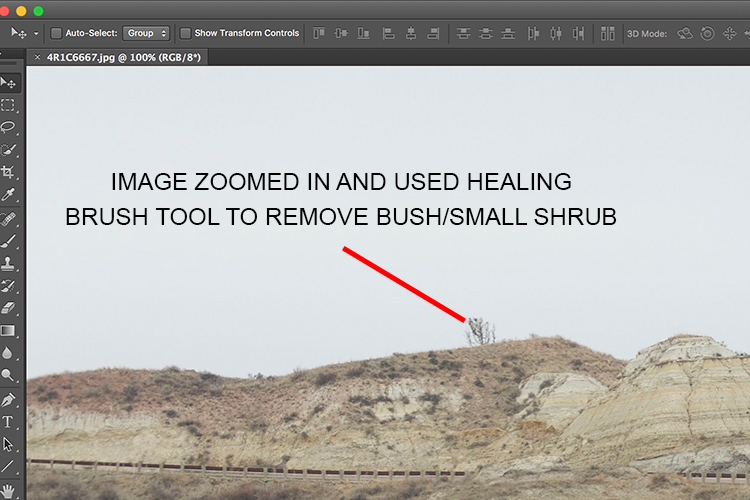
    I use the Healing Brush Tool is for slightly more complex cleanups, especially areas that have sharp edges, curved, or straight lines that separate areas of different textures and color. As you can see here, the top of the hill has a small tree which sticks out against the overcast sky. For more accurate editing, zoom in to the area that needs to be edited, so as to eliminate any errors. It is hard to be completely accurate if you are not zoomed in accurately to the specific area that needs to be edited.

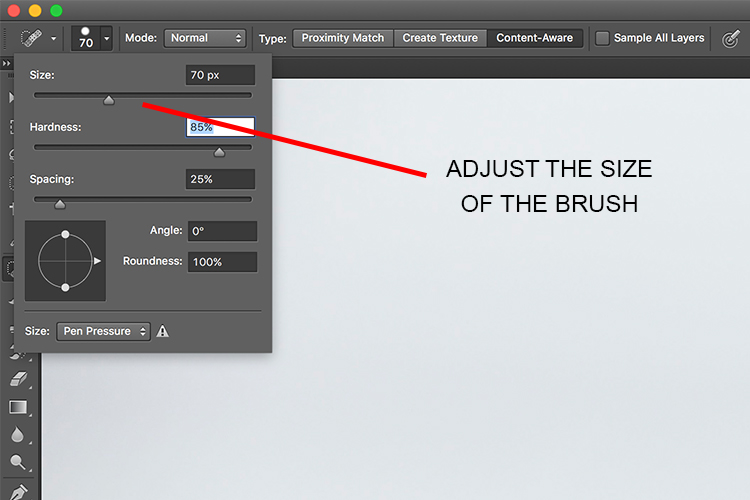
    Once selected, theHealing Brush Tool requires you to set a source point from which to heal the affected area (that is the easiest way to think about the healing action, in my opinion). I set the right size of the brush (use the [ ]  keys to increase or decrease brush size, OR click on the slider as shown in the image below), then I select the edge of the line closest in texture to the source area. Holding my cursor down (holding down the mouse button), I drag the cursor from start to finish over the object to be removed.

    Memorable Jaunts Landscape Image cleaned using healing brush tools Artcile for DPS 04

    After

    After cleanup

    The Patch Tool

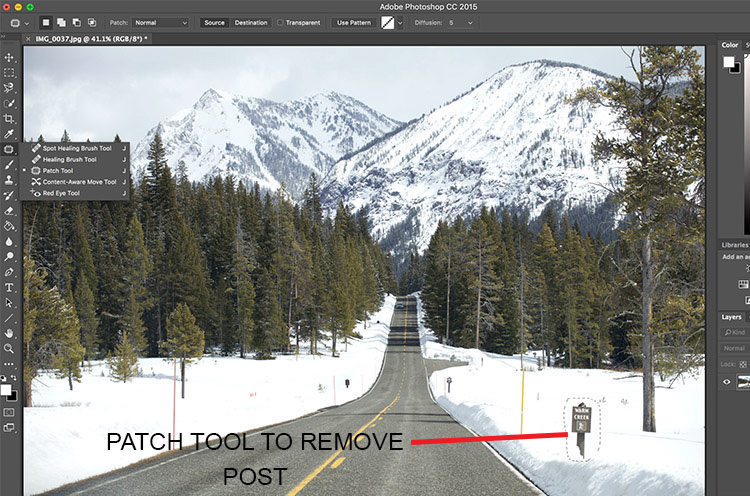
    I use the Patch Tool in Photoshop for any bigger areas that need to be adjusted. For example, in the image below, there are many sign posts along the road that are larger. I could use the healing brush tool but it would be a little bit more time-consuming as I would have to go over the adjustments several times, to clean it out completely. Instead I used the Patch Tool to fix the affected spot, and replace it with another area sampled from the surrounding landscape. Using the Patch Tool, select the area to be cleaned up, then select the area close to it to sample from, to do the patch.

    Notes about the Patch Tool:

    • To do your editing non-destructively use the patch tool on a duplicate layer (it cannot be an empty layer).
    • You must select a Patch type as Normal or Content Aware. For most things Content Aware does a better job, so try that first and resort to Normal if it doesn’t work.
    • If you select Normal you have to choose either Source or Destination. The difference is that when Source is highlighted, the area you select will be Patched with the area you drag it over to. When Destination is highlighted the area you select will be cloned over to the area you move it to.

    Final image where all the posts, signs and snow measurement sticks have been removed using a combination of patch tool, spot healing brush and healing brush tool.

    As you can see, the healing tools in Photoshop are quite effective. With such a wide variety of options, any cleanup is easy and effective. One tip that I have learnt from experience is to do all the adjustments while zooming in to the affected area. This ensures that right amount of cleanup is done to all the pixels. If you find that the cleanup effect is too stark and harsh, an easy fix is to adjust the Opacity (i.e. visibility) of the cleanup layer. Especially when cleaning up blemishes on the face, this gives a more natural, blended effect. There is no right opacity percentage, simply choose the value that seems more natural to the eye.

    How do you use the Healing Tools in Photoshop? Please share in the comments below.

    googletag.cmd.push(function() {
    tablet_slots.push( googletag.defineSlot( “/1005424/_dPSv4_tab-all-article-bottom_(300×250)”, [300, 250], “pb-ad-78623” ).addService( googletag.pubads() ) ); } );

    googletag.cmd.push(function() {
    mobile_slots.push( googletag.defineSlot( “/1005424/_dPSv4_mob-all-article-bottom_(300×250)”, [300, 250], “pb-ad-78158” ).addService( googletag.pubads() ) ); } );

    The post How to Use the Healing Tool in Photoshop by Karthika Gupta appeared first on Digital Photography School.

    Digital Photography School

  • Photo Composition Tips from Bob Holmes – Composition in Travel Photos

    Who better to get photo composition tips from than four-time Travel Photographer of the Year award-winner, Bob Holmes? He shares some techniques you can use to work with composition and take better photos, no matter where your travels may take you.

    Havana 012016 1314 Thumb dPS

    Bob has been all over the world, and his travel photos have appeared in National Geographic, Departures, and 46 books as the sole photographer. Working outdoors on most of his trips, Holmes is an expert at using natural lighting in photos.

    He loves looking for composition that grabs you, and his unique tip is that you need to “get in the zone” and be fully responsible for everything in the frame. The key to learning composition is to practice – you can’t become a great photographer in a week, but you will get there by shooting as much as you can.

    Bob Holmes dPS

    Watch this video interview I did with Bob Holmes, then look below the video for more helpful resources.

    Check out these dPS resources for more info:

    • LIFE IN NATURAL LIGHT- The Ultimate Guide to a photographer’s most powerful tool
    • NATURAL LIGHT – Mastering a Photographer’s Most Powerful Tool
    • TRANSCENDING TRAVEL – A guide to captivating travel photography

    googletag.cmd.push(function() {
    tablet_slots.push( googletag.defineSlot( “/1005424/_dPSv4_tab-all-article-bottom_(300×250)”, [300, 250], “pb-ad-78623” ).addService( googletag.pubads() ) ); } );

    googletag.cmd.push(function() {
    mobile_slots.push( googletag.defineSlot( “/1005424/_dPSv4_mob-all-article-bottom_(300×250)”, [300, 250], “pb-ad-78158” ).addService( googletag.pubads() ) ); } );

    The post Photo Composition Tips from Bob Holmes – Composition in Travel Photos by Marc Silber appeared first on Digital Photography School.

    Digital Photography School

  • How to Clean Your Photography Gear and Keep it in Good Shape

    A long time ago when I started my first steps into the photography world, a good friend of mine that worked many years as a photojournalist, told me:

    “Treat your camera like a soldier treats his gun, keep it clean and ready to fire!”

    I never forgot that advice from him, and I kept a Pentax K1000, my very first camera, in pristine condition to this day. Nowadays things are a bit different, and electronic digital equipment is not really built to last like in the good old days of mechanical equipment.

    Modern cameras and lenses are built with a lot of sensitive electronic components, and are much more difficult to maintain. Most of the equipment I use is exposed to the elements, and to a lot of abuse during my shooting sessions, and to me it is fundamental to sometimes take a little bit of time off and make sure everything is clean, working properly, and ready to fire.

    01

    In this article I will guide you through the steps I usually take cleaning my photo equipment.

    Like everything in life, everyone has their own method of doing things. The way I do this process might not be perfect, but it is the best method I have used so far, with all the tips and tricks I have been collecting along the years.

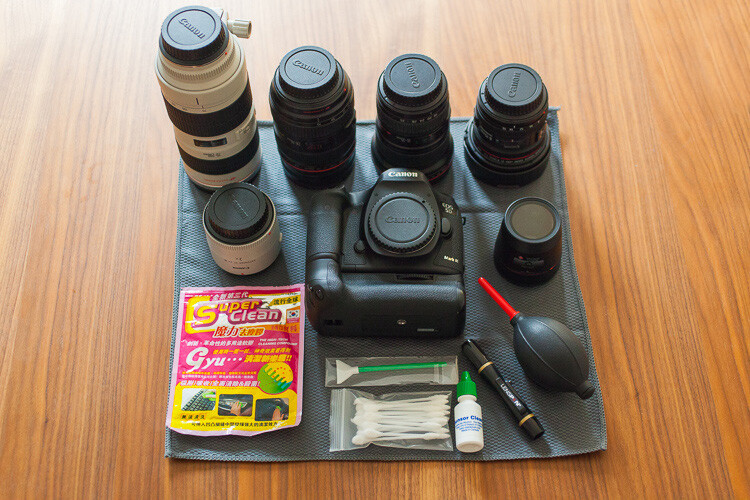
    To start, I always try to be in a dust free environment, and have an anti-static microfiber cloth under the equipment I am cleaning. This is really important because your equipment is going to grab all the dust that is in the air like a magnet every time you try to clean it.

    The way I do it is always to go from the outside to the inside, meaning I always clean the outer part of the lenses before I clean the glass, and I always clean the outside of the camera body before I clean the sensor. This way I gradually eliminate the dust that is stuck to the equipment.

    Starting with the lenses, I used to just clean the outside of the lens with a microfiber cloth, and use a blower to keep the dust away. But a few years ago I was introduced to a new product from Japan that was the answer to all the germophobes that were really concerned with all the germs computer keyboards collect.

    02

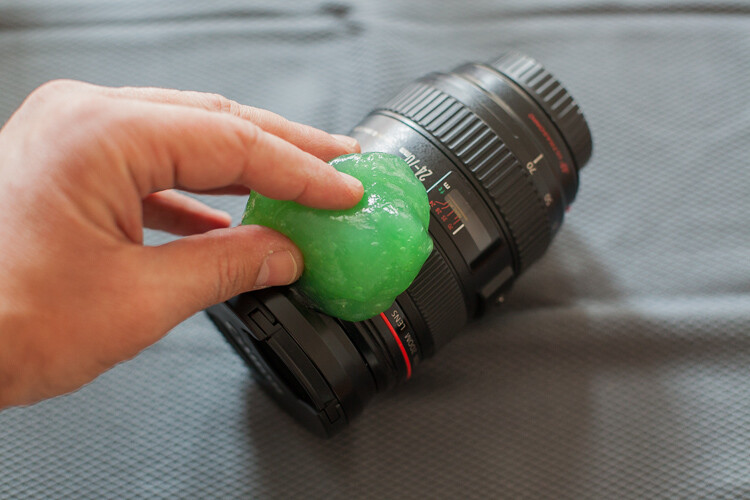
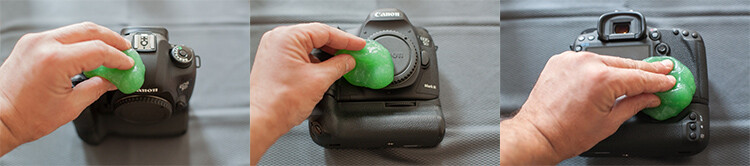
    This cleaning compound is like a sticky jelly, with anti-bacterial properties that can be used on everything you want to keep clean and germ free.

    I use it on the outside of my lenses and camera body, always with the caps on, because it is not supposed to be used on glass.

    03

    This product was expensive, and really hard to find when I first bought it, but nowadays it seems to be much cheaper and available in most stores online.

    I find it really useful to clean the camera body in the buttons areas, where it collects a lot of dust that is difficult to clean.

    04

    Next it’s time to concentrate on the glass

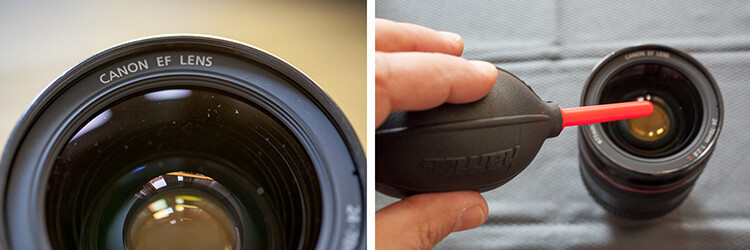
    Dust specs are really difficult to keep away from your lenses, and you should never try to wipe the glass off with a cloth like most people do. Wiping off dust might result in scratching your lens. The correct process should always be to blow it off first. You can use a blower or a compressed air can, and this way you remove the dust but don’t touch the glass.

    05

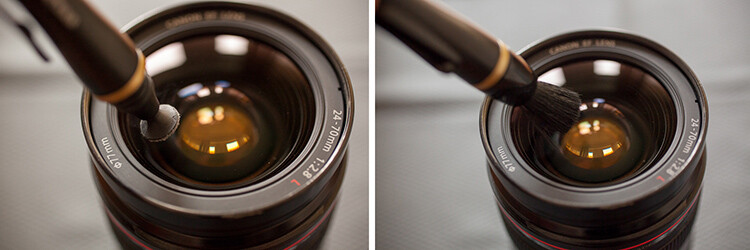
    Now the dust is gone it is time to clean eventual smudges or fingerprints you might have on the glass. My favorite tool for this process is the Lens Pen. It has a tip with a soft compound that is made to safely wipe the glass, without damaging it.

    After cleaning with the soft tip, you may use the anti-static brush on the other side of the pen to get rid of any dust that is still around.

    I usually don’t use any lens cleaning fluid unless it’s really needed. Those kinds of chemicals are never good for your lens coating, but if your lens has grease smudges, then cleaning fluid and a soft cloth might be the only solution.

    06

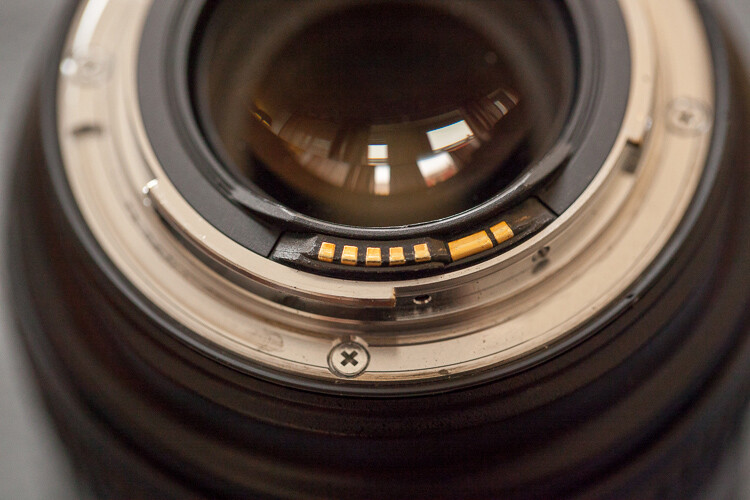
    Repeat that process on the glass on the other side of your lens, and while you’re at it it’s also a good idea to check the electrical contacts of your lens (metal parts on the back). Dirty or oxidized contacts are most often responsible for camera malfunctions or errors, so I always clean them off with a soft cloth.

    In extreme situations I have heard of people cleaning these contacts with a rubber or really fine sand paper, but I’ve never had to do anything like that.

    07

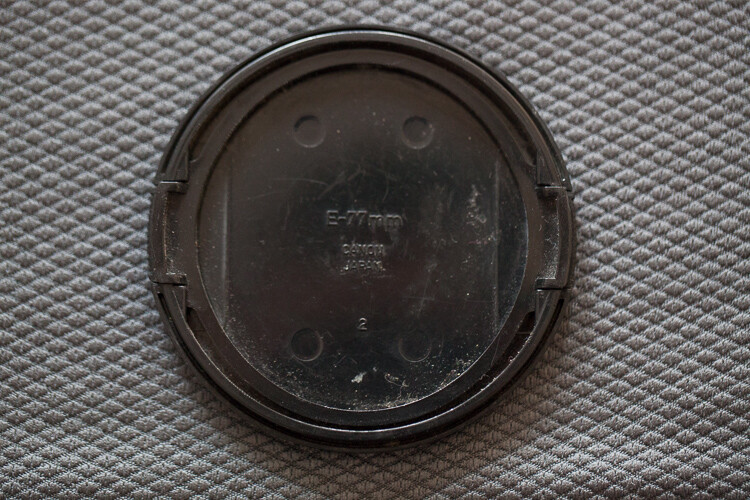
    Dirty lens caps are also something to keep in mind to clean, as they always end up in your pocket or at the bottom of your camera bag while you’re photographing, so they collect a lot of dust. It doesn’t make sense to have your lens all cleaned up, then cover it with a dirty cap, the same applies to the body caps.

    Replacing your caps with new ones from time to time might be a good idea, as they are not that expensive and give your equipment a newer look.

    08

    Now it is time to clean the camera body

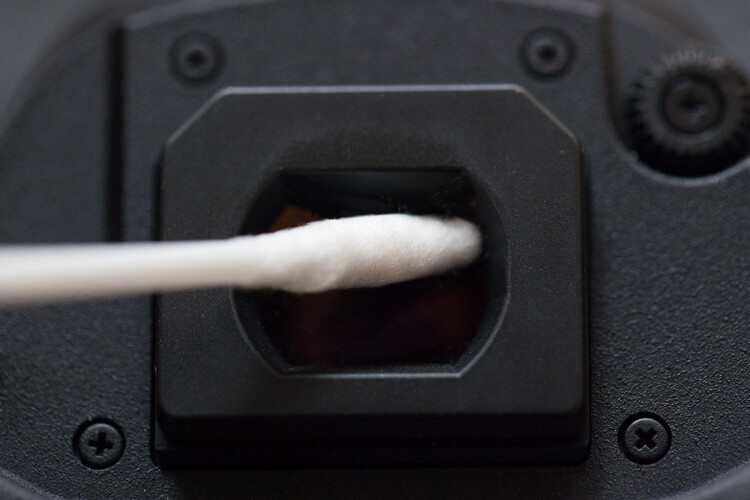
    After cleaning the outside with the anti-bacterial jelly compound, I usually clean the viewfinder. That is a difficult operation as it is a small, deep, and difficult to reach area. My trick for it is Q-Tips, but not the regular ones. I use some special ones made for babies that have a smaller pointy tip, and are made from a softer cotton, which allows a deeper and more efficient cleaning.

    09

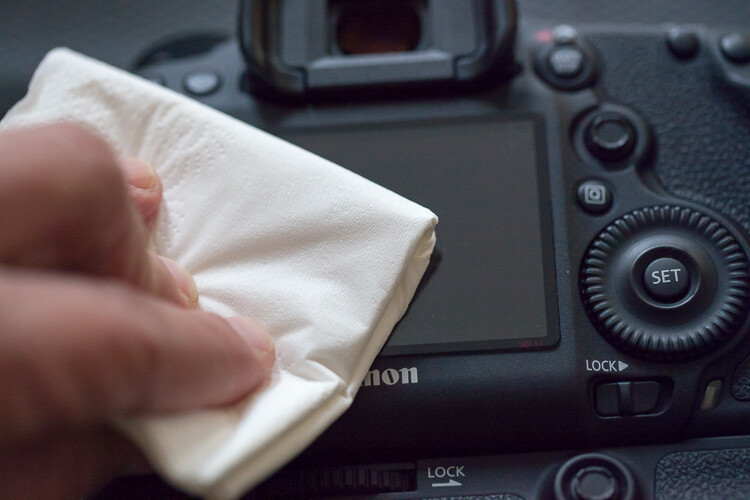
    Next I clean the LCD screen glass with a little drop of glass cleaner and a paper tissue. This removes all the grease that the LCD screen gets from being stuck to my face all the time.

    10

    Cleaning the inside of the camera

    As tempting as it might be I never try to clean the mirror of the camera. It usually seems to do more harm than good, and it usually sends more dust to the inside of the camera chamber, making it land on the sensor sooner or later.

    We finish with the most complicated part of the whole process that is the sensor cleaning.

    Camera makers always advise that this process should only be done in the brand’s technical assistance, by a trained technician, so if you are not comfortable with doing this yourself, please don’t try it.

    I remember I was a bit scared the first time I tried to clean the sensor myself. But, the fact is that I have done it lots of times, with different cameras over the years, and it always worked out fine. You just have to be careful and do things slowly and steadily.

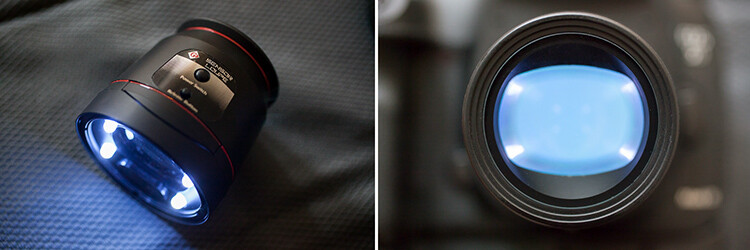
    This is a totally optional step, but I usually use a sensor loupe to check the sensor before I clean it. It is a really nice device that illuminates and magnifies the inside of your camera, making it possible to see with good precision any dust that is on your sensor.

    11

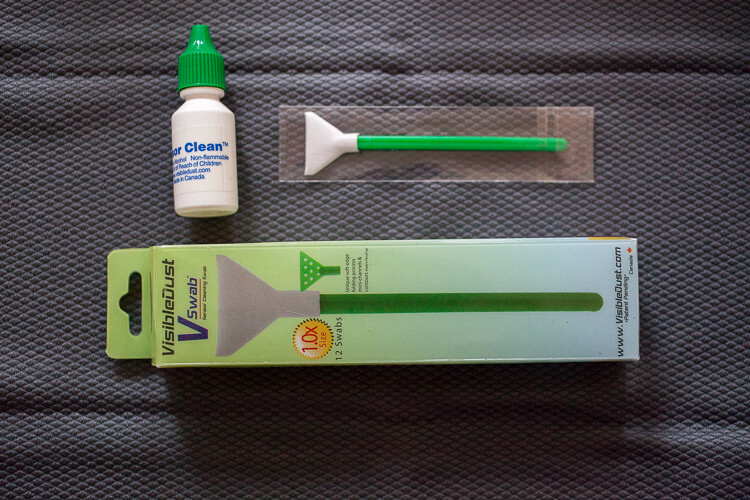
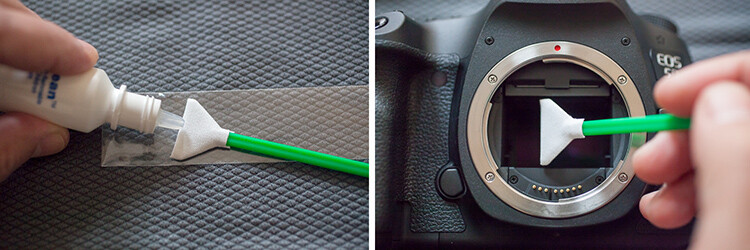
    Now for the cleaning part itself, there are many different systems and brands out there for sensor cleaning. I have tried a few and my favorite is the Vswab by Visible Dust which consists of one time use soft-edge swabs, and a sensor cleaning fluid that you use to clean the sensor from any smudges or dust specs. There are specific swabs for different size sensors, so be sure to buy the correct one for your camera.

    12

    Just get the swab a little wet with the cleaning fluid (a drop or two is all you need) then activate the mirror lockup on your camera (or use the sensor clean setting – check your camera’s user manual if you aren’t sure how to lock it up for cleaning). Wipe your sensor from left to right, just one time, touching it but trying not to apply too much pressure.
    Most of the times it works at first, but I always check it again with the sensor loupe after cleaning, and if needed I swab a second time.

    Note: Keep it mind that these swabs can only be used one time, so if you go for a second clean use a new swab.

    This allows the sensor to be clean all the time, avoiding spots on your images, caused by dust specs the get inside your camera every time you change your lenses.

    13

    These simple maintenance steps gives me confidence that my equipment is in top shape, and that I can be sure that it is going to work fine next time I pick it up.

    Remember, keep it clean and ready to fire!

    googletag.cmd.push(function() {
    tablet_slots.push( googletag.defineSlot( “/1005424/_dPSv4_tab-all-article-bottom_(300×250)”, [300, 250], “pb-ad-78623” ).addService( googletag.pubads() ) ); } );

    googletag.cmd.push(function() {
    mobile_slots.push( googletag.defineSlot( “/1005424/_dPSv4_mob-all-article-bottom_(300×250)”, [300, 250], “pb-ad-78158” ).addService( googletag.pubads() ) ); } );

    The post How to Clean Your Photography Gear and Keep it in Good Shape by Ivo Guimaraes appeared first on Digital Photography School.

    Digital Photography School

  • Choosing the Right Camera Bag – and Why You May Need More than One

    You’ve just bought yourself a new camera, or perhaps a new lens. Now you find yourself wanting to get a new bag for new purchases – after all, a good bag will protect your equipment, and can serve as an ideal place to store your photography gear when not in use.

    camera bags

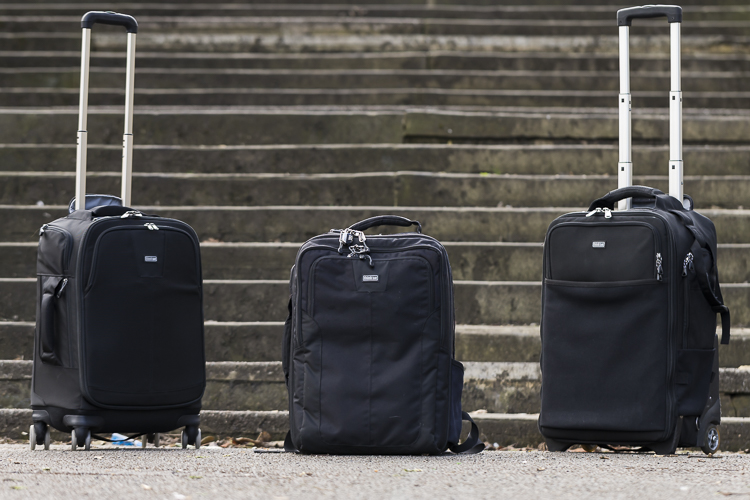
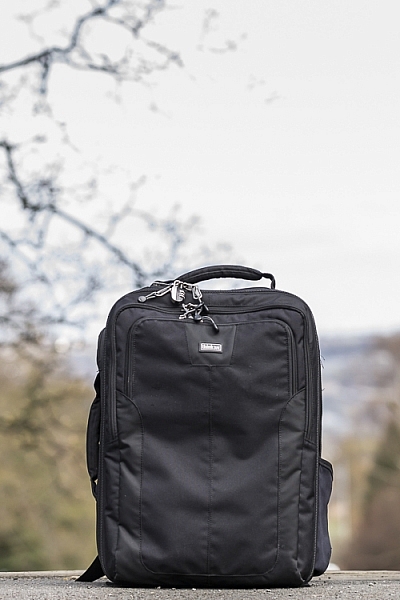
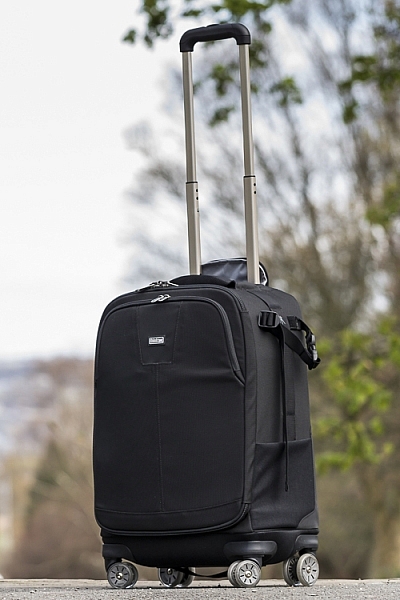
    These are some of my bags. The two end ones are both roller bags. From left to right: ThinkTank Roller Derby; ThinkTank Airport Accelerator; ThinkTank Airport Security.

    However, choosing a camera bag that’s right for you may not be as straight forward as it seems, but it is something that some thought should be given to. Choosing the right bag can make photography more enjoyable for you, as it can help carrying your equipment easier and more comfortable.

    The days of buying the generic shoulder bag are gone! Now we are spoilt for choice with offerings of backpacks, shoulder bags, sling bags, belt packs, roller bags; the list goes on. But which one is right for you? Which one is the best fit for you and your equipment needs?

    1. Camera Bag Size

    This is my largest camera bag. I use this bag when I need to carry more equipment than normal.

    This is my largest bag. I use this bag when I need to carry more equipment than normal.

    How much equipment do you have, and will you want to carry all, or only some of it with you? This will help you decide on which size bag you need to look at. Also, think ahead; will you be buying more equipment such as additional lenses or camera bodies? Will you be adding a flash system, etc.?

    All of these will obviously increase the size of your kit, and influence the size of the bag you purchase if you wish to use the bag for all of your stuff. But, do bare in mind that the more kit you carry with you, the heavier the bag will be. Also do be aware that if you use a pro-sized or gripped body, some bags may not fit your camera as the bag is not deep enough to accommodate such sizes. Generally, bag manufacturers will give a list of what can fit into a bag, and list so you can see if pro-sized or gripped DSLRs are suited to that particular bag.

    2. Camea Bag Style – The Personal Part

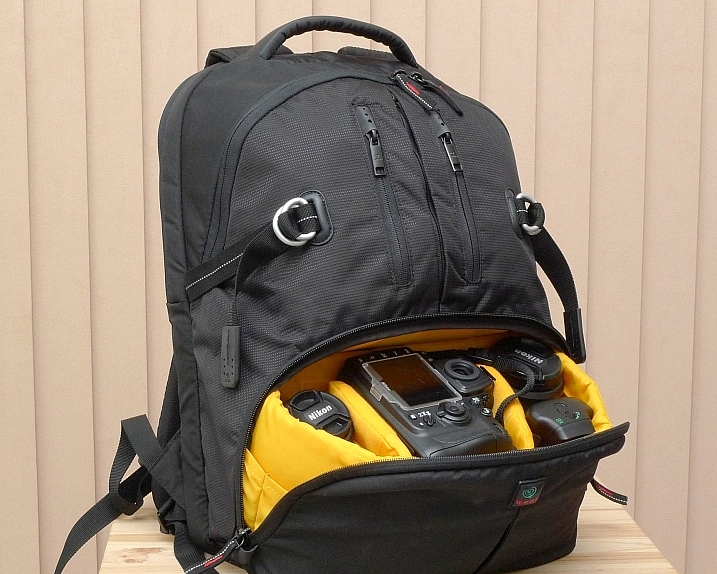
    camera bag backpack

    Choosing the size of your bag is relatively easy. It’s choosing the style of bag that I think is the most challenging, and this is where most people can get a little stuck. There are just so many choices available, it really does come down to personal choice.

    I take my backpack, the ThinkTank Airport Accelerator (left), to nearly every job I do. I use this bag to carry my laptop, laptop accessories (charger, internet hub, card reader, etc.) and any other bits and pieces I may need such as wet weather gear. If I need it, I also put my modular set (not pictured) inside this bag to use on site.

    You may prefer to use a shoulder bag, where the next person may prefer to have a backpack. It’s important to consider just how much equipment you want to carry around in your bag, as this can influence the style of bag you end up purchasing. Below is a small table with a short list of pros and cons to each style of bag.

    Let’s have a look at some of the pros and cons of the following bag types:

    Backpacks

    Backpack style camera bag

    By ????? KhE ?

    Pros:

    • Completely frees your hands, enabling you to use your phone, change lenses, etc.
    • Varying levels of carrying capacity.
    • Weight is moved from one shoulder (on a shoulder bag) to both shoulders, and your lower back.
    • Can be more comfortable that other options.
    • Can be ideal for storing equipment when not in use.

    Cons:

    • Can be slow to access your equipment and/or change lenses etc
    • Bags can have the ability to carry too much equipment and become too heavy
    • Can become uncomfortable with sustained activities; especially in warmer climates

    Roller Bags

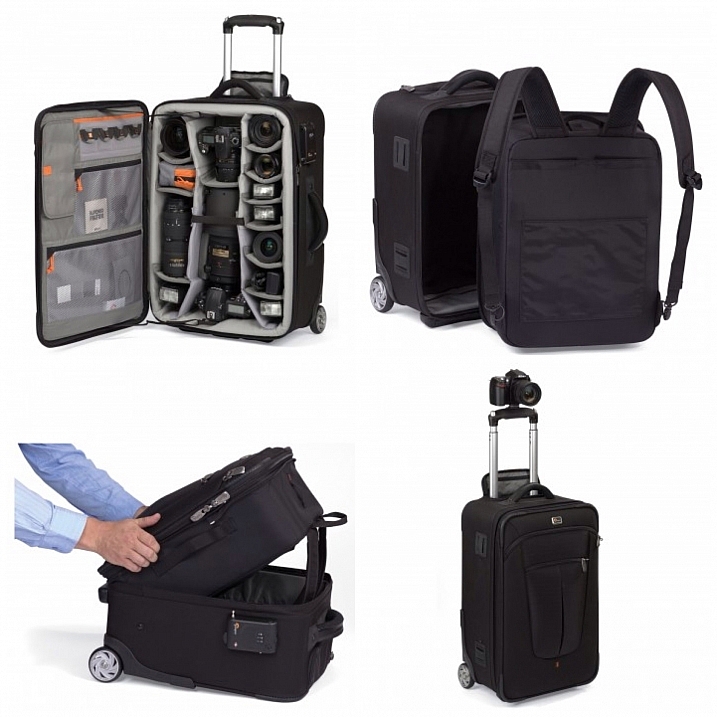
    Roller bag style camera bag

    By See-ming Lee

    Pros:

    • Can carry the largest volume of equipment easily.
    • Easy to transport equipment, as you are not required to carry anything; simply roll the bag along.
    • Perfect for keeping all of your gear in one bag, and storing equipment when not in use.

    Cons:

    • Not well suited if you require more mobility whilst out photographing.
    • Require somewhere secure to be left when no longer needed on a shoot.

    Modular Systems

    modular camera bag system

    Image courtesy Lowepro

    Pros:

    • Ideal for photographers who want maximum mobility.
    • Smal pouches that attach via a belt sit on your waist, thereby removing the weight off your back and shoulders, and transferring it to your hips.
    • Ideal for carrying extra pieces of equipment without the need for a bag on your back.

    Cons:

    • Not ideal for transportation as the pouches to not offer enough protection.
    • Each pouch has a very limited carrying capacity, so not suited to carry all of your equipment.
    • Not suited for storing equipment as each pouch can only hold a very limited number of items.

    Sling Bags

    Pros:

    • A hybrid of backpack and shoulder bag; these bags sit on your back via a single strap.
    • Can be more comfortable for prolonged use than a shoulder bag.
    • Quickly and easily access your equipment without take the bag off.
    • Perfect for storing smaller amounts of equipment.

    Cons:

    • Generally have a lower carrying capacity than other bag styles.

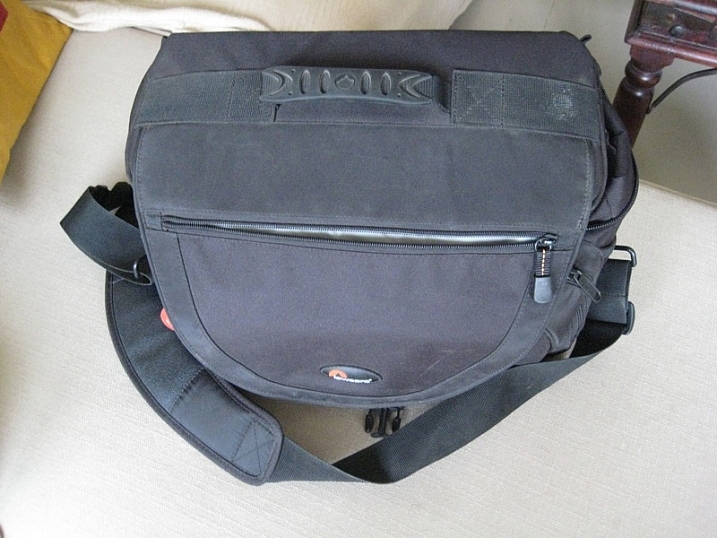
    Shoulder Bags

    Thomas Wanhoff

    By Thomas Wanhoff

    Pros:

    • Easy access to equipment as it’s by your side.
    • Can look more casual, allowing you to blend in easier.
    • Varying levels of carrying capacity to suite your equipment.
    • Can be great to store equipment when not in use.

    Cons:

    • Weight of equipment is on one shoulder and can cause discomfort.
    • Not ideal if you have larger lenses (greater than ~200mm for example).

    3. Active or Passive Bag Concept

    Personally, over the years I have used pretty much every style of bag around from backpacks, sling bags, shoulder bags, to roller bags and modular belt systems; you name it and I’ve most likely used it at some stage!

    What I have learned from this experience is that one style of bag is no better than the next and that what works on one adventure, won’t necessarily work as well on another. I have also learned that generally, one bag will not fit every situation. This brings us to an interesting concept that I have called Active Bag and Passive Bag.

    An Active Bag is a one that allows you to easily carry equipment with you and be more mobile; one that can go with you all the time. The styles of bag that are suited to this are: backpacks, sling bags, modular systems and shoulder bags.

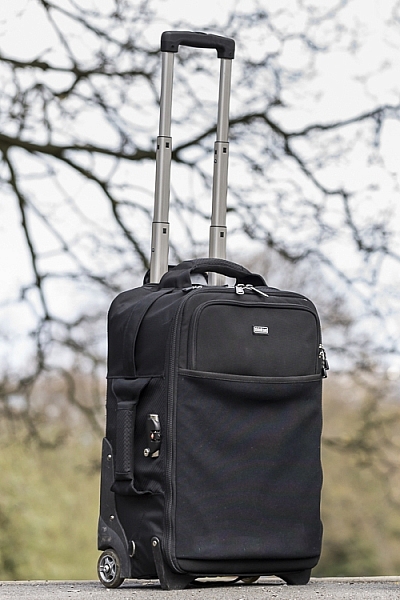
    This roller bag - the ThinkTank Roller Derby - is the bag that I take to pretty much every job I have. It's small enough to easily fit in the car, yet carries everything that I need on a job.

    This roller bag – the ThinkTank Roller Derby – is the bag that I take to pretty much every job I have. It’s small enough to easily fit in the car, yet carries everything that I need on a job.

    Passive Bags are great at transporting all your equipment to and from your shooting location and even providing a great storage solution for storing your kit whilst it’s not being used. But these bags are not ideal for the photographer who is constantly on the move. What I have found to work best is having a combination of both Active and Passive Bags with me. I use my roller bag to transport my kit to my shooting location and it provides great protection during the transport phase – not to mention a great portable desk to sit my laptop on! I then compliment this by using an Active Bag, usually a modular belt system or backpack, to carry the extra lens and flashes that I may need.

    I already have two cameras over my shoulders, each with a lens, so the bags I have are there to carry what I cannot hold in my hands, or do not need right at that moment. It is a little more expensive, yes, but the benefits are great. This is something worth considering if you’re find yourself in a similar situation where you want/need to carry a larger amount of equipment, but do not need that bag once you are at your location.

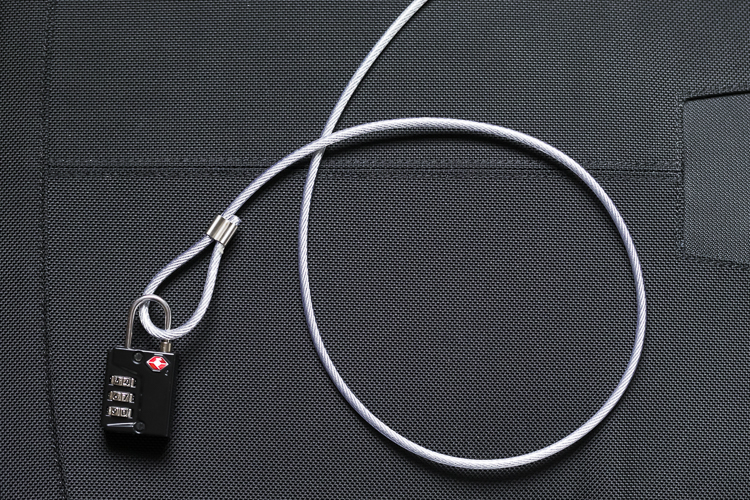
    Cable Lock

    Some manufacturers also include a cable that is made in to the bag. This is ideal to lock the bag to an immovable object; perfect for Passive type bags.

    4. Bag Quality

    So you’ve decided on the size and style of bag you wish to purchase; but please do not overlook quality. You’ve spent a small fortune on your equipment, and the last thing you should do it cut corners on what protects it.

    A good camera bag should have nicely padded, removable inserts inside. The removable inserts will allow you to customize the bag to best suit your equipment, and the padding will provide greater protection and help prevent your equipment from crashing into each other.

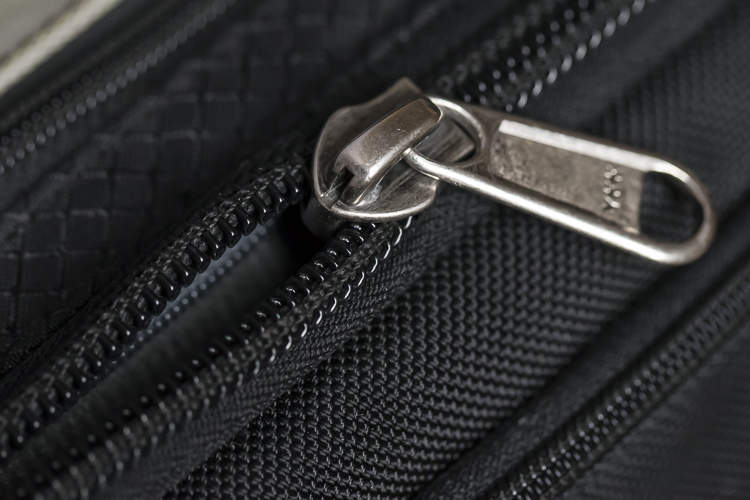
    Generally, the first thing to fail in a camera bag are the zippers, so looking for a good feeling zipper (especially for the main camera compartment) is very important. A poor quality zipper can unexpectedly fail, and potentially cause your equipment to fall out and break.

    You also want your bag to last, so make sure the exterior fabrics used are tough and wear resistant. Personally, I use ThinkTank Photo products and to be honest, I cannot fault them at all. They’re extremely well made and have withstood everything that I have thrown at them.

    Zipper

    A close up of the zipper on the main camera compartment on one of my bags. The zippers used on this bag are YKK Fuse zippers.

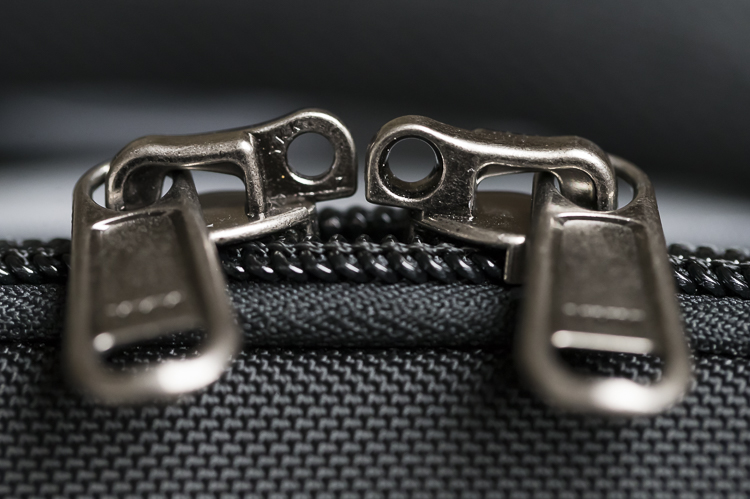
    Lockable Zipper

    Some bags also offer zippers that are lockable; ideal for that little bit of extra security.

    Conclusion

    Whilst this is an introduction into buying a bag for your camera, by no means is this exhaustive and you will still need to do a little research before you make a purchase. But, this article should offer some guidance on which bag may be right for you. You will find that most of your decisions will be based upon your own requirements. I would highly recommend you go in to a store, and bring your kit with you to try the various bags to help you find the best one.

    I’d love to hear if you have anything else you want to add and offer some advice based on your own experiences. What kind of bags do you have?

    googletag.cmd.push(function() {
    tablet_slots.push( googletag.defineSlot( “/1005424/_dPSv4_tab-all-article-bottom_(300×250)”, [300, 250], “pb-ad-78623” ).addService( googletag.pubads() ) ); } );

    googletag.cmd.push(function() {
    mobile_slots.push( googletag.defineSlot( “/1005424/_dPSv4_mob-all-article-bottom_(300×250)”, [300, 250], “pb-ad-78158” ).addService( googletag.pubads() ) ); } );

    The post Choosing the Right Camera Bag – and Why You May Need More than One by Daniel Smith appeared first on Digital Photography School.

    Digital Photography School

  • Your First 100,000 Photos are Your Worst

    Henri Cartier-Bresson once said that your first 10,000 photos are your worst. The point of that statement was that photography ought to be an art that is perfected with practice, hard work and repetition. It takes time before a photographer feels as one with their camera. Over time though you eventually learn your camera backwards and forwards, the two of you are old friends and you handle it with the skill of an expert. Likewise, after enough experience you begin to develop your own style. You find what works for you compositionally. Light and color take central stage as you do what you do best, naturally, borne out of habit and experience.
    I would change Cartier-Bresson’s quote in the modern digital age to say that your first 100,000 photos are your worst. Maybe it really ought to be your first 1,000,000 photos are your worst.

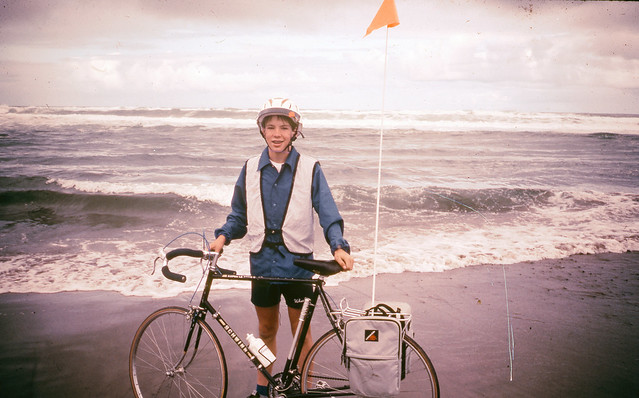
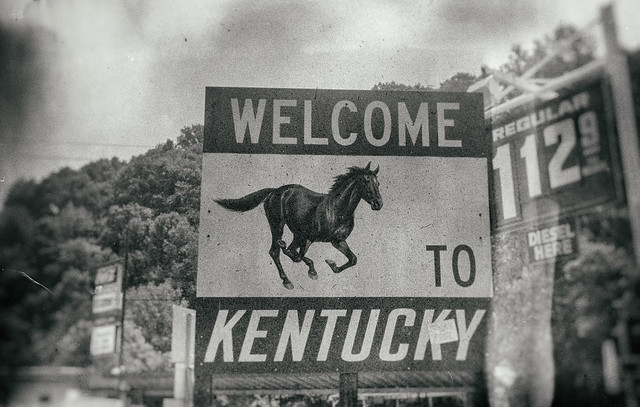
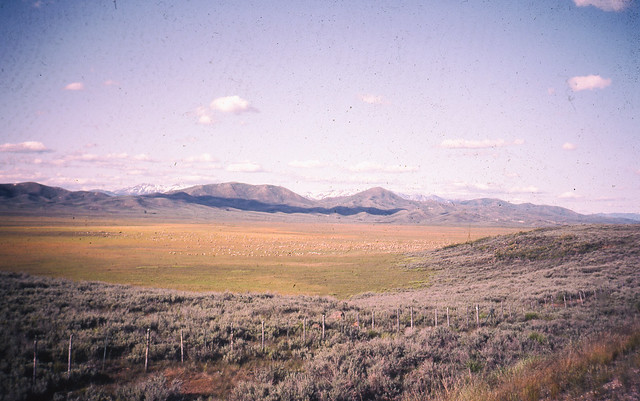
    America Coast to Coast Bicycle Trip, First Photos with an SLR, 1983

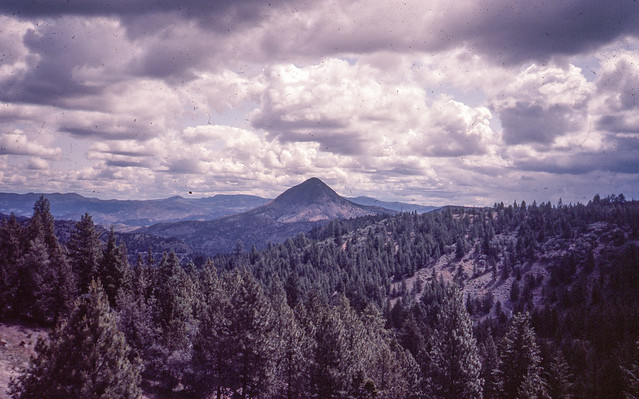
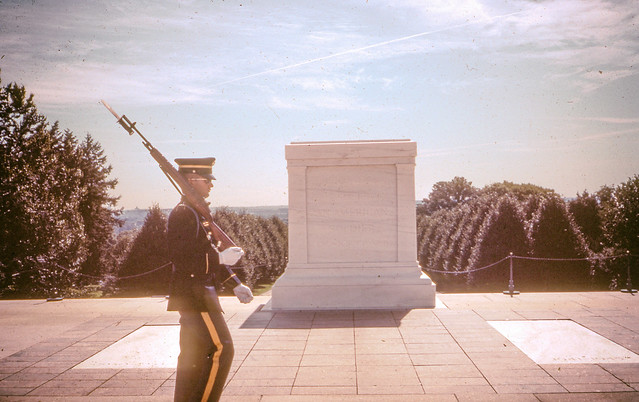
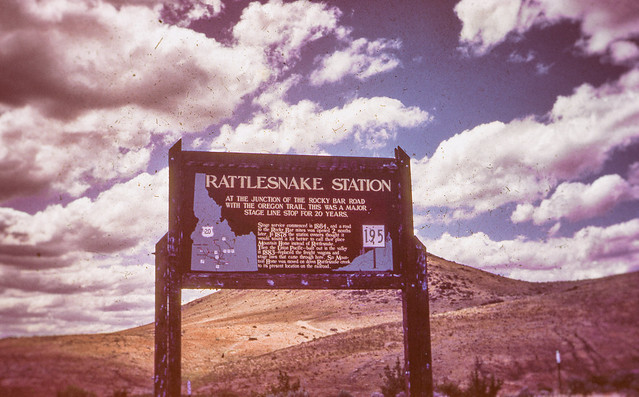
    My love affair with photography began early when I was given my first camera, a Kodak Instamatic at the age of 7 or so. When I really became most interested in photography though was at the age of 15 when my parents bought me my first SLR. It was a Sigma camera with a zoom lens. The very first photos I took with that camera were the Summer between 9th and 10th grade when I rode my bicycle across America. I did the trip with a group called Wandering Wheels out of Taylor University. I rode my bicycle from Lincoln City, Oregon to Rehoboth Beach, Delaware over the course of about six weeks. It was one of the best things I did in my youth and seeing and photographing America in my youth has carried on with me as I continue documenting America now at the ripe old age of 48.

    On my coast to coast trip in 1983 I shot Kodak slide film. I had the slides developed back in 1983 but I’ve never scanned or published any of these images. Today I finally got around to spending some time with Epson V700 and scanned in the 100 or so images I took on that trip. The slides are old, dirty and scratched, but here are some of my first 100,000 images.

    America Coast to Coast Bicycle Trip, First Photos with an SLR, 1983

    America Coast to Coast Bicycle Trip, First Photos with an SLR, 1983

    America Coast to Coast Bicycle Trip, First Photos with an SLR, 1983

    America Coast to Coast Bicycle Trip, First Photos with an SLR, 1983

    America Coast to Coast Bicycle Trip, First Photos with an SLR, 1983


    Thomas Hawk Digital Connection