Category: Photography

  • Weekly Photography Challenge – Fishing

    Fishing and fishermen can be a fascinating subject for photographers. You can see that for yourself in these images we shared earlier. Here are a few more of my images of the fishing village in Nicaragua:

    fishermen-darlene-nicaragua-05

    The combination of the fish tails, pineapple, and a bottle of Coke caught my eye. With a bustle of activity on the beach behind it.

    fishermen-darlene-nicaragua-04

    These ladies were negotiating, a serious business.

    fishermen-darlene-nicaragua-03

    Happy with her purchase. Dinner tonight.

    fishermen-darlene-nicaragua-02

    This lady was a stern business woman. The men were not messing with her. It was all “yes maam, yes maam”

    fishermen-darlene-nicaragua-01

    A young helper. The family members come to help bring the haul in and get a few fish in exchange for their labor.

    Weekly Photography Challenge – Fishing

    This week we want to see images of fishing. Either people or animals in the act of actually catching fish or the equipment that we humans use such as nets, poles, boats, etc. to catch them.

    Nate2b

    By nate2b

    Luyen Chou

    By Luyen Chou

    Prayudi Hartono

    By Prayudi Hartono

    Florian F. (Flowtography)

    By Florian F. (Flowtography)

    Cycling Man

    By Cycling Man

    Riccardo Cuppini

    By Riccardo Cuppini

    Share your images below:

    Simply upload your shot into the comment field (look for the little camera icon in the Disqus comments section) and they’ll get embedded for us all to see or if you’d prefer, upload them to your favorite photo-sharing site and leave the link to them. Show me your best images in this week’s challenge. Sometimes it takes a while for an image to appear so be patient and try not to post the same image twice.

    Louis Vest

    By Louis Vest

    EPi.Longo

    By ePi.Longo

    Ilkka Jukarainen

    By Ilkka Jukarainen

    Vince Alongi

    By Vince Alongi

    Janmennens

    By janmennens

    Share in the dPS Facebook Group

    You can also share your images on the dPS Facebook group as the challenge is posted there each week as well.

    googletag.cmd.push(function() {
    tablet_slots.push( googletag.defineSlot( “/1005424/_dPSv4_tab-all-article-bottom_(300×250)”, [300, 250], “pb-ad-78623” ).addService( googletag.pubads() ) ); } );

    googletag.cmd.push(function() {
    mobile_slots.push( googletag.defineSlot( “/1005424/_dPSv4_mob-all-article-bottom_(300×250)”, [300, 250], “pb-ad-78158” ).addService( googletag.pubads() ) ); } );

    The post Weekly Photography Challenge – Fishing by Darlene Hildebrandt appeared first on Digital Photography School.


    Digital Photography School

  • Save 60% off with these Professional Photoshop Actions & Lightroom Presets

    It’s Day 5 of our 12 Days of Christmas sale and today our friends over at Shutter PulseShutterPlus are offering an exclusive 60% off to dPS subscribers.

    Shutter pulse

    Today you can save 60% on their Professional Photoshop Actions and Lightroom Presets.

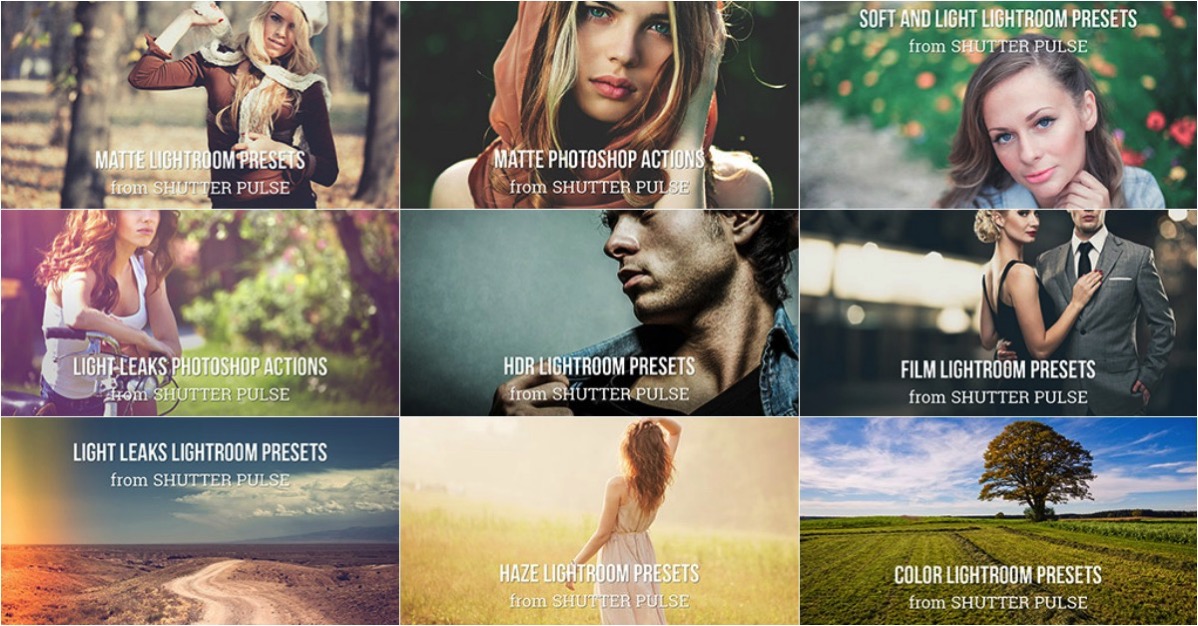
    Quality Photoshop Actions and Lightroom Presets allow you to save a massive amount of time during post processing, and they can also help you to achieve impressive looks and effects with ease.

    Today you have the option to pick up the following ShutterPlus Packs:

    • 300+ Photoshop Actions Bundle – Just $ 29, normally $ 39
    • 330+ Lightroom Presets Bundle – Just $ 29, normally $ 59
    • OR… get Both Bundles for an even bigger saving of just $ 39, normally $ 98!

    These Bundles Include 100’s of effects including:

    • Stunning HDR Effects
    • Vintage Effects
    • Cinema-Inspired Effects
    • Film-Inspired Effects
    • Matte and Haze Effects

    Pick up your bundle before it’s gone!

    P.S. You’ll need a copy of Adobe Lightroom and/or Photoshop to use Presets or Actions.

    P.P.S These presets are completely different to the dPS presets on sale yesterday, so here’s your chance to build up your preset collection so you have the right look for every occasion!

    googletag.cmd.push(function() {
    tablet_slots.push( googletag.defineSlot( “/1005424/_dPSv4_tab-all-article-bottom_(300×250)”, [300, 250], “pb-ad-78623” ).addService( googletag.pubads() ) ); } );

    googletag.cmd.push(function() {
    mobile_slots.push( googletag.defineSlot( “/1005424/_dPSv4_mob-all-article-bottom_(300×250)”, [300, 250], “pb-ad-78158” ).addService( googletag.pubads() ) ); } );

    The post Save 60% off with these Professional Photoshop Actions & Lightroom Presets by Darren Rowse appeared first on Digital Photography School.


    Digital Photography School

  • 5 Top Tips for Incredible Headshots Every Time

    Headshots are arguably the unsung heroes of the photography world. They’re everywhere, from social media profiles and advertisements to portfolios and hanging on the walls of the home. These carefully crafted images didn’t take themselves, though.

    If your headshot skills are a little wanting, there are a few tips you could take to improve your game. If you’re after magnificent snaps, for personal or professional reasons, follow these steps for a perfect shot every time.

    1. Let the eyes be the stars

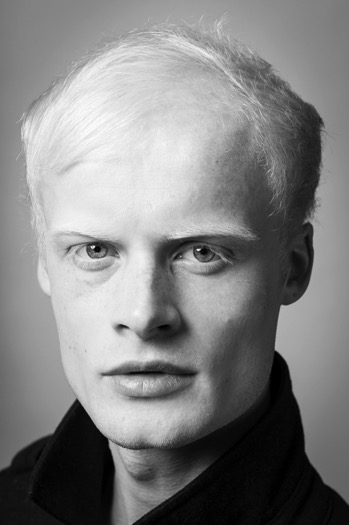
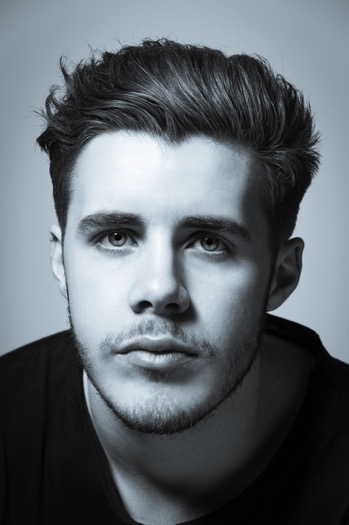
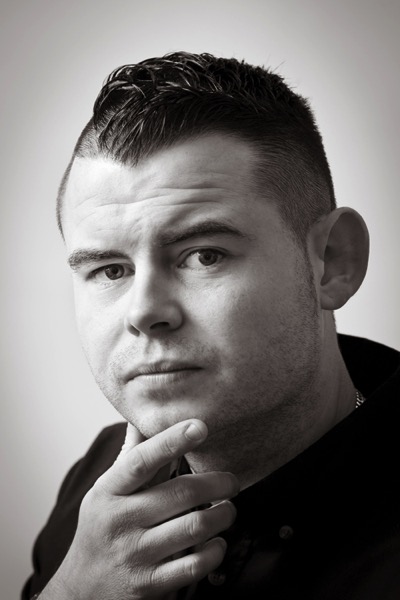
    Eyes headshot tips Eyes headshot tips

    As cliché as it may sound, eyes really are the windows to the soul. By creating a clear focus on them, this is a world of opportunities that can instantly draw in the attention of a viewer. If you want to capture a certain emotion it’s easy to do so.

    Depending on the intended use of the images, you can convey a specific message. Want to create a professional looking photo? Focus on welcoming eyes that encourage contact. After a serious acting portfolio? Concentrate on targeting a stern appearance stemming from the eyes.

    Don’t be afraid to experiment with different poses, eye positioning, and lighting. After a few shots, you’ll know exactly what to do.

    2. Think about light

    Light headshots

    It may sound rather obvious, but light can create a number of different variations of the same photo. The best photographers know how to use light to their advantage and create excellent works of art.

    Again, this is largely dependent on the purpose of the shoot. Natural light and the outdoors are great for showcasing a genuine feel. Natural light can be powerful for achieving real-life situation photos. It will also allow you to grab an honest and genuine aura of the person.

    Light headhsots

    Artificial or studio light is an exceptional tool for providing a highly professional end result. You’ll be able to inject light where you see fit, creating a photo that screams professionalism. This is probably the better option for taking corporate headshots as it allows for a uniform lighting pattern amongst a team.

    3. The lens is key

    Lens headshots Lens headshots

    You’re probably very familiar with your lenses but with so many available, it can sometimes be difficult to know which one will work for each shot. Generally speaking, headshots aim to achieve two things. Compliment the subject and grab a clear and concise image.

    Even the best lenses on the market are vulnerable to distortion if used in the wrong way. Mid to wide angle options are best avoided, as headshots are taken within a fairly close range to the subject (they will create facial distortion).

    Using a 90mm or longer telephoto lens will let you capture a stunningly clear image, with the added benefit of slimming the face, which most subjects would be thrilled with.

    4. Capture the mood with your background

    Backdrop headshots

    Pathetic fallacy works on so many levels. Primarily used as a literary term for setting a mood or humanizing elements, the same criteria can be applied to the camera.

    If your shoot is outdoors, you don’t have to do too much to convey the message. Typically speaking, you wouldn’t capture a happy face in the rain unless you were doing a contrast shoot. You’d wait until the weather brightens up and use the environment to further enhance the purpose of the image.

    Backdrop headshots

    Healthy trees and plants have lively connotations; a park can showcase a playful personality. There are literally thousands of ways you can use a backdrop to strengthen your headshots. Just be careful that the attention isn’t taken away from the subject, though.

    5. Live the shoot as a director

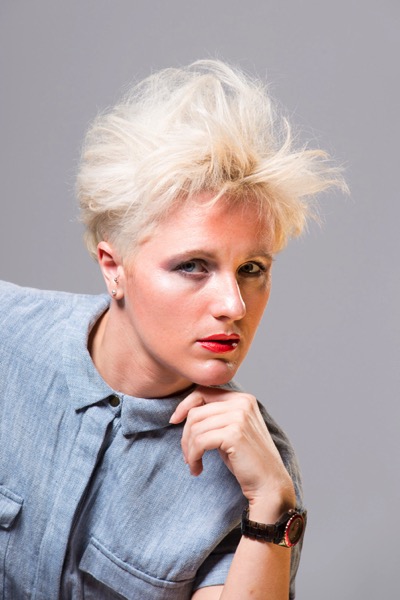
    Director headshots

    As a photographer, you’re essentially the director of a film split into still photographs. This might not be completely for your benefit, but you’re the one who knows exactly how it should be done.

    Of course, it’s important to listen to the subject’s requirements, but from there you are the captain. Dictate how the shoot goes. Explore different angles. You are the professional after all.

    You’ll be working together to achieve the end goal. With your direction, knowledge, and experience, you’ll both get the best possible results.

    Director headshot tips

    It’s easy once you know how

    Headshots are among the trickiest photographs to capture. A demand for perfection is there almost every single time. With so many variants to take into account, what works for one shoot may be completely wrong for another.

    With a little thought and by leaning on your expertise, you’ll get incredible results. You’ll produce your best work and the subject will be more than happy. Everybody wins.

    Please post any questions or share your images in the comments section below.

    googletag.cmd.push(function() {
    tablet_slots.push( googletag.defineSlot( “/1005424/_dPSv4_tab-all-article-bottom_(300×250)”, [300, 250], “pb-ad-78623” ).addService( googletag.pubads() ) ); } );

    googletag.cmd.push(function() {
    mobile_slots.push( googletag.defineSlot( “/1005424/_dPSv4_mob-all-article-bottom_(300×250)”, [300, 250], “pb-ad-78158” ).addService( googletag.pubads() ) ); } );

    The post 5 Top Tips for Incredible Headshots Every Time by John Kemp appeared first on Digital Photography School.


    Digital Photography School

  • How to Understand and Use the Lightroom Histogram

    The histogram in Lightroom is a useful tool that is easily overlooked. Its main purpose is to help you understand the relationship between the sliders in the Basic panel and the tones in your photos. It helps you get brightness levels spot on and edit images without losing highlight detail.

    Where is the Lightroom histogram?

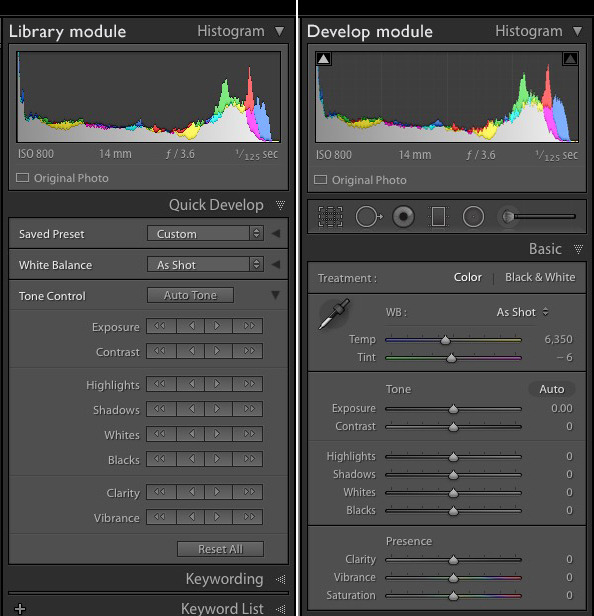
    The histogram is found in two places, at the top of the right-hand panels in both the Library and Develop modules. In the Library module, it helps you see what is happening to your image when you make adjustments in the Quick Develop panel. You also need it in the Develop module so you can see how any adjustments you make during post-processing affect the histogram.

    The Lightroom histogram

    What does the LR histogram tell you?

    The histogram tells you whether you have any clipped highlights or shadows. It also tells you how much contrast the photo has. This information lets you decide whether you need to adjust exposure and contrast. It also tells you whether the original photo was over or underexposed. The histogram changes as you move sliders around in the Basic panel, so you can immediately see the effect.

    Important: Please note that the following features work with the Develop module histogram, but not the Library module histogram.

    How to check for clipping

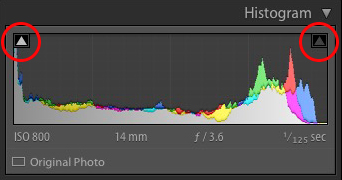
    Clipping is indicated by the Show Shadow Clipping and Show Highlight Clipping triangular icons in the top left and right (circled below). Use the keyboard shortcut key J to show and hide clipping.

    The Lightroom histogram clipping

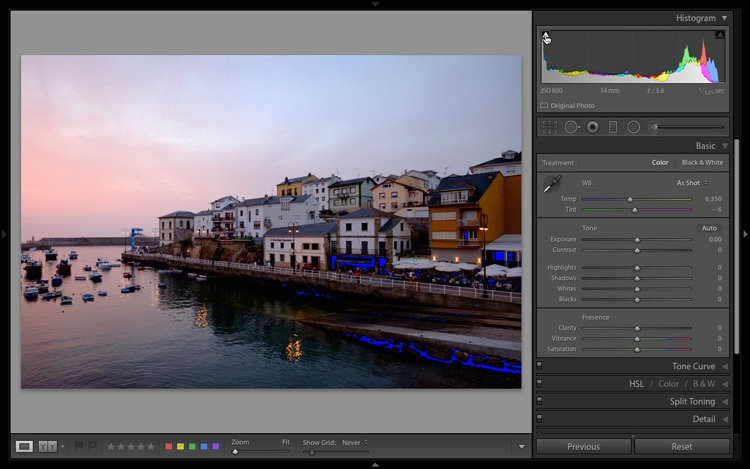
    In this histogram, the Show Shadow Clipping icon is colored white to show that the image contains clipped shadows (this is perfectly normal in many images and nothing to worry about).

    If you click on (or hover over) the Show Shadow Clipping icon, those clipped shadows are shown in blue in the photo.

    The Lightroom histogram clipped shadows

    The Show Highlight Clipping icon on the right is colored gray to indicate that there are no highlights clipping. This is a good sign, as most photographers expose to preserve highlight detail.

    The Clipping icons also come in useful to indicate if you are losing detail in the highlights or shadows as a result of making adjustments in the Basic panel.

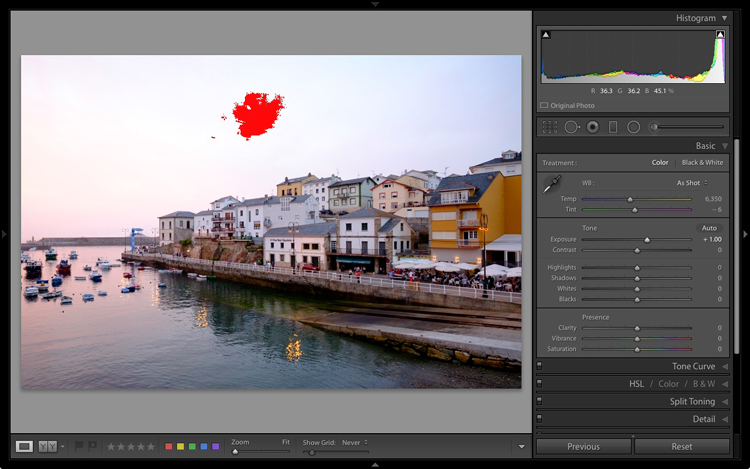
    If I set Exposure to +1.00 for this particular image, the histogram tells me that I have lost detail in the sky. The Show Highlight Clipping icon is colored white to indicate this. If you click the icon, clipped highlights are displayed in red in the image. You can see from the screenshot that only a small part of the sky is clipped. This may not be important, but it indicates that perhaps I increased the Exposure too much.

    The Lightroom histogram clipped highlights

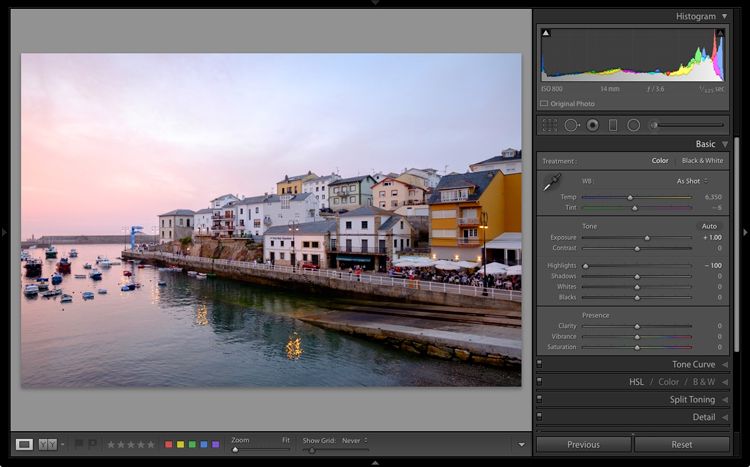
    If I set Highlights to -100 the detail comes back in the sky and there is no clipping. Notice how the histogram has changed from above to the one below.

    The Lightroom histogram

    This simple example shows you how you can push sliders around, using the histogram to make sure that you don’t lose highlight or shadow detail.

    The histogram and underexposure

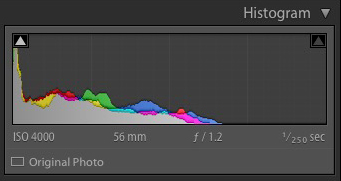
    If there is a gap on the right side of the histogram it probably indicates that the image was underexposed (an exception would be if the photo has lots of dark tones but few light ones – like a photo of a black cat sitting on a black rug).

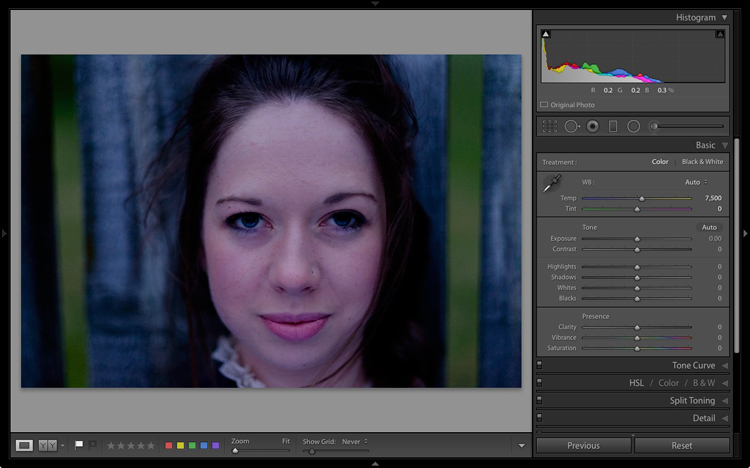
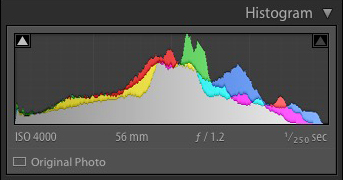
    Here’s an extreme example. The photo generating this histogram was underexposed by over a stop.

    The Lightroom histogram underexposed image

    A look at the photo confirms the histogram is correct and that it is underexposed (too dark).

    The Lightroom histogram

    While it is best to get the exposure right in the first place, you can fix this by moving the Exposure slider to the right. As you do so, the histogram also moves to the right. The Exposure slider is quite clever and increases brightness mostly in the mid-tones to prevent highlight clipping. You may be able to push it a long way to the right without losing any highlight detail.

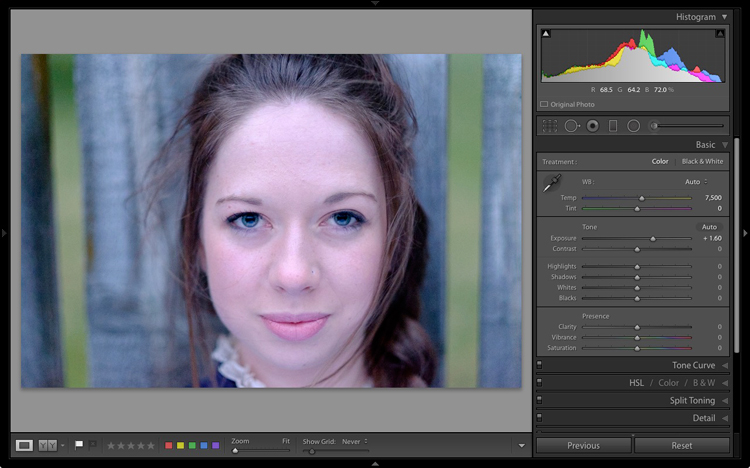
    Here, I set Exposure to +1.6, and the histogram looks much better.

    The Lightroom histogram

    This is what the photo itself looks like after that simple adjustment. Now it is ready for further refinement.

    The Lightroom histogram

    If you see a gap on the right side of the histogram yet the brightness of the photo looks okay to your eye, it could be a sign that the brightness of your monitor is set too high. If this is the case, you will find your photos look dark when printed or viewed on other people’s monitors. Ideally, you want to calibrate your monitor to be the correct brightness.

    The histogram and contrast

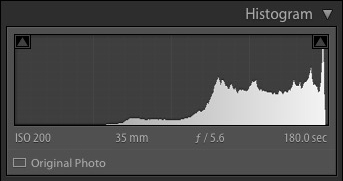
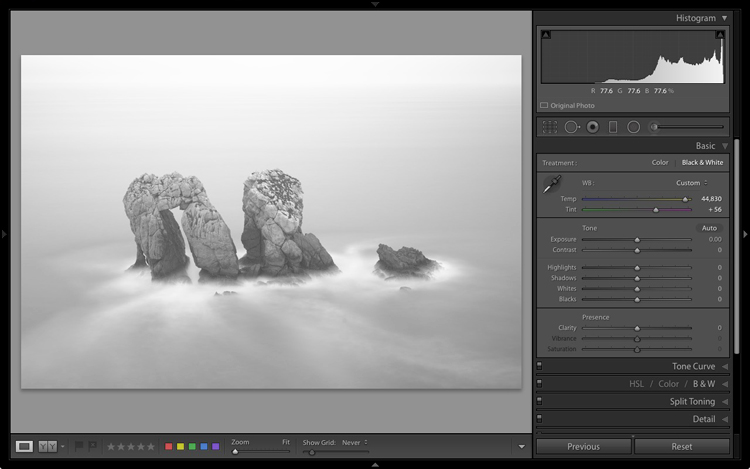
    If the histogram is bunched together and doesn’t cover the entire range of the graph this indicates that the photo has low contrast. This is most likely to happen when shooting in flat light.

    Here’s a histogram that demonstrates this.

    The Lightroom histogram low contrast

    The histogram belongs to a black and white photo taken on a cloudy day in warm and humid conditions. The spray coming from the sea reduced the contrast of the scene, resulting in a very flat image.

    The Lightroom histogram

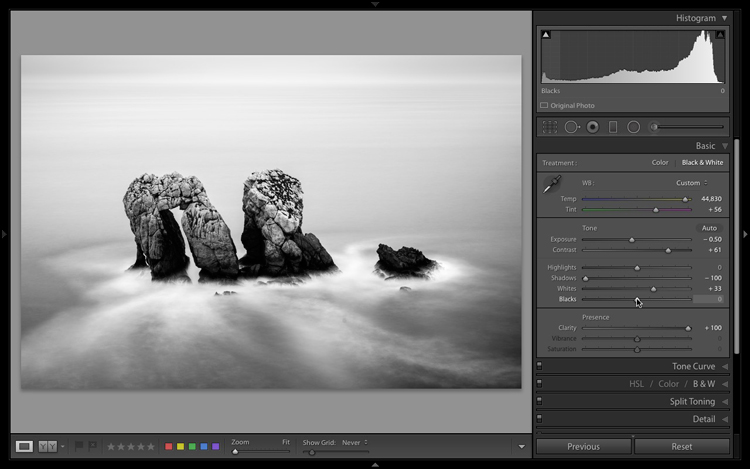
    I used the Tone sliders to increase contrast and stretch the histogram so that it filled the space available. The histogram acted as a guide that told me exactly what was wrong with the image and helped me add the contrast back into the photo that it lacked.

    The Lightroom histogram contrast adjusted

    The histogram and the Tone sliders

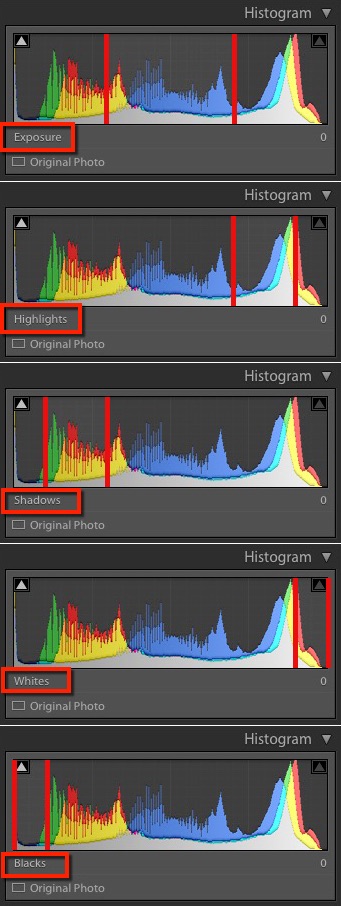
    There are five zones in the Lightroom histogram.

    When you move the mouse over the Exposure, Highlights, Shadows, Whites or Blacks sliders in the Basic panel the zone that is affected by that slider is shown in light gray in the histogram. I’ve added red lines to make it clear where each zone falls.

    lightroom-histogram-zones

    The same zones are shown when you move the mouse over the histogram itself. The name of the slider that controls the tones in that part of the histogram is displayed underneath.

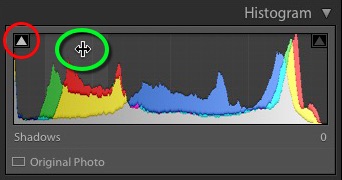
    This diagram (right) shows the zone that corresponds to the Shadows slider.lightroom-histogram-sliders


    When you see the icon with the two arrows (circled in green), hold the left mouse button down and move side to side to adjust move the Shadows slider left or right. The histogram will change as you do so. This technique gives you control over the Tone sliders from the histogram itself.

    Each slider controls a particular zone, but bear in mind that those adjustments also make changes in the other zones. Don’t worry if this sounds complicated – it will make perfect sense once you try it out for yourself. The key is to practice, and you will soon understand the relationship between the Tone sliders and the histogram.

    Luminance and color histograms

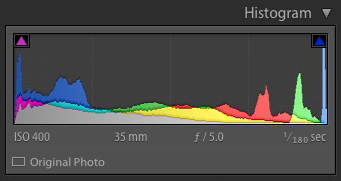
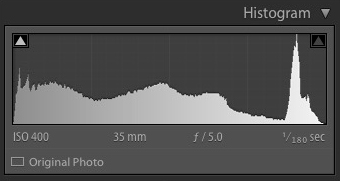
    If you’re processing a color photo you’ll notice part of the histogram is colored. Lightroom is actually showing you four histograms in one. On top is the luminance histogram, shown in gray. This shows brightness values only and has nothing to do with color. This is similar to the luminance histogram on your camera. The other three histograms are colored red, green and blue and correspond to the color channels in the image (some cameras also show these histograms).

    You’ll also see some additional colors (like yellow) where the red, green and blue histograms overlap.

    Saturation and the histogram

    The color controls in the Basic panel affect the color histograms. The easiest way to show you is by demonstrating how the Saturation slider affects the color histograms. Here is a histogram belonging to a color photo, with Saturation set to zero.

    The Lightroom histogram

    This is what happened when I set Saturation to +100. Increasing Saturation means that the colors are stronger. The result is that the peaks of the color histograms are higher.

    The Lightroom histogram

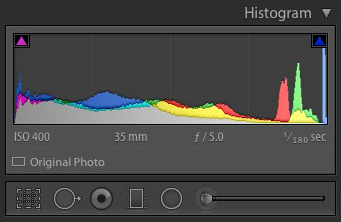
    You’ll also notice that the Shadow Clipping icon (on the left) has turned magenta, and that the Highlight Clipping icon (on the right) has turned blue. These indicate that there is clipping in the shadows, but only in magenta hues, and that there is clipping in the highlights, but only in the blue channel.

    This is an extreme example because in real life you will never increase Saturation to +100. But there may be times when you make adjustments that clip colors rather than brightness values. It probably doesn’t matter in images viewed on a computer screen, but it may do with images that are printed on paper or reproduced in a book or magazine.

    Finally, when I move the Saturation slider to -100, which removes all color from the photo, the color histograms disappear and we are just left with the luminance histogram. This is a useful tip if you would ever like to see the luminance histogram by itself.

    The Lightroom histogram

    Conclusion

    That concludes our overview of the histogram in Lightroom. Hopefully, you can see what a useful tool it is for processing photos in Lightroom. If you have any questions about the histogram, please let me know in the comments below.


    If you enjoyed this article and woudl like to learn more about Lightroom then please check out my Mastering Lightroom ebooks.

    googletag.cmd.push(function() {
    tablet_slots.push( googletag.defineSlot( “/1005424/_dPSv4_tab-all-article-bottom_(300×250)”, [300, 250], “pb-ad-78623” ).addService( googletag.pubads() ) ); } );

    googletag.cmd.push(function() {
    mobile_slots.push( googletag.defineSlot( “/1005424/_dPSv4_mob-all-article-bottom_(300×250)”, [300, 250], “pb-ad-78158” ).addService( googletag.pubads() ) ); } );

    The post How to Understand and Use the Lightroom Histogram by Andrew S. Gibson appeared first on Digital Photography School.


    Digital Photography School

  • DEAL: 2 Amazing Courses to Improve Your Landscape Photography

    Our 6th deal of our 12 Days of Christmas Sale brings you two amazing online video courses that will improve your Landscape Photography – at 60% off the regular price.

    NewImage

    Today only you can pick up these two courses for just $ 54 (normally $ 188).

    This value packed Landscape Photography bundle includes:

    Creating Impact Course by Varina Patel
    Go beyond the basic rules to build stronger compositions with visual impact. The Creating Impact course will help you to establish your creative vision, develop a solid workflow that will make that vision a reality and help you take beautiful landscape photos.

    This course normally sells for $ 134.

    Practical Lightroom Tutorials by popular dPS writer and renowned Landscape Photographer Anne McKinnell.

    Anne will teach you how to stop being overwhelmed by Lightroom and to start using it to transform the Landscape (and other) images that you take. Anne authored our popular ultimate guide to Landscape Photography article, and we’re sure you’ll enjoy these lightroom tutorials just as much!

    This course normally sells for $ 49.

    This Deal Won’t Last

    You are going to love these courses – they have been developed by two of our favourite landscape photographers and contain so much practical information that will help you to take some beautiful photos.

    Grab both of these courses today – with hours of video training and 40 online videos – for just $ 54. A Saving of $ 129!

    This offer won’t last because tomorrow’s is just 24 hours away – so avoid disappointment and pick it up today here.

    googletag.cmd.push(function() {
    tablet_slots.push( googletag.defineSlot( “/1005424/_dPSv4_tab-all-article-bottom_(300×250)”, [300, 250], “pb-ad-78623” ).addService( googletag.pubads() ) ); } );

    googletag.cmd.push(function() {
    mobile_slots.push( googletag.defineSlot( “/1005424/_dPSv4_mob-all-article-bottom_(300×250)”, [300, 250], “pb-ad-78158” ).addService( googletag.pubads() ) ); } );

    The post DEAL: 2 Amazing Courses to Improve Your Landscape Photography by Darren Rowse appeared first on Digital Photography School.


    Digital Photography School

  • 4 Beginner Tips for Doing Architecture Photography

    The first thought you will want to steer clear of is that architecture means buildings, as it actually encompasses most man-made structures. Architectural photography involves capturing an image of a physical structure in an aesthetically pleasing way for your viewers. Here are a few tips to consider if you are just getting into this category of photography.

    architecture photography tips

    1. Gear Up

    In any genre of photography, the right gear makes the difference and this also holds true for architectural photography.
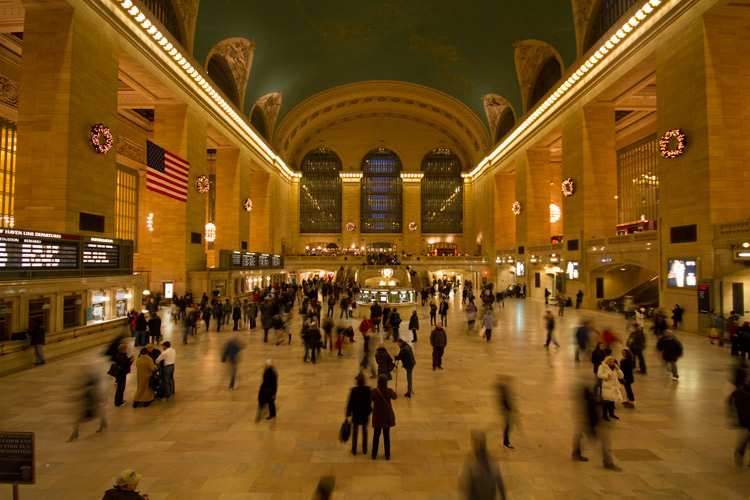
    If you want to get an entire structure or room into your frame or opt for a dramatic composition, pack a wide-angle lens in your bag.

    architecture photography tips

    Keep in mind that there will be times when even a wide angle lens may not be adequate to capture an enormous structure or a sense of place – here the knowledge of shooting panoramic images can come in handy.

    architecture photography tips

    On the flip side, you may not want to show everything and just focus on some interesting details. Pack a zoom lens to capture those details which help to convey the more ornate and interesting characteristics of architecture.

    arnos-vale-entrance-architecture

    architecture photography tips

    Also, a telephoto lens allows shooting your subject from further away and can help a building’s walls and lines appear straighter (with less distortion).

    2. Compose Yourself

    Interesting architectural photography benefits from good composition. While distortion can add drama and lend to that artistic feel, buildings leaning backwards or looking too distorted can be less appealing. Always consider your angles and how you want to convey your subject.

    architecture photography tips

    Photographers who specialize in architectural photography find themselves correcting skews in the post-processing phase or invest in a tilt-shift lens to avoid distortion in the first place.

    If you are starting out and want to play around with the dramatic feel, you can shoot from lower or higher angles to maximize the disfigurement. Remember while doing this can be interesting, it is recommended to reduce the effect so that it is not too distracting.

    architecture photography tips
    Move around and try different angles – shoot straight up, get closer or further away, go low to the ground or higher than the building if possible and see what enhances your architecture.

    3. Lighting

    A major challenge with architectural photography is that you have no control over the position and orientation of the subject (especially when it comes to buildings), so most times you have to make the most the available light.

    architecture photography tips
    One of the most interesting (and recommended) lighting options for buildings is when light falls on its side and front (side-front lighting). This angle of lighting provides a decent amount of illumination and can cast interesting shadows across the face of a building, which gives it a more three-dimensional look. So scout out your location at different times and see how the light and shadows change the look and feel of your image.

    architecture photography tips
    Be wary with strong back lighting when shooting buildings since it can create uniform dark surfaces, unless you are going for that silhouetted look. Again the time of day comes into play and if the structure itself has lights, it adds to the photo.

    architecture photography tips
    Alternatively, you can shoot at night. Many buildings and cities are designed with night time in mind. Even bridges, sculptures, and windmills can be interesting pieces to photograph after dark. Look for color and the way the buildings are lit and use a tripod!

    4. Time Investments

    As noted there is little control over large-scale lighting on existing grand architecture, so work with the light that is already there. You can do this effectively by investing time to determine what light is most flattering.

    architecture photography tips nighttime

    Does the building look better in the morning sun or at sunset? How about at night – is it lit or does it make a great silhouette? Are there interesting reflections in the daytime or a lot of texture to capture? Remember that different times of the day and varying weather conditions can change the mood of your architecture.

    architecture photography tips light

    Conclusion

    Architectural photography is interesting and can be quite exciting. Give yourself time to see architecture from alternate angles, at different times of the day and study it long enough to know what you want your end result to be. Invest the time – it can be worth it.

    What is your favorite type of architecture to shoot? Please share some of your shots and techniques with us in the comments below..

    googletag.cmd.push(function() {
    tablet_slots.push( googletag.defineSlot( “/1005424/_dPSv4_tab-all-article-bottom_(300×250)”, [300, 250], “pb-ad-78623” ).addService( googletag.pubads() ) ); } );

    googletag.cmd.push(function() {
    mobile_slots.push( googletag.defineSlot( “/1005424/_dPSv4_mob-all-article-bottom_(300×250)”, [300, 250], “pb-ad-78158” ).addService( googletag.pubads() ) ); } );

    The post 4 Beginner Tips for Doing Architecture Photography by Nisha Ramroop appeared first on Digital Photography School.


    Digital Photography School

  • Tips and Resources for Doing Android Phone Photography

    Everywhere you go in the world today you will find someone, or many people, with their phones in the air capturing what they see. They all have a camera with them because they have their phones and can photograph everything they see. Phones have had cameras in them for quite a few years now, but slowly over the years they have improved and today many phones are amazing.

    However, when you look around at phone photography there does seem to be an emphasis on iPhones and their cameras. While this article isn’t about which is better, it is important to remember that when it comes to phones Android has a much larger market share and therefore more people are using Android phones and their cameras.
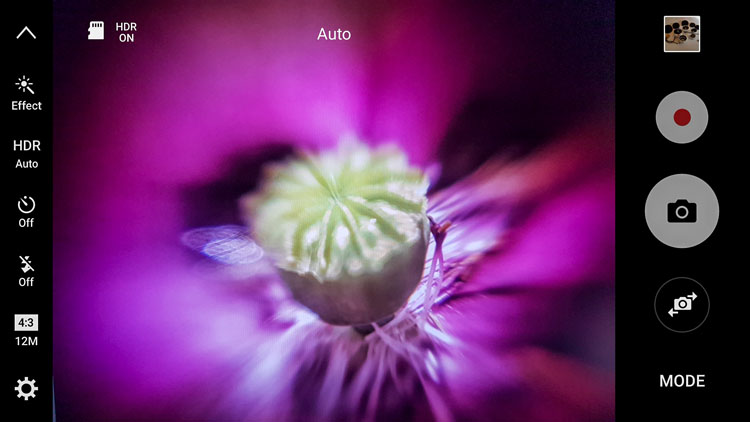
    Android phone photography tips

    The camera user-interface for the Samsung Galaxy S7 Edge.

    For this reason, this article is going to concentrate on Android photography, as there are many who seem to think that everything is made for the iPhone and if they don’t have one they are missing out. That really isn’t the case and since beginning research for this article so many things have come to light.

    Phone

    Not all phones are the same, nor are the cameras in them. If you are serious about using it for photography, then it would be good to do your research and get one that has a good camera.

    While Samsung has had some bad press lately over the debacle with the release of the Note 7, it has to be remembered they are still good phones and the camera in the Galaxy S7 Edge is said to be the best still camera (inside a mobile phone) on the market. It is very clear and the photos have an amazing quality. This is the one I use.

    Get one that matches your needs

    The camera, as with most, has lots of different settings and modes so you can find one that will be suitable for the type of photography that you are shooting.

    If your intention is to use your phone a lot for photography then be sure to select on that has what you need. Also, make sure that it is easy to get the photos from the phone to your computer. In today’s phone market, though, that is easier than ever.
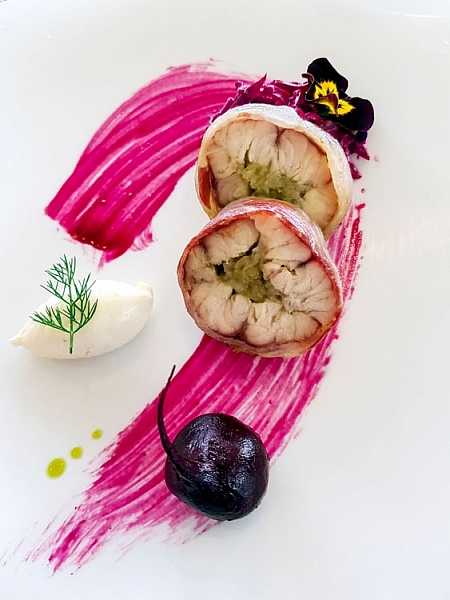
    Android phone photography tips

    Some food photography with the Samsung Galaxy S7 camera.

    Apps for photography

    We live in a world of apps. There seem to be apps for everything. Whether they are good or not is another story.

    If you go to the Google Play Store and search for cameras you will be given an overwhelming choice. You can get apps for image sharing, doing effects, making selfies, collages, and so on. The list seems endless. Just the popular results give you over 200 choices.
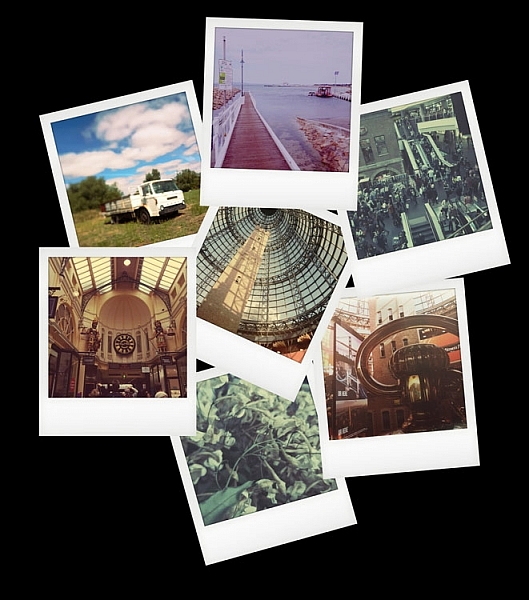
    Android phone photography tips

    Photos taken with the Instant Camera App.

    Most of them are free, so if you are unsure which ones to use you can install them, try them out, and if you don’t like one then just uninstall it. The reviews and number of stars can be a good indicator, especially for ones that you have to pay for. If you have to spend money, then you want to make sure it is a good purchase. Having said, though, many of them don’t cost a lot.

    I purchased Instant, which imitates the type of image you would get with a Polaroid camera. After playing around with it for a bit I discovered that there are lots of filters in the app to create many different effects. It is set up for you to shake or blow the image for it to be revealed, like the original Polaroids. Even though you know you don’t need to do it, it almost seems irresistible to not shake or blow on it.
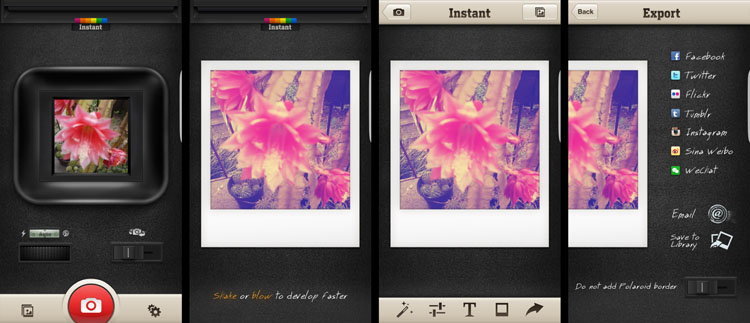
    Android phone photography tips Instant app Polaroid.

    Taking photos with the Instant Camera App.

    Retro camera app

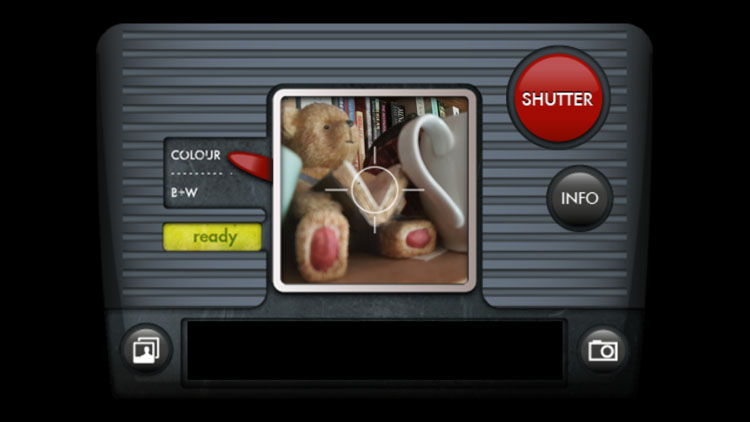
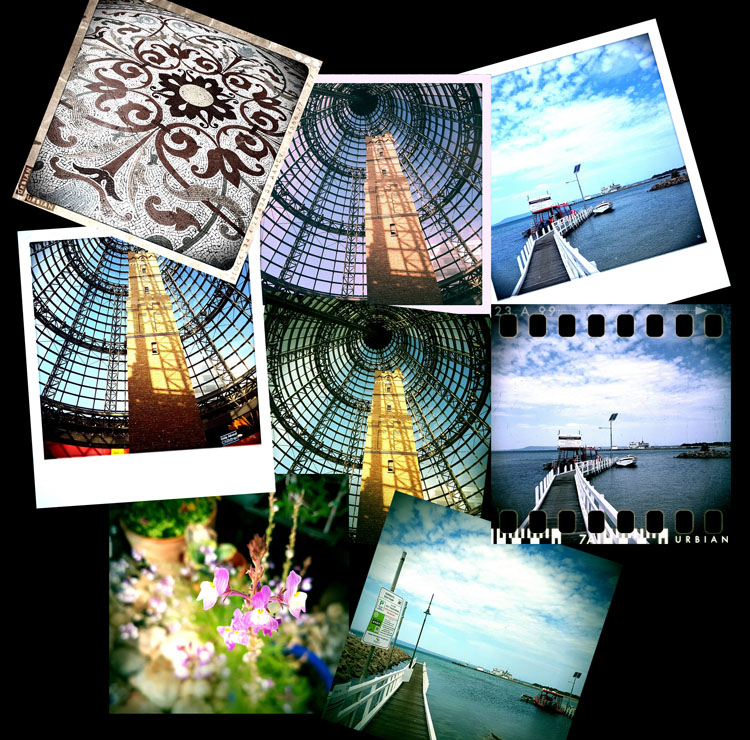
    Another one that you can try out is the Retro camera. It’s free and comes with several different cameras. If you press the camera icon in the app you can scroll through and find different ones. I quite like the Xoloroid one and the Fudgecan.  This app does not seem to have the filters, but you can choose to either take colour or black and white images with it.
    Android phone photography tips retro camera

    The Retro Camera app as it is taking an image.

    They are great fun to play around with and I do suggest you try many apps. You might even fall in love with one.
    Android phone photography tips retro app

    Using the cameras within the Retro Camera app you can get a variety of results with each of the different options.

    Lenses to attach to your phone

    Lenses for mobile phones have been around for a while, but there does seem to be the impression that they are only for iPhones. I thought the same thing too. But, there are many lenses available for you to attach to your Android phone.

    Lensbaby has lenses for the iPhone. When asked why didn’t they do them for Android the answer was simple. They did, but people didn’t seem interested and they didn’t sell. Perhaps the reason they didn’t sell well, was because people didn’t know about them. Well, now you do.

    It is unknown how many lenses there are for Android, but apparently, a lot of the ones for iPhones can also be used on Androids. They use a magnetic ring that sticks over the top of the camera on the back of your phone. Some rings are better than others, and some don’t work very well.

    Lensbaby

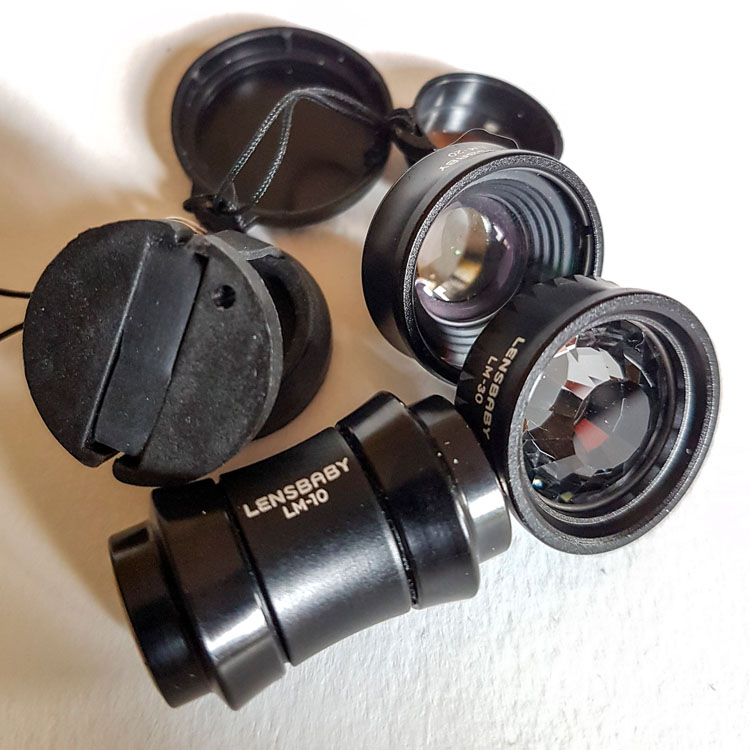
    There are three phone lenses from Lensbaby and they all do different things. Along with them is an app for your phone that helps you take photos.

    • The Lensbaby LM-10 is a two-way lens, meaning you can turn it around and use the opposite end as well. The sweet spot is in the center for both ends, but one end will let you get closer than the other. It is a bit like reversing the lens on your camera.
    • LM-20 has a bigger sweet center spot and lets you take more normal images.
    • LM-30m this is very sharp in the middle and gives a crazy effect around it. Some say the photos are mind-bending, and can too strange. You do have to think about where you would use this lens. It isn’t suitable for everything.
    Android phone photography tips Lensbaby LM-10

    Lensbaby Lenses

    The magnetic ring that sticks to the camera is great and doesn’t come off when you take the lenses off. However, it can be hard to focus using it and if you leave it on, the camera can move so it may need readjusting next time.

    One thing that is quite good is that you can take it on and off a bit. I’ve done it up to four times and often leave it stuck to the back of the phone until I need it, and then move it over the camera when I’m ready to shoot.
    Android phone photography tips lenses

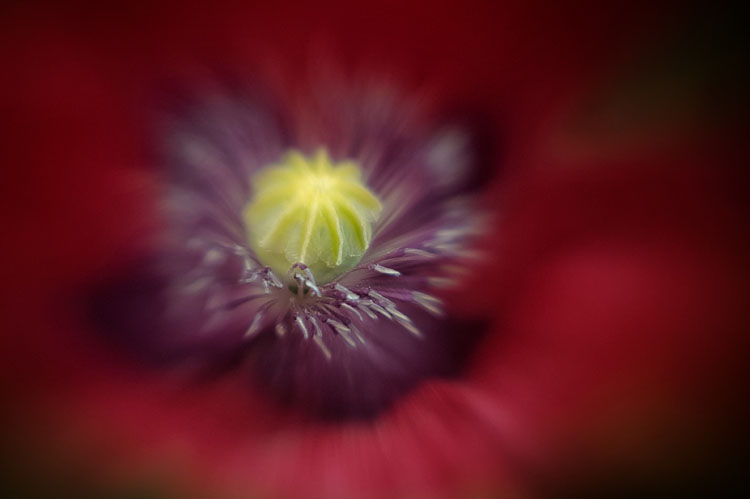
    Macro photo taken using the Lensbaby LM-10

    Lensbaby app

    As previously stated, Lensbaby also has a free app that you can download that lets you have a lot more control over the images. You can move the sweet spot around, or lock it to one position. Be aware that the LM-10 does reverse the image when you are taking it, so you need the app so you can reverse the view so it appears right way around.

    Overall the lenses are great and are small enough to carry around in your pocket or bag when you’re out. I use them a lot for macro photography.
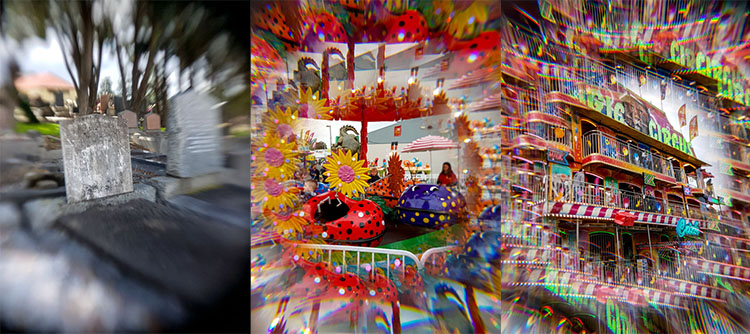
    Android phone photography tips Lensbaby

    Three images, the first taken with the Lensbaby LM-20, the second two taken using the LM-30 lens.

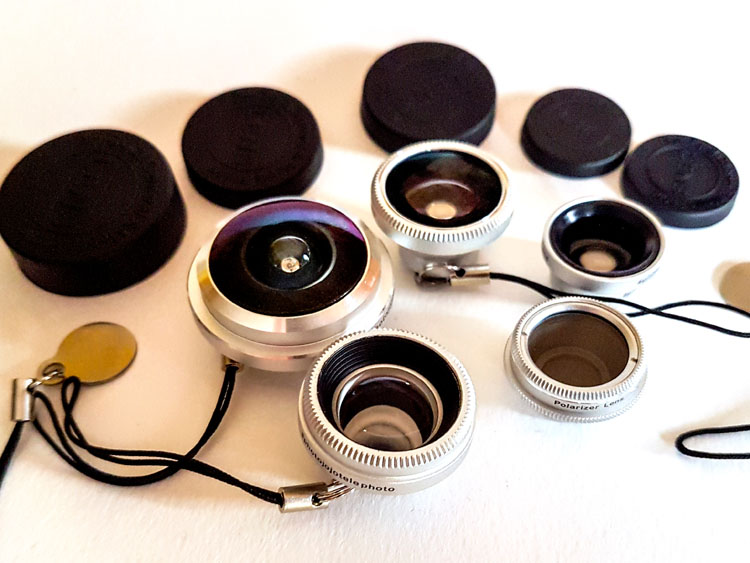
    Photojojo

    Another company that has produced lenses is Photojojo. You can buy all five or just a couple of them. They have standard lenses, but they also have some special effects ones as well. They are the only company that I saw with a polarizer, which could be very handy for some situations.

    Here is a list of what they have:

    • Fisheye
    • Superfisheye
    • Polarizer
    • Wide/macro
    • Telephoto lens
    Android phone photography tips Photojojo

    Photojojo lenses

    They are all good but the super fisheye is probably the one I’ve played with the most. It is very wide and distorted. You will get your hand holding the camera in the shots you take with this lens. The other lenses are much what you would expect.

    The Photojojo lenses come with the magnetic rings to attach to your camera, but they don’t stick very well and when you remove the lens, the ring often comes off as well. If the lens is a bit heavy, like the super fisheye, when you angle the phone down it will just come off, along with the ring.
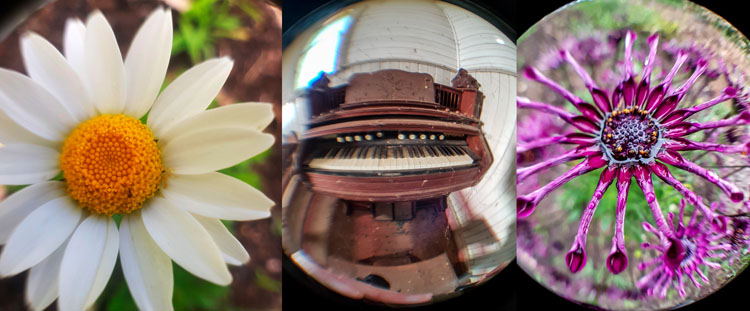
    Android phone photography tips Photojojo lenses

    Photos taken with the Photojojo lenses, the super fisheye.

    I’ve been using the Lensbaby rings with the Photojojo lenses. Sometimes you have to move the lens or the ring around, but you can get them to work together if you are patient.

    Photo editing apps

    When you start taking photos with your phone the next progression is to start sharing them with the world on social media places like Facebook or Instagram. You could just post them straight up, use the filters that come with Instagram, or you can do some fine tuning of the images photo editor apps.

    If you do a search for photo editors in the Play Store you will be given many choices. As it was for the cameras, you need to go through and see which ones you think will work for you and your purposes. We are going to look at two here.

    Snapseed

    Snapseed is a photo editor app that has been around for a while. It is free and fairly easy to use. While it does have some filters that you can just add to your image, it also has quite a few adjustments as well. Often, that is all you need to do, just do a few tweaks and the photo is ready to be saved.

    As with any software that allows you to make changes to your images you always have to save it. On your phone, Snapseed will make a new gallery for your new saved edited images. You will end up with two of every image, the original and the edited version. When you are sharing, make sure to choose the one from the Snapseed gallery.
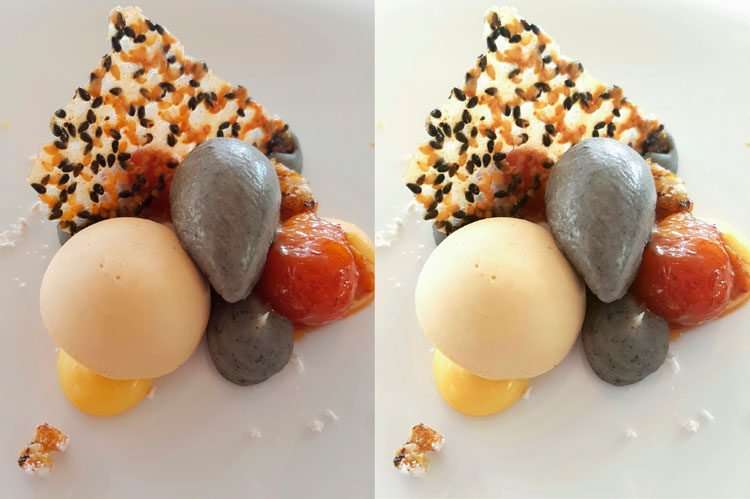
    leannecole-androidphone-snapseed

    The photo on the left was taken with my phone and then processed in Snapseed on the right.

    Lightroom Mobile

    To get Lightroom Mobile for your phone you have to be a subscriber to Adobe for Photoshop CC and Lightroom CC. It comes as part of the package. Once you are a subscriber you can download the app and sign in.

    Get a 20% discount on Photography Plan using this link for dPS readers only! 

    It doesn’t work like Lightroom CC on your computer, rather is very similar to other photo editing apps like Snapseed. It is easy to navigate around and figure out. Again, save everything you do and it will export it into a Lightroom gallery for you on your phone.

    If you don’t subscribe, then don’t do it just to get this app. Snapseed is probably just as good, and if you don’t like it there are lots of other editing apps. Ask around and I am sure you will get a list for a lot of them. One thing that is great is the ability to install them, and if you don’t like, just uninstall.

    Android photography round-up

    Taking photos with your phone can very enjoyable and just because you have an Android that doesn’t mean you can’t take photos just as well as those with iPhones. Don’t let Apple users tell you your phone isn’t as good. Now you know that you can take good photos just as good, maybe even better.

    In the end, it comes down to the person holding the camera (you) and how good you are. Have faith and share your photos. I would love to see them in the comments section below.

    googletag.cmd.push(function() {
    tablet_slots.push( googletag.defineSlot( “/1005424/_dPSv4_tab-all-article-bottom_(300×250)”, [300, 250], “pb-ad-78623” ).addService( googletag.pubads() ) ); } );

    googletag.cmd.push(function() {
    mobile_slots.push( googletag.defineSlot( “/1005424/_dPSv4_mob-all-article-bottom_(300×250)”, [300, 250], “pb-ad-78158” ).addService( googletag.pubads() ) ); } );

    The post Tips and Resources for Doing Android Phone Photography by Leanne Cole appeared first on Digital Photography School.


    Digital Photography School

  • DEAL: How to Create Captivating Photo Collages in Seconds

    Welcome to Day 7 of the dPS 12 Days of Christmas Sale.

    Today’s exclusive offer will help you make beautifully designed collages within Lightroom, in seconds.

    Cole from Cole’s Classroom has an exclusive offering for dPS subscribers.

    LR collage header

    Normally $ 158, today it’s only $ 29. That’s 85% Off.

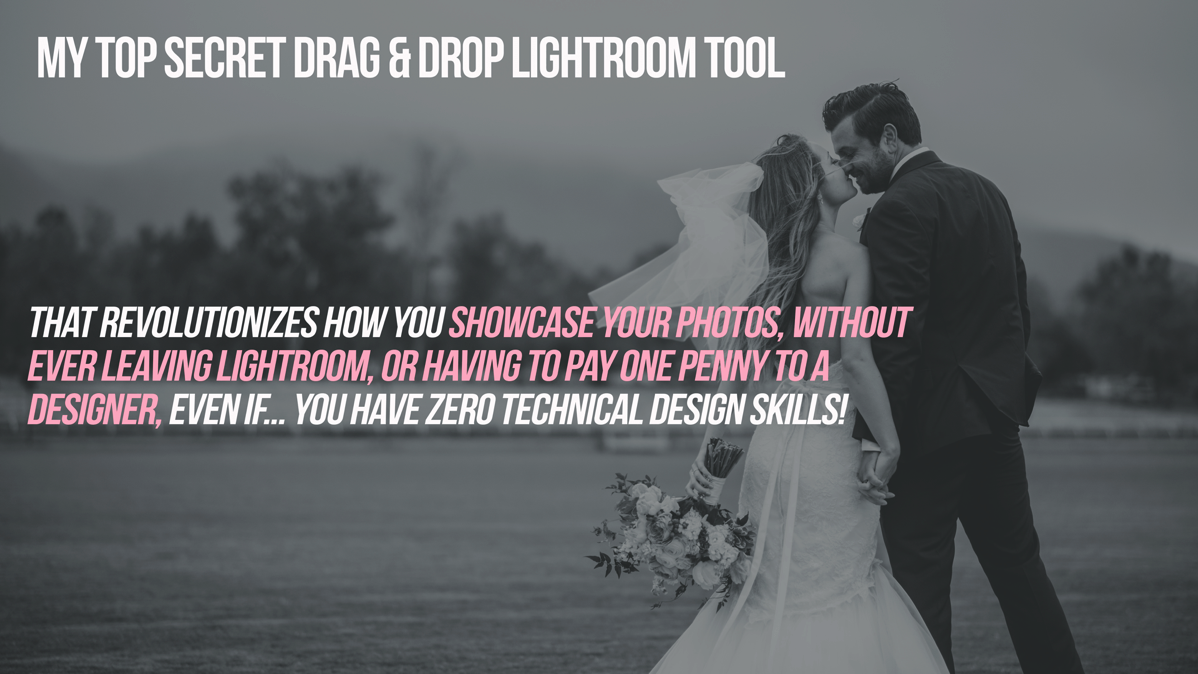
    Creating photo collages has never been so simple, and without ever having to leave Lightroom, you save massive amount of time! These Drag & Drop Collage Templates are Perfect for…

    Your Blog, Instagram, Facebook, Prints for Your House & More!

    Cole has set up templates for all the popular formats, so you can create collages using:

    • 16 Instagram Unique Design Templates
    • 18 Blog or Website Collage Templates
    • 19 Facebook Cover Design Templates
    • 7 Facebook Ad Templates
    • 16 Print Design Layout Templates

    That’s a total of 76 unique design layouts & collages!

    Cole has also thrown in a bonus if you buy today so you can export your collages to your blog or Facebook in one click!

    So don’t miss out, save $ 129 today.

    Note: There’s a 100% no-questions asked money back guarantee on these templates so no risk to you. Buy it, try it and if isn’t what you expect Cole will be more than happy to provide you with a refund.

    googletag.cmd.push(function() {
    tablet_slots.push( googletag.defineSlot( “/1005424/_dPSv4_tab-all-article-bottom_(300×250)”, [300, 250], “pb-ad-78623” ).addService( googletag.pubads() ) ); } );

    googletag.cmd.push(function() {
    mobile_slots.push( googletag.defineSlot( “/1005424/_dPSv4_mob-all-article-bottom_(300×250)”, [300, 250], “pb-ad-78158” ).addService( googletag.pubads() ) ); } );

    The post DEAL: How to Create Captivating Photo Collages in Seconds by Darren Rowse appeared first on Digital Photography School.


    Digital Photography School

  • 4 Tips For Doing Eye-Catching Landscape Photography

    Landscape photography is everywhere today and for good reason – the world is beautiful! However, because landscape photography is so popular, it can be difficult for your photographs to grab the eyes of your desired viewers. While there’s no way to predict exactly what image will stand out in the crowd, you can use these four techniques to give your photography the edge when it comes time to grab some eyes.

    Landscape Photography

    #1. Define your vision

    As a photographer you are not only taking a photograph, you are sharing a vision – your vision. It’s important to remember this concept every time you’re capturing an image. This is important because if you are aware of why you’re attracted to a scene, and why you want to share it with others, the easier it will be for your viewers to connect with what you saw.

    This does not mean that you have to stick with the same definition of vision through every photograph you take. Instead, you should try to adapt and evolve your vision each time you go out to take photographs. Letting your experiences influence the choices you make in your photography will allow your photography to express your individuality as a person.

    #2. Perspective

    Landscape Photography

    It’s easy to see a beautiful landscape and take a photograph of what you see, but that is often not enough to grab the eye of your viewer. After you’ve defined your vision for a specific photograph it’s time to answer some questions about the perspective you wish to convey.

    Do you want to photograph from a low angle or from above the scene? Are you thinking of using a super wide-angle lens or would your scene be better suited for the compressed look of a telephoto? You can even begin to think about what type of post-production techniques you will use. Will it be HDR, black and white, vibrant and saturated, or muted?

    Each photograph you take is going to be unique in its answers to these questions. There’s no one-answer-fits-all solution here, it’s just a matter of finding out what works and learning from experiences over time.

    #3. Be purposeful in the choices you make

    Landscape Photography

    If you’re going to overexpose a photograph, have a reason why. If you’re going to post-process an image using the HDR technique be sure do it because it makes sense, not because you want it to be HDR. Making purposeful decisions in your photography will make every photograph you take better.

    In regards to post-production in general, be sure to use it as a tool to elevate your great photographs to the next level, and not to save your misfires from the trashcan. Post-production is not what makes a photograph great, it can only enhance an already great photograph allowing it to stand out, above the crowd.

    #4. Subject matter, light, and the basics

    Landscape Photography

    Finally, a boring landscape, shot in bad light, with the wrong techniques is not going to win any love from the peanut gallery so brush up on the basics first. Learning how to photograph in the right lighting conditions, how to properly use a tripod, and how to achieve the perfect exposure of your scene will allow you to create more eye-catching photographs.

    What else?

    Do you have some other tips for achieving eye-catching landscape photographs? Share them with us in the comments below!

    googletag.cmd.push(function() {
    tablet_slots.push( googletag.defineSlot( “/1005424/_dPSv4_tab-all-article-bottom_(300×250)”, [300, 250], “pb-ad-78623” ).addService( googletag.pubads() ) ); } );

    googletag.cmd.push(function() {
    mobile_slots.push( googletag.defineSlot( “/1005424/_dPSv4_mob-all-article-bottom_(300×250)”, [300, 250], “pb-ad-78158” ).addService( googletag.pubads() ) ); } );

    The post 4 Tips For Doing Eye-Catching Landscape Photography by John Davenport appeared first on Digital Photography School.


    Digital Photography School

  • 5 Tips for Shooting Glass to Enhance Your Street Photographs

    As any studio photographer will tell you, photographing translucent and reflective objects like glass for product work can be an ordeal. It’s not impossible, but it sure isn’t easy, with plenty of variables and tricky reflections to minimize and avoid.
    Naturally, you can imagine my foray into street photography was both a welcome change and a culture shock. Stepping out of the studio and into the realm of street photography, I went from an incredibly controlled environment to anything but! That’s when I began to view glass in a different light. Yes, the very bane of many a studio photographer’s existence can actually be a street photographer’s blessing.

    Shooting through glass

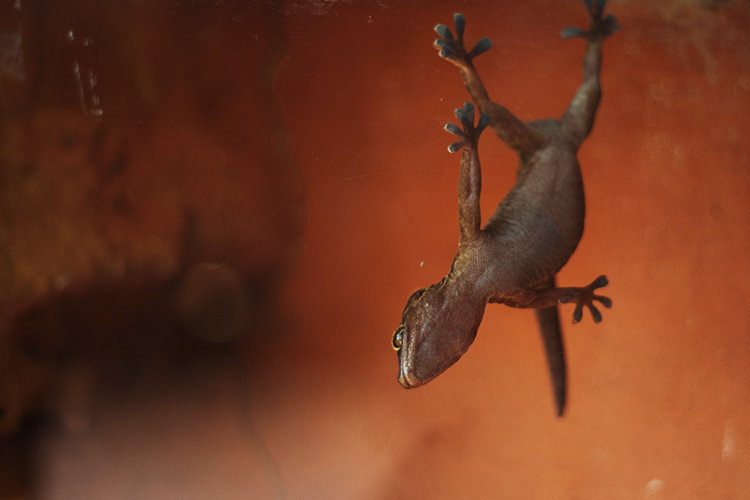
    Photographing through glass lends unique perspectives, like this photo of a gecko hanging upside down on a glass enclosure.

    There aren’t many fixed objects that pose opportunities as readily to a street photographer as glass. As photographers, we all (mostly) use glass in our lenses as its inherent properties focus light and correct optical aberrations, allowing us to record sharp images. Glass surfaces in the street, however, present a variable and volatile abundance of opportunity. It can soften, reflect, highlight, disguise, frame, and transpose. Glass constantly changes with the environment yet it behaves as a physical barrier between the photographer and subject, allowing for a degree of ease between the two.

    For the sake of this article, I’ve narrowed the benefits of glass to only the most obvious and dramatic – color, pattern and texture, reflections and depth, glass as a physical barrier, framing and finally, distortion and perspective. Okay, so I combined a few points, but you’ll soon see that glass isn’t just for selfies and reflections. Shooting through glass can actually change up your practice and give you a whole new perspective on street photography.

    1 – Color

    photography-through-glass05

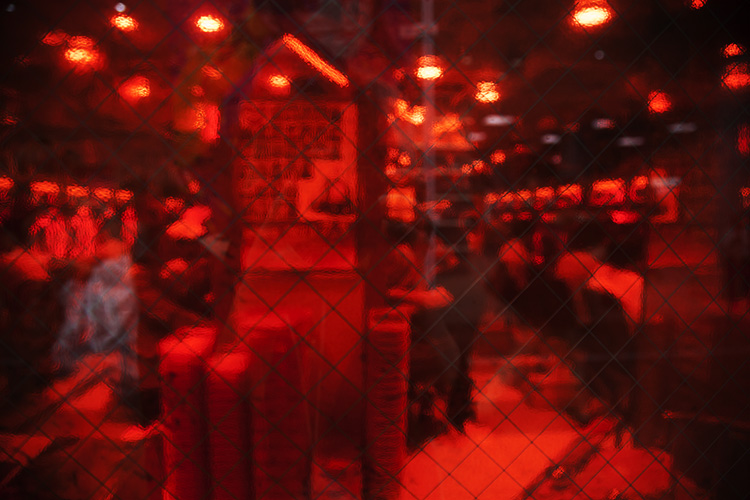
    The saturated red of the glass between the subject and I adds a sense of voyeurism.

    Color greatly influences how a viewer reads an image. Shooting through colored glass is a great way of adding atmosphere to your photographs without post-production. Red glass, like that found on decals or nightclubs, suggests a sense of intimacy or passion, whereas blue could suggest an aquatic or daylight setting. Color eludes to the time of day a photograph was taken and a highly saturated image can also take on a surreal appearance, distancing the viewer from the photograph and creating a feeling of voyeurism. Try photographing subjects through tinted feature walls at late-night shopping malls or through the aged glass of old windows.

    photography-through-glass06

    2 – Pattern and texture

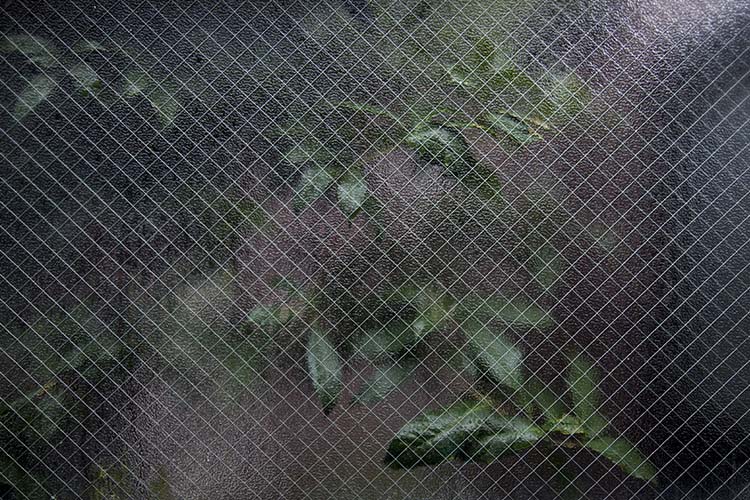
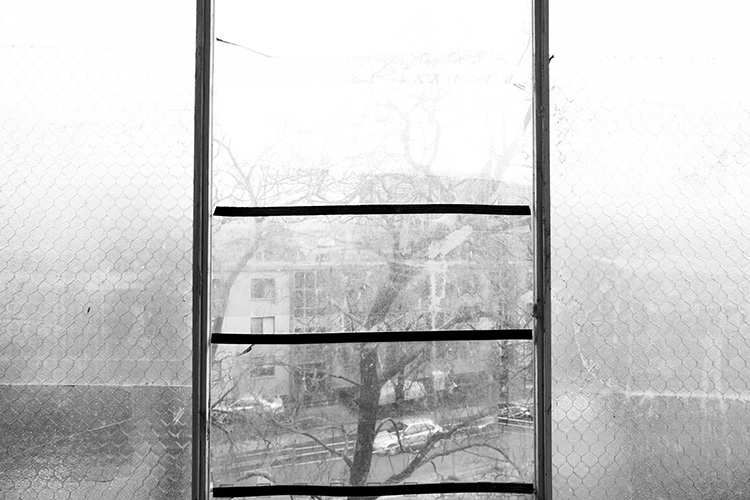
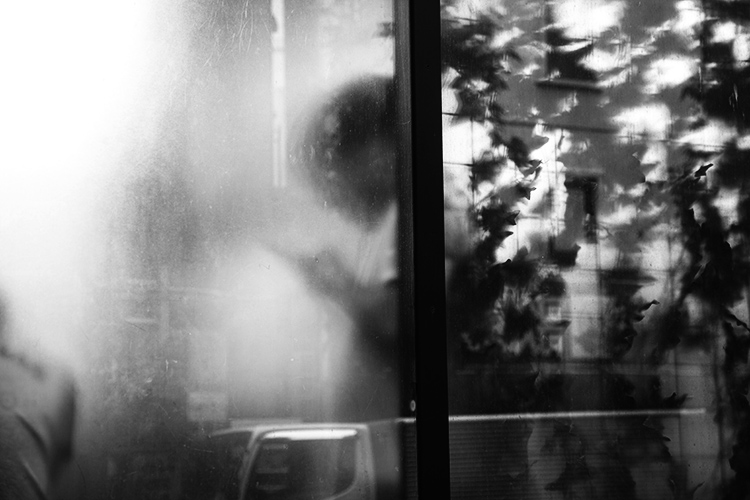
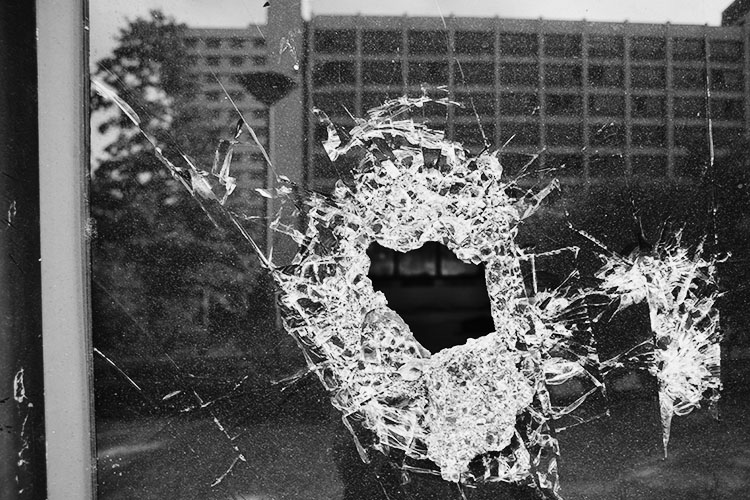
    Using pattern and texture in a photograph explores how an image feels as well as how it looks. Textural images appeal to our sense of touch and it allows photographers to form greater connections with an audience. Photographing textured, semi-opaque and reinforced glass divides an image into smaller sections. This prompts a viewer to dissect an image in pieces to gain a greater understanding of the whole.

    Different textures are great for images with organic and inorganic subject matter too. Creating juxtapositions that draw attention to subjects that are usually discounted creates engaging subject matter. Texture also affects the way light interacts with glass, softening the subject matter behind it and emphasizing form and shape over content.

    photography-through-glass04

    The rough, reinforced glass in the foreground of this image highlights the soft, organic form of the plant in the background.

    photography-through-glass07

    3 – Reflections and depth

    Want to add context to a portrait but running low on legroom? Reflective glass windows are a great way to add depth to a photograph. Reflections in glass create a greater sense of atmosphere and give the viewer more information about an image. The characteristics of reflected light add tonal variety to a photograph, drawing a viewer in for a closer look. The closer you are to a glass surface, the less it will reflect, try stepping back or shifting the camera angle. Stepping back also has the added bonus of minimizing your chances of disturbing a potential subject.

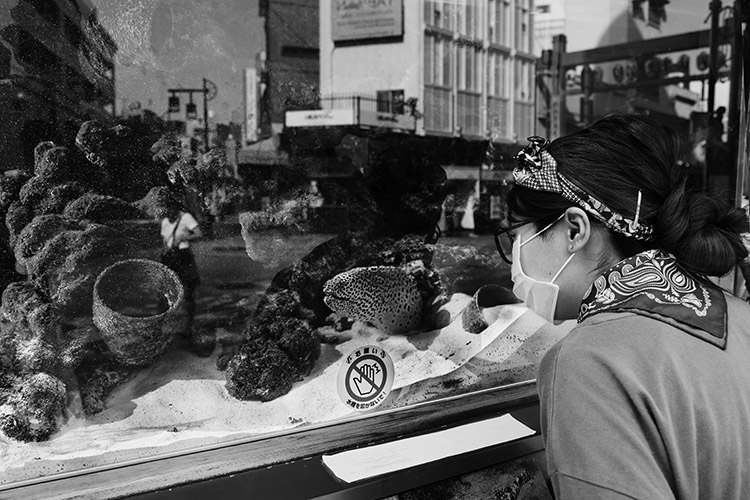
    photography-through-glass02

    This photograph features a woman inspecting an eel in a shop window, but also includes a reflection of the street, adding depth and a greater sense of context.

    4 – The invisible wall

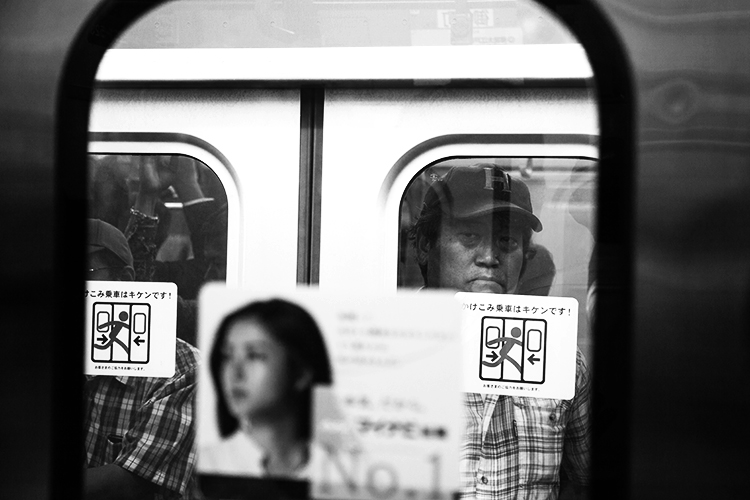
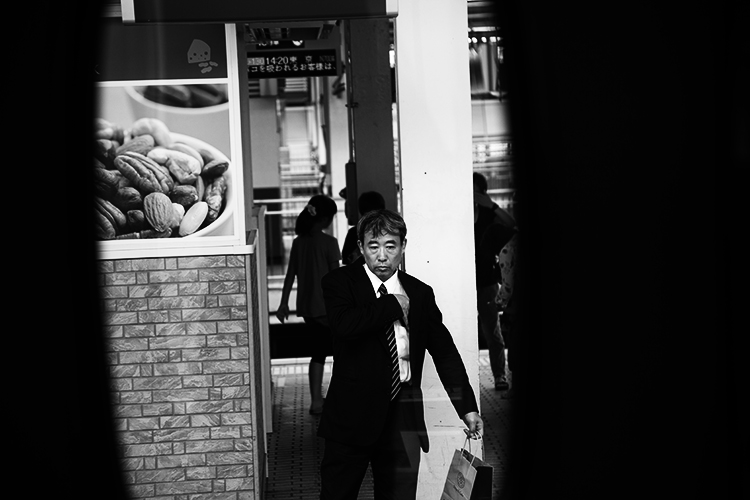
    In my time as a street photographer, I’ve noticed an interesting psychological phenomenon. When I’m photographing subjects through transparent panes of glass – people are much more at ease. Photographing people through a glass window or panel seems to add a degree of separation. My theory is that when there is a physical barrier between you and the subject, people subconsciously feel more comfortable. Glass reduces noise and light, creating a physical partition that lures people into a sense of security.

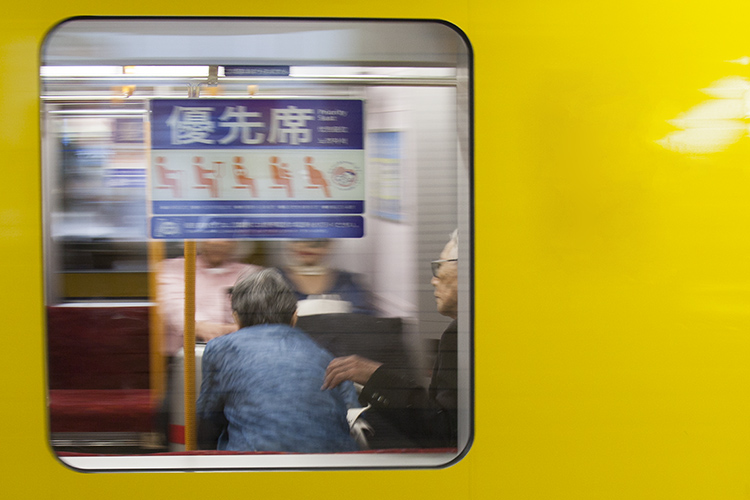
    I find that when separated by a pane glass people are more likely to look directly into the lens too, allowing their curiosity to run a little freer behind a physical partition. Some of the most natural street portraits I have taken have been through glass partitions and windows. Train rides offer an excellent opportunity for unencumbered street photography.

    photography-through-glass12

    Taken from a train window, the subject and I had a bit of a stare-off before I took this shot.

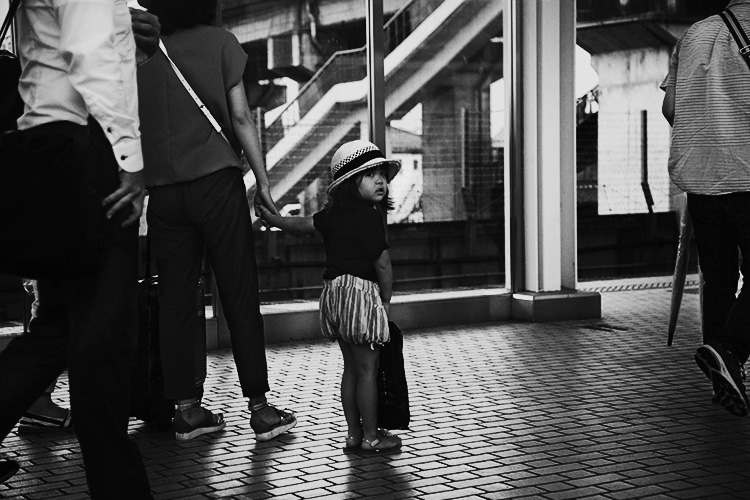
    Also taken from a train window, this child was watching my train leave the station. I was quick enough to place my camera against the glass to capture her looking back at me.

    5 – Framing and perspective

    Emphasizing the photographer’s point of view can lend a voyeuristic atmosphere to an image. Framing is the use of shapes in the environment to guide the viewer’s eye to a point in a photograph. Photographing through glass partitions or windows emphasizes that you have captured a moment without prompting a subject, like looking through a keyhole.

    Viewing a subject photographed from above feels different to viewing a photograph taken from below. One great way to take advantage of glass’s transparent nature is to focus on various animals’ attraction to transparent surfaces. Inhabitants of urban landscapes such as lizards, frogs, spiders, snails and insects all negotiate glass surfaces with ease.

    A photographer with a keen eye can exploit these opportunities to capture unique perspectives of our fellow city-dwellers. Like humans, animals seem more at ease with a wall of glass to separate them from potential predators, allowing you the chance to capture a more natural photograph.

    photography-through-glass13
    photography-through-glass11

    photography-through-glass03

    Distortion

    Light traveling through glass often behaves in surprising and interesting ways. If light touches even the most minute curved surface it refracts, distorting anything viewed through it. Planning a shot in front of a pane of glass can yield fascinating and surrealistic photographs.

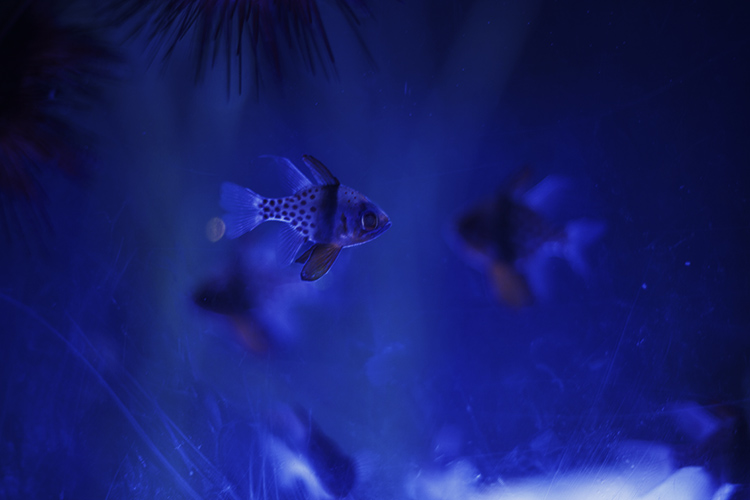
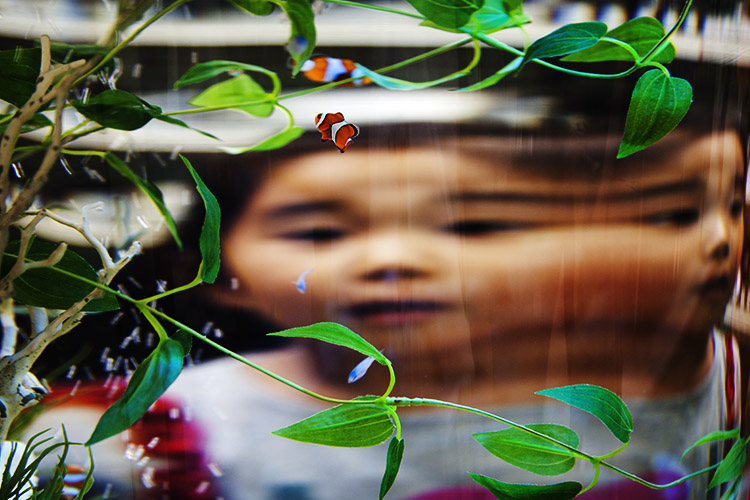
    Try experimenting with different thicknesses of glass at varying degrees of curvature. Aquariums and aquatic displays are good for honing this technique because the water inside the glass containers amplifies the distortion. Holding variously shaped prisms over the front of your lens can yield some surprisingly effective and interesting results too.

    photography-through-glass08

    Conclusion

    Transparent, opaque, tinted, laminated, textured, reinforced… there are endless varieties of glass and each presents a unique opportunity for you as a photographer. Although I’ve tried to list a few of the more dramatic ways to use glass in street photography, the potential is limitless and exciting.

    photography-through-glass14

    They key to taking great street photographs is to be open to opportunity and quick on the shutter button. With limited time to capitalize on the moments that are presented to you, focusing on surfaces like glass that can yield fascinating results quickly and is a fool-proof way of enhancing your craft.

    googletag.cmd.push(function() {
    tablet_slots.push( googletag.defineSlot( “/1005424/_dPSv4_tab-all-article-bottom_(300×250)”, [300, 250], “pb-ad-78623” ).addService( googletag.pubads() ) ); } );

    googletag.cmd.push(function() {
    mobile_slots.push( googletag.defineSlot( “/1005424/_dPSv4_mob-all-article-bottom_(300×250)”, [300, 250], “pb-ad-78158” ).addService( googletag.pubads() ) ); } );

    The post 5 Tips for Shooting Glass to Enhance Your Street Photographs by Megan Kennedy appeared first on Digital Photography School.


    Digital Photography School