Blog

  • How to Photograph in the Harsh Midday Sun

    It’s all about the light! The golden hour when the sun is just above the horizon shining its low angle golden rays on the scene; sunrise and sunset when the clouds light up pink, orange, and red; and the blue hour when the sun is below the horizon but it is not yet totally dark. Those are the best times to photograph.

    But midday? That’s when tourists make snap-shots, right?

    Well, yes, but that doesn’t mean there aren’t options for you too. You just have to know what to do when the sun is high in the sky shining its harshest light on a day with no clouds to soften the rays.

    How to Make the Most of Harsh Midday Sun

    We don’t always have the option to shoot on the edges of the day when the conditions are best. On a recent trip, I was in between two destinations and had a few spare hours to visit a small village on route. It turned out to be an amazing location, but the light was harsh and the buildings were white. I could barely look at them let alone photograph them. I had to put my harsh light tactics to the test.

    Here are some midday photography tips to help you:

    1. Look for shade

    The first thing I did was look for shady spots under trees and on the opposite side of the bright white buildings I was facing. Shade provides a nice soft, even, light, which is perfect for colorful subjects and ones with interesting shapes. I especially like to photograph flowers under soft light because the delicate nature of the subject lends itself to soft light.

    How to Make the Most of Harsh Midday Sun - lotus flower

    2. Look for shadows

    Subjects with really distinct shapes will also have very distinct shadows in the harsh lighting conditions of midday. So you can make your photograph all about the shadows. Look for patterns in shadows, leading lines made by shadows, and shadows that create interesting shapes in your frame. Remember, you don’t necessarily have to include the object itself, sometimes just the shadow makes your photo a bit more mysterious.

    Shadow Patterns - How to Make the Most of Harsh Midday Sun

    3. Look for reflections in water

    Whenever there is a body of water near a subject that has harsh light on it, you’ll get a bright reflection. This works best when the subject being reflected has a lot of color. Ideally, the subject will be in direct light and the water will be in the shade. Again you don’t have to include the object with the direct light on it. Sometimes photographing just a reflection can make an interesting abstract image.

    Half Dome reflects in the Merced River in Yosemite National Park - How to Make the Most of Harsh Midday Sun

    4. Use the time for scouting

    When all else fails, rather than photographing, you can use the time to scout out locations for the future. Walk around, find a great subject and play with different compositions. Make “sketch” images by trying different compositions and choosing which one has the most impact. Then, when you find it, make a note of the exact location and make an image so you remember your camera angle.

    It’s also a good idea to take note of how long it takes you to walk to that location, what the trail or route is like, and anything you may want to make note of should you need to return in the dark, like before sunrise for example. You’ll thank yourself later when you don’t have to guess at a location and composition before you can really see what is in your frame.

    Mono Lake Tufa State Natural Reserve, California - How to Make the Most of Harsh Midday Sun

    5. Rest up

    When you’re on a long trip, sometimes it’s best not to wear yourself out by doing three photo shoots a day. Of course, you’re going to go out for sunrise and sunset. During the day you might want to clean your gear, get out some maps and do some planning, research stuff on the internet, or even take a nap.

    Sometimes the best thing you can do for your photography is simply to have a rest so you have lots of energy for your next outing.

    Conclusion

    What tips to you have for working with the midday sun in your photography? Please share them in the comments below.

    The post How to Photograph in the Harsh Midday Sun by Anne McKinnell appeared first on Digital Photography School.


    Digital Photography School

  • 2017 Roundup: Interchangeable Lens Cameras $500-900

    The $ 500-900 category (based roughly on US MSRP) features quite a few strong offerings, some of which should satisfy first-time camera buyers with easy-to-use interfaces and point-and-shoot style functionality. Others are aimed more at seasoned-enthusiasts, offering direct manual controls and high-end features.

    At this price point, all of the cameras use either Four Thirds or larger APS-C-sized sensors and all can shoot Raw. And while a larger sensor can mean the potential for better image quality and more control over depth-of-field, the difference in size between APS-C and Four Thirds is not enormous. As such, small differences notwithstanding, the vast majority of cameras in this roundup have what we would consider to be very good image quality.

    All of the cameras in this selection are reasonably small in size (compared to pricier ILCs), but the number and arrangement of control points, grip size, build quality and weight all vary quite a bit. As do the inclusion of features like like 4K video capture and in-body image stabilization.

    Let’s take a look at the currently available interchangeable lens cameras that fall into the $ 500-900 price range (give or take).

    • Canon EOS M3
    • Canon EOS M6
    • Canon EOS Rebel T7i (EOS 800D)
    • Fujifilm X-E2S
    • Fujifilm X-T20
    • Nikon D5600
    • Olympus OM-D E-M10 II
    • Panasonic Lumix DMC-GX85
    • Panasonic Lumix DMC-GX850
    • Pentax K-70
    • Sony Alpha a6000

    Articles: Digital Photography Review (dpreview.com)

  • 5 Hacks and Tricks to up your Landscape Photography Game

    Landscape photography is something that most photographers do. You may be a beginner or an advanced landscape photographer, you may have your own style, or you prefer certain subjects, but there’s always room for something more, something different.

    This article is meant to show you five ways in which you can experiment with landscape photography. The techniques will force you to think differently about the surrounding landscape and will uncover new potential shots in places or situations where you might not have considered even getting your camera out.

    Let’s see what these five landscape photography hacks that will up your game:

    #1 – Long exposures in unusual places

    When you think about long exposures you may be thinking of water flow, night photography, or everything that is in low light. The thing is, you can do a long exposure on anything that moves or changes over time. If something is still, then there is no point of doing this technique.

    Sometimes you’ll need a Neutral Density filter of 6-stop or maybe even 10-stops if you want to do this during the day when the light is bright. In this case, you would need an ND to dim it down. The idea is to seek subjects that are moved by the wind for example; it works better if some elements of are still and some are moving. Maybe leaves or some thinner branches are moving and the thicker tree trunk is still.

    5 Hacks and Tricks to up your Landscape Photography Game

    5 Hacks and Tricks to up your Landscape Photography Game

    Place your camera on the tripod, use the ND filter if necessary, and take the shot. You’ll get a simple, yet powerful image that represents not only a glimpse of time but few seconds. You can also try this with crops blown by the wind.

    #2 – Move your camera while shooting

    You usually try to stay still when you shoot so that’s why, as a landscape photographer, you use a tripod. But sometimes it’s interesting to bend the rules and see what the unexpected offers. You can try and move the camera while shooting. Move it from up to down or maybe you can rotate it slightly while the shutter is pressed.

    This technique will produce more of an impression of what you see and certain movements work better with certain types of subjects; for example, move your camera up and down if you have straight tall trees. It also helps to have an exposure time of about one second.

    5 Hacks and Tricks to up your Landscape Photography Game

    5 Hacks and Tricks to up your Landscape Photography Game

    5 Hacks and Tricks to up your Landscape Photography Game

    5 Hacks and Tricks to up your Landscape Photography Game

    5 Hacks and Tricks to up your Landscape Photography Game

    #3 – Zoom your lens

    Another element that usually stays the same while you press the trigger is the focal length. But what would happen if you changed it during the exposure? Of course, it helps a lot if you have longer exposure time so that you’ll have time to actually zoom.

    You have two options with this technique. You can just zoom in or out and you get an interesting effect like everything is “running” to the edges of the photo.

    5 Hacks and Tricks to up your Landscape Photography Game

    Or you can first zoom your lens in all the way and hold the zoom ring. While you press the shutter button keep the zoom ring fixed and rotate the camera so that the lens zooms out. Don’t forget to keep the hand that is holding the zoom ring still; you are actually zooming out by moving the camera. You’ll get a twisted effect that I find it works better on pines or similar trees.

    5 Hacks and Tricks to up your Landscape Photography Game

    5 Hacks and Tricks to up your Landscape Photography Game

    5 Hacks and Tricks to up your Landscape Photography Game

    #4 – Use graduated filters in unusual ways

    As a landscape photographer, you likely know how to use graduated ND filters to balance the brightness of the sky with the foreground, but you can do so much more with them too.

    In the old days, photographers used to dodge and burn certain areas of a photo to lighten or darken those spots. The technique is still used today in post-processing.

    But what if you could do this right in the camera using two graduated ND filters to darken the margins of an image. You only need to place the grad ND filters at a 90-degree angle, one facing left and the other facing right. You don’t even need to have the same filters; you can use a 2-stop and a 3-stop, for example. This will create a light beam effect.

    5 Hacks and Tricks to up your Landscape Photography Game

    #5 – Create Cinemagraphs

    Cinemagraphs are the new thing, and they look cool. You may be wondering what is a Cinemagraph? Well, it’s a combination of still photography and video. The result is a video, but because of this combination, I included this idea here. Here’s an example of what they look like:

    In short, the technique requires you to record a video, preferably with the camera on a tripod, freeze one of the frames and make it a photo, and then creating a mask that reveals only one element that moves. It looks better if you make the video loop-able but that is not absolutely necessary. The effect plays with your mind because everything is still apart from one element that moves.

    Conclusion

    I hope you’ll find these ideas interesting and you’ll use them to open new horizons and explore new techniques. I think experimenting plays a big part in photography and landscape photography is no exception.

    Share your landscape tricks and tips in the comments below.

    The post 5 Hacks and Tricks to up your Landscape Photography Game by Toma Bonciu appeared first on Digital Photography School.


    Digital Photography School

  • Lighting 103: Use Gels to Tune Your Home’s Lighting

    Abstract: You can use your knowledge of color temperature and gels to improve the quality of light in your home.

    So far, everything we have done has centered on gelling a single light to create a single desired color shift. But before we make the jump into using multiple colors and light sources, one quick hack for your home's lighting that will help you to improve the quality of light in compact fluorescent and LED bulbs.

    Like the gawdawful green-tinged lamp above, for example. Read more »
    Strobist

  • Emoji Facade: Dutch Architects Decorate Brick Building with 22 Smiley Faces

    [ By WebUrbanist in Architecture & Offices & Commercial. ]

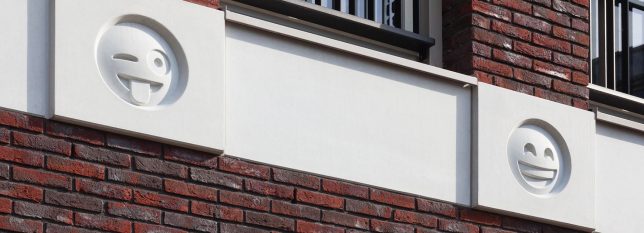
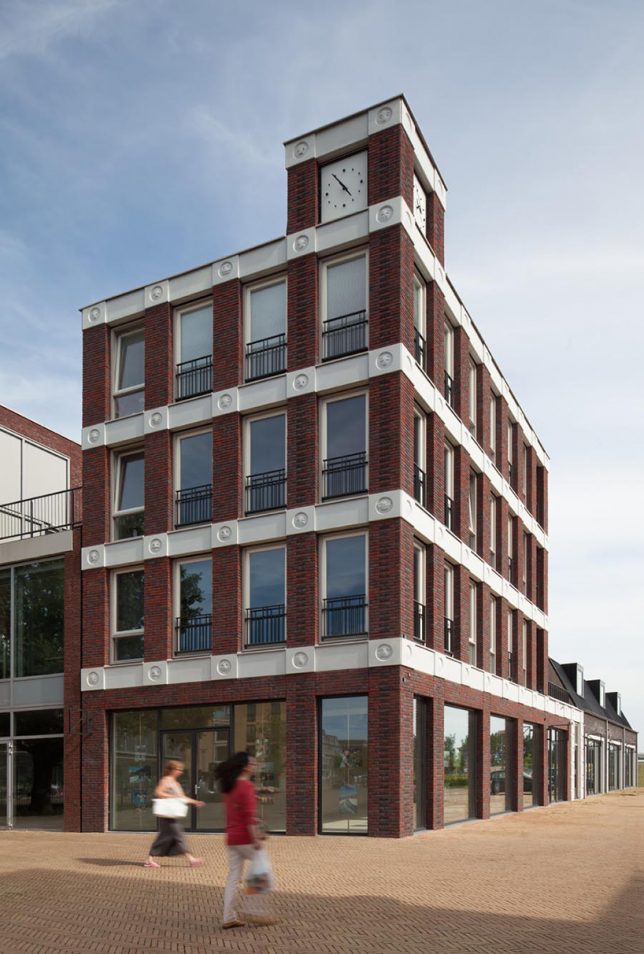
    Instead of gargoyles, grotesques or ornate decorative details, this somewhat silly facade expresses an array of emotions through circular icons familiar to anyone with a smartphone or social media account.

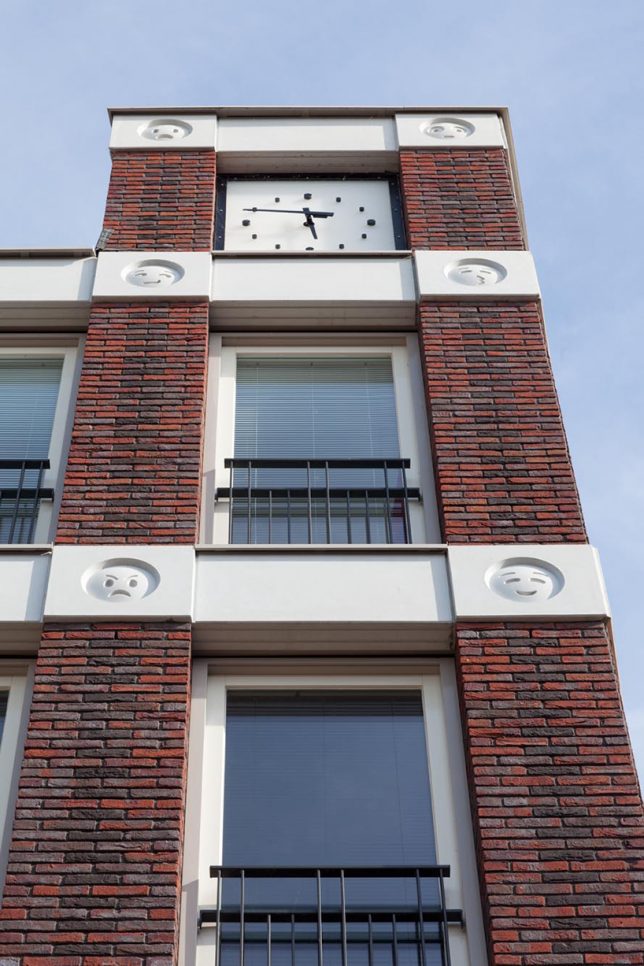
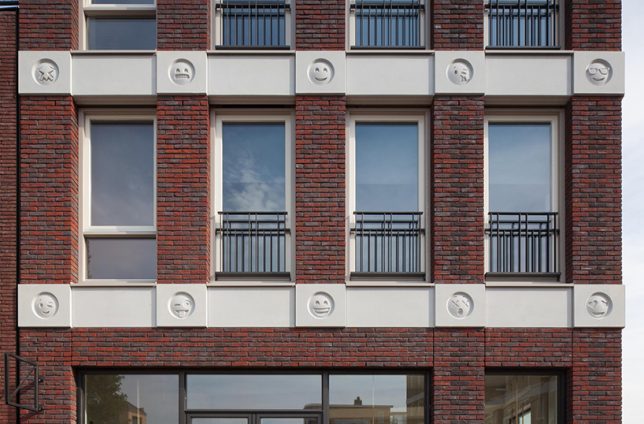
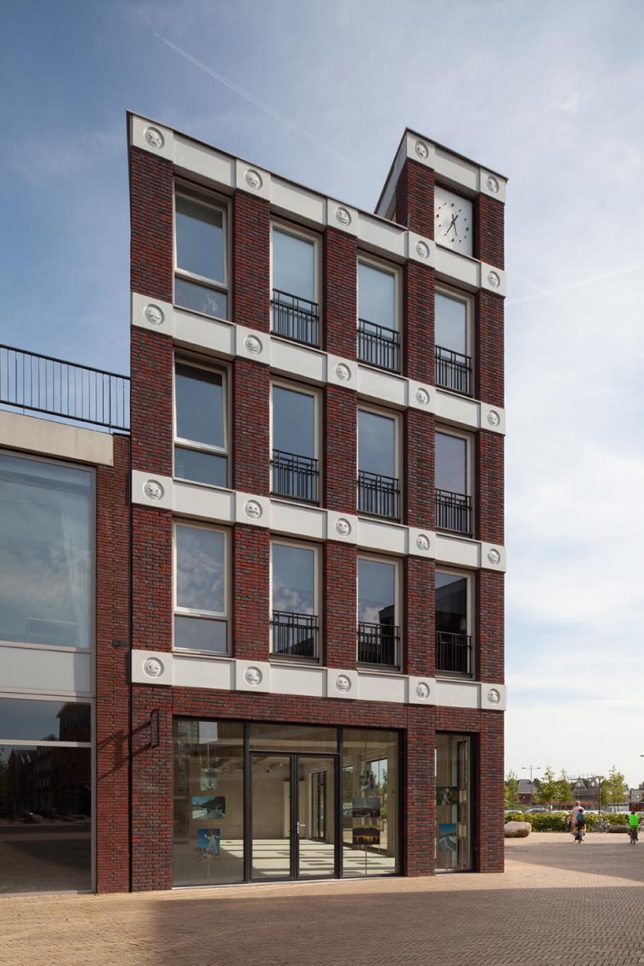
    Located in suburban Vathorst near Amersfoort, this design by Attika Architekten (images by Bart van Hoek) looks quite conventional at a glance. At each level, horizontal rows of light concrete break up stacks of dark brick and divide the tops and bottoms of windows.

    Upon closer inspection, however, the mixed-use project has a detail that varies from one location to the next — round faces featuring a broad range of emotional states and attitudes.

    “In classical architecture they used heads of the king or whatever, and they put that on the façade,” explains the architect. “So we were thinking, what can we use as an ornament so when you look at this building in 10 or 20 years you can say ‘hey this is from that year!’.” If nothing else, they seem to have hit that target.

    “The cast concrete characters express a range of familiar emoji emotions, including the classic sad and happy styles, the instantly-recognizable kissing face, and the much-loved heart eyes personality.”

    Formally speaking, this decor adds a layer of interstitial detail often found in early Modern architecture urban architecture (derived historically from Gothic influences). It adds an element that spans the fine grain of the brick columns and otherwise featureless and monolithic concrete rows.

    Whether or not these emoticons will look funny, cool, creative, unique, dated or all of the above in a few decades remains to be seen. Still, it is certainly is a fun way to think about decor in the post-Postmodern world where rote historicism has become a thing of the past.

    Share on Facebook


    [ By WebUrbanist in Architecture & Offices & Commercial. ]

    [ WebUrbanist | Archives | Galleries | Privacy | TOS ]


    WebUrbanist

  • Look at this teetering stack of Panasonic cameras

    We’re working on reviewing the Panasonic GX850 and while shooting some product shots got a bit carried away with the stacking. From top to bottom: the Panasonic GM1, Panasonic GM5, Panasonic GX850, Panasonic GX85 and Panasonic GX8.

    Note: No Panasonic cameras were injured in the making of this photo.

    Articles: Digital Photography Review (dpreview.com)

  • ‘The only camera that ever got me a date’ – Remembering the Canon EOS-1D Mark II

    I dropped it because I was drunk. It was a brand new Canon EOS-1D Mark II, and I was drunk because I hadn’t eaten any dinner. It fell from hip-height onto the sand-covered floor of a shipping container, which had been converted into a tiki bar at an outdoor music festival. It was 2005 – tiki bars were a thing back then. 

    The camera survived the fall, but the attached 24-70mm F2.8 did not. The lens took most of the impact, and jammed badly and permanently at around 50mm. A sobering (literally) lesson was learned, and in the subsequent weeks I shot quite a few jobs at 50mm before I could afford to send it in for repair. 

    Another lesson from what I came to remember as ‘The Tiki Bar Incident of 20051‘ was that no matter how carelessly it was treated, the Canon EOS-1D Mark II was a very hard camera to kill. Based on the chassis of the original EOS-1D, the Mark II seemed to have been hewn from a solid lump of magnesium alloy. Like a Henry Moore sculpture, there wasn’t a straight line or hard corner anywhere. Also like a Henry Moore sculpture, it was large, expensive and heavy as hell.

    Compared to the EOS 10D, the 1D Mark II was actually capable of proper flash metering – quite a novelty for me, back in 2005. That said, with the benefit of hindsight there’s no excuse at all for this slow sync zoom effect. 

    For me, upgrading from an EOS 10D to the 1D Mark II was like entering an entirely different world. The 10D wasn’t cheaply built by any means, but the 1D series has always been in a league of its own. I got talking to a sports photographer a few years ago who still used an original EOS-1D, and over years of hard use, he’d worn the paint off virtually every part of the camera until it looked like a lump of roofing lead. Despite appearances it still worked perfectly, regularly getting smacked by soccer balls in its retirement role as a static goalpost camera. 

    I owned my EOS-1D Mark II for about four years. I don’t remember any close encounters with soccer balls but it certainly absorbed its fair share of abuse.

    It also absorbed a lot of beer. Shooting live music in major venues isn’t glamorous. During my (short) career I was pelted by bottles, kicked in the head, stolen from, and on one memorable occasion, almost swallowed by a collapsing floor2. And almost every night, someone would throw beer3 at the stage, which would inevitably fall short and drench the photographers instead. Back then, one of the most useful items I carried in my camera bag was a towel. Come to think of it, that’s still true.

    Canon EOS-1D Mark II, 2004-8

    $ (document).ready(function() { SampleGalleryV2({“containerId”:”embeddedSampleGallery_8480443759″,”galleryId”:”8480443759″,”isEmbeddedWidget”:true,”standalone”:false,”selectedImageIndex”:0,”startInCommentsView”:false,”isMobile”:false}) });

    At the time of its launch in 2004, the EOS-1D Mark II was unmatched. Nikon’s game-changing D3 was still three years off, and Olympus and Pentax had quietly retreated from the professional SLR market, leaving Canon at the top of the tree. The EOS-1D Mark II had the best sensor and the best autofocus system of any professional DSLR and (arguably) benefited from the best lens lineup, too. Its modest APS-H crop factor of 1.3X provided a welcome focal length boost for telephoto work, without hobbling wideangle lenses too much (the 17-40mm F4L, for example, became a still very usable 22-50mm equivalent).

    Shot from a prone position, on the stage side of the very skinny security barrier at Newcastle’s Carling Academy (stage 2). Compared to the 10D, the 1.3X crop of the EOS-1D Mark II wasn’t too severe, meaning that wide lenses were still reasonably wide.

    It was from a similar position on the same stage that I was accidentally kicked in the head by a crowd-surfing metal fan a few months later. He was very nice about it, and most apologetic.

    Compared to my 10D, the 1D Mark II was a racehorse. Suddenly I could shoot at ISO 1600 and upwards without worrying too much about noise, and take more than a handful of Raw files in a sequence (at 8 fps, no less) without the camera locking up. One battery lasted for thousands of exposures. I could use off-center autofocus points without fear. The EOS-1D Mark II even got me a date.4 It was the first camera I ever really loved, is the point.

    So when I found a used 1D Mark II in my local camera store last year for a couple of hundred dollars (Glazers Camera in Seattle – be sure to visit if you’re ever in town) I couldn’t resist.

    Can we all just agree that this is a good-looking camera? The EOS-1D Mark II is nothing but compound curves. In keeping with a lot of late-2000s reboots, the Mark III ditched the friendly curves for sharper, more aggressively-sculpted edges. Shame.  

    Inevitably, after more than a decade my ardor has cooled a little. I’ve used a lot of cameras in the interim. I’m older, more jaded perhaps. More… experienced. And with experience comes perspective. The EOS-1D Mark II is still beautiful, but it’s not the forever camera I thought it was when I was just starting out.

    The smile of a man who can barely afford to pay rent, but who’s having a good time anyway. This is a selfie taken on the balcony of the Newcastle Carling Academy in 2005, before ‘selfie’ was even a word. The EOS-1D Mark II is on the right.

    By today’s standards, its most obvious deficiency is the small rear LCD screen, which isn’t sharp enough to judge critical focus with any degree of confidence. And then there’s the user interface. I’d forgotten how obsessed Canon used to be with preventing accidental button input in its professional cameras.

    Even something as simple as scrolling through images or navigating the menu requires a cramp-inducing combination of ‘press, hold, scroll, press again’ actions that take a while to learn. I used to be able to operate the Mark II entirely by muscle memory, but shooting with it again recently I was struck by how complicated it seems compared to more modern cameras.

    A youth theatre production of ‘Les Miserables’ in Durham, in 2005. The EOS-1D Mark II was my main camera for theatre and music photography for several years. 

    Fussy user interface aside, when the EOS-1D Mark II is placed alongside the current EOS-1D X Mark II it’s amazing how little some things have changed. Canon got a lot right with the control layout of the EOS-1 back in 1989, and the continuity of design over almost 30 years of development is impressive. If you’ve shot with just a single one of the EOS-1 series, the chances are you’ll be able to pick up and use any of the rest without too much of a learning curve.

    In 2005 the EOS-1D Mark II was replaced, sort of, by the torturously-named Canon EOS-1D Mark II N. Essentially the same camera with a larger LCD screen, the ‘N’ stuck around until early 2007, when Canon unveiled a more substantial update in the form of the EOS-1D Mark III.

    For low light photographers like me, the Mark III was a better camera in all respects. It brought serious improvements to image quality and low light autofocus performance, it was faster, and it introduced a more modern user interface. It also marked the switch from Canon’s older, heavy NiMH battery packs to the lithium-ion batteries we still use today. Unfortunately, its AF system was bafflingly complicated compared to the Mark II, and turned out to be plagued with unpredictable accuracy issues when tracking moving subjects in daylight.

    Aside from the small LCD, the EOS-1D Mark II’s rear control layout is extremely similar to today’s EOS-1D X Mark II. The essentials of the 1D II’s design were actually laid down in the original EOS-1, way back in 1989.

    For whatever reason, the Internet responded to these problems with pure fury5, and Canon, caught on the back foot, struggled with damage limitation. A series of firmware fixes didn’t convincingly ‘fix’ the issues, and adding to the company’s woes was the fact that unlike the Mark II, the Mark III had some serious competition. A few months after the Mark III was introduced, Nikon upped its game considerably with the full-frame D3 – a colossally capable next-generation camera that eventually persuaded me (and a lot of the photographers I knew) to switch systems.

    Because the EOS-1D Mark III had developed such a toxic reputation (unfairly, I would argue, but please let’s not get into all that again…) the Mark II/N enjoyed quite a long ‘life after death’, holding its value on the used market for a couple of years after it was officially discontinued. Ironically, that worked out well for me in 2008, when I sold mine to pay for a Nikon D3 – but that’s a whole other article…

    Original Canon EOS-1D Mark II review samples (2004)

    $ (document).ready(function() { SampleGalleryV2({“containerId”:”embeddedSampleGallery_1219446781″,”galleryId”:”1219446781″,”isEmbeddedWidget”:true,”standalone”:false,”selectedImageIndex”:0,”startInCommentsView”:false,”isMobile”:false}) });


    1 Overshadowed in my memory only by ‘The Royal Festival Hall Cloakroom Disaster of 2009’, which I still can’t talk about.

    2 I’m pretty confident that most of it wasn’t personal. Except perhaps for the floor.

    3 At outdoor festivals, on the other hand, one of the first lessons you learn is that it isn’t always beer…

    4 On the same day as the Tiki Bar Incident, actually. How’s that for karma? (It never happened again).

    5 I got caught up the backlash myself, having published a largely positive review of the Mark III in the spring of 2007 for my previous employer, based largely on analysis of low-light shooting (like I said, it was spring in England). Since joining DPReview in 2009 I’ve been regularly subjected to violent threats by anonymous Americans over something I wrote on the Internet, but back in 2007 it was still a novelty.

    Articles: Digital Photography Review (dpreview.com)

  • Reshaping camera sliders

    Austrian startup Waterbird wants to free you from linear sliders when making time-lapse sequences.

    Articles: Digital Photography Review (dpreview.com)

  • $138,000 unboxing video!

    Linus Tech Tips just published a very entertaining unboxing video that shows what’s not included when you buy a RED Weapon 8K camera (or two). At least you get free stickers. 

    Articles: Digital Photography Review (dpreview.com)

  • Stacked: Cleverly Designed Chinese Hotel Gives Everyone a Unique View

    [ By SA Rogers in Boutique & Art Hotels & Travel. ]

    Despite sharing a tiny footprint of land with other guests at this Chinese hotel, you can practically forget anyone else exists altogether thanks to a clever stacked arrangement that points each level in a different direction. Step out onto your private balcony – located on the roof of the room below – and look out onto the peaceful forest of rural Huang Shan, Anhui Province, China. Designed by Shanghai-based architecture firm Bengo Studio, the Qinyushan Tree House is a beautiful use of space.

    A spiral staircase runs up through the center of the hotel, which includes two guest rooms, two bathrooms, one living room, and a ‘landscape room’ located at the top of the building. Each room has its own roof access with a glass railing to avoid interrupting views of the trees.

    Elevated off the forest floor, the hotel features curvy volumes fanning out in different directions from the central core, capped on each cantilevered end by floor-to-ceiling windows. Guests ascend an enclosed glass hallway to either walk down into the lowest bedroom and bathroom, or ascend to the upper levels.

    Its vertical wooden cladding helps it blend into its natural environment, and the minimalist design is an interesting take on modern treehouse-inspired structures.

    Share on Facebook


    [ By SA Rogers in Boutique & Art Hotels & Travel. ]

    [ WebUrbanist | Archives | Galleries | Privacy | TOS ]


    WebUrbanist