Blog

  • Digital Photography – Is it the Death of Prints?

    Fotografía, foto, photograph…all ways of saying the same thing. But what is this thing that we all strive to become better at doing and in turn share with the world? There was a time not so long ago that the idea of producing a photograph involved a good bit of skill, patience, and hard work in darkrooms making prints.

    The only way for one’s work to make its way in front of the eyes of someone else was for it to be printed. Today, the capability of communicating our images to others digitally has virtually become boundless. We are accomplishing the same old thing in decidedly new ways.

    Digital Photography - Is it the Death of Prints?

    So, are we slowly bearing witness to the death of prints entirely? With the advent of digital photography, the world of photo making changed. The medium morphed into something more translucent for the masses. The craft became less organic; less physical. Making photographs, dare I say, became “easy.”

    That’s not to imply that there aren’t incredible advancements being made to the photographic art directly as a result of digital photography and sharing. What we’re talking about here is a possible disconnection between craft and craftsman (or craftswoman) which happened slowly.

    Digital Photography - Is it the Death of Prints?

    Perhaps that disconnection is an inevitable natural step as we evolve as a photographic culture. Have we entered into the stages of some type of weird photogenic altruism? Are we missing something by not printing our work?

    To print or not to print?

    As it turns out we likely are shorting ourselves by not regularly printing our photographs but not in the way we might think. Why go through the problems of manifesting prints when they are, in the eyes of many, unnecessary for most people who shoot with digital cameras.

    Printing costs money whereas digital storage cost nothing or next to nothing. Physical prints can’t be “shared” or “liked” on social media. They aren’t something that we can readily copy and paste somehow. And therein lies their value. Not in a monetary sense even though art prints and portraits are still profitable for some. The worth of seeing your own photographic work printed comes from something else.

    Digital Photography - Is it the Death of Prints?

    Digital photography is wonderful in terms of production, cost, and convenience. But it very well may be that it also lessens our own perception of the power derived from photography, which causes us to stop short of the full scope of the art.

    The finality of a print is something that gives us as photographers total control over the end product of all our hard work. The print represents a cathartic culmination of everything that we know about making an image and we present that image to world confidently. Prints don’t rely on screen resolution, color modes, or other variables that plague the viewing of our work digitally.

    Digital Photography - Is it the Death of Prints?

    How many times have you viewed a photo on your laptop, your cell phone, or your home computer screen only to notice that in fact, you are viewing three different versions of the same photo? If you’re like me, it causes no small amount of photographic anxiety.

    The resurgence of prints?

    Lately, there has been somewhat of a possible resurgence in the understanding about the benefits of physical photographic prints. Take the increased popularity of Instamatic cameras which hearken back to Lomography and Polaroid-type cameras. Even Leica and Fuji now manufacture cameras that make singular self-developing prints that are one-of-a-kind expressions. Fuji has taken it one step further by also developing a photo printer which wirelessly prints images from your cell phone onto its Fuji Instax instant film.

    Digital Photography - Is it the Death of Prints?

    The rise in the popularity of the instant medium could mean that we are yearning to slow down and be more committed to our photography. We have become accustomed to swiping right, scrolling up, and clicking over. Could it now be that we are beginning to favor the exclusivity that comes from possessing a print instead of a digital file? Only time will tell what direction the trend will follow.

    Final thoughts….

    Digital images and physical prints are the twin manifestations of the same artistic vision. Should you always print your work? Perhaps not always. Not every digital photo you make will always be worth a print…but that’s up to you.

    Whether or not the digital camera revolution signaled the end of traditional prints is not the issue here. Instead, digital photography, even with all its outstanding contributions to the photographic arts, has possibly caused us to lose sight of the endgame. Sure, sharing your photos so easily with the world is great. It’s an important part of the art of photography. But at the same time, we shouldn’t stop there.

    Digital Photography - Is it the Death of Prints?

    Print your work from time to time. If you have an image that speaks to you just a little bit louder than the others, print it; hang it on your wall, sell it, share it with a photo gallery. Do something more meaningful than just looking at it on your screen.

    The post Digital Photography – Is it the Death of Prints? by Adam Welch appeared first on Digital Photography School.


    Digital Photography School

  • 5 Composition Tips for Landscape Photography

    So what exactly is composition in photography and why is it such a big deal? Composition is the way you intentionally arrange or put together the visual elements in an image, in and around your subject. The goal is to catch the viewer’s interest and keep it wandering around your photo. While some people have an innate ability to “see” and compose great images, it is a skill that can be taught.

    Once you have identified your subject, here are a few useful precepts you can use when composing your next great image.

    5 Composition Tips for Landscape Photography

    1. Simplicity

    Now that you have your subject in mind, the first question is how do you showcase it so there is no doubt of your intent? Keeping it simple is a good approach, as clutter can distract or even make it difficult to identify your focus. Most times in landscape photography, you have no control over what is around your subject. Here the use of lighting can reduce clutter, as the brighter areas of your photo will draw the eye in. You can also find an angle that helps you remove any

    Most times in landscape photography, you have no control over what is around your subject. Here, the use of lighting can reduce clutter, as the brighter areas of your photo will draw the eye to them. You can also find an angle that helps you remove any strong elements that can detract the focus of the object. Thus use only what you consider necessary components. Good composition is as much about what you leave out as it is what you include.

    Good composition is as much about what you leave out as it is what you include.

    5 Composition Tips for Landscape Photography

    2. Lines

    You have no doubt heard the term lead-in lines – which are lines that direct the eye where you want it to go. This is a powerful tool in composition and can add a three-dimensional feel to your image. It does this by creating movement and can take away that static/flat feeling.

    Lines can be literal (such as roads, streams, power lines, or fences) or implied (those that link different subjects in the frame). While diagonal lines are considered the strongest, you are not limited to it as experimenting with horizontal, vertical and converging lines can also be a source of inspiration.

    5 Composition Tips for Landscape Photography

    3. Oddities

    If you have more than one subject in your image, choose an arrangement with an odd number of subjects (at least three e.g. three rocks or trees). Similarly, you can frame or surround your main subject with two objects to add visual stimulation. Odd numbers within a frame are said to be more pleasing and comforting to the eye.

    5 Composition Tips for Landscape Photography

    Side Note: In landscape photography, even numbers in the frame can seem less natural and informal, although an even number of subjects can produce symmetry. This is just something to keep in mind if you are breaking the “rule of odds”.

    4. Interest

    The easiest way to create interest is by having a foreground element in your shot which adds extra depth and dimension. Following on from the point above, you can feature a subject in the foreground, middle, and background, keeping them harmonious or having subjects that complement each other. Complementary subjects are those that have some association (e.g. they are the same color, similar appearance, or add to your story in some way). On the opposite side of this, you can use juxtaposition to create some tension in your image.

    Other ways to add interest can be showing the scale of the scene by including an object or person or even by framing your photo in an interesting way.

    5. Rules? What Rules?

    Most composition articles start with the rule of thirds. This rule divides the image into thirds horizontally and vertically and suggests that you arrange your subject and other important elements near these division lines or at their intersections. The objective is to be more visually pleasing, as placing your subject in center of the frame stops the eye there and takes away from the movement you are trying to create and use to your advantage.

    5 Composition Tips for Landscape Photography

    It is a classic rule that is widely used with great results, so it is an excellent place to start as a beginner. However, what if you want to create a perfectly symmetrical image, such as a mountain with its perfect reflection in a lake? What if you have just as much interest in the sky as in the ground? An image like that will clearly not follow the rule of thirds, would it?

    When you are out in the real world looking at the scene before you, these rules become more like handy suggestions. You need to allow your subject to influence your composition and not force it to conform to the “rules”. Therefore knowing the rules helps you decide when it is okay to break them, this is a skill you will develop over time.

    5 Composition Tips for Landscape Photography

    5 Composition Tips for Landscape Photography

    Conclusion

    Composition is important. To get a sense of how important, think about the impact of what you perceive as a really good or bad image. First, analyze the elements and how they work or do not work together. Identify the subject(s) of the photo and break it down into which compositional “rules” are present or broken. Are there lead-in lines? Is there a point of interest in the foreground or odd numbers present? Remember to move around your scenery and try different angles for your composition and in time you will know which rules to apply or ignore.

    Please share any images you have created that use one or more of these tips, in the comments below.

    The post 5 Composition Tips for Landscape Photography by Nisha Ramroop appeared first on Digital Photography School.


    Digital Photography School

  • Low-Key Photography – Highlighting Darkness

    Black is the new black. Low-key photography is a style where the main elements are darkness and negative space. It’s an excellent way to create a certain mood or to use contrast to highlight a subject, such as an item, gaze, or outline. These dark images might suggest a dark mood – loneliness or danger – but they don’t have to! Darkness can also be used to create a sense of safety or adventure, for instance.

    You can create a low-key photograph in a variety of ways. It can be an underexposed or high-contrast photo; it can be made in the studio, at home, or outdoors; the subject matter can be anything from a landscape to a tiny detail. The main thing is to create something overwhelmingly dark. As darkness is the absence of light and light is the main ingredient of photography, this is a pretty simple recipe.

    lo- key photography

    Still, low-key photography might be a bit of a challenge for a complete beginner, as you need to know how to manually control the exposure of your pictures. But don’t let that discourage you from trying.

    Technically speaking, you should make sure you don’t have a lot of light reaching the sensor, by using shutter speed, aperture, and ISO – the histogram should be heavily left-biased. Most of the time these kinds of photos can be made using a very low ISO, so always start with that if you can – that way, you can make sure your photos are as high-quality as possible.

    low-key photography

    Let’s use some examples to get an idea of how low-key photographs can be created. When you browse through the pictures, try to pinpoint the mood of each photograph and what role the darkness plays in it. Is it playing a supporting role – for instance, creating an opportunity for something else to be the focus? Or is the darkness the main point of the photograph?

    Let’s begin!

    Using flash or shooting in the studio

    Using a flash might seem like a surprising suggestion for a style which is defined by a lack of light. Yet, it’s perhaps the easiest way to accomplish exactly what you want, since it gives you precise control over the amount of light that’s used (and where it falls). A black background helps, but isn’t required. The important thing is that there’s a large enough difference in light levels between the highlights and the rest of the image.

    low-key photography

    ISO 100, 1/125th, f/10.

    This photo was made in a studio, with a black background, two flashes, and a good friend. Leather or another textured, dark material works really well for this kind of photography.

    low-key photography

    ISO 100, 1/125th, f/8.

    To get this profile image, I used two flashes behind and slightly to the right of the model, one higher up and one lower down. This photo could have worked with most backgrounds, as long as the flashes are strong enough.

    low-key photography

    ISO 100, 1/125th, f/8.

    To light a very specific area of this scene, I used a snoot over my flash.

    Using natural light for low-key portraits

    To get a low-key portrait in natural light, the most important thing you need to watch out for is that the light source is confined by something, such as a window or a door. You also want the spot where the subject is located to be much darker. The examples below show this in two different ways.

    low-key photography

    ISO 400, 15 seconds, f/7.1,

    Calling this ”natural light” is perhaps a stretch, since it’s coming from inside a house at night. Still, the same applies; it’s a restricted light source shining into a relatively dark space. This time, the space is outdoors and the light source is indoors.

    low-key photography

    ISO 640, 1/200th, f/2.8.

    Here, the subject is sitting in a room with daylight shining through a window with curtains. The background was actually a white wall, but since the light from outside wasn’t shining directly onto it, it was dark enough to turn black in this picture.

    Using natural light – textures

    Low-key photography is a great way to bring out the feature of a subject that is hard to notice when it’s well lit.

    low-key photography

    ISO 400, 1/60th, f/2.8.

    I found a lot of subtlety in the whites of this wilting flower once I underexposed the shot. The background was very busy, but it became almost completely black once I exposed the shot the way I wanted. I added a slight vignette to darken some lighter spots in the corners of the shot. Another nice thing about this style is that it’s easy to extend a black background if you want more space or to make slightly lighter parts black in post-processing.

    low-key photography

    ISO 3200, 1/200th, f/5.6.

    Sometimes there are also nuances to be found in the blacks. This crow, and its beak, were on a table next to a window (the joys of knowing biologists!) which only got indirect light from outside, so the light levels were very low. Still, it was enough to capture the shades and shapes of the beak.

    low-key photography

    ISO 4000,1/125th, f/4.

    The lighting of these crow feathers was the same as for the above photo. The focus on an all-black scene let all the textures and tones be expressed.

    Low-key landscapes

    Do you prefer landscape photography? No worries, the low-key photography style works wonderfully for that, too! A night scene usually works very well, but clouds are also very useful. They might make the sky less bright, but they also create interesting light patterns on the ground.

    low-key photography

    ISO 500, 1/250th, f/8.

    An overcast day and an industrial, urban scene provided a great opportunity to capture something dark.

    low-key photography

    ISO 100, 1/320th, f/8.

    The clouds added some nice texture to the sky. But what I was most grateful to them for in this picture was the spotlight effect they created on the landscape.

    Conclusion

    Experimenting with low-key photography is a great way to get creative – there are so many ways to do it! I hope this basic introduction has whet your appetite to try it out. I’d love to hear from you and see some of your creations in the comments section below!

    The post Low-Key Photography – Highlighting Darkness by Hannele Luhtasela-el Showk appeared first on Digital Photography School.


    Digital Photography School

  • This flower bloom time-lapse took three years and 8TB of raw footage to create

    You can pick your favorite symbol of springtime from any number of familiar images. In Seattle, the local favorite is a rain-soaked figure clutching a latte with a cold, dead look in their eyes. But it’s hard to beat the natural beauty and optimism of a blooming flower. That’s the imagery that dominates filmmaker Jamie Scott’s recent time-lapse titled ‘Spring,’ a follow-up to his popular video ‘Fall’ of a couple of years ago.

    He gives FStoppers a fascinating look at what it takes to create a time-lapse of this scope. Not surprisingly, a lot of patience and hard drive space were involved. Watch the video, check out the behind-the-scenes and let us know what you think in the comments.

    Articles: Digital Photography Review (dpreview.com)

  • Risk-Taking Russian Rooftopper: Woman Takes Terrifying Skyscraper Selfies

    [ By SA Rogers in Travel & Urban Exploration. ]

    If you’re afraid of heights, a mere glance at these photos taken by Russian daredevil photographer Angela Nikolau might be enough to give you the heebie-jeebies. The 23-year-old scales some of the tallest skyscrapers in Russia and Asia, either using a selfie stick, a drone, or bringing her boyfriend Ivan Kuzenetsov along to take the photos. And as if perching on the edges of structures at such extreme heights isn’t enough, she often does yoga poses or wears stilettos while doing so.

    Sunset in Dubai. ?????? ???????? ?????????? ????? ? ????? ??????? ??????? ? ????? ? ?????? !!!?? 9 ??? !!! ?????? ?? ????????? ?? ?????? ? ??? ??? ? ?????? ????? ????? @adrionov! #9??? #????? #????? #????? #???? #????? #???????? #?????????????? #??????????

    A post shared by Angela Nikolau (@angela_nikolau) on

    Solar Bangkok #chasingrooftops #city_explore #rooftopping #neverstopexploring #ssgkilleverygram #killtheaboveground #urbanexploration #china #roof #rooftop #shanghai #hongkon

    A post shared by Angela Nikolau (@angela_nikolau) on

    The self-taught climber is not too concerned about bypassing security and breaking trespassing laws to capture these incredible images, and virtually no building is too tall. Angela and Ivan climbed all 2,000 feet of the Golden Finance 117 building in Tianjin, China last fall.

    What inspire you? ? ??? ??????????? ?????#chasingrooftops #rooftopping #neverstopexploring #killeverygram #killtheaboveground #urbanexploration #roof #roof_top #rooftop #china #guangzhou #city_explore #rooftopping #neverstopexploring #ssgkilleverygram #killtheaboveground #urbanexploration #china #roof #rooftop #shanghai #hongkong #selfietime #selfies #selfie #extreme

    A post shared by Angela Nikolau (@angela_nikolau) on

    You often ask me "are you afraid?". Sometimes like on this photo I am afraid. ?? ????? ??????????? ???? "????? ?? ??". ??????, ??? ?? ???? ??????????, ? ??????. #artofvisuals #envisiontones #alphahype#shotzdelight #ourmoodydays #spacewheel#depthobsessed #streets_vision #agameoftones#fatalframes #theIMAGED #eclectic_zhotz#gramslayers #moodygrams #createandcapture#citykillerz #heater_central #streatdreamsmag#colors_of_day #urbanandstreet #thevisualones#way2ill #creativeoptic #themoodoflife#visualambassadors #vzcomacro #folksouls#createcommune #capturedconcepts #burjkhalifa

    A post shared by Angela Nikolau (@angela_nikolau) on

    Other illegal conquests include the Sagrada Familia in Barcelona, the Shanghai Tower in China, the Tsing Ma bridge in Hong Kong and the Eiffel Tower in Paris. Unsurprisingly, many of the photos have to be taken late at night to avoid being caught.

    Do not stop! ?? ??????????????! #yimap #highwithyi #yi4k #chasingrooftops #city_explore #rooftopping #neverstopexploring #ssgkilleverygram #killtheaboveground #urbanexploration #china #roof #rooftop #shanghai #hongkong #selfietime #selfies #selfie #extreme

    A post shared by Angela Nikolau (@angela_nikolau) on

    My life will never be the same Thanks to my dear @beerkus for the photo. ??? ????? ?? ?????? ??????? !) ?? ???? ??????? ????? ???????? @beerkus #yimap #highwithyi #yi4k #chasingrooftops #city_explore #rooftopping #neverstopexploring #ssgkilleverygram #killtheaboveground #urbanexploration #china #roof #rooftop

    A post shared by Angela Nikolau (@angela_nikolau) on

    Angela’s casual poses might be the most disconcerting aspect of the photos, especially for those of us who imagine death-gripping the edge if we managed to make it up that high. She’s often lounging dangerously close to certain death, holding on to a ladder with just one hand or hanging barefoot off cranes. In some images, she’s held aloft by her boyfriend, dangling hundreds of feet off the ground.

    Dreamer ??????? ???????? ?? @to_be_bride Photo by @beerkus #shanghai #rooftop #roof #chasingrooftops #city_explore #rooftopping #neverstopexploring #killeverygram #killtheaboveground #urbanexploration

    A post shared by Angela Nikolau (@angela_nikolau) on

    Always near. By @beerkus #hongkong #city #urban #china #girl ?? ???????? ??????? ???? ???????? ???????? @dr.2ch

    A post shared by Angela Nikolau (@angela_nikolau) on

    Check out my new video, full version by link in bio. My channel on YouTube Elevation_ia Thanks for support @cherehapa #cherehapa ??????????? ????? ???????? ?? ???? ?????? ? ????? ,?????? ? ????????. ??? ????? ?? ????? Elevation_ia ??????? ?? ????????? @cherehapa #chasingrooftops #city_explore #rooftopping #neverstopexploring #ssgkilleverygram #killtheaboveground #urbanexploration #china #roof #rooftop #shanghai #hongkong #selfietime #selfies #selfie #extreme

    A post shared by Angela Nikolau (@angela_nikolau) on

    On a scale from one to ten, how happy are you now? ?? ????? ?? ?????? ?? ??????, ????????? ?? ?????? ?????????? Thanks to my dear @beerkus for the photo. ?? ???? ??????? ????? ???????? @beerkus #yimap #highwithyi #yi4k #chasingrooftops #city_explore #rooftopping #neverstopexploring #killeverygram #killtheaboveground #urbanexploration #china #roof #rooftop

    A post shared by Angela Nikolau (@angela_nikolau) on

    Check out all of Angela’s images at her Instagram, @angela_nikolau.

    Share on Facebook


    [ By SA Rogers in Travel & Urban Exploration. ]

    [ WebUrbanist | Archives | Galleries | Privacy | TOS ]


    WebUrbanist

  • National Geographic photographer shares tips for controlling light

    National Geographic photographer Bob Holmes has posted a video on YouTube explaining how to control the three different types of light to give your pictures the trademark look from the famous magazine.

    Articles: Digital Photography Review (dpreview.com)

  • Guardians of the Galaxy team reveals why they chose an 8K Red camera

    If you’re a Guardians of the Galaxy fan, you’re no doubt looking forward to seeing Volume 2 in the series, which was released last weekend. If you find yourself standing in line at the theater, you can even impress your friends with some movie trivia: Guardians of the Galaxy Volume 2 is the first feature film shot on the RED Weapon camera using the 8K RED DRAGON VV sensor. They’ll either be seriously impressed at your informed insider knowledge, or they’ll slowly move away and pretend not to know who you are. YMMV.

    If you’re the gear-freak we think you are, watch this behind the scenes video of Director James Gunn and Director of Photography Henry Braham talking about their decision to use the camera, praising it for its large format look, small size, and high degree of usability. Oh, and as a bonus you’ll get to see actors flying around in front of blue screens as well.

    Articles: Digital Photography Review (dpreview.com)

  • 7 tips to set up your Nikon DSLR for fast use

    We’re fans of Steve Perry’s wildlife and landscape photography, but even bigger fans of his practical tips. In a recent video and article Steve outlines seven great tips about how to set up your Nikon DSLR for quick operation, particularly when it comes to wildlife shooting. Incidentally, we agree with every single one of his points for general shooting: the first thing we do when a new Nikon shows up in the office is set up these very ‘tricks’. They may not be news for seasoned Nikon shooters, but give the video a watch: you may be surprised by what you don’t know.

    Articles: Digital Photography Review (dpreview.com)

  • Art Sinks to New Depths: 25 Wet Works of Sub-Aquatic Sculpture

    [ By SA Rogers in Art & Sculpture & Craft. ]

    Temporarily submerged in a swimming pool for snorkelers to explore or permanently sunken into the sea as a diving destination, these subaquatic works of art take on a whole new dimension under water. Artists create faux shipwrecks, artificial reefs, submerged art shows and other water-themed works, often with environmental messages.

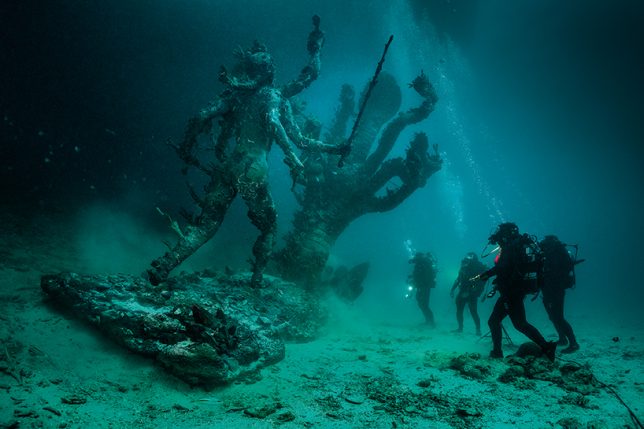
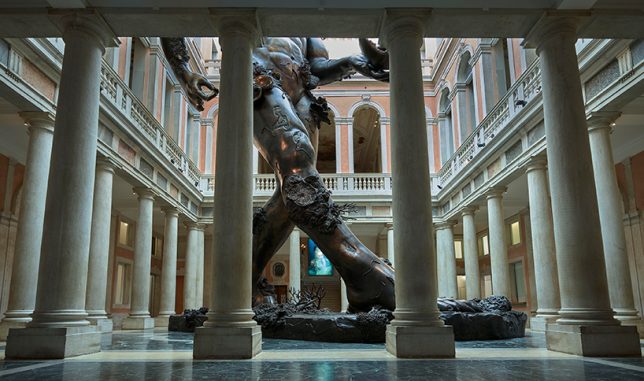
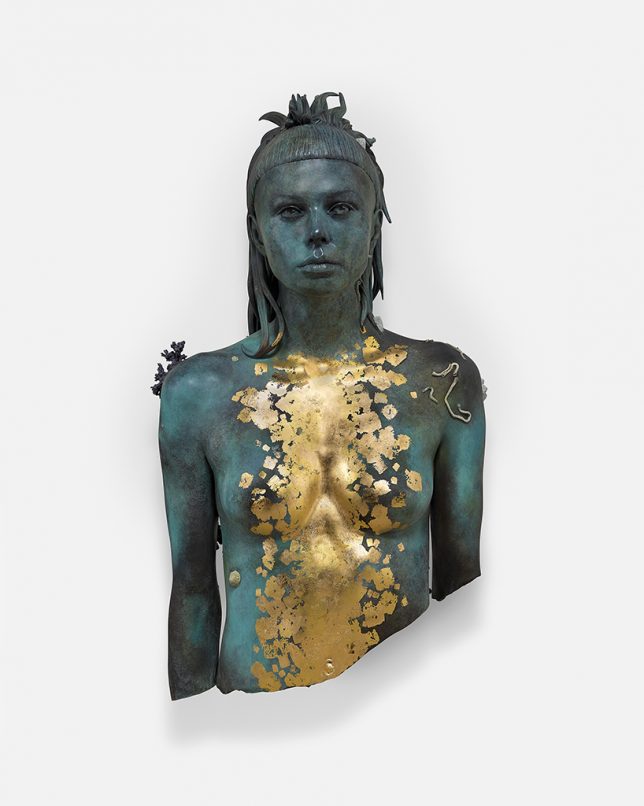
    Treasures from the Wreck of the Unbelievable by Damien Hirst

    Ten years of work culminate in a massive museum show in Venice as artist Damien Hirst displays ‘Treasures from the Wreck of the Unbelievable,’ based on a fictional account of an ancient shipwreck. The sculptures were lowered into the ocean so their ‘discovery’ by scuba divers could be filmed, and then brought back up again. No one ever called Hirst – who’s known for his outlandish and often absurdly expensive spectacles – unambitious.

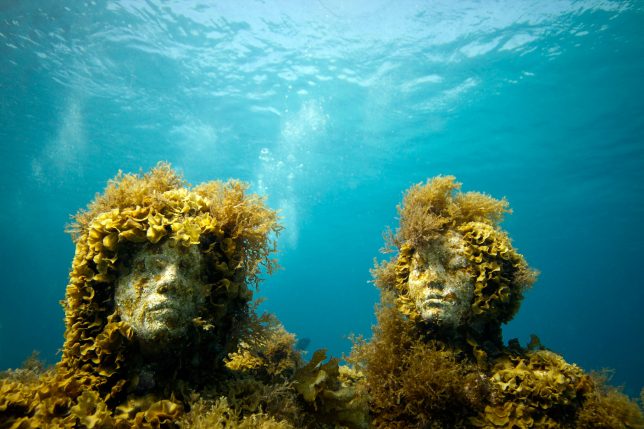
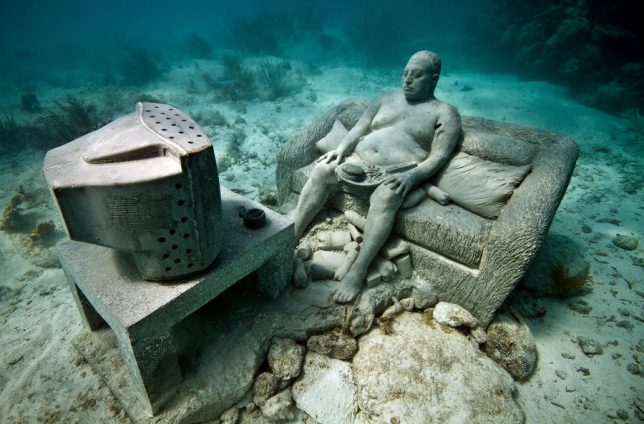
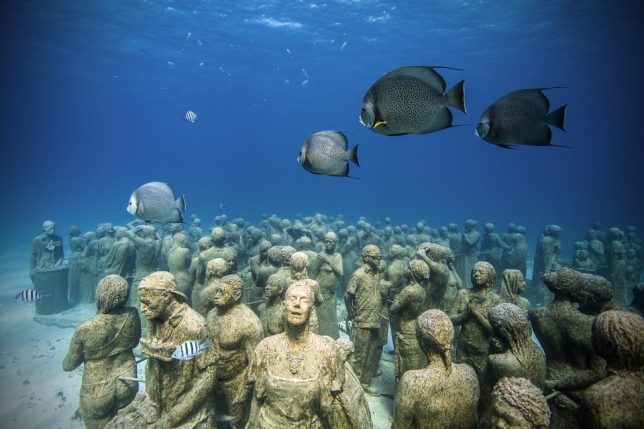
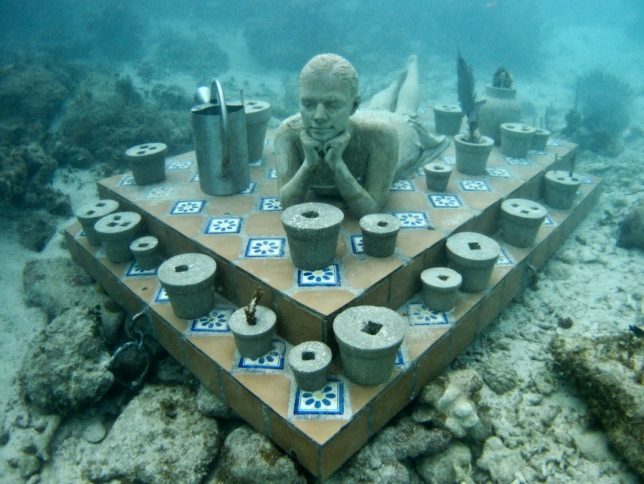
    Submerged Sculptures by Jason deCaires Taylor

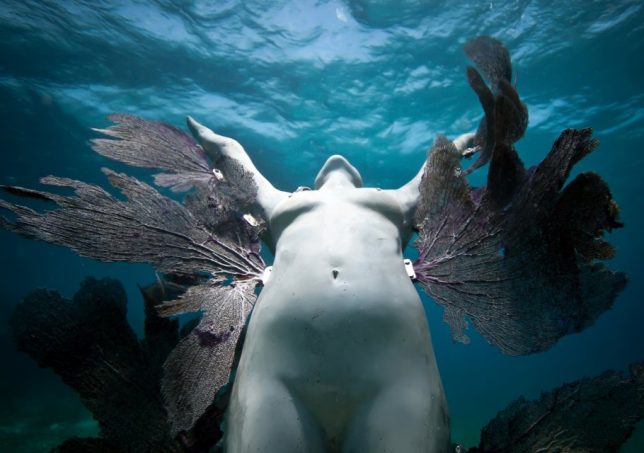
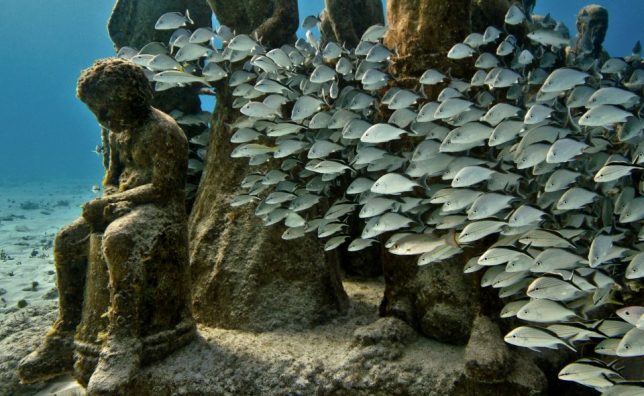
    Looking at the many sculptures by Jason deCaires Taylor that have been submerged into the sea and transformed into artificial reefs, you can’t help but wonder whether these items might remain long after we living humans have rendered ourselves extinct, waiting to be discovered by alien explorers. The sculptor’s work revolves around such issues as immigration and the Syrian humanitarian crisis, and many exhibitions – like The Raft of Lampedusa in the Museo Atlantico, the first underwater contemporary art museum in Europe – are open to divers.

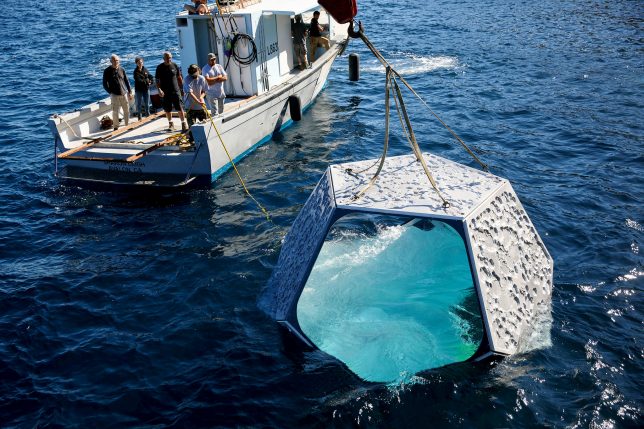
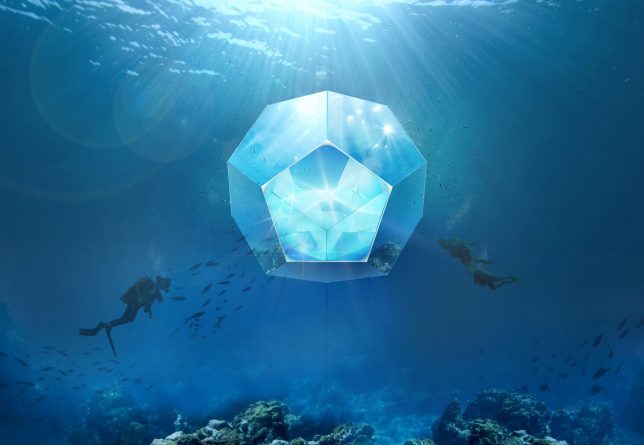
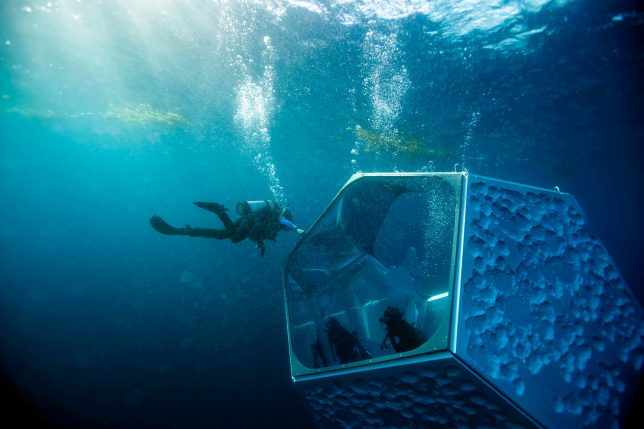
    Underwater Pavilions by Doug Aitken

    Artist Doug Aitken created three geometric swim-in, swim-out pavilions that are now moored to the ocean floor in a dive park off Avalon, California. Each twelve-sided structure is lined with mirrors, giving them a shimmering appearance that almost doesn’t look real. Produced by Parley for the Oceans and presented in partnership with the Museum of Contemporary Art Los Angeles, the installations “engage the living ecosystem as the viewer swims into and through the sculptures, which create reflective abstractions. The work operates as an observatory for ocean life, creating a variety of converging perceptual encounters. The sculptures will continously change due to the natural and manmade conditions of the ocean.”

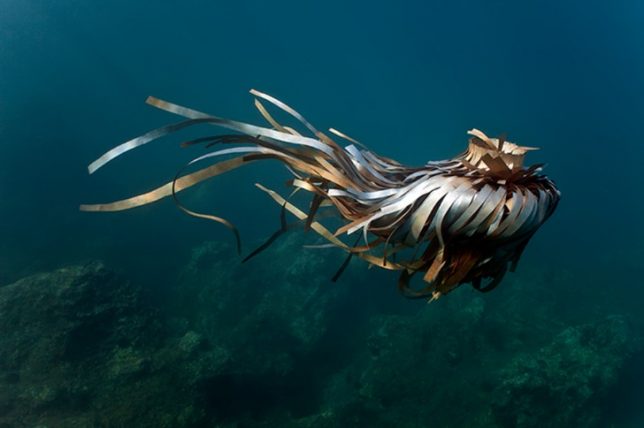
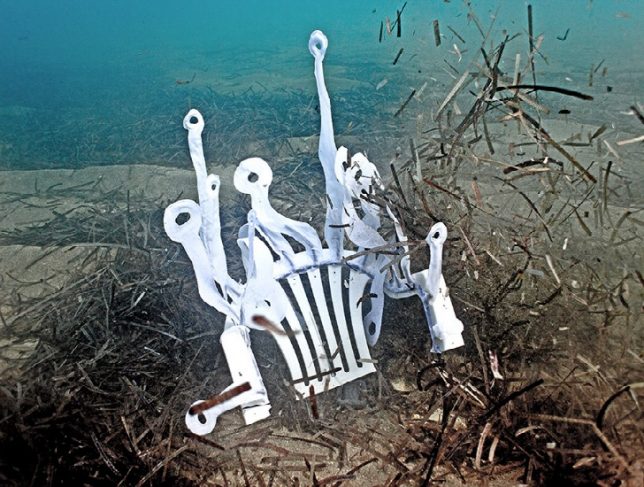
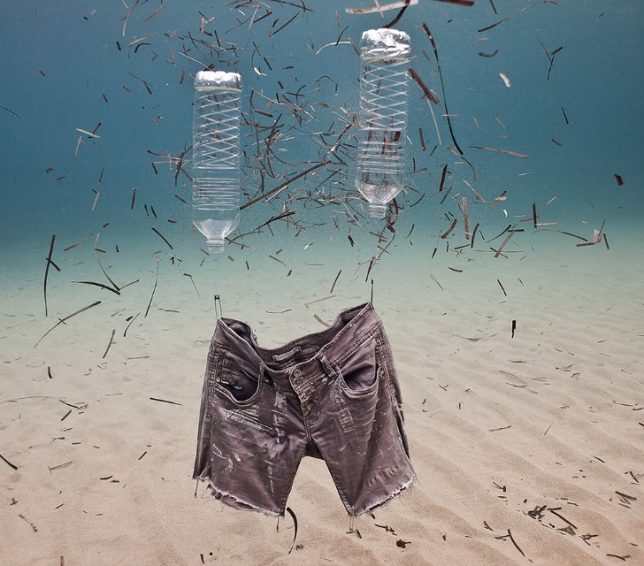
    Underwater Sculptures Made of Trash by Forlane 6 Studio

    Discarded items found on the beach are transformed into surprisingly beautiful and poignant works of art by Forlane 6 Studio in this underwater photo series. The objects represent the careless way in which human activity has invaded virtually every corner of the earth. “When submerged, the objects seem to metamorphose and become organic creatures,” say the artists. “Their role in space is no longer fixed and static.”

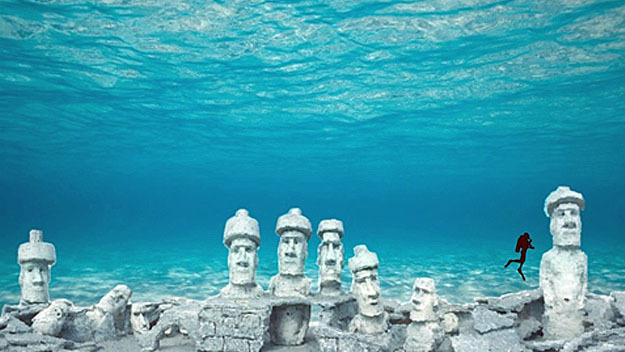
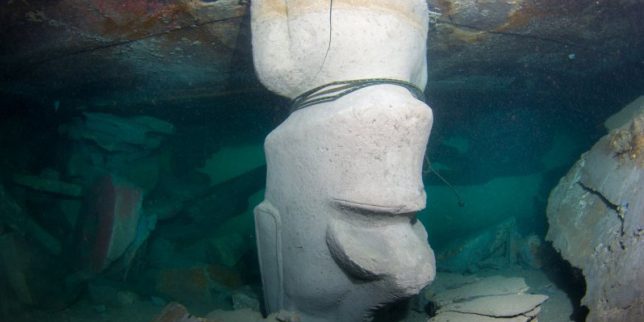
    Rapa Nui Reef by Dennis Macdonald

    Intended as an underwater replica of the famous Easter Island sculptures, Rapa Nui Reef was supposed to be a dive site off Deerfield Beach in Florida. The sculptures were cast, shipped and loaded onto a barge for installation – but technical difficulties destroyed the project. The barge flipped over, destroying the statues. Oops.

    Next Page – Click Below to Read More:
    Art Under The Surface 25 Works Of Sub Aquatic Sculpture

    Share on Facebook


    [ By SA Rogers in Art & Sculpture & Craft. ]

    [ WebUrbanist | Archives | Galleries | Privacy | TOS ]


    WebUrbanist

  • Lighting Tips for Perfect Portraits

    Snapping a portrait, is much more complex than than pinning up a laser backdrop and requesting your subject say “cheese.”

    The key to a polished look is lighting!

    Read our tips for making your pals look their best in any light (you might just want to add some shine to help them look their best).
    (…)
    Read the rest of Lighting Tips for Perfect Portraits (301 words)


    © laurel for Photojojo, 2017. |
    Permalink |
    No comment |
    Add to
    del.icio.us

    Post tags:


    Photojojo