Blog

  • Canon EOS 7D Mark II firmware 1.1.1 removed over communication bug

    Canon has revoked firmware version 1.1.1 for the EOS 7D Mark II, citing a communication bug that appears when using Wi-Fi Adapter W-E1. The firmware was released on April 27 and brought with it a couple of enhancements and bug fixes, including improved communications reliability with the Wireless File Transmitter WFT-E7 B. Unfortunately, 7D cameras updated with the latest firmware from v1.0.5 or earlier aren’t able to shoot remotely with the related Camera Connect App.

    According to Canon, there are two exceptions to the issue, with the first being that cameras updated from firmware 1.1.0 to 1.1.1 won’t experience the bug, nor will cameras that were sold with firmware 1.1.1 already installed. Other cameras, however, must be rolled back to firmware 1.1.0 to remove the bug until a corrected update is released in early June. Canon has re-released firmware 1.1.0 for download.

    Via: CanonRumors

    Articles: Digital Photography Review (dpreview.com)

  • Ghostly Garden: Classical Wire Mesh Architecture Haunts Abu Dhabi

    [ By SA Rogers in Art & Sculpture & Craft. ]

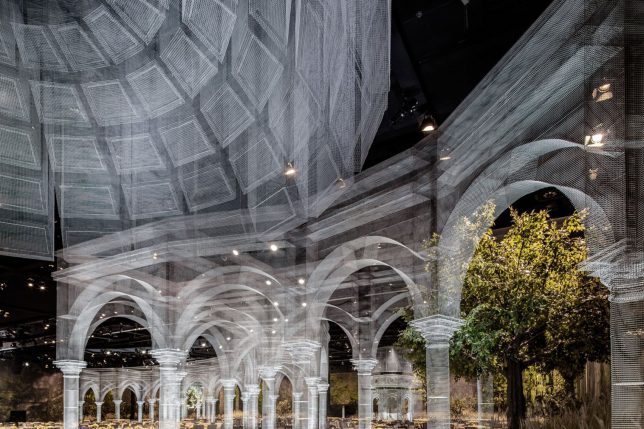
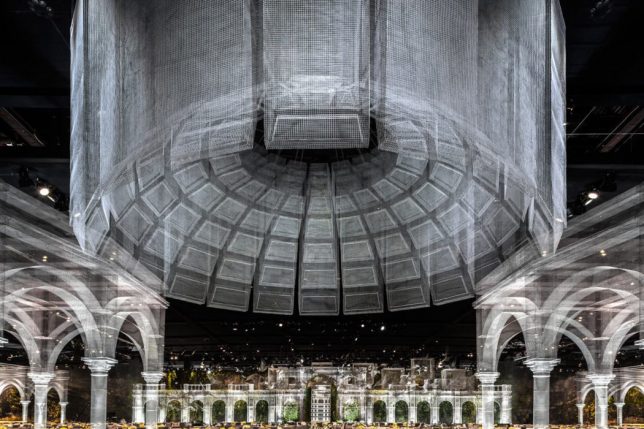
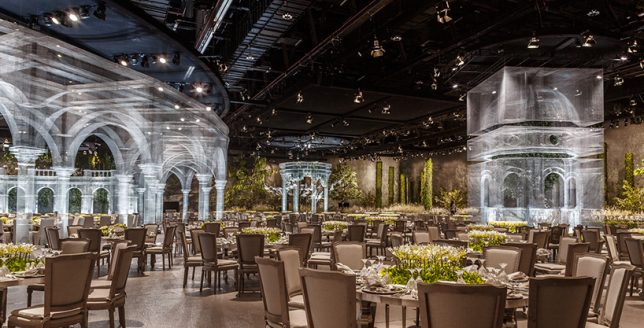
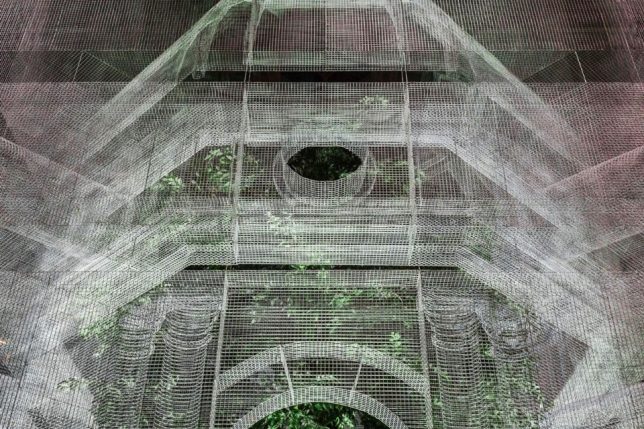
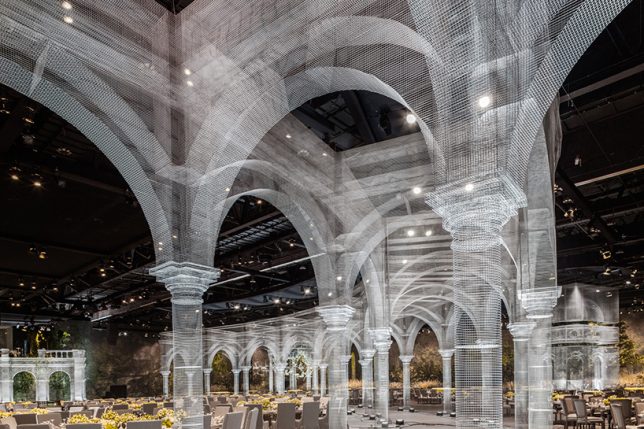
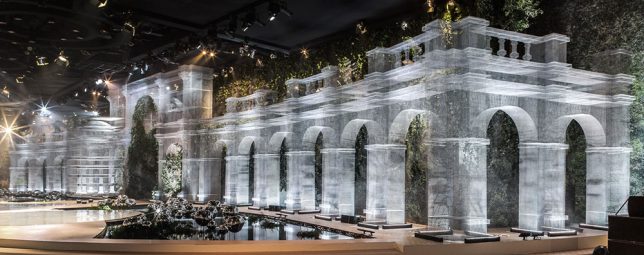
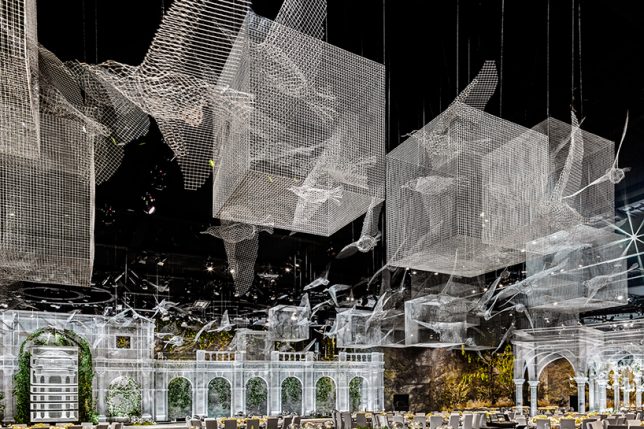
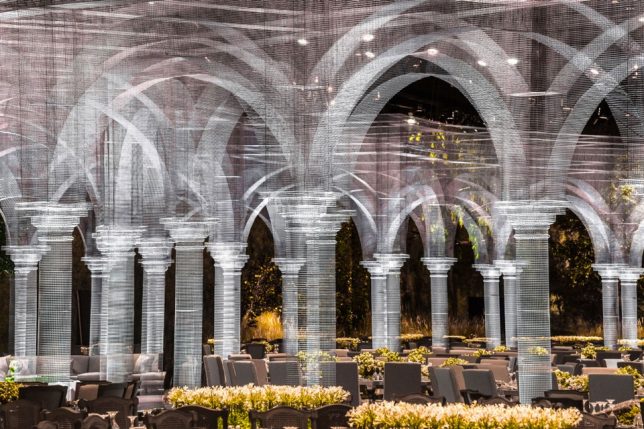
    Seeming like a ghostly image of structures long gone overlaid onto the current reality, these wire mesh architectural creations arch over 75,000 square feet of event space in Abu Dhabi. The way the mesh shifts between transparency and opacity depending on how it’s layered, paired with its grid pattern, gives it the look of a light-based projection, yet it’s physical and three-dimensional, crafted in full-scale skeletal form to suggest structures rather than bring them to fruition.

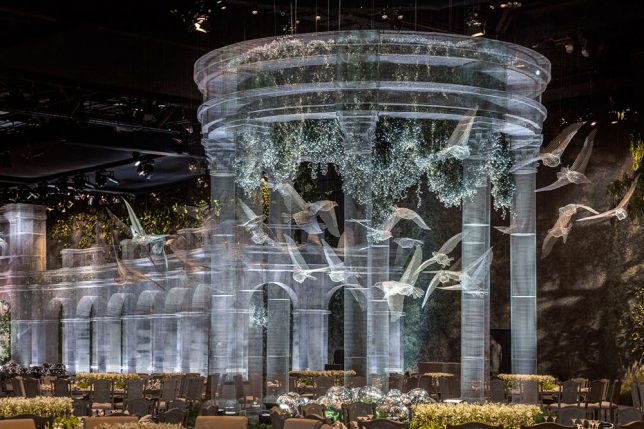
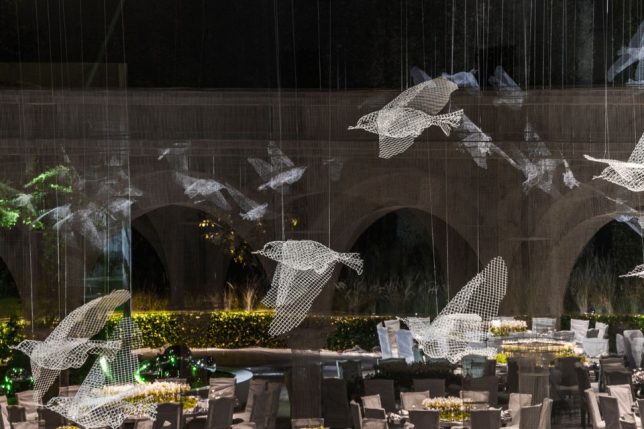
    Artist Edoardo Tresoldi previously resurrected an ancient church in Puglia, Italy that had been destroyed by earthquakes in the 13th century right where it once stood, allowing visitors to get a sense of how the structure interacts with the site before and after its demise. This time, Tresoldi sculpts a whole series of architectural sculptures, along with flying birds and cubes that hang suspended in midair.

    The Abu Dhabi installation acts as a decorative tableau for a royal event attended by 1,900 guests from all over the Middle East, and took three months to complete, representing the artist’s first time creating a large installation for an indoor space. After the event, some of the structures will be moved and reassembled in public places across the UAE capital, including museums, parks and universities.

    Many of these forms are reminiscent of previous Tresoldi works, including an archway used on a fashion runway, and a caged bird. Tresoldi creates figurative wire mesh sculptures, as well. You can see the evolution of his process at his Behance profile.

    Share on Facebook


    [ By SA Rogers in Art & Sculpture & Craft. ]

    [ WebUrbanist | Archives | Galleries | Privacy | TOS ]


    WebUrbanist

  • How to Improve your Photography in 21 Days

    The web is saturated with top ten lists of how to be a better photographer. Heck, I’ve even written a number of them myself. Yet, one has to wonder, how much better can someone really become after reading just one article? Wouldn’t a larger transformation involving several weeks or months be necessary?

    Depending on your current amount of personal bandwidth, you may not like the answer. There are some shortcuts, but ultimately you are looking at a minimum of 21 days to really make an impact.

    Better photographer 21 days 02

    For an even deeper understanding of how it all works, you need to dedicate a little bit of time every day for three weeks. It’s a big commitment, I know, but at the end of this period you will be shooting with the best of them. In the grand scheme of things, it’s actually not that long. Just 21 days is all it will take. Let’s get started with the essentials.

    Week 1

    Day #1 – Believe in Yourself

    I know it’s only day one, but this first step is a critical part of your growth as a photographer. It’s where you tune-out your inner critic and start thinking positively. The transformation your thoughts can make is truly remarkable. Be careful though, negative patterns will try to creep back in. Squash them as they arise and replace them with something positive about yourself. This tip is first because it’s the foundation that everything else is built upon. Without it, you’re building a house on sand.

    “Believe in yourself! Have faith in your abilities! Without a humble but reasonable confidence in your own powers you cannot be successful or happy.” – Author, Normal Vincent Peale.

    Better photographer 21 days 10

    Day #2 – Get a Library Card

    Amazon is convenient, but the library has its own charm. It’s where you’ll find treasures you didn’t realize you were looking for. It’s in those long aisles full of books that you’ll find a heaping dose of inspiration. Flip through the pages, study how the masters composed and created their shots. Look for titles by Ernst Haas, Eliot Porter, Garry Winogrand, Robert Frank, Ansel Adams, and more.

    Don’t stop there, however. Take the time to learn about photographers you’ve never heard of. Read about what inspired them to get started and any tips they may offer. One of my favorites is the Nature Photography Field Guide by John Shaw. He has the simplest way of teaching the most complex topics, including manual metering.

    “Everything you need for better future and success has already been written. And guess what? All you have to do is go to the library.” – Henri Frederic Amiel.

    Day #3 – Face Your Fears

    If there is some type of photography that really freaks you out, make a concerted effort to schedule time for it. Perhaps you only shoot landscapes and nature. If so, now is the time to try your hand at portraiture or street photography.

    Better photographer 21 days 06

    I talk to many photographers who never use flash and claim that they only use natural light. That sounds reasonable, but deep down you know it’s just an excuse to avoid learning about guide numbers, slave units, TTL, etc. Don’t avoid this step as it will come back to haunt you later on. The more educated you are, the more jobs you’ll be able to accept. This will make all the difference in your potential earnings, should you choose to go pro.

    “Inaction breeds doubt and fear. Action breeds confidence and courage. If you want to conquer fear, do not sit home and think about it. Go out and get busy.” – Dale Carnegie.

    Day #4 – Reach Out for Help

    Okay, so you’ve identified your weakness, but you have no idea where to turn for guidance. This is where you get to wave the flag and ask for help from a professional. Sure you can visit a photography forum, but you may get poor advice from amateurs or those who think they know it all. A better option is to find a local mentor or one who offers online training and Skype calls. Many sites offer this type of service for a reasonable fee.

    Better photographer 21 days 05

    Regardless of who you use, be sure to check out their work, and read any testimonials from past students. With a trusted advocate by your side, you can speed up the learning process. If you’re hesitant about seeking guidance, consider this; asking for assistance proves your strength, not your weakness.

    Day #5 – Learn a New Camera Feature

    Cameras have never been so sophisticated. Unlike the cameras of old, they are essentially mini computers. With such features like live view, autofocus tracking, electronic viewfinders, histograms, and white balance. It can seem daunting at times. Yet if you don’t get ahead of technology, you risk being left behind.

    That’s why I recommend upgrading your camera every few years. It doesn’t mean your current camera is no longer relevant, but consider using it as a backup to your new model. If purchasing isn’t a viable option right now, then I’d recommend renting a camera for a week or so.

    Better photographer 21 days 07

    If you’ve only used DSLRs, then a mirrorless camera would be an eye-opening experience. Another educational experience is to really dig into the camera menu. Mess with every button and play with every feature. Keep the camera manual nearby to cross reference anything you’re not sure of, and learn it.

    Day #6 – Start a Website

    There is no excuse for a Facebook page being used as a website (especially if you want to do this as a business). Your web presence is the first impression people will have of your work, and you know what they say about first impressions. When someone is viewing your images for the first time, send them to a professional website with big bold images, a contact page, and perhaps a short bio.

    Today there are totally free options like Wix and Weebly which are perfect for slick portfolio pages. If you want a more powerful platform, check out Squarespace with their photography templates and e-commerce integration.

    “First impressions matter. Experts say we size up new people in somewhere between 30 seconds and two minutes.” – Elliott Abrams.

    Day #7 – Create a Savings Plan to Buy Good Gear

    Better photographer 21 days 11

    Lenses are a long-term investment, and as such, they are usually quite expensive. Still, a good lens will absolutely make a big impact on your work. For example, a professional quality lens will typically be sharper, faster to focus, easier to create a shallow depth of field with, and have a tougher build for all-weather conditions.

    I would go as far as saying that the lens will make more of a difference than the camera. For this reason, it makes sense to build your kit with quality glass. Rather than starting off in photography with debt, start a savings fund for photography gear. Anytime you make extra money (from your photography or otherwise), save a portion of it. If you’re working a day job, try to squirrel away a little each paycheck.

    When you do eventually purchase your lens, be sure to pick up a quality UV filter to protect the glass. I once saw a rented 300mm lens smash to the cement. The filter was shattered in hundreds of little pieces while the lens itself was 100% intact.

    Better photographer 21 days 14

    Week 2

    Day #8 – Accept Your Faults

    Whether you’re a reclusive introvert or an over-the-top outgoing type A, there is a type of photography for you. The trick is to work with your faults, not against them. If you’re not a people person, perhaps wedding photography isn’t the best role for you. Instead, consider a more solitary pursuit such as travel or wildlife photography. For those with the gift of gab, portraiture might be a perfect fit.

    “The learner always begins by finding fault, but the scholar sees the positive merit in everything.” – Georg Wilhelm Friedrich Hegel.

    Day #9 – Embrace Success

    It sounds counter-intuitive but many people are actually afraid to succeed. Similar to the fear of failure, this can hold one back from fulfilling their dreams. Because success is heavy, it carries a responsibility. It is much easier to procrastinate and live on the “someday I’ll do it” philosophy. Don’t sabotage yourself! Stay focused on all of the good things success can bring.

    Better photographer 21 days 19

    The writer Denis Waitley says – “People procrastinate because they are afraid of the success that they know will result if they move ahead now.”

    Day #10 – Commit to Waking Up an Hour Earlier

    I’m not talking about catching sunrise every day, but simply using the extra hour towards your passion for photography. This could be blogging, working on your website, studying, networking, or editing photos. There are endless ways to use the time. Of course, it’s also the best time to take photos as well. Besides there being no one around to spoil your composition, the light is spectacular at dawn and sunrise. It’s also when wildlife and birds are most active.

    The coach, George Allen, Sr. said – “Work hard, stay positive, and get up early. It’s the best part of the day.”

    Day #11 – Build an “I Quit” Fund

    Imagine handing your boss a resignation letter to pursue your career in photography. It happened to me, and it can be your reality as well. Ideally, you want about six months of reserve funds, you can probably get by with three. I know this sounds like a tall order, but it all starts with a single step.

    Better photographer 21 days 13

    Start a special savings account and add to it every month with funds from your day job. Need help raising the cash? Raid your chest of photo gear and sell anything you haven’t used in at least a year. If you need more, get a part-time job for a while. Eventually, you’ll have enough to leave behind a job you are unhappy with and begin your new career as a photographer.

    Day #12 – Meet People in Real Life

    Social networks are terrific, but face to face meetings are even more valuable. You may be wondering where to find these like-minded people. Start by joining a local camera club, or visiting a nearby art gallery. Perhaps you can take a photography class at a community college in your area. Bring your business cards to popular photography spots and talk to fellow photographers. You can exchange tips, geek out over gear talk, and share favorite locations.

    As another perk, they may recommend you for a job they aren’t interested in. You can potentially get work and experience by simply being cordial. Hey, you may even make some friends along the way. The photo industry is small, so it pays to stick together.

    Better photographer 21 days 04

    Day #13 – Listen to Your Heart

    I know, it’s the title of a song by the 80s band, Roxette. That’s not the point. What is important is to find your passion.

    When you look around the web it’s easy to slip into a nasty funk. Don’t compare yourself to what others are doing, even if they’re successful. Follow your gut and do the type of photography that makes you happy. Some people may tell you that being a jack of all trades is not wise. However, if you feel like photographing all kinds of subjects, don’t let anyone stand in your way.

    “Your work is going to fill a large part of your life, and the only way to be truly satisfied is to do what you believe is great work. And the only way to do great work is to love what you do. If you haven’t found it yet, keep looking. Don’t settle. As with all matters of the heart, you’ll know when you find it.” – Steve Jobs.

    Day #14 – Ask for More Work

    It sounds painful, I know, but seeking out more photography work could be one of the best decisions you make. Go on Craigslist, offer to be a second shooter at a wedding. Ask to assist on a portrait shoot, or offer your editing help to a local studio. You have to create your own opportunities as jobs will rarely fall in your lap. As you gain more experience, you’ll also enjoy more exposure.

    Better photographer 21 days 20

    “There exist limitless opportunities in every industry. Where there is an open mind, there will always be a frontier.” – Charles Kettering.

    Week 3

    Day #15 – Invest in Your Mind

    Invest in yourself, as there is nothing more valuable than your future. As Benjamin Franklin said, “An investment in knowledge pays the best interest.”

    For photographers, this can be done in a number of ways. Group workshop are a terrific way to expedite the learning curve. If you prefer one-on-one training, you can take private photography lessons. Of course, not all of your efforts have to be paid options. Watching free online tutorials and reading articles (like those here on dPS!) will cost nothing but your time.

    Day #16 – Take a Sick Day

    You know those extra hours you’ve been saving up at work? Use one day for a photography outing. There are rarely awards for perfect attendance, so what’s the point? There’s nothing quite like an impromptu road trip to lift your spirits and break you out of a creative rut.

    Better photographer 21 days 16

    Everyone deserves a day to pursue their passion, plus, you’ll be more productive when you return to work. Recharging your batteries is a necessary way to strike a balance between work and play. This is an essential step, so don’t skip it.

    Day #17 – Do Volunteer Work

    Not only will this make you feel good, but you are using your skills to make the world a kinder place. Coincidentally, my entire business started by volunteering a single print to a non-profit organization’s fundraiser. The winner was an amateur photographer in a nearby town. She reached out to see if I did private lessons. Fast forward nearly 10 years, and I now teach photography full-time.

    Although it’s a hotly debated topic, it can absolutely pay to work for free on occasion. Bare in mind, I’m not talking about shooting a wedding for free. The idea is to find an organization you can back, and donate your time or services to them for an afternoon.

    “Research has shown that people who volunteer often live longer.” – Allen Klein.

    Better photographer 21 days 12

    Day #18 – Forget the Haters

    When people are hateful, remember this quote by author Shannon L. Adler, “You will face your greatest opposition when you are closest to your biggest miracle.”

    Let’s face it, some people will just not be happy when you’re on the verge of something great. Don’t take it personally, as it’s their issue, not yours. Perhaps the most common place for haters to lurk is online, especially in blog post comments or on photography forums. There are even “trolls” who look to instigate trouble under anonymous names. They want you to engage and waste your time. Don’t take the bait, expend your energy, or let them limit your success. They don’t deserve your attention which can be used for much more positive things.

    Day #19 – Cut Out Bad Habits

    Do you leave your camera on automatic and just fire away? If so, you are doing yourself a disservice. Work to break these bad habits once and for all. Put the camera into manual mode and learn how to properly expose by using the shutter speed, aperture, and ISO. This is one area where there are no shortcuts. Without it, it’s like you are driving blindfolded.

    Better photographer 21 days 09

    Bad habits aren’t formed overnight. Similarly, it will require considerable effort to break them. In photography, you need to be your own coach. This requires that you be honest with yourself. If you catch yourself cheating, replace the bad habit with the proper steps immediately.

    “People try to change too much at once and it becomes overwhelming, and they end up falling off the program. So gradually changing bad habits makes much more of a difference than trying to change them all at once.” – Ian K. Smith.

    Day #20 – Plan the Night Before

    Laying out your clothes the night before is always helpful, but what about taking it a step further. Imagine how much more productive you could be if you planned the entire next day before hitting the sack. This is especially important when you want to spend time doing photography. It involves charging all batteries, formatting memory cards, packing your gear, getting the tripod ready, and gassing up the car. Don’t leave these things for the last minute or you’ll end procrastinating.

    Better photographer 21 days 03

    It may also help to write down your five most important goals for the next day. Block out the time, add them to your calendar and get ready to have a terrific adventure. If you need caffeine to get going, be sure to set the coffee pot to automatically brew the next morning.

    “Productivity is never an accident. It is always the result of a commitment to excellence, intelligent planning, and focused effort.” – Paul J. Meyer.

    Day #21 – Start a Journal

    You don’t need to write like Anais Nin to keep a journal. For photographers, a simple notebook with sketches and ideas can have a number of benefits. For one, you’ll retain more information by writing it down. You can even spark your creativity by capturing your thoughts in a daydream.

    Dr. James Pennebaker, author of Writing to Heal says, “When we translate an experience into language we essentially make the experience graspable.” This means that complex topics can be worked out on paper in a way that’s easy to digest. Mistakes can be documented as well as solutions. When you look back at it, you can see just how far you’ve come. This ushers in a feeling of accomplishment and encourages you to keep going.

    Better photographer 21 days 08

    Conclusion

    So is it possible to improve your photography in three weeks? I believe it is, and the keys to do so are listed above.

    Granted, it’s going to be hard work, but you’ve read this far so you must be hungry for change. In addition to transforming your photography, some of these items can improve the quality of your life. Of course, it doesn’t all happen at once and will require patience. Stick with the program for 21 days, however, and you’ll see the impact.

    Consider this my personal guarantee to you. If you really try the steps in this article, I promise you’ll not only be a better photographer but a happier person as well. Leave me a note in the comments to let me know about your progress.

    The post How to Improve your Photography in 21 Days by Chris Corradino appeared first on Digital Photography School.


    Digital Photography School

  • How to do Creative Water Splash Photography with Off-Camera Flash

    Photography gives us the unique opportunity to freeze time. Moments that normally can’t be seen because they occur in the blink of an eye can suddenly be captured by a camera with incredible precision. This gives us the opportunity to discover fascinating and unique opportunities for photography that showcase and celebrate the wonder of the world around us. It can also be an extremely fun and creative style of photography, and a way to practice your skills with off-camera flash.

    A toy car dropped into water, photographed with off-camera flash

    Chances are you’ve come across a photo of a water droplet or water splash before. The intricate and mesmerizing patterns of water droplets in flight make for excellent abstract art.

    But how can you take a picture fast enough? How does it work to freeze each individual droplet in midair?

    A water droplet frozen in midair with off-camera flash photography

    Lightning Fast Photography

    Most modern cameras can take a picture as fast as 1/8000th of a second. You’ve probably noticed, however, that lightning fast shutter speeds typically require a lot of light.

    If you are walking around outdoors on a bright and sunny, you will be able to get your camera up to 1/8000th, and you can capture a water fight or the splash of a water fountain. However, there often isn’t enough light to take a good image indoors or under cloudy lighting conditions.

    Water droplets splashing into a jar, photographed with off-camera flash

    Furthermore, taking a picture under sunny lighting conditions won’t hide the background. The intricacies of the water will be lost against the background.

    That’s why the trick to creating a truly amazing water image is to use off-camera flash.

    How it works

    Cameras only record what they see. This means that a picture taken in a dark room will result in a pitch black picture.

    When you use flash in a dark room, your subject will be illuminated for the duration of the flash of light – which means that your new “shutter speed” will be the speed at which your flash fires (flash duration).

    Depending on the model and power, a flash can fire as quickly as 1/10,000th of a second. This new shutter speed of 1/10,000th of a second is easily fast enough to freeze a water droplet in midair.

    A water droplet, frozen in midair with off-camera flash

    This shot was taken using the settings 1/250, f/5,6, ISO 250. Even with the “slow” shutter speed, the flash stops the water droplet in mid-flight.

    The neat thing here is that as long as the room is dark, the shutter speed on your camera doesn’t actually even matter anymore. With the right setting, your camera can take an image that lasts for a full second long, but the final shot will only be recorded in the blazing fast burst of light from the flash.

    Setting up your shot

    To try this out for yourself, you will need to set up in a fairly dark room – dark enough so that you can use your in-camera settings to take a completely black picture. You’ll need to get off Auto mode in order to do this.

    Remember that the aperture and ISO that you select will affect your flash power. Selecting either a wider aperture or a higher ISO will make your camera more sensitive to light, including the light from your flash. This makes your flash more powerful, in a way.

    For this purpose, I used the following setup:

    A behind the scenes shot of the setup for water splash photography

    Note the towel. A towel just might be the most important piece of equipment to remember when you try water splash photography!

    Even though there is still some light in the room, I was able to create a dark background by setting my camera to 1/250, f/5, ISO 250.

    Get the flash off-camera

    The key is to use the flashes off-camera. Having the light come in at an angle is more in line with how we experience light in the real world, so it produces a more naturally lit image.

    But you don’t need to have multiple flashes to try this out – experiment with one flash and see what happens!

    More importantly, by bringing the light in from an angle and preventing it from shining on the walls or objects behind your subject, you can create a dark background. This really makes each droplet shimmer and shine in contrast.

    Two tomatoes splashing into water, shot with off-camera flash

    A toy car splashing into water, photography with off-camera flash

    Two common ways of triggering a flash off-camera are to use either a radio transmitter or a sync cord that connects your camera’s hotshoe to the flash itself. Your camera may also be able to fire your off-camera flash optically using the built-in pop-up flash. You may need to check your camera’s manual to see if your system has that functionality.

    The exact power settings you will need to use on your flash will vary depending on the type of flash, the setup, and the distance between your flash and the splash you are photographing.

    Remember: Digital is cheap! Experiment and watch your camera’s LCD screen after every shot. If it is too dark, simply turn up the flash power or consider moving your lights a bit closer to the subject.

    Getting the timing right

    Once you have everything set up, it’s simply a matter of trial and error! Even with a fancy setup, perfecting your timing in order to capture a splash at the right moment is tough.

    Unless you have a high end strobe unit, you won’t be able to take pictures quickly – the batteries will need a moment to recharge every time they fire. This means you’ve only got one shot for every splash!

    A man photographed with off-camera flash as he is hit by water in the face

    If you get tired of using toy cars as a model, why not ask a friend to step in?

    Every camera has a very slight delay after you press the shutter button (before it actually takes the picture). You’ll want to work on your timing so that you can make the most of every shot – especially if you ask a friend to stand in as a target for a water splash picture!

    Shooting digital allows you to experiment until you have a good sense of the timing. After a bit of practice, you will have some incredible and creative water splashes to show for your effort!

    A man being photographed splashing water while on a black background

    The post How to do Creative Water Splash Photography with Off-Camera Flash by Frank Myrland appeared first on Digital Photography School.


    Digital Photography School
  • 6 Steps To Better Photography

    A few weeks ago I received an email from a new photographer who asked, “How do I make my images better?” At first, I chuckled, realizing that question has resulted in the production of thousands of articles here at dPS, and uncountable books, websites, and magazines. There is just SO MUCH information on how to do better photography that it’s easy to get lost in the sea of advice, photo tips, and expert opinion.

    better photography

    In my response to that struggling photographer, I sketched out six things and quickly sent the email. My answer was off the cuff, but the more I thought about it, the more I realized that my advice was actually pretty darn good. These six things really will help you improve your photographs. Some are easy to accomplish and some reach to the core of the art of photography. All of them, however, will push you further into your process and lead you a bit closer to the images you’ve always wanted to create.

    Better photography

    Aerial image of the Hula Hula River in the Arctic National Wildlife Refuge, Alaska.

    1. Know Your Camera

    This is the easiest one to tackle. One of the places where I’ve noticed new photographers stumbling is having a poor understanding of their camera. Know what each setting means, what it does to your image, and how to quickly change from one to another. Know the five essential camera settings backward and forwards, how to set them, and what impact they will have on your final image.

    Better photography

    Understanding how bright, snowy conditions will impact your image, and your camera’s ability to meter correctly will allow you to quickly capture fleeting light like this, when others may stumble.

    But don’t stop there. Spend some time in the menus and custom settings. Know things like focus and metering modes, and how those relate to different shooting situations.

    I recently added a new camera system to my quiver (Panasonic Lumix) and am having to re-learn all these things for a new camera brand. It is daunting, but it is also extremely important. Get friendly with your camera until you understand it intimately. Then, when you are in the field and need to make changes quickly, you won’t have to think twice, or god-forbid, have to look it up while your opportunity slips away.

    2. Learn the Rules

    Better photography

    Rule of thirds composition. It’s a “rule” because it usually works.

    If you’ve spent much time reading about photography online, you’ll have read the words “Break the rules!” so often it’s become a platitude. Everyone is pushing you to break rules, but there is very little discussion about the rules themselves, what they mean, and why they should be broken. The fact of the matter is that the “rules” of photography are guidelines for a reason – they often work.

    better photography

    The “rule of thirds” for example, is effective because it results in a pleasing composition. (There is a mathematical reason for this, but a complete discussion of the topic is beyond the scope of this article.)

    Proper focus, exposure, and color balance are all “rules” because they result in a pleasing image. Know how to effectively achieve these in your images again and again in a variety of shooting situations. Once you’ve mastered the “rules”, you can move beyond them (see #6 below).

    3. Study Images Until You Know WHY They Work

    As you are browsing through images on the internet, in magazines, or books, take a few minutes to study the photos that catch your eye and consider:

    1. What did you first see that captured your interest? Was there an action, color, or story that was compelling?
    2. How does your eye move through the image? At what point do you lose interest?
    3. What colors or points of contrast are interesting?
    4. Is there a story being told? What is it?
    better photography

    What about this image catches your eye? Is it something else that causes you to linger?

    Images can be effective alone, in groups, or as part of a larger story being told in the surrounding text. Social media has a tendency to raise up stand alone images, but I encourage you to go farther. Good images are often a part of stories, and stories need to go somewhere. Sometimes that’s to the next photo in the series, sometimes it’s integrated into the text.

    Successful photographers know this, and will cater their images to reflect the context. Magazines like National Geographic are very good at it, and many of the images in their pages do not stand alone well, but work beautifully within the context of the story being told.

    better photography

    Consider the images carefully, how they do, or do not integrate with their surroundings, and then try to reverse engineer them. How did the photographer create the photo? Is there artificial light? What exposure was likely used? Often there is a reason why successful photographer’s images look a certain way. See if you can suss that out by looking.

    4. Make Lots and Lots of Photos

    There is an old adage about becoming a good writer, “Write every day.” It’s no different with photography. Practice is vital. Make images, waste pixels. Delete lots, but make images, one way or another.

    better photography

    An atypical composition on a bright, flat-light day. The almost upside-down composition makes this image successful despite the poor light.

    When you have successful images, study them as I recommended above in #3 to find out why they worked, and what you could have done to make them even better. Honest self-critique is tough. We can almost always find a way to justify our errors or to overlook the mistakes we make. We have a tendency to like our own images because they remind us of our experiences creating them, but our viewers don’t share those memories. The experience of viewing the images has to be sufficient.

    Try to look at your photos as an outsider would, take note of the distracting elements, the clumsy balance, or off-kilter compositions. Consider would could be better, and work toward that goal your next time you’re out with your camera.

    5. Travel

    Getting away from our home environment is a great way to find inspiration. That can be a trip to some photogenic destination a world away, or simply driving to a different part of town. The trick is to break out of your rut, and make some new images.

    better photography

    When you come eye to eye with a grizzly bear, it’s easy to get overly excited and screw up your images. But, if you have the fundamentals of photography and your camera controls mastered, your odds of success improve dramatically.

    New places also tend to inspire, but I caution you here. More than once, at a new place, I’ve been so enthusiastic to make images, oohing and aahing at the sights I’m seeing, that I failed to pay attention to the basics (See #1 and #2). I have utterly blown entire mornings of beautiful light because I was so caught up in the excitement that I didn’t notice my compositions were wonky, or my exposures were blown out.

    Escape your normal routine, but always remember the fundamentals of photography.

    6. Become Your Own Photographer

    better photography

    Storm light, shadows, and the sun, play across the northern foothills of Alaska’s Brooks Range. It isn’t a classic composition, yet I knew this image would work when I made it.

    Much of the advice I’ve shared here relies on comparing your own work to that of others. This is a great way to learn, but eventually, you run the risk of stagnating, or worse, imitating others.

    better photography

    Every shooter is inspired by the work of other photographers. We all have gone through stages where we want to make similar images (or even identical) to what others have made. That’s why some sites are so famous: the Firefall in Yosemite, the bears catching salmon in Katmai National Park, the Tetons over the Snake River. Photographers crowd these locations, trying desperately to emulate, imitate, or re-create famous images they’ve seen before. This can be a great way to learn, but please don’t stop there.

    better photography

    Nothing about the lighting in this image follows the rules. It was blistering hot, midday, washout light. If I had followed the rules, I would never have lifted my camera.

    Once you’ve mastered the basics and have a strong understanding of what makes an image succeed or fail, it’s time to break out on your own. Make images for yourself, compositions that are a-typical, weird, strangely composed and focused. Take the rules of composition, focus, and exposure and push their limits. Here is where the rules can be bent and broken. This is where you experiment, play, and most of the time – fail utterly.

    But sometimes you won’t fail. Sometimes, that strange composition, that weird exposure, will work, and work beautifully.

    better photography

    Make images because they speak to you, not because you think your Instagram followers will like them. When you break away from what you think is expected, and to what you care about, your images will become your own. For me, this took a long time, but once I found my groove, my own style, I started enjoying the art of photography even more.

    better photography

    Caribou in winter on the arctic coastal plain of northern Alaska. Nothing typical about the lighting or composition of this image, yet it’s one of my favorite wildlife images. I’ve never seen another image like this, and that’s a big part of what I like about it.

    Conclusion

    Don’t try and please everyone. If you do, your work will appear generic and it will not push you to excel. In other words, be willing to fail. A willingness to fail will eventually lead to success.

    Do you follow these six tips? Do you have any others that you would suggest to beginners to help them do better photography? Please share in the comments below.

    The post 6 Steps To Better Photography by David Shaw appeared first on Digital Photography School.


    Digital Photography School
  • Video: first person view of a spacewalk, shot by an action cam

     
    There’s literally nothing cooler than outer space. And getting to see a first-person view of a spacewalk, shot by an action camera, is both fascinating and exciting. The above video was taken on March 24th by ESA astronaut Thomas Pesquet. It also shows NASA astronaut Shane Kimbrough.

    The two are shown preparing a dock and making repairs to components at the International Space Station. From the Youtube post:

    “The primary task was to prepare the Pressurized Mating Adapter-3 (PMA-3) for installation of the second International Docking Adapter, which will accommodate commercial crew vehicle dockings. The PMA-3 provides the pressurized interface between the station modules and the docking adapter. The pair disconnected cables and electrical connections on PMA-3 to prepare for its robotic move, which took place on Sunday, March 26. PMA-3 was be moved from the port side of the Tranquility module to the space-facing side of the Harmony module, where it will become home for the docking adapter, which will be delivered on a future flight of a SpaceX Dragon cargo spacecraft. The spacewalkers also installed on the starboard zero truss a new computer relay box equipped with advanced software for the adapter.

    The two spacewalkers lubricated the latching end effector on the Special Purpose Dexterous Manipulator “extension” for the Canadarm2 robotic arm, inspected a radiator valve suspected of a small ammonia leak and replaced cameras on the Japanese segment of the outpost. Radiators are used to shed excess heat that builds up through normal space station operation.”

    Articles: Digital Photography Review (dpreview.com)

  • Video: is the Canon EOS M6 good for vlogging?

     
    The Canon EOS M6 features 1080/60p video capture, Dual Pixel AF, a selfie screen and lens-based IS. All of this adds up to what seems like an appealing package for vloggers. But is it? To find out for sure – and as part of our Canon EOS M6 review – DPReview’s Carey Rose put the camera’s vlogging chops to the test in a vlog about vlogging with the M6. Have a watch!


    Articles: Digital Photography Review (dpreview.com)

  • Sigma offers firmware updates for four Canon mount lenses

    Sigma has released new firmware for Canon mount versions of four of its lenses:

    • 17-70mm F2.8-4 DC Macro OS HSM | Contemporary Canon
    • 18-200mm F3.5-6.3 DC Macro OS HSM | Contemporary Canon
    • 18-300mm F3.5-6.3 DC MACRO OS HSM | Contemporary Canon
    • 24-105mm F4 DG OS HSM | Art Canon

    According to Sigma, the new firmware improves the AF accuracy of the lenses when used with the Sigma Mount Converter MC-11, as well as decreasing the lens diaphragm blades noise when using the aforementioned converter.

    The same AF accuracy improvement and decreased noise also apply to the lenses when they are used with Canon EOS DSLRs while shooting video or while in Live Mode. Finally, Sigma says these lenses are now compatible with the Canon Digital Cinema Camera EOS C300 Mark II. 

    Sigma lens owners with the Sigma USB Dock must first update the Sigma Optimization Pro software to, at minimum, version 1.4.1 (Windows) or version 1.4.0 (Mac) before installing the new firmware.

    The full Sigma changelog is below:

    Benefits of this firmware update

    • It has improved the AF accuracy when the lens is attached with the SIGMA MOUNT CONVERTER MC-11.
    • ?It is necessary to use the SIGMA USB DOCK for Canon ver.1.02 or later to update the firmware.
    • ? For customers who own SIGMA MOUNT CONVERTER MC-11 EF-E, it is necessary to update this to the latest firmware ver. 1.05.
    • It has reduced the operating sound of the lens diaphragm blades when attached with the SIGMA MOUNT CONVERTER MC-11 EF-E and used for video shooting.
    • It has improved the AF accuracy when the lens is used for video shooting as well as with Live View mode of EOS DIGITAL SLR cameras.*1
    • It has reduced the operating sound of the lens diaphragm blades when the lens is used for video shooting on EOS DIGITAL SLR cameras. *1
    • It has become compatible with the Canon Digital Cinema Camera EOS C300 Mark II.
    • *1 The degree of improvement may differ depending on the camera used.

    Via: Sigma

    Articles: Digital Photography Review (dpreview.com)

  • How to Improve Your Art – The Creative Process in Photography

    As photographers, we all want to be constantly improving our work. However, often this can seem like an uphill struggle, especially when you are just starting out. As an art form, photography is all about the creative process and exploring ideas through images, but in order to really create great images you need to put a plan in place for your own development; especially focused on skills, inspiration, purpose and output. By tackling these elements you can focus your mind and develop your work, to help you produce better and more refined art every time you go out on location.

    Creating prints as a final output

    Skills – The Basics

    In order to get on to the creative elements, having a solid understanding of the base knowledge first is integral to improving your art as a photographer. I’m not going to go into detail here about understanding exposure, depth of field, composition, etc., but these are key things to spend time on.

    It may seem like a huge task, but with solid work you can come to grips with being able to shoot in full manual mode easily within a month. After that point, you need to understand the basics as well as the layout of your camera’s functions, helping to make it an extension of yourself and not a distraction from your intended subject. There are a large number of fantastic tutorials here on dPS that can help you to get up to speed and really understand the basics.

    Knowing your settings

    Focus Days

    Taking your learning further is all about practice and persistence, so think about spending a few days focused on certain image types. Set yourself the task of going out the door to just shoot panning images, wide angles, bokeh, etc. This will help you to formulate the skills in your photographer’s arsenal and produce more creative images for the future.

    No matter how many years you have been shooting, testing yourself and constantly putting in the time will always help you improve. If you can’t find a whole day, why not a lunch break at work? Small efforts done consistently lead to great results.

    Working on a local project

    Restrict Yourself

    Creativity is something people often believe thrives with options, but in honesty, having too many things to choose from can often dilute your vision and reduce the creativity within your images. Restrict yourself by focusing on a single subject for an extended period of time. Build a long term project in your garden or local nature reserve and keep returning to build upon your images.

    Working with primes

    Another option is to work with a single focal length or prime lens to explore how you can make the most of what you’ve got. If you don’t have a prime lens use a piece of gaffer tape to hold your zoom lens in position to stop the temptation of zooming in or out. These practices will enhance your skills when it comes to general shooting, as you will be able to quickly select and formulate the ways and ideas you want to shoot.

    Create a prime using gaffers tape

    Record

    In order to get the best out of the images you are taking and the skills you are learning, remember to record them. Working with a simple notebook or online workbook, evaluate the images you have taken for successes and failures, in order to cement the lessons in your mind and learn from your work.

    Sketchbook for taking notes

    Inspiration

    Inspiration is very important for your development as a photographer. Without constant inspiration it can be hard to formulate ideas and develop on past work. Staying inspired doesn’t just mean looking at other photographer’s work, as often over-saturaturation of a single medium can result in less creativity. So it’s better to take input from as wide a range of sources as possible.

    Galleries

    A traditional showcase of artwork, galleries are still a fantastic option for gaining some inspiration. The variety of work on show, from ancient works such as stone carvings and cave paintings, through to impressionism and modernism, really do offer a superb variety of visual stimuli. Often, to get the best out of them, attending a tour or showcase day can help, giving you the backstories of the work as well as explaining the techniques and mediums used. This knowledge will inform, and allow you to formulate your own processes when creating images in the field.

    Nature

    As a wildlife photographer, nature is a huge inspiration to me. Heading out on walks, be it with or without a camera, is a great way to soak up some atmosphere. Look at light and shape of the landscape, and pull in ideas for future images.

    Architecture

    Looking for line and shape

    Buildings offer fantastic inspiration for photography. Lines, form and shape are used to make striking structures and can be a excellent source of inspiration. Focus on looking for the way the shapes are used to form elegant structures or draw your eye to a pivotal point. Additionally, take note of the way shadows form, as this will help you imagine and anticipate lighting for future images.

    Online

    In the modern world the internet has a huge amount to offer, and with so many fantastic resources it is full of inspiration. Taking a look at photographers’ portfolios, or the feeds of 500px, Flickr, etc. offer superb images that can be the perfect inspiration for your own work. One thing to avoid is that of visual trends, copying styles just because they are popular. It is always worth noting that just because an image doesn’t have many Likes or Favourites” does not deny its worth as inspiration, as images will always mean different things to different people.

    In person

    A great way to find inspiration is to become part of a community. Heading to events in the photography world such as exhibitions or trade shows can provide a great way to meet like-minded people as well as see some excellent work. Also, think about looking for a local photography group or club. Many areas have these and they offer a great chance to meet up and discuss work and camera techniques with your peers, all the while helping you improve and develop your skills.

    Record (again)

    Just as above, it’s very important to also record your inspirations. Write down the names of artists and photographers you want to look up, and make notes on what you like and dislike about certain images and media. All of these thoughts and feelings are great to revisit when creating to help formulate and focus your own work. Remember to keep that notebook handy!

    Purpose

    Back Garden wildlife

    Creativity often needs purpose and so do your images.The most powerful images almost always have a purpose behind them, be it to tell stories, stir emotion, tempt us, or give us a glimpse into something we’ve never seen before. Images with purpose have greater strength.

    When wanting to improve your own images look for purpose within your shots. Tell stories through single images or start to work on documenting a larger idea through multiple images. Have the story in your head and shoot frames to help tell it pictorially. Stories don’t need to be huge photojournalist essays, instead start off by just showcasing the mundane, everyday occurrences.

    Training yourself to make powerful images of these situations will equip you with the necessary skills for more exciting opportunities in the future. Working on a local project, be it in your back garden or local community, means you can spend a great deal of time focused on your images as well as developing your story and vision.

    Always ask yourself the following;

    • Why am I creating this image?
    • What am I trying to show?
    • What are the key elements in this story?
    • How can I find a unique angle?

    These thoughts will help you work toward creating stronger images with purpose and meaning, leading to far more creative photography.

    Taking inspiration from architecture

    Output

    Art deserves to be shown and deciding how you are going to output your final work is a great way to focus your creativity. In the modern world, most images just end up on a hard drive, away from the light of day where no one can see them. With all the work and effort you are putting into them, they deserve more.

    In terms of being creative with your work, think about how it should best be shown. Often people lean toward online media, showcasing work through the likes of Flickr or Facebook, Although these are a great way of getting work out there, they can numb the creative and learning process somewhat.

    Printing your work

    Think about outputting to hard media, printing out your work as well as online platforms. There are loads of great ways to produce photo books, magazines and gallery style prints that will look far better and suit certain bodies of work far more. The creative process of learning to design a photo book, bring together a 12-part print collection, or design a magazine spread, will also be an excellent learning curve to help you when working on future projects.

    In addition, there is something to be said for holding a final piece of work in your hands. A finished print really is the ultimate moment for an image. Having passed through all of the creative stages from conception and execution, through to editing and final completion in your hands is a great feeling, and one every photographer deserves after finishing an image.

    Conclusion

    In order to produce more and more creative work it’s all about focusing on the process. The skills behind creating, the inspiration and purpose behind projects, the final results and how they are output. By taking time to think through these stages you can really focus your mind and produce refined work to be proud of, as well as constant develope your skills and grow as a photographer in the future.

    The post How to Improve Your Art – The Creative Process in Photography by Tom Mason appeared first on Digital Photography School.


    Digital Photography School
  • AI-powered Google Lens can identify types of flowers, give info about restaurants

    At Google I/O 2017 the company showed off its new Google Lens technology. This AI-powered capability uses visual recognition to provide information about whatever your smartphone’s camera is pointed at. Examples given by the company include identifying a type of flower or providing reviews and other information about a restaurant.

    You will also be able to point the camera at a concert sign and have the opportunity to buy tickets, or get connected to a Wi-Fi network by aiming at the router’s ID ‘setting sticker.’

    Google Lens will be incorporated into the company’s Photos and Assistant apps, but specific release dates aren’t given.

    Articles: Digital Photography Review (dpreview.com)