Blog

  • How to do Post-Processing of Focus Stacked Images

    Let me take you on a short walk through Lightroom and Photoshop. There are relatively few steps required to process focus stacked images. In a previous article (How to Photograph the Images Needed For Focus Stacking), I went through what I think you will find is the best and easiest way to take the required photographs.

    focus stacked image

    My Melbourne tea cup

    This image is acceptably in focus from the front to the back. You can only achieve this sort of large depth of field by taking, and computationally combining, several photographs. You can work through the image, taking photographs which are focused on different points, then combine those photographs with software. Photoshop does the job well, but there are also other specialized programs for doing focus stacked images. Zerene Stacker and Helicon Focus are the ones which seem to be mentioned most often.

    I hoped that the tea cup made a bright, attractive image, and gave a clear illustration. However, it is hardly a great photograph, is it? Being a little more aspirational, I have mostly used this technique to produce images of palm leaves. It would really be great if you could find your own project, your personal muse to apply this technique.

    focus stacked image

    Palm leaf

    I confess that I am not always the most patient person when it comes to processing. Every now and then, I have spent hours on one image, but I generally like to get things done quickly. However, with focus stacked images, working in Lightroom, then Photoshop, I actually rather enjoy the process. I think part of the reason for that is that I am happy with the final product, but it is also quite a pleasant, simple routine, which can be almost relaxing.

    Stage One – Lightroom

    One of the joys of photography, and computers too is that there is often more than one way of doing things. This is my approach, it is probably not the only approach, but it works well.

    Firstly, I import the RAW files into Lightroom.

    focus stacked image

    Import to Lightroom

    The images to be focus stacked

    The images below have not been processed, just converted to jpegs. I thought you should have some idea what I started with, and that it might be helpful for you to see where each individual shot was focused.

    focus stacked image

    Image #1

    The next shot was focused on the other side of the frame, on the left. In the actual situation of taking the photographs, it was easy to see which part of the leaf was furthest from the camera, and which was just a little closer.

    focus stacked image

    Image #2

    This is moving forward, with focus along the left edge of the leaf.

    focus stacked image

    Image #3

    If you are photographing a subject which has a distinct edge, like this leaf, something running from the back to the front of the object, it can be very useful. It makes focusing easier, and it gives you something which you can work along in equal increments.

    focus stacked image

    Image #4

    For the next shot, I moved to the other side of the leaf.

    You may notice that I like to be extra careful to make sure that the front part of the photograph, where the viewer’s eye will go first, is extra sharp.

    focus stacked image

    Image #5

    Three shots cover the front section at slightly different depths.

    focus stacked image

    Image #6

    Lightroom adjustments

    For these shots, I knew what my goal is for the final image. To that end, I did a modest amount of processing, using only the Basic panel in Lightroom. I certainly would not do anything like lens corrections, or transformations, or local adjustments – nothing beyond the basics, only global adjustments. The real work is going to be done by Photoshop, and we should give it the best possible chance to do its job.

    It might be leaves, your favorite possessions, or even be a landscape (I would love to try and make a focus stacked portrait, a tight portrait with focus from front to back) the point is that your project will require your own individual processing. This is what I did for the highly-textured leaves.

    focus stacked image

    Lightroom settings

    This processing revealed a few details and gave the images a little more bite or edge. That seemed to work well, and move towards what I had in mind for the final image. I then synchronized all settings in Lightroom.

    focus stacked image

    So far so good?

    With all the images selected, in this case just six, press G and then CTRL/CMD + A. You can then move to the second stage, by going to Photo > Edit in > Open as layers in Photoshop.

    focus stacked

    Select Photo > Edit In > Open as Layers in Photoshop

    Stage Two – Photoshop

    You may well have Photoshop set up in your own individual way. This is what you should see in the Layers panel once your images are opened.

    focus stacked image

    The first step in Photoshop is to select all the layers. My habit is to do this by clicking on the top layer, holding down shift and clicking on the bottom layer.

    focus stacked image - layers selected

    All layers, all six images, selected.

    Another confession? There is a part of me which would like to make this sound much more difficult, at least a little bit cleverer. There would then be more chance of you being impressed. However, the next two steps are too easy.

    Align the images

    Because the point of focus has moved through the image, the size of the object in the frame will have shifted slightly. But, Photoshop can handle this for you.

    focus stacked image

    Edit > Auto-Align Layers has always worked perfectly for me.

    You could choose to go to great lengths to resize the images by hand, making the actual object the same size in each image, being careful to align parts of the subject in each of the photographs. I have never found it necessary, and any extra steps to achieve alignment, would probably be best covered by a video. For the moment, I am happy that Photoshop has never let me down using Auto-Align Layers.

    focus stacked image - auto-align layers

    The auto-align layers dialog box

    Under the Projection area, I have found that Auto works perfectly well.

    For the Lens Correction section, I have found it best to uncheck Vignette Removal and Geometric Distortion (as shown above). Those choices gave me a couple of strange results and did not provide any discernible benefit. I like to think that the secret for this smooth progress is having taken good images in the first place. Push OK, and Photoshop does its thing and does it very well.

    Of course, you are welcome to try whatever settings you like. In fact, I would very much encourage you to experiment, have a play! However, the old KIS acronym, of Keeping It Simple, seems to work well enough.

    Blend the layers

    Next, go to Edit > Auto-Blend Layers. I do wish I could make this sound more difficult.

    focus stacked image

    Auto-Blend Layers…

    As I am sure you will realize, you should choose the Stack Images option in the Auto-Blend Layer dialog box that pops up. With the images I have been feeding to Photoshop, I have chosen to put a check mark next to Seamless Tones and Colors.

    But, if that does not produce a result you are happy with, it costs you very little time to experiment. This is what has worked well for me. The images which you have loaded into Photoshop may have been created in different circumstances to mine, and your desired final image may be very different too. The important thing is that the main steps will be the same.

    focus stacked image

    Auto-Blend Layers dialog box.

    Below, you can see the layer masks which Photoshop has created. On a layer mask white reveals, so the white areas are where Photoshop has determined that the focus is good. The white areas are the parts that are allowed to come through and contribute to the final image. In this example, looking at the masking of the layers, you can see the focus stepping forward.

    focus stacked image

    I think the masks are quite interesting, pretty even.

    Merge layers

    Finally, right click on any layer and choose either of the Merge commands.

    focus stacked image

    Merge the layers.

    What you see now, in your main Photoshop window, is your single, focus stacked image.

    focus stacked image

    Final focus stacked image result!

    You might see the marching ants indicating a selection by Photoshop of part of the image. My advice is simple. It seems random in its placement, I have never found it helpful, so just ignore it.

    When closing the image in Photoshop, simply click save, and you will find a file added to your Lightroom library. In this example, where there were six files to start with, there are now seven (the new focus stacked image has been added).

    This extra file will be in TIFF or PSD format (whatever you have setup in your LR preferences).

    That is just about it. Stages Two and Three, fulfill our initial brief. You have produced a focus stacked image. All that remains is to export the image from Lightroom.

    However, I think you might find it a little unsatisfactory to leave the process at that point, to walk away with the job not completely finished. I think you might want to see what happened next.

    Stage three – final processing

    I chose to so some further processing to the TIFF file in Lightroom. Using the Adjustment brush I added some positive clarity, +20, on to the top section of the image. By pushing the ‘O’ key, you can see the red mask where painting has been applied.

    focus stacked image - location adjustments

    The red area is where a local adjustment has been applied of +20 Clarity.

    I added a graduated filter with the exposure pulled down 2 stops to the left side of the image.

    focus stacked image

    A Graduated filter of -2 Exposure was added to the left side of the image.

    Another was added to the bottom too, as I really like the black to be unquestionably pure black.

    focus stacked image

    Another Graduated filter with -2 Exposure was added to the bottom of the image.

    I then took that image back into Photoshop, where I used the bucket to fill some more bits of black around the bottom left corner of the leaf.

    Then I spot retouched some bits of nature which were a bit too real. In particular, I think any white spots are very distracting. Then I turned to one of my long-term favorites, Nik’s Silver Efex Pro.

    focus stacked image

    Sadly, it seems likely that Google is going down the route which it has gone down many times before. Having purchased the German company Nik Software a few years back, it seems it is now allowing the software to die through lack of attention. However, I still like the results I get from Silver Efex Pro and still use it. In this case, I applied the High Structure – Smooth preset.

    I then cropped the into a square. The final result is below.

    focus stacked image

    Final focus stacked image.

    Conclusion

    I hope the first article helped you take photographs for focus stacking and this one helps you with the processing. Most of all, I hope that you might have a go at this. I hope you do not mind me repeating the same point, it would be great if you could find your own project and apply these techniques. For me, that is a major reason to write these articles.

    Please share your questions, comments and focus stacked images in the section below.

    The post How to do Post-Processing of Focus Stacked Images by Richard Messsenger appeared first on Digital Photography School.


    Digital Photography School

  • Electronic shutter, rolling shutter and flash: what you need to know

    The rolling shutter effect is usually seen as a damaging defect but even this can be used creatively, with enough imagination.
    Photo by Jim Kasson, Fujifilm GFX 50S

    Click! goes the camera and in that fraction of a second the shutter races to end the exposure. But, although it’s quick, that process isn’t instantaneous. Whether you’re syncing a flash, wondering why banding is appearing in your image or deciding whether to use your camera’s silent shutter mode, the way your shutter works has a role to play. This article looks at the different types of shutter and what effect they have.

    At their most basic, cameras capture light that represents a fragment of time, so it shouldn’t be surprising that the mechanism that defines this period of time can play a role in the final outcome. It’s not nearly as significant as the exposure duration (usually known as shutter speed or time value), or the size of the aperture but, despite great effort and ingenuity being expended on minimizing it, the shutter behavior has an effect.

    Mechanical Shutters

    There are two main mechanical shutter technologies: focal plane curtain shutters and leaf shutters. The majority of large sensor cameras and nearly all ILCs use focal plane shutters while the majority of compacts use leaf shutters.

    Focal plain shutters

    Focal plan curtain shutters are what you probably think of when you think about shutters. At the start of the exposure a series of horizontal blades rises like a Venetian blind and, to end the exposure, a second series of blades rises up to cover the sensor again.

    The first curtain lifts to start the exposure, then a second curtain ends the exposure. The shutter’s movement is shown as the blue lines on the graph. The time taken to open and close the curtains (red) is defined by the shutter rate, the exposure time is shown in green. 

    These blades move quickly but not instantly. We’ll call the amount of time it takes the shutter to move across the sensor the shutter rate. This is not the same thing as shutter speed, which is the amount of time that elapses between the bottom of the first curtain lifting and the top of the second curtain passing that same point.

    Leaf shutters

    Leaf shutters work slightly differently. These are built into the lens, right next to the aperture, and usually feature a series of blades that open out from the center, then snap shut again to end the exposure. Because each blade doesn’t have to travel so far, these shutter rate can be much faster.

    Leaf shutter still take a small amount time to open and close but they’re very fast. And, because they’re mounted so close to the aperture, they progressively increase or decrease illumination to the whole sensor, so there’s no difference between the slice of time seen by the top and bottom of the sensor.

    However, since the same blades that start the exposure also end it, the maximum possible shutter speed is more closely linked to the shutter rate (because you can’t end the exposure until the shutter is fully open).

    In addition, the distance the shutter blades need to travel depends on the aperture you’re shooting at (on some cameras, the shutter acts as the aperture). Consequently, it’s not unusual to encounter cameras that can’t offer their maximum shutter speed at their widest aperture value.

    Electronic shutter

    But why do we need mechanical shutters at all? Unlike film, digital sensors can be switched on and off. This reduces the number of moving parts (which both lowers cost and obviates the risk of shutter shock) and means you get a totally silent exposure, so why not use that?

    The answer is that you can. However, there is a restriction: while you can start the exposure to the whole sensor simultaneously, you can’t end it for the whole sensor at the same time. This is because with CMOS sensors, you end the exposure by reading-out the sensor but, in most designs, this is has to be done one row after another. This means it takes a while to end the exposure.

    Fully electronic shutter

    This need to read out one row at a time has a knock-on effect: if you have to end your exposure one row at a time, then you have to start the exposure in a similarly staggered manner (otherwise the last row of your sensor would get more exposure than the first).

    Electronic shutter tend to be comparatively slow in terms of shutter rate (red), leading to rolling shutter (note that exposure for the top of the sensor has already finished even before the bottom of the sensor has started. This is despite the use of a faster shutter speed (green)

    This means that your shutter rate is determined by your sensor’s readout speed. Lower pixel count sensors have an advantage in terms of readout: they have fewer rows and each of those rows has fewer pixels in it, both meaning they can be read out faster.

    Smaller sensors also have an advantage in this respect: less physical distance to travel means rows can be read-out quicker. This is why we saw 4K video in smartphones, then compacts, then larger sensor cameras and why cameras such as the Canon EOS 5D IV struggle with rolling shutter, even when only using the central region of their sensor. However, newer sensor designs are constantly striving to reduce the read-out time (and consequently increase the shutter rate).

    Note from the diagram that even an exaggeratedly slow shutter rate doesn’t stop you using fast shutter speeds. In fact, the beginning and end of the exposure can be controlled very precisely, allowing super-high shutter speeds.

    However, although each part of the image is only made up from, say, 1/16,000th of a second, the slow shutter rate means each part of the image is made up from different 16,000ths of a second. Essentially, you’re capturing the very short slices of time that your shutter speed dictates, but you’re capturing many different slices of time. And, if your camera or subject have moved during that time then that distinction becomes apparent. This effect, where the final image is made up from different slices of time as you scan down it is known as the ‘rolling shutter’ effect.

    The same thing happens with any shutter that isn’t immediate, which includes focal plane mechanical shutters. However, these tend to be fast enough that the rolling shutter effect isn’t usually noticeable.

    Electronic first curtain

    Electronic first curtain shutter is an increasingly common way for cameras to work. As the name suggests, these work by using the fast mechanical shutter to end the exposure and then syncing the start of the electronic shutter to match its rate.

    An electronic first curtain shutter avoids the risk of shake from the first curtain’s movement but avoids the downsides of fully electronic shutter.

    This requires a mechanical shutter where the second curtain and be operated independently of the first curtain. But, in those circumstances, you get many of the anti-shock benefits of electronic shutter while retaining the speed benefits of a mechanical shutter.

    Global electronic shutter

    Sensors do exist that can read-out all their rows of pixels simultaneously to give what’s called a ‘global shutter.’ However, while these are great for video, the more complex technologies used to achieve this add both noise and cost. The added sensor noise limits dynamic range, so they are not yet common for those video or stills applications where image quality is critical. 

    Find out about flash sync and working under artificial lights

    Articles: Digital Photography Review (dpreview.com)

  • 4 Tips for Capturing Beautiful Seascapes

    Seascape photography can be both incredibly rewarding and incredibly frustrating at the same time. The entire process of photographing seascapes is slightly different than regular landscape photography and there are a few extra factors you need to keep in mind.

    4 Things to Know Before Capturing Beautiful Seascapes

    Coming from inland Norway it wasn’t until I moved to Northern Spain that I really got a taste of photographing seascapes. It took a while for me to adapt and feel comfortable with waves crashing around me (I know those who come from coastal towns might be laughing now!) However, after living along that coast for nearly a year, and revisiting several times since, I’ve picked up several tips and tricks that can make a huge difference in your seascape photography.

    #1 – Know the Tides

    Understanding how the tides will impact the location you’re photographing is most likely the most important factor of capturing beautiful seascapes.

    I remember the first time I visited Playa de Barrika, a stunning beach outside of Bilbao in Spain, I didn’t take one single image. It was a warm and beautiful day but the beach looked nothing like what I had expected. In fact, there wasn’t much of a beach at all. Since the tide was high, the waves went almost up to the cliffs, leaving only a thin strip of beach left. In my defence, the main purpose of this trip wasn’t photography but I had hoped to at least see what all the fuss about this place was about.

    Tips for Seascape Photography

    Playa de Barrika during low tide.

    A few weeks later, I revisited the beach and this time I made sure that the sunset was during medium to low tide, which is ideal for this location. What met me was a completely different beach which was nothing but spectacular.

    Anyway, what I’m saying is that you need to familiarize yourself with the beach you’re visiting and learn what tide is optimal to photograph that spot. Some places are interesting during high tide only while others offer opportunities regardless of the tide. Just make sure that you’re aware of this so you don’t miss out on a potentially great image.

    Rising tide at Los Urros, Spain

    How to Research the Tides

    There are several methods to research and learn about the tides but I prefer to do this via a website such as Tides4Fishing or Tide Forecast. What I like about these pages is that you’re able to see the tides for a long period into the future, making it possible to plan trips that are months ahead.

    Even though I prefer to research the tides from my computer or on a web browser, smartphone applications such as My Tide Time will also do a great job.

    #2 – Accessories for Seascape Photography

    We can’t avoid talking a little about accessories, can we?

    Quite honestly, the accessories I recommend for seascape photography is more or less the same as the ones I recommend for landscape photography in general. The requirements are pretty similar even though the conditions by the coast might require a heavier use of cleaning products!

    Lens Wipes

    If you don’t already have a couple lens cloths and pre-moisturized wipes in your camera bag I strongly recommend you get some right away. These cheap and small tools are essential in keeping your lens clean and free for unnecessary dust spots.

    4 Things to Know Before Capturing Beautiful Seascapes

    Zeiss lens cleaning wipes.

    Pre-moisturized wipes are even more important for seascape photography. If there’s a little wind, or you’re standing close to the waves, it’s quite likely that salt will gather on the front of your lens or filters. By having a pre-moisturized wipe and a microfibre cloth nearby you can easily remove this dirt from the lens and continue to take smudge-free images. This will also save a lot of time in post-processing.

    Filters

    Filters aren’t an essential part of seascape photography but they do have an even greater impact than they do when photographing motionless landscapes. A slight increase in the shutter speed can benefit the image a lot, but we’ll come back to this in a few minutes.

    4 Things to Know Before Capturing Beautiful Seascapes

    There are many filters to choose between but if you are just getting started with photography I recommend starting with a Circular Polarizer, a medium strength ND Filter, and a Soft Graduated ND Filter. This combination is all you’ll need in most scenarios and will be a great start to capturing beautiful seascapes.

    Keep in mind that the use of a slow shutter speed also requires the use of a tripod!

    A Remote Shutter

    When you’re working with shutter speeds of approximately 0.5 seconds you’ll want to use a remote shutter to avoid camera shake. This doesn’t need to be an expensive accessory; a cheap remote shutter from Best Buy will do the job.

    A remote shutter can also be useful when your tripod is placed close to the water and you don’t want to get wet. You can stand on a rock next to the camera and take pictures exactly when the waves look the best. Just take care of your camera and watch out for big waves. You don’t want the tripod to fall over!

    #3 – Choosing the Perspective

    The perspective often plays a great role in an image’s composition regardless of what you’re photographing. But when working with seascapes and the water’s motion, I’ve found it to be even more impactful.

    Changing from a high to low perspective can make a great difference to the image, especially the depth. When photographing with a low perspective you’ll get the sensation that the waves are actually surrounding you. In addition, you can benefit from the leading lines that the waves create, which also will greatly benefit your composition.

    4 Things to Know Before Capturing Beautiful Seascapes

    On the other hand, using a higher perspective, or even an overview of the beach, can impact the image in a completely different way. You might not feel like your standing in the water but you get a better look at the beach and its surroundings. Some of my favorite images of beaches are taken from above rather than at sea level.

    #4 – Choosing the Right Shutter Speed

    The last factor you should keep in mind when photographing seascapes is the choice of shutter speed. Since I first began photographing with filters I’ve been fascinated by how great an impact a slight adjustment can have.

    4 Things to Know Before Capturing Beautiful Seascapes

    There are no right or wrong choices for shutter speed. It depends on your preference and what you wish to convey through that specific image. However, I’ll share some of my thoughts about this topic:

    When photographing close to the water, with waves rolling in and leaving trails as they go back out, I prefer to use a shutter speed of approximately 1/2 second. I’ve found this to be the spot where I capture both the textures of the waves but still get the nice lines as the waves recede.

    As I adjust to a higher perspective I tend to slow down the shutter speed more (longer exposures). Exactly how much depends on the specific scene, but normally I use an exposure between 5-30 seconds.

    Again, that’s just my preferences and even I don’t follow them strictly. The best way of finding what you enjoy is to explore with different shutter speeds. If you want to learn more about the use of slow shutter speeds I’ve shared everything I know about the topic in The Ultimate Guide to Long Exposure Photography.

    The post 4 Tips for Capturing Beautiful Seascapes by Christian Hoiberg appeared first on Digital Photography School.


    Digital Photography School

  • Side by Side Drone Comparison – DJI Mavic Pro Versus the Phantom Pro 4

    Drones are becoming more and more popular and there is more competition on the market now. Phantom isn’t the only game in town anymore. But does the DJI Mavic match up?

    DJI Mavic Pro Versus the Phantom Pro 4 – Drone Comparison

    In this video, Colin Smith from PhotoshopCAFE shows you footage from each drone and a summary of his points. Each has their pros and cons, and ultimately it comes down to your needs.

    Do you have a drone? Which one? What was the deciding factor for you in choosing yours?

    Shop for the DJI Mavic Pro or the Phantom 4 Pro on Amazon.com.

    The post Side by Side Drone Comparison – DJI Mavic Pro Versus the Phantom Pro 4 by Darlene Hildebrandt appeared first on Digital Photography School.


    Digital Photography School

  • How to Create a Beautiful Bokeh Background

    Have you ever thought that a sheet of aluminium foil can be used as a backdrop in order to create stunning bokeh effect? Before we start talking about El Bokeh Wall and how it can be achieved, let us first get to know what exactly the term bokeh means.

    Assuming that you may not be aware, bokeh is a term which comes from a Japanese word “boke”, which means blur. You can capture a photo with the blur effect, which makes the background out of focus by shooting at smaller aperture values (larger openings) such as f/1.8 or f/1.4.

    Bokeh background or El Bokeh Wall

    El Bokeh Wall is basically a technique in which you can capture a photo with the backdrop full of bokeh, which makes your photo eye-catching.

    El bokeh background wall 01

    Things required to prepare El Bokeh Wall:

    • An sheet of aluminium foil
    • A fast lens, an a maximum aperture of at least f/2.8 or larger
    • At least two speedlights or studio lights
    • A sheet of colored gel

    Step 1

    El bokeh wall - bokeh background

    Take a sheet of aluminium foil long enough to fully cover the background in your frame. Now crumple the foil sheet gently and make a ball out of it, but do not press it too hard.

    El bokeh wall - bokeh background

    Step 2

    Now open the foil ball that you just made and in doing so, make sure that you do not remove the crumples. These crumples on the aluminium foil sheet will be used to create the bokeh effect.

    Simply lay the sheet on a flat surface and move your hand gently over it, without removing the wrinkles formed on the foil sheet.

    El bokeh wall - bokeh background

    Step 3

    Once you have flattened the aluminium foil sheet, put it on the wall or hang it in such a manner that it fills the frame. Make sure that the crumples are evenly distributed and the sheet fills your entire frame in order to capture perfect results.

    Step 4

    Now place your subject in such a position that there is a gap of at least 2-3 feet between the foil sheet and the subject. This will allow you to capture shallow depth of field and make the background out of focus. In order to create a bokeh effect you need to allow some distance between the subject and the background.

    Step 5

    The last step is where you light up your subject and the foil sheet in order to create a well-lit photo. Start with lighting the aluminium foil sheet, you can either use a flash, studio light or even a table lamp. In order to make the bokeh appear colorful, you can place a colored gel in front of the light source.

    El bokeh wall - bokeh background

    Now light up the subject as per your desire. Make sure that the light source being used on the subject does not spill too much on the background which can make your background appear overexposed. This is another reason why you should maintain some distance from the background.

    Some tips before you start clicking

    Once you have positioned your subject and set up the lighting, take out your camera and start clicking. But before that, keep these tips in mind in order to capture a photo full of beautiful bokeh.

    El bokeh wall - bokeh background

    Try using a lens which allows you to shoot at low aperture value such as f/2.8 or f/1.8. The smaller the aperture value, the more bokeh effect you can achieve.

    Use a telephoto lens with focal length of 50mm or more in order to get shallow depth of field and you will need a smaller foil sheet as well.

    Using flash or studio lights will give you better control over the light and you can capture much better-quality results. On the other hand, if you are using a table lamp or a bulb, you might have to bump up the ISO sensitivity which will introduce noise.

    Conclusion

    This is an easy technique to create some stunning bokeh-licious images. Please share your questions, comments and bokeh background images in the section below.

    The post How to Create a Beautiful Bokeh Background by Kunal Malhotra appeared first on Digital Photography School.


    Digital Photography School

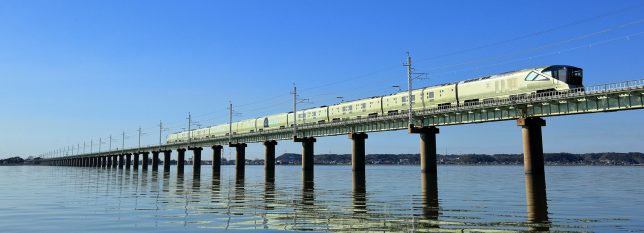
  • Ferrari Designer Launches World’s Most Luxurious Sleeper Train in Japan

    [ By WebUrbanist in Technology & Vehicles & Mods. ]

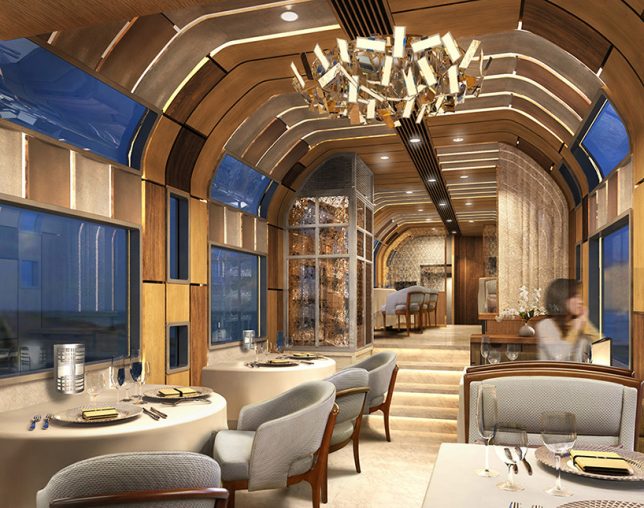
    Public transit meets luxury transport in this elegant and open train design with rich interiors as well as copious windows for viewing the passing landscape.

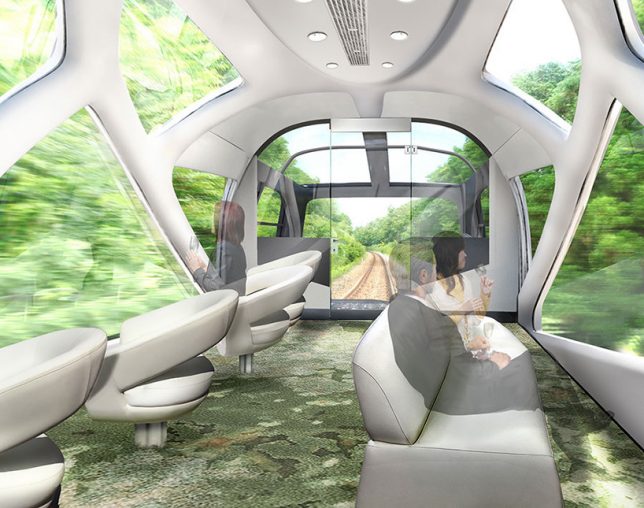
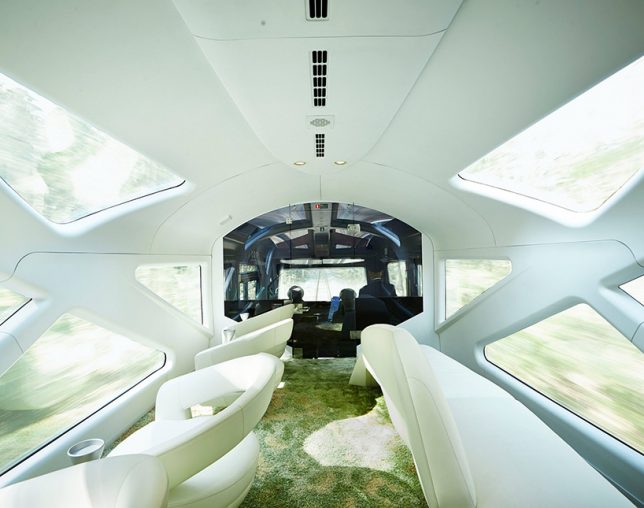
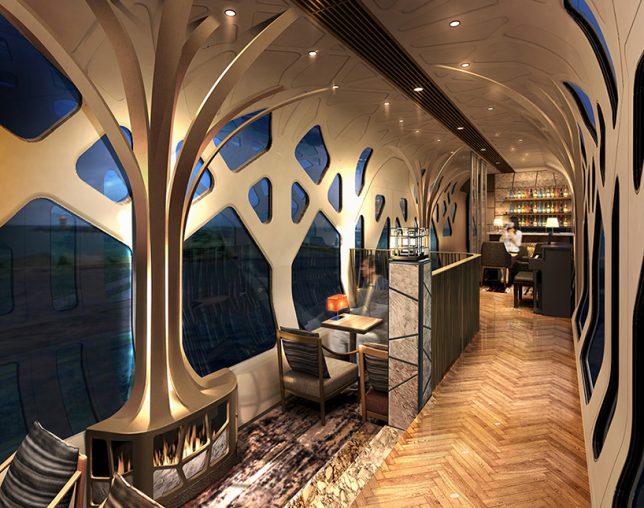
    The champagne-colored Shiki-Shima sleeper boasts aesthetics by Ken Kiyoyuki Okuyama, the automotive designer behind the Ferrari Enzo as well as Maserati Quattroporte. Inside, branching window frames are meant to conjure images of tree-lined forests.

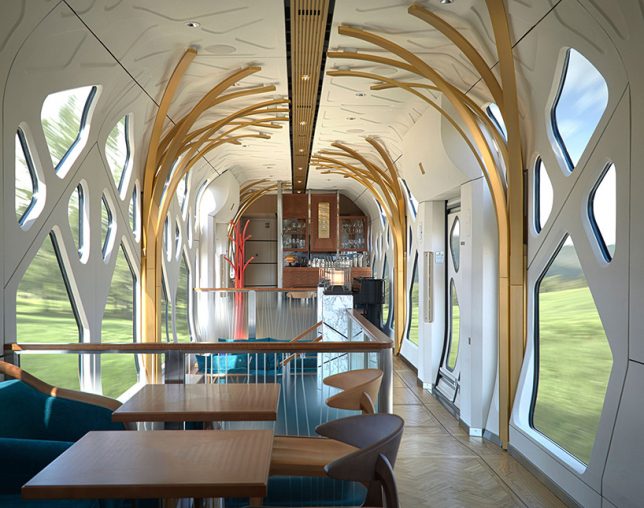
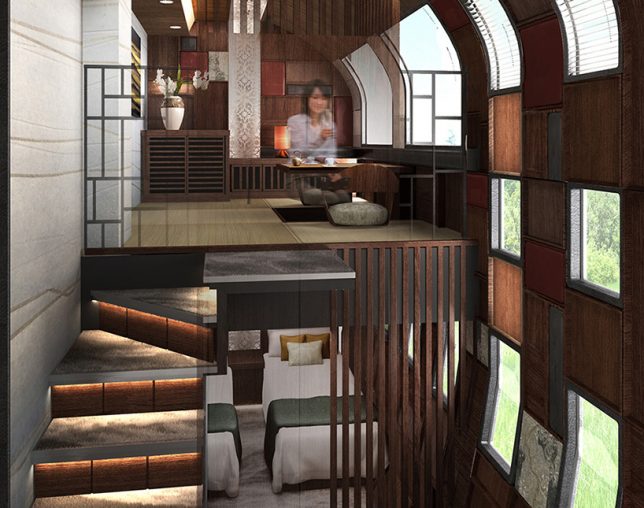
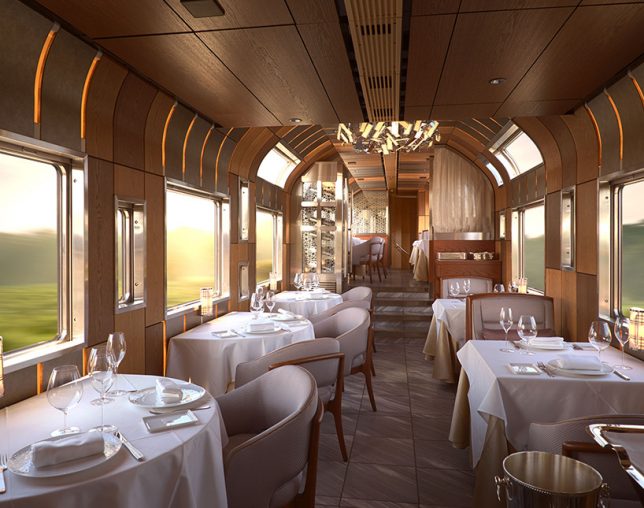
    Window geometries on the exterior reflect the different needs of interior spaces, from lovely common rooms and fancy dinner cars to split-level sleeping compartments.

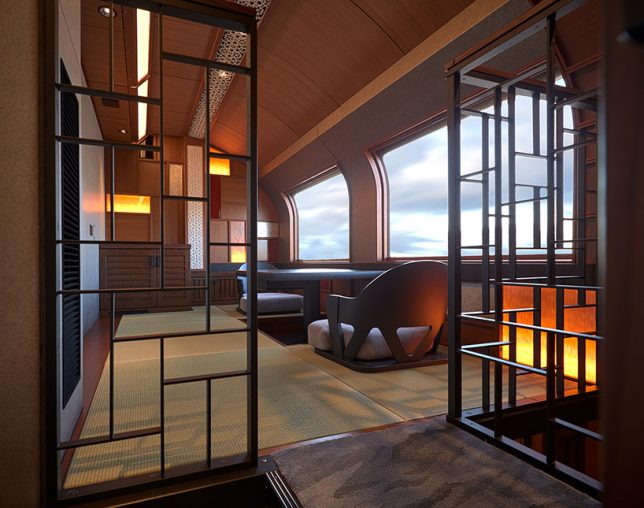
    The design is also distinctly Japanese, featuring traditional wood, paper and lacquer interiors with tatami mats and artistic techniques developed over centuries of history.

    and brings the elegant physique of a supercar to public transport. with dome cars, large geometric windows and a plush sofas, a trip on the rain suite shiki-shima is comparable to a luxury cruise.

    “Okuyama nods to japanese artisanal crafts with his use of bentwood—made by curving wood with steam—to frame the sofas and seating. Meanwhile, oriental carpet mills takes car of the design under foot, using their signature ornate carpets that can already be found in the Vatican palace and Kyoto state guest house. The train consists of 17 rooms in total, with two large suite rooms and 15 smaller ones. JR east, the rail operator behind the luxury masterpiece, seeks to provide ‘a high-grade space’ that is currently unseen in existing railway journeys.”

    Share on Facebook


    [ By WebUrbanist in Technology & Vehicles & Mods. ]

    [ WebUrbanist | Archives | Galleries | Privacy | TOS ]


    WebUrbanist

  • Fading To Black: 13 Abandoned TV Repair Shops

    [ By Steve in Abandoned Places & Architecture. ]

    TV repair shops, once fixtures of our tuned-in society, have faded away as televisions became more reliable and the broadcast medium itself lost its relevance.

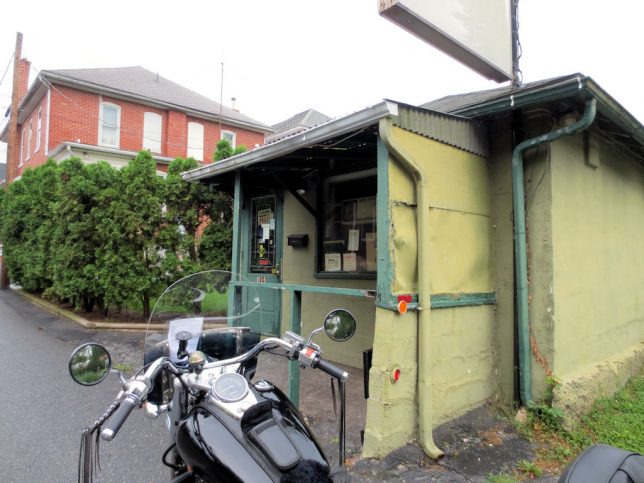
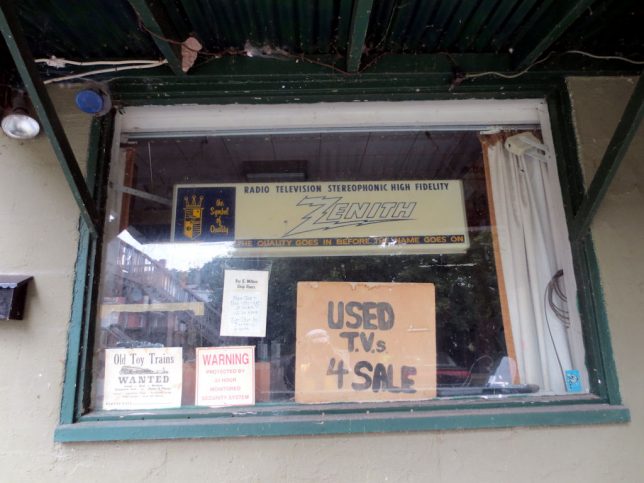
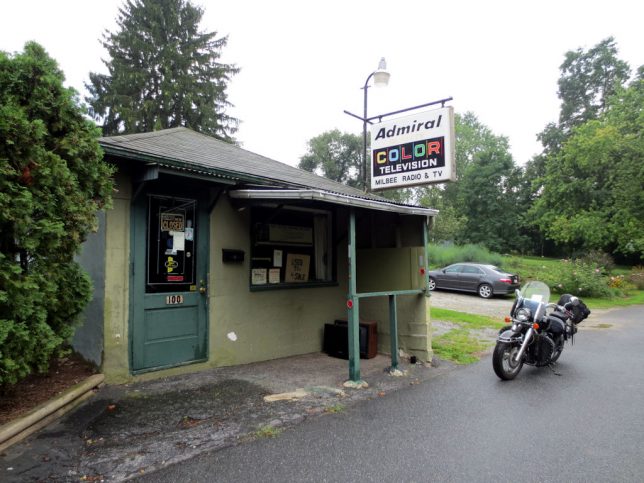
    Take Milbee Radio & TV, a tiny TV repair shop supposedly operating out of Elizabethtown, PA. We say “supposedly” because neither Flickr user Katie Burkey (StarPhotographs) nor Wendyvee of RoadsideWonders have been able to find anyone actually working there – “I think this shop might be abandoned, but I never knew for sure,” stated Burkey in March of 2011.

    Aside from the minuscule size of the shop (and its queasy two-tone green paint job), the gloriously retro sign tells a story all on its own. Does anyone remember brand names like Admiral, Zenith, Philco and Quasar? How long since the word “RADIO” on a sign attracted customers? Last but not least, “COLOR” television was once a feature worthy of note.

    Don’t Give A Hoot

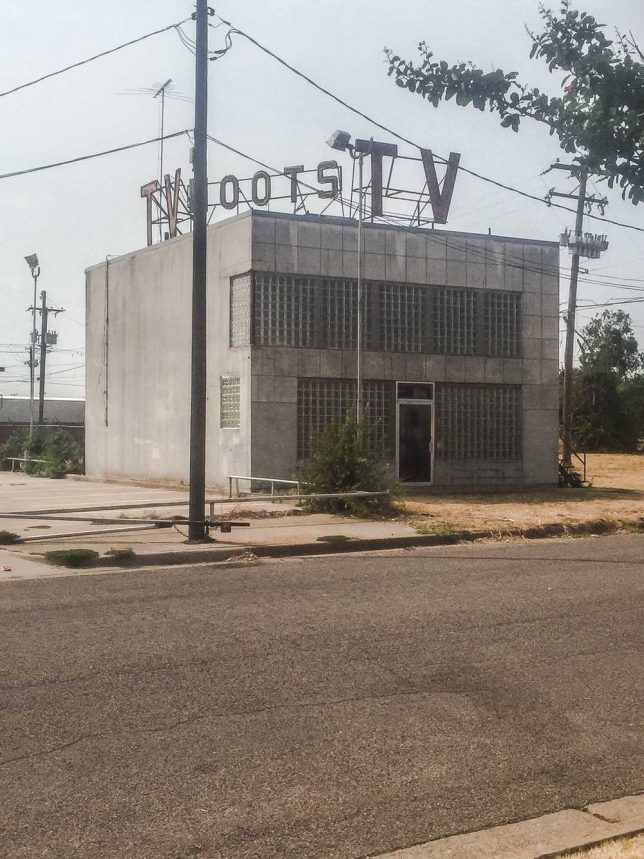
    The latest entry in the Anti-Zombie Fortress sweepstakes is the former Hoots TV Service on Highway 80 West, Fort Worth, Texas. According to Joan Carroll, the glass block-enhanced blockhouse dates from 1964 and was the third (and final) location of Hoots TV.

    Screen Thy Last Screen

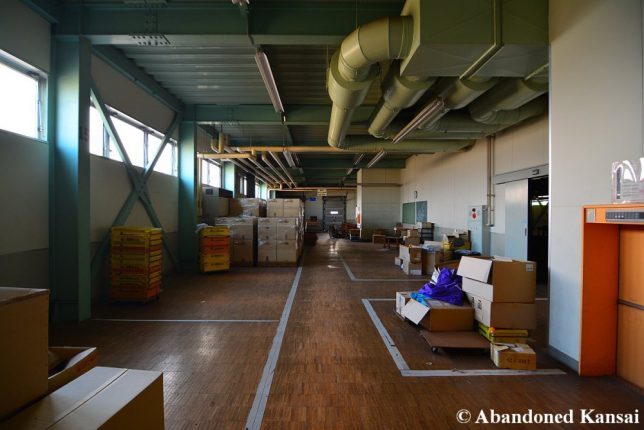
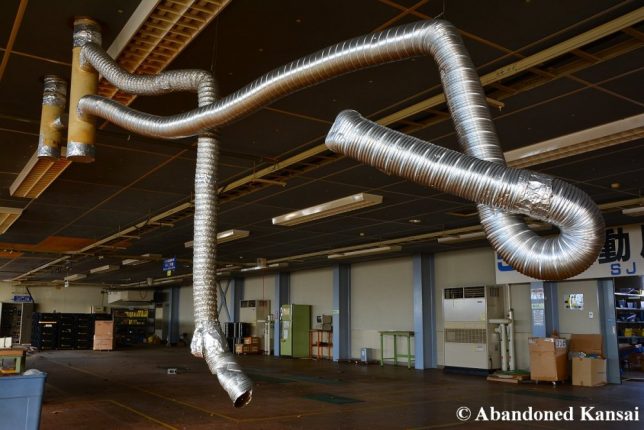
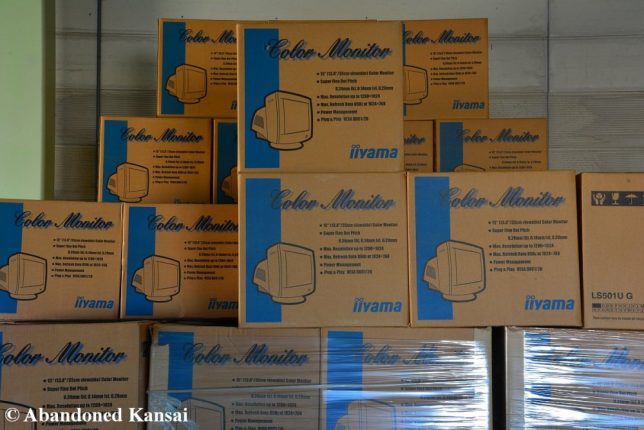
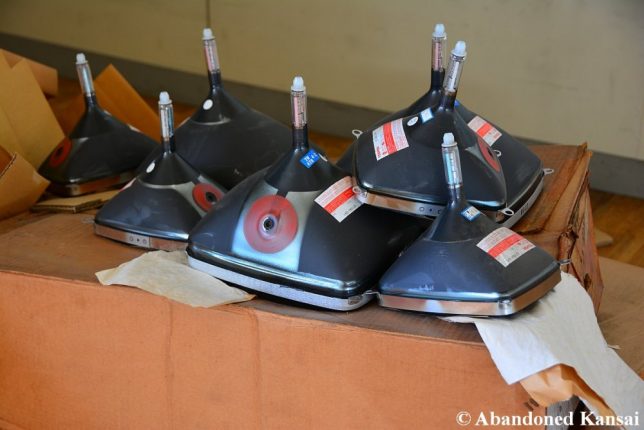
    This Japanese TV and monitor repair, assembly and distribution center seems to have soldiered on until 2008, according to calendars found within by Florian and friends from the Abandoned Kansai urbex blog.

    Like many Japanese abandonments, the business appears to have been closed in a hurry with much equipment and stock left in place and on shelves. Towards the end, the business serviced Sega arcade machines and monochrome computer monitors but couldn’t afford to retool when ponderous CRT screens gave way to flat-screen LCD and TFT-LCD displays.

    Bad Dreams

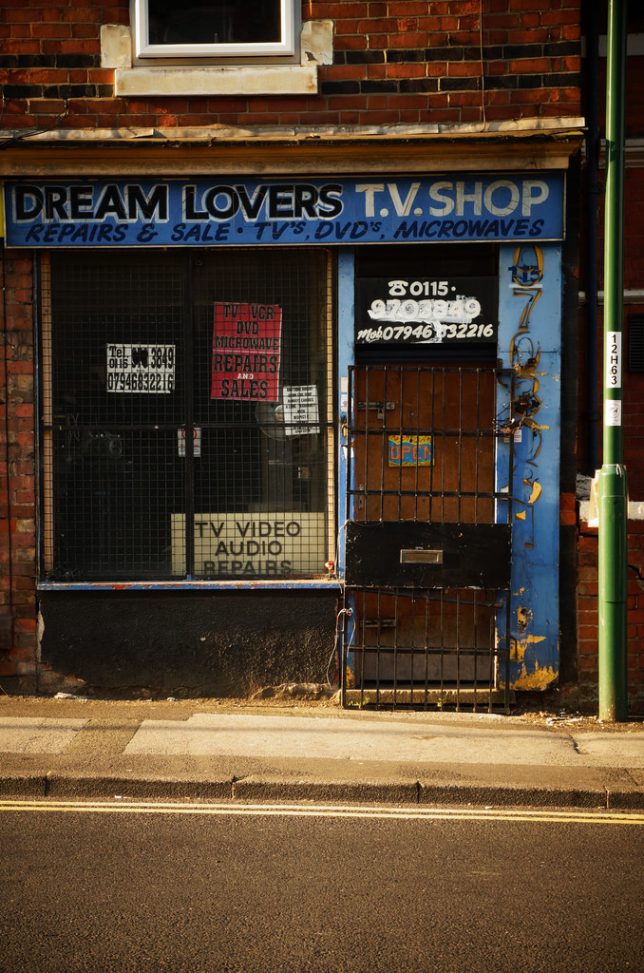
    Odd that microwave ovens were once categorized as electronic devices instead of kitchen appliances but hey, those were the days! Dream Lovers T.V. Shop (why the periods between T and V?) once sold and serviced televisions – and presumably microwaves – from this gritty shop in Nottingham, UK. Flickr user Rust Never Sleeps captured the shop’s well-aged storefront in late July of 2014.

    Rough In The Dimond

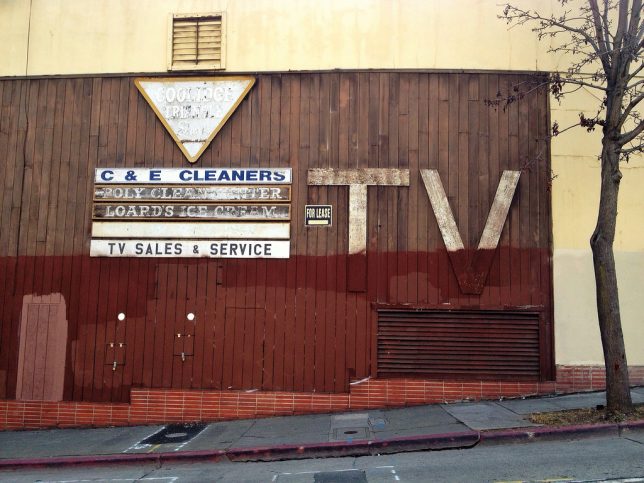
    This ultra-rustic TV Sales & Service shop languishes unlamented in the cold heart of East Oakland’s Dimond (pronounced “diamond”) district. Flickr user Billy (misterbigidea) snapped the shop’s weary weathered facade in late January of 2014.

    Next Page – Click Below to Read More:
    Fading To Black 13 Abandoned Tv Repair Shops

    Share on Facebook


    [ By Steve in Abandoned Places & Architecture. ]

    [ WebUrbanist | Archives | Galleries | Privacy | TOS ]


    WebUrbanist

  • ‘It’s about being prepared for whatever is thrown at you’: Q & A with William Vazquez

    NYC based photographer William Vazquez on one of his earlier assignments.

    New York City based photographer William Vazquez, travels about 30-50% of the year. From Cuba to the mountains of Nepal, Vazquez has worked in more than 54 countries on more than five continents, often arriving first on the scene of a humanitarian crisis to document recovery operations for NGO’s and the companies that provide support to the areas affected by natural disasters.

    While his documentary humanitarian work may be the most dramatic in context, Vazquez’s portraiture brings us closer to other cultures, whether it’s a flamenco dancer outfitted in a brilliantly colored red dress in Cuba or a black and white portrait of a woman cloaked in a burka in a clinic Afghanistan captured with a Speed Graphic on Type 55 Polaroid film.

    You may find him trekking in the mountains of Nepal, wandering the streets of Cuba, or watching a baby being born after a devastating a typhoon in the Philippines. But, no matter where he is, Vazquez’s images bring life to the stories of the people and places he’s been.

    You can see more of Vazquez’s work at his website and on Instagram.

    How did you get your start in photography?

    Vazquez’s warm personality and genuine interest in people elicits wonderful reactions in the portraits he makes around the world, including the photo of this woman in rural India.

    Photography started as a hobby when I was a teenager. My first camera was a used Rollei 35 S, which I still have. But I had never considered photography a profession and didn’t know anything about professional photography until 1985 when I met a New York City based still life photographer named Jeff Glancz. He hired me one Christmas season to deliver gifts to his clients. At the time, I was studying electrical engineering at New York Institute of Technology but when Jeff started calling me to assist him on jobs at his NYC studio, I would cut class to work for him.

    Summer break came, and he was looking for a full-time assistant. I agreed to work the summer and then go back to school when fall came around. But I never went back. I had found my calling: shooting 4×5, processing black and white film, and printing. This is where I wanted to be. I worked for Jeff for about a year when he told me I need to finish my education. I got a scholarship to Parsons (School of Design in NYC) in1986 and returned to school.

    During and after Parsons I worked for a wide range of photographers in advertising, catalog, fashion, location, portrait and travel. I did it all, and travelled the world on assisting gigs. I learned things during this time that I still use in my work. It was an amazing experience! I learned how people worked business wise as well as photographically. I think that assisting pros is where I got my real education in photography.

    I assisted for about 5 years with a 3-year transition period. Then my first big job came in. I did the 1995 Pfizer annual report. It was a global book with locations spanning the globe including Milan, London, Johannesburg, Sao Paulo, Hong Kong, Tokyo and a number of locations in the U.S.

    When I first started as a pro, I did product photography for magazines like Martha Stewart Living, This Old House, GQ, and others. After a while I realized that I was not cut out for product photography. I am too impatient, and I liked being out of the studio. So I started doing more portraiture, and chasing down portraiture work.

    Tell us about your current work.

    The circle of life continues with the birth of babies despite the devastation of Typhoon Haiyan in the Philippines.

    Right now my work is a blend of commercial, and humanitarian projects. I create photo libraries for my corporate clients such as Abbott, Pfizer, and Samsung, just to name a few. These assignments can be anything from lifestyle, portraits or industrial shoots. For example, one day I might be making pictures to illustrate middle class lifestyle in India; another day, I’ll photograph people working in a production plant.

    An important part of my work is photography that illustrates CSR (Corporate Social Responsibility) efforts of large corporations around the world. This is how I got started in humanitarian work. Companies want to document the support they give to NGO’s (Non-Governmental Organizations) so they hire me to work with these non-profit groups. Once I connect with the NGO, we develop a relationship, which allows me to work for them directly.

    ‘It’s tough work… But that’s just a minor inconvenience compared to what the people who lived through the disaster have endured.’

    The work I do for organizations like Americares, Direct Relief, and Project Hope, for example, varies from in-depth still or video stories on their humanitarian projects or documenting emergency relief operations such as those after Typhoon Haiyan in the Philippines, or the earthquake in Nepal. When documenting relief operations, I’ll fly in with the first people on the ground. It’s tough work—rough sleeping, bathing out of a bucket, low quality food, no electricity, etc. But that’s just a minor inconvenience compared to what the people who lived through the disaster have endured.

    I also work with much smaller organizations as personal projects. These small organizations need quality images and video in order to help with fundraising, so it’s a good thing to do. Sometimes my expenses are paid or I tack it on to a paid project in the same country or close by. It’s one of my ways of giving back.

    What equipment do you usually bring with you? Any tips for traveling overseas?

    On his way to the day’s location in rural Shirdi India, this young man swinging from the vines of a banyan tree caught Vazquez’s eye. Captured with a Sony a7R II and a 24-70mm F4 lens.

    If I have to just do still photos, and I don’t have to be dragging my gear through a jungle, I bring my Canon 5D Mark III with a variety of lenses, and accessories. I like working with the Canon 5D Mark III – it’s responsive and tough.

    If I have to keep a low profile or do a combo of stills and video, I use my Sony A7R with a variety of lenses. The Sonys are great for keeping a low profile – they are small, lightweight, and less obtrusive. People get relaxed faster when you don’t have a huge machine with you. I also like the Sony a7S and the Sony a7R II for video because of the features and the dedicated accessories that help make the process easier for a one-man show, particularly for sound.

    One of the things I am in love with at the moment is the DJI Osmo RAW. One of my biggest problems is getting usable video when working handheld, and when things are moving fast. The DJI is great for following people, shooting from a car and for grab shots. I end up with much more, and better, footage with the DJI and it still allows me to shoot loose.

    I work alone in most of my projects, so I try to travel light. Sometimes I am able to get a local person to help carry gear but most of the time I’m on my own. Also, what I bring depends on the nature of what I need to accomplish. I usually try to keep it to one bag of gear with some additional items such as tripods, etc. that I carry in my suitcase. If I am working in an urban environment, I use a rollercase. If I’m going to be out in the countryside, I use a backpack. I have a mix of Thinktank and Tenba bags. Sometimes I use belt packs from Thinktank and leave the backpack in the car. When I start photographing, I’ll put my bag down and walk away from it when the action moves on, so I need to keep my gear attached to me.

    ‘There is always something new
    to make life difficult.’

    One of the issues I am facing these days is that airlines are really cracking down on the size and the weight of carry-ons, particularly on short hops within a country like India. So I use a photo vest that I pack full of gear to make sure the bag weighs as little as possible. I’ll sometimes use the photo vest when I’m forced to check in bags or I’ll use a backpack that fits in a Pelican case, and check that in.

    I’m really excited about my upcoming trip to Nepal. However, I’m am not excited about what I have to do to deal with that electronics ban when traveling through the UAE. There is always something new to make life difficult.

    I tend to fly though one of the UAE countries on most trips east, to Asia and Africa. They have the best fights to those places and good prices. I always carry my gear with me on the plane. But now with the restrictions banning electronics larger than the size of a cellphone on the way back, I have to pack my cameras in a Pelican 1510 case to carry on board, take a backpack in my suitcase to carry the gear when I work, then pack it back in the Pelican and check it in.

    As for backup drives I invested in Samsung 1TB T3 SSD drives that are half the size of an iPhone so I can carry them on the plane with me. I’ll bring a smaller Macbook so I can pack more essential equipment. I usually don’t need a powerful laptop on the road – just something to copy files. If I have to process a few files, I can do that, too. At the end of the day, I just need is to make sure my images stay with me. Cameras can be replaced.

    At this point, though, the bigger issue is the uncertainty of it all. What about batteries? Can I take them? Which ones? The list goes on and on. It’s about being prepared for whatever is thrown at you but, at this point, there’s little real information out there.

    One of your favorite assignments in 2015 was documenting the rebuilding efforts after the earthquake in Nepal. Tell us a little about that experience.

    Crammed into a tiny hut without electricity in Nepal waiting for a storm to pass, people turned on the lights on their cell phones so Vazquez had enough light to take pictures.

    Nepal is one of my favorite places to visit. It’s stunningly beautiful and the people are very friendly and open. I have traveled there many times on assignment and for personal projects and I have a deep love for the place, and its people.

    I went there right after the devastating earthquake in 2015. Seeing how the Nepalis were able to overcome something really traumatic, and still take the time to stop what they were doing to offer me hospitality, is something that will stay with me forever. I remember traveling with Americares up in the mountains to visit some people who were hurt and a freak storm rolled in. We had to take cover in the patients’ home. It was five of us and what felt like half the village crammed into their tiny hut.

    It was pitch black in the hut and as I contemplated how I was going to photograph in the dark, someone turned on their cell phone light, then another, and another. I had lighting! Tea was served as we sat together waiting out the storm. Despite the hardships the people endured, they still thought of me. It was a magical moment.

    How do you prepare for overseas humanitarian assignments?

    “In the mountains of Nepal,” says Vazquez, “you are always climbing up or climbing down.” When he offered his hand to help the woman behind him—one of a group of social workers for Americares—she laughed and reminded him, “we are mountain women.” After thinking about it for a minute, Vazquez realizes “She could probably carry me up and down that hill—in sandals, no less!”

    Anytime I am going anywhere I always do research on who I am working with, and where I need to go. It is important to have a sense of the geography I will be traveling through so I can gauge how far out in the woods I will be, travel times, etc. Plus it’s important to get to know who I’ll be working with on the ground.

    I also look into the types of places I will be staying at so I know if I need to bring any specialized gear. Things like battery packs, solar battery chargers, a hammock, sleep sack, satellite phone, GPS tracker, water purifier, lighting, mosquito netting, what type of footwear, medicines – the list goes on and on.

    I am my own best travel agent. I have a good grasp of geography, I know the airlines I like to travel on, and the places I don’t want to get stuck in. I organize my travel to and from places and take care of some hotel reservations. If I am going to be way out in the field, the local NGO I am working with handles the local logistics, like accommodations, and transport or I may hire a fixer to help me with translation and getting around.

    ‘If all else fails… Google Translate!’

    When working with the NGOs they have people on the ground who know where things are, as well as speak the local language. But speaking even a few words of the local language goes a long way. I speak Spanish so when I was in the Dominican Republic after Hurricane Matthew, I was treated like family. In Nepal, many of the younger generation speak English, so you can always find someone to communicate with. Once you have done lots of traveling, it gets easier figuring out what people are trying to say. If all else fails… Google Translate!

    I do use a travel agent when it comes to booking multiple cities and airlines. It makes it easier and if you run into problems, you have someone to reach out to. All I have to do is email my travel agent and she takes care of it. Try doing that with Expedia.

    What’s a typical day like when covering a humanitarian assignment?

    One of the first people on the ground after Typhoon Haiyan in the Philippines, Vazquez photographed these massive ships that were forced ashore during the storm.

    Working on humanitarian assignments usually means really long days. Get up early and go for a long ride in a beat up car, in the heat with no air conditioning on a bad road. I get up early, eat whatever there is for breakfast, and get on the road. I always make sure I bring plenty of water and something to eat for the day. Most undeveloped places or places in crisis won’t have any food or water to buy.

    ‘…I sometimes have to put my camera down and lend a hand’

    Then you make your stops at whatever the story is about. In my case it’s usually clinics or temporary places set up to distribute food and medicine with lots of people needing help—whether it’s food, or medical care. It’s amazing how overwhelming it can be. So much so that I sometimes have to put my camera down and lend a hand in unloading a truck, opening boxes, and handing out food. Then you get back to wherever you’re staying, clean up, eat, download cards, back images up, check out the day’s work, upload to my social media channels (if there’s an internet connection), then plan for the next day.

    I have stayed in everything from a tent, to a home with a tarp over it, slept in a truck, slept in a communal room with lots of beds, and snoring people—again, minor inconveniences compared to those who have lived through a disaster. In the course of day I can see a baby being born in a tent, ride in an ambulance with someone in distress, witness an operation, and everything in between.

    You meet a lot of people on your assignments. Do you stay in touch with some of the locals that you meet?

    These schoolboys were more than happy to smile for Vazquez’s camera when he was on assignment in India.

    One of the best things about what I do is meeting people. I do my best to stay in touch with them. Facebook makes it much easier, in some cases. There are many times I end up coming back to a country for a different assignment, and I make it a point to see the people I’ve met before.

    When on assignment I usually spend a lot of days with the same people. We are together 24/7, eating together, traveling together, drinking together, laughing together and hanging out together. Much of what is experienced on some of these assignments is very emotionally charged, so we often form a tight bond.

    I photographed a young woman in India, and her photo was used for the cover of the publication I was working for. The next year I returned and I saw her again, and I had some copies of the publication. She was so amazed she was speechless. She was so thrilled that she showed the magazine to everyone in sight. That’s one of the reasons I do what I do. That my work can perhaps inspire that type of response.

    Also, I make it my business to get to know the people I am working with, which also helps for future opportunities in working together.

    What are some of the challenges when working in remote locations? How do you overcome those challenges?

    Ongoing humanitarian missions include the donation and distribution of medicine. Here, horsemen prepare to escort dignitaries celebrating the 100 millionth dose of antibiotics to reach the population of Ethiopia’s Amhara Region to combat malaria and trachoma (a disease that leads to blindness).

    Working in remote locations is tough for many reasons. If you forgot something or a piece of critical gear breaks, you can’t get a replacement. You’d better be a flexible eater, too, because bush meat stew can be all there is to eat for days. If you get sick, you should be prepared with any medications you may need, because there is no medicine.

    ‘…with a multitool and duct tape you can fix
    almost anything’

    There will probably be no internet or even cell phone service. I have a satellite phone that I use for emergencies, and a satellite GPS tracker that I can send messages with so my wife knows where I am. Be prepared for no electricity too, but I have battery packs that I can charge with the sun or in a car. And, with a multitool and duct tape you can fix almost anything.

    At the end of the day research where you are going, think of what the challenges will be, ask anyone you know for firsthand advice, invest in having the right gear, make sure you have all the insurances you need like evacuation insurance, and think carefully about what you are taking. If you take too much, getting around is a problem. If you don’t bring enough, you may not have what you need to get the job done. It’s all about bringing the right stuff.

    You taught yourself how to shoot and edit video about 4-5 years ago. How often do you add video to your assignments?

    Whether he’s shooting stills or video, Vazquez will put his cameras down to help distribute supplies when needed.

    Almost all my assignments right now include B-roll in addition to stills, and sometimes more involved video work. I have tried different cameras, and setups but I prefer the Sony A7 series cameras because they do great video, are great still cameras, have advanced features, and have accessories that can make things work together instead of having to Frankenstein them together. I work by myself with lots of distractions going on, so I need to just have one button to push to make everything work.

    Last year you did the Rickshaw Run to raise money for orphanages in India and Nepal. What’s your fundraising project for this year?

    To raise money for orphanages in India and Nepal, Vazquez and fellow photographer Greg Kinch did a “Rickshaw Run” for more than 2500 miles through India in this colorful but cramped auto rickshaw. Getting stuck in the mud, dealing with burned out pistons and a carburetor that needed regular disassembly and cleaning were part of the adventure.

    In my assignment work, I see so many great organizations and people that need support. I always want to do more. So besides providing free photography and communications advice I fundraise. I found the best way to fundraise is to do something that people will pay attention to. It’s been working. I also couple it with personal challenges that I want to do, and to inspire me.

    My life revolves around my photography work so I have to constantly feed it with investment and inspiration. I feel that is what keeps my work relevant these days. Being able to combine my adventures to help people less fortunate makes it perfect.

    Last year I did the Rickshaw Run. Fellow photographer Greg Kinch and I decided to drive an auto rickshaw (also known in some countries as a Tuk Tuk), 2500 miles through India to fundraise for an orphanage in India and an orphanage in Nepal, including Kids of Kathmandu. It was an amazing thing to do. It was tough, but a great personal achievement, and we raised about $ 5,000 – money that goes a very long way in that part of the world.

    This year I am trekking to Everest Base Camp and taking a group of people who will also fundraise for the education fund of Kids of Kathmandu. The organization does amazing work in Nepal—they support an orphanage and rebuild schools up in the mountains that were damaged by the earthquake. All donations go straight to the organization and are tax deductible.

    We’ll also be stopping at schools along the route to deliver solar powered lights donated to Kids of Kathmandu by Mpowerd. Electricity is scarce in this part of the world and kids often can’t read or study after the sun goes down, so these lights will help tremendously.

    Articles: Digital Photography Review (dpreview.com)

  • Helping Hands: “Support” Sculpture Braces Venetian Architecture From Below

    [ By WebUrbanist in Art & Installation & Sound. ]

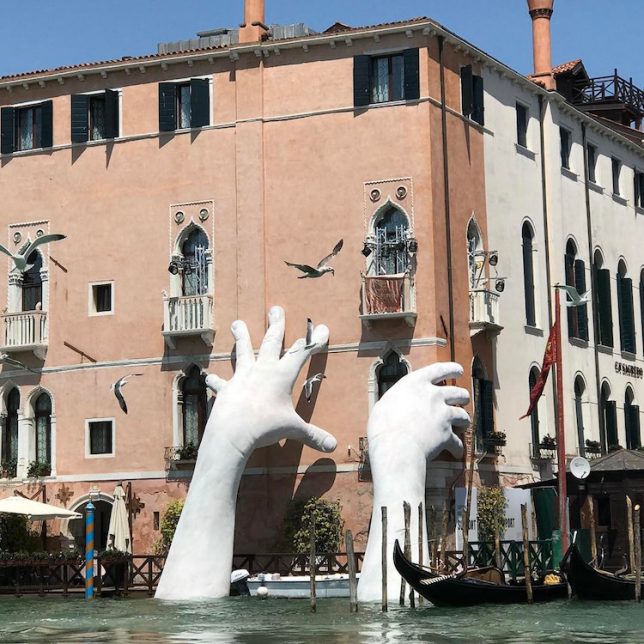
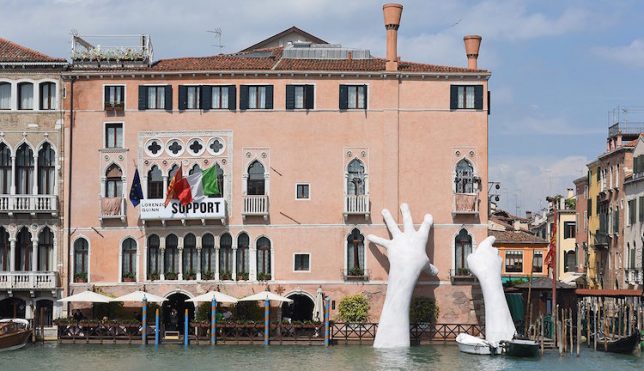
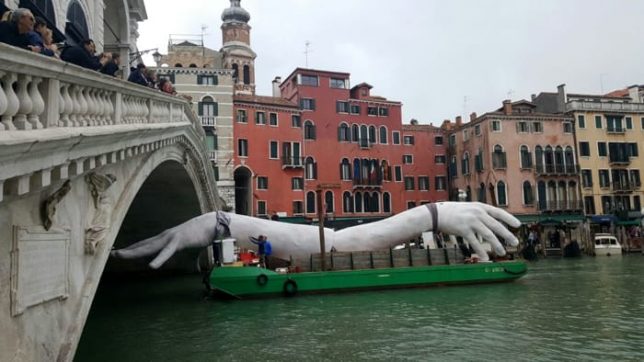
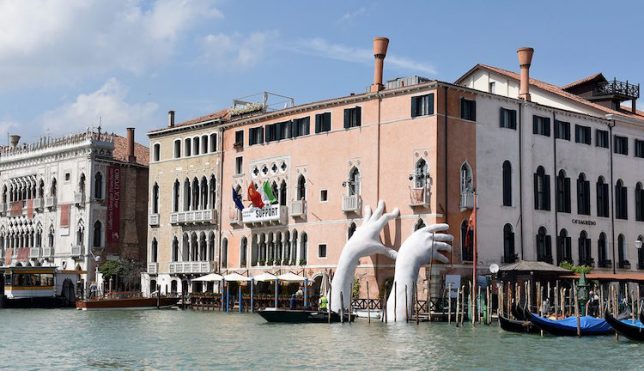
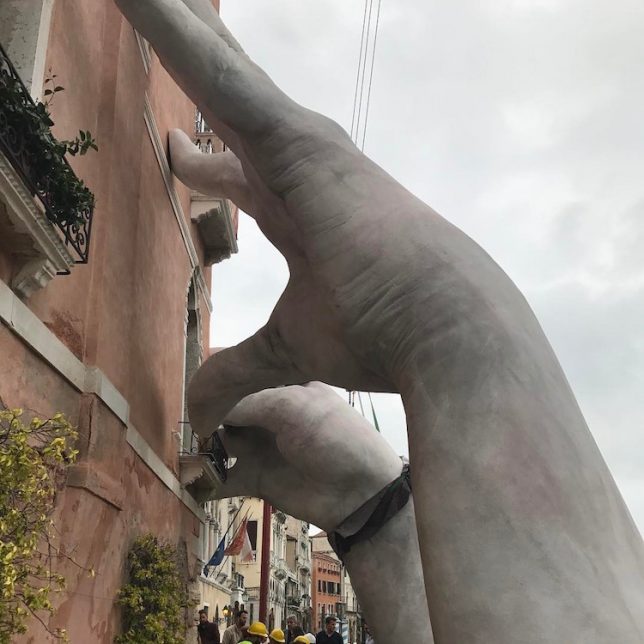
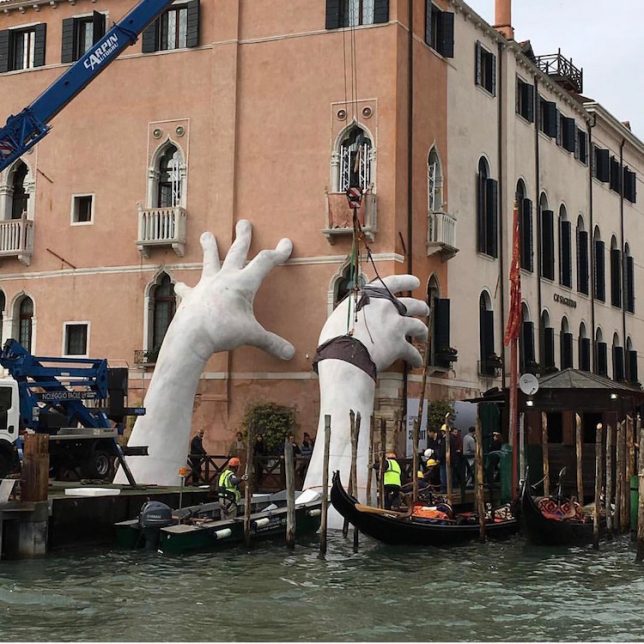
    Historic architecture meets modern art on the canals of Venice, where a pair of gigantic hands emerge from the depths to lend support above the waterline.

    Designed by Lorenzo Quinn, “Support” was put into place a month in advance of the 57th International Art Biennale but is already drawing massive crowds ahead of its official debut.

    It was prefabricated and shipped into positioned down the Grand Canal, then assembled and positioned so that it appears to support the Sagredo Hotel, a structure dating back to the 14th century.

    Like many historic buildings in the city, this one rises straight up from the water — also like others, it is threatened by the prospect of higher sea levels as well as sinking and settling of the ground below.

    “I wanted to sculpt what is considered the hardest and most technically challenging part of the human body. the hand holds so much power – the power to love, to hate, to create, to destroy” says the artist.

    “Venice is a floating art city that has inspired cultures for centuries, but to continue to do so it needs the support of our generation and future ones, because it is threatened by climate change and time decay.”

    "Cose" interessanti. #biennaledivenezia #venezia #lorenzoquinn #biennalearte2017 #manigrandi #solocosebelle #ENERGIA??????

    A post shared by Nicolas Falcone (@nic.falcone) on

    Le mani sono strumenti che possono tanto distruggere il mondo quanto salvarlo e trasmettono un istintivo sentimento di nobiltà e grandezza in grado anche di generare inquietudine poiché il gesto generoso di sostenere l'edificio ne evidenzia la fragilità. #venezia#venice#casagredohotel#mani#scultura#arte#support#lorenzoquinn#igersvenezia#igersveneto#loves_united_venice#loves_venezia#loves_veneto#veneziaunica#veneto_best_pics#veneto_in#loves_united_veneto#venetissimo#ig_venice#veniceinlove#loves_united_italy#loves_united_team#loves_united_details#volgoitalia#labellavenezia#volgoveneto#loves_veneto#venezia??

    A post shared by Sabrina (@sabri_sini_) on

    Stunning #venezia #venice #fondacodeitedeschi #rooftoop #canalgrande #biennalearte2017 #lorenzoquinn

    A post shared by Serena (@serena.pavan) on

    “Reflecting on the two sides of human nature, the creative and the destructive, as well as the capacity for humans to act and make an impact on history and the environment, Quinn addresses the ability for humans to make a change and re-balance the world around them—environmentally, economically, socially,” writes the Halycon Gallery, which represents Quinn.

    Share on Facebook


    [ By WebUrbanist in Art & Installation & Sound. ]

    [ WebUrbanist | Archives | Galleries | Privacy | TOS ]


    WebUrbanist

  • 5 Things Every Newbie Photographer Must Learn and Practice

    There are certain things as a photographer you should know regardless of if you are an expert or a novice. These simple yet powerful lessons not only differentiate you but also help you grow in your art and your photographic career. For every newbie photographer, these are essential lessons to learn and practice.

    Note: For the purposes of this article, all the images used here are SOOC (Straight out of camera). This is done to demonstrate key concepts highlighted here. My camera of choice is Canon 5D MKIII with a few common Canon L-series lenses like the 50mm and 85mm.

    #1 – Know your gear inside out

    This almost seems like a no brainer but I am surprised by the number of people who say that they have a really fancy (and expensive) DSLR camera but still shoot in auto mode 100% of the time. Now before you get all upset and say that there is nothing wrong with shooting in auto, I will raise my hand and say that yes, I also shot in auto when I got my first DSLR camera. But very quickly I realized that my camera (a Canon 5D MKII at that time) was a fantastic and sophisticated piece of equipment that was capable of some incredible shots if I only knew how to operate it.

    So take the time and really know the ins and outs of your gear. The user manual is a great place to start to not only familiarize yourself with what all the buttons do but also where they are located on the camera. You should be able to adjust settings without removing your eye from the eyepiece/viewfinder when you are composing your frame. Think about it this way, would you like to own a convertible and always drive with the top up (i.e. closed), even on the most gorgeous of summer days?

    Here are some ways to learn the ins and outs of your gear.

    ISO – Play around with various ISO settings to understand how it affects exposure and what is an acceptable ISO grain (for you). This will help you make photography decisions in low light situations. Some of these ISO decisions may be limited to the kind of camera you have. Regardless, you should know the upper limits of your gear.

    5 Things Every Newbie Photographer Must Learn and Practice

    The quality of light at the stables where my kids ride is terrible. Even though they have lots and lots of flood lights, there isn’t enough light just because of the sheer size of the barn. These images were shot handheld at ISO 3200 – the one on the left was at 1/60th shutter speed whereas the one on the right was at 1/400th. That was because of the natural light coming in closer to the wall that illuminated my son and gave me a higher shutter speed to capture the motion of the horse.

    Sweet spot – Find the sweet spot for your lens. Every lens has an aperture setting where the image is sharper overall than others. This will help you analyze what is the widest aperture (smallest f-stop) you can shoot in and still have the image in focus. This is different than the depth of field (which is how much of the scene is in focus) in that the actual resolution of the image is sharper at the sweet spot.

    Minimum shutter speed – Find out what is the lowest shutter speed you can handhold your camera and get a sharp image. This will also help in low light situations as well as in creative motion blur type shots when you don’t have a tripod handy. The general rule of thumb is to shoot at one over the focal length of your lens.

    5 Things Every Newbie Photographer Must Learn and Practice

    Here I was shooting in a dark canyon with dark stone walls. I was using a 35mm lens at f/1.4 (completely wide open aperture) because I wanted a very low ISO (100) to eliminate any noise. My shutter speed dropped to 1/30th – which I clearly could not hold steady…the image is completely blurry and out of focus!

    Weight – Find out what is the maximum weight you can comfortably carry without hurting yourself or almost passing out because of discomfort from carrying excess weight (true story!)

    #2 – Know and understand light

    There are some photographers who only shoot in natural light while others only shoot using some form of artificial light. Then there are photographers who shoot in any type of light and do a fantastic job at that. There is no right or wrong answer here in terms of preference but it is important to know how to shoot in any form of light. That might be the only thing that stands between you and the shot of your dreams.

    Knowing how to read, analyze, and play with light is one of the most basic and important skills every newbie photographer should know, in my opinion. Keep in mind that not all light is equal from a purely technical standpoint (tungsten versus fluorescent versus white-balanced light). Certain types of light are good and others are not so good. Experiment with many different kinds of light so you know how to read light, then learn how to shoot in each.

    These three images were all shot within the hour just before sunrise.

    Here my settings are as follows ISO1250, f/2.8, 1/60th shutter speed. I LOVE the blue in the sky falling on the snow covered Pike’s peak in Colorado.

    5 Things Every Newbie Photographer Must Learn and Practice

    The warm sunrise cast such a magical glow on the mountain and surrounding areas. My settings here were ISO 320, f/5.0, and 1/500th. The sky filled with so much light that I had to stop down my aperture to be perfectly exposed.

    5 Things Every Newbie Photographer Must Learn and Practice

    The overcast sky with little spots of blue took my breath away. My settings here were ISO 320, f/5.0, and 1/800th to get a perfectly exposed photo.

    5 Things Every Newbie Photographer Must Learn and Practice

    I do not like indoor yellow tungsten light…everything become so orange! (A custom white balance or correction in processing is necessary)

    5 Things Every Newbie Photographer Must Learn and Practice

    But neutral natural light is so much easier to work with and to get even natural-looking skin tones.

    3 – Practice good ethics

    Be respectful of the people, places, and things you photograph. I cannot tell you how much it pains me when I see photographers (both amateurs and professionals) disrespect their surroundings. Be it climbing where they are not supposed to, keeping heavy equipment on delicate surfaces, overcrowding and overstaying their welcome in public places and not giving other general tourists the opportunity to enjoy the scenery.

    Pay special notice to other photographers. These are folks in your industry even if they are beginners. They are all in it for the same reasons you are – love for the art! Leave that sense of entitlement behind, just because you have more expensive gear does not make you a better photographer or a creative artist. Take the extra effort to find out what the photography rules are in the places that you intend to photograph and stick to them.

    5 Things Every Newbie Photographer Must Learn and Practice

    I belong to several groups of photographers and we regularly meet to shoot the breeze, photograph together and just generally geek out about all things photography. There is no pressure, no tension and everyone plays nice! Community over competition!

    4 – Safety

    Be safe when you are out and about. Always be aware of your surrounding especially if you are a female photographer who tends to travel alone. Check out this article  Safety Tips for Travel Photographers (Particularly Women) that addresses this issue. Remember safety always comes first, art next.

    5 – Be your true self and be patient

    Whether you choose to be in business or not, be true to your art. Get inspiration not just from other photographers but also from daily life. There are many amazing things around us at any given point in time. Just because no-one else photographs it does not make it boring. Similarly think outside the box, just because everyone photographs something a certain way does not mean you have to follow the pack.

    When you are starting out, don’t obsess over clients, getting work, and making money. Yes, they are absolutely important, I will not disagree, but take the time to perfect your art (to the point where you are confident charging money for your photography) and then the money and fame will follow.

    Also give out as much as you can, be helpful and uplift others who are on this journey with you. The more you put out there the more you will receive from the universe! I truly believe in that mantra across all walks of life.

    5 Things Every Photographer Must Learn and Practice

    I am always coming up with shoot concepts and ideas to keep experimenting. Some work and some fail miserably but that’s okay. I take everything as a learning experience and try to stay positive in my game. An editorial shoot with my daughter captured on film was a complete disaster as I got all the setting wrong and ended up with grainy, grudge frames! – but I learned a whole lot about film and light and how different it is to digital!

    5 Things Every Photographer Must Learn and Practice

    Leftover florals from Valentine’s day gave me a chance to practice some styling as well as a more moody, contrasty way of editing – which I sort of like and dislike at the same time! But no money was lost and I only used 10 digital frames and spent 30 minutes in editing experimentation.

    Conclusion

    Are there any other life lessons that photography has taught you? In the spirit of building this community of creatives, feel free to share it with others.

    The post 5 Things Every Newbie Photographer Must Learn and Practice by Karthika Gupta appeared first on Digital Photography School.


    Digital Photography School