Blog

  • Video: Kai Wong’s first impressions of the new DJI Spark drone

     
    DJI’s latest drone is here and it is tiny, stabilized and reasonably priced. A floating selfie stick of sorts, the DJI Spark is likely to appeal to a wide array of casual users and enthusiasts. So is it any good? Kai Wong spent some time testing out a prototype of the Spark prior to its release, and seems impressed with the video quality and stablization. Have a watch for specifics and some insightful commentary, as well as a bit of humor.

    Articles: Digital Photography Review (dpreview.com)

  • Some Annoying Things About Photography and Cameras

    Photography gave me a creative outlet in life, and I owe so much to it. It’s my form of escape and a way to relax. It pushes me to explore new places and it gets me out the door. I love it dearly.

    That being said, there’s a lot about photography that annoys the heck out me, and here’s a list of everything I can’t stand. As a side note, I hope you don’t mind that I illustrate this article with some zen photography instead of pictures of the things that annoy me. That would just get my heart rate up too high.

    Disclaimer: This article is meant to be tongue-in-cheek and have some fun. Don’t take it at all seriously, please!

    Everything that annoys me about photography and cameras

    Buttons

    Have you seen a Nikon camera these days?? Most people will never need half of those buttons in their lifetime. Can’t they invent a camera that only needs a few buttons? Where is Apple when you need them?

    But seriously, I wish more camera companies put extra time into thinking about ergonomics, design, and making everyday use more pleasant rather than trying to pack each camera with new unneeded features just to lure people into an upgrade.

    Everything that annoys me about photography and cameras

    Lens dust

    Last time I changed lenses, I was literally in a vacuum chamber and still a piece of dust got stuck smack in the middle of the sensor. And is there anyone who can clean it easily near me? Nope, because Nikon stopped making repair parts available in order to shut down third party repair companies. So not only do I have to send my Canon camera to the factory for small repairs because my local shops couldn’t stay in business without the Nikon business, but I can’t even find someone locally to quickly clean my sensor.

    Yes, I know I can do it myself, but I’d rather have someone trained so that I don’t screw something up.

    Everything that annoys me about photography and cameras

    Filters

    Remember that time when you thought you needed all these expensive filters to be a good photographer? While you do need a few filters, everyone goes overboard at some point and now has a filter graveyard drawer.

    Everything that annoys me about photography and cameras

    Megapixels

    We don’t need more megapixels Sony! Our computers and external hard drives can barely keep up. Instead, give us better ergonomics, better ISO, faster focusing, and better dynamic range. Which brings me to the next point.

    Everything that annoys me about photography and cameras

    Small cameras with big lenses

    What’s the point in a tiny mirrorless camera with a massive 20-pound lens? Is it impossible to make that 24-70mm lens that everyone uses just a little bit smaller? Please take the money from the megapixel blitzkrieg department and put it into the making lenses smaller department.

    Everything that annoys me about photography and cameras

    Tripods

    Why are all $ 300 tripods designed to fail after a year of use? I can’t imagine how much money the Planned Obsolescence Manager at Crap Tripod Inc. makes. We all learn this the hard way. We suffer until we get fed up and spend way too much money on a Gitzo that lasts us the rest of our lives and makes us really happy.

    Everything that annoys me about photography and cameras

    People walking in the way of your shot to get a closer shot

    You’re pretending you don’t see me. I’ve been here for an hour. I’m a peaceful man, but I will strangle you with my remote shutter cord and break this tripod over your skull (not really, I’m just kidding!). Oh wait, it’s a Gitzo. This Gitzo will break your skull and then continue to work perfectly fine.

    Everything that annoys me about photography and cameras

    Neck pain

    Please don’t carry your tripod over your neck. Use a backpack sometimes instead of a shoulder bag. Pick one lens before you go out the door instead of five. Stretch. Your body will thank you in 20 years when you’re not walking around like the Hunchback of Notre Dame.

    Everything that annoys me about photography and cameras

    Taking an iPhone photo of some sweaty person at a party with overhead lighting and them thinking it’s going to be amazing because I’m a photographer

    I’m not Saint Theresa – I can’t perform miracles. Now stop trying to look like a duck.

    Everything that annoys me about photography and cameras

    People saying, “Isn’t everyone a photographer these days?”

    You know, photography is a way for all types of people in all walks of life to find a creative outlet, and there’s a vibrant community of so many fun and interesting people that are drawn to it. But whether you meant it or not, that statement has a demeaning and devaluing undercurrent to it. All of us are completely different as photographers, just as anyone with a pen will write in a completely different way. Just because this amazing community is growing, does not mean that photography should be devalued.

    Everything that annoys me about photography and cameras

    When we’re traveling and I can’t skip out on all the fun stuff to take photos

    You mean I have to go to a nice dinner at a fun looking place on the water with someone that I love dearly? What the heck – I want to go walk down this dirty alleyway for the next hour to take some moody photographs!

    Everything that annoys me about photography and cameras

    Conclusion

    What things annoy or make you angry about photography or your gear? Please share in the comments below.

    The post Some Annoying Things About Photography and Cameras by James Maher appeared first on Digital Photography School.


    Digital Photography School

  • How to Understand Your Camera’s Light Meter and Get the Exposure You Want

    Regardless of how you shoot, and whichever shooting mode you prefer to use, there is one item that remains constant – the light meter. Somehow, either you or your camera has to know how much light in on your scene in order to determine the optimal combination of aperture size, shutter speed, and ISO sensitivity to get the photo you want. This tool, which may not seem all that relevant to new photographers, is called a light meter.

    Understanding what your camera’s light meter does and how it works is critical to advancing your skills and helping you get the shots you really want. Hopefully, this article will help you get a grip on it.

    How to Understand Your Camera's Light Meter and Get the Exposures You Want

    An analogy to help you understand the light meter

    Before I get into a discussion about how the light meter works, think about the last time you cooked some meat on the grill. Whether it was a steak, some pork chops, or even just a couple hamburgers – you likely had a vision in your mind of what the finished product would be.

    For backyard chefs like me who aren’t very good at this sort of thing, we have to use a meat thermometer to make sure our food is properly cooked. There’s always the question of where to put the thermometer to check and see if the meat is done. Or, in photography terms, check to see if the meat is properly exposed. You can touch it to the surface, poke it through to the middle, or insert the thermometer at various points around your dinner in order to get a good overall reading.

    Each method would work for a different scenario, but it all depends on what you are cooking and how you want the finished food to turn out.

    How to Understand Your Camera's Light Meter and Get the Exposures You Want

    Your camera’s light meter is like measuring the temperature using a meat thermometer. Placement is crucial for an accurate reading.

    How the camera light meter works

    When you point your camera at a scene you also need a way of measuring the incoming light so you know how much of it there is and what settings you (or your camera) need to control in order to get the shot you want. It’s just like measuring the temperature of your food with a thermometer to make sure it’s done properly.

    Most cameras today use a process called TTL Metering, which stands for through-the-lens. It means that your camera examines the light coming in through the lens and evaluates the brightness of the scene. Then you, or your camera, can adjust the settings in order to make sure your photo is exposed how you want. You may not ever notice the light meter at work or even see that it’s there at all unless you shoot in Manual Mode. But trust me, it’s constantly monitoring the light whether you know it’s working or not.

    View the metering scale in Manual Mode

    To see the light meter doing its thing, put your camera in Manual Mode and look for a series of dots or vertical lines at the bottom of your camera’s viewfinder.

    How to Understand Your Camera's Light Meter and Get the Exposures You Want

    In Manual Mode, look at the bottom of the screen in your viewfinder. Notice the scale with zero in the middle. That is the light meter at work.

    The number scale at the bottom of the image above is an example of a camera’s light meter, and the tiny little triangle shows whether the picture is properly exposed or not. In this case, the triangle is at 0, which means the image is neither under or overexposed, but changing the aperture, shutter speed or ISO would make the triangle move up or down the line accordingly and result in a picture that is either a little too bright or a little too dark.

    What part of the scene is the camera measuring the light from?

    While that is all well and good, it’s only part of the story because it doesn’t explain how your light meter actually functions. Is it looking at all the incoming light or just some of it? Where in the frame is it looking as it measures the light? Understanding the answers to these questions is the key to unlocking the power of your camera’s light meter, and it all has to do with what’s known as metering modes.

    How to Understand Your Camera's Light Meter and Get the Exposures You Want

    Measuring the Light

    Most cameras today have a few basic ways of measuring the incoming light:

    1. Matrix or Evaluative Metering – the camera looks at the light in the entire scene and averages it, (Nikon puts a bigger emphasis on the area where your lens is focused as well). Nikon calls this Matrix Metering, Canon calls it Evaluative.
    2. Center-Weighted Average Metering – looks at the light of the entire scene and averages it, but with emphasis on the center of the frame. Nikon and Canon both call this Center-Weighted Average Metering.
    3. Partial Metering – this measures the light only in a small portion of the center of the frame (about 8-12% of the scene). This is a Canon metering mode, Nikon does not have one similar.
    4. Spot Metering – measures the light only in a small area around the central autofocus point (about 1.5-3% of the frame). Nikon and Canon both call this Spot Metering.

    Other camera manufacturers have different names for these modes, but suffice it to say the way in which your camera measures incoming light can have a huge impact on whether your photo is properly exposed. As an example, here are three shots that were taken with different metering modes.

    Image #1, taken with Matrix (Nikon) or Evaluative (Canon) Metering.

    Image #2, taken with Center-Weighted Metering.


    Image #3, taken with Spot Metering.


    Reflective versus incident metering

    There’s another aspect of light metering that comes into play when setting up a shot. It has to do with how TTL metering works as opposed to a handheld light meter.

    Reflective metering

    The former, (the type of metering used in DSLRs), works by measuring the amount of light that comes through the lens. But the problem with that is that unless you are pointing your camera directly at the light source, the light being measured is actually bouncing off your subject first.

    All the colors we see in the world around us get their hues and tonal values by absorbing every color of light except for what is bounced off of them. As many of us learned in grade school, light is made up of a spectrum of colors including red, orange, yellow, green, blue, indigo, and violet. A green tree leaf absorbs every color of light except for green. A red car absorbs every color except for red, and so on.

    reflective metering - camera light meter

    When your camera measures incoming light, it’s looking at the amount of light being bounced off your subject, not the amount of light actually hitting your subject. This has huge implications and can dramatically affect your exposure. In the illustration above, the subject is wearing clothes that absorb most colors of light except for blue, which means there is still a great deal of light being bounced off him and sent to the camera. However if the child changes clothes things can change a great deal.

    reflective metering dark subject - camera light meter

    In the illustration above, even though the amount of light hitting the boy has not changed, the camera will read the scene much differently because he is now wearing a dark shirt and pants. The camera will think it needs more exposure to compensate for what it thinks is less light on the scene, and the overall image will be overexposed as a result.

    Here’s a real-world example of how this works:

    reflective metering - camera light meter

    Nikon D7100, 200mm, f/2.8, 1/8000th of a second.

    In the photo above, so much light was being reflected off the girl’s white shirt that my camera had a hard time metering the scene properly. Much of the sunlight was bouncing off the shirt and coming directly back to my camera, so it responded by using a very fast shutter speed and low ISO value in an effort to make sure the shirt was properly exposed. Unfortunately, the rest of the scene was underexposed as a result.

    Nikon D7100, 200mm, f/2.8, 1/1500th.

    This was a few seconds later in the exact same spot, and all I did was have her put on a brown shirt. With much of the light from the sun being absorbed by the dark color of her outfit, my camera created a much brighter exposure by using a slower shutter speed. Not as much light was being captured by the TTL metering system so the camera thought more light was required for a good exposure.

    Incident metering

    This phenomenon can be particularly troublesome if you are shooting a wedding; grooms often wear dark tuxedoes whereas brides will usually be dressed in dazzling whites, which can really throw off your camera’s TTL metering system. The solution is to use an external handheld light meter, such as the Sekonic L-308S-U, which actually measures the amount of light falling on the subject.

    Handheld light meter for incident light metering (light falling on the subject).

    In the image above you can see that the meter shows you need an aperture value of f/16, shutter speed of 1/125th of a second, and ISO 100 in order to get a properly exposed scene. These numbers will likely be different from what the camera’s TTL system measures because some light will invariably be absorbed by the subject, which is why an external system like this can be so useful.

    Here’s how the diagram from earlier would look if the setup involved an external handheld incident light meter.

    incident metering - handheld light meter

    You will often see wedding photographers using a light meter such as this in order to get a more accurate reading of how much light is hitting the wedding party during formal photos. This is especially true if they’re using a system of flashes or external speedlights because they need to know how much extra light the scene will require or tolerate.

    When shooting a wedding it is quite common for the bride to wear a white dress, which reflects a great deal of light, and the groom to wear a dark tuxedo which absorbs almost all light. This can wreak havoc with a TTL metering system, and an external light meter is a great way to address the problem.

    light metering - camera light meter

    Conclusion

    The overall goal here is to understand how the light meter in your camera functions. This, in turn, will help you know how you will need to alter the exposure settings to get the shot you want.

    I hope this article has been helpful in explaining how the light meter works, how light is reflected off your subjects, and why your camera may not see a given scene quite like you expect it to. Ultimately it’s important to remember that there is no one correct way of metering a scene. Any of the metering modes and methods will work as long as you know what you are shooting and what type of results you are trying to achieve.

    Knowing the difference between the various metering modes and types, and understanding how light is measured as it hits your camera can help you get the shots you want. None of these methods are any better or worse than the other, but each one has its own strengths and weaknesses. The more you know about how all of this works the better equipped you will be to get precisely the photographs you want.

    The post How to Understand Your Camera’s Light Meter and Get the Exposure You Want by Simon Ringsmuth appeared first on Digital Photography School.


    Digital Photography School

  • Think Tank Photo updates TurnStyle sling bags and adds wheels to StreetWalker series

    Bag and accessories manufacturer Think Tank Photo has updated two of its ranges, adding more internal space and a rolling option to the StreetWalker series and a new waist strap to the TurnStyle sling-type bags.

    All three of the existing StreetWalker backpacks have been enlarged to create more depth in the interior compartments so they can carry more kit, and particularly large bodies with wide-ranging zoom lenses still attached. The series also now features a version with wheels and a retractable handle in the StreetWalker Rolling Backpack V2.0, which can operate as a backpack or a rolling case.

    The company has also revamped its Turnstyle series of sling bags, adding a new waist strap to hold the bag securely when the user is taking pictures. There are three sizes of bag, and each is now available in grey or blue.

    The StreetWalker Rolling Backpack V2.0 costs $ 299.75 while the Turnstyle bags are priced $ 74.75 , $ 84.75 and $ 99.75 for the 5, 10 and 20 versions. For more information see the Think Tank Photo website.


    Press release

    Think Tank Photo Releases New StreetWalker® Rolling Photo Backpack
    and Upgrades Classic StreetWalker® Series Backpacks

    Santa Rosa, Calif. – Legendary durability and award winning comfort have made Think Tank Photo’s StreetWalker® series one of the most sought-after products in the photographic world. Now Think Tank announces the new StreetWalker Rolling Backpack V2.0, featuring the ability to switch from a backpack to a roller. Also released are upgraded versions of all three classic StreetWalker backpacks. Photographers get the same comfort and quality as the original series but with new features such as increased depth for modern DSLR systems, and dedicated pockets for both tablets and smartphones.

    The new StreetWalker Rolling Backpack V2.0 is so spacious, it will fit two DSLR
    bodies with lenses attached (including a 200-400mm f/4), and a 15” laptop. The StreetWalker HardDrive V2.0 backpack fits two bodies with lenses attached or a gripped body with a 200–400mm f/4 attached, a 15” laptop and a 13” tablet. The StreetWalker Pro V2.0 backpack fits two bodies with lens attached or a 400mm f/2.8 unattached, and a 10” table. And, the StreetWalker V2.0 backpack fits one gripped DSLR with 70–200mm f/2.8 attached, one standard DSLR with 24–70mm f/2.8 attached, a 16–35mm f/2.8, and a 10” tablet.

    “With the release of the new StreetWalker Rolling Backpack and the new versions of the three classic StreetWalker backpacks, we made three of the best pro-level backpacks in the photo industry even better,” said Doug Murdoch, Think Tank Photo’s CEO and lead designer. “The one thing we’ve heard over and over since they first launched is how comfortable and durable they are.

    Now, with the hybrid rolling backpack and the upgraded core backpacks, we’ve integrated even more photographer feedback to expand their functionality.”

    KEY FEATURES

    StreetWalker Rolling Backpack V2.0

    • Comfortable harness system allows you to roll the bag or carry it on your back
    • Dedicated laptop compartment that holds up to a 15” laptop
    • Fits two bodies with lenses attached including a 200–400mm f/4
    • Specially designed interior to maximize gear for carry-on, meets most U.S. and International airline carry-on requirements
    • Reinforced telescoping handle with rubberized touch points
    • Tripod mount on front panel
    • Dedicated smartphone pocket fits today’s large phones with a 5.5” (14cm) screen size
    • Lockable YKK® RC Fuse zipper sliders (lock not included)
    • Two side water bottle pockets and two side zippered pockets
    • YKK® RC Fuse zippers, ballistic nylon, high-density velex and closed cell PU foam are the highest quality materials in the industry
    • Custom-designed, high-performance, 80mm wheels with sealed ABEC grade 5 bearings for quiet rolling
    • Seam-sealed rain cover included
    • User-replaceable retractable handle, wheels, wheel housings, feet and kick plate extends product life
    • Adjustable dividers allow a customized fit for your DSLR or Mirrorless gear
    • Hypalon reinforced rear panel for increased durability
    • Shoulder harness pockets, D-rings, daisy chain and adjustable sternum strap

    Think Tank Photo’s Upgraded TurnStyle V2.0 Camera Bags Offer Greater Stability

    Santa Rosa, Calif. – Ideal for a casual day of shooting with a DSLR or Mirrorless system, Think Tank Photo’s slim, body-conforming TurnStyle V2.0 sling bag allow photographers to move and shoot freely. The updated version of this popular series offers a new stabilizer strap that holds the bag steady while actively shooting or tucks away when not in use. Think Tank’s sling bags’ design promotes easy rotation for rapid access to gear and accessories.

    The TurnStyle 5 fits a mirrorless body plus two to four lenses, and an eight-inch tablet. The TurnStyle 10 fits a standard size DSLR plus one to two lenses, and an eight-inch tablet. The TurnStyle 20 fits a standard size DSLR plus one to three lenses, and a 10” tablet. These new version releases come in the traditional Charcoal and in a new color, Indigo Blue.

    “This new version of our popular TurnStyle sling bags reinforces their reputation as the ideal ‘grab and go’ camera bag,” said Doug Murdoch, Think Tank Photo’s CEO and lead designer. “One thing we’ve learned from serving professional photographers for so long is that they always need one, pre-conformed gear kit that gives them access to their core gear. The TurnStyle is that bag.”

    KEY ADDITIONAL FEATURES

    • Slim, contoured, body-conforming design with a wide shoulder strap provides a very comfortable fit
    • Lightweight materials and construction
    • Breathable 320G air-mesh back panel keeps your back cool during long days
    • Easily accessible front organizer pocket for batteries, memory cards or other small accessories
    • Rear internal pocket holds documents
    • Fully customizable interior dividers
    • Seam-sealed rain cover included in dedicated pocket

    MATERIALS

    Exterior: All fabric exterior is treated with a durable water resistant coating while fabric underside is coated with polyurethane for superior water resistance, YKK® RC Fuse zippers, 420D velocity nylon, 550D polyspun, 320g air mesh, nylon webbing, 3-ply bonded nylon thread.

    Interior: Removable closed-cell foam dividers, P210D, polyurethane backed velex liner, 2x polyurethane coated 210T seam-sealed taffeta rain cover, nylon binding tape, 3-ply bonded nylon thread.

    Articles: Digital Photography Review (dpreview.com)

  • Hidden Stories: 3D-Printed, Architect-Designed Rings Tell Looping Tales

    [ By WebUrbanist in Design & Products & Packaging. ]

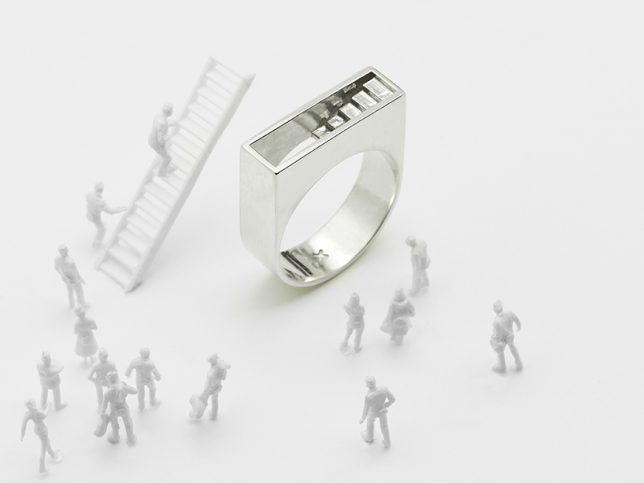
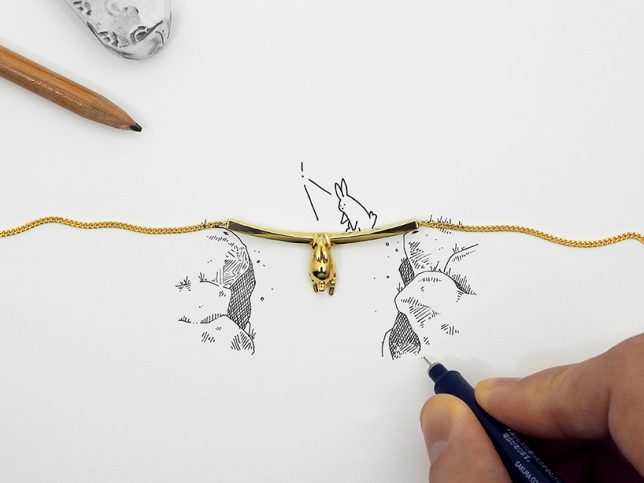
    Most jewelry tells some kind of a story (about its origin if nothing else) but these pieces are a bit more explicit, featuring tales of structures, characters and actions in miniature built environments.

    Architectural designer Artur Dabrowsk produces rings, cuffs, necklaces and bracelets that revolve “around the concept of ‘depth’ in terms of formal language (shadow lines, composition, depth of field) as well as in meaning (details, storytelling).”

    Whether he is crafting mysterious staircases to nowhere or endlessly looped brick arches, each piece involves careful attention architectural detail (including theoretical structural load calculations) and is available in brass, bronze or silver.

    The brick ring specifically goes back to his days in architecture school — “there is something very tactile and nostalgic that give [bricks] both timeless function and meaning,” says the designer.

    “I was raised in a brick clad apartment building in Brooklyn,” he explains, “so I associated the brick wall as a shelter for my introverted childhood. The arch became a metaphoric portal through which I could turn the corner, open up, and express myself while still proud of my introverted self.”

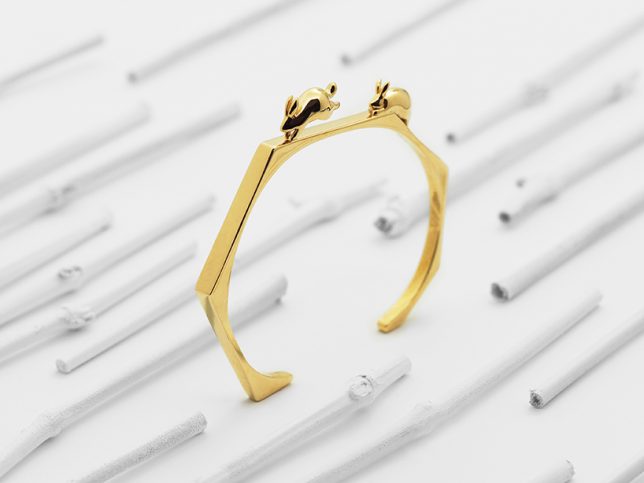
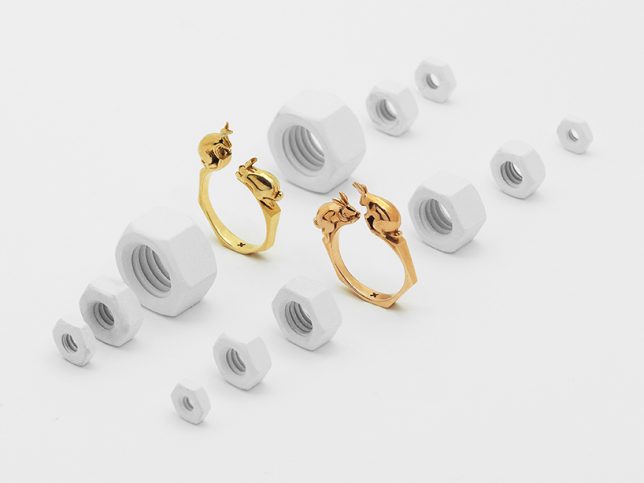
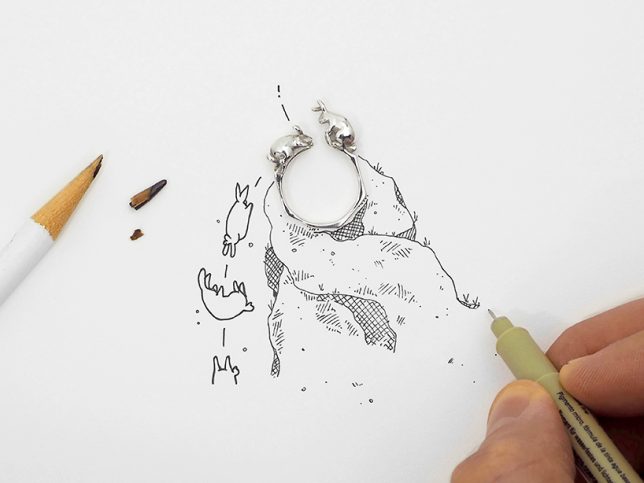
    Dabrowsk also has a thing for rabbits, which are something he has sketched idly for a long time and has since started to include as characters in his tiny built environments. “I started drawing them in the margins of my notebooks during grade school and personify them to express thoughts, situations or feelings I was having.”

    “I think the imagery of it being personified is playful — the rabbit is cute, hops around, eats, multiplies… and lives naively in this world.” Even here, though, he is conscious of real-life conditions – the suspended rabbit above hands from what would, in reality, be the bare minimum load-support beam across an abyss.

    Fans of architectural jewelry should also take a peak at this series of wearable skylines, featuring famous scenes and settings (though in a more two-dimensional format) from around the world.

    Share on Facebook


    [ By WebUrbanist in Design & Products & Packaging. ]

    [ WebUrbanist | Archives | Galleries | Privacy | TOS ]


    WebUrbanist

  • A prototype of the Leica Noctilux-M 50mm Edition 0.95 can be yours for $25K

    As if $ 13,950 wasn’t enough to pay for a special edition lens, the Leica Store in San Francisco is offering a prototype of the Noctilux-M f/0.95 ASPH ‘Edition 0.95’ for $ 24,995. The Edition 0.95 is already a limited run version of the ‘standard’ $ 11,000 version of the lens, that comes finished in Leica’s new anodized high-gloss black instead of black paint.

    There are only 95 of the ‘Edition 0.95’ lenses worldwide, which have unpainted engravings, but it isn’t clear how many Prototype B models exist. Needless to say, we’d hope there are fewer than 95.

    The store’s website says that this specific model has the words ‘Prototype B’ in white paint on its underside, and that it will come with a matte black lens cap instead of the usual glossy one. Despite the store only having one example of this lens, thrill seekers can still add ten or more to their virtual shopping basket.

    For more information see the San Francisco Leica Store website.


    Store information

    Leica Noctilux-M 50mm f0.95 ASPH. “Edition 0.95” Prototype B

    The Noctilux 0.95 Edition is one of the most unique noctilux lenses ever to roll off Leica’s production lines in Wetzlar. Built to resolve past the capabilities that are known in any other fast primes or even the faculties of human vision, the Noctilux is a legendary benchmark of photographic optical engineering. This special “0.95 Edition” is limited, respectively, to 95 units world wide and stands visual representation of the elegantly unique images the Noctilux creates. Featuring the same optical design as the regular Noctilux 50mm 0.95 ASPH this special edition has an added bit of elegance. The exterior of the “0.95 Edition” features Leica’s newly developed high-gloss anodized aluminum surface. The markings on the lens are left unpainted except one, the 0.95 f-stop mark.

    This lens will be available in extremely limited quantities worldwide, and Leica Store SF/Camera West Boutiques will have very limited stock. If you have any questions concerning the availability of this lens please feel free to contact us directly at sales@leicastoresf.com or call 415.801.5066.

    This specific lens is a prototype of this already rare blend of Leica and S.T. Dupont craftsmanship. This could very well be one of the most collectible 0.95 Noctilux’s on the market today. The Prototype reads “prototyp B” the the back side of the barrel, and features a matte black cap instead of the glossy cap that comes with other 0.95 edition lenses.

    Articles: Digital Photography Review (dpreview.com)

  • Sony provides firmware updates for ten E-mount lenses and LA-EA3 adapter

    Sony has issued firmware updates for ten of its E-mount lenses and the LA-EA3 adapter. The updates address a variety of bugs and stability issues. You can view details and download the update for your operating system by clicking on the Drivers & Software button on the linked product pages below:

    • 70-200mm GM 
    • 70-200mm G 
    • 24-240mm G 
    • 28-70mm G 
    • 24-70mm Zeiss 
    • 16-35mm Zeiss 
    • 50mm f/1.8 
    • 24-70mm GM 
    • 50mm Zeiss 
    • 85mm GM 
    • LA-EA3 adapter

    Articles: Digital Photography Review (dpreview.com)

  • Jinbei Studio Flash Units Recalled for Electrocution Risk

    The Swiss government last month issued a recall for ten models of Jinbei studio flash units. While the recall notice has made the rounds on message boards, I am frankly surprised that photo media outlets have not picked this up. Read more »
    Strobist

  • Tutorial – How to Use the Lightroom Map Module

    The Lightroom Map Module lets you add your photos to a map so you can search and organize them by location. It’s quite a cool feature, so let’s take a look at the best ways to make use of it.

    1. Using the Lightroom Map module if your camera has built-in GPS

    Photos taken with a camera or mobile that has built-in GPS are the easiest to work with in the Lightroom Map module. As long as GPS is enabled, the camera saves the exact location an image was shot in the photo’s EXIF data. Lightroom reads the data when you import the photos and automatically adds them to the map.

    For example, I made this photo using an iPhone SE.

    Lightroom map module

    Lightroom automatically reads the GPS coordinates embedded in the photo’s EXIF data. The yellow square marks the spot where the photo in the filmstrip was taken.

    Lightroom map module

    Note: Lightroom uses Google maps and an internet connection is required for the Map module to work.

    2. If you have a secondary GPS unit

    Some camera manufacturers make GPS units that you can connect to the camera body. If you have one of these it does exactly the same as a built-in GPS unit. It embeds the camera’s coordinates in the EXIF data of your images. That data is then read by Lightroom when you import the photos.

    3. If you have an app or sports device that records your movements in a GPS file

    Most mobile phones have built-in GPS. You can download apps that record your route and let you export that information in a GPS tracklog (extension type .gpx) file that you can import into Lightroom. Some fitness devices like sports watches and fitness bands have the same functionality.

    The effectiveness of this depends on how often the app or device records your location. If your camera has built-in GPS, for example, the location of the camera is always recorded accurately as the camera takes a GPS reading when you press the shutter.

    When you use an app to do so, the app doesn’t record your location continuously. Instead, it takes a reading every few seconds. This creates a set of dots that can be joined together to show your approximate route. It’s how apps that record walking routes or running times work. That means that you can’t rely on this method for pinpoint precision, but it does help you with an approximate location.

    The screenshot below shows a series of photos taken on a Canon camera that does not have GPS. The location information came from a .gpx file generated by a tracking app on my phone.

    Lightroom map module

    4. If your camera doesn’t have GPS but your mobile phone does

    Here’s an easy method to add GPS data to your photos if you have a mobile phone with built-in GPS. All you have to do, whenever you take a photo with your camera, is remember to take an additional photo with your mobile phone. You can import these into Lightroom and add them to the same Collection. Once you have done so, simply drag the photos taken with your camera, those without GPS data, to the locations on the map indicated by the photos that do have GPS data (those taken with your phone).

    Here’s a landscape photo I took in northern Spain.

    Lightroom map module

    Here’s another that I took with my mobile phone.

    Lightroom map module

    This screenshot shows exactly where I took the photo with my mobile phone.

    Lightroom map module

    The other photo in the Collection was made with my Fujifilm X-T1 camera, which doesn’t have GPS. I added location data to the Fuji image by dragging it onto the icon representing the location of the photo taken with my mobile phone at the same spot. The yellow icon now displays the number 2 to indicate that there are two photos in that location with the same GPS coordinates, as seen in the Lightroom Map Module below.

    Lightroom map module

    Lightroom automatically adds the GPS coordinates to the photo’s EXIF data.

    Lightroom map module

    This method requires the most effort and relies on you to remember to take a photo with your phone whenever you take one with your camera. This isn’t always practical and is most suited for landscape photography, where you have the time to take an additional photo with a mobile phone.

    Conclusion

    The Lightroom Map module is an often under-utilized but surprisingly useful tool. Using these ideas you can add Gcoordinatestes to any photo, even those taken by a camera without GPS. In years to come, you can find out exactly where your photos were taken, even if you can’t remember. It makes revisiting your favorite locations a much easier and more enjoyable task.

    Do you have any questions about the Lightroom Map Module? Please let me know in the comments below.


    Would you like to learn about Lightroom’s under-appreciated features? Then check out my Mastering Lightrooom ebooks and start getting more out of Lightroom now.

    The post Tutorial – How to Use the Lightroom Map Module by Andrew S. Gibson appeared first on Digital Photography School.


    Digital Photography School

  • Facebook Live: Sony a9 impressions so far

    The new Sony a9 landed in our office a few days ago, and we’ve been using it non-stop. Editors Rishi Sanyal and Carey Rose hosted a Facebook Live discussion to share their early impressions about the camera so far, as well as to answer live questions from our audience.

    We apologize in advance for some audio difficulties. We’ll fix it for next time!

    Articles: Digital Photography Review (dpreview.com)