Blog

  • Bikesphere: Car-Detecting Ring of Red Light Puts Cyclists in a Safety Bubble

    [ By SA Rogers in Design & Products & Packaging. ]

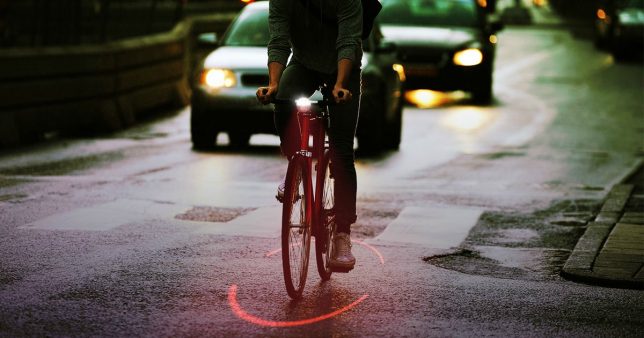
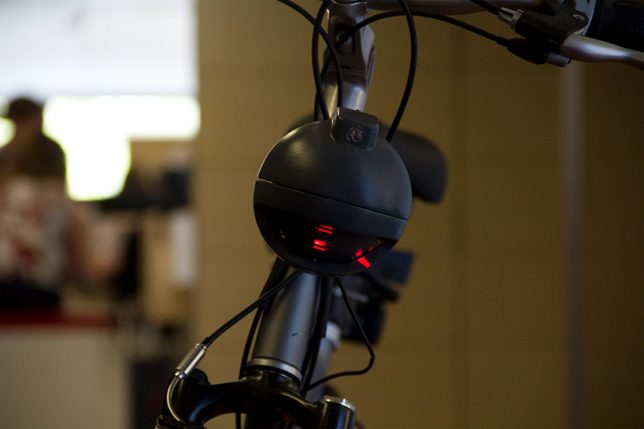
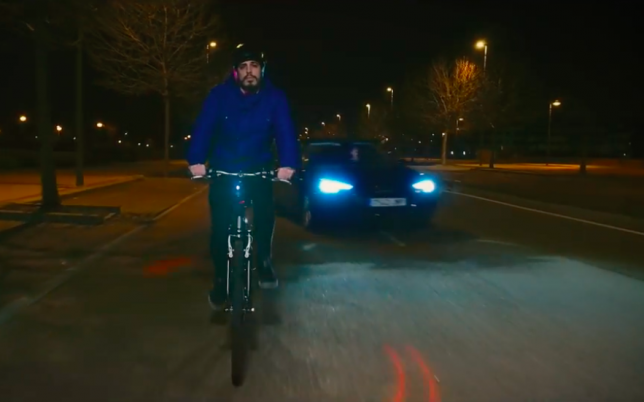
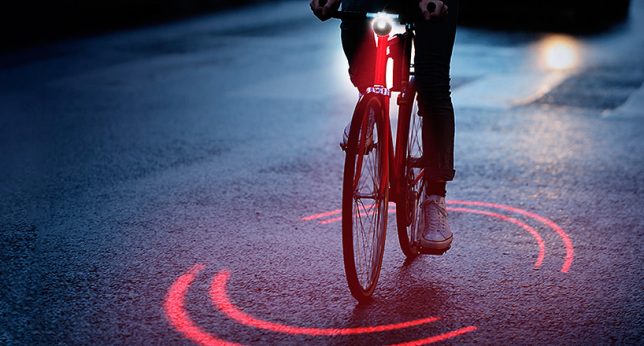
    There’s no missing cyclists – or the zone of space you need to safely pass them – when they’ve got a ring of red light encircling them as they ride down the road. Michelin’s new open-source project, Bikesphere, features a light sensor and proximity detecting sensor that work together to monitor the environment around a cyclist and react accordingly if a car gets too close, pointing a double laser spotlight on the ground to define a safety area.

    As it stands, riding a bike in an urban area can be a risky proposition, with more than 5,000 avoidable accidents happening every year due to cars passing cyclists at an unsafe distance.

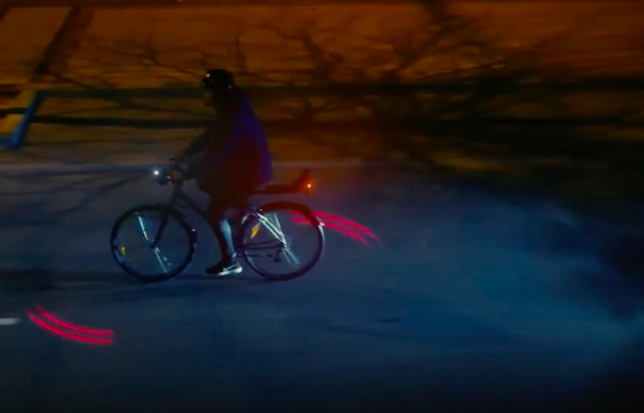
    During the day, the Bikesphere works like a normal light-detecting bike lamp, turning on when you go through dark areas as needed. By night, it’s ready to defend you, projecting a single-lined sphere for the entirety of your ride. When it can tell a car is coming, the light turns into a double line and starts to spin faster to alert both the cyclist and the driver.

    Bikesphere is the first crowd-sourced idea to come to fruition through Michelin’s #TrendyDrivers movement, which aims to change the habits of drivers to make the roads safer. When an idea is approved, they fund the project to get it off the ground. Ultimately, the Bikesphere will be made public, so anyone who wants one can purchase the common components and download the plans to print the rest using standard 3D printers.

    Share on Facebook


    [ By SA Rogers in Design & Products & Packaging. ]

    [ WebUrbanist | Archives | Galleries | Privacy | TOS ]


    WebUrbanist

  • Leica unveils limited edition Leica M Monochrom “Jim Marshall Set”

    Leica has released a limited-edition Leica M Monochrom “Jim Marshall Set”. Jim Marshall was the first and only photographer to receive the Grammy Trustees Award. The edition will be limited to 50 sets worldwide. The kit includes the new brass plated Leica M Monochrom camera with a special “Laiton” finish. Leica says the latter provides a unique matte quality. The camera comes with an inscription of Jim Marshall’s autograph and a Summilux-M 50mm f/1.4 ASPH lens.

    In the box you’ll also find a Jim Marshall Limited Edition Estate print of “Thelonious Monk at the Monterey Jazz Festival 1964” and a special, numbered edition and estate embossed copy of the book Jim Marshall: Jazz Festival.

    To mark the occasion the Leica Gallery Los Angeles which will showcase some of Marshall’s images of jazz icons like Miles Davis, Nina Simone and Thelonious Monk. The exhibit will run from June 15th through July 31st.

    Press Release:

    Leica Camera and the Jim Marshall Foundation Present a Leica M Monochrom Limited Edition Jim Marshall Set

    LEICA M MONOCHROM “JIM MARSHALL SET” WITH LEICA SUMMILUX-M 50 MM F/1.4 ASPH

    Leica Camera and the Jim Marshall Estate are proud to offer a limited edition set of the LEICA M Monochrom “Jim Marshall Set” with LEICA SUMMILUX-M 50mm f/1.4 ASPH to celebrate Jim’s legacy and his life-long relationship with Leica Camera. This edition is limited to 50 sets and will be sold worldwide exclusively through Leica Stores and Boutiques.

    The numbered and Jim Marshall autographed LEICA M Monochrom (Type 246) and LEICA
    SUMMILUX-M 50mm f/1.4 ASPH are made of brass components with a very special “Laiton” finish which provides a unique matt finish and a one of a kind appearance for each set. Another distinctive component of the set is the lens. This lens, while modern in its optical design, has the classic knurled focus ring and round lens hood reminiscent of the 1960’s. Both are made of brass with the “Laiton” finish.

    The set also includes a Jim Marshall Limited Edition Estate print of Thelonious Monk at the Monterey Jazz Festival 1964 and a special, numbered edition and estate embossed copy of the Jim Marshall: Jazz Festival published by Reel Art Press. During the extraordinary rise of popular culture and the counterculture in the 1960”s, Jim Marshall seemed to be everywhere that mattered. His images of the Monterey Pop Festival chronicling the
    breakout performances of Jimi Hendrix, Janis Joplin and Otis Redding are woven into the lore of the era. Jim shot more than 500 album covers. His photographs are in private and museum collections around the world. To learn more about Jim Marshall, visit www.jimmarshallphotographyllc.com.

    We invite you to the Leica Gallery LA to view Jim Marshall’s JAZZ FESTIVAL exhibition at the Leica Gallery LA, on view June 15th through July 31.

    Join us on June 15th at the Leica Gallery LA from 5PM-6PM for a guest lecture and book signing with Amelia Davis, owner of Jim Marshall’s archive of photography, followed by the opening reception of Jim Marshall’s JAZZ FESTIVAL exhibition.

    RSVP for the lecture and book signing here.
    RSVP for the opening reception here.

    Articles: Digital Photography Review (dpreview.com)

  • Eyebombing Bulgaria: Artist Adds Googly Eyes to Bollards, Bins & Pipes

    [ By WebUrbanist in Art & Street Art & Graffiti. ]

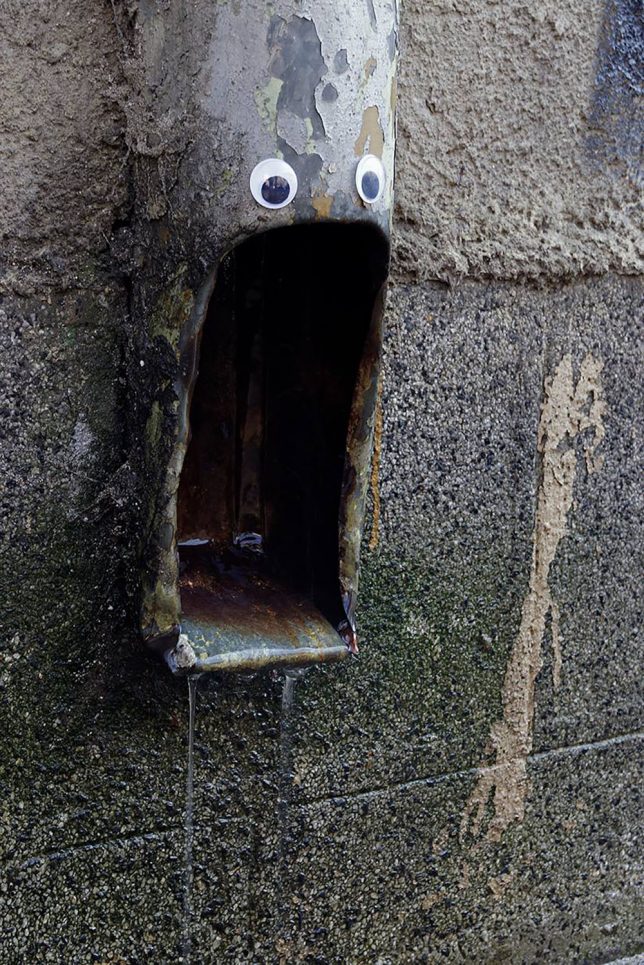
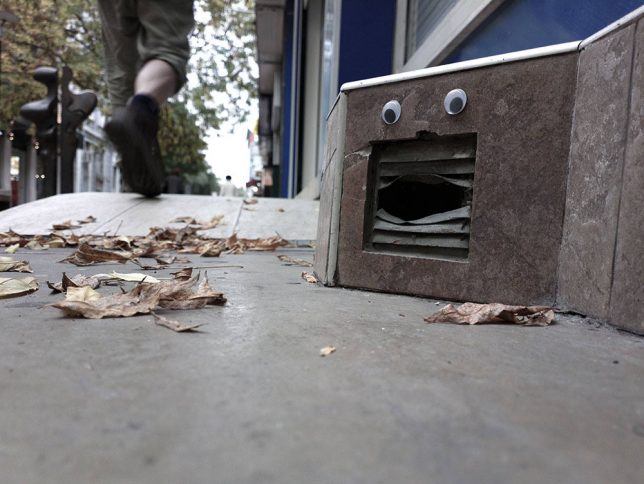
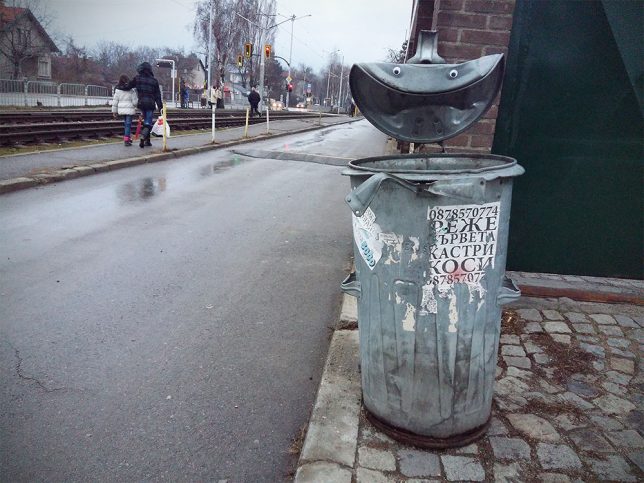
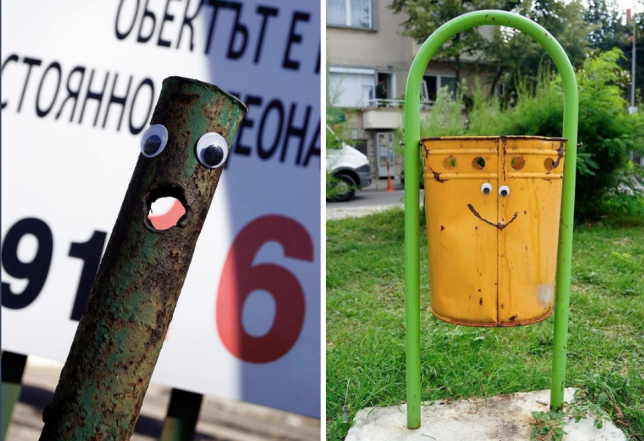
    As public art interventions go, googly-eye additions to urban objects and surfaces are pretty simple to implement, effectively animating their surroundings without too much work (or risk of being caught).

    Humans are naturally wired to read faces into ordinary things, but an extra cue or too by someone like Vanyu Krastev solidifies the effect, often with hilarious results.

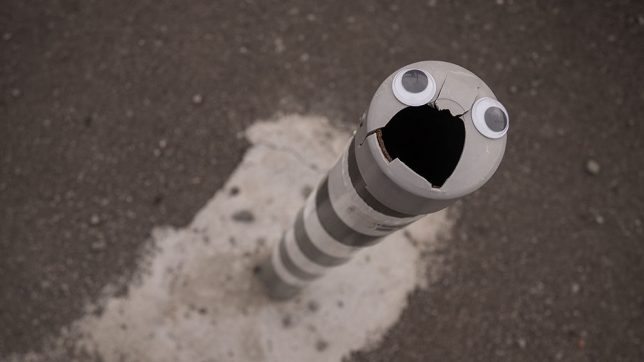
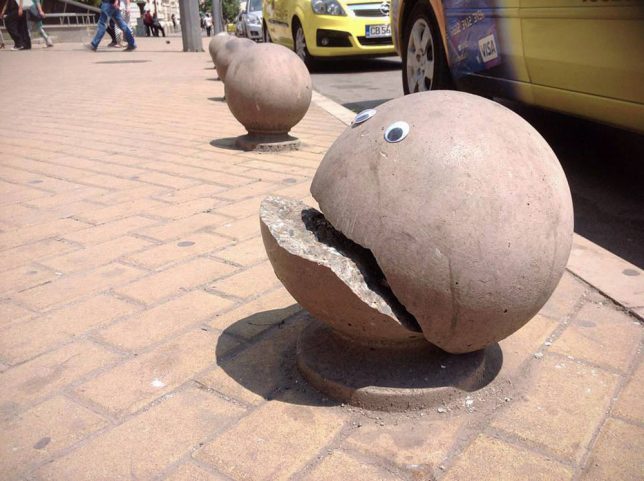
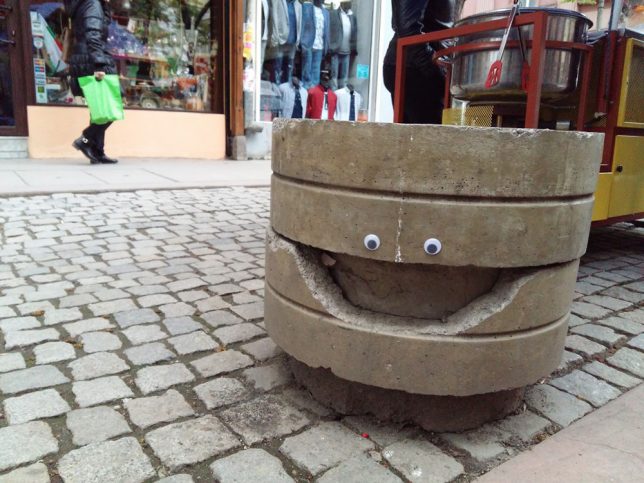
    Cracked bollards become crooked Pac Man-esque creatures and gaping water pipes seem to scream while doors and garbage cans gain strange sentience. The emotive range of these inanimate objects is quite impressive, considering it’s entirely in the eye of the viewer (and the two eyes placed on a given thing).

    Eyebombing is nothing new (at least as old as the internet and probably as old as ‘googly eyes’ themselves), but always a fun way to lighten someone’s day as they pass by on the street. It’s also a form of expression anyone can engage in — very little skill or cash required.

    It is “different from traditional types of street art like tagging, sticking, stencils” according to Eyebombing.com because “the above forms are largely driven by egocentric behaviour, like getting seen, respect and maybe a hope to get famous, often using vandalism as modus operandi.”

    Share on Facebook


    [ By WebUrbanist in Art & Street Art & Graffiti. ]

    [ WebUrbanist | Archives | Galleries | Privacy | TOS ]


    WebUrbanist

  • Meyer Optik launches modern version of historic Lydith 30mm F3.5

    German optical manufacturer Meyer-Optik-Gorlitz has launched a Kickstarter campaign to help it reintroduce its Lydith 30mm F3.5 lens. The original lens was launched in 1964 and the forthcoming version will remain true to the basic design of five elements in five groups, but the new company will be updating a number of its features.

    Meyer will use Schott glass, modern coatings and a 12-bladed iris instead of the 10 of the original lens. The modern Meyer Optik trades on the interesting ‘bubble’ bokeh of its Trioplan lenses and has gone to some lengths to ensure bokeh is equally exciting to the eye in its modern relaunched lenses.

    The original Lydith from 1964

    The Lydith will offer a closest focusing distance of just 16cm/8in, which is approximately half that of the 1964 lens, and although the company hasn’t said specifically it is likely that it will have a click-less aperture ring as well.

    The standard price of this manual focus lens on the Kickstarter page is $ 749, though some early bird offers were left at the time of writing. The earliest shipping date is December 2017, with the main batch going out in February 2018.

    For more information about the company see the Meyer-Optik-Gorlitz website or the Lydith 30mm F3.5 Kickstarter page.

    Manufacturer’s newsletter

    Meet our new lens – create magic

    Dear Meyer-Optik-Görlitz friend,

    We are very excited and proud to introduce you to the next in our oustanding line of art lenses – the Lydith 30mm f3.5

    One of the widest lenses in the Meyer-Optik lineup, the Lydith will impress you with its versatility at all distances. Exceptional sharpness, contrast and colour fidelity and it’s wonderful ability to create images with that indefinable magic is how this lens can best be described. It is a lens that will allow you to creatively capture those “magic moments”.

    Designed in the late 1950s and introduced in 1964, the modern version of the Lydith will be updated with high-perfomance lens coatings and a short minimum focusing distance of 8 inches (16 cm). Like all of Meyer-Optik’s lenses, the Lydith will be fully manual, 100 percent handmade in Germany.

    We think you are going to fall in love with the way it renders colors, its exceptional sharpness and, of course, it’s signature creamy bokeh not only in the background but also in the front.

    Don’t miss out – visit our Kickstarter now and be one of the first in the world to own the modern version of this classic lens.

    Best regards,

    Dr. Stefan Immes and the Meyer-Optik Team

    Articles: Digital Photography Review (dpreview.com)

  • Nikon updates NEF Codec to version 1.31.0

    Nikon has updated its NEF Codec to version 1.31.0, bringing new support to Windows Photo Gallery, Live Photo Gallery, and Photo Viewer. After updating, all three applications are able to display the previews embedded within NEF images. The software can be downloaded now from Nikon’s website.

    Via: NikonRumors

    Articles: Digital Photography Review (dpreview.com)

  • Benro launches ProAngel line of compact travel tripods

    Benro has announced the ProAngel line of ultra-lightweight and compact travel tripods and monopods. The ProAngel tripods are compact enough to fit into most small and medium sized bags and come with a single leg locking mechanism, allowing users to open the tripod leg sections with a single twist. Secure locking only requires half a turn.

    The two-section telescoping center column provides additional height when needed and has a standard 3/8″-16 thread to attach a photo tripod head. ProAngel tripods and monopods are available for most types of camera, from smartphones (Series 0) and compact system cameras (Series 1 & 2), to full frame DSLRs (Series 3 & 4).

    The ProAngel models are available without a tripod head or as a kit with the Benro B1 ballhead. For transportation and storage a protective bag with carrying strap is included. Monopods are priced from $ 49-$ 59, while the tripods range from $ 99-$ 249.

    Articles: Digital Photography Review (dpreview.com)

  • 23 Remarkable Mirror Images of Reflections

    Mirrors are not the only things that can provide a good reflection. Look around and see what other things can provide a good mirror image.

    These 23 images are great examples of how to photograph a reflective surface and reflections creatively. Enjoy.

    By Jacob Surland

    By Glenn Simmons

    By M.G.N. – Marcel

    By Pablo Fernández

    By Bruce Irschick

    By Elizabeth Haslam

    By Rüdiger Stehn

    By Jim Choate

    By Michael Levine-Clark

    By Ken Douglas

    By Chris Sorge

    By josef.stuefer

    By Bernat Casero

    By Ramesh SA

    By Dianne Lacourciere

    By Chrissy Wainwright

    By Arild Storaas

    By Max Milkovitsch

    By Theophilos Papadopoulos

    By Mario

    By Susanne Nilsson

    By Laurent Ribot

    By ANDY ARCIGA ( www.arcigaandy.com )

    The post 23 Remarkable Mirror Images of Reflections by Darlene Hildebrandt appeared first on Digital Photography School.


    Digital Photography School

  • Latest “Shot on iPhone” commercial puts focus on iPhone video capabilities

    After previously mostly concentrating on still imagery Apple’s latest iPhone commercial showcases the iPhones video mode by combining several clips that were shot by iPhone owners. There are nature scenes, including beaches, mountains, animals, insects, and ice floes, but also some scenes that feature human subjects.
    The soundtrack draws a thematic link by using a recording of astronomer Carl Sagan reading an excerpt from Pale Blue Dot, warning about the fragility of human existence and the importance of protecting the Earth.
    While the footage looks impressive it’s important to mention that a footnote at the end of the video says that “additional equipment and software” were used in some or all of the featured videos.

    Articles: Digital Photography Review (dpreview.com)

  • Weekly Photography Challenge – Reflections

    Reflective surfaces can be difficult to photograph – a “challenge” even! Here are a few examples of images of reflections to get you started.

    By Theophilos Papadopoulos

    Weekly Photography Challenge – Reflections

    Your challenge this week is to find some reflective surfaces and photograph them in a creative way. Some sources for reflections might include:

    • Windows
    • Puddles
    • Lakes and rivers
    • Chrome (fenders and car parts)
    • Actual mirrors
    • Sunglasses
    • Roads and sidewalks after the rain
    • Plexiglass or shine countertops

    By Jeff Wallace

    By Gavin Golden

    By Jamie McCaffrey

    By Dan Masa

    By Vince Young

    Share your images below:

    Simply upload your shot into the comment field (look for the little camera icon in the Disqus comments section) and they’ll get embedded for us all to see or if you’d prefer, upload them to your favorite photo-sharing site and leave the link to them. Show me your best images in this week’s challenge. Sometimes it takes a while for an image to appear so be patient and try not to post the same image twice.

    Share in the dPS Facebook Group

    You can also share your images on the dPS Facebook group as the challenge is posted there each week as well.

    The post Weekly Photography Challenge – Reflections by Darlene Hildebrandt appeared first on Digital Photography School.


    Digital Photography School

  • How to Make and Apply a Bokeh Overlay Using Photoshop

    Bokeh overlays are an excellent way to add a trendy stylized look to your portraits. You can purchase overlays, but I would instead suggest making your own. It’s easy, fun, and best of all, it’s free!

    In this video, I take you through the process of making and applying a bokeh overlay to a portrait using Photoshop. You will also learn to how to color tone your image to create a stylized look.

    How to Make Your Own Bokeh Overlays

    You can create bokeh overlays from almost any photo that is not too bright, and which has good contrast. The photos themselves do not have to be great photos at all; they can even have boring subjects and be totally out of focus.

    To demonstrate the power of this technique, we will work with two bad cell phone pictures; a photo of a hamburger and a photo of a street.

    How to Make and Apply a Bokeh Overlay Using Photoshop

    It’s a good idea to look through your phone and experiment with the photos that you already have.

    To create a bokeh overlay, place the image into your working document by going to File > Place Embedded. Once the image is in the Layers panel, right-click on it and select Convert to Smart Object. This will make it so that any filter that you apply is non-destructive and you can edit it later if you need to.

    To blur the image, and get the bokeh effect, go to Filter > Blur Gallery > Field Blur.

    Start by dragging the Blur slider to the right to make the image blurrier. In most cases, you’re going to want to keep the bokeh small, so don’t take the blur slider past 200px.

    How to Make and Apply a Bokeh Overlay Using Photoshop - field blur

    You can then fine-tune the effect by adjusting the Light Bokeh, and the black and white points in the Light Range. You can introduce more colors to your bokeh effect by dragging the Bokeh Color slider to the right.

    Here are my results:

    How to Make and Apply a Bokeh Overlay Using Photoshop

    How to Applying a Bokeh Overlay to Your Photo

    Once you have made your bokeh overlays, you can apply them to any image by using layer Blending Modes.

    For this type of effect, the Screen Blending Mode will be the best to use in most cases. But you can try any of the Blending Modes in the Lighten Category to see if they can give you a result that works better for your image. If you’re not familiar with Blending Modes and how they work, then check out this comprehensive look at Blending Modes where I explain each one in detail.

    The Screen Blending Mode allows you to keep the bright pixels of an image and hide the dark ones. In this case, the bokeh is bright, so it will stay, and it will hide the darker background.

    How to Make and Apply a Bokeh Overlay Using Photoshop

    How to Use Layer Masks to Hide Problematic Areas

    Some overlays will not be perfect matches for your photos. Sometimes the bokeh may cover up important parts of the portrait, such as the eyes or even the entire face. Create a layer mask and paint on the mask with black to hide those problematic areas.

    When you paint with black on a layer mask, you hide pixels. To reveal them again paint on the mask with white. Painting with different levels of gray will give you different levels of transparency.

    How to Make and Apply a Bokeh Overlay Using Photoshop

    Use Levels to Change How the Bokeh Blends

    The bokeh overlay may not give you the best results by simply changing the Blending Mode to Screen. In many cases, you will have to modify the luminosity of the layer to change how the bokeh blends. Remember, the Screen Blending Mode reveals bright pixels and hides dark pixels.

    By using a Levels or Curves Adjustment Layer, you can control the brightness of the layer which will control how much of the bokeh is revealed. When using an Adjustment Layer add a Clipping Mask to make sure that the changes only affect the bokeh layer. To clip an Adjustment Layer to the layer blow it, you can press Command/Control+Option+G.

    How to Make and Apply a Bokeh Overlay Using Photoshop

    Apply a Color Tone to the Image

    To finalize the stylized effect, you can color tone your image by using a Selective Color Adjustment Layer.

    Under the Colors dropdown menu select Blacks and slide the Cyan slider to the right, and move the Yellow slider to the left to subtract yellow. Doing so will add a blue tint to the shadows, and it will give your image a retro feel.

    How to Make and Apply a Bokeh Overlay Using Photoshop

    You can watch a video of the whole process below:

    Conclusion

    Here is the before and after comparison of the image.

    Before tutorial

    Before

    Finished tutorial

    After

    There it is, a quick and easy way to make and apply your own bokeh overlays. Try it and please share your images in the comments below.

    The post How to Make and Apply a Bokeh Overlay Using Photoshop by Jesus Ramirez appeared first on Digital Photography School.


    Digital Photography School