Blog

  • Brutalist Victory: Concrete Skylines Dominate Radical Retro-Future Cities

    [ By WebUrbanist in Architecture & Cities & Urbanism. ]

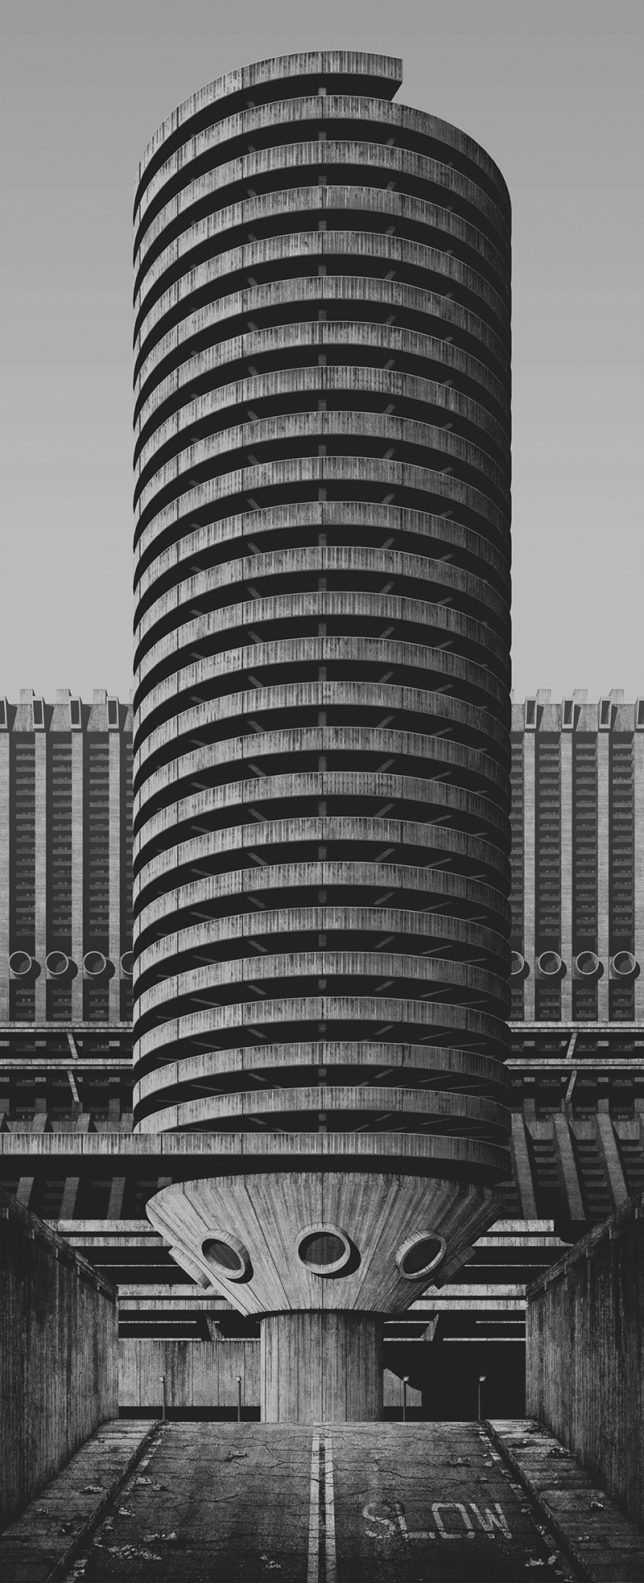
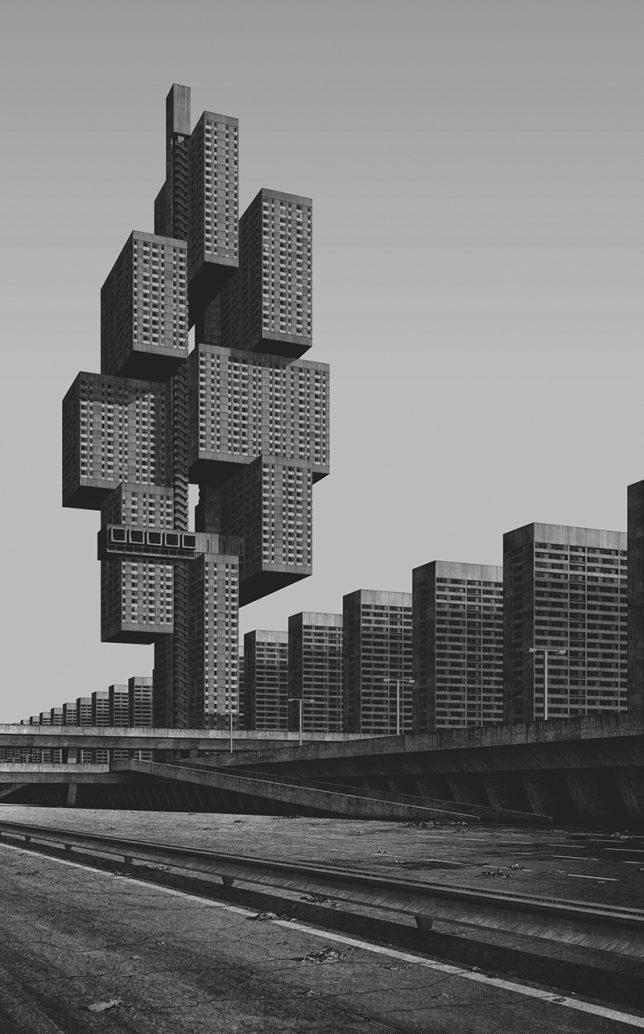
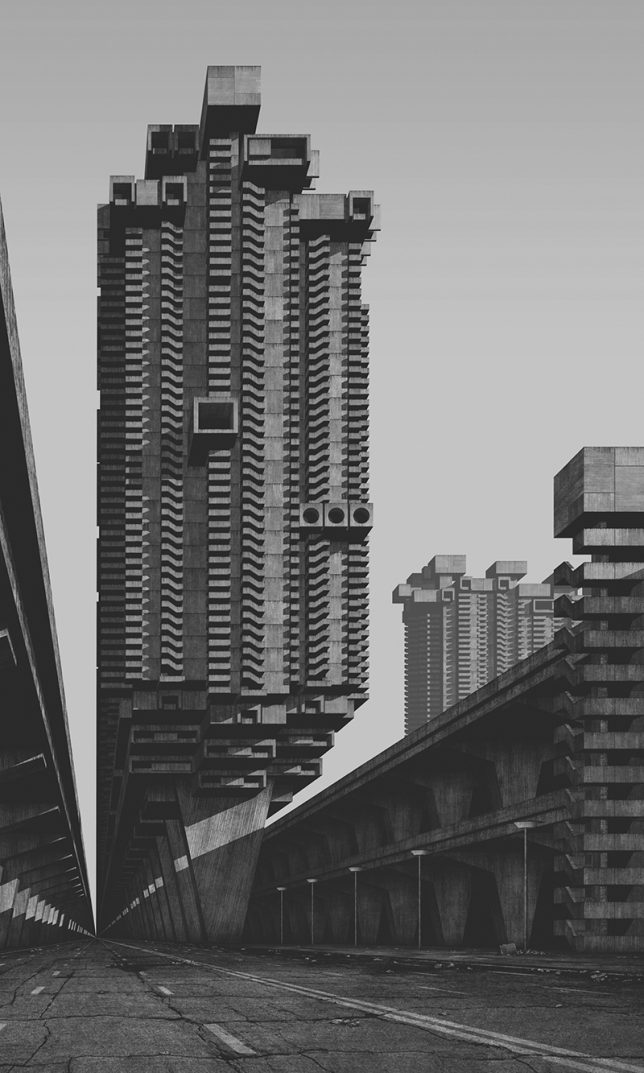
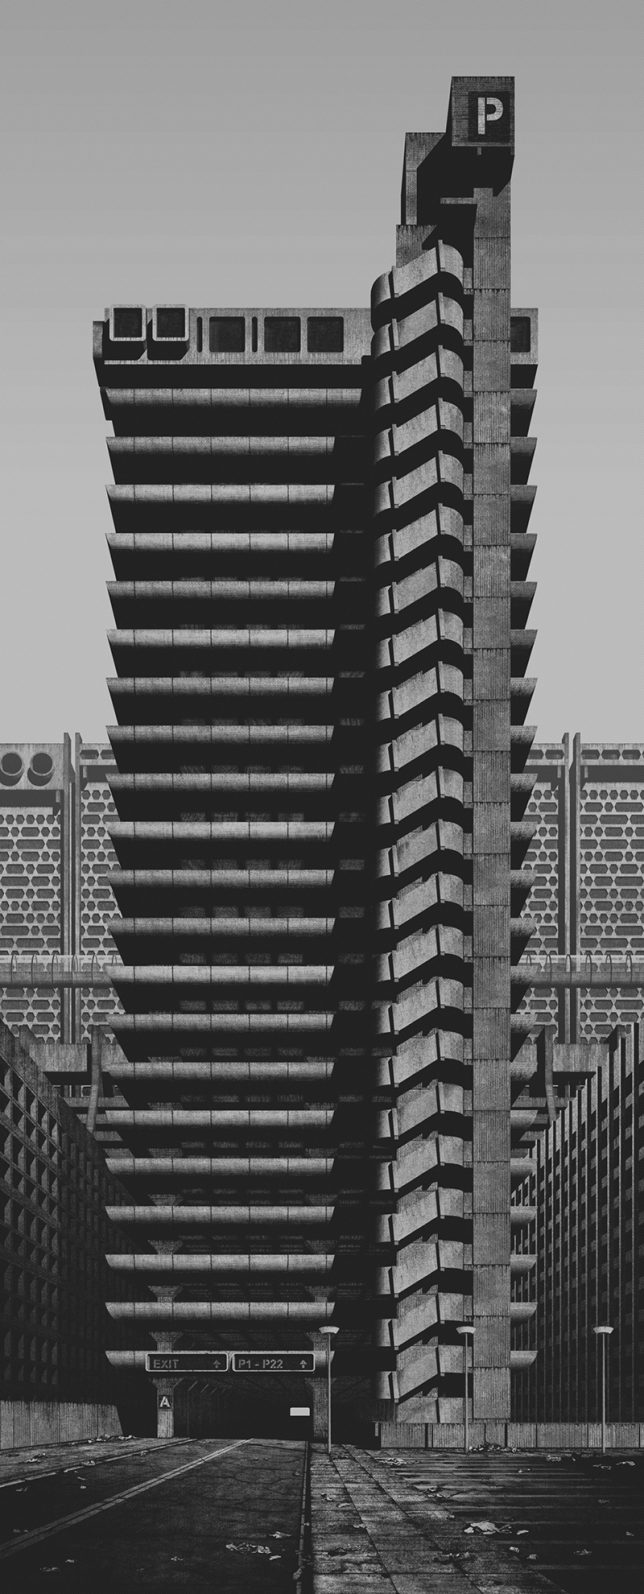
    Architectural trends come and go, but some visions are more persistent than others, and Brutalism could have been among them. This artist asks and answers the question: what if concrete monstrosities of the 1960s and 70s had somehow won the war against the steel-and-glass towers that dominate contemporary skylines?

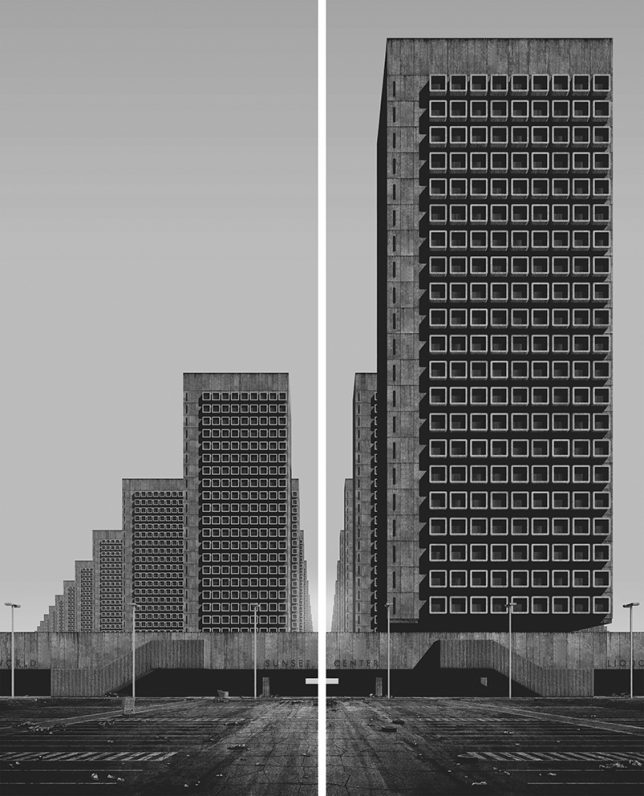
    German digital artist Clemens Gritl has built a virtual world around this retro-futuristic vision, dubbed “A Future City from the Past”, populated with extreme forms of concrete idealism. His “super-brutalist” metropolis extrapolates the revolutionary aesthetic of this harsh material, seen for a time as representing social progress and democratic ideals in architectural form.

    Through 3D modeling (exhibited as black-and-white 2D images), this series presents something that could have been seen as utopian but inevitably, with Brutalism in hindsight, feels oppressive and dystopian. His renditions are meant to look like products of a past time, capturing Modernist-worthy views of these giant-sized Brutalist creations.

    “All buildings and structures are homogenic,” says the artist. “The differentiations of architectural styles and eras are eliminated and replaced by geometric structures, repetition and absolute materiality.”

    “Ballard’s novel paints a dark dystopian picture — the architecture of a single residential tower becomes the driving force for mysterious changes of the tenants behaviour. Can the presence of a high-rise structure truly create such a threatening atmosphere and social tension, culminating in murder, decay, destruction and even anarchy?”

    Individually, various structures recall Modernist greats as well, like a towering residential complex arrayed on piloti (columns) as envisioned and realized by Le Corbusier. But, like Corbu’s masonry towers for his idyllic cities, the results do not look particularly livable. Perhaps the portrayal is also a little unfair — after all, Corbu at least envisioned these things surrounded by green landscapes.

    Share on Facebook


    [ By WebUrbanist in Architecture & Cities & Urbanism. ]

    [ WebUrbanist | Archives | Galleries | Privacy | TOS ]


    WebUrbanist

  • Photomatix Pro 6 launched with more color control and realistic-looking results

    Example picture by Ron Pepper

    UK software company HDRsoft has released version 6 of its Photomatix Pro imaging application with the promise of more realistic HDR images and better control of picture characteristics. A key new feature allows users to blend an unedited version of a picture with its HDR counterpart so that the overall effect of the process can be moderated if needed.

    The software now includes a tool called Tone Balancer that offers a wider range of choices in the render that assist in making HDR images that look less manipulated than usual, while a new brush tool provided the means to select and adjust color values in local areas. Lens and perspective corrections can also be made in this version with new facilities to deal with distortion, and HDRsoft says it has made the workflow easier to manage and follow.

    Photomatix Pro can be used to blend multiple images to create HDR images, and it offers controls for removing ghosted moving objects and to correct small movements in the camera between exposures. It can also be used to optimise the dynamic range of single image files. The package can be used as a standalone application or as a plug-in for Adobe’s Lightroom and costs $ 99 for new users. Owners of Photomatix 5 can upgrade for free, while those using earlier versions can get version 6 for $ 29. A free trial is available. For more information see the HDRsoft website.

    Press release

    HDRsoft announces the release of Photomatix Pro version 6

    The latest version of their software application that helps photography pros and enthusiasts create HDR (High Dynamic Range) photos in a large range of styles, from realistic to artistic.

    Key benefits in the new release include:

    • More style choice for realistic results. A new HDR rendering method called Tone Balancer adds more options and presets for realistic looking results. It is well-suited to real estate and natural style landscapes.
    • Refining with more control over color. With the new interactive brush tool, users can make color changes to just parts of the image, by painting over those areas. They can also fine-tune the saturation, hue, and brightness of individual colors in a photo. This control is especially useful for removing color casts and enhancing skies and other image features. Images can also be cropped to easily remove distractions or to improve their composition.
    • Avoiding overdoing it. For a more realistic look, users can blend an original photo with the rendered image, either globally or by using a brush to select specific areas.
    • Removing distortion from your photos. A new distortion correction tool makes it easy to straighten photos that aren’t level and fix perspective issues where lines don’t look parallel when they should. These are particularly helpful features for architectural and landscape photographers.

    A more intuitive workflow. Both new and experienced users will find it easier to load their images and develop them in Photomatix Pro with a guided workflow. A user can quickly open their images and move through the development process to achieve their results.

    Photomatix Pro merges photographs taken at different exposure levels into a single HDR image with options for automatically aligning hand-held photos and for removing ghosts or visual artifacts when moving objects are present in the scene. Merged images can then be adjusted with a range of precise controls and settings or with one-click presets.

    Photographers can quickly get the look they desire from natural-looking results to painterly images, from surreal and dreamy photos to ultra-realistic images with increased details.

    Photomatix Pro can also be used to enhance a single photo to boost its shadows and enhance its highlights. The program includes a plugin for Adobe Lightroom for users who want to integrate Photomatix Pro into their Lightroom workflow.

    “What’s unique about Photomatix Pro is the full range of styles it offers to render HDR photos, and version 6 makes this even better,” said Geraldine Joffre, HDRsoft Managing Director. “Unlike other apps which rely on one HDR rendering algorithm, Photomatix comes with several. Each algorithm can give an entirely different look with enhancing tones and details or fusing multiple exposures together. Photographers will find it useful to have several alternatives for processing HDR photos as things change with different subjects or lighting conditions.”

    AVAILABILITY
    Photomatix Pro 6 is available now for $ 99 USD for a single-user license. Customers who purchased Photomatix Pro 5 will receive a free upgrade. Earlier versions of Photomatix Pro can be upgraded for $ 29 USD.

    Articles: Digital Photography Review (dpreview.com)

  • Turning the Black Sea blue: NASA’s image of the day shows phytoplankton bloom

    NASA’s image of the day is a composite, taken by the Moderate Resolution Imaging Spectroradiometer (MODIS) on its Aqua satellite. It shows phytoplankton swirling in the currents of the Black Sea. Credit: NASA/Jeff Schmaltz, LANCE/EOSDIS Rapid Response

    The Black Sea is one of the largest bodies of water on earth, measuring 168,500 square miles, and it turns out not to be black at all. NASA’s appropriately-named Aqua satellite captured this shot last month, showing the deep blues and turquoise colors of the Sea from an orbital altitude of 438 miles. This is actually a composite image, made up of multiple photographs taken during several passes over the region.

    The light-colored swirls are billions of phytoplankton – floating microscopic organisms plated with calcium carbonate.

    Read more at NASA.gov

    Articles: Digital Photography Review (dpreview.com)

  • How water droplets came to life for a Gatorade ad

    Image courtesy UNIT9 and Gatorade

    Video production outfit UNIT9 pulled off some neat visual tricks in a recent project for client Gatorade. Using a custom-built ‘rain rig,’ precisely timed water droplets fall to the ground in the shape of a figure. Strobes illuminate the droplets and give the effect of freezing them, and frame-by-frame the water figure appears to run, jump and kick right in front of our eyes.

    The figure’s movements were informed by motion-capture, and the rain rig had to be timed to turn water pressure on and off at millisecond intervals. The camera, strobes and rig were all synced to work in concert with each other, and each frame was processed to correct for gravitational acceleration of the drops as they fell.

    Photo courtesy UNIT9 and Gatorade
    Photo courtesy UNIT9 and Gatorade
    Photo courtesy UNIT9 and Gatorade

    Manipulating falling water to this extent hadn’t been done before, so the rig was custom built. It’s a neat piece of innovation that plays with the most basic principle of video capture: string together a certain number of still images every second in front of a viewer’s eyes and they’ll look like a moving image. For a behind the scenes look, check out the video below and visit UNIT9’s website.

    Articles: Digital Photography Review (dpreview.com)

  • Why would I want an external recorder/monitor?

    Not everyone wants to shoot video, so it may seem unthinkable to spend around $ 1000 on an external video monitor/recorder. However, others find it opens up creative challenges every bit as satisfying as stills photography.

    The more you shoot video, the more you’re likely to encounter (and find yourself needing) tools that are rarely provided on stills/video cameras. We’ll be shooting with a couple of the more common models over the coming weeks to see how they compare, but first we wanted to give an overview of why you’d even consider using one.

    Why would I want an external monitor/recorder?

    As the two-part descriptor suggests, there are two main benefits to using an external recorder: to get a bigger, more informative preview as you shoot and to capture better quality footage.

    Recording

    In terms of recording, the benefits come from a number of factors.

    Understandably, most stills/video cameras have processors designed primarily for stills, and they also have to make significant compromises in the name of battery life and thermal management, since video isn’t their primary role. Also, for the most part, they’re designed to produce amounts of data that are manageable by consumers, and at bit rates compatible with (relatively) slow memory cards. This typically means heavily compressed video, usually using what’s known as a GOP (group of pictures) video codec, which only records a full image at select key frames while interpolating the in-between images based on changes between frames. H.264 is a common example of a GOP codec.

    “As the two-part descriptor suggests, there are two main benefits to using an external recorder: to get a bigger, more informative preview as you shoot and to capture better quality footage.”

    External recorders, by contrast, are dedicated video capture devices built by companies that specialize in video capture. So, while they can’t improve the level of detail that your camera initially captures, they leverage the fact that your camera often captures more detail than can be recorded using the internal codec. As a result, you can capture video with fewer compression artifacts, and usually in formats that work smoothly with major editing software, such as Apple’s ProRes and Avid’s DNxHD and HR.

    For example, most cameras output a more detailed 4:2:2 stream over HDMI, rather than the simpler 4:2:0 footage they can themselves capture and compress. Meanwhile the Fujifilm X-T2 will only output Log footage over its HDMI socket. Other cameras, notably Panasonic’s GH4 and 5, will output 10-bit footage and can’t capture their very highest quality footage internally.

    External recorders also often support SDI connectors, a more robust type of connection typically used on pro video cameras. The latest recorders support Raw footage over SDI which means the recorder can continue to serve you if you move beyond your current camera.

    Camera Frame Rate Codec Bit depth / sub-sampling Bitrate
    Panasonic GH5 UHD/24p h.264 10-bit, 4:2:2 400 Mbps
    Sony a7S II UHD/24p h.264 8-bit 4:2:0 100 Mbps
    Olympus E-M1 Mark II DCI/24p h.264 8-bit 4:2:0 237 Mbps
    UHD/24p ProRes 422 10-bit 4:2:2 471 Mbps
    UHD/24p ProRes 422 HQ 10-bit 4:2:2 707 Mbps

    Similarly, external recorders often have better audio capture capabilities than those baked into the mass-market capture formats used in many cameras. As with the video footage, this is primarily a case of having more space dedicated on the screen, lower levels of compression and a wider range of settings and connectors.

    Monitoring

    The monitor side of things, there are a lot more benefits than just having a bigger screen to see things with, though this in itself is valuable. The ability to see your scene on a larger screen makes it easier to spot small, distracting objects and check precisely where your focus is set. It can also help you better visualize the way your final footage will look, helping you make creative decisions such as choosing how much depth-of-field you want.

    It’s also common for monitors to offer overlays and composition aids. For example, framing guides that show crops for different aspect ratios can be helpful if you intend to publish your work in something other than the camera’s native aspect ratio.

    Also, freed from having to share battery power with so many other functions, external monitors can often be run brighter than the rear screen on your camera, making it easier to shoot outdoors.

    Boxes full of tools

    But just as significantly, external devices often include useful monitoring tools that go beyond those offered in most cameras, both in terms of the range of tools available, and the precision with which they can be configured.

    It’s becoming increasingly common for cameras to offer focus peaking, to check where the point of perfect focus is, but zebras, which highlights an area of a certain brightness, are still not universal. External recorders offer these features, often with greater control over their settings. The ability to choose to highlight a typical skintone brightness or everything exposed over 90 or 95% brightness, makes achieving consistent exposure much easier.

    Focus peaking is becoming increasingly common on cameras, but external monitors can offer more subtle control over color and threshold, to make it easier to fine-focus.

    The other feature common on external recorders that we’ve only seen on a couple of cameras is the ability to apply color and gamma curve correcting look up tables (LUTs) to Log video in real time. This means that you can shoot gradable, but washed-out-looking, Log footage but with a preview that approximates the finished result, so you end up looking at something much more visually meaningful.

    ‘Scopes

    There are a series of exposure and color analysis tools widely used in video production, collectively known as ‘scopes.’ These are very rare on contemporary stills/video cameras, but are hugely useful for assessing your setup.

    A waveform display is a tool to help visualize luminance/exposure. It’s common on pro video equipment as well as in video editing software. Rather than a histogram, which just tells you how many pixels hold each brightness value, a waveform tell you where those pixels occur in the image. The waveform diagram shows the brightness values for every column of pixels in the image: dark at the bottom, bright at the top.

    Videographers like to use waveforms because it’s easy to visualize both exposure and contrast across the frame. This is particularly helpful for judging exposure at a particular location, such as a subject’s face. It’s also pretty common to have a choice of Luminance or separate R,G,B waveforms (known as an ‘RGB Parade’), for judging color balance and per-channel exposure.

    The luma waveforms shown here are representing the ColorChecker on our test scene. There’s a thin, bright peak on the far left, representing the sliver of white that just crept into shot, then there are six columns representing the six columns of color patches on the ColorChecker.
    Look closely and you’ll see that the pattern of the left-hand three columns getting progressively shorter continues into the right-hand columns: these are the progressively darker greyscale patches along the bottom of the ColorChecker.

    The other common video tool is the Vectorscope, which can be used to evaluate color information in the image, such as hue and saturation. Getting accurate color straight out of camera (as well as matching it between shots) is particularly important when shooting video since Raw video capture hasn’t yet arrived in hybrid cameras. It’s a bit like shooting JPEGs – you only have so much latitude to adjust things in post.

    False Color paints regions of the image to reflect their brightness. There’s a fairly standard scale, red for clipped whites, purple for crushed blacks, green for middle grey and pink for skintones.

    Finally, one feature we’ve not seen on any camera yet is False Color, which is a little bit like having multiple zebras active at the same time. Most brands use a similar scheme in which tones around middle grey are painted green, one stop above this (the approximate brightness of Caucasian skin tones) is painted pink, near clipping is yellow, clipped is red, near black is blue and crushed black is purple. The result is a riot of color but with a bit of experience, it gives you a very easy way to interpret your exposure.

    Workflow benefits

    The net effect of these features quickly add up to provide benefits throughout the video workflow. If you can capture footage using a codec favored by your choice of editing software, you can usually speed up the process of importing by avoiding the need to transcode.

    Similarly, the use of the fastest memory cards or still-faster SSDs maximizes transfer rates when it comes to transferring large video files to your editing computer. Again, with a project that takes more than a handful of clips, this is a huge time-saver.

    Some external devices let you review and tag your clips before you get back to your computer, again speeding up the initial step of organizing your footage.

    It’s not all good

    As you’d expect, there are disadvantages to using external recorders, too.

    Although each of the tools offered make it easier to set your shot up perfectly, this more precise way of working can also risk slowing you down. Also, the added weight and bulk of carrying a second device around with you makes it much harder to run-and-gun with an external monitor.

    On top of this, it’s much less likely that you’ll go unnoticed. Even a relatively small monitor/recorder makes your setup look more professional and consequently more obtrusive. This is not the look for Guerrilla film making.

    One downside of off-camera recorders is that it’s a bit harder to blend into the scenery and remain unnoticed.

    Also, although external devices don’t need to share their battery power with so many other functions, it still takes a lot of power to run a screen and capture and compress video. Even the models with fans tend to run hot and hit their batteries hard, meaning you’ve got more recharging to plan and worry about.

    But, given the amount of planning that goes into anything beyond the simple grabbing of clips, this additional consideration isn’t that onerous. For a bit more planning and setup time, an external recorder can help you get the very best out of your camera.

    $ 1000 isn’t a trivial amount of money but, for a great many photographers, it’s an amount they’d justify spending on a lens. Just like a lens, an external recorder can help expand the range of things you can do with your current camera. It’s also brand agnostic, so unlike a lens, it’s very likely to work regardless of what camera you buy next, and will help boost the quality of everything you shoot, not just the things you can use a new lens for. And that’s got to be worth it, hasn’t it?

    Articles: Digital Photography Review (dpreview.com)

  • Haul For One: U-Haul Adapts & Reuses Abandoned Buildings

    [ By Steve in Architecture & Offices & Commercial. ]

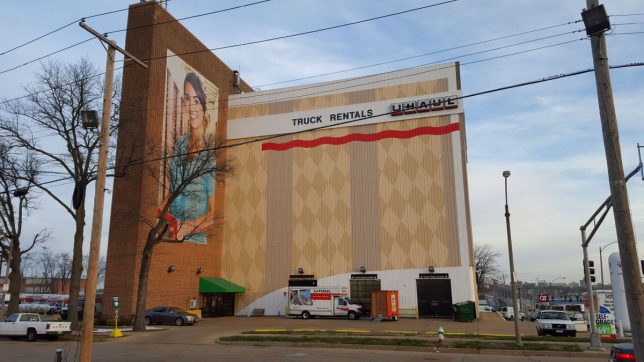
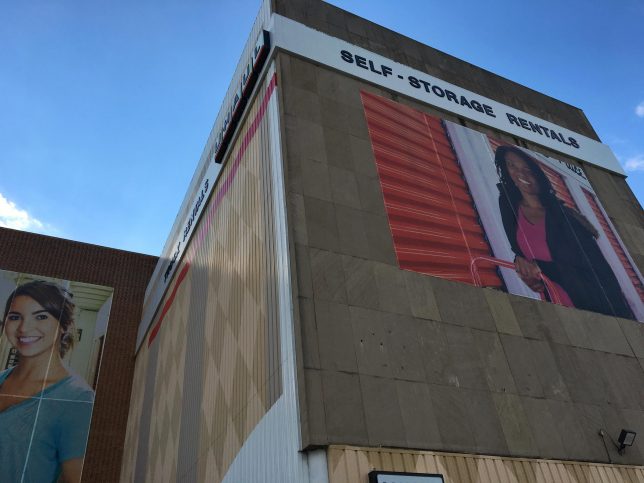
    U-Haul company’s commitment to renovate and reuse abandoned buildings is not only economical, it also serves to revitalize post-industrial neighborhoods.

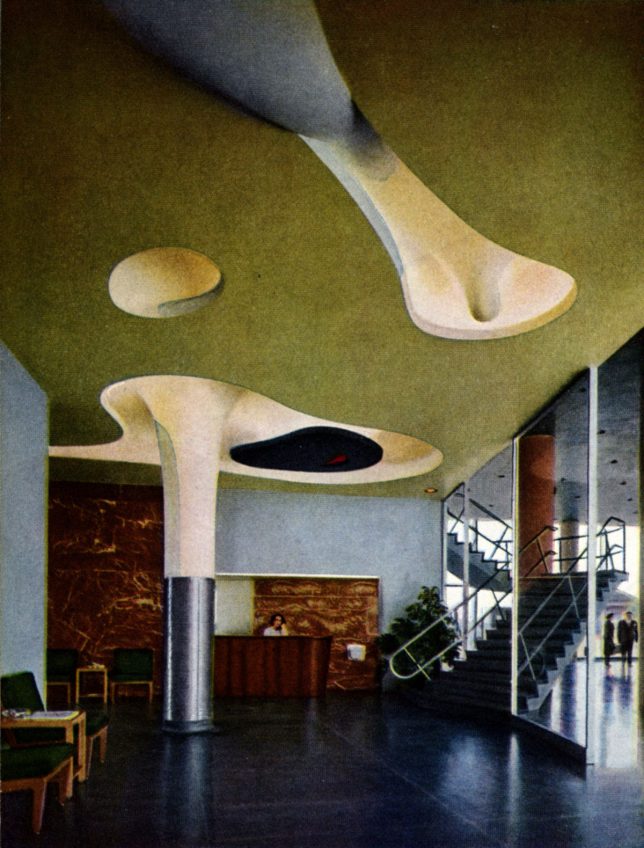
    One of U-Haul’s most noteworthy adaptive reuse projects is the former Magic Chef head office building in south St. Louis, Missouri. Built in 1947-48 and designed by architect Harris Armstrong, the building’s lobby featured a beautiful sculptured ceiling created by legendary Japanese-American artist Isamu Noguchi.

    Magic Chef sold its St. Louis buildings and factories in the late 1950s and the head office building at 1641 South Kingshighway sat abandoned for about a decade before U-Haul bought it in 1977.

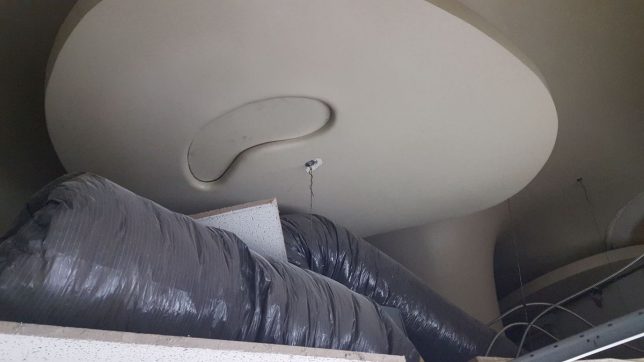
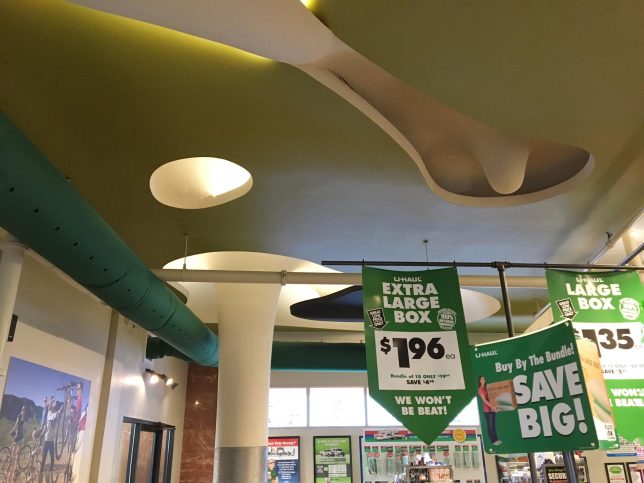
    A practical renovation in the early 1990s saw a drop ceiling installed beneath Noguchi’s sculptural ceiling but thanks to U-Haul’s current focus on adaptive reuse and respectful regional marketing, both the building and its unique mid-century lobby ceiling are undergoing a well-deserved renaissance.

    Shop The Pig

    U-Haul’s corporate sustainability initiatives pay off for both the company and the community in a number of ways including lightening the local carbon footprint, reducing consumption of energy and resources on new construction, and helping cities and towns reduce their inventories of unwanted buildings. Saving historic architecture isn’t always a priority, however. This former Fox Brother’s Piggly Wiggly supermarket in Saukville, Wisconsin is a prime example. The defunct grocery store was converted into the U-Haul Moving & Storage of Port Washington full-service moving and self-storage facility over the summer of 2016.

    For St. Pete’s Sake

    U-Haul doesn’t have to expend the expense required to beautify their adaptively reused buildings but aren’t you glad they do? Take the U-Haul depot above, located in downtown St. Petersburg, Florida. Formerly a drab, dreary, abandoned rail-connected cold storage building, the structure now boasts a gigantic mural of Tampa Bay wetlands fauna and flora on one side highlighted by an artistically rendered Roseate Spoonbill. Flickr user Mark Evans (st_asaph) captured this uplifting urban scene on February 27th of 2017.

    Next Page – Click Below to Read More:
    Haul For One U Haul Adapts Reuses Abandoned Buildings

    Share on Facebook


    [ By Steve in Architecture & Offices & Commercial. ]

    [ WebUrbanist | Archives | Galleries | Privacy | TOS ]


    WebUrbanist

  • Nikon D7500 vs Canon EOS 80D

    Introduction

    We’ve already looked at how the Nikon D7500 fits into Nikon’s lineup, and how it compares to the more expensive D500 and its outgoing predecessor, the D7200.

    But now, we’re going to look at how it compares with Canon’s EOS 80D.

    The EOS 80D is older, admittedly, launching in February 2016 with an MSRP of $ 1199, though it currently sells for $ 1099. The D7500 was announced in April of this year, and its MSRP and selling price are currently both $ 1299. So you pay a little more, and get a newer camera with the D7500, but what does that actually translate to? Let’s find out.

    Sensor and image quality

    The D7500 has inherited a new 20MP sensor from its high-end brother, the D500, which might look at first like a downgrade next to the 24MP unit in the EOS 80D. But while we haven’t had a chance to thoroughly test the D7500 just yet, It’s image quality is likely to be extremely similar to the D500, with that camera offering a bit better high ISO performance in Raw mode compared to the EOS 80D, and JPEG noise reduction that retains detail and eliminates noise just a little better as well.

    We’re also a big fan of Nikon’s JPEG color rendition, with warm, saturated yellows and reds and vibrant – yet neutral – greens. So while it’s too early for us to make a definitive call on overall image quality, the D7500’s imaging pipeline certainly looks competitive, despite the (small) resolution advantage of the EOS 80D.

    Shooting rate and buffer

    Switch the Nikon D7500 into ‘Continuous High’ shooting mode and you’ll be greeted with a solid 8fps burst speed, while the EOS 80D tops out at 7. It’s not a huge disparity to be sure, but it’s when you hold that shutter button down that you’ll really notice a difference.

    The EOS 80D’s buffer is capable of holding 110 JPEG or 25 Raw images, while the D7500 allows for an infinite amount of JPEG shooting as well as 50 uncompressed 14-bit Raw files.

    For those that need to shoot either long bursts or several successive short bursts of fast action, the D7500 pulls ahead handily.

    Screen

    Both the D7500 and 80D have screens that are 3.0″ diagonal and offer touch functionality. The 80D’s is marginally higher in resolution, and comes with a more standard (for this sensor format) 3:2 aspect ratio, but it is a fully-articulating design, while the D7500’s is a tilt-only design.

    The tilting design on the D7500 offers more unobtrusive from-the-hip street shooting, without a big screen flipped out to the side, but the 80D allows for shooting from high-and-low angles in both portrait and landscape orientation.

    Keeping a hand on the EOS 80D’s fully articulating screen may also help stabilize the camera, but on the other hand, flipping the screen out will impede usage of the HDMI and USB ports. This is a problem for those using an external video recorder, or those who are want to shoot tethered in a studio. The tilt-only screen on the D7500 won’t present a problem in either of those situations.

    Body, controls and build

    But what if you’re venturing outdoors, into potentially rainy or adverse conditions? Neither of these cameras offers an all-metal body but both are reassuringly well-made.

    The D7500 is constructed with a combination of Carbon Fiber Reinforced Thermo Plastic (CFRTP) and magnesium alloy, while the EOS 80D is made from polycarbonate plastic, and both are weather-sealed, to some extent. The D7500 feels a little more solid in the hand, but unless you’re heading into a war zone or are very hard on your cameras, build quality shouldn’t play too heavily into your choosing one of these cameras over the other.

    Both cameras offer two control dials for easy manipulation of manual camera settings, have an abundance of external buttons and switches and offer a reasonable level of customization. Each offers a single SD card slot, and the EOS 80D is CIPA-rated to 960 shots on a full battery, while the D7500 is rated to 950 shots. Both offer 100% coverage viewfinders, though the D7500’s is marginally bigger in terms of magnification.

    The question of whether Canon’s ergonomics and controls versus are superior to Nikon’s is highly subjective. It’s best, if you can, to just pick each one up and see how they each feel for yourself.

    Video

    At first glance, the D7500 might appear to be the more ‘serious’ video camera. Both cameras offer headphone and microphone ports, HDMI out and have touchscreens for placing focus, but while the 80D offers a maximum video recording resolution of HD 60p, the D7500 can shoot 4K. But there’s more to it than that.

    The 4K video mode on the D7500 comes with an additional 1.5x focal length crop over the existing 1.5x crop from using an APS-C sensor, meaning a full 2.25x crop relative to the focal length printed on your lens. This means even at the 18mm wide-angle setting of the D7500’s kit lens, you’ll be getting a 40.5mm-equivalent field of view when you shoot 4K video. On the other hand, the D7500 has no crop factor when shooting Full HD, just like the EOS 80D, so you could argue that having 4K at all is a nice bonus.

    The D7500 also comes with zebra highlight warnings and a flat(ish) picture profile, so it should be easier to keep highlight clipping in check than on the EOS 80D. Neither camera offers sensor-shift or digital image stabilization, so it’s best to make sure you’ve got stabilization built in to your lens for handheld video shooting.

    So yes, so far it seems like the D7500 is the one to get for video shooting. But not so fast.

    We’ve found that Dual Pixel Autofocus gives Canon cameras an incredible advantage when it comes to autofocus in video. The D7500 is still stuck with plain-old contrast-detect AF, which means lots of hunting, whereas the EOS 80D will stick to subjects or people’s faces reliably, and makes for easy focus racking and run-and-gun shooting.

    In the end, despite the relatively pedestrian HD video spec, we think that Dual Pixel AF alone is enough of a reason to recommend the EOS 80D to those that are interested in shooting video, even above and beyond the D7500’s 4K capability and additional capture aids. It really is that good.

    Autofocus

    The D7500 has a carryover 51-point (15 cross-type) autofocus system from the D7200 (and the D750), but now includes the D500’s 180k-pixel metering sensor for more accurate subject tracking (which Nikon calls 3D Tracking) through the viewfinder. In our initial testing, the new metering sensor makes a noticeably positive difference.

    The EOS 80D, meanwhile, has a 45-point system where all points are cross-type, and uses a 7560-pixel RGB + IR metering sensor to help drive its iTR (Intelligent Tracking and Recognition) subject tracking.

    When shooting through the viewfinder, the D7500’s subject tracking wins handily, sticking reliably to subjects more reliably than the 80D as they move about the frame. It also offers Auto AF Fine Tune, first seen on the D5 and D500, to help you calibrate your specific lenses to your specific D7500 for the best possible results.

    However, Canon’s Dual Pixel AF isn’t done yet. When shooting in Live View, the D7500 feels absolutely prehistoric compared to to the EOS 80D. While you can tap to move your focus point on the D7500, you’re still greeted by a series of pronounced hunts before the camera settles into critical focus. On the 80D, just tap, and watch the camera smoothly rack focus, lock on and track.

    Connectivity, battery grip

    In terms of wireless transfer, whether to your phone, a laptop, the cloud or elsewhere, there’s not between these two cameras. The D7500 gains Bluetooth LE to (hopefully) help make the pairing process easier, but if you’re an Android user, you may find NFC on the EOS 80D to be more convenient.

    Lastly, for those needing extended stamina, there is a first-party battery grip option for the EOS 80D, while Nikon doesn’t have one for the D7500.

    So, which is better?

    Well, of course it depends.

    For those who are shooting fast action and stills and primarily use the optical viewfinder, the D7500 is a better bet, with its faster burst speed, deeper buffer and better (likely class-leading) phase-detection autofocus system, with 3D AF tracking.

    For those who have a greater emphasis on video and don’t necessarily need 4K (or just don’t want it at a 2.25x crop), the EOS 80D is hard to beat, due in no small part to Canon’s Dual Pixel AF. It just makes it so easy to shoot video that’s properly focused, allowing for dependable face detection and subject tracking as well as precise focus racking.

    But wait, we’re not done yet…

    Versus 7D II?

    There’s another camera in Canon’s roster that to some degree also competes with the D7500 – the more pro-oriented EOS 7D Mark II.

    The 7D Mark II came out back in September of 2014, so while it’s a little long-in-the-tooth, it remains Canon’s APS-C flagship. While it was released with an MSRP of $ 1799, it currently sells for around $ 1499, so about $ 200 more than the Nikon D7500.

    While they both have sensors with similar resolution, the D7500 is almost certain to have notably better dynamic range and improved high ISO performance thanks to its newer, D500-inherited sensor. The 7D Mark II does have dual card slots (one CF and one SD), but the D7500’s buffer still allows for longer burst shooting in Raw. In the name of outright durability, the 7D II’s screen is fixed, though it is touch-enabled, just like the D7500.

    The viewfinders and level of external controls are also comparable, though the the 7D II is made from a heftier magnesium alloy body. To go with its 65 all cross-type point AF system, the 7D Mark II comes with an AF joystick to make AF selection easier, though Nikon’s 3D Tracking will still handily outperform Canon’s older implementation of iTR. On the other hand, while the 7D II comes with an older processor, it still comes with Dual Pixel AF, and as such, it should offer a better live view experience than the D7500.

    Lastly, connectivity on the 7D II comes with an optional Wi-Fi SD card, while it’s built in on the D7500.

    Overall, the EOS 7D Mark II is still a dependable, durable workhorse that is serving seasoned pros well – but if you’re looking at getting a new camera or are just considering moving into the enthusiast DSLR segment, we can’t help but feel the Nikon D7500 is a better choice.

    Articles: Digital Photography Review (dpreview.com)

  • FilmLab negative scanning app fully funded, changes pricing model

    The Kickstarter crowdfunding campaign for the FilmLab negative scanning smartphone app that we recently wrote about has ended successfully, with more than 2000 backers funding the project almost 200%. After screening the reader feedback on our original article, FilmLab founder Abe Fettig has also decided to change the pricing model for his app. Instead of a subscription model FilmLab will now be available as a one-off purchase.

    The app will be a free install with a limited number of free scans for testing. Once they have run out of free scans users can decide between buying additional scans or upgrading to the FilmLab Pro version which will offer unlimited scans and a range of additional power user features. FilmLab Pro will cost $ 4.99 for Kickstarter backers and $ 29.99 for everybody else.

    In the video below Abe explains the new pricing model in more detail and also provides more information about the current state of the app and its image output. In addition he has written a blog post with side-by-side comparisons between FilmLab captures made with a smartphone camera, and professional film scanners.

    Articles: Digital Photography Review (dpreview.com)
  • Join us and the Nikon D7500 for a Facebook Live chat Friday, June 9th, 1pm EST

    DPReview editor and music photographer Dan Bracaglia took the Nikon D7500 along with his D750 to shoot the Big Bldg Bash music festival in Seattle.

    On Friday, June 9th at 1pm EST, he’ll join fellow editor Carey Rose on Facebook Live to talk candidly about how it fared as well as his thoughts on how it fits into Nikon’s current lineup. We’ll also be fielding your questions live – join us!

    Articles: Digital Photography Review (dpreview.com)
  • World’s Largest “Car Vending Machine” Dispenses Real Bentleys & Ferraris

    [ By WebUrbanist in Design & Guerilla Ads & Marketing. ]

    Combining architecture, advertising and technology, this car dealership lets users punch in numbers to bring their vehicle of choice down a 15-story showroom looming above in full view. The tall lit-up facade of Autobahn Motors acts as a billboard and show space, letting fans scope out a Lamborghini from a distance then take it out for a test drive on the streets below.

    The design responds in part to the lack of surface real estate in this space-crunched island city-state, but it also serves as great marketing for the business. While not the first such automobile-vending tower in the world, it is the largest, and it works quickly: a user-selected vehicle can be brought down in just two minutes from the floors far above. Given land scarcity in cities, this unusual-looking typology makes a lot of sense, and could start to spring up in other places as well.

    Meanwhile, for those in the United States: Carvana has smaller versions located in Austin, Texas and Nashville, Tennessee. These are less a response to density issues and more driven by marketing and novelty.

    And while the towers aren’t quite as tall the effect is still pretty neat – modular platforms provide vehicles on demand from an array of sports cars, hatchbacks, minivans and trucks.

    As a bonus for fans of quirky interactivity: their system operates even more like a vending machine – users are given a giant coin to insert, which lets them bring down the vehicle of their choice from the display racks above.

    Share on Facebook


    [ By WebUrbanist in Design & Guerilla Ads & Marketing. ]

    [ WebUrbanist | Archives | Galleries | Privacy | TOS ]


    WebUrbanist