Blog

  • Meeting Owl robotic video offers 360-degree views of conferences

    Owl Labs, a startup backed by Android co-founder Andy Rubin, has launched a new camera called the Meeting Owl. This 360-degree camera is designed specifically for companies and groups, enabling them to hold video conferences without the burden of manually operating the cameras. The Owl does the hard work itself, automatically focusing the video feed on the person who is talking. Oh, and guess what it looks like? Yep, an adorable, productivity-increasing owl.

    The device features a 360-degree camera on the top of its cylindrical body, as well as a total of 8 omnidirectional beam-forming microphones for capturing audio from all directions. The combination of the two enables Owl to capture everyone around a table at the same time, presenting viewers with a full view of the conference room. The camera shifts focus onto whomever is speaking, and presents split-views if multiple people are engaging in a conversation. The microphones isolate important noise from unwanted ambient sounds.

    Owl Labs has designed its conferencing camera to work with major video conferencing platforms, including Slack, Skype, Google Hangouts, Zoom, and GoToMeeting; the camera is plug-and-play via a USB cable. According to the company’s website, ‘limited quantities’ of the Meeting Owl are available at this time, with shipping starting within the next four weeks. The camera is priced at $ 799.

    Via: The Verge

    Articles: Digital Photography Review (dpreview.com)

  • Living Light: 11 Transforming Kinetic & Illuminated Art Installations

    [ By SA Rogers in Art & Installation & Sound. ]

    Rippling, unfolding, slithering and glowing like bioluminescent creatures, these kinetic and illuminated works of art are mesmerizing to watch. We can’t help being fascinated by the combination of light and motion, especially when it’s integrated into clothing, responds to our gaze or voices, or is engineered into monumental interactive installations of laser beams for our slack-jawed amusement.

    Sound Activated Clothing by Ying Gao

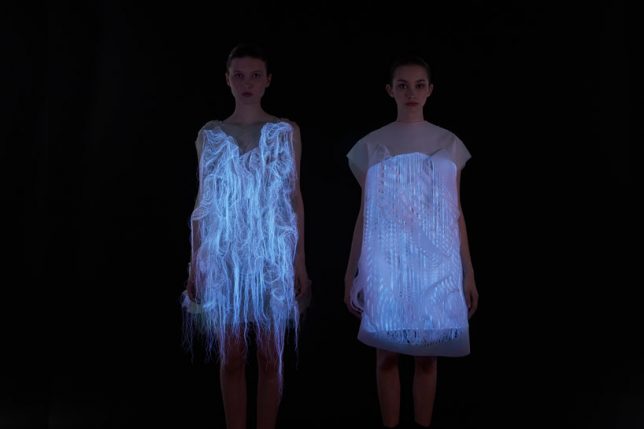
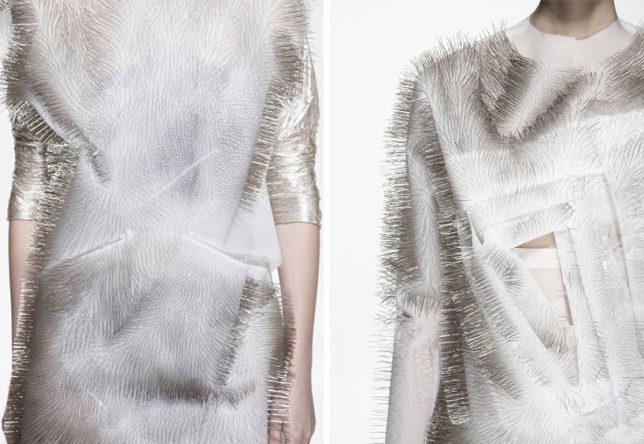
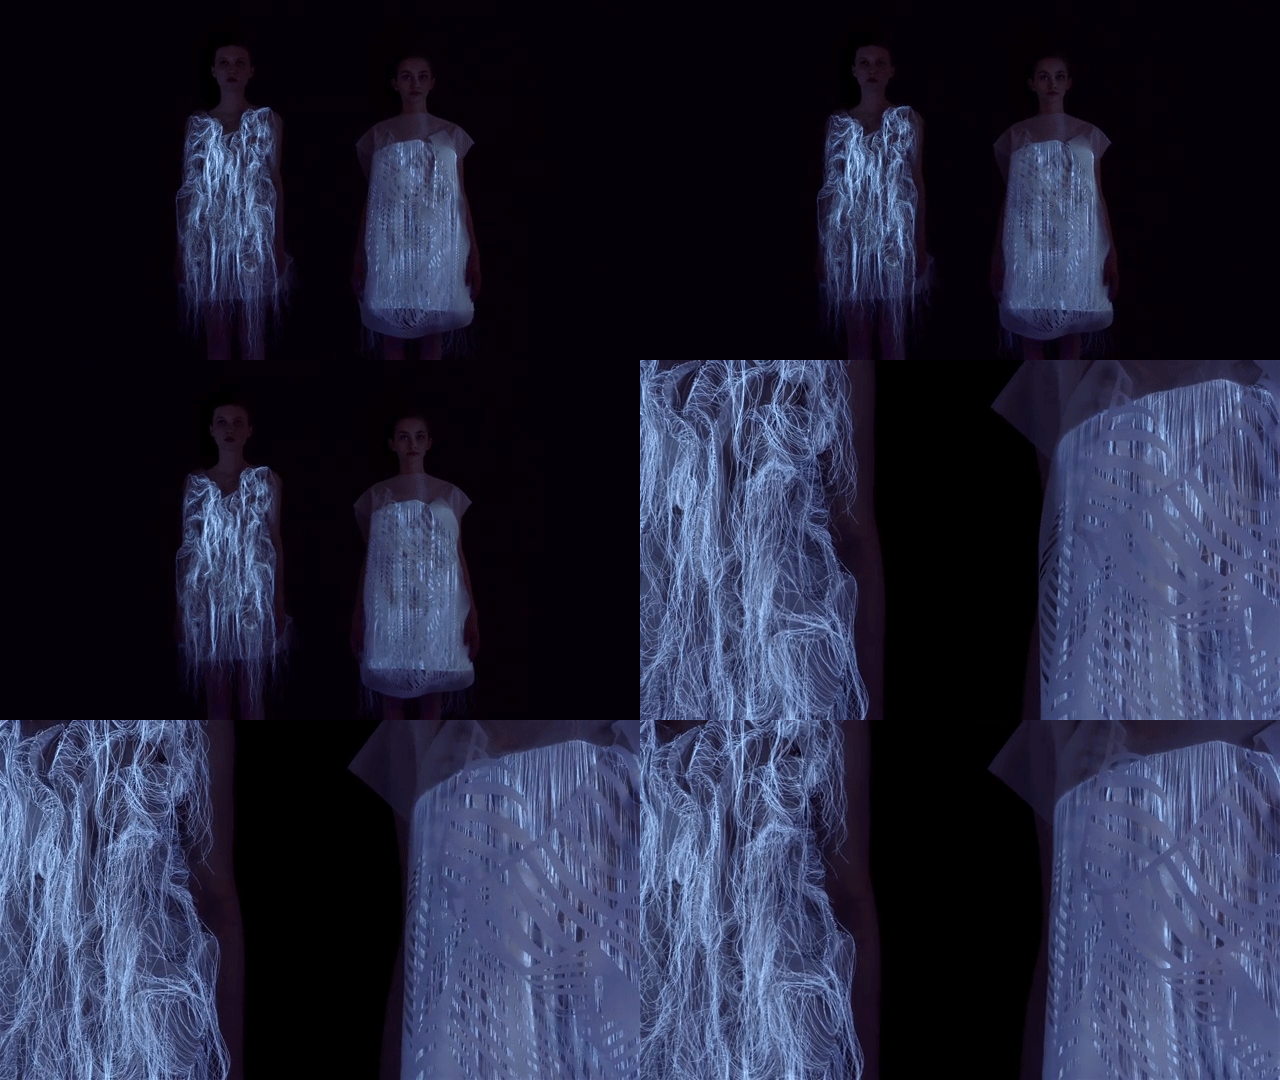
    ‘Incertitudes’ and ‘(NO)Where (NOW)here’ by fashion designer Ying Gao are two series of unusual reactive garments – the former covered in rippling dressmaker pins, and the latter moving like a living creature while glowing eerily in the dark. The photo luminescent thread works with eye tracking technology to activate movement by the gaze of spectators, while the pins respond to spectators’ voices.

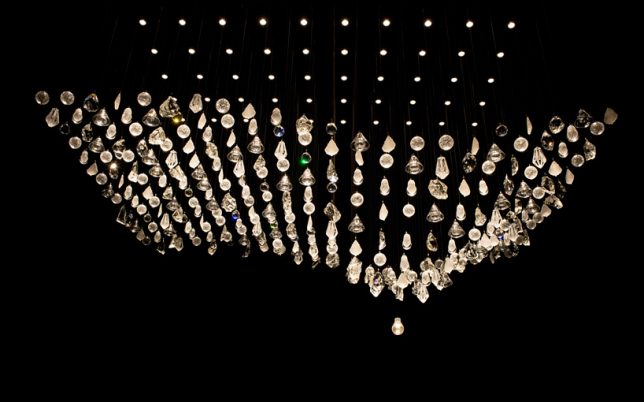
    Experimental Kinetic Glass Installations by LASVIT

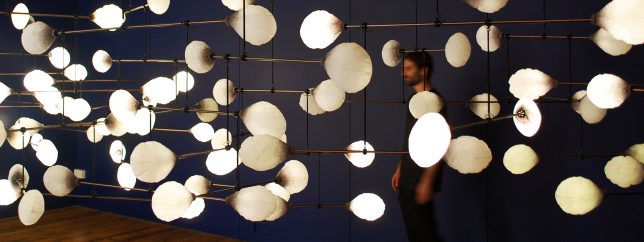
    Czech lighting company LASVIT presents a series of experimental kinetic glass installations during Milan Design Week, creating immersive illuminated environments that move and shift in synchronized rhythms.

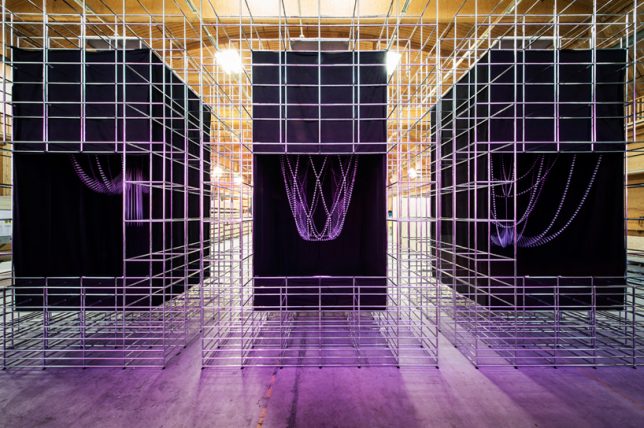
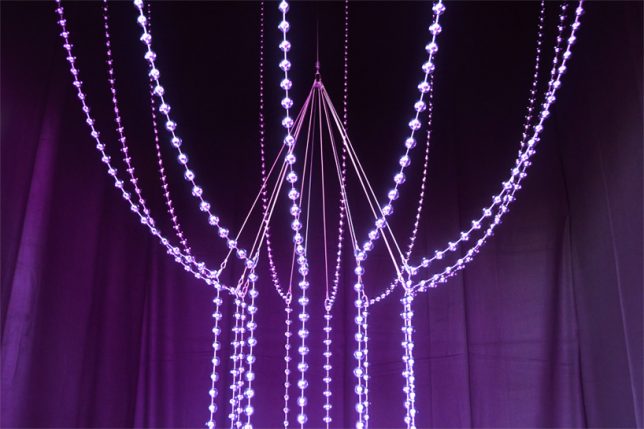
    La Vie en Rose by Atelier Öi & USM

    A company called USM produces a network of industrial components known as USM Haller Systems that offer infinite reuse and reconfiguration possibilities. For Designer’s Saturday 2014 in Switzerland, the company commissioned Atelier Öi to use these parts as a base for a kinetic art installation expressing these possibilities. ‘La Vie en Rose’ is the result.

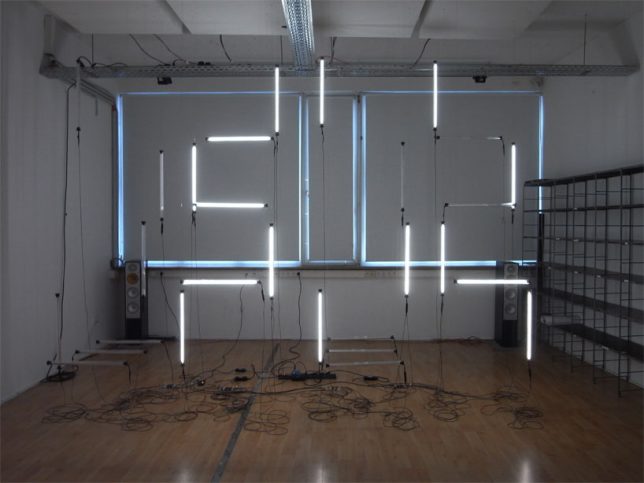
    CL:OC Installation by GROSSE 8

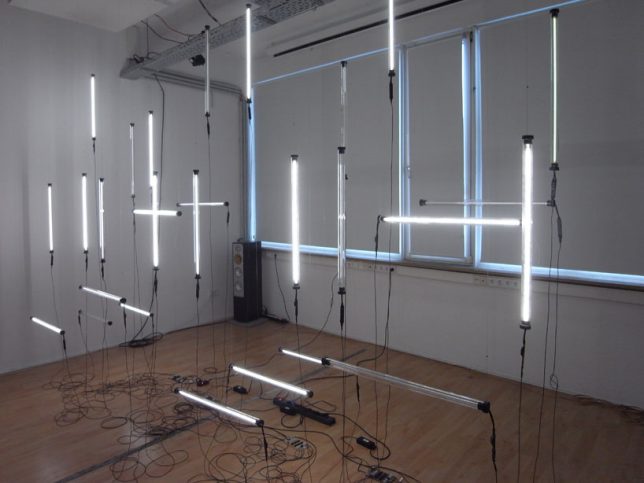
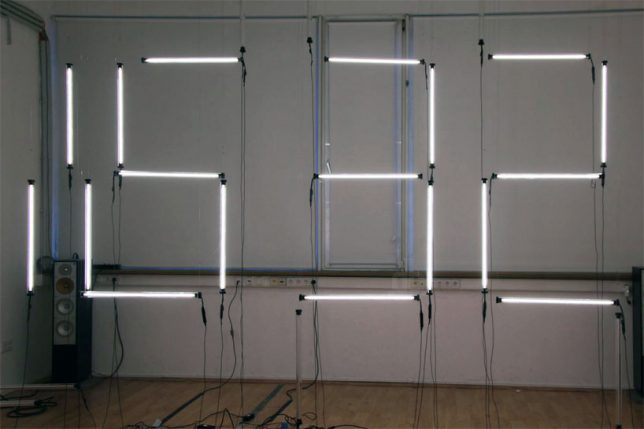
    Hanging flurorescent tubes powered by twenty-eight motors hang in the air, constantly rearranging themselves to display the time in digital numbers. Created by German design collective GROSSE 8, the sculpture debuted at Interior Design Week Cologne.

    Big Dipper: Helical Kinetic Sculpture by Michael Candy

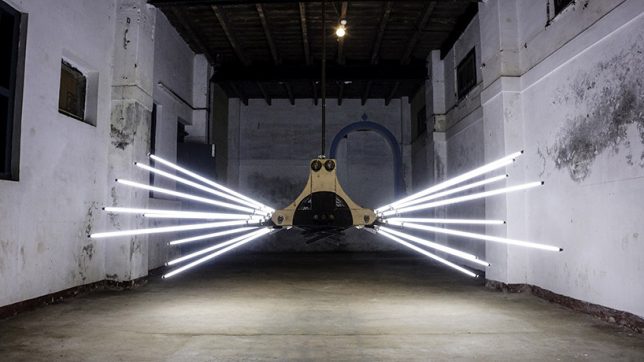
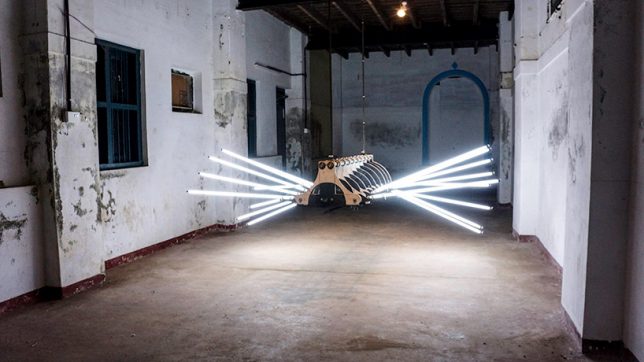
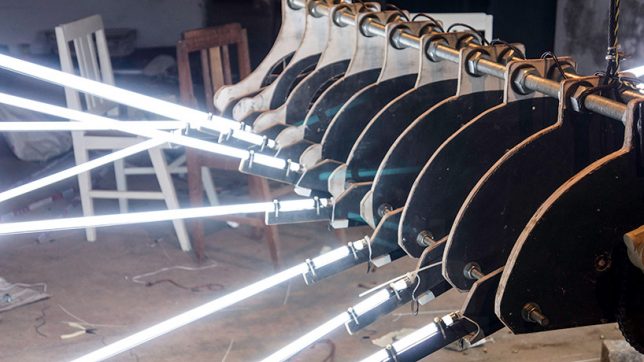
    Looming in the air like some kind of monstrous mechanical spider, BIG DIPPER by Michael Candy is suspended within an old warehouse in India, just waiting to scare the pants off a passerby. It features 18 fluorescent tubes sticking out of a plywood and metal body.

    Next Page – Click Below to Read More:
    Living Light 11 Transforming Kinetic Illuminated Art Installations

    Share on Facebook


    [ By SA Rogers in Art & Installation & Sound. ]

    [ WebUrbanist | Archives | Galleries | Privacy | TOS ]


    WebUrbanist

  • Quick Review of the Sigma 135mm F1.8 DG HSM Art Lens

    In this quick review of the Sigma 135mm f1.8 Art Lens, I will go over some of its features and give you my overall impression of this lens.

    Photographers like gear

    I belong to several photography groups, both online as well as within my local area, and often times when we meet, we end up talking about our gear. Conversations typically revolve around the gear we have, what we would like to have, and what we want to sell off. On several occasions, I have heard my fellow photographers talk about the Sigma Art series of lenses. They always start the conversation with, “Oh, I absolutely love my Sigma Art lens. The bokeh is so dreamy!” Now, I am a Canon shooter – always have been and always will be. But that does not mean that every once in a while, I don’t like to test out gear from other companies to compare performance, specifications, and price.

    Quick Review of the Sigma 135mm F1.8 DG HSM Art Lens

    The Sigma 135mm F1.8 DG HSM Art Lens comes with a case and a lens hood.

    So when I had the opportunity to test out the Sigma 135mm 1.8 DG HSM Art lens, I jumped at the chance. I spent about three weeks with this lens and used it for a variety of photography assignments – both indoors and outdoors. Here is my review based on my personal experiences with this lens.

    Technical Specifications

    As per Sigma’s website, the Sigma 135mm F1.8 DG HSM Art is a medium range telephoto prime lens designed for modern high-megapixel DSLRs. A new large Hyper Sonic Motor (HSM) delivers ample torque to the focusing group for outstanding speed, ensuring exceptionally stable performance even at lower speeds. This state-of-the-art prime lens touts a dust and splash proof mount for guaranteed performance in any condition and its large 1.8 aperture allows for more creative control over imagery.

    Quick Review of the Sigma 135mm F1.8 DG HSM Art Lens

    The Sigma 135mm F1.8 DG HSM Art Lens attached to my Canon 1V film camera.

    My telephoto lens of choice is my Canon EF 70-200L lens. It’s heavy and bulky but gives me some of the best picture quality in its class. Compared to that lens, the 135mm felt lightweight and comfortable to carry around all day. Being a fixed lens, there are no moving parts, unlike the zoom ring on the 70-200mm. While this meant that I had to move around to get shots at various distances, it was not an inconvenience. I just used pretended to have a zoom lens by moving my feet!

    The lens looks very sharp and clean. The smooth matte black finish of the lens gives it a certain visual appeal. The build quality is very clean and it feels like a solid piece of glass. The lens is a little heavy (at about 2.56 pounds or 1.2 kg) but if you are used to walking around with other telephoto lenses, it’s not any different compared to using those.

    Sharpness of the Sigma 135mm F1.8 Art Lens

    The legendary quality of having the dreamiest bokeh is very true with this lens. It is super sharp even when shooting absolutely wide open. I typically shoot very wide opened with all my Canon L-lenses which fits my style of photography. The aperture of f/2.0 is my personal sweet spot – the one that I really trust to give me a shallow depth of field and dreamy bokeh (blurry background). This lens did not disappoint at my favorite f-stop.

    But even at f/1.8 (the widest aperture on the Sigma 135mm), the lens was tack sharp with very shallow depth of field. Once it was stopped down to f/16, there was some softness on the edges of the frame but it’s not very prominent. With a lens of this quality, the best aperture would be between f/1.8 to f/4 (in my opinion) to get the best of the shallow depth of field and bokeh that we all love.

    Quick Review of the Sigma 135mm F1.8 DG HSM Art Lens

    Shot at ISO 200, f/1.8 – wide open – look at that dreamy bokeh.

    Quick Review of the Sigma 135mm F1.8 DG HSM Art Lens

    ISO 200 at f/2.0

    Quick Review of the Sigma 135mm F1.8 DG HSM Art Lens

    ISO 200 at f/9 – more of the entire scene is clear and visible – with a wider (deeper) depth of field here.

    Vignetting

    The Sigma 135mm at f/1.8 Art Lens showed slight edge vignetting when shot wide open. But for my style of photography, it’s minimal and nothing I could not fix in post-processing. I was very impressed with the number of tack sharp images that I could keep even when I used the lens completely wide open at f/1.8.

    Quick Review of the Sigma 135mm F1.8 DG HSM Art Lens

    The image above left was shot at ISO 200, f/2.0 and on the right, the same scene was shot at ISO 200, f/9. There is no visible softness or vignetting at either aperture. The bokeh at f/2.0 is so dreamy (shallow depth of field) and at f/9 more of the background is visible.

    Autofocus

    The Sigma 135mm has an electronic hypersonic motor. This makes the autofocus very fast and smooth. I found that the lens locked focus easily and did not hunt while focusing. The AF motor was also relatively quiet and smooth as compared to other telephoto lenses like the Canon 85mm f/1.2L II USM that is really slow while hunting for focus in the AF mode.

    Quick Review of the Sigma 135mm F1.8 DG HSM Art Lens

    While hiking my two boys decided they would lead the pack. I really wanted to capture this independent streak and both images are shot less than 2 seconds apart. The Sigma 135mm had no problems tracking focus as they moved up the trail. Both images were shot at ISO 200, f/2.0 and both have the subjects tack sharp and in focus in spite of the movement.

    Macro capabilities

    While the Sigma 135mm is not described as a macro lens, it did offer 0.2x magnification with a minimum focusing distance of just under three feet. Since I have a dedicated macro lens that I use for my detail shots, I did not pay much attention to this feature. However, in a pinch, this lens could be used to provide some magnification.

    Karthika Gupta Memorable Jaunts DPS Article - Sigma 135mm lens review-11

    The 135mm zoom was a little tight when I had to take in-studio headshots but once I got the focus locked, it turned out beautifully. Both images were shot at f/2.0 ISO 640, 1/125th.

    Summary

    Overall I was really very impressed with the Sigma 135mm 1.8 DG HSM Art lens. It is a superbly built piece of gear that was incredibly fast, easy to carry, handle, and use.

    The only thing I needed to get used to was the fact that it was a prime lens and not a zoom, unlike my favorite 70-200mm telephoto lens. This meant I had to move around to get shots at different angles and different focal lengths, but I don’t consider that a con. Instead, I feel that shooting with a prime lens makes you more careful and thoughtful about your compositions since you have to physically move around to get a diverse range of shots.

    The Sigma 135mm lens is definitely something to look into if you are in the market for a good quality telephoto lens.

    The post Quick Review of the Sigma 135mm F1.8 DG HSM Art Lens by Karthika Gupta appeared first on Digital Photography School.


    Digital Photography School

  • 10 Reasons Why it’s a Good Idea to Start Producing Video Content

    If you spend any amount of time online you’ll be well aware of the rapid expansion of access to video content that has happened over recent years. Being largely user driven, this content varies from professionally produced through to home videos of cats, puppies and everything in between.

    With the increase in internet speeds and processing power of viewing devices, we have the ability to watch countless hours of video content where and when we like. This provides some interesting opportunities for you as a photographer to consider, either through creating video content, or using video as a platform to show your work in a different way.

    Ultimately it allows you to connect with people differently, using elements of storytelling and emotional connection that can only exist through the use of motion and sound. Here are some reasons why I have embraced video as a way of communicating.

    Reasons to produce Video 01

    1. Video allows you to tell stories in a more immersive way

    Anyone who has been to see a film or documentary and become heavily invested in the story and its characters will be able to relate to this. While still images can communicate much of a subject, the depth of which you can tell stories through motion is effective in a different way.

    Hearing the person’s voice rather than reading a quote, listening to them describe a situation or speak to another person and feeling the emotion in what they are saying and how they are presenting it. There is the element of moving images that cannot be replicated through stills. It is not to say that motion is a better way, just a different way to tell stories.

    It also allows the viewer to have a different experience in seeing environments through motion. Seeing the elements that exist move and interact is again difficult to replicate through stills. Wildlife photos versus wildlife footage is an excellent example of how your understanding of an environment can shift based on the way you are viewing it.

    Case study: Karma Coffee

    2. Music can introduce a different kind of emotional pull

    Music plays a significant role in every piece of film or TV content, from the news to drama to documentary. It has incredibly strong pulling power with our emotions and this is something anyone can take advantage of. The immediate tone that is set with music helps to identify what we can expect to feel, the anticipation of a lion hunting its prey, the feeling of accomplishment for a climber reaching a summit, or a family coming together after a long time apart. The ability to pull your audience further into a story with the emotive power of music is something we should look at seriously if producing video content.

    While we may not have the budget for commercial music or large-scale productions, there are a lot of options available through stock music sites that will give you the style of music you are after. By using music that is available for licensing, you are free to have your video projects available for public viewing with no concern of copyright infringement as long as the music is licensed for the correct use.

    Case study: Mates in Construction – Kokoda

    3. Creating slide shows of your images adds a more dynamic element to your portfolio

    This is a great way to bring a collection of images together and show them in a more dynamic way. The collection of images may simply be your portfolio, or it could be from a wedding you have shot, an overseas trip, or a family event. There are many benefits to presenting still images in this way as it allows you to include music and some animation or movement of your images within the frame as opposed to just a static position.

    It also means your photographic portfolio can now be viewed on platforms that would otherwise be unavailable for still images, such as YouTube.

    Case study: Damian Caniglia Photography Slideshow

    4. You can bring together a collection of images and video that are connected

    Producing video content doesn’t have to include exclusively just video. Incorporating stills and animation can help tell stories in a more complete way, as well as utilizing content that may already exist.

    An example of this may be a short story telling project about a person’s life growing up. Using old photos as part of the visual elements means you are able to give greater context to that person’s life, their story, and what they were like at this time. It also brings a greater level of authenticity to the person’s story as the viewer is able to see a visual representation of what they are talking about.

    Another example of this is you may be telling the story of an artist. Using images of their art as they describe their motivation, process, and aims allows to help show their work as they are discussing it. Again, giving better context to who they are as well as a visual representation of their work within the video piece.

    5. You can develop character-driven stories and documentaries

    Many documentaries have a narrator or voice-over directing the flow and narrative of the story. Character driven stories only allow the voice and vision of the person the story is about, to appear.

    While often there is an interviewer involved, the voice of the person asking the questions is removed from the final edit leaving only the people appearing in the video as the ones directing the story.

    This has some considerations when asking questions during an interview, and more specifically, the way in which the person being interviewed responds.

    Case study: Kokoda 2013

    6. Most social media channels favor video content

    A quick look across the most popular social media platforms will show how much video content is being favored. In fact, doing a few tests will show you that the current algorithms being used by these platforms favor video content above almost all others.

    While YouTube is still the king of video, other platforms such as Facebook and Instagram are definitely showing great reach and interaction with its users and video content. This can be a big advantage for those producing video as you have the potential to reach a bigger audience based on this shift.

    Case study: Preserving the Ancient

    7. You can offer more options to existing clients including time-lapse videos

    It used to be the case that if a client wanted photographic work done, they hired a photographer and if they wanted video content produced, they hired a video producer or production company. But, there has been a shift in recent years with clients having the option of choosing one person who is capable of producing both. This has a number of benefits for the client as well as the supplier.

    For the client, they only have to deal with one person or company. This is especially important if the styled approach needs to match across different content (photo still and video, for example. For the producer of content, it means you are able to offer more solutions for your clients, giving them a turnkey solution for production and more reasons to use you instead of anyone else.

    Case study: PODS time-lapse

    8. You can produce video for stock licensing

    There has never been a greater demand for video content. That demand is only set to rise as video content is embraced across all sectors of our society and more online platforms.

    Here lies the opportunity for content creators. While there is nothing better than custom footage made specifically for a story, film, or documentary project, there is not always the budget or easy access to what is needed. Stock content is an excellent way for producers to obtain content for their respective projects. This is not a new concept as stock content has been around for a long time.

    By looking through the libraries of some of the larger stock libraries, you can quickly determine the style of content that is accepted by stock libraries, and what is the most popular for purchase and download. There are many options for your approach to creating stock video content. However, maximizing your existing connection or access to local areas or industries means you can take a more strategic approach to what you produce based on your knowledge of said industries or areas.

    Case study: Sample Footage, Tasmania, Australia

    9. You can start doing a regular vlog (video log) to showcase your work

    This is almost like a behind the scenes process of telling your story. It is a great way for your audience to get a better idea of who you are as an artist and producer. It will allow your followers to become better invested in your work and your story so they become better connected to you.

    By understanding your process in a transparent way, your followers can not only understand the amount of effort and resources that go in to producing your work, they will also develop a better understanding of what it takes to be a successful artist.

    10. Producing video is a good skill to have

    Even if you are not using video production within your business or work, it is a good skill to develop for the future. As mentioned earlier, there is no doubt we are consuming more video content than ever before.

    Organizations that traditionally would not consider producing video content in-house are starting to do so. Developing the skill and understanding for what is needed to produce this content will give you a better understanding of the strategy needed, whether you are producing it personally, or engaging the services of an external producer.

    This will often lead to better planning and execution of a project, which results in better quality outcomes.

    Conclusion

    If producing video content is of interest then get out there and start experimenting with this medium. As most, if not all cameras for photography also shoot video now, it means there is little or no investment in equipment to get started. Be sure to check out some articles on how to get started shooting video and hit the record button and start experimenting.

    The post 10 Reasons Why it’s a Good Idea to Start Producing Video Content by Damian Caniglia appeared first on Digital Photography School.


    Digital Photography School

  • How to Have Fun with Shutter Speed and Added Motion Blur

    If you think learning is a boring task, you definitely haven’t studied photography. To make this point, I decided to explain the relationship between shutter speed and movement by spending the day at a theme park.

    Image blur – unwanted or not

    When you get an unwanted blur in your photograph it can be very frustrating. However, this shouldn’t stop you from experimenting with your camera’s shutter speed. Perfectly sharp images can be great for composition and color but they don’t really reflect everything that’s going on and can fail to convey the atmosphere.

    Composition - shutter speed

    Shutter speed 1/640th, f/9, ISO 200.

    Movement shutter speed

    Shutter speed 1/50th, f/22, ISO 200.

    Theme parks can be the most fun, but even so, they can appear a bit dull in still images. However, just adding a little movement can do the trick. Don’t you agree?

    Still shutter speed

    Shutter speed 1/1000th, f/3.5, ISO 200.

    Moving shutter speed

    Shutter speed 1/15th, f/22, ISO 200.

    If you are comfortable using Manual Mode on your camera, then please do so. However, if you are not used to adjusting your settings you can always do these exercises by using Shutter Priority Mode. To do this you have to set the dial of your camera to the S (Nikon, Sony) or Tv (Canon) symbol on your mode dial. This mode gives you the flexibility to choose the shutter speed that you want, and the camera figures out the rest of the settings for you in order to have a well-exposed photo.

    However, there is one thing that you do need to know first . . .

    What is shutter speed?

    The shutter is a curtain inside your camera that opens to allow light to enter the camera and hit the digital sensor (or film) in order to create your photo. Shutter speed refers to how fast or slowly it opens and closes. The longer you leave the shutter open, the more light will come in.

    Therefore, as long as it’s opened everything in front of your lens is leaving an imprint. In the case of a moving object, this results as a halo or a ghost and is why you get blurry photos when using slower shutter speeds. The longer the exposure time, the blurrier the subject will be.

    Faster shutter speed

    Shutter speed 1/60th, f/22, ISO 200.

    Slower shutter speed

    Shutter speed 1/30th, f/29, ISO 200.

    Creative effects of shutter speed

    #1 Blurry subject sharp background

    Now that you have that clear, let’s dive into the fun part and start doing some creative effects with this knowledge. First, we’ll start with a sharp background and a blurry object/subject, as this is the easiest one to achieve. For this one, you need to be standing still and have something or someone in motion in the scene in front of you. As for your camera, you need to use a slow shutter speed. How slow depends on the speed your subject is moving, so just make a few tries.

    Note: All movement gets registered in the image when you are using slow speeds, including your own. So if your subject requires for you to shoot lower than the length of your lens (i.e. slower than 1/50th with a 50mm lens) it’s better if you use a tripod or else your fixed background will look blurry as well.

    Cars shutter speed

    Shutter speed, 1/6th, f/22, ISO 200 and an 18mm lens.

    Twirls shutter speed

    Shutter speed, 1/50th, f/29, ISO 200 and a lens focal length of 33mm.

    #2 Blurry background sharper subject

    For the second effect, let’s do the opposite; a blurry background and a sharper subject. You don’t want the moving subject completely sharp because then you can lose the purpose and it will look dull or worse, fake (as in Photoshopped into the image). So it’s always better for the subject to have a small halo around it that shows its movement, direction, and speed.

    This one is a little bit trickier because, on top of choosing the correct shutter speed, you also need to follow the moving subject with your camera, matching its speed (this is called panning). So please don’t get frustrated if you don’t get it right on the first try because the results are worth the effort!

    Follow Circular shutter speed

    Shutter speed, 1/50th, f/29, ISO 200. The camera was moved in a circular motion to follow the subject.

    Follow Vertical shutter speed

    Shutter speed, 1/40th, f/32, ISO 200. The camera was moved in a vertical motion to follow the subject.

    Follow Horizontal panning shutter speed

    Shutter speed, 1/60th, f/22, ISO 200. The camera was moved in a horizontal motion to follow the subject.

    #3 Mix it up

    When you feel comfortable with the previous techniques, try introducing some mixed movements. In other words, your subject moving one way and you in another.

    Mix shutter speed

    Shutter speed, 1/50th, f/22, ISO 200.

    Mix shutter speed

    Shutter speed, 1/40th, f/32, ISO 200.

    #4 Still objects

    Liking it so far? It gets better! You can even put some movement into photos of still subjects.

    Ducks shutter speed

    Shutter speed, 1/50th, f/22, ISO 200 with an 18-35mm lens.

    To achieve this effect you need to use a zoom lens. What you have to do is to twist (zoom) so that you go from one focal length to another while the shutter is still open. The bigger the zoom, the more intense the effect.

    Barrel zooming shutter speed

    Shutter speed, ½ a second, f/29, ISO 200, focal length 18-28mm.

    Barrell shutter speed

    Shutter speed, 1/50th, f/29, ISO 200, focal length 18-45mm.

    Barrell shutter speed zoom

    Shutter speed, ½ a second, f/29, ISO 200, focal length 18-55mm.

    Your turn to go try it

    There you go, you are ready to enjoy your day in the park while making some amazing looking shots. Take a ride, have fun, and let all your problems all blur away!

    Blur

    Shutter speed, 1/15th, f/22, ISO 200.

    Please share your comments, questions, and motion blurry images below.

    The post How to Have Fun with Shutter Speed and Added Motion Blur by Ana Mireles appeared first on Digital Photography School.


    Digital Photography School

  • The Kennel Club 2017 photo contest winners are cute as h*ck

    The Kennel Club Dog Photographer of the Year

    The Kennel Club has announced the 2017 winners of its annual ‘Dog Photographer of the Year’ photo contest. Now in its 12th year, the international competition received almost 10,000 entries from 74 countries around the world, and was sponsored by SmugMug and Nikon School. As the internet would say, that’s a lot of h*ckin’ good puppers.

    We present the 1st place winners from each of the ten categories in the competition. To see all the winners in each category, head over to the Dog Photographer of the Year website.

    Above:

    Overall winner and ‘Man’s Best Friend’ category winner: Maria Davison Ramos (Portugal)

    About the photo: For me, capturing real and candid moments is what photography is all about. This is one of those moments. My friend had just adopted Yzma and while we were chatting in the kitchen I was taking some photographs. The location and the light were far from perfect, but I ended taking one of the photos I’m most proud of.

    About the dog(s): The dog’s name is Yzma and she’s a Golden Retriever cross. She was adopted by one of the photographer’s closest friends.

    The Kennel Club Dog Photographer of the Year

    ‘Assistance Dogs’ category winner: Alasdair Macleod (Ayrshire, Scotland)

    About the photo: Megan was photographed during her weekly visit to South Beach Care home in Saltcoats, with one of the residents, 95 year old RAF veteran Mr Duncan Currie (a pilot for the Royal Air Force No. 617 Squadron, Dam Busters) who has Dementia.

    About the dog(s): Megan is a rescued Greyhound and was the top Therapet for 2016.

    The Kennel Club Dog Photographer of the Year

    ‘Dogs at Play’ category winner: Kalyee Greer (United States)

    About the photo: Petey and I stood there together on the water’s edge in awe as the day bowed out to the night and the sun slipped its yellow head behind the horizon. Pastel colours painted themselves across the Summer sky above our shoulders in stripes of pink and cobalt blue as we quietly revelled in that perfect, endless moment. Then, just as suddenly as the sky had lit itself on fire, Petey clumsily jumped into the water with a joyful little sparkle in his eye, beckoning me to come along. I followed him in and giggled until my sides hurt as he would push his paw down into the warm, salty water, sending little crystal droplets flying through the air all around him. With each happy splash came the realization of the perfection in those tiny moments, and of the unmatched purity of the canine heart.

    About the dog(s): The dog in the photo is named Petey. A cuddly and endlessly sweet Wheaten Terrier who belongs to a previous client of Kaylee’s.

    The Kennel Club Dog Photographer of the Year

    ‘Rescue Dog’ category winner: Alexandra Robins (Wiltshire, England)

    About the photo: When I went to Bath Cats and Dogs home to photograph some of their animals, Chloe and Tess were the first on my list. We took them out to one of the large, grassy paddocks for them to have a run around. Both dogs flew across the field together, I managed to get some fun action shots of them playing. However, it was this image of Chloe looking up at her carer that has always been my favourite. Chloe was a little timid towards strangers; she was probably looking for reassurance with a strange photographer present!

    About the dog(s): Chloe came to Bath Cats and Dogs home with her friends, Tess and Diego, when their owner died. Chloe the brindle greyhound was a timid dog and used to hide away from strangers but was gentle and caring to her friends. All three dogs found loving homes.

    The Kennel Club Dog Photographer of the Year

    ‘Dogs at Work’ category winner: Sarah Caldecott (Yorkshire, England)

    About the photo: The photograph of Rita was taken during a training day in February this year on the moors in County Durham the weather hadn’t been kind and the light was fading fast.

    About the dog(s): The dog in the photograph is a pointer called Rita owned by a friend who Sarah met during training sessions with her dog.

    The Kennel Club Dog Photographer of the Year

    ‘Puppy’ category winner: Mirjam Schreurs (Netherlands)

    About the dog(s): Mirjam placed a call out on Facebook for dogs to photograph and the owner of Tyson the Boxer puppy responded to it. Mirjam photographed Tyson when he was 14 weeks.

    The Kennel Club Dog Photographer of the Year

    ‘I Love Dogs Because…’ category winner: Julian Gottfried (Chicago, US)

    About the photo: I especially enjoy this photo because it exemplifies what I love about my dog. In the image you can easily see his cuteness, personality, and playful manner. Combined with the snow, they create a truly lively photo.

    About the dog(s): Pippin, a terrier-mix. Julian’s family adopted him on Valentine’s Day in 2010. He and his brother had been wanting a dog for a really long time, and their parents finally decided to adopt one. Pippin had been found wandering around Missouri with his mother in a poor state, and was staying at a shelter. He was only seven pounds, but the most adorable dog there, and he has since become an integral part of the family.

    The Kennel Club Dog Photographer of the Year

    ‘Oldies’ category winner: John Liot (St. Helier, Jersey)

    About the photo: This image was taken as part of a commissioned shoot with three rescue dogs. It was a beautiful and bright November day and the Sun was creating an intense light through the windows, warming the client’s house. Kelly, an apprehensive 12 year-old collie-cross, found her spot in the God rays heating up the arm of a sofa and had a nap. She was a cautious girl with a sad backstory and had challenging behavioural issues prior to being adopted. Happily though, she has found rejuvenated life with her new family in Jersey who are giving her all the love and attention she sorely missed in her younger years.

    About the dog(s): Kelly is rescue and her breed is unknown. She was 12 when the photo was taken. She was adopted by Bex D., a worker at Jersey’s animal shelter, who has two other rescue dogs that she’s also adopted from the JSPCA.

    The Kennel Club Dog Photographer of the Year

    ‘Young Pup Photographer’ category winner: Dylan Jenkins (Swansea)

    About the photo: I took this photo in my garden. We had some cake and Mosey came to sniff it. I took about twenty photos and this was the best and the funniest.

    About the dog(s): Mosey is the older of our two hounds. She’ll be 10 in October. She has had some scent training (truffles!) and has appeared in a few dog shows but is happiest as a pet/companion dog She is incredibly gentle and sweet-natured and hilariously funny. Mosey and Dylan have an incredible bond.

    The Kennel Club Dog Photographer of the Year

    ‘Dog Portrait’ category winner: Anastasia Vetkovskaya (Russia)

    About the photo: This magnificent Afghan was incredibly nice to shoot – he is very expressive and emotional.

    About the dog(s): SISLEY- SHOU GERAT GRANT AHTIAR AK JAR, Afghan Hound

    Articles: Digital Photography Review (dpreview.com)

  • Adobe achieves record revenue

    Software maker Adobe has today published its financial results for the second quarter fiscal year 2017 ended June 2, and the company reports a record quarterly revenue of $ 1.77 billion. At the same time operating income was increased by 46 percent and net income by 53 percent year-over-year on a GAAP-basis.

    “Digital transformation continues to be the burning agenda for creative professionals, enterprises, governments and educational institutions,” said Shantanu Narayen, president and CEO, Adobe. “Adobe is the go-to company for creating world-class digital customer journeys from design to delivery to measurement and monetization.”

    Other highlights of the financial results include the following:

    • Diluted earnings per share was $ 0.75 on a GAAP-basis, and $ 1.02 on a non-GAAP basis.
    • Digital Media segment revenue was $ 1.21 billion, with Creative revenue growing to a record $ 1.01 billion.
    • Strong Creative Cloud and Document Cloud adoption and retention drove Digital Media Annualized Recurring Revenue (“ARR”) to $ 4.56 billion exiting the quarter, a quarter-over-quarter increase of $ 312 million.
    • Adobe Experience Cloud achieved record revenue of $ 495 million, which represents 29 percent year-over-year growth.
    • Operating income grew 46 percent and net income grew 53 percent year-over-year on a GAAP-basis; operating income grew 42 percent and net income grew 43 percent year-over-year on a non-GAAP basis.
    • Cash flow from operations was $ 645 million, and deferred revenue grew to approximately $ 2.07 billion.
    • The company repurchased approximately 2 million shares during the quarter, returning $ 266 million of cash to stockholders.

    More information and detailed figures are available on the Adobe website.

    Articles: Digital Photography Review (dpreview.com)

  • Zeiss launches Milvus 1.4/35 full-frame lens for Canon and Nikon

    Zeiss has launched a new lens for full-frame DSLRs with Canon and Nikon mount, the Milvus 1.4/35. The new model is the tenth lens in the Milvus series and according to Zeiss, thanks to its fast aperture, particularly suited for portrait photography. That said, its 35mm focal length also makes it a good all-rounder and useful in landscape photography and even filming.

    “The high maximum aperture enables the subject to stand out clearly against the background, and the photographer can achieve creative combinations of focus and blur,” says Christophe Casenave, Product Manager at Zeiss.

    Like all lenses in the Milvus line the 1.4/35 comes with a robust metal barrel and is protected against dust and splashes and therefore suitable for working in adverse weather conditions. Zeiss says a new optical design with aspherical lens elements, special glass materials and advanced correction means photos taken with the Milvus are practically free from chromatic aberrations. The Zeiss Milvus 1.4/35 will be available from specialist dealers and in the ZEISS Online Shop from July 2017. The recommended retail price is 1,999 Euros ($ 2,228). More information is available on the Zeiss website.

    Press Release:

    ZEISS Milvus 1.4/35 Camera Lens for DSLR Cameras

    The tenth lens in the ZEISS Milvus series for DSLR cameras already shows its many benefits at full aperture

    OBERKOCHEN/Germany, 2017-06-21.

    ZEISS has launched a new lens for full-frame DSLR cameras from Canon1 and Nikon2 on the market: the ZEISS Milvus 1.4/35. Now the tenth lens in the Milvus family, the ZEISS Milvus 1.4/35 is particularly suitable for portrait photography thanks to its speed. “The high maximum aperture enables the subject to stand out clearly against the background, and the photographer can achieve creative combinations of focus and blur,” says Christophe Casenave, Product Manager at ZEISS. “The manual focus enables very exact focusing, and the creamy bokeh provides an excellent image look. And even at full aperture the image quality leaves nothing to be desired.” The ZEISS Milvus 1.4/35 is also perfectly at home in landscape photography: “The 35-millimeter focal length is a genuine all-rounder.” Like all lenses in the ZEISS Milvus family, it is protected against dust and splashes and, according to Casenave, even bad weather is no problem. The metal barrel gives the lens its robust and durable character.

    Practically no chromatic aberrations thanks to a new optical design

    With aspherical lens elements, special glass materials and advanced correction, ZEISS has given the lens a completely new optical design. “This means the photos are practically free from chromatic aberrations,” says Casenave. Thanks to their excellent edge-to-edge imagery the ZEISS Milvus lenses are designed for high-performance digital cameras. “The resolutions of camera sensors are constantly becoming higher, and this also increases the demands made on the lenses. For ZEISS Milvus lenses this is no problem. They are a solid investment in the future.”

    Also suitable for filming

    The ten lenses in the ZEISS Milvus family, ranging between 15 and 135 millimeters, are also suitable for film productions: the manual focus with a large rotation angle can be operated with the aid of a ZEISS Lens Gear with a follow-focus system. The de-click function allows the aperture to be set continuously in the version for Nikon3 cameras. A further benefit for filming: ZEISS has matched the color characteristics of the ten lenses. Filmmakers can therefore switch between the focal lengths and still have a uniform color look. “This facilitates editing enormously,” says Casenave.

    Price and availability

    The ZEISS Milvus 1.4/35 will be available from specialist dealers and in the ZEISS Online Shop from July 2017. The recommended retail price is 1,999 euros.

    You can find further information at www.zeiss.com/photo/milvus1435

    Articles: Digital Photography Review (dpreview.com)

  • How to Practice Low Impact Nature Photography

    In many parts of the world, spring has blossomed into summer, furry and feathered babies were being born and summer is on its way. Photographers are pulling out their camera gear and finally heading back outside for some nature photography. I am so ready to get out and photograph the bounty that warm weather brings, I bet you are too. Before you head outside though, here are a few tips on having a little lower impact on the nature you’re photographing.

    Low Impact Nature Photography - nature in bloom

    Spring has sprung so let’s all get outside and shoot. Canon 5DIII, 70-200 @ 121mm, ISO 500, f/4, 1/750th.

    Reduce your carbon footprint

    When you do head out to do nature photography, consider your carbon footprint. We lead such comfortable lives these days that’s it’s easy to forget that hopping into the car for a two-hour drive isn’t all that great for our environment. Car-pooling with two or three of your friends is an easy way to reduce emissions. It’s a lot more fun to spend the day shooting with friends, too.

    Low Impact Nature Photography - shoot with friends

    Planning a day trip or holiday to shoot with your friends is not only more fun, it also helps to reduce your carbon footprint when you carpool and share vehicles.

    Doubling up

    Another way to reduce your carbon footprint is something I call “doubling up.” Whenever you fly somewhere, research what else you can easily see while you’re there. For example, this fall I’ll be a special guest photography teacher for Big Sky Yoga Retreats “Yogatography,” a combined yoga and photography retreat in Montana.

    The ranch I’m staying at is only about a 90-minute drive from Yellowstone National Park so it makes perfect sense to add a few days in the park after the retreat ends. Of course, I also save money by combining my visit to Yellowstone with the Yogatography retreat but more than that, I reduce emissions by flying to Montana once instead of twice.

    Low Impact Nature Photography - Mammoth Hot Springs

    The last time I was in Yellowstone I was only carrying a little point and shoot while I hiked so I’m pleased to be able to “double up” this fall when I’m in Bozeman teaching and have another crack at shooting Mammoth Hot Springs with some beefier gear.

    Heed the signs

    Once you arrive at your location, heed the park signs. Often, the signs are meant to protect you from harm. But sometimes they’re meant to protect the wildlife around us.

    How to Practice Low Impact Nature Photography

    On the left, a sign from Antelope Island in Utah requesting that cars and hikers stay on the road to avoid aggressive wild buffalo encounters. On the right, a funny and scary bathroom sign from a Nevada park. For heaven’s sake, don’t slip. There are rattle snakes!

    Several years ago in Utah, I left the trail while I was shooting in Arches National Park. My guide quickly pulled me back and pointed out what I hadn’t seen. Right next to where I’d planted my foot was a type of very slow growing fungal plant life that, when crushed, will not revive for hundreds of years.

    How to Practice Low Impact Nature Photography - Arches National Park

    It’s hard to see, but tucked in and around the rocks and bushes are delicate fungal plants that are easily crushed when stepped on. Canon 5DIII, 24-105 @ 22mm, ISO 100, f/16, 1.5 seconds.

    We all want the best, most unique photographs but if we all leave the trail, our combined impact can destroy the beautiful environments we are trying to capture not to mention causing a lot of potential injury to ourselves.

    Share special locations judiciously

    While I greatly admire photographers who openly teach and share, consider very carefully whether you should share every amazing location you stumble upon with every photographer you know. Unfortunately, delicate environments can’t handle hordes of photographers. The wear and tear of too many people hiking in and out can destroy the natural beauty of the location itself, even if everyone stays on the trail.

    Low Impact Nature Photography - secret location

    Canon 7DII, 70-200mm with 1.4xIII extender @ 280mm, ISO 1000, f/5.6, 1/250th.

    I love to photograph the tiny Key Deer on Big Pine Key in Florida. When I drive the island, I know just where these little creatures like to hang out. I don’t tell very many people about this location though, because the deer have become too habituated to humans, frequently approaching people and begging for food.

    Too many human visitors can also frighten wildlife, disrupt nesting, and impact natural reproductive cycles. While complete secrecy about a magical location seems stingy, consider sharing more environmentally fragile places only with photographers who know and understand the impact they have on where they shoot.

    Look, don’t touch!

    When I see a lush, velvety plant growing at the Chicago Botanic Garden, all I want to do is run my fingertips across its surface. The rule at the garden, however, is to look and not touch. Sometimes I practically have to put my hands in my pockets to stop myself from touching the amazing specimens on display!

    Luckily, they have a wonderful Sensory Garden where visitors are encouraged to physically touch the plant life. The Sensory Garden is mainly a teaching and learning area. But by allowing visitors to touch the plants there, it also helps prevent wear on the rest of the garden, leaving it pristine for the thousands of weekly visitors, many of whom are photographers.

    Low Impact Nature Photography - velvet leaf

    These broad velvety leaves beg to be touched. Canon 5DIII, 24-105mm lens @ 105mm, ISO 1000, f/4, 1/2000th.

    If you’re shooting in a wild and remote place, use the same rule as that applies at the Chicago Botanic Garden, and don’t touch the plant life. Imagine hundreds of people walking through that same wild area and touching the same plant you’re touching. It wouldn’t take much before the plant started to wither around the edges, and ultimately turn brown and die. Next time, before you touch, ask yourself whether you’re truly leaving no impact on the plant. If you are impacting it, perhaps reconsider your actions.

    Don’t pick the flowers

    It probably goes without saying that when you pick wildflowers you’re impacting the environment in a negative way. Acres and acres of wildflowers are a breath-taking sight. A field left with only one or two flowers standing? Not so much.

    Low Impact Nature Photography - field of tulips

    Like a field of wildflowers, a picked-over field of tulips wouldn’t be nearly as stunning to photograph as this lush bed was. Canon 5DIII. 70-200mm lens @ 111mm, ISO 250, f/4, 1/1000th.

    In some locations, it’s also illegal to pick wildflowers. It’s also illegal to remove shells, bones, pottery shards, and petrified wood from many state and national parks. While we humans seem to have a knee jerk reaction to gather and collect things, leaving plants and artifacts alone preserves them so that all of us can visit, enjoy and photograph them.

    Avoid leaving tracks

    Is that mud flat, playa or sand dune you’re photographing absolutely pristine? If it is, take care not to walk on it or leave footprints. Don’t drive on it or leave tire tracks either. Environmental recovery from this sort of carelessness can take decades before there will be enough wind or rainfall to smooth out your tracks. You’re not only wrecking the image-making opportunity for the next photographer that comes along, you’re destroying the beauty of the location for everyone who visits it.

    Low Impact Nature Photography - Cumberland island boardwalk over dunes

    On Cumberland Island, in Georgia, the National Park Service has constructed boardwalks so that visitors can view the dunes without damaging them. Canon 5DIII, 100-400mm lens @ 100mm, ISO 12800, f/8, 1/6000th.

    Keep wild animals wild

    Because I mainly photograph wild horses, I’m frequently asked if I touch, pet, or ride them. These questions always strike me as naive but, because most people are used to domesticated horses, perhaps they think that wild horses tolerate or accept humans more readily than other wild animals. They don’t.

    Low Impact Nature Photography - cautious wild horse

    Does this wild stallion look like he wants to be petted? He doesn’t. His ears are pinned back and he has an eagle eye on me too. Canon 5DIII, 100-400 @ 400mm, ISO 1250, f/6.7, 1/500th.

    The same rules apply to wild horses that apply to any other wild animals. No matter how sweet or cuddly a wild animal seems, never approach, feed, touch, hug, or pick it up. Wild animals are often so much bigger than we are and even if they fearfully strike out with mildly aggressive behaviors, you can be seriously injured. Always keep a safe distance between you and the animal you’re photographing and, in some cases, shoot from the car or another protective structure like a blind. If, as a photographer, you’re afraid you’ll be too far away, buy or rent a bigger lens.

    If you’re afraid you’ll be too far away to get a good photo, buy or rent a bigger lens.

    Low Impact Nature Photography - don't feed wild anmals

    Visitors to Big Pine Key often get too close to the Key Deer that live there. This woman fed the deer her lunch leftovers (!!) and then tried to pet them. This is the perfect example of what not to do when you’re photographing wild animals.

    These rules may not seem like much “fun” but they are for the animals’ safety as much as for yours. Animals that become too accustomed to humans become less wild, more dependent on humans for their food, and ultimately nuisances when they start to forage for food in suburban areas. When too many wild animals invade populous areas, they are often culled, which is just a more politically correct word for killed. Keep your distance and keep wild animals wild, free, and alive.

    Pack it in – pack it out

    You’ve probably heard this bit of advice before. Whatever you carry in with you when you head into a refuge, preserve, or wilderness area, you should also plan to carry out with you. Garbage littering the landscape doesn’t make a very pretty picture. Of course, you can just “Photoshop it out in post-processing” but for the environment’s sake, and for the safety of the animals who might ingest any garbage left behind, take everything you brought in with you back out when you leave.

    Low Impact Nature Photography - trash in water

    The Salt River Wild Horse Management Group volunteers do an amazing job of regularly cleaning up the river but too many people toss their trash into it rather than carrying everything out with them when they leave. Even the day after a massive clean up effort, these wild horses were drinking next to floating trash. Canon 5DIII, 100-400 with 1.4xIII extender @ 560mm, ISO 1250, f/8, 1/500th.

    An even nicer thing to do is to leave the area cleaner than you found it. On your way out, pick up the garbage other less savvy hikers and photographers have left behind and dispose of it appropriately once you get back home.

    Leave Fido at home

    If you’re a weekend warrior type of photographer – and many of us are – it might seem like a natural thing to bring your faithful pup along with you. In a very few situations, bringing your dog (or any domestic animal) may work out just fine, but at best bringing your dog along is a distraction from making images. At worst, your dog can wreck a field of flowers or scare off wildlife (or get injured).

    Low Impact Nature Photography - dogs on boat

    These two dogs are having a much better time relaxing at sea than they would be out hiking while you photograph wildlife. Canon T3i, 55-250 @ 240mm, ISO 200, f/6.3, 1/320th.

    Perhaps if you’re a macro flower photographer, your well-behaved and leashed dog won’t a problem. He can rest on the path while you shoot. A puppy however (at least any that I’ve ever met) probably won’t be content to relax on the trail. Instead, he’ll be crashing through the flowers, possibly damaging them, and rendering them less likely to be image-worthy for the next guy that comes along with a camera.

    Domestic animals affect the behavior of wild animals

    If you’re photographing butterflies, birds, or wild animals, your dog should really stay at home for his safety, as well as the other animals. I’m sure that some of you are scratching your heads right now and exclaiming how well-behaved your dog is, but seriously… I’ve been out there on the range photographing wild horses when someone shows up with their “amazing dog.” The horses’ behaviors always change as they become aware of the dog.

    Low Impact Nature Photography - alert wild stallion

    This stallion has just sighted a hiker and her two dogs on the river bank. He’s alert and ready to protect his family. Canon 5DIII, 100-400 @ 241mm, ISO 500, f/4.5, 1/3000th.

    Your dog might be cool with wild animals but the wild animals are immediately on alert. Remember, dogs are instinctually predatory animals and other animals recognize that. The behavior dynamic shifts when you bring your dog, no matter how amazing he is. Yell at me all you want, but please, leave Fido at home. Your dog impacts the environment and not in a good way for photography.

    Reduce nature’s impact on yourself

    I was in North Carolina a few weeks ago hiking on Shackleford Banks and photographing the wild horses. The first thing I did when I got back to my rental house was to shower off the sweat, sand, sunscreen and bug spray. As I toweled my hair dry, I kept itching my ear. That’s when I discovered the tick. Thankfully it wasn’t attached yet and I could just pick it off my skin but, ugh, so gross.

    Low Impact Nature Photography - wear protective clothes

    Photo Credit: Eden Halbert. Here I am in on Shackleford Banks in 80F+ degree weather, covered head-to-toe in UPF 50 quick dry clothing. Depending on your environment, wear a hat, sun- and bug-protective clothing, sunscreen and bug spray. Don’t forget to bring and drink plenty of water.

    To reduce nature’s impact on you, my recommendation is to wear a hat, sun- and bug-protective clothing, sunscreen, and bug spray. Plus, remember to do what I forgot to do. After your photography hike and before you get into your car, check yourself, your clothes and your camera bag for ticks, burs and other clinging critters.

    Teach others

    Finally, set yourself up as a good example for your fellow photographers. More often than not, when another photographer crashes around like King Kong, it’s not with the intent to be destructive. It’s usually because he/she doesn’t know any better. If you model more appropriate behaviors, and explain why all these strategies are so important to preserving nature, your friends will follow your lead.

    What strategies do you use to lower your impact on the nature and wildlife you photograph? Please share your thoughts in the comments. The dPS community would love to hear from you.

    The post How to Practice Low Impact Nature Photography by Lara Joy Brynildssen appeared first on Digital Photography School.


    Digital Photography School

  • How to Create a Double Exposure Effect Using Photoshop

    What is a double exposure effect?

    In days of yore, back when DSLR cameras were SLR, a roll of film was inserted in the back of your camera to give you 24 or 36 exposures. A double exposure was created in-camera by taking two different photos on the same frame of film.

    How to Create a Double Exposure Effect Using Photoshop

    The Double Exposure Effect created in Adobe Photoshop using Blend Modes, Layer Masks and of course two or more images.

    When I did shoot with an SLR camera, I managed to achieve this effect more by accident than intent. In order to take another shot, you had to manually wind onto the next exposure!

    With the onset of digital, this technique is very easy to replicate in Adobe Photoshop. If you don’t have Photoshop, get GIMP, it’s free to download and use. If you do a search on YouTube, there are plenty of tutorials on making double exposure effects to choose from. The more popular tutorials seem to use images of a portrait and a landscape.

    However, you can use any images you want as this is quite a stylistic technique.

    The ingredients

    In essence, all you need are two images.

    One of these images will have to be cut out using a layer mask so that the other image can be clipped to it.
    Then it’s a case of using the blending modes, reducing the opacity, and other color effects to produce the desired result. Depending on what images that you use, experiment with the different blending options to see which effect you like the best.

    The technique – step-by-step

    In this article, I will show you a step-by-step tutorial on how to create your very own double exposure effect using Photoshop. The hardest part will be selecting the two images that you want for the composition.

    Select your images

    For my first image, I’ll be using this photo of the Hook Lighthouse. I took this shot a couple of years ago while on holidays along the hook peninsula in Wexford, Ireland.

    How to Create a Double Exposure Effect Using Photoshop

    Hook Lighthouse on the Hook Peninsula in Wexford in South of Ireland.

    However, I didn’t get to snap any seagulls. This is exactly what I wanted for my second image, a close up side shot of a seagull.

    I found one on Pixabay. If you don’t have images ready to hand. You can go to sites such as Pixabay or Unsplash. These two sites alone have excellent quality images to choose from and you can download any image for free (note: please read the usage terms for the Creative Commons license and be sure to follow them).

    How to Create a Double Exposure Effect Using Photoshop seagull

    Seagull image from Pixabay.com

    Cut out the subject from the background

    So, first I needed to make a selection of the seagull. The Quick Selection Tool did a good job and I finished it off by using the Refine Mask. I was able to save this out on its own layer with a layer mask.

    How to Create a Double Exposure Effect Using Photoshop

    Using the Quick Selection Tool and Refine Mask in Photoshop to isolate the subject from the background.

    I decided to add a blue background in keeping with the nautical theme but also the seagull is predominately white, so he stands out more.

    How to Create a Double Exposure Effect Using Photoshop background

    I added a blue background after I isolated the seagull from the original background.

    Add the second image and adjust the Layer Blend Mode

    I brought the lighthouse image in as a Smart Object above the seagull layer and resized it. Next, I dragged the seagull layer mask to the lighthouse layer (which copies and applies it to the second layer) and changed the Blend Mode to Vivid Light. Finally, I then reduced the opacity to 68%.

    How to Create a Double Exposure Effect Using Photoshop

    I used the Blend Mode – Vivid Light which produced some funky colors on the beak of the seagull. But I liked the effect it created on the lighthouse image in comparison to the other Blend Mode options.

    How to Create a Double Exposure Effect Using Photoshop

    The Layers Panel in Photoshop and how the double effect in Photoshop is achieved.

    Adjustments

    At this stage, the colors on the seagull went a little too funky, especially around the eye and its beak.

    So, I added a Hue & Saturation Adjustment Layer, checked the colorize tick box, and dragged the Hue slider to 183 and increased the Saturation to 10.

    I added a Hue & Saturation Adjustment Layer to get rid of the funky colors that the Vivid Light Blend Mode created around the beak of the seagull.

    The lighthouse rocks were still a little too sharp, but I didn’t want to reduce the opacity of the overall image any further. So I duplicated the seagull layer and dragged it to the top of the layer stack. I chose a big soft brush and I dabbed a couple of times on the layer mask around the rocks and the lighthouse to give it more of an opaque/ghostly look.

    Final image

    A GIF animation illustrating the different stages in creating a double exposure effect.

    I had hoped to put a video together to accompany this article. But honestly, Adobe Creative Cloud have done a great job with a video on their YouTube channel, in illustrating this technique in under 45 seconds!

    Now it’s your turn, let’s see what you can do. Why not give this technique a go? Please post your questions, comments and results in the section below.

    Disclaimer: the author was not sponsored by Adobe, Pixabay or Unsplash. Words and opinions are those of the author only.

    The post How to Create a Double Exposure Effect Using Photoshop by Sarah Hipwell appeared first on Digital Photography School.


    Digital Photography School