Blog

  • How to Boost your Lightroom Performance and Improve Speed

    Are you running out of space on your hard drive? If you’re both a prolific photographer and a Lightroom user the answer may be yes. A hard drive that’s close to being full is bad news because it slows down Lightroom and just about every other application that you use on your computer. So how can you boost your Lightroom performance and make your computer run faster?

    Luckily, there are ways to both minimize the amount of hard drive space Lightroom uses and to free up some space that is being used unproductively. As a result, Lightroom will run faster, as well as your entire computer usually.

    So, how much spare hard drive space is required for Lightroom?

    Ideally, you need at least 20% of your hard drive space to be free. If you have a 1TB drive, that means you should aim to keep at least 200GB free. If you have a smaller drive, such as the 256GB solid state drive I have on my iMac, then you need less. In my case, I need to keep at least 50GB free to keep Lightroom happy.

    So, here are some tips to help improve Lightroom performance:

    1. Store all your photos on an external hard drive

    This has nothing to do with Lightroom per se, but it’s important because your photos are likely to take up a lot of hard drive space (especially if you shoot in Raw). The best approach is to use a separate hard drive for your photos, either an external drive or another internal drive added to your computer (if this is possible on your machine).

    For example, my Raw photos take up 1.96TB of hard drive space. I keep them on a 3TB external hard drive like the one shown below.

    How to Boost your Lightroom Performance and Improve Speed

    It’s important that the hard drive on which your photos are saved also has at least 20% of its space free. Otherwise, it might slow Lightroom down as well.

    It’s good practice to use the external drive for photos and Lightroom catalog backups and nothing else. That means it won’t get cluttered up with other files. It’s easier to backup to other hard drives.

    2. Save fewer LR catalog backups

    It’s important to backup your Lightroom catalog regularly in case it becomes corrupted or the hard drive it is saved on fails.

    Many photographers recommend that you set up Lightroom to backup the catalog every time you exit the program. The only problem is that the hard drive space occupied by those catalog backups can soon add up to a considerable amount.

    It’s less of an issue in Lightroom 6 and Lightroom CC, which compress the backup catalogs than it is with older versions of Lightroom. But even compressed backups take up a lot of hard drive space. For example, my backup folder currently has six backups in it and is 2.94GB in size.

    There are two steps to take to minimize this problem:

    1. Save catalog backups on an external hard drive. The same one you use to store your photos is ideal.

    Each time you quit Lightroom the Back Up Catalog window appears. Click the Choose button to select the folder where you want it to save the Catalog backups. NOTE: this is the only time this option appears!

    Also worth noting is that you want to save your backups on an external drive anyway because if your main hard drive crashes, both your main catalog and all the backups are gone. That is not good and defeats the purpose of having backups.

    How to Boost your Lightroom Performance and Improve Speed

    2. Delete old backups. You don’t need to keep anything older than the two most recent catalog backups.

    I deleted my four oldest backups and freed up nearly 2GB of hard drive space. It may not sound like much if you have a 1TB or larger hard drive, but it does make a difference on a 250 GB solid state drive.

    It may be tempting to move your catalog to an external drive, but this will slow Lightroom down. It’s best to keep the working catalog on your internal hard drive.

    3. Keep an eye on the Preview Cache

    If you go to Lightroom > Catalog Settings (Mac) Edit > Catalog Settings (PC) and click on File Handling you will see something like this.

    How to Boost your Lightroom Performance and Improve Speed

    Lightroom gives you a lot of useful information about how it uses hard drive space here. First, it tells you the size of your Preview Cache. This is where Lightroom stores all the previews it builds which enable you to view your photos in the Library module.

    As you can see, my Preview Cache is currently 36GB, which is a large chunk of a 250GB hard drive. It’s less of an issue if you have a bigger hard drive.

    How to Boost your Lightroom Performance and Improve Speed

    If your Preview Cache is too large, there are some tips for reducing its size in the next two sections.

    4. Regularly delete 1:1 Previews

    Of all the Library module previews Lightroom uses the 1:1 Previews take up the most space. But they are essential for zooming into your photos at 100%, which is why many photographers build them.

    You can manage 1:1 Previews by setting Automatically Discard 1:1 previews to After 30 Days. You can also set it to After One Week or After One Day. Just pick the one that works best for you. Avoid the Never option, otherwise, your Preview Cache will grow out of control.

    How to Boost your Lightroom Performance and Improve Speed

    Set your File Handling Preferences in the Catalog Settings to automatically delete 1:1 Previews after 30 days.

    There’s another way to delete 1:1 previews:

    1. Go to the Catalog panel in the Library module and click on All Photographs.

    How to Boost your Lightroom Performance and Improve Speed

    2. Go to Edit > Select All (or click CMD/CTRL+A for the keyboard shortcut).

    3. Go to Library > Previews > Discard 1:1 Previews (click the Discard option in the next window).

    There are a couple of things you should be aware of, though:

    • Lightroom doesn’t delete the 1:1 previews from the Preview Cache right away. There is a delay, so in case you change your mind you can use the Undo function. You may have to wait a day or so to see the benefit.
    • Lightroom only deletes 1:1 previews that are at least double the size of your Standard previews.

    5. Build Standard Previews that aren’t too large

    You can set the Standard preview size in your Catalog Settings as well. If you select Auto Lightroom sets the smallest size required for your monitor resolution. You can also set Preview Quality to Medium or Low to reduce the space the previews take up.

    How to Boost your Lightroom Performance and Improve Speed

    6. Build fewer or dump Smart Previews

    The Catalog Settings also show you the amount of space occupied by Smart Previews. If that is too large, you can delete them.

    How to Boost your Lightroom Performance and Improve Speed

    1. Go to the Catalog panel in the Library module and click on All Photographs.
    2. Go to Edit > Select All.
    3. Go to Library > Previews > Discard Smart Previews (click the Discard option in the next window).

    7. Regularly dump the Camera Raw Cache

    Lightroom creates more previews to use in the Develop module when you process your photos. These previews are saved in the Camera Raw Cache.

    You can set the maximum size of that cache by going to File Handling in Preferences. The larger the number you set the more hard drive Lightroom’s Develop module previews will potentially take up. But, Lightroom may run slower if you set it too low – so you need to find a balance between too big and too slow. Try around 20GB to start with and see how you go.

    How to Boost your Lightroom Performance and Improve Speed

    You can delete the Develop module previews by clicking the Purge Cache button. It’s probably a good idea to do this every now and then to free up hard drive space. The last time I did it I gained over 20GB of space (see below).

    How to Boost your Lightroom Performance and Improve Speed

    If you edit or view video files in Lightroom you can also gain space by purging the Video Cache (below).

    How to Boost your Lightroom Performance and Improve Speed

    Conclusion

    Lightroom is essential for most photographers but it can use up a lot of hard drive space. The tips in this article let you take back control of your hard drive. Any questions? Let me know in the comments below.


    If you’d like to learn more about Lightroom, then please check out my popular Mastering Lightroom e-books.

    The post How to Boost your Lightroom Performance and Improve Speed by Andrew S. Gibson appeared first on Digital Photography School.


    Digital Photography School

  • Now we know: Sony a9 is sharper than we thought

    To make a long story short, we’ve re-shot our studio scene shots of the Sony a9 with the FE 85/1.8 lens, and they’re much sharper. We apologize for misleading any of our readers, but it’s a long story – see below. To jump to the images, just click the button, but we do encourage you to read the full text as well.

    The Long Story

    You may have noted on the studio scene page of our Sony a9 review that we admitted to having quite a bit of difficulty focusing the camera with the new Sony 85mm F1.8 lens in magnified live view. The maximum magnification (x9.4) on the camera LCD made it very difficult to fine tune the 85/1.8 precisely. Multiple AF-S attempts yielded shots varying in sharpness, and we were often able to attain better results manually focusing. But the only way to check each shot was to shoot tethered and check each shot magnified on a monitor. Of course, every time we thought we’d nailed focus, we’d try nudging the camera or focus ring just a bit to make sure we couldn’t do any better, and then realize we’d fallen off a bit.

    And so the search began again and again, with the quest for perfect focus ending up a bit of a fool’s errand. We finally tuned focus to what we thought was reasonable (we look for maximum aliasing in the central Siemens stars, and color aliasing in the text), and shot our entire studio and dynamic range tests.

    Subsequently, we got lots of complaints about the a9 being soft.

    The Lens Factor

    Was it the lens? This is the first Sony FE camera we’ve shot without the stellar Zeiss 55mm F1.8. We’ve had a long-standing policy of shooting with an on-brand 85mm equivalent lens per-system, to maintain equal distance from camera to target, something that allows for all images to be rendered with equal perspective. With Sony’s recent release of the razor sharp FE 85/1.8, we thought we’d stick to our policy and give it a try.

    But we don’t blindly switch lenses for a system; we first verify:

    1. The new lens is at least as sharp as the previous one.
    2. The lens transmission (also accounting for the aperture at F5.6) is not so different as to affect noise comparisons.

    Our initial testing showed equivalent sharpness between the 55 and 85mm F1.8 lenses on even a high-resolution a7R II (see below). Furthermore, DXO verified similar levels of sharpness between the 85 and 55 F1.8 lenses (which both perform better than Sony’s 85/1.4 GM, surprisingly). And while we don’t have a way of directly measuring lens transmission, we measured signal:noise ratio of a few grey patches in our scene with the two lenses on the same camera body, and found them to be within 1/6 to 1/10 EV of one another. That meant the new lens would not make the a9 look better, or worse, in Raw noise comparisons compared to if we were to use the Zeiss 55mm F1.8 at F5.6.

    Sony 85mm F1.8 at F5.6 (left) vs. Sony 55mm F1.8 at F5.6 (right). Shot on a7R II

    Some Friendly Help

    While plowing ahead with other aspects of the review, a message from forum expert Jack Hogan turned up in my inbox showing this:

    Long-time forum member and all-round expert Jack Hogan did a quick MTF analysis per color channel based off of the slanted edges in our scene. Uh-oh. Looks like the red channel is focused better than the green channel, yielding a calculated MTF50 of only 945 line pairs per picture height (equiv. to a 5.4MP image if weighting sharpness, or MTF50).

    Importantly, the green channel should have the highest MTF.

    It was now clear that focus was the underlying issue with our studio shots. Not a bad lens. Not a strong anti-aliasing filter. But simply the fact that the lens was not optimally focused: if it were, the green channel would have the highest MTF.

    So we sat down one day and spent the entire day shooting many, many runs of our studio scene, slowly moving a macro rail (rather than coursely adjust focus on the lens) between each run. From these shots, we picked the (centrally) sharpest runs. While our copy of the 85/1.8 appears slightly decentered (the left is softer than the right), the results now are much more in line with where things should be:

    Jack Hogan re-analyzed some of our new studio shots of the a9, and the green and blue channels now have the highest MTF, not the red channel. The calculated MTF50 of 1125 lp/ph (equiv. to a 7.6MP image if weighting sharpness, or MTF50), which is a 19% increase in linear resolution over our previous results.

    A side benefit of analyzing properly focused shots is an ability to estimate the strength of the anti-aliasing filter, which appears to kick in around 0.744 cycles per pixel (the first minimum in the MTF curve). For comparison, the D5’s anti-aliasing filter kicks in around 0.748 cycles per pixel according to Jack’s analysis of our studio scene shots. Meaning the a9’s AA filter is fairly typical.

    Have a look at our updated images, and our updated image quality analysis based off of our new results:


    Editor’s note:

    As camera sensor and lens resolutions are becoming astronomically high, tiny little differences become visible in pixel-peeping. And that’s precisely what our studio scene allows you to do.

    Our studio scene isn’t perfect, but it can be helpful. It has its caveats though. For example, because we don’t control for lens transmission from brand-to-brand, or any shutter speed inaccuracies, we state that noise comparisons are only accurate to within 1/3 EV. Trying to extrapolate differences smaller than that from high ISO shots of our studio scene is meaningless: margins of error are real.

    The same goes for sharpness. The reality of lenses and mounts is that there is copy variation – in both. Therefore, we urge you to make sharpness comparisons largely from the center of the scene, which removes the lens (as much as it can anyway) from the equation. The rest of the scene is useful for assessing color, detail retention and noise at high ISO in JPEG and Raw, respectively, and other subjective attributes. And keep in mind common sense things: the lock of hair is well above the plane of optimal focus, and different lenses can have field curvature which either helps or hurts the sharpness of this lock. It’s important to keep these sorts of things in mind when pixel-peeping our scene.

    This time, with the a9, we take full responsibility for a non-optimally-focused set of shots. But the process has also been a learning experience for us: depending on a lens’ electromechanical coupling and the magnification of the live feed, it can be extremely difficult to take test shots that stand-up to the level of scrutiny our image comparison tool demands. And there are the practical issues mentioned above around taking one shot, checking it, and repeating the process – returning to the position of optimal focus is nearly impossible. The results of visually checking which shot is sharpest can even vary from tester to tester. I can assure you though: we are constantly working on methods to improve these processes.

    That said, it’s important to keep things in perspective: in the real world it’s unlikely you’d have seen the sharpness ‘issues’ we had with our initial a9 run (that otherwise appeared so drastic in our studio scene). Why? Because (1) you don’t typically view images at 100%, (2) there will at least be a plane of maximum sharpness (which in our case, unfortunately wasn’t our studio scene on our first run), and (3) your lens and shooting aperture will have far more impact on subject sharpness than which 24 MP sensor was used to shoot it.

    To our readers: we offer our sincere apologies, and wish you happy shooting!

    Articles: Digital Photography Review (dpreview.com)

  • Hands-on with the Fujinon MK50-135mm T2.9 cine lens

    Hands-on: Fujinon MK50-135mm T2.9 cine lens

    The Fujinon MK50-135mm T2.9 cinema lens is the second in Fujifilm’s new line of MK lenses designed for Super 35 and APS-C cameras. MK lenses are designed to appeal to the emerging production market, offering features and quality typically associated with more expensive cinema lenses at a price point that’s attractive to budget-conscious cinematographers. The MK lenses are based on Fujifilm’s excellent Cabrio line of cinema lenses (which cost $ 15K and up), and share the same coatings as well as a similar mechanical build, but at a cost just under $ 4,000 they’re more accessible to a lot of users.

    I reviewed the first MK lens, the MK18-55mm T2.9, a few months ago and really liked it. Since the two lenses are designed to work as a set, they’re basically indistinguishable except for focal length, so if you want to read my detailed thoughts on how the MK lenses perform I recommend reading my earlier review, which for all practical purposes applies to both lenses.

    Hands-on: Fujinon MK50-135mm T2.9 cine lens

    If you’re not yet familiar with the MK cine lenses, you may be surprised to learn that they use Sony E-mount. Why? Fujifilm wants to address the growing market of independent filmmakers, small production houses, and other professionals who use the Super 35 and APS-C formats. Sony has a huge presence in this market thanks to cameras like the FS7, FS5, and even a-series mirrorless, and many users of these cameras adapt other lenses, such as Canon EF-mount, to their cameras.

    What about Fujifilm’s own mirrorless cameras? The company has announced plans to release MK lenses in X-mount later this year so that Fujifilm shooters can take advantage of them as well.

    Hands-on: Fujinon MK50-135mm T2.9 cine lens

    When I tested the MK18-55mm lens earlier this year, I did so with a Sony FS7, a Super 35mm camera mounted on a shoulder rig with rails, a follow focus, and an accessory EVF. However, Fujifilm emphasizes that the MK lenses are also designed for use on similarly sized APS-C sensors, so this time I decided to go that route. Unfortunately, during our short window of time with the lens I didn’t have access to a rig for a full setup, so I was limited to basic tripod and handheld use.

    When mounted the Sony a6500, it’s easy to see how large the MK50-135mm is compared to the diminutive camera. While it’s technically possible to shoot this combination handheld, it’s not terribly practical thanks to its large size and all mechanical controls.

    The great news is that the video I captured looked beautiful, and the lens appears to deliver the same quality that we saw on the MK18-55mm.

    Hands-on: Fujinon MK50-135mm T2.9 cine lens

    I also tried using the MK50-135mm with the full frame Sony a7R II in Super 35mm mode. The size mismatch is a bit less obvious than with the a6500, however it’s no more practical for shooting handheld. That’s not necessarily a bad thing – chances are good that if you’re considering this type of lens, you’re planning to rig it in some way.

    In fact, this lens works very well with both the a6500 and a7R II (in Super 35 mode), and would be a great lens to pair with either of them. With a basic set of rails and a follow focus, the setup would work just as effectively as with a dedicated video camera.

    Hands-on: Fujinon MK50-135mm T2.9 cine lens

    One of the reasons for using cinema lenses is that they often come in matched sets, and this is the case with the MK lenses. The MK18-55mm and MK50-135mm are physically identical, including T2.9 iris, gearing, dimensions, and even weight (right down to the gram). They’re also matched optically, meaning they can be interchanged seamlessly without changing the look of the resulting footage.

    Why are matched lenses important? In a cine setup the lens is often mounted on rails, and likely has attachments such as a follow focus or matte box. Ideally, you don’t want to have to readjust every accessory each time you change lenses, and having physically matched lenses means you can swap them in and out very quickly without needing to readjust everything. The MK lenses are so similar that I would have a difficult time telling them apart without seeing the zoom range printed on the lens barrel.

    Hands-on: Fujinon MK50-135mm T2.9 cine lens

    When it comes to build quality, the MK50-135mm is very solid thanks to its all metal construction. As with most cinema lenses, it’s completely mechanical, and every movement feels well damped. It’s a pleasure to use and gives one the sense of using a high quality piece of precision equipment.

    Hands-on: Fujinon MK50-135mm T2.9 cine lens

    One thing that sets the MK50-135mm apart from most still photo lenses is the large 200 degree focus rotation angle. This offers a lot more precision than you’ll get with the shorter focus throw of a DSLR lens, or the unpredictability of focus-by-wire, so it’s easy to make very fine adjustments as your subject moves. The lens includes very precise distance marks, in both English and metric units. This is particularly helpful if you have a separate focus puller who is following the action in a blocked scene.

    Hands-on: Fujinon MK50-135mm T2.9 cine lens

    The MK50-135mm also has a parfocal design, meaning it can maintain precise focus while adjusting the focal length. As still photographers, we don’t usually worry about this capability since it’s easy to refocus after zooming. In contrast, when shooting video you may actually intend to zoom while recording, and you want to maintain focus on your subject through the entire transition. Losing focus during a zoom can ruin the shot.

    I was really impressed with the parfocal performance on the first MK lens, and the MK50-135mm performed to the same standard.

    Hands-on: Fujinon MK50-135mm T2.9 cine lens

    Another common property of cinema lenses is that they resist breathing, a phenomena that causes the lens’s field of view to change slightly when focus is adjusted. This becomes particularly important when you’re doing something like racking focus between two subjects; you don’t want the field of view of the scene to change when you do this as it can be very distracting. The MK50-135mm suppresses lens breathing very effectively, which is not surprising given that the MK18-55mm did so as well.

    Hands-on: Fujinon MK50-135mm T2.9 cine lens

    Based on a couple days of use, I really like the Fujinon MK50-135mm lens, which – not surprisingly – is the same conclusion I came to after testing the MK18-55mm version. They’re both beautiful pieces of equipment that are a joy to use, and which deliver excellent results. The fact that there are now two of them spanning the entire 18-135mm range makes me want the set even more. If you’re a videographer using an E-mount camera, it’s really tough to go wrong with these lenses.

    The MK lenses should also appeal to Fujifilm X-mount users. In particular, we found the Fujifilm X-T2 to be a credible 4K video camera, especially since it’s capable of outputting F-Log gamma over its HDMI port. We don’t yet know the exact release date for the X-mount versions, but Fujifilm tells us it will be later this year, and we saw prototypes at NAB in April.

    The MK50-135mm T2.9 will be available in E-mount in mid-July for a price of $ 3,999, which is just slightly higher than the $ 3,799 MK18-55mm.

    Articles: Digital Photography Review (dpreview.com)

  • How to Create and Shoot Night Portraits

    If you limit your portrait photography to daylight, you’re missing out on a chance to get some really cool people photos. Whether you just want something better from your camera automatically, or you want complete control of the light in the scene, there’s something in this article for you. Read on to get some tips to help you create and shoot night portraits.

    Get off Automatic Mode

    If you’re using your camera in Automatic mode, you’ll find one of two things will happen. With the flash off, you get a really blurry photo because the camera needs a longer exposure time at night. Or with the flash turned on, the camera restricts the shutter speed and while your subject is well lit by the flash (but is flatly lit), the background has gone black. It’s a lose-lose situation, especially if you want to mix a photo of your subject with a cool background.

    How to Create and Shoot Night Portraits - automatic mode

    With Auto Flash, the background gets rendered quite dark, and even fully black later in the night.

    Night Scene Mode

    Fortunately, most cameras have a set of helpful scene modes. On the command dial, there are modes like M for Manual and P for Program (or professional as some of my buddies like to joke). But you’ll also find a series of picture icons, like a mountain or a sprinter. The one you want here is the Night Scene mode (you may have to go into your menu to find it). It usually has the moon or a star with a person. This mode allows for a longer exposure, but your flash fires as well.

    Night scene mode.

    Set the mode and remember that because you’ll have a longer exposure, you need to hold the camera steady. Your flash will freeze the subject, but they need to stay still for the shot as well, to avoid going transparent. You’re not shooting ghosts here! Sometimes this mode will be called Slow Synchro instead of Night Scene Mode.

    How to Create and Shoot Night Portraits - slow synchro or night scene mode

    Slow Synchro/Night Scene mode exposes for both the flash and the background, although it can result in image blur from camera shake.

    Moving to Manual

    When I shoot nightclub portraits, I’m emulating this mode, but I have the camera set for Manual control. I use an aperture and shutter speed on the camera so the background scene looks good, maybe a little under exposed, then I use an automatic flash on-camera to capture my portrait.

    How to Create and Shoot Night Portraits

    A nightclub shot taken with the camera set to Manual mode, with exposure set to expose for the background. A mix of high ISO and a large aperture helped prevent camera shake. The flash was in TTL mode, setting flash exposure was set automatically.

    Let’s look at how you can take even more control now. As you probably tell from how Night Scene mode works, you’re effectively taking two shots in one picture. The first is of your subject, the second is of the background.

    Lighting the Subject

    For complete control of light on your subject, you need to use a light that’s off-camera. This doesn’t have to be a flash. In fact, it can even be a street light, something we can touch on later in the article. It can also be a continuous light that you’ve brought with you, like an LED or video light. But before this, we’ll look at using flash.

    To get your flash off-camera, you need a trigger to fire it. If you have a flash like the Godox V850II, it has a receiver built-in, so you just need a trigger like the XT-16 or the X1. The same applies to the Cactus RF60X flash paired with the V6II trigger. You’ll also need a light stand or someone to hold the flash and aim it for you. To get an idea of where you can point the flash to achieve great lighting, check out my article on lighting positions. If you want to control the look of the light, have a look at this article 4 Value Speedlight Modifiers that Won’t Break the Bank.

    The Background

    The background just needs a longer exposure to render on the sensor. If you want to avoid blurring your background, use a tripod. Even with a tripod, you can opt to use a higher ISO to make the shutter speed shorter.

    How to Create and Shoot Night Portraits

    This shot was in Manual mode, and the exposure was set for the background. The off-camera flash was set to manual and was dialed up or down as needed to suit the exposure for the background.

    Getting the shot

    The first step you need to make is how much of the shot you want in focus. A wide aperture like f2/.8 means the background will go out of focus, but you can use a shorter shutter speed to expose the background. When using flash, the shutter speed isn’t important for the subject, so you should get the subject flash exposure right first.

    Set your aperture and your ISO first, 400-800 should be fine. If you’ve got a prime lens, you can even try wider aperture’s which will give a creamy out of focus background. The shutter speed can be anything below 1/200th (or your camera’s sync speed, which will be in your camera manual). Tip: If you can’t focus properly, use your phone flashlight to illuminate the face enough to focus, then switch the lens to manual focus.

    Aim your flash at the subject at a low power like 1/32 or 1/16. Take a shot and check it. Firstly, if the subject is too bright, turn the flash power down. Alternatively, if they’re too dark, turn it up. Finally, if it’s still too bright at the lowest flash setting, move the flash further away from the subject.

    This image was shot at 1/250th, which is the sync speed of the camera. Flash power is tied to the aperture below the sync speed of the camera, so you can safely open up the shutter speed to add more light in the background. 

    With that working, you probably have a black background, like the image above. Have no fear, you’re only halfway there. Next, bring your shutter speed down. If you’ve got live view on your camera, use it. Make sure it’s set to Exposure Simulation or Preview Mode On. As you lower the shutter speed (make it slower), you’ll see more and more of the background. When you’re happy with how the background looks, you’re ready to shoot.

    This lighter image was shot at 1/30th. Notice that the flash exposure on the subject is the same in both pictures. Both shots are at ISO 1600 and f/4.0. As a final note, the subject was completely dark, so to focus I had him use his phone to light his face. I used autofocus to lock focus, then switched to manual and indicated he should stay still.

    If your shutter speed is really slow, like 1/15th of a second or below, encourage your subject to stay still so they aren’t blurred in the image.

    Background Ideas

    Your background can be an interesting building, a bridge or even just a street. For a really cool look, find somewhere with loads of lights. By using a really shallow aperture these look fantastic out of focus.

    Bokeh background

    Using Continuous Light

    If you bring a something to light your subject other than a flash, there’s a different juggling act that needs to happen. First, you’ll probably need a higher ISO. For these shots, set your background exposure first and then introduce the light on the subject.

    In the image below I brought in a $ 35 Godox LED video panel. The panel has both brightness and white balance controls from Tungsten to Daylight. It gives a nice soft quality of light and looks natural. Even better is that what you see in the viewfinder is what you’ll get when you shoot, not like flash, where you’re always guessing.

    How to Create and Shoot Night Portraits - LED panel

    Using an LED panel instead of a flash can be a great option. You can see the shot in the viewfinder and focus easily.

    If your light doesn’t have a brightness control, you can move it closer or away from your subject to change the intensity on the subject instead. This applies to using a street light as well. If your subject is bright compared to the background, move them further away from the light to get a better balance.

    How to Create and Shoot Night Portraits

    Street lights can also be used for night portraits.

    For this shot, I used a street light across the road as my key light. I moved my subject until I could see a triangle of light on the side of the face opposite the light. A slight tilt of the head helped as well. I chose this spot so I had the railway bridge and cars in the distance out of focus, but the background still retained interest.

    Shooting with Style

    To go the whole hog, you could get someone to do hair and makeup, as well as getting really stylish clothes to make the shot look even better. You can just use friends and clothes borrowed their wardrobe, but it makes it look properly professional.

    How to Create and Shoot Night Portraits

    Here’s a selection of night portraits that I’ve done and details about how they were made.

    How to Create and Shoot Night Portraits

    The band, Drown, photographed for The Thin Air Magazine. Here I used the Godox AD360 with a 120cm Octa box off to camera right. This post-sunset scene was exposed to capture a good exposure for the clouds, then the flash was set to expose the band correctly. Without flash, the band would have been silhouetted

    How to Create and Shoot Night Portraits

    This photo doesn’t contain a background, but I wanted to create the feel of a busy road. I used two bare-bulb speed lights to give the effect of passing cars lighting from the front and back. In reality, we were on an empty road with no traffic. The backlight was positioned as both a rim light and to add flare.

    How to Create and Shoot Night Portraits

    I’ve been doing a series of portraits with a red tulle skirt, so it’s appropriate that I include them here. This was shot using a speed light and a 120cm Octa box. The light was off to camera left to create a loop lighting pattern. I’ve balanced the flash and ambient light to get this exposure. There is a mistake in it though. I really should have used a CTO gel (Color Temperature Orange), or at least a half CTO gel to warm up the color of the flash a little. The flash can look quite blue when shot against tungsten lighting, especially the sodium vapor lights in the background here.

    Get out there and try some night portraits

    Nothing here will make any difference if you don’t get out there. If you’ve got no gear, you should start with a battery powered LED work light or even one of the Godox LEDP 120C panels (make sure you get a battery as well). Get your camera off automatic too, and give yourself more control!

    The post How to Create and Shoot Night Portraits by Sean McCormack appeared first on Digital Photography School.


    Digital Photography School

  • The Photographer’s Emphemeris will launch a 3D app for iOS on June 27

    The Photographer’s Ephemeris, a tool that helps photographer’s plan landscape photos by providing lighting information about locations, will soon receive a new 3D upgrade. Over the weekend, the company announced plans to launch a new product called the Photographer’s Ephemeris 3D for iOS, a ‘visualize tool’ that allows users to view the effects of sunlight on a landscape anywhere in the world using 3D topographical models.

    According to the Photographer’s Ephemeris, the new 3D iOS app enables users to simulate the presence of the sun, moon, and Milky Way in any given landscape during a certain period of time. The simulation presents ‘actual topography’ that shows how the sun’s light will look spread across the land, as well as where the moon and Milky Way will be located for nighttime photography. The simulations are available in time frames ranging from days to years in the future.

    The 3D iOS app launched in New Zealand and Ireland yesterday, but won’t arrive for everyone else until June 27. The application can be used on any device running iOS 10, though more powerful devices will show greater detail in the simulations. The app will be priced at $ 19.99, $ 30.99 AUD, €21,99 EURO and £19.99 GBP. The company says it plans to offer a pro subscription in the future with, among other things, full offline support. It is unclear whether the company plans to launch an Android version.

    Via: Photographer’s Ephemeris

    Articles: Digital Photography Review (dpreview.com)

  • Should You Switch from Photoshop to Affinity Photo?

    If you are considering the switch from Photoshop to Affinity Photo, you might wonder how it will affect your photo editing workflow. And how will just a tiny loss in features (for a big drop in price) affect your options for photo editing? Keep on reading to find out how your workflow will change, what you will miss and what Continue Reading

    The post Should You Switch from Photoshop to Affinity Photo? appeared first on Photodoto.


    Photodoto

  • Water Splash Photography Made Easy

    How exciting is it to freeze things in action? High-speed photography and water make the perfect recipe to get stunning images – and creating them is incredibly fun and easy too! Here are some tips for doing your own water splash photography.

    Water Splash Photography Made Easy

    What will you need to do splash photography?

    You will definitely need an assistant. He/she will make your life much easier. It’s true that you can do everything by yourself but it’s way more productive if you have some help, a person who can throw the objects into the water, get them out and then throw them again. And again. And again.

    Water Splash Photography Made Easy

    • Next you want a glass aquarium with a minimum size of 24x12x16”, preferably made of transparent glass.
    • Set up a table covered in black fabric.
    • Use a black background (paper or textile) standing at a minimum of six feet away from the aquarium.

    Setup

    Fill the aquarium with tap water, half or 2/3 full, depending on how deep you prefer the subjects to fall. Please keep in mind that if you fill the tank too high, every splash will probably result in water spilling. Please be careful with both flashes and your camera, when working with water.

    Gear

    Setup Water Splash Photography Made Easy

    Any decent camera will be okay, but to obtain better quality you would probably like to use a crop-sensor or full-frame DSLR – or a mirrorless camera, with a good lens. Shooting from a distance, I used a 70-200mm f/2.8 lens at 200mm in order to obtain as much depth of field as I could.

    As subjects you can use anything you like. I personally prefer fruits and vegetables because they vary in size, shape, and color.

    Water Splash Photography Made Easy

    Always use a tripod for your camera. Set the camera at a position where you have the desired framing of the aquarium, leaving enough space up, down and on both sides to capture most of the splashes. After you have positioned the camera, set the focus manually.

    Focusing

    For this step, ask your assistant to hold the subject in the water approximately where you want to make the splashes happen. Leave the camera on manual focus (or use back button focus). This way, the camera won’t need to refocus every time you make a picture, and you’ll know that the subject will be in focus every time the object is thrown into the same location.

    Freezing the water splash

    You have to know that freezing the motion (in this case) is done by the flash and not by the camera. Here’s a little bit of theory to explain this.

    You have probably already made pictures where you stopped a human or an animal in motion. You’ve achieved that result by using a really quick shutter speed, somewhere between 1/4000th or 1/8000th of a second. But in the studio, where you use flashes or strobes, things change.

    Water Splash Photography Made Easy

    Your camera has to be in sync with the flashes (sync speed) and in most cases, this results in a shutter speed of 1/125th – 1/200th which is way too slow to freeze fast action. Luckily, there is this magic word called “flash duration”. This is the short period of time when the flash emits light which, if short enough, gives you the freezing effect you wanted.

    You can use hot shoe flashes (speedlights) as they generally have pretty short flash duration, but only at very reduced power settings of 1/32 or 1/64 of full power. That results in low light, but you can compensate for that by increasing the ISO and opening the aperture.

    The other option I prefer is using strobes with short flash durations. Most manufacturers make the flash duration of their strobes public information and the power at which you get the shortest flash duration. For the pictures of this article, I used Elinchrom ELC Pro HD 500 strobes, which have the shortest flash duration – 1/4000th of a second – at power 3.1.

    Setting up the flash and camera

    For your water splash setup, you will need two flashes, one on each side of the aquarium, aimed directly at your subject. I prefer to use light shapers which restrict the light to hit only the subject, so it doesn’t spill all over the scene, thus avoiding unwanted reflections and highlights.

    For this shoot, my camera settings were ISO 100, 200mm, f/16, at 1/125th of a second.

    Water Splash Photography Made Easy

    Taking the pictures

    This is the fun part! If you an assistant you’ll have to synchronize your movements. As he drops the objects in the water you’ll need to capture the perfect moments. In practice, this means that you will count to three, after which he’ll drop the object while you press the shutter release and pray to get the moment just right!

    I sincerely suggest you repeat these four steps for a few hours. I prefer to set my camera to continuous or burst mode (my flashes recycle very fast) and record three or four pictures per drop. That way I increase the probability of capturing the subject and the splash of the water.

    Water Splash Photography Made Easy

    Some quick tips:

    • Use subjects with vivid color, this way you will have good separation of the subject from the black background and the white/blueish splash. This makes your pictures really pop.
    • If you photograph small subjects, try to use a minimum of 6-10 pieces at once.
    • Try to combine subjects of different sizes, colors, and shapes.
    • The heavier the subject, the faster it will fall, making it harder to capture at the right moment. So take that into consideration.
    • To get larger splashes, use subjects with a larger surface are, or let them fall from a higher position.
    • Wash the fruits and vegetables well before you use them, this way you can keep the water cleaner for a longer period of time.
    • If the water starts becoming dirty, change it. It’s pretty unpleasant as the tank is heavy and you’ll have to do that a couple of times. But the good news is that by doing so, you’ll have to work less in the post-processing phase, while also getting sharper, more cleaner images.
    • Frequently clean the front glass of the tank to get rid of the water drops that tend to accumulate on it.

    Water Splash Photography Made Easy

    Post-processing tips

    This part is crucial! Despite all the efforts you have made to capture the perfect splash, the raw images you’ll get will definitely still need a little bit of polishing and processing.

    Water Splash Photography Made Easy

    Raw unprocessed image.

    I only use Lightroom and Photoshop for post-processing, but you can achieve the desired effects in any preferred image processing application.

    Clean up the water

    After you’ve selected the image you want to retouch, you’ll first need to clean the water. I suggest that you use the Adjustments Brush, with Blacks set to -100. Apply this brush everywhere on the image except the subjects (that would make the subject too dark).

    Water Splash Photography Made Easy

    Adjustment Brush settings to apply to the water.

    You can use the brush even on the splash itself, because this will make it cleaner and sharper, but be careful not to over do it because you can lose some details on the splash.

    Water Splash Photography Made Easy

    After the Adjustment Brush has been applied.

    Final touches

    Now open the image in Photoshop, create a new empty layer, select the brush color black, and start painting the new layer black. Be careful near the subjects, to avoid painting them also. This way you can achieve a clean black background around the subject. You can even paint away small drops of water that you consider unnecessary. Try to preserve a little bit of the surface of the water though.

    If you like the painting you applied, it’s time to add sharpness to the image using the Unsharp mask at the level of your taste. You can also add some contrast or saturation depending on the final look you want to get.

    Water Splash Photography Made Easy

    Water Splash Photography Made Easy

    Water Splash Photography Made Easy

    Your turn

    Are you ready to give water splash photography a try? Here’s another dPS article that can give you some more splash tips, How to do Creative Water Splash Photography with Off-Camera Flash.

    If you have any questions please post them in the comments section below, and also share your images so we can see your results.

    Bio

    Stefan Mogyorosi is a photographer based in Oradea, Romania. He works mostly on commercial projects for the beauty industry, but also likes to do personal projects photographing still life, macro, fashion, portraits, or glamour. Experimenting with freezing motion and working with liquids are his top priorities right now.

    Personal page – http://www.mogyorosistefan.ro
    Facebook page – https://www.facebook.com/mogyorosistefanphotography/
    Instagram page – https://www.instagram.com/mogyorosistefan/

    The post Water Splash Photography Made Easy by Stefan Mogyorosi appeared first on Digital Photography School.


    Digital Photography School

  • Video: mesmerizing stop motion film of raw wood being shaved away layer-by-layer

    Photographer and animator Brett Foxwell teamed up with friend and musician Conor Grebel to create something awesome. Together, they painstakingly milled their way through several pieces of wood, layer by layer, capturing one frame of video at a time to create a stop motion film they’re calling WoodSwimmer.

    As you can imagine, the process of actually capturing this film was incredibly time-consuming, and at times grueling.

    ‘[The final video] involved endless hours of shooting, cutting, and prepping for each frame,’ Brett tells DPReview. ‘Which involved either clearing all the wood chips away or keeping them looking consistent and pretty, and finally applying wood oil to the sample for each frame.’

    You can see the mess this process created in some behind the scenes images Brett shared with us. Unfortunately, he only captured a couple of these BTS shots, because, in his words, ‘It was just such a grueling process that I never got around to getting proper documentation of the process.’

    Regarding gear, Brett tells us he used a Canon EOS 60D with Tamron 90mm macro lens attached. This setup was tethered to DragonFrame, a stop-motion capture software that Brett says is “a great tethering application even if you’re not shooting specifically stop-motion.”

    Tons of work and a nightmare to clean up, but well worth it when you get a load of the final product. Here are a couple of stills Brett sent our way:

    Several stills from WoodSwimmer are available as prints from Brett’s website, and you can see more of his stop motion, nature photography, and other artistic work by following him on Instagram.

    Articles: Digital Photography Review (dpreview.com)

  • There’s no ‘right way’ to use Instagram as a professional

    Okay so it might not be super minimalist….it might not fit the feed… but rules are meant to be broken right?! ???

    A post shared by Jennifer Moher (@jennifermoher) on

    I don’t view my Instagram feed very seriously. I put some ‘work’ photos on there that I’m proud of, both from reviewing cameras and my freelance work. I definitely don’t do a very good job of curating – people who are interested in both motorcycles and cats would probably like my feed, but I’m not sure how much overlap there really is for those audiences.

    So for those who are full-time, working professional photographers who need to hustle clients for a paycheck, how does Instagram fit in? Rangefinder Magazine asked five photographers about their posting philosophies, and got five pretty different results.

    Jennifer Moher likes to show people that she’s more than just a wedding photographer, so while her feed has a pretty consistent visual aesthetic, there’s a lot of her personal life on there, with everything from hikes to coffee cups. Caroline Briggs, on the other hand, says ‘a random snap of my coffee cup would be too jarring and off-topic,’ and therefore keeps her personal and professional photography in two separate accounts.

    Are you on Instagram? How does it fit into your photographic world? Let us know in the comments, and head on over to Rangefinder for the full writeup.

    Via: Rangefinder

    Articles: Digital Photography Review (dpreview.com)

  • Hyperloop Hotel: Zoom from City to City in a Luxury Lodging Pod

    [ By SA Rogers in Drawing & Digital. ]

    Hyperloop transit is about to make the world a whole lot smaller, and with it could come a system of luxurious private pods outfitted like high-end hotel rooms so you can zoom from one city to the next in unprecedented comfort. While it might seem like there’s little need for such cush train cars when your trip takes less time than ever, the Hyperloop Hotel aims to solve the problem of where you’re going to stay while traveling.

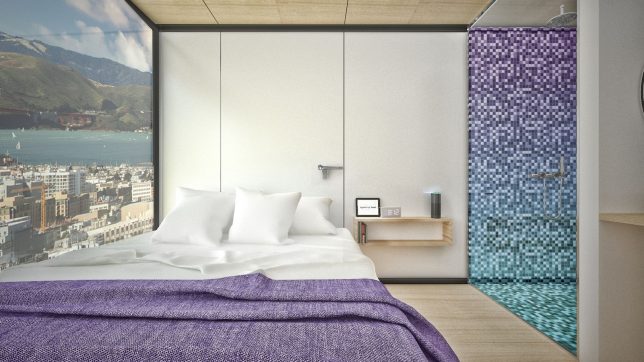
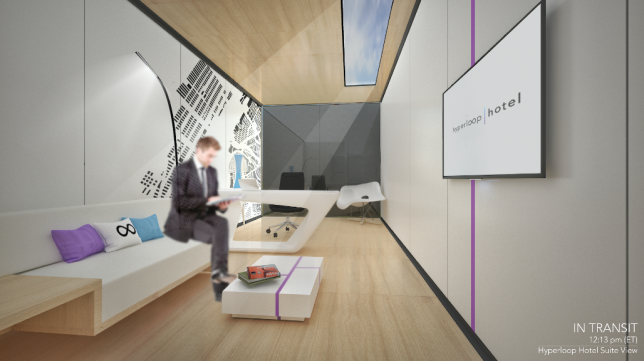
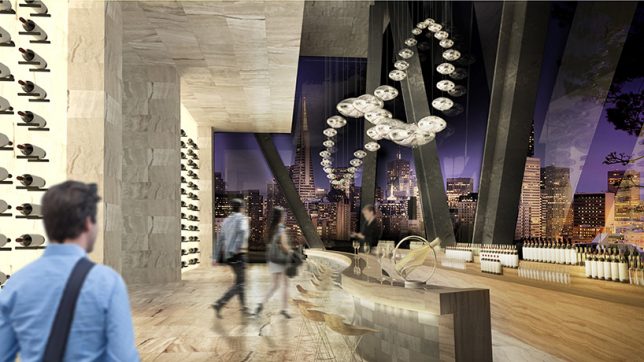
    Developed by Radical Innovation Award winner Brendan Siebrecht, the Hyperloop Hotel consists of shipping containers that double as traveling guest suites, able to ‘dock’ themselves at any of 13 different hotel stations in cities like Seattle, Portland, Las Vegas, Los Angeles, Austin and New York City. While the nightly fee hasn’t been set yet, Siebrecht reveals that for a fee of $ 1,200, guests can even visit multiple cities in a single day. That’s right, you could maintain a comfy home base while having breakfast on the East Coast, lunch in the South and dinner on the West Coast.

    It might sound too futuristic to be real, but Hyperloop One is already being tested in Las Vegas and could be carrying passengers by the year 2020, so it’s actually not that far away, assuming the technology stays on track (pun intended.) But the hotels definitely wouldn’t come cheap – it would cost about $ 10 million to build each one. The pods themselves feature a bedroom, office, bathroom and living room, with a glazed wall that can be covered while you’re in motion.

    “I believe the Hyperloop One is the next big innovation in transportation in the United States and possibly the world,” Siebrecht told Business Insider. “I wanted to explore ways in which this technology could transform the overall travel experience and hospitality.”

    Share on Facebook


    [ By SA Rogers in Drawing & Digital. ]

    [ WebUrbanist | Archives | Galleries | Privacy | TOS ]


    WebUrbanist