Blog

  • Apple patent shows camera system that helps you take better selfies

    A newly granted Apple patent details a new type of camera system that aims to produce higher-quality selfies. The patent, first filed with the US Patent and Trademark Office in 2015, describes using a wider field-of-view with the iPhone’s front-facing camera when taking selfies in landscape mode. The wider FOV wouldn’t be fixed, however, with the camera reverting to a narrower FOV when a selfie is taken in portrait mode.

    These field-of-view effects are designed to improve selfies when taken both in groups of people and alone. In the case of groups, the patent explains that turning the phone sideways would expand the camera’s field-of-view to cover a wider angle, ensuring everyone in the group is featured in the selfie. A self-only selfie taken in portrait mode, though, would feature a more traditional aspect ratio such as 4:3 and a narrower FOV.

    The camera system in this patent would also be able to intelligently prod the user to take better selfies by selectively narrowing the FOV in portrait mode, requiring the user to extend their arm further away. The system could also adjust the previewed image in such a way that the user will need to change the camera’s angle, the end result being an overall better selfie with a more natural look, reduced distortion, and other improvements.

    Explaining that latter point, the patent says the camera system may ‘crop/scale/zoom/shift the image window to coax the user to hold the camera device in a more optimal ‘self-taking’ position.’ As with any patent, it is possible Apple will never implement this technology into a consumer product, but it’s good to know so much technical thought is being put into… selfies.

    Articles: Digital Photography Review (dpreview.com)

  • Japan’s space agency has an adorable ball-shaped camera drone on the ISS

    The Japan Aerospace Exploration Agency (JAXA) has a robotic ball-shaped camera drone called Int-Ball floating around the International Space Station, and for the first time ever it has released videos and images captured by the camera.

    The drone, which measures 15cm in diameter and was delivered to the ISS on June 4th, was created using 3D printing technologies; with it, flight controllers and researchers on Earth can watch video from the ISS in real-time.

    JAXA hasn’t detailed the type of camera used with Int-Ball, saying only that the robot features ‘existing drone technology.’ According to a report in The Japan Times, a dozen propellers enable Int-Ball to navigate in any direction while a variety of inertial sensors, ultrasonics sensors, and a camera make navigation possible.

    JAXA says Int-Ball frees up about 10% of the ISS crew’s time for other tasks… so there is some use for it beyond adorable ISS drone marketing.

    Articles: Digital Photography Review (dpreview.com)

  • 7 Different Ways to Approach Macro Photography

    Macro photography is one a genre that many people love. But the expense of buying a top lens to take close up photos can make it restrictive or impossible to do. However, there are many ways of approaching this kind of photography, and not all of them have to break the bank.

    Here are seven different approaches to macro photography. We’ll start with what most people think of, and cover other ways to help you do macro photography when you don’t have a big budget to do what you love.

    7 Different Ways to Approach Macro Photography - orange flower

    105mm Macro lens with auto-focus. I have used the same flower for all the photos. They were taken as close to the flower as the lens would allow for focusing. A full frame camera was used to take the images, except for the last one.

    #1 – Dedicated Macro Lens

    Getting yourself a macro lens is one if the best ways of doing close-up photography. These lenses are specifically designed to allow you to focus very close to your subject. With most macro lenses, you can get as close as about four inches or 10 centimeters (compared to “regular” lenses which close focusing distance is usually around 12 inches or more). That is with autofocus on, but if you turn it off you will be able to focus even closer.

    Manual focusing seems to be the preferred way of doing macro photography. If do some reading, you will find a lot of photographers prefer to use their macro lenses this way. It allows them to get even closer. This, then, might be where you ask the question, “Why should I bother buying a macro lens that has autofocus?”

    Many of the top lenses manufacturers make options for macro photography. They are high-end, and the quality is as you would expect those brands to produce. However, they are also very expensive and you can expect to pay quite a bit for a dedicated macro lens.

    Many other companies are now also making macro lenses. Some don’t have autofocus, but if you are happy using manual then they may be a better (or less expensive) alternative for you. They are often around half the price of the big brands, so if you can’t afford one of the top models, then this could be a much better fit for you.

    7 Different Ways to Approach Macro Photography

    Shot with a 105mm Macro lens using manual focus.

    #2 – Zoom Lenses

    When many people start doing macro photography they often start with a zoom lens and do their best to get as close as possible. Depending on the focal length of your lens you can get pretty close to your subject. You may not get tiny bugs on your flowers from the garden, but you will get whole flowers.

    There are some zoom lenses that also have a macro ability which makes it easier for you to get great photos and it allows you to focus in closer. Often zoom lenses will only focus if you are a few feet away from your subject. If you have one with the ability to get closer, then you will be able to get fairly good “almost macro” images.

    7 Different Ways to Approach Macro Photography

    Image taken with a zoom lens and the focal length was 300mm.

    #3 – Lensbaby Velvet 56

    The Velvet 56 by Lensbaby is a special lens that can be used for taking normal photos, but what a lot of people use it for is macro photography. It looks like a normal prime lens, but it has a very short depth of field, which makes it ideal for macro photography. You can change the aperture to give you very little in focus or a lot.

    A lot of macro photographers who start using the Velvet 56 fall in love with it and find it difficult to use other lenses again.

    7 Different Ways to Approach Macro Photography

    This image was taken with the Lensbaby Velvet 56.

    #4 – Lensbaby Composer Pro and Optics

    This is a unique system where the first part, the Lensbaby Composer Pro, fits onto your camera like a lens. It is made up of two parts which are connected by a ball-like socket so you can move the outer part around to put your focus point and plane where you want. Into this, you put an optic that will give you the desired effect you want. There are many different types of optics, however, the Sweet 35 and Sweet 50 are the most popular ones for macro photography.

    The Composure Pro and optics gives you a lot of opportunities to get some interesting and different effects. You can change the point of focus to anywhere you want in the image. You can also decide what depth of field you want to get. Macro images that are very different to what you can achieve with other types of macro lenses are possible with this system.

    Read my overview of the Lensbaby system here: Overview of the Lensbaby System – Is it for you?

    7 Different Ways to Approach Macro Photography

    This image was achieved by using the Lensbaby Composer Pro with a Sweet 50 optic.

    #5 – Extension Tubes

    You can also get extension tubes that will fit in between your camera and your lens. These will make your lenses get closer to your subjects (and shift the focusing distance). Your 50mm lens with extension tubes, and you can start taking photos that are very close to those from a macro lens. It should be noted that there are differences though, and a dedicated lens for close ups is easier to use.

    Extension tubes are usually bought in a group of three, you get a 12mm, 20mm and a 36mm. You can use them individually, or combine together. You can get one that will not allow the lens to communicate with your camera, they are usually much cheaper. So look for what they call automatic rings, with Autofocus. I use Kenko Automatic Extension Tubes.

    You have to be careful with the rings as they are not very heavy and if you put a big hefty lens on your camera and don’t give it enough support, then you risk damaging the connection between the lens and camera.

    7 Different ways of approaching macro photography

    Shot with a 50mm lens on its own.

    7 Different Ways to Approach Macro Photography

    Shot with a 50mm lens and a 36mm extension tube.

    #6 – Close-Up Filters

    There are many filters available for your lenses and you can also get ones that help you get really close to subjects. They are called close-up filters and are like magnifying glasses. You are quite limited in what you can do with them, and they can be hard to use.

    When you go looking for close-up filters you will find different levels of magnification. It would be tempting to get lots of them, but you really only need a couple. The one I have is a +5 from B+W.

    I also use the close-up filters on my macro lens as it allows me to get even closer to the flowers I’m trying to photograph. Sometimes you have to use everything you have to get as close as possible.

    7 Different Ways to Approach Macro Photography

    105mm macro lens with a +5 close-up filter.

    #7 – Phone

    Most cell or mobile phones have quite good cameras now and you can get some really good images with them, including macro photography. You can find the option for macro photos in your settings. Though my Samsung Galaxy S7 Edge doesn’t have a specific macro one, there are some that will help you get better photos.

    With the phone, you can get just as close to your subject as you can with most macro lenses. That makes it great, however, it can be much harder to get a good image. It is very hard to hold the phone steady enough to get good photos. It takes a lot of practice to get good images.

    Many companies now produce lenses that you can use with your phone including a macro lens which can be a great way for doing this kind of photography.

    7 Different Ways to Approach Macro Photography

    This macro image was taken with the Samsung Galaxy S7 Edge Phone.

    In the end

    There are so many different approaches, and while seven have been mentioned here, there may be a lot more. Whichever way you choose to go, you have to find the method fits within with your budget and the amount of time you want to spend photographing subjects at a macro level.

    What do you use to do macro photography? Do you have a different approach you can share with us?

    The post 7 Different Ways to Approach Macro Photography by Leanne Cole appeared first on Digital Photography School.


    Digital Photography School

  • Adobe updates Lightroom Mobile with new features and interface on iOS and Android

    Today’s Lightroom Mobile updates include the addition of the selective brush on iOS, and a new interface for Android users.

    Adobe released a major update to Lightroom Mobile for both iOS and Android users today. Each update is unique, offering different features depending on which operating system you use. Scroll down for a summary of both.

    Lightroom Mobile for iOS

    For iOS users, today’s update includes a new selective brush, improved details tab, and an improved interface for iPad users.

    The new selective brush is a much-requested update, allowing you to paint enhancements onto specific parts of your image. What’s more, 3D-touch enabled devices (iPhone 6S or later) will vary the strength of the brush based on finger pressure.

    Other improvements include the addition of global sharpening and noise reduction to the Details tab, and a new iPad interface that has been optimized to take full advantage of the powerful processors found in the iPad Pro and iPad Pro 2.

    $ (document).ready(function() { SampleGalleryV2({“containerId”:”embeddedSampleGallery_5384339921″,”galleryId”:”5384339921″,”isEmbeddedWidget”:true,”standalone”:false,”selectedImageIndex”:0,”startInCommentsView”:false,”isMobile”:false}) });

    Lightroom Mobile for Android

    On the Android side, today’s update focuses on making Lightroom mobile faster and, in Adobe’s own words, “more Android-y.”

    “We wanted to provide the best Android experience possible ,so we redesigned Lightroom for Android from the ground up to be faster, more efficient, and, well, more Android-y,” explains Adobe’s Josh Haftel. “Every screen has been redesigned with the goal of ensuring a natural, native Android experience while providing the highest quality, professional-grade mobile photo editing app ever.”

    $ (document).ready(function() { SampleGalleryV2({“containerId”:”embeddedSampleGallery_1712960971″,”galleryId”:”1712960971″,”isEmbeddedWidget”:true,”standalone”:false,”selectedImageIndex”:0,”startInCommentsView”:false,”isMobile”:false}) });

    To take advantage of these updates on both iOS and Android, either update your Lightroom Mobile or download a new copy off the iTunes App Store or Google Play.

    Articles: Digital Photography Review (dpreview.com)

  • 19 Lush Green Images of Summer

    Summertime is here in many parts of the world. The grass is green, as are many things in nature.

    Here are a few examples:

    By Tatiana T

    By Jackie Allen

    By Tokkes

    By Appalachian dreamer

    By Rolf Brecher

    By Jaros?aw Pocztarski

    By Matthew Fang

    By Cheng I

    By Neville Nel

    By Hammad Asghar

    By fs999

    By Toni Martín

    By tanell_85

    By Rodney Topor

    By Carolina Valtuille

    By Eileen McFall

    By Andreas Levers

    By Etienne

    By eLKayPics

    The post 19 Lush Green Images of Summer by Darlene Hildebrandt appeared first on Digital Photography School.


    Digital Photography School

  • Weekly Photography Challenge – Green

    Take a look at these 19 bright and colorful images of green things.

    By Ram Yoga

    Weekly Photography Challenge – Green

    This week your job is to seek out anything green and photograph it. Find some good light, make a creative composition, and do your best for this week’s challenge.

    By PicturesFromWords

    By VirtualWolf

    By Hamish Irvine

    Share your images below:

    Simply upload your shot into the comment field (look for the little camera icon in the Disqus comments section) and they’ll get embedded for us all to see or if you’d prefer, upload them to your favorite photo-sharing site and leave the link to them. Show me your best images in this week’s challenge. Sometimes it takes a while for an image to appear so be patient and try not to post the same image twice.

    Share in the dPS Facebook Group

    You can also share your images on the dPS Facebook group as the challenge is posted there each week as well.

    The post Weekly Photography Challenge – Green by Darlene Hildebrandt appeared first on Digital Photography School.


    Digital Photography School

  • How to Remove People from Your Photos Using Photoshop

    The worst part about taking photos of monuments and city streets is that you always get cars and people blocking the architecture behind them. It can be very distractive, and they take away from the real subject. In this Photoshop tutorial, you will learn a technique that will allow you to quickly remove people and cars from your photos. You do need to plan ahead and take multiple photos, but the results will be amazing!

    Photoshop has this little-known feature that has been around for over a decade called Image Stack Modes.
    The Image Stack Modes are sort of like a Blending Mode that blends layers inside of a Smart Object in a certain way depending on the algorithm that you select.

    One of those Stack Modes is Median, which takes a statistical average of the content found in all the photos in the stack. It will keep identical areas and remove everything that changes between the different shots. It is very likely that cars and people will move and change locations from one shot to the next. Thus, you can remove people and unwanted traffic when the algorithm is applied, leaving only the background.

    The tricky part is to get the right photos for this Stack Mode to work. Ideally, you should take your photos on a tripod so that the images line up better during the blend. However, if you do not have a tripod, hold your camera as steady as possible when shooting your images and you will still get great results.

    The pictures that we will be using in this tutorial were shot by hand with a mobile phone. I wanted to use photos that were less than perfect so that you could see the power of this technique.

    How to Remove People from Your Photos Using Photoshop

    When you take your photos, wait about 20 seconds or so in between each shot. You want to give people and cars enough time to move. In most cases, you will need between 8 to 25 photos.

    Bring Your Photos into a Single Photoshop Document

    The first step is to bring the image files into Photoshop as layers in a single document. To do so, go to File > Scrips > Load Files into Stack…

    In the “Load Layers” window select “Folder” from the “Use” drop down. Then click on the “Browse” button, and look for the folder containing your images. Press OK after you have selected the folder.

    The file names will appear within the window (as shown below). If all the files are there, press the OK button. Photoshop will then take all the files and place them in a single document as layers.

    How to Remove People from Your Photos Using Photoshop

    Auto-aligning Layers

    For the Image Stack to work, the layers need to be aligned as best as possible. If you used a tripod when shooting the images, then your layers should already be aligned. The photos used in this tutorial were shot without a tripod, so we will need Photoshop to align them for us.

    To align the layers, select them all by pressing Cmd + Option + A (Ctrl + Alt + A on PC). Then go to the Edit menu and select “Auto-Align Layers.” Make sure that “Auto” is selected, and press “OK.” Photoshop will then look through all your layers to find similar pixels and align them accordingly.

    How to Remove People from Your Photos Using Photoshop

    Put Aligned Layers into a Smart Object

    Now that all the layers are aligned, you need to put them into a Smart Object so that you can apply the Stack Mode. Select all your layers again by pressing Cmd + Option + A (Ctrl + Alt + A on PC). Then right-click the space on the left side of any selected layers and choose “Convert to Smart Object.”

    You should now only have a single Smart Object in your Layers Panel.

    The Median Stack Mode

    Now that all the layers are inside a Smart Object you can control how the set blends by using a “Stack Mode.” Go to Layer > Smart Objects > Stack Mode > Median.

    This Stack Mode takes a statistical average of the content found in all the photos. It keeps identical areas and removes everything that changes between the different shots, such as people walking through the scene.

    Faster Way of Doing This – The Statistics Script

    You can get to this point in the tutorial by only using one single command!

    The reason that I took the long approach was so that you could see what Photoshop was doing behind the scenes. If you get into trouble, then you’ll know what the steps were to create the effect, and you can backtrack to fix the problem.
    To do this whole process in a single command, go to File > Scripts > Statistics…

    In the Image Statistics window, select Folder you want to use. Click on the Browse button to find the images that you want to use in the Image Stack.

    Once the images load, select Median as the Stack Mode, and check “Attempt to Automatically Align Source Images.”

    How to Remove People from Your Photos Using Photoshop

    This will Auto-Align the images, put them in a Smart Object using the Median Stack Mode. Getting you to this part of the demo all within one window!

    How to Remove People from Your Photos Using Photoshop

    Fixing Image Stack Errors

    Problems may arise when dealing with background elements that are always moving, such as water, clouds, or flags. In this example, the two flags on top of the Tribune Tower disappear. We can bring them back by copying and pasting a flag from one of the original images.

    To see the original images, go to Layer > Smart Object > Edit Contents. A new tab will open that contains the contents of the Smart Object. Then look through your layers to see which of the original layers contains the best version of the item you would like to replace.

    Select the Lasso Tool and make a selection around the objects. With the selection active press Cmd/Ctrl + C to copy.

    How to Remove People from Your Photos Using Photoshop

    Go back to the working document and press Cmd/Ctrl + Shift + V to “Paste in Place.” Repeat these steps with any other object that you need to fix.

    Create a Smart Object to Hold it All Together

    Select the all the layers by pressing Cmd + Option + A (Ctrl + Alt + A on a PC), right-click on the side of any selected layer and choose “Convert to Smart Object.” This Smart Object can now be adjusted or manipulated as if it were a single layer. You can apply the Camera RAW filter non-destructively to enhance the image color and tone.

    Camera RAW Filter to Adjust Tones and Color

    Select the Smart Object containing all the layers and open Adobe Camera Raw by going to: Filter > Camera RAW. This filter works a lot like Adobe Lightroom. The controls are in a similar layout and do the same things. Lightroom is built from the Camera RAW engine, so it will be familiar to you if you are a Lightroom user.

    How to Remove People from Your Photos Using Photoshop

    You can create an HDR effect by darkening the Highlights and brightening the Shadows. Slide the Highlights slider to the left, and the Shadows slider to the right. Slide the Clarity slider to the right. Clarity adds contrast to the mid-tones.

    Finalize the effect by adding Vibrance which is a controlled saturation. Vibrance adds less saturation to already saturated areas, and it protects skin tones in portraits.

    Crop Your Photo

    If you did not use a tripod, you will see that the edges of the photo are likely misaligned. To remove these imperfections, you can simply crop them out by using the Crop Tool. Press C on the keyboard, then use the handles to adjust the size of the crop. Press Return when you’re done.

    This is how the final image looks:

    How to Remove People from Your Photos Using Photoshop

    Conclusion

    Give this technique for and go try and remove people and cars from your images. Let me know how you make out and if you have any questions, please post them in the comments area below.

    The post How to Remove People from Your Photos Using Photoshop by Jesus Ramirez appeared first on Digital Photography School.


    Digital Photography School

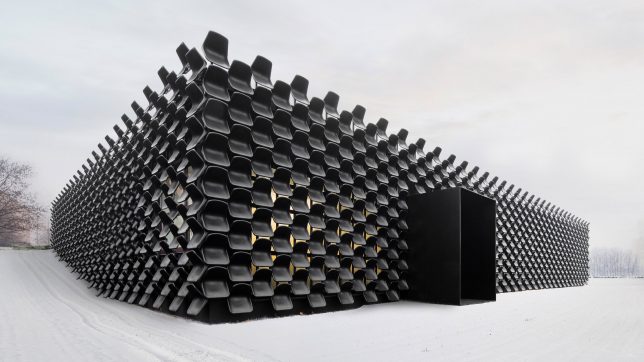
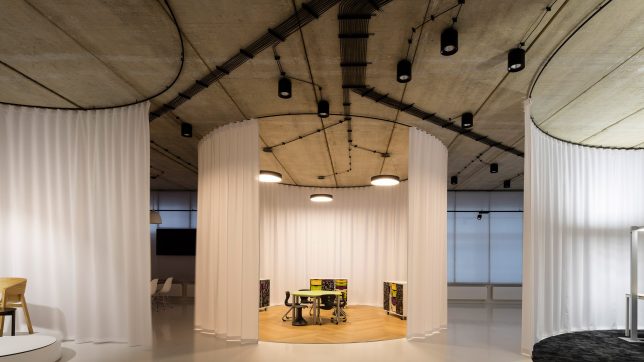
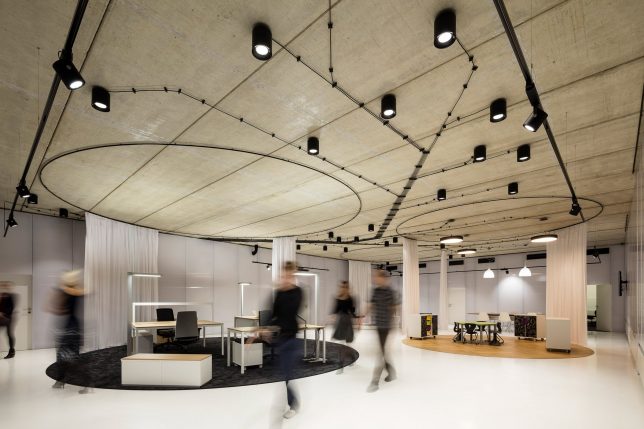
  • Cheap Seats: Sculptural Furniture Showroom Facade Made of 900 Black Chairs

    [ By WebUrbanist in Architecture & Offices & Commercial. ]

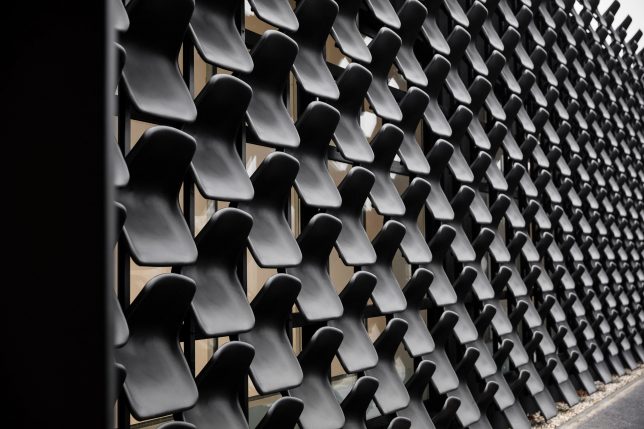
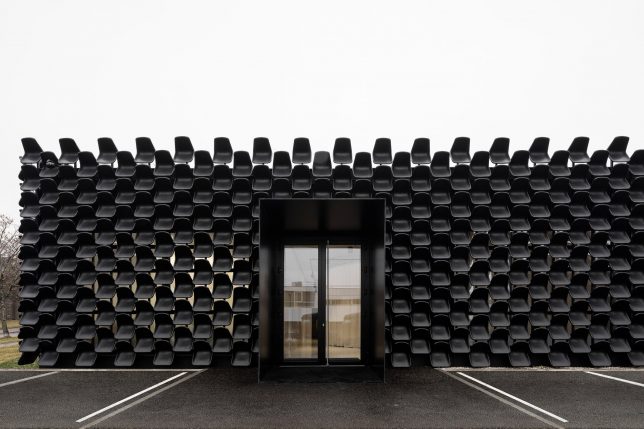
    Using cheap and repetitive materials sounds like a recipe for kitsch, but this furniture-oriented facade clad in generic black chairs (at around $ 5.00 USD a piece) manages to pull off an elegant and refined look.

    The clients, MY DVA (a furniture company), were looking for something additive, layered onto the existing bland building, but also reflecting their function (to showcase office and school furniture). The ideal solution would promote their wares while also entertaining visitors. It also had to be inexpensive.

    Versed in product and urban design, Ondrej Chybik and Michal Kristof of studio CHYBIK+KRISTOF, took these concerns into account when designing the facade. Tapping into their respective backgrounds, they came up with cladding literally composed of product designs that also fits a neighborhood theme of repetition (filled with identical blocks of flats).

    In total, the team used 900 Vicenza seats, a regular offering of the company, to form an undulating black box around the showroom, which functions well with the reduced light provided by these exterior shading elements.

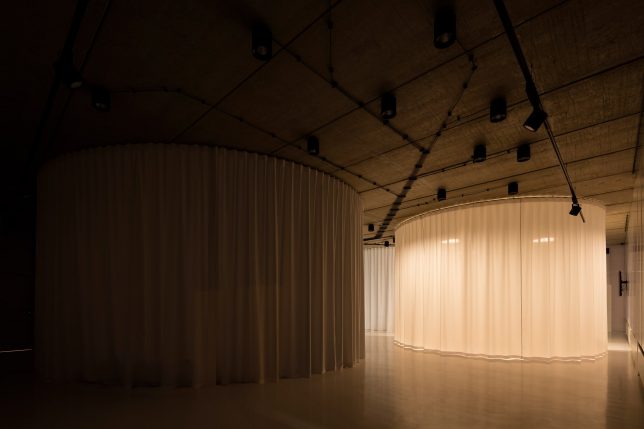
    Inside, the space was pared down to expose a raw concrete ceiling, from which suspended curtains hang to create little galleries — adjustable lights in these zones simulate different lighting conditions for furniture client spaces.

    Staff offices are located along the edges, off to the sides and out of the way behind translucent partitions, leaving a large, open, blank-slate showroom for furniture buyers.

    Share on Facebook


    [ By WebUrbanist in Architecture & Offices & Commercial. ]

    [ WebUrbanist | Archives | Galleries | Privacy | TOS ]


    WebUrbanist

  • Winners of the 2017 Magnum and LensCulture Photography Awards announced

    Winners of the 2017 Magnum and LensCulture Photography Awards announced

    Earlier today, Magnum and LensCulture officially announced the winners of their 2017 Photography Awards, doling out prizes in six categories: Documentary, Fine Art, Open, Photojournalism, Portrait and Street.

    Each of the ‘Single Image’ award winners (Magnum and LensCulture also gave out awards for best Series) walks away with $ 1,500 in prize money and the serious bragging rights that come with having won an award administered by one of the most prestigious names in photography.

    Additionally, all of the winners, finalists and juror’s pics will be screened at various photo festivals worldwide throughout the year.

    Press Release:

    WINNERS OF THE MAGNUM AND LENSCULTURE PHOTOGRAPHY AWARDS ANNOUNCED

    Twelve international photographers have been announced as the winners of the 2017 Magnum and LensCulture Photography Awards. The legendary photography agency, Magnum Photos, and LensCulture have joined forces for the second time to produce this opportunity to recognize, reward and support photographic talent. Each photographer will be awarded a cash prize and will also receive international exposure through Magnum Photos and LensCulture’s combined audience of over 6.5 million. The winning projects will be shown in a digital exhibition at The Photographers’ Gallery in London later this year and exhibited at photography festivals worldwide. Furthermore, the laureates will be awarded access to expert guidance from Magnum and LensCulture.

    The twelve winners of the prestigious award hail from all over the world and deal with a diversity of subjects. Nick Hannes, the Documentary series winner, pursued a project featuring the culture of the elite in Dubai, while Lissa Rivera’s striking portraits of her non-binary partner explore contemporary notions of gender and its narratives in today’s society. All told, the series and single image awards include six categories: Street, Portrait, Photojournalism, Open, Fine Art and Documentary.

    SERIES WINNERS

    Street: Argus Paul Estabrook, South Korea — “Losing Face”?

    Portrait: Lissa Rivera, United States — “Beautiful Boy”

    Photojournalism: Jason Florio, United Kingdom — “Destination Europe”

    Open: Medina Dugger, Nigeria — “Chroma: An Ode to J.D. Okhai Ojeikere”?

    Fine Art: Daniel Shipp, Australia — “Botanical Inquiry”

    Documentary: Nick Hannes, Belgium — “Bread and Circuses”

    SINGLE WINNERS

    Street: Hakim Boulouiz, Switzerland — “Choral”?

    Portrait: Artur Zdral, Poland — “Kasia”

    Photojournalism: Szymon Barylski – “Fleeing Death”

    Open: Britta Jaschinski, United Kingdom — “Confiscated”?

    Fine Art: Ellie Davis, United Kingdom — “Stars”

    Documentary: Retam Kumar Shaw, India – “Street Wrestling”

    In addition, twenty-one finalists have also been selected, and each juror has chosen one photographer as a “Juror’s Pick.”

    Jurors’ Picks

    Edgar Martins, United Kingdom — “Siloquies and Soliloquies on Death, Life and Other Interludes.” Selected by Yumi Goto, independent photography curator, editor, researcher, consultant, and publisher.

    Shahria Sharmin, Bangladesh — “Call Me Heena.” Selected by Susan Meiselas, Magnum photographer and MacArthur Fellow.

    Christian Werner, Germany — “Road to Ruin.” Selected by Sarah Leen, Director of Photography at National Geographic Magazine.
    Sonja Hamad, Germany — “Jin—Jiyan—Azadi: Women, Life, Freedom.” Selected by Lesley Martin, creative director at the Aperture Foundation and publisher of The PhotoBook Review.
    Antonio Gibotta, Italy — “Enfarinats.” Selected by Jim Casper, editor-in-chief of LensCulture.

    MD Tanveer Rohan, Bangladesh — “Fun Bath.” Selected by David Hurn, Magnum photographer.

    Terje Abusdal, Norway — “Slash and Burn.” Selected by Alec Soth, Magnum photographer.

    Mirko Saviane, Italy – “B-Uranus.” Selected by Azu Nwagbogu, Founder and Director of LagosPhoto Festival and the African Artists’ Foundation.

    Finalists

    Zhang KeChun, China — “Between the Mountains and Water”

    Thomas Alleman, United States — “The Nature of the Beast: Living On The Land In Los Angeles”

    Thom Pierce, South Africa – “The Horsemen of Semonkong”

    Sasha Maslov, United States — “Veterans: Faces of World War II”

    Roei Greenberg, Israel — “Along the Break”

    Paul D’Haese, Belgium — “Building an Imaginary City”

    Panos Kefalos, Greece — “Saints”

    Jonathan Bachman, United States — “Unrest in Baton Rouge”

    Jens Juul, Denmark — “Biotope”

    Gregg Segel, United States — “Daily Bread”

    Gabriel Romero, United States — “Liberation and Longing”

    Emilien Urbano, France — “War of a Forgotten Nation”

    Ash Shinya Kawaoto, Japan — “Scrap and Build”

    Antonio Faccilongo, Italy — “Habibi”

    Ramona Deckers, Netherlands — “Goran in Bed”

    Matthew Sowa, United States — “Grandmother’s Room”

    Karen Pulfer Focht, United States — “Busiest Brain Surgery Unit”

    Farida Lemeatrag, Belgium — “Milo”

    Ana Carolina Fernandes, Brazil — “Burning Bus”

    Amos Nachoum, United States — “Seal and Penguin”

    A.M. Ahad, Bangladesh — “Childhood Covered with Metal Dust”

    Winners of the 2017 Magnum and LensCulture Photography Awards announced

    Retam Kumar Shaw, India – “Street Wrestling”

    Photo © Retam Kumar Shaw. Documentary Single Image Winner, Magnum and LensCulture Photography Awards 2017.

    Winners of the 2017 Magnum and LensCulture Photography Awards announced

    Ellie Davies, United Kingdom – “Stars”

    Photo © Ellie Davies. Fine Art Single Image Winner, Magnum and LensCulture Photography Awards 2017.

    Winners of the 2017 Magnum and LensCulture Photography Awards announced

    Britta Jaschinski, United Kingdom – “Confiscated”

    Photo © Britta Jaschinski. Open Single Image Winner, Magnum and LensCulture Photography Awards 2017.

    Surely an elephant foot is of no real use to anyone but the animal itself. These elephant feet were attempted to be smuggled from Africa to the US, but were seized by the American Border Patrol and are currently stored at the National Wildlife Repository Denver, Colorado, USA.

    I have been documenting illegally traded wildlife products since August 2016 at borders and airport across the globe.

    Winners of the 2017 Magnum and LensCulture Photography Awards announced

    Szymon Barylski, Ireland – “Fleeing Death”

    Photo © Szymon Barylski. Photojournalism Single Image Winner, Magnum and LensCulture Photography Awards 2017.

    Fleeing Death. Refugees in the queue for the checkpoint at Idomeni, Greece. March 6, 2016.

    Winners of the 2017 Magnum and LensCulture Photography Awards announced

    Artur Zdral, Poland – “Kasia”

    Photo © Artur Zdral. Portrait Single Image Winner, Magnum and LensCulture Photography Awards 2017.

    Winners of the 2017 Magnum and LensCulture Photography Awards announced

    Hakim Boulouiz, Switzerland – “Choral”

    Photo © Hakim Boulouiz. Street Single Image Winner, Magnum and LensCulture Photography Awards 2017.

    Santa Cruz de Tenerife

    Articles: Digital Photography Review (dpreview.com)

  • This is what happens when your camera’s frame rate matches a bird’s wing flap

    Here’s a neat trick you might not have realized is possible. If your camera’s frame rate matches the flapping rate of a bird’s wings, you can create a video where it seems like the bird is floating ‘magically’ on frozen wings.

    The video above is going viral today after YouTuber Ginger Beard shared it on his nascent channel. As he explains on Reddit, the video was captured with a Hikvision DS-2CD2342WD-I security camera set to “max resolution” at 2688×1520 and 20 frames per second. Apparently, the bird’s wings were also set to 20fps, because this ‘magic’ video is what popped out the other side.

    And if you like this, check out this similar video shared on the DPReview forums a few months ago. In that one, the camera’s frame rate is perfectly synced to a helicopter’s rotor.

    Articles: Digital Photography Review (dpreview.com)