Blog

  • Lighting 103: Use Color to Evoke Time and Place

    It can be scary to add a lot of color to your light. But it’s easy to underestimate how much color it takes to transform a scene and set a mood. Don’t be shy. Those gels won’t bite.
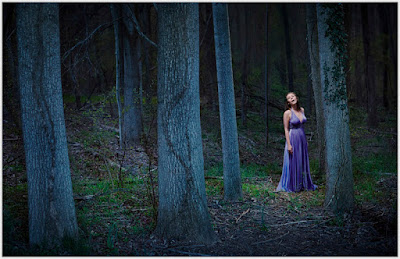
    This nighttime portrait of soprano Alexandra Rodrick was a big step for me. It was made about five years ago, when I was just starting to realize how color-fluid real light could be. I kinda knew it, but I still didn’t have the nerve to actually do it.

    So I took a deep breath and threw way more blue into the environment than I normally would. And not only did I come out alive on the other side, but I ended up pretty happy.
    __________

    I prevsiouly wrote in more detail about how we made the photo in On Assignment. It’s a two-part post, if you’re interested. So I won’t fully rehash that here.

    We wanted to evoke nighttime, but you can’t really shoot this photo at night. Especially with the PhaseOne camera I shot this with. (You can see a full-sized version here.) The Phase effectively maxes out at ISO 100, and we wanted to get some depth and detail going way back into the scene. So we shot at twilight, and underexposed the ambient before adding three light sources into the mix.

    Looking back, this photo was big leap forward for me. I took a chance and pushed a lot of CTB into the scene—full CTB, to be exact. We had to move the lights way back to light the scene evenly. In fact, here’s my fill light coming from my second floor dining room, here:
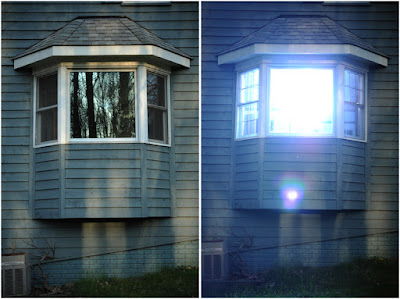
    Before this point, I would have weenied around with a 1/2 CTB, or even a 1/4 CTB.
    The result would have been very much muted. Safer, maybe. But not nearly as evocative.

    This is the first time I had really tried to connote the feeling of full night in a photo and actually had been willing to push some real color. Am I fully happy with it now? Not totally, and more on that in a minute.

    But my advice is, while it is very tempting to try partial/interim color shifts, do yourself a favor and experiment with pushing some real color density into your frame. You may be pleasantly surprised at the result.

    In the past I tried lesser color densities and ended up with pictures that were okay, but didn’t really live up to what I pictured in my mind’s eye. (Fortunately, no one else had access to my mind’s eye, so my comparative failures were private affairs.)

    What I am learning going forward is that the 1/4- and 1/2-measure color shifts come across as subtle in the final image. In fact, in many cases they would only be noticeable in their absence via side-by-side comparison.

    And that subtlety is actually pretty cool and useful. Because as we have seen with portraiture, you can define what is in shadow with color as much as you can with density.

    Think about it. By using a 1/2 CTB (maybe with a little green in there) in the shadows of a portrait against a 1/2 CTO key light in the highlights, you are defining shadows with color as much as you are with light levels.

    This means you can not only get a more evocative palette of light on your subject, but you can vastly expand the range of visible detail in your photo. Because it is the color of light that is informing you in the shadow, rather than a harsher underexposure—and a corresponding lack of detail.

    Our brain reads that relatively subtle blue shift also as signaling the transition to shadow. So if you are going to shift a whole scene to evoke a time and place—night in the woods, for instance—you’d better be willing to bring more color density to the party.

    Don’t be shy. Take a chance. You can always back off if you don’t like it.

    What I Would Do Differently Now

    Back to Alexandra, I look at this frame and see that I was being relatively couragious (for me, then) in some parts of the photo, and a weenie in other parts.

    Let’s talk about the light on her face, courtesy a 1/4 CTO’d speedlight in a China ball.

    Yes, it separates from all that blue night woodsy light. But why is it warm? I told myself at the time that it felt more theatrical (warm spotlight in cool environment and all). But really, it was also me long being comfortable throwing a warm light at my subject’s face.

    If I were shooting this today, I’d be more looking to integrate that key light into the scene. Less spotlight, more moonlight. As if she was catching a moon ray in the clearing.

    I’d probably start with a 1/4 CTB. Cool her down, but but as much as the night woods. After all, moonlight is just reflected daylight.

    And to that 1/4 CTB, I might consider adding a little green. Maybe 1/4 PlusGreen? Dunno, until I try it. But the idea would be to blend the moonlight with the influence of the green grass and leaves that would be filtering/reflecting it.

    Would it be scary to try? Yeah, a little. I’m not used to blue-green faces in my photos. Not even a little bit. But it wouldn’t be nearly as scary now as it would have been for me back in 2012.

    And to be honest, 2017 me thinks the slight blue-green face would look better. Which is the point of taking chances with your light, finding new things that work and the result being growth as a photographer.

    This is the most recent post in Strobist’s Lighting 103 module. New installments publish on the first and third Thursday of each month. If you would like to be notified as they become available, please sign up here.
    Strobist

  • Quick and Dirty Method of Using the Photoshop Spot Healing Brush Tool

    Let’s say you use Lightroom and you’ve tried and tried to get rid of those distracting spots using Lightroom’s Spot Removal Tool but no matter how you set it – using Clone or Heal or changing the Opacity or increasing the Feather – you have a giant, obvious repair on your image. Not good!

    Photoshop Spot Healing Brush Tool - wild horses

    This is my final, processed image but I had to dive into Photoshop to get there.

    You’re a good photographer

    For kicks, let’s agree that in addition to knowing your way around Lightroom, you’re a skilled photographer. You also subscribe to Adobe CC, but honestly, you don’t use Photoshop much. Perhaps you’re even a little bit afraid of it. You loaded the software and update it whenever Adobe tells you to but other than the PS icon looking cool and professional in your dock, you don’t actually use it.

    You just don’t use Photoshop

    I mean, Layers, Masks, Blending? Ugh. I know. I do 90% of my work in Lightroom. No one has ever called me out on that so I keep on keepin’ on with Lightroom. I love Lightroom but – and it’s a great big but – LR’s Spot Removal Tool is no match for Photoshop’s Spot Healing Brush Tool.

    Because I know this issue affects so many of us, I’m going to teach you the quick and dirty method for how to Spot Heal in Photoshop. No layers. No tricky stuff. Just easy, quick simple repairs for the problem areas in your images.

    Practice as you read this

    Grab an image that has a problem area that you can’t seem to fix in Lightroom and follow along with me. Practice is the best way to learn so repeat these steps a few times today. After you Spot Heal a few images in PS, it will naturally become part of your image processing tool kit.

    Step #1 – Process the image in Lightroom

    In Lightroom, process your image as normal. Here’s my RAW  image before I’ve made any adjustments.

    Photoshop Spot Healing Brush Tool - raw image

    Canon 7D Mark II, 70-200 plus 1.4x @ 280mm, f/6/3, 1/1600, ISO 400.

    Below is a screenshot of all the adjustments I’ve made on my image. I started with a pretty aggressive crop. You can see the White Balance and Basic adjustments but I also dropped in several Radial Filters to add clarity and brightness to key elements like the horses’ eyes. However, I struggled to get rid of the flecks of mud around the black horse’s eye.

    Photoshop Spot Healing Brush Tool - Lightroom adjustments

    Step #2 – Edit in > Photoshop

    Right-click on your image. Select Edit in Adobe Photoshop CC.

    Photoshop Spot Healing Brush Tool - Edit in Photoshop

    It is very important that you don’t skip this step. Do not open your image directly in Photoshop. For the down and dirty method to be most effective, you must start this process in Lightroom.

    NOTE: If you haven’t updated to PS CC 2017 or if you use an older version of PS, you might need to modify these steps. Instead of Edit in Adobe Photoshop CC 2017, you might see Edit a Copy in PS.

    Step #3 – Select the Spot Healing Brush

    It takes a minute, but eventually, your image will appear in the Photoshop window. Here’s the image I’m working on. Check and make sure your screen looks pretty similar to mine.

    Photoshop Spot Healing Brush Tool - PS interface

    Click on the Spot Healing Brush Tool. It looks like a band-aid except that it has a little semi-circle handle over it.

    Photoshop Spot Healing Brush Tool - band-aid icon

    If you can’t find this tool, count seven icons down on the tools pallet and right-click on that. Once you right-click, you should see the rest of the tools. Hover your cursor over the band-aid icon that says Spot Healing Brush Tool. Click to select it. It will now show as the active tool.

    Step #4 – Setup the Spot Healing Brush

    Review the settings for the tool bar that runs across the top of your Photoshop window.

    Photoshop Spot Healing Brush Tool - mode and type

    If your Spot Healing Brush Tool doesn’t default to these settings, change them to:

    • Mode = Normal
    • Type = Content Aware

    Step #5 – Zoom in

    Zoom in and increase the size of your image so you can see the problem area more clearly. Click the Command/Alt key and the + (plus) key simultaneously. Click again to zoom in more. If you’ve zoomed in too far, click the Command/Alt Key and the – (minus) key simultaneously to zoom back out. Grab the drag bars on the bottom and right side of the image to reposition the problem area so that it’s in the middle of the screen and easy to see and repair.

    Photoshop Spot Healing Brush Tool - zoom in

    Zoomed into 200%, I can see the problem area clearly.

    Step #6 – Size the Brush Tool

    Hover the Spot Healing Brush Tool over the problem area. You may need to change the size of the brush. The easiest way to do that is to use the square bracket keys on your keyboard.

    • Click the Left Bracket Key [ to decrease the size of the brush.
    • Click the Right Bracket Key ] to increase the size.

    Notice that as you click on the bracket keys, the Size number in the bar that runs across the top of your image increases or decreases. (If you click on that number, you’ll get more tool options. Don’t worry about those for now.)

    Photoshop Spot Healing Brush Tool - 20px brush

    Using the Left Bracket Key, I adjusted my Spot Healing Brush Tool to 20 pixels and started making small repairs around the eye.

    Step #7 – Brush over the bad area

    After you’ve adjusted the size of your brush, start clicking on the area of your image that you want to repair. You can also drag the brush to make short strokes.

    Photoshop is smart and should fill in the area with an appropriate selection but if it doesn’t, click Edit > Undo Spot Healing Brush in the top menu (or Cmd/Ctrl+Z will also undo). That will undo the last thing that you did.

    If you want to undo multiple things, go to Edit and click Step Backward repeatedly till you’re at the last point that you liked. Step Backward does have limitations so work slowly and check your repair work often. Note: you can aslo open the History panel and go back to any previous step.

    Photoshop Spot Healing Brush Tool - undo

    Step #8 – Save

    Evaluate your work. Do you like the repairs? If Yes, go to File > Save in the top menu. Photoshop defaults to saving images as a TIFF file. If it doesn’t, select the TIFF option if/when the menu pops up. This will also import the newly edited image into Lightroom.

    Photoshop Spot Healing Brush Tool - save

    If you don’t like the repairs you made, quit Photoshop without doing anything. Photoshop will ask if you want to save your work. Just say No. Go sip some coffee and try again another day when you’re fresh.

    Step #9 – Head back to Lightroom

    Almost done!

    Go back to Lightroom. You’ll still be in the Develop Module with the original RAW image that you were working on still open. Press G for Grid which will take you to the Library Module. Check to make sure that next to your original RAW file is a new TIFF file. Select the two images and view them in Survey Mode so that you can look at them side by side (N on your keyboard).

    If the two files don’t show up right next to each other in Lightroom resort your images by Capture Time (or file name), or drag and drop so that they do.

    Photoshop Spot Healing Brush Tool - compare

    Side by side of RAW file adjusted in LR (on the left) and TIFF with the addition of spot healing (on the right).

    Wait, don’t you have to use layers in Photoshop?

    That’s the down and dirty part. When you’re doing simple fixes like this, you don’t need to worry about layers. Why? Well, layers are excellent if you’re doing quite a few things to your image and you want to be able to turn different effects on and off. They’re also important so that you preserve your original image in a background layer (non-destructive editing).

    But with this method, you still have your original RAW file. That’s why you want to start in Lightroom and then open your image from there into Photoshop. Lightroom sends a copy of your image to Photoshop. When you save your work in Photoshop in step #8, Photoshop generates a totally separate image file. That new TIFF file shows up in your Lightroom catalog next to your original RAW file.

    NOTE: If you haven’t updated to PS CC 2017 or if you use an older version of PS, you might need to modify these steps. You might need to select “Edit a copy” and not “Edit Original.”

    Photoshop Spot Healing Brush Tool - final image

    This is a wild horse so I didn’t go too crazy fixing every little thing, but the distracting mud around the eye and on the neck is cleaned away nicely, don’t you think?

    What if the down and dirty method doesn’t work?

    This might not work for your image. Some repairs are finicky and this is definitely a hack method that won’t work for everything. My advice is to experiment. Remember the other tools that were grouped with the Spot Healing Brush Tool? Try one of those. Or, keep using the Spot Healing Brush Tool but change the Mode from Normal to Replace or even Multiply.

    Remember when we clicked the Size number? Click that again and adjust the Hardness of the brush or the Roundness. Make only one change at a time and make notes on what each change does. If something works, click File, then Save and remember what you did. If nothing works, exit out of Photoshop without saving (and go have more coffee).

    You can always experiment again another day because you still have your RAW image. It’s cataloged in Lightroom right next to the TIFF file. As long as you always start in Lightroom, you’ll be able to try again later.

    Photoshop Spot Healing Brush Tool - Essaouira cafe

    In this image of an outdoor seafood market in Essaouira, I experimented with a variety of tools to zip out the distracting bit of tree on the left, the construction equipment and the light posts. The RAW image, with Lightroom only adjustments, is on the left. The spot-healed TIFF is on the right.

    Share with the dPS community: What hack or down and dirty methods do you use when you process your images?

    The post Quick and Dirty Method of Using the Photoshop Spot Healing Brush Tool by Lara Joy Brynildssen appeared first on Digital Photography School.


    Digital Photography School

  • Call of Nature: Waterfront Step Organ in Croatia Turn Waves into Tunes

    [ By WebUrbanist in Art & Installation & Sound. ]

    oceanfront wave organ

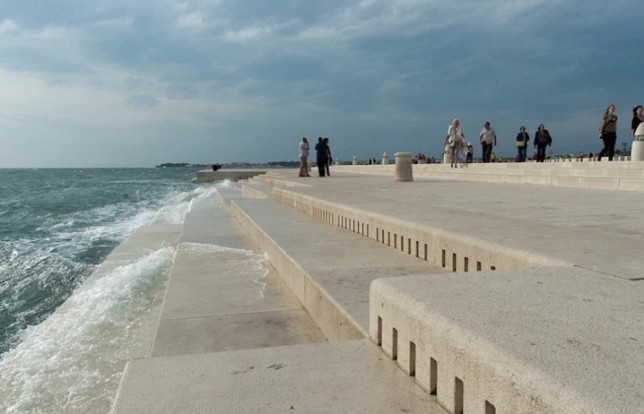
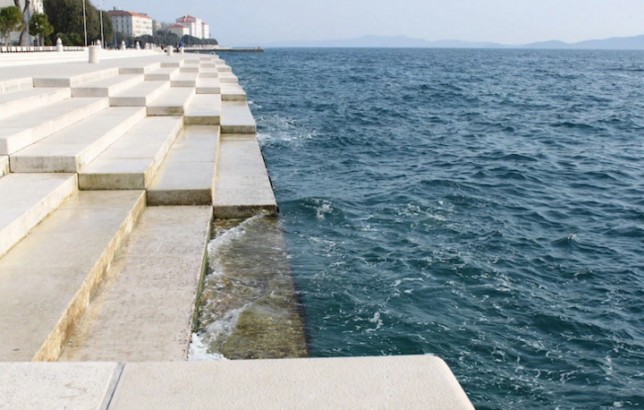
    This 230-foot-long musical instrument contains 35 organ pipes and is powered by the Adriatic Sea, producing sounds for visitors that seem eerily composed rather than random.

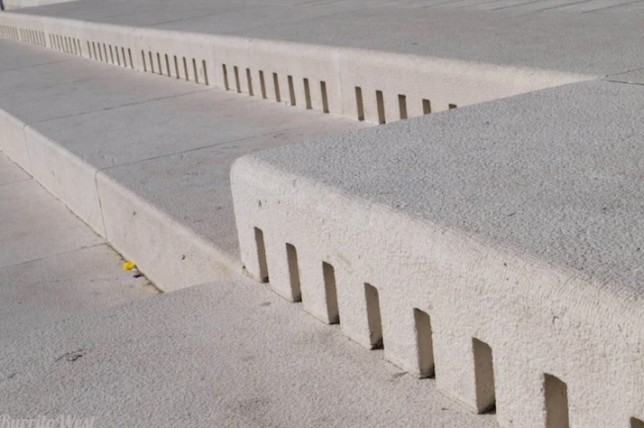
    Whistle holes cut into the stone steps are ‘powered’ by air pushed in by waves of water, creating chords that are strikingly harmonious in nature. The sounds are constantly shifting, but you can listen to a clip above (a .wav file of the waves, if you will).

    seafront playable instrument music

    The Sea Organ, or the Morske Orgulje, is part of plan to revive Zadar, a city over 3,000 years old that was nearly obliterated in the Second World War. Architect Nikola Baši? wanted to give the place something with character, differentiated from the stark and boring concrete buildings that were created during initial years of rebuilding.

    sea organ white steps

    The design was inspired by the Hydraulis, an ancient Greek instrument that used water to push air through tuned pipes, but also borrows from the Wave Organ in San Francisco, a likewise seaside device amplifying the sounds of the Pacific Ocean. (images by linssimato, Lisa and J We).

    Share on Facebook


    [ By WebUrbanist in Art & Installation & Sound. ]

    [ WebUrbanist | Archives | Galleries | Privacy | TOS ]


    WebUrbanist

  • You can now explore the International Space Station in Google Street View

    Cupola Observation Module, Image: Google

    Thomas Pesquet, an astronaut with the European Space Agency (ESA) spent 6 months on board of the International Space Station (ISS). During his time in space he worked with Google capturing spheric panorama images of the space station’s interiors and unique images of the Earth seen from space.

    As a result you can now explore the ISS and have a look at the blue planet from space using Google Street View.

    US Laboratory Module, Image: Google

    In his post on the Google Blog Thomas provides a little insight into the the picture capturing process in space: “Because of the particular constraints of living and working in space, it wasn’t possible to collect Street View using Google’s usual methods. Instead, the Street View team worked with NASA at the Johnson Space Center in Houston, Texas and Marshall Space Flight Center in Huntsville, Alabama to design a gravity-free method of collecting the imagery using DSLR cameras and equipment already on the ISS. Then I collected still photos in space, that were sent down to Earth where they were stitched together to create panoramic 360 degree imagery of the ISS.”

    More information and images are available in Thomas Pesquet’s article “Welcome to Outer Space View” on the Google Blog.

    Joint Airlock (Quest), Image: Google

    Articles: Digital Photography Review (dpreview.com)

  • Concert Photography 101: Cameras and Lenses for Beginners

    If you’ve ever wondered how to become a concert photographer, one of the very first steps is to acquire the right gear. You’ve probably been to a concert or festival and seen music photographers hauling tons of equipment such as two camera bodies and enormous lenses. While it’s certainly ideal for a professional to have this much stuff (and then some), most beginners or amateurs absolutely don’t need this much gear to get started. Read on for some of my suggestions on how to gear up as a beginning doing concert photography.

    Concert Photography 101: Cameras and Lenses for Beginners

    Concert photography rules

    Before we get into gear, let’s discuss your typical concert photography setting. Whether you’re shooting a big arena show or a small, casual performance in a bar, concert photography rules are more or less the same. You get to shoot for the first three songs only, and cannot use a flash or strobe of any sort. With these two rules in mind, this means that you need gear that allows you to adjust and shoot quickly and pull off shots in a low lighting setting.

    What kind of camera do you need?

    First off, invest in a solid DSLR camera. While there are point and shoot cameras that could arguably get the job done, you need the lens choices that come with DSLRs. It doesn’t really matter what brand you choose. What does matter is being comfortable using it and knowing that you have a wide variety of lenses to pair with it. Canon and Nikon are two of the biggest camera brands that are among the most popular for concert photographers.

    Crop Sensor or Full Frame?

    When researching DSLR camera options, you’ll have a choice between investing in a crop sensor or full frame camera. The differences between the two types of DSLR cameras is best explained in this article.

    To quickly summarize, crop sensor cameras are typically smaller in size and much cheaper than full frame cameras. The main disadvantage to crop sensor cameras has to do with their smaller sensor sizes that will impact available ISO options, thus resulting in slightly noisier or grainy photos than full frame cameras. In short, start out with a crop sensor camera if you’re on a budget, and aim to upgrade to a full frame camera the further you get in your concert photography career.

    Concert Photography 101: Cameras and Lenses for Beginners

    Canon 5D Mark III (full frame) on the left and a 6D on the right.

    Suggested concert photography cameras

    Full Frame

    • Canon EOS 6D
    • Canon 5D Mark IV
    • Nikon D810
    • Nikon D750
    • Nikon D610

    Crop Sensor

    • Canon 7D Mark II
    • Canon 77D
    • Canon 80D
    • Canon EOS Rebel T6i
    • Nikon D500
    • Nikon D7500
    • Nikon D5600
    • Nikon D3400

    What are the best concert photography lenses?

    After you’ve invested in a DSLR, be sure to budget for the purchase of accompanying lenses, which can end up being just as expensive as the camera body. Generally speaking, you shouldn’t use the kit lens that automatically comes with your DSLR camera.

    Most of these kit lenses are fine for shooting in ample lighting conditions, but they won’t perform well in the low light settings of concerts. Instead, what you want is a fast lens with a wide aperture (or f-stop) of between f/1.2-f/2.8. This will help you capture moving subjects in dark settings.

    Concert Photography 101: Cameras and Lenses for Beginners

    Canon 24-70mm f/2.8 and 70-200 f/2.8.

    Start with prime lenses

    For beginning concert photographers on a budget, prime lenses are your best bet. While these lenses have fixed focal lengths, meaning you can’t zoom with them, their low f-stops mean they will shoot better in low light. Prices and exact lens models will vary according to which camera brand you’ve chosen. Since I’m a Canon shooter, these lenses are geared toward Canon.

    • 50mm f/1.4 (or the cheaper 50mm f/1.8) – for Nikon try the 50mm f/1.8G
    • 85mm f/1.8 – for Nikon try the 85mm f/1.8G
    • 35mm f/1.4  – for Nikon try the 35mm f/1.4

    Put these lenses on your wish list

    Pretty much every professional concert photographer will have two go-to lenses on hand: a 24-70mm f/2.8 midrange zoom lens, and a 70-200mm f/2.8 telephoto lens. Neither of these lenses is cheap and should definitely be considered a long-term investment. But if you can afford one or both, don’t hesitate to add these lenses to your concert photography kit.

    Concert Photography 101: Cameras and Lenses for Beginners

    Keep an eye on third party brands

    While it’s certainly ideal to purchase lenses in the same brand as your DSLR camera manufacturer, there are many third party companies producing cheaper and sometimes even better options. Great lens options exist from Sigma, Tamron, and Tokina, to name a few. Again, the specific options will depend on the DSLR camera body you’ve chosen, but here are a few possible options for Canon shooters:

    • Tokina 11-16mm f/2.8 (for Canon EF-S/crop sensor or Nikon DX)
    • Sigma 17-50mm f/2.8 (for Canon EF-S/crop sensor or Nikon DX)
    • Sigma 24-70mm f/2.8

    If you’re on a budget

    It’s a reality that concert photography equipment isn’t cheap. But there are some ways to score more affordable camera gear. First, look into used or refurbished camera bodies and/or lenses. As long as you purchase from an accredited source, you can save hundreds of dollars on gear.

    On the flip side, keep in mind that camera gear retains its value as long as you take care of it. So if you buy a lower-end camera or lens and want to upgrade later on, it’s pretty easy to sell off your old gear to help you invest in newer options.

    Finally, look for older models or previous versions of gear. For example, you could spring for the brand new Canon 5D Mark IV camera body, or you can save over $ 1,000 by investing in the older yet still very functional Canon 5D Mark III. The same is true for many other camera bodies and lenses on the market. It all depends on your budget and what kind of features you absolutely need to have.

    Concert Photography 101: Cameras and Lenses for Beginners

    In Conclusion

    Consistently pulling off pro-quality concert photos often requires investing in pro-grade camera gear. But it’s best to start small and to upgrade over time as your skills and budget increase. What are your go-to concert photography cameras and lenses? Let me know in the comments below!

    Concert Photography 101: Cameras and Lenses for Beginners

    The post Concert Photography 101: Cameras and Lenses for Beginners by Suzi Pratt appeared first on Digital Photography School.


    Digital Photography School

  • Photographer duo reinvents Emil Busch’s 1910 Glaukar portrait lens on Kickstarter

    A pair of photographers from Germany are trying to bring the Emil Busch Glaukar 3.1 portrait lens from 1910 back to life.

    A portrait lens from 1910 might be coming back to life if two photographers from Germany succeed in a new Kickstarter project—the latest development in the craze to remake vintage optics.

    The Glaukar 3.1 was originally made in Rathenow, Germany by Emil Busch AG for plate camera users, and was considered in its day well corrected for astigmatism, as well as fast with its f/3.1 aperture. The reinvented lens will share the original’s maximum aperture and three-element symmetrical construction, but will use different glass and lens designs to bring it into line with modern technology, while attempting to retain the characteristics of its ancestor.

    Photographers Benedikt Ernst and Firat Bagdu say they have tried to maintain the same angle of view that the Glauker would have delivered on a 13x18cm plate camera so the new version—which is aimed at full frame, APS-C and MFTs users—will have a focal length of 97mm. It will feature a 12-bladed iris, will use glass from the Schott and O’Hara factories, and will be made mostly in Wetzlar, according to the pair.

    Here is a set of sample photos captured with a prototype of the lens:

    $ (document).ready(function() { SampleGalleryV2({“containerId”:”embeddedSampleGallery_7756244780″,”galleryId”:”7756244780″,”isEmbeddedWidget”:true,”standalone”:false,”selectedImageIndex”:0,”startInCommentsView”:false,”isMobile”:false}) });

    The start-up has connections with Meyer Optik Gorlitz, a company that similarly redesigns vintage optics for modern cameras. Meyer says it has helped Emil Busch source manufacturing and parts, so we should expect the glass, iris and barrel to be similar to that of the existing German brand. The engineer for the project is Dr. Wolf-Dieter Prenzel, who is also responsible for many of the Meyer Optik Gorlitz lenses.

    The Glaukar’s barrel will be aluminum finished with a brass-effect, and the lens will come in mounts for Nikon, Canon, Sony E, Fuji X, Micro Four Thirds, Leica M and Leica T. Shipping is expected to begin in Summer 2018 and the price is estimated to be around $ 2,000—though early backers can pre-order by pledging $ 700 via the Kickstarter page. For more information see the Emil Busch website.

    Press Release

    Reinventing the Legendary Emil Busch Glaukar 3.1 Lens

    More than 100 years after the Emil Busch Glaukar 3.1 was introduced as one of the most important lenses of its time, two top German photographers have reinvented this classic as a modern portrait lens that promises to be as innovative as the original. The pair has partnered with well-known optical engineer Wolfdieter Prenzel on this project in which production will mostly take place in Wetzlar, Germany, to ensure the highest quality.

    Fashion photographer Benedikt Ernst and portrait photographer Firat Bagdu launched a Kickstarter campaign today to bring the Glaukar 97mm f/3.1 into the modern age.

    The new Glaukar 3.1 will have the same brass appearance and silhouette as the original but will be constructed from high-end aluminum with a brass-like oxidation, which ensures the durability and mechanical precision of a modern lens. But while the new lens will look very much like the classic, the inside has been redesigned by Prenzel, completely from scratch to meet today’s high-tech demands.

    But due to its specially coated lenses the new Glaukar produces a fascinating mixture of sharpness, strong colors and, along with 12 aperture blades, wonderful bokeh effects.

    Ernst and Bagdu, whose clients have included Rolls Royce, Redken, Chopard, to name a few, knew what qualities they wanted in a lens. They defined the principles and joined with lens designers and manufacturers in Germany to design the first prototype.

    In fact, it was the success of one of their clients, German lens maker Meyer Optik, that inspired them to start their own project. Meyer Optik has even put the pair together with key German camera contacts in Wetzlar to help support the founders.

    So, while the pair are a startup, they are backed by years of industry experience.

    “We have seen some campaigns in the past where old lenses were brought back for the users of today’s cameras and appreciated them, but we wanted to go further and recreate a lens that would otherwise be lost,” Bagdu said. “But at the same time, the quality of the lens must be to the highest standards as well,” Ernst added. “Therefore, we are glad that we could ensure cooperation with some leading German firms.

    Manufacturing will be done to a large extent by Uwe Weller Feinwerktechnik in Wetzlar, which was formed from the merger of several firms, including the mechanical divisions of Leica Camera and Zeiss-Hensoldt. The partnership with Uwe Weller GmbH will ensure that the high- precision elements of the lens will be produced precisely to Prenzel’s design, which will include the use of top-of-the-line Schott and O’Hara glass.

    The exclusive use of Schott and O’Hara glass ensures that the goal of creating the perfect portrait lens is put into practice exactly as intended.

    Part of their inspiration came from the legendary Glaukar 3.1 that pioneer German lens maker Emil Busch introduced in 1910. The original Glaukar was a groundbreaking lens because it corrected for spherical aberration, coma and astigmatism – something that no other lens in daily use could do at the time. Not even Zeiss and its famed lens maker Paul Rudolph had been able to match the Glaukar since their designs required coatings not available at the time.

    The modern Glaukar will come in the following mounts:

    • Nikon
    • Canon
    • Sony E
    • Fuji
    • Micro Four Thirds
    • Leica M
    • Leica T

    Lens Specs

    • Focal length: 97mm
    • Maximum aperture: 1:3.1
    • Aperture range: 1:22
    • Image circle: 43mm
    • Field of view: 25°
    • Electronic contacts none
    • Closest focusing distance: 1.5 m
    • Filter thread: 37mm
    • Max diameter: length 73mm/80mm (DSLR), approx. 85mm mirrorless
    • Weight: 410 g

    Articles: Digital Photography Review (dpreview.com)

  • 7 Travel Photography Tips I’ve Learned from People in the Industry

    Like any profession, over the years and countless hours of working and talking to people in the industry, you will pick up tips, advice and even things to avoid. This will ultimately help you improve and possibly make your photography business more profitable. Here are some of the main tips that I have picked up over the years from people in the travel photography industry.

    7 Travel Photography Tips I've Learned from People in the Industry - new zealand

    #1 – Blue Sells

    If you were to line up a whole load of travel magazines next to each other, you will notice that the vast majority of their front covers have something in common, the color blue. Whether it is the sky or water, magazine covers tend to feature photos of gorgeous sunny days rather than moody, dark and atmospheric conditions.

    I had always noticed that my “gorgeous sunny weather” shots outsold the photos with other types of conditions. But it wasn’t until the editor of a travel magazine told me the reason that I understood why. They found that historically, issues with beautiful sunny shots on the front cover sold much better than issues with dark and moody conditions. The reason is that most people going about their day aspire for tranquil and beautiful holiday conditions. So, while a stormy landscape photo might look more dramatic and striking, the average holidaymaker doesn’t want to go somewhere and experience a storm.

    7 Travel Photography Tips I've Learned from People in the Industry - Scotland

    #2 – Avoid “Tourist” Shots

    I remember asking a picture editor once for the single biggest piece of advice they could give me and they responded with, “Don’t send me tourist shots.” But what does that mean? After all, if you are in a city and have to photograph the most famous landmark then how do you avoid tourist shots. Once I delved in a little deeper, I realized what he meant was that he didn’t want just another shot of the famous landmark taken at eye level because he could get thousands of them through any stock agency.

    Instead, he wanted to see a photo that demonstrated an experience, feeling or mood. This was a few years back and more and more I have been asked by picture editors and stock agencies I work with to try to show these “experiences” in the photos. So rather than taking a photo of the landmark, it might be worth photographing a couple enjoying an ice cream in its shadow. The key is to look beyond the obvious shot and look for a moment or composition that can convey an emotion.

    7 Travel Photography Tips I've Learned from People in the Industry Turkey

    #3 – Give Them People

    Often the easiest way to capture unique photos that don’t look like tourist shots is to include people. But including people in your photos can also convey a sense of scale, portray an emotion or a feeling and often tell a much more intriguing story. One of the best bits of advice I was given was that including people can also help you capture different types of shots from the same location. That, in turn, means you can maximize your stock shots from a single location.

    For example, take any scene in front of you. If you capture that scene with a couple admiring the view holding hands it tells a completely different story than capturing the scene with someone running or cycling. So you suddenly go from one photograph per location to three. Move slightly around the scene and capture a few different scenarios and you can suddenly end up with a whole load of different stories from practically the same spot. As any stock photographer will tell you, it’s a numbers game and the more photos you have the better your chances of selling some.

     7 Travel Photography Tips I've Learned from People in the Industry Turkey

    Taken from the same location as the photo above but a completely different message.

    #4 – Check Every Photo, Every Time

    Photography is a competitive industry. You are often competing with pretty much everyone with a camera to try and get work or make sales. The last thing you want to happen is to have a photo that has been chosen by a client come back to you because it isn’t focused properly or you haven’t removed the dust particles. Not only is it embarrassing, but it can also hurt your chances of working with that client further down the line.

    So don’t try and cut corners. You worked hard to capture the photo so do it justice and make sure it looks its best when it’s going in front of someone else. Check every inch of the photos you intend to send out to clients. View them at 100% in post-production and make any corrections or edit as necessary. Be professional in your approach from start to the finish.

    7 Travel Photography Tips I've Learned from People in the Industry

    #5 – Face the Opposite Way

    It doesn’t matter where you are in the world, there will usually be a spot marked “sunset viewpoint” or similar where everyone will go to capture their photos. Often this is because that particular spot offers the best view. But sometimes it is because it is the easiest and most convenient place for lots of people to get to or stand.

    One bit of advice that has been floating around for many years and has been said by numerous photographers, is that when you get to one such location, face the other way. Go against the crowd and photograph what is behind everyone. Clearly this advice shouldn’t be taken literally as sometimes photographing the other way wouldn’t give a good photo. The point is to look beyond the first and most obvious location and viewpoint.

    If you are prepared to do your research beforehand and are willing to put more of an effort in than the average tourist, you will undoubtedly end up with better photos.

    7 Travel Photography Tips I've Learned from People in the Industry

    #6 – Step Closer

    The world famous war photographer, Robert Capa said, “If your pictures aren’t good enough, you aren’t close enough.”. This is something that most amateur photographers struggle with for travel photography and photographing people. It often means having to get close to your subject and they then might notice you.

    The truth is that usually, the worst that can happen is that the person you want to photograph will just say no. But getting closer means having to be right in the middle of the action and that you also have to engage with that person and build a connection, if even briefly. This, in turn, will transfer into your photographs and give you a much better and more intimate photo than if you were standing 300 yards away with a telephoto lens.

    7 Travel Photography Tips I've Learned from People in the Industry - Italy

    #7 0 Don’t Be Shy

    One of the biggest things that you may realize as a photographer is how accommodating and intrigued most people are about your profession. I have not kept a tally of the number of conversations I’ve had with total strangers all based around photography, but it’s been a lot. One thing I learned is that sometimes when you have a camera on your shoulder it can work to your advantage (and sometimes it can work against you) as people may help you capture the photo that you want to take.

    But you have to be willing to ask. If you don’t ask you will not get. For example, one of the best places to take photographs of a city is from your hotel room. I’ve lost count of the number of times that I have been upgraded to a room with a better view by simply asking and explaining the reason for it. This extends to if you want to photograph people, places, and so on. Don’t be shy, just ask. The worst that could happen is being told no.

    7 Travel Photography Tips I've Learned from People in the Industry Thailand

    I took this photo of the Bangkok skyline from my hotel room.

    Conclusion

    Over the years you will pick up your own tips and advice that you have been given or have derived from your own experiences. In the meantime, hopefully, the ones above can be as helpful to you as they have been for me.

    Do you have any other bits of advice that you have been given? Please share below.

    The post 7 Travel Photography Tips I’ve Learned from People in the Industry by Kav Dadfar appeared first on Digital Photography School.


    Digital Photography School

  • Canon EOS 6D Mark II sample reel

    The Canon EOS 6D Mark II offers decent video quality at up to Full HD (1080/60p) resolution. It doesn’t offer any form of 4K capture like its higher-end siblings, but with full Dual Pixel Autofocus and effective digital image stabilization that works in tandem with in-lens stabilization, the footage is generally smooth and in focus.

    In addition to a somewhat inauthentic mojito recipe, the above video demonstrates how the EOS 6D Mark II copes with high-contrast scenes, lots of potential distractions for autofocus, as well as gives a general impression of the overall quality you’ll get from Canon’s newest HD-capable DSLR.

    The video was filmed entirely hand-held with Canon’s ‘Movie Digital IS’ enabled (but not the ‘enhanced’ option), using the 1080/60p MP4 setting. White balance was kept to auto, and Auto ISO was used to allow for automatic changes in brightness while the shutter speed and aperture were controlled manually. There are also speech samples from both an external shotgun microphone and the internal microphones on the 6D II, and Canon’s Dynamic Lighting Optimizer was set to ‘High.’

    What do you think about the 6D II’s video quality? Let us know in the comments.

    Articles: Digital Photography Review (dpreview.com)

  • Canon EOS 6D Mark II sample gallery

    The sun’s been out in Seattle, giving us ample opportunity to shoot with the new Canon EOS 6D Mark II. Initial impressions point to a capable, well-rounded full-frame camera with controls and handling nearly identical to that of the Canon 80D. In the field the camera’s AF coverage feels small compared to the 80D, though the Live View shooting experience is the same: excellent.

    We’ll be adding to this gallery more as we work toward posting the review. In the meantime, here are 100+ initial samples from a full-production camera to start with.

    Articles: Digital Photography Review (dpreview.com)

  • Disney’s Star Wars Hotel Will Make Each Guest a Character with a Storyline

    [ By SA Rogers in Destinations & Sights & Travel. ]

    Fans visiting Disney World’s upcoming Star Wars Land expansion, set to open in 2019, will have the opportunity to immerse themselves even more deeply into the fictional universe in an almost Westworld-style experience. At its D23 Expo in Los Angeles this week, Disney announced a new Star Wars-themed hotel where every window will offer views of ‘outer space,’ every employee will be in character, and every guest will be the protagonist of their very own Star Wars storyline.

    Premiering as part of the new Disney 360 vacation concept, the hotel will be a ‘living adventure.’

    “It’s unlike anything that exists today,” says Bob Chapek, Chairman of Walt Disney Parks & Resorts. “From the second you arrive, you will become a part of a Star Wars story! You’ll immediately become a citizen of the galaxy and experience all that entails, including dressing up in the proper attire. Once you leave Earth, you will discover a starship alive with characters, stories, and adventures that unfold all around you. It is 100% immersive, and the story will touch every single minute of your day, and it will culminate in a unique journey for every person who visits.”

    Disney also unveiled models of the new park along with its name, Star Wars: Galaxy’s Edge. The park will also be an interactive experience with each guest as a character – so you don’t have to stay in the resort to enjoy that aspect of the action, but it certainly seems like it would add to the overall effect.

    “One attraction will make you feel like you’re on a Star Destroyer inside a hangar bay. It’s an attraction built on a scale we’ve never done before.

    The second attraction will give guests the opportunity to fly the Millenium Falcon, piloting the ship, shooting blasters or preparing for hyperspace – all while completing a critical mission. But how you perform on the mission holds even bigger stakes: perform with skill and you may earn extra galactic credits, while bringing the ship back banged up could put you on the list of a bounty hunter. End up on Harkos’s list and you may face a problem if you show up at the local cantina!”

    Share on Facebook


    [ By SA Rogers in Destinations & Sights & Travel. ]

    [ WebUrbanist | Archives | Galleries | Privacy | TOS ]


    WebUrbanist