Blog

  • Chances are you’ll never see Dunkirk the way Christopher Nolan intended

    What happens when one creator’s artistic vision comes into conflict with prevailing standards and industry mores? Christopher Nolan’s Dunkirk gives an insight into the chaos that is wrought as the industry retreats from film.

    Christopher Nolan is famously attached to large-scale film when it comes to his productions. For Dunkirk he shot with a mixture of 65mm film and the taller, squarer IMAX 65mm filmstock—a decision that had unexpected benefits. Problems arise, however, when Nolan’s film choice collides with an industry that has largely gone digital—with 2K and 4K projectors being the norm, many theaters simply can’t show the film the way it was shot.

    Film fan and president of the University College London film society, Anton Volkov, has put together a great infographic showing not only the different aspect ratios of the formats on offer, but also the relative sizes of the formats from which they’re being projected.

    Translation: You end up seeing a different amount of the picture, depending on where you see it.

    The digital formats in the infographic above are scaled based on IMAX’s assessment of the pixel-equivalent resolution of the different film formats (Experts at RED appears to suggest lower numbers for film resolution, which would mean the digital formats are slightly under-represented and could be considered closer to the size of 35mm).

    Volkov also illustrated the different aspect ratios using this short GIF, from the NolanFans forum:

    Note also the shape of the 35mm image. It looks like it’s been horizontally cropped to a very square format, but has actually been horizontally squeezed onto the film using an anamorphic lens (an asymmetrical lens that captures a wider field of view horizontally than it does vertically). This film is designed to be projected with another anamorphic lens to ‘de-squeeze’ the footage back out to its full width.

    Of course, even if you are lucky enough to find somewhere able to show 70mm IMAX (we can’t, here in Seattle, as our local IMAX cinema has gone digital-only), there’s still a question mark about whether you’ll be able to appreciate the full resolution.

    If you’ve seen the film (whichever crop of it), let us know what you thought?

    Articles: Digital Photography Review (dpreview.com)

  • Canon’s new imagePROGRAF PRO-6000 printer can make 60-inch prints

    Canon has announced the upcoming launch of its new imagePROGRAF PRO-6000 inkjet printer for fine art photographers and digital artists. The PRO-6000 is capable of printing anywhere from 17in/43cm to 60in/152cm fine art prints, according to Canon, making it the largest 12-ink printer currently on the market.

    Canon anticipates the imagePROGRAF PRO-6000 will be available this upcoming August for a whopping $ 12,000 USD.

    Press Release

    Professional Fine Art Photographers Prepare to Obsess as Canon U.S.A. Announces New Large-Format imagePROGRAF Inkjet Printer

    MELVILLE, N.Y., July 20, 2017 – For professionals who want sharp, brilliant and obsessively beautiful prints that they can share with the world, Canon U.S.A., Inc., a leader in digital imaging solutions, today announced its latest professional large-format inkjet printer – the imagePROGRAF PRO-6000. At 60-inches wide, the imagePROGRAF PRO-6000 printer is the largest 12-ink printer on the market today.

    The PRO-6000 expands the PRO Series models offered from 17-inches to 60-inches wide, giving users the ability to own multiple sized printers all with the same print head, ink and image processor, helping to ensure the same high quality across the line. As with previous models, the PRO-6000 device’s sleek design emphasizes the link with Canon’s EOS digital cameras and red-line “L-series lens.” Highlights that set this model apart from the crowd include its 60-inch print width, the ability to feed from the only standard Multifunction Roll System in its class and a 12-channel system including Chroma Optimizer that offers spectacular image quality for the fine art and photographic markets.

    “With the introduction of our largest model, the imagePROGRAF PRO-6000, we round out our full line of high quality PRO Series printers,” said Toyotsugu Kuwamura, executive vice president and general manager, Business Imaging Solutions Group, Canon U.S.A., Inc. “Our PRO Series now offers an expansive lineup of large-format inkjet solutions and sizes for a broad range of applications in the photo, fine art, proofing and graphics market segments.”

    Designed to meet the needs of photo professionals and graphic artists, the imagePROGRAF PRO-6000 printer provides users with Canon’s input-to-output photo printing support, known as Crystal-fidelity. This solution allows users to obtain a print quality that accurately expresses the structure, clarity and texture of photos shot using Canon EOS DSLR cameras. Fine art professionals and graphic artists will welcome the versatility that the PRO-6000 offers, including the ability to print on various media types, such as glossy paper, matte paper and fine art textured paper.

    “I prefer Canon large-format printers because of their amazing quality, as well as their outstanding reliability. With the new PRO-6000 printer, the singular print head further improves the quality of nozzle alignment for cleaner, sharper images. I can launch an entire roll’s worth of prints and be confident that I won’t find banding half way through the batch – a huge advantage over the competition,” said Cody Ranaldo, Technical Director for Griffin Editions NYC, a full-service fine art photographic printing, imaging and mounting studio. “The dual-roll loading system greatly reduces the amount of handling damage incurred when switching back and forth between rolls. Finally, there is an aqueous inkjet printer designed for a true production environment.”

    “One of our best clients has been waiting to offer her work in 60-by-60 inches and is excited to now be able to offer fine art prints to a new client base,” said Eric Luden, founder and owner of Digital Silver Imaging, based in Belmont, Massachusetts. “Commercial clients are especially excited to see the larger scale prints for their lobbies and conference rooms. Our new Canon PRO-6000, which includes all the improvements that we’ve come to enjoy on our Canon PRO-4000, will open up new opportunities and markets for our business.”

    High-level Precision

    As with previous models in the imagePROGRAF PRO line, the imagePROGRAF PRO-6000 model features the LUCIA PRO 11-color plus Chroma Optimizer ink system to provide exceptional image quality. The printer maintains this high print quality with a multi-sensor that calibrates the printer, helping to ensure color consistency from the first print to the last and across multiple PRO Series printers. It also features a high-precision mechanical platform, providing a uniform, rigid frame to reduce vibrations during printing and more accurate ink ejection as well as effortless media feeding capabilities, allowing users to no longer have to worry about blemished prints due to fingerprints.

    Extraordinary Productivity

    The imagePROGRAF PRO-6000 printer features the L-COA PRO processing engine for high-precision image reproduction and high-speed processing of high resolution data. The Sub-Ink Tank feature valued by users of the imagePROGRAF Series has been carried over to this model, helping to reduce downtime and minimize costs by automatically enabling ink tank replacement during printing. With both black ink types active at the same time, there is no need to waste time or ink by swapping out tanks when printing between matte and glossy paper. Right out of the box users will be able to print more as the imagePROGRAF PRO-6000 model comes with 330 ml starter ink tanks.

    Media Handling

    Typically an option for smaller sized models, a Multifunction Roll System (MFR) comes standard with this 60-inch model to allow for increased versatility. When used as a second roll, the MFR system enables users to load glossy media in one roll and matte media in the other to seamlessly print to both rolls without needing to manually switch media. The Multifunction Roll unit will intelligently switch to the correct media, automating the process and providing increased ease of use. The roll can also act as a take-up unit with bi-directional rewind, ideal for long, uninterrupted print runs.

    User-Friendly Software

    Included with this new imagePROGRAF PRO printer to help enhance user experience is Print Studio Pro, a plug-in for Adobe® Photoshop®, Adobe Lightroom®1 and Canon Digital Photo Professional software. The Accounting Manager utility is included to help photographers keep track of consumable costs, such as ink and media, to help users determine their overall printing expenses. Also included is Device Management Console, an administrative tool which provides users with the means to manage up to 50 imagePROGRAF PRO Series printers, all from one location.

    Availability

    The imagePROGRAF PRO-6000 printer is expected to be available in August 2017 with an MSRP of $ 11,995.

    Articles: Digital Photography Review (dpreview.com)

  • Swim on the Subway: Taipei Train Cars Transformed into Sports Venues

    [ By SA Rogers in Art & Installation & Sound. ]

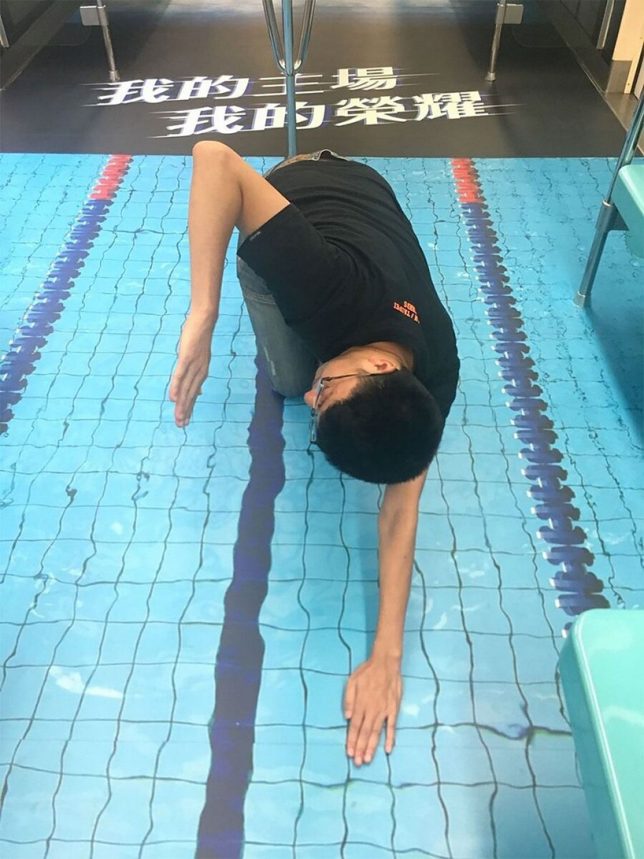
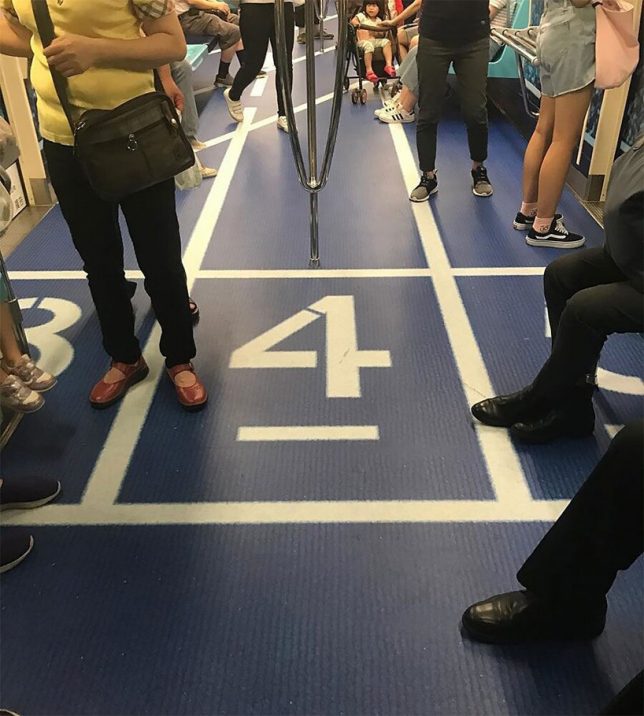
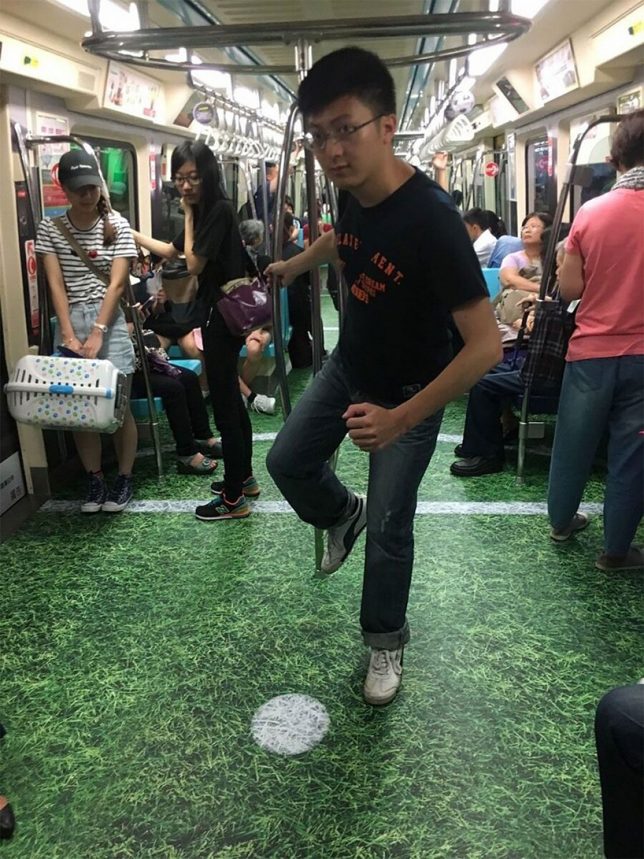
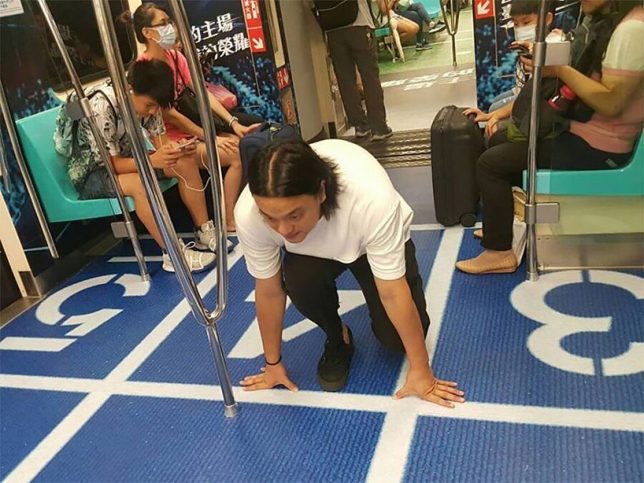
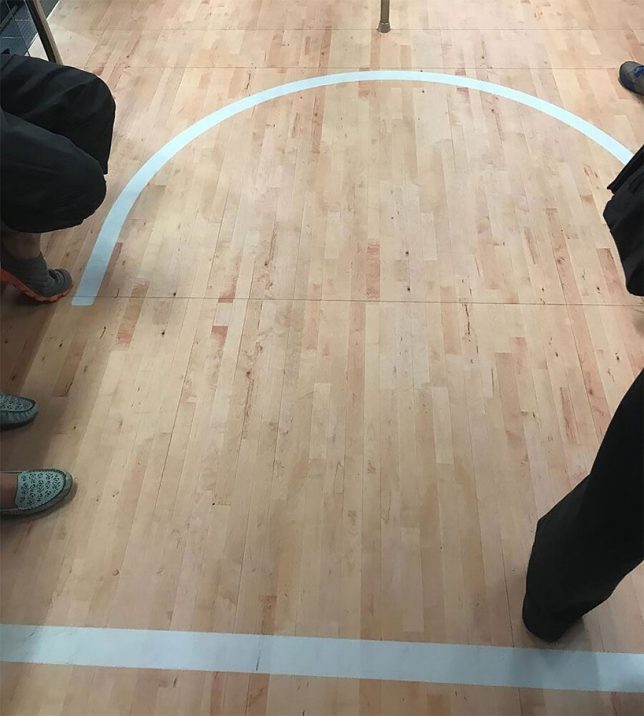
    Subway cars in Taipei have become swimming pools, basketball courts, baseball fields and track lanes to get residents amped for the upcoming 2017 Summer Universiade, an international multi-sport event for university athletes. While the installations mostly consist of photorealistic photographic murals stuck onto the floors, the illusion comes together pretty nicely, especially in the case of the swimming pool, which matches the existing subway car chairs and poles.

    These ‘moving sporting venues’ will transport lots of tourists attending the events, and the city hopes to add to their excitement. The Universiade is the second-largest international sporting event after the Olympics, set to begin on August 19th and end on August 30th, and will include competitions in 22 different sports across 70 venues.

    Images by: Taipei City Government Department of Information and Tourism, @skywu0326, @chi._.851229, @nikoleko1007

    Share on Facebook


    [ By SA Rogers in Art & Installation & Sound. ]

    [ WebUrbanist | Archives | Galleries | Privacy | TOS ]


    WebUrbanist

  • Sony patents 400mm F2.8 lens for a curved medium format sensor

    It’s a great day for innovative patent news. Earlier today, we told you about a Nikon patent for a lens that was designed to work with a full-frame curved sensor camera. But that might not be the most innovative curved sensor patent you’ll hear about today. That title goes to Sony, and their 400mm F2.8 lens designed for a curved medium format sensor.

    Sony Alpha Rumors first spotted the Japanese patent, which describes a lens designed for a curved 645 size sensor—that’s bigger than the sensors found in the Fuji GFX-50s and Hasselblad X1D-50c. The lens is “single focus” and “can be used as an interchangeable lens” reads the translated patent. It goes on to say that, thanks to the curved sensor design “High MTF can be obtained.”

    Here’s are a couple of diagrams, in case you’re curious and know a thing or two about optical design. The lens seems exceptionally simple in design, possibly thanks to the benefits of a curved sensor:

    As with all patents, there’s plenty of reason to doubt this exact diagram will materialize into a real product; however, it does mean Sony is thinking about medium format and curved sensors, and that should have anybody interested in digital camera innovations very excited.

    Like we said earlier today, it’s not so much “will” someone bring this tech to photographers, but “when” and “who will get there first?” May the most innovative company win.

    Articles: Digital Photography Review (dpreview.com)

  • Zillow and VHT appeal $4 million copyright infringement ruling

    Real estate listing firm Zillow Group and photography firm VHT have been locked in a huge copyright lawsuit over Zillow’s alleged infringement of thousands of VHT’s real estate images for years now, and it doesn’t look like it’s going to end any time soon.

    VHT originally filed the suit against Zillow Group in 2015, alleging that tens of thousands of its images were used without permission on both the Zillow.com website and Zillow Digs. Though the claims regarding Zillow.com were dismissed last year, the legal matter has persisted over alleged infringement on Zillow Digs.

    This past February, VHT was awarded $ 8.24 million in statutory damages and $ 79,875 in actual damages by a jury over copyrighted images that appeared without authorization on Zillow Digs. The matter took another turn last month, however, when a judge slashed that figure in half, citing lack of evidence to prove that most of the 28,000+ images were ever viewed by users.

    Following that, both VHT and Zillow Group petitioned the 9th U.S. Circuit Court of Appeals this week in an effort to have the lower court’s ruling overturned. The case remains ongoing.

    This isn’t the first legal row Zillow has been involved in over image copyright issues. The company was recently in the news over legal threats it issued against blogger Kate Wagner of ‘McMansion Hell’ over her use of photos reportedly sourced in part from Zillow’s website. It was soon revealed that Zillow did not own the copyrights to those images, but was instead attempting to enforce third-party contracts to which Wagner was not a party. The company publicly stated that it would not pursue legal actions against Wagner over what her attorneys called fair use of the images.

    Articles: Digital Photography Review (dpreview.com)

  • 10 Photography Bad Habits for You to Conquer

    Let’s define what a bad habit is first; A habitual behavior considered to be detrimental to one’s wellbeing. However, this can be extended into learning a new skill set (like photography) where you may develop habits that can inhibit your learning progression, or even cause you physical injury.

    How to Conquer Your Photography Bad Habits

    Magnolia bud, not 100% sharp as I hadn’t taken my tripod with me

    Before you can fix or adjust a bad habit, first you have to identify it. There is a good chance that a majority of photographers pick up or share the same habits, so maybe you can learn from my list. Possibly you are doing some of the same things. If you are lucky you aren’t doing all of them and this will help you avoid picking up any new photography bad habits.

    There is little as heartbreaking as downloading your photos from a shoot to find you did a really stupid thing like have your ISO really high, or the wrong white balance setting or some other silly thing. Take the time to develop good habits and break any bad ones you might have.

    How to Conquer Your Photography Bad Habits

    Macro image of a gerbera, achieved by allowing sufficient time and patience to set up the shot and my gear correctly.

    Confession Time

    Most of the following are simple stupid things, stuff that doesn’t take a lot of time to think about or do but is easy to put aside for later. Except later usually doesn’t come, and then you pay the price.

    Bad Habit #1 – Batteries not charged and ready

    Failing to check and charge spare camera batteries when they need it is an issue. Nothing worse than being in the middle of a great shoot, having to switch batteries to find that all your spares are flat.

    10 Photography Bad Habits for You to Conquer

    Bad Habit #2 – Memory cards not empty and ready to use

    Forgetting to take the CF card out of the camera and wipe it before reusing is bad habit number two. I have multiple spare cards so leaving one in the computer isn’t a deal breaker, but I am bad about formatting the card and dumping the previous images before a new shoot.

    10 Photography Bad Habits for You to Conquer

    Bad Habit #3 – No cleaning routine

    Another photography bad habit is not completing a regular cleaning routine after each shoot. Living in a coastal area means always being aware of salt spray off the sea. You should have a regular cleaning routine for your camera, lenses, any accessories and don’t forget the inside of your camera bag as well. The life of your expensive camera gear will be extended. Also if your lenses and filters are clean, there is less to handle (fix) in the post-production stage.

    10 Photography Bad Habits for You to Conquer

    Bad Habit #4 – Not checking camera settings

    Are you guilty of this one – not checking how the camera is set up before a new shoot? Time to fess up – this is my personal worst habit and it has cost me some good shots over the years.

    Before you go out on your next shoot, allow time to go over your gear, check that you have everything you need, and set your camera up to your preferred base starting point. A few minutes spent here is an investment that saves you hassles and disappointment later.

    10 Photography Bad Habits for You to Conquer

    Shot unnecessarily at ISO 400 because I forgot to check my camera settings BEFORE the shoot.

    Bad Habit #5 – Underestimating travel allowance time

    Underestimating your travel allowance time so you can get on site and scout out in advance can be a problem. Sometimes it’s hard to find a particular spot, or the sun is setting as you are driving home from work. There are a Lot of reasons for you to be in a hurry to get to somewhere with your camera. But, make life less stressful by allowing plenty of travel time and plan out your route in advance. Get there early.

    10 Photography Bad Habits for You to Conquer

    Bad Habit #6 – Not stopping when you see a shot

    Have you ever seen a possible shot while driving and not stopped?  I often think I will get it on the way back, but the light changes and the shot is gone forever. Of course, habit five applies here as well, if you have allowed sufficient travel time and built in a buffer for possible stops along the way, then you can stop.

    10 Photography Bad Habits for You to Conquer

    Bad Habit #7 – Not protecting your gear properly

    Not protecting my gear as much as I should.  Doing things like putting my tripod legs in the sea, forgetting to use my rain cover for the camera, relying on the weather sealing to protect my camera and lens in a drizzle. Guilty!

    If you do use your tripod in water, learn how to take it apart and clean it. They get a surprising amount of sand inside the legs which can eventually rust. Use proper rain gear to take care of your equipment.

    10 Photography Bad Habits for You to Conquer

    Bad Habit #8 – Not using a tripod

    Sometimes I’m lazy about taking my tripod with me. It’s heavy and carrying it everywhere can be annoying sometimes. However, for landscapes and long exposures, it is a necessity.

    10 Photography Bad Habits for You to Conquer

    This bokeh shot was only possible while using a tripod.

    Bad Habit #9 – Getting caught in the excitement

    Getting caught up in the excitement of an event or happening and forgetting to take my time and plan for strategic shooting.

    This is possibly less of a habit and more something you learn with time and experience. But learning how to distance yourself from the excitement of what is happening in front of your camera is a necessary skill to help you compose and capture meaningful images, rather than “spray and pray”.

    10 Photography Bad Habits for You to Conquer

    Taking myself off to the side of this light display, after capturing the usual images I decided to have a play with some ICM – Intentional Camera Movement.

    Bad Habit #10 – Afraid to hit delete

    Being afraid to delete images. While there is some merit in keeping images that you can come back to and edit later when your skills might have improved, part of your journey in learning to improve is being able to critique your own work. Learn to identify average shots, poor composition, dull lighting and other things that lessen the quality of your images, and don’t be afraid to cull them. If nothing else, it will help extend the life of your computer hard drive capacity.

    10 Photography Bad Habits for You to Conquer

    It’s a nice memory of a fun birthday lunch but it’s not the most amazing photo ever!

    Conclusion

    “I don’t have time to do it now” or “I’ll do it later” are two of the worst mental habits you can get into as a photographer. Learn to stop yourself when you think these things, then take the time to do whatever it was you were going to put off.

    Being a photographer means you need to cultivate the art of patience. With patience, you also have to learn to allocate your time effectively and efficiently. Spending time looking after and checking your gear in advance of a shoot, will save you from making mistakes or wasting time later on fixing them.

    Your photography bad habits may well be different to mine, so make a list of your own personal ones. Don’t try to fix them all at once. Pick the two that have the most impact and concentrate on fixing those. Over time you may find that the good habits you develop make it easier to quit the bad ones.

    Keep an eye out for developing new bad habits in the future too. It’s easy to tell ourselves we won’t, but trying to be perfect is one of the worst habits of all. Do the best you can on the day, and hopefully every day it gets easier, and your good intentions become habits. Positive outcome!

    The post 10 Photography Bad Habits for You to Conquer by Stacey Hill appeared first on Digital Photography School.


    Digital Photography School

  • Google’s Motion Stills app is now available for Android

    Last year Google launched Motion Still for iOS, an app that stabilizes the iPhone’s Live Photos and makes them shareable as looping GIFs and videos. Now the software giant has made the app available for Android devices running version 5.1 and later of its own mobile OS.

    The app works a little differently on Android to the iOS version. Instead of using an existing Live Photo, the Android version forces you to record video inside the app. Stabilization is then applied using a, compared to the iOS version, redesigned video processing pipeline that processes each frame of a video as it is being recorded. As consequence the results are instant and no waiting is required to share the created GIFs.

    Fast Forward is a new feature and builds on the stabilization algorithm to capture longer clips and create stabilized time-lapses or hyperlapses. Playback speed is adjustable from 1x to 8x and GIF output can be created in three sizes.

    Motion Stills for Android is now available on Google Play.

    Articles: Digital Photography Review (dpreview.com)

  • How to Find Animals for Wildlife Photography Beginners

    Wildlife photography may seem like an attractive field of photography to you, but one of the most daunting things for beginners is how to actually go about finding the animals in the first place. Thanks to mankind’s destructive nature we’re used to seeing fleeting glimpses of animals, often far away, prompting heated debates between groups as to what is that winged black speck in the distance.

    5 Beginner Tips to Help You Find Animals for Wildlife Photography

    Two female red grouse amongst the heather on a British moorland.

    As a newcomer to wildlife photography, you may find yourself wondering how on Earth you are supposed to get even remotely close enough for a picture. Sure, you can maybe settle for an atmospheric habitat shot, with the subject small in the frame, but you’d be forgiven for wanting close-up portraits of animals too.

    So let’s look at some of the ways you can achieve those super detailed close-up shots, showing every part of fur or feather.

    1. Wildlife Parks and Reserves

    5 Beginner Tips to Help You Find Animals for Wildlife Photography

    One of the first pictures I ever took was in a wildlife reserve, and of this slightly soft Mandarin Duck.

    One of the first places I visited when I first embarked on my journey as a wildlife photographer was a small wetland reserve. This reserve had some birds kept in open enclosures, as well as a river which was host to many wild ducks. Ducks tend to move slowly, at least when swimming casually along and are fairly easy to get close to (especially in a reserve frequented by well-intended people).

    The best attraction for me, though, was the woodland hide. Situated in a quiet clump of trees, this woodland hide looked over a feeding station for wild birds. It was visited by mainly small passerines, such as great tits and bullfinches, but occasionally the odd predator would drop in such as a sparrow hawk.

    5 Beginner Tips to Help You Find Animals for Wildlife Photography

    Even small woodland birds are interesting and exhibit great behavior if you watch for a long time.

    If you can find yourself a local reserve like this one, or just a public wildlife hide in a good spot, put in the hours and try to think outside the box. You’ll most likely come away with some decent images that you can be proud of.

    2. Get a Wildlife Blind

    Not happy with a public hide? Get your own wildlife blind – a camouflage tent, if you will – and set it up wherever you think wildlife may frequent. This might even be in your backyard, and if you set up a small feeding station there you could have all sorts of birds and small mammals visiting. Bird feeders filled with sunflower seeds will quickly attract small passerine birds, with squirrels most likely making a visit there too.

    5 Beginner Tips to Help You Find Animals for Wildlife Photography

    Wildlife blinds can get you close to all sorts of rare animals, like this black grouse.

    Working in hides requires a lot of patience. In the past, I spent 15 hours a day for two weeks in a hide waiting for brown bears make an appearance. But even with animals that are visiting regularly, you’ll need to put in the hours to capture interesting behavior and something more than just a simple “bird on a stick” portrait shot.

    3. Try Using a Trail Camera

    If you’re really stuck for ideas or want to track down something a little more interesting, try setting up a small Bushnell trail camera in likely locations for animals. Such locations might be runs in a woodland (trodden down trails in the grass you can see, where animals move regularly). The camera will sit and watch 24/7 for you, triggering when something moves by. They’ll record video or take photos that you can later review, unveiling the secrets of a particular area to you.

    5 Beginner Tips to Help You Find Animals for Wildlife Photography

    Track down regular haunts of hard-to-spot animals like foxes by using a trail camera.

    Some animals are nocturnal, and in those cases, you could even try setting up a DSLR camera trap, although these are usually used by more practiced wildlife photographers. I wouldn’t recommend trying out this technique just yet if you are very new to the game, and instead, stick to the trail cameras for finding locations.

    4. Practice Your Fieldcraft Techniques

    If you want to be a successful wildlife photographer, then you need good fieldcraft skills. You need to learn how to remain concealed, and silently approach animals without them noticing you. This involves learning to properly observe your subject. Only move when they are distracted. You should never approach an animal that is clearly alert and wary that something is nearby. Wait until they’re relaxed and unaware, before continuing to move closer.

    5 Beginner Tips to Help You Find Animals for Wildlife Photography

    Practicing your fieldcraft skills lets you get closer to animals without the need for a blind.

    But learn the limits. There’s going to be a point you need to stop, otherwise, you would be standing nose to nose with a moose or something similar. You’ll need to practice stalking techniques, with many failures no doubt, before you get it just right. Simple things like thinking about the material your clothes are made of, in order to prevent loud noises when your walk, will make all the difference.

    Once you’ve done that, you’ll find yourself able to spot an animal at a distance and get closer and closer. It takes time, but it’s great fun and it definitely makes the final image more worthwhile thanks to the hard work you put in. I love to try stalking red deer – they’re big, charismatic subjects but they’re really wary of people. They’ll happily stare at you standing still, but once they spot you moving towards them they’ll run a mile.

    5. Keep Alert

    Many of my wildlife photos are opportunistic. It doesn’t hurt to drive around with your camera in the passenger’s seat, keeping your eyes peeled for wildlife. In an ideal world, you’d have someone driving for you so you can pay 100% attention to the surrounding areas, rather than having to focus on the road.

    5 Beginner Tips to Help You Find Animals for Wildlife Photography

    Using your car as a hide can be a great way to find wildlife over a large area, like I did with this cuckoo bird.

    Cars can be the best wildlife blinds available. Animals are so used to seeing them that they are mostly ignored. While you may get a photo from your car, this is also a great way to find the regular haunts for a particular animal. Dawn and dusk are the best times to start exploring when animals are generally most active.

    Conclusion

    Do you have any other tips for doing wildlife photography and finding animals to photograph? Please share in the comments below.

    The post How to Find Animals for Wildlife Photography Beginners by Will Nicholls appeared first on Digital Photography School.


    Digital Photography School

  • PSA: Leica’s new TL2 may break if you use it with the Leica Visoflex electronic viewfinder

    Earlier this week, word surfaced online about an issue with the newly released Leica TL2. Apparently, some cameras would simply stop working when you attached Leica’s own Visoflex electronic viewfinder.

    Online retailer Lcameras.com posted a notice on its Facebook page advising customers that it had paused sales of the camera due to Leica’s recommendation, but details weren’t forthcoming. Now, Leica has issued an official statement on the matter confirming an issue with the external EVF.

    According to Leica’s notice, “a defect may occur that could stop the camera from working” when it is used with the Visoflex viewfinder. An earlier version of the statement used bleaker language, stating “If this defect occurs, then it is no longer possible to use the camera.” By all accounts, this is a serious issue that could ‘brick’ your new camera.

    Earlier today, the company released another statement saying they had “identified the cause of the failure when using the TL2 in combination with the electronic viewfinder” and that “it is very likely that this can be resolved with a firmware update.” But until that firmware update is ready (it is currently being ‘intensively’ tested) users should either not attach the Visoflex viewfinder, or they should return their TL2 to the Leica dealer they purchased it from.

    Articles: Digital Photography Review (dpreview.com)

  • Study finds most people can’t spot manipulated photos, can you?

    A new photography study from researchers at the University of Warwick has found that many people aren’t very good at determining whether an image has been digitally manipulated.

    The study, which has an online test component that anyone can take, asks volunteers to look at 10 different images and guess whether each is altered or unaltered. Volunteers are also tasked with choosing the part of the image they think was altered, and rating their certainty about the alteration(s) or lack thereof.

    After compiling the results, the researchers found that only 65% of altered images were correctly identified by volunteers; even less unaltered images were identified, at just 58%. Given that chance performance is 50%, the results show that the volunteers did little better than they would have with simple guessing. Furthermore, the team found that age and gender did not affect the results, with the difficulty being notable across all volunteers.

    “In the digital age, where photo editing is easy and accessible to everyone, this research raises questions about how vigilant we must be before we can trust a picture’s authenticity,” said the university in a release. “It is crucial that images used as evidence in courts—and those used in journalism—are better monitored, to ensure they are accurate and truthful, as faked images in these contexts could lead to dire consequences and miscarriages of justice.”

    The question is, can a bunch of photography nerds wreck the curve? Take the online component and let us know how you did in the comments.

    Articles: Digital Photography Review (dpreview.com)