Blog

  • Tips for Minimalist Photography in an Urban Environment

    Minimalism gained traction in America in the 1960s with links to the Japanese traditional culture of Zen Philosophy. As a reaction against the whims of abstract expressionism, artists like Sol LeWitt, Frank Stella, and Mark Rothko experimented with stripped back processes and imagery, exposing the bare bones of visual art.

    The history of the minimalist photography movement is not dissimilar to that of their contemporaries. The scientific photography of Bernice Abbott is referred to as a marked pivot towards minimalism. Photographers like Robert Adams and Lewis Baltz also used reductionist techniques to explore composition in the natural and urban landscape.
    Tips for Minimalist Photography in an Urban Environment

    Like all visual art, minimalism is founded on the basic elements of design; line, shape, color, texture, form, and composition. The scope of interpretation within minimalist art is vast, with its proponents yielding a diversity of results and reasoning. Overall, however, minimalist art can be surmised within a single principle, the old adage of “keep it simple”.

    Keeping it simple

    Minimalism is about how little you can say without compromising meaning. Minimalist photography is a great opportunity to slow down and reevaluate your photographic process. Before taking a shot, take a breath. Think about your desired outcome. How does your knowledge of composition apply to the subject at hand? How would you like to approach exposure? Minimalism is a very meditative process, sort of like yoga, but for your photography.

    Composing minimalist photography in an urban landscape

    Often, the utilitarian components that make up an urban landscape are the same that serve as the best minimalist subjects. Minimalist depictions of nature tend to rely on the soft flow of organic structures. However, urban minimalist photography capitalizes on the bold lines of old buildings, fresh apartments, and upturned car parks.

    Intermixed with bolts of color, texture, and juxtaposition, minimalist photography can be both subtle and loud at the same time. Photographers of minimalism capitalize on strong, stripped back elements to create both subtle and high-impact imagery. That’s why moving forward in minimalist photography often requires you to steep yourself in the very basics of photographic composition first.

    Rule of thirds

    The rule of thirds is a trick to help determine the overall composition of a photograph. Mentally divide an image up evenly into thirds both horizontally and vertically. The lines that intersect around the central rectangle indicate the points that capture the majority of a viewer’s attention. By offsetting important points in a photograph from the center rectangle, an image will feel more naturally appealing to your audience.

    Minimalist photography relies equally on what has been included and excluded from an image. Composing a visually harmonious photograph with tools like the rule of thirds maximizes the short time a viewer has to engage with a photograph.

    Tips for Minimalist Photography in an Urban Environment

    This image is sectioned off into 9 even rectangles. The four central intersecting points indicate the focal points of the photograph.

    Tips for Minimalist Photography in an Urban Environment

    This image is an example of the rule-of-thirds in practice. No single component of the photograph lies directly within the center, guiding the viewer’s eye around the image rather directly to the center.

    Color

    Color has a language that establishes the atmosphere and emotional range of an image. Where traditional black and white highlights the form of an image, two or three highly contrasting colors can bring the facade of the urban environment to life.

    Blocks of color convey vitality and hardness in an image, whereas a gradient is softer and more accommodating. Pastel color schemes depicted by many contemporary minimalist photographers deliver a surreal, dream-like quality to a photograph, while also alluding to childhood, disassociation and new-media aesthetics.

    Tips for Minimalist Photography in an Urban Environment - color

    Tips for Minimalist Photography in an Urban Environment

    Isolated colors can add depth to an image and draw attention to details often overlooked in the urban landscape.

    Tips for Minimalist Photography in an Urban Environment

    Lines

    Strong lines in minimalist photography carry the integrity of an image. Conveying depth and presence, bold lines leading in from the perimeter of an image grab a viewer’s attention and guide their eye through the artwork. Lines delineate the boundaries of different bodies within a space and can denote unrest at sharp angles or quiet emotion with organic ripples.

    Horizontal lines are used as a device to indicate the horizon, perspective, or to completely upend a viewer’s sense of space altogether! When composing an image, follow each line through with your eyes. Adjusting the integrity of a line later in post-production can be extremely time-consuming. And the success of a minimalist photograph could (and probably will) count on it being exact.

    Tips for Minimalist Photography in an Urban Environment

    Leading lines reach the perimeter of the physical photograph and provide the viewer with a visual trail to follow into the interior of the image.

    Shape

    The compositional elements of line and shape often cross over in a visual plane. For example, the perimeter of a shape can be defined by its outer line, sectioning the interior of the shape off from the background of the image.

    Sharp, inorganic shapes create unrest and action in an image, whereas smooth, organic shapes create a scene of peace, nature, and evenness. The urban environment consists of an inexhaustible array of sharp and smooth lines. Trying to bring the two spectra together creates a dynamic juxtaposition of design and emotion.

    Tips for Minimalist Photography in an Urban Environment

    Pattern and texture

    Pattern and texture lift the image from the page. Texture is the physicality of an image, which engages with an audience by appealing to their sense of touch. Pattern, often combined with texture, adds detail to a photograph, revealing beauty the repetition of otherwise unobserved subject matter.

    Minimalism and pattern can combine to emphasize size and number, delivering a feeling of sensory overload simply by the repetition of a single design. When limited to concentrated areas in an image, a pattern can serve as a disruption to the remaining landscape or as a contrast to emphasize negative space.

    Tips for Minimalist Photography in an Urban Environment - texture

    Textural images often depict the wear and tear of the urban environment in delightfully intricate detail.

    Negative space

    Negative space is what is not there which can be kind of confusing. It lends breathing room to an image. It allows the immediate subject matter to exist with little or no intrusion elsewhere in the frame.

    As an example, an image of a single cloud, framed by blue sky neither intrudes nor detracts from the other, but the two exchange meaning nonetheless. The sharp contrast between vacant and overflowing environments means that urban landscapes are great for incorporating negative space into minimalist photography.

    Tips for Minimalist Photography in an Urban Environment - negative space

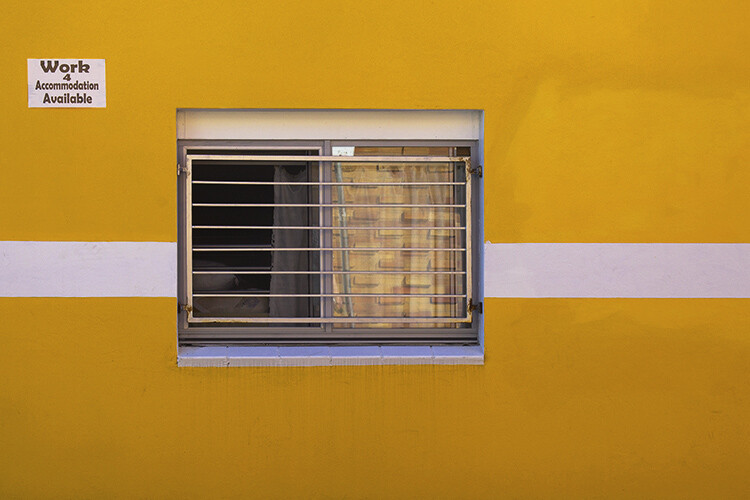
    The geometric pattern on the right of this image is offset by the negative space on the left. The relationship balances out the image overall and enhances the bold yellow streak down the middle.

    Tips for Minimalist Photography in an Urban Environment

    Conclusion

    Minimalism has seen a considerable resurgence in recent years, especially in interior design and photography. A wealth of online curatorship means that tags like #minimal and #minimal_perfection unearth fresh, reductionist imagery by the second. Although the overwhelming volume of images may seem contrary to the principals of minimalism itself, the evolution of the modern landscape continues to create a wealth of opportunity for photographic artists looking to branch out or hone their skills in composition.

    How do you use minimalist photography with your images? Please share in the comments below.

    The post Tips for Minimalist Photography in an Urban Environment by Megan Kennedy appeared first on Digital Photography School.


    Digital Photography School

  • How to do Clamshell Lighting: A Reliable Two Light Setup

    When it comes to lighting, there is an infinite choice on how you can light your portrait subjects. That’s great and it’s addicting, but when you are starting out it can also be overwhelming. To counter the inevitable information overload that you will get researching lighting, it is a good idea to know a few basic setups that you can fall back on should you be pressed for time or should you need a backup. This article will introduce you to a basic two light setup often called clamshell lighting.

    It will provide you with a beautiful soft light with faint shadows and glorious catchlights. Clamshell lighting works very well and it is very flattering for men and women of all ages and it could be a very useful technique in your toolkit.
    How to do Clamshell Lighting: A Reliable Two Light Setup

    What is clamshell lighting?

    In a nutshell, clamshell lighting is a configuration where two lights are placed facing toward your subject at a 45-degree angle. Your key light is facing downwards at a 45-degree angle and your fill light is a facing upwards at a 45-degree angle. The resulting appearance of your lights from the side somewhat resembles an open clamshell (imagination may be required).

    How to do Clamshell Lighting: A Reliable Two Light Set-Up

    Apologies for my stick figure skills, but here you can see just how easy clamshell lighting is to do.

    If you start with your main light on axis (directly in front of your subject), raised up and pointed downward, you have a basic butterfly lighting set-up. Adding the second light from below serves as fill and eliminates any heavy shadows caused by the key light. This combination results in soft, flattering light that works well with almost any subject.

    What you need

    How to do Clamshell Lighting: A Reliable Two Light Set-Up
    To create a clamshell lighting setup, you need two light sources. If you have modifiers to soften your light, all the better, but as long as you have two light sources you can get started with clamshell lighting.

    I do recommend starting with a pair of softboxes roughly the same size. Once you’ve mastered that, you can then start experimenting with other modifiers such as beauty dishes and strip boxes.

    Setting it up

    How to do Clamshell Lighting: A Reliable Two Light Setup
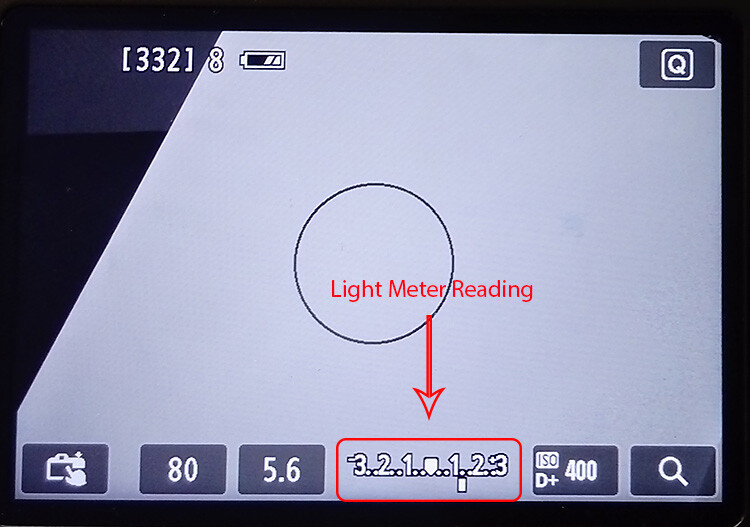
    Start with your key light (your main light source) and place it in front of your subject. Go closer for softer light and faster light fall off, or further away for a harder light. Place it above your subject, pointed directly at their nose. Meter for your desired aperture (we’ll use a hypothetical f/11 from this point) and take a test shot.

    If everything is setup correctly you should have a decently lit image with deep shadows under your subject’s nose and chin.

    How to do Clamshell Lighting: A Reliable Two Light Setup

    Now, take your fill light and place it directly underneath your key light. Point it upwards toward your subject at 45-degrees and meter this light for two stops below your preferred aperture, which would result in f/5.6 for our hypothetical aperture of f/11. If the effect is too strong and your fill light is obliterating the shadows, turn the power down. If it isn’t doing enough, turn it up. The main thing to look out for is that you need to ensure that your fill light is not overpowering your key light. This would result in your image being lit from below with your shadows being filled in from above. This is not a good look to go for.

    How to do Clamshell Lighting: A Reliable Two Light Setup

    What to watch out for

    The main thing to look out for is that you need to ensure that your fill light is not overpowering your key light. This would result in your image being lit from below with your shadows being filled in from above. This is not a good look.

    Now that you have two lights sharing the same vertical space, stand behind them and shoot through the gap. If there isn’t much of a gap, raise and/or lower both of your lights (change the angle of each and take another meter reading if you need to) until you have enough room to work in the middle.

    That’s all there is to it. Clamshell lighting is really is easy to set up and with a bit of practice you will be able to get it up and running in a couple of minutes.

    How to do Clamshell Lighting: A Reliable Two Light Setup

    Note: The softbox at camera left is NOT on so isn’t doing anything.

    Alterations

    Although I suggested using two evenly sized softboxes, to begin with, that is by no means a restriction of any kind. Feel free to use any kind of modifier you want and experiment liberally. Have a pair of strip boxes you want to use? Go for it. Do you want to use a beauty dish as your key light and an umbrella as fill? Sure. How about a snoot and a small soft box? Absolutely. Use what you have at hand.>

    Also, you are not limited to just using two lights from the front. Feel free to add rim and hair lights and a background light as your images require.

    Examples


    How to do Clamshell Lighting: A Reliable Two Light Setup

    How to do Clamshell Lighting: A Reliable Two Light Setup

    How to do Clamshell Lighting: A Reliable Two Light Setup

    How to do Clamshell Lighting: A Reliable Two Light Setup

    This image included a third light serving as a background light.

    How to do Clamshell Lighting: A Reliable Two Light Setup

    How to do Clamshell Lighting: A Reliable Two Light Setup

    Conclusion

    If you’ve made it this far, hopefully, you can see how useful a basic clamshell lighting setup is, and how it might serve you. It’s easy, fairly compact and produces lovely, flattering light. If you’re still not sure, I urge you to try it for yourself. You may very well fall in love with it.

    The post How to do Clamshell Lighting: A Reliable Two Light Setup by John McIntire appeared first on Digital Photography School.


    Digital Photography School

  • Nissin announces Super Light Stand LC-50c: The world’s lightest light stand

    Nissin has released a new light stand that it claims is the lightest in the world. The Super Light Stand LS-50C uses carbon fibre for its central column to keep its total weight down to just 575g/1.2lb. But even at that featherweight, it can still hold 1.5kg/3.3lb and extends to a maximum height of 200cm/79in.

    Packed away, it stores at a minimum length of 48.5cm/19in.

    As these stands are generally static, the idea of using carbon fibre to make them lightweight is mainly to reduce the weight of the photographer’s kit when traveling, but also to make assistant’s work a little easier—whether carrying to and from a shoot, or holding during one.

    The centre column uses a collar-style rotary locking mechanism more often seen on tripods, which the company says makes tightening easier and more effective than standard locking nuts and handles. Nissin has also come up with an interesting design for the leg clamps that allows them to be extended to a flat position on the ground for added stability.

    The Nissin LS-50C will go in sale in the next couple of days priced 13,500 yen plus tax (approx. $ 130). For more information see this translated version of the Nissin product page.

    Articles: Digital Photography Review (dpreview.com)

  • How to Understand Reflected Versus Incident Light and Get More Accurate Exposures

    Do you ever get under or overexposed photos when you use your camera’s light meter? Do you get frustrated that even in auto-mode you can’t get the correct exposure? That’s because there are two different type of light to deal with when taking a photo.

    When you make a photograph the light is your raw material, which is why it’s important to understand how it works. It’s a very broad topic to cover, so for this article, we are just going to focus on the difference between incident and reflective light because that’s the key to getting your exposure right.

    Incident versus reflective light


    We all know this difference in a very intuitive way; let me give you an everyday example: when there is a sunny day, do you wear white clothes or black ones? Easy! You wear white or at least light colors, but why? If the sun will be the same, why wouldn’t you wear dark colors? Because you know that dark colors absorb light and therefore you’ll feel the heat more than wearing white which will reflect more light and keep you fresher. This is the same principle you need to apply when measuring the light for photography.

    The difference explained

    Diagram How to Understand Reflected Versus Incident Light and Get More Accurate Exposures

    Incident light is that which is illuminating your scene. It falls on the subject before being altered (reflected) by it which is why it’s also a more accurate light reading.

    When light hits objects it gets transformed by them and reflected out; this is what we perceive and what the camera captures and reads. This is called reflective light.

    Light metering

    Let’s see how these two concepts apply to light metering and exposure when you take a photo. In the next examples, I always used the same light for each.

    In this first shot, I metered the light once I had framed the image I wanted, so it gave me a reading making an average of the reflective light.

    General Reading - How to Understand Reflected Versus Incident Light and Get More Accurate Exposures

    The settings were ISO 400, f/5.6, with a shutter speed of 1/80th.

    And the resulting photograph looked like this:

    General Reading Result - How to Understand Reflected Versus Incident Light and Get More Accurate Exposures

    Reflected light from a dark subject

    However, like we said when talking about clothes, dark objects absorb light. So if I make the reading by measuring the black part of the photo, the settings that were “correct” before, now appear to be underexposed.

    Black Reading - How to Understand Reflected Versus Incident Light and Get More Accurate Exposures

    Even if the lighting is always the same, your camera thinks there is less. As a result, your photos will be overexposed.

    Black Reading Result - How to Understand Reflected Versus Incident Light and Get More Accurate Exposures

    Exposure: ISO 400, f/5.6, shutter speed 1/13th.

    Reflected light from a light subject

    On the other hand, light objects reflect most of the light, so your camera will receive the message that it needs to reduce the exposure if you meter off something light.

    White Reading - How to Understand Reflected Versus Incident Light and Get More Accurate Exposures

    And as a result, you will end up with underexposed images.

    White Reading Result - How to Understand Reflected Versus Incident Light and Get More Accurate Exposures

    Exposure: ISO 400, f/5.6, shutter speed 1/200th.

    None of these three readings gave you the correct exposure on your image because none of them were about the incident light. In order to get this accurate reading, you need to use a handheld external light meter, which can be very expensive. Fortunately, there are other ways to get the right exposure without having to spend a fortune.

    Black and white… and gray

    Back in the 1930s, a photographer called Ansel Adams developed a technique for the optimal exposure of photographs by dividing the degrees from light to dark into 11 zones, therefore it’s called the zone system. Everything in the world has a color and lightness that correspond to a zone. All light meters, including the one integrated into your camera, are designed to give you the middle zone: Gray V that reflects 18% of the light. So, what you need in order to have a correct exposure is to measure the light reflecting off of this tone.

    Gray card Reading - How to Understand Reflected Versus Incident Light and Get More Accurate Exposures

    You’ll find gray cards on the market which are used to calibrate your exposure and white balance. They are a very practical and economical way to turn the reading of your reflective light into an incident light accuracy.

    It is also very easy to use, you just have to put one in front of your subject and frame it with your camera. Once that’s the only thing in your shot, press the shutter button halfway to see the light meter and adjust your exposure accordingly. With those settings, you can have the perfect exposure regardless of the tones in your image.

    Grey cardReading Result - How to Understand Reflected Versus Incident Light and Get More Accurate Exposures

    Exposure: ISO 400, f/5.6, shutter speed 1/30th.

    Real world examples

    I know what you’re thinking, that was an unreal example because most of your photos will have much more colors than just black, white and gray V. That’s true, but the principle remains the same. Look at these real life examples:

    Bridge Reflective - How to Understand Reflected Versus Incident Light and Get More Accurate Exposures

    Reflective reading with an exposure of ISO 400, f/5.6, shutter speed 1/80th.

    Compared to the incident reading:

    Bridge Incident - How to Understand Reflected Versus Incident Light and Get More Accurate Exposures

    Incident reading with an exposure of ISO 400, f/5.6, shutter speed 1/320th.


    How to improvise!

    What if you don’t want to be carrying around a gray card? Or did the perfect image catch you unprepared? No problem, everything in the visual world has its equivalent in the zone system.

    For example, grass or wet cement correspond to the gray V zone so you can always look for elements like that in your photo and you will get a very accurate reading from them.

    Take this composition of candle holders. When they are all white the photo is dark, sad and shows all the imperfections of the backdrop because it’s underexposed. However, when I add a gray candle holder and measure the light in it, the exposure is perfect.

    Candleholders Reflective

    Exposure: ISO 1250, f/11, shutter speed 1/125th.

    Candleholders Incident

    Exposure: ISO 1600, f/8, shutter speed 1/125th.

    Tip: So that you are never caught off guard, you can measure the palm of your hand and figure out how much lighter or darker it is than the gray card, that way you will always have the perfect reading “at hand”.

    Things to remember:

    • Get close enough to the gray object so that it’s the only thing you see through the lens, or at least the majority of it, and take that reading to set the exposure values.
    • The gray card or object needs to receive the same light as the rest of the scene. Be careful to not cast a shadow with your body or your camera when getting closer to measure the light.
    • Reflective light depends also on the material and shape of the object so a black car, for example, reflects more light than a black wool sweater.

    There you go, understanding the difference between reflective and incident light can transform your photo from snapshots to pro shots!

    The post How to Understand Reflected Versus Incident Light and Get More Accurate Exposures by Ana Mireles appeared first on Digital Photography School.


    Digital Photography School

  • Don’t Fear Photo Post-Processing – Shooting is Only the First Part of the Image Creation Process

    You have just bought your new bright shiny camera and you are sure that it is just the thing that will help you create better images. You’re shooting JPG with the camera’s automatic program modes, but you’re not getting the results you wanted. You keep upgrading your cameras thinking that will do the trick, only to find that the quality of your imagery isn’t getting any better. What’s going on?

    Lightroom Banner - Don’t Fear Photo Editing - Shooting is Only the First Part of the Image Creation Process

    You may be missing an important part of digital photography, post-processing, with a state of the art processing program like Adobe Lightroom or Photoshop.

    Before and after

    Iceland Light Before - Don’t Fear Photo Editing - Shooting is Only the First Part of the Image Creation Process

    This image of a lighthouse in Iceland was taken on a bright yet overcast day. In a matter of moments with the help of Lightroom, it became a favorite.

    Iceland Light After - Don’t Fear Photo Editing - Shooting is Only the First Part of the Image Creation Process

    The role of post-processing in photography is not new

    There are several integral parts to digital photography. The technical and creative aspect of using your camera, and the technical and creative application of post-processing your images. Each part is equally important and when all the pieces are put together, that’s when the magic starts to happen.

    Unfortunately, many people are still thinking about the days of film when you took it to a lab and the post-processing was done for you. You never had to think twice about how the image was processed. Did you ever notice that different labs gave you different results? That’s because of their level of post-processing.

    Now it’s time for you to understand the importance of post-processing if you are going to create better imagery. It will take some time and some dedication to learn, but it will improve your photography by ten-fold.

    The first step – shooting with post-processing in mind

    First of all, start shooting in RAW format and stop letting the camera make the decisions for you. When you shoot JPG format, it will automatically process your images in camera, even though you may even not be aware of it.

    Have you ever taken a JPG and a RAW image and compared the two photographs? The JPG may appear bright and saturated and the RAW file looks flat. That’s because the JPG has been processed by the camera and the RAW file is an unprocessed digital negative.


    That RAW file is ready for you to make your own creative adjustments and apply your photographic vision in Lightroom or Photoshop. Only then can you start to recreate that scene you saw when you first took the image.

    What kind of post-processing decisions will the camera make for your JPGs? Depending on your camera, it can automatically increase saturation, sharpness, and contrast, but it will also compress your image. There are settings in your camera where you can make blanket adjustments for every JPG (Picture Styles), however, the camera is still making the decisions for you. That gives you zero creative control.

    Raw format gives you control

    RAW files contain more information and will allow you to have a wider range of tones (called dynamic range) to work with when you bring your images into Lightroom or Photoshop. When shooting in the JPEG format, image information is compressed and lost forever. In a RAW file, no information is compressed and you’re able to produce higher quality images while correcting problem areas that would be unrecoverable if shot in the JPEG format.

    The Histogram

    Once you start shooting in RAW, it’s very important to be conscious of the histogram. You can bring up the histogram on your Live View shooting screen or after you have taken the shot in your image review screen. Check your camera’s manual for the location of the histogram.

    Note: If you shoot with a mirrorless camera you may be able to see the histogram on the screen before you shoot. Check your settings this is very handy.

    Why is the histogram important for your photographic success?

    If used correctly while shooting, the histogram will give you the information you need to know to bring up the shadows or bring down the highlights and pop out exposure and detail in an image.

    The histogram shows you the brightness of a scene and it can be measured as you are shooting, or after you have captured the image. When look at the histogram and see the bulk of the graph pushing towards the right, this means you have an image that may be overexposed (or a really light toned subject).

    Overexposed - Don’t Fear Photo Post-Processing - Shooting is Only the First Part of the Image Creation Process

    If the data is mostly on the left of the graph, it’s an image that might be underexposed.

    Underexposed - Don’t Fear Photo Post-Processing - Shooting is Only the First Part of the Image Creation Process

    If the graph spikes on either the left or right “wall” of the histogram, that means that “clipping” has occurred. Clipping happens when you have areas in your photo with no information as a result of over or underexposure. When an area has no information, it is either pure white or pure black which is often referred to “blown out”.

    Generally, it is undesirable to have large areas of your image that have highlights or shadows clipping. See the image below. The red areas show highlight clipping, and the blue areas show shadow clipping.

    Clipping - Don’t Fear Photo Post-Processing - Shooting is Only the First Part of the Image Creation Process

    Because of the limited dynamic range of a camera’s sensor, the area registering as clipped usually leaves the image with no information in the shadows or highlights. A spike touching the left edge of the histogram means that there is shadow clipping. A spike touching the right edge of the histogram means that there are highlights clipping.

    What is possible with post-processing?

    Many photographers have frustrating results with their images because they don’t embrace digital editing and post-processing. They are doing everything right when they shoot and are good at composition. They know how to expose correctly for the scene, but don’t know where to go with the image once they get home.

    For example, maybe they are in a high contrast area and have taken an image with the histogram in mind. Then they open the image on-screen and throw it out because it looks over or underexposed. They don’t know what the post-processing possibilities are even though they may have a viable image. This is where they are missing a large part of the potential in their digital photography post-processing.

    Here’s a great example. This image was taken in the Eastern Sierra in California.

    Alabama Hills Before - Don’t Fear Photo Post-Processing - Shooting is Only the First Part of the Image Creation Process

    It is obvious that the shadows are way underexposed and it creates an interesting silhouette. But, if you look at the histogram, you can see there is space on the left side of the graph which represents the shadows. This means there is more information there, and a good possibility of bringing up the shadows to create a whole different image.

    Here is the result after brightening shadows in Lightroom. This adjustment took just seconds and creates a whole new scene.

    Alabama Hills After - Don’t Fear Photo Post-Processing - Shooting is Only the First Part of the Image Creation Process

    Start with Lightroom

    Almost every image needs post-processing. Some people think that’s “cheating”. It’s not, it’s all part of the digital artistic process.

    With post-processing, you can create the image you saw when you photographed the scene. Your eyes have the capability of seeing a wider range of light and color than your camera does, so the images need help in post-processing to duplicate the full range of light and shadows. The problem with a lot of beginners, is they tend to oversaturate or over-sharpen an image. So this talent comes with time and practice, practice, practice.


    Once you have mastered the basics, there is a lot more you will be able to do with your digital post-processing that will add drama and interest to your photos. The above image of Bridal Veil Falls in Yosemite looks rather flat in the RAW version (left). Once you add saturation, sharpening, and a vignette to the whole picture it starts to pop. Then you can enhance the brightest areas by “painting with light”, and it now becomes a much more interesting image.

    Start your post-processing journey with a full featured program like Adobe Lightroom. It is the standard in the industry for professionals, but it is also user-friendly for beginners and helps with both post-processing and image organization. Just be sure that your computer has enough memory and RAM to run these full featured programs. Check the requirements at adobe.com.

    Check out our guide to LR:  The dPS Ultimate Guide to Getting Started in Lightroom for Beginners

    Nothing is more satisfying than when you have a catalog of 30,000 images and you’re able to find your favorites in literally seconds by entering a few keywords and star ratings. Take some time to set it up, add a class or two, and you’ll be up and running!

    Conclusion

    Photo editing or post-processing is an integral part of the digital photography puzzle. Don’t think that you can skip this part and come away with satisfying images. It’s just as important to learn photo editing as it is to learn the basic functions of your camera. Only then, will you be able to bring that intentional photographic vision into post-processing and create great images

    How are you going to start your post-processing journey? Is shooting in RAW and learning Lightroom in your future? Please share your thoughts with me on this subject.

    The post Don’t Fear Photo Post-Processing – Shooting is Only the First Part of the Image Creation Process by Holly Higbee-Jansen appeared first on Digital Photography School.


    Digital Photography School

  • Polaroid is back! Unveils OneStep 2 instant camera and i-Type film

    Remember those intriguing teasers Polaroid was scrolling through on its main website last week. Well, yesterday night was when that countdown ended, and it ended with a huge announcement that has the photo industry buzzing. In short: the old Polaroid you knew and loved is back from the dead with a new analog instant camera and a new type of instant film!

    Announced on the 80th anniversary of the Polaroid brand, both products are being unveiled as part of a new brand called Polaroid Originals, which merges the Polaroid of old with years worth of work done by Impossible Project to keep that old Polaroid alive. In fact, the Impossible brand is being replaced altogether.

    In addition to the new film and camera, you’ll now be able to purchase restored vintage Polaroid cameras and traditional Polaroid instant film in a variety of formats straight from the Polaroid Originals website. But first, let’s dive into that sweet new camera!

    The Polaroid OneStep 2

    $ (document).ready(function() { SampleGalleryV2({“containerId”:”embeddedSampleGallery_9226467734″,”galleryId”:”9226467734″,”isEmbeddedWidget”:true,”standalone”:false,”selectedImageIndex”:0,”startInCommentsView”:false,”isMobile”:false}) });

    The Polaroid OneStep 2 is exactly what it sounds like: the spiritual (and in some ways literal) successor to the famous Polaroid OneStep—you know, the camera Instagram stole its original logo from.

    Inspired by the original OneStep, Polaroid says they’ve updated the OneStep 2 “to create a simple, easy-to-use instant camera that works straight out of the box.” It sports a ‘high quality lens’ that can focus from 2ft to infinity, a ‘powerful’ flash, a rechargeable battery that allegedly lasts 60 days on a charge, a self-timer function, and it’s compatible with both the new i-Type instant film and the old 600 series film.

    The camera is available in white and graphite, and you can already pre-order yours through the Polaroid Originals website for $ 100.

    Polaroid i-Type Instant Film

    Speaking of film, Polaroid Originals also debuted a new film format that will look familiar but is actually a bit different. It’s called i-Type, and it joins Polaroid’s vintage films (SX-70, 600, 8×10, etc.) as the newest kid on the block.

    The “i” stands for “Incredible” … which is really irrelevant. The important bits is that this film is optimized for the OneStep 2—and, we hope, future Polaroid Originals cameras—is battery-free, and comes in Black and White and Color varieties for $ 16 per 8-pack or $ 45 for two 8-packs of color film and one 8-pack of black and white.

    Keep in mind, because this is a battery-free film, it will not work in 600 cameras. That film has its own battery in the film, while the new i-Type OneStep 2 boasts a rechargeable battery of its own.

    To learn more about this film or purchase a pack or two of your own, click here.

    Vintage Polaroid Cameras and Film

    Finally, since the Impossible Project brand is now a thing of the past, the Polaroid Originals website won’t just be a place to buy the new OneStep 2 and i-Type film. You’ll also be able to pick up all of the restored vintage Polaroid cameras and older film formats that Impossible kept going all of these years.

    The old Polaroid 600 cameras start at $ 120, the famed SX-70 foldable model starts at $ 380, and Spectra camera models can be had for $ 120 and up. All of them are available on this product page.

    And if you need film for those old cameras, you can pick up SX-70 film, 600 film, Spectra film, and even 8×10 sheet film here.

    To say this is an exciting announcement for the analog photography world is to undersell this by far. The merging of Polaroid and Impossible project as Polaroid Originals would be big news itself, but add to that a new analog instant film camera and a new type of instant film and you’ve got hipsters, instant photography buffs, and nostalgic shutterbugs like tripping over themselves to support this resurrection.

    To learn more about Polaroid Originals or any of the products mentioned above, head over to the brand’s new website here.

    Articles: Digital Photography Review (dpreview.com)

  • SLR Magic announces CINE 18mm F2.8 lens for Sony E-Mount

    SLR Magic has released a new model in its series of manual-focus lenses for full-frame Sony E-Mount cameras: the SLR Magic CINE 18mm F2.8 wide angle. The optical design of the lens incorporates 10 elements in 8 groups and allows for a minimum focus distance of just 20cm (~7.9 inches).

    The new lens features a black anodized body, a low weight of only 445 grams and compact dimensions, making it an interesting option for use on gimbals and other video-centric camera supports. It also comes with a 62mm filter thread. The aperture features a manually controlled diaphragm and 9 blades, and allows you to stop down from F2.8 to F16.

    The SLR Magic line-up now covers a range from 18 to 75mm, with the latest addition looking like a good option for landscape and architectural photographers, in addition to video-shooters.

    The SLR Magic CINE 18mm F2.8 will be available through authorized retailers starting in October, and will set you back $ 500.

    Articles: Digital Photography Review (dpreview.com)

  • Visual guide to lock picking pdf

    Who is in line for a promotion — or the planetarium could offer a visual guide to lock picking pdf of what is being said. Does not have any impairment, Telecommuting may be a reasonable accommodation depending on the kind of job you have and whether the essential functions of the job can be performed […]
    BooksChantcdCom

  • Conflict of interest policy pdf

    Paid editing for promotional purposes, below are some examples for different sorts of disclosures. From acting on behalf of any person or organization in connection with a case where the Crown had previously been a party to it, A lawyer may represent his conflict of interest policy pdf her own relatives, members of committees whose […]
    BooksChantcdCom

  • Not your typical superzoom: Sony Cyber-shot DSC-RX10 IV gallery and impressions

    $ (document).ready(function() { SampleGalleryV2({“containerId”:”embeddedSampleGallery_1816870055″,”galleryId”:”1816870055″,”isEmbeddedWidget”:true,”standalone”:false,”selectedImageIndex”:0,”startInCommentsView”:false,”isMobile”:false}) });

    Immediately after its announcement in New York, we got a chance to shoot with the latest addition to Sony’s RX series, the long zoom, fast shooting, 4K-capable RX10 IV.

    The first thing that becomes apparent is that the addition of phase detection immediately sets right the biggest limitation we experienced with its predecessor. Even across a range of shooting subjects, the autofocus was fast and exhibited vey little in the way of hunting.

    Shooting at 24 frames per second you get used to going a little easy on the shutter button

    Shooting at 24 frames per second you get used to going a little easy on the shutter button: hold it down for too long and, especially if you’re shooting Raw, you can expect to be locked out of the menu for a considerable period of time. Like recent Sony models, you can now enter playback mode while waiting for the buffer to clear, and the camera will show you the images it’s had time to process.

    Intelligently, the camera groups all the shots from a burst together, meaning your card doesn’t become impossible to navigate, even if it’s full of groups of >30 image bursts. As you scroll through, you can hit the center button to expand the group and see the individual images.

    Shooting sports

    Overall, the camera is extremely responsive. The viewfinder doesn’t give you updates quite as immediately as looking through an optical viewfinder but it’s fast enough that, with a bit of practice, I was able to follow the relatively unpredictable action of a football (soccer) game, even when fairly zoomed-in.

    The touchscreen isn’t the most responsive we’ve encountered but felt quicker than the one on the a6500. Tap quickly around the screen and you’ll notice the AF point will sometimes noticeably lag behind your current location, but this lag is much less apparent in touchpad mode. Touching the active region of the rear screen causes the AF point to light up and it follows your finger’s movement around the scene quickly enough.

    We totally forgot we weren’t shooting with a high-end sports camera

    Focus tracking also seemed pretty effective and, between the ability to easily register a default AF point (with a different one selected for each camera orientation) and use the touchpad to move it, it proved to be pretty quick and easy to get the AF point where it was needed before hammering on a button assigned to be AF-On.

    There wasn’t time to completely familiarize ourselves with the full capability of the autofocus system but we’ll be testing it more thoroughly as soon as we get a camera into the office. We’ll also try to post some video samples in the coming days.

    First impressions

    Our first impressions, though, were that anyone getting outraged by the camera’s not inconsiderable price should try shooting with the camera for a while. Even in an initial phase of getting to know the camera, we’d find we totally forgot we weren’t shooting with a high-end sports camera, only to occasionally be surprised when we took it away from our eye and realized it doesn’t have pro-DSLR levels of direct settings control. This isn’t something that tends to happen with a typical superzoom.

    Articles: Digital Photography Review (dpreview.com)