Blog

  • How to Plan a Street Photography Shoot When Traveling

    Street photography is normally a very open and free-form photography genre, but sometimes because we are traveling it’s better to plan a shoot rather than relying on luck.

    Fortune, they say, favors the prepared, and when all you have is a few hours in a new land, better get ready to make the most of what you’ve got. Makes sense, no? Here’s how I prepare a street photography shoot when I know time will be limited.

    What to do a few days before

    A few days before your shoot you will need a few apps and tools.

    The first is an offline map, Google Maps allows you to save chunks of the map but some areas are off limits (I tried to save a map of Osaka and wasn’t allowed). You need to find apps that have offline maps from the get-go and download the map of the area where you are going. It sounds stupid and you might be tempted to skip this part, but when I went to Hong Kong, I wasted an hour and a half trying to get out of the subway area into the main roads.

    How to Plan a Street Photography Shoot When Traveling

    The second app you need is called the Photographers Ephemeris (iOS / Android). It’s designed for landscape shooters but it’s also useful for street photographers because it allows you to know where and when the sun will rise and set. It tells you what to expect in terms of light. It is a paid app, but alternatively, you can get that information for free online.

    This is very useful information that you can use to predict what camera/lens you may require also. No need to get your high ISO camera if you plan to leave before the sun sets, for example.

    How to Plan a Street Photography Shoot When Traveling

    Planning your shoot

    Here’s the deal, if you had all the time in the world, you would stroll and go wherever you feel images are calling you. But you don’t, probably one or two days is all you have while traveling. So you need an idea of where to go while leaving things open to opportunity and chance as well.

    1- Check the weather

    Don’t miss this step! It may sound stupid but this not only allows you to plan ahead and might tell you to bring extra protective gear. I usually check the day before because the weather is very unreliable and the forecast can change quickly.

    How to Plan a Street Photography Shoot When Traveling

    2- What are your numbers?

    You need to know when you are arriving and leaving. For example, imagine you are arriving at 8 pm and leaving at 4 pm the next day. What I recommend first of all is to set an alarm that tells you when to start and stop shooting, it usually takes an hour to get situated so I would set an alarm for 9 pm and 3 pm the following day. You need to figure out the amount of time it takes to get from the airport to where you are staying and to return again. I personally have an alarm for when to eat too.

    While this might sound tedious, it gives you the freedom to shoot because it will tell you exactly when to start and when to stop, and you do not have to worry about it. When traveling you have no familiar bearings so the alarms get you grounded.

    How to Plan a Street Photography Shoot When Traveling

    Consider your arrival time

    The other reason for knowing your numbers is knowing what you can expect. Remember the information you got from Photographer’s ephemeris or online. When are the sunrise, midday, and sunset?

    Let’s say sunset is at  7 pm and sunrise at 7 am. If you are arriving at 8 pm you would know that you will arrive at night. So if you want to shoot the morning light, you need to wake up before 7 am and you know that you will miss the sunset. This kind of information will tell you what kind of light you can anticipate. But you also need to know where you are going.

    How to Plan a Street Photography Shoot When Traveling

    Where to go

    When going somewhere new, I try to find the population centers and busy streets. So I google “[city name here] busy street” look at the results, and try to find the names of the busiest streets. It’s not magical, it’s probably overshot but where there are more people, usually there are interesting shots. Here are my results using Hong Kong as an example.

    How to Plan a Street Photography Shoot When Traveling

    Note: This is where you want to google according to your project and style. If you have a project with businessmen, you want to find out where the central business district is for example.

    When looking for populated areas, there is usually a long stretch of road that is popular that provides great opportunities. For example:

    • Market Street in Philadelphia
    • Times Square in New York
    • Dotonbori in Osaka
    • Ocean Drive in Miami
    • Gangnam in Seoul
    • Nathan road in Hong Kong

    Then I map out how to go there from the airport. When you know your times and where to go, you have a clearer idea of what you can expect. All of your energy is saved for shooting and not figuring things out when you arrive. Like I said above, after sweating like a pig trying to get out of the subway area in Kowloon, Hong Kong, it zapped my energy levels greatly. I doubled down on coffee.

    How to Plan a Street Photography Shoot When Traveling

    Use your gathered information wisely

    It takes some experience but after a while, you start to know what to expect with all the information gathered. In the morning, you know what direction to be in to shoot the sun or have it at your back. You know when stores will start opening and people go to work. Knowing where you are going will help with your expectations. For example, if there are a lot of high-rises that will create shadow areas.

    Knowing what time night falls will tell you when street vendors will start to close, the light from stores will create a new light source, or when to pull out a flash if that’s your thing.

    How to Plan a Street Photography Shoot When Traveling

    Protection

    You have to be careful. What you believe is a camera is someone else’s next meal for a month. Population centers and busy streets are opportunities for street photographers but also for street thieves. It depends on where you are going, some places are safer than others. I like the anti-theft Pacsafe brand, but you can make yourself less pick-pocket friendly if you turn your backpack and hold it against your belly.

    Also, don’t flaunt your camera if you know you are going somewhere there are lots of pick-pockets. You have to be careful not to damage the camera, but some tape is perfect to uglify the camera. And as much as you can, avoid backpacks and bags that scream “camera bag”. It immediately flags you as having a camera.

    How to Plan a Street Photography Shoot When Traveling

    Conclusion

    There you have my system for how to prepare for a travel street photography shoot. I would be the first to say that it’s better to go somewhere and leave things open, but sometimes that’s just not a good use of your time when you only have a few hours or days to shoot somewhere. It’s better to prepare and then leave things open. Be yourself, stay focused and keep on shooting.

    The post How to Plan a Street Photography Shoot When Traveling by Olivier Duong appeared first on Digital Photography School.



    Digital Photography School

  • Kodak PixPro Orbit360 4K VR camera now on sale in the US

    The 360-degree camera Kodak unveiled at Photokina 2016 is now available to buy in the US. The PixPro Orbit360 is a rugged, compact action camera with a pair of 20MP sensors, one on the front and the other on the back, joining by two curved 155-degree and 235-degree lenses, a microSD slot for storage, a 1″ LCD, and an included selfie stick (depending on bundle).

    JK Imaging, the company behind the camera, designed the PixPro Orbit360 to be rugged for outdoor use. The camera has an IP6X dustproof equivalency, an IPX5 splashproof equivalency, a shockproof design able to withstand drops from 2m / 6.6ft when using the lens cover, and the camera is also freeze-proof to temperatures as low as -10C / 14F.

    The PixPro offers users three recording modes: a fully 360-degree spherical mode, a 235-degree ‘dome’ mode, and a 197-degree 4K Ultra-Wide mode. It works with a related mobile app (Android | iOS) that makes it possible to directly upload the PixPro’s videos to YouTube and Facebook.

    The camera’s full specs sheet is available here.

    The Orbit360 is being sold in the US through the Kodak PixPro website and through Amazon.com. It $ 500 USD in the “Adventure Pack” (arriving later this year) and $ 550 USD for the “Satellite Pack” (available now). The Satellite Pack includes some accessories not included with the Adventure Pack, such as the aforementioned selfie stick.

    Articles: Digital Photography Review (dpreview.com)

  • Pop-Up Pavilions: 15 Playful Temporary Architecture Installations

    [ By SA Rogers in Architecture & Cities & Urbanism. ]

    Pavilions are like playgrounds for architects and designers, allowing them to show off what they can do when they really set their imaginations free. Unfettered by the typical limitations of a permanent structure, they can experiment with new materials and processes, potentially producing innovations they can apply to other structures. These pavilions are often subversive in the urban environment, too, taking over public spaces and giving them back to the people or creating micro housing that falls within grey areas of the law.

    Transforming Street Cinema in Venice by Omri Revesz


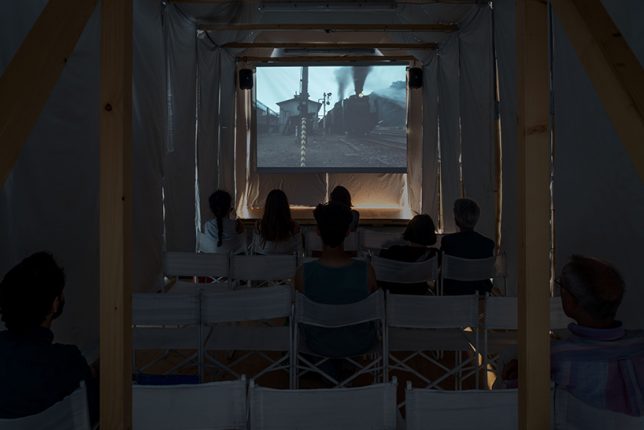
    Created for a V-A-C Russian contemporary art foundation exhibition at the Venice Film Festival 2017, this pop-up cinema celebrated the 100th anniversary of the start of the Soviet Revolution. The modular wooden structure is collapsible, its design inspired by the logic of Russian constructivism. Its wooden frame is on wheels set into rails so it can expand to make more space for performances, or contract to create a darker, more intimate setting.

    Algae Dome in Denmark by SPACE10

    IKEA’s ‘Future living lab,’ known as SPACE10, debuted its ‘Algae Dome’ in Denmark a couple weeks ago, demonstrating how we might be able to grow “the supercrop of the future.” Designed by a team of engineers, the dome-shaped structure supports a network of transparent hoses, regulating their sun exposure so algae grows in the water inside them. The dome produced 450 liters of microalgae in just three days of its demonstration, which SPACE10’s chef crafted into such foods as ‘spiraling chips.’

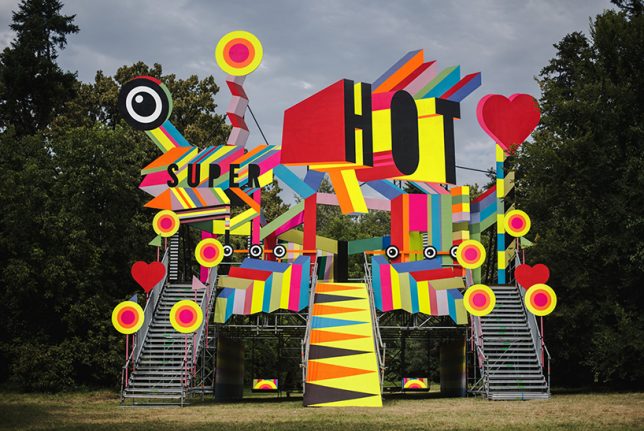
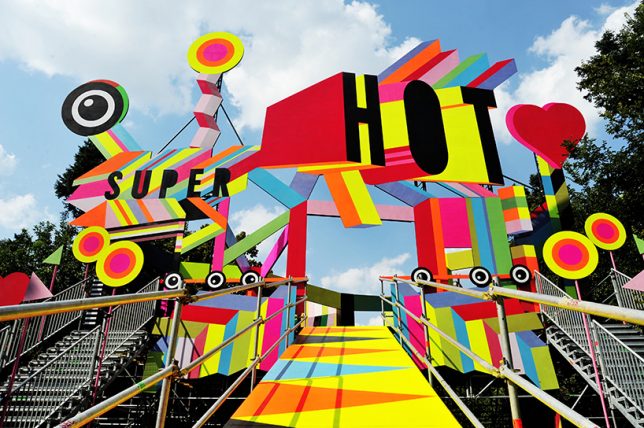
    Super Hot Pavilion in Bucharest by Morag Myerscough

    Designed for the 7th edition of the ‘Summer Well Festival’ in Bucharest, Romania by artist Morag Myerscough, the ‘Super Hot’ pavilion is envisioned as a fun and whimsical place to stage and take in performances. There’s space within the structure to hang out, dance, play or zoom down a slide.

    Wave of Buckets in Mexico City by Factor Eficiencia

    Hundreds of painter’s buckets are connected into a walkable structure that curls up into a wave at either end, occupying the central Alameda Park in Mexico City. Designed by Factor Eficiencia and 5468796 Architecture, the installation uses the bucket as a symbol of liberation of public spaces. In Mexico, it’s common for entrepreneurs to use buckets to block off certain areas of the city so they can aggressively charge for parking.

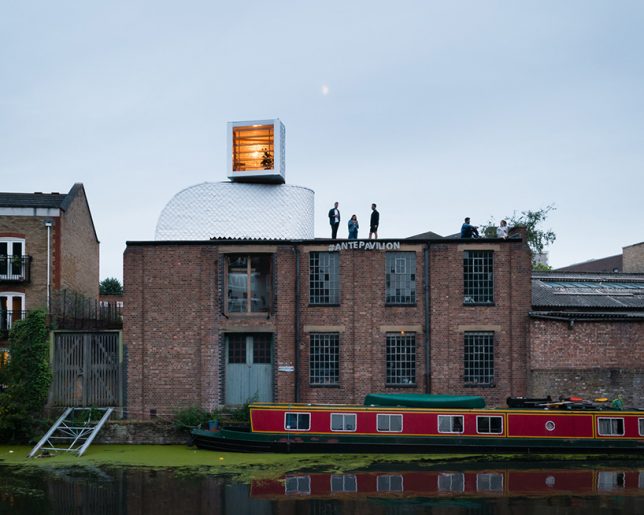
    Urban Camouflage Pavilion in London by PUP Architects

    PUP Architects wanted to disguise their pop-up, entitled ‘H-VAC,’ as ordinary rooftop mechanical equipment. Do you think they pulled it off? The designers are taking advantage of UK building legislation that makes it legal to install rooftop equipment without planning permission; they believe that if you can sufficiently disguise rooftop addition as infrastructure, thousands of new micro dwellings could be added to London and other cities. The temporary structure is clad in waterproof tetra-pak shingles and includes two rooms.

    Next Page – Click Below to Read More:
    Pop Up Pavilions 15 Playful Temporary Architecture Installations

    Share on Facebook


    [ By SA Rogers in Architecture & Cities & Urbanism. ]

    [ WebUrbanist | Archives | Galleries | Privacy | TOS ]


    WebUrbanist

  • Enter to Win Corel PaintShop Pro 2018 Ultimate

    Win a $ 500 gift card and a Corel software package – PaintShop Pro 2018 Ultimate, AfterShot Pro 3, VideoStudio Ultimate X10 and ParticleShop. Boom!

    Enter the Corel “Colors of Fall” photography contest today!

    Over the last few years here at dPS, we’ve run very some very popular competitions with our partners to give away some of their great photographic products to lucky dPS readers.

    We are lucky enough to be able to do it again now.

    Three Prizes

    For this competition, Corel is giving away, as the grand prize, a $ 500 gift card and a Corel Software Package. The second place winner will receive a full Corel software package and the third place winner will win a copy of PaintShop Pro 2018 Ultimate.

    The software package includes PaintShop Pro 2018 Ultimate, AfterShot Pro 3, VideoStudio Ultimate X10 and ParticleShop.

    These prizes are designed to help every level of photographer create BETTER pictures. Since 1989, with the introduction of CorelDRAW, Corel boasts a range of award-winning products that includes graphics, painting, photo, video and office software with a community of over 100 million strong. Each prize will be won by a different dPS reader.

    Enter to Win Corel PaintShop Pro 2018 Ultimate

    All three prize winners will receive the full version of Corel’s leading photo editing and graphic design software – A $ 99.99 value!

    * Special Offer – All dPS readers will receive 10% discount on PaintShop Pro 2018 Ultimate

    Get Photoshop-like results for less with PaintShop® Pro 2018 Ultimate including a faster, easier PaintShop Pro and an exclusive bonus collection of premium software you won’t find in Photoshop. Turn photos into works of art with Painter® Essentials™ 5, automatically correct images with Perfectly Clear 3 SE, and edit RAW photos quickly with Corel® AfterShot™ 3.

    • Edit photos like a professional
    • Create unique graphic design projects
    • Turn your photos into works of art
    • Enhance your photos instantly
    • Work with RAW images
    • Simplified user interface

    Enter to Win Corel PaintShop Pro 2018 Ultimate

    Enter to Win Corel PaintShop Pro 2018 Ultimate

    Learn a little more about PaintShop Pro 2018 Ultimate here.

    How to Win

    To win this competition you’ll need to:

    1. Download a free trial of PaintShop Pro 2018
    2. Edit your favorite “Colors of Fall” photo, using PaintShop Pro 2018
    3. Post your “Colors of Fall” photo, along with a few words on how you feel PaintShop Pro 2018 Ultimate would help your photography and, of course, a few words about your “Colors of Fall” photo. It’s as easy as that!

    Do this in the next 21 days and on October 9, 2017, the team at Corel will choose the three best photos and comments, and we will announce the winners in the following days.

    The deadline to enter is October 8, 2017, Midnight PDT. Photos and comments left after the deadline will not be considered.

    Note: By entering the “Colors of Fall” photo competition, the Entrant is providing permission to Corel to publish their photo, if it is chosen as a winner, to be utilized within media post/s by Corel announcing the winners and promoting. Entrants will be provided a full photo credit if a photo is used, and will retain their copyright.

    Please click HERE for full contest rules, terms and conditions.

    By best – we’re looking for people who understand photography post-processing, and how PaintShop Pro 2018 Ultimate may best suit your needs. So you’ll need to check out the product page to put yourself in the best position to win. Don’t forget that to grab a free trial download.

    There’s no need to write essay length comments to win – but we’re looking to hear what you like about the software and how it would help your development as a photographer. Don’t forget to include your “Colors of Fall” photo that you edited with PaintShop Pro 2018. We encourage you to have fun and be creative!

    This competition is open to everyone, no matter where you live – but there is only one entry per person. To enter – simply leave your photo and comment below.

    Note: By entering the “Colors of Fall” photo competition, the Entrant is providing permission to Corel to publish their photo, if it is chosen as a winner, to be utilized within media post/s by Corel announcing the winners and promoting. Entrants will be provided a full photo credit if a photo is used, and will retain their copyright.

    Enter to Win Corel PaintShop Pro 2018 Ultimate

    Disclaimer: Corel is a paid partner of dPS.

    The post Enter to Win Corel PaintShop Pro 2018 Ultimate by Darlene Hildebrandt appeared first on Digital Photography School.


    Digital Photography School

  • Tamron developing lightweight, compact 100-400mm F4.5-6.3 lens

    Third-party lens maker Tamron has officially announced that it is working on a new tele-zoom lens for full-frame cameras: the 100-400mm F/4.5-6.3 Di VC USD (Model A035).

    Thanks to the use of magnesium in key areas of the barrel, Tamron claims the lens is both durable and, weighing in at just 1.12kg, the lightest in its class. The optical design incorporates three low dispersion elements to control chromatic aberration and Tamron’s eBAND (Extended Bandwidth & Angular-Dependency) coating to minimize reflections and flare.

    Tamron also included a high-speed Dual MPU (Micro-Processing Unit) control system, which works in conjunction with Tamron’s Ultrasonic Silent Drive focusing motor to deliver AF speed and precision.

    The lens will be compatible with Tamron’s 1.4X teleconverter and the Tamron TAP-in Console that lets you fine-tune and adjust focus and stabilization, among other parameters. An Arca Swiss compatible tripod mount will be available as an optional accessory.

    If everything goes to plan, the 100-400mm F/4.5-6.3 Di VC USD will be available by the end of 2017 in Canon and Nikon mount versions.

    Press Release

    Tamron announces the development of a new ultra-telephoto
    zoom lens with superior image quality, advanced features
    and lightweight, compact design

    100-400mm F/4.5-6.3 Di VC USD (Model A035)

    September 15, 2017 – Commack, New York – Tamron USA, Inc. announces the development of a new ultra-telephoto 100-400mm F/4.5-6.3 Di VC USD zoom lens (Model A035) for full-frame DSLR cameras. The advanced optical design of Model A035 includes 3 LD (Low Dispersion) lens elements for greater aberration reduction and Tamron’s original eBAND Coating for superior anti-reflection performance.

    At 39.3 oz., the new lens is the lightest weight in its class[1] and features magnesium material in key areas of the lens barrel to improve weight reduction, strength and portability.

    The Model A035 delivers fast and precise autofocus performance and consistently powerful VC (Vibration Compensation) benefits thanks to the high-speed Dual MPU (Micro-Processing Unit) control system that is found in the latest Tamron lens models.

    Model A035 is fully compatible with Tamron’s 1.4X teleconverter and the Tamron TAP-in ConsoleTM that enables lens customizations for focus adjustments, VC mechanism adjustments and more. Additionally, an Arca Swiss compatible tripod mount is available as an optional accessory.

    This combination of features and optional accessories join to create a lens that photographers everywhere will enjoy using in various shooting situations, including low-light conditions that require handheld operation as well as those where convenient attachment to a tripod is preferred.

    [1] Among 100-400mm F/4.5-6.3 lenses for 35mm full-frame DSLR cameras (As of September 15, 2017; Tamron)

    PRODUCT HIGHLIGHTS

    1. 3 LD (Low Dispersion) lens elements effectively compensate for axial chromatic aberrations, a potential issue for ultra-telephoto lenses, and other various aberrations.
    2. eBAND (Extended Bandwidth & Angular-Dependency) Coating, with superior anti-reflection performance to eliminate flare and ghosting, provides flawless, crystal clear images.
    3. High-speed Dual MPU (Micro-Processing Unit) control system delivers quick and highly responsive autofocus performance and outstanding vibration compensation.
    4. Lightest weight (39.3 oz.) lens in the ultra-telephoto zoom lens category.
    5. Optional accessory tripod mount is Arca Swiss-compatible.
    6. MOD (Minimum Object Distance) of 59″ and maximum magnification ratio of 1:3.6
    7. Moisture-Resistant Construction and Fluorine Coating for weather protection
    8. Fully compatible with 1.4X teleconverter and TAP-in ConsoleTM

    Articles: Digital Photography Review (dpreview.com)

  • Review and Field Test of G-Technology G-Drive ev ATC Portable Hard Drives

    As photographers, keeping our data safe is of the utmost importance. Being able to trust your hard drives to work and survive all types of conditions and hardships is something to consider. As a wildlife photographer, I often find myself out in the elements, and when traveling, my gear has to put up with the rugged nature of travel, while still being ready to work when called upon. Recently I have been putting the G-Technology G-Drive ev ATC hard drives through their paces and I think these might just be one of the best rugged and solid ways to keep data safe on the move.

    Review G Technology G Drive ev ATC Portable Hard Drive

    G-Drive ev ATC hard drive features

    The ATC is part of the G-technology ev series, a set of drives offering a simple workflow from the field to the studio. The ATC builds upon the standard RaW and ev drives by adding a polycarbonate protective shell to the main drive offering protection from bumps, dust, sand and even full submergence in water to keep your drive and data safe.

    The case itself is solid – the simple blue and black design that is stylish and bright enough to easily find in dark conditions. The polycarbonate shell feels very solid in the hand and fits the drive like a glove. It seals closed with a latch system that might seem flimsy, but offers a solid click and seal to ensure the drive is closed off from the elements.

    G-Drive ev ATC hard drives - The G drive inside the ATC case

    G-Drive ev ATC hard drives Locking mechanism for waterproof closure

    The G-Drive ev ATC comes in two varieties, offering Thunderbolt or USB-3 connections for your chosen device. The cords are built into the case itself so you don’t need to worry about forgetting them, a really well thought out design. Of course, the case adds an extra amount of bulk to the setup that might be a problem for those photographers wanting to keep things as small as possible, but personally, I think the extra size is a worthy trade off for the added protection.

    Testing the drives during travel

    Testing the drives out, they have accompanied me on a few international trips, coming as my primary and backup drives for work in the Falklands, Canada, and Finland. On each trip I have worked with two drives, keeping one as a primary and the other as secondary backup. The fast data transfer speeds were great, 1GB of data transferred in less than a minute over USB-3 meaning backups were swift and simple.

    On returning flights keeping data separate is important (in case of a lost bag) and I had no worries about packing one of these with the G-Drive ev ATC hard drives into my checked baggage, knowing the solid construction would keep it protected from any rough handling from the dreaded baggage handlers! On all of my trips, the hold drive never skipped a beat, being ready to upload as soon as I got home to my office.

    G-Drive ev ATC hard drives Using the internal drive with the EV docking station

    The drive easily pops out and can be inserted into the G-Dock for easy file transfer back home.

    In the office the workflow is simple. Popping the drives out of the housing I can easily slot them into the Ev docking station (called G-Dock) that gives me Thunderbolt speeds to upload images directly to my main drives for editing, backup and archiving. The ease of being able to just slot in one drive saves faffing around with multiple SD and CF cards again, keeping my workflow streamlined.

    Extreme testing

    To further test the drives I wanted to put them through the mill so I decided to rough them up with some real world testing. Grabbing one of the drives in the ATC case I took it out onto location and basically treated it like I didn’t care it was full of precious data. Dropping it onto the ground, into muddy puddles and even throwing it into my local river before rescuing it again down stream.

    G-Drive ev ATC hard drives Tested in the dirt and mud without a hitch

    Each test was passed with flying colors and even after fully submerging the drive underwater with my hand for a minute, it was in perfect working order. Of course, one problem with the drive is that you do need to check that everything is latched down. Human error, not fully closing the latch or getting something stuck into the gasket could compromise the waterproofing and seal, so it’s best to always be careful. I mean I doubt too many of us regularly throw our drives in a river intentionally…

    G-Drive ev ATC hard drives Underwater isnt a problem for the ATC

    As a drive, they are built solidly, but one area that I feel would be a great improvement is the use of SSDs rather than normal disk drives. Including an SSD would just add another level to the rugged nature of the drives making them even more durable for life on the road, while also giving faster transfer speeds. This would be especially useful for those editing and working with video files on the move as well.

    As a photographer, G-Drive ev ATC hard drives suit my needs very well. The large 1TB hard drive easily has enough storage for a long photo shoot on location and with the protective shell offering great durability to my drives I am sure they will be part of my workflow for many years to come.

    The post Review and Field Test of G-Technology G-Drive ev ATC Portable Hard Drives by Tom Mason appeared first on Digital Photography School.

    Digital Photography School

  • Western Digital’s new 12TB hard drive offers lots of storage and class-leading reliability

    Western Digital is upping the internal storage ante with a new WD Gold drive that measures in at a whopping 12TB. The new WD Gold 12TB is a twelve-terabyte 7200RPM 3.5″ SATA 6Gb/s hard drive with the company’s 4th-gen HelioSeal, a technology that seals the drive with Helium to improve efficiency and reliability.

    Western Digital is marketing the drive at IT managers, enterprises, and similar, but it is suitable for anyone who have a large amount of data to store… hint hint.

    This 12TB model is the latest expansion in Western Digital’s WD Gold drive lineup, which also offers 8TB and 10TB capacities with 256MB cache, and even lesser capacities (down to 1TB) with 128MB cache. The drive stands out among other 3.5″ HDDs, according to Western Digital, because of its 550TB/year workload rating. Other features include enhanced RAFF tech to protect against vibrations, time-limited error recovery, real time fly height adjustment, and compatibility with all major desktop operating systems.

    In other words: lots of storage meets class-leading reliability.

    The WD Gold 12TB hard drive is available now from Western Digital for $ 522 USD.

    Articles: Digital Photography Review (dpreview.com)

  • Tips for Why and How to do Wildlife Photography at Eye-Level

    Wildlife photography is all about creating a connection with the subject and with your audience. One of the key components of your wildlife images is how well they capture the audience’s attention. One of the most effective ways to do that is to try and get down and shoot at eye-level with the subject. Please note that eye-level need not necessarily mean ground-level always. You could have a subject on a tree, rock, etc., so it’s not always essential to be at the ground-level but being at eye-level really helps.

    What’s the difference?

    Let’s see what difference is in an image when you shot from eye-level of the subject.

    Taken from a car.

    Taken at eye level on the ground.

    Purely from an attention grabbing perspective, this renders the background totally blurred thus restricting the number of points vying for attention. As is seen in the image above, the image when taken from eye-level helps in drawing attention directly to the bird. Why does this happen, though? What causes the background to blur out?

    The background is affected

    Often in my workshops and tours, I suggest people that they should ask “Why?” for all concepts and tips. For the eye-level approach to wildlife photography, I again ask, “Why does this result in getting a cleaner background?” The answer might be obvious to a lot of you but for those others who are just starting their journey as photographers, the following question might help.

    Ever you ever searched for a tiny thing like an earring or a needle on the floor?

    The obvious approach is to immediately get down to ground level and rest your head on the floor. But why does that help? It helps simply because by changing your perspective you change the distance between the subject and the background. The greater this distance, the greater the chance there is of the shallower depth of field coming into play and that of the subject standing out.

    Take the images above for example. The following illustration will show the difference in terms of background for both..

    Tips for Why and How to do Wildlife Photography at Eye-Level

    In the illustration where the photographer is standing up, the background consists of the ground immediately behind the bird. The less the distance between subject and background, the lesser the blur of the background is achieved.

    Where the photographer is lying down, the background is almost infinity (a significant distance away from the bird). The greater the distance between subject and background, the more blur of the background can be achieved.

    With that rule understood, you will be able to apply it in the field that much better. Here are a few more examples of eye-level wildlife photography.

    Tips for Why and How to do Wildlife Photography at Eye-Level

    Tips for Why and How to do Wildlife Photography at Eye-Level

    Tips for Why and How to do Wildlife Photography at Eye-Level

    Tips for shooting wildlife photography at eye-level

    Now that we have established the advantage of going to the eye-level of the subject, let’s take a look at a few ways to go about doing that.

    Getting to the eye-level

    #1 Get yourself flat on the ground

    This is the easiest to do, as you just have to lie down, right? Well, I wish it was just that. If you are in a vehicle and are close enough to the subject, then try to get down on the ground with minimal to no noise and generally very slowly. Try and make moves only when the subject is looking away. Once you are flat on the ground, try not to make a lot of burst shots immediately. Let the subject get accustomed to you first.

    #2 Get the vehicle at eye-level

    Take a look at the image below. It is a pair of lions in the African savannah.

    Tips for Why and How to do Wildlife Photography at Eye-Level

    Quite often, wildlife photography is done in reserves or national parks, where getting down from the vehicle is not allowed. So what can you do in such scenarios? This is where your field-craft comes in handy. Know your subject and you will be able to predict its movement.

    For example, take a scenario where you have a big cat walking on a road (they seem to like doing that don’t they?). You could either stop where you are and fire-off a few shots. OR you could take a moment to evaluate the animal’s potential path and wait at a location where the road is slightly lower than where you are currently situated. A lower elevation for the vehicle would ensure a better connection with the subject when it walks towards you. Take a look at the simple sketch below to give you an idea.

    Tips for Why and How to do Wildlife Photography at Eye-Level

    #3 Crawl

    This one has to do mostly with shooting on the beach. If you are into shorebird photography quite often you will find yourself on a sandy beach because those are the areas where your subjects are found. It is generally not very easy to get up-close to these guys using your vehicle so you have to start crawling from a safe distance.

    I have noticed that shorebirds allow you to get really close-up as long as you are willing to put in that effort to crawl and not rush in on them. Here is an example of the result of a 50-foot crawl.

    Tips for Why and How to do Wildlife Photography at Eye-Level

    Yes, get those elbow and knee guards ready because it isn’t the easiest thing to do. Especially if you are carrying a big lens around. A contraption like the ground pod helps a lot in this situation to push the gear easily.

    #4 Standing up

    Sometimes, when you are in a vehicle, getting to eye-level might simply mean standing up. Look at the following two images. Both clicked at the same spot, one while I was sitting down and the other when I decided to get up to eye-level.

    Tips for Why and How to do Wildlife Photography at Eye-Level

    Tips for Why and How to do Wildlife Photography at Eye-Level

    It makes a world of a difference right? Now please remember that even when you are doing a simple thing like standing up, you need to be very cautious and slow in your approach. Wildlife does not like sudden movements, it spooks them.

    Getting ready for eye-level

    As with everything in photography, practice makes life much easier in the field, so here is my advice for the eye-level approach. Initially just try it without the camera. See if you can understand the mood of the subject. Remember, make no alarming or sudden movements and be as quiet and slow as possible.

    Once you are able to do this with a certain degree of success, you are ready to then bring out the camera gear and give it a go. Remember, this is quite a lot like being a predator. You will not have a 100% success rate. Just make sure that when you succeed, you make full use of it. What I mean is, make sure that before you get down on the ground, you have chosen the spot well for a good background and you have taken into account the light on the subject.

    So get out there, and practice and share your wildlife photography eye-level images.

    The post Tips for Why and How to do Wildlife Photography at Eye-Level by Rahul Sachdev appeared first on Digital Photography School.


    Digital Photography School

  • Nikon Director of Development: ‘If Nikon will go mirrorless, it must be full-frame’

    Photo by Joseph Chan

    We’ve known for some time now that Nikon is working on a mirrorless camera—in fact, Nikon confirmed this to DPReview directly. But one question has remained tantalizingly unanswered: will it be a full-frame system, or simply an evolution of the old 1-inch Nikon 1 system?

    The answer, at least according to one high-level Nikon director, seems to be what we were all hoping for. The mirrorless camera will be full-frame.

    This information came to light in an interview with Tetsuro Goto, Director of Laboratory Research and Development at Nikon Japan, who told Chinese website Xitek that, “full frame is the trend. If Nikon will go mirrorless it must be full frame.” A statement that immediately set the photography world on fire with speculation.

    You can read the full translated interview at this link. Most of it focuses on the Nikon Df and other topics, but page 4 of the interview begins to cover new ground including competition from Sony, Fuji, and the like, and the future of Nikon mirrorless. The other, slightly controversial statement shared by Mr. Tetsuro during the interview had to do with Nikon’s market share and penetration vs the competition (translation courtesy of Nikon Rumors):

    Nikon customer base is very broad, from novice to enthusiasts to prosumer to professional, that’s Nikon’s advantage. Olympus, Sony and Fujifilm can only cover a small part of that. So far there is no professional using their products. So when they develop products, even like retro style, they only try to meet these people and that’s only what they can do. Their customer base is limited anyway so they have limited view in developing products.

    Read the full interview here, and then feel free to go speculation crazy in the comments. We’ll update you as soon as we have something official from our sources at Nikon.


    A Nikon representative was not immediately available for comment at the time of publication. We will update this news story as soon as we have an official response from Nikon USA about Mr. Tetsuro Goto’s comments.

    Articles: Digital Photography Review (dpreview.com)

  • Shopping Block: 20 Deservedly Abandoned British Stores

    [ By Steve in Abandoned Places & Architecture. ]

    These charming British shops and boutiques just couldn’t compete with big box stores but that’s not the only reason they’ve bitten the biscuit.

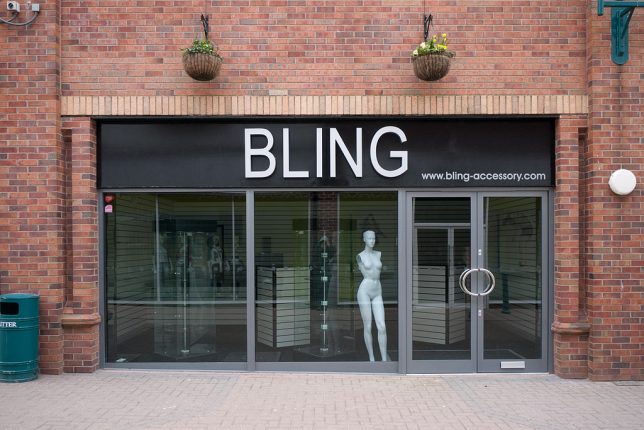
    Why try owning and operating a store selling niche items when Asda (owned by Walmart), Tesco and of course Amazon can stock most of their inventory in a single aisle? While lower prices and greater convenience are welcome benefits of this socioeconomic transformation, the carnage inflicted on Britain’s shopping streets was, is and continues to be staggering. Take “Bling” for example… an abandoned East Yorkshire accessories boutique displaying (as of March 2010) only a broke-ass Venus de Milo surrounded by stripped shelving units.

    Let It Go

    “Fridges, Freezers & Fridge Freezers” could be a follow-up to Monty Python’s legendary Spam sketch – all that Spam, Spam, Spam, Baked Beans & Spam needs to be stored somewhere, amiright? The erstwhile owners of this Doncaster, West Yorkshire kitchen chillling appliances outlet at least had sufficient space on the facade to display their phone number… twice.

    Priceless Characteristics

    Allow us to state right here and now that all of our featured images were captured by Flickr member and urban landscapes photographer extraordinaire leon S-D (littleweed1950). We’ve cherry-picked from well over a thousand eerily beautiful images of closed and abandoned UK shopfronts including the befuddlingly-named “Characteristics and Electrotec” in Bridlington, East Yorkshire. That’s just off the charts, even for Quainte Olde Englande.

    What the heck did this store sell (or at least TRY to sell), anyway? Radios, CBs, “Fancy Goods”… is that last one a euphemism for something? Who can put a price on “Characteristics”? Nobody now, it would seem. In any case, the photographer thought this shopfront was so nice, he visited it twice – in September of 2009 and again in January of 2013. Curiously, though the shop remained abandoned the facade was mildly rejuvenated with a coat of blue-green paint, thus improving its visual characteristics.

    We All Float

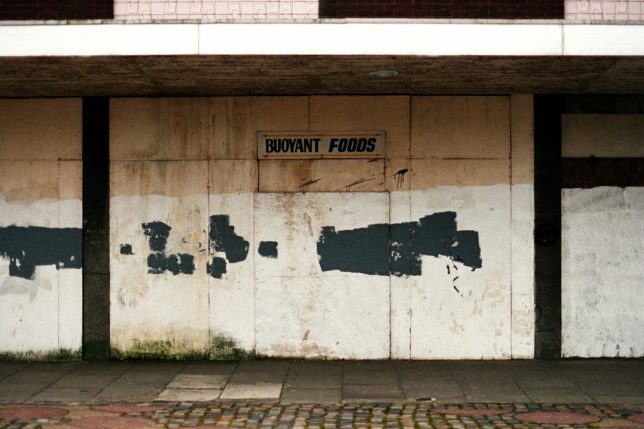
    “I’m going to need to stock up on unsinkable meats and produce,” said no one ever. Seriously, even the captain goes down with the ship and he’s not going to be upstaged by some leftover broccoli. You’ll find the bubbly former “Buoyant Foods” store in Town Centre, Grimsby, Lincolnshire where it looked rather grim in November of 2009.

    Keep Us In Sus-Pants

    Have you noticed that British real estate agents use the term “To Let” on their “for sale” signs? Have you also noticed the two-word phrase looks alarmingly like the one-word er, word “Toilet”? Even more so here in beautiful downtown Scunthorpe, Lincolnshire, where the agent’s typical triangular sign leaves the former store’s name as “S-TY PANTS”. Now what could that really be, hmm? We’re sure the neighboring shop’s sign (“The POO”?) isn’t influencing our thoughts at all.

    Next Page – Click Below to Read More:
    Shopping Block 20 Deservedly Abandoned British Stores

    Share on Facebook


    [ By Steve in Abandoned Places & Architecture. ]

    [ WebUrbanist | Archives | Galleries | Privacy | TOS ]


    WebUrbanist