Blog

  • How to Find Interesting Subjects for Photography in a Boring Place

    One of the common complaints I hear about photography is from people who struggle to find interesting things to take photos of. I understand the frustration. Some people are lucky enough to live in photogenic places that other people have to travel to see. But lots of people live in places where it’s genuinely hard to find interesting subjects for photography.

    So, what do you do when this happens to you? Here are some ideas to help you find interesting subjects and inspiration.

    pink flower - How to Find Interesting Subjects for Photography in a Boring Place

    Food photography

    Okay, I admit that people taking photos of their brunch with smartphones and uploading them to Instagram is getting old. But don’t let this put you off taking food photos at home. The nice thing about food photography is that it combines two hobbies – cooking (or baking) and photography. If you’re a good cook, it could be the perfect subject you.

    There are two sides to food photography. One is the ability to prepare food so that it’s photogenic enough for a photo. The other is to provide the right environment to show the food off at its best.

    If you don’t have what you need already that does involve a small investment. Think chopping boards, wooden tables, hand-made plates, and so on.

    For lighting, nothing more sophisticated than window light is required. But you can also use it as an opportunity to practice your flash skills. I made this photo below using natural light.

    Interesting subject - How to Find Interesting Subjects for Photography in a Boring Place

    Flower photography

    It’s quite possible that you don’t need to look any further than your backyard for an interesting subject. Most people have flowers in the garden. If you don’t, perhaps you know somebody who does. There may also be a park or botanical garden nearby that provides an interesting selection of flowers to photograph.

    To be successful you’ll need to get close to the flowers using extension tubes, close-up lenses or a macro lens. It’s a good way to practice your macro and close-up techniques.

    I made this photo in a local park.

    flowers - How to Find Interesting Subjects for Photography in a Boring Place

    Build a studio

    The advantage of photographing food or flowers is that you can set up your photos indoors. There’s no need to worry about the weather or light, as window light is beautiful enough for both types of photography.

    But why not take it further and set up an indoor studio? It’s possible to create a studio in the smallest of spaces. If you have any doubts about this then check out Nick Fancher’s book Studio Anywhere. It’s full of ingenious tips and tricks for setting up a studio in the tightest of spaces.

    Note you can read more from Nick in these dPS articles:

    • How to Create Dramatic Portraits in Your Garage
    • Making the Most out of the Photography Stuff You Have Already
    • How to Create Dark Moody Low-Key Portraits with Minimal Gear

    Get a model

    Once set up, you need a subject. We’ve already looked at food and flowers, but you can take it a step further by finding local people to model for you. Whether you’re looking for models or characters, friends and family are a good way to start. Once you’ve got a few shoots under your belt – and the start of a portfolio – you can approach other people to see if they’d be interested in taking part.

    I made this portrait using a single Canon Speedlite flash in a 90cm Lastolite softbox.

    portrait - How to Find Interesting Subjects for Photography in a Boring Place

    Start projects

    Feeling inspired yet? My next tip holds the true key to finding interesting subjects in boring places. There’s no better way to become a better photographer than to start a project. They are so good for improving your photography skills that even pros regularly set themselves personal projects.

    Projects can be simple, or they can be complex, expensive and time-consuming. But don’t feel intimidated by grand projects – you can get started with a modestly ambitious project.

    For example, over the last few years I’ve spent time photographing dancers, craftspeople, artists, musicians, parkour and circus performers. Here’s a photo I made recently of a dancer.

    dancer - How to Find Interesting Subjects for Photography in a Boring Place

    The reward of these projects has been twofold. On one hand, I’ve made some interesting photos and portraits for my portfolio. On the other, I’ve met lots of new and interesting people and made new friends. I’ve had experiences that I would never have had if I had not created these projects.

    Reach out to new people

    The great thing about projects is that they give you an excuse to contact people who may be interested in taking part. For example, let’s say you’d like to start a project photographing dancers. There may be local dance schools you can approach or Facebook groups for dancers. You can get in touch, explain your project idea, and ask if anybody is interested in taking part.

    The hardest part is getting started. After your first photo shoot, you will have some photos to show other people. Also, the person you photographed might be able to introduce to other people who could be interested in taking part.

    Projects are a fantastic way of finding interesting subjects to photograph. I’m sure that wherever you live, no matter how boring it may seem, there are people nearby doing interesting things that could make a great photo project.

    I made this portrait of a local singer after getting in touch by email and asking if she’d like to take part in a shoot.

    singer - How to Find Interesting Subjects for Photography in a Boring Place

    Conclusion

    Hopefully, these ideas give you a head start on defeating boredom and finding interesting things to photograph in your area, no matter how boring or uninteresting it may seem.

    Do you have any suggestions for finding interesting things to photograph? Please let us know in the comments, I’d love to hear them.


    If you enjoyed this article and would like to learn more about the creative side of photography then please check out my ebook Mastering Photography. It shows you how to take control of and be creative with your digital camera, no matter what your skill level!

    The post How to Find Interesting Subjects for Photography in a Boring Place by Andrew S. Gibson appeared first on Digital Photography School.
    Digital Photography School

  • Take Your Photography into Hyperdrive with Zoom Blur Photos

    Warning: preg_replace(): The /e modifier is no longer supported, use preg_replace_callback instead in /home/forge/content.photojojo.com/content.photojojo.com/wordpress/wp-content/plugins/ozh-better-feed/inc/feed.php on line 134


    Photojojo

  • Lush Life: 12 Verdant Architecture Projects Making Plants a Main Priority

    [ By SA Rogers in Architecture & Houses & Residential. ]

    Not all architecture incorporating lots of living greenery is doomed to remain an unrealistic rendering, depicting buildings that can’t structurally support the weight of all the soil and water needed to keep full-sized trees alive. Architect Thomas Heatherwick built ultra-strong concrete pillars into his 1000 Trees design, for example. Other buildings take a subtler approach, choosing ivy, potted plants or existing trees rooted in the ground. All of these projects attempt to meld urban architecture with lush gardens in the hopes of cleansing the air, storing CO2 to mitigate climate change and providing enhanced access to green spaces in cities.

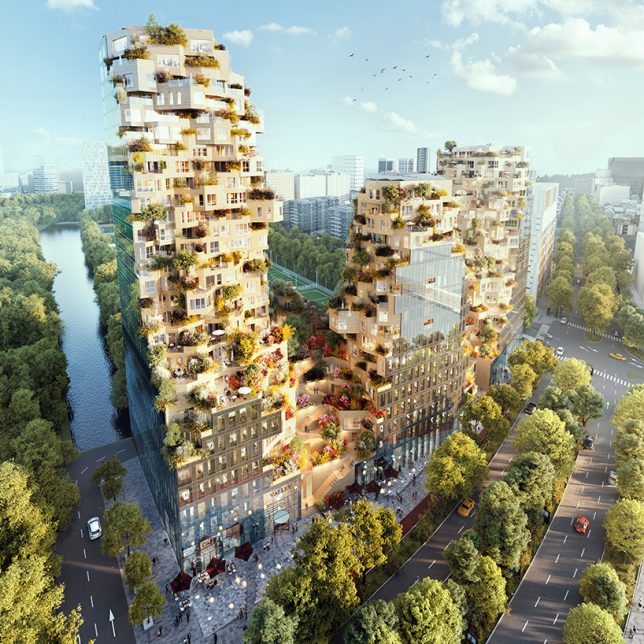
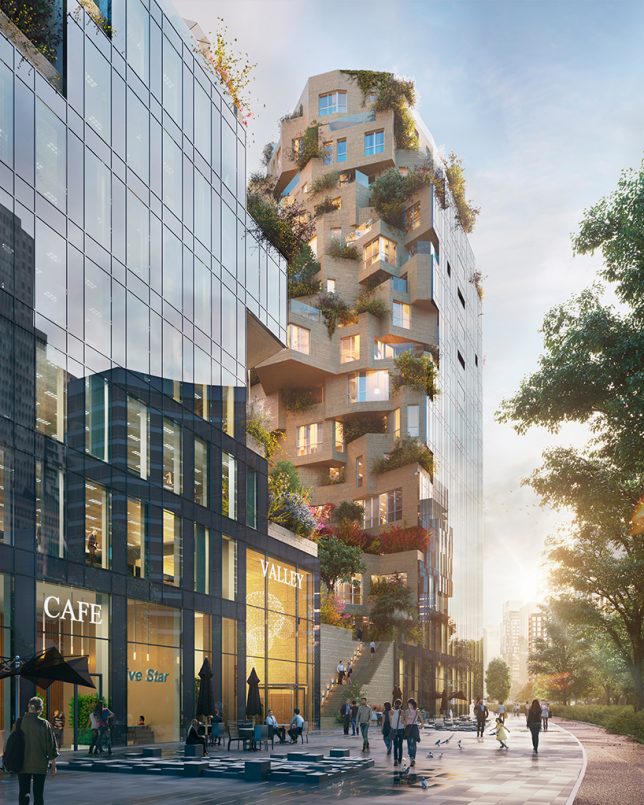
    Valley: Green-Terraced Towers by MVRDV in Amsterdam, The Netherlands

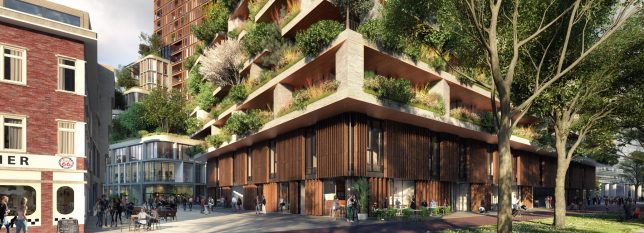
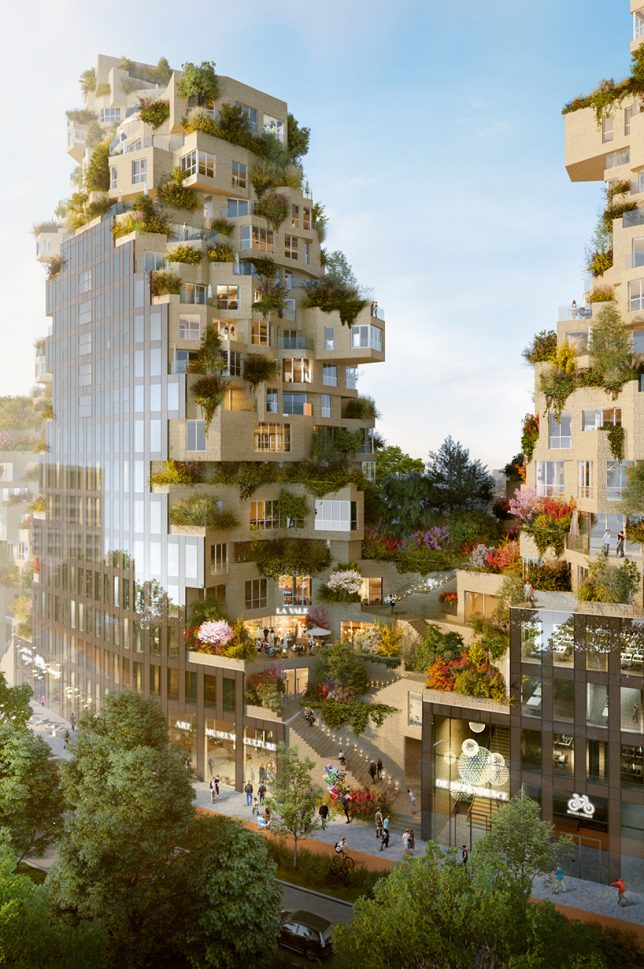
    Construction began in August 2017 on MVRDV’s ambitious ‘Valley,’ a mixed-use complex of green-terraced towers in Amsterdam’s central business district. ‘Valley’ is notable not only for its unusual offset stacking of volumes , creating an irregular shape, but also for all the greenery it supports. The towers include 196 apartments, 7 stories of offices, shops, restaurants, cultural facilities and a three-story parking lot.

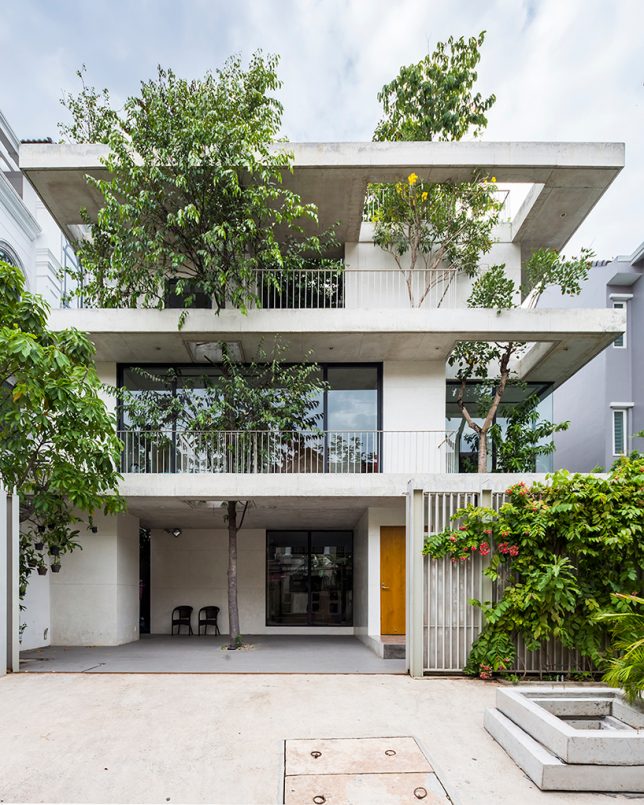
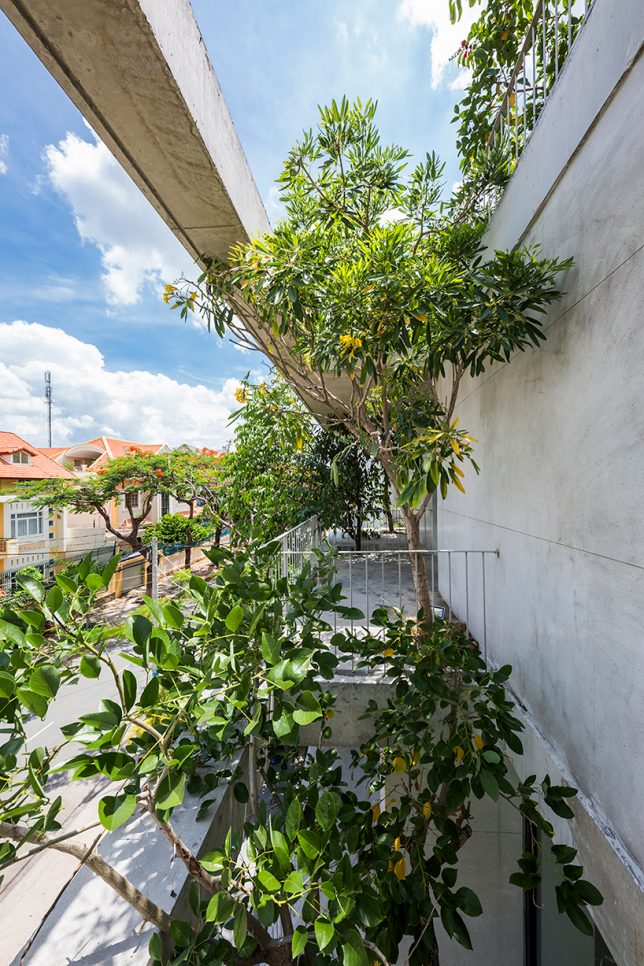
    House for Trees by VTN Architects in Ho Chi Minh, Vietnam

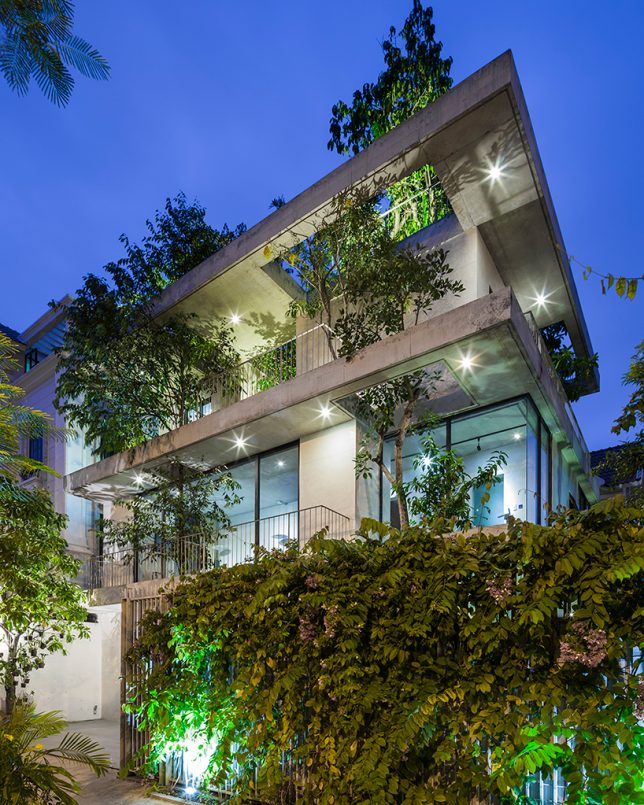
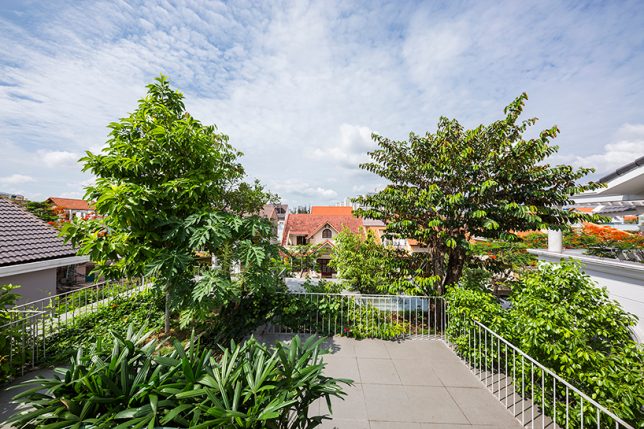
    VTN Architects approached ‘House for Trees’ as a way to alleviate the lack of access to green spaces as well as poor air quality found in big cities like Ho Chi Minh. This residential project incorporates trees into its design, envisioned by the firm as a “small park in a dense neighborhood.” The trees are set into deep planter boxes disguised among the concrete volumes of the house, with cut-outs allowing their crowns to rise as high as they like.

    Nautilus Eco Resort by Vincent Callebaut in the Philippines

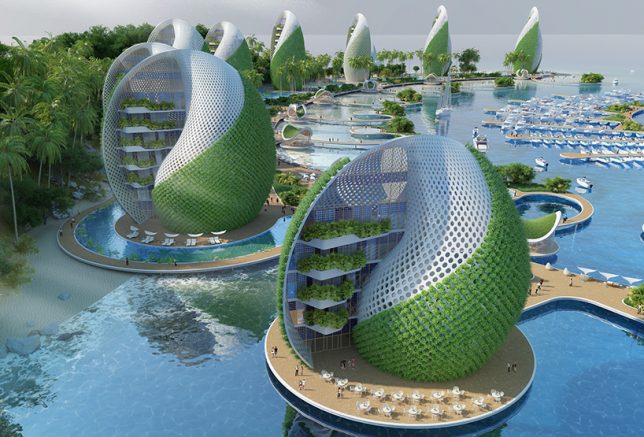
    The Nautilus Eco Resort by Vincent Callebaut is designed as a ‘zero emissions, zero waste, zero poverty’ development for the Philippines in response to environmental and social problems in the country, like overfishing, pollution and mass tourism. The project would be built from reused or recycled materials, self-sufficient in producing its own energy and food, and engage volunteer ecotourists in cleaning up plastic waste that washes up onto the area’s beaches. It consists of a series of shell-shaped hotels and apartment towers spiraling around a central island housing a nautical center and scientific research laboratories. The plant walls cool the buildings as they grow food.

    Amata + Triptyque Timber Building in São Paulo, Brazil

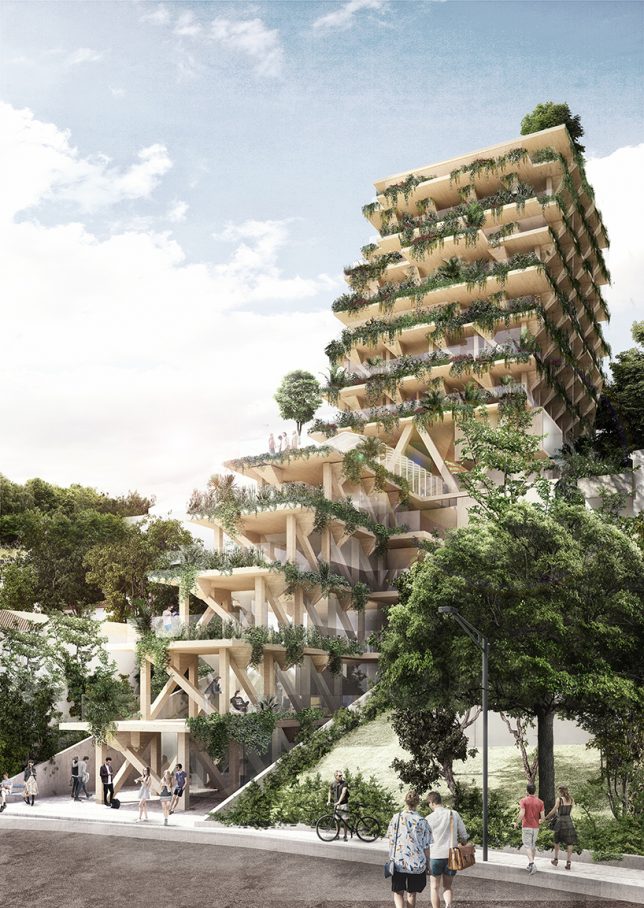
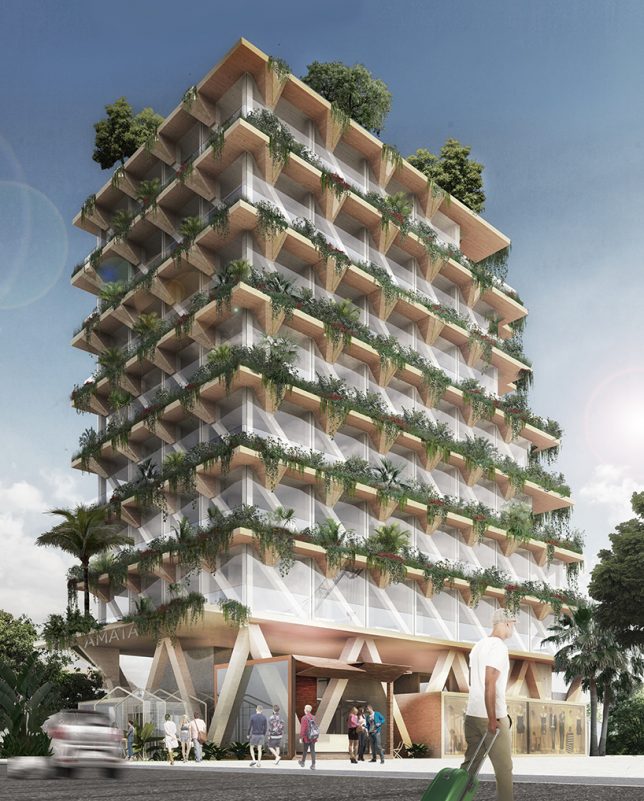
    Constructed entirely from Brazilian timber, this building is a collaboration between architecture studio Triptyque and forest management company Amata. The building aims to be a giant carbon sink, contributing towards the fight against climate change. Each square meter of wood is capable of absorbing a metric ton of carbon dioxide from the environment. The 13-story building contains co-working, co-living and dining spaces, the edges of its terraces dripping with living plants.

    Next Page – Click Below to Read More:
    Lush Life 12 Verdant Architecture Projects Making Plants A Main Priority

    Share on Facebook


    [ By SA Rogers in Architecture & Houses & Residential. ]

    [ WebUrbanist | Archives | Galleries | Privacy | TOS ]


    WebUrbanist

  • Two Photos Combine for a Perfectly Mirrored Sunset

    Warning: preg_replace(): The /e modifier is no longer supported, use preg_replace_callback instead in /home/forge/content.photojojo.com/content.photojojo.com/wordpress/wp-content/plugins/ozh-better-feed/inc/feed.php on line 134


    Photojojo

  • Master drone pilot captures video while flying around, inside, and under a moving train

    Absolutely, positively never try this yourself. By all accounts, this flight was highly illegal and DPReview in no way condones this activity.


    If you’re at all plugged into the world of drone news, you’ve probably seen this video floating around the past week. Captured by master First Person View (FPV) drone pilot Paul Nurkkala, it shows his “flight of the year” in which he flies around, inside, onto, and under a moving train… barrel rolls included.

    Nurkkala captured the video using his custom built drone, which is equipped with a GoPro Hero5 Session and piloted from afar using special FPV goggles.

    The video has split the internet into two predictably conflicted camps. The first thinks it’s just the coolest footage to ever come out of a drone, because Nurkkala is clearly such a talented pilot. The second is infuriated that he would do something so obviously illegal, post the results online, and receive so much praise and adulation (and so many views… at last count his 5-day old YouTube video had accrued nearly 850,000 views).

    No judgement if you find yourself both entertained and a little bit annoyed/angry while watching the video.

    Articles: Digital Photography Review (dpreview.com)

  • Learning Digital Photography May Have More Benefits Than You Think

    Many people struggle with the different elements of learning photography. Mastering the technical aspects of your camera, on top of applying all of the creative and technical concepts, can make it a daunting pursuit for many. Now, with digital photography the norm for most photographers, there is also the added element of learning post-processing if you are really going to become successful as a photographic artist.

    Learning Digital Photography May Have More Benefits Than You Think

    Learning Photography and Aging

    As you scratch your head trying to put all the pieces together, you may not have realized that you are exercising many aspects of your brain. Studies have found that digital photography keeps your brain sharp and your mind in good shape.

    Learning Digital Photography May Have More Benefits Than You Think

    I have watched one of my family members pursue digital photography well into his 90s. I always thought there was something about this activity and the creative process that was keeping him active and on track. But I never put much thought into it until I read this study from the University of Texas on digital photography and aging.

    The study shows . . .

    During the University of Texas study, six groups of individuals aged 60–90 were studied over a 10 week period. Each group was engrossed in a specific activity for 15 hours a week. The primary activities under observation included digital photography, digital quilting, and a variety of activities like playing cards and socializing. Only the groups doing quilting and photography improved their memory abilities when confronted with these continuous and prolonged mental challenges.

    Learning Digital Photography May Have More Benefits Than You Think

    The results of the University of Texas study showed that digital photography is the best activity to participate in for aging baby boomers interested in maintaining their cognitive health and development.

    Benefits of learning digital photography

    What were the benefits? The most significant improvement was found in their use of words and phrases as well as their recognition of conceptual and visual imagery. The reason digital photography came up so high in this cognitive study is that it uses many parts of the brain to be successful.

    Learning Digital Photography May Have More Benefits Than You Think

    It affects the creative and technical sides of your brain in both the shooting and post-processing. It also uses memory to make all of the functions work together. These benefits apply to someone who is shooting in full manual or partially automatic programs on their camera and are using advanced Photoshop or similar post-processing programs.

    Learning Digital Photography May Have More Benefits Than You Think

    How it works

    Here’s an example of some of the brain functions that are used when you create an image: When you are out on a photo shoot, and you want to create a compelling image, it takes some time to think about how to creatively compose the scene. Then, you need to choose the aperture and shutter speed settings based on the best creative application for the image, applying your memory of how the camera works.

    Some of the high-end cameras these days will give you a decent point and shoot shot, but if you are intentionally going to create something of value, you need to put some technical thought into the image. At the same time, when you are setting up a shot, it helps to think through what you might do for post-processing the image once you get home.

    Learning Digital Photography May Have More Benefits Than You Think

    Now that you have conquered the technical aspects of operating the camera, you need to bring the image into post-processing. Whether or not you are using Photoshop or Lightroom, you still need to have some technical ability on the computer and knowledge of how the program works. All of these activities together require memory, creativity, and cognitive abilities to perform these tasks correctly. This is all good exercise for your brain.

    Learning Digital Photography May Have More Benefits Than You Think

    What does all of this mean for you?

    The process of creating a digital image is fun, creative and clinically proven to be good for your mind. Just like we need to keep our heart healthy with diet and exercise, we also need to keep our brain active as we age. It’s not just the activity, but learning new and mentally challenging subjects that is the important part of this puzzle.

    If you continue to pursue and learn digital photography well into your later years, it will serve as a good way to keep your brain and memory functions sharp.

    Does that sound like a good plan for you to continue practicing the craft of digital photography as you age?

    Learning Digital Photography May Have More Benefits Than You Think

    The post Learning Digital Photography May Have More Benefits Than You Think by Holly Higbee-Jansen appeared first on Digital Photography School.

    Digital Photography School

  • Bar The Rays: 15 Closed & Abandoned Tanning Salons

    [ By Steve in Abandoned Places & Architecture. ]

    These closed and abandoned tanning salons, spas and studios made hay while the sun didn’t shine but sooner or later they (and their clients) felt the burn.

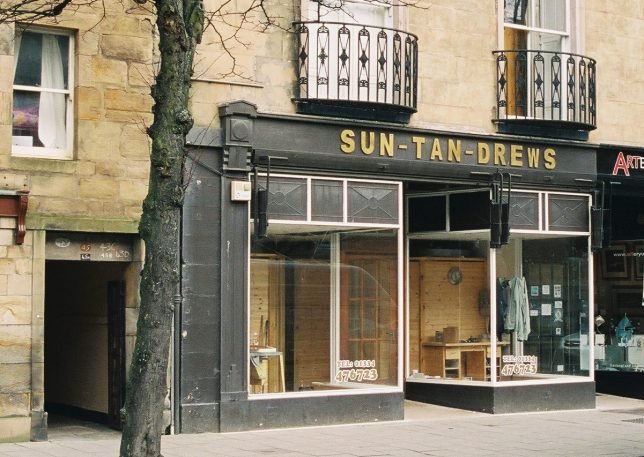
    “Sun-Tan-Drews” may not have been the sunniest tanning salon in St Andrews, Scotland but it was by far the punniest. Note the “W” on the lettered sign had fallen off sometime in the past and was replaced by a slightly smaller version. Kudos to Flickr members Ian Macdonald (Ghiribizzo) and Jonathan Baldwin (artistry), and Panoramio member Richie W, all of whom captured the recently shuttered pun-tastic tanning salon in early 2007.

    Smokeless

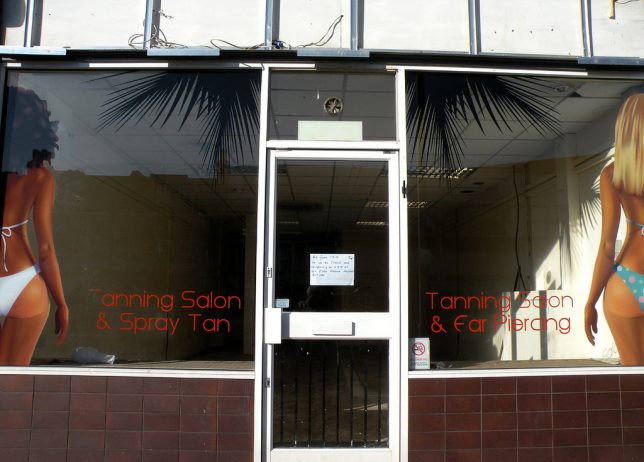
    The sign on the door of this closed Bristol, England tanning salon states smoking inside is prohibited, assuring potential customers they won’t be burnt to a crisp for the sake of fashion. Another sign, hand-written this time, notes the business has moved to newer and more northerly digs. Shame they didn’t take the alluring window stickers with them when they moved. Flickr member Steve (Steve Lewis2009) snapped the abandoned Wells Road spa in May of 2010.

    The Sun Isn’t There

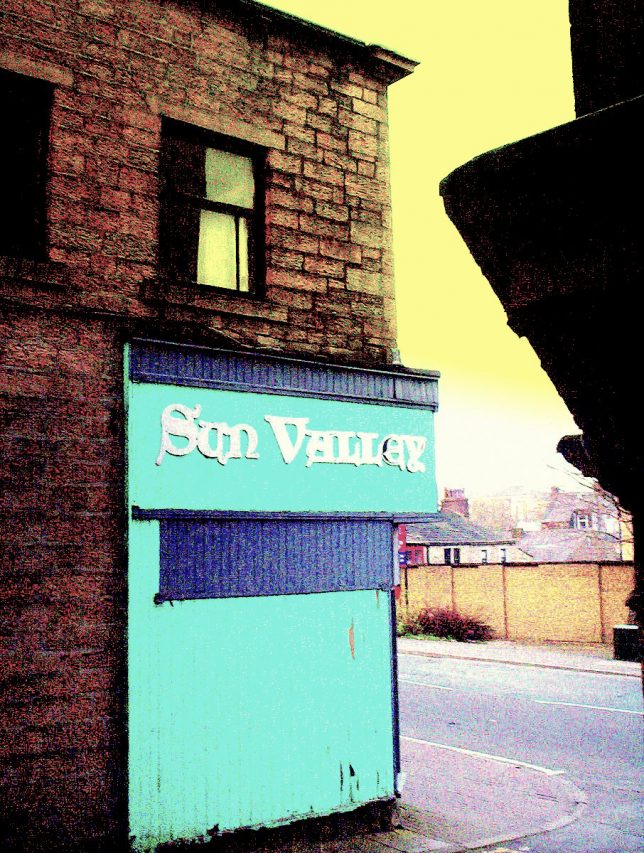
    This gloriously grainy photo of the late and unlamented “Sun Valley electric UV tanning salon” – in the words of photographer and Flickr member Boo (Lawrence Peregrine-Trousers) – was taken in early 2003 somewhere in Lancashire, northern England. Odd how many tanning studios there are in the UK, abandoned or not… then again, have you seen British people lately?

    Hot Stuffed

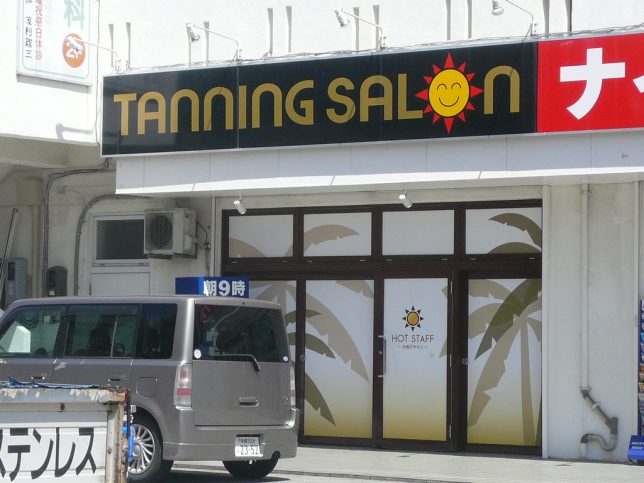
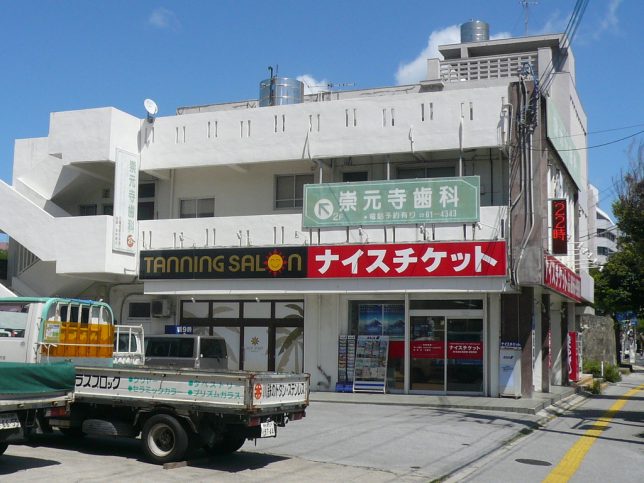
    The “Hot Staff” (yes, that’s its name) Tanning Salon in Naha, capital city of Okinawa, is a mass of contradictions. An information page states the salon is open year round but it’s “CLOSED” whenever you access the page. The salon’s website hasn’t been updated since 2011 but regardless… a tanning salon in Japan’s most southerly prefecture?? As for the spa’s curious name, well, typos are all in good fun until they create issues for employees.

    One Lesstan

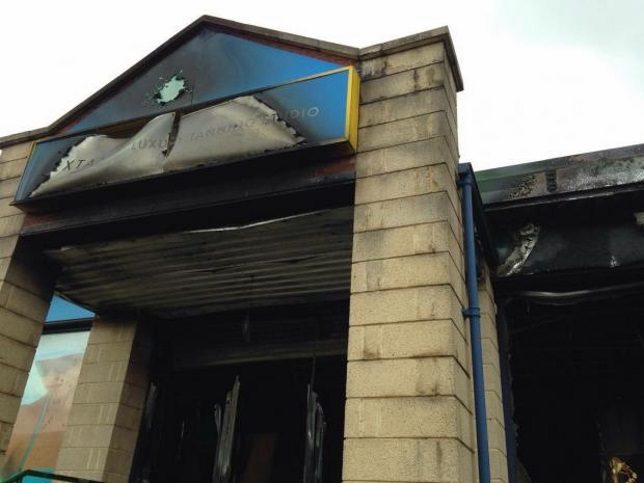
    Founded in 2006, “Lextan” grew to become the biggest chain of luxury tanning salons in Wales with 16 locations. Erm, make that 15 – on the night of June 15th, 2016 the Lextan studio in Ebbw Vale (pop. 33,000) burnt to the ground and was totally destroyed in what local police have stated was an arson attack. Seems someone wasn’t happy with their tan lines or ended up looking like Tan Mom.

    Next Page – Click Below to Read More:
    Bar The Rays 15 Closed Abandoned Tanning Salons

    Share on Facebook


    [ By Steve in Abandoned Places & Architecture. ]

    [ WebUrbanist | Archives | Galleries | Privacy | TOS ]


    WebUrbanist

  • My Top Recommended Equipment for Night Photography

    Being a Norwegian it’s hard not to be somewhat fascinated with night photography. Our winters are long and dark and when the skies are clear that means great opportunities for night photography. However, it wasn’t until I moved to Spain that I got even more obsessed with photographing the stars and I’ll admit that it’s slightly more comfortable doing so wearing shorts than three layers of clothes.

    My Preferred Equipment for Night Photography - milky way shot

    A lot can be said about the essential camera equipment for night photography, but in this article, I’d rather look at the equipment that I rely on in order to capture the images that I prefer. Photographers who execute more niche techniques such as star trails and deep space photography would probably add an item or two to this list.

    That being said, I strongly recommend using the equipment mentioned in this article. I believe it will be hard for you to capture great images of the night sky without (most) of them.

    The Camera…

    The camera is your most important tool as a photographer – there’s no way around that. While upgrading your camera is expensive there are certain elements that you should consider if you desire to do better night photography.

    Since you’re dealing with low-light at night you depend on using a high ISO in order to capture both the beautiful stars and the details in the landscape/scenery surrounding you. Unfortunately, entry-level cameras have a tendency to not rate well at higher ISO values. Already at a lower value such as ISO 800, they begin introducing a How to Avoid and Reduce Noise in Your Imagessignificant amount of noise. There are a few workarounds for this such as the median technique, but I won’t be getting into that in this article.

    Wide Angle Lens

    Besides the camera itself, you’ll also need a lens in order to capture an image. There are many different types of lenses available on the market but to get the best possible images during the night, make sure that you choose a lens with a large maximum aperture. This means that you can use an open aperture such as f/2.8 (which lets in more light).

    My Preferred Equipment for Night Photography

    A subtle display of Northern Lights in Lofoten.

    While it might be a personal preference, I find that wide-angle lenses give the best results for night photography. Somewhere between 14-24mm is typically the best.

    A Tripod

    The last of the three most expensive tools is a tripod. Since you’ll be working with shutter speeds of 15-30 seconds, or even several minutes if you’re making a star trail, you depend on keeping your camera still for that long. This is hard to do without a tripod.

    Unless you’re planning on photographing in harsher conditions, you don’t need to buy the most sturdy and solid tripod. However, I still recommend that you choose one that is somewhat solid and will last for a while. Low-end tripods have a tendency to break more easily and in the long run, it will cost you more than one of a higher quality.

    Remote Shutter

    If you plan to photograph star trails or do exposures longer than 30 seconds (i.e. use Bulb Mode), a remote shutter release is required. You don’t need to spend a lot of money on this and a simple one will do the job. However, I prefer to use one that has a small LCD screen that shows the time of your exposure and allows you to lock up the remote button.

    When working with exposures shorter than 30 seconds a remote shutter release isn’t essential. In those cases, you can simply use a 2-second timer or delayed shutter release.

    Natural Night Filter

    The last of the tools I keep in my bag when doing night photography is a filter that I’ve grown to become a fan of during the last few months – especially when photographing in areas with light pollution.

    The Natural Night Filter (I use NiSi’s but other brands such as LEE also have similar products) is made to reduce the amount of light pollution and give you a crisp image. Yes, this is relatively easy to fix in post-production but I find that the more light pollution there is the better the filter works.

    Other non-camera related tools

    Besides the tools mentioned above, there are a few more items I won’t leave home without when doing night photography. While all of them aren’t used in combination with a camera and don’t have a direct impact on the image itself, they are essential to get the shot:

    1. Extra layers of clothes (at least when photographing in the Arctic!).
    2. Powerful headlamp.
    3. Extra batteries for your camera (if it’s cold keep one on the inner pocket of your jacket).
    4. PhotoPills app – a great tool for planning your night sessions

    My Preferred Equipment for Night Photography

    What are your preferred tools for night photography? Let me know in a comment!

    The post My Top Recommended Equipment for Night Photography by Christian Hoiberg appeared first on Digital Photography School.

    Digital Photography School

  • How to Take Better Action Photos of Dogs

    If you enjoy photographing your pets, and dogs, in particular, this article will help you take better action photos of dogs. Learn what camera equipment to use, the best settings, and general tips for success.

    How to Take Better Action Photos of Dogs

    The Camera Body

    If you want to take better action photos of dogs, I recommend a camera body with a fast burst rate. From my experience, five frames per second is the minimum. If your camera has a faster frame rate than that, you are going to increase your keeper rate as long as your approach and technique are on point, which we will get to shortly. I personally use Nikon’s D610 and D7000 and have great success with photographing dogs in action.

    The Camera Lens

    How to Take Better Action Photos of Dogs

    I recommend long and fast lenses. I’ve tried to photograph action shots with the 50mm f/1.8, and the Tokina 100mm f/2.8, with very little success. While both of these lenses are incredibly sharp, they are soft wide open and do not focus well on moving subjects.

    Longer lenses with fixed apertures generally focus on moving subjects much faster than shorter lenses. They also keep you and your camera gear safer. Think about it. If you have a 45 point Border Collie running full speed right at you, you need to get the photograph and get out of the way quickly.

    A longer lens will give you the time you need to move once the dog starts to fill the frame. I personally use the Nikon 300mm f/4 and sometimes I’ll even throw a teleconverter on it for extended reach and cleaner bokeh.

    Camera Settings

    How to Take Better Action Photos of Dogs

    Setting Your Autofocus

    I recommend locking your autofocus directly in the center of the frame. When photographing action shots of animals you don’t have time to be moving the focus point around. I also suggest using AF-C (Continuous focus mode, called Servo on Canon), which may also be called autofocus continuous, AF-Continuous. This is the setting I always use when trying to get action shots of dogs.

    Set your Camera to Burst Mode

    How to Take Better Action Photos of Dogs

    Make sure you check your camera drive setting. I know it’s common sense, but make some kind of reminder, though, a checklist you look at before capturing action shots. I’ve been photographing animals for over a decade, and still screw this up sometimes. It wastes time if you don’t have your camera set to burst mode and also wastes the dog’s energy. Dogs can only run for so long and you need every opportunity you can get within that time frame.

    Photographing Running Dogs

    When I photograph dogs running, I aim to get them looking straight into my camera lens. I want the dog running directly toward me, and I focus on as much eye contact as possible. So to consistently get great photographs of dogs running in this manner, you’re going to need some help.

    How to Take Better Action Photos of Dogs

    What I do to accomplish this is have the dog owner or an assistant stand fairly far away from me. I will then position myself on my belly, using my camera bag to stabilize the lens. I try and keep my back to the sun when outdoors. This will help me get the shutter speed that I want to photograph the dog running. I shoot for 1/1250th of a second to 1/2000th.

    I’ll first take a test shot to make sure my exposure is right. Then I have the assistant throw a tennis ball right at me. I usually tell them to try and hit me with the tennis ball. This sends the dog running full speed, right at me. I will also instruct the assistant to quickly move to the left or right as soon as the ball is thrown. This saves me tons of time later in post-processing by not having to remove them from the background with Photoshop.

    Photographing Dogs Catching Frisbees

    How to Take Better Action Photos of Dogs

    This is a little trickier and complicated to pull off compared to photographing running dogs. The goal is to get the dog in mid-air right before he is about to bite down on the Frisbee. I use pretty much the exact same camera settings and approach that I do for photographing dogs running.

    I do change one thing, though, and that’s the camera shooting angle. I like to shoot from the hip. Meaning the camera is around my hip level. I’m not actually shooting from the hip, but kneeling down on one knee. Following the dog chasing the Frisbee, I bump the focus until the dog is close to the target. Then holding down the shutter button, I burst out some shots until the buffer gets filled.

    Photographing Dogs Jumping

    How to Take Better Action Photos of Dogs

    This is simpler than capturing the two types of dog action shots mentioned previously. It definitely requires an assistant to pull off consistently, though. You also don’t need a lens as fast or long to photograph docs jumping compared to the other types of action shots. Although, I prefer using long lens simply because it makes a smoother, more out of focus background.

    Here’s how to do it. Position yourself so the dog is in only one-third of the camera frame or less. Check your exposure. Have an assistant hold up a toy, a tree branch, or whatever the dog is interested in enough to jump up and grab. Have the assistant hold it up high, with their arm extended as long as they can. This is incredibly helpful when it comes to post-processing.

    Look out for the Safety of the Dog

    How to Take Better Action Photos of Dogs

    You can photograph a dog all day just lying around and looking cute. When dogs are running and chasing Frisbees, they get tired. If you are doing a pet photography session and want action shots, this is going to happen incredibly fast.

    The dog owners don’t always prepare for it, but I’ve done this many times, and I always prepare. I keep several bottles of water on me, along with a collapsible drinking bowl. If the dog is panting heavily, give them a rest. If they drink a 16-ounce bottle of water in less than a minute, you may want to wait a while before attempting more action shots.

    Some factors that you need to consider when shooting action shots are how hot it is, the dog’s age, and the breed. Certain dog breeds handle heat better than others. This is also true for exercise needs. If you are a professional pet photographer, you should be well aware of what the dog’s exercise needs are as well as how well they handle the heat.

    Conclusion

    So I hope that you find these tips helpful for taking better action photos of your dogs, or those of your clients. Any action photography takes some practice so keep at it and you’ll start to have more keepers over time. Please share your dog action photos in the comments below, we’d love to see them.

    The post How to Take Better Action Photos of Dogs by Dave Spates appeared first on Digital Photography School.

    Digital Photography School

  • How to Make a Joiner Collage for a Retro-Style Panorama Image

    Almost every camera can do a panoramic shot. A lot of apps and software can create a “little planet” image. So how can you capture that beautiful view and still stay creative? Try going vintage! In this article, I’ll show you how to do a patchwork-style collage (called a Joiner Collage) so you can do any panorama in an original way and end up with a one-of-a-kind image.

    What is a Joiner Collage?

    Back in the 80s, an artist called David Hockney was studying how human vision works and experimenting with an idea he created called Joiners. Using Polaroids at the beginning and commercial 35mm film later, he shot one subject from many different angles and then put them together into one image creating sort of a patchwork pattern.

    Following on this idea, I’m going show you how to do some digital panoramas. By following these steps, you can capture any subject from every point of view that you want. Here is a panoramic I made of Milan that I’ll use to show you all the steps.

    How to Make a Joiner Collage for a Retro-Style Panorama Image

    How to make a Joiner

    To start this project you already have to be thinking about it from the moment you make the photos. Three things you have to consider:

    1. You will want to shoot all the photos that you are going to need so that you don’t find yourself in front of the computer with a piece of your scene missing.
    2. If you decide to go with a regular shape like a square or a rectangle then try to visualize how many pieces you need per side and divide your scene like a grid (e.g. Five photos for the horizontal side and three for the vertical side).
    3. You need to set the resolution to a lower setting than you might be used to, because all the files will be combined into one (I’ll explain how further along). If you shoot each one at 25 MB for example, or the highest your camera can shoot, it will probably be too big for your computer to handle.

    Once you have all the images, organize just the ones are you going to use, all into one folder.

    How to Make a Joiner Collage for a Retro-Style Panorama Image

    Merging the images

    Now open the folder in Bridge and select all images. You can easily do this by holding the Shift key while clicking the first and then the last file; it will select all the images in between as well (or Cmd/Ctrl+A for select all).

    With all the photos selected you can now go to the menu Tools > Photoshop > Load Files into Photoshop Layers.

    How to Make a Joiner Collage for a Retro-Style Panorama Image

    The result of this command is exactly what its name suggests. It will open one image composed of all the selected images as layers. However, the file will be the size as an individual image, so you need to make room to fit all of them.

    Go to menu Image > Canvas Size and a window will pop up with the current measurements. In the drop-down menu choose Percentage and multiply it by as many photos you will line up in your panorama, plus one. So if you are doing a panorama of 5×3 you need to put a percentage of 600 x 400, that way you will have also some blank space to play with.

    I like to leave the point in the center so that space will be created evenly on the sides. But you can move that around depending on how you feel it’s easiest for you to spread your images out on the canvas.

    How to Make a Joiner Collage for a Retro-Style Panorama Image

    Arrange the Joiner collage

    Now all you have to do is use your creativity and arrange the photos to create your Joiner collage.

    To make this task easy, use the Move tool from the tools panel. Tick the Auto-Select choice and choose Layer from the drop-down menu from the settings of the tool. This will allow you to just click on each image and move it without having to go back and forth to the layers panel. The tool will select it automatically.

    How to Make a Joiner Collage for a Retro-Style Panorama Image

    Tweak your final image

    That’s it! Once you have the final layout you can add some adjustment layers if you want to fine-tune the levels, contrast, saturation or anything else on your panorama. Add a background color if you decide to incorporate some negative space around your Joiner, and flatten the image.

    How to Make a Joiner Collage for a Retro-Style Panorama Image

    You can also add some effects if you want to create different versions of the image. For example, you can turn it into negative.

    How to Make a Joiner Collage for a Retro-Style Panorama Image

    You can also do an abstract or surreal panorama by duplicating layers, forcing perspective, and anything you can imagine.

    How to Make a Joiner Collage for a Retro-Style Panorama Image

    Keep in mind that David Hockney, the creator of the Joiner worked mainly with portraits, so you don’t have to limit yourself to panoramas. Try all sorts of subjects, the sky is the limit!

    How to Make a Joiner Collage for a Retro-Style Panorama Image

    Conclusion

    I hope you give this fun and easy technique a try. Please share your Joiner collage images in the comments below. We’d love to see what you create.

    The post How to Make a Joiner Collage for a Retro-Style Panorama Image by Ana Mireles appeared first on Digital Photography School.

    Digital Photography School