Blog

  • As Seen on TV: Distorted Long Exposure Portraits

    Warning: preg_replace(): The /e modifier is no longer supported, use preg_replace_callback instead in /home/forge/content.photojojo.com/content.photojojo.com/wordpress/wp-content/plugins/ozh-better-feed/inc/feed.php on line 134


    Photojojo

  • The Nikon D850 could be the only DSLR you’ll ever need

    Introduction

    Out-of-camera JPEG.
    Nikon 70-200mm F2.8E @ 70mm | ISO 125 | 1/2500 sec | F4

    Perched on a rock jutting out over Class IV+ rapids on the Deschutes River, I become fully aware that were I to slip and fall, the frothy white waves would toss me around like a cork, I’d probably hit my head on a submerged volcanic rock, fall unconscious and die.

    One of the best things about photography (or one of the worst, I suppose, depending on your perspective) is access. Even if you’re not covering the industry, knowing your way around a camera and having a decent portfolio will often afford you opportunities to get up-close and personal with people you’ve never met before, who are doing things you’ve never seen before, in a place you’ve never been before.

    The D850 might just be the most well-rounded camera Nikon’s ever made.

    In this particular instance, the access came courtesy of Nikon USA. They wanted us to use the D850 so much that they flew me down to Bend, Oregon with a collection of other photographers and journalists, and stuck us all in a variety of disparate scenarios to get a feel for the camera.

    From sports to portraits, the D850 seems almost universally capable. Out-of-camera JPEG, cropped slightly to taste.
    Nikon 24-120mm F4 @ 50mm | ISO 2200 | F4 | 1/125 sec

    And, not being one to back down from a challenge (or maybe I’m just terrible at scheduling), I was booked to photograph a friend’s wedding immediately upon returning to Seattle. I was eager to use the camera outside of the realm of a press trip, especially since its specs seem to indicate that the D850 might just be the most well-rounded camera Nikon’s ever made.

    Actually, it might be the most well-rounded stills camera that anyone has ever made.

    This thing is way too fast to be shooting 46 megapixels

    This kayaker didn’t seem particularly worried about the Class IV+ rapids, which I was later told verged on Class V. Out-of-camera JPEG.
    Nikon 70-200mm F2.8E @ 70mm | ISO 64 | 1/800 sec | F2.8

    Perhaps the highest praise I can offer for the D850 is that, in more ways than one, it reminds me of Nikon’s flagship D5 with one of the grips lopped off.

    The camera feels incredibly solid. The AF joystick is fantastic. Shutter lag is nonexistent. Autofocus is instant. As with the D5, I repeatedly got the sense that the camera was waiting for me, not the other way around. It offers a ‘transparent’ experience by just getting out of the way and letting me focus on what’s happening in front of me so I don’t miss a photo.

    In more ways than one, the D850 reminds me of the flagship D5.

    And that’s exactly what I needed as the first kayaker came around the bend. I initiated autofocus and let the camera’s 3D Tracking do its thing as I constantly zoomed and adjusted my composition, with the kayaker moving unpredictably through the scene in front of me and the camera motoring away at seven frames per second.

    Want to know what brand the kayak is? Just zoom in to 100%. Out-of-camera JPEG.
    Nikon 70-200mm F2.8E @ 70mm | ISO 125 | 1/2500 sec | F4

    The fact that the D850 behaves this way, in that it is capable of churning out accurately focused 46MP files of fast-moving subjects, makes it unique. It’s true that Sony’s a99 Mark II shoots 42MP files at a speedier 12fps, but that camera wasn’t our best autofocus performer, and the user interface and SD-only recording media make it a slower camera than the D850 in most other respects.

    So in the D850, you basically have a sports camera that you could turn around and make wall-sized gallery prints with in a heartbeat. If that doesn’t meet your definition of ‘well-rounded,’ I don’t know what will.

    This man seems comfortable with his life choices. Out-of-camera JPEG.
    Nikon 70-200mm F2.8E @ 70mm | ISO 125 | 1/2500 sec | F4

    Good at every ISO

    As I was heading to the airport outside of Bend, I was looking forward to my evening. I had a short flight back to Seattle, and enough time to get from Seatac Airport to a friend’s wedding ceremony on the shores of Puget Sound. Then I checked in, and saw my flight was delayed by 45 minutes.

    Heavy sigh. Heavy stress.

    By the time I hopped out of my cab in West Seattle minutes before the ceremony was set to start, the sun had already dropped low in the sky. I hastily introduced myself to the family members I hadn’t yet met, apologized profusely for my tardiness and gave the happy couple a couple of hugs. Time to start taking pictures.

    Image processed to taste in Adobe Camera Raw, exposed for the highlights with shadows lifted. With a Nikon D5, Canon EOS-1D X Mark II or Sony a9, this processing would result in a much noisier image.
    Nikon 24-120mm F4 @ 24mm | ISO 64 | 1/160 sec | F8

    In many ways, peak action and wedding photography place similar demands on both photographer and camera. You’re constantly on the lookout for fleeting moments, and the camera has to be able to respond when you do.

    But dedicated sports cameras often come with compromises, such as lower resolution and lower dynamic range. It’s not uncommon to see wedding shooters with one ‘speed’ body and one ‘resolution’ body. With the D850, I’m not sure that’s going to be necessary anymore.

    Out-of-camera JPEG.
    Nikon 24-120mm F4 @ 46mm | ISO 900 | 1/200 sec | F4

    Even without a boost from the battery grip, the burst rate is more than sufficient. As when shooting white water kayaking, I never once found myself waiting for the camera during the ceremony. I knew that images at lower ISO values would have lots of editing latitude, but I was also pleasantly surprised at the quality of higher ISO shots when the sun set behind the clouds.

    You can dramatically change an image’s composition while still maintaining a good amount of resolution.

    The biggest downside for using the D850 for weddings, so far as I can see it, is just that the average client might not need 46MP for every single image. It burdens the photographer in terms of storage space, and honestly burdens the clients if they’re not going to be printing anything bigger than an 11×14. (Even high-quality JPEG files out of the camera weigh in at 20-30MB).

    The camera’s smaller Raw file options might help this somewhat, but we’re still testing to see if there will be any dynamic range or other image quality penalty involved. But on the flip side, there’s no avoiding the freedom you’ll feel when cropping tightly on such a high-res image. You can dramatically change an image’s composition while still maintaining a good amount of amount of resolution, which is pretty powerful.

    In the wild. Out-of-camera JPEG.
    Nikon 24-120mm F4 @ 110mm | ISO 1400 | 1/500 sec | F4

    Should I buy it?

    No camera is perfect.

    I’m not a big video shooter for freelance work, but I love a tilting screen to get some unique angles for stills, and while Nikon’s live view autofocus is accurate, it certainly isn’t fast. Forget about shooting moving subjects if you’re not in a position to have your eye to the finder.

    Commitment.
    Nikon 35mm F1.8G | ISO 400 | 1/160 sec | F4

    Beyond that, Snapbridge (Nikon’s term for a suite of features including Wi-Fi and Bluetooth connectivity for downloading images) has improved, but still isn’t exactly refined. The initial connection process was quick and easy, but I couldn’t reconnect again until after I had both my phone and the camera ‘forget’ each other, and start all over again.

    For the last year or so, I’ve been wrestling with the issue of whether or not to upgrade. For what I shoot, which is mostly weddings and events, the D850 certainly has a lot to offer. The files are awfully big, but downsizing them will just make for very sharp lower megapixel options.

    Nikon seems to have thrown just about everything they’ve got into the D850, and it sits at a very reasonable price point for all that it is capable of. At first glance, it may not be the most exciting camera for the average consumer; it certainly isn’t flashy, nor is it petite.

    Out-of-camera JPEG.
    Nikon 35mm F1.8G | ISO 3200 | 1/320 sec | F1.8

    But for seasoned photographers shooting a variety of subjects, the D850 is a formidable option.

    For landscape shooters, you have the current low ISO benchmark at ISO 64, meaning the D850 should be able to match some medium format digital cameras in terms of dynamic range. For wedding and event shooters, you have all the speed you need, but with tons more resolution than may be used to – this could be a blessing or a curse, depending on your style. For those that love manual focus lenses, you get Nikon’s biggest-ever viewfinder on a DSLR. And for wildlife enthusiasts, you get the benefits of the latest sensor tech with plenty of resolution for cropping, as well as excellent autofocus tracking and coverage, even with low light levels.

    In all, the D850 offers excellent autofocus performance, incredible resolution, expansive dynamic range and a capable burst speed. Unless you find yourself shooting run-and-gun video on the regular, the D850 is worth a look.

    Sample gallery

    $ (document).ready(function() { SampleGalleryV2({“containerId”:”embeddedSampleGallery_5682971467″,”galleryId”:”5682971467″,”isEmbeddedWidget”:true,”standalone”:false,”selectedImageIndex”:0,”startInCommentsView”:false,”isMobile”:false}) });
    Articles: Digital Photography Review (dpreview.com)

  • UltraPod II: Saving Space and Holding Cameras Still

    Warning: preg_replace(): The /e modifier is no longer supported, use preg_replace_callback instead in /home/forge/content.photojojo.com/content.photojojo.com/wordpress/wp-content/plugins/ozh-better-feed/inc/feed.php on line 134


    Photojojo

  • $80,000 vs $3,000: Arri Alexa vs Canon 80D video shootout

    These days, capturing professional-looking video no longer requires Hollywood-sized budgets. But does that mean that there’s no longer much advantage to Hollywood-quality gear? Let’s find out. Gene of the YouTube channel Potato Jet pegged his Canon 80D setup against an Arri Alexa setup that costs upwards of $ 80,000 and filmed several scenes with both cameras rigged up side-by-side.

    Unlike his previous (very popuplar) iPhone 7 vs Arri Alexa video, this one is a bit more of a fair fight—the sensor area used to shoot most formats on the Arri is much closer in size to the 80D sensor than the iPhone, and one of the cameras isn’t a freaking smartphone.

    Of course, the difference between the footage is still immediately obvious—who would have guessed an $ 80K setup would shoot better footage than a $ 3,000 setup?—but the side-by-side comparison is fun and interesting to watch all the same. That’s because Gene doesn’t just point out the differences in the dynamic range and quality of the video from the two cameras, he outlines the pros and cons of using a small light-weight DSLR like the 80D vs a cinematic powerhouse like the Arri Alexa.

    Check out the full comparison for yourself up top, and if you want to see more from Gene or consider yourself an amateur filmmaker, definitely subscribe to Potato Jet.

    Articles: Digital Photography Review (dpreview.com)

  • Graphicy Street Scene

    Warning: preg_replace(): The /e modifier is no longer supported, use preg_replace_callback instead in /home/forge/content.photojojo.com/content.photojojo.com/wordpress/wp-content/plugins/ozh-better-feed/inc/feed.php on line 134


    Photojojo

  • Your Wacom tablet won’t work with macOS High Sierra until ‘late October’

    Photo by Damian Patkowski

    Apple’s newest macOS operating system, macOS High Sierra, launched today. But if you use a Wacom tablet to do your photo editing, you’ll want to hold off on hitting the upgrade button. It seems Wacom tablets won’t work with High Sierra until the end of October.

    The disappointing news was broadcast in a tweet published by the main Wacom Twitter account that read, “We will release a Driver update late October for 10.13 High Sierra. The current driver is not compatible.” If you click on the more info link offered in that tweet, you get this slightly more detailed explanation:

    Apple has announced 10.13 High Sierra will be released September 25th. Wacom is currently working on a new driver update to support the new operating system. The new Wacom driver will be ready by late October at the latest. Due to nature of the changes in High Sierra, the existing Wacom driver for 10.12 will not work. To continue to use your tablet uninterrupted, Wacom suggests not to upgrade to 10.13 until the new driver is released.

    The news is particularly disappointing given that Apple announced High Sierra months ago, and gave developers access to that beta the very same day. And based on the wording of the announcement, the old driver won’t work at all, so upgrading to macOS High Sierra will leave you Wacom-less for at least a couple of weeks—if you rely on a Wacom tablet for your work, you’ll just have to wait.

    Keep an eye on this link to know the instant Wacom releases their overdue macOS High Sierra driver.

    Articles: Digital Photography Review (dpreview.com)

  • How to Use Plastic Wrap to Create Neat Color Special Effects

    In this article I’ll show you how to use a common household item, plastic wrap, to make creative images with colored filter special effects.

    Plastic wrap (a blanket term for Saran Wrap, Glad Wrap and Cling Wrap) is a clear plastic film typically sold in rolls or boxes with a serrated edge. Usually used for sealing food items like sandwiches to keep them fresh for longer, plastic wrap is an incredibly versatile material. Great for a picnic or practical jokes, it’s also a useful tool for creative photography.

    If you’re looking to add something a little different to your portfolio, plastic wrap is a simple, low-cost option. Using a rubber band, a camera, and some markers, you can easily create a colored filter out of plastic wrap – adding an experimental edge to your photographic repertoire.

    How to Use Plastic Wrap to Create Neat Color Special Effects

    The science

    Like many great scientific discoveries, plastic wrap was discovered by accident. Ralph Wiley, a lab worker at The DOW Chemical Company was having trouble washing out a beaker which contained a substance he couldn’t scrub clean. He called the substance “Eonite” named after an indestructible substance created by chemist Eli Eon in the Little Orphan Annie comic book strip. DOW researchers adopted the substance, using it to create a greasy, dark green film they called “Saran” and shared it with the military to spray on fighter jets as a guard against sea spray.

    How to Use Plastic Wrap to Create Neat Color special Effects

    A very subtle red and blue colored filter adds a little color to this image of a Ferris wheel.

    Saran works by polymerizing vinylidene chloride with acrylic esters and unsaturated carboxyl groups to create chains of vinylidene chloride. What does that mean? Simply put, the process results in a film with molecules bound so tightly that very little can penetrate it. The chemists at DOW eventually removed Saran’s green color. They also removed an unpleasant odor the Saran emitted when exposed to oxygen. It was first sold for household use in 1953.

    How to Use Plastic Wrap to Create Neat Color special Effects

    A surreal green shade created with a plastic wrap filter colored with green marker.

    Plastic wrap in art

    While handy in the lunchbox or fridge, plastic wrap is also a great material to experiment with creatively. Artists have used plastic wrap in sculpture, painting and as a prop for photography. Many well-known fashion designers have created clothing from layers of plastic cling film for the runway.

    Because of its relatively clear composition, plastic wrap is great for forming a barrier between your camera lens and foreign materials. Recently, I applied a layer of Vaseline to plastic wrap stretched over the front of my camera lens. The result was a fine, misty effect without the agony of a greasy camera.

    How to Use Plastic Wrap to Create Neat Color special Effects

    This image was captured using plastic wrap over the lens with a red section on the upper half and a green colored portion below.

    Creating a colored special effects filter

    You will need:

    • A piece of plastic wrap at least 30cm in length and width.
    • Camera and lens.
    • Permanent markers.
    • A few rubber bands.

    Adding color

    To create a colored filter for your camera, first you will need to add some color to your plastic wrap! The easiest way to do this is to stretch the plastic wrap over your lens and color in the plastic within the circle. However, this method is a little risky. If the plastic wrap is pierced, you will end up drawing on your lens or lens protector (cap).

    Instead, take your lens cap or lens and place it on the plastic wrap. Trace a circle around the outside. Now you’ll know where you should color your plastic wrap to get full coverage of the lens. To minimize the use of plastic here, you can trace multiple outlines of your lens on the same sheet of plastic wrap as I’ve done below.

    How to Use Plastic Wrap to Create Neat Color special Effects

    Use the same sheet of plastic wrap to create different effects, making it easier to keep for later and minimizing waste.

    Finally, add color to the sectioned-off portion of plastic wrap, make sure you use quality permanent markers. Low-quality texters won’t leave any visible color on the plastic wrap and the ink from non-permanent markers simply slides off the plastic (onto your hands or something worse).

    You can color in your circles any way you would like. For a full effect, color in the whole interior of the marked out circle with one or two colors. For a softer gradient, draw a light squiggle. You can color in the center of the circle and leave the perimeter clear, or vice versa. Don’t be afraid to experiment here!

    How to Use Plastic Wrap to Create Neat Color special Effects

    The effect of a portion of plastic wrap colored entirely green and placed over the front of the lens.

    How to Use Plastic Wrap to Create Neat Color Effects

    Coloring only the outer perimeter of the plastic wrap filter produces a fish-eye effect.

    How to Use Plastic Wrap to Create Neat Color special Effects

    Create an eerie atmosphere with a thick layer of red permanent marker.

    Time to photograph

    When you are happy with the colors of your circles, select one and lay it carefully over the front of your lens. Fix the filter in place with a rubber band, but don’t pull the plastic wrap too tightly or it will split.

    When the filter is fixed properly to the lens, it’s time to get photographing. Because your camera will have difficulty focusing with the layer of colored plastic wrap in the frame, you should use manual focus over automatic. Because the filter will cut down the light reaching your sensor, you may also need to increase your exposure time or adjust your aperture accordingly.

    Also, be sure to check the rubber band is fitted snugly around your lens. You don’t want it to come flying off, especially when photographing portraits!

    How to Use Plastic Wrap to Create Neat Color special Effects

    How to Use Plastic Wrap to Create Neat Color Effects

    Using colored plastic wrap can add an effect imitating the light leaks produced with partially exposed film.

    Finishing up

    Once you are happy with your photos, take them back to have a look on your computer. As I mentioned before, the filer may cut down the amount of light reaching your sensor. This could result in photographs that lack contrast. Photoshop is your friend here.

    Open your images in Photoshop and adjust the Curves layer to increase contrast. For more intense colors you may also want to adjust the Vibrance and Saturation of the image with the Vibrance and Saturation tool.

    How to Use Plastic Wrap to Create Neat Color Effects

    Adjust the Curves tool for more contrast in your images.

    How to Use Plastic Wrap to Create Neat Color Effects

    Adjust the Vibrance and Saturation tool for more intense colors.

    Your Turn

    Once you’ve got some quirky plastic wrap photos, please share them in the comments below. And remember to keep your filters for later. You never know when you might need them. Fold them down or scrunch them into a loose ball, they last for ages. Have fun.

    How to Use Plastic Wrap to Create Neat Color Effects

    An apocalyptic scene created with red ink that completely covers the plastic wrap filter.

    How to Use Plastic Wrap to Create Neat Color Effects

    How to Use Plastic Wrap to Create Neat Color Effects

    Loosely fixing colored plastic wrap to the lens, mirrors the view through a window on a rainy day.

    Pulling the plastic wrap taut reduces glare.

    An image with a slower shutter speed creates light trails as if looking through a window with raindrops on the outside.

    The post How to Use Plastic Wrap to Create Neat Color Special Effects by Megan Kennedy appeared first on Digital Photography School.


    Digital Photography School

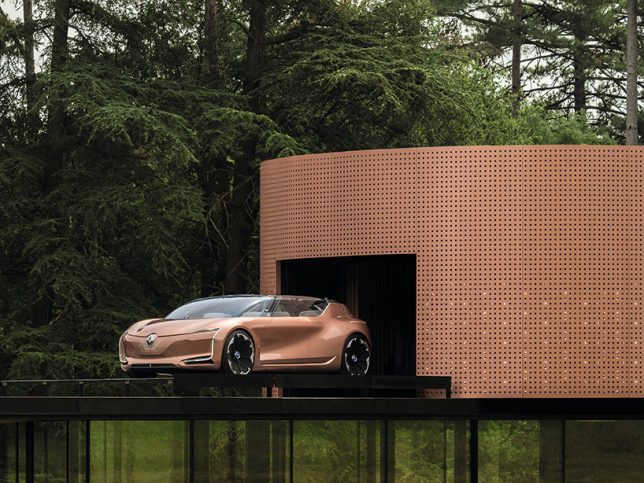
  • SYMBIOZ: Renault’s Autonomous Car Integrates Into a Matching Residence

    [ By SA Rogers in Technology & Vehicles & Mods. ]

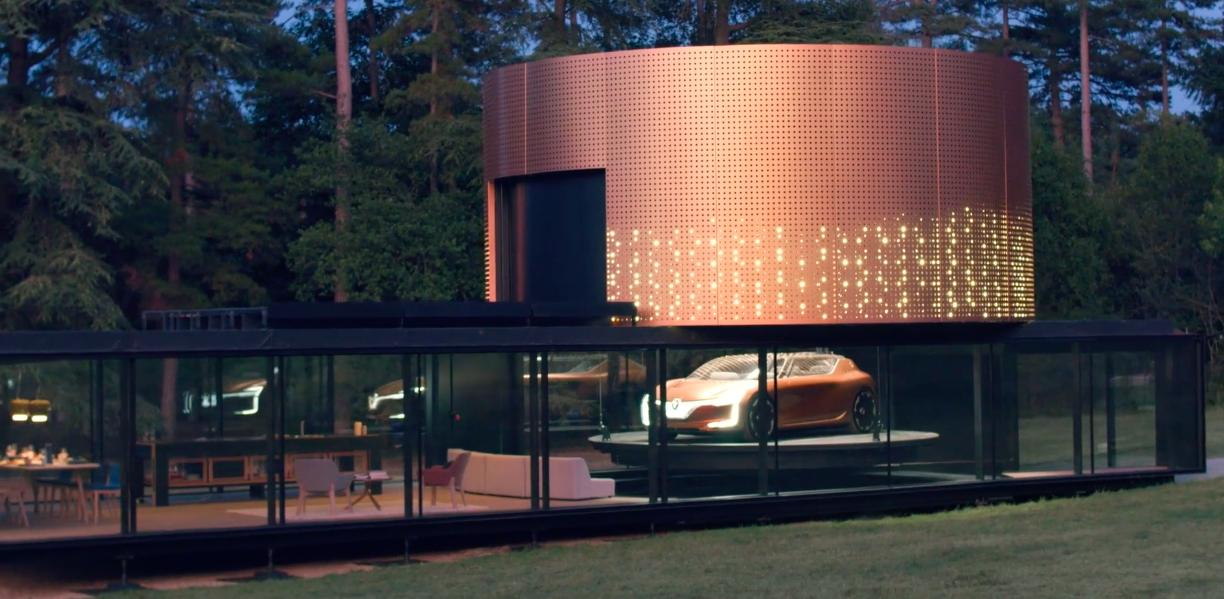
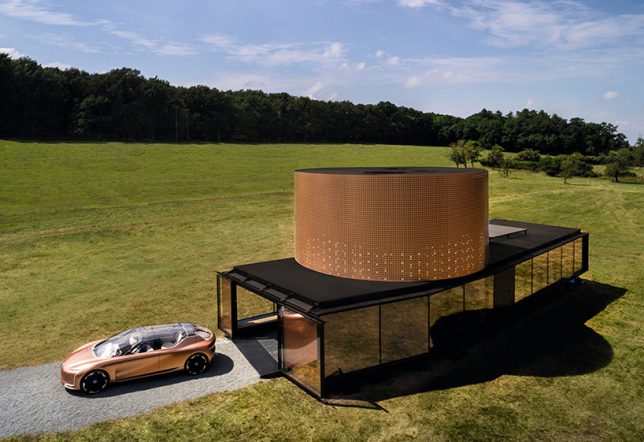
    In the future, will our autonomous vehicles simply sit within our homes like a part of the living space, eliminating the need for garages and parking spots? Probably not. At least, not for most of us. Concepts like the new SYMBIOZ car and house combo are clearly made for the richest among us, and it’s not likely that most existing housing will be retrofitted to accommodate our driverless cars, especially since many people will likely use car services instead of owning their own vehicles. But Renault’s concept shows off one vision of how some of us might integrate autonomous cars into our lives in the decades to come.

    “The way we use our cars is changing,” says Thierry Bolloré, Renault’s executive vice president and chief competitive officer. “Already a car is more than just a way to get from one place to another. It’s becoming an interactive and personalized space that connects passengers to other cars, people and objects around them. Looking to 2030 we imagine new scenarios with more efficient energy use, connectivity and autonomous driving scenarios that will improve how we live and travel.”

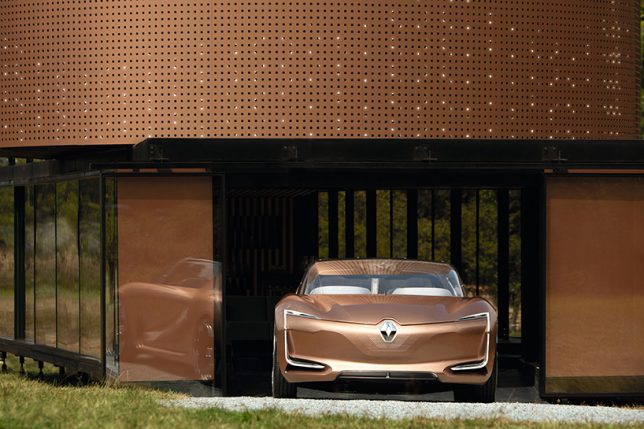
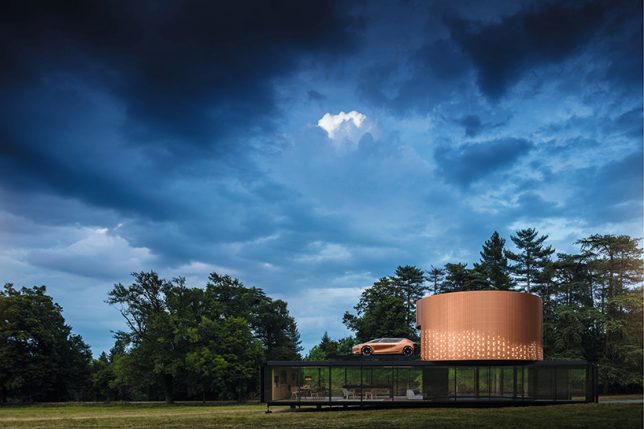
    Presented at the 2017 Frankfurt Motor Show, the SYMBIOZ concept envisions the emissions-free,  all-electric car as a room within a room, entering the home to offer additional seating and make the transition between home and travel more comfortable. It’s easy to move objects and children back and forth between the home and the car, and once the car is brought inside, it starts to charge from the home’s energy systems automatically. The car can even act as an energy generator in case the power goes out.

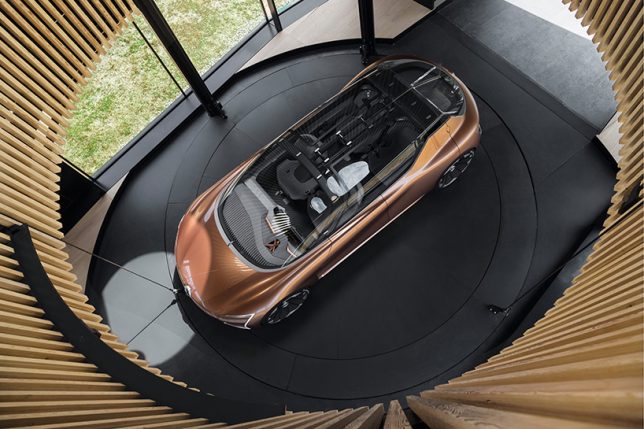
    Clean energy means the car won’t bring in nasty exhaust fumes. The car-home combo shows it parking on a special circular pad that can be raised up to the second level on demand, freeing up space below and keeping the vehicle secure. Inside the vehicle, you’ll find a retractible dashboard and front seats that pivot to the back to enable easy conversation between passengers. What do you think – would you take advantage of technology like this, if it were accessible to you?

    Share on Facebook


    [ By SA Rogers in Technology & Vehicles & Mods. ]

    [ WebUrbanist | Archives | Galleries | Privacy | TOS ]


    WebUrbanist

  • Contest – Win One of 3 Online Photography Courses from New York Institute of Photography

    Over the last few years here at dPS, we’ve run some incredibly popular competitions with one of our partners – the New York Institute of Photography – to give away to lucky dPS readers some of their great online photography courses.

    Due to popular demand – we’re doing it again this week.

    Contest

    Win One of THREE Online Photography Courses from New York Institute of Photography

    Contest – Win One of 3 Online Photography Courses from New York Institute of Photography

    For this contest, NYIP is giving away THREE prizes.

    Each will be won by a different dPS reader. Here’s what you could win:

    Fundamentals of Digital Photography Course – worth $ 749

    This is one of NYIP’s most popular courses. The beginner digital photography course is meant to help you master your digital camera.

    • Learn the basic functions of your camera so you can begin to shoot in manual mode.
    • Professional photographers will show you how to see the world like a photographer.
    • Complete a series of photography projects that help you practice your new skills.
    • Your teacher will work with you, review your photos, and help you improve throughout the program.
    • By the time you finish, you will have the skills and knowledge to take professional-quality photographs.
    • NYIP Graduates are eligible to become certified by the Professional Photographers of America (PPA).
    Contest – Win One of 3 Online Photography Courses from New York Institute of Photography

    Photo Credit – Dennis Asfour

    All students get the benefit of online courses they can work through at their own pace, as well as one-to-one feedback from professional photographers on their work!

    Contest – Win One of 3 Online Photography Courses from New York Institute of Photography

    How to Win

    To win this competition you’ll need to:

    Watch the video below and visit the course page HERE:

    Leave a comment below and tell us why you’d like to enroll in New York Institute of Photography. Please note: there is a limit of one entry per person.

    Do this in the next two weeks and then on October 15, 2017, the team at NYIP will choose the best three answers and we will announce the winners in the following days.

    The deadline to enter is October 9, 2017, Midnight PDT. Comments left after the deadline will not be considered.

    By “best” – we’re looking for people who understand what NYIP is, what the course offers, and how it suits their needs. There’s no need to write essay length comments to win – but we’re looking to hear what you like about NYIP, the course and how it would help your development as a photographer.

    This competition is open to everyone around the world no matter where you live, but there is only one entry per person, please. To enter – simply leave your comment below.

    Don’t forget to share this post with your friends!

    NYIP logo440x232black

    Learn more about New York Institute of Photography here.

    Disclaimer: NYIP is a paid partner of dPS.

    The post Contest – Win One of 3 Online Photography Courses from New York Institute of Photography by Darlene Hildebrandt appeared first on Digital Photography School.


    Digital Photography School

  • Calumet UK and Wex Photographic will officially merge tomorrow

    Two of the biggest photography retailers in the UK are going to officially merge tomorrow. This marks the culmination of a process that was set in motion way back in March when Calumet owner (and former Bowens owner) Aurelius bought Wex Photographic and announced that the Calumet competitor would merge with its former adversary.

    If you visit the Calumet UK website today, you’re greeted by the following message:

    “From 26 September, Calumet Photographic Limited UK will be merging with Wex Photographic, offering an improved experience and wider range of products to photographers across the UK,” reads the statement. “Later this week, this website will be closed and moved to www.wexphotographic.com.”

    The statement goes on to assure Calumet customers that there will be “minimal disruption” to service, and any outstanding pre-orders, back-orders, or vouchers will be honored under the new brand.

    For more information about the merger and how it will (or won’t) affect customers, you can visit this FAQ page on the Wex Photographic website.

    Articles: Digital Photography Review (dpreview.com)