Blog

  • Video: Photographer shoots one model with three different vintage lenses

    Photographer and filmmaker Mathieu Stern is good to his word. He said he would start a series of videos highlighting vintage lenses, and he has. In his second installment of “three vintage lenses, one model” he shoots the same model (obviously) using the Konica Hexanon 28mm f/3.5, Minolta MD 100mm f/2.5, and Industar 50-2 50mm f/3.5.

    You might remember his previous test where he compared the Canon FD 50mm f/1.4 S.S.C., the Soligor 21mm f/3.8, and the Helios 103 53mm f/1.8 (which he had modified for tilt focusing).

    This comparison is shot exactly the same way: no overbearing voiceover, just a quick introduction to the lenses before he goes out and shows all three in action at three different locations. Results are shown on-screen so you’ll want to watch this full screen at the highest resolution your internet connection can handle.

    Let us know in the comments which of the three lenses is your favorite, and if you like this comparison check out Mathieu’s YouTube channel for a lot more vintage gear goodness.

    Articles: Digital Photography Review (dpreview.com)

  • Judge determines FAA drone rules take precedence over local regulations

    A court has ruled that federal drone laws trump local drone regulations in instances where the two are in conflict, setting a new and very important precedent for commercial and recreational drone pilots alike. The ruling was passed down by US District Judge William G. Young during a legal case involving the city of Newton, Massachusetts, and its drone regulations that are even more restrictive than the FAA’s rules.

    According to the Wall Street Journal, the lawsuit was brought by Newton resident Michael Singer, who challenged four Newton provisions including a requirement to get permission before flying a drone over private property. The city had argued that the FAA allows for the local co-regulation of civilian drones, but Judge Young ruled otherwise, in part because the local regulations were sometimes in direct conflict with the FAA’s.

    For instance, whereas the FAA allows small drones to be operated below 400ft, the city of Newton’s provisions banned the operation of drones below that altitude if they were over private property. This left pilots only one legal option: get permission from each property owner over whose property the drone would pass. Otherwise you’d either be violating Newton’s laws or the FAA’s regulations.

    Referring to this particular law, Judge Young stated, “This thwarts not only the FAA’s objectives, but also those of Congress for the FAA to integrate drones into the national airspace.”

    Newton drone provisions that weren’t challenged by the lawsuit have been left in place, and the city has indicated that it may appeal the ruling.

    Articles: Digital Photography Review (dpreview.com)

  • Snapchat ‘sky filters’ use augmented reality to replace the sky with stars, sunsets and more

    File this one under minor smartphone photography news: it seems Snapchat is using its augmented reality powers to expose non-photographers to the magic of dropping a new sky into your photos. The newly released feature—dubbed ‘sky filters’—can take a regular boring old blue sky and replace it with a colorful sunset, starry night scene, and more.

    Sky Filters are already rolling out now to both iOS and Android users, and like their other AR features, this one will rotate daily so you can experience a variety of world-bending effects.

    Articles: Digital Photography Review (dpreview.com)

  • A Guide to Creating Stunning HDR Images

    The simple contrast between light and shadow can have a powerful effect on a photographic image. In fact, quite often you may find that contrast is what inspires you to photograph a particular scene or subject in the first place. Sometimes, however, the contrast of a scene exceeds the ability of your camera to contain all of that information. Fortunately, with the help of powerful software such as Aurora HDR 2018, you can transform a scene with high contrast into a stunning photographic image with tremendous detail. In this article, I’ll show you how it’s done.

    Photographing the Scene

    The first step in creating a high dynamic range (HDR) image is to capture a sequence of photos. Put simply, when you aren’t able to capture a single photo that includes detail in the darkest shadows and the brightest highlights of a scene, you’ll want to capture multiple exposures and blend them together with software such as Aurora HDR 2018.

    Bracketed Exposures A Guide To Creating Stunning HDR Images

    Most cameras include an automatic exposure bracketing (AEB) feature that can help streamline the process of capturing the several exposures which are needed to create an HDR result. If your camera only enables you to capture a bracket of three exposures, you can separate the exposures by two stops each. If you are able to capture a bracketed sequence of five or more photos you can separate the exposures by one stop each. It is highly recommended that you use the RAW capture mode for these exposures, to ensure there is maximum information available for creating your final image.

    In most cases you will want to keep the lens aperture setting fixed, altering the shutter speed for each frame to adjust the exposure. This will help ensure consistent depth of field in the scene. The ultimate goal is to be sure that you have one exposure that is dark enough to include full detail in the bright areas of the scene, one exposure that is bright enough to include full detail in the dark areas of the scene, and exposures in steps of one or two stops to transition between the darkest and brightest exposures.

    Creating the Initial HDR

    There are two basic steps to creating a final HDR image. The first is to assemble the multiple exposures into a single image with a tremendous amount of information. The second is to perform what is referred to as “tone mapping” or translating the huge range of tonal and color values into the range of values available for a “normal” photographic image.

    With Aurora HDR 2018, there are a couple of ways you can start the process of creating the initial HDR image. If you’re using other software such as Lightroom or Photoshop as the foundation of your overall workflow, you can employ Aurora HDR 2018 as a plug-in for these other software tools. The other option is to simply open the original captures directly from within Aurora HDR 2018.

    Open your images

    When you initially launch Aurora HDR 2018 you’ll see the “Open Image” button. You can click that button, or choose File > Open from the menu to get started. Note, by the way, that you could also take advantage of the “Batch Processing” option to assemble multiple HDR images in a single process.

    Aurora Open Images - A Guide To Creating Stunning HDR Images

    After selecting the option to open images, you can navigate to the folder containing the photos you want to assemble into an HDR image, and select those images. Then click the Open button to initiate the process of creating your HDR image.

    The images you selected will then be presented as thumbnails so you can confirm which photos are going to be assembled into an HDR image. More importantly, however, you can adjust the settings for how the individual captures should be combined.

    HDR options and settings

    Almost without exception, you’ll want to turn on the “Alignment” checkbox. Even if you used a tripod when capturing the bracketed frames, it is possible that there was a tiny movement of the camera during the capture process. By having the Alignment checkbox turned on, Aurora HDR 2018 will analyze the contents of the images and fine-tune the positioning of each to ensure perfect alignment.

    Aurora Initial Settings - A Guide To Creating Stunning HDR Images

    Next, click the popup with the gear icon to adjust the settings for assembling your HDR image. If there was any movement of subjects within the frame, such as people or cars, or even trees blowing in the breeze, you’ll want to turn on the “Ghost Reduction” checkbox. In many cases having this option enabled can completely eliminate the “ghost” effect that results from objects moving within the frame from one exposure to the next.

    Once you have turned on the “Ghost Reduction” checkbox, you can choose which exposure to prioritize by selecting it from the “Reference image” popup. In most cases, you will want to choose the image that would provide the best overall exposure if you hadn’t captured bracketed exposures in the first place.

    You can also choose the strength setting for ghost reduction, depending on how much movement there was in the scene you were photographing. If there was minimal movement in the scene you can use the “Low” option. However, there are also settings for Medium, High, and Highest to help you achieve good results even when there was considerable movement within the scene you photographed.

    Other settings

    For many situations where you might employ HDR techniques, you may be photographing a scene with relatively low light levels. If so, you can turn on the “Color Denoise” checkbox to apply noise reduction to your original captures as Aurora HDR 2018 is processing them.

    It can also be helpful to turn on the “Chromatic Aberration Removal” checkbox so that any color fringing that appears in the captures can be removed. This fringing is most common when using a wide-angle lens to photograph a high-contrast scene, but it can also occur with other lenses or photographic situations.

    Once you have established the desired settings for the assembly of your HDR image, click the “Create HDR” button. Aurora HDR 2018 will then combine the multiple exposures you selected into a single high dynamic range result.

    Presets and Beyond

    Put simply, an HDR image contains a greater range of tonal information that can actually be displayed on a computer monitor or presented in a printed output. It is, therefore, necessary to translate that huge range of information into the range used for a normal digital photo. That process is referred to as “tone mapping”. Fortunately, Aurora HDR 2018 makes it easy to exercise considerable control over the interpretation of your image during this process.

    One of the great features of Aurora HDR 2018 is the ability to use a variety of presets to quickly achieve the optimal look for your image. Even better, these presets are presented as thumbnails that provide an actual preview of the effect you’ll achieve with each preset. In other words, there is no guessing involved. You can browse the preset thumbnails, and easily find a good starting point for processing your photo.

    Preset Categories - A Guide To Creating Stunning HDR Images

    The presets are organized into categories, so you can start by clicking the “Categories” popup at the center of the thumbnail display at the bottom of the Aurora HDR 2018 interface. Choose a category from the popup (including an option to view all presets at once), and then browse the thumbnails to find a preset that looks good to you. To apply the effect, simply click on the thumbnail for the desired preset.

    Adjust to your taste

    Of course, the presets are merely a starting point in the process of optimizing your interpretation of the HDR image. You can still exercise tremendous control over the image with a variety of adjustments.

    First, you can tone down the effect of the selected preset by reducing the strength with the “Amount” slider. As soon as you select a preset, you’ll see a slider on the thumbnail for that preset. Simply drag that slider to a lower value if you want to reduce the strength of the overall effect.

    In addition, there is a wide variety of adjustment controls available on the right panel within Aurora HDR 2018. The preset you selected will have changed the value for many of these controls, but you can go far beyond the effect applied by that preset.

    You will probably want to get started in the “HDR Basic” set of controls, where you can fine-tune the overall color and tonality of the image. For example, you can bring out more detail in darker areas of the image by increasing the value for Shadows. In the Color section, you can adjust the intensity of colors in the photo.

    HDR Basic A Guide To Creating Stunning HDR Images

    Many options available

    You’ll then want to move on to some of the other powerful adjustments available. The HDR Structure section provides controls for enhancing the overall appearance of detail in the image. You’ll also find a variety of special effects available, including a polarizing filter effect, graduated adjustments to refine the top or bottom areas of the image, color tinting, dodging and burning, a vignette effect, and much more.

    Be sure to also take a look at the Lens Correction and Transform controls available via a popup at the top of the right panel in Aurora HDR 2018. These enable you to correct for lens distortion as well as perspective issues caused by your position relative to the subject you photographed.

    As you refine the settings for the many available adjustments in Aurora HDR 2018, you will likely find it helpful to see a “before” and “after” view of the image. You can click and hold your mouse on the “Quick Preview” button (the eye icon) at the top-center of the Aurora HDR 2018 interface to see the image without any adjustments applied. Then release the mouse to see the final effect. You can also enable the Compare view with the button to the right of the Quick Preview button.

    Compare View A Guide to Creating Stunning HDR Images

    Tone mapping a single image

    By its nature, creating a high dynamic range image involves capturing multiple exposures and combining them into a single image with tremendous detail. However, the powerful adjustments available in Aurora HDR 2018 can also be used to improve the appearance of a single photo.

    To use Aurora HDR 2018 to process a single image, you can simply open that image. Instead of selecting multiple exposures when you initiate the process of working in Aurora HDR 2018, you can select a single image. The overall workflow is exactly the same as when assembling an HDR image from multiple exposures, and all of the same adjustments are available.

    So after getting familiar with the use of Aurora HDR 2018 to process a series of exposures into a single stunning HDR result, you can use the same basic process to apply similar adjustments to individual photos.

    Single Image - A Guide to Creating Stunning HDR Images

    Special Pre-Order Offer Now Available!

    Don’t miss this opportunity to pre-order Aurora HDR 2018 with over $ 150 worth of bonuses, all for only $ 89. (For a limited time.)


    Only the beginning

    The ability to assemble multiple exposures into a single image containing a tremendous amount of detail and texture provides you with incredible creative control as a photographer. Aurora HDR 2018 provides a powerful solution for creating high-quality HDR images and creating unique interpretations of those images with a variety of features and effects.

    In this article, you’ve learned the basic process of creating great HDR images using Aurora HDR 2018. But this is only the beginning. If you spend a little time exploring the many adjustments available within Aurora HDR 2018, you’ll be able to create stunning HDR images with ease.

    Disclaimer: Machpun is a Paid Partner of dPS

    The post A Guide to Creating Stunning HDR Images by Tim Grey appeared first on Digital Photography School.


    Digital Photography School

  • No Edits Needed for a Picture Perfect Moment

    Warning: preg_replace(): The /e modifier is no longer supported, use preg_replace_callback instead in /home/forge/content.photojojo.com/content.photojojo.com/wordpress/wp-content/plugins/ozh-better-feed/inc/feed.php on line 134


    Photojojo

  • Review of the DJI Spark Drone

    DJI doesn’t particularly need an introduction. Their Phantom series brought drone video to the average Joe, while the Mavic Pro brought it closer to the tech and vloggers communities. Now, the DJI Spark aims to bring it to everybody. This tiny wonder goes places no toy drone could hope to go and really packs the tech of its older siblings into a tiny package.

    Review of the DJI Spark Drone

    Specs of the DJI Spark

    The DJI Spark is not much more than palm-sized, and I don’t have particularly big hands. Weighing in at 300 grams (little more than half a pound), you’d think it wouldn’t be up to much, but as I live close to the sea, most of my flights have been in high winds. The DJI Spark has coped admirably, especially considering its petite frame.

    Review of the DJI Spark Drone

    Aerial views are a breeze in the wind with the DJI Spark.

    Toy drones for practice

    Let me give you a little of my drone background. I’ve wanted a drone for ages, but with my history of new gear accidents, added to seeing some of my friends destroy really expensive drones, I avoided getting a good one. Instead, I bought loads of toy drones and learned to fly them. While my agenda was always to get a proper drone, flying toy drones is a lot of fun. Best of all, the price means you’re not afraid of crashing them. I found this a great way to get comfortable with flying.

    Review of the DJI Spark Drone

    A seascape frame from a DJI Spark video.

    Let’s look at the rest of the DJI Spark’s specs. It has a 12MP JPEG only stills mode, with video capabilities limited to 1080p 30fps video. This camera sits on a 2-axis gimbal, which, while not in the league of the 3-axis capabilities of bigger drones, works quite well in practice.

    The field of view is 25mm equivalent and looks great. The battery is an intelligent type and has its own firmware independent of the drone itself. Charge time is quick, and as well as the dedicated charger, there’s a micro USB port on the drone that can be used to charge the battery. That’s handy when you’re out and have a power bank at the ready.

    DJI Spark Options

    The DJI Spark comes as a standalone device, flown via the DJI Go 4 app for $ 499 and as the Fly More kit combo with a controller, spare battery, prop guards, 3 battery charger and a bag for $ 699. Don’t waste your money on the basic version. Get the kit. Why?

    Well, flight time is quoted at 16 minutes, but it’s less in practice. You’ll need the extra battery after your first flight because you’ll want to fly more! But the main reason is the controller. With just the phone, you’re limited to using an ad hoc phone Wi-Fi network to control the Spark. This is a meager 30m radius. You’ll run out of fun really quickly.

    Review of the DJI Spark Drone

    In Flight

    Now for the crucial question. How does it fly? After flying toy drones for a while, I’m well used to how the controls work. My left hand has throttle and spin, with the right doing forward/back and left/right. It becomes natural quickly. Because the DJI Spark uses GPS for positioning, as soon as you stop flying, the drone stops moving. It’s locked solidly in place.

    Review of the DJI Spark Drone

    I began using the Beginner mode from the phone only and moved to the controller once I was comfortable. Beginner mode reduces both the distance and speed the Spark can travel. It’s perfect for learning the ropes.

    There’s one thing I will stress. Compared to toy drones, the Spark almost flies itself. It makes me regret not getting a proper drone sooner. However, those toy drones did give me more confidence in flying. If you’ve been holding out and just want a drone with a quality camera for basic photography, this is the one for you.

    Issues

    Are there any issues with the DJI Spark? Yes. I’m happy enough to use JPEG and there are exposure controls available, but there is one thing that I’m not happy about, sharpening issues. In-camera sharpening on the files is horrible. I’m sure they would print fine, but looking at the files at 100%, it’s just horrible. There’s no way to turn it down either. Obviously, DNG would be better, but that’s a selling point of the Mavic Pro.

    Review of the DJI Spark Drone

    Review of the DJI Spark Drone

    100% view showing the weird sharpening and artifacts with the JPEG.

    The flight time for the Spark is quite low in comparison to its older siblings. It’s quite long compared to toy drones though and comparing battery sizes, it’s not a wonder. For the size of the drone, the flight time is acceptable.

    The App

    The DJI Go 4 app is easy to use and contains all the information you need while flying. High wind warnings, along with information on the home point and general flying information show on the screen as you fly. Height, distance and velocity show on the bottom of the screen. There’s a compass in the bottom left. Always check the direction the drone is facing before take off so you can align the drone if it goes out of visual range.

    Review of the DJI Spark Drone

    Gesture Control

    The big selling point in DJI’s advertising is Gesture Control. To use this, you power it on (single tap, then long hold on the power button), then tap twice. If the sensors pick you up, the props will start to rotate and the Spark will take off.

    A series of gestures control the device and placing your hand under it will make it land on your palm. Does it work? Yes, it does. Is it a gimmick? Yep, it’s fun, but only up to a point. Flying with the controller is the only way to go. You get bored with the Jedi palm control rather quickly, though most people find it really impressive.

    Sport Mode

    In the center of the controller is a button marked sport. This removes the handbrake and turns the Spark into a fun monster. It isn’t immediately obvious that you don’t need the app to fly the Spark. Turn on the controller, then turn on the Spark. Once connected you can fly the Spark directly from the controller with Sport mode on.

    I found that it wouldn’t fly for me without Sport mode on. Aim the two joysticks in and down to start the propellors, then throttle to take off. Enjoy! It’s fast and furious, but watch out with braking as it needs room to stop or reverse even.

    Verdict

    The DJI Spark is a great starter drone with a usable camera. It’s fun to use and easy to fly. If you need 4K and DNG, don’t even look at it, go for the Mavic Pro. If these aren’t an issue, you’ll love the Spark, but save yourself some pain and get the kit version.

    Pros

    • Small size.
    • Stable even in high winds.
    • Good mix of control options.
    • Beginner mode useful for learning to fly, as is the in-app Flight Academy.
    • Fun. It’s just loads of fun, especially in controller only Sport mode.
    • Controller flying is great.

    Cons

    • JPEG only, with terrible sharpening.
    • 1080p with only 30fps. Obviously, a tactic to upsell to one of the big brothers.
    • Low flight time; acceptable, but still a con.
    • Needs controller for best use, but the kit is a great value.

    The post Review of the DJI Spark Drone by Sean McCormack appeared first on Digital Photography School.


    Digital Photography School

  • Getty Images bans Photoshopping models to look thinner thanks to French law

    In 2015, France passed a law that will require some commercial images with a digitally retouched model to have a label notifying viewers about the alterations. That requirement will be effective starting October 1st, 2017, and Getty Images is preparing for that day with a policy change of its own.

    Announced in an email that DPReview has acquired from a reader, Getty has updated its Creative Stills Submission Requirements to specify that it will no longer accept images of models whose bodies have been edited to look either thinner or larger.

    The law doesn’t extend to minor digital edits, such as fixing skin blemishes, altering hair color, or altering nose shape; however, edits that change a model’s body shape require a disclosure. In response, Getty Images says that starting October 1st, photographers may not “submit to us any creative content depicting models whose body shapes have been retouched to make them look thinner or larger.”

    Submitting this type of altered image will result in the photographer breaching both submission guidelines and their agreement with the company, Getty warns. The same change applies to iStock submissions, as well.

    Magazines and other entities in France that use these altered photos without proper disclosure face a fine of up to €37,500 (~$ 45,000 USD).


    DPReview has reached out to Getty Images for comment on the policy change, as well as clarification about how broad this change is, and what the company intends to do about the altered images already in its catalog. We will update the post if and when we hear back.

    Articles: Digital Photography Review (dpreview.com)

  • Nature Sets the Scene in Hot River, Iceland

    Warning: preg_replace(): The /e modifier is no longer supported, use preg_replace_callback instead in /home/forge/content.photojojo.com/content.photojojo.com/wordpress/wp-content/plugins/ozh-better-feed/inc/feed.php on line 134


    Photojojo

  • Prefab Plyscraper: World’s Tallest Timber Building Tops Out at 173 Feet

    [ By WebUrbanist in Architecture & Public & Institutional. ]

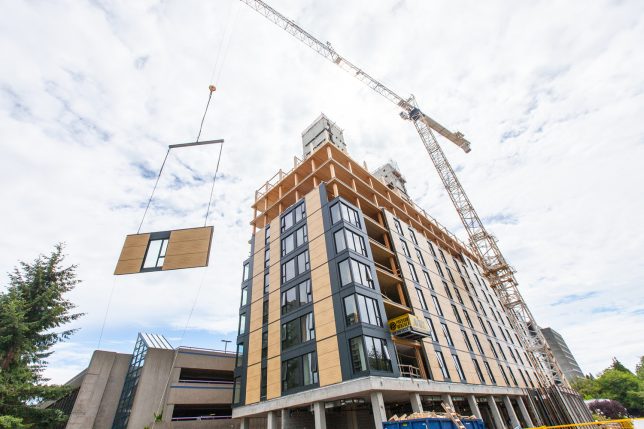
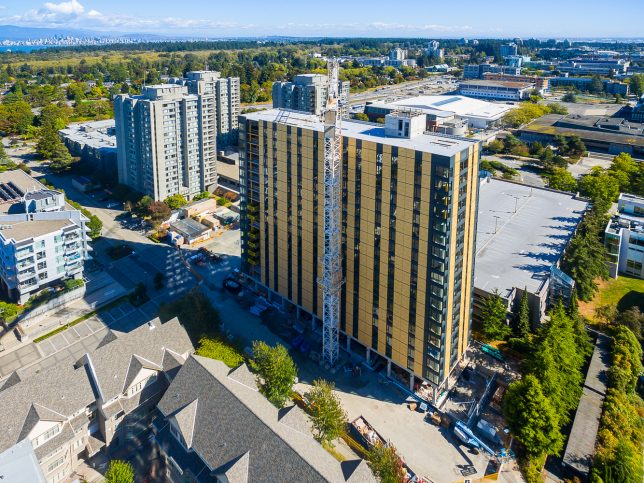
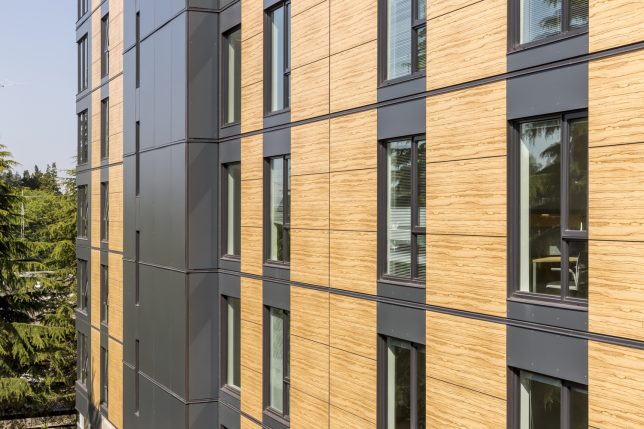
    On the University of British Columbia’s campus in Vancouver, a new record-setting wood structures highlights the many advantages of a growing trend: vertical timber construction. Brock Commons Tallwood house is the highest of its kind to date, providing housing for over 400 students.

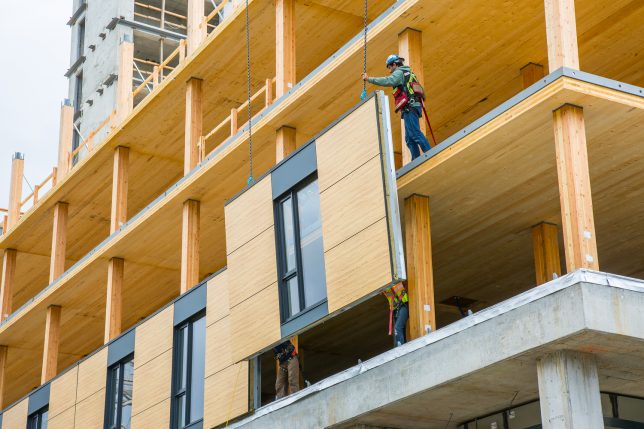
    The Canadian firm behind its construction, Acton Ostry Architects Inc, says that using wood allowed for a much faster building process. Offsite testing of wood-to-wood connections and structural stability meant less time onsite spent figuring things out. Combined with prefabrication techniques, these approaches helped the builders finish the tower in just 70 days.

    In addition to cost and time savings, wooden structures like this one are lighter weight, requiring less energy input during construction while also making them more flexible and resistant to earthquakes.

    Sustainable forestry also enables them to sequester carbon while using a renewable resource — wood buildings like this open the door to carbon-neutral or even carbon-negative projects. Use of glue-laminated beams and columns also allows thinner trees and offcuts to be used in the construction process, reducing waste and growth time for harvested plants.

    Some concrete was still required for the elevator cores, metal was needed for connections, and windows, of course, required glass. Still, compared to steel-framed structures, the amount of these materials used was dramatically reduced. And this project is not alone — around the world, forward-thinking architects and developers are beginning to realize that wood is a useful material for building tall.

    Share on Facebook


    [ By WebUrbanist in Architecture & Public & Institutional. ]

    [ WebUrbanist | Archives | Galleries | Privacy | TOS ]


    WebUrbanist

  • K-Pan is a 3D-printed panoramic film camera that shoots 6 x 14cm photos

    The 3D-printed camera formerly known as the ‘Cycloptic Mustard Monster’ has launched on Kickstarter under the name K-Pan Panoramic Camera. This medium-format analog camera has the same design showcased earlier this year, and assuming the crowdfunding campaign is successful, it’ll be made available to buyers as a DIY kit. Creator Paul Kohlhausen is also offering 10 limited edition pre-assembled camera units.

    The K-Pan’s components are printed from SLS nylon, and once assembled, the camera measures 22cm x 9cm / 8.6in x 3.5in and weighs 350g / 12oz (without a lens). Users supply their own 4 x 5 lens and 120 film, of which the camera shoots five 6 x 14cm frames per roll. When assembled according to its default design, the K-Pan’s focus is set to infinity; however, users can change that by inserting spacer brackets as desired.

    Kohlhaussen is offering K-Pan in various bundle options with pledges starting at £270 / $ 364 for a standard kit. Shipments to backers are available globally and are anticipated to start in March 2018.

    Articles: Digital Photography Review (dpreview.com)