Blog

  • Preserving Architectural Gems: 8 Beijing Hutong Plug-Ins Update Historic Shells

    [ By SA Rogers in Architecture & Houses & Residential. ]

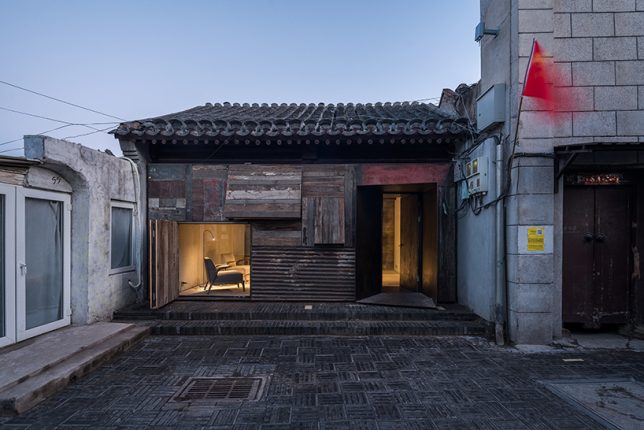
    Passing through historic Beijing neighborhoods, seeing only the preserved street-facing facade, you’d never know that surprisingly modern structures contrast with aging surfaces within the courtyards just out of sight. Instead of just demolishing the ‘hutong’ courtyard houses found only in this Chinese city, architects are adapting them to modern life, slotting houses, hostels, museums, tea houses, cinemas and more under the existing roofs.

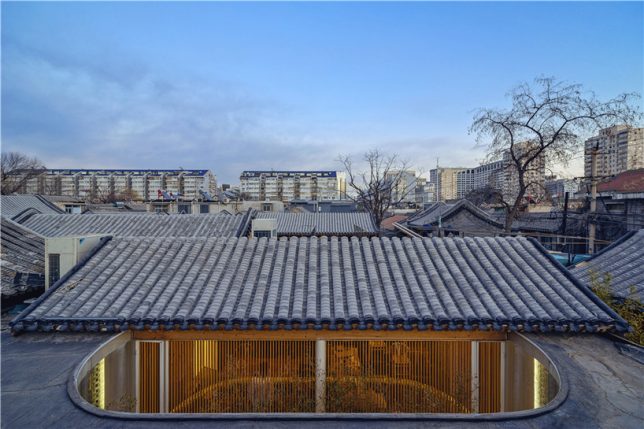
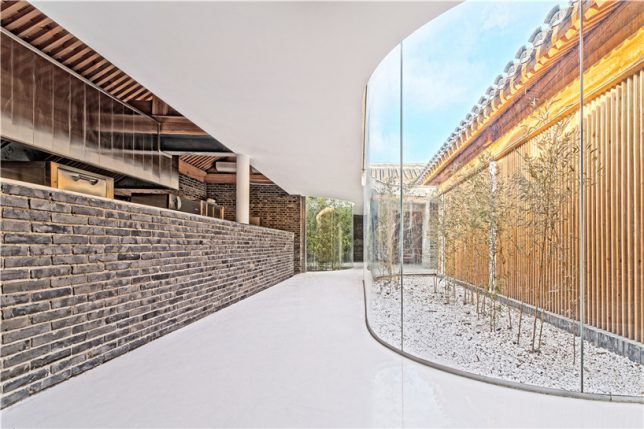
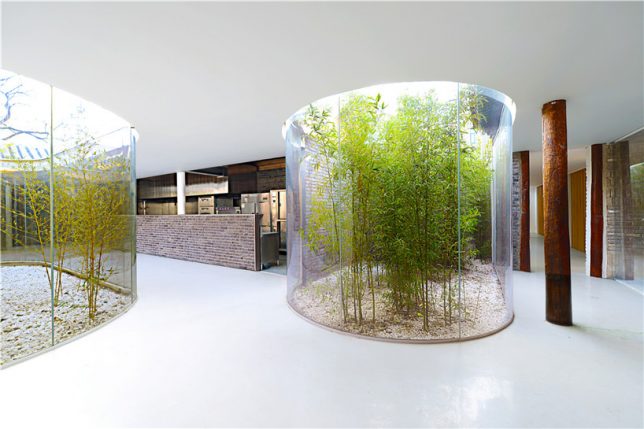
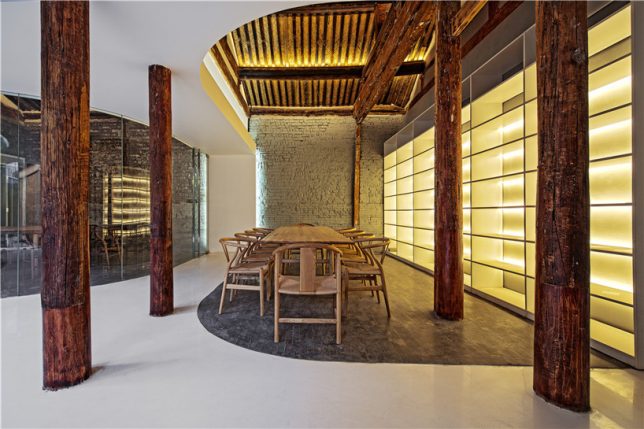
    Tea House by Archstudio

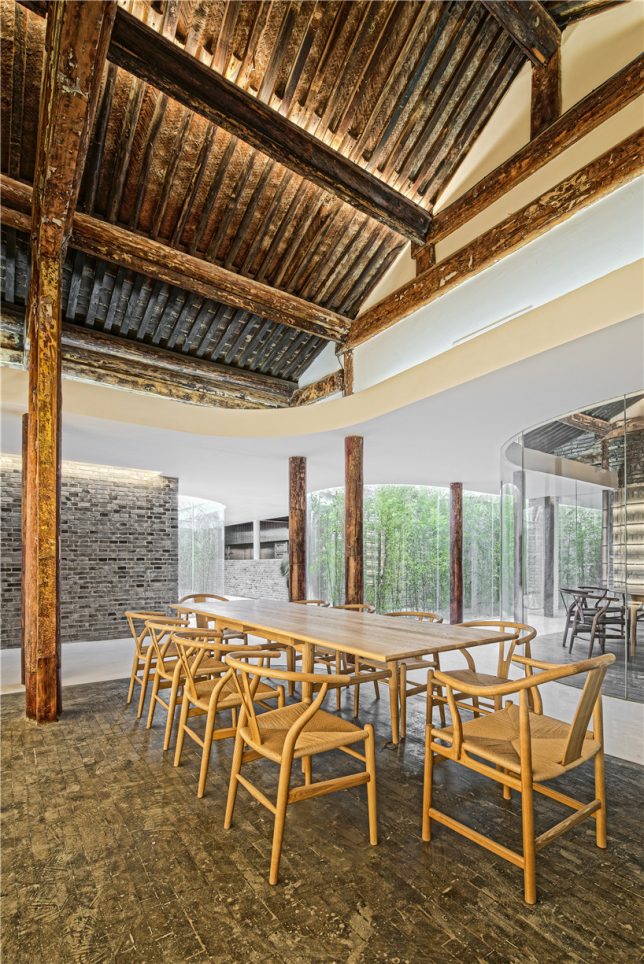
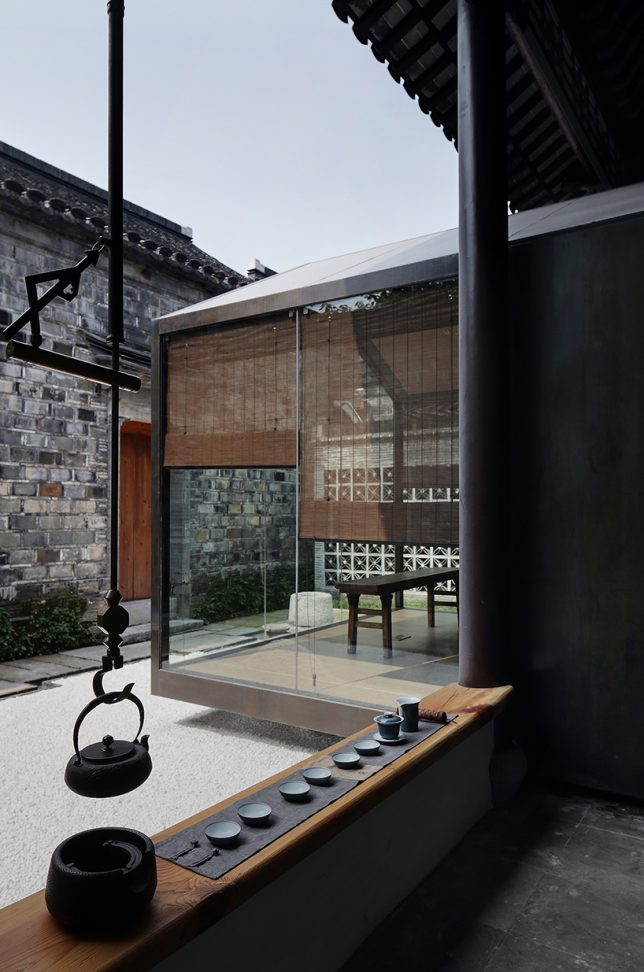
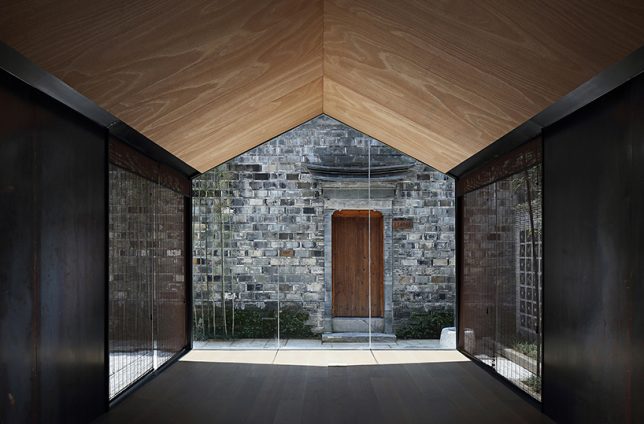
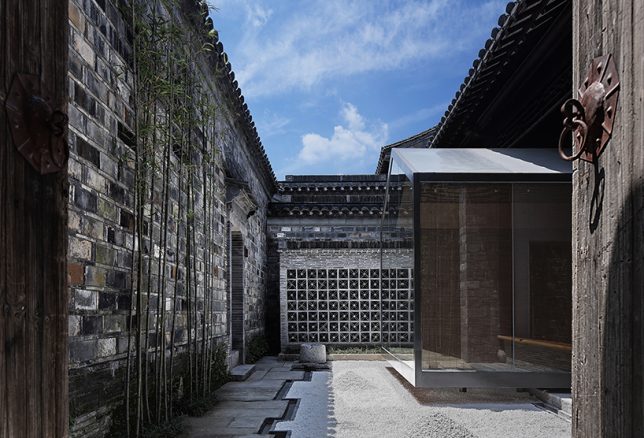
    In a truly stunning adaptation, Archstudio has completed a tea house and cafe within an existing hutong house, enclosing it from above with new roofs while leaving atriums open for bamboo and other greenery. The intervention connects the site’s five existing structures with a glazed corridor following the path of the original courtyard, forming three tea houses with their own unique views.

    Twisting Courtyard by Archstudio

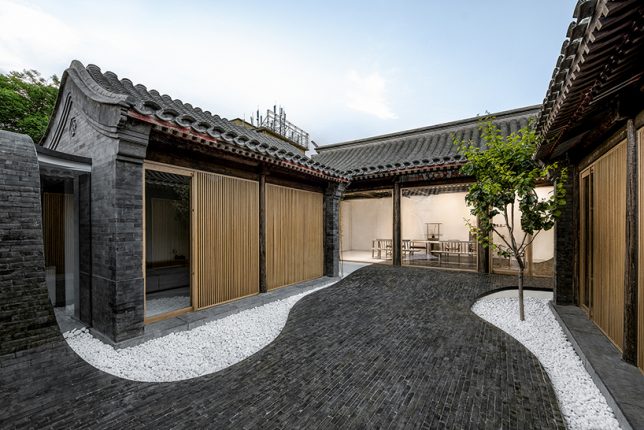
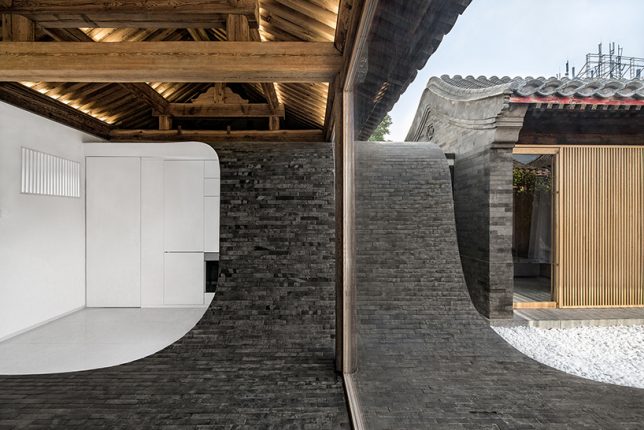
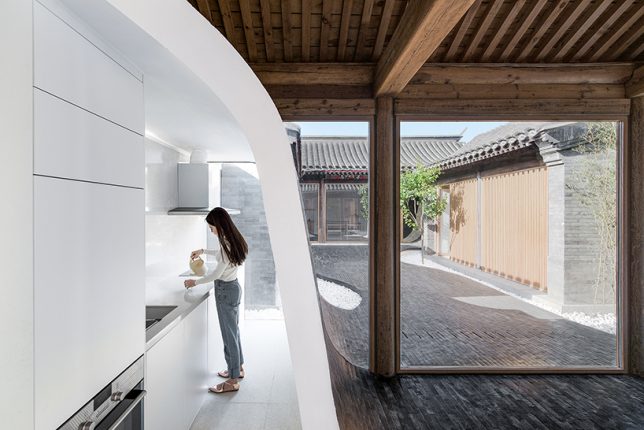
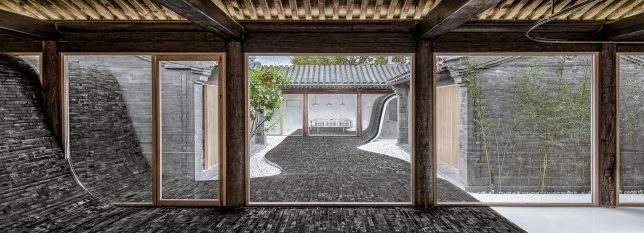
    A river of glossy grey bricks streams through the courtyard of a Siheyuan house in the Paizihutong area of Beijing, upgrading the historic architecture with spaces that meet modern requirements of living. Archstudio‘s stunning pathway arches over the new volumes and even continues right into the dining room as part of the floor.

    Mini Hostel Inside Hutong by ZAO / standardarchitecture

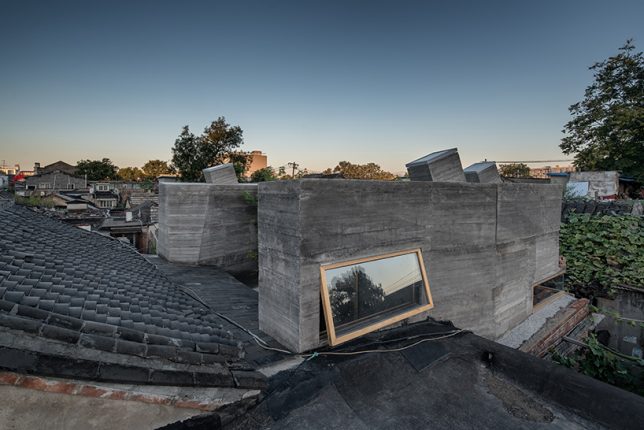
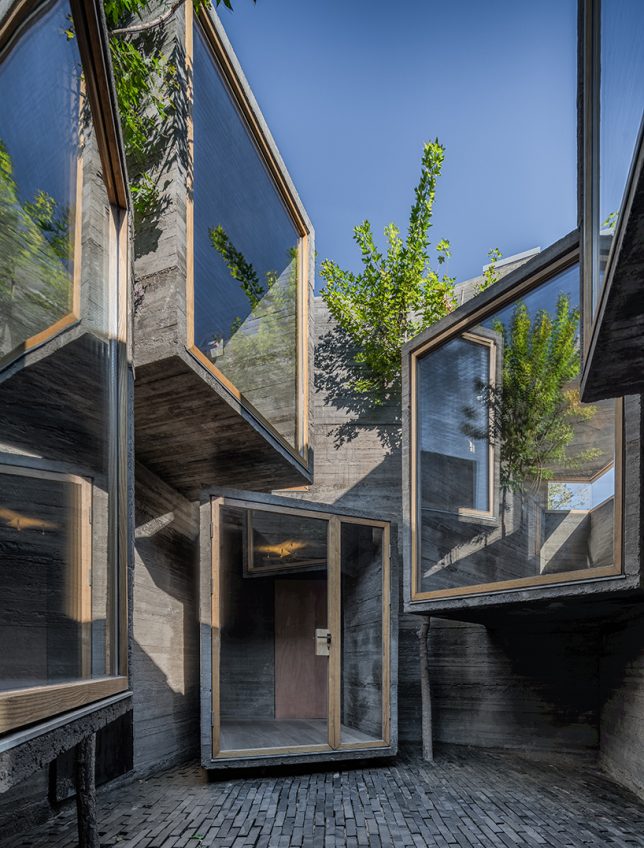
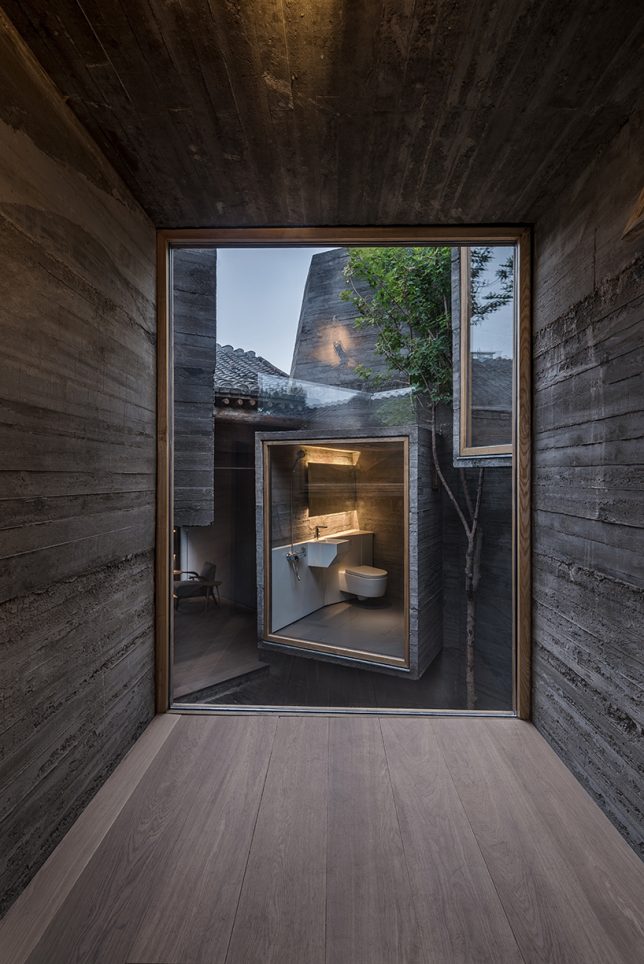
    The firm ZAO / standard architecture inserted a small hostel inside a renovated Beijing hutong, exploring the potential of small-scale accommodations that slot right into the city’s existing architecture instead of displacing it. The glazed facades of volumes made of board-formed concrete project into the courtyard, facing each other (in some cases, with views of toilets, much to the horror of many Westerners looking at these images.) “The result is an architectural operation that brings back the courtyard as generator of the program, as it activates the building by creating a direct relationship with its urban context.”

    Lai Yard House by Minggu Design

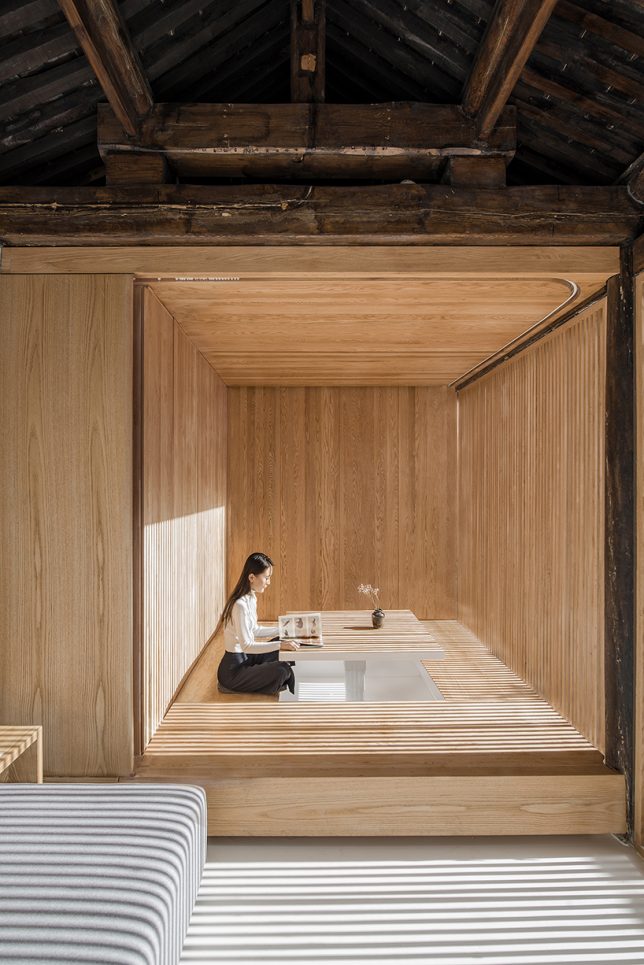
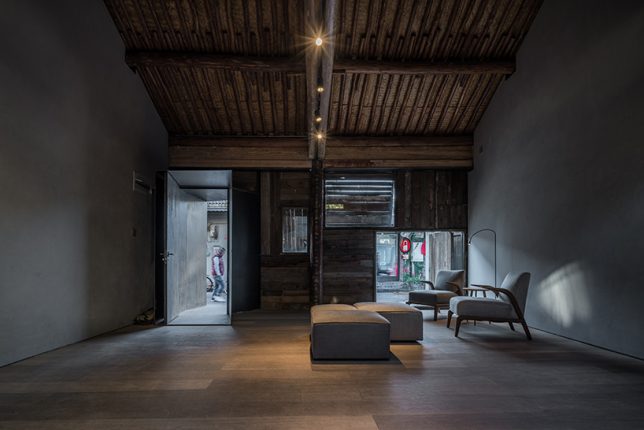
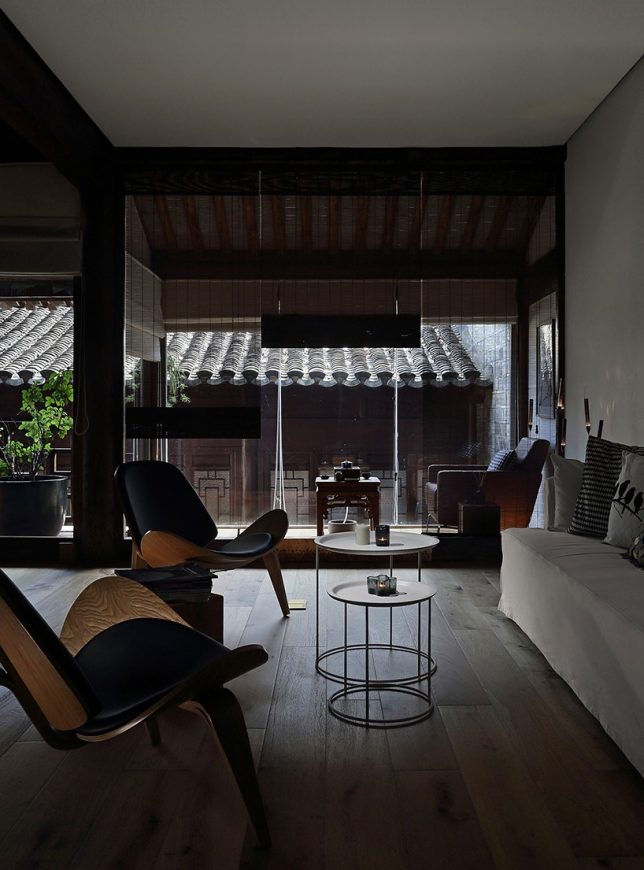
    Tucked away behind weathered brick facades near the ancient city wall of Beijing, this courtyard home was crumbling. Minggu Design protects and preserves the original Chinese architecture while enhancing and adapting it for the 21st century, inserting volumes made of wood and glass to complement the surroundings without overpowering them. They used the new volumes to intentionally block and filter light to the original interior, creating a tranquil cave-like feel.

    Next Page – Click Below to Read More:
    Preserving Architectural Gems 8 Beijing Hutong Plug Ins Update Historic Shells

    Share on Facebook


    [ By SA Rogers in Architecture & Houses & Residential. ]

    [ WebUrbanist | Archives | Galleries | Privacy | TOS ]


    WebUrbanist

  • Godox XPro-N wireless flash trigger for Nikon boasts TTL, HSS and more for just $70

    Godox has launched a Nikon version of the XPro-C 2.4GHz wireless flash trigger it announced for Canon last month. The new model—aptly titled the XPro-N—is equipped to control Godox’s X1 system, and is currently listed by online retailers as available for pre-order with shipping planned to start on October 31st.

    This Nikon version will be joined by models for Sony, Fujifilm, and MFT throughout the remainder of the year.

    As with the Canon version, the new XPro-N model sports a large dot-matrix LCD alongside five physical buttons. The display shows five groups, one group per physical button, as well as data pertaining to each group. The trigger supports HSS (up to 1/8000), TTL, and manual (1/1 – 1/256) control. There’s also support for TTL-Convert-Manual (TCM) functionality, which allows you to meter flashes in TTL, then switching to manual mode with the settings automatically adjusting to keep an equivalent output.

    The XPro-N is listed for pre-order at $ 70 on Amazon.

    Articles: Digital Photography Review (dpreview.com)

  • 4 Tips for the Minimalist Photographer

    Tips for the Minimalist Photographer

    I’ve photographed countless sessions in the past nine years. Weddings, families, children, newborns, seniors, huge extended family groups, community events, products for companies, bike races, fine art, birth stories. . . You name it, I have probably photographed it. Knowing that you might be a little bit surprised when I tell you what equipment I have in my bag:

    • Nikon D700 body
    • 50mm f/1.4G  lens
    • 85mm f/1.4D lens

    That’s everything, besides two 8GB Compact Flash cards, two 4GB Compact Flash cards, three camera batteries, a couple of business cards, and some lip balm. All of this fits inside one Kelly Moore Westminster Camera Bag. I use Photoshop CS6 with Adobe Camera Raw to edit my photos on a 27″ iMac. That’s it!

    Tips for the Minimalist Photographer

    I started nine years ago with a Nikon D90, the kit lens, and a 50mm f/1.8 lens. A couple of years later I upgraded to my full-frame body, better lenses, and haven’t felt a need for anything different, or anything more since that day. I’d say I’m very much a minimalist photographer, and it works well for me.

    Could it also work well for you? Is it possible to have so few pieces of equipment and be satisfied? I’d like to share some thoughts with you, and maybe you’ll find that it’s a system that could work for you. You also might think I’m just insane, and add an additional lens to your collection just to spite me. Don’t worry! I won’t judge you harshly either way.

    Tips for the Minimalist Photographer

    #1 – Let Go of Keeping Up

    All too often in life, we get caught up in what everyone around us has, and what they are doing. We feel that in order to be good enough, we have to have and do all of that stuff too. Photography is no different.

    Your best photographer friends are telling you about the latest and greatest lens they just purchased. Your photography competition just switched to a different brand and bought entirely new everything. The blogger you follow online just ordered the most life-changing new camera bag and is urging you to buy it too. You are surrounded by it every day, but you don’t have to keep up. You don’t have to do what everyone else is doing to be your best self. Likewise, you don’t need to have everything they have to compete.

    Tips for the Minimalist Photographer

    If it’s hard for you to see what others have and be satisfied with your own life, then stop looking at what they have. Stay away from social media for awhile, and quit looking at the blogs that are trying to sell you things. Get out and photograph something real with the equipment you have, and you might just forget that other photographers even exist. Eventually, you will be able to congratulate a friend on a new acquisition without feeling even a bit of jealousy.

    #2 – Quit Thinking “Stuff” Will Change Everything

    Have you ever told yourself that if only you had a certain camera, if only you had a few more lenses, you would be an amazing photographer? While equipment does make a difference, it doesn’t make the photographer. Great photographers can make beautiful photos with anything they have, and a not-so-great photographer could have the highest-end equipment with every lens imaginable and still come up with nothing.

    Tips for the Minimalist Photographer

    That said, it’s great to work towards purchasing quality equipment because if you’re only going to have very few things, you might as well make sure they’re very nice. You can get a nicer camera body and lens if you know that you’re going to use it all the time, and you won’t be spending your money on a lot of other “stuff”.

    Practicing your photography, getting out there and actually taking photos, reading articles and books from the library about photography, and talking with other photographers will help you become a better photographer. And those things don’t cost you anything. Work on yourself instead of your stuff.

    Tips for the Minimalist Photographer

    #3 – Try Before You Buy

    At some point in your life, I’m betting that you thought you had to have something, you got it, then realized that it wasn’t what you really needed or wanted after all. I’m pretty sure it’s happened to you, because I know it’s happened to me, more than once.

    So before you buy another piece of photography equipment, see if you can borrow it from someone (or rent it), or at least watch it in action before you take the plunge and put down your hard-earned money for it. I’m very careful about what I purchase, but even I have had a few misses throughout the years.

    I bought a reflector that I’ve used exactly two times in my entire career. UV lens protectors were purchased for peace of mind, then I decided that I liked my photos better without them, and I am a cautious person. I trust myself, so I don’t need them. A camera bag that sounded great in theory but lifting a flap every time I wanted to get my camera didn’t work for me. I bought a lens cleaner that the cap never stayed on. These are little purchases, but they’re just money and space wasters to me.

    Tips for the Minimalist Photographer

    Test Drive

    I heard so often that Lightroom was amazing, and that there were so many things that you could do with it, and that I needed it along with Photoshop. I sat down one day with a sweet photographer friend and asked her to show me everything she loved about it, and why I needed it. Every single thing that she showed me could be done with Adobe Camera Raw and Photoshop. I felt content with my workflow, and I went home satisfied that I didn’t need to buy another program.

    The great thing about trying something out, or watching it in action, is that you can see if it will truly work for you or not. You can read or listen to lots of other photographer’s opinions, but they aren’t you. The things that are important to them may not be important to you. You ultimately have to make that decision if it’s something you truly need and if it’s a good fit for you.

    Tips for the Minimalist Photographer

    #4 – Let Your Limited Resources Expand Your Abilities

    It’s strange to me that someone like me, with such limited equipment, could be so much more content than the photographer who owns suitcases full of equipment and still wants more. Some types of photography truly require more than what I have, and more equipment could be necessary, but you’d be surprised how innovative you can be when you need to make do with what you have.

    There is a certain freedom that comes when you have everything you need in your hands and in your head. You don’t need to carry around rolling luggage full to the brim with equipment because you use everything available to you to create something beautiful. If you can’t shoot something that comes to mind because you don’t have the right lens, you either find another way to shoot it, or you find something else to shoot. That something else might be even better than the first thing that came to mind.

    You won’t be wasting time, or risking dust and dirt in your sensor, by changing lenses constantly. You won’t be weighed down by multiple camera bodies swinging from your neck. No more worrying about where you put that third bag full of your lighting equipment. Your mind is freer to capture real life.

    Tips for the Minimalist Photographer

    Decide What Works for YOU

    Please don’t read this article as a criticism of photographers who own a lot of equipment. I like things simple in my life, inside and outside of photography. I don’t like to have more than I need, and an excess of anything makes me feel uncomfortable. Being a minimalist photographer works for me, and whether your reasons are that you like simplicity too, or your budget requires simplicity, you might find a few things to think about after reading this.

    Tips for the Minimalist Photographer

    Are there other photographers out there like me? I’d love to know what equipment you find most essential. And, for all of you who have everything, I’d love to know if you had to cut your equipment down to five or fewer items, what would you keep? What could you give up?

    The post 4 Tips for the Minimalist Photographer by Melinda Smith appeared first on Digital Photography School.


    Digital Photography School

  • Video Tutorial: How to Make Realistic Images Faster with Aurora HDR 2018

    As a landscape photographer who relies heavily on HDR to pull off much of my work, I’m always keen to learn about better ways of doing what I do. Most of the time my art tends to run towards natural looking images in contrast to the wild and crazy stuff of HDR’s reputation. The HDR software I use matters when I’m going for a more natural looking photo in my post-processing.

    Going natural with Aurora HDR 2018

    Aurora hdr 2018 cactus before after

    You can see several examples of the natural-looking results I’m getting in from Aurora HDR in the accompanying video and the several before and after images included here in the article.

    Aurora HDR 2018 delivers, even more, natural-looking photos than before

    The latest version of Aurora HDR is fresh out of the factory and I’ve been in a tire-kicking session with it for a few days making several photos. As expected, it’s a worthy upgrade. Do you want to see what’s new and how it helps when you want to keep the look of your HDR photos on the natural side?

    Before

    After processing with Aurora HDR 2018.

    Under the Hood of Aurora HDR 2018

    The Macphun engineers have been very busy for many months re-building Aurora HDR from scratch. It’s like Walter White always says in Breaking Bad, “It had to be done.” In order to create a cross-platform Windows/Mac application, all new code was required. Big job.

    The resulting product is something they can be proud of. The new HDR algorithm in Aurora HDR 2018 churns out very natural looking HDR images when it’s used correctly and with natural HDR being the goal. Of course, Aurora HDR 2018 is a perfect fit for my landscape photography work. It uses the most modern tone-mapping technology and an advanced image-processing engine, which makes very clean images, as you’ll notice in my examples.

    Before

    After processing with Aurora HDR.


    Video tutorial: Keeping it natural and real in Aurora HDR 2018

    All the new features, just added to Aurora HDR 2018 in this release, bring it ever closer to becoming the only app you’ll need to process your HDR images and keep them as natural looking as you want. When you watch the video you’ll see how I use some of the new major features packed into Aurora HDR 2018 when creating my natural looking HDR landscapes. Watch the demo video:

    Embracing the faster workflow using Aurora HDR 2018

    You probably love photography as much as I do. Getting new tools that really help me get to my intended vision faster, or easier, or just better in any aspect, are quite welcome. They make it even easier to love what I do.

    Kudos to the completely rewritten HDR algorithm and the advanced image-processing engine in Aurora HDR 2018. I’m finding that it’s speeding up my workflow significantly. That’s because of how good my photos usually look immediately after tone mapping even without even doing anything else in Aurora.

    If I were brand new to photography, I’d be totally happy leaving my photos in that initial tone-mapped state with no further processing. They are that clean!

    Before

    After

    Back in the day (before Aurora HDR), it could take me up to a couple of hours to finish an HDR photo. Even then, it wasn’t all that natural looking much of the time. Thankfully, things are always evolving in exciting ways.

    Ever since my foray into HDR photography eight years ago, my skills have improved. But I honestly have to credit the improvements in software, like Aurora HDR 2018, for dramatically reducing the time it takes me to finish a photo to just a few minutes while getting better, more realistic, results.


    My intention is keeping my post-processing time to five minutes per image and striving for consistently higher quality photography. Aurora HDR 2018 is a big piece in my HDR workflow making that happen so it’s now a permanent tool in my HDR arsenal.

    Be sure to watch the video, then I invite you to check out more Aurora HDR images in my SmugMug gallery.

    Disclaimer: Macphun is a paid partner of dPS.

    The post Video Tutorial: How to Make Realistic Images Faster with Aurora HDR 2018 by Keith Cuddeback appeared first on Digital Photography School.


    Digital Photography School

  • Canon hit two milestones today: 90 million cameras and 130 million lenses

    Canon has hit two couple major production milestones today. Specifically, Canon says it has now produced 130 million EF-series interchangeable lenses and 90 million EOS cameras. And in case you’re curious, the camera maker revealed that an EOS 5D Mark IV was its 90 millionth EOS camera to go through production, while the 130 millionth interchangeable lens distinction goes to an EF 16-35mm f/2.8L III USM.

    Both the EOS and EF series made their debut in March 1987, eventually picking up production speed in the early 2000s as DSLRs became more popular.

    The company boasts a 14-year consecutive No. 1 share of the global interchangeable lens digital camera market, as well as the distinction of being first to bring certain features to the market with its EF lenses, including image stabilizer tech and an ultrasonic motor. Canon’s EOS Series also has some notable distinctions in its past, including being the first to offer an electronic lens mounting system and fully digitized communication between the lens and camera body.

    Articles: Digital Photography Review (dpreview.com)

  • HP reveals the ZBook x2: The ‘world’s most powerful detachable PC workstation’

    $ (document).ready(function() { SampleGalleryV2({“containerId”:”embeddedSampleGallery_9365668628″,”galleryId”:”9365668628″,”isEmbeddedWidget”:true,”standalone”:false,”selectedImageIndex”:0,”startInCommentsView”:false,”isMobile”:false}) });

    Step aside Microsoft, because HP just released a monstrous ‘detachable PC workstation’ that can compete with powerful laptops like the Surface Book 2 released yesterday… but in a form factor that looks more like a Surface Pro. Meet the HP ZBook x2: the so-called “world’s most powerful and first detachable PC workstation.”

    In HP’s own words, this computer “was designed to solve the performance and mobility needs of artists, designers and digital imaging professionals who need to push Adobe Creative Cloud and other professional applications to the limit.” So what makes this computer more capable than HPs other two-in one solutions: the HP Spectre x2 and HP Elite x2. In a word: performance.

    While previous two-in-one iterations with these kinds of specs put most of the components—the main CPU, GPU, etc—into the base unit, the HP ZBook x2 flips the script. The bluetooth keyboard is basically just that: a bluetooth keyboard; even when the tablet is detached completely it maintains the full performance from its CPU and GPUs. Think of it like a Surface Pro dressed up to star in the next Iron Man movie.

    Spec-wise, the HP ZBook x2 can be configured with 8th Gen Intel Core i7 graphics, a discreet NVIDIA Quadro M620 graphics card with 2GB of dedicated GDDR5 memory, up to 2TB of local PCIe SSD storage, and up to 32GB of RAM. All of this sits behind a 14-inch 4K multi-touch screen with optional 10- bit, one-billion color HP DreamColor display that’s been calibrated 100 percent of Adobe RGB.

    The computer can be used in four different modes:

    • Laptop Mode: attached to the bluetooth keyboard.

    • Detached Mode: Use the tablet with the new HP pen, while still having full access to your Bluetooth keyboard shortcuts off to the side.

    • Docked Mode: Using the ZBook Dock, the x2 can power two additional 4K displays or five total displays.

    • Tablet Mode: totally detached and disconnected from the keyboard, the x2 maintains full graphics performance.

    In most modes, you’ll want to use the ZBook x2 with the new battery-free HP pen, which is based on Wacom EMR technology and offers 4,096 levels of pressure sensitivity with multi-directional tilt capabilities and a dedicated eraser. And when it’s docked and powering two 4K displays, the setup can look pretty … intense:

    In short, the ZBook x2 is trying to be all things to professional creatives and designers. Instead of using some combination of laptop, iPad, and Wacom tablet, you can replace all of them (ostensibly) with one ZBook x2. And since it was designed in collaboration with Adobe, you can bet Photoshop, Lightroom, Illustrator, Premiere, and other powerful CC apps will work exceptionally well.

    To learn more about the HP ZBook x2, head over to HP’s website. The new ‘detachable workstation’ will go on sale in December and starts at $ 1,750 for the base model with a dual core 7th generation Intel Core i7 CPU—no word yet on how much more expensive it’ll be to fully spec out one of these.

    Press Release

    HP Unveils World’s Most Powerful and First Detachable PC Workstation

    HP ZBook x2 PC Allows Designers to Unleash the Power of Adobe Creative Cloud and Other Professional Applications

    LAS VEGAS, NV – October 18, 2017 — Today at Adobe® MAX, HP will showcase the world’s most powerful detachable PC1 designed to solve the performance and mobility needs of artists, designers and digital imaging professionals who need to push Adobe Creative Cloud® and other professional applications to the limit. The performance of the HP ZBook x2, the world’s first detachable workstation,15 increases productivity and allows digital creators and storytellers the freedom to work when and where inspiration strikes.

    HP’s reinvention of detachable PCs began earlier this year with the introduction of the HP Spectre x2 and the HP Elite x2. Today’s introduction of the HP ZBook x2 completes HP’s trifecta with its most powerful detachable solution targeted for the creative community. With this new offering, HP is extending its PC leadership by pioneering a new era for detachable PCs that offer superb performance, elegance and efficiency.

    “As the world’s most powerful and first detachable PC workstation, there is no device better suited to turn the vision of artists and designers into reality,” said Xavier Garcia, vice president and general manager, HP Z Workstations, HP Inc. “With the HP ZBook x2, we are delivering the perfect tool to accelerate the creative process – with unprecedented power, performance and natural ease-of-use. This device will make it easier than ever for creators to do what they do best – bring inspiring new ideas to life and enrich the world around us.”

    Liberating Digital Creativity

    The HP ZBook x2 allows designers to effortlessly create with quad-core Intel® CoreTM processors2, twice the memory of any other detachable PC3 and NVIDIA® Quadro® Graphics that deliver 73 percent higher graphics performance compared to the Surface Pro4. A quiet, dual-fan active cooling system is designed to dissipate heat from the powerful graphics card and processor. To better meet the needs of the creative community, including Adobe users, HP also developed customizable, application-aware HP Quick Keys, to provide artists with 18 time-saving shortcuts.

    “At Adobe, our goal is to accelerate creativity. Creative Cloud is the platform that enables us to deliver powerful innovation in our apps and cloud-based services supported by Adobe Sensei with artificial intelligence at the heart of every customer experience,” said Mala Sharma, vice president and general manager, Creative Cloud Product, Marketing and Community. “Adobe is thrilled with our collaboration with HP, which we know will further fuel creativity and give Creative Cloud members more power and freedom to create wherever inspiration strikes.”

    Today, many creative professionals use multiple devices such as a MacBook Pro plus an iPad to accomplish the same tasks that can be done on the HP ZBook x2. Knowing that ultimate mobility is important, HP created a single device that delivers the same performance capabilities from inking to docked mode.

    HP’s most versatile detachable to date, the HP ZBook x2 operates in four modes: laptop, detached, docked and tablet.

    • In laptop mode, the HP ZBook x2 is a powerful mobile workstation with a keyboard leveraged from the HP ZBook Studio.

    • In detached mode, it allows users to create on the tablet with HP’s most accurate and expressive pen while still having full access to all of their shortcut keys with the Bluetooth®-enabled keyboard off to the side.

    • In docked mode, the HP ZBook x2 can power two additional 4K displays or five total displays.

    • In tablet mode, it maintains full graphics performance allowing users to capture ideas with powerful NVIDIA 3D graphics.

    Using HP’s most natural pen with the HP ZBook x2, users can create without interruption as the pen never needs to be charged. The battery-less, HP-designed pen based on Wacom EMR technology, responds instantly to every nuance of the artist’s hand for natural motion. The HP ZBook x2 offers 4,096 levels of pressure sensitivity with multi-directional tilt capabilities and includes a dedicated eraser.

    As a member of the world’s most secure and manageable mobile workstation family10, the HP ZBook x2 features HP Sure Start Gen311 for BIOS protection, TPM 2.0 for hardware-based encryption to secure credentials, secure authentication methods through the Smart Card Reader and HP’s Client Security Suite Gen312 to protect data, device and identity, including facial recognition and fingerprint reader.

    HP ZBook x2 Highlights

    The HP ZBook x2 embodies the intersection of mobility and performance in a fully-machined, aluminum and die-cast magnesium body starting at just 3.64 pounds5 and 14.6 mm thin when in tablet mode, and 4.78 pounds5 and 20.3 mm in laptop mode. The HP ZBook x2 has a stunning 14-inch diagonal, 4K multi-touch display with an optional 10- bit, one-billion color6 HP DreamColor display calibrated to 100 percent of Adobe RGB. The HP ZBook x2 has the world’s most advanced detachable PC display16 and includes an anti-glare touchscreen allowing users to immerse themselves while working in any lighting condition. At the desk, it can power dual 4K displays from the HP ZBook Dock with ThunderboltTM 37.

    This detachable PC has up to 10 hours of battery life13 for maximum productivity and ultra-fast recharge (50 percent in just 30 minutes8). The HP ZBook x2 offers up to 4.2 GHz of Intel®Turbo Boost, 32 GB RAM over dual channels for more responsiveness under heavier workloads like complex layering in Photoshop. The model’s HP Z Turbo Drive storage is up to 6X faster than SATA SSD and up to 21X faster than traditional HDD storage. The HP ZBook x2 offers up to 2 TB9 of local PCIe storage and incorporates a full-sized SD card slot, perfect for professional photographers. Using the dock or Thunderbolt 3 ports on the HP ZBook x2, it can transfer large files from cameras, external storage, phones and other peripherals.

    Designed to go anywhere and handle the toughest workloads, the HP ZBook x2 mobile workstation is designed to pass MIL-STD 810G testing14. The HP ZBook x2 also undergoes dozens of tests for certification and optimized performance with the industry’s leading software providers like Adobe and Autodesk.

    HP ZBook x2 Pricing and Availability

    HP ZBook x2 is scheduled for availability in December starting at $ 1,749. The datasheet is available here.

    Articles: Digital Photography Review (dpreview.com)

  • Review: Struman Lenses for Mobile Phones

    As the use of mobile phones as cameras become more popular people want to get the best possible images with them. In some ways, they are very limited in how you can take photos. There are many companies now making lenses for mobile phones to help you get much better images.

    Some are better than others with most requiring a magnetic ring to attach them to your phone, over the camera lens. They can have varying degrees success. Some have good lenses, but the rings don’t work, while others are designed for a particular camera and aren’t good on other models.

    Review: Struman Lenses for Mobile Phones

    The Struman Optics case, the clip, and three phone lenses.

    Struman Optics has come up with a set of lenses that consider all aspects of using them along with different phone products. Through phone cases for the most popular brands, or a special clip for the others, you can now use their lenses (the macro, fisheye, wide-angle and telephoto) with any phone.

    Phone cases

    Unlike many other lenses for mobile phones, the Struman Optics ones have covers for the top two brands – both iPhone and Samsung. The phone covers have a section where the camera is that allows you to screw in the lens so it is aligned perfectly with the camera.

    The case makes taking photos a lot easier as you can hold your phone in any manner, and not worry about the lens coming off. It makes the whole system much sturdier.

    Review: Struman Lenses for Mobile Phones

    The phone case with a lens screwed into it ready to be used.

    Clip

    If you have one of the lesser known phone brands or models, the lenses come with a clip that allows you to put them over the phone. They come with a spongy surface that sits against the screen so it won’t scratch. This takes a little more mucking around to get the lens correctly aligned, but once it’s done you can take your photos.

    You can put the empty clip to help you work out where it should go. You can then screw in the lens that you want to use and take your images. If you decide you want to change to another lens, it isn’t a problem as they are easy to swap out.

    Review: Struman Lenses for Mobile Phones

    The clip on the phone with a lens in it.

    The Lenses

    There are two kits available. The first includes a macro, wide-angle and fish-eye lens. The second is a telephoto lens that also has a holder for your phone and small tripod that you can use to help you steady the camera.

    Macro Lens

    Trying to get really close to objects for macro photography with your phone seems to be something that so many of us try to achieve. Some phones do it well, while others struggle. My current phone has trouble getting close and it can be frustrating. I do like macro photography, so having a lens I can put on my phone is great.

    The Struman Optics macro lens is incredible. It will allow you to get a lot closer to your object than your phone can. It gives you a great amount of detail and is very sharp. When you go to take an image you can get as close as a couple of centimeters or an inch away from the subject.

    Review: Struman Lenses for Mobile Phones

    This photo was taken with my phone and the macro lens screwed into the phone case.

    Perhaps the one negative thing about this is that you don’t have a lot of choices, you only get the one focal range. All images have to be taken from the same distance, which is really close. However, if your intention is to get as near as possible, then you will love this lens.

    Review: Struman Lenses for Mobile Phones

    This is as close as you can get with just my phone and no added lens.

    Review: Struman Lenses for Mobile Phones

    When you screw in the Struman macro lens, you can get a whole lot closer and capture a lot more detail.

    If you decide you want to get a little further away the wide-angle lens is what you need.

    Wide-Angle Macro Lens

    The wide-angle lens will let you take photos at any distance. You can get a wider angle than what your phone will take. If you have a subject that is hard to photograph because you can’t quite get it into the frame, then this lens will allow you to get a wider angle of view.

    Compare the images below. The first image shows you the lighthouse taken with the phone and no lens. It is a tight image, and to get more distance I would have to move farther back. But as there was a cliff behind me so that was not an option.

    Review: Struman Lenses for Mobile Phones

    The lighthouse taken with the phone and no lens attached.

    The Struman wide-angle lens was attached to the phone and now you can see that there is a lot more room around the lighthouse. This made it a better image.

    Review: Struman Lenses for Mobile Phones

    Same Lighthouse, but with the wide-angle lens attached.

    The lens also has macro capabilities. If you find that you don’t want to get as close as you have to with the macro lens, put the wide-angle on and you can get that distance. It is good for photographing the whole flower or getting more than one in the shot. It is a great lens to go with the macro.

    Fish-eye Lens

    The fish-eye lens is a lot of fun. When you use one for the first time it is addictive to see what you take with it. This lens is similar to other fish-eye lenses for phones in that the image is a circle. If you give your subject enough space you can crop it so it is square or rectangle. However, if you do that you are reducing the size of the file.

    Review: Struman Lenses for Mobile Phones

    Fish-eye lens used to photograph the lighthouse and then cropped to make a normal rectangular image.

    Like the wide-angle lens, the fish-eye can also do macro. It can be used when you want to highlight an object in particular. It creates a bokeh effect with everything around it.

    Review: Struman Lenses for Mobile Phones

    Some shelves with an assortment of things, taken with the fish-eye lens.

    Carry Case

    The above three lenses and the clip all come in a little case that fits in your bag or your pocket. It makes it very easy to carry them around. There is a little pocket that has some instructions and a cleaning cloth for the lenses. The case is not soft and is quite solid, so it keeps everything inside safe.

    Telephoto Lens

    As stated earlier, Struman Optics also makes a telephoto lens which you can purchase in a kit with a stand and a holder for the phone. This also fits into the phone cover case or the clip to help hold it still. You do really need the stand and phone holder as it’s a large lens. It is hard to hand-hold it to take photos.

    When you find a subject you want to photograph, you have to be a certain distance from the object, a meter or a yard away. You do have to focus it manually, so if you find it is too hard to focus that could your subject is either too close or too far away.

    Out of all the Struman lenses, this is the hardest to use. You do need to use the stand, or a stand with the phone holder. It does mean you have to carry a bit more equipment with you if you want to use this lens.

    Review: Struman Lenses for Mobile Phones

    The telephoto lens in the phone case, with the phone secured by the holder and kept up-right on the stand.

    Stand and Phone Holder

    The stand is basic and not very big, though it is easy enough to carry around. You do need to have a surface to put it on and that isn’t always possible.

    The phone holder screws onto the top of the stand and you put your phone in it. It is easy to use, though it can be a bit stiff to mount your phone. The holder will also fit on other tripods or Gorillapods. That allows you to use it with your other gear if you decide to throw the holder and lens in your kit when you go out.

    Review: Struman Lenses for Mobile Phones

    This flower image was taken with the wide-angle lens, shot very close to the flower.

    In Practice

    When I went away recently I put the cover on my phone so I could use the lenses anytime I wanted. I didn’t take the telephoto lens with me, but I most definitely packed the other three. They were always with me, either in my bag, or my pocket.

    They are the best mobile phone lenses I’ve seen yet. The images are amazing and the detail you can get in your images is so sharp. If you love using your phone for photography and want to get more out of it, then here are the lenses that may be perfect for you. Struman Optics is an Australian company, but they ship all over the world.

    I would give these lenses 9 out of 10, I love them.

    The post Review: Struman Lenses for Mobile Phones by Leanne Cole appeared first on Digital Photography School.


    Digital Photography School
  • Surprise! Google hid a custom-built image processor inside the Pixel 2

    Google’s Pixel 2 launch event on October 4th put a lot of emphasis on the new smartphone’s camera capabilities. However, the presenters at the event left out one very interesting detail: Google Visual Core.

    Visual Core is a custom-built system-on-a-chip (SOC) designed to power and accelerate the Pixel 2 phones’ much-lauded HDR+ function that achieves better dynamic range and reduced noise levels through computational imaging. The new Pixel 2 phones already come with the chip built in, but it has not been activated yet. It appears Google ran out of time before the Pixel 2 launch to fully optimize Visual Core implementation in the device.

    The good news is it will be activated at some point “over the coming months”, which should make HDR+ processing on the new devices even quicker and smoother than it already is (and it’s already far faster than on the original Pixels). According to Google, it will then be 5x faster and use less than 1/10th of the the energy,” a real advantage over the current general purpose processing. In the future the chip could also take over additional image processing tasks.

    The company will also enable Pixel Visual Core as a developer option in its Oreo 8.1 preview, allowing access to HDR+ for the developers of third-party camera apps. All of this is currently limited to Google’s Pixel 2 devices, but there’s hope other manufacturer will pick up the Visual Core technology and associated software in the future.

    Articles: Digital Photography Review (dpreview.com)

  • Leica is resurrecting the soft-focus Thambar 90mm F2.2 portrait lens from 1935

    $ (document).ready(function() { SampleGalleryV2({“containerId”:”embeddedSampleGallery_3871588870″,”galleryId”:”3871588870″,”isEmbeddedWidget”:true,”standalone”:false,”selectedImageIndex”:0,”startInCommentsView”:false,”isMobile”:false}) });

    Leica is getting into the lens resurrection game, announcing earlier today that it will bring back the Thambar-M 1:2.2/90: a portrait lens from 1935 that’s famous for exceptional spherical aberration that creates extremely soft images. The Thambar-M will be an accurate reproduction of the original lens, only this time around in the M mount instead of the L screw mount.

    The lens features a 20-bladed iris that produces round, out-of-focus highlights, and only four elements arranged in three groups. Its softness comes about through uncorrected spherical aberrations that are more obvious when the lens is used wide open, and which can be emphasized via the use of an included centre spot filter that prevents axial light passing through the construction.

    With the light from the centre of the lens blocked, the majority of image recording light comes from the edges where the aberration is at its strongest.

    $ (document).ready(function() { SampleGalleryV2({“containerId”:”embeddedSampleGallery_1148566037″,”galleryId”:”1148566037″,”isEmbeddedWidget”:true,”standalone”:false,”selectedImageIndex”:0,”startInCommentsView”:false,”isMobile”:false}) });

    Without the centre spot filter the lens is still soft, but becomes sharper as the aperture is closed and the aberration subsides. The barrel of the Thambar has twin aperture markings that show in white the reduced aperture values when the spot filter is used, as well as the recommended range of apertures that can be used with the filter in place.

    Originally made only in a run of 3,000 in 1935, this new version will be much more widely available starting mid-November, and will cost you £5095/$ 6495. For more information see the Leica website, or read this article on the Leica blog.

    Press Release

    Leica Camera AG presents a modern renaissance of the classic lens – the Leica Thambar-M 1:2.2/90

    A legend reborn: following the Leica Summaron-M 1:5.6/28, Leica Camera AG has further expanded its lens portfolio with the Thambar-M 1:2.2/90, the modern renaissance of another classic lens. Just like its namesake from 1935, the contemporary incarnation of the lens is distinguished by its characteristic soft-focus effect and unmistakeable bokeh. Its focal length of 90 mm is suitable for photography in a multitude of scenarios and is as good as predestined for capturing portraits with a uniquely aesthetic atmosphere that cannot be reproduced in digital postprocessing. The new Thambar-M is thus an exciting addition to the existing Leica M lens portfolio and brings photographers entirely new possibilities for creative composition.

    The optical design of its ancestor remains almost unchanged in the new Thambar-M 1:2.2/90. It has therefore also inherited the characteristic properties of its predecessor. The only difference is that the four elements in three groups that make up the design have now been single-coated to protect the glass against environmental influences and surface corrosion. The 20 blades of its iris deliver a unique bokeh with perfectly round rendition of point light sources.

    The soft look of the Thambar is the result of intentionally accepted under-correction of spherical aberration. This under-correction increases towards the edges of the optical system with the consequence that not only the depth of focus, but also the degree of softening can be precisely controlled by means of the stepless aperture setting. The effect is more pronounced as apertures increase, and is continually reduced as the lens is stopped down to smaller apertures.

    The design of the original lens has been almost completely preserved in today’s Thambar-M 1:2.2/90. The black paint finish, the proportions of the lens and its aperture engravings in red and white correspond to the appearance of the original. In addition to this, slight modifications have been made that bring the lens into line with the current, minimalist design of modern M-Lenses. These include the knurling, the lettering and scales and the specific use of sharp edges and bevelling that underline the precision of the lens design.

    ‘The name Thambar has always been preceded by the adjective ‘legendary’ – rightly so. It portrays people with a wonderful aura, in a romantic way – but landscapes too are raised to a higher, incomparably aesthetic plane. The addition of a new incarnation of this classic lens to our selection of vintage lenses was one of our greatest wishes – to my great delight, this wish has now been fulfilled.’ emphasises Dr. Andreas Kaufmann, majority shareholder and chairman of the supervisory board of Leica Camera AG.

    As is the case with all Leica lenses, the Leica Thambar-M 1:2.2/90 is also manufactured in strict compliance with the most stringent quality criteria. The use of only the best materials in its construction guarantee the familiar long working life of all Leica lenses. As was the case with the original lens, the lens hood, the ring of the centre-spot filter and both front and rear lens caps are made of metal. Even smallest details, like the felt lining of the lens hood and the front cap, contribute to the exceptional perceived quality of this lens. The design of the rigid lens keeper in ‘Vintage Brown’ leather is identical to that of the original from 80 years ago in almost every respect and, as in the past, the centre-spot filter can be safely and conveniently stowed away in its lid.

    The Leica Thambar-M 1:2.2/90 will be on sale from mid-November 2017.

    Articles: Digital Photography Review (dpreview.com)

  • LURVIG for Pets: IKEA Debuts its First Line of Animal Furniture & Accessories

    [ By WebUrbanist in Design & Furniture & Decor. ]

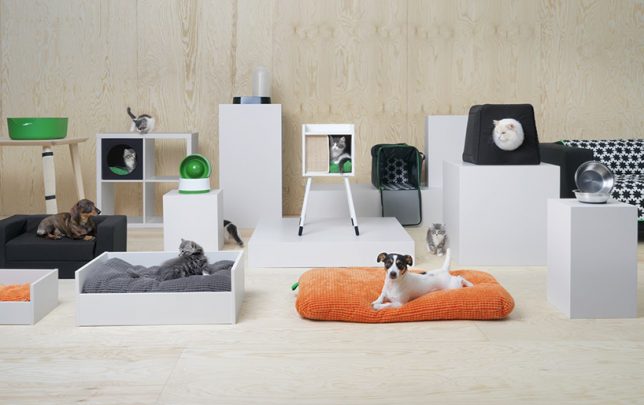
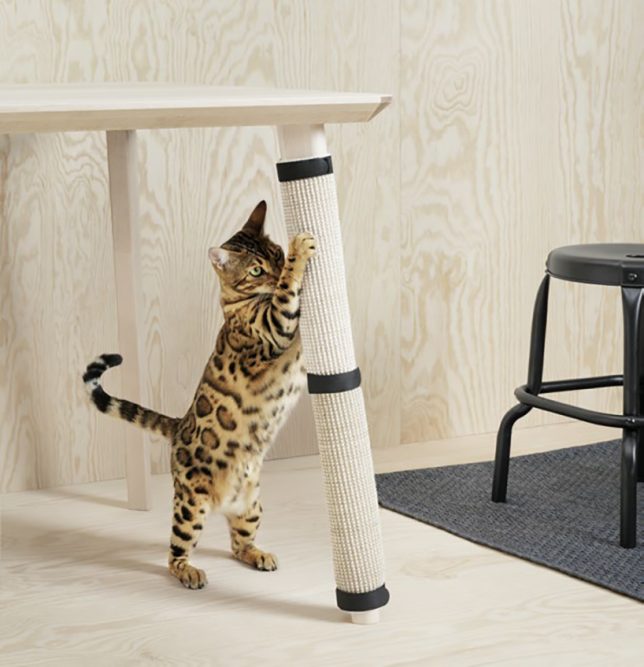
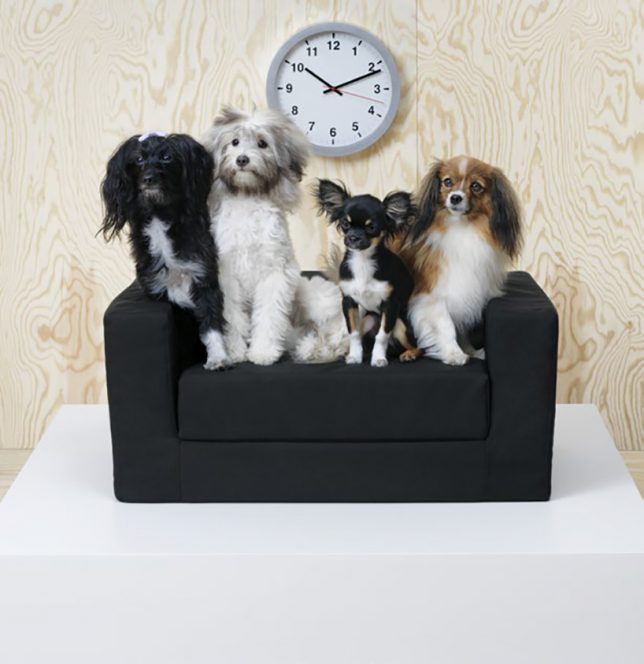
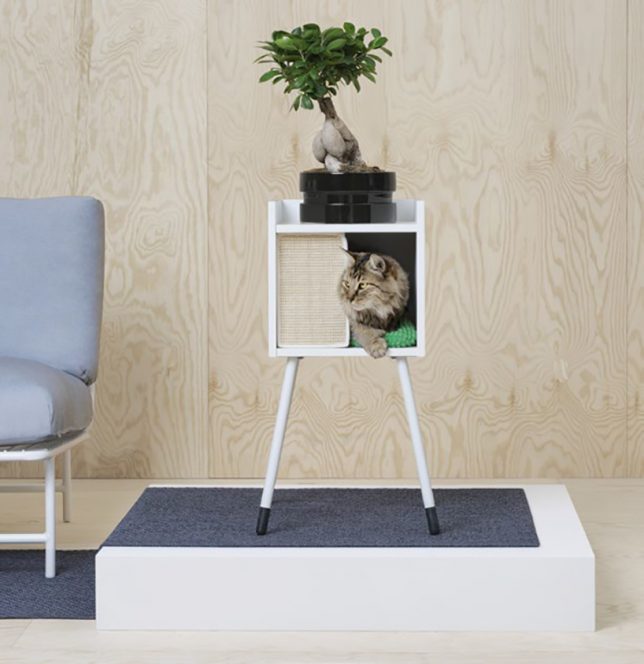
    Made to be compatible with other IKEA furnishings and fixtures, this new first-of-its kind pet collection has something for all your favorite furry friends.

    The 62-piece collection was designed by Inma Bermudéz and aims to fill a market gap with quality, aesthetically pleasing but affordable pet products.

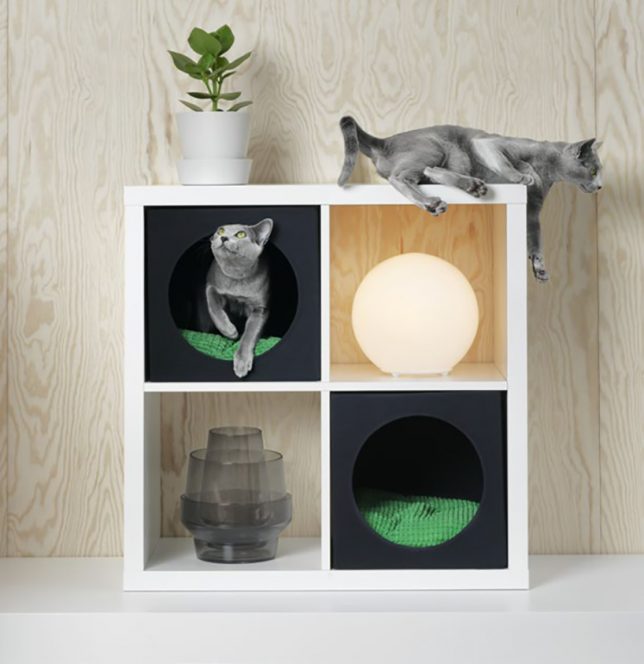
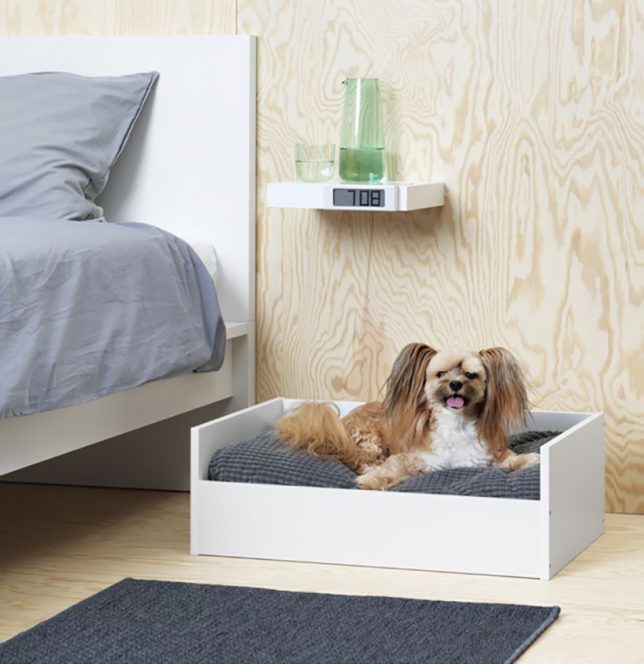
    Some of the objects extend existing uses, helping customers save money and space, like kitty-scratching materials that attach to existing IKEA table legs or puppy beds that slot into bookshelf systems already on offer.  A number of the products are designed to pack flat and fold away when not in use.

    The designs reflect extensive research into pet needs and behaviors, including a bed designed to be stuffed with old clothes, blankets and towles to help dogs feel comfortable and familiar around their human family.

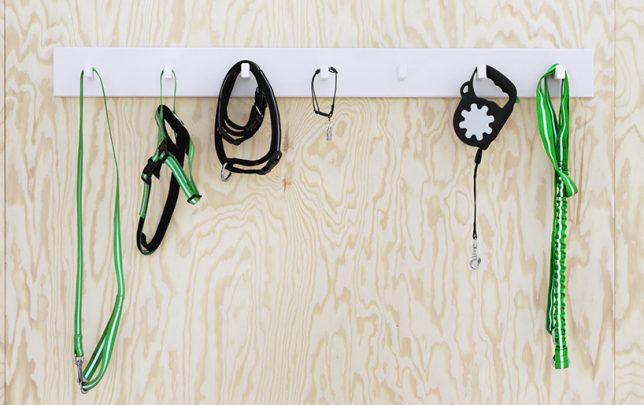
    Aside from pet sleepers and carriers, the LURVIG line features an array of brushes, bowls, leashes, bag dispensers spanning eating, playing, sleeping, traveling, walking.and other cat and dog activities.

    Perhaps the biggest surprise in this stellar new collection is that no one at IKEA thought to do this sooner — thankfully, now they have.

    Share on Facebook


    [ By WebUrbanist in Design & Furniture & Decor. ]

    [ WebUrbanist | Archives | Galleries | Privacy | TOS ]


    WebUrbanist