Blog

  • Leica unveils limited run of 100 red Leica M (Typ 262) bodies

    $ (document).ready(function() { SampleGalleryV2({“containerId”:”embeddedSampleGallery_0572848715″,”galleryId”:”0572848715″,”isEmbeddedWidget”:true,”selectedImageIndex”:0,”isMobile”:false}) });

    Leica has released a series of 100 limited edition Leica M bodies with red anodized top and base plates. The company says the red hue of the cameras makes a bold statement, though some might argue the nearly-$ 7,000 price tag is slightly more daring.

    The cameras will be technically identical to the existing M (Typ 262) with the lightweight aluminum top plate and base, and no video or live view modes. The company says the red body will match the red 50mm F2 APO Summicron-M lens that it launched in equally limited numbers in November of 2015, though new owners of the red camera would be very lucky indeed to find one of those red lenses still on the shelves.

    The red anodized M bodies will be sold through Leica’s own stores starting today. By comparison, a standard M (Typ 262) costs $ 5595/£4680.

    For more information, visit the Leica website.

    Press Release

    Leica Camera Unveils Special Edition M Camera with Striking Red Anodized Finish

    The Leica M (Typ 262) ‘red anodized finish’ is limited to just 100 units worldwide

    December 14, 2017 – Leica Camera presents a special new addition to the Leica rangefinder system – the Leica M (Typ 262) ‘red anodized finish’. The unique color scheme of this special edition camera takes the classic styling of the Leica M and couples it with the bold statement of a bright red hue. The top plate and baseplate of the Leica M (Typ 262) are machined from solid aluminum and anodized in red. This lends the camera a unique look that perfectly matches the color of the special edition Leica APO-Summicron-M 50 mm f/2 ASPH. lens released in 2016. The exclusiveness of this striking edition is further underlined by the strictly limited number being made available: As was the case with the lens, the Leica M (Typ 262) ‘red anodized finish’ edition is limited to just 100 cameras worldwide, each with a unique serial number.

    The technical specifications of the special edition camera are identical to those of the standard production Leica M (Typ 262). With its concentration on the functions essential for photography and intuitive handling, it is the perfect camera for experiencing the pure enjoyment of Leica M-Photography. The Leica M (Typ 262) embodies all the essential advantages of the Leica rangefinder system, while consciously eschewing extraneous features that can distract from the pure rangefinder experience. Its full-frame CMOS sensor is conceived exclusively for rangefinder photography and intentionally does without additional functions such as Live View and video recording. Its 24-megapixel resolution ensures exceptional imaging quality and extreme sensitivity to light, which also makes the Leica M (Typ 262) a perfect camera for photography in any available light situation. Supporting the sensor’s versatility to capture top-quality photographs in any situation, the camera’s Maestro processor guarantees fast processing of captured images and immediate readiness to shoot.

    The handling of the Leica M (Typ 262) fulfills everything that discerning photographers expect from a Leica M. All controls and functions are logically and ergonomically located exactly where the photographer expects them to be. Just like every other M, it allows fast manual focusing with the coupled rangefinder and the focusing ring of the lens. It also offers a choice of manual or automatic aperture priority exposure. Due to the omission of Live-View and video capability, the menu is extremely lean and consists of only two pages. This ensures that all camera settings are easily and rapidly accessible at all times. This also applies to white balance, where the M (Typ 262) has a dedicated WB button on the back of the camera.

    The Leica M (Typ 262) ‘red anodized finish’ will be available exclusively at Leica Stores and Boutiques beginning today, for the price of $ 6,995.00.

    Articles: Digital Photography Review (dpreview.com)

  • An Introduction to Lightroom Classic’s Newest Tools

    The announcement of Lightroom CC has been stealing all the thunder when it comes to Lightroom over the last few weeks. At the same time, however, Adobe made some changes and additions to the Lightroom you and I have been using (now called Lightroom Classic). There aren’t many changes, but they are very significant, so let’s take a look.

    An Introduction to Lightroom Classic's Newest Tools

    Changes to Lightroom Classic

    Before we get into the new tools, you’re likely to notice an overall change to Lightroom. It is faster. Much faster. It imports faster, you can flick through your pictures faster . . . everything just works faster. That is a nice change.

    When it comes to making global edits to your pictures –  that is, changes that affect all parts of the picture – Lightroom works exactly the same. There are no changes (except the speed). The bad news is that there are no new features, but the good news is that you will still be comfortable with how everything works.

    Making Local Changes in Lightroom

    The latest change to Lightroom comes in the local adjustment tools. If you aren’t already familiar with them, Adobe lets you make changes to specific parts of your picture using one of three tools: the Adjustment Brush, the Graduated Filter, and the Radial Filter.

    Since the changes to Lightroom work within these tools, it is worth spending a second making sure you are familiar with them.  Here is what they are and how they work:

    An Introduction to Lightroom Classic's Newest Tools

    • Adjustment Brush: It is just like it sounds. You select the brush and then paint in where you want to make changes. When you call up the brush, a series of sliders will appear, and the changes you make with these sliders only affect the part of the image you have selected. If you want Lightroom to find an edge for you as you paint, to keep things from spilling over into other areas, be sure you have checked the Auto Mask option at the bottom.
    • Graduated Filter:  You will find this tool gets more useful the more you use it. This is a filter that makes gradual changes to your picture, along a straight line. If you are familiar with a graduated neutral density filter, then you are familiar with this tool. As with the Adjustment Brush, when you call up this tool and create a gradient, you will see sliders appear on your screen. You can then make changes to only the part of the image you chose. Those changes will be softly blended in. You can create multiple gradients to change many discrete parts of your image.
    • Radial Filter: Frankly, this is the one I use the least. It works like the Graduated Filter, but it selects an elliptical area. Once you make your selection, you’ll see the usual sliders for making adjustments to the selected area. I find it is most useful for highlighting the subject or a particular part of your image.

    The trouble with these selection tools has always been controlling the selection. Take the Graduated Filter, for example.  How often do you really want to make changes along a straight line across your entire picture?  Probably not often. What you end up doing is just trying to feather your changes in softly enough that you don’t notice changes to things sticking over the line.

    Now, however, Adobe has provided additional tools for us to deal with that. It is called the Range Mask feature, and you’ll see it as an option at the bottom of the Adjustment Brush, Graduated Filter, and Radial Filter tools.

    Using the Range Mask Feature

    What does the Range Mask feature do? Simply put, it allows you to exclude things from a selection based on brightness values or color.

    An Introduction to Lightroom Classic's Newest Tools

    Here’s how it works. Once you have selected a part of the picture to edit using one of the three tools mentioned above, you’ll see a little option at the bottom of the controls for that tool labeled Range Mask. It will be in the Off position by default, meaning it is doing nothing.

    When you click on it, you will see options for Color and Luminance. You pick one and then you can exclude colors or brightness values from the selection.

    Color Range Mask

    For example, if you choose Color, then you will see an eyedropper tool. Use it to select a color you want to exclude from your selection. If you’re happy with that, you’re done. If it isn’t quite right, there is an amount slider just below so you can fine tune it. You can also click and drag to select all the colors in a particular area, or you can Shift-click with the eyedropper to select multiple colors.

    An Introduction to Lightroom Classic's Newest Tools

    Luminance Range Mask

    Or you can select Luminance instead, which will allow you to exclude pixels of certain brightness values from your picture. You’ll see a Range slider with two points on it. Think of these as your black point (on the left) and the white point (on the right).

    When you drag the left/black point up, Lightroom will remove darker pixels from the selection. For example, if you want to make changes to a particularly bright area of your picture, but not affect some dark items sticking into the bright area (trees into the sky, a mountain or building, etc.), then pull up the left point of the Range control.

    An Introduction to Lightroom Classic's Newest Tools

    The Range Mask Feature in Action

    It might be more understandable if you see these tools in action. Let’s take a photo like this one just below, where you want to adjust the sky, but there isn’t a nice clean line to use a graduated filter. I should note that we could try to make an adjustment using the Adjustment Brush, but even using Auto Mask it won’t be able to make a clean selection around all those branches. Our best bet is going to be the new Range Mask feature.

    An Introduction to Lightroom Classic's Newest Tools

    With the new tools in Lightroom, you can make quick work of this. Just grab the Graduated Filter (or the Adjustment Brush, if you prefer) and make the changes you want to the sky. Don’t worry about how it affects the darker part of the image for now. When you are done making your changes, it might look something like this:

    An Introduction to Lightroom Classic's Newest Tools

    We can now use the Range Mask feature to clean this up very quickly. Just select Luminance, then pull the left/black point of the Range slider up. That will exclude the dark areas from the selection.

    Voila! You now have the exact changes to the sky you want, without any spillover into areas (the cliff and trees) that you don’t want to be affected.

    An Introduction to Lightroom Classic's Newest Tools

    You can repeat the process in reverse to make changes to the darker portion of the image as well.

    Additional Uses of the Range Mask Feature

    As you play with this feature, you’ll find additional things you can do with it. The ability to target pixels based on brightness and color values is so powerful and has so many different applications, that I think you’ll end up using it in a variety of different ways. I am just getting started with it (obviously, as it just came out), but I am already seeing uses for it in my night photography.

    With this tool, it is a pretty simple matter to target the dark areas of the sky and leave the stars alone. I can create a selection of the entire sky using the Graduated Filter, and then use the Range Mask to remove the stars from the selection. That way I can just darken and apply noise reduction to only the darker areas.

    An Introduction to Lightroom Classic's Newest Tools - night sky image

    Previously, that required a tedious process of luminance masks in Photoshop. That’s just one little application I found, and you will doubtlessly find your own better applications.

    Application to Your Photography

    The recent update to Lightroom Classic has only one additional tool, which is the Range Mask feature addressed in this article. While it is only one change, it is a really powerful addition. It makes all the local adjustment tools in Lightroom Classic that much more powerful.

    If you have shied away from making local selections in Lightroom, it is now a much more feasible process. If you are someone that routinely takes your photos into Photoshop to make local changes – utilizing the powerful masking features there – this will probably save you a few trips.

    Give it a try and I think you’ll like what you find.

    The post An Introduction to Lightroom Classic’s Newest Tools by Jim Hamel appeared first on Digital Photography School.


    Digital Photography School

  • Video: Travel Photography Tips – Shoot with a Purpose

    The challenge with travel photography is that you may not get back to a location again anytime soon. So many photographers try and squeeze out as many photos as possible. The issue is lack of attention to detail and having any intentions or purpose before shooting.

    What do you want your image to show?

    Waiting for the right gesture, or even right subject to enter your scene is critical.

    In this image shot in Trinidad, Cuba I found some amazing light skimming across the cobblestone streets. But it lacked something.

    By waiting for a subject, the couple, to enter the scene it is more of a complete story.

    In this video, photographer Mitchell gives you some great examples of how to shoot lots of images but end up with better results than just rapid-fire shooting.

    The key points mentioned in the video are:

    • It’s not about shooting as many images as possible, but to shoot as many as possible with a purpose and intent.
    • Don’t settle for one or two shots from each scene. Get out of the mindset of needing to get the perfect shot in as few frames as possible. It’s not a contest.
    • Don’t spray and pray. Have an idea of what you want to capture.
    • Explore different framings and camera settings.
    • See how the light changes from different angles.
    • Experiment with different perspectives.

    Another example

    Here you can see some shots I took of two men deep in conversation in Cienfuegos, Cuba. But it still wasn’t quite what I wanted. The first (upper left) was too busy. The second (right) was more focused on the med but lacked context of the busy street scene. The third (lower left) shot from across is getting closer. 

    Finally with the addition of the cyclist I had the shot I had envisioned. It shows context, has layers of activity, and interest. To me, it really speaks about daily life in a Cuban city. 

    Do you photograph with purpose? Slow down and think about each frame you shoot. Be intentional.

    And come home with great photos!

    The post Video: Travel Photography Tips – Shoot with a Purpose by Darlene Hildebrandt appeared first on Digital Photography School.


    Digital Photography School

  • Have your say: Best prime lens of 2017

    The year 2017 was great for prime lens shooters. Based on reader interest and preferences, we’ve got a whopping twenty lenses for this category of our year-end reader polls. Vote now for your favorite!

    Articles: Digital Photography Review (dpreview.com)

  • DEAL: 87% off 44 Photography Training Cards for your Camera Bag

    Have you ever gone out to shoot, but forgotten a technique you recently learned?

    We don’t all have a photographic memory, so having a compact reference guide at hand can help you recall what you learnt.

    That’s why the folks over at Photzy made these 44 printable Photography Training Cards called “Snap Cards”.

    And as part of our Christmas Deals, they’re offering them to dPS readers for just $ 29. Normally $ 220, for the next 48hrs you can get these reference cards for 87% off.

    Practical Training that Will Improve Your Photography

    A few of the cards include:

    • Aperture Explained
    • Shutter Speed Explained
    • ISO Explained
    • Shooting Modes Explained
    • DSLR Terminology
    • Depth of Field Explained
    • Exposure Compensation Explained
    • Mastering Backlighting Explained
    • Shooting in Low Light Explained
    • Tips on Photographing Night Scenes
    • Composition Psychology
    • How to Pose Groups of people
    • Working with Natural Light

    And So Much More!

    Money Back Guarantee

    There are 44 colour coded lessons in 9 main photography areas. Photzy offers a 100% money back guarantee, so there’s no risk in trying them out to see if they’re right for you.

    Available for 48 Hours Only

    Available for just 48hrs, grab them here while you can.

    Bonus Partner Offer

    This year as part of our 12 days of Christmas we have some extra special bonus offers from some great partners. For example – buy any dPS Christmas Deal and get $ 40 off ON1 Photo RAW 2018 today!

    Christmas Deals:
    Bonus Offers

    Bonus Offers

    Brought to you by

    ON1
    Athentec Perfectly Clear
    KelbyOne
    New York Institute of Photography

    The post DEAL: 87% off 44 Photography Training Cards for your Camera Bag by Darren Rowse appeared first on Digital Photography School.


    Digital Photography School

  • Famed Chinese rooftopper falls to his death from 62-story skyscraper

    Photo: Weibo

    Editor’s Note: We have decided not to post the video of the tragedy, or even link to it. Please, if you value your life, do not engage in ‘rooftopping’ or other risky activities for the sake of a ‘cool’ photo. There are legal and safe ways to capture great photos from tall places.


    Performing dangerous stunts to capture exciting photos has long been hotly debated, but that hasn’t stopped some people from continuing to do incredibly dangerous things for the sake of a few Instagram likes. “Rooftopping,” the act of climbing a very high structure to take images showing the distance to the ground, is one of the most popular of these activities, and it recently claimed the life of 26-year-old Chinese rooftopper Wu Yongning.

    Yongning regularly engaged in risky photo shoots. Hanging off of tall buildings earned him more than 60,000 followers on Weibo and a portfolio of unique, if vertigo-inducing and deeply unsettling, images. In the end, it also claimed his life.

    Photo: Weibo

    According to Channel NewsAsia, Yongning fell from the 62-story Huayuan Hua Centre while filming an attempted stunt to win 100,000 CNY (about $ 15k USD / €13k EUR) from an unnamed sponsor. Yongning reportedly planned to use the money to fund his wedding and help pay his mother’s medical bills.

    A camera that had been set up to record the stunt captured Yongning’s final moments, showing him performing a couple of pull-ups while hanging off the edge of the skyscraper. Tragically, Yongning didn’t have the strength to pull himself back onto the rooftop afterward, and without anyone there to help him back up, he eventually lost his grip and fell.

    The incidence happened on November 8th.

    Recent public awareness of the tragedy has prompted Chinese state media to warn against performing unsafe social media stunts for money and/or attention.

    Articles: Digital Photography Review (dpreview.com)

  • Final Cut Pro X 10.4 adds HDR support, VR video editing, and (finally!) curves

    Apple has released a Final Cut Pro X update that adds a slew of new features and expanded support to its video-editing software, most notable among those features being support for 360-degree and VR video. This is a major update for the software, which has been optimized to fully leverage the greater processing power of the new iMac Pro desktop systems.

    In version 10.4, Final Cut Pro supports editing 360-degree videos and viewing them in real time using an HTC Vive VR headset. According to Apple, the software supports importing, editing, and delivering these VR videos, with available edits including “immersive effects,” removing camera rigs, straightening the horizon, and adding standard videos/images to VR projects.

    In addition to its new 360/VR capabilities, Final Cut Pro 10.4 adds support for high dynamic range (HDR) videos in Rec. 2020 HDR10 and Rec. 2020 Hybrid Log Gamma formats, as well as new advanced color grading tools, including color wheels with controls for adjusting brightness, saturation, and hue.

    The latest version of Final Cut Pro also offers color curves with multiple control points, enabling users to make “ultra-fine color adjustments,” according to Apple. Or, as our Senior Reviewer Richard Butler put it: “Curves! Curves! At long bloody last, Curves!”

    Users have both manual white balance and eye dropper color sampling options, as well as the ability to apply custom lookup tables (LUTs) from Color Grading Central, PremiumBeat, and select other color grading apps. The latest version of Final Cut Pro combined with the new iMac Pro desktops also marks the first time a Mac can be used to edit full 8K-resolution videos.

    Apple lists the following additional features as arriving in Final Cut Pro 10.4:

    • Easily import iMovie projects from iPhone and iPad into Final Cut Pro for advanced editing, audio work, motion graphics and color grading.
    • HEVC and HEIF support for importing and editing high efficiency video and photo formats from Apple devices.
    • Updated audio effects plug-ins from Logic Pro X with redesigned, resizable interfaces.
      Faster, higher quality optical flow analysis built on Metal, Apple’s advanced graphics technology.

    The Final Cut Pro 10.4 update is available for free to existing Final Cut Pro owners, while new users will need to pay $ 300 USD for the application. Apple has also released Motion 5.4 and Compressor 4.4 for free to existing users, and at $ 50 USD each for new users.

    To learn more or pick up a copy for yourself, head over to the Final Cut Pro website.

    Press Release

    Final Cut Pro X introduces 360-degree VR video editing

    Apple’s Pro Video Editing App Also Adds Advanced Color Grading, HDR Support and More

    Cupertino, California — Apple today announced a major update to its professional video editing app, Final Cut Pro X, with new features including 360-degree VR video editing, advanced color grading tools and support for High Dynamic Range (HDR) video.

    Optimized to take full advantage of the incredible performance capabilities of the all-new iMac Pro, Final Cut Pro users can now edit full-resolution 8K video for the first time on a Mac. Apple is also extending 360-degree VR video support to Final Cut Pro companion apps, Motion and Compressor.

    Today, with more than 2 million seats, Final Cut Pro X is the most popular version of the software ever and is used by professional video editors to create incredible works of art, from award-winning Hollywood feature films and commercials, to international broadcasts and the world’s most popular YouTube videos.

    “With new features like 360-degree VR editing and motion graphics, advanced color grading and HDR support, Final Cut Pro gives video editors the tools to create stunning, next-generation content,” said Susan Prescott, Apple’s vice president of Apps Product Marketing. “When combined with the performance of Mac hardware, including the all-new iMac Pro, Final Cut Pro provides an incredibly powerful post-production studio to millions of video editors around the world.”

    Final Cut Pro lets professional editors create VR content with the ability to import, edit and deliver 360-degree video and view the project in real time through a connected HTC VIVE headset with SteamVR. Users can easily add 360-degree titles in 2D or 3D; apply blurs, glows and other immersive effects; and use visual controls to straighten horizons or remove camera rigs from equirectangular videos. Standard photos and videos can also be added to VR projects and 360-degree video can be shared directly to popular websites including YouTube, Facebook and Vimeo.

    The update also includes powerful tools for professional color grading. Unique color wheels feature built-in controls to adjust hue, saturation and brightness. Color curves allow for ultra-fine color adjustments with multiple control points to target specific color ranges, and eye droppers let users sample specific colors and apply manual white balance. Users can also apply custom lookup tables (LUTs) from popular color grading apps like DaVinci Resolve and websites including PremiumBeat, Color Grading Central and more.

    With support for the most popular HDR formats, Final Cut Pro gains access to an expanded range of brightness levels to deliver incredibly realistic images. Editors can output video to HDR monitors using I/O devices from AJA and Blackmagic with brightness levels up to 10,000 nits. The new color grading tools support both HDR and Standard Dynamic Range (SDR) video, and with tone mapping, users can easily change HDR to SDR output for broadcast.

    Additional Features in Final Cut Pro 10.4:

    • Easily import iMovie projects from iPhone and iPad into Final Cut Pro for advanced editing, audio work, motion graphics and color grading.
    • HEVC and HEIF support for importing and editing high efficiency video and photo formats from Apple devices.
    • Updated audio effects plug-ins from Logic Pro X with redesigned, resizable interfaces.
    • Faster, higher quality optical flow analysis built on Metal, Apple’s advanced graphics technology.

    Motion 5.4 enables users to create immersive 360-degree VR titles and effects that can be instantly accessed in Final Cut Pro. The update also makes it easy to convert between any type of Motion project at any time, create realistic spring-loaded animations with the new Overshoot behavior and apply photographic-inspired looks with new filters. Compressor 4.4 lets users deliver 360-degree video with industry-standard spherical metadata. Compressor also lets users export HEVC and HDR video, while adding a range of new options for delivering MXF files.

    Pricing and Availability

    Final Cut Pro 10.4 is available as a free update today for existing users, and for $ 299.99(US) for new users on the Mac App Store. Motion 5.4 and Compressor 4.4 are also available as a free update today for existing users, and for $ 49.99 (US) each for new users on the Mac App Store. Education customers can purchase the Pro Apps Bundle for Education for $ 199.99 (US). For more information, please visit: apple.com/final-cut-pro.

    Articles: Digital Photography Review (dpreview.com)

  • A fully loaded iMac Pro will cost you $13,200

    Photo: Apple

    It’s official! As we reported yesterday morning, the iMac Pro is now officially on sale in the United States, starting with the two base models—the 8-core and 10-core variations—and a price tag of $ 5,000 for the ‘standard configuration.’

    Up until now, that’s the only price we knew for this behemoth of a computer—what Apple calls “the most powerful Mac ever”—but now that the iMac Pro website is official and the product is up in the store, we can find out how much a fully loaded version costs. And let’s just say you should hold on to your wallets.

    If you go to Apple’s store website and trick out the computer, going all the way up to the 2.3GHz 18-core Intel Xeon W Processor with Turbo Boost up to 4.3GHz, 128GB of 2666MHz DDR4 ECC memory, a 4TB SSD, and a Radeon Pro Vega 64 graphics card with 16GB of its own HBM2 memory, your price tag goes up to.

    Drum roll please…

    $ 13,200

    If you do one of the more basic configurations, you’ll be able to get yours in the next 1-2 weeks. However, if you plan to shell out the aforementioned $ 13,200 for the fully-loaded 18-core beast, don’t expect to get the computer in 2017. According to the Apple store website, a fully loaded variation will ship in 6-8 weeks.

    To learn more or configure your own (if you’re lucky enough to have pockets this deep) head over to the iMac Pro website.

    Articles: Digital Photography Review (dpreview.com)

  • 5 Tips for Better Winter Landscape Photography

    Born and raised in Norway, my opinion might be slightly biased but winter is my favorite season for photography.  Sure, it’s a cold and harsh season but there are so many opportunities to capture beautiful winter landscape images both during the day and night.

    I haven’t always been a fan of winter photography, though. In fact, it took me several years after purchasing my first camera before I brought it with me on skiing and hiking trips. Needless to say, it didn’t take many trips before I was hooked and began looking forward to next winter. I quickly realized that photographing during winter is in many ways different than any other season.

    There are several new challenges you need to handle and, quite often, everything is white. How do you handle that? Here are five tips to capture better winter landscape images.

    5 Tips for Better Winter Landscape Photography

    1 – Look for Color Contrast

    After a few days of heavy snowfall, the landscape here in Norway is completely white. White trees, white lakes, white mountains and normally a white sky. When everything is white, it’s quite challenging to find a focal element as nothing really stands out.

    During days like this, you should be searching for elements of color that stand out in the otherwise white landscape. Here’s an example of a house captured the morning after a heavy snowfall.

    5 Tips for Better Winter Landscape Photography

    The red cabin is what makes this picture interesting. Without it, the scene lacks a focal element and the viewer’s eyes have no place to rest.

    I find red to be a particularly pleasing color in situations like this but search for any dominant color. Perhaps there’s an autumn leaf laying on top of a thin layer of snow, or maybe it’s a few skiers wearing red jackets. Just find a dominant color in the otherwise white landscape and use that as your focal element.

    2 – Bright is Better than Dark

    When you’re not able to find a colorful focal element that stands out in the frame, overexpose your image. If it’s snowing and there’s no contrast in the sky, winter images can often benefit from being a stop or two brighter. Just avoid clipping the highlights.

    5 Tips for Better Winter Landscape Photography

    This isn’t something I always do but whenever it’s a whiteout I tend to lean that direction. The slightly overexposed image enhances the whiteout and helps convey just how cold you were when taking the picture, yet it still shows a sense of calmness.

    3 – Choose a Cold White Balance

    You can either choose White Balance in camera or in post-processing if you’re photographing Raw, a cool color balance is often the most suitable for winter scenes.

    Unless it’s a colorful sunset, there’s no reason to use a warm White Balance. Snow is white and the shadows are cool. Using a cold White Balance will help enhance the winter mood while keeping the image more realistic.

    5 Tips for Better Winter Landscape Photography

    4 – Photograph During Bluehour

    Winter is a season with lots of opportunities throughout the entire day; even a sunny winter day is worth taking your camera out for. However, during the last years, I’ve begun to appreciate the blue hour more and more.

    The moments before the sun rises or after it sets creates a magical, soft light in the winter landscape, especially near the mountains. This is a time where you should be out with your camera. Even if it’s freezing cold and you’d rather stay at home underneath a blanket, you’re doing yourself a favor by going out with the camera at this time of day.

    5 Tips for Better Winter Landscape Photography

    If I was only able to choose one time of the day to go photographing during winter it would be the blue hour (well, night-time and aurora chasing might be preferred…)

    5 – Bring Extra Batteries and Keep Them Warm!

    The last tip is perhaps the most important when it comes to photographing cold climates in general – bring extra batteries. Batteries drain much quicker in winter and if you’re like me and use Live View for most shots, you need to bring at least a few extra batteries – just in case.

    I tend to keep at least one spare battery in an inner pocket of my jacket to keep it from draining or failing in the cold temperature. I’ve also found that doing so will result in the battery lasting longer when you do start using it.

    5 Tips for Better Winter Landscape Photography

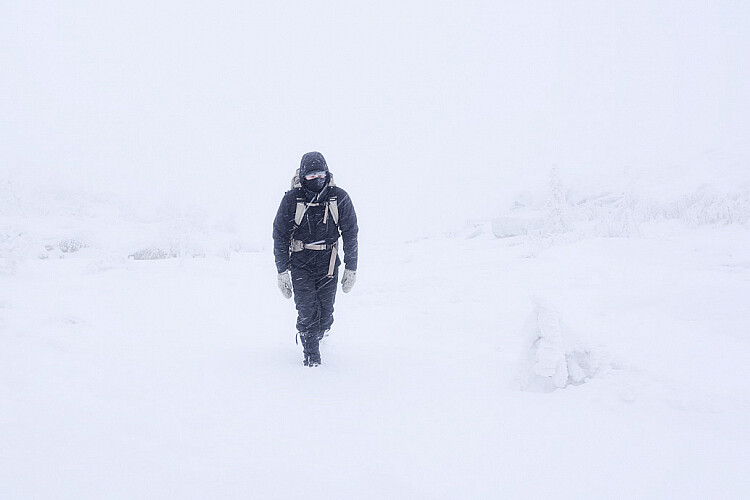
    A self-portrait I took on a hike in rough conditions last winter

    Lastly, related to keeping the batteries warm, you need to stay warm as well. Always be prepared and rather bring a layer too many than too few. You always want to have the opportunity to dress down, especially if you’re going on a hike.

    Over to you

    Do you get winter weather where you live? Get out and take some winter landscape shots and share them in the comments below. We’d love to see them.

    The post 5 Tips for Better Winter Landscape Photography by Christian Hoiberg appeared first on Digital Photography School.


    Digital Photography School

  • SLC-1L-01: One Speedlight Outdoors — Find Shade

    There is an inherent tradeoff when using small speedlights outdoors in daylight. They are light, and convenient and cheap. But they don't have a ton of power.

    And the aggravating factor is the relationship between a small flash and a bright environment. Which is, in turn, governed by our sync speed. And by this I mean our natural speed limit for flash, absent power-robbing gimmicks like high-speed sync (HSS).

    At a sync speed of 1/250th of a second, even at a low ISO, you are probably going to be at f/16 in full sun. That's a small aperture, which means your flash will be working hard to create a full exposure.

    Because of that, working in full sun with speedlights usually means we lack the power that we need. Certainly, we don't have enough power to push the flash's light through a softening modifier to look nice.

    The solution: Get more power… or find some shade. Read more »
    Strobist