Blog

  • CopyTrans brings native HEIC support to Windows with free plugin

    CopyTrans has launched a free piece of software that brings High Efficiency Image Format (HEIC / HEIF) image support to Windows, enabling PC owners to view the popular new image format that has replaced JPEGs in iOS 11.

    Windows doesn’t natively support HEIC images at this time, instead receiving JPEG versions of HEIC images when they’re transferred from an iOS 11 device. And while we’ve seen other programs build HEIC support into their own Windows versions, CopyTrans’ program is the first to bring native support.

    In other words, as CopyTrans software developer Niki Minkov explained to us over email:

    That is, when you browse your files with Windows, HEIC files will display thumbnails just as JPEGs, double clicking will display them full size with Windows Picture Viewer, and the right-click-on-file context menu will now include a “Convert to JPEG” feature.

    In fact, our plugin is using the same integration technology that Nikon and Canon used to make Windows compatible with their respective RAW formats.

    CopyTrans HEIC for Windows also supports Microsoft Office, and it retains the images’ original EXIF data.

    The HEIC format allows for much smaller file sizes than their JPEG counterparts, enabling a greater number of photos to be saved to a device’s built-in storage. Other advantages of the format include the ability to store burst photos, focal stacks, and exposure stacks in a single file, the ability to store image editing operations, and more. Thanks to CopyTrans HEIC, you don’t have to give those advantages up just because you own a PC.

    To learn more or download the software for yourself, head over to the CopyTrans website.

    Articles: Digital Photography Review (dpreview.com)

  • Canada’s ‘The Camera Store’ robbed of $27,200 in high-end camera gear

    Photo by The Camera Store

    Calgary camera shop The Camera Store—known for their fun YouTube reviews of various camera gear—was robbed over the weekend. In what the owners are calling a “very targeted” break-in, thieves made away with $ 35,000 CAD (~$ 27,200 USD) worth of high-end camera kit, including a limited edition Leica M-P Edition Safari.

    The owners are offering a $ 5,000 CAD (~$ 3,880 USD) reward to anyone who can help catch thieves or recover any of the stolen equipment, which includes:

    Hasselblad X1D camera body silver #UQ27014288

    Hasselblad XC 30mm F3.5 lens #2WV10784

    Hasselblad XC 45mm F3.5 lens #2UVT10447

    Hasselblad XC 90mm F3.5 lens #2VVT10265

    Leica MP Safari Edition #09008593

    It’s thought the thieves forced the stores shutters apart in the early hours of Saturday morning, December 16th, and smashed a window to gain entry. Tens of thousands of dollars worth of equipment was ignored by the thieves, who went directly to display cabinets to take very specific models.

    The limited edition Leica stolen in the heist.

    Canada’s CBC news service reports that store owner Julian Ferreira said it is the first time he has suffered a break-in during the 21 years The Camera Store has been open. Ferreira has offered a $ 5,000 shopping spree in the store to anyone who comes forward with information that leads to a conviction.

    Please call police at 403-266-1234 or if you wish to remain anonymous call crime stoppers at 1-800-222-8477


    Articles: Digital Photography Review (dpreview.com)

  • Struggling owl takes home top prize in 2017 Comedy Wildlife Photography Awards

    $ (document).ready(function() { SampleGalleryV2({“containerId”:”embeddedSampleGallery_9371092915″,”galleryId”:”9371092915″,”isEmbeddedWidget”:true,”selectedImageIndex”:0,”isMobile”:false}) });

    After showing off 40 chuckle-inducing finalists early last week, the 2017 Comedy Wildlife Photography Awards have revealed their overall winners in each category. The results were unveiled last Thursday, but a Monday evening seems like the best possible time to share some photos that’ll make you smile.

    The overall winner is a photo of an owl struggling to stay on a branch, part of a sequence of four shots by photographer Tibor Kercz that he aptly titled “Help.” Meanwhile, the category prizes—On the Land, In the Air, and Under the Sea—went to Andrea Zampatti, John Threlfall, and Troy Mayne, respectively. You can see all 7 winning photos in the gallery above.

    Of course, these 7 are far from the only images worth a laugh. So in addition to naming its winners, the CWPAs also named 10 Highly Commended images, which we’ve included in the gallery below. You’re welcome…

    $ (document).ready(function() { SampleGalleryV2({“containerId”:”embeddedSampleGallery_6267236120″,”galleryId”:”6267236120″,”isEmbeddedWidget”:true,”selectedImageIndex”:0,”isMobile”:false}) });

    In addition to making us smile once a year, The Comedy Wildlife Photography Awards also works with The Born Free Foundation, which “works locally, nationally and internationally to end wild animal cruelty and suffering, and protect threatened wildlife.” To that end, they’ve put together a photo book of comical photos submitted to the CWPAs over the years, which helps to raise funds for the Foundation.

    If you like what you see above, consider purchasing the book and supporting the Foundation. And if you want to learn more about the Comedy Wildlife Photography Awards head over to the CWPA website where you’ll find all of the finalists and winners from the past three years—a little inspiration for your entry to next year’s competition, perhaps?

    Articles: Digital Photography Review (dpreview.com)

  • How to Use Natural Light for Macro Photography

    I have to admit that the sun is one of those things in life that intrigues and fascinates me. When I was a kid I remember laying on the floor looking at the sky, watching the sun changing its position during the day and casting different types of shadows and reflections.

    Natural light is the term we use in photography to refer the light of the sun. This, as opposed to artificial light that is usually created by the transformation of electricity into light through the use of light bulbs.

    Even though natural light has the sun as a starting point, it can look very different depending on many factors. Time of the day, the season of the year, weather conditions and various other circumstances may influence the way sunlight reaches the earth and can be captured in a photograph.

    As photographers, it is our job to understand the way it works and make the best out of it. In this article, we will explore the way natural light works and how to apply it in macro photography work. Let’s start with the basics.

    Quality of Light

    Quality of light is a term usually used by photographers to refer to the “hardness” or “softness” of a light source.

    This quality is determined by the way a given light source produces the transitions between the highlights and shadows.
    Soft light produces smooth transitions, while hard light produces abrupt transitions between the tonal areas, therefore giving the image less or more contrast.

    The basic principle is: The larger the light source, the softer the light.

    This means that sunlight gets softer closer to sunrise and sunset and harder closer to midday, due to the changes of distance between the sun and the earth during the day (and the angle at which it enters the atmosphere).

    Lighting macro photography 01

    Left: Image photographed at sunrise. Right: Image photographed at midday.

    Direction of Light

    The direction of light refers to the position of the light relative to the subject. This positioning determines the width of the shadows it casts creating the sense of texture and shape.

    The basic principle is: Shadows fall to the opposite side of where the light is located.

    Frontal lighting has a flattening effect on most subjects as it casts the shadows on their back, removing the three-dimensional effect.

    Side lighting accentuates the texture of the subject as it casts side shadows creating the sense of dimension and volume.

    Backlighting creates an outlining effect on the subject separating it from the background, making it more dominant.

    Lighting macro photography 02

    Color and Contrast

    The color of light, or white balance, and contrast in natural light is mainly affected by two factors:

    #1 – Time of day affects the position of the sun. The closer the sun is to the horizon, the less contrast and warmer is the light. This phenomenon happens mainly because sunlight has to cross more atmosphere which gives less contrast and filters the blue light resulting in a yellowish tonal effect. Closer to high noon the higher the contrast and less color variation it has because the sun is further away from the horizon.

    #2 – Weather which affects contrast and color of light mainly by the presence of clouds which act like a huge diffuser resulting in less contrast and a blue color cast.

    Lighting macro photography 03

    Diffused and Reflected Light

    Even though you cannot control sunlight, it doesn’t mean you cannot modify it to suit your needs.

    Diffused light is achieved by sending a beam of light thru a semi-transparent surface resulting in lower contrast and feathered edge shadows.

    Reflected light is achieved by bouncing the incident light off a reflecting surface onto the subject resulting in a change of direction and intensity of the light.

    Lighting macro photography 04

    Tools

    Basic tools like reflectors and diffusers are fundamental resources for natural light photography. Even though there are a lot of macro photography dedicated gear options available, if you don’t want to spend your hard earned money on them, you can just build your own with things you probably already have around the house.

    Tracing or baking paper and aluminum foil are great materials for building custom diffusers and reflectors. Just cut them to the size and shape that best suits your needs.

    Lighting macro photography 05

    Light diffusion materials range from nylon to translucent paper, plastic or acrylic. Here is a good example of a macro shot of a quarter dollar coin with direct side natural light and with tracing paper sheet diffuser.

    Lighting macro photography 06

    Left: Direct sunlight from the side. Right: Diffused sunlight from the side.

    In this particular situation, the diffuser acted as a light softener and a reflector creating the highlights that give volume to the coin engraving.

    Adding more light

    Even though sunlight is only one light spot it is easy to simulate additional spots with reflectors. Take a look at this example of an old pocket watch photographed with side natural sunlight.

    Lighting macro photography 07

    Even though the light on the watch’s face is good, the rest just fades to black, making it flat. Another light spot would really help to get the right image volume. So we will add a mirror reflection on the opposite side of the main light for better definition of the object.

    Lighting macro photography 08

    And here is the final image

    Lighting macro photography 09

    That small spot reflection from the mirror on the left side of the image was enough to create the right volume, and give the image depth and ambiance.

    These kinds of reflections can be created with different types of materials. A mirror like the one used in this image gives a narrow and intense reflection. While materials like aluminum foil create a broader reflection that can be scattered if you crumple the foil making it reflect light in different directions.

    White surfaces like cardboard are also good reflection materials, giving a softer and less contrasted reflection than aluminum foil.

    Background Separation

    In photography, there are many factors that can influence background separation; focal length, aperture, distance between the subject and its background and lighting.

    But because macro photography is such a specific subject that happens in a very small area, all these factors become critical as every small change translates to a big difference in the captured image. Because of the highly enlarged capture area, it becomes very difficult to use a camera handheld. A tripod and a shutter release cable are a must have for macro photographers.

    The “Boogie Man” in the macro photography world is without a doubt the depth of field. In most macro circumstances the focus area is so shallow that a minimal change in the distance to the subject or aperture results in failure. This shallow depth of field can also be used as an advantage point to create background separation.

    Both of these images were photographed in the same position with a 100mm macro lens. The difference here is the depth of field created by different apertures.

    Lighting macro photography 10

    Left: f/32. Right: f/11.

    The image on the left gets confused and overcrowded with information. While the image on the right gets separation between the main focus subject and the background making it simpler and more appealing to the eye.

    Another way to get background separation is to use the position of the light to create separation.

    Lighting macro photography 11

    This image was done using a simple and monochromatic background and backlighting which creates overexposure in the background, making the main subject stand out.

    Mixing Natural Light with Flash

    Sometimes natural light just isn’t enough for the image you want to create. Mixing natural light with flash is not an easy job, as flash usually overpowers natural light, giving the image an artificial look.

    However, mixing the right amount of these too light sources can give some interesting results.

    Lighting macro photography 12

    This image was created with the use of a ring flash that created the specular highlights in the water drops, and a longer shutter speed that allowed the background to capture some natural light.

    This result could only be achieved by the mix of these two light sources. Using only natural light would result in dull water drops without the flash sparkle, and artificial light background if only the ring flash had been used.

    Mixing Natural Light with LEDs

    In the past few years, LED light has become a valuable resource for photographers that want to use continuous light but don’t want to deal with incandescent or fluorescent bulbs and all their associated problems.

    LEDs are very energy efficient as they convert about 80% of the energy they use into light, while incandescent only converts about 20%. They also don’t generate much heat and are available in many colors.

    Lighting macro photography 13

    This image was created with the mix of natural morning light shining through a window, and a simple and inexpensive cool white LED pocket flashlight.

    The overall look was created by the use of a light painting technique with a 2-second exposure. Moving the flashlight on the top of the table created the texture and blue cast, while the diffused backlight from the window illuminated the food.

    Final Thoughts

    I guess light in photography is not what you start with, but what you make out of it. Once you know the rules, you can adapt yourself to what you’ve got and transform a bad lighting situation into great images.

    Don’t be afraid to experiment, as trial and error is the best way to success. Use and abuse natural light, after all, it is free and is for sure different every day!

    The post How to Use Natural Light for Macro Photography by Ivo Guimaraes appeared first on Digital Photography School.


    Digital Photography School

  • KUVRD Universal Lens Cap protects any lens from dust and water

    $ (document).ready(function() { SampleGalleryV2({“containerId”:”embeddedSampleGallery_8206056277″,”galleryId”:”8206056277″,”isEmbeddedWidget”:true,”selectedImageIndex”:0,”isMobile”:false}) });

    KUVRD has launched a one-size-fits-all Universal Lens Cap (ULC) designed to protect lenses from hazardous elements, including dirt and water, as well as minor drops. Simply called the KUVRD Universal Lens Cap, this ULC is made with silicone that can stretch to accommodate various lens shapes and sizes, including both the front and rear of the lens.

    Here’s a quick intro, not that the concept isn’t pretty self-explanatory…

    In addition to being water- and dust-proof, KUVRD explains that its ULC “never falls off” and helps absorb shocks.

    One cap will absorb a little bit of a drop, but photographers who desire a greater degree of bump/drop protection can layer several KUVRD ULCs, placing one lens cover over another until you have several very snug layers of rubber between your lens and the elements. When not in use, KUVRD can be folded and stored in a compact area, such as a pocket or wallet.

    KUVRD is seeking funding for its Universal Lens Cover on Kickstarter, where it has very quickly exceeded its $ 2,500 funding goal with about $ 72,000 in pledges. Backers who pledge at least $ 30 and share the campaign on social media are offered two Universal Lens Covers. Shipments will be available globally and are expected to start in March 2018.

    Articles: Digital Photography Review (dpreview.com)

  • DPReview Instagram takeover: Barney’s photos from Mexico

    Have you followed us on Instagram yet? Now’s a great time to, since over the next three days we’ll be turning our account over to Barney, where he’ll be sharing photos from a recent trip to central Mexico. It’s the trip that cemented the Leica M10 as his Gear of the Year, and provided plenty of opportunities to photograph the beauty of the region – from the captivating architecture of Queretaro to the jungle of San Luis Potosi and points in between.

    Give us a follow and stay tuned!

    Articles: Digital Photography Review (dpreview.com)

  • Putting the Fine Art into Travel Photography

    “Fine Art” when it comes to travel photography is not an often used term and few photographers define themselves as “fine art travel photographers”. Genre definitions in photography can be highly subjective, and the fine art line can be very fine indeed. For me as a travel shooter, the fine art approach is just a natural extension of who I am and how I see and share the world through my images.

    Vietnam is one of my favorite places to photograph, not only because of its remarkable aesthetic qualities but because of my great fondness for its people. And so when asked talk about my photography through the fine art lens, using Vietnam as the focal point was an easy choice to make.

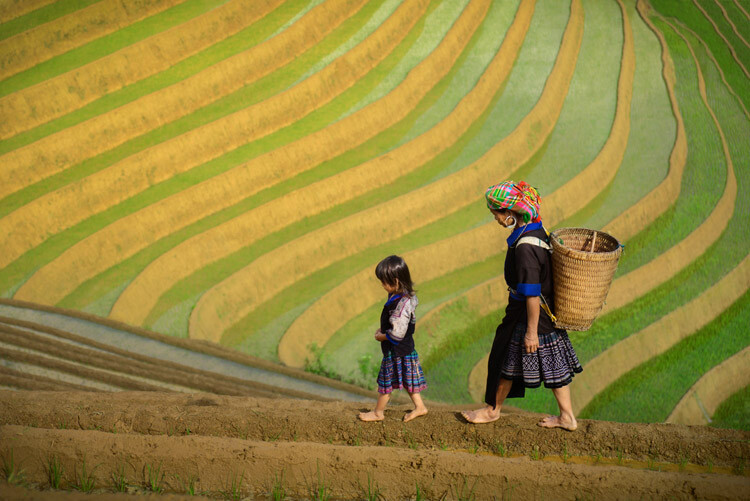
    Putting the Fine Art into Travel Photography - Vietnam rice terraces

    Flower H’mong mother and daughter walking a rice terrace berm in Mu Cang Chai, northern Vietnam. Exposure settings: f/4, 1/2000th, ISO 400, 70mm lens.

    fishermen resting on Boats - Putting the Fine Art into Travel Photography

    Fishermen resting. Shot from a bridge near Lang Co Bay. Exposure settings: f/8, 1/320th, ISO 800, 56mm lens.

    The Fine Art of Travel Photography – People and Landscapes

    Fine art photography, at least the way I see it, is about focusing on a specific style or look that reoccurs in every image with a goal to create aesthetically pleasing and engaging work.

    Fine art travel photography implies that each travel-themed photo is of a very high artistic standard with consistent consideration to an effective composition, use of tonal range (lights and darks), and a balanced or focused color scheme throughout the photo.

    Personally, I use natural light, and again, approach a photo to be a work of art. The goal is to create a visually striking image that looks similar to what a painter might have created, while still also looking completely like a photograph.

    Fishermen in Halong Bay - Putting the Fine Art into Travel Photography

    Fishing amidst the thousands of karst limestone formations of fabled Ha Long Bay. Exposure settings: f/9, 1/200th, ISO 800, 35mm lens.

    Fishermen Ballet - Putting the Fine Art into Travel Photography

    Four fishermen raise their nets on the Perfume River in Hue, central coastal Vietnam. Exposure settings: f/11, 1/160th, ISO 800, 30mm lens.

    Showcase the people and culture

    I aim to do this while still faithfully representing a country’s culture, with the goal to accurately, if ideally, portray the personality and lives of the people within the photos. I have always been most interested in the artistic side of travel photography, and less so in the traditional or documentary approach.

    That said, I can see myself taking on more singularly focused projects in the future, where I can apply my artistic sense to the challenges of documentary storytelling within the travel space.

    Vietnamese Monk - Putting the Fine Art into Travel Photography

    A Khmer-Vietnamese monk daydreams at his monastery window in the Meklong Delta region. Exposure settings: f/4, 1/125th, ISO 640, 40mm lens.

    Set your intention of making art

    Although it may seem obvious, I think it’s critically important when adopting the fine art style to have the intention of making art throughout the process – from preparation to post-production. I take this mindset into the field and shoot a variety of subjects in various ways.

    Portraiture is my first love, but I also enjoy landscape, wildlife, and cultural documentary photography. The purpose is to showcase scenes of life and culture for others to observe and enjoy. And of course I enjoy it as well, or I wouldn’t be doing it!

    Playing in the River - Putting the Fine Art into Travel Photography

    Ladies from the Cham ethnic group in Phan Rang having their own water festival. Exposure settings: f/36, 1/15th, ISO 400, 90mm lens.

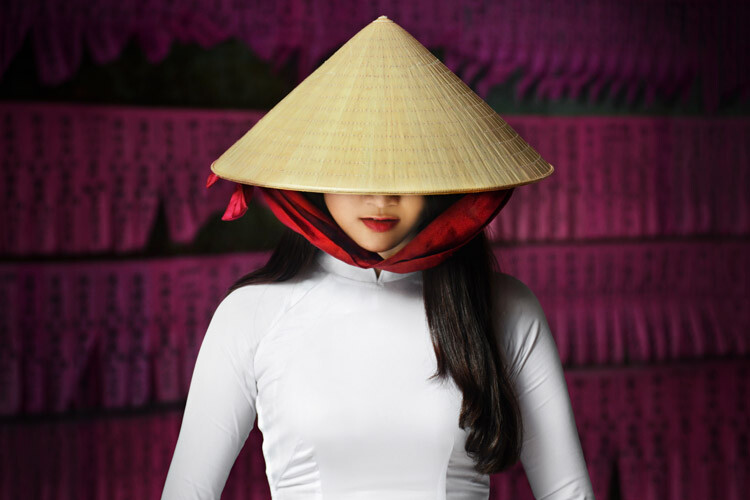
    Lady in Conical Hat - Putting the Fine Art into Travel Photography

    Vietnamese lady wearing the traditional white “Ao Dai” and Non La (conical hat), Saigon. Exposure settings: f/4, 1/125th, ISO 640, 70mm lens.

    Have a vision and shoot with a purpose

    In each work, I try to have a vision and understand what the photo will be about and how it will look in my mind before I take it. There is nothing in the frame that shouldn’t be there – everything included serves a purpose.

    I also like to look for patterns in the scenes and feature these in the composition. Careful composition allows for clean backgrounds, no unnecessary distractions from the subject, and a clear focal point that is immediately identifiable against a complementary background that helps to tell the story or set the mood for the piece.

    Below is some insight into how I approached photographing some of my favorite Vietnam images taken over the last few years.

    Forever in Love

    Forever in Love - Putting the Fine Art into Travel Photography

    “Forever in Love” – A loving couple in Hoi An share a moment of joy and happiness together in their garden as the sun sets. At the time of photography, they had been married for 66 years. Exposure settings: f/7.1, 1/200th, ISO 500, 50mm lens.

    I met a fellow travel photographer who now resides in Vietnam, Réhahn Croquevielle, and he generously invited to show me around his hometown of Hoi An. I was lucky to meet a lovely old couple who live in his village. When I met them they were smiling widely and happy be photographed by us.

    To take this photo, I first observed the direction of light. Then I made sure to position them in front of the setting sunlight so their faces would be bright and the details on their skin well exposed.

    I also had to consider the background and overall scene, and I found an area near one of their vegetable patches which was clean (consistent colors and even patterns without clutter) while also providing context and a backstory for the couple. So I asked them to sit there. They found this all very funny and were laughing constantly as we kept the mood light and fun, which I think is important to help make subjects enjoy a portrait session.

    Interesting subject matter is the most important element to a successful photograph, in my opinion, followed by good composition and lighting. But a background that complements and doesn’t distract from the focal point is also crucial for a powerful photograph, and perhaps too often overlooked.

    Playing in a Sea of Fishing Nets

    Playing in a Sea of Fishing Nets - Playing in a Sea of Fishing Nets

    A happy boy playing in a blue sea of fishing nets in the Mekong Delta region of southern Vietnam. Exposure settings: f/8, 1/250th, ISO 500, 24mm lens.

    I was in search of a workshop where fishing nets are made by hand in the Mekong Delta region of Vietnam. When I arrived, I noticed a boy and his friends were curious about my presence and wanted to meet me and help out if they could. They led me to the net weaving shop, which was a large open-ended structure with a corrugated tin roof.

    Inside were seated ladies spread about busily creating these nets. I was immediately struck by the blue color and knew it would be very photogenic, but it was important to get the right light to make them come to life. I noticed all the ladies were in shaded, darker areas where the light wasn’t strong enough. There was an area that was close to an opening in the rooftop, under a natural skylight. I saw that the light was good there, but without a human subject the photo wouldn’t be so interesting.

    Since I had created a rapport with the boy and his friends and they were still hanging around, I encouraged them to play in the fishing nets. Demonstrating myself, I ran and jumped into the nets, making everyone laugh, and the kids started to do the same themselves. I captured this photo knowing that the frame had to be filled with the blue fishing nets to bring attention to the boy. It’s his genuine smile and action that makes this photo all the more interesting and enjoyable to view.

    Patterns on the Streets of Hanoi

    Patterns on the Streets of Hanoi - Putting the Fine Art into Travel Photography

    A busy street scene in Hanoi photographed from a bridge on a rainy morning. Exposure settings: f/14, 1/40th, ISO 1250, 35mm lens.

    It was raining one morning that I was to be exploring the city of Hanoi, which could have been considered a problem for photography. I went to the Long Bien Bridge after visiting a nearby market and observed the traffic passing by underneath me. I saw the potential for a really interesting pattern of cyclists with the high volume of motorbike traffic and the occasional bicycle. The rain had stopped, but the wet roads were creating reflections which would ultimately be beneficial and make for more dynamic lighting in the picture.

    I waited a long time and photographed many combinations and patterns of commuters. I felt it was important to have an interesting focal point that was different from the rest of the scene. That was either going to be a person walking across the road or riding a bicycle amongst the sea of cars and other traffic.

    I decided to use a slightly slower shutter speed to blur the traffic and capture the human subject sharper than the surroundings. It took a lot of patience and time on the bridge to finally capture an interesting pattern. It was fun to find the art in simple, everyday life.

    Old Man with a Lute

    Old Man with Lute - Putting the Fine Art into Travel Photography

    Exposure settings: f/4, 1/160th, ISO 1000, 70mm lens.

    I met this old man in the small idyllic village of Ninh Binh where he was walking by a lake. When he learned that I would like to make his portrait, he invited me into his home close by. We drank some tea and I spent some time together with his family.

    Before I photograph someone, I always look around the scene and try to find the right place where I will take their picture, depending on the lighting and the background. I noticed near a window there was strong natural light coming into his otherwise dark home, and I placed a chair in this spot for him to sit. There was enough light on the man to not require a tripod in this position.

    I noticed an old lute hanging on the wall. I found out that it was his and he could play, so I asked if he could show me. As he played, I took some pictures, but I noticed that the light would be stronger on his face, which is the main focal point if he were looking out the window. The breeze from the window blew his beard gently to one side, creating some movement in this portrait of an interesting, old and very friendly Vietnamese man who I was privileged to meet and photograph.

    Here are a few more example images of my fine art travel photography.

    Fisherman at Sunrise

    Girl with Blue Eyes

    Lady with Fan

    Mekong Breakfast

    Running and Playing

    Salt Harvesters


    The post Putting the Fine Art into Travel Photography by David Lazar appeared first on Digital Photography School.


    Digital Photography School

  • 2017 Buying Guide: Best cameras for parents

    Quick. Unpredictable. Unwilling to sit still. Kids really are the ultimate test for a camera’s autofocus system. We’ve compiled a short list of what we think are the best options for parents trying to keep up with young kids, and narrowed it down to one best all-rounder.

    Articles: Digital Photography Review (dpreview.com)

  • Behind the scenes of Joe McNally’s ‘High Fashion Heist’

    Joe McNally created this shot in the Museum of Ethnography in Budapest, Hungary using the Nikon D850, a 14-24mm F2.8 zoom lens, and strobes. A lot of strobes.

    Nikon D850 | AF-S Nikkor 14-24mm F2.8 @ 14mm | ISO 160 | 1/20 sec | F5.6

    Joe McNally is one of the most recognizable names in photography. As one of the foremost fashion and portrait photographers in the world, his work has been published internationally in books, magazines and newspapers for decades.

    In his role as a Nikon Ambassador, McNally had early access to the new Nikon D850. We spoke to him recently to talk through the process of creating one of the most arresting images of Nikon’s D850 launch campaign.


    How did the idea for this image come together?

    I think the bottom line here is that I’ve seen way too many James Bond movies! I wrote up three separate potential treatments, and this one I titled ‘The High Fashion Heist’. So imagine an elegant lady sweeping down a grand staircase, gown flowing behind her, clutching stolen gems, racing past the sleeping security guard. And the wrinkle is her gown inadvertently is toppling a priceless statue. It’s a heist gone wrong, that type of thing. I also wanted to include the feeling of motion or speed.

    The museum was willing to work with us, it was affordable, and it’s Budapest, which is an amazing place

    Did the concept evolve during the process of putting the shoot together?

    The original treatment did not include the toppling statue. I was driving the sense of motion from the flowing gown, and we wanted to emphasize a little more tension, so when I re-wrote the concept I threw in the idea that she’s knocking over a statue.

    Where did you shoot?

    We had to work outside the U.S., and we came up with a number of locations – one of which was in Edinburgh, Scotland, and one was in the Hermitage in St. Petersburg. And one was the Museum of Ethnography in Budapest, Hungary. They sent me scouting photographs of it, and it had that feel. The old elegance. The big staircase.

    The museum was willing to work with us, it was affordable, and it’s Budapest, which is just an amazing place. So after the idea was approved, we moved forward on the location pretty quickly.

    $ (document).ready(function() { SampleGalleryV2({“containerId”:”embeddedSampleGallery_2777146075″,”galleryId”:”2777146075″,”isEmbeddedWidget”:true,”selectedImageIndex”:0,”isMobile”:false}) });

    The bust tipping over in the foreground – was that manipulated in post?

    The column and the head are supported by metal braces. We couldn’t buy a bunch of busts and have them smash on the floor, so we took the column and put a brace against it, and the head, and then touched out the braces in post.

    I’d say there were probably about 20 large power packs and heads, and about 10-15 Speedlights

    How did you light this shot? Was it all strobes?

    It’s virtually all strobes. We were allowed to come into the museum at around 6 o’clock at night when it was closed, and we worked until 6 o’clock in the morning. So there was no natural light. So if you look at the windows up top, camera left, those are strobes on a crane truck outside. I’d say there were probably about 20 large power packs and heads, and about 10-15 SB-5000 Speedlights.

    Were you shooting in TTL mode, or was it all manual flash exposure?

    I shot all manual for this. The D850’s touchscreen is fantastic, because now, if I’m doing something complex with six groups of Speedlights for example, I can just tap on the screen and alter their values.

    How did the D850’s particular feature set help you in putting this shoot together?

    First off, there’s the resolution. When you shoot in an ornate place like this, you really want to be able to capture all of the detail, and the camera handled that really well. The D850’s sensor has great dynamic range, so I didn’t have to over-light. In the cavernous spaces, I could hint at lighting, and I knew that the shadow detail would be alright. The autofocus is hyper-accurate, which is essential, because you don’t want to get THE expression and THE particular arrangement of the gown absolutely perfect and have any sort of focus issues afterwards.

    I was able to effectively control two fields of flash, with the Speedlights being controlled from the camera

    I was shooting the flashes in manual exposure mode, but I was controlling all of the Speedlights using the WR-10 radio trigger from the camera. So I had a big strobe system on a different radio system, but I also had the Nikon Speedlight system. I was able to effectively control two fields of flash, with the Speedlights being controlled from the camera.

    We had a big crew, plus a video crew, the clients were there, we had a props person, hair, makeup, fashion, styling, and a very elegant wonderful model. I had a crew of five assistants! So the convenience of the new technology really helped.

    Are there other features of the camera that you’re excited to try out?

    So far, I’ve used the D850 strictly as a stills camera. I’ve been using it a lot just for simple portraiture and for beauty portraiture, but I’m very much looking forward to going into video mode with this camera. Again, the detail is really pretty luscious and pretty wonderful. I have a small stills and video project I’m going to be shooting in February, and I’m looking forward to it.

    I shot the Rio Olympics with my D5, because it’s tough and it’s fast, and I’ve always used my D810’s when I needed resolution. But the D810 doesn’t have the radio controls that I’ve come to be so fond of with the SB-5000 flashes. And the D810 didn’t have things like the tilting LCD from the D500, which I’ve found to be very convenient. With the D850, I can have all of that in one camera. Speed, resolution and convenience.


    This is sponsored content, supported by Nikon. What does this mean?

    Articles: Digital Photography Review (dpreview.com)

  • Rokinon AF 50mm F1.4 FE: sample gallery and impressions

    $ (document).ready(function() { SampleGalleryV2({“containerId”:”embeddedSampleGallery_2483026964″,”galleryId”:”2483026964″,”isEmbeddedWidget”:true,”selectedImageIndex”:0,”isMobile”:false}) });

    The Rokinon/Samyang AF 50mm F1.4 FE ($ 500) and AF 35mm F1.4 FE ($ 800) represent the South Korean manufacturer’s first foray into the autofocus lens market. The 50mm F1.4 is a steal compared to Sony’s own Planar T* FE 50mm F1.4 ZA ($ 1400). So what do you sacrifice, and is it worth the savings? In short, it’s enough to say this lens is no gem in a bargain’s disguise. But it’s not a bad piece of glass either.

    The housing is made of metal like the Planar T* and the build quality is reassuringly dense – nothing rattles around when you shake it (a very scientific test indeed). It’s a little bit smaller than the Planar T* (the filter ring is 67mm vs 72mm), as well as lighter (645g / 1.4lb vs 778g / 1.7lb). But the Planar T* is by all accounts a large, heavy prime, meaning the Rokinon too feels hefty to lug around. It left this reviewer yearning for the comparably tiny/light-weight Sony Sonnar T* FE 55mm F1.8 ZA instead.

    The Rokinon/Samyang AF 50mm F1.4 FE, shot wide open. ISO 100 | F1.4 | 1/5000 sec

    Photographers considering the Rokinon AF 50mm are likely doing so because of its F1.4 maximum aperture. Wide open, it’s not terribly sharp, but photos shot at F1.4 are certainly usable, especially if you add more sharpening in ACR or Photoshop. As you’d expect, sharpness improves as you stop down (until you hit diffraction territory). For a full stop aperture progression, head to the end of our gallery.

    There’s a considerable amount of longitudinal chromatic aberration (purple and green fringing), and it can be really distracting around high contrast edges – see the second image in the gallery. While this can often be removed – to an extent anyway – in ACR or Lightroom, it’s often difficult or very time consuming, and comes with the risk of desaturation of other areas of your photo. Lateral CA corrections were left off for images in this gallery, and while you can turn it on in-camera or in Raw processing software, lateral CA seems to be well-controlled in this lens.

    The AF motor is very noisy, not unlike a distant submarine distress call

    The other significant reason photographers are likely to consider this lens over the cheaper manual focus Rokinon 50/1.4 is its autofocus. Unfortunately, we don’t have a whole lot of good news in this department. In use, the AF motor is very noisy, not unlike a distant submarine distress call. That, or a very near dental tool. Trying to use it paired with the Sony a7R III in AF-C is a nightmare. Focus speeds are slow, loud, and AF is easily confused, sending the lens into a painfully long hunt. Performance and focus accuracy are far more reliable in AF-S. Eye AF, one of our favorite Sony features thanks to its uncanny ability to grab a subject’s eye and lock focus is sadly inaccurate and unreliable when used with this lens.

    This would not be my first choice for a normal Sony FE lens with AF, but it’s still capable of lovely results. ISO 100 | F2.5 | 1/1000 sec

    The lens also has some issues with bokeh. Take a look at the onion rings in the out-of-focus highlights here, and if you search around the image above at 1:1, you’ll see slightly out-of-focus highlights having distracting holes in their center.

    The takeaway: If you’re on a budget and want an FE 50mm F1.4 lens with autofocus, well, you don’t have a lot of options. Seeing as you can get some nice, usable images wide open, I wouldn’t steer you away from pulling the trigger on the Rokinon. But I would probably try to convince you to settle for F1.8 and save up for the Sonnar T* FE 55mm F1.8 ZA ($ 900) instead (quality-wise it is far superior to the Sony FE 50mm F1.8 – $ 200).

    That said, optically this lens actually performed better than I expected a first-generation AF lens to. And I’m pretty excited to see Rokinon stepping into new territory.

    Articles: Digital Photography Review (dpreview.com)