Blog

  • just … stop


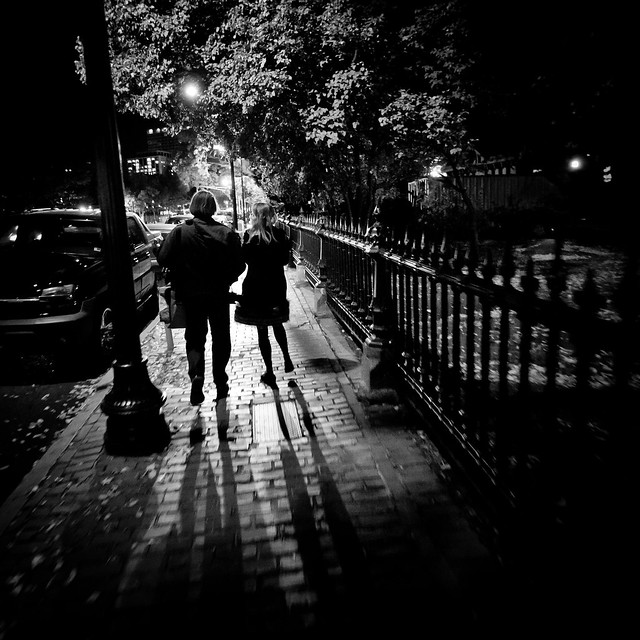
    just … stop, originally uploaded by Mahdi . J ~KPC.

    Catchy Colors Photoblog

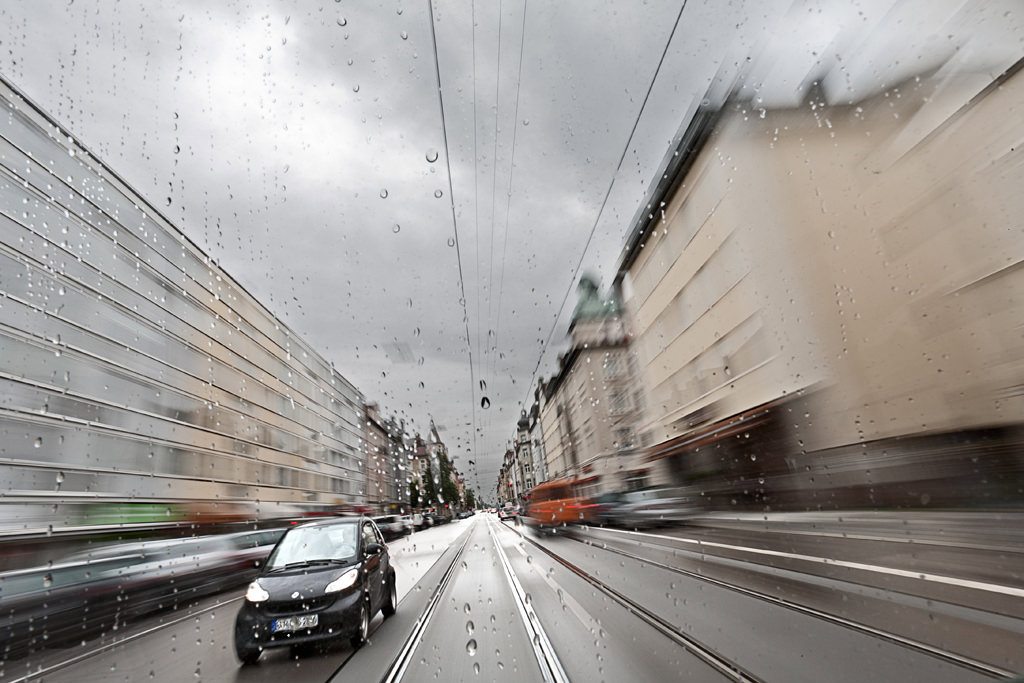
  • Benjamin Regali stellt ein Foto vor: Smart

    Das ist ein Gastartikel von Benjamin Regali. Tagsüber arbeitet er als Screen Designer in München und in seinen freien Minuten fotografiert er so oft er kann, meist urbane Architektur oder Street. Seine Bilder findet man auf Flickr und seinem Fotoblog 10mmgalore. Wer mag kann ihm auf Twitter folgen.

    Spontan oder Geplant?

    Es gibt unterschiedliche Möglichkeiten wie ich zu einem Bild finde: Entweder ich gehe gezielt los, bin dementsprechend ausgerüstet und konzentriere mich auf ein beziehungsweise mehrere Motive oder ich habe einfach meine Kamera ohne viel Schnickschnack dabei und versuche spontan etwas zu finden was ich in Szene setzen könnte. Letzteres geht natürlich öfters schief, manchmal findet man rein gar nichts. Aber hin und wieder kommen ein paar ganze gute Fotos dabei rum und genau so eins möchte ich hier vorstellen.

    Die Entstehung

    Ich war gerade fertig mit der Arbeit und auf dem Weg nach Hause. Eigentlich wollte ich nach getaner Arbeit unbedingt noch Fotos machen, aber das Wetter war ziemlich nass und trist, nicht unbedingt das was einen so direkt zum fotografieren einlädt. Also ab in die Strassenbahn Richtung Heimat. Die war menschenleer, ich setzte mich auf den hintersten Platz und schaute durch die riesige Scheibe auf die nassen Schienen hinter der Bahn.

    Da dachte ich mir, so während der Fahrt nach hinten raus zu fotografieren, mit Bewegungsunschärfe, das könnte doch vielleicht ganz spannend werden. Passenderweise hatte ich ein Weitwinkel drauf, also zückte ich meine Kamera, stellte die kleinste Blende ein, ISO runter soweit es ging, damit ich möglichst lange belichten konnte. Die Kamera hinten auf die Ablage gelegt und alles halbwegs vernünftig ausgerichtet, Fertig!

    Endlich fuhr die Strassenbahn los und ich hatte den Finger am Auslöser: Sobald irgendetwas interessantes auf und neben der Strasse zu sehen war, drückte ich drauf. Einige Autos fuhren hinter der Strassenbahn her und überholten sie, darunter auch ein Smart, der streckenweise wie auf Schienen im gleichen Tempo die Bahn verfolgte. Ich machte noch ein paar Bilder, packte die Kamera wieder ein und verließ wenig später zufrieden die Strassenbahn.

    Die Bearbeitung

    Zu Hause angekommen, wurden die Bilder zunächst einmal auf dem Rechner gesichtet. Eins von denen, auf dem der Smart verhältnismäßig scharf zu sehen war, stach mir dabei besonders ins Auge: Die Dynamik, die durch die Bewegungsunschärfe und durch das Weitwinkel entstanden war, gefiel mir dabei besonders gut. Nur war die ganze Szenerie irgendwie noch viel zu trist, der Himmel zu flau und die Farben irgendwie langweilig. Also ran an die Bearbeitung.

    Als erstes habe ich in Camera Raw die Verzerrung des Objektives korrigiert und die Belichtung leicht angehoben. Die unterschiedlichen Bereiche wie Himmel, Häuserfronten links und rechts sowie die Strasse maskierte ich grob und erhöhte jeweils die Kontraste der einzelnen Bereiche mit Gradationskurven. Dann wurden noch die Farben etwas entsättigt, so langsam nahm Bearbeitung Form an.

    Der Gesamteindruck war jetzt deutlich dramatischer, aber noch nicht wirklich homogen. Also sollte das Ganze ein passendes Toning bekommen, um es stimmiger wirken zu lassen. Auch hier kamen wieder die Gradationskurven zum Einsatz: Die einzelnen Farbkanäle angewählt, um den Tiefen einen bläulich-grünen Look und den Mitten einen leichten Gelbstich zu verpassen. Das passte nun besser zur Stimmung des Bildes, insbesondere zum düsteren Himmel. Zum Abschluss noch eine Vignettierung eingebaut und etwas nachgeschärft.

    Das Ergebnis

    Mit dem finalen Look war ich dann eigentlich ganz zufrieden. Es sah schon so aus, wie ich es mir vor meinem inneren Auge vorgestellt hatte. Natürlich ist es weit entfernt von Perfektion, der Smart könnte deutlich mehr Luft nach unten vertragen oder die Häuserschluchten noch imposanter sein, aber immerhin bin ich am Ende des Tages doch noch zu meinem Foto gekommen. Ab und zu lohnt es sich seine Kamera fast überall dabeizuhaben und sei es nur, um eine langweilige Strassenbahnfahrt zu überbrücken.

    ***
    Werbepause: Buchtipp – Vom Alltäglichen zum Besonderen!


    KWERFELDEIN | Digitale Fotografie

  • The 2 Greatest Photographers Ever

    Dave Barnes and Barrett Ward answer very riveting photogaphy questions…
    Video Rating: 4 / 5

  • Review: Ansel Adams In The National Parks


    “Ansel Adams In The National Parks Photographs of From America’s Wild Places” has just been released today (10.18.10) and I was quite fortunate to receive an early preview of the book. Unlike “Ansel Adams in Color” a book I just purchased, “Ansel Adams In The National Parks” only contains the iconic black and white prints that Adams’ is best known for. This latest release of Adam’s work is also a refreshing read in contrast to recent controversies swirling over a find of lost glass slides that have been purported to be Adams’.

    “Ansel Adams In The National Parks” excels in that Andrea G. Stillman, the books’ editor, has pulled not just amazing photographs from the Adam’s archive, but also his writing & correspondence that breath life into an otherwise historical photo anthology. As one would expect viewing the artistic images and reproductions of his finely crafted prints is nothing less than inspirational. What separates this book from his others are the great anecdotes and quotes that bring Ansel Adams down from the pedestal so many of us keep him on to a mere human with family, everyday challenges and a variety of relationships spanning the average to celebrity. Especially fascinating was being able to read these anecdotes in relation to select images featured in the book adding an entirely new dimension to his photographs.

    What I found most interesting as a landscape photographer was the inclusion of several image sets at the end of the book. These image sets reveal the seconds in relation to some of Ansel Adams most iconic photos. This provides a great opportunity to catch a glimpse of what Ansel Adams saw, photographed and selected as he reviewed his work.

    Will every photograph in “Ansel Adams In The National Parks” be new or as high impact as Moon and Half Dome? No, but you will certainly see work that sheds light on a journey of life, art and creation. This book has made a great addition to my library and is one I’ll be viewing often.

    A photograph is made, not taken. – Ansel Adams

    Recommended blog reading: The Subtlety of Greatness and Today’s Loss of Appreciation

    Technorati Tags: Photography, Fine Art, National Park, review, book, Ansel Adams

    This book was provided gratis by the Hachette Book Group

    Copyright Jim M. Goldstein, All Rights Reserved

    Review: Ansel Adams In The National Parks


    JMG-Galleries – Jim M. Goldstein Photography

  • Close-Up Lens Boosts Your Zoom

    I tend to be a one lens traveler.  My camera and lens are heavy enough so I usually leave the house with just one lens and one body, unless I have an assignment that calls for more.  And yet, I’ve been enjoying close-up photography more and more.  You know; bees on flowers, barnacles on rocks, bugs of all kinds.  My 28-300mm Canon lens can only get so close, so I started casting about for a reasonable solution.

    Enter the Canon 500D (no, not the camera 500D) Close-Up Lens. (Note: Nikon has a number of close-up lenses as well with different diopter sizes.  This post is meant to cover the general idea, so the concepts will work with both manufacturers.)

    This lens fits on the end of 77mm lenses and works best with high zooms, such as the 70-210mm or 100-400mm.  Canon also carries the 250D for 58mm diameter lenses.  They both work as easy as they sound; just screw the lens onto your prime lens as you would any other filter.  Let’s take a look at some examples.  Click on any picture to see the image at 100% for maximum pixelpicking.

    First, a shot of some barnacles with a Canon EOS 7D DSLR, 28-300mm at 300mm and approximately two feet from the subject.  ISO 100, f5/6, 1/800sec

    No Close-Up Lens – 300mm

    Now, applying the close-up lens and moving the end of the lens to within about six inches of the rock, we get the next image.  ISO 100, f/5.6, 1/1000sec

    Close-Up Lens Applied – 300mm

    The shutter speed change was due to variance in the natural sunlight while taking the photos.  Otherwise, the lens typically stops things down close to one full stop when applied.

    Next are the same shots with an f-stop of 20.  ISO 100, f/20, 1/80sec, 300mm, no close-up lens

    No Close-Up Lens – 300mm

    And now: ISO 100, f/20, 1/80sec, 300mm,  with the close-up lens applied.

    Close-Up Lens Applied – 300mm

    Again, click on each photo for a full size image (WARNING: They are about 7MB each).

    The close-up lens does decent work at getting crisp macro shots, especially when used at smaller aperture sizes.  The images can be soft around the edges, though.  No, it is not a full replacement for a good, quality macro lens, but it does fill a certain niche.  That niche is perfect for those who don’t wish to carry another lens just for Macro work while traveling, as well as those looking to be a bit cheaper alternative, especially those looking to experiment with Macro before dropping money on a high quality lens

    Post from: Digital Photography School


    Digital Photography School

  • Adobe Photoshop CS5 – PatchMatch and download CS5

    Tutorial Photoshop CS5 english and Download Photoshop CS5 from here Part 1 i2links.com part 2 i2links.com part 3 i2links.com part 4 i2links.com part 5 i2links.com kegen i2links.com
    Video Rating: 5 / 5

  • Art of the Game: Marvel Ultimate Alliance 2: Part 5 (Making-of Documentary)

    Art Of The Game: Marvel Ultimate Alliance 2- Part 5 Art Of The Game explores the many roles that help breathe life into today’s most amazing games. From Art Directors to Sound Designers, each job is vital to the game designing process. Through interviews, concept art, motion capture video, prototype animations, and gameplay, this show reveals the process behind the art form of video game design. In this 6 -part series, we talk with the team from Vicarious Visions, makers of Marvel Ultimate Alliance 2. In Part 5, Concept Artist Christian Piccolo explains how he provides the basic concepts for what becomes epic environments in the Marvel universe. FOR MORE MACHINIMA GOTO: www.youtube.com

  • Tokyo best 3D Anaglyph ever

    A wonderfull video of an artificial town, a super town. This requires red-blue glasses.
    Video Rating: 4 / 5

  • Solitude (Nikon D90 HD-movie)

    Short nature film produced with Nikon D90 and edited in Apple’s iMovie. Mid autumn sunset through grass, a lonely swan, billowing water. The clips are all shot one night during the golden hour. I recommend using a good pair of speakers or headphones and crank it up loud. I have pre-processed the RAW-footage in Final Cut Studio using the Too Much Too Soon (TMTS) plugin “D90 Rescaler” to smooth out the jagged lines from the M-JPEGs. For some of the clips shot after sunset at ISO3200 I used subtle chroma noise reduction and all are slightly sharpened in post, no colour grading added, just the in-camera picture styles. Please visit www.martinwallgren.com