We recently named the Canon EOS M200 our top choice for cameras under $ 500, and we’re recognizing it again – this time as the best easy-to-use camera on the market.
Blog
-
How to Use an Art Gallery Visit to Inspire Your Photography
The post How to Use an Art Gallery Visit to Inspire Your Photography appeared first on Digital Photography School. It was authored by Charlie Moss.

We’ve almost all done it. We’ve gone to an art gallery to look for inspiration for our photographic work and ended up just snapping some pictures of paintings we like on our phones for later reference.
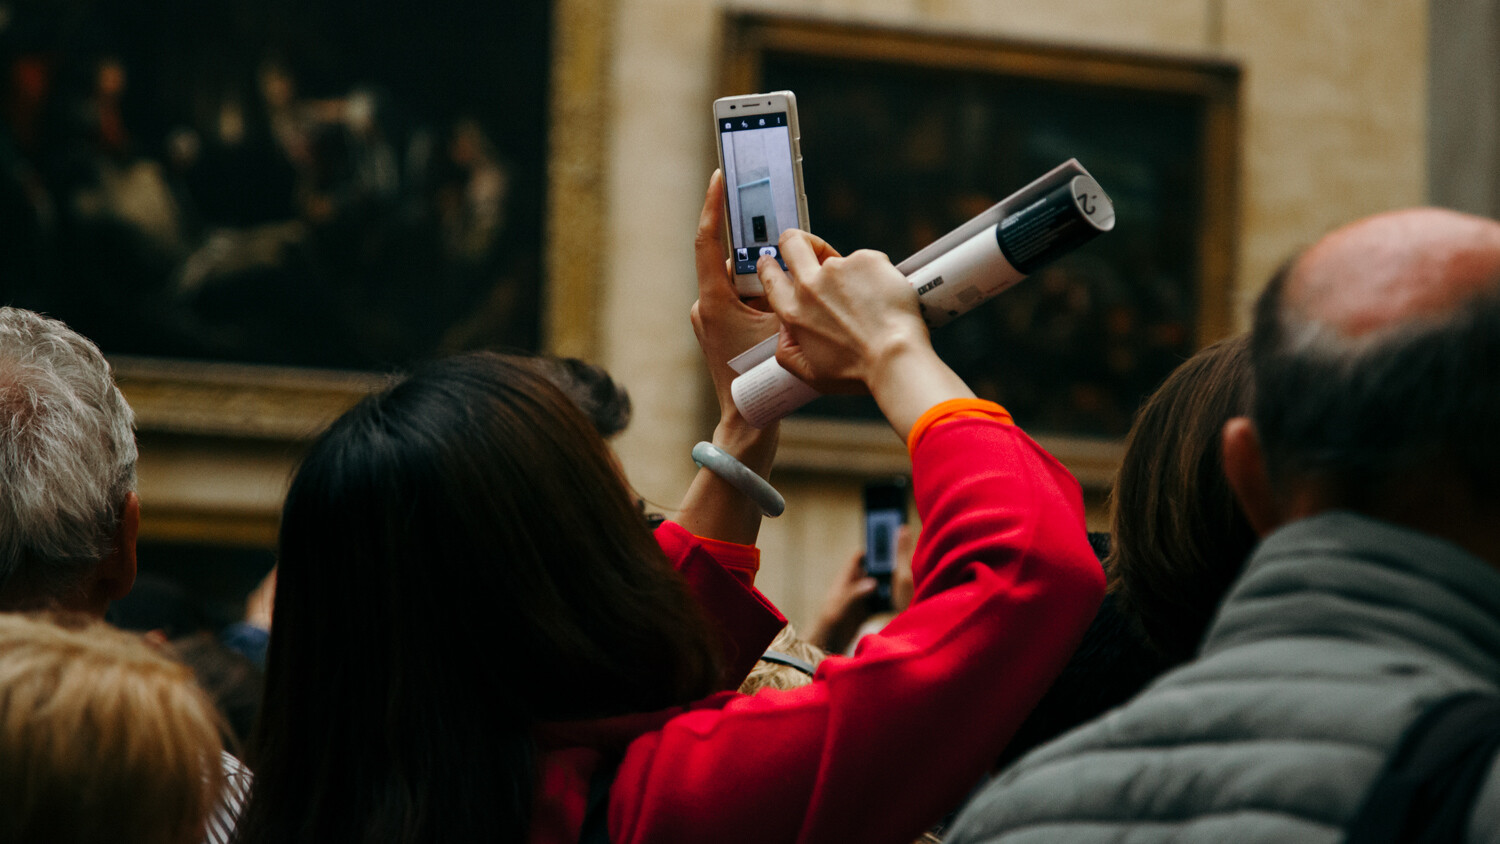
While that is one way to approach the task of finding inspiration for photography in art galleries, there are other ways that you might find more success.
In this article, I’m going to explore some different ways that you can use an art gallery to find inspiration for your photography. And they’ll all result in a more original result than if you just photograph the actual work of art itself.
Visiting a gallery
When you visit an art gallery, make sure you allow yourself enough time. Ideally, set aside a whole morning or afternoon for a larger gallery.
When going to a new gallery that I’ve never been to before, I love to take a trip around the whole thing. Then I go back and visit rooms or artworks that I loved to see them in more detail. At very large galleries or museums, you might want to look on the floor plan ahead of time and identify a smaller section to see on that visit.

After you’ve viewed works of art for an hour or so, take time to visit the cafe and relax a bit. This will give you time to think about what you’ve enjoyed so far. Use this time to make some notes if you want to.
Of course, it’s not possible for everyone to visit a gallery, or to do so regularly. Instead, perhaps ‘visit’ the online archive of a museum or gallery on their website. Some museums and galleries offer themed collections that you can browse. Others have lists of the artwork in each room so that you can ‘tour’ it virtually!
Take a sketchbook
So many photographers don’t use a sketchbook, but I think they’re vital to inspiration-gathering. You don’t have to be good at drawing to use a sketchbook. My sketching abilities extend to a fraction more than stick figures. But it isn’t your drawing ability that counts; your sketchbook will just be a place to record ideas for your own reference.

As you make your way around the different rooms of the art gallery, stop in front of any work that catches your eye. Ask yourself why that piece of art caught your attention. Perhaps it was the:
- pose
- colors
- concept
- composition
This approach for finding inspiration is applicable to all types of photography. You could be interested in still life, landscapes, architecture, or any other kinds of photography!
Record what you see
Take out your sketchbook and record those thoughts. Draw a sketch of the pose or the composition. It doesn’t have to be an elaborate or detailed sketch. Just a thumbnail to serve as an aide-memoire in the future when you’re planning shoots.
If it was the concept or the colors that caught your eye then make a note of them. Write down the things that you particularly liked about it. Perhaps pink roses against a blue background seemed particular striking for you. Or maybe a bright blue gown gave you ideas for something in the future.

These six thumbnail sketches were done at the Tate Modern in London to record down quick ideas of pose and composition.
It might not even be important to you to record the name of the artwork or the artist. If it’s just a pose you like, then who cares who originally painted the picture?
This approach is nothing new in the art world. The eighteenth-century British painter, Sir Joshua Reynolds, allegedly had a book where he would sketch down poses that other painters had used. When you commissioned him to paint your portrait, you could pick your pose from the book!
When you come to create new photographs, go back and look at your sketchbook. Pull together your ideas from these notes, and you’ll soon find yourself with some interesting inspiration for your photography that doesn’t rely heavily on a single source.
Taking inspiration from single works of art
If there’s a particular artwork that you love then start to analyze that piece and see what it really is that you love about it. You might surprise yourself.

Researching Van Gogh’s paintings of sunflowers revealed themes of hope and gratitude as well as life and death. I created my own interpretation which I wrote about here.
I always start with a blank page in my notebook, where I sketch out the pose or composition of the work of art. Then I identify different elements. Perhaps the colors that seem particularly strong, the mood of the image, or the concept. There might be a key prop or costume piece that I like, and I’ll note that down too.
Try doing the same and then use that information, rather than the original artwork, to shape the photoshoot you have planned. You’ll almost certainly find that your ideas take on a life of their own that is quite different from the original piece of inspiration.
Taking inspiration from a whole exhibition
It can be an interesting creative exercise to take inspiration from a whole exhibition rather than a single artwork. And it often results in the creation of some very different photographs that don’t resemble the exhibition at all!
See the exhibition and, again, take out your notebook or sketchbook. Write down the themes of the exhibition that you can identify. Look around and see if you can find any compositions, styles, or techniques that reoccur in the work of the artist and make sketches or notes about those.

This image was created on a visit to Monet’s home in Giverny in France where he painted. The day before I had seen the incredible display of his impressionist water lilies paintings at the Musée de l’Orangerie in Paris.
Don’t be afraid to put your notes to one side for a while. I often wait for weeks or even months before creating an image inspired by the art I have seen.
Sometimes it can be good to wait a while – you’ll be using the concepts and ideas as a starting point for your own work rather than just copying what you have seen. A break can help you to interpret the themes of the exhibition in your own way.
Venture outside your comfort zone
Be bold and try something new! Experiment with taking inspiration from different genres of art. Use the process of creating new photographs to motivate you to visit the kinds of galleries and exhibitions that you might not have visited before.
But most of all, try and interpret the artworks and exhibitions that you see into something original. Focus on bringing a part of yourself to the work that you create, no matter where your inspiration comes from, and you’ll be well on the path to originality.

And while you’re there, don’t forget to take some photographs of the gallery itself and the people around you! There’s no reason why you can’t be finding inspiration for future image-making while also practicing your street photography.
The post How to Use an Art Gallery Visit to Inspire Your Photography appeared first on Digital Photography School. It was authored by Charlie Moss.
-
Sony a6100 review sample gallery (DPReview TV)
$ (document).ready(function() { SampleGalleryV2({“containerId”:”embeddedSampleGallery_0052091785″,”galleryId”:”0052091785″,”isEmbeddedWidget”:true,”selectedImageIndex”:0,”isMobile”:false}) });
Check out our gallery of Sony a6100 sample photos captured during this week’s production of DPReview TV.
View DPReview TV’s a6100 sample gallery
-
The Sony a7R IV is the best camera for landscape photographers
We’ve updated our guide to the best cameras for landscape photographers with a new overall winner: the Sony a7R IV. Take a look at the full shortlist for all of our picks.
-
DPReview TV: Sony a6100 review
The a6100 is Sony’s newest entry-level APS-C mirrorless camera. As Chris and Jordan highlight in their review, it features some useful upgrades over to the [apparently immortal] a6000.
Subscribe to our YouTube channel to get new episodes of DPReview TV every week.
- Intro
- Design and handling
- Animal eye-AF
- Jpeg processing
- Burst shooting
- Kit lens
- Image quality
- Real-time tracking
- Auto ISO limitations
- Video capabilities
- Conclusion
Sample gallery from this episode
$ (document).ready(function() { SampleGalleryV2({“containerId”:”embeddedSampleGallery_0052091785″,”galleryId”:”0052091785″,”isEmbeddedWidget”:true,”selectedImageIndex”:0,”isMobile”:false}) });
Articles: Digital Photography Review (dpreview.com) -
Speedlight vs Monolight on Location: See How They Compare [video]
The post Speedlight vs Monolight on Location: See How They Compare appeared first on Digital Photography School. It was authored by Caz Nowaczyk.
In this video from Adorama, Gavin Hoey compares speed light vs monolight on location.
In the test, he does three very common lighting scenarios. He uses the flashes as fill flash, overpowering ambient light, and high-speed-sync flash.
He uses model, Charlotte, for the demonstration.
Gavin uses the following gear for the shoot:
- Olympus E-M5 Mk III
- Olympus 12-40mm f/2.8 Pro lens.
- Olympus M.Zuiko 7-14mm f/2.8 Pro lens
- Olympus M.Zuiko 25mm f/1.2 Pro lens
- Flashpoint Xplor600 Flash
- Zoom Li-on Speedlight
- Glow Parapop 38″ Softbox
- Flashpoint R2 Pro II Transmitter
- Seconic L-308X-U
View this post on InstagramScenario one: fill flash
First up, in the Speedlight vs Monolight comparison, Gavin uses the monolight.
Before taking any shots, he takes a meter reading of the ambient light. Then to get his flash to match those settings, rather than use trial and error (which you can do), he uses a light meter to take an accurate reading from his model’s chin. He then uses that to set the flash.
Settings: f/3.5 1/250th Sec ISO 200
Next, he uses the speedlight flash. He sets it up using the same light modifier that he uses with the mono light and puts it in the same position.
He takes another light meter reading of his model’s chin, and set’s his speedlight flash.
When comparing the photographs, it is difficult to see the difference between using the monolight and using the speedlight.
Scenario two: overpowering the ambient light
Settings: f/16 1/250th sec ISO 200
In this scenario, Gavin runs the flash at full power to see what sort of aperture he can get out of the flash.
When doing a light meter reading, he gets an aperture of f/22 at the flash’s full-power setting.
Because he doesn’t want to waste the flash battery power and have a longer recycle time, he drops the flash to half power, which gives him an aperture of f/16.
He tests the camera settings without flash first to see how dramatic the sky looks. Then he turns the flash on to get some dramatic shots.
Gavin then swaps the flash over to the Speedlight, again using the same modifier and distance. The meter reading with the speedlight gives f/11, and the speedlight is set to full power.
In the side by side comparison, Gavin prefers the speedlight version over the monolight (what do you think?). But he prefers the flexibility, faster recycle times, power usage etc. of the monolight.
Scenario three: high-speed-sync flash
High-speed-sync flash strobes the light rapidly, meaning you get less power out of the lights. It is used for a shallow depth of field, so Gavin switches to a 25mm f/1.2 lens and shoots at f/1.2.
Firstly, Gavin turns off the flash and dials in f/1.2 and his flash sync speed of 1/250th of a second and then takes a picture of his model, Charlotte, to see what he gets at those settings.
While his model is quite well exposed at those settings, the background is overexposed, so Gavin tries 1/4000th of a second shutter speed, which gives him more detail in the background.
Most light meters won’t work with high-speed sync, so Gavin uses trial and error to set the flash to light Charlotte. He settles with 1/16th power.
Settings: f/1.2, 1/4000th sec, ISO 200.
He then tries the same settings with the speedlight flash with the flash at half-power.
While the flash does well to light the model, it struggles to keep up when shooting a number of shots in quick succession. He managed to get 18 photos in a row before the speedlight stopped working. This was actually the recycle time getting much longer.
Conclusion
If you have lots of high-speed-sync photos to take on location, you are better off with a monolight.
Variables: how far flash is from the subject, amount of ambient light, and softbox.
What are your thoughts on the comparisons? Which do you think wins in the speedlight vs monolight comparison? Share in the comments!
You may also like:
- Simple Tips to Improve Your Portrait Photography Immediately
- Getting to Grips with Fill Light in Portrait Photography
- What Size Beauty Dish is Right For Your Portrait Photography?
- Your Guide to Studio Lighting Equipment
- Learn How to Setup Studio Lighting in 15 Minutes
- Understanding Broad and Short Lighting in Photography
- Portraits: Lighting the Shot
The post Speedlight vs Monolight on Location: See How They Compare appeared first on Digital Photography School. It was authored by Caz Nowaczyk.
-
Instagram hidden-likes trial goes global after months of regional testing

After testing it across several regions earlier in the year, Instagram started hiding ‘likes’ for accounts based in the United States last week. Now, the Facebook-owned company has announced on Twitter it’s rolling the test out on a global scale.
The trial is part of an initiative aimed at making users focus on the quality of the content they are posting rather than on how many likes their posts are receiving. Those users included in the trial won’t see a like-count on other people’s images and videos, but can still see the numbers for their own posts.
Starting today, we’re expanding our test of private like counts globally. If you’re in the test, you’ll no longer see the total number of likes and views on photos and videos posted to Feed unless they’re your own. pic.twitter.com/DztSH0xiq2
— Instagram (@instagram) November 14, 2019
Instagram says feedback on the trial so far has been positive but the company is aware that removing like counts constitutes a fundamental change to its platform and therefore is expanding the test to ‘learn more from our global community.’
It is also aware of the importance of like counts for some of its users, such as influencers who use followers and likes as a currency in sponsorship negotiations, and says it is ‘actively thinking through ways for creators to communicate value to their partners.’, without specifying yet what these ways could be.
-
Olympus issues statement disputing rumors its imaging division will shut down within a year

Last weekend, an administrator for a Personal View forum claimed ‘closure is near’ for Olympus’ camera division, spurring a number of rumors that Olympus would shut down within a year. Since then, Olympus’ has issued a statement to Sina Finance News (translated) that suggests these rumors are little more than hearsay.
The post was made by a Personal View adminitrator who goes under the username Vitaliy_Kiselev. It included two images of Olympus’ latest financial presentation and said underneath that Olympus’ camera division is in ‘total instability’ with various Olympus employee’s ‘running and looking for new positions.’

A screenshot of the forum post made on the Personal View forums on November 9, 2019. Vitaliy_Kiselev went on to say in the post that ‘rumors and talks’ suggest Olympus’ camera division will shutter some time between ‘January-March,’ presumably this upcoming year, and ends by claiming there are talks ‘that [Olympus’] development team and some equipment can be picked either by Sony or Samsung.’
In response to the aforementioned post, Chinese financial publication Sina Finance News asked Olympus to comment on the rumors to confirm or deny their accuracy. Olympus’ official response was (machine-translated):
‘The image business has always been the driving force of technology, including imaging technology and mass production technology, for medical and The science field has made tremendous contributions. As stated in the new business strategy, since the imaging business and the scientific business are important businesses supporting the company, we will continue to work on the improvement of profitability and efficiency in these two business areas.’
Sina Finance News followed up to further question what the plan was for Olympus’ imaging and scientific business considering there was no specific mention of either of these divisions in its most recent financial presentation material. In response, Olympus said (machine-translated):
Detailed information about these business plans can be found in the next quarter’s earnings.
While Olympus’ answers are vague, the statements suggest that Olympus is continuing efforts to keep its imaging division alive. It’s possible these statements aren’t in contention with the forum post made by Vitaliy_Kiselev, but it does seem much less damning than the initial reports suggest.
We have contacted Olympus regarding these rumors and will update this article with a statement if provided.
-
Photographer David Burnett on shooting his third impeachment: ‘I felt that historic pang’

© 2019 David Burnett/Contact Press Images It’s not every day that you see someone using a 4 x 5 film camera on TV, and certainly not during the coverage of one of this years’ most-watched events: the opening on Wednesday of the public phase of the house impeachment enquiry into President Donald Trump. But as diplomat William Taylor and State Department official George Kent took their seats, our eye was caught by one figure among the crowd of photographers jostling for a shot, and his camera.
After some quick Twitter research, we identified him as David Burnett, multi award-winning photographer, and veteran of three impeachment hearings. His camera? A custom-made ‘Aero Liberator’. We caught up with David on his drive back to New York after the hearings to learn more about his work, his approach to photography, and that camera.
The following interview has been lightly edited for clarity and flow.
When did you start shooting large format film?
I’ve been shooting with my Speed Graphic for 15, 16 years. I started in 2003-4 doing politics, then I did the Olympics, and some presidential stuff – John Kerry and George Bush. I won a bunch of World Press Photo prizes in 2004-5, ‘Best Sports Story’ with the pictures taken with my Speed Graphic. Along the way I met this guy called John Minnicks, who I happily describe as a mad scientist, who takes a camera and then makes it into something else. John made me this camera, which he calls the ‘Aero Liberator’.
He figured out a way to make it using a Graflex Super D, which is a sweet little camera, and just such a beautiful little thing. So he puts the Aero Ektar lens on it. I’m sort of responsible for the re-birth of that lens in the past 15 years, because for my Speed Graphic, I was getting tired of shooting slow lenses. So I looked around, and I found this F2.5 lens, from a WWII reconnaissance camera.
There must be easier ways of working, as a photojournalist….
If you’re shooting with film holders, you have created for yourself a major impediment. Nobody did that to you, you did it to yourself. And in a way, you could say to yourself ‘well that was kind of a dumb move, why can’t you just shoot cool digital cameras like everybody else?’ And I’ve got Sony a7s and a9s and I love those cameras. But one frame, having the wherewithal and the guts to slow down and figure out when that one frame is supposed to be shot, that’s the real deal.

WW1 re-enactors at the 2019 Veteran’s Day Parade, New York City.
© 2019 David Burnett/Contact Press ImagesSo the other day, I walked up and down 5th Avenue during the Veterans Day parade, I shot 18 frames. I’ve been shooting this stuff for 15 years now. You could ask why would you tie one hand behind your back by working like that? When you force yourself to step up to that challenge, and you get a picture – and you don’t always get a picture! I may not have anything from today, in which case my so-called ‘heroic’ actions will have been for naught! But it’s worth a try.
I’ve been doing this a long time, and I love being fired up enough to still want to do something a little different, and a little challenging.
Did you know that you were featured in the live stream from the hearing?
I had no idea that I was on-camera. We’d all just gotten into the room to figure out where we were going to be. I was just standing there with my camera, and I’d brought along my little Sony a6500, which today I was using with an old 1940s Kodak Cine lens, a 50mm F1.6 Anastigmat. It’s very fun! It rekindles the fun, and makes it challenging.

David Burnett at the opening of the house impeachment hearings on Tuesday November 12th, with his custom ‘Aero Liberator’ 4 x 5 film camera. (NBC News) Your first color assignment was covering Apollo 11, and that was 50 years ago…
I know, that was a long time ago!
What keeps you doing it?
I don’t know if you’ve seen the wonderful movie that Stephen Wilkes did about Jay Maisel? It’s called ‘Jay, Myself’. There’s a wonderful moment in there when Jay says ‘I love photographs, but I really love photographing’. You have to decide which is your dominant personal motivation. And watching the movie I was thinking ‘well, I know which one I would choose – I wonder if I chose the right one?’
There are many times when you don’t get the picture, but the act of being there and trying to get it is not a bad thing.
I love photographing. I’d prefer to be paid for it, but there are times when it’s pretty clear I’m not going to be paid for it and if I want to go shoot something, I’ll go shoot it. There are many times when you don’t get the picture that you want, but the act of being there and trying to get it is not a bad thing. Just be happy to share and discover.
Were you on assignment today?
No, that was just me. I was at the Nixon hearings, and Clinton, and I felt that historic pang.
So this is your third impeachment?
I will be my third, yeah! But it’s not really about politics for me. I’ve been going to the white house for 52 years. The only thing I care about is how I feel when I walk through the North West gate. It’s always special. I’ve been there for Nixon, Johnson, both Bushes – everybody. For me it’s about the institution, and how it still works. That’s the cool thing. That’s really what draws me to politics. Eventually you’ll find yourself in a place where for 200 years people have been doing the same thing.
It’s a great tradition to be able to walk into that place with a camera and try not to get to beat by everyone around you. And that happens a lot! Turns out there are a lot of really great photographers, men and women, that work there.

President Lyndon B. Johnson at a joint session.
© 2019 David Burnett/Contact Press ImagesWatching you in the footage today, I’m interested to know about your process.
With this camera, it’s a mirror reflex so you look down into it from overhead. I kind of eyeball it, roughly, then I’m just looking at Ambassador Taylor to see if I can identify a moment which might be more interesting than half a second ago, or half a second from now. A thing like this, where you don’t have long, and then you have to back away, I try to get my focus where I think he’s going to be, but I don’t always shoot right away. You’ve got one shot, and by the time you’re ready for the next one that’s maybe 20 or 30 seconds. I can do it pretty quickly, I’m not bad with it, but there’s a lot to do on those cameras.
The ‘Speed‘ Graphic? I mean – compared to what? Well, compared to what came before it, it was pretty good.

Natalie Coughlin, Olympic Gold Medalist.
© 2019 David Burnett/Contact Press ImagesWhat kind of reaction does the old film equipment get?
When you bring out a camera like that, people tend to give you a second of hesitation, before they say ‘no’. It puts you in a slightly different place as a photographer, as a journalist and an artist. Compared to if you were showing up with the usual three or four digital cameras and all that stuff. ‘OK, this is a little different’. And it’s much appreciated, by me. As long as you don’t drop it, or do something stupid, it definitely gives you a little bit of an edge.
I was the only guy at the Olympics to get a letter saying ‘he’s authorized to carry a tripod’.
It’s hilarious – I used to carry my Speed Graphic around at the Olympics. I was the only guy at the last three Olympics to get a letter from the Olympics chief saying ‘he’s authorized to carry a tripod’. It’s been great, I made a few really good pictures, and maybe you could have made the same picture with a digital camera, but when you see all the flaws that can happen [with large format film] it has more of an honesty about it. There are 100 things that could go wrong, and any one of them can really screw you up.
If it turns out that you didn’t get any shots from today, how would you feel?
Well, I looked at my digital pictures already, and honestly, I’m going to look at the papers tonight and tomorrow and see who made a great picture. There was some real talent in that room. I mean real talent. Doug Mills, Damon Winter – those guys, it’s hard to do better than either of them. Scott Applewhite from AP was there, there were some really good people in the room.
So if I don’t get anything, I won’t feel like a total schmo but I’ll be a little disappointed. But I made a couple of good pictures at the veterans parade on Monday and that kicked me in the ass to decide to go give it a try.
How long before you’ll know?
Well it’s Wednesday night now, so maybe Friday afternoon if I’m lucky. I’ll let you know!
Visit David Burnett’s website to see more of his work
Learn more about the Aero Liberator by John Minnicks
-
A Quick Guide to Amazing Bird Photography Compositions
The post A Quick Guide to Amazing Bird Photography Compositions appeared first on Digital Photography School. It was authored by Jaymes Dempsey.

Do you want to capture amazing photos of birds? If so, you have to master bird photography compositions.
Composition refers to the arrangement of elements within the photo. And it’s often the difference between a creative, compelling image, and an image that just falls flat.
In this article, I’m going to share with you everything you need to know about bird photography composition. I’m going to give you several tips that ensure you capture beautiful bird photography compositions, without fail.
Sound good?
Let’s dive right in.

The composition basics: Capturing a gorgeous bird photo
When you take a bird photo, everything in the frame matters.
The bird. The position of the bird. The position of the bird’s head. The background. Any elements behind the bird. Any elements in front of the bird.
It’s all important.
Because the key to a gorgeous bird photography compositions is keeping the shot focused on your main subject.

You want to make sure that the bird stands out in the frame. You want to make sure everything else in the photo emphasizes and enhances the bird.
So how do you do that?
A few simple ways, starting with:
Simplify the entire composition to make the bird stand out
If your composition is chaotic, then the viewer is going to get lost.
And that’s absolutely not what you want.
Instead, you should aim to simplify the composition as much as possible. The best compositions tend to include a bird and a background. That’s it.

While it’s possible to create beautiful shots by including additional birds or interesting features (e.g., shells, flowers), I recommend avoiding that as much as possible. These mess up compositions more often than they enhance them.
Also, in the interest of simplicity: If there’s anything in the frame that’s distracting, get rid of it. So make sure there are no branches behind the bird. Make sure there’s nothing in the background that dominates the frame or draws the eye.
That’s how you’ll keep your bird photography compositions beautiful.
And speaking of backgrounds:
Aim for a uniform, simple background that makes the bird pop
If you want a beautiful bird photography compositions, then you need a beautiful background.
What does this involve?
First, the best bird photography backgrounds are simple. They’re also uniform.
Like this:

Notice how the background is a nice uniform color.
It keeps the attention on the bird. It doesn’t distract.
To create a background like this, you want to start by ensuring a large separation between the bird and the background. One trick is to get down low, on the bird’s level; this will cause the ground behind the bird to fall away, creating a more distant background.
You should also make sure you use a decently wide aperture, such as f/5.6 or f/6.3 (the particulars depend on the size of your bird, because you don’t want to accidentally make parts of the bird soft!).
Finally, you should ensure that the background doesn’t include colorful elements that catch the eye. Before you take a shot, look behind your bird, and ask yourself: Will anything in the background dominate the frame? Will anything pull the viewer away from the bird?
If the answer is “Yes,” then you should consider moving slightly to the left or right so that you’re no longer stuck with a distracting background.
Use the rule of thirds to position the bird’s eye
Now that you know how to capture beautiful backgrounds, it’s time to look at your main subject and how to position it.
Generally speaking, you’ll have a single bird in your photos. And you need to position this bird carefully.
You don’t want to put it smack-dab in the middle of the frame. That’s a recipe for a boring, static composition.
Instead, I recommend you place the bird so that its eye falls along a rule of thirds power point.
What is the rule of thirds power points?
They’re simply points that are a third of the way into the frame, both vertically and horizontally.
The eye in this photo, for instance, falls along a power point:

It’s a third of the way down, and a third of the way from the left.
Now, the rule of thirds is misnamed; it’s a guideline, not a hard-and-fast rule. But it is a great way to position your bird and will ensure that the shot feels a lot more interesting.
So use the rule of thirds whenever you can to position your bird within the frame.
Point the bird into the frame to add movement
I’ve talked about positioning your main subject using the rule of thirds, but there’s another aspect to positioning that you should always, always consider:
The direction the bird is pointing.
You see, most bird photos have some empty space in the frame.
And when they do…
…you want to point the bird into the empty space, rather than away from it.

You see, by making sure the bird is looking into the empty space, it adds a sense of completeness and a sense of motion to the frame. The viewer’s eye follows the birds line of sight, and everything feels satisfying.
Whereas if you point the bird out of the frame, the whole shot feels tense. The viewer wants to know what’s outside the frame, with no resolution in sight.
That’s why bird photographers love to point the bird into the frame. It’s far more satisfying, and can turn the shot into something powerful.
Capture the bird in a creative pose for increased interest
Now, when it comes to bird photography, you can capture birds in a normal standing pose.
And that’ll get you some nice photos.
But sometimes…
This isn’t enough.
If you want to create truly creative bird photography, you need to go beyond the simple standing pose. And capture the bird doing something interesting.
What counts as interesting?
For one, preening birds look really interesting. They appear wonderfully tranquil as they clean their feathers.

And birds that are sleeping also give off a sense of peace that I love.
You can also go for action shots: Birds feeding, for instance, can create a lot of interest. You can capture photos of birds that are about to catch food, are currently catching food, or have just caught food. Think of a bird with a huge fish in its mouth.
It’s guaranteed to add interest.
Cool, right?
You can also go for shots of birds fighting or, as is a common bird photography practice, shots of birds flying. Photographing birds in flight can be a challenge, but a really rewarding one.
So whenever you’re able, don’t just take a standard bird photo. Go beyond this.
Make something unique!
A quick guide to amazing bird photography compositions: Conclusion
You should now have a sense of the best ways to capture beautiful bird photography compositions.
And remember:
Getting amazing compositions isn’t hard. You just have to use the tips that I’ve given you, and you’ll be taking stunning photos in no time.
Have other tips for gorgeous bird photography compositions? Share them in the comments!

The post A Quick Guide to Amazing Bird Photography Compositions appeared first on Digital Photography School. It was authored by Jaymes Dempsey.