Blog

  • 5 Holiday Photography Ideas to Shoot More and Get Less Stress

    Ahhh, the Holidays, that time of year when everyone is happy and feeling great. Tensions are low, everyone is totally relaxed, and since there’s so much copious free time, everyone wants to get their family pictures taken. Well, that statement might be a little bit off, but I have to say, I love shooting holiday pictures. Just in case the Continue Reading

    The post 5 Holiday Photography Ideas to Shoot More and Get Less Stress appeared first on Photodoto.


    Photodoto

  • Sony Cyber-shot RX1R II added to studio test scene

    The Sony RX1R II is the kind of camera that turns heads. With a full-frame 42.2MP sensor, fixed 35mm F2 lens, optical variable low pass filter and a 399-point phase-detect AF system that’s much improved over its predecessor, it’s just about in a class of its own. We’ve had a full-production model for a few hours – just enough time to get it into the studio to see how it handles our test scene. Read more

    Articles: Digital Photography Review (dpreview.com)

  • Playing the Ace? Sony a7R II Review

    Though it’s the fifth model in Sony’s full-frame E-mount lineup, the a7R II arguably represents just as much of a technological leap forward as its first mirrorless full-frame predecessors did. Its 42MP full-frame BSI CMOS sensor, 399 on-sensor phase detection point AF system and 5-axis IS are just a few reasons why the a7R II is one of the most talked-about cameras of the last year. See how it performed in our comprehensive testing. Read more

    Articles: Digital Photography Review (dpreview.com)

  • Adobe Lightroom CC 2015.3 and 6.3 arrives with restored import interface and bug fixes

    Adobe has released Lightroom CC 2015.3 and Lightroom 6.3, bringing back the Import tool that had been, to many users’ dismay, removed from Lightroom 6.2. The new version also provides fixes for some of the bugs introduced in the last version of Lightroom, along with additional lens profile and Raw support. Read more

    Articles: Digital Photography Review (dpreview.com)

  • David Stewart’s ‘Five Girls’ wins £12,000 Taylor Wessing Photographic Portrait Prize

    A photographer who has charted the growing up of his daughter and four of her friends has won the Taylor Wessing Photographic Portrait Award with a re-staged picture he entered into the 2008 competition. Five Girls 2014 shows the group six years on from an original image that was taken right before their GCSE school exams (11th grade). Read more

    Articles: Digital Photography Review (dpreview.com)

  • Im Gespräch mit Denis Krieg

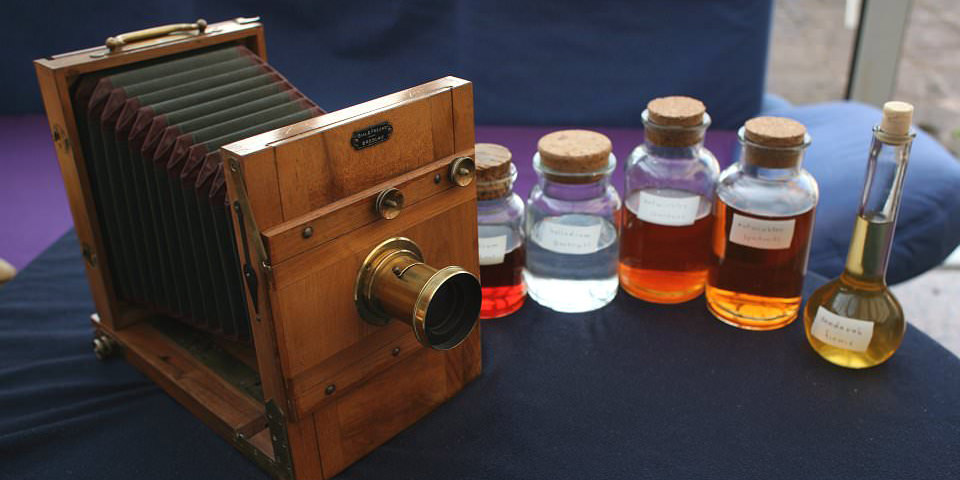
    Eine alte Kamera und diverse Chemikalien

    Ein Beitrag von: Denis Krieg

    Vor Kurzem durfte ich dem Karlsruher Fotografen Denis Krieg bei der Arbeit mit alten Großformat-Kameras über die Schulter schauen. Mittels Ambrotypie fertigt er in seinem Studio mit eigener Dunkelkammer Nassplatten-Portraits an und bedient sich handwerklichen Verfahren wie sie im 19. Jahrhundert üblich waren. Um mehr über dieses vielseitige Kunsthandwerk zu erfahren, bat ich ihn um ein Interview.
    kwerfeldein – Fotografie Magazin | Fotocommunity

  • Nikon announces development of flagship D5 DSLR

    In a brief press release, Nikon announced the development of its D5 digital SLR, which will be the company’s next flagship camera. There aren’t any real details in the release, other than the expected promise of better performance and image quality. A new SB-5000 Speedlight and WT-6 Wireless Transmitter are also on the roadmap. Read more

    Articles: Digital Photography Review (dpreview.com)

  • Make it Snow with Pure Photoshop Actions Winter Wonderland Set

    winter-wonderland-action-1

    When it comes to post-processing, photographers definitely have opinions about Photoshop Action sets. Some photographers love them, others consider them cheating. For me personally, Actions are most valuable when they either (a) make the editing that I would do by hand more efficient and/or (b) offer something unique and fun that may be outside my normal editing style, but fits a particular session.

    In this case, the Winter Wonderland Action Set by Pure Photoshop Actions (available for Photoshop CS and above, and Elements 6-11 for $ 25 regular price) fits a bit of both those criteria. It’s not something that I use every day, but it really is a fun action set to have on hand during the winter months!

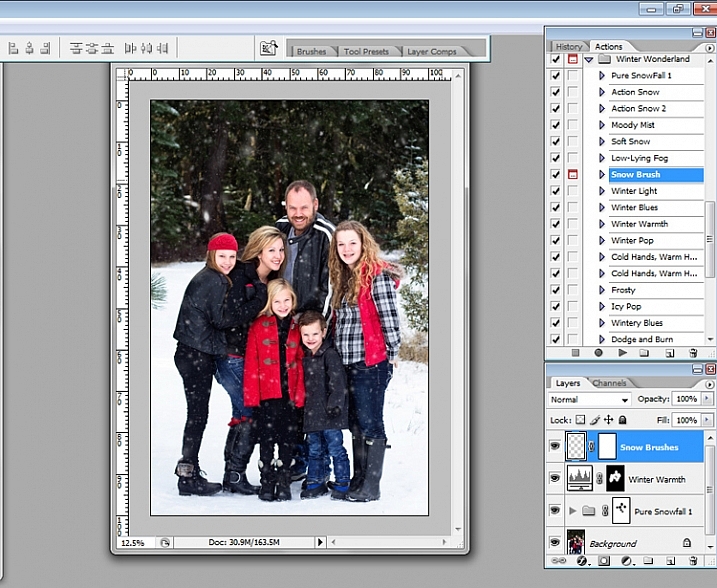
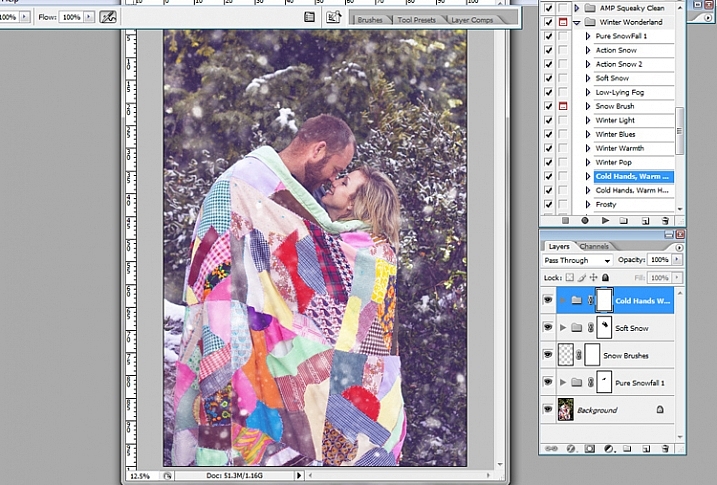
    Essentially, the Winter Wonderland Action Set allows you to add snow with one click during post-processing. It includes several different kinds of snow, fog, and mist that can add a little something extra to your winter images. It also offers some tints and adjustments that allow you to tweak the final images towards your normal style of editing, whether you lean towards natural and clean, or a faded vintage look.

    winter-wonderland-action-2

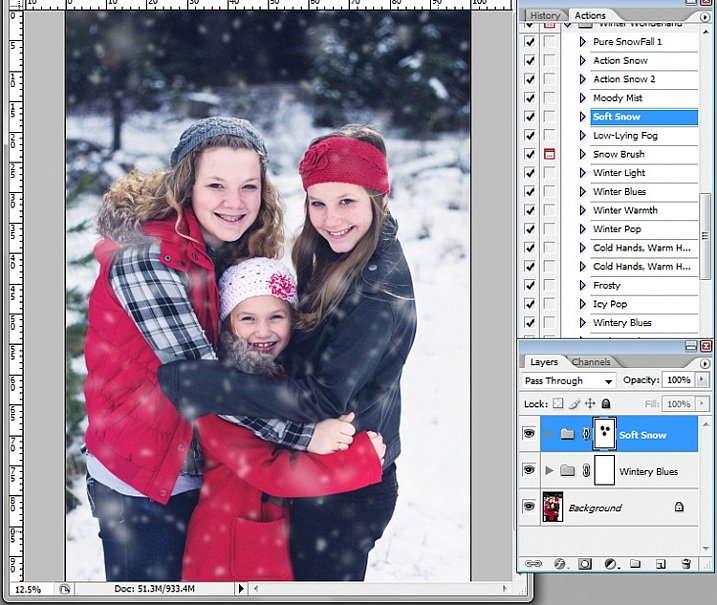
    The first thing that I should mention, right off the bat, is that some of these actions run very slowly. The “Pure Snowfall 1” action in particular always seems to take several minutes to run. On the other hand, the “Soft Snow” action runs quickly every time. That said, even with “Pure Snowfall 1” taking several minutes to run, it’s still much faster than adding in individual snowflakes by hand, so it’s a win in my book.

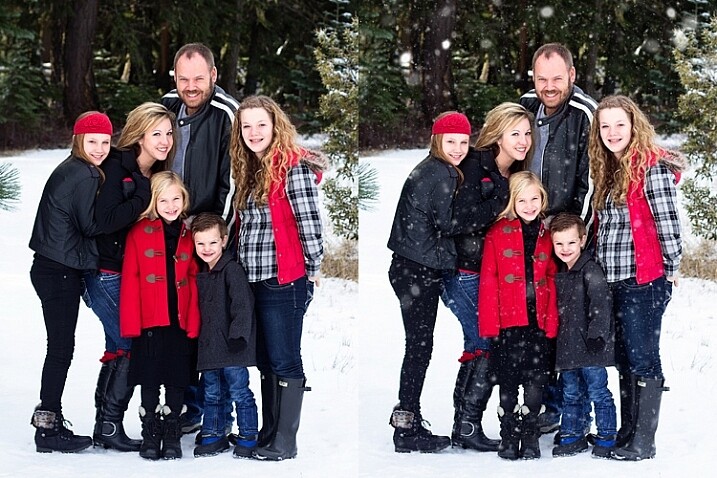
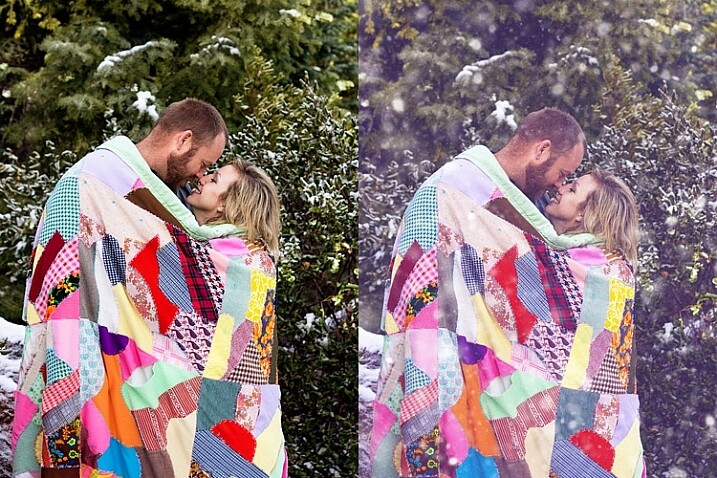
    Original image on the left, final image using PPA Winter Wonderland on the right.

    Original image on the left, final image using PPA Winter Wonderland on the right.

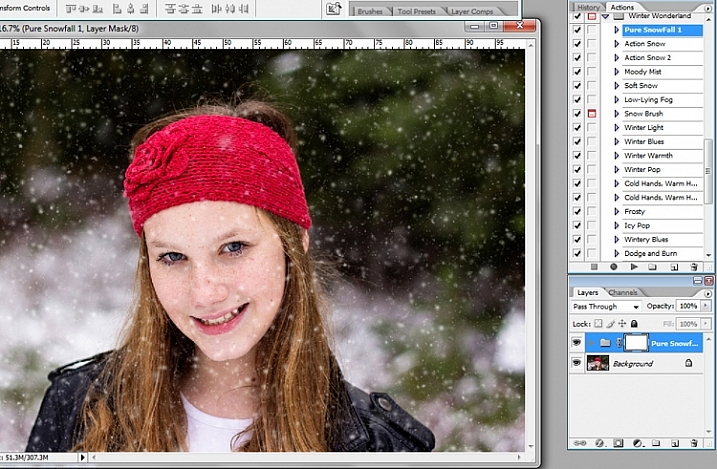
    As with most action sets, you should be prepared to tweak Winter Wonderland to fit your particular image. Winter Wonderland adds masks to most of the actions after they’ve run, and I find that I use them quite often. The most common tweak that I make to the Winter Wonderland set is to remove the added snowflakes from the subject’s eyes, nose, and mouth. I prefer the “snow” to look as natural as possible, so I do tend to leave the snowflakes around the hairline, and sometimes even on the cheeks.

    winter-wonderland-action-4

    The actions in this set tend to do a pretty good job of varying the size of the snowflakes in order to give a more realistic foreground and background, but there is also a snowflake brush included with the set, which allows you to pick the overall size of snowflake you want, and then scatters additional snowflakes in that size randomly over the image.

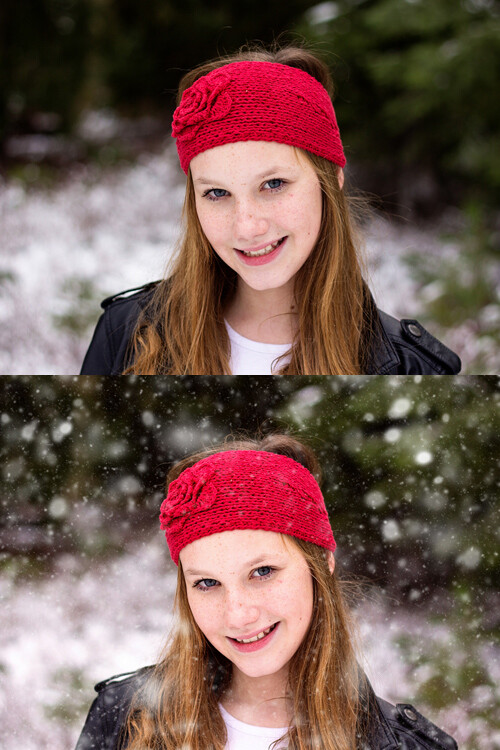
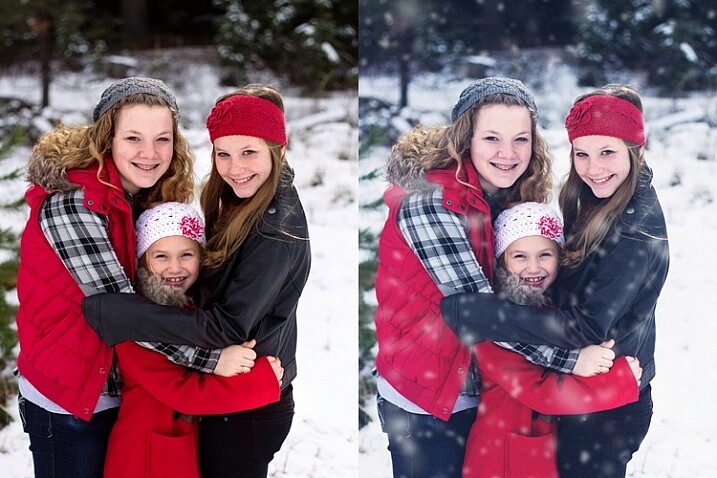
    Original image on top, final image edited with PPA Winter Wonderland on the bottom.

    Original image on top, final image edited with PPA Winter Wonderland on the bottom.

    My editing style tends to be pretty clean, so that is about where I usually stop with this action set. However, the set also includes a number of actions that allow you to achieve a subtle vintage feel to your final images, and I’ve also enjoyed testing those options out as well.

    winter-wonderland-action-6

    Original image on the left, final image edited with PPA Winter Wonderland on the right.

    Original image on the left, final image edited with PPA Winter Wonderland on the right.

    When I use the Winter Wonderland action set, my ultimate goal is that if I were to post the image on Facebook, the majority of my client pool would not readily be able to tell that the snow was added in post-processing. Of course, some of my photographer friends are likely to be familiar with this particular action set, and others may be familiar enough with Photoshop to know that something’s up, but my hope is to create images that look natural enough that they could easily pass as being real. So, in order to accomplish that goal, one of the key pieces is to only use images in which your model is dressed appropriately for snow, and there could feasibly actually be snow in that location.

    This particular set of images is my favorite set that I’ve ever edited with Winter Wonderland, and I think that’s due in large part to the fact that there was actually snow on the ground during our session. So, it’s not too much of a leap for a casual viewer to see snow on the ground, and find it feasible that snow could be falling at the same time. On the other hand, if I were to run this same action set on an image taken at sunset during the summer months, it would likely look ridiculous…which would really only work if you’re going for a super campy “Christmas in July” themed session.

    winter-wonderland-action-9

    winter-wonderland-action-10

    Original image on the left, final edited image with PPA Winter Wonderland on the right.

    Although I’ve seen Winter Wonderland marketed almost exclusively towards photographers doing portraits or family photography, don’t underestimate this set for landscape and nature images as well. As long as the content, and coloring of your landscape or nature image, would be appropriate for a photograph taken in the winter, there’s no reason not to give it a try!

    winter-wonderland-action-8

    Just for the record, I purchased the Winter Wonderland Action Set on my own, and Pure Photoshop Actions has no idea that I’m writing this article. I have just enjoyed the Winter Wonderland set quite a bit, and thought that it was worth sharing (and reasonable price at $ 25) as we head into the winter months in the northern hemisphere.

    Have you tried the Winter Wonderland Action Set? If so, what did you think? If not, is there an image you’re eager to try it on?

    googletag.cmd.push(function() {
    tablet_slots.push( googletag.defineSlot( “/1005424/_dPSv4_tab-all-article-bottom_(300×250)”, [300, 250], “pb-ad-78623” ).addService( googletag.pubads() ) ); } );

    googletag.cmd.push(function() {
    mobile_slots.push( googletag.defineSlot( “/1005424/_dPSv4_mob-all-article-bottom_(300×250)”, [300, 250], “pb-ad-78158” ).addService( googletag.pubads() ) ); } );

    The post Make it Snow with Pure Photoshop Actions Winter Wonderland Set by Meredith Clark appeared first on Digital Photography School.


    Digital Photography School

  • How to Use Foreground to Create Depth in Your Images

    One of the biggest hurdles in photography is the fact that our majestic three-dimensional scene is rendered into a mere two-dimensional image, and the physical depth that we experience in real life is lost. To resurrect this spacious feeling, we can create the illusion of depth where there is none, by using strong elements in the foreground.
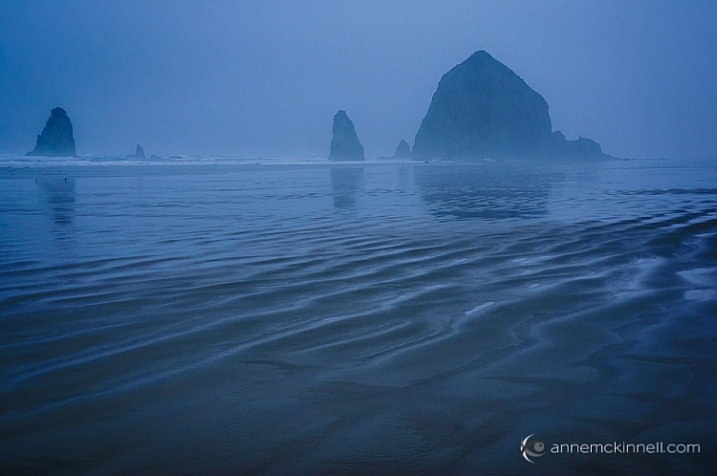
    Cannon Beach, Oregon, by Anne McKinnell

    When we make a photograph, our natural urge is to get a clear shot of the main subject, without other objects getting between it and the lens. That’s exactly what makes foreground elements so powerful though – they’re unexpected, and sometimes even counter-intuitive. Like any other compositional element, they create shapes, lines, and patterns that lead the viewer’s eye through the image and can be used to enhance its visual impact.

    What is the foreground?

    When you are working with a grand vista landscape scene, you can often divide it into three sections: the foreground, mid-ground, and background. For example, the scene below contains some colorful shrubs in the foreground, a pond in the mid-ground, and trees in the background.
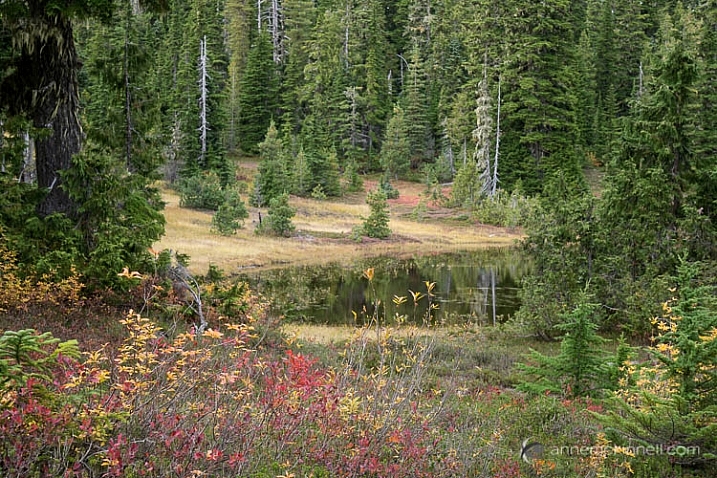
    Paradise Meadows by Anne McKinnell

    The foreground, mid-ground, and background areas are not at fixed distances, but are understood relative to each other. The foreground consists of anything that lies between you and your subject, which is typically considered to be in the mid-ground (but not always). The background is made up of everything behind the subject.

    You can think of a photograph like a stage: you have the upstage – that’s the background. It gives setting and context to what happens below it. Center stage is the mid-ground, where the bulk of the action takes place. But downstage – the foreground – is the closest to the audience, and therefore the most intimate part. It is capable of whispering to them and luring them into the action. It is the most easily seen and heard, and therefore understood, and can reveal the finer details of the story.
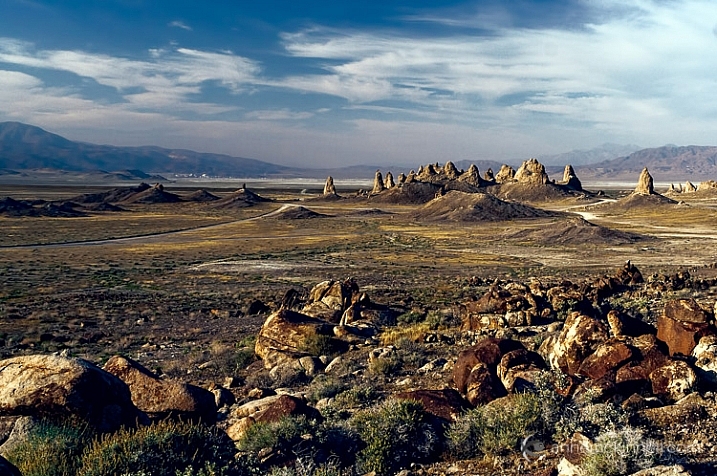
    Trona Pinnacles, California, by Anne McKinnell

    Not all photographs have three sections though, some just have a foreground and a background, and some have no depth at all.

    How is the foreground used?

    The foreground should contain some key point of interest, such as a human figure, a tree, a boat, some flowers, rocks, or anything else that is comparatively near to you. Composing in this way evokes depth, and gives your image the illusion of that missing third dimension.
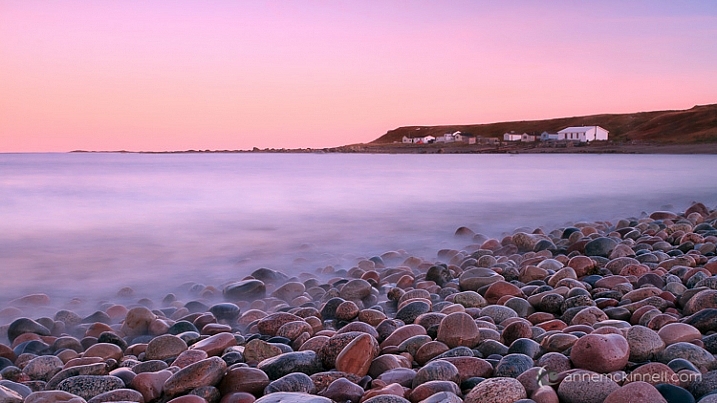
    Green Point, Newfoundland, by Anne McKinnell

    When you’re composing a photo and you feel that it’s looking a little too flat, placing something in the foreground can instantly add a sense of depth. Exactly how this is done depends entirely on your subject, and on your own creative decisions. This can mean physically adding something to your scene, if you are able to. But most of the time, you’ll be looking for objects in the surrounding area that would make an interesting foreground, and changing your perspective – either by moving your camera higher, lower, or to one side – to incorporate those elements inside of the frame.

    For example, imagine a group of oak trees in a field, all standing in a row. If you photograph them head-on, they’ll all look more or less identical – their size, distance, and focus will be the same, and the composition will likely be a flat, static one. However, if you change your perspective and shoot them from one side, everything changes. One becomes closer, and therefore larger, while the others shrink in comparison. When a viewer sees this image, their eyes will immediately fall on the tree in the foreground first, and the implied line created by the row will pull their gaze inwards towards the other trees. Suddenly, the composition has depth!
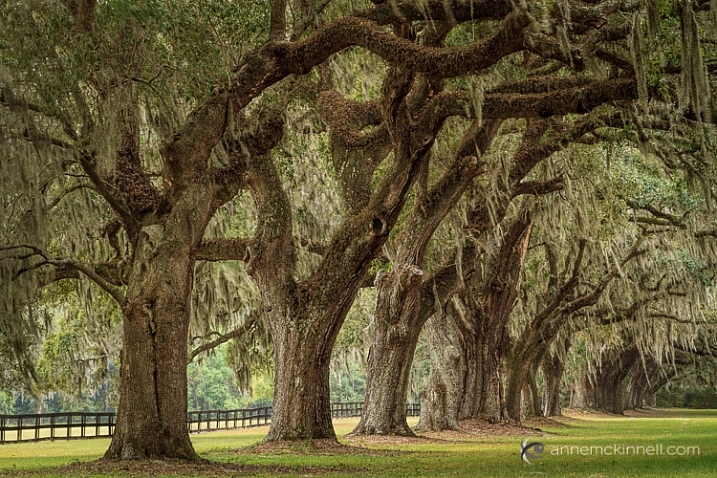
    Boone Hall Plantation, South Carolina, by Anne McKinnelll

    Likewise, you could change your perspective by lowering your camera angle to incorporate rocks, flowers, or anything else that is on the ground, into your image. This use of foreground will provide a point for the viewer’s eye to enter the image, and any lines created in the foreground will direct their eye into the image.

    Like any other compositional element, the foreground is only helpful if it adds to the impact of the image. If it doesn’t help tell the story, or worse yet, if it distracts the eye, then it isn’t working as a benefit to your image. Your foreground should be an important part of the scene, and not something distracting. Look for things that point towards the focal point in some way.
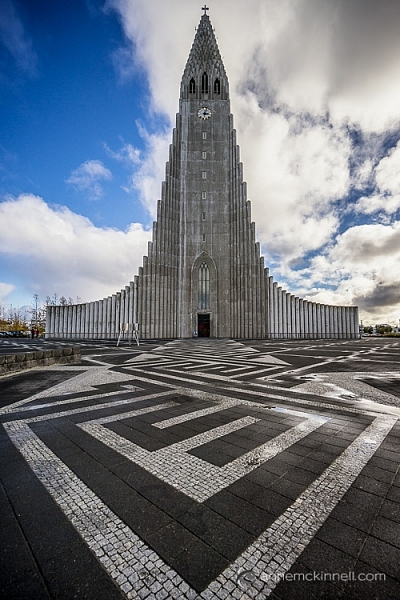
    Hallgrimskirkja, Reykjavik, Iceland, by Anne McKinnell

    Foreground elements can even be made of simple shapes and lines. In some cases, your foreground elements may be nothing but shapes and lines, like the paint on a stretch of road, the waves on the ocean’s shore, or the shadows cast across a wind-swept desert. Anything that forms a line towards your subject is especially effective. These are known as leading lines.

    Similarly, a wall that stretches into the picture from the foreground will carry the eye along with it. The corners of your frame are especially strong points, and anything that leads inwards from them will have a particular impact. Textures are another compositional tool that can make for an interesting foreground.
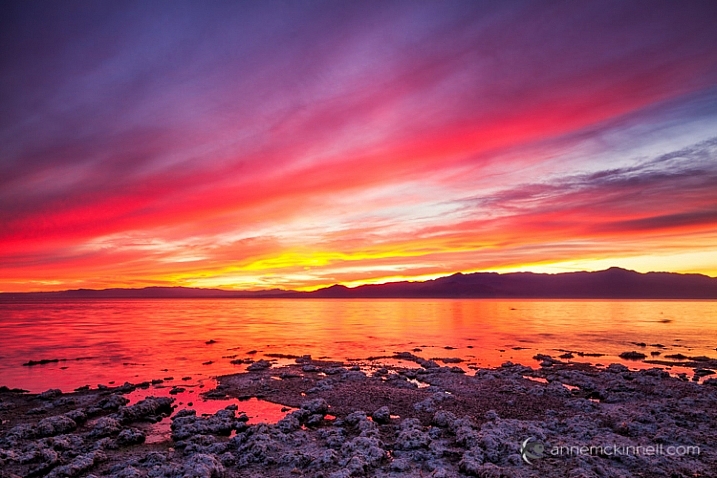
    Salton Sea, California, by Anne McKinnell

    Arranging your composition so that there are interesting elements in front of your main subject is a very effective compositional tool that can evoke depth, by giving your image the illusion of the missing third dimension.


    This week on dPS we’re featuring a series of articles about composition. Many different elements and ways to compose images for more impact. Check out the ones we’ve done so far:

    • Using Framing for More Effective Compositions
    • 7 Tips to Improve Your Skyline Photos
    • 33 Images that Exemplify Compositional Elements
    • Weekly Photography Challenge – Composition Craziness
    • How to Take Control of Aperture and Create Stronger Photos
    • How Cropping in Post-Production Can Improve Composition
    • Good Crop Bad Crop – How to Crop Portraits
    • How to use Focal Length and Background Compression to Enhance Your Photos

    googletag.cmd.push(function() {
    tablet_slots.push( googletag.defineSlot( “/1005424/_dPSv4_tab-all-article-bottom_(300×250)”, [300, 250], “pb-ad-78623” ).addService( googletag.pubads() ) ); } );

    googletag.cmd.push(function() {
    mobile_slots.push( googletag.defineSlot( “/1005424/_dPSv4_mob-all-article-bottom_(300×250)”, [300, 250], “pb-ad-78158” ).addService( googletag.pubads() ) ); } );

    The post How to Use Foreground to Create Depth in Your Images by Anne McKinnell appeared first on Digital Photography School.


    Digital Photography School
  • Fast Track: New High-Speed Pedestrian Lanes Live in Liverpool

    [ By WebUrbanist in Architecture & Cities & Urbanism. ]

    pedestrian walking lane

    An experimental pedestrian fast lane system deployed in England allows speedy walkers to circumvent gawking tourists and window shoppers.

    Implemented by retailer Argos adjacent to a shopping complex in Liverpool, the Fast Track is a trial run (or: really fast walk) for separating dawdlers from power walkers.

    PIC BY ARGOS/MERCURY PRESS (PICTURED: THE FAST LANE IN LIVERPOOL CITY CENTRE) Speedy shoppers will no longer get stuck behind people who dawdle or stop to check their phones ñ thanks to the UKís first ever pedestrian fast lane. Argos has painted new markings on the pavement outside its Liverpool store after research revealed almost half the nation found the slow pace of high streets to be their biggest shopping bugbear. The new lane, being trialled this week in the Liverpool One shopping complex, hopes to help pick up the pace for those who are hurrying by bypassing the crowds. SEE MERCURY COPY

    pedestrian fast speed lane

    If it seems like a marketing stunt, consider this: close to 30,000,000 Brits favor fast lanes for busy pedestrian thoroughfares. Close to a third surveyed in a recent study responded that they would approve of some consistent solution to slow-moving foot traffic.

    fast lane shopping market

    As in similar attempts elsewhere, like NYC’s half-joking painted pavement markings dividing New Yorkers from Tourists, the aim is to provide clear paths for different paces, segregated by speed, cellphone use or other factors, indoors or outside.

    This latest variant may only be temporary, but a store spokesperson says it is there by popular demand and if successful the same idea could continue to spread to other private and public spaces.

    Share on Facebook


    [ By WebUrbanist in Architecture & Cities & Urbanism. ]

    [ WebUrbanist | Archives | Galleries | Privacy | TOS ]


    WebUrbanist