Blog

  • 6 Photoshop Tools Every Newbie Should Learn

    In the days before digital imaging, if you truly wanted to elevate your photography to the level of art, you learned how to process your images in the darkroom. You learned dodging, burning, masking, sandwiching negatives, flashing and fogging – all designed to get the most out of your images, and deliver your artistic vision to your viewers.
    Photoshop-tools

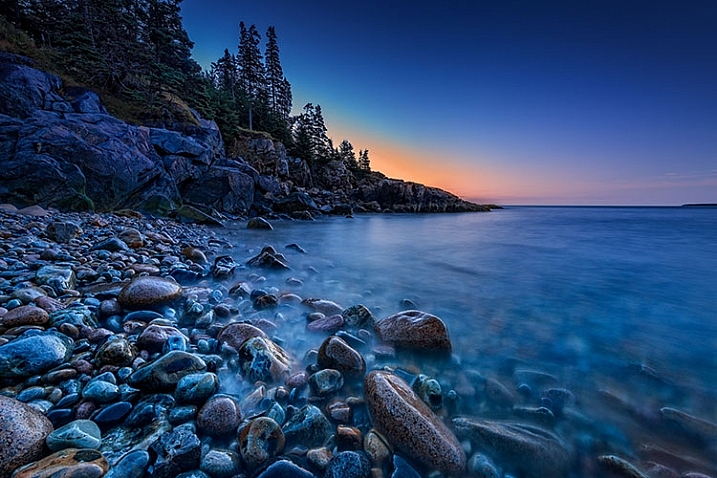
    The finished image after Photoshop, using the tools discussed below.

    With the advent of digital imaging, photographers have a new way to bring their artistic vision to life, known as the digital darkroom. While there are several different applications available for photographers, one has become synonymous with photo editing, and that is Adobe Photoshop.

    Many of the tools in Photoshop can trace their origins to the wet darkroom of yesteryear. If you’re new to Photoshop, it can seem overwhelming the first time you open an image in the program. I’ve created this list of six must-know Photoshop tools to help you get started editing your images. These aren’t by any means the only tools needed, and there are of course tools within the tools to figure out, but this list should give you some idea of where to start. The great thing about most tools in Photoshop is that there are a lot of sliders, meaning you can experiment and see what each tool does, then undo it if you don’t like it.

    1 – Adobe Camera Raw
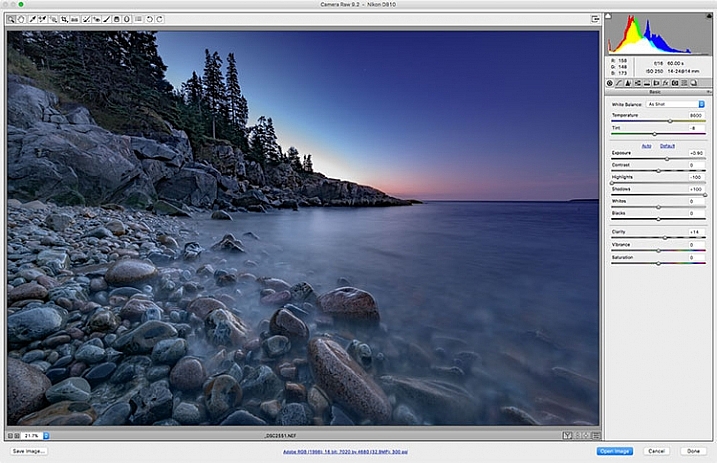
    Adobe Camera Raw is a series of sliders and tabs used for processing RAW files. The beauty of the RAW file is you can make changes to the file non-destructively and change them again later if you choose.

    Adobe Camera Raw is a series of sliders and tabs used for processing RAW files. The beauty of the RAW file is you can make changes to the file non-destructively and change them again later if you choose.

    It is my personal belief that if you aren’t photographing RAW images, you are doing yourself a disservice as a photographer. When you allow your camera to process your image into a JPEG, you are throwing out potentially critical information from your image. You are trusting your camera to make creative decisions for you about the color, contrast, tone, and more, with regards to your image.

    To get the most out of your image, you’ll want to set your camera to capture the image as a RAW file. A RAW file contains unprocessed, uncompressed, grayscale data from your camera’s image sensor, as well as metadata about how the image was captured. Adobe Camera RAW is the plugin for Adobe PhotoShop that can take this information and process a color image.

    When you open a RAW image in Adobe Camera RAW, you’ll be presented with a toolbar across the top, and a tool palette on the right side. The tool palette is divided into 10 tabs: Basic, Tone Curve, Detail, HSL/Grayscale, Split Toning, Lens Corrections, Effects, Camera Calibration, Presets, and Snapshots.  The tabs I use most in my workflow are Basic, Lens Corrections, Effects, and Camera Calibration.

    The beauty of a RAW file is that you can change the settings using the sliders, and other tools, as often as you like. If you don’t like what you’ve done, or you want to try something different, you can always revert the image back to the original settings, and the file is the same as it was when you downloaded it from your camera. Don’t be afraid to play with the sliders and see what they do. You can’t ruin the RAW file, so you might as well see what everything does. For more on using Adobe Camera Raw, check out Understanding the Basic Sliders In Adobe Camera Raw.

    2 – Layers and Layer Masks
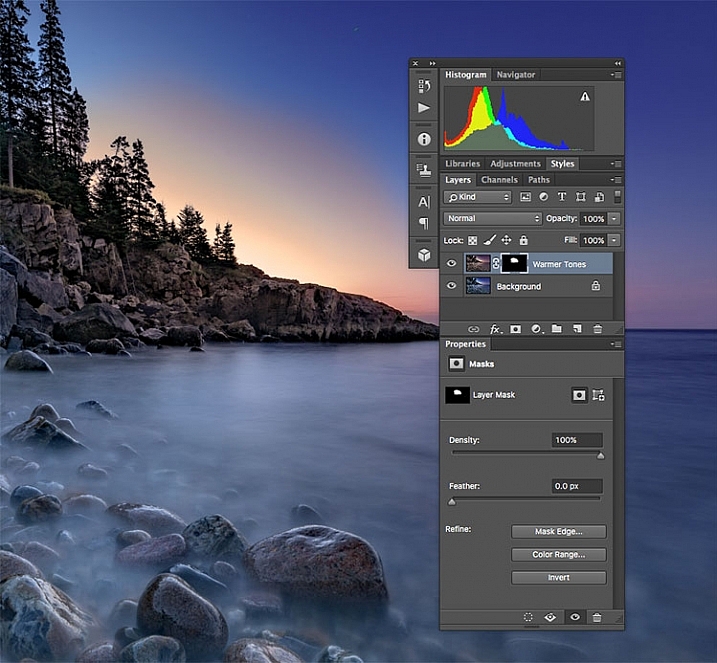
    I created a duplicate layer to warm up the sunrise a bit and look more like it appeared when I was there. But since I still wanted the cooler tones on the rocks, water, and the rest of the sky, I used a layer mask to show only the warmer tones where I wanted them.

    I created a duplicate layer to warm up the sunrise a bit and make it look more like it appeared when I was there. But since I still wanted the cooler tones on the rocks, water, and the rest of the sky, I used a layer mask to show only the warmer tones where I wanted them. The white area of the mask for the layer called, “Warmer Tones” shows the area of that layer that is showing through.

    I consider this number 2a and 2b. If you’re going to learn layers, you’re going to have to learn layer masks as well. In Photoshop, one of the first things you’ll notice when you open an image is the Layers Palette on the right side of the screen. Initially, it will likely only have one layer called “Background” which contains your image.  You can add new layers as needed. You can also add empty layers which will allow you paint, draw, or copy portions of the image below onto them, and you can use layers to create a composite from multiple images. Layers can be adjusted to different opacities using the opacity slider at the top of the palette, so they can be made partially translucent which allows the layers underneath to show through.

    In addition, you can create layer masks, which allow you show or hide portions of a layer, and allow you to see the layer or layers beneath. You do this simply by painting with black on the layer mask to hide that part of the layer, or painting white to show that part of the layer.

    Layers give you room for quite a bit of creativity, allowing you to edit areas of an image non-destructively. If you don’t like what you did, simply delete the layer and start over. You can sandwich together two separate images, much the way you’d sandwich negatives in a wet darkroom, and create photo composites. For more on using layers, read A Beginner’s Introduction to Using Layers.

    3 – Blend Modes
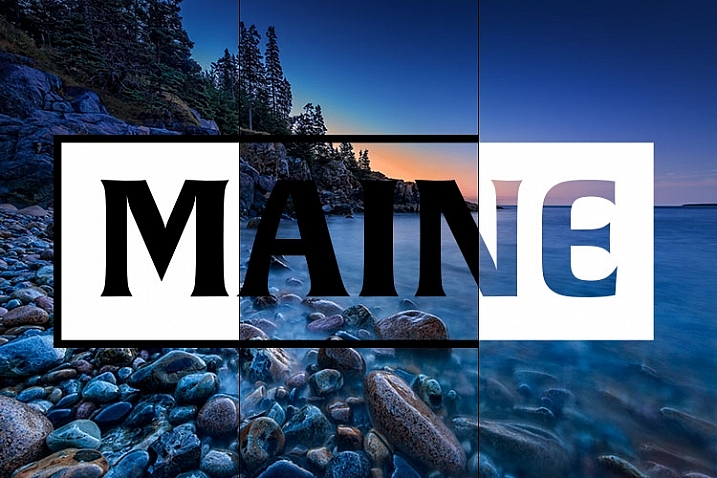
    This image shows two different blend modes. On the left, Normal is selected, so the white box with the black text appear as I drew it. In the center, the blend mode is set to Multiply, so the white disappears and the black remains. On the right, Screen is selected, which shows the white area and shows the black.

    This image shows three different blend modes. On the left, Normal is selected, so the white box with the black text appear as I drew it. In the center, the blend mode is set to Multiply, so the white disappears and the black remains. On the right, Screen is selected, which shows the white area and hides the black.

    As mentioned above, the Opacity Slider allows you to blend the active layer with the layers beneath. The Blend Modes, found in a drop-down menu to the left of the Opacity Slider, work in a similar fashion, but use different mathematical calculations to change the appearance of the layer being blended for different things. For instance, if you simply duplicate the image on a new layer and set the Blend Mode to: Multiply it will darken the image by about a stop, and Screen Blend Mode will lighten the image by a stop. If you create a layer on top of your image with black text inside a white box, using Multiply will eliminate the white box, and allow the layer below to show through. Screen will do the opposite (see image above).

    As of Adobe Photoshop CC 2015, there are 27 Blend Modes. The two modes I noted above are ones I use often, usually adjusting the opacity slider as well to get to my final look. Knowing what each mode does will help in choosing which one to use for your particular purpose. Darren Rowse put together a great tutorial, An Introduction To Blend Modes In Photoshop to give you a more in depth look at Blend Modes. You can also check out The First 3 Blend Modes You Need to Understand.

    4 – Adjustment Layers
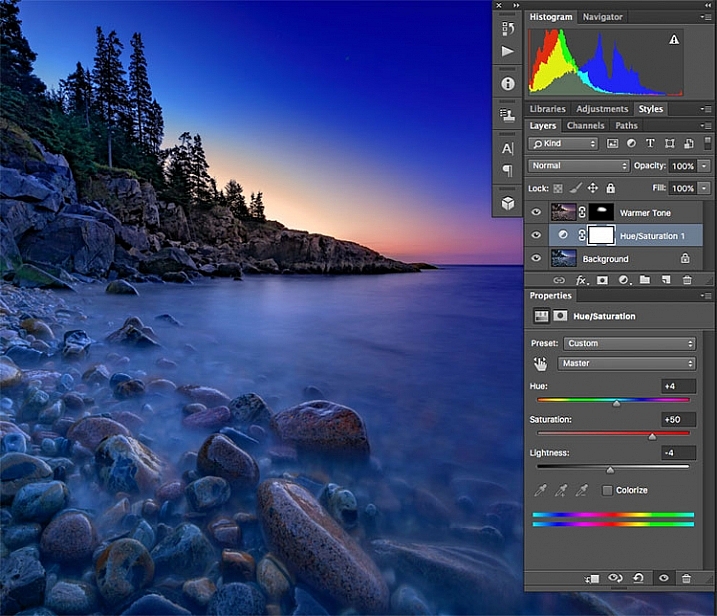
    I used an Adjustment Layer on the cooler layer to bump up the color saturation a bit.

    I used an Adjustment Layer on the cooler layer to bump up the color saturation a bit.

    Photoshop Adjustment Layers are a great way make changes to an image, without actually changing the original file. It’s an easy way to try things, such as adjusting contrast or saturation, so that you can go back and change it again later – as long as you’ve kept the layers in tact by saving as a PSD or a TIFF file, formats that both support layers.

    There are 19 different adjustment layers, which can be combined to create different effects on your image. Some basic uses are color adjustment, contrast adjustment, saturation, and black and white conversion. In addition, you can use Layer Masks to apply the effects in specific areas only, rather than the entire image, if you so choose.  You can also adjust the Opacity of an adjustment layer to reduce the effect of the adjustment on your image.

    Adjustment layers provide a ton of flexibility when editing an image, without forcing you into a change that can’t be undone easily. For more on Adjustment Layers, check out Photoshop: Applying Fixes using Adjustment Layers and Masks and Burning and Dodging with Adjustment Layers and Layer Masks.

    5 – The Spot Healing Brush
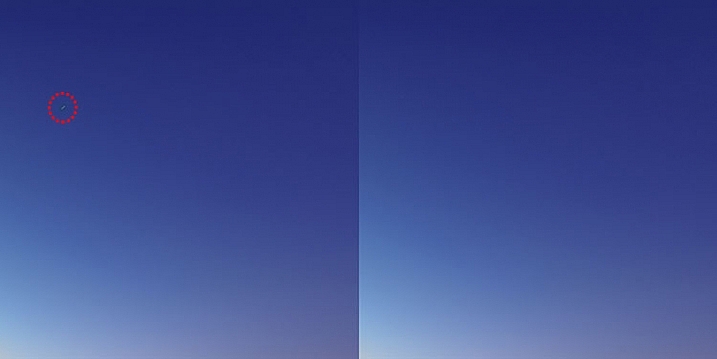
    There were a few stray star streaks in the sky that I wanted to eliminate, so I used the Spot Healing Brush to quickly remove them.

    There were a few stray star streaks in the sky that I wanted to eliminate, so I used the Spot Healing Brush to quickly remove them.

    The Spot Healing Brush is one of the primary retouching tools in Photoshop, allowing you to remove blemishes and errors, or other parts of your photos. In the digital age, the bane of all photographers’ existence is dust on the imaging sensor, and the Spot Healing Brush provides a quick and easy way of removing those fromyour images.  The Spot Healing brush works similarly to the Cloning Stamp tool, in that it samples from one area of the image to correct other areas.

    The Spot Healing Brush automatically detects the content or texture of the surrounding area, and attempts to replicate it wherever you click in the image. There are several options to work with which appear at the top of the screen. These include brush size and hardness, Blending Mode, and the type of fix you want to use, such as Content Aware, Create Texture, or Proximity Match. Each image will have different needs, depending on the content, so it’s best to experiment with the various settings if you find you’re not happy with the results you’re getting.

    The Clone Stamp Tool
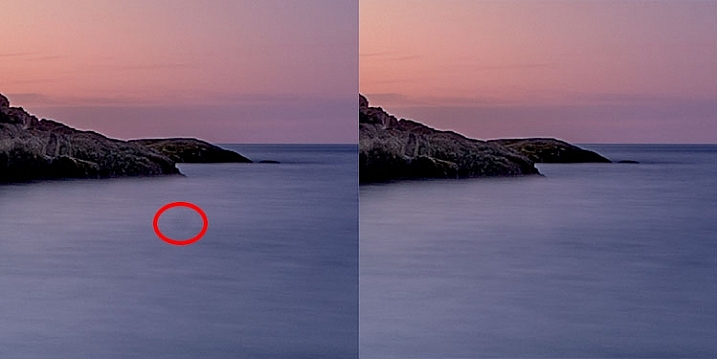
    I had a few dust spots on my sensor. This one in the water, circled in red, did not respond well to the Spot Healing Brush, so I used the Cloning Stamp to sample and area of the water and stamp it over the dust spot.

    I had a few dust spots on my sensor. This one in the water, circled in red, did not respond well to the Spot Healing Brush, so I used the Cloning Stamp to sample an area of the water and stamp it over the dust spot.

    As I mentioned above, the Clone Stamp Tool and the Spot Healing Brush are similar in that they are both used for retouching images, and both use sampled areas of the existing image. The Clone Stamp, however, allows you to select the area from which to sample by holding the Command key and clicking (on Mac) or CTRL and click (on Windows), and creates an exact copy of the area you sample. Then you simply click on the area you want clone out and a copy of the area you sampled appears.

    Again you have some options at the top of your screen, including Blend Modes, Opacity, and whether or not to sample a specific layer, or use all layers. You can also change the edge hardness and size of the stamp. The clone stamp works well when you have a well-defined edge to maintain, such as the wall of a building. The Healing Brush tries to blend edges, which can cause a blurred mess when you really need a clean edge. For more on using the Clone Stamp, head over to 12 Tips for Mastering the Clone Stamp Tool in Photoshop

    These six tools in Photoshop are my go-to tools for editing my images. I would estimate that about 90% of my image editing is done using these tools. What are some of your tried and true Photoshop tools?

    googletag.cmd.push(function() {
    tablet_slots.push( googletag.defineSlot( “/1005424/_dPSv4_tab-all-article-bottom_(300×250)”, [300, 250], “pb-ad-78623” ).addService( googletag.pubads() ) ); } );

    googletag.cmd.push(function() {
    mobile_slots.push( googletag.defineSlot( “/1005424/_dPSv4_mob-all-article-bottom_(300×250)”, [300, 250], “pb-ad-78158” ).addService( googletag.pubads() ) ); } );

    The post 6 Photoshop Tools Every Newbie Should Learn by Rick Berk appeared first on Digital Photography School.


    Digital Photography School

  • Die 5 Fotobücher des Monats

    Ein Stapel Foto-Bücher und Bände sitzen auf einem älteren Sessel.

    Wir sind tatsächlich beim letzten Teil der monatlichen Fotobuch-Empfehlungen angelangt und finden nun zu einem krönenden Abschluss für das Jahr 2015. Wir haben uns mal wieder an den Tisch gesetzt und über zahlreiche Fotogenres hinweg die Neuerscheinungen auf dem Büchermarkt inspiziert.
    kwerfeldein – Fotografie Magazin | Fotocommunity

  • Discover the Secrets of Natural Light Photography With This 70% Off Deal

    As we announced yesterday – today is Day 1 in our 12 Deals of Christmas dPS – and we’re kicking things off with fantastic deals on or popular Natural Light eBooks.

    You can pick either one up for $ 7 (65% off) or grab them both for an even more amazing price of just $ 12 USD (a 70% saving).

    PicMonkey Collage

    The eBooks are:

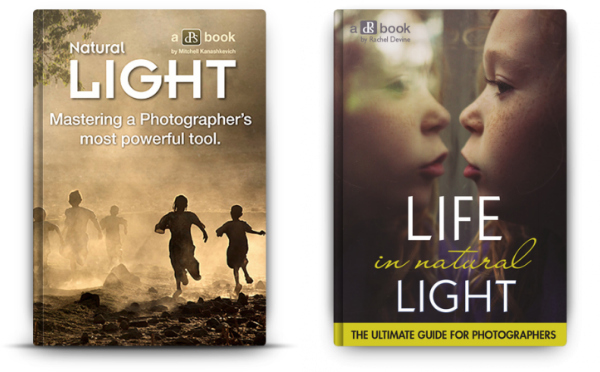
    • Natural Light: Mastering a Photographer’s Most Powerful Tool – by travel photographer Mitchell Kanashkevich
    • Life in Natural Light: The Ultimate Guide Guide for Photographers – by family photographer Rachel Devine

    These eBooks are normally $ 19.99 – today only either one is $ 7 USD!

    Both of these beautifully illustrated and informative eBooks tackle this vitally important topic for photographers from different perspectives but together they make a beautiful little bundle of learning for just $ 12 (70% off).

    Taking beautiful photos using nothing but the light around you can often seem as difficult as using the Jedi Mind Trick to get the people in your lens to sit still. But these two books will help you see your photography in… well…. a whole new light.

    We could go on about these eBooks all day but this deal only lasts 24 hours so head to our 12 Days of Christmas Page and grab yours before this deal is over.

    googletag.cmd.push(function() {
    tablet_slots.push( googletag.defineSlot( “/1005424/_dPSv4_tab-all-article-bottom_(300×250)”, [300, 250], “pb-ad-78623” ).addService( googletag.pubads() ) ); } );

    googletag.cmd.push(function() {
    mobile_slots.push( googletag.defineSlot( “/1005424/_dPSv4_mob-all-article-bottom_(300×250)”, [300, 250], “pb-ad-78158” ).addService( googletag.pubads() ) ); } );

    The post Discover the Secrets of Natural Light Photography With This 70% Off Deal by Darren Rowse appeared first on Digital Photography School.

    Digital Photography School

  • dPS 12 Days of Christmas: Save up to 94% on Some Great Photography Training

    It’s that time of year where we at dPS kick off our annual 12 days of Christmas campaign!

    12 deals christmas dps

    This is the sixth time we’ve run this and this year we’ve got our biggest deals yet!

    Here’s how it works.

    Every day between now and Christmas we have put together a fantastic deal on some photography training products. We’ll set them live on this page (the first one goes up tomorrow).

    In the coming 12 days you’ll see some of our own dPS eBooks at discounts we’ve never offered before as well as some deals from other photography sites that we’ve negotiated on your behalf.

    Deals this year are as high as 94% off!

    Each deal only lasts for 24 hours so you’ll need to be quick!

    Get Notified of Each Deal

    To get notified of each deal as soon as it goes live simply subscribe via email here:


    (function($ ) {window.fnames = new Array(); window.ftypes = new Array();fnames[0]=’EMAIL’;ftypes[0]=’email’;fnames[1]=’FNAME’;ftypes[1]=’text’;fnames[2]=’LNAME’;ftypes[2]=’text’;}(jQuery));var $ mcj = jQuery.noConflict(true);
    Don’t worry we keep your email completely private and you can unsubscribe at any point if you find the deals are too many!

    We’ll also be updating the deals here on the blog and on our Facebook page.

    Our first deal goes out to those who are subscribed in the next 24 hours so keep an eye on your inbox and don’t forget you only get 24 hours to grab each one!

    googletag.cmd.push(function() {
    tablet_slots.push( googletag.defineSlot( “/1005424/_dPSv4_tab-all-article-bottom_(300×250)”, [300, 250], “pb-ad-78623” ).addService( googletag.pubads() ) ); } );

    googletag.cmd.push(function() {
    mobile_slots.push( googletag.defineSlot( “/1005424/_dPSv4_mob-all-article-bottom_(300×250)”, [300, 250], “pb-ad-78158” ).addService( googletag.pubads() ) ); } );

    The post dPS 12 Days of Christmas: Save up to 94% on Some Great Photography Training by Darren Rowse appeared first on Digital Photography School.

    Digital Photography School

  • Review: Incase DSLR Pro Pack Backpack

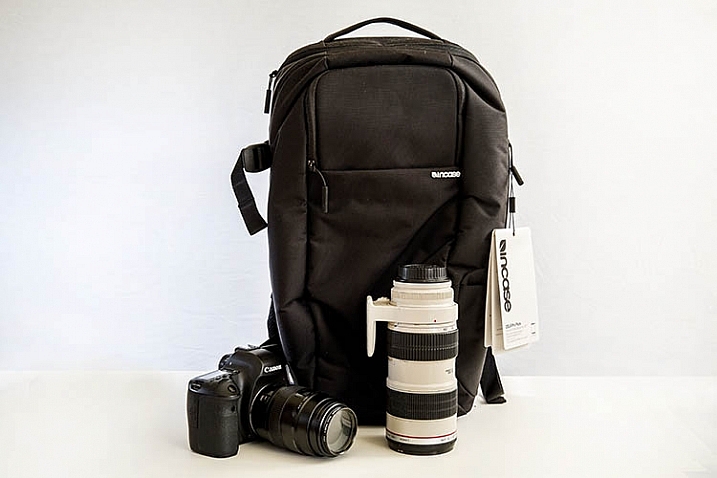
    As a freelance photographer, my office while on assignment is, more often than not, whatever I can carry on my back. Everything from my multiple pieces of DSLR camera gear and laptop, plus its accessories, must fit in a bag (or two) to be ready to whip out at a moment’s notice. This presents a constant dilemma of figuring out the most efficient, yet safe, way to carry and store very expensive electronics while on the go. At this point, there are a myriad of DSLR laptop bags out there, but I’ll show you why the Incase DSLR Pro Pack is my new favorite travel companion.

    Incase DSLR laptop backpack

    Lightweight and sturdy

    The first thing you’ll notice about this bag is that even when it’s empty, it’s super light. Weighing in at 2.7 lbs (1.22 kg), this bag won’t weigh you down while on the go. It’s also made of sturdy 840D nylon material that will protect your gear from the elements.

    Incase DSLR laptop backpack

    Thick padding for lots of gear

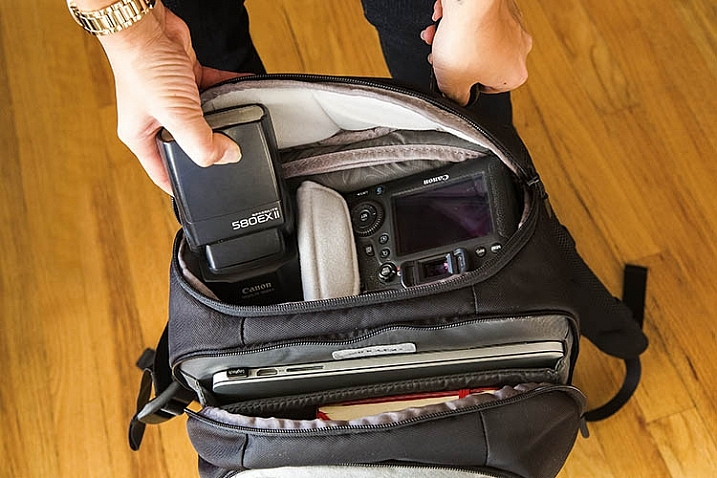
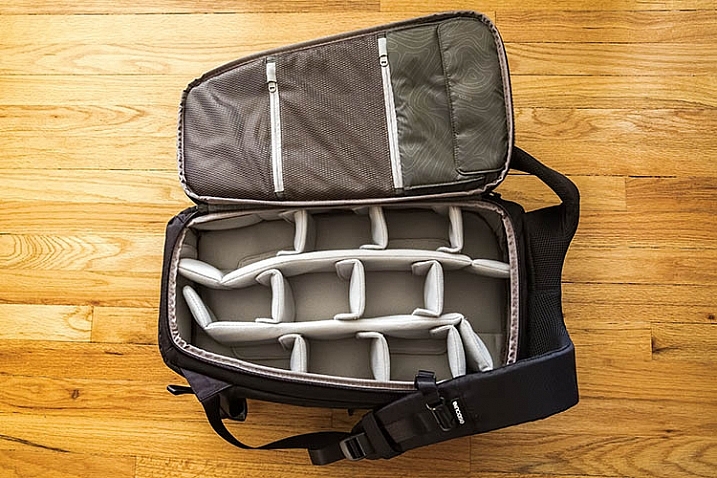
    First, let’s take a look at the most important part of this bag: where it stores your camera gear! Out of the box, this bag comes preconfigured with soft, thick, padded dividers (also fully adjustable). Don’t tend to carry that much camera gear? You could likely come up with a configuration that can hold other things, like clothes or shoes if you’re traveling. You will likely need to customize this grid of padding to yourr own liking depending on how much gear you’re looking to carry.

    Incase DSLR laptop backpack

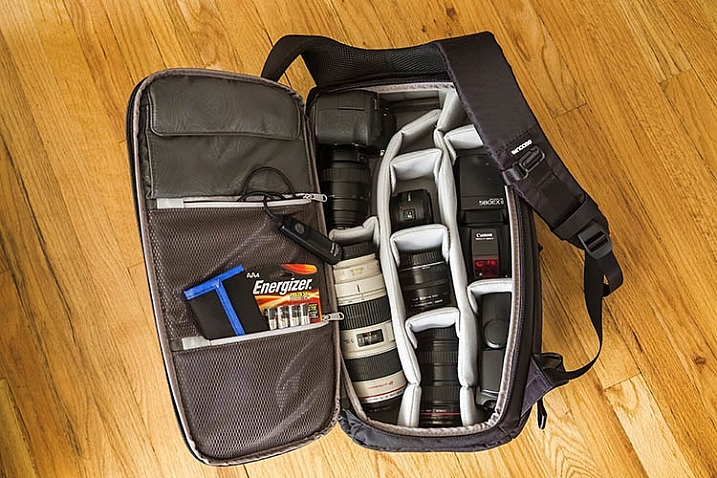
    On a typical freelance photography assignment, I’ll bring loads of gear, and I was impressed with how it all fit into the backpack. My kit below includes the following:

    • (1) Canon 6D DSLR with 100mm f/2.8 macro lens attached
    • (1) Canon 16-35mm f/2.8 wide-angle lens
    • (1) Canon 70-200mm f/2.8 telephoto zoom lens
    • (1) Canon 24mm f/2.8 prime lens
    • (1) Canon 50mm f/1.8 prime lens
    • (2) Canon 580 EXII flashes
    • A bag of accessories including: remote release cable, extra batteries, and remote flash triggers

    Incase DSLR laptop backpack

    Unique design for easy access to gear

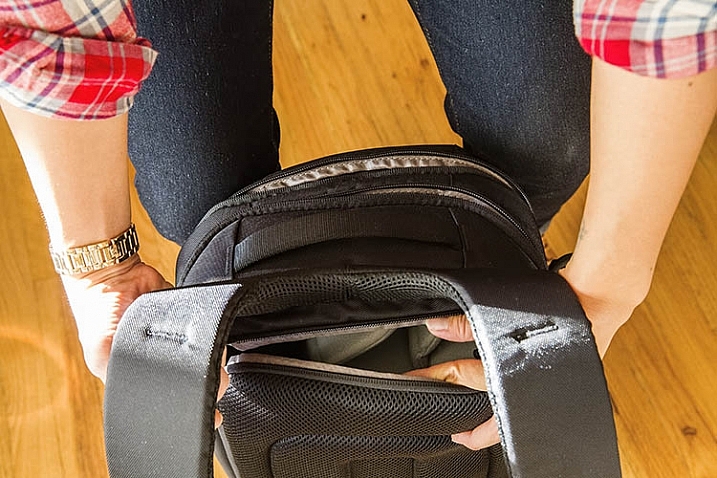
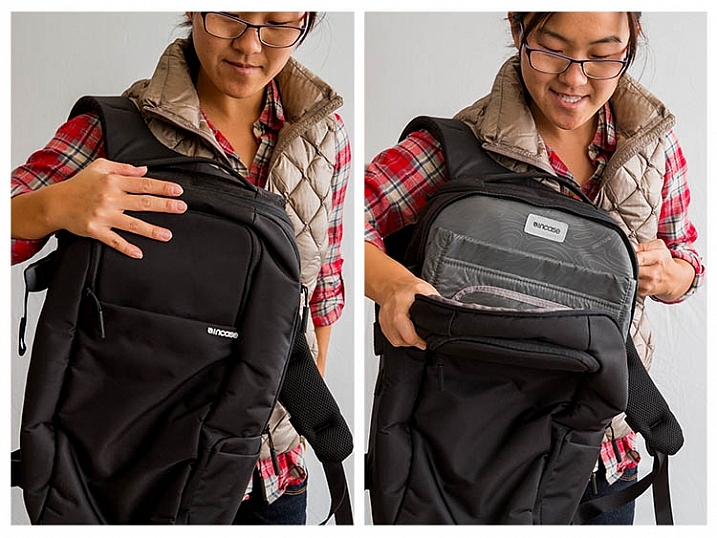
    Perhaps the best feature of the Incase DSLR Pro Pack bag is the unique way it stores your gear. Instead of opening from the outside, you actually unzip the camera compartment from the bag’s backside. This can make it tough to access all of your gear at once, but here’s the genius part – the bag’s design allows you to easily unzip the top of the camera section and take out a couple pieces of gear that are stored closer to the top. In the demo photo below, you can see how it works.

    Incase DSLR laptop backpack

    Incase DSLR laptop backpack

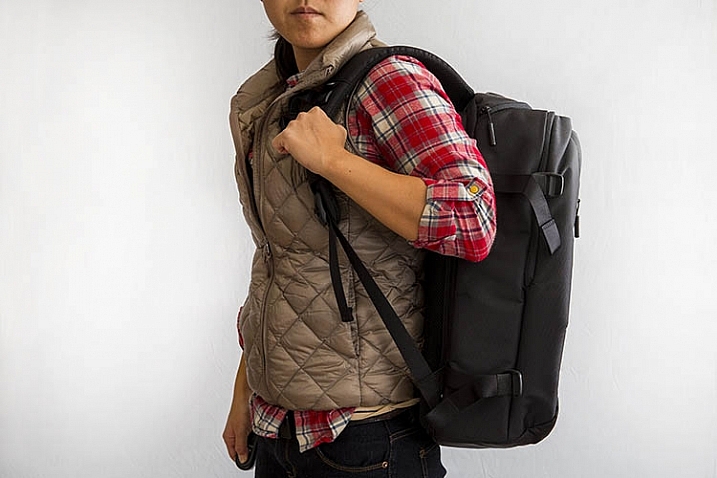
    Speaking of the back of the bag, check out that thick, mesh material lining the back and straps. They feel as comfy as they look, keeping your back and shoulders protected as you haul your gear around.

    Side pocket for tripod or monopod attachment

    If you travel with larger items such as a tripod, monopod or umbrella, you could also tack that on to this bag with the buckles, and extra pocket located on the right-hand exterior of the bag.

    Extra room up front for more office accessories

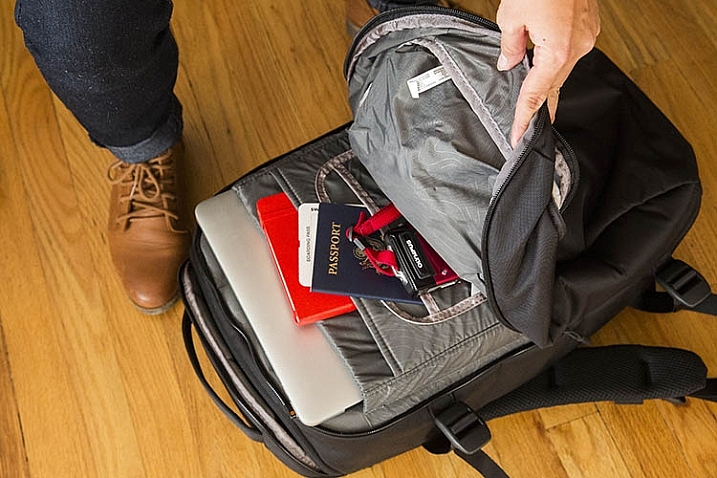
    Since the bag’s backside provides primary access to photo gear, that means the front pockets provide very easy access to the rest of the accessories you choose to pack. In this case, that could include a laptop (up to the size of a 15″ MacBook Pro), a notebook, pocket-sized point and shoot camera, and important documents like your passport.

    Incase DSLR laptop backpack

    Incase DSLR laptop backpack

    Two things I wish were included

    Ergonomics are a top feature to look out for when selecting a new backpack. While this backpack is ergonomic in many ways, including the mesh back padding and a secure chest strap, I wish there were also waist straps. This would make me feel a bit more comfortable if I were hauling my full camera and laptop kit around on my back.

    Another feature I’d like to see (especially as a Seattle resident) is the inclusion of a rain jacket. While I have no doubt that the bag’s durable 840D nylon would protect my gear from a light sprinkling, I’m not so confident about it handling a downpour very well.

    Overall a high rating for this bag. Have you tried this one or any other camera/laptop backpacks out? Please share your favorite in the comments below.

    googletag.cmd.push(function() {
    tablet_slots.push( googletag.defineSlot( “/1005424/_dPSv4_tab-all-article-bottom_(300×250)”, [300, 250], “pb-ad-78623” ).addService( googletag.pubads() ) ); } );

    googletag.cmd.push(function() {
    mobile_slots.push( googletag.defineSlot( “/1005424/_dPSv4_mob-all-article-bottom_(300×250)”, [300, 250], “pb-ad-78158” ).addService( googletag.pubads() ) ); } );

    The post Review: Incase DSLR Pro Pack Backpack by Suzi Pratt appeared first on Digital Photography School.

    Digital Photography School

  • Tips for Using Flash to Enhance Outdoor Nature and Landscape Photography

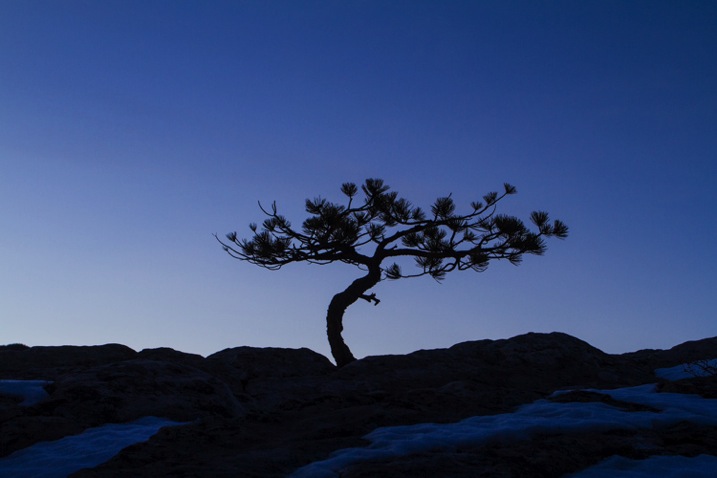
    Late on a winter evening, I was photographing atop a ridge in Colorado’s Front Range. I had been working on some landscape shots, but with the light fading from the sky, the thought of beer and food was beginning to overwhelm my desire to stay out. The colors were shifting to the deep tones of blue hour, and the light was long gone from the hills. About to give up and head home, I spotted a lone juniper atop a rocky outcrop, perfectly silhouetted against the deep blue of the mountain sky. I sighed, tempted to ignore the scene, but instead put my camera back on the tripod, walked over and composed a shot. With a click, I snapped the shutter.

    CO KenCaryl evening 30Dec2011 6

    The image was decent, nice blues with a clean black foreground, but it needed some warmth, an element to contrast with the abundant cool tones. “If only I could get a beam of sunlight to reach back above the horizon…” I thought to myself.

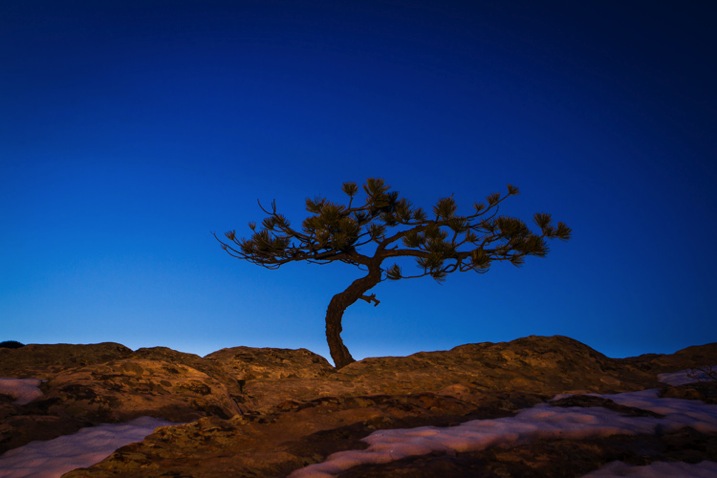
    Wait a second… I didn’t need the sun, I had a flash and a remote trigger in my bag. I pulled it out, all thoughts of beer and food forgotten, and placed the flash on a boulder a few feet to my left. I set it low, to 1/4 of full power, then took a shot.

    Better, I thought, looking at the image glowing on the back of my camera, but still not right. The light coming from the flash was too cool, lacking the warmth I wanted. Digging back in my bag, I emerged with a pack of gels and slapped a half cut of CTO (color temperature orange) over the flash, and clicked off another.

    CO KenCaryl evening 30Dec2011 7

    “Now we’re talking”, I muttered. A warm beam of light crossed the rocky foreground to light up the tree. Never mind that the actual sunlight disappeared 45 minutes before, I could re-create it with a little artificial light trickery. A few adjustments to the flash’s positioning and brightness, and I had my keeper shot. Finally, I could go home.

    Using Flash Outdoors

    For most photographers, flash is relegated to the studio, and if used outside it is usually restricted to portraiture. But there is so much more potential for artificial light. Landscape and wildlife photography can often benefit from a little flash, and with some creativity, it can bring out the best in your images. Here are a few tips to help you get using flash for your outdoor nature and landscape photography.

    To get started, you’ll need a few things in your bag:

    • At least one flash
    • Some kind of remote trigger (I use cheap and simple wireless triggers I found on Amazon for a few bucks)
    • A selection of multi-colored gels
    • A flash stand or assistant
    • For night photography, a strong headlamp or hand-held flashlight is a good addition to the kit
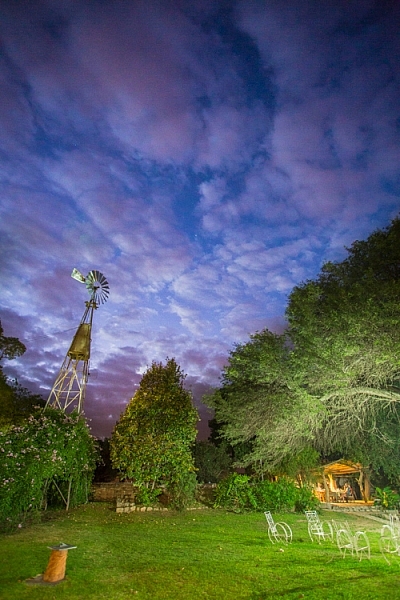
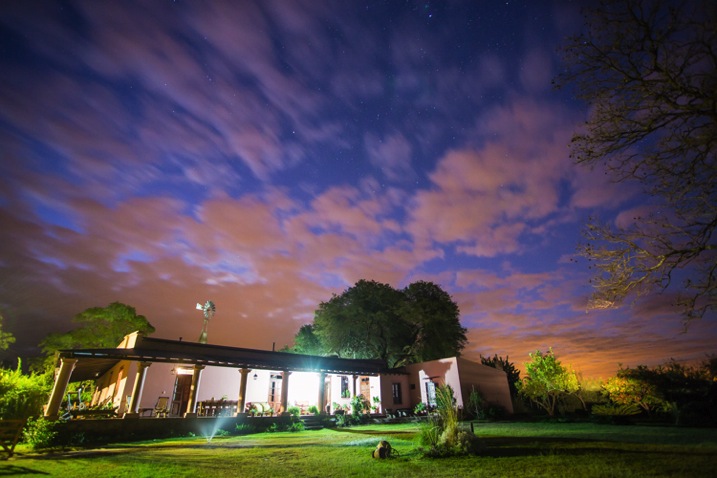
    A windmill stands in the garden of the Finca Santa Anita in Salta Province, Argentina.

    A windmill stands in the garden of the Finca Santa Anita in Salta Province, Argentina.

    General Guidelines

    As with almost all flash use, for best results, you’ve got to get the light off your camera. On-camera, straight flash, looks weird and unnatural. I like to say that photographic rules are meant to be broken, but this one seems universal: get the flash off your camera.

    Get the flash off your camera

    Direction of light, and how much to use it, is a matter of your personal vision, but here are my thoughts: Artificial light should either look so natural, you don’t notice it comes from a bulb, or so obvious, that it’s clear the scene was lit for artistic reasons. Anything in between usually doesn’t work.

    As with all successful photography, you need to think through your image, and the story you are trying to tell. Do you want a natural-looking scene or are you aiming for an artistic portrayal of your subject? Once you have an answer to that question you can move forward.

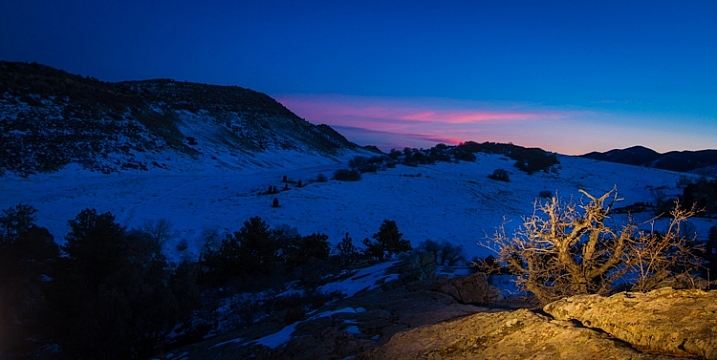
    Scrubby pines grow from the rocks of the Dakota Hogback in the foothills of Colorado outside Denver, late evening.

    Scrubby pines grow from the rocks of the Dakota Hogback in the foothills of Colorado outside Denver, late evening.

    Imitating Natural Light on the Landscape

    The near-dark hours before dawn and just after sunset, or full night, are the most suitable times to add a bit of light to a scene. A natural look is usually subtle and may rely heavily on the light that is already available to you. In my example of the juniper tree, I kept the flash setting low, and warmed the light with a gel to get a sun-like look. Finding the right balance between flash and ambient light is critical.

    The further you get from the flash, the dimmer, and harder the light becomes. A flash aimed toward the ground will be very bright close to the strobe, fading quickly to invisibility. When setting your scene, use the test button to look at the throw of light across your subject. Aim it carefully, and take advantage of the flash’s zoom to consolidate the beam just where it is needed.

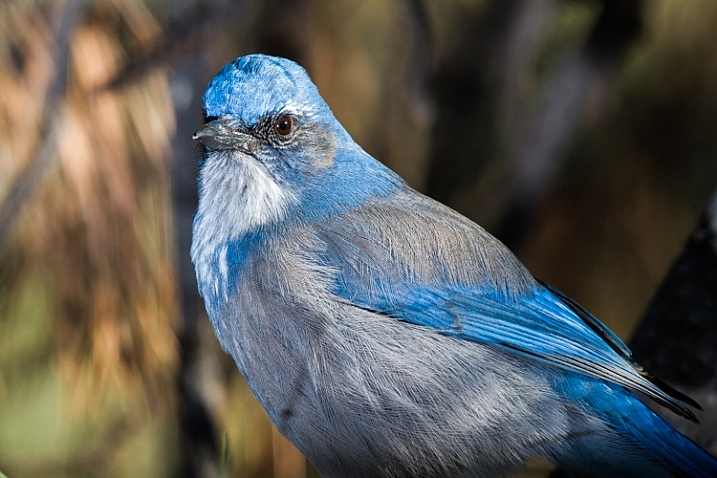
    A Western Scrub Jay perches in a tree in the foothills of the Rocky Mountains outside Denver, CO, USA.

    A Western Scrub Jay perches in a tree in the foothills of the Rocky Mountains outside Denver, CO, USA.

    Adjusting Exposure

    Once set, pop a shot or two, and check the results on your LCD. Almost always, you’ll find you need to adjust the flash brightness, placement, or the ambient light exposure.

    When using flash remember this: adjust ambient light with the shutter speed, and flash with the f-stop (aperture).

    For example, if you want to bring out more brightness in the sky, lengthen your shutter speed, if you want to increase the apparent brightness of your flash, open up the aperture. This is effective for small adjustments in camera, and keeps you from having to constantly readjust flash settings.

    Lighting Your Vision – Artistic Styles

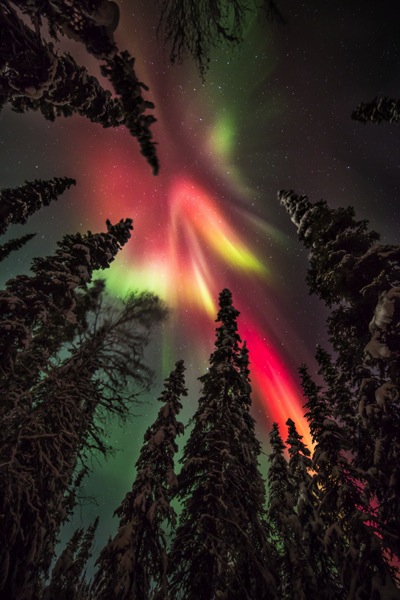
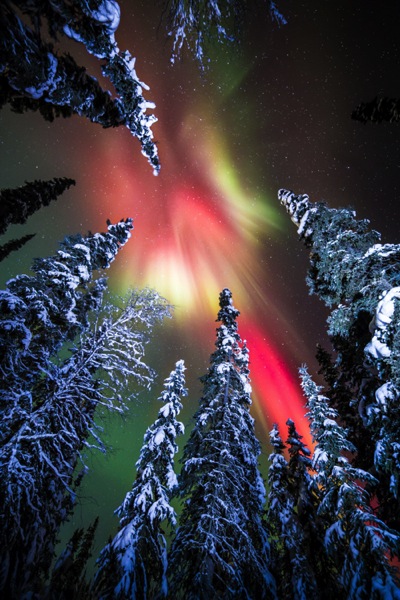
    An artistic look is more straight forward, but light direction, intensity, and color are just as important. I often photograph the northern lights around my home in Fairbanks, Alaska. Often the moon, stars, or aurora itself, are sufficient to illuminate the foreground, but at times, it fades to black as you can see below.

    AK FAI aurora 112073 17

    In such cases, a splash of light is just what I need. When photographing the aurora, or the night sky in general, I rarely carry an actual flash, but I’m always wearing a headlamp. During a typical 5-10 second exposure, if I need a little extra texture or warmth, I can pan the beam quickly over the foreground, “painting” it with light as I did in this image.

    AK FAI aurora 112073 18

    Light from a typical LED is very cool, but cover it with CTO gel, and nice warm tones result. Light painting is a popular technique, but one that requires some practice to make sure your subject is evenly lit, and not too bright. Mixing light painting and ambient can be very effective to even out brightness in an image, and compensate for highlights. In Argentina, a few years ago, I was shooting a historic farmhouse during the late evening. Bright porch lights on the house needed to be evened out, so I painted some key parts of the scene.

    Arg Salta SantAnita house night 104133 18

    A warning: painting light can mess with the color of a digital image. If you use your camera’s automatic settings, as I do, light painted images will often require some color correction in post-processing. Shoot in RAW to be sure you retain this flexibility.

    Wildlife

    Flash can also play an important role in wildlife photography. Birds in particular are often down low in dark forests, where natural sunlight is rarely found. The flat, boring light beneath the foliage can be replaced by the directional light of a flash.

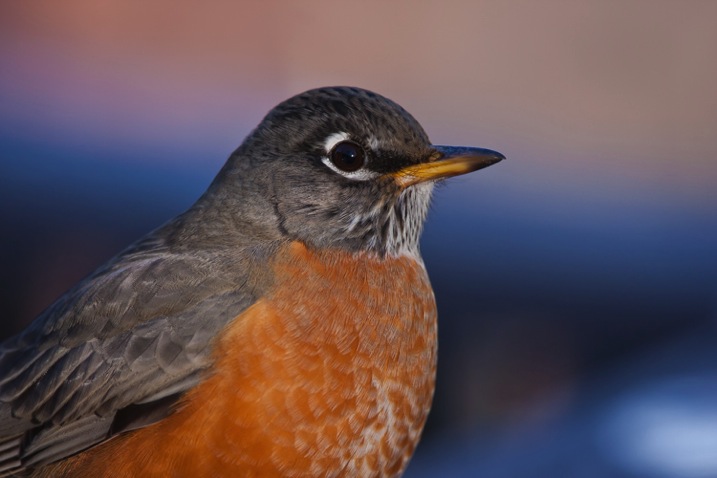
    CO Dec2009 AMRO 3

    When using flash with a long telephoto, you can often get away with on-camera, or bracket-mounted flash, as I did of the portrait of the American Robin above. Using camera-mounted flash is easy with TTL (Through The Lens) compatible strobes. In fact, this technique is so easy, that I’m not even going to go into it, because more interesting possibilities exist.

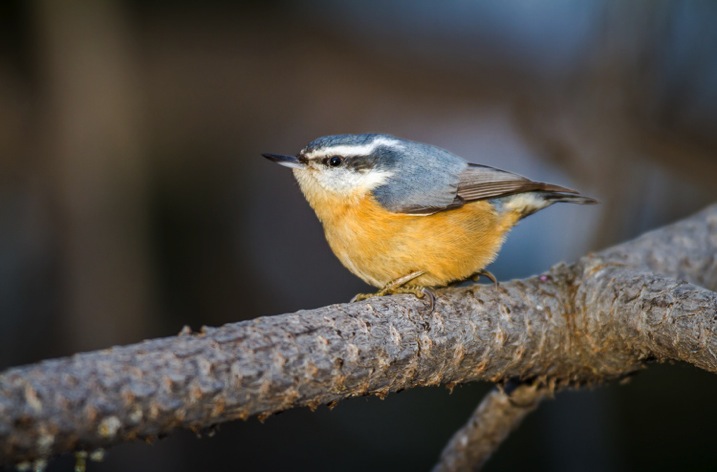
    Where I live in Alaska, the winters are long, and during the few hours of daylight, the sun is often hidden behind trees or clouds. The birds I love to photograph are usually stuck in flat, gray light. There are a few trees in my yard that the birds prefer. By setting up a flash (or two), gelled with CTO to emulate the absent sun, I’ve managed to create some well lit portraits of these guys.

    RBNU 21Dec2011 2

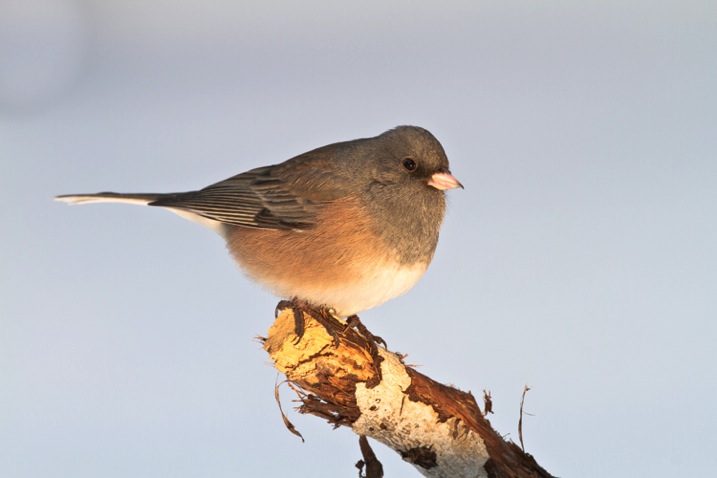
    The method is similar to lighting a landscape. You’ve got to choose your flash placement to avoid shadows, and since there is rarely a chance to replicate a poorly exposed shot, it’s best to get your settings right and then leave them in place throughout the shoot. In this case, I was going for an almost studio-like look, so I took advantage of the white snow as a background, making the final image appear almost as a cut-out.

    ORJU 22Dec2011 2

    I like to put my flashes atop a tall stand to get them over my head like a low angle sun. Done right, the set up and exposure takes only a few moments, and the results can be great.

    Conclusion

    Artificial light in the outdoors offers a great opportunity to create unique images. Think through your shots, consider where extra light can be added, and what role it will play in the final image. Not every situation requires it, in fact, most don’t. But there are times when that extra pop of light can take a photo from mundane to extraordinary.

    Have you tried using flash with your nature or landscape photography? Please share your tips and images in the comments below.

    googletag.cmd.push(function() {
    tablet_slots.push( googletag.defineSlot( “/1005424/_dPSv4_tab-all-article-bottom_(300×250)”, [300, 250], “pb-ad-78623” ).addService( googletag.pubads() ) ); } );

    googletag.cmd.push(function() {
    mobile_slots.push( googletag.defineSlot( “/1005424/_dPSv4_mob-all-article-bottom_(300×250)”, [300, 250], “pb-ad-78158” ).addService( googletag.pubads() ) ); } );

    The post Tips for Using Flash to Enhance Outdoor Nature and Landscape Photography by David Shaw appeared first on Digital Photography School.

    Digital Photography School

  • 12. Dezember 2015

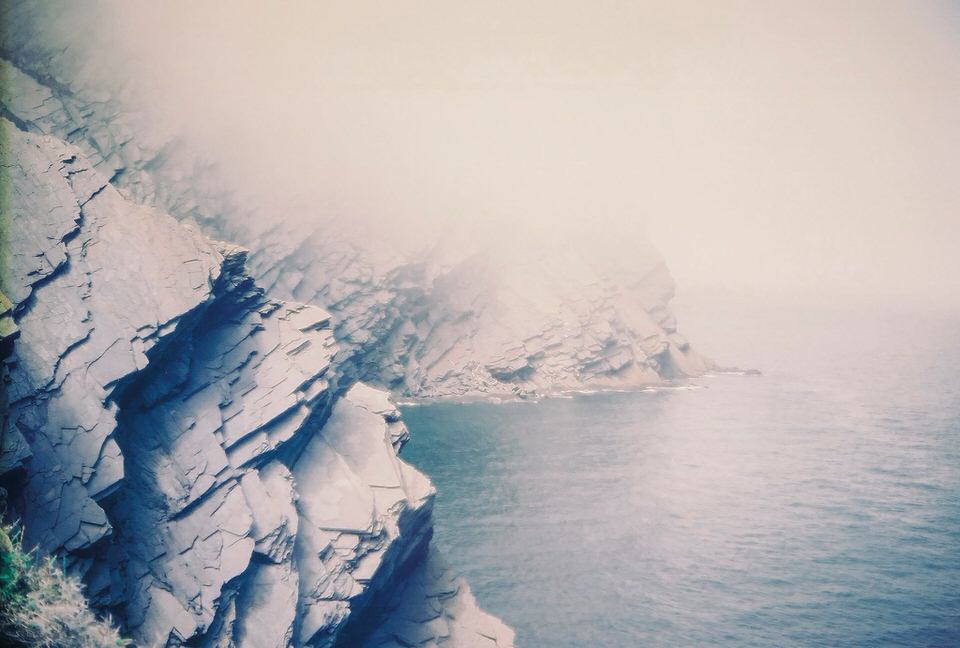
    Das Bild des Tages von: Luna Khods

    Felsen am Meer.

    Bild des Tages auf kwerfeldein: Analoge Felsen.
    kwerfeldein – Fotografie Magazin | Fotocommunity

  • Geometry + Humanity: Beirut Shutterbug Abstracts Everyday Life

    [ By WebUrbanist in Art & Photography & Video. ]

    abstract building facade

    Photographing real people in actual places, Serge Najjar manages to make the mundane seem strange and fantastical, highlighting the intersection of humans and the architectural spaces they inhabit.

    abstract roof jumper

    abstract window looker

    His planned-looking portraits of people in urban environments are surprisingly spontaneous, appearing staged but usually featuring strangers he has never met and captured as he wanders cities.

    abstract circles building

    abstract flag architecture

    Technically, Najjar, a lawyer by trade in Beirut, Lebanon, is not even a professional photographer, though the beauty and popularity of his work would suggest otherwise.

    abstract window view

    abstract side view

    His work, which spans from his home city to Rome and Berlin, features both generic architecture and famous places, all with his eye for making the familiar stream foreign and fresh.

    abstract folded window

    abstract shadow building

    While there are common threads, themes and angles to much of his photography, it is impossible to describe the commonality strictly in terms of perspective, as various works break the very conventions he generally follows.

    Share on Facebook


    [ By WebUrbanist in Art & Photography & Video. ]

    [ WebUrbanist | Archives | Galleries | Privacy | TOS ]


    WebUrbanist

  • Behind the Shot: Prince of the Night

    ‘Prince of the Night’. Parque Nacional Los Glaciares, Argentinian Patagonia, April 2014

    In this article I’d like to take you far away to Parque Nacional Los Glaciares, a well known national park in Argentinian Patagonia. I visited Patagonia in April 2014 and spent a month scouting for my ‘Giants of the Andes’ photo workshop and Fitz Roy Annex. I shot in several locations in Argentina and in Chile, and among those, I spent several nights in Campo Poincenot, a camp offering relatively short hiking distances to some very good view points of Mount Fitz Roy, one of Patagonia’s most renowned landmarks.

    On one of these days we hiked to Laguna Sucia (‘Dirty Lagoon’ in Spanish). It’s so named because before the glacier that formed it receded, the lagoon was always littered with icebergs. When I visited, there were no icebergs to be found anywhere near the bank.

    The hike to Laguna Sucia isn’t long, but it’s mostly on loose rock, which is no fun at all. Basically you need to always watch your step: some rocks might shift and tumble when you step on them, others are covered with ice so you might slip – you get the idea.

    Loose rock on our way to Laguna Sucia. Image courtesy of Santiago Siro Folcini.

    Since we wanted to shoot the lagoon and Mount Fitz Roy both at night and during sunrise, we decided to camp there, but as we didn’t want to carry the tents, we only carried our sleeping bags and inflatable mats. We set up our ‘sleeping quarters’ under a large boulder close to the lagoon and went on to explore the area.

    Setting up camp in a most unusual location. Image courtesy of Santiago Siro Folcini

    After shooting the lagoon and the mountain at sunset, I started looking for nighttime compositions. I was thinking about shooting the moonlight glowing on the very top of the mountain (the same way the sun glows on tops of mountains producing Alpenglow), so I had to wake up before moonrise. This meant it was going to be very, very dark, and thus I had to compose and leave the tripod at the same place, so when I returned, I only had to find it, attach the camera and I’d be ready to shoot. I found a composition I liked, set the tripod and went back to ‘camp’. The moonrise was at about 3 a.m., so we set up the alarm for 2:30 and went to sleep.

    Upon waking up, things didn’t look so good. Clouds had accumulated and blocked the moonlight, so all plans for glow fell through. We were quite disappointed but decided to stay around and see what happened. And surely enough, half an hour or an hour later, the clouds dispersed and the mountain was bathing in moonlight. This was the moment I had been waiting for. I went back to the tripod (which was still at the same spot) and took the shot.

    Before discussing how I made the shot, I’d also like to show you two additional images I took at the same place, at later stages. I call them ‘Prince of Crimson’ and ‘Prince of Gold’, and it’s pretty clear why when you see the colors. I really like these images (‘Crimson’ is probably the best of the three), but I had much less to say about them, and so I chose the night image as the topic for this article. By the way, I named the images so to allude to the name of the mountain, literally meaning ‘Son of King’.

    If only I had left the tripod in the same place for the last shot… I’m still sad about it!

    Settings and Execution

    To shoot this image, I used my Sony A7R and a Canon 16-35 F2.8L with a Metabones III adapter.
    The image is a composite of 3 different shots, each taken for a slightly different purpose. Let’s view the untouched Raw files.

    The leftmost image is a relatively short exposure for the sky and reflection. It was taken at ISO 6400, F2.8 and 30sec exposure. The middle image is a longer exposure, just over 2 minutes at ISO 1600, F2.8 to preserve the luminosity. From this image I took the mountain itself and the other parts of the background, except for the sky which at this exposure time had unwanted startrails. The last image was taken with very similar parameters to the second, but the focal point was on the foreground. I used this image to focus-stack the foreground and background, to get sharpness across the image.

    Composition

    The composition isn’t very complicated. The only point really worth mentioning is that the specific location was chosen since the rocks in the foreground follow a similar contour to that of the mountains’ reflection. This contributes greatly to the flow of the image. 

    Post Processing

    As I’ve mentioned, the image is a composite of the 3 shots above. Before combining them, I needed to make some initial tweaks in Adobe Camera Raw (ACR). The first thing I did was apply the lens profile, to avoid aberrations and counteract some of the vignetting. I also changed the white balance to better match what I had seen with my eyes, and made some other minor adjustments, visible in the screenshot below.

    Next I did some local adjustments. I brightened the foreground (to balance the global contrast) and boosted contrast and clarity in the reflection part, to enhance detail.

    I was then ready to combine the images. This wasn’t such a hard task, as the different parts were very distinct. I placed the three images as layers in Photoshop and aligned them (Edit->Auto Align layers). The top layer was the sky layer, and I had to delete the mountain from it in order to get the cleaner version of it from the mid layer. I selected the part I wanted to delete, refined the selection (Select->Refine Edge) and deleted it, exposing the layer below. Once done, I merged the two top layers.

    I was left with a top layer with a blurry foreground, and a bottom layer which I had to expose to get the sharp foreground rocks. I manually deleted the foreground, following the contour of the rocks to avoid exposing the blurry reflection in the bottom layer.

    Once finished, I merged the layers and was left with a flattened image.

    My next goal was to increase local contrast and enhance detail in the image, which has a lot of flat parts. Initially, I used luminosity selections to enhance contrast without losing detail in the highlights or shadows. I selected the midtones and used a levels adjustment layer to boost contrast.

    At this point I was pretty happy with all but the higher-left part of the image. It felt too bright compared to the foreground and the right side, so I needed to work on that separately. I selected the bright parts and refined the selection once again. I then used a levels adjustment layer to darken it, while keeping it brighter than the other parts of the image, which made sense as it was directly lit.

    The last task was to take care of unwanted color, caused by high ISO and shadow recovery. As you might notice, the sky is spotted with purple blotches, and the foreground seems too green. Both these color problems were dealt with in the same way: a color blend layer. The process is as follows: you duplicate the image layer, select blend mode ‘color’, and then whatever the pixel color on the top layer, it passes to the bottom layer as well. To cancel the purple in the sky, I had to select the sky without selecting the stars. I did that by selecting the whole image, and then subtracting a very light luminosity selection, until I had a selection which almost didn’t contain stars. I then used the pipette tool to sample the sky’s blue color and gently painted it in.

    The same was done with the foreground rocks. I sampled the foreground color I wanted and painted a color layer, until the rocks were grey, as they were in reality.

    All that was left was to convert to the sRGB color space, perform size reduction and sharpening and I was finally done.


    Erez Marom is a professional nature photographer, photography guide and traveler based in Israel. You can follow Erez’s work on Instagram, Facebook and 500px, and subscribe to his mailing list for updates.

    If you’d like to experience and shoot some of the most fascinating landscapes on earth with Erez as your guide, you’re welcome to take a look at his unique photography workshops around the world:

    Land of Ice – Southern Iceland
    Winter Paradise – Northern Iceland
    Northern Spirits – The Lofoten Islands
    Giants of the Andes and Fitz Roy Annex – Patagonia
    Tales of Arctic Nights, Part I and Part II – Greenland
    Earth, Wind and Fire – Ethiopia

    Selected articles by Erez Marom:

    • Behind the Shot: Dark Matter
    • Mountain Magic: Shooting in the Lofoten Islands
    • Behind the Shot: Nautilus
    • Behind the Shot: Lost in Space
    • Behind the Shot: Spot the Shark
    • Quick Look: The Art of the Unforeground
    • Behind the Shot: Watery Grave
    • Whatever it Doesn’t Take
    • Winds of Change: Shooting changing landscapes

    Articles: Digital Photography Review (dpreview.com)

  • Warum fotografiere ich eigentlich Akte?

    @ Corwin von Kuhwede

    Ein Beitrag von: Corwin von Kuhwede

    Seit 2005 bin ich im Bereich der professionellen Aktfotografie tätig. Da war es nur eine Frage der Zeit, bis ich mir selbst die Frage stellen musste, warum ich eigentlich Akte fotografiere. Das klingt nach einer einfachen Frage, aber eine ehrliche und aufrichtige Antwort darauf zu finden, war gar nicht so einfach.
    kwerfeldein – Fotografie Magazin | Fotocommunity