Blog

  • Testbericht: Leica M Monochrom (Typ 246)

    Ein Mann raucht und steht an einem Mikrofon

    Ein Beitrag von: Roman Tripler

    Für viele Fotografen ist es schon ein wunderbares Gefühl, eine Leica in der Hand zu halten, geschweige denn, dauerhaft eine benutzen zu können oder gar zu besitzen. Bei allem Für und Wider zum Thema Preis vs. Leistung besitzt Leica eine Art gepachtete Magie wie kaum eine andere Marke in allen mir bekannten Branchen.
    kwerfeldein – Fotografie Magazin | Fotocommunity

  • Taboo Town: Architecture Designed to Make You Uncomfortable

    [ By Steph in Architecture & Public & Institutional. ]

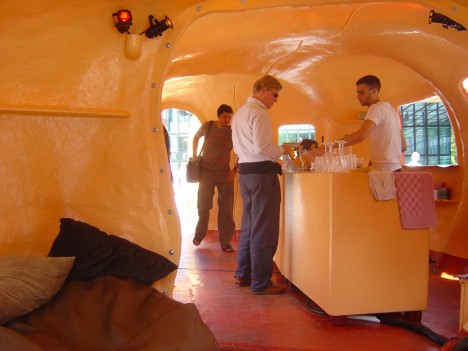
    uncomfortable architecture 1

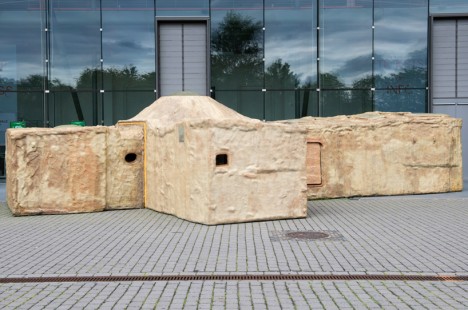
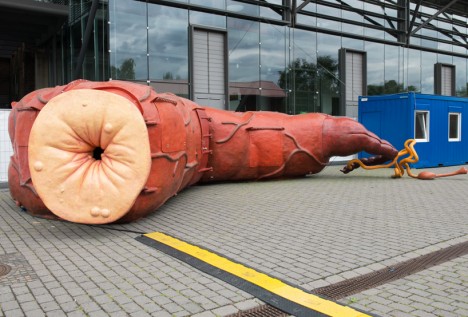
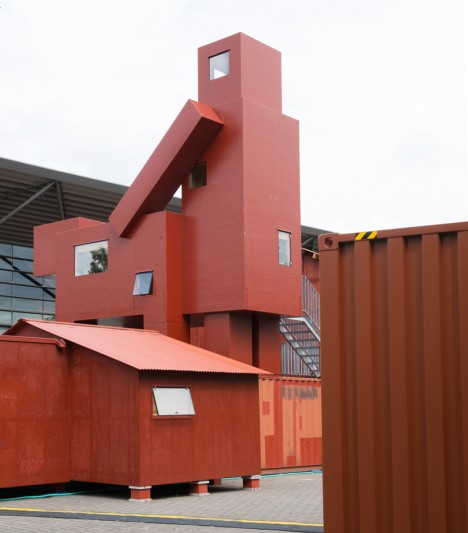
    Grab a cocktail inside an oversized rectum and then take in the unsettling sight of a sculptural red building graphically referencing humankind’s dominion over nature. Dreamed into being over a period of nearly twenty years by design collective Atelier van Lieshout, this series of over 20 sculptures and structures became an immersive exhibit at the annual Ruhrtriennale Festival in Bochum, Germany.

    uncomfortable architecture 3

    uncomfortable architecture 4

    Collectively called The Good, The Bad and The Ugly – also the name of a mobile art lab created by the studio in 1998 – this series really lives up to its name, ranging from the aforementioned visual abstraction of bestiality to a pair of giant inhabitable heads placed horizontally on the grass. The Head Claudio & The Head Hermann call to mind an eerie statue at the abandoned ‘Gulliver’s Kingdom’ theme park in Japan.

    uncomfortable architecture 5

    uncomfortable architecture 6

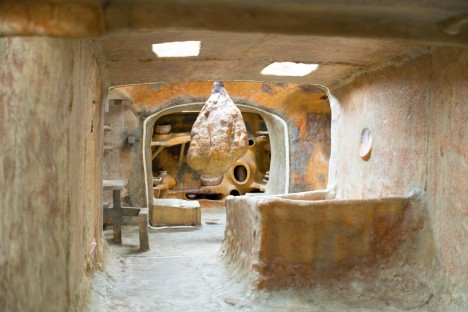
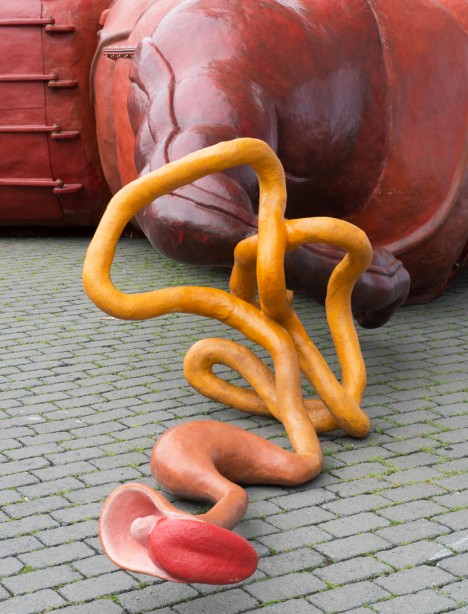
    With its lumpy beige textures mottled with red, a fleshy, human-fat-mimicking structure called Hagioscoop could very well be the answer to the question, “What’s the most viscerally disgusting material that a building could be made of?” The ‘Barrectum’ isn’t exactly pretty either, covered in veins and ending in a tangle of intestines that lead to a stomach and finally, a tongue.

    uncomfortable architecture 7

    uncomfortable architecture 8

    uncomfortable architecture 9

    But it’s the Domestikator that’s really the star of the show, even if you don’t particularly want to look at it too much. “Domesticator symbolizes the power of humanity over the world,” say the designers. “It pays tribute to the ingenuity, the sophistication and the capacities of humanity, to the power of organization, and to the use of this power to dominate, domesticate the natural environment.”

    uncomfortable archictecture 2

    “The act of domestication, however, often leads to boundaries being sought or even crossed. Only a few taboos remain, and it is these taboos that the Domestikator seeks to address.”

    Share on Facebook


    [ By Steph in Architecture & Public & Institutional. ]

    [ WebUrbanist | Archives | Galleries | Privacy | TOS ]


    WebUrbanist

  • Leica SL firmware update improves image and EVF quality and L-Log gamma

    Leica has announced a firmware update for its SL (Typ 601) full-frame mirrorless camera. The company says that firmware v1.2 improves low ISO performance, the quality of the image on the electronic viewfinder, and makes entering Wi-FI passwords easier.

    It also corrects an issue with using the Leica Log Gamma curve (L-Log) with internal 8-bit recording, which was previously only capturing the bright tones from the scene. The update has lowered the offset to zero, which will allow the files to incorporate darker tones.

    Finally, there’s now an image magnification tool for use with Leica M and R lenses, which is activated by the AE Lock button. The update also ensures that the correct EXIF information is recorded when using R lenses via their adapter.

    The update is now available for download and can be installed at a local Leica store. 


    Press release:

    Leica Camera Announces New Firmware Update for SL Users

    Leica Firmware Update 1.2 Optimizes Picture Quality and Improves Handling 

    December 14, 2015 – Leica Camera today announced a new firmware update 1.2 for the Leica SL, which includes several fundamental improvements in the camera’s picture quality and handling. To access the firmware update, registered camera users can log into the Leica owner’s area of the Leica website and download the firmware version at: https://owners.leica-camera.com. Leica users can also take their camera to a Leica store and take advantage of the free update installation service. 

    The new firmware update 1.2 includes optimization of picture quality at ISO values from 50 to 400, improvements to the image in the electronic viewfinder and greater flexibility when entering WLAN passwords. 

    When shooting with Leica M and R lenses, camera users will find that the new firmware update 1.2 activates a loupe (magnifying) function with the auto exposure lock button (AE Lock) to allow fast manual focusing. Additionally, the firmware update guarantees the correct indication of the R-Adapter-M and the R-Lens used in the EXIF data of image files.

    Finally, the firmware update offers an improvement in the Leica Log Gamma curve (L-Log) for video, enabling its use for in-camera 8-bit recording. The reduction of the offset will now allow recordings to appear considerably darker. Subsequently, videos recorded with L-Log must be corrected with a gamma correction in an external video editing program. The use of L-Log enables greater leeway for post-production color grading of videos recorded on the Leica SL. 

    Leica SL owners can also find a regularly updated and expanded overview of all SD cards compatible for use with their camera at sl.leica-camera.com.

    For more information about the Leica SL Firmware Update 1.2 or Leica visit www.leica-camera.com, or follow the brand on Facebook, Instagram and Twitter.

    About Leica Camera

    Passion for creating perfect pictures. Leica represents a union of craftsmanship, design and experience. It is a beautiful collision of art and engineering, and the future of form and functionality. Leica Camera is an internationally operating, premium-segment manufacturer of cameras and sport optics products. The legendary status of the Leica brand is founded on a long tradition of excellence in the supreme quality and performance of cameras and lenses, and the iconic images that artists and photojournalists everywhere captured with them. Leica Camera AG is headquartered in Wetzlar, Germany.

    Articles: Digital Photography Review (dpreview.com)

  • Manfrotto updates Digital Director app to add remote control of its LED light panels

    Italian accessory manufacturer Manfrotto has released a new app for its Digital Director iPad cradle that allows users to wirelessly control Manfrotto Lykos and Litepanels Astra LED lights. The 2.0 app is capable of handling up to 13 panels via a Bluetooth connection, so brightness levels can be controlled from the camera position. The app can switch the lights on and off as well, and when the BiColor models are in use color temperature can be adjusted between daylight and tungsten settings. Lights can be controlled individually, or in groups, though some models will need a Bluetooth dongle to make them compatible with the system. 

    The update also brings zebra patterning to the live view display, showing when areas of the image to be captured will be over- or under-exposed, and focus peaking can now be customized with different colors and strengths. In review mode the app can now crop images, either freely or with set proportions, and pictures can be rated in the gallery with stars that are compatible with other desktop software programs. 

    For more information visit the Manfrotto website, and you can read our review of the Manfrotto Digital Director here. 


    Press release:

    Manfrotto Announces New Digital Director App 2.0

    Upper Saddle River, N.J. (December 10, 2015) – Manfrotto, a leading global innovator and manufacturer of premium photo, video and lighting support products and accessories, has launched the Digital Director App 2.0, the updated App for Manfrotto’s Digital Director, which brings new enhancements to professional and enthusiast photographers and videographers who wish to make shooting much smarter. 

    The Digital Director App 2.0, now available in the App Store on Apple iPads, includes new and improved features, in particular:

    REMOTE CONTROL OF LIGHTS

    The new Digital Director App 2.0 not only controls all Nikon and Canon DSLR key camera functions, but turns the iPad into an innovative interface, enabling total remote control of Manfrotto LYKOS and Litepanels ASTRA LED lights (up to 13 lights!) via Bluetooth®. Lights can be controlled remotely: you can turn lights on/off, adjust dimming level and color temperature, set up groups and configure multiple scenes directly from the iPad.

    FOCUS PEAKING & ZEBRA FILTER 

    From the Digital Director App 2.0’s general settings, in the Digital Director Options, it’s possible to set up new features. The implemented Focus Peaking Filter presents new options: the possibility to adjust the intensity of the filter and to select the desired color for the peaking (red, blue, green, yellow). In addition, the new Zebra Filter helps to adjust exposure through striped patterns that indicate the overexposed and/or underexposed areas of the image.

    INTUITIVE POST PRODUCTION IMAGE ADJUSTMENT

    The new App 2.0 offers new tools for post production: cropping free or with proportion, blur and saturation. Together with the existing functions (rotate, contrast, light, checking histogram and EXIF information), it may also allow you to make final adjustments on the image in just a single touch of your finger on the iPad screen.

    The App 2.0 integrates new and improved features such as control of new Manfrotto LYKOS LED lights and Litepanels ASTRA, new Focus Peaking settings, Zebra filter, new post-processing tools, gallery photo sorting and image rating that is included in the .jpeg file shared from Digital Director via FTP and email. With these upgrades, Digital Director can better help professional and enthusiast image makers make their shooting workflow more effective and intuitive.

    DIGITAL DIRECTOR

    Manfrotto Digital Director is the only Apple certified (MFi – Made for iPad Certification) electronic device that connects your camera and iPad, via USB cable, to help manage the photo and video workflow from the setting of your camera (Canon and Nikon DSLR) to sharing your pictures. It features a built-in Apple microchip that works with the 600MHz 256MB DRAM ARM® Cortex®-A8 microprocessor, simultaneously, in order to ensure the perfect communication between the iPad and the camera. The result is perfect control of all shooting parameters of different DSLR cameras, a smooth and consistent video streaming between devices with extremely low latency time, and an ultra-fast, high-quality image download onto the iPad.

    Articles: Digital Photography Review (dpreview.com)

  • 24 Hour Deal: Become a Lightroom Expert Quickly and Easily

    Today we have an amazing deal for you as deal 2 in our 12 Deals of Christmas.

    It’s 85% off Cole Joseph’s Lightroom Training Workshop.

    NewImage

    Cole Joseph has processed over half a million photos in his career and so certainly knows a thing or two about Lightroom.

    In this workshop he’ll share his best tips and tricks with you to help you prices the highest quality final edits to your images in no time at all.

    Walking you through Lightroom step by step, Cole will demonstrate exactly how to use Lightroom to its full potential. You’ll not only learn how to edit more quickly, but see how to get the same results he does.

    Buy today at a crazy 85% off, and by this time tomorrow, you’ll be a Lightroom master!

    PS: Cole is offering this training with a no risk 30 day money back guarantee. If you buy it and don’t find it meets your expectations – simply ask for your money back. What could be better than that!

    googletag.cmd.push(function() {
    tablet_slots.push( googletag.defineSlot( “/1005424/_dPSv4_tab-all-article-bottom_(300×250)”, [300, 250], “pb-ad-78623” ).addService( googletag.pubads() ) ); } );

    googletag.cmd.push(function() {
    mobile_slots.push( googletag.defineSlot( “/1005424/_dPSv4_mob-all-article-bottom_(300×250)”, [300, 250], “pb-ad-78158” ).addService( googletag.pubads() ) ); } );

    The post 24 Hour Deal: Become a Lightroom Expert Quickly and Easily by Darren Rowse appeared first on Digital Photography School.


    Digital Photography School

  • Hands-on with the Miggo Splat Flexible Tripod

    I’ll admit that the inside of my camera bag can yield some interesting surprises. Sometimes they are slightly less interesting objects, like half eaten apples and business cards for people I don’t remember.

    More often, however, the items are far more practical (I guess apples can be considered practical) such as colored gels, diffusers, and waterproof camera covers. Another handy little gadget I often roll around with is a small GorillaPod. Although it is useless for supporting my hulking DSLR, it does come in handy for off-camera flash placements and shooting with a GoPro.

    Since I’ve been using this little tripod for years, I jumped on the opportunity to take GorillaPod’s new competitor, the Miggo Splat for a spin.

    What is the Miggo Splat Travel Tripod?

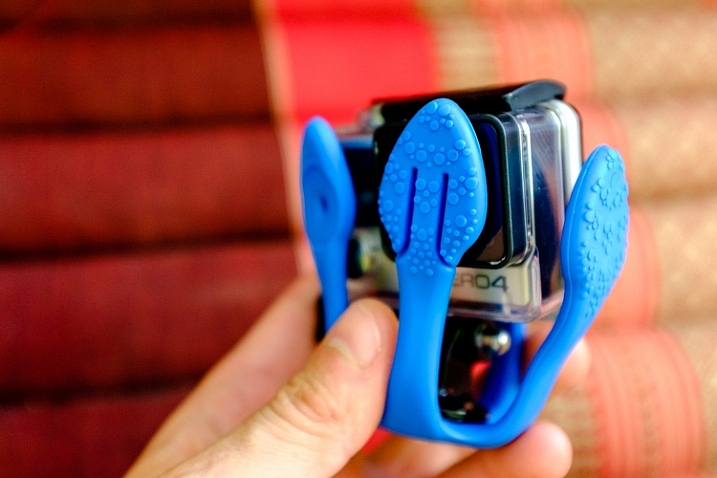
    The Splat Flexible Tripod, a recently released product from a newly established (2014) company called Miggo, is similar to a GorillaPod but has flat, flexible, rubber-covered metal legs – opposed to the ball-and-socket setup that GorillaPods utilize.

    the miggo splat tripod

    The Miggo Splat is a portable tripod with flexible metal legs covered in rubber.

    At the time of writing, Miggo has three options of the Splat Flexible Tripod available: one for DSLRs with three legs ($ 25), a mirrorless version and an Action cam (GoPro) version both with five legs (both are 10.99 on Amazon.com). Although I only have the DSLR and action cam versions for review, the specifications of the mirrorless and action camera versions appear identical on Miggo’s website.

    • Maximum load is 500 grams/1.1 lbs for the Splat Flexible Tripod for Go-Pro and Action cameras, and the Splat Flexible Tripod for P&S and Mirrorless Cameras (so if your mirrorless system is more than 1.1 lbs opt for the DSLR version)
    • Maximum load is 1200 grams/2.6 lbs on the Splat Flexible Tripod for DSLR Cameras

    First Impressions

    I immediately liked the idea of the Miggo Splat. Sometimes the GorillaPod needs too much tweaking to get all the ball-and-sockets lined up.

    Although they are not heavy (75 grams/0.16 lbs for the action cam, 111 grams/0.24 lbs for the DSLR version), both of the tripods seem to be very solid, intended to last a while. I did wonder if you were to bend the legs in the same direction many times, how long it would take for the metal to weaken and break. However, shortly thereafter I learned that they offer a five year warranty so that put my worries at ease.

    the splat beside a gorillapod

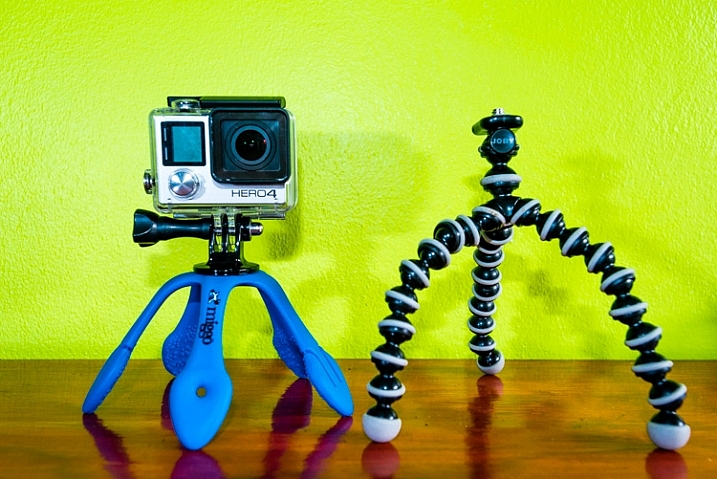
    The Splat Flexible Tripod for Go-Pro and Action cameras, shown beside the GorillaPod equivalent.

    I had two other immediate concerns about the Splat: the legs on the action cam version seemed a little short, and the rubber coating didn’t seem very sticky, which may allow it to slide around too easily.

    I did like the addition of a hole at the end of one of the legs which enables you to hang it from a nail, stick, etc., or move the mounting screw and place the camera on that arm. Two feet on the action cam version have two small tabs that can be used for further creative placements.

    In the Field

    Mounting the cameras on the tripods, I was disappointed that there is no quick release, just a threaded screw. The DSLR Splat has a little hinged ring on the screw head to aid in attachment, but the Action Cam version leaves you fumbling around for a coin or key as a makeshift screwdriver to affix the camera.

    GoPro and Action Camera Splat

    The Splat Flexible Tripod for Go-Pro and Action cameras comes with a standard GoPro mount with female threads to enable you to attach the camera to the tripod since GoPro doesn’t provide one for you (seriously GoPro???). The disappointment here is that it is only a simple swivel and not a 3-way adjustment so it can be a bit of a pain to get level shots. I would be surprised if Miggo didn’t introduce a small ball head for their tripods in the near future – it would be immensely more versatile with one.

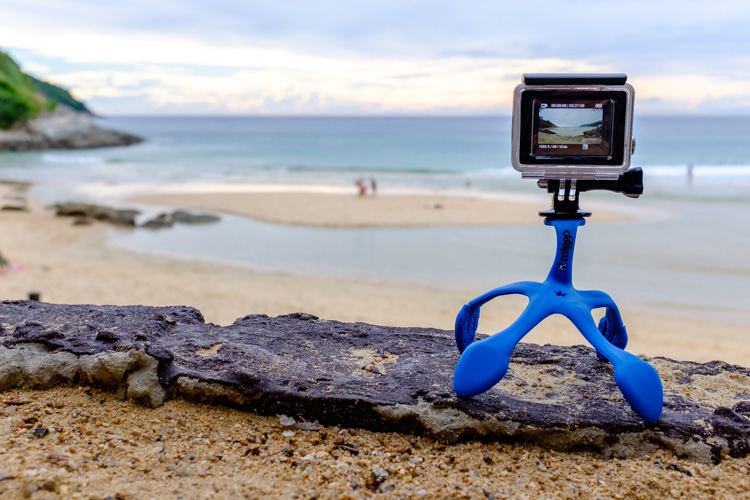
    To circumvent the problem of not having a ball head, you can mount the camera on the end of one of the arms. This works pretty well with the action cam, as the leg is short and you have more of them, and the camera is light. The other advantage is the ability to have the camera protrude forward of the tripod so to avoid capturing the tripod in images, due to the extreme wide angle of view with these cameras. However, curving the leg creates a nice little spring so if there is any movement, or even a moderate breeze, the camera bounces around.

    miggo splat action cam version

    You can mount the camera at the end of one of the Splat’s legs to level it.

    Having five legs is definitely the way to go; any less and the Splat would take a serious hit in practicality. It’s a bit tricky to get a firm attachment while wrapping the legs around objects. I tried to mount the GoPro on the handlebars, and elsewhere, of my motorcycle but the metal springs outward slightly when trying to wrap tight and the top-heavy setup slides around.

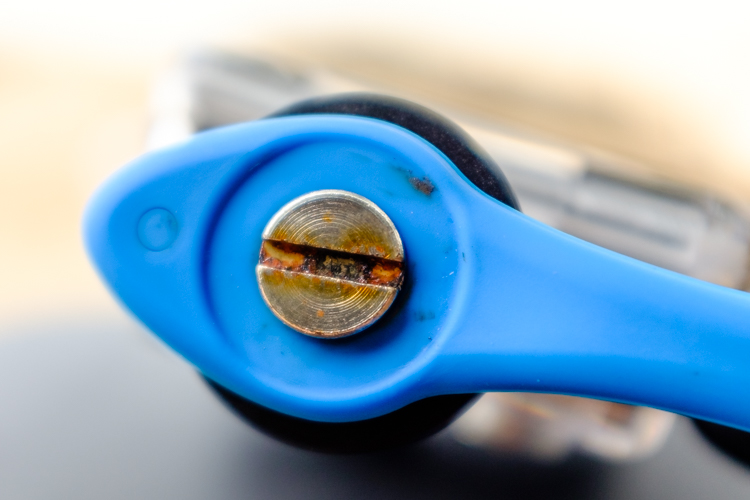
    Folding the legs all together under the camera creates a nice handle for getting more stable videos. As such, I used the Splat in this fashion while going out for a snorkel and it does help greatly. Unfortunately, the attachment screw (made from brass according to their website) rusted immediately.

    rust on the miggo splat

    Apparently the Splat isn’t designed to be submerged in salt water.

    Folding the legs the opposite way encapsulates the camera adding a layer of protection. I assumed this to be a gimmick but it proved to be one of the best features of this gadget.

    DSLR Splat

    As soon as I laid eyes on this tripod I knew they screwed up only giving it three arms.

    First of all, if you try to mount the camera on the end of the arms (there is a hole to accommodate the mounting screw or to hang the tripod off of a nail) it is very difficult to stabilize the camera and it just bounces around or the arm slowly bends.

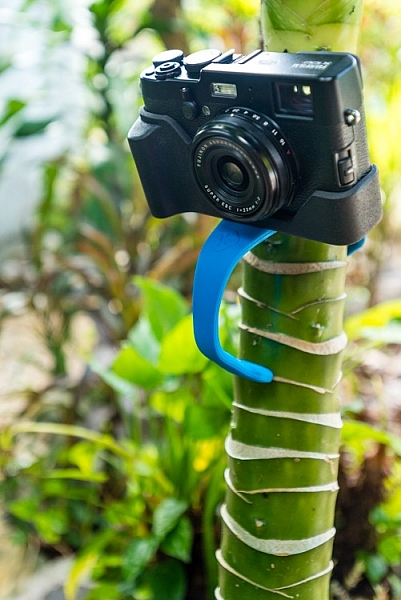
    the miggo splat attached to a tree

    Although it’s uses are limited, the DSLR Splat can come in handy.

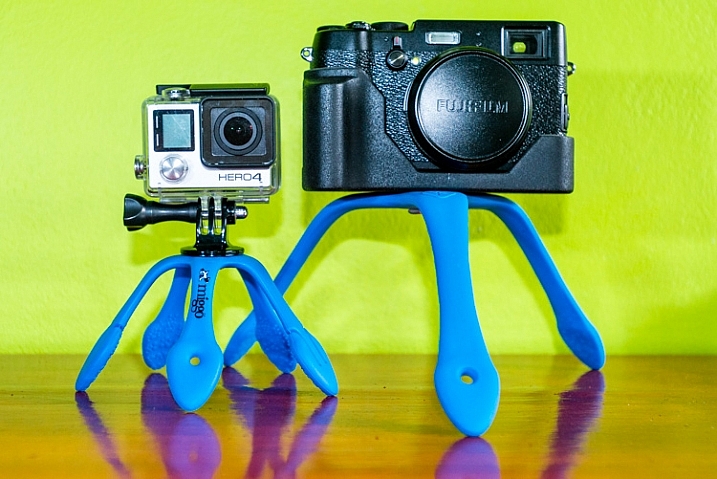
    Since my DSLR is too heavy for this version of the Splat, I took it for a spin with my Fujifilm X100T, which it handled with ease. Again though, with only three legs and no ball head, it took way too much fumbling around in most cases to get a well-framed shot, while keeping the camera level and stable. However, it is a good compact, lightweight, and sturdy option to tote along for selfies, to get sharper images, for low light shots, and for HDR or time-lapse. It slides perfectly into the back of my camera bag where I don’t even notice it.

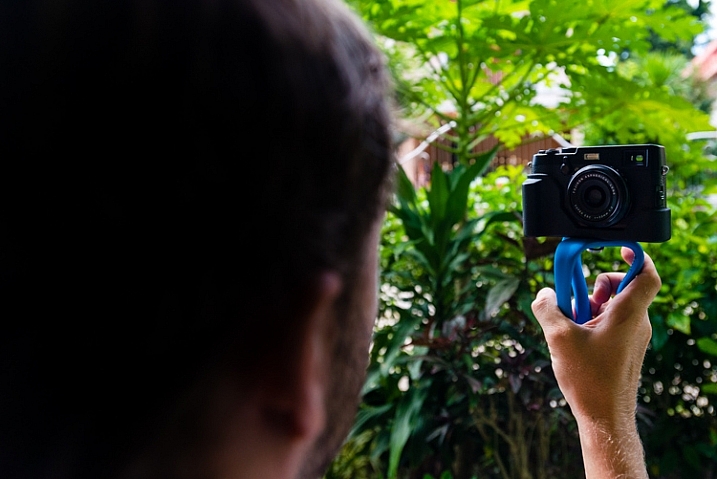
    the miggo splat for selfies

    The Splat can be contorted into a useful handle.

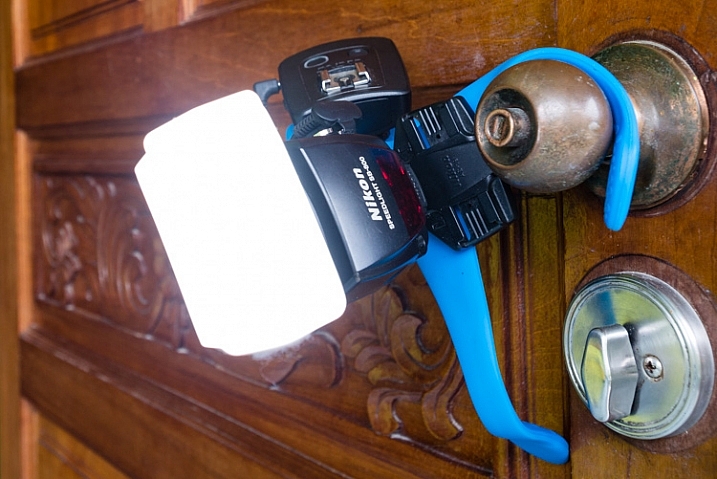
    As I had presumed, for my needs this tool would prove way more useful to support off-camera lighting. My largest speedlight (Nikon SB-900), with a wireless trigger, easily fit within the weight capacity of the Splat.

    the miggo splat holding a speedlight

    I found the DSLR Splat far more useful for creative speedlight placements.

    It also doubles as a way to simply keep equipment off the ground where it is dusty, muddy, or wet.

    Conclusion

    With the addition of accessories to enhance the usefulness of these tripods, they will be very cost-effective, quality tools to add to your gadget bag.

    As it stands I feel that the action cam version is the better of the two for actually taking pictures or video. I could easily see leaving my GoPro attached to the Splat most of the time. It’s light, unobtrusive, and protects the lens.

    the miggo splat protecting a gopro lens

    The Splat doubles as protection for your camera.

    The DSLR version I find fairly useless for actual photography but everyone’s needs vary. If you want something inexpensive, light, and simple, it’s a good option for the price. However, if you want a convenient means of expanding your creative off-camera lighting techniques, I definitely recommend the Splat.

    Does the Miggo Splat Flexible Tripod seem like the kind of accessory that you would find useful?

    Ratings:

    • Splat Flexible Tripod for Go-Pro and Action cameras: 4.5 STARS
    • Splat Flexible Tripod for DSLR cameras: 2.5 STARS

    googletag.cmd.push(function() {
    tablet_slots.push( googletag.defineSlot( “/1005424/_dPSv4_tab-all-article-bottom_(300×250)”, [300, 250], “pb-ad-78623” ).addService( googletag.pubads() ) ); } );

    googletag.cmd.push(function() {
    mobile_slots.push( googletag.defineSlot( “/1005424/_dPSv4_mob-all-article-bottom_(300×250)”, [300, 250], “pb-ad-78158” ).addService( googletag.pubads() ) ); } );

    The post Hands-on with the Miggo Splat Flexible Tripod by Jeremie Schatz appeared first on Digital Photography School.


    Digital Photography School

  • 35 Super Valuable and Affordable Gift Ideas for Photographers

    It’s just a couple of weeks before Christmas and many of you are probably struggling to complete the holiday shopping on time. As always, Photodoto is here to help! If you have photography buffs on your list, this round-up of affordable gift ideas for photographers will definitely come in handy. In this collection you’ll find some of the best digital Continue Reading

    The post 35 Super Valuable and Affordable Gift Ideas for Photographers appeared first on Photodoto.


    Photodoto

  • 13 Tips for Doing Action Photography in Bad Light

    Elizabeth-Bars

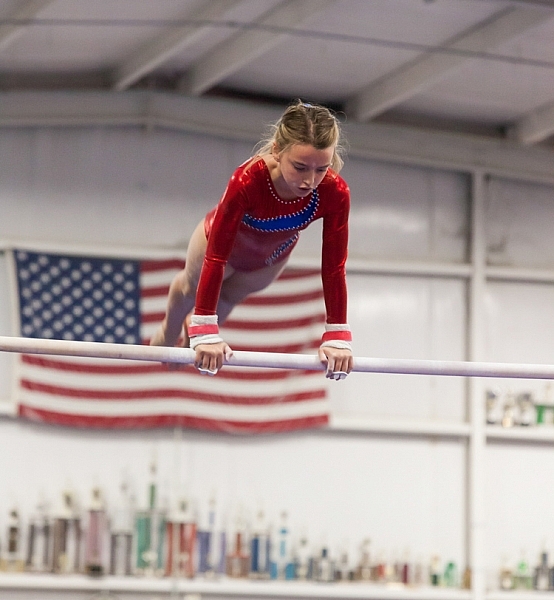
    Sometimes I feel cursed. Like any parent I want to take pictures of my kids doing their activities. However, I have a daughter who is a gymnast. For a photographer, that is a toxic combination of very fast action with generally poor light. But then it gets worse. My other daughter is very involved with her school’s theatre program. That means I’m trying to take pictures of her acting, singing, and dancing in the worst light imaginable.

    As a result, I spend a lot of my time trying to photograph action in bad lighting. Having done so for a while now, I have a few tips to pass along, so hopefully this will be easier for you next time you find yourself in a similar a situation – shooting action photography in bad or low light conditions.

    #1. Use Manual Mode

    Before you even think about shooting, make sure your camera is set up for success. Let’s start with the shooting mode. No matter what mode you normally use, in this context you are going to need a large degree of control over your camera’s settings. Manual mode gives you complete control, so it is generally a good choice. If you are not comfortable using Manual, or if you face changing light conditions, use Aperture Priority.

    Hannah1

    Shutter speed: 1/320; Aperture: f/2.8; ISO 3200.

    You will be using very specific exposure settings that the camera probably wouldn’t choose on its own. We will get to those settings in a moment, but using Manual (or Aperture Priority) will allow you to use them.

    #2. Use Fast Glass

    Next, you’ll need to decide which lens to use. Use your longest and fastest lens (fast glass) here. The low light environment means that you will want a lens with a wide aperture, that lets in a lot of light. The fact that your subject is likely to be rather far away from you means that you will also need a longer focal length. I personally use a 70-200mm f/2.8 and it works great. I could see even using a longer lens than that.

    You may be inclined to use a teleconverter to get some extra reach. If you aren’t familiar with teleconverters, they are extensions that fit between your camera and lens, which increase the magnification of the lens, usually by 1.4 or 2 times. In other contexts, they work great – in a low light environment, however, they don’t. A 1.4x teleconverter costs you 1 stop of light and a 2x teleconverter costs you 2 stops of light. If you start with an f/4 lens, it is now an f/8 lens. That won’t work here. There just isn’t enough light. If you need the extra reach, you are better off taking the picture without it and then cropping it later.
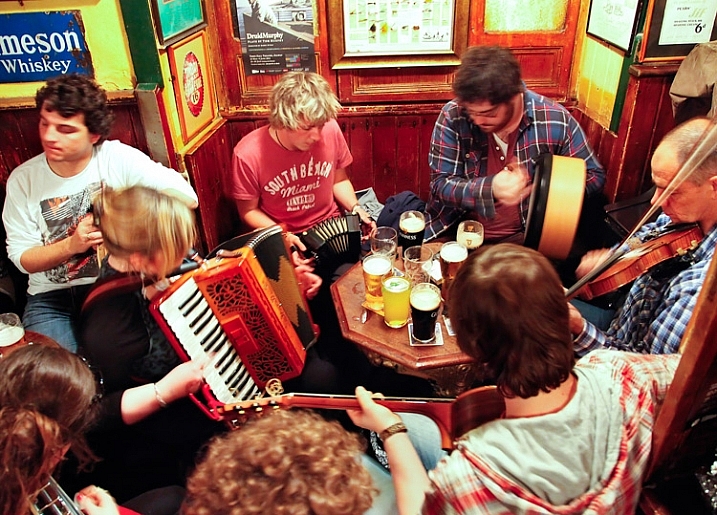
    Pub-music

    Sometimes a slower shutter speed adds a sense of movement. Shutter speed: 1/10; Aperture: f/4; ISO: 6400.

    #3. Shoot Wide Open

    Now it is time to prepare the shot. The first exposure setting to make is the aperture. Deciding which aperture to use in this context is easy. Put the aperture at its widest setting, which is the smallest f-number. Doing so lets in the most light. The downside is that you will have a very shallow depth of field. However, in this context that should not matter. You will only want your subject in focus and having some background blur is just fine (sometimes even preferable).

    #4. Set a Fast Shutter Speed

    Next you will set your shutter speed. The trick here is to make sure you are using a fast enough one. If your subject is not moving, then your minimum shutter speed will be a function of your focal length. The Reciprocal Rule states that your minimum shutter speed for a sharp picture should be the inverse of your focal length. So if you are shooting at 100mm your shutter speed should be 1/100 of a second or faster.

    When your subject is moving, things change a bit and you will need to use an even faster shutter speed. I find that 1/200th of a second is a minimum for a moving subject if you want to avoid any blur. Start with that setting, and increase it if you have enough light. Try hard to avoid using a slower shutter speed unless you are trying to add a slight blur to your subject, to show a sense of movement. Otherwise, even if you don’t see any blur when you look at your pictures in the LCD, it might still be there and you will be disappointed when you get back to your computer to find you have a card full of blurry pictures.
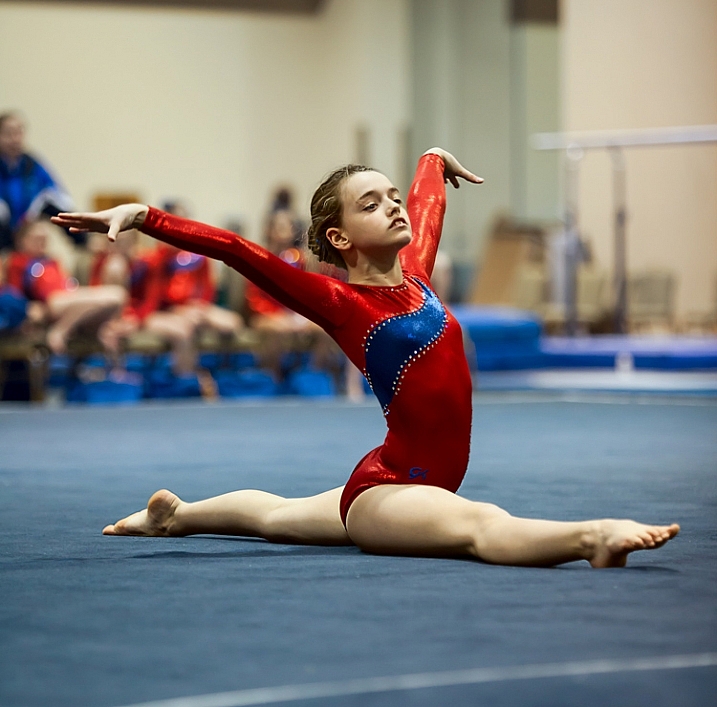
    Elizabeth-Floor

    In this picture, I was able to get away with a shutter speed of only 1/160th of a second because my subject wasn’t moving. . . (Shutter speed: 1/160; Aperture: f/2.8; ISO: 2000)

    #5. Set the ISO (High)

    The final exposure setting to make is ISO. Since you have already set your aperture and shutter speed, the ISO just is what it is. Set the ISO to whatever level is necessary to achieve a proper exposure.

    Don’t be alarmed if you need to use a very high ISO to get a proper exposure. I routinely use ISO 1600 or 3200, and sometimes I even need to put it to ISO 6400. These are ISOs I would never even think about using in most other situations, but they are often necessary here.
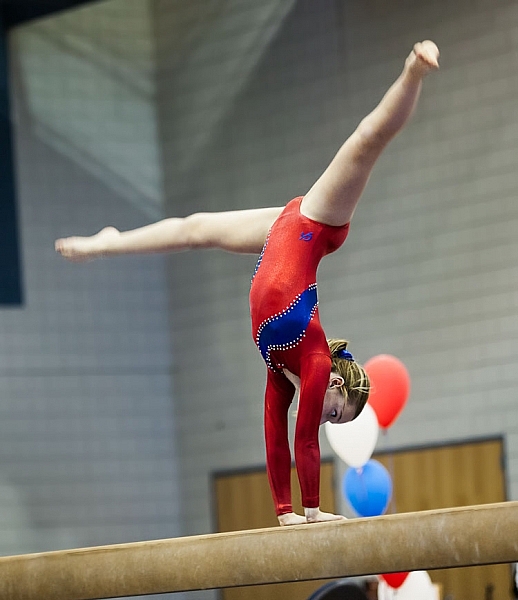
    . . . but in this photo where my subject was moving, 1/160th of a second wasn't quite fast enough (Shutter speed: 1/160; Aperture: f/2.8; ISO 3200)

    . . . but in this photo where my subject was moving, 1/160th of a second wasn’t quite fast enough. Arguably the blur in the legs implies movement, but it isn’t what I was trying to do (Shutter speed: 1/160; Aperture: f/2.8; ISO 3200).

    #6 Test Your Exposure Settings Before the Action Begins

    Test your exposure settings before the action starts. Since you are indoors, the light is often unchanging. In that case you can tweak the exposure settings and then more or less forget about them while you concentrate on the action. Where there is changing light, you will need to revisit the exposure settings often. In any case, start by making sure they are right, and do a test.

    #7. Zoom In

    Now let’s concentrate on the taking pictures part. In composing the picture, the first rule is to fill the frame. Zoom in on your subject. Don’t leave a lot of background. The important part of your picture is your subject, and they should dominate the picture.

    #8. Wait for Peak Action
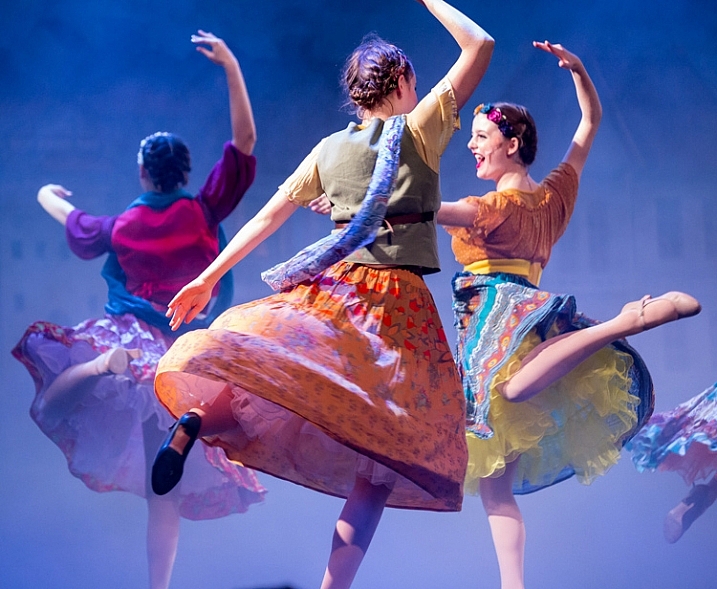
    (Shutter speed 1/250th of a second; Aperture f/2.8; ISO 6400).

    (Shutter speed 1/250th of a second; Aperture f/2.8; ISO 6400).

    You may be inclined to machine gun your subject during the action. I know that there are many photographers who do that with great success, but I find it rarely works for me. Instead, anticipate moments of peak of action and prepare for them. When the peak action arrives take 2 – 4 shots very quickly (make sure your camera is in continuous shooting mode) and then recompose. When something else of interest happens, take 2 – 4 more shots, and so on.

    Try to anticipate those moments of peak action. When you do so, and you shoot in a quick burst, you are more likely to get the best shots.

    #9. Don’t Overlook Breaks in the Action

    It may seem odd, but breaks in the action are often great times to shoot. By a break in the action, I mean two things.

    The first is a momentary pause during the event. For example, in gymnastics after a difficult move there is typically a momentary pose. The same holds true in singing and dancing, as they hold a pose after finishing a part of a routine. The pose often makes a great shot, plus they aren’t moving so you won’t have as big of a problem with blur.
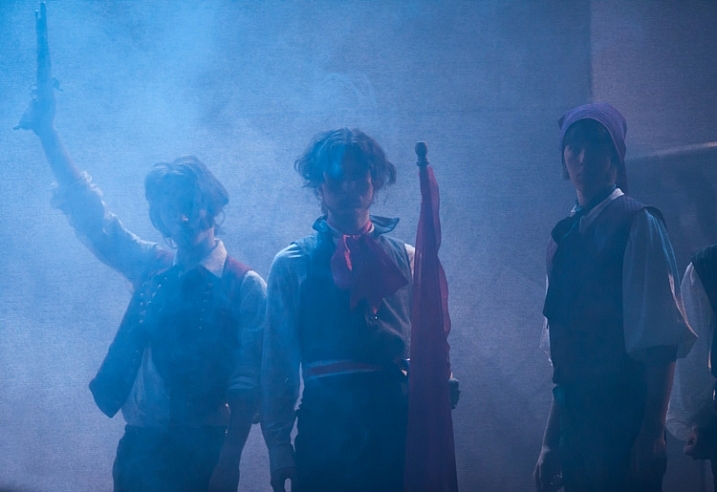
    A break in the action will sometimes provide great shots while allowing you to use a slower shutter speed (Shutter speed: 1/50th of a second; Aperture f/2.8; ISO 3200).

    A break in the action will sometimes provide great shots while allowing you to use a slower shutter speed (Shutter speed: 1/50th of a second; Aperture f/2.8; ISO 3200).

    The second break in the action I am talking about is an actual break, like the end of a period in sports. There are often warm-up drills going on at that time that lend themselves to great shots. Plus you are typically allowed a bit more latitude in terms of your own movements, and you don’t have to worry about getting in anyone’s way. The best part is that no one will know whether you took the shot during a drill or the real game/match/meet. In fact, after a year or two, you probably won’t remember either!

    #10. Nail the Focus

    Because you are shooting with your aperture wide open, you will have a very shallow depth of field. That means the focus will be unforgiving and if you miss it there is no leeway.

    So what should you focus on? Well, the subject, of course. If your subject is a person, then always focus on the eyes. If the eyes are on different planes, focus on the nearest eye.

    This is an area where it pays to be comfortable with your camera’s autofocus modes. Your camera will have a mode designed to focus on stationary points (Canon calls this One-Shot and Nikon and Sony call it AF-S). Your camera will have another autofocus mode designed to track moving subjects, which Canon calls AI Servo and Nikon and Sony call AF-C. In the case of a moving subject, this mode will continuously track your initial focus point and readjust as it moves. Most photographers use this mode in the case of a subject that is moving. I personally almost always use the stationary autofocus, but use whichever one you are comfortable with.

    Hannah2

    Shutter speed: 1/640; Aperture: f/2.8; ISO 3200.

    Another decision you should make to help with your focusing is whether to use back button focus. Normally, your camera focuses when you press your shutter button half way down. You can, however, set your camera to focus when you press a button on the back of the camera instead. I prefer this method because the focus will not automatically reset with each picture, Either way is fine, but back button focus gives you slightly more control over your camera’s focus so you might want to give it a try.

    #11. Chimp!

    That’s right, I want you to chimp. This refers to the act of looking at your photos on the camera’s LCD screen. Some photographers look down on this practice and referred to it as chimping (supposedly because the people looking at the LCD make “oo oo” noises while looking at their pictures, similar to chimpanzees). I actually think you should look at your LCD in any shooting context, but in this situation it is important to do so. There is just too much that can go wrong, and you need to make sure you are getting the shots. You might have the exposure wrong, your focus might be off, the action might be too fast for your shutter speed, and so on. You do not want to get home and discover you were doing something wrong, that could have been corrected while you were shooting.

    #12. Additional Noise Reduction

    You will have your own workflow for post-processing your pictures, so I will not dwell on that too much here. There are a few things, however, that are particularly important in this context, that I want to pass along. The first is that you will need to do some noise reduction since you will be using high ISOs for these shots, and you should probably do it in a manner that is a little different than you are used to doing.

    Start off by using Lightroom’s noise reduction in the usual manner. Push the Luminance slider under Noise Reduction to the right. There is an equivalent slider in Adobe Camera Raw (ACR), if you use Photoshop or Photoshop Elements. Keep the increase moderate at this point, I find that is usually in the range of 10-15.

    After that, reduce the noise in the background further. The background of your picture will usually be blurry because you used a large aperture, so the loss of detail from the additional noise reduction will not hurt anything. In Lightroom, use the Adjustment Brush and push the noise slider to the right, painting in where you want the noise reduction. Photoshop users can do the same thing in ACR or create a new layer with noise reduction, while masking off the subject.
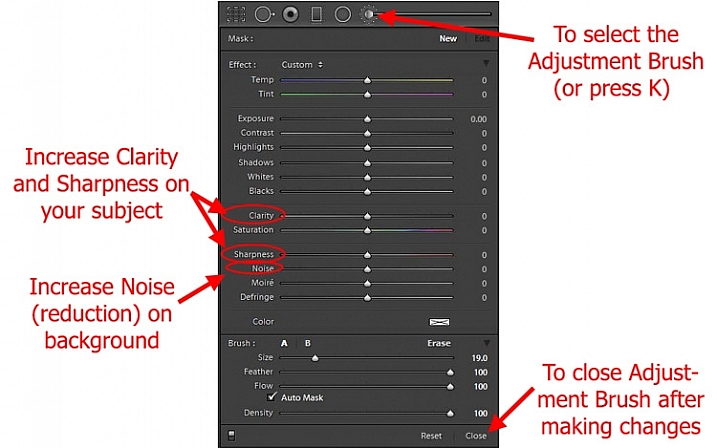
    Using Lightroom's Adjustment Brush to Sharpen and Add Noise Reduction

    Using Lightroom’s Adjustment Brush to Sharpen and add Noise Reduction – you will need two adjustment brush points added, one for the subject and a second for the background.

    Note: you will need to add two adjustment brush points to do this (because you’re making different adjustments to each), one for the subject (to increase Clarity and Sharpness, see below) and a second for the background (to increase Noise Reduction).

    #13. Sharpen the Subject

    Next, sharpen your photo but, similar to the noise reduction you did above, you should tailor it to this situation. To start off, apply a slight amount of sharpening to the whole image, but not as much as you would usually apply because it will likely also cause an increase in noise.

    Then apply sharpening to the subject only. In Lightroom, use the Adjustment Brush again. This time increase the Clarity and Sharpening amounts. Apply the effect only to your subject, while leaving the background alone. In Photoshop you can do the same thing in ACR or create a new layer that you sharpen, and mask off everything but your subject. The extra sharpening will help make your subject stand out a little bit better.

    Conclusion

    Photographing action in low light is a severe test of your camera equipment and your photography skills. It pays to have fast glass and a camera that performs well in low light. Using the tips in this article, you should be able to set up your camera and make the proper exposure settings. It will take practice to consistently nail the focus. It will take even more practice, and a little bit of luck, to capture the moments of peak action. But when you do, it is priceless.

    Do you have any other tips or tricks that you use when shooting action in bad or low light? Please share in the comments below.

    googletag.cmd.push(function() {
    tablet_slots.push( googletag.defineSlot( “/1005424/_dPSv4_tab-all-article-bottom_(300×250)”, [300, 250], “pb-ad-78623” ).addService( googletag.pubads() ) ); } );

    googletag.cmd.push(function() {
    mobile_slots.push( googletag.defineSlot( “/1005424/_dPSv4_mob-all-article-bottom_(300×250)”, [300, 250], “pb-ad-78158” ).addService( googletag.pubads() ) ); } );

    The post 13 Tips for Doing Action Photography in Bad Light by Jim Hamel appeared first on Digital Photography School.


    Digital Photography School
  • Panasonic updates five Lumix G lenses with Dual IS support

    Panasonic has released firmware updates for five Lumix G lenses, adding support for the maker’s Dual IS technology. The feature was introduced in the Lumix DMC-GX8 camera; with this update, a total of eleven lenses are compatible with that model’s Dual IS system, including the Leica DG Macro-Elmarit 24mm F2.8 Macro and collapsible Lumix G Vario 12-32mm F3.5-5.6.

    Panasonic’s Dual I.S system uses both the GX8’s body I.S and lens I.S together for improved image stabilization, ‘achieving a more powerful handshake correction,’ according to Panasonic. The new firmware is available for the following five lenses:

    • Panasonic Leica DG Macro-Elmarit 45mm F2.8 Macro ASPH Mega OIS (H-ES045) Ver.1.0?Ver.1.1
    • Panasonic Lumix G Vario 45-150mm F4.0-5.6 ASPH Mega OIS (H-FS45150) Ver.1.1?Ver.1.2
    • Panasonic Lumix G Vario HD 12-32mm F3.5-5.6 Mega OIS (H-FS12032) Ver.1.0?Ver.1.1
    • Panasonic Lumix G Vario 35-100mm F4.0-5.6 ASPH Mega OIS (H-FS35100) Ver.1.0?Ver.1.1
    • Panasonic Lumix G X Vario PZ 14-42mm F3.5-5.6 ASPH Power OIS (H-HS043) Ver.1.0?Ver.1.1

    The updated firmware is available for download from Panasonic’s website.

    Articles: Digital Photography Review (dpreview.com)

  • Classic Modern Mix: 13 Striking Additions to Historical Houses

    [ By Steph in Architecture & Houses & Residential. ]

    additions octopi

    Stretching out of the original structures like alien growths, these modern additions don’t even bother trying to blend in with their traditional architectural settings – but somehow, it works. The mashup of old and new keeps the historic character of the original structures intact while updating them for use by 21st-century residents, expanding the available space in unexpected ways.

    Sculptural Extension to 1930s Miami Bungalow
    additions miami 1

    additions miami house 2

    This three-story extension certainly isn’t trying to blend in with the modest 1930s Miami bungalow that can be seen peeking out from behind it. Sun Path House by Studio Christian Wassman sits upon a spiraling concrete structure containing a kitchen, which connects to the original house.

    Greenery-Clad Vertical Extension
    additions sandwich house 1

    additions sandwich house 2

    This concept by Zawelski Architecture Group literally raises the roof of an aging brick house with a sandwich of elements that hide a terrace inside the top story. The original structure houses the living spaces, the middle envelope contains private spaces like bedrooms and bathrooms, and a fence of ivy conceals a perfectly private backyard.

    High Contrast at Bord-du-Lac
    additions bord du lac 1

    extensions bord du lac 2

    A 200-year-old stone house in Canada gets a striking metal-clad addition in this project by Henri Cleinge. The stark transition between old and new is meant to express the passage of time, the new volume representing the modern-day family and the old representing their ancestors.

    Hankai House: Modern Volume Protects 300-Year-Old Japanese Home
    additions hankai

    additions hankai 2

    additions hankai 3

    A new wooden building wraps protectively around a 300-year-old wooden gate house in Japan, extending its space while leaving the original structure virtually untouched other than sections that were beyond repair. The new structure provides extra earthquake resistance, and though it’s clearly contemporary, its burnt cedar walls pay tribute to the architectural vernacular of the town.

    Cosgriff House: Sleek in the Suburbs
    additions cosgriff 1

    Christopher Polly Architect_Cosgriff House

    Christopher Polly Architect_Cosgriff House

    A striking new extension provides three new levels of living spaces without dwarfing the standard suburban Australian home it’s attached to. Architect Christopher Polly followed the form and contours of the house, inserting a large new living area beneath it.

    Next Page – Click Below to Read More:
    Classic Modern Mix 13 Striking Additions To Historical Houses

    Share on Facebook


    [ By Steph in Architecture & Houses & Residential. ]

    [ WebUrbanist | Archives | Galleries | Privacy | TOS ]


    WebUrbanist