Blog

  • How to Make Sure You Use Your New Camera

    Raise your hand if this scenario sounds familiar: you get a new camera, possibly as a gift, and immediately your mind leaps with excitement at all the photographic possibilities that await. You quickly start taking photos of everything around you; houseplants, food, pets, your kids, the trees in your yard, even mundane objects like cookware, or office trinkets. You just can’t wait to get your new camera and kit lens off the shelf and shoot photos of everything.

    But after a week or two the lustre wears off, and your camera starts spending more time in your closet than in your hands. You find yourself too distracted, too uninspired, or worst of all, too busy to take photos. Every now and then you pick up your camera, put it in Auto mode, and take a few interesting pictures – but sooner or later your camera, which initially held such wonderful photographic possibilities, spends most of its time tucked away, only to be pulled out on special occasions when you really need some good photos.

    use-your-new-camera-butterfly

    If that rings a bell it’s because almost everyone interested in photography goes through a similar phase at some point. Thankfully there’s hope! I’ve been in this same situation, as have many other people I know. So, here are some tips that will help you get your camera out more often, so you can start learning and growing as a photographer.

    Take your camera with you

    This may seem obvious, but it’s an important step that many new camera owners overlook. Your fancy DSLR or mirrorless camera doesn’t have to be just for special occasions, it can be for anything you want. The important thing is that you have it with you to take pictures.

    Basically, if you don’t want your camera to end up collecting dust on a shelf, don’t let it sit and collect dust on a shelf. Going to work? Grab your camera. Heading to a friend’s house? Take your camera. Taking a walk? By all means, bring your camera. Of course you’re going to bring your camera to events like your kid’s baseball game or your friend’s graduation, but using it only in those circumstances often leads to camera atrophy.

    use-your-new-camera-student-fountain

    This shot was a complete accident. It was not planned at all, and I only got it because I had my camera with me when I was out for a walk.

    The famous hockey player Wayne Gretzky once quipped, “You miss 100% of the shots you don’t take”, and the same holds true for photographers. The only way you’ll ever start taking more pictures, and thus growing as a photographer, is if you start taking more pictures. And you can’t do that if you don’t have your camera.

    I take mine with me to work every day, and even though I have a similar daily commute and work routine, I constantly find myself looking for new shots to take, and new ideas for photography. If you are worried about breaking your camera, buy a cheap bag or a better carrying strap. If you’re a bit self-conscious of what people may think if they always see you with your camera, just tell them you’re trying to learn more, and get better as a photographer. It might seem kind of weird at first to take your camera with you wherever you go, but that will likely pass (it has for me, and for others I know) as you start to discover the joyful serendipity that’s inherent in documenting the world around you with a camera that’s leaps and bounds better than the one in your mobile phone.

    Join a photography community

    In the movie Office Space, the protagonist, a twenty-something chump named Peter Gibbons, tells a pair of consultants why he has so much trouble doing his job. “It’s a problem of motivation,” he casually explains, as the three of them discuss his low work performance, and what can be done about it. Photographers, especially new ones with recently-acquired gear from the holidays, often suffer from the same problem. They are highly motivated to take pictures and use their cameras, but when the rigours of their daily life set in, they lose the motivation they once had. One solution is to join a group, whether online or face to face, of fellow photographers and enthusiasts.

    use-your-new-camera-construction

    Photography communities have been invaluable to me as a source of knowledge and inspiration.

    Being a part of a photography community offers all sorts of benefits. You can get answers to questions, get help with your camera, share your own experiences with others, go on photo walks, engage in photo critiques, and get to hang out with a lot of really fun people. If you live in a small town like I do, you may not have a group that you can join in person, but there are many online forums that offer similar experiences. DPS has an extensive set of online forums where people engage in all sorts of photography discussions, and there are hundreds more like this on the internet. Facebook is rife with thousands of photography groups that cater to interests as varied as people who like sharing photos, to those who own specific models of cameras, or live in certain locations. Reddit’s r/photography forum is a fantastic source of news, information, discussion, and education.

    I could go on and on, but the point is that joining some type of photography community will not only help motivate you to take more photos and grow as a photographer, it will also help you meet a lot of new and interesting people who share a similar passion for taking pictures.

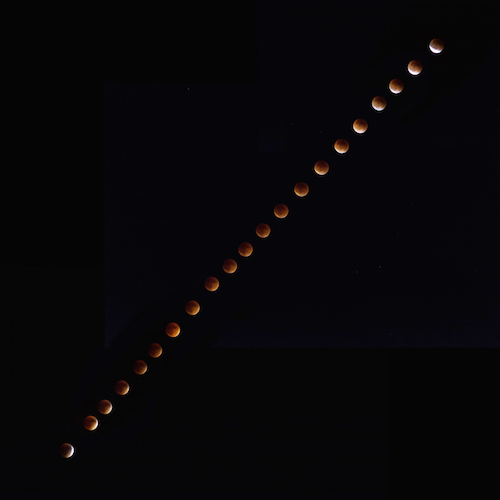
    use-your-new-camera-eclipse

    I don’t know anything about astrophotography, but asking about it in photography communities taught me enough to get this composite shot of a recent lunar eclipse.

    Do a Weekly Photo Assignment

    Many churches, businesses, and support groups use the concept of accountability partners; people with whom you develop a personal relationship in order to keep each other on the straight and narrow path. Photographers can benefit from this type of accountability as well by taking part in weekly photo assignments, essentially ensuring that you always have a reason to go out and take pictures. DPS has a weekly photography challenge, but there are lots of other weekly challenges you can find online as well.

    While the goal is not to create a one-on-one relationship of support and trust, just knowing that you have an assignment to take pictures each week can go a long way towards helping you use your camera more often. In doing so, you will learn more about your equipment, but also grow as a photographer as you try new things, and get exposed to ideas for pictures you would have never otherwise considered.

    use-your-new-camera-leaves-rain

    Doing weekly photo assignments has forced me to look for picture opportunities where I would have never otherwise seen them.

    Notice that I said weekly and not daily, and there’s a reason for this. Photography burnout is a very real problem especially for new photographers, and doing a daily challenge or assignment can be fun at first, but often gets more than a bit overwhelming. I know several people who have actually stopped taking photos because of a daily challenge. They felt like they were failures because they could not meet the requirements of taking pictures every single day, and that in turn led them to stop taking pictures altogether.

    Monthly challenges are nice, and will not usually overwhelm you, but they are (in my opinion) a bit too infrequent to be sufficiently challenging or motivating. Weekly photo assignments seem to hit the sweet spot, and can be a fantastic way to help ensure you get a lot more use out of your camera.

    use-your-new-camera-spider-grasshopper

    If you do a weekly assignment for a while and don’t feel as though it offers enough of a challenge, then by all means start doing daily photo projects. Alternatively, if you find that you can’t meet the demands of a weekly photo, then go down to one a month. The point of these is to hold yourself accountable for using your camera more often, to improve your skills over time, and a weekly assignment is a fantastic place to start.

    Never let the value of your photos be determined by others

    This final rule is more of a word of caution to new photographers – do not fall into the trap that likes or shares on social media equates to quality images. Use your camera to take photos that are interesting for you, not for others. Find ways of expressing yourself, capturing emotions, telling a story, or presenting a scene through photography, not with the purpose of getting likes on Instagram or Facebook, but simply because it’s something you personally enjoy.

    The problem with chasing after likes and shares is that there’s simply never enough. Initially you might be thrilled to have a dozen, but soon you’ll want more. After a little while you’ll be thrilled to have 100 likes, but then you might wonder why your friend got 200 on a picture that you think is clearly subpar. One of your photos gets shared a hundred times, or you post an image that gets lots of shares, but another one is virtually ignored. Or a beautiful shot you took gets no retweets, while a selfie you took with your iPhone gets retweeted dozens of times. Or an image you spent hours trying to capture gets no comments at all.

    If your enjoyment of photography can only be quantified by social media metrics, you’ll probably never be satisfied.

    use-your-new-camera-squirrel

    This is one of my favorite animal pictures I’ve taken. I know it’s not perfect and the squirrel blends in a bit too much with the leaves, but I like it and that’s what gives it value to me.

    The problem with these scenarios is they all rely on external validation of your work, and if it fails to materialize, then it can lead to feelings of worthlessness on your part. Taking pictures should be fun, interesting, experimental, captivating, and enjoyable for you. If you like your photos, then it doesn’t matter if you don’t get hearts, thumbs-up, plus-ones, or shares online. Of course you can, and should, seek opinions and advice from others so you can learn to grow your skill, and improve as a photographer. But, don’t let the worth or value of your images be determined by the numbers below them on social media. That’s a trap into which many budding photographers have fallen, and while it can be fun to see one of your images get a lot of attention, the truth is that attention is so fleeting that people will move on to something else within a few hours.

    Summary

    If you just got a new camera, congratulations! If you have one that’s been sitting around waiting to be used, go pick it up! I’m excited for you, and I am thrilled for the journey that awaits. If you have been in these situations before, what are some of your favorite tips and tricks that have helped you use your camera more over the years? I’d love to hear your thoughts in the comments below.

    googletag.cmd.push(function() {
    tablet_slots.push( googletag.defineSlot( “/1005424/_dPSv4_tab-all-article-bottom_(300×250)”, [300, 250], “pb-ad-78623” ).addService( googletag.pubads() ) ); } );

    googletag.cmd.push(function() {
    mobile_slots.push( googletag.defineSlot( “/1005424/_dPSv4_mob-all-article-bottom_(300×250)”, [300, 250], “pb-ad-78158” ).addService( googletag.pubads() ) ); } );

    The post How to Make Sure You Use Your New Camera by Simon Ringsmuth appeared first on Digital Photography School.


    Digital Photography School

  • Layer Chair: Mod Slots Let You Swap Out Panelized Acrylic Decor

    [ By WebUrbanist in Design & Furniture & Decor. ]

    layer chair

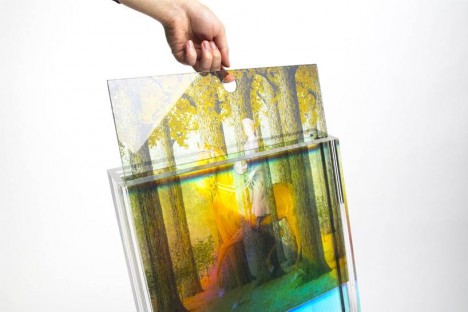
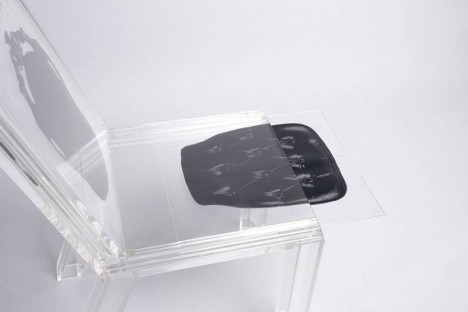
    Treating the seat and back as blank slates for expression, the Layer Chair allows its owner to slip in and slide out works of art and design, transforming the look of the furniture on demand.

    layer hologram pop art

    layer print insertion

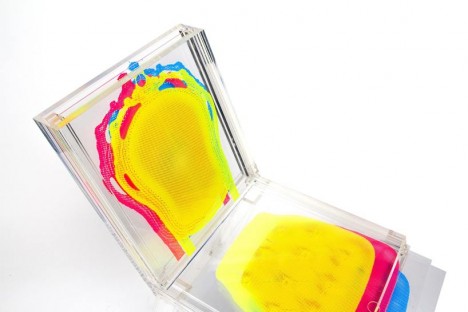
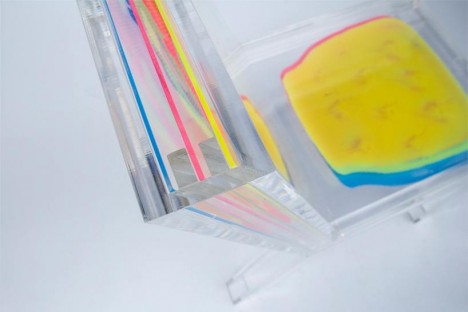
    The clear acrylic framework “allows for a see-through structure. Both the back and the base of the chair have a void where the user can fit three different layers of printed or colored acrylic, or even wood, glass, or any other material that comes in mind.”

    layer chair mod effect

    layer chair diy mod

    The approach by South Korean graphic and industrial designer Sohyun Yun is intended to address aesthetic limitations of traditional chairs, which are locked into a single style or look. Instead, through layers, this seat is visually refreshed through user-driven modifications.

    layer normal seat use

    layer seat insert

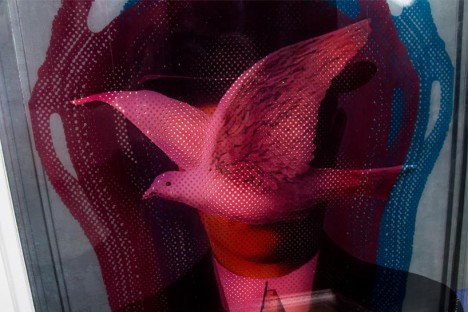
    Anything is possible, from pairing a hologram back with an Andy Warhol seat print, to slotting in more conventional looking pieces and parts aligned with other furniture looks and styles.

    layer custom chair color

    layers sliding into place

    layer simple colors seat

    The layers also allow for experimentation and playful interactions between sheets, since their patterns can be partial and/or semi-opaque. A number of layers come with the initial object, but others can be created or bought by users as well.

    Share on Facebook


    [ By WebUrbanist in Design & Furniture & Decor. ]

    [ WebUrbanist | Archives | Galleries | Privacy | TOS ]


    WebUrbanist

  • Week in Review: 2016 CES edition

    Week in Review: 2016 CES edition

    CES isn’t always a blockbuster show for photography, but Nikon fixed that for us this year. Welcome to 2016, the year of the long-awaited D300 replacement. But that wasn’t all – a few hours before Nikon trounced all over the other show announcements, Olympus took the wraps off a 300mm F4 Pro lens, Panasonic put a 1″ sensor into a travel zoom camera and Kodak brought back Super 8. If this week was any indication of how the rest of 2016 will go, then we’ll be needing a lot more of the ‘Just Chill’ anti-energy drinks that Dan brought into the office last week.

    Nikon D5/D500

    We knew that Nikon had a professional grade full-frame camera coming, so while we weren’t surprised to see the D5 announced at CES, we were not expecting the D500. Possibly the longest-awaited successor to a popular model ever, the D500 replaces the D300S after six years – long after many enthusiast Nikon photographers had given up hope of ever seeing it.

    Like the D5, the D500 uses a 20MP CMOS sensor and 153-point AF system. But being an APS-C format camera, that AF array stretches almost to the edges of the frame. Both the D5 and D500 are hugely impressive and we look forward to getting them in our studio very soon.

    Nikon KeyMission 360

    Nikon had quite a few ‘firsts’ this week, including the introduction of its first 360-degree camera. Despite a name that reminds of Tom Cruise movies, the KeyMission 360 looks enticing. Fully rugged and capable of 4K video, the KeyMission uses two lenses on opposite sides of the camera to create immersive video and stills. We weren’t able to get any closer to it than this and were told that the design is ‘not quite final yet.’ For now it’s just a mysterious figure behind glass and a super intense name.

    Panasonic Lumix DMC-ZS100/TZ100

    Joining the ever-expanding ranks of 1″-type sensor compacts is the Panasonic Lumix DMC-ZS100. With its 25-250mm equivalent field of view it provides more reach than the RX100s without the substantial size gains seen in the likes of the company’s own DMC-FZ1000 or Canon’s PowerShot G3 X. Throw in an EVF and Panasonic has a little travel cam ready to accompany you on your next journey.

    Samsung

    We’re still hoping for some signs of life from Samsung’s NX series but it’s looking pretty grim. We expected the scene at the company’s CES booth to be heavy on VR, high-tech refrigerators and gadgets like the new Galaxy TabPro S, but we’d hoped for at least a glimpse of their camera lineup on the tech world’s biggest stage but nope, not a peep at the press conference and not a single NX1 at the booth.

    Maybe, argues staff writer Dan Bracaglia, it’s time to open up your smart fridge, crack open a cold beverage and pour it out for Samsung’s mirrorless line. And that’s a real shame.

    Olympus M.Zuiko PRO 300mm F4

    When we were briefed on the Olympus M. Zuiko PRO 300mm F4 we were told about the amazing tolerances used when making this lens. This quote isn’t verbatim, but it went something like ‘If the front element is a football field, we are removing inconsistencies the size of a human hair.’

    This geeky attention to detail has always been characteristic of Olympus, and the sharpness of the 300mm is a testament to the manufacturer’s hard work. Combine that with a 600mm equivalent prime that can feasibly be used handheld, and we have one impressive tube of metal and glass on our hands. Check out our sample gallery to witness the sharpness for yourself.

    Kodak Super 8

    Slated for a Fall 2016 release date, the Kodak Super 8 was among the most surprising products we saw at CES this year. It’s not entirely clear how, but the Super 8 still shoots Super 8 film cartridges (which Kodak will process and digitize for you) while allowing you to preview your cinematic masterpiece by way of a flip-out LCD monitor.

    A built-in handle/microphone, an array of ports and a versatile C-mount round out the package. Sure, Kodak is leaning pretty heavily on nostalgia-fueled hype surrounding the format and being stingy with actual details on the Super 8 itself, but we still can’t wait to get our hands on a production model.

    Week in Review: 2016 CES edition

    One does not simply walk into the Las Vegas Convention Center during the first week of January. Prepping for and surviving CES is like an athletic event, never-ending networking happy hour and a Sunday at Ikea all wrapped into one. For several days in a row. So here’s a shout out to Dan and Dale, the DPR staffers who were our eyes and ears on the ground at the show this year. Thanks for hauling your laptops and camera gear through the convention hall for days on end, taking lots of notes and photos, and eating boxed press lunches while sitting on the floor. We owe you a couple of Just Chills.

    Articles: Digital Photography Review (dpreview.com)

  • Histograms for Beginners

    When the digital revolution came to photography it brought with it a plethora of advantages for photographers: making vast quantities of images with no increase in cost; seeing the photo immediately after you make it; changing ISO with each shot; and the advent of the digital darkroom; to name a few.

    One of the most important benefits of digital photography is one that can be a little intimidating for new photographers – the histogram. But there’s no reason to shy away from it – it’s actually pretty easy to use once you understand how it works. The histogram is simply a graphical representation of the tonal range of your photo that helps you evaluate the exposure.

    Before digital photography, we had to wait until we developed the film to know for sure whether we got a good exposure when we made an image. Now, by using the histogram, this information is at your fingertips before you take the shot (in cameras with Electronic Viewfinders), after you take the shot, and during post-processing as well.

    How to Read Your Histogram

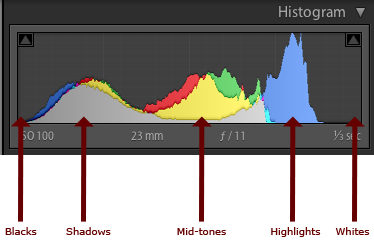
    It’s easy: the blacks are on the left, the whites are on the right, all the mid-tones are in between.

    histogram-info

    The most important thing to know about the histogram is that a spike on the right, that touches the edge of the graph, is a problem. That means that there is a portion of your image where the highlights are “blown out”, or completely white with no detail. The reason this is such a big problem is that an area that is blown out contains no data at all, so you will not be able to do anything in post-processing to adjust it. This only applies if the spike touches the edge of the graph. If it spikes before the edge, that’s okay.

    If there is a spike on the left edge, it means part of your image is completely black. You may want to use your exposure compensation to adjust the exposure to the right to make it brighter. But remember that having part of your image completely black, especially for a night shot, is okay.

    There is no such thing as a perfect histogram. It’s just a graphical representation of the tonal range in your image. It’s up to you, as the artist, to decide what to do with this information. Having solid blacks and bright tones (provided they are not blown out) is not necessarily a bad thing.

    Let’s take a look at some examples of how histograms will look for different types of images.

    Histogram Examples

    High Key Scene

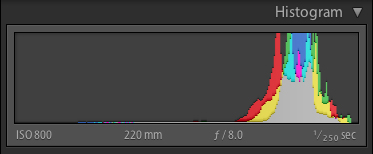
    When you have a scene that is high key, it has a lot of bright tones, and not so many mid-tones or blacks. When you are photographing a scene that you want to be high key, your histogram should be stacked up on the right side – but not going up the right edge. If you want your scene to be high key, but your histogram is showing a lot of mid-tones, your whites are probably going to come out looking more gray than you would like.

    Pelicans at the Salton Sea, California

    A high key or light toned scene

    histogram-swans

    Histogram for the image above showing mostly light tones

    Low Key Scene

    A low key scene is one that is dark, which you would expect when photographing at night. In this case, your histogram will be stacked up on the left side. You may have a spike on the left edge, which indicates solid blacks.

    Star Trails in Guadalupe National Park

    A low key or dark scene will have mostly tones on the left side of the histogram.

    histogram-stars

    Histogram for the image above showing a dark scene.

    High Contrast Scene

    A high contrast scene is one where there are lots of very dark, and very bright tones, and perhaps not so many tones in between. In this case, your histogram will show data on the left and right, and not so much in the middle.

    Fountains of Bellagio

    High contrast scene. Extreme brights and extreme darks with little in the middle.

    histogram-fountain

    Histogram of high contrast scene above.

    Low Contrast Scene

    A low contrast scene has a lot of mid-tones, and few and bright tones. Your histogram will have a bell shape.

    Butchart Gardens

    histogram-garden

    Again, it’s up to you as the artist to choose what to do with this information. You have to decide whether the information in the graph is what you want or not. It’s just another tool in your arsenal, to help you transform your artistic vision into a photograph.

    If you’re not happy with your histogram, use your exposure compensation to adjust the exposure by making the image darker or lighter. Or, you may choose to affect the light on the scene instead by using a flash, a reflector, or a diffuser. The choice is yours.

    Understanding the Colour Histogram

    You’ve probably noticed in the examples above that the histogram not only shows the tones in grayscale, but it also shows you colours. Yes, it’s possible to blow out a colour! If there is one particular colour that is very bright in the scene, sometimes that colour will become so saturated that you loose detail. This commonly happens with red flowers for example.

    Red Flower with Bee

    histogram-flower

    To combat this, you can slightly desaturate the colour in post processing to bring back some of the detail in the flower petals. The histogram above shows the increase in red tones towards the brighter end of the scale.

    When to use the Histogram

    In the field, you can use the histogram in conjunction with Live View to see it before you make an image (or turn it on if you have a camera with an Electronic Viewfinder like many mirrorless models offer). You can also see it afterwards when you review the photo on your LCD screen. Either way, it’s critical that you use the histogram to check your exposure while you’re in the field. That way you have an opportunity to make another exposure while you are still on scene.

    Don’t rely on your LCD to give you feedback about exposure. It’s great for checking composition and focus, but not exposure. That’s because the brightness of your LCD has nothing to do with the brightness of your image, since you can adjust the brightness of your LCD. For example, you can brighten it so you can see it more easily outside on a sunny day. But then if you don’t change the brightness back again and you look at it at night your images are going to appear super bright, when they actually are not.

    The histogram is also available to you while post-processing your image. Use it to see where adjustments need to be made and to ensure that you don’t create areas that are too bright or too dark while processing your images.

    I hope that gives you a better understanding of how to use this handy tool. If you have any questions about histograms please put them in the comments below.

    googletag.cmd.push(function() {
    tablet_slots.push( googletag.defineSlot( “/1005424/_dPSv4_tab-all-article-bottom_(300×250)”, [300, 250], “pb-ad-78623” ).addService( googletag.pubads() ) ); } );

    googletag.cmd.push(function() {
    mobile_slots.push( googletag.defineSlot( “/1005424/_dPSv4_mob-all-article-bottom_(300×250)”, [300, 250], “pb-ad-78158” ).addService( googletag.pubads() ) ); } );

    The post Histograms for Beginners by Anne McKinnell appeared first on Digital Photography School.


    Digital Photography School

  • 10 Winter Miles of Stand Up Paddling on South Platte River

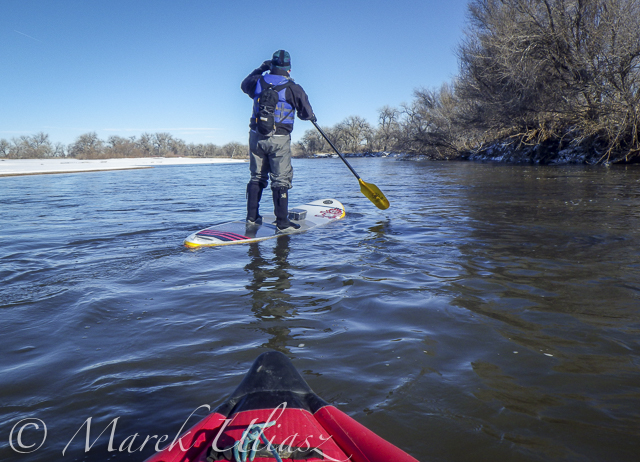
    January 3, 2016. First SUP paddle of the year with Rob Bean. We paddled 10 miles on the South Platte River from highway 58 to Kuner. Great weather, river flow ~900 cfs at Kersey, several bald eagles and hundreds of ducks. There are no portages on this river section since we started just below the Plumb Ditch Dam (the second diversion dam if you paddle from Evans).

    We started from a gravel bar under the new bridge on highway 58 – a right river shore with parking on a wide shoulder, a shorter, steeper route with barbed wire fence on the upstream bridge site. Downstream bridge site may be more convenient without the fence, but with a little longer walk. You can reach the bridge by turning into the new highway 49 at traffic lights from Colorado highway 34 between Evans and Kersey.

    Rob posted his pictures on facebook. They actually show much better our launching site.

    Start at gravel bar under the new highway 58 bridge

    Start at gravel bar under the new highway 58 bridge

    Somewhere on the river around Kersey

    Somewhere on the river around Kersey

    Ducks, ducks, and more ducks. Hundreds of them.

    Ducks, ducks, and more ducks. Hundreds of them.

    winter SUP paddling on South Platte River

    Finishing 10 mile trip at Kuner

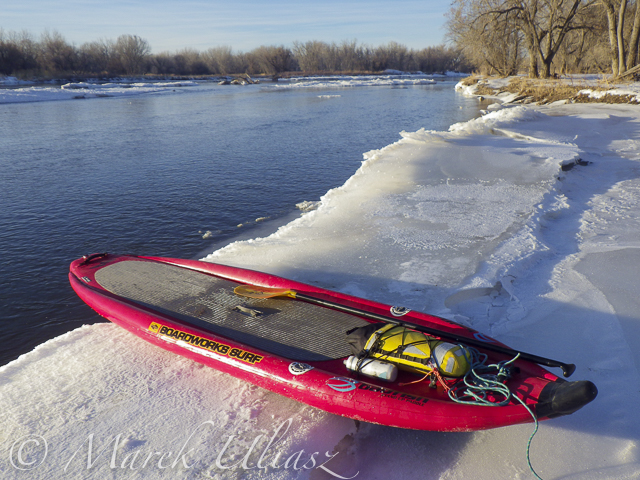
    A little bit icy  landing at landing (left shore upstream of the bridge)

    A little bit icy landing at Kuner (left shore upstream of the bridge)

    Related posts:
    South Platte River below Denver – river guide
    Starting 2015/16 Winter Paddling Season on South Platte River
    Paddling SUP on South Platte River from Kersey to Kuner
    South Platte River from Wildcat to Evans by SUP


    paddling with a camera

  • Panasonic adds Leica 100-400mm F4-6.3 tele-zoom to Micro Four Thirds lens lineup

    $ (document).ready(function() { SampleGalleryV2({“targetContainerClass”:”sampleGalleryImageViewerContainer”,”galleryId”:”2215321511″,”isEmbeddedWidget”:true,”selectedImageIndex”:0,”startInCommentsView”:false,”isMobile”:false}) });

    Panasonic is adding a high-end super telephoto zoom lens to the Micro Four Thirds lineup: the Leica DG Vario-Elmar 100-400mm F4-6.3 ASPH. This lens has the longest focal length of any MFT lens, and Panasonic promises fast autofocus thanks to its 240 fps AF drive speed.

    This lens is equivalent to a whopping 200-800mm when attached to a Micro Four Thirds body and features much-needed ‘Power’ optical image stabilization to keep things steady. It has has one aspherical, one UED, and two ‘regular’ ED elements, as well as a nine-bladed circular aperture. The minimum focus distance is 1.3m, with a magnification of 0.25x. 

    A cool feature of this lens is its compact tripod collar which rotates with the camera body, taking the buttons with it. The collar has a tripod screw mount built into it, into which a longer (included) ‘foot’ can be added if additional clearance is need. The zoom lock is built into the lens barrel, as is a small pull-out lens hood (a full-sized hood is available as an optional accessory). The 100-400mm is also sealed against dust and moisture.

    The Leica DG Vario-Elmar 100-400 F4-6.3 will be available in early April at a price of $ 1799.99.


    Press release:

    Panasonic Launches LUMIX G 100-400mm Telephoto-Zoom, LEICA DG VARIO-ELMAR Lens

    Las Vegas, NV (January 5, 2016) – Panasonic has today introduced a new telephoto lens for its LUMIX G range of Micro Four Thirds System cameras – the LEICA DG VARIO-ELMAR 100-400mm F4.0-6.3 ASPH. Telephoto-Zoom (H-RS100400) with Power Optical Image Stabilization (O.I.S.).

    Small, light and highly durable, the latest addition to Panasonic’s range of interchangeable lenses is perfectly suited for photographing birds and other wildlife in all types of environments.

    The lens is constructed of 20 elements in 13 groups and incorporates a number of aspherical and extra low dispersion elements to assure best quality and avoid flaring. The advanced construction of the new Telephoto-Zoom leads to highest quality standard earning the LEICA Logo for a LUMIX Lens once again.

    Outstanding image quality and Telephoto-Zoom performance

    Elegantly designed with a metallic black finish, the new 100mm-400mm LEICA DG VARIO-ELMAR lens from Panasonic provides superb image rendering across the entire zoom range. The lens’ 200-800mm focal length (35mm equivalent) and 0.5x Magnification capability provide highly detailed shots from distance, as well as stunning close up capability– ideal for subject matter regardless of shape and size.

    In order to capture steady, vibration free images across the entire zoom range, the lens also incorporates Power O.I.S. to keep unwanted shaking under control and ensure pictures look crisp and clear. 

    The 100mm-400mm lens is also suited to a variety of photographic styles – with nine diaphragm blades providing a circular aperture to produce a smooth and beautiful bokeh.
     
    Smaller and lighter than other Telephoto-Zoom lenses

    When compared with conventional super telephoto DSLR lenses, the latest addition the LUMIX G line up offers outstanding mobility – perfect if you’re travelling and don’t want to pack too much. Similarly, the lens also boasts a durable, gapless construction so you no longer have to worry about unwanted dust or light rain damaging your equipment.

    In addition to the lens’ practical size and weight, a compact, two-part tripod mount has also been incorporated to enable faster conversion between landscape and portrait orientation. While conveniently and speedily turning to the 90° angle, the levers for Focus Limiting, Power O.I.S. and the manual focus switch remain right at your fingertips as they do not move when you turn the lens. 

    The lens also incorporates an integrated, hide-away hood to help you capture that perfect shot, without having to worry about sun glare.

    Stunning 4K video capability

    Panasonic’s new LEICA Telephoto-Zoom lens is perfectly suited for 4K video recording with its construction assuring the best contrast and colors. Furthermore the Telephoto-Zoom incorporates Panasonic’s high speed and precise 240 fps AF-motor. Due to the modern design, filming can also be conducted silently, so you can get up close to the subject without drawing attention.

    As well as high resolution video, the lens’ 4K capability also enables you to take photos like never before. Panasonic’s 4K Photo function – found on LUMIX G cameras including the LUMIX DMC-G7 – lets you extract an 8-megapixel still from 4K video (30fps) easily right on the camera’s screen with a simple fingertip touch.

    Key features:

    • Longest focal length for Micro Four Thirds
    • Compatible with Dual Image Stabilization
    • 240fps AF Drive
    • Zoom ring lock
    • Weather Sealing
    • Integrated Quick Shifting Tripod Mount
    • Integrated shift-away lens-hood

    Panasonic Leica DG 100-400mm F4.0-6.3 ASPH specifications

    Principal specifications
    Lens type Zoom lens
    Max Format size FourThirds
    Focal length 100–400 mm
    Image stabilisation Yes
    Lens mount Micro Four Thirds
    Aperture
    Maximum aperture F4.0 – F6.3
    Minimum aperture F22.0
    Aperture ring No
    Number of diaphragm blades 9
    Aperture notes Circular blades
    Optics
    Elements 20
    Groups 13
    Special elements / coatings 1 aspherical ED, 1 UED, 2 ED elements
    Focus
    Minimum focus 1.30 m (51.18″)
    Maximum magnification 0.25×
    Autofocus Yes
    Motor type Micromotor
    Full time manual Yes
    Focus method Extending front
    Distance scale No
    DoF scale No
    Focus distance limiter Yes
    Physical
    Weight 985 g (2.17 lb)
    Diameter 83 mm (3.27″)
    Length 172 mm (6.75″)
    Sealing Yes
    Colour Black
    Zoom method Rotary (extending)
    Power zoom No
    Zoom lock Yes
    Filter thread 72.0 mm
    Hood supplied Yes
    Tripod collar Yes

    Articles: Digital Photography Review (dpreview.com)

  • Nikon’s New D5 and D500 Push the Boundaries of DSLR

    Nikon D5 and D500 Push the Boundaries of DSLR

    CES 2016 saw the announcement of two important DSLRs from Nikon, including an update to its flagship line, as well as an almost mythical product many had given up hope of ever seeing: a true D300 replacement.

    The newly announced D5 is Nikon’s top-of-the-line professional DSLR, with a 20.8MP full frame sensor capable of shooting at up to 12fps with AF and 14fps without (with the mirror locked up). The headline feature, though, is arguably the new 153 point AF system with 99 cross-sensors. AF tracking with this new system will also benefit from the doubling in resolution of the RGB metering sensor used for scene analysis, and the D5 is the first Nikon camera capable of 4K video.

    The biggest news though may be the long-awaited replacement of the D300S. The 20.9MP APS-C D500 is Nikon’s ‘best enthusiast DX offering’, and the term ‘enthusiast’ might be an understatement. With continuous shooting speeds of 10 fps and a 200 shot buffer for Raw images, the camera is aimed squarely at action and fast-paced photographers who don’t mind the smaller sensor, or even benefit from its extra reach. It features the same 153-point AF system and 180k-pixel RGB metering sensor of the D5, along with the EXPEED 5 processor. It can also capture 4K/UHD video and also features ‘SnapBridge’, a constant connection to a smartphone using Bluetooth.

    Join us as we take a closer look at the technologies inside these cameras.* Pro tip: you may find viewing this slideshow easier if you hover over and click the ‘fullscreen’ button at the upper right of the slide, and use left/right keys to leaf through the slideshow.


    * Some of the information in these slides come from Nikon’s technology digest on the D500, here.

    Nikon D5 and D500 Push the Boundaries of DSLR

    Let’s start with the AF module, which is shared between both the D5 and D500. Here is the Multi-Cam 20K in all its glory. It’s a major step up from the Multi-Cam 3500FX module, variants of which were found in the D4s, D810, and D750. Up from 51 total AF points with 15 central cross-sensors, the module in the D5 and D500 offers 153 phase-detect points with 99 cross-sensors spread across much of the frame. 

    The improvements don’t stop there though: the module has its own dedicated processor, to deal with the computationally intensive information coming from 153 AF points cross-referenced with the scene analysis system (more on that later). The center AF point is now sensitive down to -4 EV. All 152 other points are sensitive down to -3 EV, much like the D750 and D7200, albeit now with an even wider spread of points.

    If Nikon’s claims are true, we can expect formidable AF performance in low light from the D5 and D500 – possibly the best from any DSLR. Although we’ve previously found Sony’s a7S to focus in at nearly -5 EV, its contrast-detect AF, and associated hunting, made it quite slow in practice. -4 EV phase-detect AF on a DSLR should be seriously impressive because it will likely be far more decisive than mirrorless, contrast-based systems. Additionally, cross-type sensors tend to perform better in low light and with low contrast subjects: cross-sensors are able to make focus measurements from subjects containing both horizontal and vertical detail (or, at least, detail that has either a horizontal or vertical component to it). In low light or backlit situations, where lowered contrast already makes it difficult to distinguish subject detail, sensors looking along multiple axes for detail to ‘lock on’ to simply have a higher chance of success than sensors that can only ‘see’ detail with a, say, horizontal component.

    Nikon D5 and D500 Push the Boundaries of DSLR

    Here’s the spread of AF points across the frame in the D5. The new AF module appears to provide more AF coverage across the frame than any previous Nikon full-frame camera (and likely any full-frame DSLR), though not quite as much coverage of phase-detect points as Sony’s recent Alpha 7R II mirrorless full-frame.

    55 of the points are user-selectable, indicated by squares. The AF points indicated by dots are essentially assist points, used by the camera if your subject moves to or simply happens to fall in between the user-selectable points. What makes these assist points particularly useful in a Nikon? Nikon’s industry-leading 3D tracking, which’ll select any one of them for you automatically if your subject happens to move, or you recompose, such that it falls under one of these assist points (in AF-C ‘Auto’ and ‘3D’ modes, that is). The video below shows how 3D tracking can be used on a D750 to precisely track an eye, so those wondering how 153 points might be useful, well, imagine this sort of performance but even more precise, with wider AF point coverage.

    35 of these 55 points are cross-type: the outermost two sections of 10 points each as well as the central section of 15. This is more clearly demarcated in the next slide.

    Nikon D5 and D500 Push the Boundaries of DSLR

    Here’s what you get by putting the designed-for-full-frame Multi-Cam 20000 module inside the APS-C D500. The AF points stretch out to the literal edges of the frame. Red points indicate cross-sensors. While Canon’s nearest competitor, the 7D Mark II, comes quite close to this level of coverage – with all cross-sensors to boot – it doesn’t quite match it.

    But it’s not even these headline features that excite us the most. It’s details such as the addition of an automated system for applying AF fine tune that have really caught our eyes. We’ve written before about how mirrorless cameras, with their direct measurement of focus (rather than a secondary sensor, acting as a proxy) tends to be more accurate when it comes to fine-focusing, especially when using fast lenses. However, we’re not alone in proposing the idea of using DSLR’s often slow, but highly precise live view autofocus to help make it easier to correct for the cumulative errors that can undermine dedicated sensor phase detection systems. Patents have been issued yet this is the first time we’ve seen it implemented in a final product. Automating the process means far more photographers may actually calibrate their lenses for more accurate focus. Furthermore, the reality of DSLR AF is that the optimal calibration values can depend on lighting, environmental factors, wide or tele end of zoom, and subject distance; hence, automating the process will realistically allow users to calibrate more often for any given scenario. Sadly, there’s no indication that calibration values can be saved for different focal lengths or subject distances (a la Sigma lenses via their USB dock), nor is there any mention of higher precision central points that give the latest Canon cameras’ central AF point nearly mirrorless-levels of precision.

    We’ve not yet had a chance to use the D5/500’s automated AF fine tune but you can be sure it’ll be one of the first things we try when one gets into our studio.

    Nikon D5 and D500 Push the Boundaries of DSLR

    Remember that ‘scene analysis system’ the AF system cross-references with information from the 153 AF points? It’s enabled by essentially a whole separate image sensor in the DSLR whose sole job is to analyze the scene to understand how to expose and focus it. Now with 180,000 pixels in the D5 and D500, this sensor has doubled in resolution compared to the D4s, D810, and D750.

    Confused by how this works? Let’s break it down. Your smartphone or mirrorless camera projects light from the lens directly onto the imaging sensor, which can ‘see’ the scene to focus and expose it properly, even find faces or other subjects and track them no matter where they move to in the frame. DSLRs have it much tougher – all the light entering the lens is being diverted either upward to the optical viewfinder, or downward to a dedicated AF module with its phase-detect sensors that understand only distance. Some of that light going to the viewfinder is itself diverted to a metering sensor, which determines appropriate exposure. Some time back, DSLR manufacturers replaced this rudimentary metering sensor with an actual RGB 2D array or, essentially, an image sensor.

    While years ago this image sensor started at a measly 1,005 pixels in the D300, it did enable rudimentary subject tracking (‘3D tracking’ in Nikon terms), since the sensor provided some color and spatial information about the subject underneath any AF point, which the camera could combine with an understanding of subject distance from the phase-detect AF sensors to understand where your subject of interest is at any given moment. Today, cameras like the D750 and D810 provide uncanny subject tracking with their 91,000-pixel metering sensors – able in many cases to track even objects as specific as a human eye. Nikon DSLRs are the only DSLRs we’ve tested to-date that are capable of the level of class-leading tracking precision you see in the videos linked above (Canon’s newer DSLRs do well with distant subjects well isolated with respect to depth, but lag behind in more demanding applications requiring higher precision). Hence, a doubling in resolution of the metering sensor is likely to further Nikon’s lead in this arena. Furthermore, metering applications also benefit from the increased resolution: as the flowchart above indicates, numerous features like face exposure, fill-flash, Active D-Lighting, and highlight-weighted metering will experience increased accuracy. 

    Nikon D5 and D500 Push the Boundaries of DSLR

    Click on the button at the upper right of the image to view this entire slideshow in fullscreen for a better view.

    So what exactly does this 180,000-pixel RGB metering sensor ‘see’ such that it can aid the camera in finding faces and tracking subjects? We’ve taken the liberty of doing some guesswork to simulate a ‘worst case’ representation of how a 180k-pixel sensor might ‘see’ a typical scene being photographed.

    If we assume that the 180k figure refers to the total number of red, green and blue pixels, then we can surmise that there’s only, at best, 60k pixels of true spatial information for any given color. For a 3:2 aspect ratio, that’s about 300×200 pixels. So we’ve taken an image and reduced it to 300×200, then blown it back up for ease of viewing. That’s what you see above.

    In reality, the metering sensor is likely to ‘see’ a bit more resolution, since the above only represents the spatial resolution of any one color channel (or 3 R, G, and B pixels combined). Even still, you can get an idea of how the sensor can detect faces, and even understand what was underneath your selected AF point when you initiated focus in order to track it even if it moves to a position underneath a different AF point. With such increases in resolution of the scene analysis system, we wouldn’t be surprised if DSLRs one day were capable of eye detection. And while we fully expect the D5/500 to be capable of tracking an eye, it’ll only do so in ‘3D tracking’ mode once you’ve ‘told’ the camera where the eye of interest is by initiating focus with your focus point over it. We’ll be curious to see if the automatic face detection in ‘Auto’ area mode prioritizes eyes of faces. 

    Nikon D5 and D500 Push the Boundaries of DSLR

    Click on the button at the upper right of the image to view this entire slideshow in fullscreen for a better view.

    Compare the last image to this one (use the left/right keys on your keyboard for ease): a 213×142 pixel representation of the same image that simulates the spatial resolution of any one color channel for the 91,000-pixel RGB metering sensor in previous full-frame Nikon DSLRs. It’s not hard to imagine how even with this level of understanding of a scene, previous Nikon full-frames were able to track quite well. But every bit of resolution helps increase precision of tracking, so while the image above isn’t a huge step down from the last image representing what the new 180k-pixel sensor sees, there’s still a significant difference.

    And remember, Nikon already led the industry with its previous 91,000-pixel RGB sensor, even performing better at subject tracking than the Canon 5DS and 7D Mark II with their 150,000-pixel RGB+IR metering sensors. Hence, we expect the doubling in metering sensor resolution to further widen the gap in performance between Nikon and all other DSLRs, potentially making the Nikon platform the best for applications that benefit from continuous subject tracking (barring any missteps on Nikon’s part). Continuous eye tracking on a Sony a7R II is still likely to give the D5/500 a run for its money, but general subject tracking of any subject, even to aid ‘focus-and-recompose’ by having the camera automatically select an appropriate AF point to stick to your subject as you recompose, will likely remain unparalleled on these Nikons compared to any other camera. 3D tracking’s ability to combine scene analysis with the distance information reported by every AF point on the phase-detect sensor makes for subject tracking that I, personally, find indispensable shooting candid portraits or weddings and events in a more photojournalistic style: I ‘define’ my subject by initiating focus on it, and the camera retains focus on it no matter how I recompose or where the subject moves to as long as I keep the shutter button half-depressed.

    Nikon D5 and D500 Push the Boundaries of DSLR

    Click on the button at the upper right of the image to view this entire slideshow in fullscreen for a better view.

    The 180k-pixel metering sensor is a huge step up from previous DX offerings from Nikon, which only featured – at best – a 2,016-pixel RGB metering sensor. The 90-fold increase in metering sensor resolution should bring a level of subject tracking to the DX format never before seen.

    Above is a 55×37 pixel representation of our previous image – and this time that’s a sort of ‘best case’ representation of what cameras like the D7200’s scene analysis system ‘saw’. Instead of showing you what any one color channel sees, we’ve decided to show you what 2k pixels in total looks like, as one-third of this resolution is a pixelated, unintelligible 32×21-pixel mess (from this forum discussion). In other words, the image above represents only a 30x drop in resolution compared to our previous 180k-pixel representation, and so likely underestimates the increased performance the scene analysis system in the D500 is likely to exhibit compared to previous DX offerings (which still performed surprisingly well for their low resolution metering sensors).

    Nikon D5 and D500 Push the Boundaries of DSLR

    Another feature enabled by the RGB metering sensor is flicker reduction. While this is only available in video on the D5, the D500 is capable of waiting until the right moment to fire the shutter under flickering light, so as to achieve and maintain proper exposure. Although Canon has been offering this since the 7D Mark II, it’s the first time we’re seeing this feature in a Nikon camera.

    Nikon D5 and D500 Push the Boundaries of DSLR

    It’s worth emphasizing here something Nikon clearly emphasized in their press conference: one of the true advantages of a DSLR over current mirrorless cameras is the lack of viewfinder lag and the true view of the scene – at least in between mirror blackouts – compared to the typical stop-motion sequence of last-shot images most mirrorless cameras exhibit during fast bursts. This simply makes it easier to follow action with an optical viewfinder than with a mirrorless camera, which is why in the video screenshot above, the photographer was able to maintain the center AF point over his subject with the D5, while missing the subject with the ‘mirror-less’ camera example on the left. It’s worth noting though that Nikon’s own 1-series cameras provide a live feed even during continuous shooting, which actually circumvents this shortcoming of mirrorless (hint: that’s how mirrorless cameras will undoubtedly address this issue in the future).

    DSLRs have also been optimized to make quick phase-detect AF measurements in between those quick mirror blackouts, allowing cameras like the D5 and Canon’s 1D X to acquire AF almost instantaneously even during 12 and 11 fps bursts. Impressive to say the least. That’s not to say mirrorless cameras aren’t catching up – in good light, Samsung’s NX1 can often successfully continuously refocus at 15 fps. Which means, yes, we do have to call out Nikon for suggesting that all mirrorless cameras have ‘soft and slow AF’: we can’t help but wonder if in that particular video sequence, the Sony Alpha series camera were left in AF-S, as cameras like the a7R II can, in fact, successfully refocus on approaching subjects (and when it can’t, the box doesn’t remain green as it does in the out-of-focus example in the Nikon press conference video – unless the focus mode is left in AF-S).

    Regardless, though, with mirrorless cameras you’re still left with the issue of difficulty in following the subject without a live view during bursts.

    Video: Matt Granger

    Nikon D5 and D500 Push the Boundaries of DSLR

    Another feature that really helps fast-paced photography is direct access to AF point selection. The D500 is the first DX-format Nikon to sport a dedicated AF-selection joystick, pictured right below and to the left of the AF-ON button. In fact, short of the D4/D5-series of cameras, it’s the only Nikon camera to feature this joystick. Cameras like the D750 and D810 dedicate their D-pads (pictured here above the ‘info’ button) to AF point selection, which works well, but never felt as fast as Canon’s dedicated AF-selection joystick. So the joystick is a welcome addition.

    And if we understand correctly, the D500’s touchscreen LCD can also be used to directly access AF point selection (don’t quote us on this yet though). We first saw this on the D5500, where in OVF shooting you could dedicate the right half of the touchscreen to AF point selection. This made it really easy to use your thumb to instantly jump over to any AF point instantaneously, without your eye ever leaving the viewfinder. It’s actually faster than using a dedicated joystick, and we’re hoping to see similar functionality in the D500. The D5 does not retain this functionality with its touchscreen, though.

    This brings me to a point I’ve made for some time to manufacturers now: why not just replace the AF joystick and area where your thumb rests with an AF touchpad? It could be relatively small, but with a 1:1 mapping to selectable AF points such that – over time – your thumb would learn to quickly jump to, or near, any desired AF point. For enhanced precision of selection, make the touchpad pressure sensitive and have different pressures activate different granularity of AF point movement. Want to avoid accidentally shifting the AF point? Allow the user to adjust pressure sensitivity of the touchpad. The possibilities are limitless with some good hardware and some clever programming.

    Speaking of fast AF point selection, those fond of the ‘focus and recompose’ technique should take note: turn on Nikon’s ‘3D tracking’ in AF-C, place your selected AF point over your subject, half-press and hold the shutter button, then recompose. This is probably the fastest way to select a different AF point: by having your camera do it automatically using Nikon’s industry leading subject tracking. If your subject falls outside of the AF area, just let the camera track it all the way out to the nearest AF point, then hold down the AF joystick (‘sub-selector’) to lock AF, and continue recomposing.

    Nikon D5 and D500 Push the Boundaries of DSLR

    Speaking of ergonomic improvements, notice anything different near the shutter button? That’s right, you no longer have to re-assign the movie button to ISO, because there’s now a dedicated ISO button! This is a boon for one-handed shooting: previously, I’d always reassign the movie record button to ISO so I could change ISO setting during one-handed shooting (since the ISO button is usually on the left side of Nikon DSLRs).

    It’s also worth pointing out the button next to the ISO button: the dedicated exposure compensation (EC) button. Common to most higher-end Nikons, this button is really not to be overlooked. It means easy, consistent access to exposure compensation no matter what shooting mode you’re in, including M mode with Auto ISO. Certain competitors without dedicated EC dials or buttons make it it quite difficult to bias brightness in M mode with Auto ISO engaged (looking at you: 1D X, which will make you sacrifice the SET button for EC or make you pull your eye away from the viewfinder to use the Q menu to adjust EC in M mode).

    Nikon D5 and D500 Push the Boundaries of DSLR

    Not to be overlooked is the new SB-5000 Speedlight: the company’s new flagship flash. Its standout feature is its ability to operate and trigger via radio frequency, a first for Nikon’s line of portable flashes. This brings the Nikon system in-line with what Canon has offered for some time now, and also obviates the need for 3rd party accessories.

    Nikon claims that when the flash is paired with the WR-R10 Wireless Remote Adapter set and a D5 or D500, the flash will operate without a direct line of sight at a range of up to approximately 98 feet (30 meters). With that same combination, the flash will be able to control up to six groups or 18 Speedlights. Photographer Todd Owyoung confirms that Nikon CLS features like TTL, Manual power, Groups, and Flash Exposure Compensation settings are all accessible directly via the camera menu system as it essentially always has with Nikon’s sensible flash system design. Just with the added power of radio control, now. And with Nikon’s extensive button customization, this will all be accessible with just one button press.

    The SB-5000 is a significant addition to Nikon’s flash line-up, not only for the radio-triggered control it brings during applications where line-of-sight isn’t feasible or practical, but also because pairing flashes to the WR-R10 is arguably preferable to pairing to the outdated SU-800 commander – which is so dated that it attaching it to your camera disables Auto ISO. That said, we really hope to see an radio-controlled update to the SU-800 commander, since the WR-R10 remote adapter doesn’t have an IR/red AF assist beam, which I personally find indispensable for dance floor photography at weddings where I typically only use off-camera flash anyway and, therefore, prefer not to waste the weight of a full-blown flash on my hotshoe.

    Which reminds me: I don’t mind the lack of a built-in flash one bit on the D500 (or D5 for that matter), as I’ll take the bigger pentaprism box and its increased viewfinder magnification (or space for a higher resolution metering sensor) over an on-board flash that I’ll never use compared to the bounce or off-camera flash of a Speedlight.

    Nikon D5 and D500 Push the Boundaries of DSLR

    The D5 and D500 are Nikon’s first 4K capable DSLRs, but 4K comes with some severe limitations. On the D5, recording is only available for 3 minutes at a time (29:59 for the D500), and both cameras record 4K UHD (no DCI 4K) with a heavy crop factor. It’s nearly a 1.5x crop factor (nearly Super 35) on the full-frame D5, while the D500 experiences an even larger crop factor for 4K, pictured in red above (the yellow rectangle outlines the DX/Super 35 area on the D500, compatible with Full HD).

    All in all – and perhaps we’re being a bit cynical – we’re not terribly excited about the inclusion of 4K on the two cameras. Yes 4K can be a pretty handy thing to have (and the uses for it will only increase as more people buy 4K capable displays), but there are numerous hints that these cameras aren’t making the most of it. Aside from the heavy crop factors above, lack of oversampling and almost certain presence of rolling shutter will likely limit the usefulness of 4K video from these cameras. Furthermore, the continued absence of focus peaking to aid manual focus or zebra warnings to help set exposure are starting to look like major oversights. And, although we’d love to be surprised, we’re concerned that Nikon’s continued adherence to the less efficient 8-bit H.264 compression system and its reluctance to publicize bitrates means the in-camera capture won’t be as exciting as the headline specs suggest. That said, there’s always the option to output 4K over HDMI to an external recorder, so it might find some use for more dedicated video shooters – if a good signal is sent over HDMI.

    And then there’s autofocus in video, where Nikon DSLRs tend to fall well behind the competition. Lack of any form of on-sensor phase-detect AF, even available in Canon’s nearest D500 competitor the 7D Mark II, means that AF in video is essentially unusable.

    Nikon D5 and D500 Push the Boundaries of DSLR

    On a more positive note, there are some solid additions to video on these cameras, like Active D-Lighting (ADL). We’ve always found Nikon’s ADL to be quite effective at reducing exposure to retain highlights, while boosting deeper tones to retain shadows. And ADL does a nice job of this global contrast reduction while attempting to preserve local contrast using its advanced tone-mapping algorithms.

    This can be computationally intensive though, so has not been available previously in video. With the new EXPEED 5 image-processing engine, though, ADL is available in movies at resolutions up to 1080p.

    For incredibly high contrast scenes, when ADL’s highest setting may not be enough to tame the scene’s extreme contrast, you can use the Flat picture profile and grade your footage later.

    Nikon D5 and D500 Push the Boundaries of DSLR

    On the D500, the EXPEED 5 processor even enables electronic vibration reduction (VR) in videos up to 1080p. Electronic VR can correct for horizontal and vertical movement, as well as rotation. This helps stabilize video footage, particularly when combined with optical VR in lenses.

    The combination of electronic (or ‘digital’) and optical VR or IS (image stabilization) is something we tend to see more of in mirrorless cameras, like Olympus’ E-M5 II or the latest 1″-type sensor compacts from Canon and Sony. It’s great to see in a DSLR form-factor.

    There’s no mention of this feature in the D5, though.

    Nikon D5 and D500 Push the Boundaries of DSLR

    Then there’s that continuously-connected wireless system. Snapbridge sounds very impressive – making use of the low-energy Bluetooth standard to maintain a connection between the cameras and a smart device so that images can be transferred without having to constantly re-establish connections. Our experiences suggest that the easier a feature is to use, the more likely we are to use it and the more likely we are to appreciate its benfits (something that often crosses our minds when DSLR shooters tell us they don’t use video on their camera). 

    And in our connected age, there’s no excuse for camera manufacturers to not facilitate ease of image management and sharing. DSLRs have it a little tough in this regard: they’re not running the full-blown OS smartphone cameras have access to, which means that apps and ecosystems are limited in scope. But we’ve seen smartphone connectivity evolving in DSLRs, and we’re all for it. We’ll be curious to test out how SnapBridge functions on the D500.

    We’ve covered a bit of ground in this slideshow, so if we were to sum up our overall thoughts on these cameras, they’d be as follows: we’re impressed that Nikon has taken a tried-and-true system and improved significantly on it. Nikon has addressed shortcomings, like lack of cross-type AF sensors, radio-controlled flash, buffer depth and burst speeds in DX format, as well as added some serious goodies: unprecedented AF frame coverage, low light AF ability, and automated focus calibration. Combine these with best-in-class object tracking in continuous AF, and the high performance sensors we typically see from Nikon that offer class-leading ISO performance and dynamic range, and we potentially have some industry-leading DSLRs on the horizon.

    Articles: Digital Photography Review (dpreview.com)

  • Weekly Photography Challenge – Panoramic Photos

    Panoramic or ultra wide views of scenes are popular and work well for many different subjects.

    David Yu

    By David Yu

    David Yu

    By David Yu

    Weekly Photography Challenge – Panoramic Photos

    If you have never done a panoramic photo now it your chance to try it. The simplest way to create one is to just crop a regular image into one that is really long and narrow. Make sure the subject fits the format and you aren’t cutting off anything important to the composition.

    The other, more complex way to make a pano is to shoot a series of images and stitch them together, usually using Photoshop. We have a few articles here on dPS on how to do that if you need some tips:

    • How to do Landscape Panoramic Photography
    • How to Shoot Panoramic Photos
    • Getting Started in Panoramic Photography (beginner)
    • Step By Step How to Make Panoramic HDR Images (advanced)
    • HDR Vertorama Photography – How to Create Mind-bending Images (advanced)
    • Step by Step Using Merge to Panorama in Lightroom (beginner)
    Guy Lejeune

    By Guy Lejeune

    David Kingham

    By David Kingham

    Stavros Markopoulos

    By Stavros Markopoulos

    Jeff Wallace

    By Jeff Wallace

    Vonderauvisuals

    By vonderauvisuals

    Inefekt69

    By inefekt69

    Share your images below:

    Simply upload your shot into the comment field (look for the little camera icon in the Disqus comments section) and they’ll get embedded for us all to see or if you’d prefer upload them to your favourite photo sharing site and leave the link to them. Show me your best images in this week’s challenge. Sometimes it takes a while for an image to appear so be patient and try not to post the same image twice.

    Howard Ignatius

    By Howard Ignatius

    Chuck Coker

    By Chuck Coker

    Don Whitaker

    By Don Whitaker

    Linus W

    By Linus W

    googletag.cmd.push(function() {
    tablet_slots.push( googletag.defineSlot( “/1005424/_dPSv4_tab-all-article-bottom_(300×250)”, [300, 250], “pb-ad-78623” ).addService( googletag.pubads() ) ); } );

    googletag.cmd.push(function() {
    mobile_slots.push( googletag.defineSlot( “/1005424/_dPSv4_mob-all-article-bottom_(300×250)”, [300, 250], “pb-ad-78158” ).addService( googletag.pubads() ) ); } );

    The post Weekly Photography Challenge – Panoramic Photos by Darlene Hildebrandt appeared first on Digital Photography School.


    Digital Photography School

  • Activeon launches Solar X action camera that’s powered by the sun

    A solar-powered action camera that can take 70% of its charge from the sun in just 30 minutes has been announced by Activeon. The Solar X uses a 16MP CMOS sensor to shoot a combination of stills and video footage, and can supplement its two-hour internal battery with four hours of additional charge from a pair of solar panels mounted on its detachable charging case. In Burst Speed Charging mode the case takes half an hour to get the battery from flat to 70%, and then it takes a further half an hour to get it to 100%. 

    The Solar X uses a 2″ touch screen for its menu system, as a viewfinder and for viewing footage recorded. Video can be recorded in what the company calls 2160p 4K resolution, but at a rate of 15 frames per second. The camera can manage six frames per second in stills mode, and users will have control of white balance, ISO and exposure values. The camera can also detect when it is mounted upside down. Built-in Wi-Fi allows the Solar X to be controlled via a smartphone app, and the company will launch an automatic cloud service for its users. 

    The Activeon Solar X will be available from March at around $ 430. 

    For more information see the Activeon website. 

    Articles: Digital Photography Review (dpreview.com)

  • DIY Loft Kits Bridge the Gap Between Furniture & Architecture

    [ By Steph in Design & Furniture & Decor. ]

    loft kit 1

    Add 160 square feet to your tiny, high-ceilinged apartment without consulting an architect or getting a permit thanks to DIY loft kits that fall somewhere between a renovation and the lofted beds you can snag at IKEA. A company called Expand Furniture makes the process of creating a mezzanine level as easy as installing a large piece of furniture, with models ranging from a bed platform to a entire extra room.

    loft kit 2

    loft kit 5

    The three kits don’t come cheap, ranging from about $ 1,500 to over $ 4,000, but they’re still less pricey than permanent additions, and don’t require owning your apartment or getting your landlord’s permission to remodel. The DIY Loft Bed Kit has enough room for a mattress, nightstands and a bit of free floor space, and takes just four hours for two people to set up.

    loft kit 3

    loft kit 4

    loft kit 6

    The modular Vancouver DIY Loft T8 Kit is height- and width-adjustable, and you can add on all sorts of accessories, like stairs of varying steepness, skylights and a variety of guard rails. The priciest kit, the New York DIY Loft T15, is large enough to be used as an entire elevated bedroom or office. All of the kits ship flat-pack from North American warehouses.

    loft kit 7

    loft kit 9

    desk

    table

    Expand Furniture also offers a range of impressive transforming items for compact spaces, including murphy beds, pop-up coffee tables and bookcases that flip around to reveal either a fold-down work surface or a mattress, all in one slim unit. The website is full of fun stuff for small-apartment-dwellers to fantasize about purchasing, if only they had $ 8,000 to drop on a king-sized bed hidden behind a sofa.

    Share on Facebook


    [ By Steph in Design & Furniture & Decor. ]

    [ WebUrbanist | Archives | Galleries | Privacy | TOS ]


    WebUrbanist