Blog

  • CP+ 2016: Nikon shows off new D5, D500 and DL compacts

    CP+ 2016: Nikon shows off new D5, D500 and DL compacts

    Attendance is up at this year’s CP+ show in Yokohama Japan, and that’s partly thanks to new products from some of the biggest camera manufacturers, including Nikon. We’re at the show, where large crowds are gathering around Nikon’s booth to get their hands on the new DL-series compacts, and two new DSLRs, the D5 and D500. 

    CP+ 2016: Nikon shows off new D5, D500 and DL compacts

    Here’s the new D5, Nikon’s new flagship FX format DSLR. Built around a new 20.8MP full-frame CMOS sensor, Nikon claims the D5 to offer leading high ISO performance due to color filter array tweaks that allow the sensor to capture more light than before. The D5 also features a newly-developed EXPEED 5 image processor. This powerful processor is necessary to provide continuous shooting at 14fps and 4K video capture.

    CP+ 2016: Nikon shows off new D5, D500 and DL compacts

    The D5 features a new autofocus system with 153 AF points, 99 of which are cross-type. All points focus down to -3EV. Only 55 points are user-selectable, but that’s OK: in AF-C, Nikon’s trustworthy 3D tracking system will automatically select the right point for you as it tracks your initially selected subject. And it’s more reliable than you might think.

    Here’s why: the camera’s metering sensor has doubled in resolution compared to the 91k-pixel sensor in the D4s, to 180k. The increased resolution makes a big difference in the camera’s ability to identify and follow a subject you initiate focus on. It even means that face detection now prioritizes eyes during viewfinder shooting (you’ll literally see the camera automatically select an AF point over a person’s eye in Auto Area mode), and continues to follow them no matter where they move to within the frame – even at 12 fps. 

    Frankly, we’ve never quite seen anything like it.

    CP+ 2016: Nikon shows off new D5, D500 and DL compacts

    CompactFlash media has been around a long time, and slowly, other formats are emerging which may ultimately replace it. Canon’s new Canon EOS-1D X Mark II features twin card slots for CF and CFast, but Nikon has chosen a different route (and different media) offering two versions of the D5, one with support for twin CF cards (shown here) and one with dual XQD cards. XQD is capable of greater data throughput but for now, the cards are pricey, and lack the familiarity (and ubiquity) of CF cards and card readers.  

    CP+ 2016: Nikon shows off new D5, D500 and DL compacts

    Nikon’s circular screw-in eyecups have been a feature of its professional SLRs for decades, but the D5 features a distinctly Canon-like removable eyepiece, which can be replaced with various forthcoming viewfinder accessories – details are currently a bit vague. One thing that we did learn, however, is that once it has been removed, this eyepiece is very difficult indeed to get back on. 

    CP+ 2016: Nikon shows off new D5, D500 and DL compacts

    Ethernet, USB 3.0, HDMI and a microphone jack are just some of the D5’s many I/O ports. Few will be routinely used by the average enthusiast, but this is a camera built for the many and various needs of professional photographers in various fields. 

    CP+ 2016: Nikon shows off new D5, D500 and DL compacts

    As such, the D5 is built like a very nicely sculpted brick. Fully weather-sealed and manufactured to the highest standard that Nikon can manage, the D5 is designed to withstand heavy professional use for many years.  

    CP+ 2016: Nikon shows off new D5, D500 and DL compacts

    Next up is perhaps the most keenly-awaited camera (at least among our readers) of recent years. The D500 is Nikon’s long-awaited replacement for the venerable D300S. We thought the day would never come, but here it is. At 20MP, the D500 offers lower resolution than the D7200, but an altogether higher quality of build and a deeper feature and performance set. It’s also the first DX camera to offer button illumination.

    CP+ 2016: Nikon shows off new D5, D500 and DL compacts

    Key to this feature set is autofocus. The D500 uses the same AF system as the D5, but because its sensor is smaller, the AF array covers more of the frame. Almost all of it, horizontally. This – plus the 1.5X crop factor of the APS-C format sensor, makes it very attractive for sports and wildlife photography. And a maximum frame-rate of 10 fps doesn’t hurt.

    CP+ 2016: Nikon shows off new D5, D500 and DL compacts

    Although not quite as bulletproof-feeling as the D5, the D500 is without doubt a ‘pro’ camera and one that we suspect will find its way into many professional photographers’ hands. It’s a great second camera to a D4 or D5, but also makes an attractive ‘long lens’ body for anyone shooting a full-frame Nikon system.

    Like the D5, the D500’s autofocus system seems to be spookily capable of tracking subjects around the frame (‘3D tracking’), even in our limited use of the camera up to this point. It can even do so effectively at its maximum 10 fps frame rate, no doubt aided by the faster processor and the same high-resolution 180k-pixel RGB metering sensor that’s in the D5. We’re hoping to be able to shoot with a final shipping sample in the next few weeks. 

    CP+ 2016: Nikon shows off new D5, D500 and DL compacts

    The D5 and D500 both replace previous cameras, but the DL range is all-new. Nikon released three DL-series compacts at CP+, the DL24-85, DL18-50 and DL24-500. All three are built around 20MP 1″-type CMOS sensors (probably the same sensor used in the 1 J5), and the model names denote the equivalent lens ranges of the cameras. 

    CP+ 2016: Nikon shows off new D5, D500 and DL compacts

    The reason behind this, Nikon explained to us, is that the company wants people to buy the cameras as if they were shopping for lenses. So someone who needs an 18-50mm lens might reach for the DL18-50, while someone looking for ultimate flexibility might reach for the DL24-500.

    CP+ 2016: Nikon shows off new D5, D500 and DL compacts

    The DL-series is aimed specifically at DLSR users who want a smaller second (and third, and maybe forth) camera. The question of where this leaves the slightly stagnant-looking 1 system remains open. We asked Nikon but didn’t get a definitive response. Clearly, executives are keeping future product strategy on the DL…

    Articles: Digital Photography Review (dpreview.com)

  • Tips to Help You Start a Successful Photo Blog

    As you learn more about using your camera, and start taking beautiful pictures, you might also want a way to share them with the rest of the world. There are many social networking platforms that are ideal for this sort of thing like: Instagram, Flickr, Google Photos, Tumblr, and Facebook, along with hundreds more.

    However, one of the most popular, and effective ways, to share your pictures is a simple, humble, tried-and-true blog. Even though blogs are sort of like grandpas in our modern internet age, there’s a reason they have stuck around for more than two decades: they’re intuitive, easy to set up, and they allow you to have full control over your content. Many photographers enjoy using blogs because of their flexibility and customizability, and if you want to spent a bit of money for a dedicated blog platform like Squarespace, or a self-hosted WordPress installation, you can get even more creative.

    If you are thinking about pursuing this route there there are some things you need to consider before setting up your own photo blog.

    There are many sites that let you build photo blogs, several of which do it for free.

    There are many sites that let you build photo blogs, several of which are free.

    Know why you are doing a blog

    This first point seems kind of obvious, but a lot of photographers find their blogs stalling out, and gathering dust after a few months, because they did not define their purpose for doing the blog when they first began. Many people start blogs because they just want to share random pictures, but if you want a viable long-term blogging solution, you’re going to need something more.

    Are you starting a photo blog to get your name out there, and generate sales leads (potential customers)? Do you want to make a mark in your community? Do you want to simply post photos you think are interesting? Whatever your reason for doing a photo blog, it’s important to make sure you at least have one, in the first place. If you have never done a photo blog, then it’s likely you are doing it for personal reasons, such as trying to learn and grow as a photographer. That is an outstanding goal, and one that has helped many other bloggers, become much better at photography as well.

    Once you know precisely why you are doing your blog, it will serve as a guide for everything you post. Brandon Stanton started the well-known Humans of New York blog with a specific purpose: to photograph 10,000 people living in New York City. This helped him have a sense of purpose and direction when taking and posting photos, and doing the same thing can greatly benefit you as well. If you cannot explicitly state why you are doing a blog, it is much more likely to gather virtual dust after a short time, and any readers you do manage to pick up, will possibly stop investing their time in it as well.
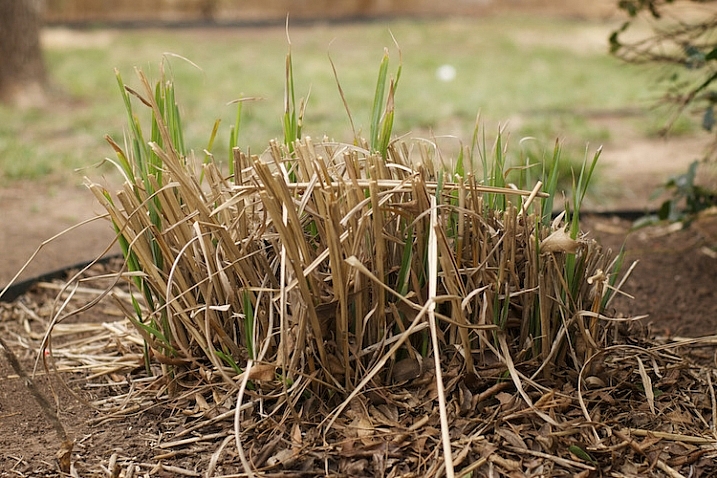
    One of the first pictures I ever posted to my blog. It's not even an interesting photo but I was just starting out and can look back on this to see how much I have learned since then.

    One of the first pictures I ever posted to my blog. It’s not even an interesting photo, but I was just starting out, and can look back on this to see how much I have learned since then.

    In 2008 the web analytics firm Technorati found that roughly 95% of the blogs it tracked, went more than 120 days without being updated. When your blog goes four months without anything new, it is more than likely a failure. So how can you keep your blog not only surviving, but thriving past 120 days, and well beyond? Here are few more tips that might help:

    Clearly articulate the purpose of your photo blog to your viewers

    Attention spans are short, and people today have a never-ending stream of tweets, news clips, soundbites, app updates, and cat videos coming their way, almost every waking moment. So,how on earth can you make your blog stand out, and get noticed amid all the other sites, apps, and feeds that people check on a daily basis?

    New readers should be able to tell within five seconds, what your blog is about. The best option is to have a specific niche that your photo blog serves (e.g. wildlife, surfers, snowflakes, street pictures, etc.). But, even if it’s just pictures you like taking for no particular reason, you should at least make that clear to your readers upfront. You’re basically setting expectations right from the outset, and giving your audience a clear sense of what they will get out of reading your photo blog. Some people do this by having a descriptive name for their blogs, a brief tagline, or a set of pictures that instantly conveys a sense of purpose (e.g. flowers, cattle, cars, sunsets, etc.). Whatever the purpose of your photo blog is, if your readers can’t figure it out, they’re going to quickly move elsewhere.
    My blog is specifically for photos I take with my 50mm lens, and I make that clear to my readers immediately when they visit the site. If you don't let your readers know what your blog is about they will probably not stick around very long.

    My blog is specifically for photos I take with my 50mm lens, and I make that clear to my readers immediately when they visit the site. If you don’t let your readers know what your blog is about, they will probably not stick around very long.

    Post new content regularly

    Not every blog that is updated regularly is going to be a success, but every successful blog is updated regularly. I have seen too many photographers start blogs that are updated daily, then weekly, and before long, the rate at which new pictures are posted slows to a trickle. Soon it’s a photo every couple weeks, then one a month, and then a written apology by the blogger about how he or she has just been so busy lately, but they promise to start posting more photos soon. More often than not, soon becomes later, then later becomes never, and a once-promising photo blog becomes another statistic of failure rates.

    The best way to combat this problem, is to not post pictures whenever you feel like it, but instead post them on a regular and predictable basis. This gives your readers something to expect, and also imparts upon you, the blogger, a sense of accountability, which helps keep your camera in your hands and out of your closet. My photo blog is titled “Weekly Fifty”, and because it requires me to post a picture every single week, I almost always carry my camera with me, and am constantly looking for photo opportunities. In almost three years I have never failed to post a photo each Wednesday morning, which has helped me build a nice following, with regular commenters as well.

    A few years ago I ran out of ideas for pictures to post, but I knew I had to stick with my weekly schedule so I made this image that turned out to be one of my more popular photos.

    A few years ago I ran out of ideas for pictures to post, but I knew I had to stick with my weekly schedule. So, I made this image, that turned out to be one of my more popular photos.

    One trick I like to recommend for photo bloggers, is to schedule your posts in advance. This doesn’t work well for blogs about news or current events, but as a photo bloggers you do not have to be timely in the same manner. I currently have complete posts (each with a photo, written explanatory text, and an accompanying 4-minute audio commentary) scheduled for the next six weeks. I use WordPress, which allows me to schedule posts in advance, so each of these six posts will be automatically published on subsequent Wednesdays at 1:00 a.m. This gives me a bit of padding, if I ever find myself in a position with lots of things going on in my life, and my readers know that they will get a new picture each week, no matter what.

    Of course the catch here, is that I can’t merely sit on my laurels in the meantime. I have to keep taking pictures, and producing new blog posts, so that six weeks from now I don’t run out of material. This type of accountability is enormously helpful for photo bloggers, and if you’re not sure where to start, I always recommend doing one picture each week. If that’s too much you can lower it, and if it’s not often enough you can increase it, but I have found that a weekly schedule is a sweet spot that gives you enough time to take pictures, and doesn’t overload your readers with so much new content that they start ignoring it.

    Engage with your audience

    Building a loyal audience is the holy grail of almost every blogger, but it’s not easy to do. Your readers have many obligations, alerts, people demanding their time, and often it’s difficult enough just to get them to visit your blog in the first place, much less comment on a photo, or offer some kind of reaction to it. Early in the life of your blog, visitors will usually not be invested in your pictures enough to leave comments. But, as you start to build traffic, and readership over time, you will likely have a few people who start to offer feedback on your images.

    When you do get commenters it’s essential that you interact with them, in order to build a sense of community, respect, and mutual sharing. If someone likes one of your pictures, say “Thank you” and ask if you can see some of their photos too. If someone offers a bit of constructive criticism on a picture, try re-taking a similar photo using their suggestions. You can offer a Call to Action by posting a photo, and encouraging your readers to take, and share similar photos in the comments section. This type of audience engagement benefits all parties; by giving you even more reasons to continue your blog, giving your readers a reason to keep coming back, and giving new readers a sense that your photos are interesting and worthy of comments.

    I ran my blog for almost a year and a half before getting any regular commenters. Now I get about 40 comments each month, a number with which I am very happy.

    This chart shows my comment statistics for calendar year 2015. I ran my blog for almost a year and a half before getting any regular commenters, and now I get about 40 comments each month. It’s not huge, but it’s a number with which I am very happy.

    If your blog grows to mammoth proportions, and you start getting hundreds of comments on each picture, it might not be reasonable to reply to every single one, but until that happens you need to take care to give each commenter a personal response. If people are taking time out of their day to leave comments on your pictures, knowing that you personally read and responded, will make them want to keep visiting your blog, and engaging with you as well as other readers.

    On my blog I have a few loyal readers who comment on every single picture, and it’s well worth a few minutes of my time each week to respond to the things they write. This helps make my commenters feel valued, and builds a sense of community that would not exist otherwise.

    Push content to your readers

    People rarely go out of their way to visit a blog, so instead you need to find a way to push your new pictures to them. One of the most effective ways of doing this is to ask your readers to sign up for email updates, but you can also use social networks to get the word out about each new post.

    Every Wednesday my email subscribers get that week’s photo in their email inbox, but I also publish a link to my blog on Facebook and Twitter, and put that week’s image in my Instagram feed as well. (With the last option people are not directed to my blog, but I still get to engage with them about my pictures.) If you would like to ultimately generate revenue from your blog you might want to focus on ways of pushing content to your readers that, as often as possible, will bring them directly to your site and not to somewhere else that also has your photos.

    I woke up the morning this photo was published and found two comments had already been posted at about 2am. This type of engagement is possible because these people subscribed to email updates. If you don't have a way of pushing content to your readers you will likely not get the same level of engagement as you would otherwise.

    I woke up the morning this photo was published and found two comments had already been posted at about 2am. This type of engagement is possible because these people subscribed to email updates. If you don’t have a way of pushing content to your readers you will likely not get the same level of engagement as you would otherwise.

    Define your success criteria

    I teach a Project Management class at Oklahoma State University. One concept we talk about often is how to tell if a project is successful, and the same holds true for your photo blog. At what point will you know that your blog has succeeded in meeting your goals? Will you be happy if you have two comments, and 10 social media shares for each picture you post? Are you looking for a way to generate a specific amount of revenue from your blog? Or is your success criteria more esoteric, such as using your blog for a sense of personal growth and development?

    Having a set of clearly-defined success criteria is not necessarily essential for a blog, but it will give you something to shoot for, and a way of knowing whether you have gotten there or not. Whatever your success criteria is, take care to not compare it to anyone else’s. For example one of your photos might get five comments and 10 social media shares, but then you talk to a friend who just had five thousand visitors to his blog. Whose blog is more successful? The answer is…they both are.

    Success depends entirely on how you define it, and thankfully the internet is big enough for millions of photo blogs to coexist. Congratulate your friend, and ask to see the photo that was so popular. Don’t make your blog’s success a competition, because and as long as you are happy with how things are going, then that’s the only thing that matters.
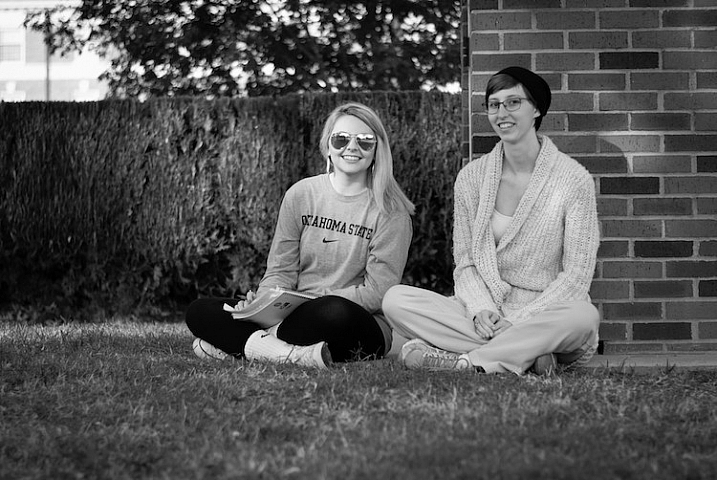
    This photo had a great deal of personal meaning to me, but it generated very little traffic and almost no comments. If my success criteria is only quantifiable through numbers I would have been let down, but instead taking this photo forced me out of my comfort zone and made me try something new. Because of that I considered this one of my better photos even though raw numbers might say otherwise.

    This photo had a great deal of personal meaning to me, but it generated very little traffic, and almost no comments. If my success criteria was only quantifiable through numbers I would have been let down, but instead the sheer act of taking this photo, forced me out of my comfort zone, and made me try something new. Because of that I considered this one of my better images, even though raw numbers might say otherwise.

    Ignore the numbers

    Visitor statistics can be so exciting, but they can also lead you down the path to the blogging dark side. It can be fun to log in to your account dashboard, and see that a recent picture generated 200 visitors, but those numbers don’t mean anything, if they don’t translate to reader engagement. Imagine building a store and getting hundreds of people to come see your wares, but having every one of them leave without making a purchase. Not only would your store be a failure, but you would quite likely be disappointed on a deeply personal level.

    As a photo blogger you need to strive for quality over quantity, and look for ways to build a loyal following, not just try to increase raw visitor statistics. You might get a nice feeling seeing one of your photos get hundreds or thousands of views, but what happens when a different (or far better) picture you post gets only a couple dozen views? Visitor traffic is a fickle mistress, and if you pin your blogging hopes and dreams on simply making the numbers go up, you could very well be setting yourself up for a painful failure.

    February 2015 was a big month for my blog, but the numbers have gone down dramatically ever since. Since my success criteria is not measured in raw numbers this drop in traffic makes no difference to me, but if numbers are your goal then you could very well end up chasing a white whale that can never be captured.

    February 2015 was a big month for my blog, but the numbers have gone down dramatically ever since. Since my success criteria is not measured in raw numbers this drop in traffic makes no difference to me, but if numbers are your goal then you could very well end up chasing a white whale that can never be captured.

    I used to run a movie and TV review website, and wrote an article about the now-defunct show, “Man versus Food” on The Travel Channel. Somehow the host of the show found out about the article, tweeted it to his followers, and that single article generated more traffic than anything else we had ever posted. The problem was that those visitors did not stick around, and within a few weeks we were back to the same relatively low numbers we always had. At the time I figured blogging success meant getting sky-high traffic numbers, and when those numbers did not pan out I thought we had failed.

    When I started my Weekly Fifty photo blog, I took an entirely different route and tried hard to ignore numbers about visitor statistics, and have been much happier as a result. I do my blog because it helps me learn and grow as a photographer, and I get a great deal of personal satisfaction out of it. I appreciate the continual challenge it offers. In short, I’m a happy and successful small-time photo blogger, because I don’t let numbers and statistics define what success means to me.

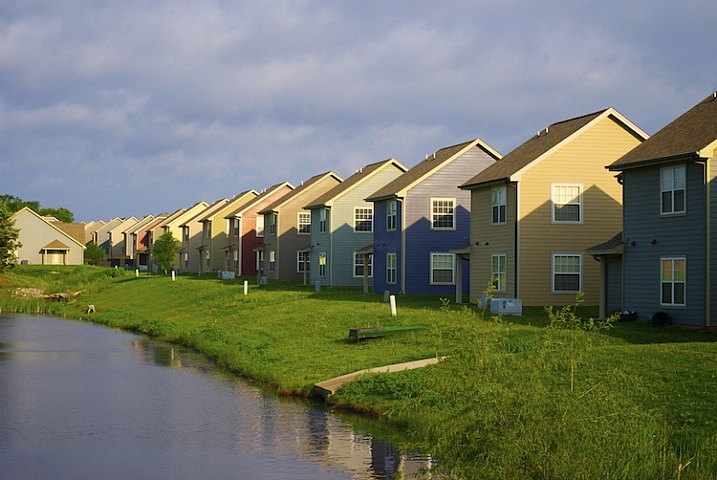
    This is by far the worst photo I have ever posted on my blog, and it's almost painful to look at it now. But early on in my blog I had no idea what I was doing, and it was only through taking lots of bad pictures that I learned how to make a good image. Even though this picture is kind of embarrassing, it served a valuable purpose both on my blog and for me as a photographer.

    This is by far the worst photo I have ever posted on my blog and it’s almost painful to look at it now. But early on in my blog, I had no idea what I was doing, and it was only through taking lots of bad pictures that I learned how to make a good image. Though this picture is kind of embarrassing, it served a valuable purpose both on my blog, and for me as a photographer.

    Do you have a photo blog, or are you thinking about starting one? I’d love to hear any tips you would like to share, and will try to answer any questions you might have as well. Leave your thoughts in the comments section below and I’ll do my best to engage with you, the dPS readers, so you feel valued and keep coming back to our site. :)

    googletag.cmd.push(function() {
    tablet_slots.push( googletag.defineSlot( “/1005424/_dPSv4_tab-all-article-bottom_(300×250)”, [300, 250], “pb-ad-78623” ).addService( googletag.pubads() ) ); } );

    googletag.cmd.push(function() {
    mobile_slots.push( googletag.defineSlot( “/1005424/_dPSv4_mob-all-article-bottom_(300×250)”, [300, 250], “pb-ad-78158” ).addService( googletag.pubads() ) ); } );

    The post Tips to Help You Start a Successful Photo Blog by Simon Ringsmuth appeared first on Digital Photography School.


    Digital Photography School

  • 2 Quick Ways to Add a Sunflare in Photoshop

    Sunflares can make an otherwise dull image, look pretty dramatic. It’s very tricky to get good images of a sunflare in-camera, especially when using natural light only, as the contrast between the light and dark parts of the image is often too great that no amount of Active-D lighting can fix. Thankfully, we have Photoshop and many special effects like sunflares can be magically created, added, or enhanced, using this software’s mind-blowing functionality.

    special-effects-sunflare-photoshop-tutorial

    Why add a sunflare?

    Special effects, such as a sunflare, ultimately boil down to the photographer’s personal taste. Here are a few reasons why sunflares may be added in post-processing.

    • To exaggerate the sun’s rays.
    • To enhance contrast and inject drama.
    • To hide unwanted clutter.
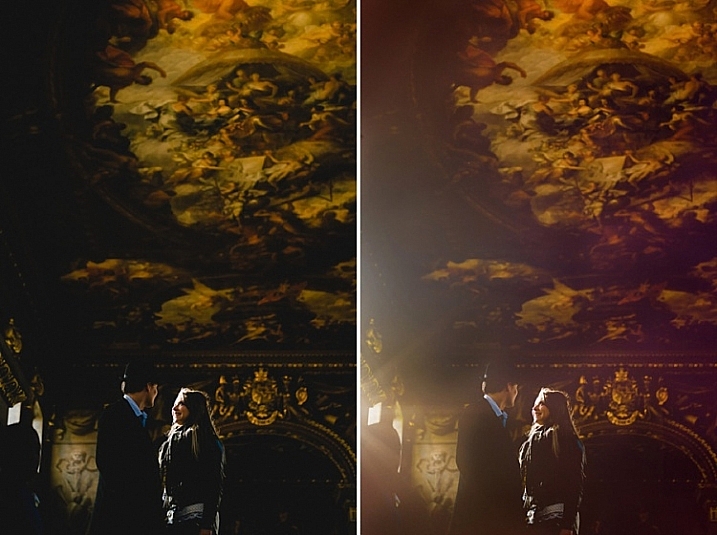
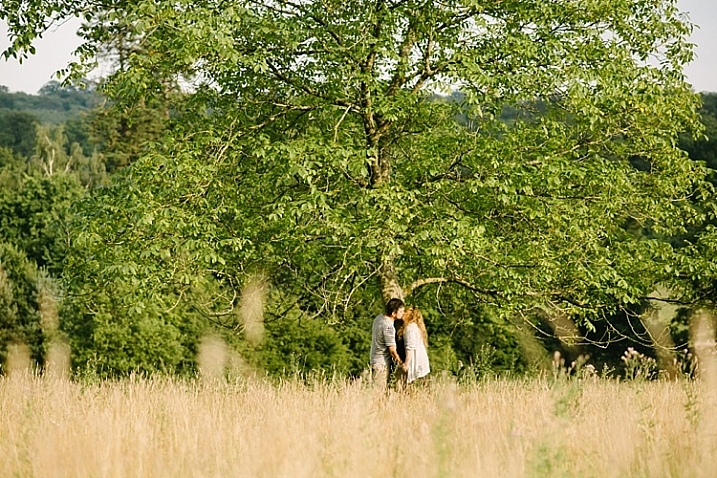
    • To achieve artistic effects, for example if you are aiming for a dreamy and romantic effect, or soft and hazy ambience, such as the image above right.

    When not to add a sunflare?

    When you discover the magic of Photoshop, you can easily get carried away by the excitement of adding special effects, and there’s the danger that you add it on all your images, even when completely out of context, out of place, or totally unnecessary. I suggest avoiding sunflares when:

    • There is no sun at all or any large light source, in the shot.
    • When it makes the image look completely fake, when you really mean for it to look natural.

    How to add flare in Photoshop

    As is the usual case in Photoshop, there are always several methods to do something. This tutorial focuses on two ways of adding a sunflare.

    special-effects-sunflare-photoshop-tutorial (1)

    1. Method one: Using the LensFlare filter

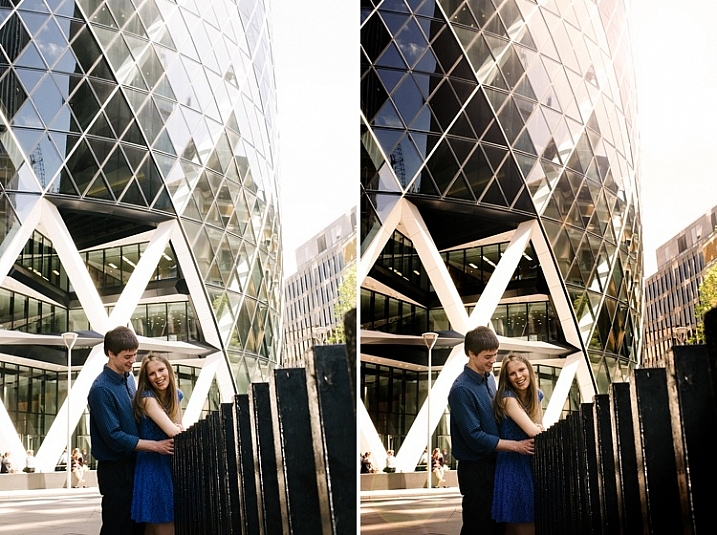
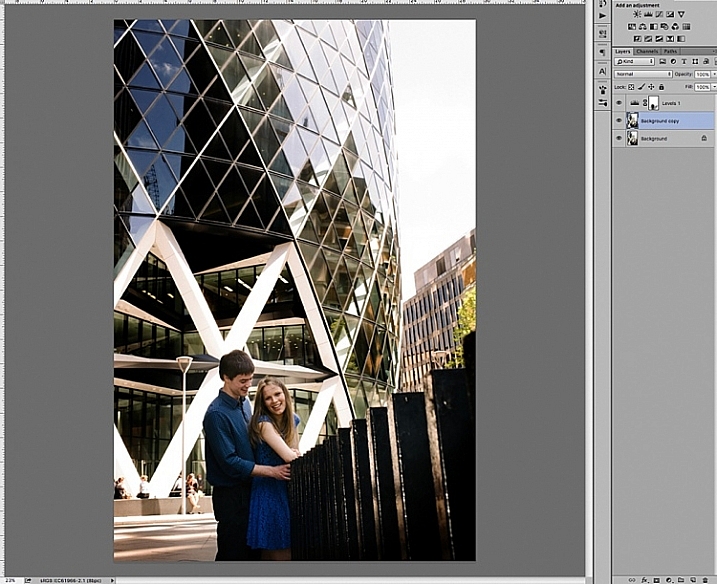
    Adding a bright sunflare to the image above won’t make much difference to an already washed out sky and part of the building. First of all you would need to create contrast by darkening the image. Copy the image on a new layer using CMD/CNTRL + J, and darken it using a Levels adjustment layer.

    special-effects-sunflare-photoshop-tutorial (12)

    Merge the background copy layer with the levels layer, by selecting both layers and typing CMD/CNTRL + E to merge them. Now you have a new darkened layer. Make another copy of the new darkened layer, then work on this new layer with the sunflare.

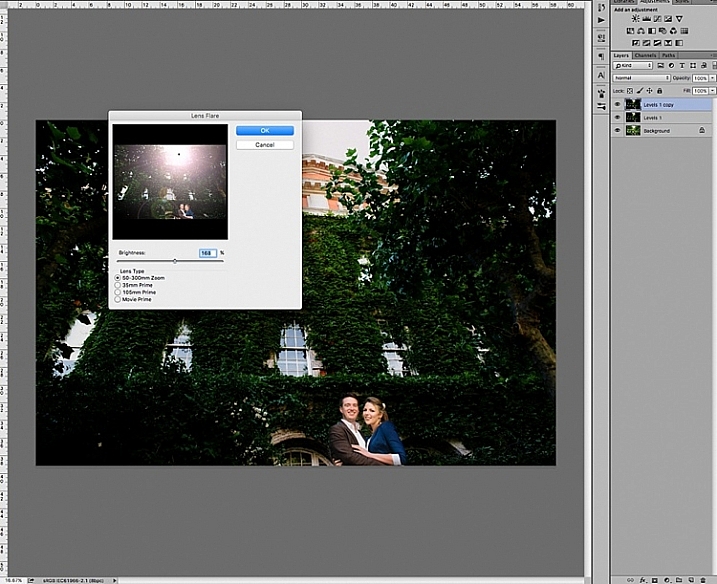
    When you add sunflare, it is automatically added on the layer as part of the image, and not on a new layer by itself. So to be safe, keep a copy of the darkened layer which you don’t touch. Always work on the new copy with the sunflare, so in case you make mistakes or need to reposition your sunflare, then you won’t need make a darkened layer all over again. You can just delete the layer you are working on, and duplicate your untouched dark layer, to start adding a new sunflare.

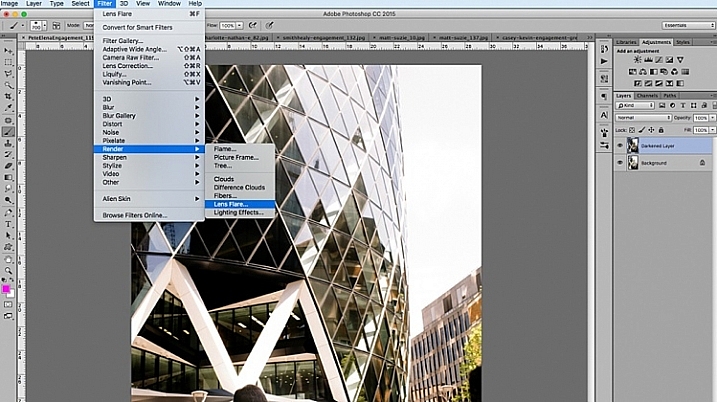
    In Photoshop, bring up the Lens Flare from the top menu bar using the Filter>Render>LensFlare drop down menu.

    special-effects-sunflare-photoshop-tutorial (1)

    You can experiment which type of lens flare you want to add, by clicking the circles next to the type of sunflare option, and adjusting the brightness intensity by moving the slider. Click OK when you’re happy with your choice, and the sunflare will be superimposed on your image on the same layer.

    special-effects-sunflare-photoshop-tutorial (8)

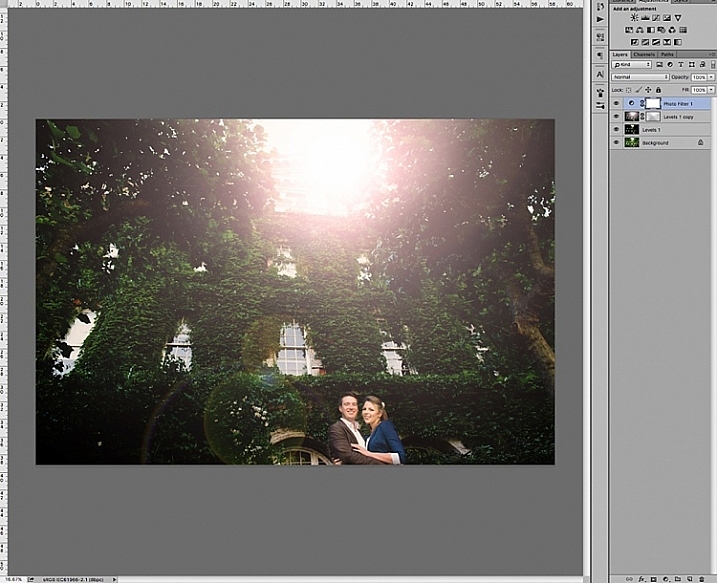
    Once the sunflare is applied to the image, add a layer mask, and using a soft black brush, remove some of the sunflare from areas you want to protect such as faces (make sure to paint on the mask, not on the layer).

    special-effects-sunflare-photoshop-tutorial (9)

    special-effects-sunflare-photoshop-tutorial (14)

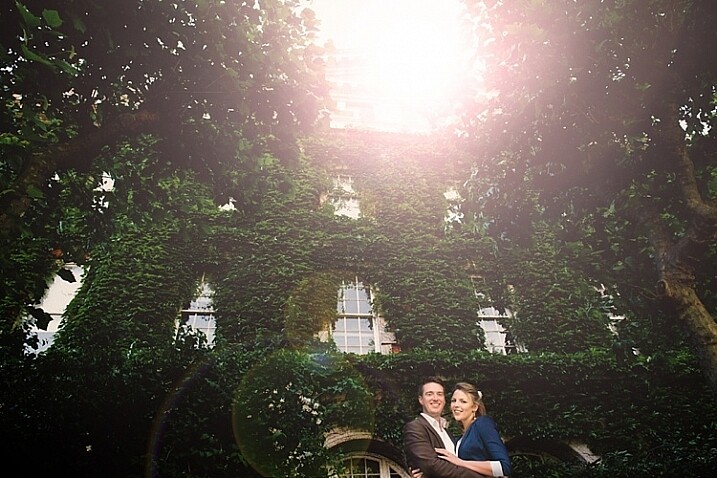
    To finish, I added a photo filter on top, to warm up the image. Below is the image before and after the sunflare has been added. It is always a good practice to save the image with sunflare as a new JPG file, and always save your Photoshop file (PSD) with all the layers in tact, in case you need to revisit it again in the future.

    special-effects-sunflare-photoshop-tutorial (3)

    special-effects-sunflare-photoshop-tutorial (2)
    2. Method two: Using overlays

    The built-in sunflares in Photoshop have very limited choices, as you have seen above. There are far more interesting sunflares of all shapes and colours available, in the form of overlays.

    Below is an example of an image with a faint sunflare added in Photoshop, using one of the built-in choices above. I don’t think this is dramatic enough. In this example, I am exaggerating the sunflare by adding a sunflare overlay.

    special-effects-sunflare-photoshop-tutorial (5)

    First darken the image with Levels, as in the first method above, using a layer mask to protect areas you don’t want to be darkened. Then apply the overlay on the entire image, as shown below.

    special-effects-sunflare-photoshop-tutorial (11)

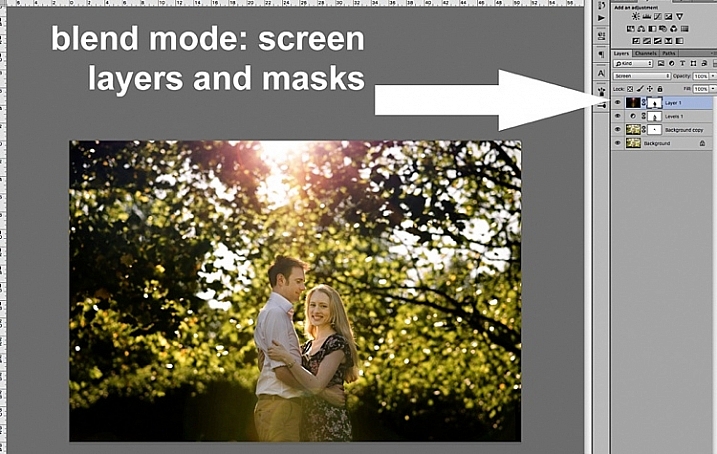
    Change the layer blend mode to Screen, which makes all the dark areas of the overlay disappear, and you will only be left with the light areas superimposed on your image.

    special-effects-sunflare-photoshop-tutorial (10)

    Below is the final JPG image with the new sunflare overlay, with the whole image darkened for more contrast.

    special-effects-sunflare-photoshop-tutorial (4)

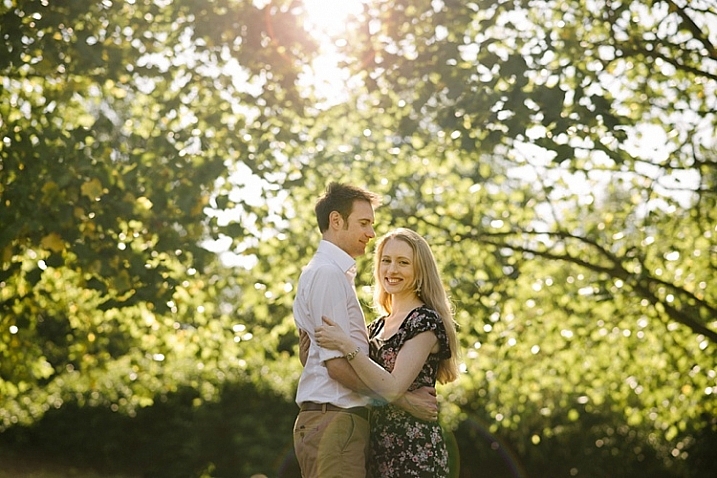
    Below is another image about to be treated with a sunflare overlay, but this time way more exaggerated than the example above.

    special-effects-sunflare-photoshop-tutorial (7)

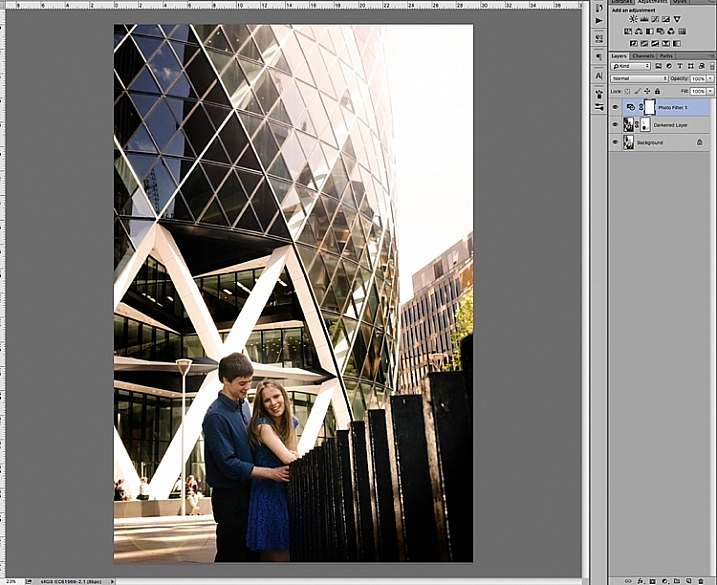
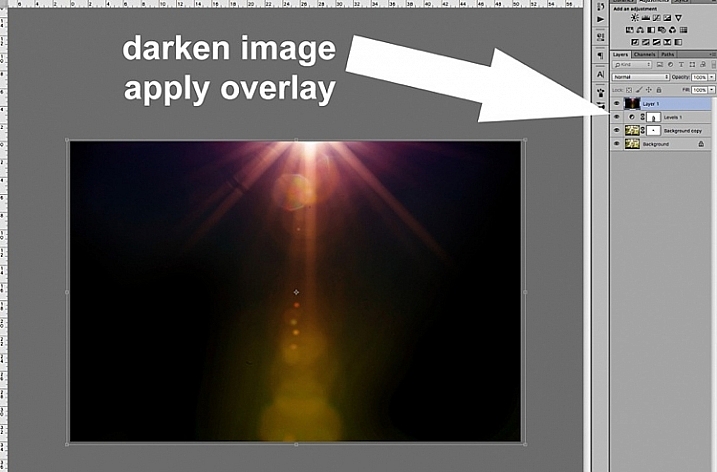
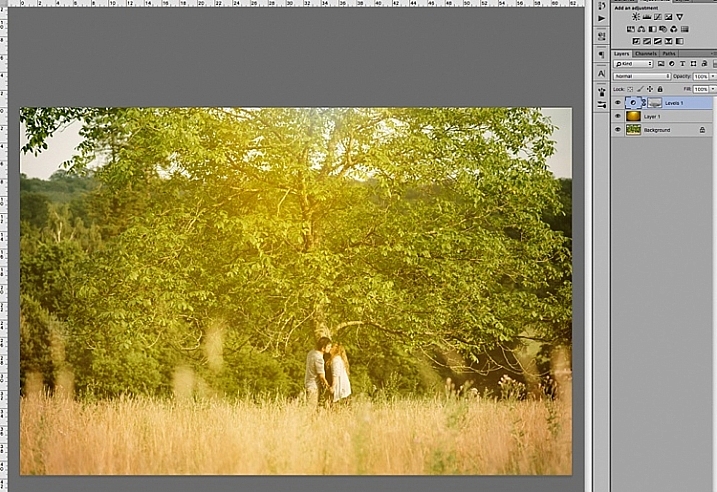
    The overlay is so strong, as you can see on Layer 1 below, I have applied a levels layer to brighten it a little, and a layer mask to gradually remove some of the overlay from areas I wanted to protect.

    special-effects-sunflare-photoshop-tutorial (7)

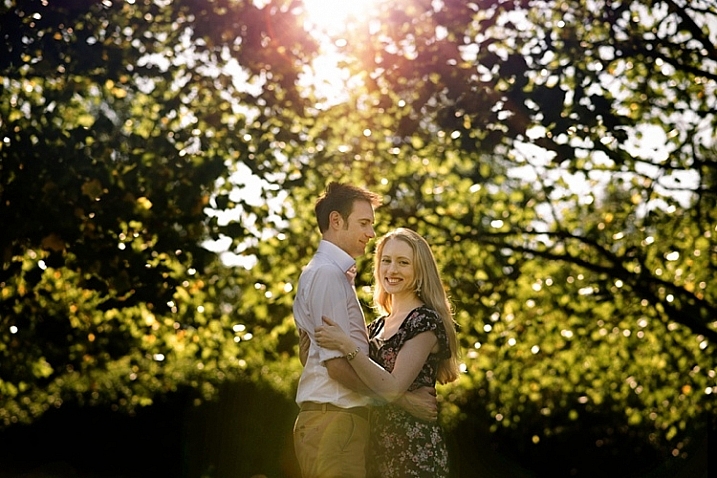
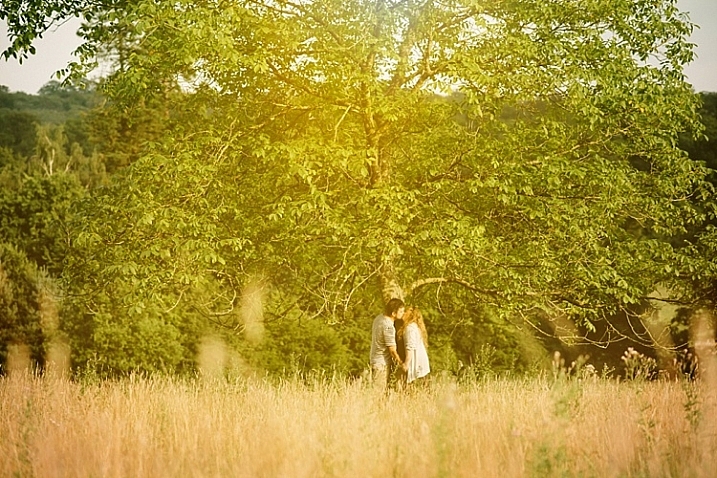
    Below is the final image with an exaggerated sunflare overlay, that looks like it has been photographed through a warm filter over the lens.

    special-effects-sunflare-photoshop-tutorial (7)

    A few things to note when applying special effects

    • Be subtle and experiment with the opacity to achieve the desired effect.
    • Darken surrounding areas to emphasize flare, especially on a very bright image.
    • Mask off special effects from faces, and areas that clearly do not need it. The built-in sunflares in Photoshop have circular flares that appear too perfect and hard-edged. You can always mask some of this away to take the edge off, and soften the flare effect.

    I hope you have enjoyed this little tutorial in adding a sunflare special effect in Photoshop. Do you have other tips and ways to add sunflares in post-processing? Please share them in the comments below.

    googletag.cmd.push(function() {
    tablet_slots.push( googletag.defineSlot( “/1005424/_dPSv4_tab-all-article-bottom_(300×250)”, [300, 250], “pb-ad-78623” ).addService( googletag.pubads() ) ); } );

    googletag.cmd.push(function() {
    mobile_slots.push( googletag.defineSlot( “/1005424/_dPSv4_mob-all-article-bottom_(300×250)”, [300, 250], “pb-ad-78158” ).addService( googletag.pubads() ) ); } );

    The post 2 Quick Ways to Add a Sunflare in Photoshop by Lily Sawyer appeared first on Digital Photography School.


    Digital Photography School

  • The journey: Michael Brown on photography at the edge of the world

    Michael Brown is an award-winning director and a pioneer of adventure filmmaking. He has summited peaks on all seven continents (including five summits of Mount Everest) and made first kayak descents of wild rivers in places like Bhutan and Chile, all with the camera rolling.

    Brown goes into some of the world’s most hostile environments — where there’s little room for error — and comes away with stunning visual footage and stirring stories that remind us of our shared humanity. He believes that if you can imagine a goal, you can achieve it.

    In his talk from PIX 2015 Michael takes us on a very personal journey to the edges of the world, including climbing Mt. Everest with blind climber Erik Weihenmayer. In the process, he shares important lessons about risks, relationships and the importance of challenging ourselves and mentoring others.

    To learn more about Michael’s work you can visit his web site at Serac Adventure Films.

    Articles: Digital Photography Review (dpreview.com)

  • Opinion: Enthusiast compacts have finally come of age

    Last December I was looking to buy a camera for my mom to replace her aging Panasonic travel zoom. It didn’t take very good photos but, to be fair, you can’t expect miracles from a 30x zoom camera with a 1/2.3″ sensor. She listed a couple of must-haves: it should fit in a purse, have a decent amount of zoom and have photo quality that was better than what she had now. She didn’t want to deal with changing lenses and my dad wanted it to have a viewfinder, if possible.

    Being somewhat knowledgeable in the digital camera field I knew that I needed to look at the 1″-type camera market first. Back in mid-December I had just a few options: the Canon PowerShot G3 X / G5 X / G7 X / G9 X, the Panasonic FZ1000 and the Sony RX100 and RX10 series. While quite a few of those cameras passed the ‘purse test’, none had focal lengths longer than 100mm equiv. For real zoom power there was only the Canon G3 X, Panasonic FZ1000 and Sony RX10, all of which were far, far too large. 

    The RX100 III and IV meet the size and EVF requirements but are just too limited in terms of zoom. The Panasonic FZ1000 is my favorite enthusiast superzoom but is way too large for a purse.

    Plan B was to find something in the middle: a slightly smaller sensor that had decent zoom, and my choice was Olympus’ Stylus 1s. It has solid image quality, well-designed controls, and a 10X zoom, making me think that I found just what I’d been looking for. Shortly after it arrived I did a quick FaceTime chat with the future recipient who thought it was too large for a purse, and I agreed, so back it went.

    At this point I felt as if I’d struck out. Anything with a decent zoom was just too darn big, and pocket cameras just wouldn’t cut it.

    The Sony Cyber-shot DSC-HX90V ticked all of the boxes on my shopping list, except for one: image quality.

    Not knowing what was coming out next (really!), I bit my tongue and bought a Sony Cyber-shot HX90V. It’s small, has a 30X zoom, a pop-up EVF (a la RX100 III/IV), flip-up LCD, and Wi-Fi. Sounds like the perfect gift, except for two rather important things. First, the sensor size is 1/2.3″, which is exactly what I was trying to avoid. Second, the lens is quite slow, with a maximum aperture range of F3.5-6.4. Thus, in low light, the camera will need to crank up the ISO, resulting in a big drop in image quality.

    The hole in the market

    What was missing in the 1″ sensor market was pretty obvious: something in-between the compact, short zooms and the giant superzooms. As anyone who has ever bought a piece of consumer electronics knows, your purchase is outdated as soon as it leaves the store. As luck would have it, the camera I’d been waiting for showed up on January 5th: the Panasonic Lumix DMC-ZS100.

    The Panasonic ZS100/TZ100 finds a middle ground between small/short zoom and huge/long zoom.

    The ZS100 (known as the TZ100 in most countries) ticked nearly every box on my list. It’s compact, has a reasonable amount of zoom (10X, 25-250mm equiv.), and an EVF (though it’s not a great one). Seeing how it uses the same sensor as the FZ1000, photo quality and 4K video should both be very good. The only downside I can find is that the lens, with a maximum aperture range of F2.8-5.9, is pretty slow. At least image quality should hold up when it has to increase the ISO sensitivity in low light. 

    Unfortunately, the ZS100 wasn’t set to ship until mid-March, so my mom was out of luck.

    Where’s my wide-angle?

    Still, there was one area of the 1″ camera market in which there was a void, and that was at the wide end. The Panasonic LX100 was really the only choice, but it’s considerably larger than what I was looking for.

    The Nikon DL18-50 filled in the last gap in the 1″ enthusiast compact market with its 18-50mm equivalent lens.

    Then, lo and behold, Nikon came running into the market with three new 1″ cameras (known as the DLs), which finally filled in that last gap. The camera that did so is the DL18-50 which, as its name implies, has an 18-50mm equivalent lens – easily the widest in this class. And it’s a fast one, with a maximum aperture range of F1.8-2.8. There are many other things going for it spec-wise; it has a 20.8MP sensor (likely from Nikon’s 1 J5 mirrorless camera), Hybrid AF system (the DL cameras are the only cameras in the 1″ category with this), tilting LCD, 4K video and a ‘SnapBridge’ Wi-Fi system that uses Bluetooth to maintain a constant connection with your phone. We haven’t tested it yet, but we’re really looking forward to it.

    The two other DLs have the same guts, but have focal lengths that fit in with the competition. The DL24-85 slots in-between the Sony RX100 III/IV and Canon PowerShot G7 X I/II, while the DL24-500 is similar to the Canon G3 X and Panasonic FZ1000. 

    Everyone wins

    When I started my search for that Christmas gift, the enthusiast compact market was so limited that I ended up purchasing the very type of camera that I was trying to avoid in the first place. Had Christmas been postponed about four months, the ZS100 would’ve been in a box with “To Mom” on it. 

    In the end, this year’s rapid growth in the enthusiast compact market didn’t help me personally. But there are now cameras for every situation, from wide-angle to super-telephoto. The enthusiast compact market has finally come of age, to the benefit of everyone. 

    * The G7 X has since been replaced by a Mark II model which offers a faster processor, improved Raw shooting and battery life, and refined ergonomics.

    Articles: Digital Photography Review (dpreview.com)

  • CP+ 2016: Fujifilm gets new X-Pro2 and X70 into photographers’ hands

    CP+ 2016: Fujifilm gets new X-Pro2 and X70 into photographers’ hands

    Fujifilm didn’t announce any new products at CP+ this year, but the show is the first chance that a lot of Japanese enthusiast photographers have had to get their hands on the X-Pro2 and X70, which were unveiled last month.

    CP+ 2016: Fujifilm gets new X-Pro2 and X70 into photographers’ hands

    In an effort to get cameras into photographers’ hands, Fujifilm is running a rental service at this year’s show, where prospective X-series users can hire gear while they’re attending the show. 

    CP+ 2016: Fujifilm gets new X-Pro2 and X70 into photographers’ hands

    Here’s the camera that a lot of people at the booth have come to see – the 24MP X-Pro2. The long-awaited replacement for the X-Pro1 brings a higher resolution sensor, upgraded processor and significantly revamped autofocus system. 

    CP+ 2016: Fujifilm gets new X-Pro2 and X70 into photographers’ hands

    Ergonomically, the X-Pro2 is very similar to its predecessor but in terms of performance, it’s a totally different beast. The snappier processor, revamped ergonomics and higher-resolution viewfinder all make a welcome difference to the camera’s operation. 

    CP+ 2016: Fujifilm gets new X-Pro2 and X70 into photographers’ hands

    Less obvious are the changes that Fujifilm has made under the hood. The X-Pro2 is weather-sealed and – Fujifilm claims – more able to withstand punishment than its predecessor. This is what happens to an X-Pro2 after it has been aged in a simulated (i.e. sped up) process which appears to have involved rather a lot of sandpaper. Even with paint missing from pretty much all of its edges, the camera remained operational (we’re told). 

    CP+ 2016: Fujifilm gets new X-Pro2 and X70 into photographers’ hands

    Apologies for the poor quality photograph, but this camera is an early mockup of an ‘X-Pro1 S’, which ultimately became the X-Pro2. Cameras often go through several design changes during the course of their development but it’s unusual to be able to see any of the rejected versions. The X-Pro1 S is a little boxier, and a little more ‘classic’ looking than the eventual X-Pro2.

    CP+ 2016: Fujifilm gets new X-Pro2 and X70 into photographers’ hands

    And slimmer, too. Although of course it’s impossible to say whether the camera would have stayed quite so skinny by the time it entered production. We’re pretty sure that this prototype doesn’t actually contain any working electronics. 

    CP+ 2016: Fujifilm gets new X-Pro2 and X70 into photographers’ hands

    Again, sorry about the poor quality of this image, but if you look carefully at this exploded view of the X-Pro2 you’ll see various yellow lines around the body shell on the left of the picture. These are gaskets for weather-sealing. 

    CP+ 2016: Fujifilm gets new X-Pro2 and X70 into photographers’ hands

    Fujfiilm is really pushing the X-Pro2 at CP+, and has even created a gallery space showcasing images from its newest X-series camera. We must say, these prints (which are mostly around 20 inches in size) look great. 

    CP+ 2016: Fujifilm gets new X-Pro2 and X70 into photographers’ hands

    Let’s not forget about the X-70 though, Fujifilm’s new APS-C format compact camera. Essentially the X70 takes the imaging components from the X100T, and puts them into a smaller, more compact body. Gone is the X100T’s hybrid viewfinder (an optical one – shown here – can be added if you like) but new is a 28mm equivalent F2.8 lens. 

    CP+ 2016: Fujifilm gets new X-Pro2 and X70 into photographers’ hands

    The X70’s rear screen can tilt outwards, and up for shooting from low and high angles (and self portraits if you’re so inclined). It’s touch-sensitive, which allows for direct placement of AF point by touch, and quick swiping through images in review mode.

    CP+ 2016: Fujifilm gets new X-Pro2 and X70 into photographers’ hands

    A major booth at CP+ just wouldn’t be complete without some scantily-clad ladies to take pictures of, and Fujifilm has even created a nice little garden for them to stand in. How kind. 

    CP+ 2016: Fujifilm gets new X-Pro2 and X70 into photographers’ hands

    Meanwhile, photographers use Fujifilm’s new 100-400mm telezoom to snap overhead portraits of the ladies in their garden. . 

    CP+ 2016: Fujifilm gets new X-Pro2 and X70 into photographers’ hands

    Fujifilm isn’t focused completely on digital technology of course. The company still makes (and sells a lot of) instant film cameras. Instax had a prominent and very colorful corner of the Fujifilm booth at this year’s show.

    CP+ 2016: Fujifilm gets new X-Pro2 and X70 into photographers’ hands

    It looks like Rishi has found his favorite color – what’s yours?

    Articles: Digital Photography Review (dpreview.com)

  • Lightweight & Portable Egg-Shaped Drone Folds Up Into Shell

    [ By WebUrbanist in Gadgets & Geekery & Technology. ]

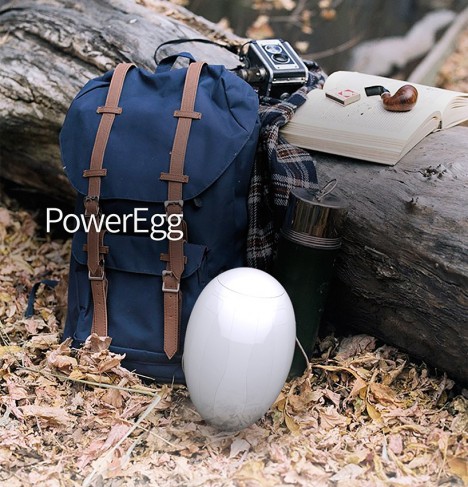
    poweregg drone

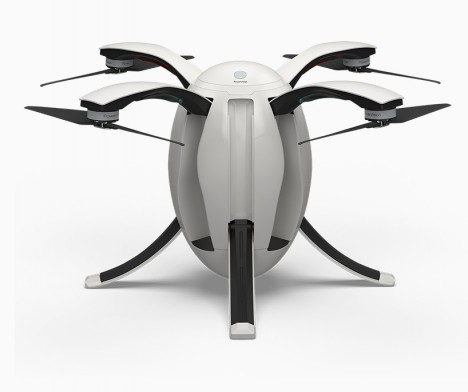
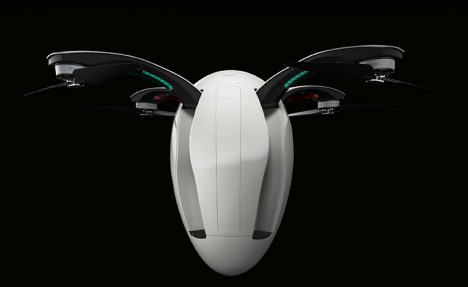
    Boasting practical portability with an eye to aesthetics, the new PowerEgg stands out against its more ungainly competitors, able to fold up into a smooth oval when not in use.

    powervision egg drone

    PowerVision “wanted to create a beautiful yet functional design for the poweregg,” explains CEO Wally Zheng. “The oval shape is not only clean and pure but also has the structural and functional benefits. This simple yet vital design means that this is more than a flying robot but a work of art.”

    poweregg size

    The device features a 360-degree panoramic HD camera able to relay long-range video, advanced optical flow sensors for indoor navigation and an easy-to-use remote control.

    powervision detail

    Developed over a year and a half, a great deal of work went into structural engineering, particularly making the moving parts work as it transforms to active from passive modes and back again.

    poweregg deployed

    “We want flying a drone to be child’s play, something even a five-year-old can do,’ continued Zheng. “With this next generation of drones, much like the internet expanded access to information in the virtual world, drones 2.0 led by innovations like the PowerEgg can expand access to the physical world and bring together humans and machines in this journey.”

    Share on Facebook


    [ By WebUrbanist in Gadgets & Geekery & Technology. ]

    [ WebUrbanist | Archives | Galleries | Privacy | TOS ]


    WebUrbanist

  • CP+ 2016: Pentax K-1 past and present

    With CP+ 2016 in full swing, we stopped by a very crowded Ricoh booth to get our hands on the hotly anticipated Pentax K-1 full-frame DSLR. During our visit, we couldn’t help but notice something very special hiding in the back – the original Pentax full-frame DSLR prototype from Photokina 2000. Take a look, as we take a peek at Pentax full-frame – both past and present. 

    Articles: Digital Photography Review (dpreview.com)

  • CP+ 2016: Nissin gets serious with radio-triggered flash solutions

    CP+ 2016: Nissin Stand Report

    Flash manufacturer Nissin offers some compelling alternatives to on-brand flashes, and they’ve recently updated their lineup with the announcement of the i60A, pictured in the middle here. The i60A features a Guide No. of 60 at at 200mm (ISO 100), which is more powerful than the company’s flagship Di700A, which has a GN of 54 under the same conditions. Impressive, given the flash’s overall smaller size. It also features High Speed Sync (HSS).

    Possibly the most compelling feature of the i60A (and the flagship Di700A)? Integrated 2.4GHz radio wireless control in conjunction with the Air 1 commander and Di700A flash. Off-camera event flash photography’s best friend. They’re ergonomically fantastic as well. Read on as we dig a little deeper into these products.

    CP+ 2016: Nissin Stand Report

    The i60A is significantly smaller than the Di700A (illustrated in grey here) – Nissin’s flagship and the flash that introduced the 2.4GHz radio wireless control system. At only 98mm tall, the i60A is significantly smaller than the 140mm tall Di700A. It’s lighter too: 300g (without batteries) vs. the Di700A’s 380g. And yet it provides brighter flash output. Nice.

    CP+ 2016: Nissin Stand Report

    The i60A is Nissin’s second flash to work with the company’s 2.4 GHz radio wireless control system, meaning you can trigger it off-camera with the Air 1 commander (on right) or Di700A flash on-camera. It can even act as a radio trigger itself in commander mode. Radio triggering can be essential for fast-paced, unpredictable scenarios, like at a wedding reception or dance floor where objects might momentarily block off-camera flashes triggered optically or via infrared.

    While Canon has had their own solution in the 600EX-RT flash and ST-E3-RT emitter, Nikon has only just recently announced their radio solution, and Sony has no such solution at all. Given the intuitive on-board control of manual power or auto TTL flash exposure bias on both the Air 1 commander and any flash units, the Nissin solution is quite attractive, even mandatory if you’re looking for radio-triggered flash on a Sony system.

    CP+ 2016: Nissin Stand Report

    So you’ve seen the Air R in a couple of photos now and are probably wondering what it is. It’s a receiver for Nissin’s 2.4GHz radio wireless control system, meaning you can attach it to flashes without radio control to have them join Nissin’s system. There are versions for Nissin, Canon, and Nikon flashes.

    CP+ 2016: Nissin Stand Report

    The Nissin i60A has a tiltable, rotatable head, capable of rotating up and down 90°, and left and right 180° in either direction. This is great for creating a softer bounce flash effect, either on or off-camera. The flash is powered by 4 AA batteries, which should provide 220 full power bursts.

    Every version of the i60A helpfully comes with the ability to act as a Canon, Nikon, or Sony radio slave, triggered by an Air 1 commander. That means that you can have a Canon version of the Air 1, mounted to a Canon body, fire a Nikon version of the i60A off-camera. Cool.

    CP+ 2016: Nissin Stand Report

    Pictured here is the i60A in comparison to the Di700A. As we’ve said before, the i60A is significantly smaller. The downside? The i60A is missing the red AF assist beam. It does, however, have a small LED light that can be used for AF assist, though its far more annoying to subjects than a red assist beam.

    Speaking of AF assist, it’s important to note that the Sony versions of these flashes can only fire AF assist beams on Sony Alpha SLT cameras, not Sony E-mount cameras. That means the assist beams are useless on the popular a7 and a6000-series cameras. We confirmed with Nissin that this is due to Sony E-mount cameras failing to send a signal over the hot-shoe connection when the shutter button is half-depressed. That’s a shame, because pros need focus ability in extremely low light conditions – the dance floor of a wedding reception, for example. I told Nissin we’d stress this with Sony, and their response was ‘please, please do’.

    Sony: your move.

    CP+ 2016: Nissin Stand Report

    We mentioned favorable ergonomics earlier on, and here’s why. Take a look at the user interface of the Air 1 commander. You’ve got visual indicators for manual power and flash exposure compensation (TTL), for each group. It’s simple to use the dial to bias these. No menu digging. The Di700A has a similar display, though the i60A’s truncated display means it can’t show quite as much information. 

    Articles: Digital Photography Review (dpreview.com)

  • 7 Tips for Better Adventure Photography

    Adventure photography has continuously become more and more popular for outdoor photographers, thanks to new technology in cameras, and the outlets of social media platforms like Instagram, that are very photography-friendly. You may have seen some posts that are routinely labeled as “epic” and want to know how to create the same awe-inspiring feeling in your own photographs.

    The good news is you can! But, just like in other fields of photography, composition is extremely important when you want to start dabbling in epic scenes. Let’s look at some tips to help you start shooting better adventure photography.

    1- Always have your camera on

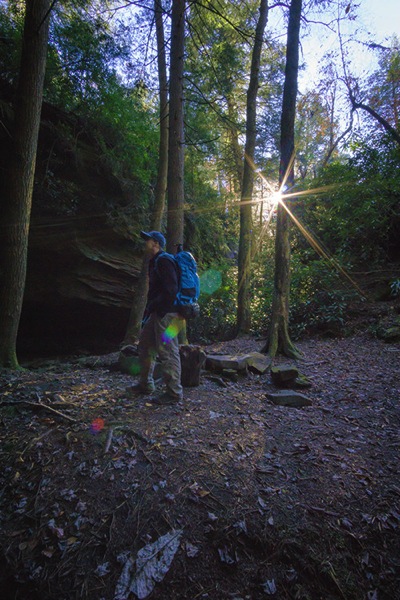
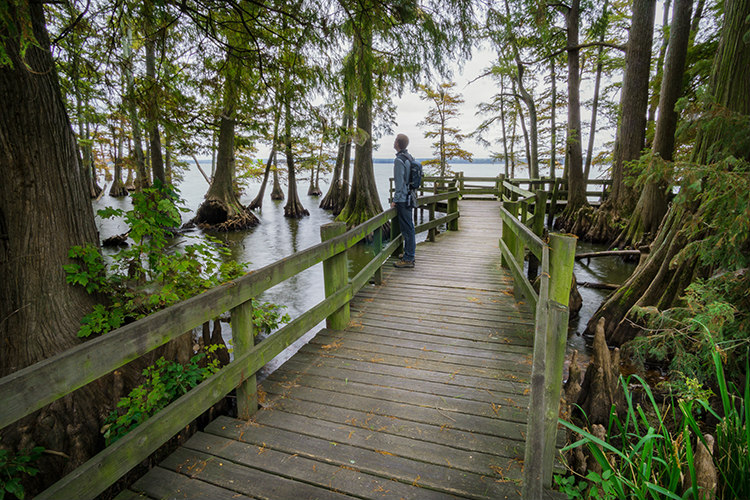
    PHOTO 1

    Like a lot of photographers, you may suffer from battery anxiety, the fear that your battery is going to die and you’ll miss that one shot you’ve been waiting for your entire life. Well, when you constantly have your camera turned off, you’re probably going to miss more amazing split second shots, than if your battery died. That’s why you should always leave your camera on when you’re out shooting adventure photography.

    Are you out hiking with your friends? Leave the camera on. What about spelunking in some caves? Leave the camera on. What if you’re zip-lining through a jungle canopy? First, leave your camera on, and then hold on to your camera tightly.

    You won’t have to worry about battery anxiety if you properly pack, including extra batteries to take with you. Simply leave your camera on, never put your lens cap on, use a lens hood to protect the lens, and take a micro-fibre cloth to clean the lens. Your fear of the battery going dead should never stand between you, and freezing an adventurous moment in time.

    2 – Put yourself in the frame

    Adventure photography features people living their lives to the fullest, by placing them in amazing landscape scenes. But, what if you aren’t in nature with anyone else? I’m sure you’ve faced that dilemma before. Well, instead of feeling like all is lost, think outside the box and put yourself into the frame.

    PHOTO 2

    It may feel a bit strange at first to feature yourself in a photograph, but sometimes you have to do what you have to do,in order to get the shot! If you’ve never done this before, all you have to do is mount your camera on a tripod, and set it to the 10-second delayed timer. Once you press the shutter and the timer starts, get into position, and wait for the camera to do its thing.

    You might want to also set your camera to take a series of shots once the ten second timer is complete, to be sure you get a suitable photograph. Many cameras have the option to use the timer, or one with continuous shots. Sometimes you might not get in place fast enough, but using a multiple shot sequence will allow you to have a couple more frames to get into position.

    3 – Subject placement in adventure photography

    Subject placement is extremely important in adventure photography. You want to feature your subject (the person out adventuring) in the landscape, without any distractions or limitations. Anyone viewing your adventure photograph should never be confused about where the subject is, or what they are doing.

    It doesn’t matter whether your subject is close to the camera, or way off in the distance. What matters is their placement in space. So, when you’re inspecting a landscape, and trying to decide where to place your subject, always look for a solid color or a negative space to place them.

    PHOTO 3

    The people in the landscape will stand out against a solid color and negative space, to allow your audience to locate the subject immediately. The last thing you want when you show a photo, is someone trying to find your subject because they are right on the horizon line, or lost in a pattern of shadows.

    Not only will placing your subject in negative space clearly reveal where and what your subject is, but it will also eliminate any boring spaces in the photograph’s composition.

    4 – Choose a better perspective

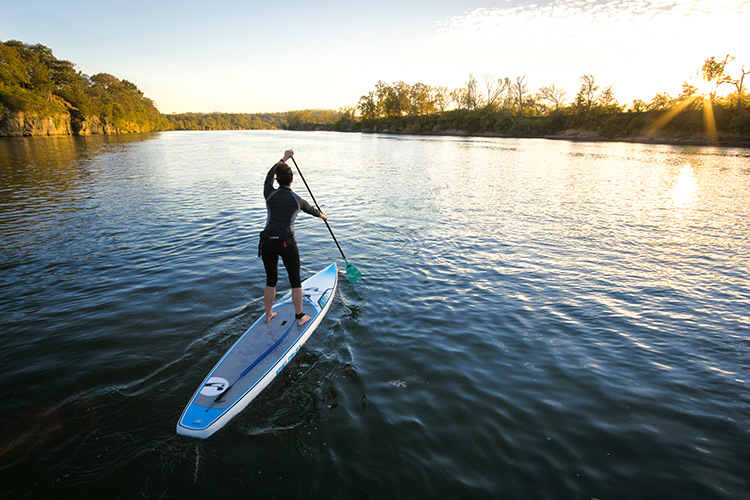
    Perspective, or point of view, in photography ia always important when you’re trying to show a scene more creatively. Think about it; everyone walks around all day seeing everything at eye level. So, if you want to show something differently, shoot a perspective that isn’t at eye level.

    Getting lower to the ground gives your subject in adventure photography a larger than life feel. This is usually shot with a wide angle lens, to fit a low perspective foreground, and the landscape into one photograph. Low perspectives show the importance of a person or activity, more than the landscape surrounding them.

    PHOTO 4

    Higher perspectives feature the landscape more than the subject, making the natural elements of the frame seem larger than they actually are in reality. These points of view are usually used to look down on your subject, while allowing you to show more of a landscape as well.

    5 – Show scale

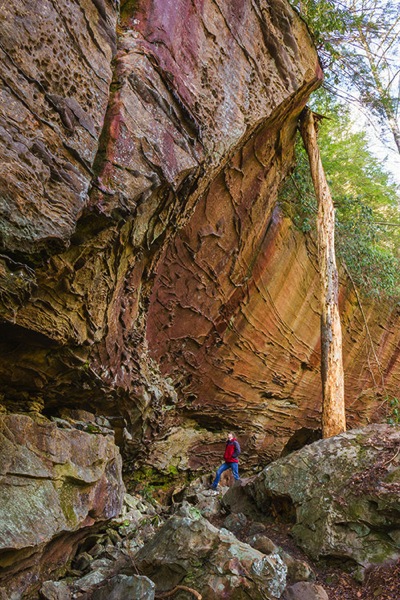
    Do you remember doing science projects in school where you’d have to collect photo evidence of your specimen, by placing a pencil or coin next to it to show its size? Well, that’s called scale. You use an object of a well-known size next to your find, to give your audience an idea of the actual size of the specimen shown.

    You can actually do the exact same thing in adventure photography. Everyone knows the average size of a human. However, when you show a photograph of just a cliff, it’s difficult for someone to get a really good idea of how large the cliff actually is.

    The solution is to incorporate a well-known average size (in adventure photography that would be a person) into the frame, so your audience is able to get a much better idea of how large and grand the landscape actually is. This is a tremendous composition technique to use whenever you feel absolutely dwarfed in nature.

    PHOTO 5

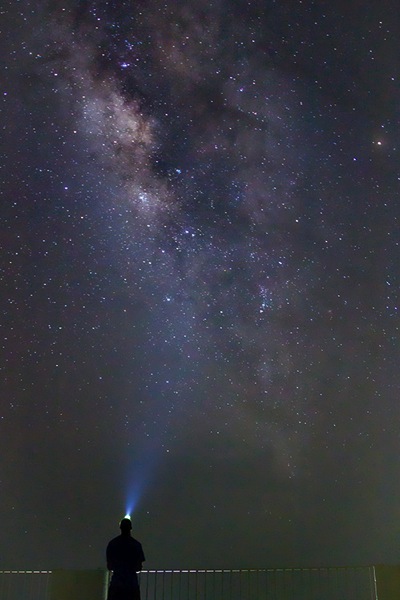
    6 – Think about using silhouettes

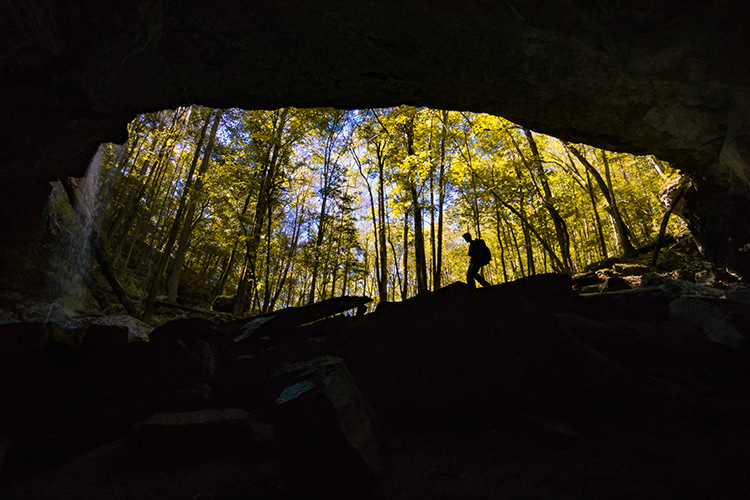
    Silhouettes are another great technique that you can use in adventure photography. Whenever you’re stuck in a bad lighting situation, one that has too much dynamic range to be able to capture both your subject and the landscape in good light, go directly for the silhouette shot.

    To use silhouettes effectively in adventure photography, place your subject on a solid line within the scene. This could be either a horizontal or a vertical line. For example, you could place your subject on a hiking trail, or on a vertical wall, while rock climbing. Next, compliment your subject by placing an interesting background behind them, such as a forest or sunset.

    The key to an effective complementary background is to create a composition that features your subject first. This goes back to what you learned on subject placement in adventure photography. Never overpower the subject of the photograph by hiding them in a complementary background.

    PHOTO 6

    7 – Make your audience jealous

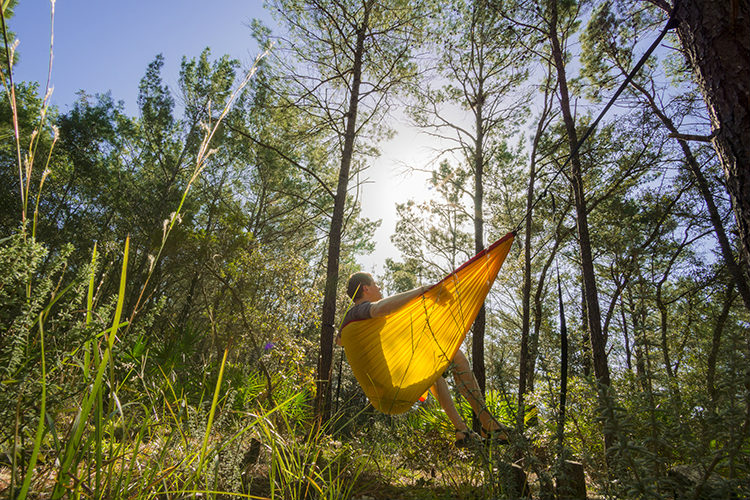
    Lastly, make your audience jealous with your adventure photography. Compose an adventure photograph in a way that makes people want to go where you went, and do what you did. The overall goal of adventure photography is to get people outside, exploring new places.

    Let your audience live vicariously through your photography. When you’re able to do that, you’ve definitely stepped up your adventure photography game.

    PHOTO 7

    So, by all means, get out and document your adventures!

    Do you have any other adventure photography tips to share? Or perhaps some of your favorite adventure photography images? Please do so in the comments below.

    googletag.cmd.push(function() {
    tablet_slots.push( googletag.defineSlot( “/1005424/_dPSv4_tab-all-article-bottom_(300×250)”, [300, 250], “pb-ad-78623” ).addService( googletag.pubads() ) ); } );

    googletag.cmd.push(function() {
    mobile_slots.push( googletag.defineSlot( “/1005424/_dPSv4_mob-all-article-bottom_(300×250)”, [300, 250], “pb-ad-78158” ).addService( googletag.pubads() ) ); } );

    The post 7 Tips for Better Adventure Photography by David Johnston appeared first on Digital Photography School.


    Digital Photography School