Blog

  • 5 Killer Reasons Why Photographers Need Social Media

    fashion-photography-blog-social-media-for-photographers

    Hey there everyone,


    This is Ed a.k.a Edrenalin, the editor of FashionPhotographyBlog.com, here to bring you insights from the inside.


    After all of my client’s photography businesses I’ve helped improve, one thing is common across each and everyone one of them, they wanted to have a presence online and they wanted to be on social media. That’s understandable since that’s where all the major businesses across every industry is moving towards. However, when I asked them why they wanted to be on social media and what they wanted social media to do for them, they couldn’t answer the question. At the end of the day, they felt that they needed to be on social media because everyone else told them they had to.


    So how can you work towards your social media objectives if you don’t know what they are in the first place? Don’t despair though, because if you are thinking similarly in this way, then you are not alone. It is a common misconception amongst photographers and creatives based on the encounters that I’ve come across. I’m going to share with you what I share with them to help clear up the reasons why you should consider incorporating social media in your own marketing strategies for your photography business.


    Top 5 reasons why photographers need social media today


    1. Social media accounts proves that there is a real person behind the photography business and that you didn’t just “open shop” yesterday. The accounts establish that the business has history and participates in dialogue and that you are active online.


    2. Google now is starting to incorporate social signals from your social media accounts as a factor in their SEO algorithms to determine the relevancy and engagement of your website when deciding to show your website on the search results pages. The weight social signals has in this algorithm is unknown and is locked away in the unbreakable vaults of Google however, I can confirm that it is now a factor.


    3. Your target audience can see social proof based on what others are saying about your photography business in your social media accounts such as in your comments and reviews section.


    4. Potential business partners and magazine editors, might want to see how engaged are your followers. If they do business with you or publish your work, then you publish the news on your social media accounts, they might want to know how many people following you would actually know about it and get eyeballs to their brand.


    5. Not everyone will know your website address, before they know about your business. With social media you are able to engage with your target audience in other social networks and hang out where they hang out. Here’s a question, how many people visit your website every day? and now how many people visit Facebook every day? which is the greater number?


    The concept behind social media marketing is that you are participating in discussions with communities of these larger social networks, “borrow” them from these established networks and introduce them to your photography business.  


    If there is one thing that you can do to improve your business this year, is to get onto social media for your business to increase the online presence for you.


    Do you like this article? Want to read more articles like this? Then please SHARE this article on social media. If you have any comments or questions please feel free to put them in the comment section below. 


    Fashion Photography Blog

  • A Journey From Novice to Natural Light Portrait Photographer

    I’m here to share my photography journey that started few years ago as a novice, to where I stand today. As am amateur or hobby photographer, you may relate.

    The journey from novice to advanced photographer

    About two years ago, I bought an entry level DSLR, to use it as an expensive point and shoot camera. The camera decided the fate of most of my pictures. On innumerable occasions, the pictures were blurry, under or overexposed, and were of poor quality.

    The urge to work on my photography skills blossomed, when I was blessed with a little girl. An utmost desire to take only the best pictures of my angel, had taken roots in me. As you may also do, I started searching the internet fervently, for ways to capture the best shots.

    Dps fb ca viks photogrphy

    This is the kind of natural light photography I do now, but that’s not where I started. Read on to find out how I got here, and you can too.

    I realized, other than going through basic photography tutorials on YouTube, the thing that helped me the most was Flickr’s discussion groups. It has large community of knowledgeable professionals, and semi-professionals, who love to take a look at your picture and provide valuable feedback. Positive suggestions and encouragement I received on the forums, helped me to experiment further, and escape out of automatic mode. If you are in the same mode as I was two years ago, I strongly recommend getting feedback for your photos, through the online forums.

    Moving out of auto mode and kit lens limitations

    The very first step towards improvement for me, was shifting to Aperture Priority (Av/A) mode. Initially, pictures were blurry even in Av mode, but I could see that inside my home, my kit lens at f/4.5, ISO 6400, was still unable to shoot faster than 1/30th of a second. Such a slow shutter speed caused the motion blur. Shooting outdoors normally helped me to avoid blurry pictures, but I was not sure why my images didn’t have a blurry background like I saw online. Eventually, I understood the limitations of my kit lens, in not being able to shoot at a larger f-stop, to achieve shallower depth of field.

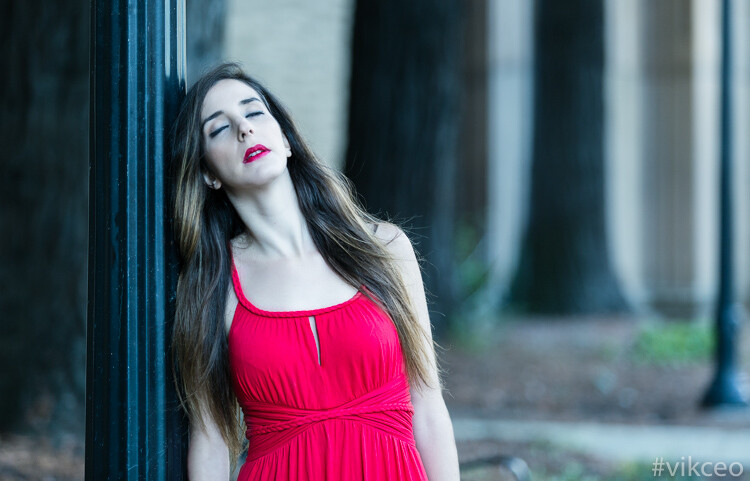
    500px Photo ID: 53404702 -

    This image is very noisy, focus is on her dress rather eyes/face, the out of focus raised hand actually distracts the viewer a lot.

    One thing I would realize after many months of shooting, is that the exposure triangle (aperture, shutter speed and ISO) is easy to comprehend theoretically, but really hard to apply in the field. I went out for a shoot almost every day, and started experimenting with aperture and shutter speed to get a more desired shot. On returning home, I always got an impression I should have used a different aperture or shutter speed for a better shot. The ability to learn through your mistakes is a major milestone in your journey.

    Branching out

    Once you are bit confident in your understanding of the basics, you start enjoying it – which is what I experienced. I started devoting time to reading topics such as composition, photography tips, and subscribed to sites like Digital Photography School. Another thing that helped me a lot, was connecting to local events and activity pages via Facebook. I started showing up at many local events and offering free photography to the organizers.

    The experience of shooting events was quite chaotic and challenging, especially when there were far more people posing in front of the camera, and many arbitrary things happening – kids running around, or folks dancing to tunes of the festivities. Every such shoot gave me lot more insight into concepts of understanding concepts like plane of focus, controlling focus points, exposure compensation, tips to hand hold the camera firmly, etc.

    One of my early event photos. The face and overall image is poorly lit and the face looks orange. Overall image is noisy and the eyes are not in focus. The person behind her is very distracting.

    One of my early event photos. The face and overall image is poorly lit, and the face looks orange. Overall, the image is noisy, and the eyes are not in focus. The person behind her is very distracting.

    Upgrading gear

    It’s very easy to get overwhelmed when reading about, or watching, the type of gear that pros are using in the field. My advice would be to start with minimum possible gear, and upgrade only when you clearly understand the limitations of your existing gear. Be it body, lens, tripod, or anything. After understanding that I couldn’t shoot with very low noise in ambient light during evenings, or achieve huge shallow DOF with my canon T3i and a kit lens, I moved up to a 6D after few months, and bought a prime lens. Though I love to shoot 100% natural light, I added a flash to my gearbox as well, to use as a fill light in some situations.

    Here are few things I learned so far, that you can also apply in your photography. Then I will move on to what kind of work I produce these days, and some explanation about how the results are achieved.

    Understand the basics:

    Read a lot about aperture, shutter speed, ISO, and other beginner tutorials. Apply them as much as you can. These concepts are simple but take a lot of hands-on practice to start making some sense.

    Very noisy, Focus is on the shoulder, a very bright area in the background is a huge distraction, very messy environment.

    Very noisy, Focus is on the shoulder, a very bright area in the background is a huge distraction, very messy environment.

    Participate:

    Do share your everyday shots and learning, to online discussion groups and forums, without worrying about the quality of your work. Google knows a lot. Give it a try by typing the question the way you would ask someone in person. Once you get some clue, make sure to try it out, to experiment and confirm your understanding. As I said earlier, do volunteer photography for local charity or non profit, etc., as that is a sure way to learn, and it is much more fun.

    Avoid GAS (Gear Acquisition Syndrome):

    Avoid the mindset that you cannot do good photography without expensive gear. In the beginning, your cheapest camera is enough to get you started. Photography is not 100% driven by expensive gear. There are way many areas to catch up like composition, understanding of light, angle of shooting, etc. Learn the basics and how to use the gear you have first.

    Shoot, shoot and shoot:

    There is no shortcut to get good at photography. You have to keep shooting to learn, and learn more to confirm your understanding and get better.

    Understand Light:

    Taken in the middle of the day when sun was overhead with caring about harsh shadows. From composition point of view the image has a very busy background and viewer will be completely distracted at other elements of the image.

    Taken in the middle of the day, without caring about harsh shadows when sun was overhead. From a composition point of view, the image has a very busy background and viewer will be completely distracted by other elements of the image.

    It doesn’t matter what genre of photography you shoot; you need a firm understanding of light. This is a key ingredient for a good picture. So, read about the direction and quality of light, and how it affects the shape, size, shadows, and contour of objects it falls upon.

    Master your camera:

    This tip is especially important if you aim to shoot events, happening at fast pace like kids photography, birds, action, sports, etc. You will really miss opportunities if you are unable to change settings quickly on the fly, without looking at the controls.

    Go Manual:

    This needs to be your ultimate destination in terms of shooting modes. It’s true that 80% or more time you may be happy with Av mode, but ideally you should have no hesitation in switching to the manual mode in a blink.

    Depth of Field:

    Technically, in simple terms, aperture controls the depth of field. However, this is the area that took me the longest time to get a good grip on. It’s very hard to stop the desire to shoot at f/1.2, if you own a lens capable of that. However, lenses are not the sharpest at so small f-numbers, plus the depth of field is so thin, that it could be unusable if you are not at the right distance from the subject.

    Though there is a nice catch light but looking at the distance it has been shot the f stop should have been chosen higher. The face is not completely in focus and the image does not appeal the viewer. The subject should have been moved a bit to get rid of uneven shadows.

    Though there is a nice catch light, but looking closer, it has been shot with an f-stop that should have been higher. The face is not completely in focus, and the image does not appeal the viewer. The subject should have been moved a bit, to get rid of uneven shadows on his face.

    Positioning the Subject:

    Another key point I have seen even very mature photographers lacking, is realizing the importance of where you should ask the subject to stand. Key mistakes are: placing subject in front of a very busy background, having undesired points of interest in the frame, a brighter large light source behind the subject, etc.

    I hope you find the above tips useful. In the final part, I would like to show some images, and a bit about my thoughts on post-processing. All the below images have been published in one or the other magazine.

    Dps fb ca viks photogrphy 5

    85mm, f/1.6, 1/1600, ISO 800

    Location: Milwaukee, WI. This was taken at golden hour, with the sun facing the subject. The trees with some fall colors, are very far behind her.

    Dps fb ca viks photogrphy 3

    85mm, f/3.2, 1/400, ISO 400

    Location: Redwood Shores, CA. This was taken at golden hour with sun facing her. The intensity of the light was low, as only partial light was passing through the tree. It was shot from above at about a 45-degree angle.

    Dps fb ca viks photogrphy

    70mm, f/2.8, 1/320, ISO 800

    Location: Los Angeles, CA. This was taken in the middle of the day, in an apartment, where model was facing window light.

    Dps fb ca viks photogrphy 6

    135mm, f/2.8, 1/400, ISO 400

    Location: Palace of fine arts, CA. Taken in the middle of the day, where plenty of ambient light was available. Behind the subject is a little darker area, due to trees and pillars. I positioned her at a spot where light was just right to avoid on her face which were too dark.

    Dps fb ca viks photogrphy 484

    85mm, f/1.8, 1/6400, ISO 100

    Location: Fremont, CA. Again taken during golden hour, with a bit of shade from the door structure.

    Dps fb ca viks photogrphy 4

    85mm, f/2.8, 1/2000, ISO 800

    Location: San Jose, CA. Taken in the middle of the day, using the shade from the ceiling above the model, and avoiding sunlight falling directly her.

    Importance of Post-Production:

    As a beginner you will surely hear or read a lot something similar to these statements, “I love straight out of camera pictures” or “I hate editing pictures”. However, I have found that you can delay getting into the post-processing of images, but cannot avoid it.

    The extent you go to post-processing an image, is totally a different debate. Some do it to enhance the existing elements of an image, and others do it to make it into a totally different image. I am in the first category, and spend time doing things that improves the overall image appeal.

    For beginners, I would advise that you stay away from it until you are comfortable with your gear and the basic concepts of photography. Always aim to get the image right in the camera.

    The first step for post-processing, you can start with Adobe Lightroom, which is a great piece of software to enhance your images. Spend time in achieving mastery with Lightroom, and, once you understand its limitations, then start exploring Adobe Photoshop on a need only basis. In my typical workflow, all the images go through Lightroom, then for some final touches in Photoshop.

    Your journey

    So where are you in your photography journey? Did you just pick up a camera and can relate to my early experiences? Have you been practicing for a while? What is your experience, please share in the comments below.

    Author Bio

    Vik (Vivek) Kumar is a photographer and a software engineer. Hi started his photography a couple of years ago as an amateur landscape photographer. The hobby became serious portrait photography fun. His images are used by reputed hotel brands like Hyatt. He has been published numerous times in various fashion magazines like ICON, PUMP, Surreal Beauty Magazine, etc. See more of his work on his website or on his Instagram profile. His landscape photography work can be explored on 500px.

    googletag.cmd.push(function() {
    tablet_slots.push( googletag.defineSlot( “/1005424/_dPSv4_tab-all-article-bottom_(300×250)”, [300, 250], “pb-ad-78623” ).addService( googletag.pubads() ) ); } );

    googletag.cmd.push(function() {
    mobile_slots.push( googletag.defineSlot( “/1005424/_dPSv4_mob-all-article-bottom_(300×250)”, [300, 250], “pb-ad-78158” ).addService( googletag.pubads() ) ); } );

    The post A Journey From Novice to Natural Light Portrait Photographer by Vik Kumar appeared first on Digital Photography School.


    Digital Photography School

  • Nazi Playground: Cult Compound Now a Twisted Tourist Trap

    [ By Steph in Culture & History & Travel. ]

    colonia main

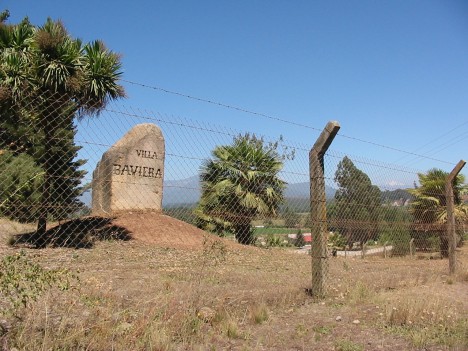
    A former haven for Nazi war criminals, child molesters and their sympathizers, Villa Baviera is now a bizarrely whitewashed German-themed tourist attraction tucked into Chile’s Andean foothills. Established in 1961, the cult compound formerly known as Colonia Dignidad (Dignity Colony) hosted infamous concentration camp doctor Josef Mengele, known as the ‘Angel of Death,’ and served as a special torture center and illegal arms cache. Now you can drink beer and watch people stomp around in lederhosen as if none of those terrible things ever happened.

    colomia 2

    colonia

    colonia 7

    The insensitive nature of the transition of the 54-square-mile compound’s use is just the beginning, considering that an investigation in the ‘90s found evidence of decades of child abuse, torture and mysterious disappearances. Founder Paul Schäfer, a fugitive wanted in Germany for pedophilia, served as the authoritarian leader of 300 residents. Children were separated from their parents and siblings, all media from the outside world was banned, and sex was forbidden without Schäfer’s approval.

    colonia 3

    colonia 4

    SONY DSC

    colonia 9

    In the ‘70s, dictator Augusto Pinochet made use of the compound to detain political dissidents. Schäfer was finally apprehended in 1997 and died in prison in 2010, and though 20 colony elders were convicted of aiding him in his abuses, the roughly 120 remaining residents were allowed to keep the property and do what they wanted with it, which was to turn it into a money-maker. Rather than making it a memorial to the Holocaust or the crimes that were carried out on the compound, they decided everybody would rather feign collective amnesia.

    colonia 6

    colonia 8

    olonia 10

    The result is a 21-room hotel, swimming pool, playgrounds, wedding tents and restaurants along with all the German food and beer you can consume. A guard tower once used to spot escapees still looks out over the property, and the perimeter is still edged with barbed wire fencing, but hey, those hot tubs will help you relax away the memories of the atrocities committed there, right?

    colonia 11

    Catch more on the history of this twisted tourist attraction at Bloomberg and in the upcoming Hollywood film ‘Colonia’, starring Emma Watson.

    Share on Facebook


    [ By Steph in Culture & History & Travel. ]

    [ WebUrbanist | Archives | Galleries | Privacy | TOS ]


    WebUrbanist

  • Tamrac Goblin gear pouches protect lenses, cameras and memory cards

    Tamrac has a new line of Goblin gear pouches designed for individual lenses and cameras, as well as a couple larger accessory pouches for storing multiple items together. The product line includes half a dozen lens pouches, all with drawstring enclosures, three body pouches, two accessory pouches and one memory card wallet. 

    The Goblin pouches feature ripstop nylon exteriors and quilted interiors. The lens pouches span bag models 0.3 to 2.4, with the smallest model (0.3) having an interior space of 6 x 8cm/2.25 x 3 in, and the largest (2.4) having an interior space measuring 12 x 21cm/4.75 x 8 in. The camera body pouches are similar, with the smallest model (0.4) offering 3 x 5.5 x 2 in/8 x 14 x 5 cm of interior space, and the largest model (1.4) offering 4.25 x 5 x 3.5 in/11 x 13 x 9 cm of interior space.

    Unlike the lens and body pouches, the two accessory pouches, models 1.0 and 1.7, feature YKK zippers and mesh windows to offer a view of what’s in the bag while it’s closed. The Goblin line is rounded out with a memory card wallet with a micro mesh window and three difference size options, one that fits 6 SD cards, another that fits 4 Compact Flash cards, and a third option that fits all ten cards at once.

    The Goblin line of pouches is available now through Tamrac’s website. Prices start at $ 12.95.

    Via: Fstoppers

    Articles: Digital Photography Review (dpreview.com)

  • Olympus ‘Fox Brown’ limited edition OM-D E-M10 II launched worldwide

    $ (document).ready(function() { SampleGalleryV2({“containerId”:”embeddedSampleGallery_9422484425″,”galleryId”:”9422484425″,”isEmbeddedWidget”:true,”standalone”:false,”selectedImageIndex”:0,”startInCommentsView”:false,”isMobile”:false}) });

    A brown and chrome version of the OM-D E-M10 II compact system camera, first announced in January, has been launched worldwide by Olympus. The new version is a limited edition, of which only 3500 will be made and distributed, and Olympus hopes the unique coloration and grained texture of the finish will attract collectors. 

    The camera is the same as the standard OM-D E-M10 II, but comes with a brown leather-effect cover, a premium leather strap and a silver-colored lens cap. It will only be available in a kit with the company’s 14-42mm F3.5-5.6 EZ Pancake standard zoom lens. 

    Olympus has also launched a pair of messenger-style bags made from brown leather and grey canvas that it says complement the new ‘Fox Brown’ edition. They come in ‘standard’ and ‘mini’ sizes. 

    The Olympus OM-D E-M10 II Fox Brown costs $ 899/£699/€899. For more information visit the Olympus website. 


    Press release:

    Fox-Brown Limited Edition collectible celebrates OM-D heritage

    Hamburg, 02/25/2016 • In the new OM-D E-M10 Mark II Limited Edition, retro design meets world-first technology – When Olympus announces a new Limited Edition OM-D, design enthusiasts know they’re in for an exceptional visual treat. The OM-D E-M10 Mark II Limited Edition offers all the high-tech fireworks of the awarded OM-D E-M10 Mark II, but stands out from its near-namesake with a striking new design. The unique Fox Brown colour and texture alone make this camera a collector’s item. The Limited Edition also comes with a premium leather strap and a matching silver-coloured lens cap to complement its compact, lightweight frame. Worldwide, only 3,500 OM-D E-M10 Mark II Limited Edition cameras will be available. They are on sale as of February 25, 2016 as part of a kit that includes the M.ZUIKO DIGITAL ED 14-42mm 1:3.5-5.6 EZ Pancake Zoom lens for €899*.

    Brown is back

    The original OM-D E-M10 Mark II set the standard – making imaging practical, portable and affordable for a new generation of hobbyist photographers. The remarkable styling of the Limited Edition takes this standard to a new level. The special Fox Brown colour sets off the glinting chrome and milled edges of solid dials beautifully. The On/Off switch and the central finder further enhance the impression of a hands-on shooting experience to be enjoyed by the talented connoisseur.

    Form fits function

    The design highlights of the OM-D E-M10 Mark II Limited Edition have a traditional flavour, but for this camera segment the technology is cutting-edge. Beneath the elegant switches, dials and contours of its all-metal body, the Limited Edition inherits some of the most powerful technology OM-D has to offer. It features the 5-axis in-body Image Stabilization that enables blur-free still and smooth hand-held filming on the move, even in low light. 5-axis IS works irrespective of the lens attached and compensates admirably for up to four steps of shutter speed**. For shooting with a large telephoto lens, an optional quick-release camera grip adds another layer of stability. Another bonus for moviemakers is 4k time-lapse recording, which allows you to capture and play back normally imperceptible movement in ultra high-resolution.

    The full EVF

    Like the E-M10 Mark II, the Limited Edition has a large, high-speed, 2,360K-dots OLED Electronic Viewfinder with an unrivalled 100% field of view. The EVF displays the full range of manual settings and optional effects in real time, for full control over the impact of manual adjustments. Again there’s a large, tilting, 3-inch touchscreen LCD with a pad control for setting the focus point using your finger, while looking through the viewfinder. The fingerprint-resistant coating helps preserve the camera’s extraordinary aesthetic.

    Matching lenses and accessories

    Owners of the Limited Edition can enhance the stand-out look of their OM-D with several accessories that complement the brown optic and leather haptic. The premium OM-D messenger bag made of brown leather and grey canvas is every bit as stylish as the Limited Edition itself, and the new OM-D messenger bag Mini has been released just in time for the Limited Edition launch. Of course, there are also more than 40 high-grade Micro Four Thirds lenses available that cover the full range of focal lengths and budgets, from hobbyist to pro.

    Like every new Olympus camera, the OM-D E-M10 Mark II Limited Edition comes with a free six-month warranty extension, on top of the statutory warranty in the country of purchase, when registered via the MyOlympus online platform***.

    Recommended accessories:

    * OM-D Messenger Leather Bag – Tailor-made for OM-D cameras and lenses, with the two-tone panache of a classic urban bag. Includes a matching shoulder strap.

    * OM-D Messenger Bag Mini – Same style as the larger version. In grey canvas and brown leather, with room for the camera body and one lens.

    * ECG-3 Grip – Makes it easier to hold the camera securely, especially when using a larger telephoto lens. The quick-release means it can be put on and taken off fast on the move.

    For the full range of OM-D E-M10 Mark II Limited Edition features and accessories, visit the Olympus website.

    Articles: Digital Photography Review (dpreview.com)

  • Field Test: The Sony Cyber-shot RX100 IV in Mexico

    A year of field tests have taken DPR Editor Barney Britton and series director Eric Becker into some challenging shooting environments, so for a change of pace, at the end of last year the pair took the Sony Cyber-shot RX100 IV to the sun-soaked Yucatán peninsula. There they put Sony’s pocket compact through all of the rigor that any traveler might – from shooting in underwater caves to selfies amidst historic Mayan ruins. Watch the video and see Sony’s travel cam in its natural environment.


    This is sponsored content, created with the support of Sony. What does this mean?

    Articles: Digital Photography Review (dpreview.com)

  • 3 Tips to Maximize Your Road Trip Photos

    Road-Trip-Photo-Tip-Wide-Angle-06

    Road trips have been hailed as one of the greatest pastimes ever, and something that everyone should do at least once in their lifetime. It is a great way to experience a lot in a short span of time, and as a photographer, there will be many opportunities and moments awaiting your perspective. Sometimes preserving your creative spin in the midst of all the new discoveries, can become sensory overload and feel overwhelming.

    Here are three tips that can help you make better photographs on your journey and maximize your road trip.

    Road-Trip-Photo-Tip-Wide-Angle-03

    1. Plan, plan … plan?

    Most successful photo sessions involve a level of planning, this is no different for road trips. The plan does not have to be detailed, it can start out with some basics, such as final destination and must-see places/events, then you determine what should happen daily. Research your routes, note interesting things along the way, and make a priority list. Keep in mind that when traveling you are subject to the unforeseen, such as inclement weather, or places inaccessible for one reason or another, so be ready to switch to Plan B.

    Road-Trip-Photo-Tip-Wide-Angle

    As a light chaser, planning should include knowing when the most flattering light will hit your must-see locations or subjects (e.g. sunrise or sunset), and getting there on time. Thankfully there are now many smartphone apps that will help you plan for the golden hours, work out directions, as well as drive times (and distance) between destinations.

    Road-Trip-Photo-Tip-Wide-Angle-01

    The last part of planning is building flexibility into your days. Sometimes even the best laid plans end up with hiccups and delays, and you still need to make the most of it. The main objective of any road trip is to have fun, so build in a little flexibility, and who knows, you could find something worth exploring, or maybe you will be forced to get creative when you least expect it.

    Road-Trip-Photo-Tip-Wide-Angle-05

    2. Gearing up

    So with your destination(s) planned, it’s time to figure out what gear you need. The last thing you want to do is lug around everything you own, in fact, quite the opposite – you will want to travel light. This is why knowing your destination is key to packing. Will you be driving through amazing scenery? If yes, then you may want to pack a wide-angle lens. If wildlife is your focus, you may decide on a telephoto zoom, which is also great for capturing portraits of people in their natural environment, without being too obtrusive.

    Note: Good advice, when it comes to portraits, asking permission is a nice approach.

    Road-Trip-Photo-Tip-Zoom-03

    Road-Trip-Photo-Tip-Zoom-01

    It all depends on what your end game is, and what lens (or two) you will be using the most. There will always be regrets over what you left behind, such as that one photo that would have been awesome if you had packed a fish-eye or macro lens – but think about the extra weight, and whether of not it’s justified for the duration of the trip.

    Road-Trip-Photo-Tip-Wide-Angle-04

    If you really want to travel light, a mid-range zoom is a great compromise and a good broad spectrum lens to have during your journey, so research your surroundings and decide if this could work for you. A tripod is a safe bet if you plan to do any night photography, but use the same rule and take it only if you need it.

    Road-Trip-Photo-Tip-Night

    3. Road trip story

    When you shoot with a story in mind, it can make your photos take on a life of their own. Are you documenting something specific along the way, such as small towns or diners, breath-taking landscapes, or the road itself?

    Road-Trip-Photo-Tip-Zoom-02

    There are many different ways to tell a story, and your objective and style will dictate the way you tell yours. If your destination includes places that are prone to lots of tourists – decide how this fits into your vision. Do you make them a part of the photo (i.e. use their presence for a sense of scale) or would you prefer the location desolate (which probably means rising early to beat the rush). What story are you trying to tell?

    Road-Trip-Photo-Tip-Wide-Angle-02

    Road-Trip-Photo-Tip-National-Park

    Conclusion

    Road trips are fun, and are a great way to make memories with hundreds of photo opportunities. Planning goes a long way, and will help you determine which gear to travel with, and what photos will make up your story line. So whether you are journeying to a National Park or just venturing out to a new place – a journey that spans two weeks or just two hours – know before you go, have lots of fun, and make awesome photo memories.

    What other important tips would you add for fellow photography road trippers?

    googletag.cmd.push(function() {
    tablet_slots.push( googletag.defineSlot( “/1005424/_dPSv4_tab-all-article-bottom_(300×250)”, [300, 250], “pb-ad-78623” ).addService( googletag.pubads() ) ); } );

    googletag.cmd.push(function() {
    mobile_slots.push( googletag.defineSlot( “/1005424/_dPSv4_mob-all-article-bottom_(300×250)”, [300, 250], “pb-ad-78158” ).addService( googletag.pubads() ) ); } );

    The post 3 Tips to Maximize Your Road Trip Photos by Nisha Ramroop appeared first on Digital Photography School.


    Digital Photography School

  • CP+ 2016: Things we found that had been cut in half

    CP+ 2016: Things we found that had been cut in half

    ‘I don’t know, Rishi’, I said in the press room, over warm coffee from a warm can. ‘I don’t know if I should do another ‘things we found that had been cut in half’ slideshow.’ Rishi was silent. I went on: ‘Is it even funny? And there aren’t that many things at the show this year which have been cut in half. Mostly I’ve just seen things which are whole. I don’t know whether I should do it’. 

    Rishi looked up. There was pain in his eyes. Confusion. The confusion of a child who’s starting to suspect that Santa doesn’t exist but isn’t ready to believe it.

    His normally whisper-quiet voice rose slightly. ‘You have to do it’ he said, almost pleading. His voice became louder still – ‘You have to do it. Not because it’s funny – Barney, listen to me. It’s not funny. It has never been funny. But that’s not why you do it. You do it because it’s tradition.’

    ‘Dammit, Rishi’ I said, straightening in my chair and in the same motion, banging my knees against the oddly low desk, ‘You’re right. And stop yelling, you’re freaking me out’. 

    CP+ 2016: Things we found that had been cut in half

    Could you disappoint this face? I couldn’t.

    CP+ 2016: Things we found that had been cut in half

    So, without further ado, here’s a selection of things we found at CP+ which had been cut in half. Buckle up, it’s going to be a wild ride*

    First up is Nikon’s brand new flagship D5. Capable of taking pictures very quickly of things moving even more quickly, the D5 is as tough as week-old sushi and entirely sealed against dust and moisture incursion. Not this one though – why not? Because this one has been cut in half. Water and dust can get right in, all over the place.  

    *It won’t be. 

    CP+ 2016: Things we found that had been cut in half

    With pro-level DSLRs being cut in half left right and center in previous years, I think Ricoh has been feeling a bit left out. In fact, I suspect that this is one reason for the much anticipated release of a proper Pentax full-frame camera, the K-1. 

    The K-1 is a 36MP full-frame camera with a host of solid core photographic features including in-camera stabilization, a revamped AF system, support for legacy Pentax K-mount lenses and little LED lights hidden in clever places all over the camera body. The rear LCD is articulated, using an innovative and unusual strut and hinge design, and the shifting sensor can be used to create full-color resolution exposures, correct wonky horizons and even track stars for night shots.

    This K-1 can’t do any of that though, because it’s been cut in half. This one is literally useless. 

    CP+ 2016: Things we found that had been cut in half

    An early prototype of the K-1, before Ricoh’s engineers realised that using clear plastic would cause serious light-leak issues. 

    CP+ 2016: Things we found that had been cut in half

    Here’s a blast from the past – a Nikon F from the early 1960s, cut in half good and proper. A period of huge social change, the 1960s saw revolutions on several fronts – sexual, social, political and photographic. This was the decade of TTL metering, removable prisms, wideangle lenses and motor-drives. Before the 1960s, the idea that a professional camera could be displayed like this – bisected, with its delicate parts exposed to public view – would have been unthinkable.

    How much has changed. Yet how much remains the same. 

    This Nikon F could be yours for only  ¥248,000 (~$ 2200). Superglue not included. 

    CP+ 2016: Things we found that had been cut in half

    In many ways a more innovative camera than the Nikon F, Canon’s F1 (which came along a little later) proved itself a solid, reliable workhorse for Canon FD photographers in the 1970s. With TTL metering built in (not via an optional metering head, as with the Nikon F) an optional (and insanely noisy) 3.5fps motordrive and a faster maximum shutter speed, the F1 was popular among sports and action photographers.

    There’s no way this one is being used to photography any sports or action though. Not only are the mercury cells that powered the F1 unavailable these days, this camera has been cut in half. It’d just fall sideways off the tripod.

    CP+ 2016: Things we found that had been cut in half

    Sony had a big booth at this year’s CP+ show, and as well as a new camera, the 24MP a6300, the company was also showing off three new ‘G Master’ lenses. Designed to cover the full-frame imaging area of the company’s a7-series mirrorless interchangeable lens cameras, the new 24-70mm F2.8, 70-200mm F2.8 and 85mm F1.4 are the most convincing pro-level optics yet released for Sony’s FE mount.

    Here’s the new FE 70-200mm F2.8 GM OSS. Comprised of a remarkable 32 elements in 18 groups, elements include one double-side aspherical and one extreme aspherical element, plus ‘Nano AR’ coating. This particular lens is even more complex, being made up of 46 elements in 36 groups. Because it’s been cut in half. Bonkers! 

    Read more about Sony’s new G Master lenses

    CP+ 2016: Things we found that had been cut in half

    Oooh, look at all that lovely glass. This is the Sony FE 85mm F1.4 GM portrait prime, sliced wide open for all to see. This lens comprises 11 elements in 8 groups, and features a new XA (extreme aspherical) element which has been rendered even more aspherical in this lens by being cut in half. 

    Read more about Sony’s new G Master lenses

    CP+ 2016: Things we found that had been cut in half

    The third lens in Sony’s new G Master trio is the FE 24-70mm F2.8 GM, which is intended as a standard zoom for Sony’s flagship a7R II. Our intial impressions of image quality from this lens are very encouraging, but it’s the Direct Drive SSM autofocus motor which has us most impressed.

    When paired with an a7R II this lens acquires focus – and can continue to focus on moving subjects – extremely quickly. We didn’t get the chance to try out the performance of this particular sample, but we’re pretty confident that it won’t be great. After all, it’s been cut in half. 

    Read more about Sony’s new G Master lenses

    CP+ 2016: Things we found that had been cut in half

    Sensors come in all manner of shapes and sizes – actually no, that’s not really true, but they come in all manner of sizes at least. From full-frame on the Sony booth to Micro Four Thirds at Panasonic, here’s the company’s new Leica DG Vario-Elmar 100-400mm F4.0-6.3 ASPH Power OIS. Optically much simpler than Sony’s 70-200mm, the Leica 100-400mm is equivalent to a 200-800mm lens when attached to a Micro Four Thirds body.

    It has has one aspherical, one UED, and two ‘regular’ ED elements, as well as a nine-bladed circular aperture. Or it would, if it hadn’t been cut in half. We didn’t get the chance to shoot with this sample yet but we’re pretty sure it’s going to give some very ugly bokeh. 

    CP+ 2016: Things we found that had been cut in half

    Here’s the Olympus M.Zuiko Digital 300mm F4 IS Pro, which offers an equivalent focal length of 600mm in full-frame terms. This lens has impressed us with its sharpness, durability and relatively light weight. This one is even lighter than normal, but much less resistant to the elements. It’s been cut in half, you see. Very silly.  

    CP+ 2016: Things we found that had been cut in half

    When it comes to cutting things in half, Zeiss is one of the best companies out there. And as usual, the Zeiss stand was a positive orgy of bisected primes, split zooms and half-naked wide-angles. Here’s the company’s Zeiss Milvus 21mm F2.8, which retails for almost $ 2000 normally. This one isn’t worth even half of that amount though. Off-center performance (on one side only) is terrible, because it’s been cut in half.

    CP+ 2016: Things we found that had been cut in half

    Hey, remember the tiny, cute little Voigtländer VM 40mm F2.8 Heliar we wrote about last year?

    CP+ 2016: Things we found that had been cut in half

    It looks even tinier and cuter when it’s been cut in half. 

    CP+ 2016: Things we found that had been cut in half

    Less small but still pretty cute is Tamron’s new SP 90mm F2.8 Di VC USD 1:1 Macro, the latest version in a line of very well-regarded 90mm macro lenses from Tamron stretching back decades. Weather-sealed with a built-in vibration correction stabilization system we’re really looking forward to seeing how this new macro prime performs. Not even Vibration Correction will get sharp results out of this one though though – this one has been cut in half. 

    CP+ 2016: Things we found that had been cut in half

    An etymological diagram of the human brain, cut in half. These are the literal translations of latin terms for the various brain regions. After 4 days at CP+, Rishi and I are mostly creating content from our ‘Little Brain’ area, although my Slime Gland has been giving me trouble. It’s probably just the jet-lag.

    We’ve got more content lined up for you over the next few days, including some more technical analysis of Nikon’s D5 and D500, and interviews with senior executives from Canon, Nikon, Ricoh and more. Thanks for reading and goodbye (for now) from Yokohama. 

    Articles: Digital Photography Review (dpreview.com)

  • First “Drawn in Place” Architecture Made with a 3D-Printing Pen

    [ By WebUrbanist in Conceptual & Futuristic & Technology. ]

    3d printed architecture pen

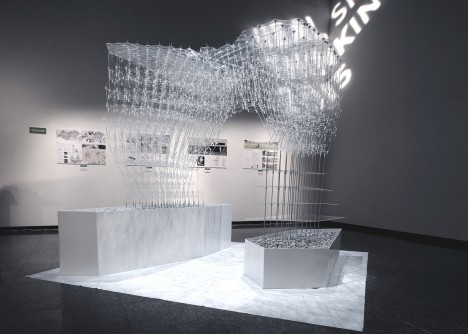
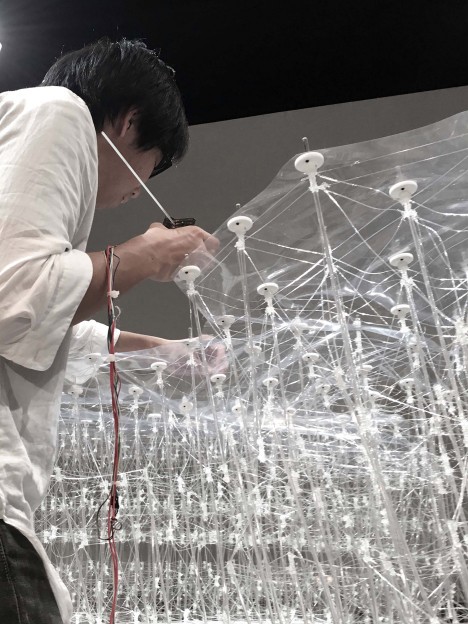
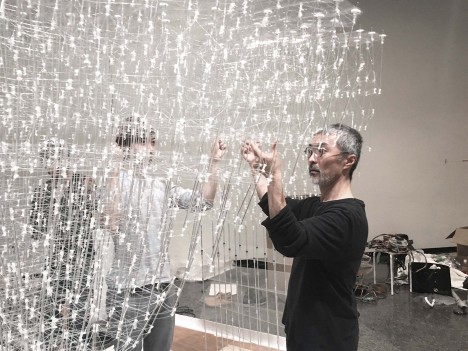
    A group of students from the University of Tokyo have created the world’s first work of 3D pen-drawn architecture, extruding thermoplastic filament to generate a structurally-stable arch installation.

    3d pen modeling student

    A digital tracking system helped builders connect rods with extruded supports, generating a lattice-like system of interconnected trusses (resulting in a kind of lightweight, smaller-scale space frame). The combination of rigid rods and fluid connectors helps the whole structural network, providing tension as well as compression capabilities.

    3d pen in use

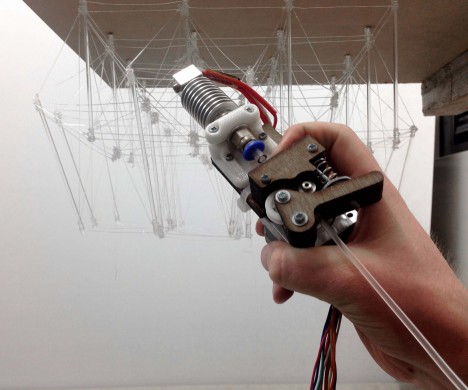
    The handheld device enabling the extrusions operates much like a hot glue gun or static 3D printer, heating the constituent material and making it malleable before it hardens upon deployment. Unlike large-scale printers, this approach enables minute on-site work by anyone trained to use the machine, reducing costs and complexity.

    3d connected network structure

    “Technology has traditionally been used to automate and replace human labour,” design team member Kevin Clement, said in an interview with Dezeen. “The issue with this approach is that it fails to take advantage of human intuition during fabrication. We believe our approach can bridge the current dichotomy between machine and human-made production.”

    Share on Facebook


    [ By WebUrbanist in Conceptual & Futuristic & Technology. ]

    [ WebUrbanist | Archives | Galleries | Privacy | TOS ]


    WebUrbanist

  • Out Cold: 12 Closed & Abandoned Dairy Queen Stores

    [ By Steve in Abandoned Places & Architecture. ]

    abandoned-dairy-queen-0
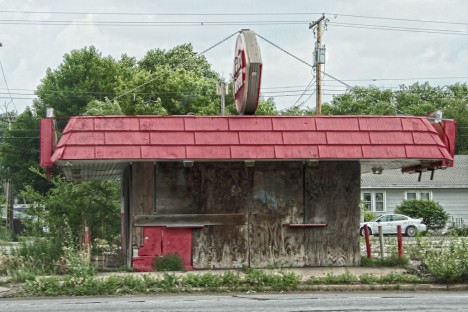
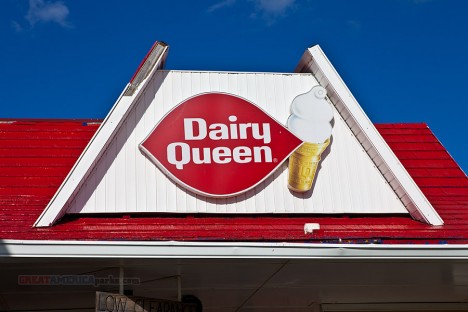
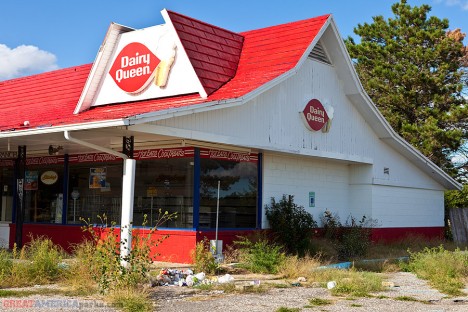
    Chill out, soft-serve ice cream fans, these 12 abandoned Dairy Queen stores aren’t typical of the 75-year-old chain’s 4,000+ locations worldwide.

    abandoned-dairy-queen-1a

    Founded in June of 1940, Dairy Queen has carved out a viable, sustainable, and for the most part successful niche in the fast, er, “fan food” industry. Take it from Warren Buffett – the legendary investor’s Berkshire Hathaway holding company has owned International Dairy Queen Inc outright since 1998.

    abandoned-dairy-queen-1b

    abandoned-dairy-queen-1c

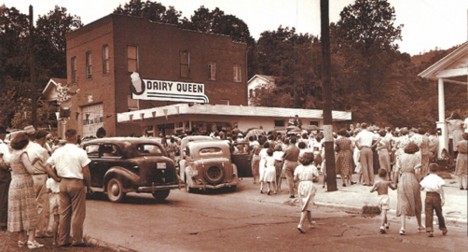
    Though abandoned by Dairy Queen, the chain’s original location on 501 N. Chicago St. in Joliet, IL still stands thanks to its 2010 designation as a city landmark. Originally built in 1895, the building was a DQ until the early 1950s – subsequent tenants included a lawn-mower repair business, a furniture store, a motorcycle shop and a plumber. Since 2007 the Universal Church of the Kingdom of God has dispensed The Lord’s message at the historic location, presumably accompanied by chilled communion wafers.

    More Like Ender

    abandoned-dairy-queen-2a

    “Abandon all hope, ye who enter here…” the hope of enjoying some fan food (not fast food), that is. Credit Flickr user haymarketrebel with the above photo of a closed and abandoned Dairy Queen in Tustin, CA snapped on November 20th of 2013.

    Grilled, Chilled, Killed

    abandoned-dairy-queen-3a

    abandoned-dairy-queen-3b

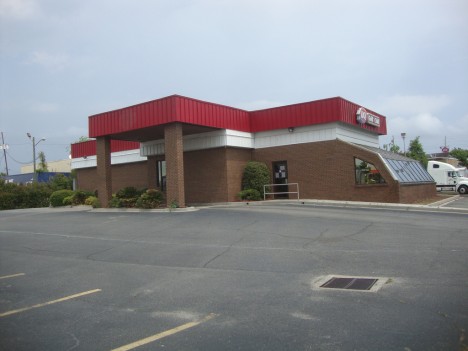
    Traditional fixtures of small-town America, larger and more restaurant-style Dairy Queen Grill & Chill stores began to appear in 2001. The above store, located in Savannah, GA sports the revised corporate logo that debuted in 2007.

    abandoned-dairy-queen-3c

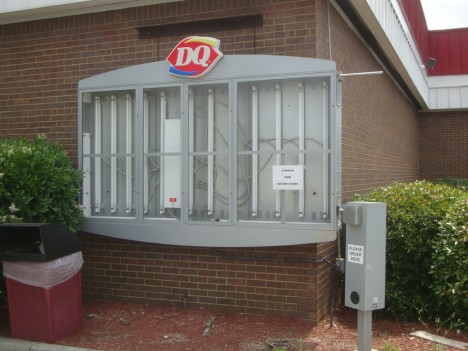
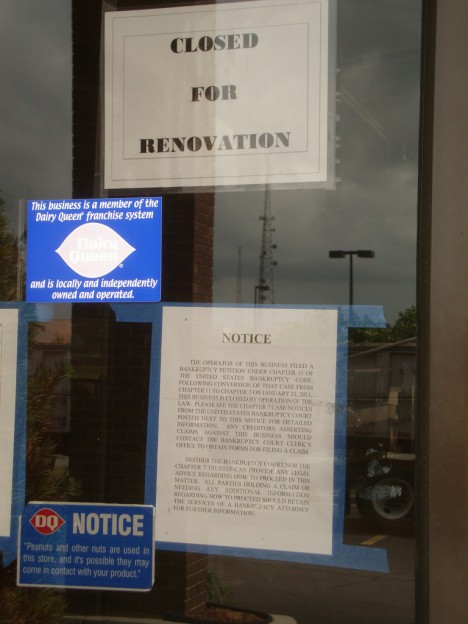
    Too big to fail? Nuh uh: Flickr user C-Bunny snapped the shuttered store in April of 2011 and noted the presence of “Closed for Renovation” and “Notice of Bankruptcy” signs plastered to the glass drive-thru window. Which is it, DQ… why not both?

    Stuckey’s to be You

    abandoned-dairy-queen-4b

    abandoned-dairy-queen-4a

    Flickr user Steven Wilson (ezeiza) has the hots for Dairy Queen: his dedicated online album features over 140 photos and counting! Wilson included but a single abandoned DQ; a combination Stuckey’s/Dairy Queen store in Lindsborg, KS that judging by the overgrown landscaping has been shut for some time.

    Next Page – Click Below to Read More:
    Out Cold 12 Closed Abandoned Dairy Queen Stores

    Share on Facebook


    [ By Steve in Abandoned Places & Architecture. ]

    [ WebUrbanist | Archives | Galleries | Privacy | TOS ]


    WebUrbanist