Blog

  • 12 Tips For Indoor Natural Light Photography

    Feeling frustrated with indoor photography?

    Harsh shadows and weird skin tones are common problems. In this article, you’ll learn how to improve your indoor photography.

    natural light photography indoors

    8 tips for indoor natural light photography

    Working with natural light indoors can be a little tricky. These beginner tips will help you create beautiful photos using natural light.

    1. It’s all about the windows and doors

    You’ll want to get to know the light that comes through them. Sometimes it floods the room softly. Other times it beams in, bouncing off the walls and floor.

    Soft light will add a soft glow, and harsh light will give a dramatic or moody look.
    indoor natural light photography tips 2

    Take note of what kind of light enters each room throughout the day.

    The color of light also changes during the day. It has a warmer look at sunrise and sunset. During midday, it has a cooler or neutral color. Use this to add different effects to your photos.

    2. Turn off the lights

    Natural light doesn’t like competition. Electric lights can affect your white balance. This is because the color of light varies with the source. Skin tones can look odd when artificial light mixes with natural light. The easiest way to fix this problem is by turning off all electric lights.

    3. Shoot in Aperture Priority mode

    In Aperture Priority mode, you choose the aperture. With indoor natural light photography, you need to let in as much light as possible. To do that, you’ll want a wide open aperture. The lower your aperture number (f-stop), the wider your aperture is open.

    When you use a wide aperture, your depth of field will be shallow. So your subject will be in focus, while your background is left soft and blurry. This adds a beautiful effect to portraits and product shots.
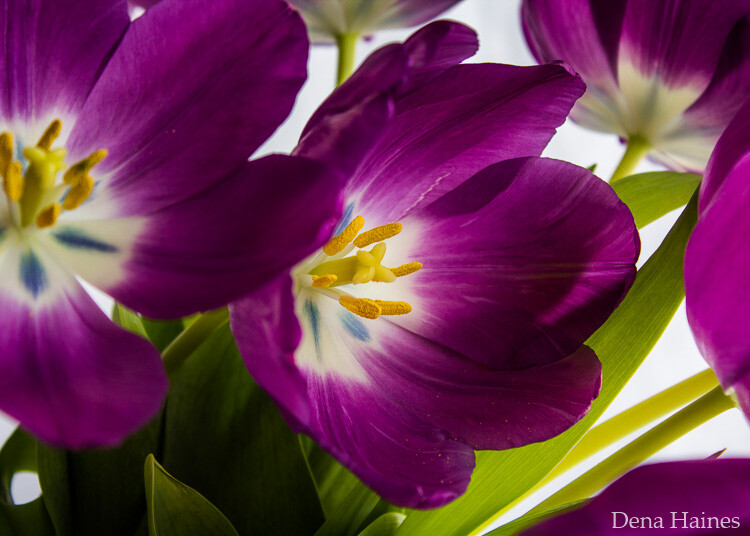
    indoor natural light photography

    For portraits, an aperture of around f/5 or f/6 will keep the entire face in focus. Focus on the eyes for best results.

    Note: Also shooting in RAW is better than JPEG for indoor natural light. RAW files give you a lot more to work with when editing.
    aperture priority for indoor natural light photos

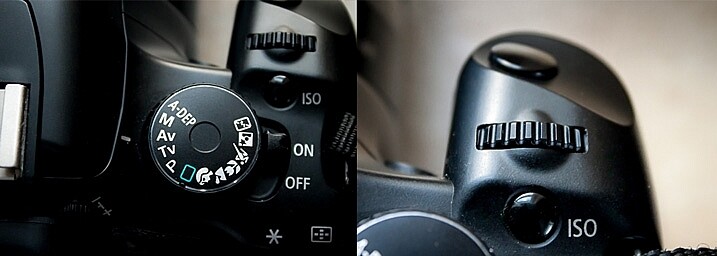
    Aperture Priority is marked with either an AV (Canon cameras, pictured above) or an A (Nikon cameras). To adjust the setting, you’ll turn the small dial (pictured on the right).

    4. Choose your White Balance

    To get good white balance take your camera out of Auto White Balance (AWB). The button for changing white balance is usually marked with a WB somewhere on the back of the camera (or use your Canon Quick menu if you shoot that brand).

    For proper skin tones choose Daylight (the one with the picture of the little sun). This will give good results, not too blue and not too yellow. If you want to warm things up a little, choose Cloudy. This will add more yellow. Try a shot with Daylight, then one with Cloudy, and see which looks right or which you prefer.

    You can adjust your White Balance while editing (if you shoot in RAW) but getting it right while shooting makes editing easier.

    5. Use a light catching backdrop

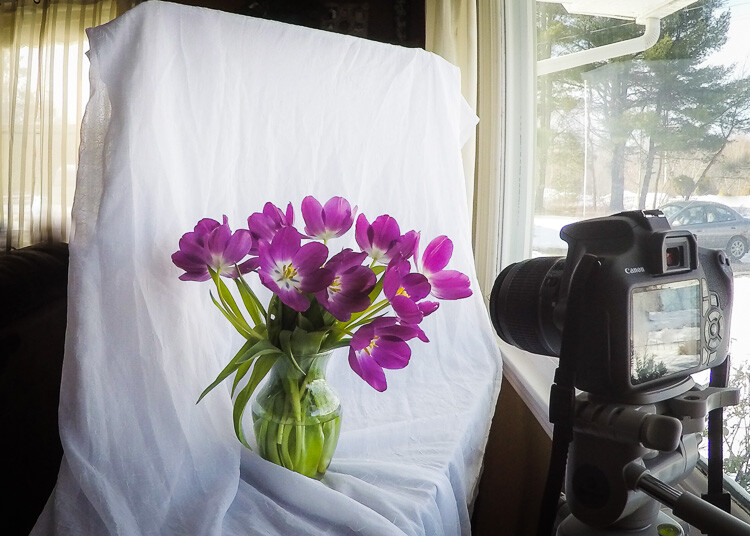
    A backdrop will help catch the light and bounce it back on your subject.
    light catching backdrop for natural light photography

    In the above image, the white material helps to cradle the light around the flowers.

    catch natural light with a backdrop

    This backdrop is made with a freestanding collapsible clothes rack and a long piece of white material. I love how easy it is to set up and move around.

    6. Use a light box

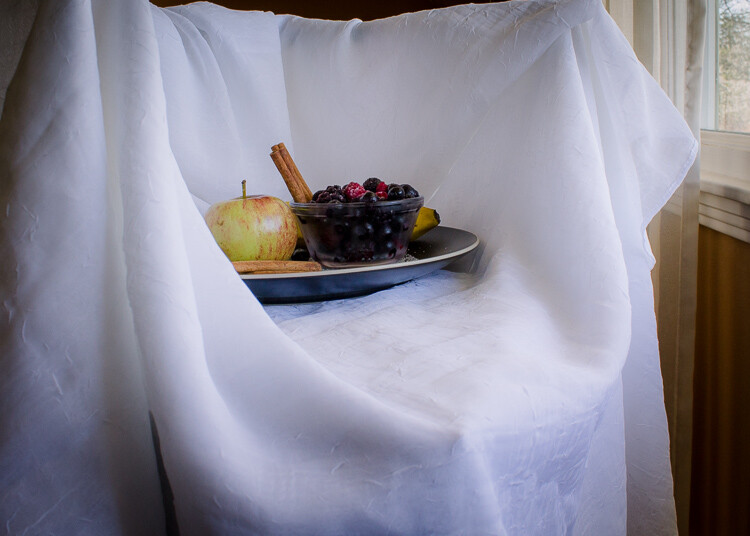
    A light box will create a similar effect as the backdrop, but it will help control the light even more.
    use a natural light light box for indoor photos

    I made this light box out of Lego and used the same piece of white material pictured in tip #5.

    tips for natural light photos

     7. Use a reflector

    A reflector is used to bounce natural light back on your subject.

    use a reflector for natural light photography

    tips for indoor natural light photography

    For these shots, I used a reflector and the backdrop. My daughter was sitting with her left side facing the window. She was holding the reflector in her right hand, which helped lighten the shadows.

    8. Use a mirror

    A mirror is another great way to control natural light. Hang a mirror in the window. I used a large suction cup with a hook to hang the mirror.

    indoor natural light photography tips

    Have your model look in the mirror. As you take your shot make sure your reflection is not in the mirror. It can take some patience to get the angles and reflections under control, but it’s worth it.

    I used a small handheld mirror for this shot. A larger mirror would require less cropping.

    tips for indoor natural light photos

    9. Tidy up

    There are often things lying around the house, especially if you have kids. This clutter can be distracting in a photograph. It’s worth taking a couple minutes to tidy up before you start shooting.

    In a small space, a backdrop can serve a double purpose. It will control light and create a blind to background clutter. It can help make a small space more workable. For most of the photos in this article, I pushed our sofa and table into the middle of our living room, so I could set up in front of our largest window. Without the backdrop, this location wouldn’t work.

    natural light photography indoors 2

    10. Place your subject close to the window

    Place your subject a foot or two away from the light source. This way you’ll make the best use of the natural light, and avoid the harsh contracts that can be created by being too close to the window/door. Try backlit, side lit, and full light by having your model face different angles to the window. 

    11. Use the curtains

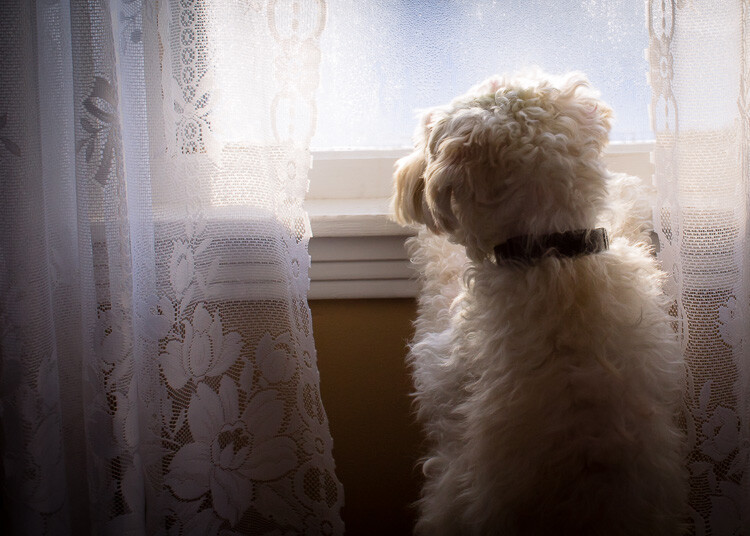
    Use curtains or blinds to help diffuse harsh light. When the sun is beaming into the room, the light can blow out your photos. Pulling the curtains can soften the light and help with proper exposure. If the curtains are not suitable, you could use a sheer piece of material to hang over existing curtain rods.

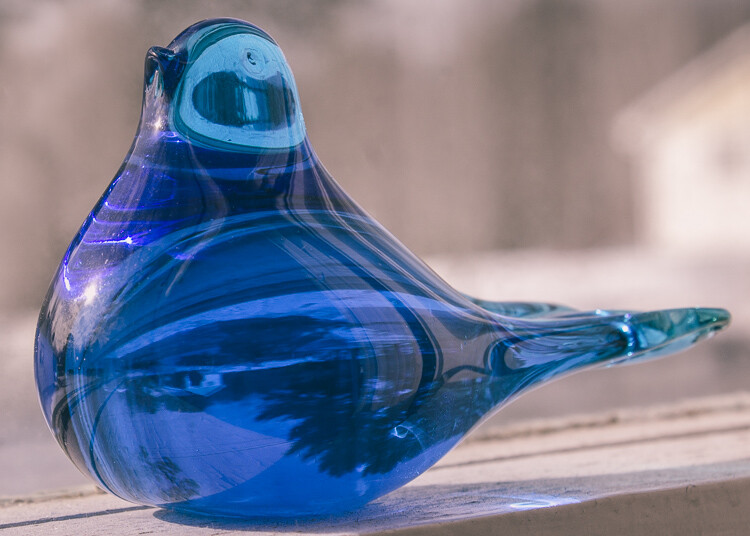
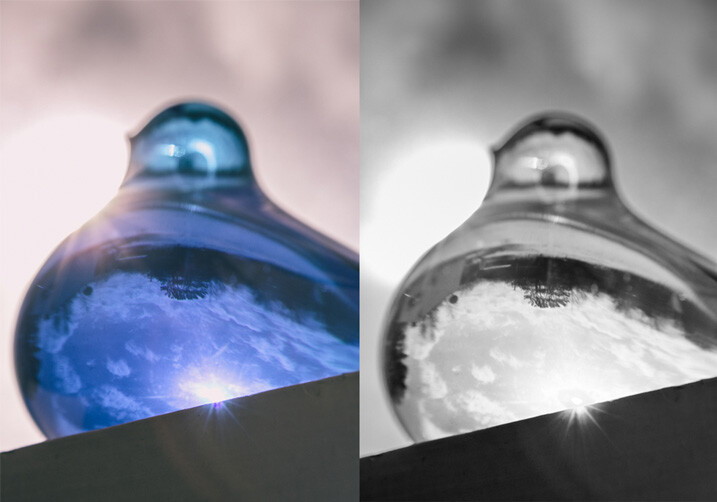
    12. Shoot reflective objects

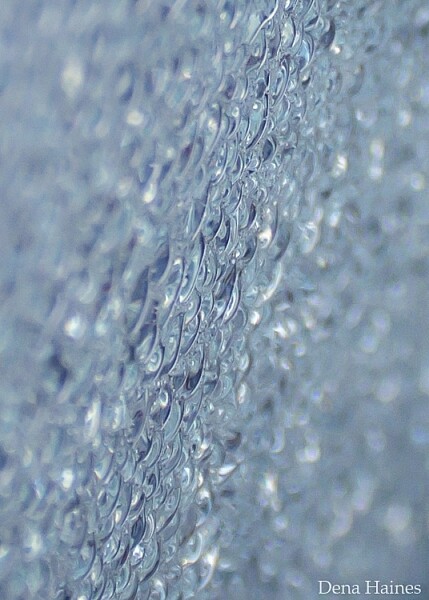
    Natural light can turn the most common thing (like the moisture on the window pictured below) into something beautiful.
    natural light on glass objects

    natural light on reflective objects

    natural light through water on the window

    Have fun playing around with reflective objects and natural light. I love the way light creates reflections and glistens on shiny/iridescent objects.

    You’ve got to love it

    It’s easy to love indoor natural light photography.

    The setup is inexpensive, portable, and easy; and you can create beautiful photos no matter the weather or time of day. Don’t forget to have fun, and let that inner beauty shine through.

    have fun with natural light

    Your turn

    Let me know how your experimenting goes by commenting below. I can’t wait to see what you create. Please share your photos as well.

    googletag.cmd.push(function() {
    tablet_slots.push( googletag.defineSlot( “/1005424/_dPSv4_tab-all-article-bottom_(300×250)”, [300, 250], “pb-ad-78623” ).addService( googletag.pubads() ) ); } );

    googletag.cmd.push(function() {
    mobile_slots.push( googletag.defineSlot( “/1005424/_dPSv4_mob-all-article-bottom_(300×250)”, [300, 250], “pb-ad-78158” ).addService( googletag.pubads() ) ); } );

    The post 12 Tips For Indoor Natural Light Photography by Dena Haines appeared first on Digital Photography School.


    Digital Photography School

  • Dual-camera rumored to be reserved for large iPhone variant

    We’ve seen several rumors about the next iPhone generation coming with a dual-lens camera setup. Now it seems that, like image stabilization, this premium imaging feature will be available only in a larger model. Read more

    Articles: Digital Photography Review (dpreview.com)

  • New York Public Library launches interactive Photographers’ Identities Catalog

    The New York Public Library has launched a new online tool called Photographers’ Identities Catalog (PIC), an interactive map with biographical data on more than 115,000 photographers, as well as photography dealers, studios and manufacturers. Users are able to filter the data based on several categories, such as region and format, to search for results throughout the entire history of photography.

    Each PIC result appears as a colored-coded dot on an interactive globe, and each dot marks a specific individual or entity. Biographical data on photographers includes name, nationality, any relevant locations or dates, and the source of the NYPL’s data. Information on businesses includes addresses and years of operation. In addition to filters, users can zoom in on a specific region to explore its results.

    Because of the wide variety of filters, users can perform very specific searches. As one example presented by the NYPL, someone can locate female photographers who worked with specific studios in certain countries. The library advises that some data could be incorrect, however, and those who spot an error can report it for correction. Historians and scholars with relevant data are encouraged to contact the NYPL to help expand the catalog, as well.

    Via: New York Public Library

    Articles: Digital Photography Review (dpreview.com)

  • Power Zoom: Panasonic Lumix DMC-ZS100/TZ100 Review

    Key Features

    • 20.1MP 1″-type BSI CMOS sensor
    • F2.8-5.9, 25-250mm equiv. lens
    • Depth from Defocus AF
    • 4K/UHD video capture
    • 3″ touchscreen LCD
    • 1.2M-dot equiv. EVF
    • Post Focus / 4K Photo functions
    • Wi-Fi

    As the 1″-type enthusiast compact market has grown over the last 2 years, there has been a noticeable gap in the market. There were small, standard zoom (24-70mm) models and long zooms (24-600mm), but nothing in-between for those who want a longer lens without sacrificing body size.

    Enter Panasonic, a company with a long history of making travel zoom cameras. In fact, the company made what many would consider the first one: the DMC-TZ1, way back in 2006. Panasonic entered the 1″-type market in 2014 with its DMC-FZ1000, a camera we liked enough to give it a Gold award.

    At this year’s Consumer Electronics Show in Las Vegas, the company announced the DMC-ZS100 (TZ100 outside of North America), which took the guts of the FZ1000 and shrank the body down to the roughly the size of a Sony RX100 IV. Naturally, you can’t stuff a fast 25-400mm lens into a compact body, but the ZS100’s 25-250mm equiv. F2.8-5.9 lens is nothing to sneeze at, either. The camera uses the same 20.1MP sensor as the FZ1000 which is more than likely the same as the one in the Sony RX100 II and III.

    The ZS100 is chock full of features, most notably its Depth from Defocus autofocus system, 4K video capture and electronic viewfinder. It also has a 3″, touch-sensitive LCD, Wi-Fi (but, unlike most Panasonic products, no NFC) and useful 4K Photo and Post Focus features.

    Why Pay More?

    Imagine you’re shopping for a compact travel zoom camera, and you’re viewing the selection at a Big Box retailer. You reach the Panasonic section and see the DMC-ZS60, which offers a 30X zoom and costs $ 450, next to the ZS100 which ‘only’ has a 10X zoom but costs $ 250 more. It’s not a stretch to imagine a camera buyer asking themselves why they should pay more for what seems like less.

    While the ZS60 does indeed have a longer lens than the ZS100, there is a trade-off:

    Above is a graph showing equivalent aperture vs equivalent focal length, which is described in detail here. The yellow line at the top is the ZS60 (1/2.3″ sensor), while the ZS100 (1″ sensor) is in blue below it. In terms of equivalent aperture (which takes into account sensor size), the ZS60 is effectively around 2 stops ‘slower’ than the ZS100.

    This means several things. For one, the ZS100 can capture roughly four times the total light at every focal length, if you keep the aperture open and use the same shutter speed. Since the sensor is gathering more light, you get a better signal-to-noise ratio, which in turn leads to higher image quality. This will be especially noticeable in low light, when the ISO needs to go up.

    There’s another benefit to having a 1″ sensor rather than the 1/2.3″ one. The lenses used on larger sensors tend to offer more control over depth-of-field, allowing you for blurrier backgrounds in portraits.

    The one area in which the ZS60 bests the ZS100 is in terms of zoom, as you can see by how much further the yellow line extends.

    Understanding the math behind all of this is a bit confusing, but the end result is the same: the ZS100 will produce better quality images and can produce more background blur than the ZS60, though you’ll have to sacrifice both zoom power and money in order to get it.

    Compared to its peers

    Using what we’ve learned from above, let’s take a look at how the ZS100 fits among its 1″ sensor peers:

    In this group, which includes cameras from Sony, Canon and Panasonic, you’ll notice that the benefit of shorter, faster lenses: their equivalent apertures start low, and stay low. For example, Canon’s G7 X I and II, which have focal ranges of 24-100mm equiv., are  2 stops faster than the ZS100.

    The Sony RX10 I/II reaches out to 200mm (not far from the 250mm on the ZS100), but since it has a fixed F2.8 lens, its equivalent aperture is over 2 stop faster than the ZS100 at full zoom. That said, the RX10 I and II are also much larger and heavier cameras. The FZ1000 isn’t quite as large as the RX10s and even with its F2.8-4 aperture range, it still has a 1+ stop advantage over the ZS100 for much of its zoom range.

    So what can you conclude from this chart?

    • Smaller cameras sacrifice focal range to keep size down but can offer fast apertures
    • Long zoom cameras sacrifice size for focal range. This is especially the case with the RX10s. Canon’s G3 X strays from the group, with its slower F2.8-5.6 lens.
    • In order to have a 25-250mm equiv. lens in a body that fits in your jacket pocket, Panasonic had to make some compromises. Its lens isn’t as long as the large-zoom cameras or as fast as those of the small cameras – instead it’s a blend of the two. If the ZS100 had a faster lens like, say, the FZ1000, you’d be looking at a camera nearly as large, which would make the ZS a lot less desirable.

    Articles: Digital Photography Review (dpreview.com)

  • Ghosts of Architecture Past: 14 Fossils of Fallen Buildings

    [ By Steph in Art & Installation & Sound. ]

    ghost architecture 1

    Like hazy memories or flickers of imagination, architectural structures either long since lost or never built in the first place interact with three-dimensional space in the form of ghostly sculptures, projections or the imprints they left behind on neighboring buildings. Some are tangible yet illusory, made of transparent materials that make them seem like hallucinations, while others attempt to conjure past, fiction and fantasy with nothing but beams of light or smudges of paint left behind on brick.

    Ancient Church Remains Resurrected in Puglia

    ghost architecture wire 11

    ghost architecture wire 10

    ghost architecture wire 12

    ghost architecture wire 8

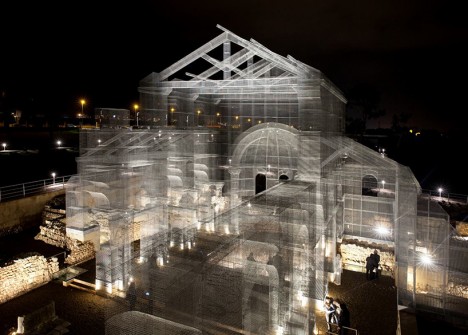
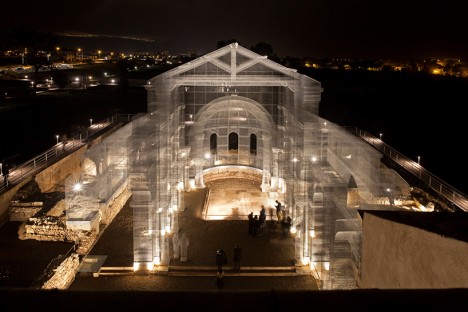
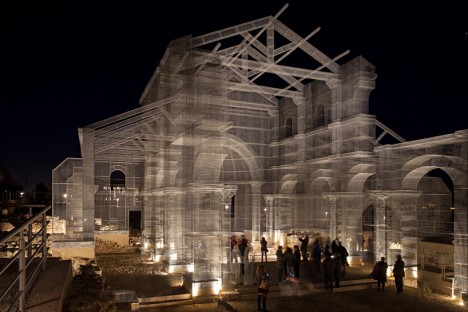
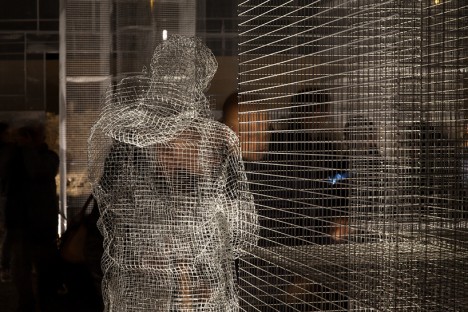
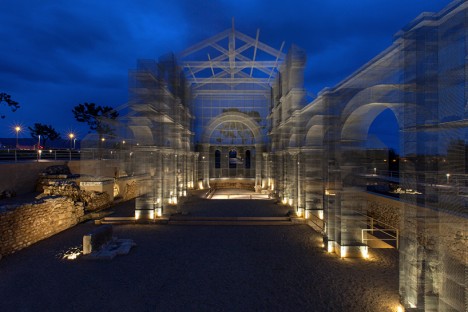
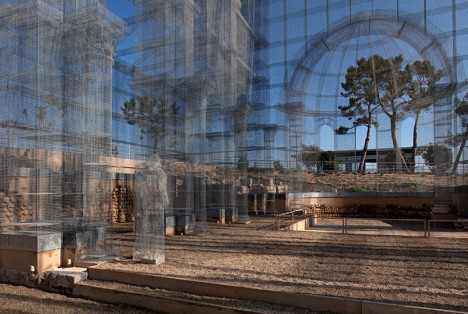
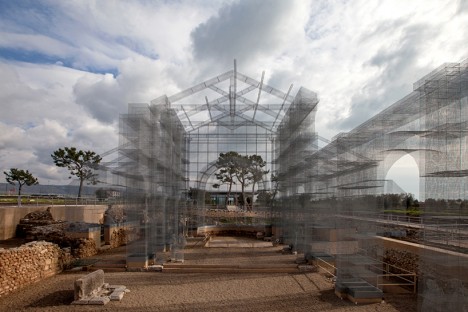
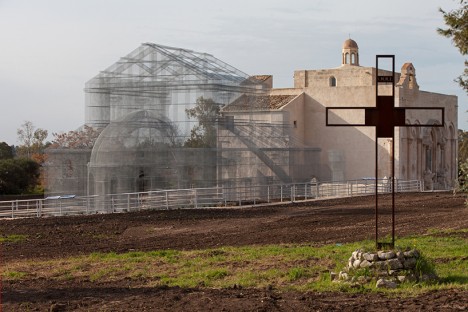
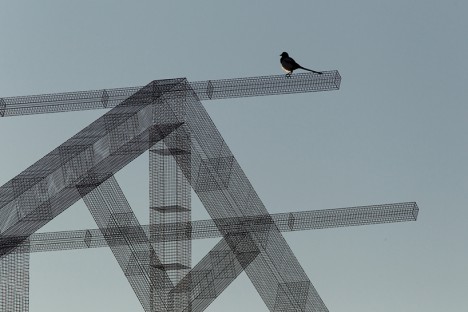
    Destroyed by earthquakes in the 13th century, the remains of one of Italy’s great harbor towns are long since abandoned, and only a foundation with a few crumbled stone walls is left to show for a grand early Christian basilica. Italian artist Edoardo Tresoldi raises it from the dead in the ghostly form of wire mesh, giving it a transparent effect that makes it seem not quite real from afar. In fact, the layered mesh creates an optical illusion that makes its Romanesque roof, columns and archways look blurred. This transparency makes it possible to see both the form and shape of the structure and how it interacted with its environment.

    ghost architecture wire 4

    ghsot artchitecture wire 2

    ghost architecture wire 3

    ghost architecture wire 5

    “The work of Edoardo Tresoldi appears as a majestic architectural sculpture that tells the volume of the existing early Christian church and, at the same time, is able to vivify, and update the relationship between the ancient and the contemporary,” says curator Simone Pallotta. “It is a work that, breaking up the secular controversy of the primacy arts, summarizes two complementary languages into a single, breathtaking scenery.”

    Ghosts of Portland’s Industrial Past

    ghosts of architecture portland 1

    ghosts of architecture portland 2

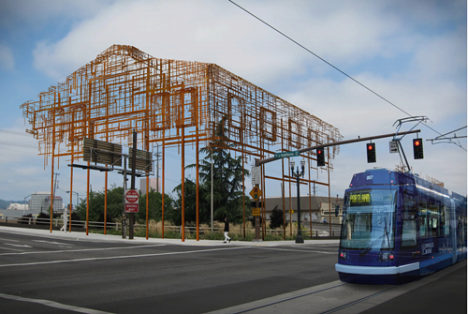
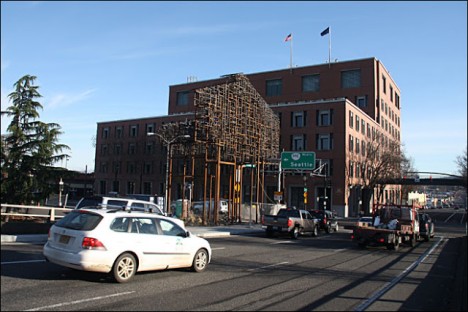
    A pair of outdoor sculptures by artists and architects Annie Han and Daniel Mihalyo sketch in vague outlines of Portland’s industrial past along the Willamette River amongst all the new construction. Made of metal mesh and sited near two bridges, ‘Inversion: Plus Minus’ represent the outer shells of ordinary industrial buildings that once existed in the area. If you pass it by without giving it a good look, you might even just assume that it’s scaffolding.

    6 Architectural Fossils
    ghost architecture fossils 1

    ghost architecture fossils 2

    ghost architecture fossils 3

    ghost architecture fossils 4

    ghost architecture fossils 5

    ghost architecture fossils 6

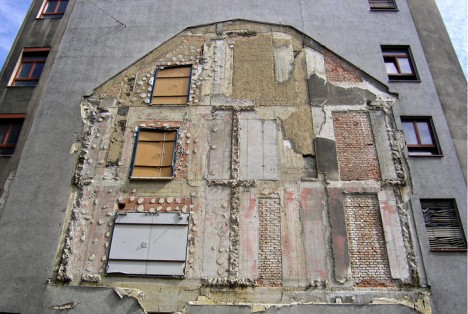
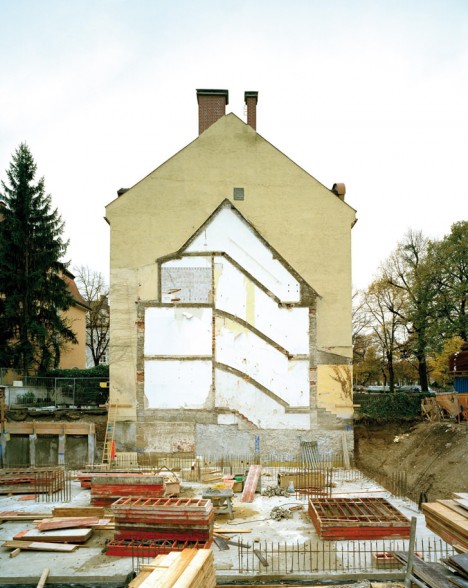
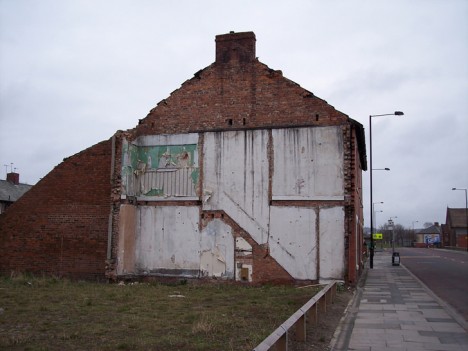
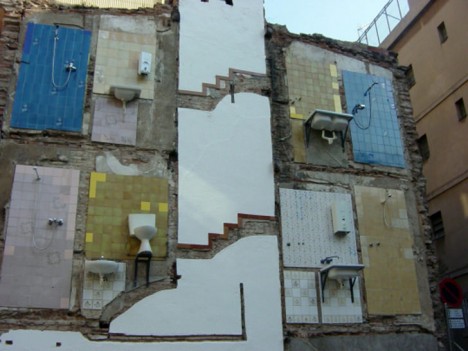
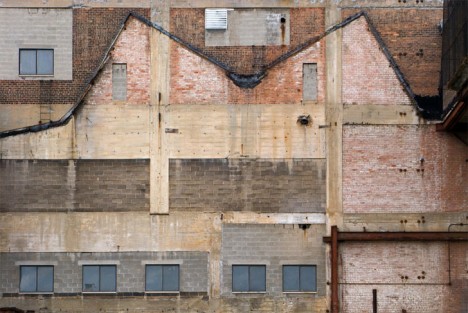
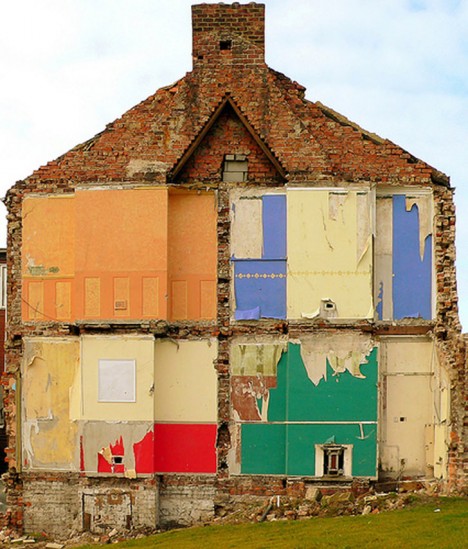
    The imprints of buildings long gone can often be seen on their surviving neighbors for decades into the future, sometimes giving us an exact outline of their shapes like fossils on adjacent brick and stone. Not only can you see the rooflines, chimneys and outer walls, but often staircases, fire escapes and individual rooms. It’s especially intriguing when bits of wallpaper still stick to the remaining walls: we see the personalities of the individual spaces, triggering us to think about the lives of their former occupants. In some cases, fixtures like sinks, shower heads and toilets still cling to the tile-clad surfaces. Like a cross between architecture and archaeology, these imprints are reminders of a city’s past, and they’re preserved for public enjoyment by the Flickr group The Unconscious Art of Demolition.

    Next Page – Click Below to Read More:
    Ghosts Or Architecture Past 14 Fossils Of Fallen Buildings

    Share on Facebook


    [ By Steph in Art & Installation & Sound. ]

    [ WebUrbanist | Archives | Galleries | Privacy | TOS ]


    WebUrbanist

  • Sony Cyber-shot RX10 III 4K sample footage and shooting summary

    4K Video Sample Reel

    All video was shot in Sony’s XAVC 4K codec, at 4K/24p (except for the high-frame rate samples). Shutter speed was locked at 1/50 sec, aperture was manually selected on the lens and the camera was left in Auto ISO. Both manual focus and continuous autofocus were used.

    Carey’s shooting impressions

    The Sony Cyber-shot RX10 III is a conventional product for Sony. That might sound slightly negative at first, but really it means that the RX10 III is built well, attractively designed, packed with great technology and is capable of capturing excellent images. Unfortunately, it also means that there’s some usual Sony foibles at work; the menu system is horrid, there’s no touch screen, there’s some operational weirdness carried through from the rest of the Cyber-shot line, and some of the ergonomics could use some work.

    The standout feature on the RX10 III is its lens. As you can plainly see from our samples gallery, the 24-600mm F2.4-4 lens is stellar. What’s more, while the camera is somewhat hefty for a ‘compact,’ it doesn’t feel unbalanced in your hand. When you combine that stable hand-holdability with the RX10 III’s optical stabilization, the average user will be able to get smooth telephoto video and sharp telephoto photos with ease. The XAVC 4K codec also means video will be crisp and detailed, the flat S-Log2 Gamma control (which was not used in the sample video above) and audio in / out ports indicate that the RX10 III will appeal to aspiring videographers as well.

    What about downsides? Well, even if you’ve come from another Sony camera, you’ll need to spend some time figuring out where your menu options are. As mentioned in our RX1R II review, even the video and audio recording settings are spread not just across multiple pages, but also multiple sections of the menu. We also wish Sony would add things like video capture resolution and frame rate to the ‘Function’ menu in movie mode. And though it’s to be expected with such a wide zoom range, some users will be turned off by the amount of time it takes to zoom that impressive lens in and out. Unlike Sony’s a7 cameras, you cannot half-press the shutter to acquire focus in movie mode. It’s either continuous AF or manual focus. My last major gripe is that, like on other Sony cameras, the C1 and C2 buttons require a contorting of the hand to operate.

    Overall, though, once you get used to some workarounds and get familiar with the camera, the RX10 III represents one of the most versatile and capable all-rounders I’ve ever used.

    Rishi’s shooting impressions

    Pros

    The standout feature of Sony’s new RX10 III is, without a doubt, its lens. It’s got incredible reach, and with a maximum aperture of F2.4-4, remains relatively bright throughout its zoom range. Brighter max apertures help keep noise (and ISO) levels low, and afford relatively good depth-of-field control (or background blur). A look at our equivalent aperture diagram indicates the RX10 III is well ahead of its nearest competitor, the Canon G3 X (lower equivalent aperture is better for any given focal length). The RX10 III’s lens is also far brighter than Nikon’s 24-500 DL, which ranges from a max aperture of F2.8 on its wide end to F5.6 on its tele end. That said, if you really don’t have much of a need beyond 200mm equivalent, the RX10 II retains a brighter aperture for most of its zoom range, save for on the wide end where the RX10 III is slightly ahead (F2.4 vs F2.8).

    The lens appears sharp edge-to-edge even wide open at 24mm equivalent, at 70mm, 200mm, and 600mm. Granted, these are JPEGs we’re looking at, which are sharpened (with a class-leading sharpening engine, no less), so we’ll have to reserve final judgement for when we’ve been able to analyze the Raws, but, suffice it to say we’re thoroughly impressed by the performance of the lens so far. Good performance wide open is important on smaller sensor formats: it means you don’t have to stop down too much and deprive the smaller sensor of more light, which also helps combat diffraction-induced softness (which starts at earlier F numbers with smaller sensor formats, as diffraction is correlated with equivalent aperture).

    Sony’s recent improvements in its JPEG engine also mean very high detail retention through smart sharpening and noise reduction that very effectively reduces noise while maintaining detail at high ISOs. This 220mm shot has plenty of detail despite being shot at the tele end of the zoom, and at ISO 320, which is approximately ISO 2500 equivalent on full-frame, assuming equivalent sensor efficiency and performance. Impressive. 

    Pair that lens and JPEG engine with a stacked 1″-type high dynamic range, high sensitivity CMOS sensor, and you’ve got a very impressive camera. The stacked sensor design marries a separate chip for memory and signal processing circuitry to the image sensor itself, which allows all that data to be read off the image sensor faster. The faster readout offers a number of benefits: faster autofocus, and fast frame rate video, as well as oversampled 4K video generated from 6K readout.

    Cons

    How about downsides? There are plenty, ergonomically. The Cyber-shot philosophy is starting to make less and less sense with such high-end offerings, and we wish Sony would instead essentially brand this as an Alpha camera, conferring upon it the advantages of the Alpha line and a consistent user-experience across all their cameras. For example, it doesn’t make sense that the ‘Focus Settings’ option can’t be assigned to the center dial back button on a Cyber-shot, yet can on an Alpha – it’s one of my favorite ways to make that button have dual function: click it to use the 4-way dial to move the AF point in any Flexible Spot mode, or click it and turn the dial to change AF area. As it is, on any Cyber-shot, you can’t assign this option, instead requiring you to leave the button assigned to ‘Focus Standard’ – lest you wish to lose control over focus point placement. That means you’ll have to waste yet another custom button for AF area mode.

    Thankfully, pressing that back dial’s center button now toggles the camera into AF point selection mode (like the a6300), which means you don’t always have to first press it to the move the AF point, but this isn’t ideal: I’d also like access to whatever custom functions I’ve assigned left, right, and down to on that 4-way dial. I don’t understand why Sony doesn’t simply include an AF point selection joystick, or add a touchscreen for that matter.

    It’s high time to marry state-of-the-art technology with an incredible user experience.

    Particularly problematic across all Sony cameras is the menu system. As I wrote in our a7R II review: ’22 AF options are split across 11 different submenu pages under two different main menu headers,’ and things aren’t any better for the RX10 III either. The lack of organization is inexplicable, but what makes it even worse is the lack of a customizable ‘My Menu’. Furthermore, now that these cameras are both stills and video powerhouses, there need to be separate customizations for each. Currently, if I assign a button to ‘Focus Magnifier’ to get around the fact that the camera doesn’t automatically magnify focus as I turn the focus ring in any video mode, that button becomes entirely redundant in stills mode, where the camera does do so.

    There are countless other examples of button customizations that are relevant to video, but entirely useless in stills – for a camera body with rather limited customizable buttons and dials, there really shouldn’t be any assigned physical controls that are only useful in one shooting mode. And as Carey mentioned, there also remain the customizations (like movie frame rate or codec) that remain unassignable to the Fn menu, requiring a menu dive, which should be avoided at all costs considering the disorienting, unorganized menu system.

    Frankly, Sony would benefit from hiring a firm dedicated to UI to re-design the physical controls, menus and button/dial interface completely from scratch. It pains me to see such refined technological achievement placed into hands of photographers, only to hear ‘I wouldn’t shoot it because I’m constantly fighting the ergonomics’ or ‘it just isn’t a pleasure to use’. An ergonomic overhaul would go a large way to addressing such complaints. 

    Articles: Digital Photography Review (dpreview.com)

  • Fuji Crystal Archive Deep Matte Paper is Freaking Amazing

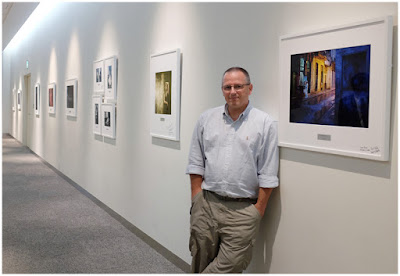
    That’s me, above, in 2013. I made a trip to Japan for some meetings with Fuji. It was me, three other photogs and a room of Fuji engineers for two solid days of “How can we make our cameras better?” discussions. Because that’s how they do.

    One of the highlights of the trip was seeing my work displayed at Corporate HQ at Fujifilm Square in Tokyo. (Pic, above, by Zack Arias.) One of the lowlights was realizing how much better these prints were than anything I could get done in the US.

    Sigh.

    I just assumed it was some sort of Fuji in-house magic file tweaking or something. Or more likely, Fuji’s continuous custody of the whole vertical process, right back to the film SIM.

    Then it happened again in the 5th Anniversary event in Tokyo earlier this year: Gorgeous print, followed by the instant pang of sadness that I cannot get it done to this quality in the US.

    An Import You’ll Wanna Drive

    Well, it turns out that you can. I found it while auditioning several labs for printing of an image of mine that is to be sold be sold at a local gallery. Short version: I have found the paper I am gonna marry, and it is Fujicolor Crystal Archive Deep Matte.

    The prints are hard to describe. They are beautiful and painterly; somehow muted and saturated at the same time. If you want a mental picture, it feels like a Gregory Crewdson image. As for the paper itself, the substrate is quite substantial and the surface is beautifully non-reflective.

    Here’s the file/framed mock-up. The thing is, the print looks significantly better than the file. And I can’t remember ever thinking that before — other than those two times in Japan.

    I have not tried it with anything subtle yet as far as the files go. But on my color-drenched citiscapes, it looks phenomenal. So much so that I am getting several of my existing prints reprinted on this paper.

    They tell me at the lab that it is great for B&W, too. You’d better believe I am gonna be trying that.

    The paper is silver halide based, and designed for large format and Frontier laser printers, according to Fuji’s poop sheet.

    It uses CP-RA (or RA-4) process, and is said to be archivally stable for 100 years on display, 200 in storage. (Okay, I’ll be dead by then. But this print will still be beautiful.)

    Do yourself a favor and try this stuff. You just need two things: A really competent lab, and Fuji Deep Matte paper. I’m using AdoramaPix and letting them drive on the color correction. (New paper, new printer, what do I know, right?) And I was super happy with the result.

    Pick your favorite file and go big, as in 16×20 or larger. Because the beauty of this paper is that it somehow seems to both accentuate detail and mask noise. I don’t know how it does that. But holy crap.

    $ 5 to Try It

    And here’s something cool: if you want to try it as a one-off, AdoramaPix has a refer-a-friend special that’ll get you $ 5 off on $ 15 or more if you are a new member. And since a 16×20 print there is $ 16.99, it qualifies and drops this little experiment to $ 11.99. Not bad.

    If you give it a try at this link, the referral code should auto-populate. And a quick heads-up, some folks are saying they can’t find the “deep matte” option. Here’s how to do it:

    Sign up using the code. Go to ->Photo Prints, ->Upload Photos Now (upload your image) ->#3 Paper Finish and ->”Deep Matte Finish”.

    It’s only available for 16×20 and up. And these guys being a pro lab, I suggest you let them color correct for you. (If you want to marry them later, you can easily download their ICC profiles and drive the car yourself then.)

    So that’s my Epiphany of The Day, if you will. Suffice to say I am done auditioning prints.

    Try it and let me know what you think.

    Strobist

  • Potential Greenery: Topsoil & Time Shape ‘Empty Lot’ Artwork

    [ By WebUrbanist in Art & Installation & Sound. ]

    emptylotdec2015

    A recently-completed, six-month art installation in the Tate Modern imported soil from parks all around London, arraying them in the museum’s Turbine hall to show what weeds, grasses and ferns would grow from seeds and spores already present in the dirt.

    Abraham Cruzvillegas_ Empty Lot.-25004509915 (1)

    Empty Lot by artist Abraham Cruzvillegas involved equalizing conditions for the various samples of topsoil, which were evenly lit by lamps and consistently watered for half a year.

    Empty Lot-24111522275

    The installation was set up as a large geometric sculpture placed on scaffolding, supporting an array of triangular planters.  The samples were brought together from six parks, and kept separate between beds, growing in parallel.

    Hyundai Commission 2015_ Abraham Cruzvillegas_ Empty Lot-24171950432

    The outcome was unknown in advance, just like growth in nature or the evolution of a city, with elements of chance revealing the hidden potential in different park spaces (images by Sara~, Jennifer Morrow and Alexander Baxevanis)

    Share on Facebook


    [ By WebUrbanist in Art & Installation & Sound. ]

    [ WebUrbanist | Archives | Galleries | Privacy | TOS ]


    WebUrbanist

  • 5 Secrets for Finding Great Indoor Portrait Locations

    156

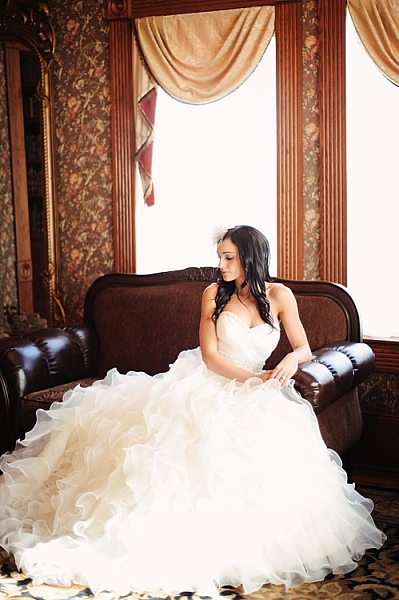
    Not all photographers choose to have a dedicated indoor studio, but sometimes you need to shoot a session indoors. Maybe it’s freezing outside, and you don’t want to be out in that weather. Maybe you have a bride who wants bridals, but is worried about her dress getting dirty. Maybe you just want something fresh and a little quirky. Maybe the building has special meaning to you or the person you are photographing.

    Whatever your reasons, in this article you are going to learn all my secrets to finding indoor locations, and getting permission to use them. Hopefully they’ll help you find the perfect spot for your next session!

    174

    Secret #1: Always be on the lookout

    Wherever you go, keep your photographer eyes open. You may be surprised at how many places transform into a great location once you really start looking. Some unique and exciting photography locations could be: family photos in the library, model portfolio shots in the city building, engagement session in the laundromat, dance group session in a hotel lobby, mom and toddler portraits in a grocery store, bridal session in a grand old house, a museum, a quaint bed and breakfast, a roller-skating rink, a university building, a furniture store, a toy store, or candy store – the list is endless.

    Look for great lighting, open spaces, interesting backgrounds, and fun things to interact with. Notice if there are lots of people that you might be disturbing, or if it’s a relatively calm place that you could photograph in peace. Use your imagination and creativity to turn the ordinary into something extraordinary.

    192

    Secret #2: Always ask permission

    Once you’ve found a place you’d like to try, make sure you ask permission before you bring a client there. I find, if possible, that asking in person is usually the best, because they can see who they are talking to, and are often less resistant if they can see your smiling friendly face. If you need to call, be professional and friendly on the phone, so they feel comfortable letting you come with your camera.

    If you aren’t sure who owns the building, check with city or county records, or ask a neighboring building or house if they know who owns it. Do the legwork to find out who owns the property before you barge in uninvited. It gives all photographers a bad name if you trespass. I’ve had many times where I call to ask permission, and the owner thanks me profusely for asking permission. They express their frustration that other photographers just start shooting without asking. They allowed me to photograph on their property, so obviously they don’t mind people being there, but they always appreciate being asked first.

    Some locations, like museums, or theme parks, are fine with you taking photographs inside, but you have to pay the entrance fee.

    148

    Some places charge a fee for photography, and some don’t allow photographers at all. If you whip your camera out in either of those types of places without asking permission first, you could be fined huge amounts. It’s not worth it. If you ask permission and get a no, just move on and find another place. However, it never hurts to ask. Most of the time you get a yes, and often they are pleased that you think their building is worthy of being a photography location.

    112

    Secret #3: Find an owner who will also benefit

    I needed a place to have adorable kids come for Valentine’s Day photos, but I didn’t know who would want multiple kids and families traipsing in and out of their establishment. Then I came across an adorable little candy shoppe that was decorated perfectly, and full of delicious sweets and treats. My photography clients came in and out all day for their sessions, and ended up buying lots of candy in the process. Many who came had never noticed the little hometown shop, with homemade caramel apples and every kind of candy you can think of, and they were happy to have discovered it. I ended up having a great place for my Valentine’s Day photos, and the owner got a lot of new business.

    177

    Look for places that might have a similar situation, and chances are the owner will be more than happy to let you use their location, free of charge. Many small locally owned places need a couple of photos of their establishment for websites and advertising purposes, or maybe even a quick headshot, and would be thrilled to let you photograph there in exchange for a photo or two.

    146

    Secret #4: Explore any connections

    Sometimes a friend may own a quaint little bed and breakfast, or maybe she works at a museum. If you are photographing that friend, that may be an especially smooth way to get your foot in the door. If things go really well, they may be okay with you bringing other people to their property again. Even if they aren’t the one that you are photographing, you could ask what they think about letting you use the property that they have a connection to.

    Be careful not to ask for too much, and be careful not to put anyone in an uncomfortable position. If you sense that they are hesitant about having a camera there, don’t push it. A little respect goes a long way, and you don’t want to be the photographer that people avoid at all costs. Relationships are more important than having a cool place to photograph, so be extra sensitive when using this secret.

    171

    Secret #5: Be the best guest

    When you’ve gotten permission to use a place, never, never, never ever let anything get destroyed, damaged, or left in any way other than how you found it. If you need to move something out of the way, ask if it’s okay first, and then put it back where you found it. Be mindful of what is going on around you, especially if you are photographing kids. You are responsible for what happens with your session, and you never want to pay a big repair bill, or lose a friendship because you were careless.

    You are not only representing yourself, but all photographers everywhere, when you use a public or private property for photographs. If you make it a horrible experience for the owners, you have more than likely ruined it for future sessions for yourself, and for all other photographers who might think to ask permission. Please don’t be that careless photographer who ruins it for everyone. Instead, leave such a great impression that all photographers will be welcomed with open arms into almost every establishment, to create beautiful and unique photographs.

    111

    Do you have any other tips for finding great indoor portrait locations? Have you found any gems? Please share your comments and images of your favorite spots below.

    googletag.cmd.push(function() {
    tablet_slots.push( googletag.defineSlot( “/1005424/_dPSv4_tab-all-article-bottom_(300×250)”, [300, 250], “pb-ad-78623” ).addService( googletag.pubads() ) ); } );

    googletag.cmd.push(function() {
    mobile_slots.push( googletag.defineSlot( “/1005424/_dPSv4_mob-all-article-bottom_(300×250)”, [300, 250], “pb-ad-78158” ).addService( googletag.pubads() ) ); } );

    The post 5 Secrets for Finding Great Indoor Portrait Locations by Melinda Smith appeared first on Digital Photography School.


    Digital Photography School

  • Talking Points: 12 Odd Japanese Safety & Traffic Cones

    [ By Steve in Culture & History & Travel. ]

    safety-cones-0
    Plastic safety cones have become so ubiquitous along Japan‘s roadways, unusual measures have been taken to ensure they stand out amongst the crowd.

    safety-cones-1a

    safety-cones-1b

    “Safety in numbers”… a self-defeating term if there ever was when it comes to Japan’s countless cohorts of conical warning signs. They’re everywhere it seems: parking lots, construction zones, anywhere the ground is disturbed and could possibly pose a hazard to drivers and/or pedestrians.

    safety-cones-1c

    safety-cones-1d

    safety-cones-1e

    If these cones were all standard Safety Orange, our senses would tune them out as visual background noise. What to do? If you’re Japan, you deviate from the norm in oft-unexpected, cute and quirky ways… like these endearing Mount Fuji cones captured by Asagiri Web, Setsugekka, One Sometimes Futari, Daily Model Railroad Room, and Illumination Designer.

    Smile When You Safety That

    safety-cones-2a

    safety-cones-2b

    Is it somewhat incongruous for warning markers to sport goofy grins? Yes, yes it is, but this is Japan so all bets are off. Flickr user Martin Bryant (MartinSFP) and blogger Cat (Overtake) Chan spotted these smiling sunflower cones making light of a serious situation.

    Flower Power

    safety-cones-3a

    safety-cones-3b

    At the Sakuragi shrine in Chiba prefecture (east of Tokyo) it’s all cherry blossoms, all the time. The theme extends even to the temple’s parking lot where cherry blossom-wrapped safety cones add a note of scenic harmony. Kudos to blogger “Drawer of his Head” for noticing the cute cone in October of 2015 and proving one does not have to blend in, in order to stand out.

    Size Matters

    safety-cones-4a

    safety-cones-4b

    safety-cones-4c

    Go big or go home, and that goes for safety cones, to the chagrin of local police forces. Kudos to Flickr user Kat n Kim and blogger Minkara for the images above.

    Next Page – Click Below to Read More:
    Talking Points 12 Odd Japanese Safety Traffic Cones

    Share on Facebook


    [ By Steve in Culture & History & Travel. ]

    [ WebUrbanist | Archives | Galleries | Privacy | TOS ]


    WebUrbanist