Blog

  • First Time in 100 Years: Forbidden City’s Secret Garden to Open

    [ By WebUrbanist in Destinations & Sights & Travel. ]

    forbidden city secret garden

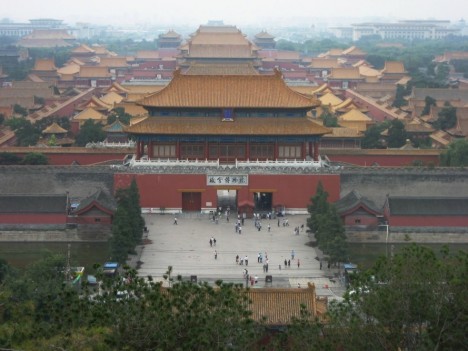
    The Forbidden City in Beijing, China, is one of the most-visited landmarks in the world, but now its secret garden, closed to the public for close to a century, is scheduled to open its gates.

    forbidden space hidden garden

    Built in the 15th Century, the Forbidden City was a center of power for hundreds of years, a vast and sprawling complex of residential, cultural and political spaces. While tourists are welcome to explore much of the complex, the Secret Garden within its walls was shut off from view after the last emperor was deposed.

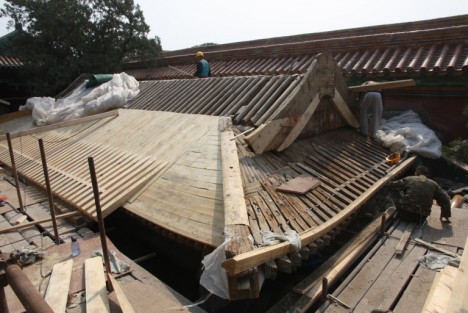
    secret garden roof

    Current conservation efforts are underway, aimed at making the space historically accurate down to the last detail. For better and worse, the Secret Garden has been largely untouched for hundreds of years, closed off and left theoretically intact but also subject to decay. The first stage of the project was completed in 2008, and the final phases are scheduled to finish by 2020, at which time visitors will be able to enter once more.

    secret garden space interior

    More details from Hyperallergic: “The Qianlong Garden Conservation Project is a joint initiative between the Palace Museum, which manages the Forbidden City, and the World Monuments Fund (WMF). Last month WMF Senior Advisor Henry Ng discussed the project’s progress at a gathering of WMF’s Moai Circle at the bar Lumos. ‘Many of the threads were lost for how this place was built,” he explained, adding that the major challenge is retrieving traditional Chinese crafts that vanished in the country’s 20th-century cultural upheaval.’” (images via Si Bing/Palace Museum, the Palace Museum/World Monuments Fund and David Stanley via Inhabitat).

    Share on Facebook


    [ By WebUrbanist in Destinations & Sights & Travel. ]

    [ WebUrbanist | Archives | Galleries | Privacy | TOS ]


    WebUrbanist

  • How to Use the Clone Stamp Tool in Photoshop to Make Clear Skin

    We’re all beautiful. Sometimes however, we have imperfections that can be a distraction (most often they are magnified in our minds and really not as bad as we think). In this tutorial, I am going to show you how you can use a basic Photoshop tool, the Clone Stamp, to create clear, natural looking skin in your photos.

    Image 1

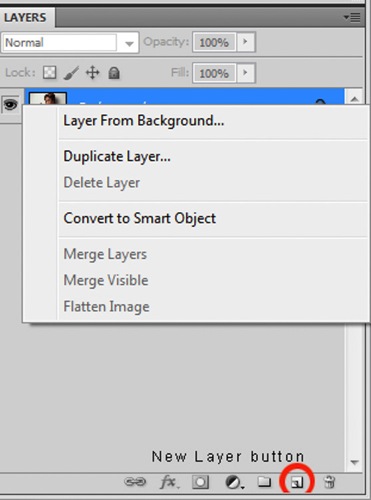
    It’s always a good idea to work on a separate layer when editing or retouching images in Photoshop. Once you have your image open, you should create either a new layer or a duplicate layer which you will edit on. You can create a new layer by clicking the new layer button in your Layers Panel, or by selecting Shift+Ctrl+N on a PC (or Shift+Command+N on a Mac). If you prefer to create a copy layer like I have, you can right click on the image in the Layers Panel and select the Duplicate Layer option provided. If you prefer to use keyboard shortcuts, you can simply press Ctrl+J if you’re using a Windows PC, or Command+J if you’re using a Mac.

    Image 2

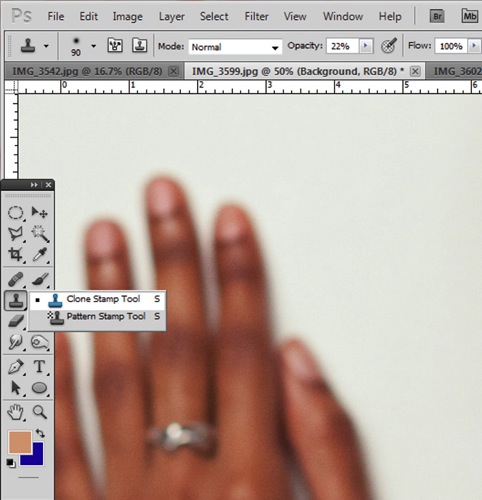
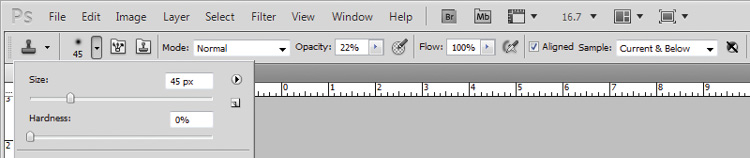
    Select the Clone Stamp tool from the tools panel, it conveniently looks like a miniature office stamp. In the options bar at the top of your screen, ensure that your brush softness is set to zero, the mode is normal, and it is set to sample Current & Below. You can keep your opacity anywhere between 10 and 30% depending on the subject. To get a natural looking result, it’s best to gradually work your way up to the final complexion or shade you are trying to attain.

    Image 3

    Image 4

    Zoom in on the area you would like to retouch by pressing Ctrl (or Command) and the plus (+) symbol on your keyboard. In this image, I’m going to focus on the shoulders mainly. You don’t need to zoom all the way in to the area, but ensure that it’s zoomed enough for you to clearly see the area you are trying to adjust.

    Image 5

    The Clone Stamp tool works by allowing you to duplicate a selected area, over to another section of your image. It’s really great for removing unwanted elements from your photos. Hold down the Alt key on your keyboard and click on an area of skin close to the spot you are trying to remove. If your spot is lighter than the overall skin tone, select an area that is darker than the spot; if the spot is darker than the surrounding skin, you will make your selection from an area that is slightly lighter than it.

    Play around with your Clone Stamp brush size and the opacity, until you find a combination that gives your best results. You will more than likely end up using a variety of brush sizes and opacities for the image (change the sample area frequently as well so you don’t get a repetition of patterns). The clone stamp method is very effective at clearing skin but requires patience on your part. A few other minor adjustments resulted in the final image below.

    Image 6

    With practice and patience you can clone your way to clear skin with the Clone Stamp tool. Have fun!

    Please share any questions and comments you have about using the Clone Stamp tool to make clear skin.

    googletag.cmd.push(function() {
    tablet_slots.push( googletag.defineSlot( “/1005424/_dPSv4_tab-all-article-bottom_(300×250)”, [300, 250], “pb-ad-78623” ).addService( googletag.pubads() ) ); } );

    googletag.cmd.push(function() {
    mobile_slots.push( googletag.defineSlot( “/1005424/_dPSv4_mob-all-article-bottom_(300×250)”, [300, 250], “pb-ad-78158” ).addService( googletag.pubads() ) ); } );

    The post How to Use the Clone Stamp Tool in Photoshop to Make Clear Skin by Tricia Bent appeared first on Digital Photography School.


    Digital Photography School

  • Lytro CEO confirms exit from consumer photography business, focus on VR

    In a recent blog post, Lytro CEO Jason Rosenthal has confirmed that the company is headed out of the consumer imaging business to focus instead on developing a light field virtual reality platform. Rosenthal admits that it was too risky to compete in an established consumer space (that was in decline, no less, thanks to smartphones), and determined the value-add of light field technology to VR would have greater impact. Hence, Lytro has scrapped product development in the consumer camera space.

    Says Rosenthal, ‘The cold hard fact was that we were competing in an established industry where the product requirements had been firmly cemented in the minds of consumers by much larger more established companies.’ He also mentions the rise of smartphones and consumer satisfaction with image quality from them.

    And ‘while consumer Light Field cameras offered a number of true technological breakthroughs such as interactive 3D pictures, radical lens specs, and the ability to focus a picture after the fact,’ the reality was that there was much more investment Lytro would’ve had to make to its cameras competitive with modern cameras in image quality. Meanwhile, VR companies and Hollywood studios were increasingly asking for light field technology in cinematic and next-gen content. ‘We had just raised $ 50MM in new capital. We didn’t have the resources to both continue building consumer products and invest in VR.’

    Accordingly, in November of last year, Lytro announced Immerge, a 360° light field video capture device, just after announcing plans for layoffs as the company shifted direction toward video and VR. The pro-grade Immerge was a confirmation of this change in focus. It’s currently only a concept camera, capable of recording live action VR in what Lytro claims as ‘six degrees of freedom’ that, if we understand correctly, should allow for multiple perspectives from multiple angles of view, as well as focus and depth-of-field control after-the-fact. This is a clear benefit for VR capture, which aims to capture as much scene content as possible for the viewer to explore in a virtual environment. 

    The decision to shift the company’s focus was not taken lightly. Rosenthal details the anxiety he felt before shifting the company vision, but now says ‘My middle of the night panic attacks are gone. I wake with a burning desire to go to work because I am so excited by what we are building and its potential to help shape VR.’

    Have a read of Rosenthal’s full blog post here. It’s quite insightful in laying out some of the considerations Lytro has faced as a company. Some of us here are certainly disappointed that Lytro appears to be completely exiting the consumer camera space, as light field technology had a lot of potential in revolutionizing autofocus, in decoupling depth-of-field and light gathering ability, bringing depth-based image editing to the table, and in radical lens design previously thought impossible, thanks to the ability of light field data to perform certain corrections – even image stabilization – after-the-fact as opposed to optically. That said, we certainly understand the change in direction and are very excited to see what Lytro brings to VR and video.

    We’ll be following closely. Let us know your thoughts in the comments below.

    Articles: Digital Photography Review (dpreview.com)

  • 5 Important Focal Lengths to Know and the Benefits of Each

    5 Focal Lengths and Why You Should Use Them 1

    Please note: all focal lengths mentioned in this article are in reference to 35mm full frame sensors.

    There are photographers that favor the convenience and flexibility of zoom lenses, and those that favor their sharper, lighter and cheaper counterpart, the prime lens. Note: some modern zooms do have prime-like optics. Often, it’s your line of work that will make that decision for you. Whichever variant you favor, you owe it to yourself to experiment with different focal lengths to learn where they each excel, and which ones mesh best with your style. You can achieve this with primes, or zooms if you can commit yourself to not touching that handy zoom barrel. Among the many options, five focal lengths you want to use are the: 24mm, 35mm, 50mm, 85mm, and 135mm.

    Let’s look at each one at a time.

    #1 – 24mm wide angle

    Areas it excels in: landscapes, astrophotography, group portraits, and event photography.

    This one is easy to experiment with because not only are there many affordable prime options available, but you’ll find this focal length at the wide end of many full frame zoom lenses. The 24mm prime lens is sufficiently wide and remarkably sharp, making it an ideal candidate for landscape photography. Zooms are wonderful for landscape photography too, but the locked-in field of view (or a prime lens) will force you to think carefully about your compositions.

    5 Focal Lengths and Why You Should Use Them 2

    The 24mm focal length also excels in situations that don’t offer a lot of light. That includes astrophotography, where 24mm lenses with wide apertures (f/.8 or wider) will facilitate shots of the milky way, and in event photography, where you’ll have an ample field-of-view to shoot indoors and add context to your photographs. Additionally, the 24mm focal length is sufficiently wide to capture group portraits with minimal perspective distortion. Just don’t get too close, and watch the edges of your frame.

    5 Focal Lengths and Why You Should Use Them 3

    #3 – 35mm focal length

    Areas it excels in: street photography, events, environmental portraits, and shooting-across-the-dinner-table photography.

    35mm is a classic focal length for many photojournalists. Part of that reason is that the field-of-view requires you to be close to the action, but still maintains enough of the environment surrounding your subject to give an image context. This same philosophy applies well to wedding or event photography, and makes the 35mm focal length a great fit.

    5 Focal Lengths and Why You Should Use Them 4

    Another great thing about the 35mm prime lens is that it just so happens to be the perfect focal length for shooting a portrait from across the dinner table. Any wider and your subjects face will suffer from perspective distortion (exaggerating their facial features) and any narrower and you’d have to get out of your seat for the shot.

    5 Focal Lengths and Why You Should Use Them 5

    #3 – 50mm (normal) lens

    Areas it excels in: street photography, full-body portraits, walk-around shooting.

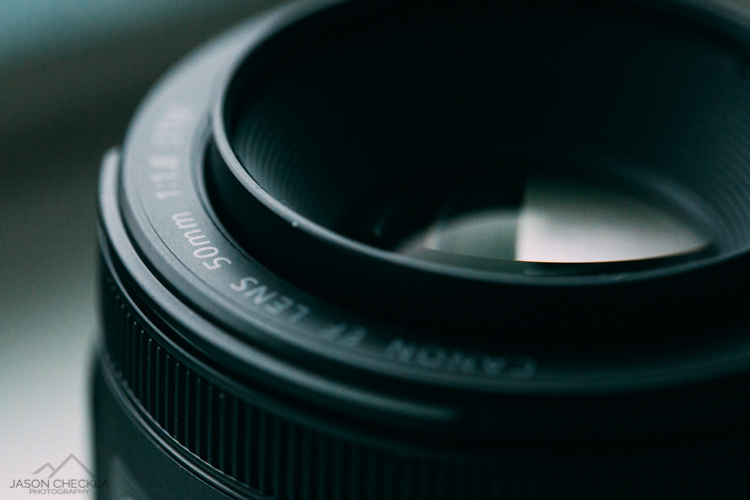
    There are so many reasons to try shooting with a 50mm prime lens. Perhaps the best one is that they’re cheap. You can purchase a brand new 50mm lens for most DSLR systems for a little over $ 100. Also, they produce an image that is normal, or most-like the image that we see with our own eyes. There is a common misconception about this concept. The normal perspective that a 50mm lens offers refers to the perspective distortion (or lack thereof), not the field-of-view. For this reason, the 50mm lens is great for full-body portraits and walk-around or street photography.

    5 Focal Lengths and Why You Should Use Them 6

    5 Focal Lengths and Why You Should Use Them 7

    The 50mm lens is another classic, and a large part of that reason is that often, the area in frame is just right. It’s narrow enough to create balanced compositions with ease, but still wide enough to create interest beyond your subject. That is why you will find a 50mm lens in the bags of most street photographers.

    #4 – 85mm slight telephoto lens

    Areas it excels in: portrait, events, and sports photography.

    The 85mm focal length is one that you will find in the bag of many wedding and portrait photographers. It creates beautiful portraits with the ability to flatten one’s features, which is generally flattering, and brilliant background separation. The field of view is not so tight that you’ll feel like you need to be outdoors to use one, but it gives you a nice working distance that allows this focal length to sneakily capture candids at a wedding or family gathering.

    5 Focal Lengths and Why You Should Use Them 8

    That working distance is great for full body shots when you’re on the sidelines of a sporting event, too. The 85mm prime is also a great working distance for photographing your kids or pets.

    5 Focal Lengths and Why You Should Use Them 9

    #5 – 135mm telephoto

    Areas it excels in: head-shots, portraits, and wedding photography.

    When you need to get in close, or if you just love bokeh, the 135mm lens is a great pick. For details and head-shots that bring your subject to life, grab this focal length. The background separation is fantastic, due to the increased compression of the image. The flattering flattening effect (say that five times) from the compression, makes this lens great for shoulder shots, senior portraits, candids, and more. You’ll have fun shooting wide open to create magical separation between your subject(s) and their surroundings.

    5 Focal Lengths and Why You Should Use Them 10

    5 Focal Lengths and Why You Should Use Them 11

    The drawback to this focal length is that you do need a lot of working room, and a lot of light. Remember the 1/focal length rule for shutter speed? In other words, you wouldn’t want to shoot a 135mm lens any slower than 1/135th of a second, without a very steady hand or a tripod. When light or space become a problem, it’s nice to have an 85mm lens to fall back on.

    5 Focal Lengths and Why You Should Use Them 12

    Chances are you will love some of these focal lengths and dislike others, but you’ll never know until you give them all a shot. Modern zoom lenses are remarkable in their optical-quality, but you do lose the connection you feel when you are truly in sync with your focal length. The more you shoot with a 50mm lens, the more you will start to see with a 50mm perspective. Good luck and happy shooting!

    googletag.cmd.push(function() {
    tablet_slots.push( googletag.defineSlot( “/1005424/_dPSv4_tab-all-article-bottom_(300×250)”, [300, 250], “pb-ad-78623” ).addService( googletag.pubads() ) ); } );

    googletag.cmd.push(function() {
    mobile_slots.push( googletag.defineSlot( “/1005424/_dPSv4_mob-all-article-bottom_(300×250)”, [300, 250], “pb-ad-78158” ).addService( googletag.pubads() ) ); } );

    The post 5 Important Focal Lengths to Know and the Benefits of Each by Jason Checkla appeared first on Digital Photography School.


    Digital Photography School

  • Small but mighty: hands on with the Panasonic GX85/GX80

    Introducing the GX85 / GX80

    The Panasonic Lumix DMC-GX85 (known as the GX80 outside of North America) is Panasonic’s latest mid-range Micro Four Thirds model. It sits in the company’s ‘GX’ series which is used to denote that it’s targeted towards dedicated enthusiast photographers but priced as a mid-range model.

    It’s a 16MP model that’s capable of 4K video shooting but features a viewfinder and several features carried-over from the older GX7, including a built-in, bounceable pop-up flash.

    As such, it’ll sit below the GX8 in the company’s lineup but the more budget-conscious user may well find that the GX85 offers a lot of its big brother’s capabilities. And, thanks to a redesigned shutter mechanism intended to minimize shutter shock, may even offer some practical advantages.

    Body

    The GX85’s body is noticeably smaller than the GX8’s. In fact it looks a little like a GX7 that’s been left in the wash and has shrunk a little. This downsizing leaves it with fewer customizable buttons, no focus mode switch and a smaller battery compartment, but most of those changes still leave it as being broadly comparable with the GX7.

    Despite the lower price point, it’s still a very solid-feeling camera. Unlike the GX8, it’s not weather-sealed, but it doesn’t feel like corners have been cut, either. The body has a pleasantly dense feeling to it, with no sense of flex or weakness.

    The viewfinder is borrowed from the GX7 but it no longer hinges upwards. Its 2.7 million-dot equivalent resolution translates as 1280 x 720 pixels refreshed one color at a time (a process called field sequential update). This is a 16:9 aspect ratio, which is fairly unusual. Like the GX7, the GX85’s rear screen tilts up and down, and is touch-sensitive. It’s a 3:2 aspect ratio panel with 1.04M-dots, which works out as 700 x 480 pixels.

    Stills and video

    One of the biggest areas in which economies have been made is in the reversion to using a 16MP Four Thirds sensor. This probably isn’t going to be a deal-breaker for many people, and Panasonic has sweetened the pill slightly by doing away with the anti-aliasing filter in front of the chip.

    This lack of AA filter should allow it to capture slightly more fine detail (Panasonic claims an improvement of as much as 10%), though comes with a slightly higher risk of moiré when used with a sharp lens. Panasonic says its JPEG engine will detect and remove the false color of moiré when it detects it.

    The camera also shoots 4K video at 30p or 24p (25p in the GX80 model outside North America).

    Redesigned shutter

    The GX85 hasn’t simply been assembled from a bin of existing parts, though. It becomes the first Panasonic to use an electromagnetically driven shutter, rather than the motor and spring arrangement used in existing models.

    This allows the shutter to be opened and closed in a more controlled manner, reducing the impact of any shutter shock, as well as making the shutter operation quieter. The new design doesn’t appear to introduce much in the way of compromise: the maximum mechanical shutter speed is 1/4000 seconds, and the flash sync speed is 1/160th. This is a little bit behind the GX8’s 1/8000th mechanical shutter a 1/250th sync speed but is a match for the less expensive G7 model.

    Panasonic, rather cautiously, only says that the new shutter reduces shake, not that it eliminates it. We’re told that an electronic first-curtain shutter (which obviates the need to open the mechanical shutter to start an exposure, essentially eliminating shutter shock), would require faster sensor read-out.

    5-axis image stabilization

    Like the GX8, the GX85 offers a Dual IS system which augments two axes of stabilization if you use a lens with built-in stabilization. Unlike the GX8’s in-body stabilisation, even without a stabilised lens the GX85 offers 5-axis stabilisation.

    Most impressively, Panasonic says that the IS continues to work in all 5 axes when you’re shooting 4K video – the first camera we can think of that does this. The digital component of IS used in video requires the camera to read lines off the sensor above and below the standard output region, then use gyro sensors to predict where on the sensor the original framing is now being projected. Most sensors can’t read out a large enough section of the sensor fast enough to stabilize 4K video, but the GX85 claims to do so.

    Video capabilities

    The GX85 continues Panasonic’s history of offering high-end video capabilities across much of its range, with this latest camera able to shoot UHD 4K at 30p or 24p. It shoots this 4K footage as MP4s at up to 100Mbps, which is pretty respectable for a consumer-focused model. It can also capture 1080p footage at up to 28Mbps as MP4 or AVCHD.

    We say ‘consumer-focused’ because the GX85 lacks not only the slightly flatter ‘CinelikeD’ color profile offered by the GH4 but also neglects to include a microphone socket, which will limit anyone with any real video-shooting aspirations. And to think we complained about the non-standard 2.5mm socket on the GX8.

    The camera does, however offers the ‘Live Cropping’ feature first introduced on the ZS100 (and demonstrated in our review of that camera). This lets you specify a start an endpoint to produce 1080p footage that appears to either pan or zoom, but does so from the 4K capture – meaning you can fix the camera on a tripod and not have to worry about how smoothly you can pan or zoom. It’s a handy option if you aren’t using sophisticated editing software.

    Stills from 4K

    Off the back of the camera’s 4K video capture, Panasonic offers its usual array of clever modes that produce stills from 4K capture.

    Top of the heap is the 4K Photo mode in which the camera captures bursts of 8MP images at up to 30 frames per second. More than simple grabs from video, this doesn’t have to be in the 16:9 aspect ratio and the camera can be set to continuously record, then present you with the thirty images before and after you choose to hit the shutter button. A handy touchscreen interface lets you choose the perfect shot.

    The Post Focus mode is similar, but it racks the camera’s focus across the depth range it detects in the scene and shoots 4K video while doing so. Tapping on the point you want in-focus pulls the frame from the video that was focused at the specified point.

    Finally, the new Light Composition mode again uses the camera’s 30 frames per second 8MP image capability, this time to create a composite image. The mode uses only the brightest value from a series of frames you select, so scenes such as fireworks displays can be created from multiple images.

    Other new features

    In addition to the upgraded shutter mechanism, the GX85 gains a couple of features that stills shooters might find handy. Rather than limiting itself to exposure and white balance bracketing, the GX85 can also bracket focus or aperture setting across several shots.

    There’s also an extra monochrome mode (such things having apparently become popular of late). The L Monochrome Photo Style promises ‘deep black and rich gradation like that of B/W film.’ We’ve not yet had a chance to put it to much use but we’ll make sure to include some more examples in our forthcoming samples gallery.

    Wi-Fi

    The GX85 features built-in Wi-Fi, which allows remote control of the camera from a smart device, as well as opening up the option to transmit images from the camera. To make full use of this, the GX85 includes in-camera Raw conversion so that pictures can be tweaked and perfected before they’re shared with the world.

    Like a couple of recent Panasonic models, the initial Wi-Fi connection is established by displaying a QR Code on the back of the camera, which can then be read by the iOS or Android app. It’s not clear whether the slightly faster NFC method has been abandoned to keep cost down or because it excludes Apple devices.

    Kit options

    The GX85 will be available as a kit bundled with the tiny, collapsible 12-32mm F3.5-5.6 zoom that was created for the similarly minuscule GM models. It’s not a bad little lens, though you pay for its convenient size through having to accept its modest reach. Panasonic USA says it currently has no plans to sell the camera body-only.

    Panasonic’s MSRP for this combination is $ 799, which compares very favorably to the $ 999 body-only price that Panasonic asked for the very similar GX7 just two and a half years ago. Obviously the cost of technology falls over time, but $ 799 with a simple lens looks competitive with Fujifilm’s $ 699 X-E2S camera body or Nikon’s $ 899 list price for the D5500 with 18-55mm VR II zoom, not least as none of its immediate peers is capable of shooting 4K video.

    Overall

    Interestingly the GX85 is called the GX7 Mark II in the Japanese market and, if you place the two side-by-side, that makes some sense: it’s not radically different in spec or control layout. That gives a hint about its intentions – it may not have all the GX8’s specifications, but it has enough that it could have sat at the top of the lineup just a few years ago.

    Most of the omissions compared to the GX7 (tilting viewfinder, AF/MF switch) aren’t necessarily essential features. Indeed the retention of the built-in pop-up flash actually gives it an advantage over the more expensive GX8. Sadly, there is one feature that’s been removed that we think will be sorely missed: the lack of any microphone input is likely to come as a real blow to anyone wanting a keenly-priced stills/video hybrid.

    Overall though, so long as the new shutter mechanism has settled the shutter shock problem, the GX85’s capability and price mean it looks to wear both the mid-range and enthusiast labels comfortably.

    Articles: Digital Photography Review (dpreview.com)
  • Priime Styles for Mac

    Priime Styles for Mac Batch Editing

    Disclosure: I am a style author and advisor for Priime.

    One of my favorite ways to edit photos on my iPhone the past year has been with the Priime app for iOS. In addition to being one of the style creators for Priime, I’ve enjoyed utilizing the custom styles created by so many other talented photographers for my mobile photography. I don’t always have as much time to work with an image when I’m editing it on mobile and it’s nice to have some super easy styles that I can easily apply to my photos and quickly publish on the go.

    As great an app as Priime for iOS is, 98% of my photos that I work with are still processed the old fashioned way, using Adobe Lightroom and Photoshop on my iMac. One of the things that I love about using Lightroom in my workflow is that more and more you are finding quality external editors that can be used as part of your editing process. Recently Google made headlines when they decided to give away their Nik software (which I have also used for several years now and love). So I was really pleased to hear that in addition to the iOS app, Priime was also releasing an external editor for Lightroom.

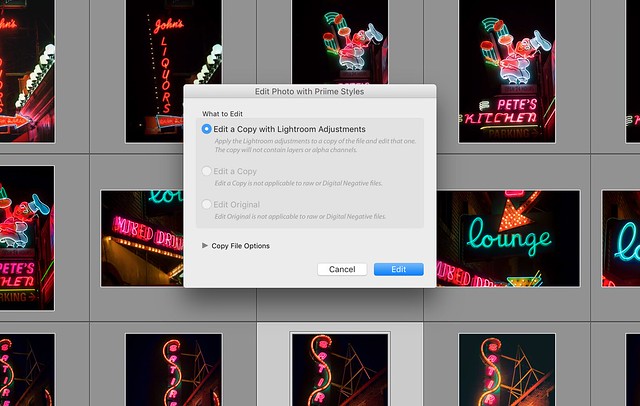
    The way that I use Priime Styles for Mac is as part of my normal Lightroom editing process. Here I can easily take a special photo (or batch of photos) and quickly move them into the Priime editor to make changes and then have copies saved back to the Lightroom catalog I’m working in. I don’t process every photo with Priime, but if I find one that is special I will often import it in there and work with it.

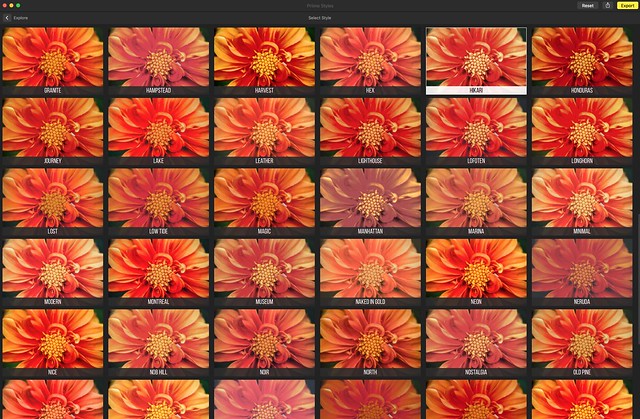
    Sometimes you want just one final version of a photo, but oftentimes I find myself making multiple versions of a photo. While some photos look great in color or black and white. Some photos look great in color AND black and white. I like creating different versions of photographs and then later deciding which I like better or maybe even publishing a few different versions. Priime allows me to try different things with a photo that I may not have thought about creating organically myself in Lightroom. With over 100 different editing styles from some of the top photographers out there today, there are a lot of new things to explore.

    Priime Styles for Mac Lightroom External Editor

    The nice thing about editing something in Priime with Lightroom is that I can still iterate on that version even after I bring it back into Lightroom, adding additional edits or touches to the photo, customizing it more as my own even as I borrow edits from others.

    I think Priime Styles for Mac will be an excellent Lightroom add on tool that serious and professional photographers can have at their disposal to make their photos look as good as possible.

    In addition to more serious and professional photographers using Priime Styles for Mac as a Lightroom plug in, I think it also is a great first step for the new or emerging photographer. Some people are not quite ready yet to pay $ 10/month to Adobe every month to use Lightroom. They just want something that can quickly make their photos look better that’s a bit more affordable.

    Even if you are not a Lightroom user, in fact especially if you are not a Lightroom user, Priime may be something for you. In addition to the Lightroom plug in, Priime can also be used as a standalone editor as well. You simply launch the app and then drag and drop the photos that you want to work with. For a lot of people $ 24.99 (on sale for launch) as a one time cost is a better value proposition than paying $ 9.99 a month ongoing for Lightroom.

    PExploring Styles with Priime Styles for Mac

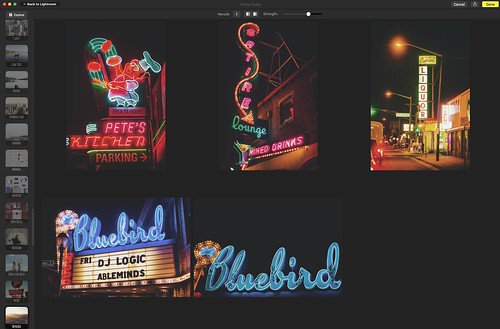
    Priime Styles for Mac has a great Explore function as well. This allows you to look at all of the styles as they’d be applied to a photo at once, which makes it easier to narrow down what might look best.

    Another way I think Priime can be helpful is for the less serious photographer/blogger who just wants a consistent look for a batch of photos. A lot of bloggers I know are not exactly photographers but need to include images with their posts. Priime Styles for Mac allows bloggers an easy go to solution where very quickly they can edit a batch of photos and have a consistency to their photos that makes them work much better together as part of a total post.

    Anyways, check it out.

    Priime Styles for Mac supports JPG, RAW and TIFF files.


    Thomas Hawk Digital Connection

  • Look Sharp: Panasonic Lumix DMC-GX85/GX80 video preview

    The Panasonic GX85/GX80 is an impressive mid-range ILC, borrowing many of the features from the company’s enthusiast-level GX8 and bringing the size and price down to earth. We’ve put together a short video so you can see the GX85 in action with your own eyes.

    Articles: Digital Photography Review (dpreview.com)

  • Madcap Murals: Playful Urban Paintings Interact with 3D Elements

    [ By Steph in Art & Street Art & Graffiti. ]

    interactive street art 4

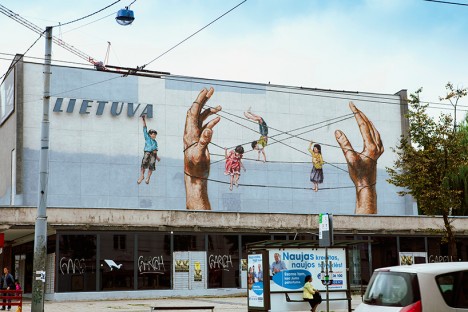
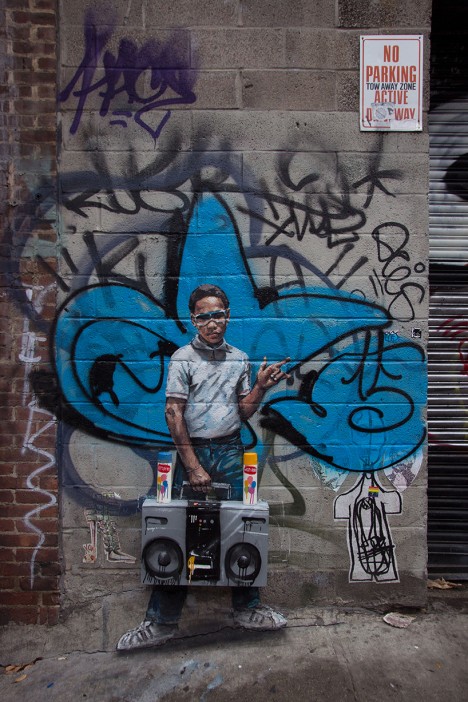
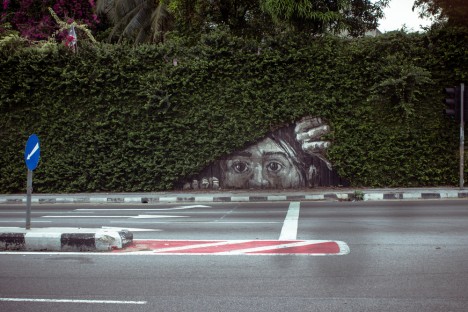
    A wall with a texture reminiscent of a cross-stitch cloth, a rusted shopping cart half-submerged in a river, curbside trash finds and utility boxes all transform into interactive 3D elements of engaging street art pieces by Ernest ‘Zach’ Zacharevic. The Lithuanian-born artist not only takes the surfaces and immediate surroundings into account when planning each mural, but also reflects the culture of the setting for totally unique, spontaneous and yet targeted infusions of color, humor and fun into the urban landscape.

    interactive street art 1

    interactive street art 2

    interactive street art 8

    Zacharevic assesses each location ahead of time, often getting inspiration from the elements already present before prepping as much of each piece as possible in his studio to cut down on outdoor painting time. Components like junked bicycles, busted chairs and peeling wheelbarrows are bolted or glued to the walls so they become an active part of the work – though many of these three-dimensional elements are already part of the urban fabric, and the artist simply integrates them.

    interactive street art 6

    interactive street art 7

    interactive street art 9

    interactive street art 14

    Gestural swipes of dripping spray paint contrast with Zacharevic’s painterly style, contrasting textures and making each mural look like it popped off a gallery canvas to become a part of the larger world. In an interview with DesignBoom, the artist notes that some of these dynamic qualities originate in a fascination with animation and “its ability to bend reality and bring images to life.”

    interactive street art 15

    interactive street art 13

    interactive street art 5

    interactive street art 16

    “I see my work more like a simple moment capturing everyday life rather than an elaborate narrative,” he says. “This seems to work best with the subject of childhood nostalgia, a subject which features often in my work.”

    Share on Facebook


    [ By Steph in Art & Street Art & Graffiti. ]

    [ WebUrbanist | Archives | Galleries | Privacy | TOS ]


    WebUrbanist

  • Pros and Cons of Photographing Dogs with a Prime Lens

    DPS article 6

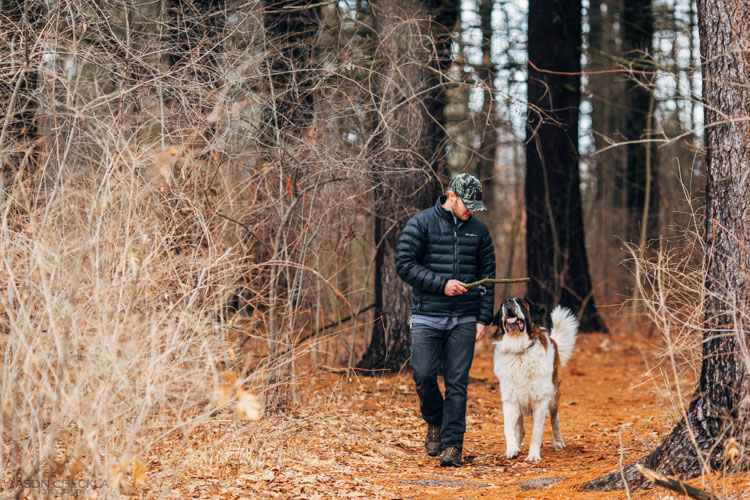
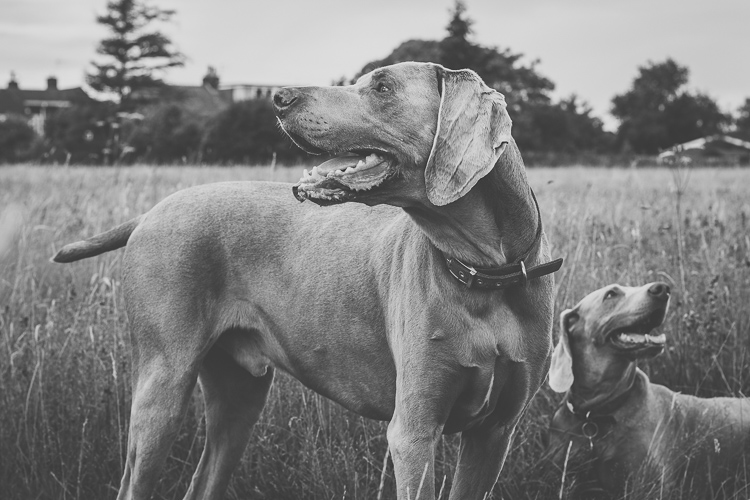
    Dogs, by their very nature, are excitable creatures. Of course, they like nothing more than being outside and running around, chasing sticks, balls, and other dogs. All this can’t be conducive to prime lens photography, right? You want a good zoom lens for a job like this, surely? Well, not me. I love shooting my pet portrait sessions with my trusty Canon f/1.4 50mm prime, and I’m going to go through what I consider to be the advantages of doing so, and how best to overcome the disadvantages.

    Pros – or advantages

    Prime lenses are as quick as the dogs they’re snapping!

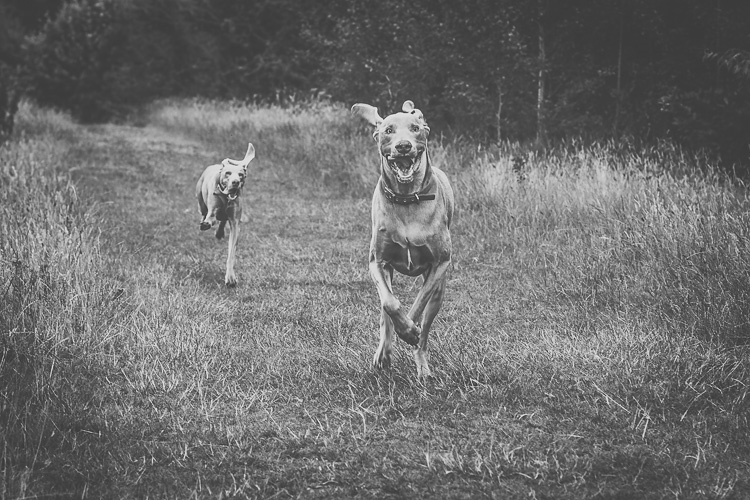
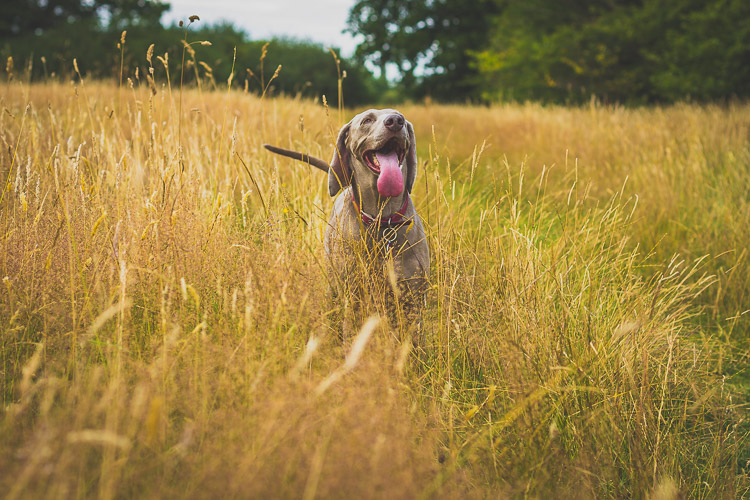
    We’ll start with the obvious benefit of shooting with a prime lens – speed. The wider maximum aperture allows for faster shutter speeds, which means that you can freeze your sprinting pooch in action and get pin sharp images as they run (below).

    DPS article 9
    These two Weimaraners were sprinting full pace towards me. Fortunately my shutter speed was fast enough to freeze their movements in full flight.

    Let’s not forget that the light conditions aren’t always going to be favourable. On dull, overcast, days you’ll be thankful for that extra couple of stops, rather than having to boost the ISO and bring noise into the equation.

    Bearing this in mind, it’s also important to remember that as you’re widening your aperture to improve your shutter speed, you’re also narrowing your depth of field, so it’s about striking the right balance for the situation.

    Image quality and sharpness

    Another well-known advantage of shooting with a prime lens is the image quality. Prime lenses are much more simple than zoom lenses in terms of the components that make them, and the mechanisms that operate them. All in all, it’s widely acknowledged that prime lenses consistently offer an extremely high level of image quality.

    DPS article 1

    Sharper images are going to be a positive thing in any situation, but when you’re editing your images and you can zoom in to see all the details in the fur of your subject, and the glint in their eye, then you will really appreciate that image reliability.

    You’re forced to focus on composition

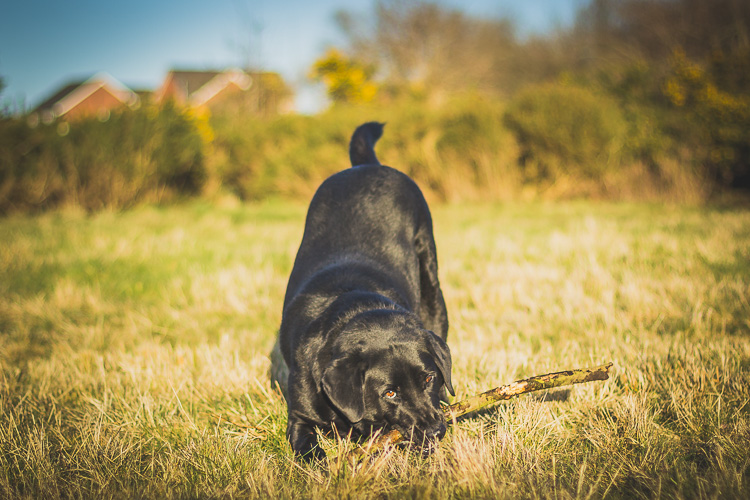
    This is an interesting one, and certainly an argument that crops up time and time again when talking about the benefits of prime lenses. If you only use zoom lenses, there can often be a level of complacency that sets in, especially if you’re relatively new to photography.

    DPS article 4
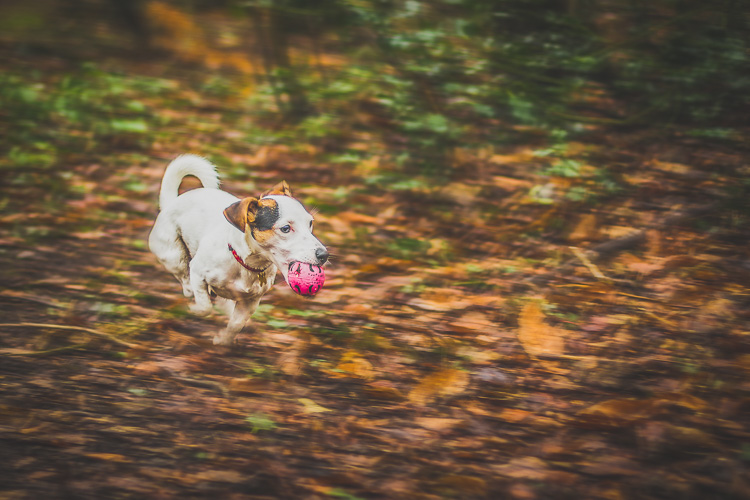
    caption: If I’d been using a zoom lens on this shoot there’s a good chance I would have zoomed in for a tighter composition, with the subject in the middle of the shot. With that option unavailable to me I was able to think about it, and ended up giving the subject plenty of room on the right to run into, improving the overall composition of this image.

    When you’re using a lens with a fixed focal length, you have no choice other than to move around with your subject. You’ll be constantly looking for different angles and opportunities, and eventually you will find yourself in the perfect position, one that you may never have found yourself in, if you weren’t using a prime lens.

    Narrow depth of field

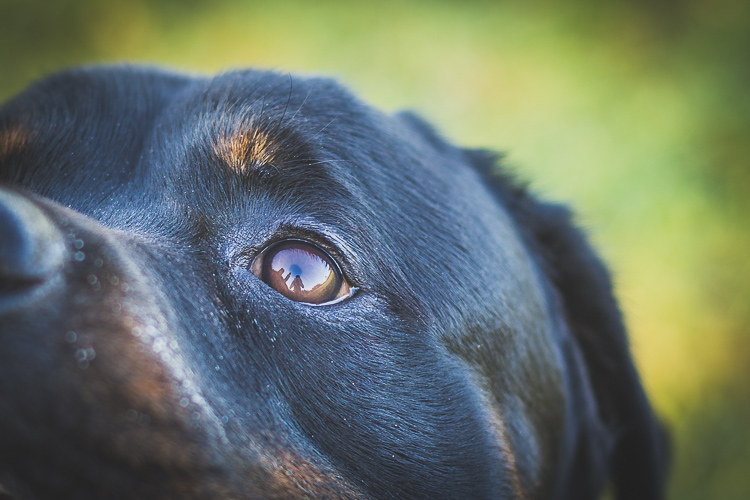
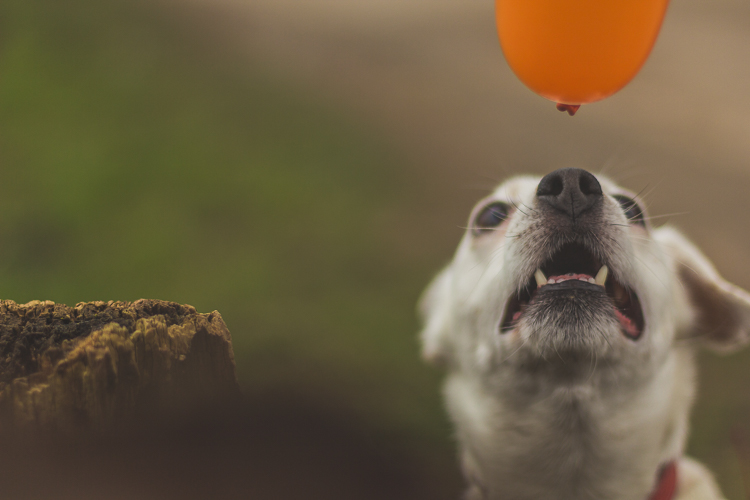
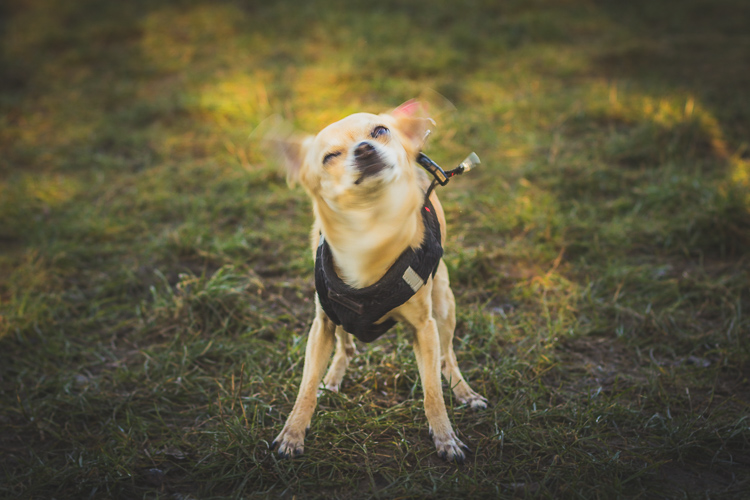
    If you want to make the pictures of your dogs stand out, then a really tight depth of field is a great way to go about it. A prime lens will allow you to open your aperture to f/1.4 or wider, and really blur out that background, making your subjects pop.

    The real benefit of this when you’re taking pictures of dogs is that, unlike human subjects, most of the time you’re not going to get the opportunity to place your dog in position with the ideal background. When you’re photographing dogs, more often than not you’re going to have to work with what you’ve got, and having the ability to blur out background distractions is a huge advantage.

    DPS article 3

    caption: I was at f/1.4 here, which allowed me to focus on the subjects mouth and nose, while completely throwing everything is the background out of focus.

    Cons – or disadvantages

    Having subjects that can move faster than you

    So you’re out with your dog, and he’s running around at full pace for the best part of an hour. Trying to photograph a subject that is constantly moving around can be very tiring, and when you’re looking at your images and seeing a large percentage that will be unusable, it can be a little discouraging.

    Something you need to be prepared for when taking pictures of dogs, is that you’re going to have a higher amount of rejects than usual. Unfortunately, this is the nature of pet photography. However, if you learn to embrace this, then you can get some really rewarding shots. Make sure you set your camera to high speed continuous burst mode, set your focus point over the necessary area on your subject, and fire away. Yes, you’re probably going to throw away 75-80% of them, but the ones you keep are going to be well worth it.

    DPS article 8

    Difficulty positioning yourself

    You may find that one of the most daunting aspects of dog photography is knowing where to position yourself. You don’t have the option to zoom in, so where you are physically positioned is vital to getting the shot.

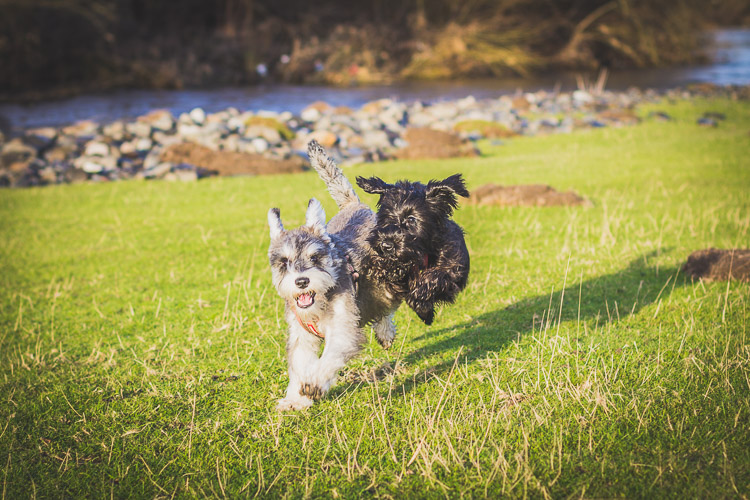
    In order to limit the amount of opportunities you miss, you need to think a couple of steps ahead at all times. Where are your subjects likely to run next? If they’re going to head over there, then where will you need to be to get the best shot? Should you try to get higher than your subject, or should you prepare to get low in order to get down to their level? These are all questions that you should always ask yourself.

    DPS article 7

    caption: These two Schnauzers were bundles of fun, but they never stopped moving. I constantly had to guess where they would be next. Often you’ll get it wrong, but sometimes you’ll get it right and nail the shot.

    If you’re doing a pet portrait session then you could stand relatively close to the owner, ask them to throw a stick or ball (or pretend to). While the dogs are running away, get into position, and be ready for when they inevitably run back towards you.

    Remember, your subject is likely to always be moving, so set your focus mode to AI Servo for Canon cameras, or AF-C for Nikon. These focussing modes are designed to continuously adjust focus on moving subjects to ensure that you have the best chance of nailing each shot.

    DPS article 5

    You end up too far away and have to crop heavily in post-processing

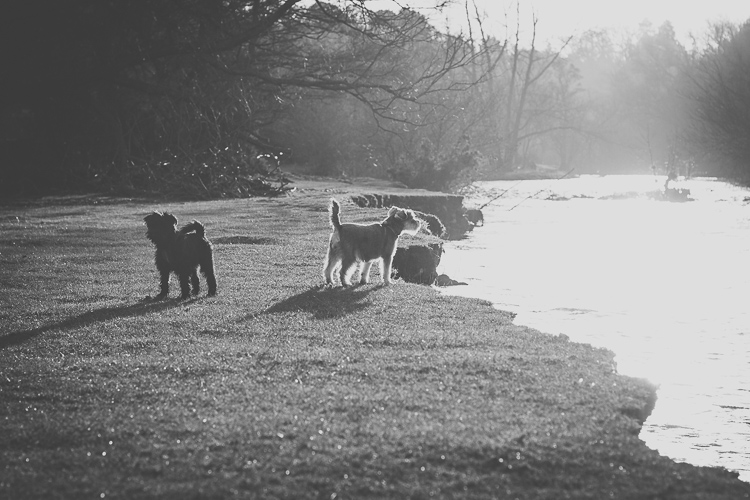
    You don’t always need to get a close crop of your subject to end up with a great image. It’s fantastic when you can see their expressions close-up, or the actions of their body and legs as they run, but sometimes a picture of the dog playing in the distance, with a picturesque backdrop of an open field or wooded area, may be the perfect way to portray the scene.

    DPS article 10

    caption: Not zooming in on this shot allowed me to capture a greater sense of the atmosphere in this winters morning portrait session.

    In summary

    Hopefully this is enough to persuade anyone with an interest in pet photography to give prime lenses a try. You can pick up a nifty fifty prime for the fraction of the price of a decent zoom lens, and you’ll have real fun getting the most out of it. At the very least, you’re guaranteed an excellent workout!

    DPS article 2

    Do you photograph dogs or pets? Have you ever tried using a prime lens? Please share your results, thoughts and comments below.

    googletag.cmd.push(function() {
    tablet_slots.push( googletag.defineSlot( “/1005424/_dPSv4_tab-all-article-bottom_(300×250)”, [300, 250], “pb-ad-78623” ).addService( googletag.pubads() ) ); } );

    googletag.cmd.push(function() {
    mobile_slots.push( googletag.defineSlot( “/1005424/_dPSv4_mob-all-article-bottom_(300×250)”, [300, 250], “pb-ad-78158” ).addService( googletag.pubads() ) ); } );

    The post Pros and Cons of Photographing Dogs with a Prime Lens by Ben Hughes appeared first on Digital Photography School.


    Digital Photography School

  • Think Tank Photo launches largest rolling case for lighting

    $ (document).ready(function() { SampleGalleryV2({“containerId”:”embeddedSampleGallery_0536172367″,”galleryId”:”0536172367″,”isEmbeddedWidget”:true,”standalone”:false,”selectedImageIndex”:0,”startInCommentsView”:false,”isMobile”:false}) });

    Bag manufacturer Think Tank Photo has introduced a rolling case for lighting kit that it claims is the largest on the market. The Production Manager 50 is designed to hold a pair of studio-style heads with power packs, battery packs, dishes, umbrellas and even lighting stands. The case has internal dimensions of 38 x 125 x 25.4cm / 15.5 x 49.2 x 10in and comes with a collection of adjustable dividers so users can customize the layout of the interior. Zip-up pockets on the inside of the lid are designed to keep cables tidy, and straps on the exterior can be used to attach tripods and larger lighting stands.

    The bag is made with ballistic nylon coated with a water-repellent agent that covers a rigid shell, and the shock-absorbing wheels are user replaceable should they get damaged. Think Tank Photo says that the idea of this big case is to make it easier for photographers to transport large amounts of kit in one load, and claims the Production Manager 50 can carry what it would normally require two assistants to manage.

    The Think Tank Photo Production Manager 50 costs $ 599.75/£515. For more information see the Think Tank Photo website.


    Press release:

    Photographers Can Fit Lighting Equipment and Large Light Modifiers in One Rolling Bag with Think Tank Photo’s New Production Manager 50

    Santa Rosa, Calif. – Think Tank Photo has released the largest rolling photography equipment case on the market, the Production Manager 50.  Designed to hold an immense amount of gear, including lighting equipment and large light modifiers, one photographer will now be able to transport what it used to take up to at least two assistants.  It is easy to move, carry, work out of, and stack among other gear.

    This large rolling bag features stabilizing, wide-set, shock-absorbing wheels that roll smoothly and hold up under the toughest conditions, the ability to lock the main compartment and secure the bag with the included lock and cable, and a fully customizable interior with dividers to protect small and large lighting equipment including c-stands and large modifiers.

    “Pro photographers usually travel by car or van to where they are going to shoot,” said Doug Murdoch, Think Tank’s CEO and Lead Designer. “Once a shoot is completed the set needs to be torn down and moved to the next location. Often times, there can be a time crunch where all the gear has to be loaded quickly. Carrying these bags up and down stairs and over rough terrain can be very cumbersome and often takes two people.  The Production Manager 50 makes this time-sensitive, cumbersome process easier and quicker.”

    KEY ADDITIONAL FEATURES
    * Large front zippered pocket for reflectors, umbrellas, extension cords, cables, etc.
    * Attachments for lightstands or tripods on both sides (straps included)
    * Rigid shell and stiffened dividers ensures gear protection
    * Robust handles on four sides for easy loading and unloading by two people
    * Heavy-duty aluminum side-frame protects axle from impact
    * ID plate can be registered on the Think Tank site that may allow lost or stolen bag to be returned
    * YKK RC Fuse zippers, 1680D ballistic nylon, and super-stick velex (interior) contribute to one of the most robust products on the market.
    * Large interior mesh pockets for organizing pocket wizards, gels, cords, tape, batteries, and other accessories
    * Ergonomic top handle for rolling or carrying by two people.
    * Velex wrapped dividers for extra durability and longevity.
    * Adjustable lid straps keep bag open and accessible
    * Rear skid rails and custom wheel housings allow for loading and unloading from a vehicle with ease
    * Business card holder for easy identification on top panel
    * User replaceable wheels & hardware
    * Seam-sealed rain cover included

    MATERIALS
    External: All fabric exterior treated with DWR while fabric underside is coated with PU for superior water resistance, 1680D ballistic nylon, YKK® RC Fuse (abrasion resistant) zippers, custom designed extra tall skid plates, replaceable custom-designed wheels, antique nickel plated metal hardware, nylon webbing, 3-ply bonded nylon thread

    Internal: 210D silver-toned nylon, PU backed velex liner & dividers, 2x PU coated nylon 210T seam-sealed taffeta rain cover, closed cell foam & PE board stiffened dividers, belly-o mesh pockets, 3-ply bonded nylon thread

    PRODUCT DIMENSIONS & WEIGHT 

    Exterior Dimensions: 17.3” W x 53.1” H x 12.6” D (44 x 135 x 32 cm)
    Interior Dimensions: 15.6” W x 49.2” H x 10” D (39.5 x 125 x 25 cm)
    Weight:  20.7 – 29.8 lbs (9.4 – 13.5 kg)

    Articles: Digital Photography Review (dpreview.com)