Blog

  • How to Make a Unique Portrait in the City at Night

    What makes a portrait into a portrait ?

    Making a portrait is like baking a cake in a way, you need to mix the right ingredients, evenly set it in a tray and add some personal touches. Once the cake is in the oven there is no way back, a bit like pressing the shutter release, then the portrait is done.
    ouria_tadmor_city_portrait003

    Any portrait, will always include a person, a background, and a key light that will allow the subject’s face and soul to come through in the picture. The subject, background and light are the ingredients, and your frame is the baking tray. Let’s hit the streets and bake the perfect portrait cake!

    The city, especially after sundown, has a vast variety of portrait ingredients to be found. Take your portrait subject with you, and go for a walk in the urban studio to look for frames, backgrounds, and light.

    The key to success, as always, lies in your eyes, so start looking at the city through a portrait lens, and look for balanced compositions that will frame a good portrait. Try to use what can be found on the streets, but if that’s not possible, a simple off-camera flash with white umbrella can complete the setup for the urban studio.
    We took a walk in the city and looked for portraits to be made. Here is what I and my model found.

    Bright store in a dark corner

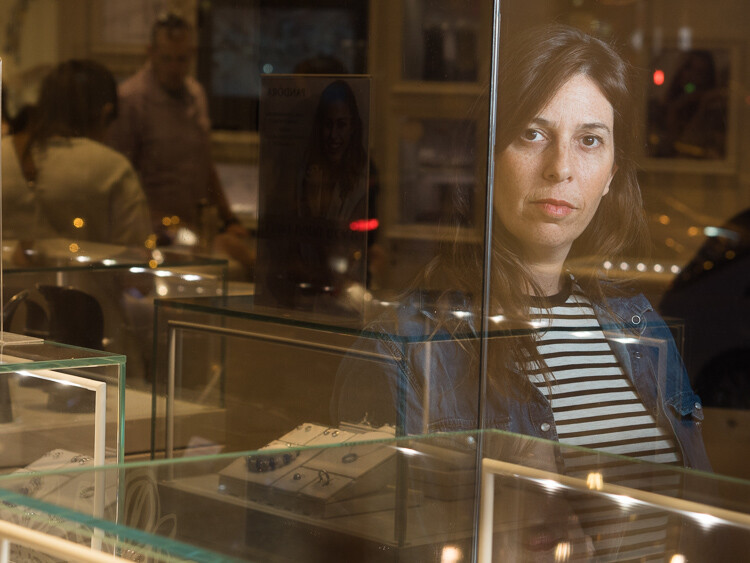
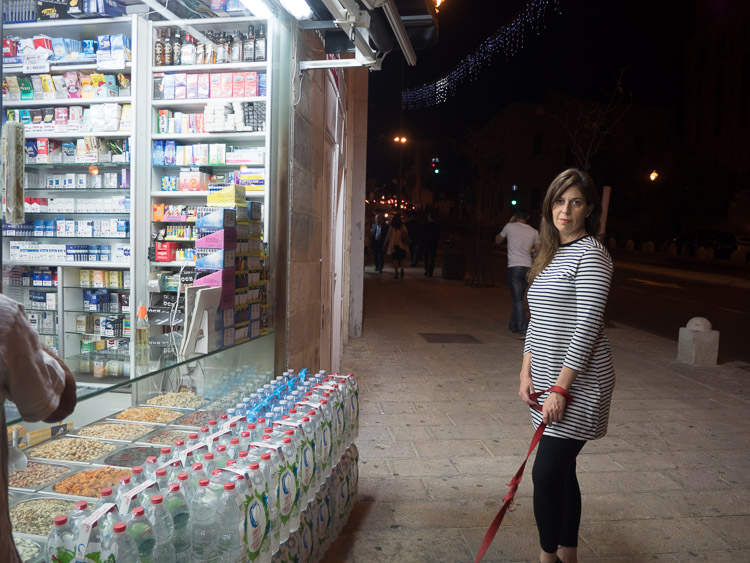
    The dynamic composition shown here creates the needed interest that focuses viewer’s attention on the model’s facial features and eyes, therefore communicating the personality of the model. This is done by having soft gentle light coming from the left and adding a red bokeh circle in the background. An invisible triangle between the model’s lips, eyes, and the red circle is directing the energy back to her eyes.

    ouria_tadmor_city_portrait011
    As you can see here, the setup for this portrait wasn’t a big soft-box in the studio, but instead was a messy drug store at night, in a busy street corner in Jerusalem. The store’s fluorescent lights provided an even and soft light source, while the much needed red circle in the background came from the traffic light behind the model (shown in green in the photo below).
    ouria_tadmor_city_portrait012

    Hotel enigma

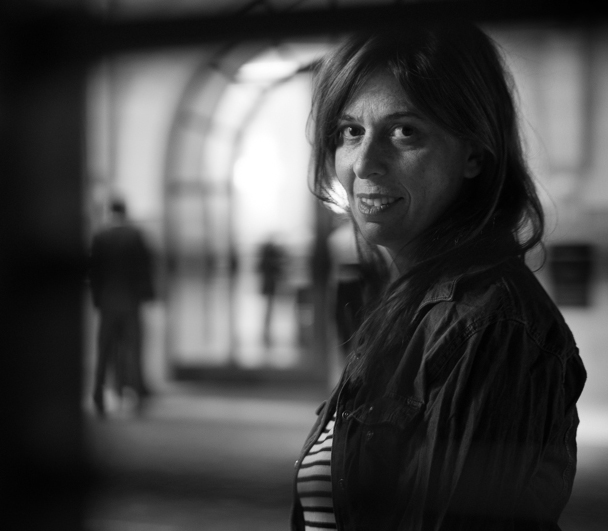
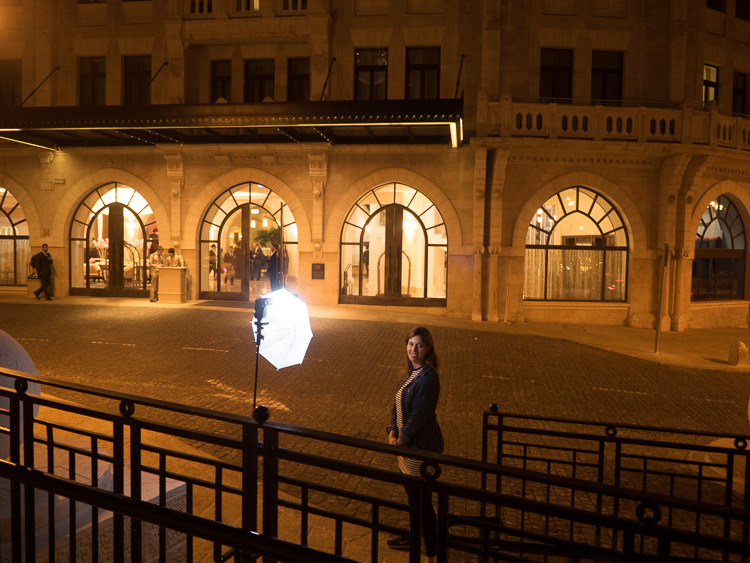
    A classic hotel building, with some human presence, helped create an enigmatic atmosphere for this portrait, the background here being part of the story. The key light on the subject came from an off-camera flash positioned at 90 degrees. The dark frame for this composition was made by photographing through a metal railing between the camera and the subject, as you can see in the next photo. This setup helped create depth, that continues with the blurry figures on the street and inside the building.
    ouria_tadmor_city_portrait013

    The whole setup can be seen below. The flash was positioned about four feet from the model, with the output set to manual at 1/32 power, in order to match the amount of light coming from the background.
    ouria_tadmor_city_portrait014

    Layer store

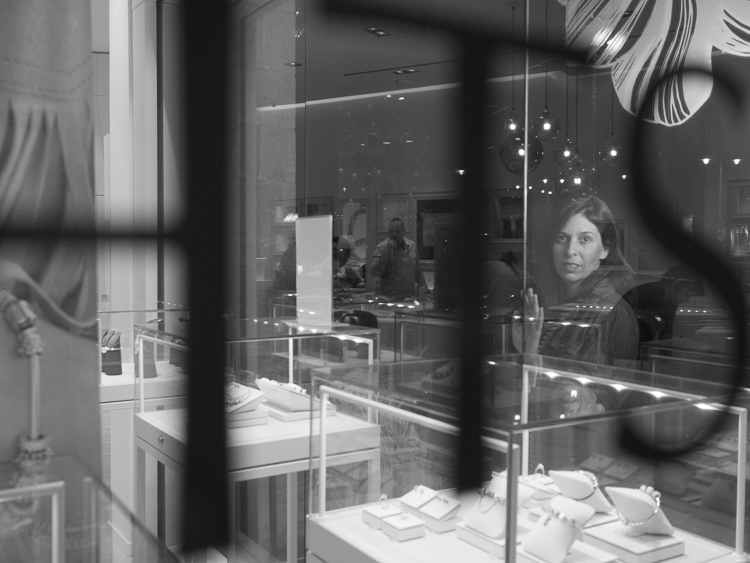
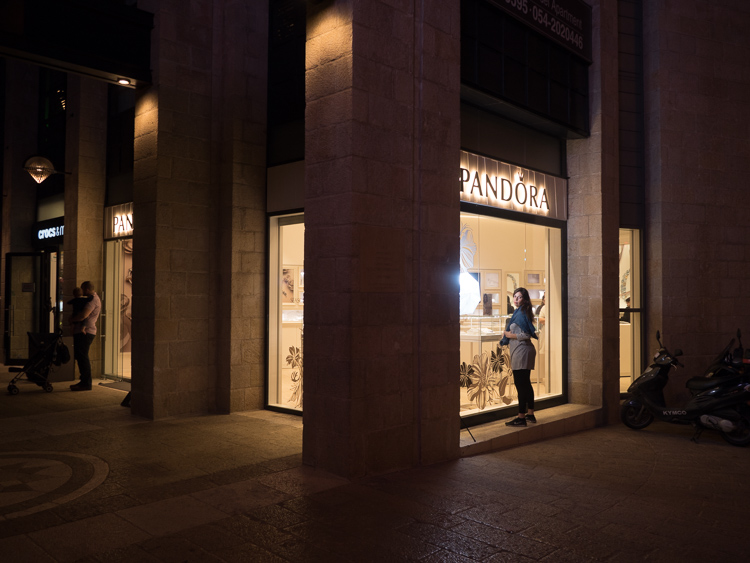
    Layers are not only to be found in photo editing programs, they are everywhere, all over the city. A corner store with windows on both sides made it possible to compose a complicated composition, that gives the eye something to explore. When doing so, you need to make sure that the viewer’s eye ends up looking at the subject, so it can still be a portrait. Dividing the frame into three, using the vertical lines on the store’s window, and positioning the subject in the right third of the frame, kept the focus on the subject in this case.
    ouria_tadmor_city_portrait002

    The main light here also came from the off-camera flash setup, as you can see in the next image. The photo was taken through the window on the left side of the store.
    ouria_tadmor_city_portrait004

    Equipment

    Any camera with a decent portrait lens and manual exposure control can do the work, most of it is hidden in the lens.

    A classic portrait lens is between the 85 mm and 105 mm focal lengths on a full frame camera, or their equivalents on any other sensor size. Those focal lengths will give you the perfect camera to subject distance of about six feet, and will produce a moderate compressed perspective, that is distortion free. Typical portrait lenses have a large aperture of f/2 or wider, which allows more light to go through, and therefore are perfect for working with what the city has to offer at night, and will deliver a shallow depth of field when needed.

    Off-camera flash can be any speedlight with manual control and radio slave system. Here is the list of equipment I used for this session:

    • Panasonic GH4 camera
    • Olympus M.Zuiko 45mm f/1.8 lens
    • Metz 52 AF-1 flash
    • Two Cactus V5 radio slaves
    • ProVision 20″ White umbrella
    • ProVision M11 shoe mount umbrella adapter
    • Meking L-2000A Light Stand

    So if you want to try something a little different get a willing subject (model), grab a flash, and head out into the city at night to make some unique portraits.

    Please share your questions and results in the comments below.

    googletag.cmd.push(function() {
    tablet_slots.push( googletag.defineSlot( “/1005424/_dPSv4_tab-all-article-bottom_(300×250)”, [300, 250], “pb-ad-78623” ).addService( googletag.pubads() ) ); } );

    googletag.cmd.push(function() {
    mobile_slots.push( googletag.defineSlot( “/1005424/_dPSv4_mob-all-article-bottom_(300×250)”, [300, 250], “pb-ad-78158” ).addService( googletag.pubads() ) ); } );

    The post How to Make a Unique Portrait in the City at Night by Ouria Tadmor appeared first on Digital Photography School.
    Digital Photography School

  • Light Touch: Sensual Installation Lets Visitors Feel Luminescence

    [ By WebUrbanist in Art & Installation & Sound. ]

    light art shimmering walls

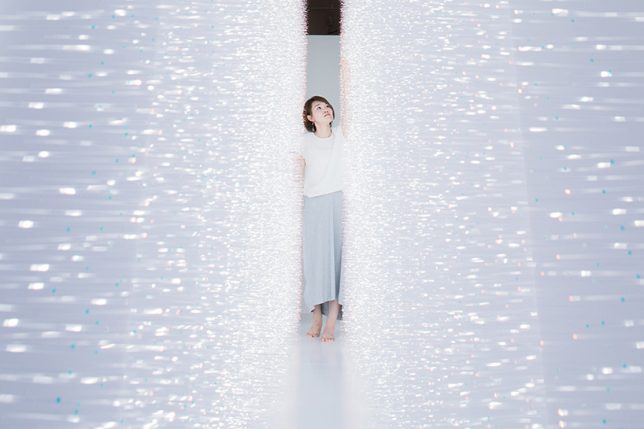
    In a new light art installation dubbed Sense of Field, Tokyo artist Hitomi Sato lets visitors simultaneously see, touch and shape shimmers of light all on sides.

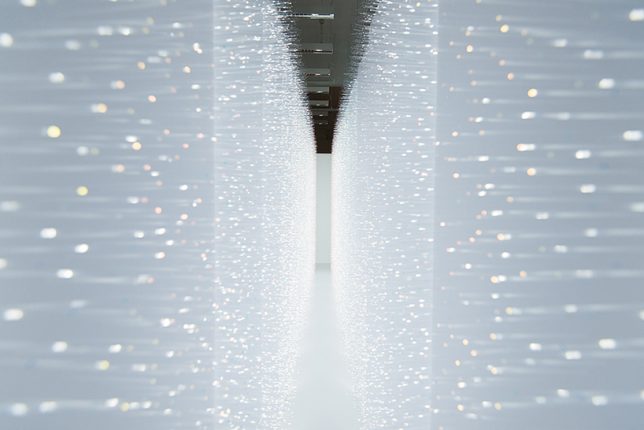
    The immersive experience is facilitated by thousands of transparent tendrils extending from two walls opposite one another. Each visitor walking between them,touches bristles on both sides, creating waves of motion that can be both seen and felt.

    light art hallway installation walls

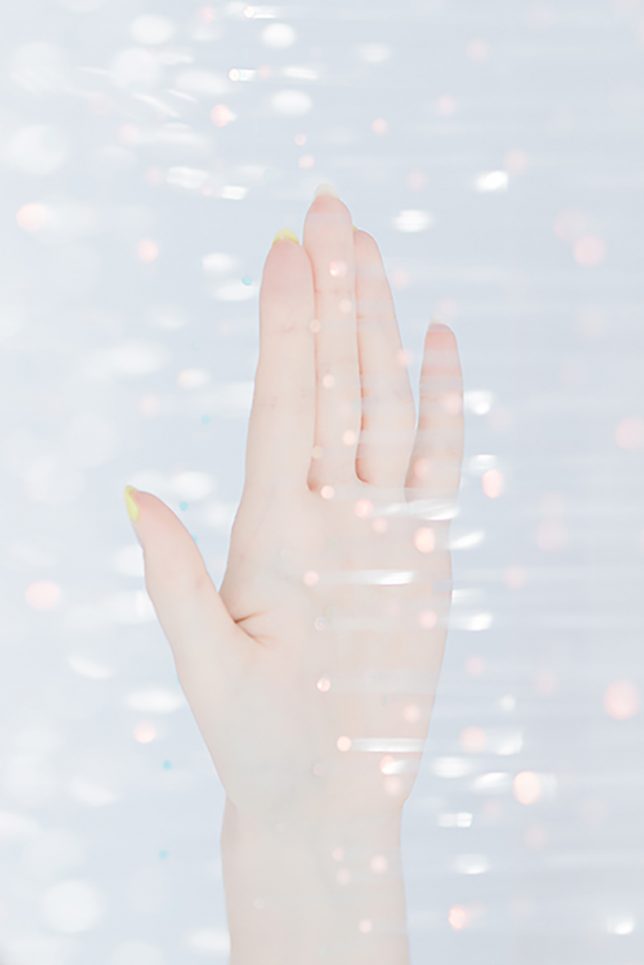
    Perspective matters: observers outside the installation see it all from another angle, experiencing the setup differently primarily as a function of gleaming luminosity. Once engaged through physical contact, sensations multiply as clothing and skin brush beads of heat and illumination.

    light art installation tokyo

    Of her work, the artist says that “when [she] sees the shimmer of light, images of various natural light comes to her mind. For example, ripples on the water’s surface, sunlight through the leaves of trees, rays from a break in the clouds, and the reflections on window’s glass.”

    Share on Facebook


    [ By WebUrbanist in Art & Installation & Sound. ]

    [ WebUrbanist | Archives | Galleries | Privacy | TOS ]


    WebUrbanist

  • Explore Mars with 360-degree image shot by NASA Curiosity Rover

    Earlier this year, NASA released a 360-degree image from the perspective of the Curiosity Mars Rover. The scene is made up of a combination of multiple exposures taken with the rover’s 2MP ‘Mastcam’ camera, which we wrote about back in 2012.

    The resulting image is pretty incredible, and if you have access to a Google Cardboard viewer you can experience it in 3D. So if you’ve got a free few minutes this weekend, why not explore the surface of Mars? 

    Articles: Digital Photography Review (dpreview.com)

  • iFixit takes a look inside the Olympus PEN E-PL7

    Inside the Olympus PEN E-PL7

    The Olympus PEN E-PL7, like its Micro Four Thirds peers, is a pretty impressive little piece of engineering. It houses a 16MP Four Thirds sensor and a 3″ LCD that flips up 180-degrees. It accepts Micro Four Thirds lenses and ships with a pocket-sized external flash. Being curious types of people, we wanted to know how Olympus squeezes everything into a camera of the E-PL7’s size. Thankfully, there’s iFixit. Their disassembly guide gives an up-close look at what’s inside the camera – and you don’t have to void your warranty in the process.

    Inside the Olympus PEN E-PL7

    This disassembly starts the way so many projects do: with a screwdriver. Screws are removed from the bottom plate and sides of the camera.

    Image via iFixit

    Inside the Olympus PEN E-PL7

    With some screws removed from the lens mount, this inner ring is revealed and carefully removed.

    Image via iFixit

    Inside the Olympus PEN E-PL7

    With even more screws gone a pair of tiny springs can be taken out of the mount.

    Image via iFixit

    Inside the Olympus PEN E-PL7

    Removing even more screws makes it possible to gently pull the chassis apart, but not quite all the way with a ribbon cable connecting the two pieces. 

    Image via iFixit

    Inside the Olympus PEN E-PL7

    A camera divided. Highlighted in red is the ZIF connector keeping the ribbon cable attached to the motherboard.

    Image via iFixit

    Inside the Olympus PEN E-PL7

    With the cable disconnected, the camera can be handled one half at a time.

    Image via iFixit

    Inside the Olympus PEN E-PL7

    Here’s another look at the motherboard, with even more ribbon cables attached.

    Image via iFixit

    Inside the Olympus PEN E-PL7

    Up top, the plate that holds the mode dial and shutter release can be removed once one more screw is out of the way. 

    Image via iFixit

    Inside the Olympus PEN E-PL7

    …And with some ribbon cables disconnected, the sensor comes free of the camera body too.

    Image via iFixit

    Inside the Olympus PEN E-PL7

     E-PL7’s 16MP sensor lies 

    Here’s a front view of the E-PL7’s 16MP sensor. 

    Image via iFixit

    Inside the Olympus PEN E-PL7

    The camera is looking quite empty at this point. Here’s a sense of how small that motherboard is.

    Image via iFixit

    Inside the Olympus PEN E-PL7

    …And with a few last cables disconnected and screws removed, the E-PL7 disassembly is complete.

    Image via iFixit

    Articles: Digital Photography Review (dpreview.com)

  • Take a closer look inside Canon’s impressive EF 200-400mm F4L IS

    Canon has posted a video showing its massive EF 200-400mm F4L IS USM Extender 1.4 X reduced to its component parts.

    The Canon 200-400mm is an impressive lens. This hefty telephoto uses no fewer than 33 elements arranged in 24 groups, including Fluorite and Ultra-Low Dispersion glass, and features a built-in 1.4X teleconverter. Canon’s stop-motion video is rather charming, and makes a nice change from the computer-generated exploded imagery that we’re used to seeing. 

    Articles: Digital Photography Review (dpreview.com)

  • Fotodiox launches flicker-free LED100WB lighting heads with dimmable daylight output

    Accessories and lighting manufacturer Fotodiox has introduced a new LED lighting head that it claims is flicker-free and suitable for high speed photography. The LED100WB head comes with a 5600k daylight balance and offers a more consistent color rendition than the company’s previous models. Fotodiox claims the heads have a CRI of >95 and while they only draw 100 watts they deliver dimmable output of more than 400 watts. The heads run cool so are ideal for a wide range of subject matter indoors and out, and will suit both stills and motion photographers.

    The company claims the output is flicker-free so frame rates as high as 120fps can be used for slow motion video, and that the bulbs have a life of 30,000 hours. The bulbs can be dimmed via a knob on the top of the housing or by using a wireless remote control. Fotodiox claims that the advantage of using their LED heads over tungsten when dimming is that the LED’s retain their color temperature.

    In a change from the company’s previous WA heads, which used a Bowens S mount for accessories, these new WB models take Alien Bee modifiers. The new heads are more compact than the WA heads, but they weigh the same and don’t offer a choice of temperature or power.

    The heads are sold on their own with a power adapter, reflector dish, a diffuser sock for the dish and a stand. A three head kit that also features folding softboxes with speed rings and a rolling case that fits the whole kit. The single head costs $ 299.99 while the 3-head kit costs $ 999.99.

    For more information visit the Fotodiox website.


    Press release:

    Fotodiox Pro Announces Compact, Powerful LED100WB for High Frame Rate Shooting

    Fotodiox Pro, creator and distributor of several lines of specialty solutions for videography, cinematography and photography, has announced the LED100WB: a soft light with powerful luminance for photographers and filmmakers. Built upon Fotodiox Pro’s award-winning LED technology, the LED100WB features a compact form factor and draws a mere 100 watts while outputting the rough equivalent of a 400+ watt Tungsten light. A perfect tool for portraits, tabletop photography, video interviews, short films and even special effects like slow-motion and time-lapse capture, the LED100W is available now as a single light or three-light kit from FotodioxPro.com.

    “The world is shooting in 4K, and we wanted to create something that would stand up to its amazing creative potential,” says Bohus Blahut, marketing director for Fotodiox Pro. “In addition to already being quite versatile and ready to use right out of the box, the LED100WB is a perfect light for exciting visuals like time-lapse and slow motion. Go ahead and bump frame rates up to 120fps – we’ve designed the LED100WB to provide powerful, beautiful, uniform soft light, with no flickering.”

    The LED100WB features a quick-release front mount compatible with Alien Bee accessories; one simple twist allows the user to mount or remove a whole host of light modification accessories. Each LED100WB comes with a metal reflector, a diffuser and a portable folding 24” Softbox, making it easier than ever to start shooting in seconds. Adding to its great versatility is a decidedly compact form factor – perfect for more creative positioning on a shoot – as well as the option to add barndoors, round and strip softboxes, and creative reflectors to each purchase. For ultimate portability, the three-light kit includes three light stands inside a custom-fit, luggage-style rolling case.

    To learn more about the LED100WB and Fotodiox Pro’s additional photography and filmmaking accessories, please visit FotodioxPro.com. View unboxing videos and product demonstrations via youtube.com/user/FotodioxInc.

    Articles: Digital Photography Review (dpreview.com)

  • Think Tank Photo launches Helipak backpack for DJI Inspire drone

    $ (document).ready(function() { SampleGalleryV2({“containerId”:”embeddedSampleGallery_7764010080″,”galleryId”:”7764010080″,”isEmbeddedWidget”:true,”standalone”:false,”selectedImageIndex”:0,”startInCommentsView”:false,”isMobile”:false}) });

    Bag manufacturer Think Tank Photo has announced a new backpack designed for users of the DJI Inspire drone and other quadcopters of a similar size. The Helipak is capable of holding a single DJI Inspire craft as well as its gimbal, three lenses, spare propellers and six batteries, according to Think Tank Photo. There are also compartments for a 17in laptop and a pair of 8in tablets.

    The idea of the Helipak is that it makes transporting the drone to ‘scenic’ locations much easier than via a hard flight case as it features shoulder straps that allow the whole thing to be carried on the user’s back. The backpack straps can also be stowed away to make the Helipak into a normal case with top and side handles.

    While the case is made with soft materials it uses ‘twinwall’ reinforcement via a pair of ABS plastic shields within the outer construction that add extra rigid protection for the drone. The exterior is made with nylons and polyester that the company says provides a hardwearing and water repellent barrier, while zips are YKK RC Fuse and feature metal ‘hardwear’. In a promotional video Think Tank Photo claims that DJI’s own $ 200 case for the Inspire has poorly made zips that are prone to failing.

    The bag is available now and costs $ 339.75. For more information see the Think Tank Photo website.

    Press release

    Think Tank Photo’s Helipak™ for DJI Inspire Backpack

    Offers Superior Organization, Comfort, and Travel Portability

    SANTA ROSA, CALIFORNIA –Think Tank Photo has released the most well thought-out, comfortable, and protective backpack for users of DJI Inspire or other similarly sized quadcopters. The Helipak for DJI Inspire easily holds a DJI Inspire (parked with gimbal and rotors detached), Zenmuse gimbal with 3 lenses, 6x batteries, 2x controllers, 2 x 8” tablets, lots of extra propellers, and a 17” laptop and charger.

    Movable dividers allow users to customize the fit of their gear in this fully featured backpack. The contoured tuck-away harness with lumbar support, cut-away air-channel, the adjustable sternum strap, and the removable padded waistbelt allow for extreme comfort while trekking into remote areas or simply pulling it from the car.

    “The backpack’s ABS twinwall reinforcement provides a rigid shell that protects sensitive gear from impacts, bumps and scrapes,” said Think Tank Photo’s president and
    lead designer, Doug Murdoch. “It also features YKK™ RC Fuse zippers, 1680D Ballistic nylon bottom panel, metal hardware, and nylon webbing that are the most durable, longest
    lasting materials on the market. The last thing drone users want to worry about is if their backpack will hold up in rigorous outdoor conditions.”

    ADDITIONAL KEY FEATURES

    • Large front pocket fits auxiliary items for the day’s outing: light jacket, 17” laptop pocket or a large tablet
    • Lockable zippers
    • Internal see-through mesh pockets for small accessories: propellers, screwdriver, cables, etc.
    • Deluxe organizer for smart phone, wallet, pens, keys, business cards, etc.
    • Water bottle pocket on side
    • Height adjustable sternum strap
    • Elastic pockets on shoulder straps for phone, energy bar, etc.
    • Robust handles on three sides ensure rapid and easy retrieval from airline overhead bins, car trunks, etc.
    • Seam-sealed rain cover helps to protect gear and stows away inside backpack when not in use

    MATERIALS
    Exterior: For superior water-resistance, all exterior fabric has a durable water-repellant (DWR) coating, plus the underside of the fabric has a polyurethane coating. It also has YKK® RC Fuse (abrasion-resistant) zippers, 1680D ballistic nylon bottom panel, 600D polyester, 420D velocity nylon, 3D air mesh, ultra-stretch pockets, Y-buckles, antique finish metal hardware, nylon webbing, and 3-ply bonded nylon thread.

    Interior: 6mm ABS twinwall, removable closed cell foam dividers with PE board reinforcement, 200D polyester, polyurethane-backed 3-layer velex liner, 2x polyurethane coated nylon 210T seam-sealed rain cover, Belly-O mesh pockets, and 3-ply bonded nylon thread.

    TECHNICAL SPECIFICATIONS
    Exterior Dimensions: 19.3” W x 24” H x 9.4” D (49 × 61 × 24cm)
    Interior Dimensions: 17.3” W x 21.7” H x 7.9” D (44 × 55 × 20cm)
    Laptop Compartment: 12.6” W x 16.9” H x 1.2” D (32 × 43 × 3cm)
    Weight (with all accessories): 8.5 lbs. (3.9 kg)

    Articles: Digital Photography Review (dpreview.com)

  • Weekly Photography Challenge – Glass

    How do you photograph something that is transparent or see through, like glass? See how these photographers did it with 28 images of glass subjects, then see if that gives you some ideas for this week’s challenge.

    Designmilk

    By designmilk

    Weekly Photography Challenge – Glass

    This should be easy enough to find subjects for this week’s challenge – glass – the tricky part is how to photograph it. Glass reflects everything including the light source and even yourself. So how you approach this will be up to you. Shoot a crystal glass in the studio, photograph an old weathered window pane, work with the reflections and go with them for effect, or shoot through glass. Get creative.

    Bill Gracey

    By Bill Gracey

    ?ethan

    By ?ethan

    Dara Or

    By Dara or

    Share your images below:

    Simply upload your shot into the comment field (look for the little camera icon in the Disqus comments section) and they’ll get embedded for us all to see or if you’d prefer upload them to your favourite photo sharing site and leave the link to them. Show me your best images in this week’s challenge. Sometimes it takes a while for an image to appear so be patient and try not to post the same image twice.

    Matthew Rogers

    By Matthew Rogers

    Wil C. Fry

    By Wil C. Fry

    Han Cheng Yeh

    By Han Cheng Yeh

    googletag.cmd.push(function() {
    tablet_slots.push( googletag.defineSlot( “/1005424/_dPSv4_tab-all-article-bottom_(300×250)”, [300, 250], “pb-ad-78623” ).addService( googletag.pubads() ) ); } );

    googletag.cmd.push(function() {
    mobile_slots.push( googletag.defineSlot( “/1005424/_dPSv4_mob-all-article-bottom_(300×250)”, [300, 250], “pb-ad-78158” ).addService( googletag.pubads() ) ); } );

    The post Weekly Photography Challenge – Glass by Darlene Hildebrandt appeared first on Digital Photography School.


    Digital Photography School

  • Please Touch the Art: Tactile 3D Portraits Let the Blind See Themselves

    [ By SA Rogers in Art & Sculpture & Craft. ]

    andrew myers screw art 13

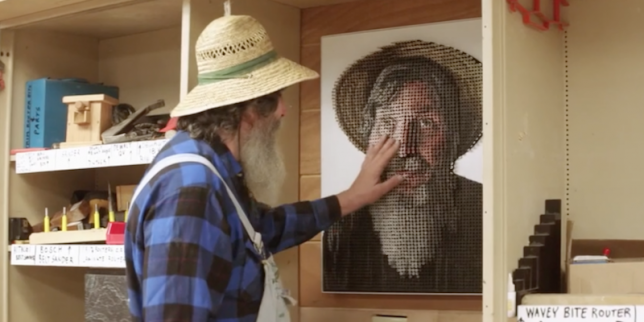
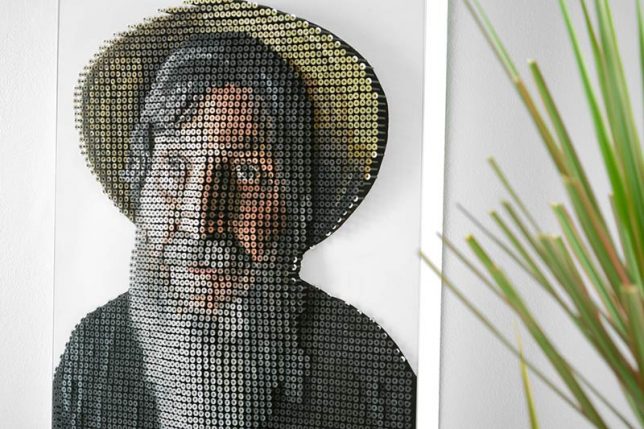
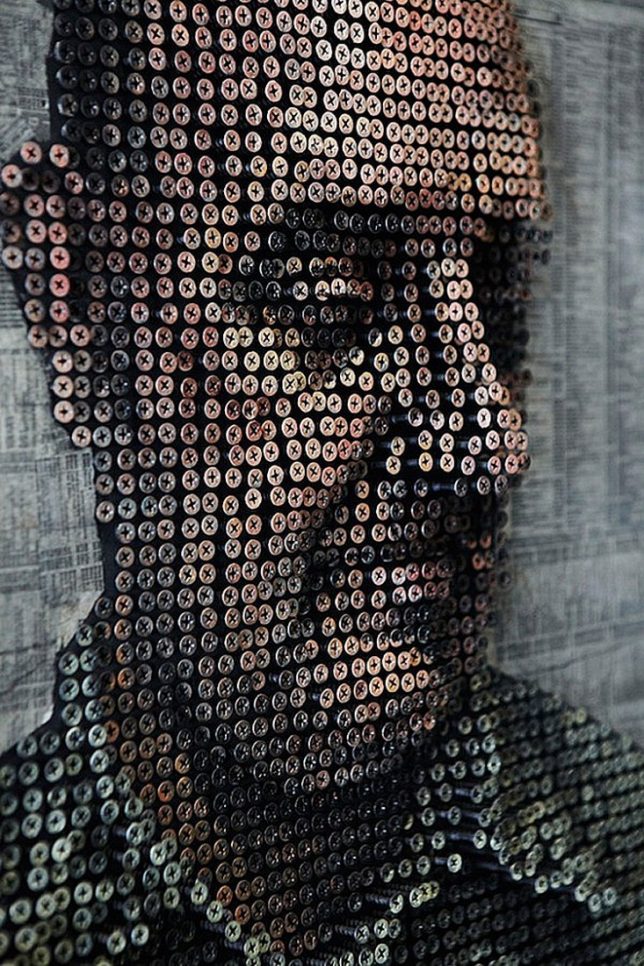
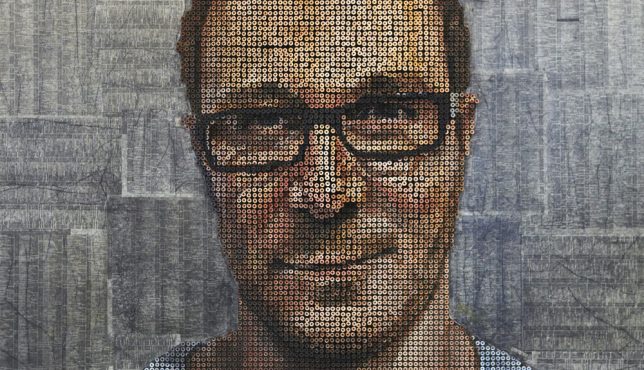
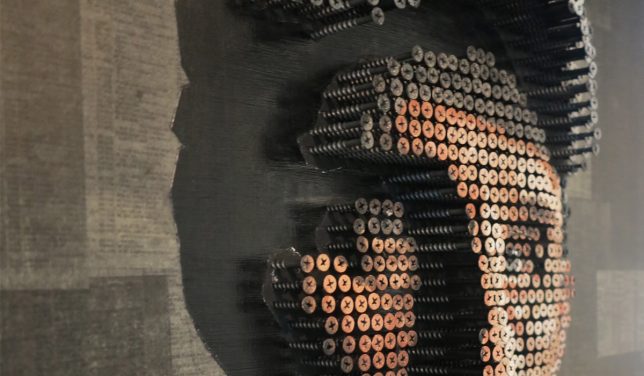
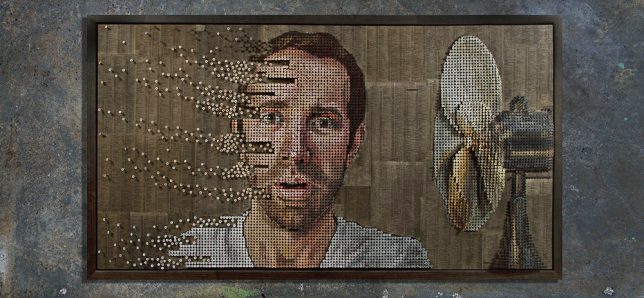
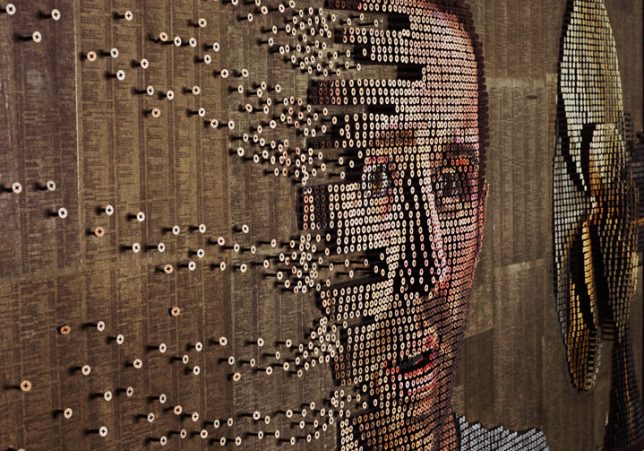
    “My nose isn’t that big!” protests portrait subject George Wurtzel as he runs his hands over his own image, rendered in paint on thousands of screws raised from a wooden board in a relief pattern. He might not be able to see the colors, or the play of light and shadow that gives the portrait much of its nuance and realism, but he can still experience it in a way that wouldn’t be possible if it were merely painted onto a canvas. For artist Andrew Myers, who specializes in these unusual sculptural paintings, this moment marks a concept that has come full circle since he first watched another blind man eagerly explore his art with his fingertips, six years ago.

    andrew myers screw art 12

    Myers doesn’t just allow people viewing his artwork to touch it, he actively encourages it, noting that it’s an important part of the experience of taking it in. Realizing that this could potentially allow a blind person to see their own portrait, he set out to create a custom work with artisan and teacher George Wurtzel as his subject. George teaches at a 300-acre summer camp for the visually impaired in California’s Redwood Forest, and has also been tasked with renovating a barn into a new Tactile Art Center full of accessible art, where blind artisans can both sell their own work and feel the 3D works of others.

    andrew myers screw art 1

    andrew myers screw art 5

    andrew myers screw art 7

    andrew myers screw art 8

    “We snuck into George’s future gallery and  hung the portrait for him to discover,” says Andrew. “As he experienced this for the first time (and between bursts of laughter) he kept repeating the phrase, ‘mind boggling.’ Not every piece of art needs to or should be touched… but perhaps it’s time we took a look at how pervasive and mandatory our ‘no touching’ rules really are – it might help everyone see artwork a little differently.”

    andrew myers screw art 15

    andrew myers screw art 2

    andrew myers screw art 3

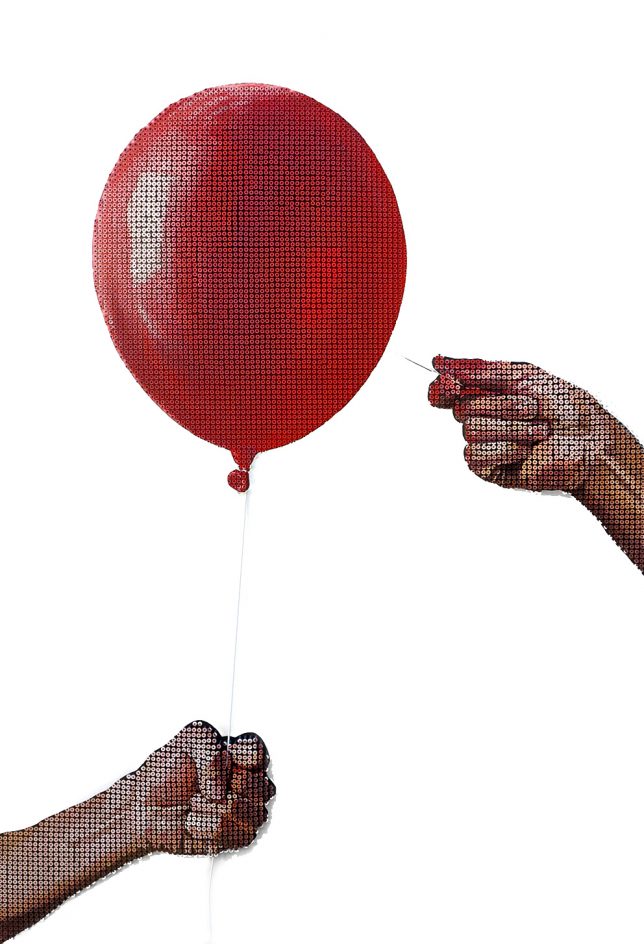
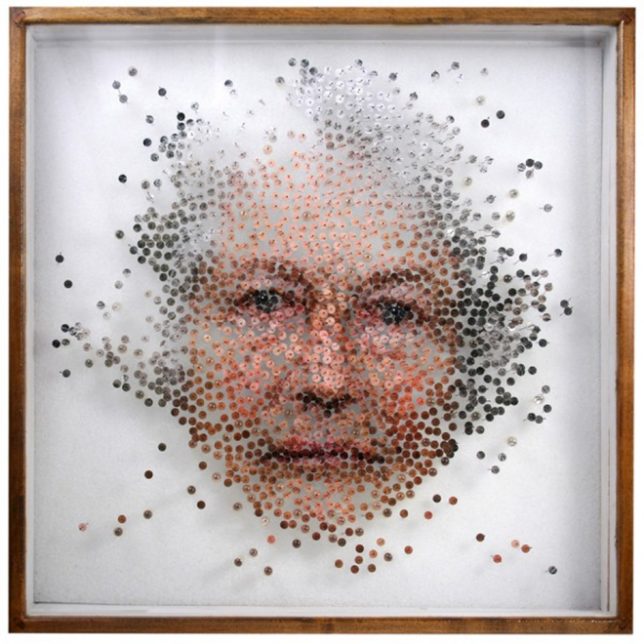
    While Andrew’s portrait of George is comprised of about 4,000 screws, other works require upwards of 20,000. One portrait, ‘Fading Thoughts,’ takes his work a step further by infusing a scene with a sense of motion, with screws seemingly being blown off the canvas.

    Share on Facebook


    [ By SA Rogers in Art & Sculpture & Craft. ]

    [ WebUrbanist | Archives | Galleries | Privacy | TOS ]


    WebUrbanist

  • SUN-SNIPER introduceds new Rotaball ultra-strong camera straps

    German company SUN-SNIPER has introduced a new line of camera straps called Rotaball, and each of the seven straps within it feature both the maker’s Rotaball Connector and Blokker hardware. In addition, SUN-SNIPER has improved the shock absorber used with the new camera straps, added an integrated anti-theft steel cable, an underarm ‘Pitt’ strap feature that keeps the shoulder pad from sliding, and an anti-camera swing feature called ‘Limiter.’

    The Rotaball connector allows the camera to swing around its bearing, reducing stress on the tripod socket attachment point.

    The Rotaball Connector (see exploded view, above) is a stainless steel mono-multiball bearing featuring a single large ball that turns within an array of 32 smaller balls. The Blokker, meanwhile, is a pin developed to prevent the camera from being unscrewed and stolen. For added security, SUN-SNIPER has also included a steel cable in five of the seven models, each of which includes a 1,000 Euro insurance against camera theft, should someone succeed in cutting through the strap and stealing your camera.

    Rotaball Pro features

    1: ‘Rotaball’ Connector
    2: ‘Blokker’ to prevent tampering
    3: Shock-absorber
    4: Steel-reinforced strap
    5: Shoulder pad
    7: Swing limiter
    8: ‘Pitt’ underarm strap

    The Rotaball camera strap lineup is composed of the Rotaball Pro (89 EUR), Rotaball One (59 EUR), Rotaball Traveler (79 EUR), Rotaball DPH (149 EUR), Rotaball TPH (229 EUR), Rotaball Surf (59 EUR), and Rotaball BPS (49 EUR). All seven models are available now through SUN-SNIPER’s website.

    Press Release:

    RELAUNCH THE NEXT GENERATION: THE NEW SUN-SNIPER ROTABALL CAMERA STRAPS

    Egestorf, June 7, 2016. SUN-SNIPER revolutionizes the camera strap and introduces new features. SUN-SNIPER is already well know for its innovative product design, providing the greatest professionalism, comfort and safety, and being ready to shoot in a flash. And now the company is enhancing its SNIPER-STRAP system with new developments. Each of the seven ROTABALL models now has a ROTABALL CONNECTOR and a BLOKKER. The stainless steel mono-multi ball bearing (a large ball turning in 32 small balls) allows the camera to pivot freely and without obstruction. The rubber washer with its SNAKESKIN structure provides the safest connection to the strap. And even more security is ensured by the BLOKKER: a newly developed pin that blocks the connector at the camera to prevent the camera from being unscrewed by anyone not authorized to do so.

    “As an innovative leader in the industry, we place great emphasis on ensuring that our products are state-of-the-art, utilizing all the new technology available. This is why we continue to develop new features and improve the existing functions of our straps, providing photographers with the most comfortable and secure straps for carrying their cameras,” explains Peter Geller, owner and CEO of SUN-SNIPER.

    SEVEN MODELS, FIVE NEW FEATURES?

    The seven ROTABALL straps are designed to meet the most varied needs of professional and amateur photographers. In addition to the new ROTABALL CONNECTOR and the BLOKKER, the integrated SHOCK ABSORBER has also been improved. And the LIMITER feature prevents the camera from swinging back, while PITT ensures that the shoulder pad fits snugly and does not slide around.

    WORLDWIDE INNOVATION – INTEGRATED STEEL CABLE INCLUDING UNIQUE INSURANCE

    The steel cable is invisibly woven into five of the ROTABALL models (PRO, TRAVELER, DPH, TPH and BPS). New: The steel cable runs completely through the rubbery SHOCK ABSORBER as well. This safety tool protects from theft caused by cutting, burning or melting the straps. But if despite these precautions a thief should still prove successful, the SUN-SNIPER insurance will cover up to 1000.00 EURO of the loss. (Additional information on the insurance can be found under http://www.sun-sniper.com)
    “I have ridden at least 2500 km on horseback through Africa, Australia and Europe, with my M + SL + S Leicas on the SUN-SNIPER strap, ready to shoot the next picture,” says Florian Wagner, wildlife and outdoor sports photographer. He always has the camera close by, hanging safely by his body and ready for the next shot. The adventurer has been using SUN-SNIPER straps for his reports as seen from atop a horse. “The reliability, strain relief and especially the security of the SUN-SNIPER straps are essential to my survival.”

    STRESS TEST PASSED WITH FLYING COLORS

    ?ROTABALL straps can bear loads of up to five kilos in camera and lens weight. “Our camera straps of course also pass tougher tests, e.g. applying loads up to 80 kg. But then we cannot guarantee the stability of the camera bodies,” adds Peter Geller. “When performing the stress test, we focused particularly on the fact that the weight of the camera multiplies significantly due to the up-and-down motion caused by running, even with the SHOCK ABSORBER providing compensation.”

    ABOUT SUN-SNIPER

    ?After founding SUNBOUNCE, a company specializing exclusively in reflector systems for photography and film, over 20 years ago, Peter Geller in 2009 started SUN-SNIPER, producing revolutionary camera straps for photographers. Peter Geller’s aim is to make photographers’ work easier with his products. After all, he knows all about what the pros need: He was the last German photographer to win the “World Press Photo Award,” and that was 45 years ago. And he won it twice.

    Via: PhotographyBlog

    Articles: Digital Photography Review (dpreview.com)