Blog

  • Rogue FlashBender 2 XL Pro Frank Doorhof Edition features ‘Super Soft Silver’ reflector

    Rogue has introduced a new FlashBender 2 XL Pro reflector designed in collaboration with photographer Frank Doorhof. The reflector uses ‘Super Soft Silver’ fabric, a material that produces an effect that falls somewhere between the soft lighting created by white fabric and the harsher, more contrasty reflections of sliver fabric.

    The FlashBender 2 XL Pro is the largest FlashBender model at 13in x 16in / 33cm x 41cm; it includes a belt and buckle for attachment to a flash, and an adjustable shape for altering the direction of light.

    The Rogue FlashBender 2 XL Pro Super Soft Silver Reflector is available now from Rogue for $ 59.95.


    Press release:

    ExpoImaging, Inc., creator of the patented FlashBender shapeable light modifiers for off-camera flash photography, today announced availability of the new Rogue FlashBender 2 XL Pro Super Soft Silver Reflector, Frank Doorhof edition.

    “Photographers looking for more contrast in their images while shooting flash on location will love this new Super Soft Silver FlashBender 2 XL Pro,” said Erik Sowder, ExpoImaging CEO. “Highly reflective shiny silver fabric is prone to hot spots and is often too bright and too contrasty for portraiture, especially in brighter light. Our custom Super Soft Silver fabric falls between harsh shiny silver and soft white fabrics. It is brighter and more “edgy” than white fabric while producing a softer and more even light than shiny silver fabric.”

    Professional photographer and lighting instructor Frank Doorhof is a master of using edgy light and contrast to create remarkable images. “I love more edge in my images,” said Frank, so when he first saw Rogue’s Super Soft Silver fabric, he knew he wanted a version of the Rogue FlashBender 2 XL Pro Reflector incorporating the fabric. Thus, the Rogue FlashBender 2 XL Pro Super Soft Silver Reflector, Frank Doorhof edition was born.

    Designed for portability to pack flat in most camera bags or laptop compartments, the 12” x 16” (30.5cm x 40.5cm) FlashBender 2 XL Pro reflector is the largest FlashBender. Building on the success of the popular Rogue FlashBender light modifiers for speedlights, FlashBender 2 reflectors can be shaped to control the direction of light from an accessory flash, and FlashBender 2’s improved belt and buckle design provides a faster and more secure attachment to your flash.
    With the control, versatility and portability of all FlashBenders and a Super Soft Silver reflective surface, the Frank Doorhof edition FlashBender 2 XL Pro Reflector represents a unique new photographic tool to create spectacular images.

    Pricing and Availability

    The Rogue FlashBender 2 XL Pro Super Soft Silver Reflector is available from ExpoImaging’s distribution partners worldwide or online at RogueFlash.com. The Rogue FlashBender 2 XL Pro Super Soft Silver Reflector retails for $ 59.95.

    About Rogue Photographic Design

    Created by ExpoImaging, Rogue Photographic Design develops innovative lighting equipment for speedlight enthusiasts. Compact, versatile, and durable, patented Rogue light modifiers offer unparalleled lighting control in portable and light weight designs. More information about Rogue Photographic Design is available at RogueFlash.com, or ExpoImaging.com. Rogue FlashBenders are patented: see http://www.ExpoIP.us.

    About ExpoImaging, Inc.

    ExpoImaging, Inc. markets, designs, manufactures and distributes innovative camera accessories to the photographic market. ExpoImaging is the pioneer in white balance filters and manufactures ExpoDisc White Balance Filters, Rogue FlashBenders, Rogue Diffusion Panels, Rogue Grid, Rogue Flash Gels, and Rogue Safari. ExpoImaging is also the exclusive U.S. distributor of CapBuckle, and Ray Flash: The Ring Light Adapter. These unique products are available at select photography dealers worldwide or online at RogueFlash.com, or http://www.expoimaging.com.

    Articles: Digital Photography Review (dpreview.com)

  • Figurative Furniture: 15 Designs With Life of Their Own

    [ By SA Rogers in Design & Furniture & Decor. ]

    anthropomorphic fleshy chair 2

    Does the human tendency to place a higher value on living things that resemble our own image even extend to furniture? You might think so from the range of anthropomorphic designs we’ve created for our own comfort and entertainment, especially when the objects are designed to mimic human contact. These creations seem like they could spring to life at any moment, bringing a sense of anticipation to an otherwise ordinary indoor setting.

    Companion Stools by Phillip Grass

    anthropomorphic companion stools 3

    anthropomorphic companion stools

    anthropomorphic companion stools 2

    Standing curiously or sitting in contemplation, Phillip Grass’ ‘Companion Stools’ stare back at us with a single oversized eyeball affixed to the wooden seat.

    Fleshy Seats That Smell Like Human Skin

    anthropomorphic body of skin

    Not only do these rounded skin-toned stools look like lumps of human flesh – they smell like it, too. Artist Gigi Barker’s A Body of Skin collection is made of silicone that matches the body’s temperature when you sit on it. Leather covers are infused with pheromones and aftershave to add to the effect.

    Nel & Maria Bedside Tables

    anthropomorphic nel maria

    anthropomorphic nel maria 2

    With hat-shaped lampshades and drawer holes resembling faces, ’Nel & Maria’ bring a little bit of abstracted anthropomorphism to your bedside. The straw hats are reminiscent of those found in the Portuguese region of Baixo Minho, the home of the designers at DAM.

    Man-Shaped Collection from Samal Design

    anthropomorphic man 1

    anthropomorphic man 2

    Designer Dzmitry Samal fuses realistically sculpted human bodies with lockers and tables for this strange series. The human legs definitely take up more space than average furniture designs, but most of the pieces are still surprisingly functional for all their dramatics.

    Free Hug Chair

    anthropomorphic free hug chair 1

    anthropomorphic free hug chair 2

    anthropomorphic free hug chair 3

    Somewhere between a living human and an oversized stuffed animal, the ‘Free Hugs’ chair is a soft fur-covered creation with extra-long arms made to wrap around you when you take a seat or provide cushioning on the floor.

    Next Page – Click Below to Read More:
    Figurative Furniture 15 Designs With Life Of Their Own

    Share on Facebook


    [ By SA Rogers in Design & Furniture & Decor. ]

    [ WebUrbanist | Archives | Galleries | Privacy | TOS ]


    WebUrbanist

  • Study finds that yes, you can take photos and enjoy an experience too

    As smartphone picture-taking has become ubiquitous, so has criticism of it. It’s become a common refrain to hear that taking pictures detracts from fully enjoying and experiencing an event, whwther that’s a concert or a papal visit. To be truly in the moment, you shouldn’t be taking photos.

    Depressing stuff, but a new study presents a different view, one that photographers would probably agree with: taking photos enhances enjoyment of experiences, rather than detracting from enjoyment.

    A previous and much-cited study looked at the effect of photo-taking on memory, and found that people taking photos of objects at a museum were more likely to forget what they’d seen than people who hadn’t taken photos. This new research focuses rather on enjoyment rather than recall. 

    According to lead author Kristin Diehl, ‘unlike checking your email or texting, […]  photo-taking actually directs you towards the experience’.

    The research mostly focuses on use of a simple camera for taking snapshots, both in real-life situations like a city bus tour, and simulated scenarios. Again and again, participants in the study who were directed to take photos reported higher enjoyment of the experience than those who could not take pictures. 

    Articles: Digital Photography Review (dpreview.com)

  • Raw capture coming to iPhone in iOS 10?

    An eagle-eyed Reddit user has spotted an important new iOS 10 feature that Apple slipped into its WWDC keynote yesterday: Raw image editing. The feature didn’t get a mention in the keynote speech itself, which instead focused on the addition of computer vision technology to sort photos more intelligently. Instead, the mention of Raw editing flashed on the screen behind SVP of Software Engineering Craig Federighi. 

    Apple’s news release for developers seems to suggest that Raw capture will also be offered with the update, which brings ‘more sophisticated control and monitoring of the entire [image] capture process […] including support for new features such as Live Photos and RAW format capture’.

    Many Android users have been enjoying Raw capture for some time now, so Apple would seem to be catching up. But the biggest news for photographers might be the ability to edit Raw files on an iPad Pro. iOS 10 is being offered in beta currently to developers, and will be released to the public this fall.

    Articles: Digital Photography Review (dpreview.com)

  • Affinity Photo for iPad early build showcased at Apple’s WWDC 2016

    At Apple’s Worldwide Developer’s Conference 2016, software maker Serif demonstrated an early build preview of its Affinity Photo for iPad software. Affinity Photo is a Photoshop alternative currently available for macOS with, as previously announced, a Windows version in the pipeline. This newly demonstrated version of Affinity Photo is designed specifically for the iPad, and brings with it the same features found on the desktop version.

    Though the company hasn’t formally detailed all of the iPad version’s functionality, the video does showcase a handful of features and capabilities, including a high level of performance enabling it to handle very high resolution photos, full 32-bit HDR editing, the ability to view and edit panoramas in a 360-degree view, and focus merging.

    ‘We’ve still got a load of work to do on [the iPad version],’ Serif stated, ‘but we thought you might like a peek.’ An anticipated release date was not provided. The company currently offers a macOS version for $ 49.99, while Windows users can sign up for access to a pending Windows beta release.

    Articles: Digital Photography Review (dpreview.com)

  • Panasonic introduces splash-proof Lumix G Leica Summilux 12mm F1.4

    $ (document).ready(function() { SampleGalleryV2({“containerId”:”embeddedSampleGallery_4269830725″,”galleryId”:”4269830725″,”isEmbeddedWidget”:true,”standalone”:false,”selectedImageIndex”:0,”startInCommentsView”:false,”isMobile”:false}) });

    Panasonic is introducing a new prime lens to the Micro Four Thirds family: the Lumix G Leica DG Summilux 12mm F1.4 ASPH. It will be the widest prime that company offers (not counting its 8mm fisheye) and provides an equivalent 24mm view on Micro Four Thirds bodies. Designed to withstand a little wear-and-tear in the form of splashes and dust, the 12mm F1.4 offers a dedicated ring to control its nine-bladed aperture.

    Its rugged build includes a metal mount, body and included lens hood. The lens uses inner focus drive and a stepping motor for quiet operation, and is made up of 15 elements in 12 groups. Pricing and availability information has yet to be announced.


    Press release:

    PANASONIC LUMIX G LEICA DG SUMMILUX 12mm, F1.4 ASPH Lens

    The H-X012 Micro Four Thirds Professional Wide Angle Mirrorless Lens

    NEWARK, NJ (July 1, 2016) – Panasonic unveiled a new LEICA DG SUMMILUX 12mm/F1.4 ASPH. (35 mm camera equivalent: 24 mm) digital interchangeable lens for Digital Single Lens Mirrorless camera based on the Micro Four Thirds standard. The new 12mm wide-angle lens enables photographers to capture beautiful group, event, and nature photography. It also allows indoor shooting in low lighting and produces an impressive, natural defocusing effect with its F1.4 aperture. In addition, the LEICA DG SUMMILUX 12mm/F1.4 ASPH. boasts a rugged, splash/dust-proof design (when combined with splash and dustproof LUMIX G Mirrorless camera models) to meet the needs of a wide-range of photographic situations.

    Integrating two aspherical lenses, two UED (Ultra Extra-Low Dispersion) lenses and an ED (Extra-Low Dispersion) lens, the lens system is comprised of 15 elements in 12 groups. The adoption of five special lenses makes it possible to meet the stringent LEICA standard for exceptional image quality with high resolution and minimum distortion. In general, flare is commonly seen around the periphery of a point source with many high-speed lenses when a large aperture is employed. However, the new LEICA DG SUMMILUX 12mm/F1.4 ASPH. achieves high resolution from the center of the image to the corners by suppressing this flare. Users can take advantage of this lens to shoot a brilliant night skies or night scenes containing illumination to capture true-to-life images with minimal blurring and distortion at the edges. The multi-coated lens elements also minimize ghosting and flaring.

    Incorporating an inner focus drive system and a stepping motor, the new LEICA DG SUMMILUX 12mm/F1.4 ASPH. is capable of smooth, silent operation together with the camera’s high-speed, high-precision contrast AF system for both photo and video recording. It is also compatible with the sensor drive at a maximum of 240 fps to take full advantage of cameras with high-speed AF. This stunning AF performance is excellent for recording 4K videos, where precise focusing is essential.

    The LEICA DG SUMMILUX 12mm/F1.4 ASPH. comes with an aperture ring for direct, intuitive aperture control. Nine blades give the aperture a rounded shape that produces an attractively smooth effect in out-of-focus areas when shooting at larger aperture settings. A highly reliable metal mount assures durability for repeated use. The lens mount, the barrel and the hood are all made of metal to provide a sleek, sophisticated design that matches the entire line-up of LUMIX G Digital Single Lens Mirrorless (DSLM) cameras.

    Panasonic Lumix G Leica DG Summilux 12mm F1.4 specifications

    Principal specifications
    Lens type Prime lens
    Max Format size FourThirds
    Focal length 12 mm
    Lens mount Micro Four Thirds
    Aperture
    Maximum aperture F1.4
    Minimum aperture F16
    Aperture ring Yes
    Number of diaphragm blades 9
    Optics
    Elements 15
    Groups 12
    Special elements / coatings 2 aspherical lenses, 1 ED lens, 2 UED lenses
    Focus
    Minimum focus 0.20 m (7.87)
    Maximum magnification 0.1×
    Autofocus Yes
    Motor type Stepper motor
    Full time manual Unknown
    Physical
    Weight 335 g (0.74 lb)
    Diameter 70 mm (2.76)
    Length 70 mm (2.76)
    Sealing Yes
    Filter thread 62.0 mm
    Hood supplied Yes

    Articles: Digital Photography Review (dpreview.com)

  • Hands-on with new Panasonic Leica Summilux 12mm F1.4 ASPH

    Hands-on: Panasonic Leica Summilux 12mm F1.4 ASPH

    Panasonic has just announced a new prime lens for Micro Four Thirds. The Lumix G Leica DG Summilux 12mm F1.4 ASPH is a metal-bodied prime that provides an equivalent focal length of 24mm in full-frame terms. We’ve got one in our hands, and we’ve got pictures to prove it! 

    Hands-on: Panasonic Leica Summilux 12mm F1.4 ASPH

    As you can see, the new 12mm prime is a fairly substantial lens, and at 335g it’s relatively heavy, too. Panasonic is touting its all-metal construction (which even extends to the detachable hood) and 15 glass elements also contribute substantially to the weight. A nine-bladed aperture should ensure both attractive bokeh and sunstars at smaller apertures. 

    Hands-on: Panasonic Leica Summilux 12mm F1.4 ASPH

    Of those 15 elements, two are ‘ultra’ extra-low dispersion glass, and one is regular extra-low dispersion. According to Panasonic, they should combine to provide very good edge-to-edge sharpness even at wide apertures, making this an ideal lens for astrophotography (among other things). The front filter ring has a diameter of 62mm. 

    Hands-on: Panasonic Leica Summilux 12mm F1.4 ASPH

    A manual aperture ring and wide, well-damped focus ring give a feeling of real quality to the new 12mm, and although it’s not a lightweight lens, handling is very nice on the Lumix DMC-GH4. Autofocus is handled by a stepping motor, which Panasonic claims is capable of keeping up with the 240 fps refresh rate of modern Panasonic M43 cameras’ sensor-based autofocus. 

    Hands-on: Panasonic Leica Summilux 12mm F1.4 ASPH

    When paired with a weather-sealed camera like the GH4, the 12mm F1.4 becomes relatively weather-resistant. Panasonic claims that this combination should be ‘splash and dust’ proof. 

    Hands-on: Panasonic Leica Summilux 12mm F1.4 ASPH

    It’s hard to make out in this image, but around the lens mount you’ll find the slimmest of rubber seals, to prevent moisture and dust from getting into the camera when the 12mm F1.4 is attached.

    Hands-on: Panasonic Leica Summilux 12mm F1.4 ASPH

    Here’s the included lenshood in all its glory. The Panasonic Leica Summilux 12mm F1.4 ASPH is the sixth Leica lens in Panasonic’s current M43 lineup – pricing and availability have yet to be announced, but we’ll keep you posted.

    Articles: Digital Photography Review (dpreview.com)

  • KitSplit is a peer-to-peer rental service for camera equipment

    KitSplit is a peer-to-peer rental network for camera gear and is best described as the ‘AirBnB’ of the camera world. Photographers who need equipment at a specific location are put in touch with owners who are willing to rent their gear out, while KitSplit takes care of vetting, insurance and the logistics. The company was founded about a year ago in New York by photographers who were unhappy with equipment rental options and by now has approximately 5000 members, both individuals and companies, and $ 40 million worth of equipment available to rent.

    The latter includes not only traditional cameras, but also drones and virtual reality gear. KitSplit says its services have been used by companies such as Condé Nast Entertainment, Hearst and NBC. After rapid growth in the New York area, KitSplit has now launched its first geographical expansion, to the Greater DC area, Philadelphia and Boston.

    Social sharing has taken off in recent years, especially in the accommodation and car rental sectors, so it only makes sense to apply the same principles to camera and imaging equipment. We’ll be interested how the company develops in the nearer future. More information about how KitSplit works can be found on the website.

    Would you use a service like Kitsplit? Let us know in the comments.

    Articles: Digital Photography Review (dpreview.com)

  • DxOMark Mobile Report added to our LG G5 review

    We have added DxOMark’s Mobile Report to our camera review of the LG G5. The report includes DxO Lab’s usual industrial-quality scientific measurements. Its imaging experts have analyzed 14 aspects of mobile imaging including detailed image quality assessment, flash performance, autofocus reliability and more to calculate a final score. Click below to read our LG G5 review and go to page 9 for the DxO Mark mobile report.

    Articles: Digital Photography Review (dpreview.com)

  • 3 Quick Tips for Photographing in the Harsh Midday Sun

    One of the most important elements of photography is light. So it’s only natural that as photographers, one of the most important skills to have under your belt is the understanding of different kinds of light, and how to SEE it before taking a single shot. Every photographic frame needs some sort of light but the intensity, direction, and quality is always in question.
    3 Quick Tips for Photographing in Harsh Midday Sun(1)

    For natural light or outdoor photographs, early morning sunlight (when the sun is low in the horizon and has a soft quality), or beautiful golden light of the setting sun is ideal. However this is not always practical, especially when dealing with clients. Firstly, not all clients are open to early morning or sunset photoshoots. Secondly, particularly in wedding photography, timing is not something the photographer has much control over. Many wedding ceremonies are scheduled outdoors at noon, when the sun is the highest in the sky, and the light is the harshest.

    As photographers we know that good quality light does wonders to an image, almost giving it an ethereal, magical look, but we cringe when we have to deal with harsh midday sun. Luckily there are a few tips and tricks to deal with this harsh light source, while still achieving beautiful images. In this article, my aim is to help explain some of these simple tips, using my newly purchased rose bushes that are waiting to be planted, and also prove that they will work for any subject, not just people!
    Memorable Jaunts Tips for photographing in the harsh midday sun-2-2

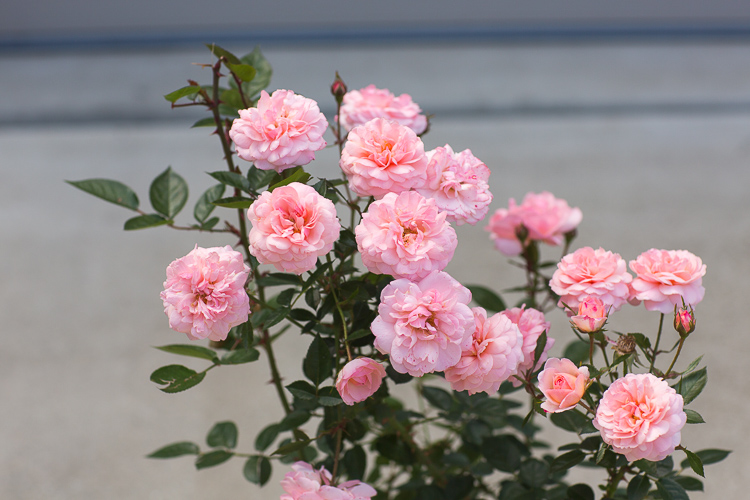
    Beautiful roses photographed at noon, under the shade cast by the front of my home.

    Please note – most of the images used in this article are SOOC (straight out of camera). I have applied minimal to no processing, because I want to show the direct results of shooting in harsh light, similar to what a photographer would experience, so as to fix as much as possible in camera, not via post-processing later.

    #1 Put the subject’s back to the sun – backlighting

    If there is no shade is available, and your only choice is to position your subject in full sun, an easy tip to follow is to position your subject with their back to the sun. This will help block most of the direct light from falling on their face, which causes them to squint their eyes. Instead, their face or the main part of the subject will be evenly shaded. This technique is called back lighting.

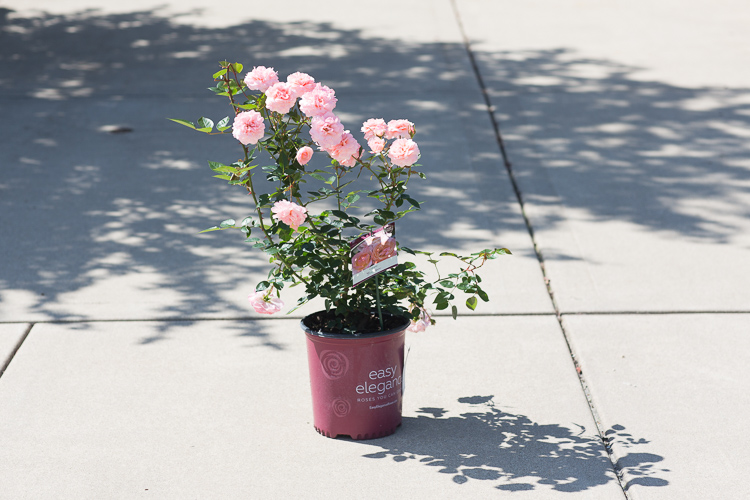
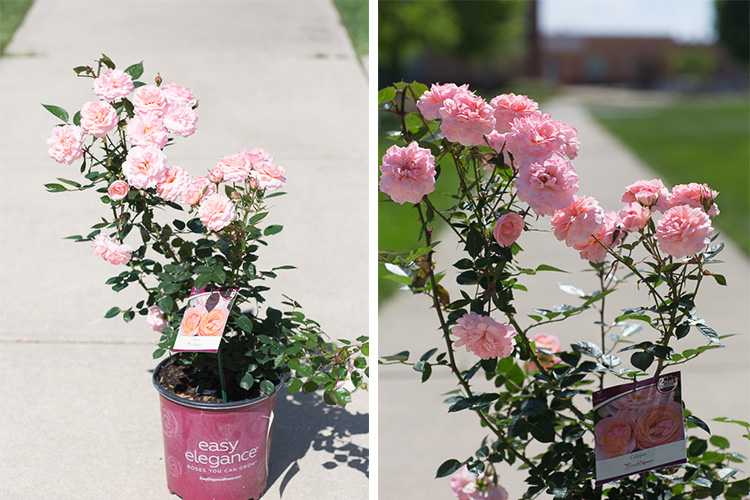
    As you can see, in the first image below, the roses are in full sun. To backlight them, I simply moved the plant so that the roses I wanted to photograph, had their backs to the sun. This is sometimes easier to do with one subject because you can position them perfectly, to make sure no sunspots are making their way onto their face. If you are dealing with two or more subjects, particularly people, then have their faces closer together or even have them turn their bodies slightly inward towards each other. This helps eliminate any harsh light spots on their face.

    Make sure to expose for the subjects’ faces or they will be too dark to see any detail. Something to note, is that when metering for the face in a situation like this, your background may be overexposed and may lose all the details, that’s okay.
    Memorable Jaunts Tips for photographing in the harsh midday sun-1

    Roses in full sun. You can see from the shadows that the sun was high in the sky, almost overhead at the time of these pictures.
    Memorable Jaunts Tips for photographing in the harsh midday sun-5

    Image on the left – Roses are facing the bright sun and almost appear washed out. Image on the right – Roses are in shadow and are darker when backlit.

    If you want to maintain detail in the background or sky in a backlighting situation, you should use a reflector to bounce some light back into the subject’s face. This eliminates the need to overexpose the background especially when metering for the face (or part of the subject in the shade). Depending on the strength of the reflector, and the position of the sun, you can even underexpose the image to retain more highlights in the background while evenly lighting the subject by way of the reflector.
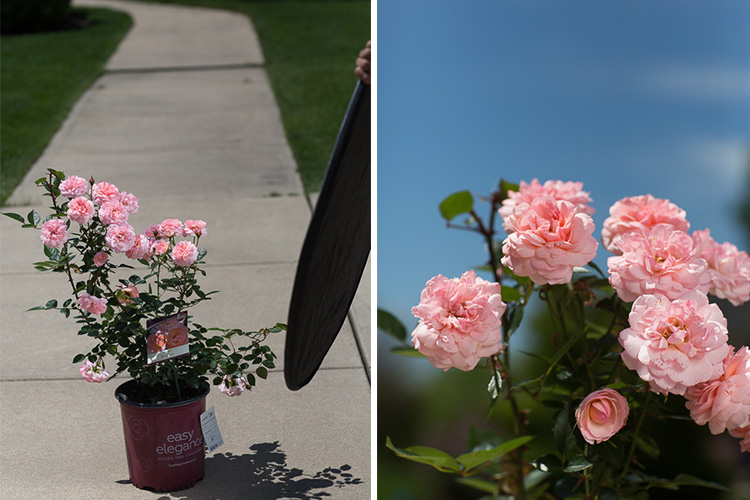
    Memorable Jaunts Tips for photographing in the harsh midday sun-7

    Left: A reflector with the silver side facing the roses is used to add more directional light on the flowers. Right: A close-up picture of the roses, slightly underexposed to maintain the clear blue in the sky, the light from the reflector is adding the pop of light on the flowers.

    #2 Open shade or even lighting

    The best way to avoid distracting facial shadows from midday lighting, is to bring your subjects into a shaded area. Shade can be provided by a large tree, an open garage, a building, an awning, or anything that casts a big enough shadow to cover your subject. The benefit of shade is that it creates even lighting where no direct sun is hitting the face or body, allowing the subject to be evenly lit. The key is to place your subject at the very edge of the shade, so that while they are evenly lit there is still enough light to illuminate them. If you place your subject in the darkest part of the shade, the light hitting them may be lost. Also make sure you are not using patchy shade, especially when subject is placed under a tree. This can cast what is called dappled light on your subject, causing uneven spots of light on their face and body.
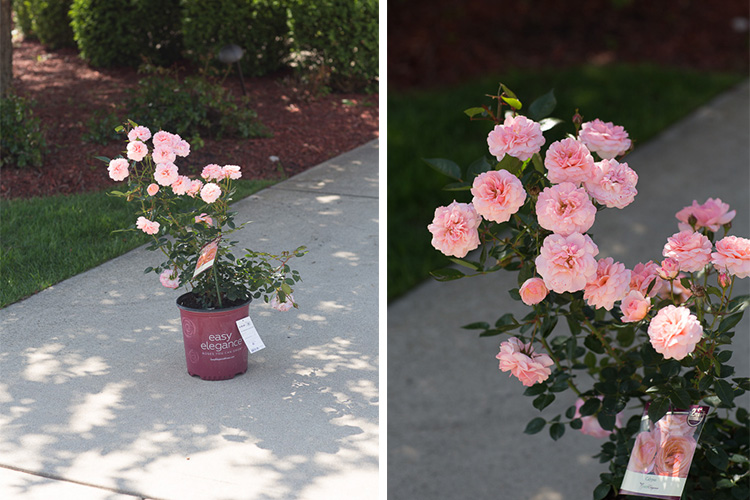
    Memorable Jaunts Tips for photographing in the harsh midday sun-8

    Left: Rose bush under the shade of a tree. Right: An example of dappled lighting on the roses. Notice how some roses are in the sun, while other are in the shade. This type of uneven lighting can cause undesired hot spots, especially on skin and hair.
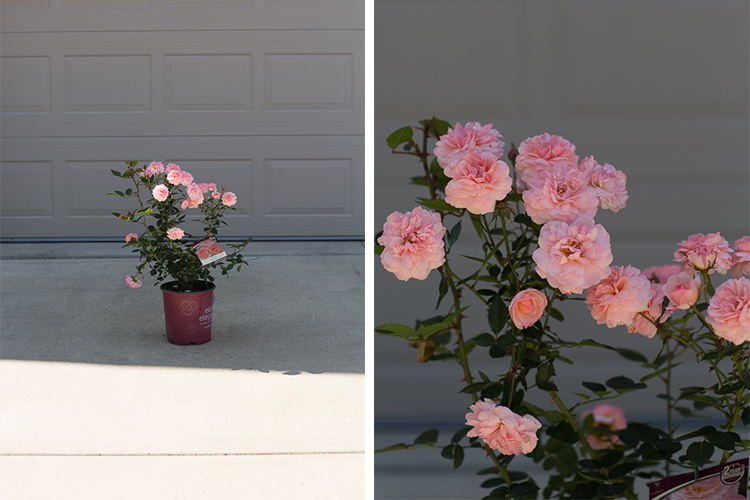
    Memorable Jaunts Tips for photographing in the harsh midday sun-10

    Left: Rose bush at the edge of the shadow cast by the front of the house. This type of open shade is more even and uniform. Right: Close-up of the roses in the shade.
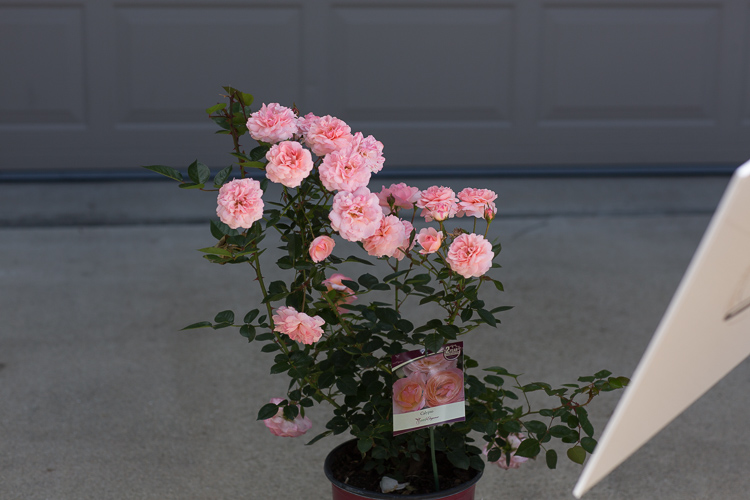
    Memorable Jaunts Tips for photographing in the harsh midday sun-11

    A simple white foam core board was used to add a little pop of reflected, directional light, onto the roses in the shade.

    #3 Full sun with a diffuser

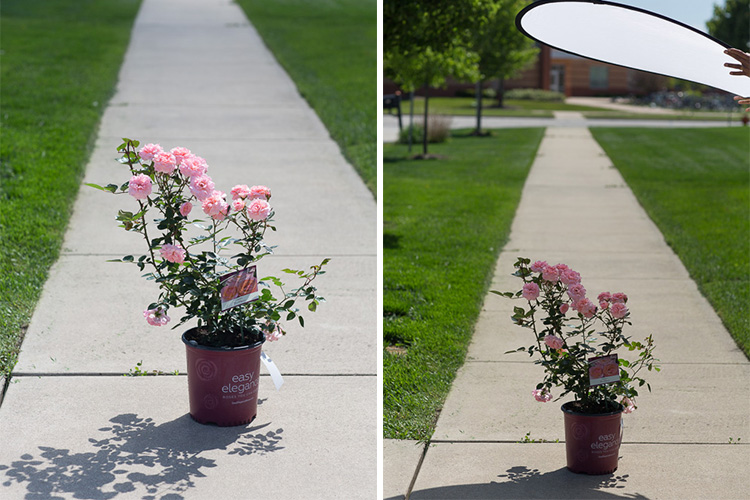
    If all else fails, and you have no other alternative but to place your subject in the full, harsh sunlight, either because of location restrictions, or time of day limitations, then using a diffuser (translucent panel of your reflector) might be the next best option.

    A diffuser takes in the harsh sunlight and spreads it evenly over your subjects. This also gives your subject some respite from the harsh sun, and casts a shadow on them so they are not squinting into the sun. In the simplest form a diffuser can be a piece of translucent white fabric (like a bedsheet). Of course, this does assume that you have an extra pair of helping hands to hold up the diffuser, when you’re shooting on location. I have been known to solicit the help of strangers, to help hold the diffuser for a quick minute or so while I take the shot – be resourceful!
    Memorable Jaunts Tips for photographing in the harsh midday sun-16

    Left: Roses in full sun. Right: A simple diffuser panel that casts even, soft light onto the flowers

    Memorable Jaunts Tips for photographing in the harsh midday sun-15

    Close-up of the roses with diffused lighting for a more even tone and color under harsh midday sun.

    So the next time you have a client wanting to shoot in the middle of the day, don’t hyperventilate and come up with excuses to avoid the situation. Instead take up the challenge and try these techniques. If nothing else, it will make you more confident as a photographer, and also help you understand light a bit better.

    For more reading check out: Portrait Photography: How to Photograph People in the Harsh Midday Sun or 5 Ways to Create Dramatic Landscape Photos at Midday.

    What other tips do you have for photographing in the harsh midday sun? Please share in the comments below.

    googletag.cmd.push(function() {
    tablet_slots.push( googletag.defineSlot( “/1005424/_dPSv4_tab-all-article-bottom_(300×250)”, [300, 250], “pb-ad-78623” ).addService( googletag.pubads() ) ); } );

    googletag.cmd.push(function() {
    mobile_slots.push( googletag.defineSlot( “/1005424/_dPSv4_mob-all-article-bottom_(300×250)”, [300, 250], “pb-ad-78158” ).addService( googletag.pubads() ) ); } );

    The post 3 Quick Tips for Photographing in the Harsh Midday Sun by Karthika Gupta appeared first on Digital Photography School.


    Digital Photography School
