Blog

  • Scrubbed: 12 Washed Up & Washed Out Abandoned Bathhouses

    [ By Steve in Abandoned Places & Architecture. ]

    abandoned-bathhouses-0
    Public baths may have a checkered history and a not-so-squeaky-clean image but these dozen abandoned bathhouses prove things aren’t always cut & dried.

    abandoned-bathhouses-1a

    abandoned-bathhouses-1b

    abandoned-bathhouses-1c

    What have the Romans ever done for us? Anyone? Bueller? Well, apart from better sanitation and medicine and education and irrigation and public health and roads and a freshwater system and, of course, the aqueduct, those toga-wearing empire builders introduced the public bathhouse to western civilization.

    abandoned-bathhouses-1d

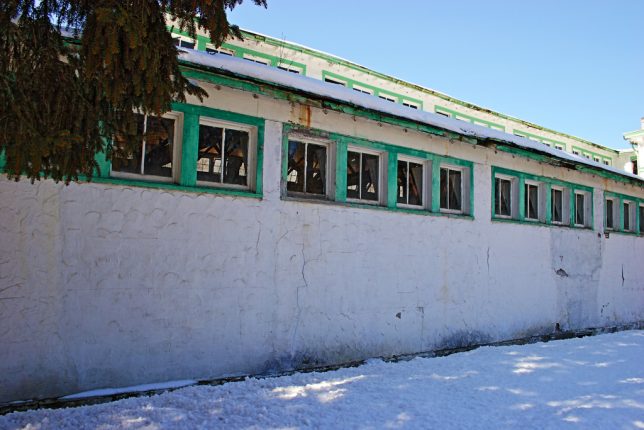
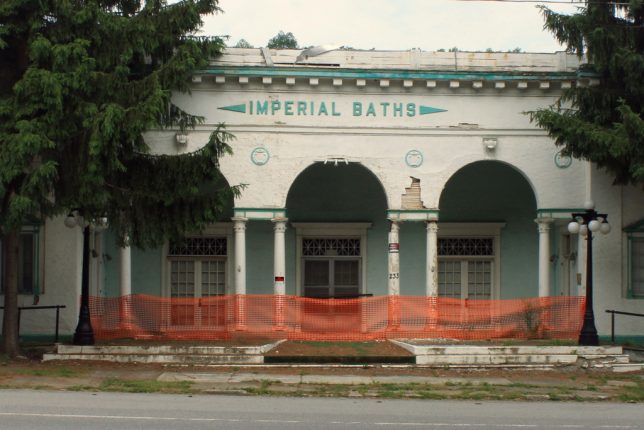
    That noble heritage is referenced in the name of the abandoned Imperial Baths in Sharon Springs, NY., and while the historic spa village itself is enjoying somewhat of a revival, it comes too late for this and other grandiose bathhouses. Kudos to Flickr users Paul (fotofish64) and Mark Barnette, who scouted out the former upstate New York getaway in March of 2009 and June of 2013 respectively.

    Zans Clothing Optional abandoned-bathhouses-2a

    The ancient Romans may have raised the bar when it came to public baths but by no means did they have a monopoly on group bathing. Take the exotic and stylish abandoned bathhouse above, gently deteriorating for who knows how many years in the wilds of Zanzibar, an island in the Indian Ocean off the east coast of Tanzania. Flickr user Arlo Midgett (acmidgett) snapped the “Abandoned Persian bathhouse” in early January, 2013.

    Michigan Ragged

    abandoned-bathhouses-3f

    abandoned-bathhouses-3e

    abandoned-bathhouses-3d

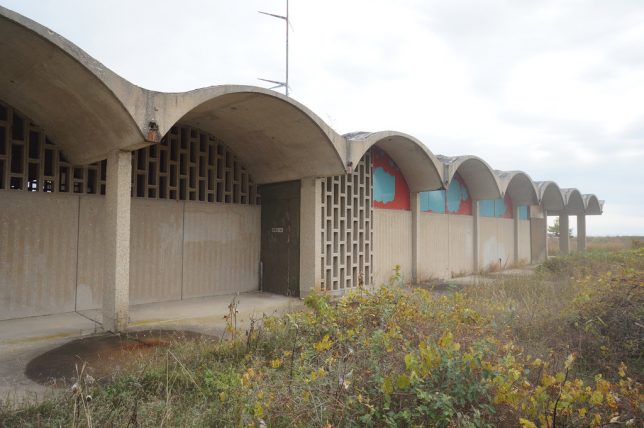
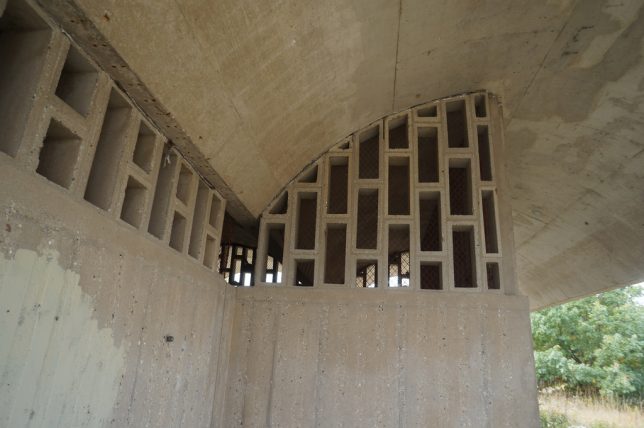
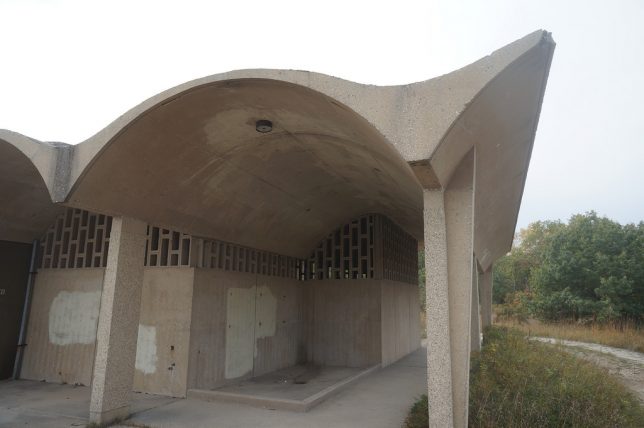
    So swimming in Lake Michigan was a thing, and not just for unlucky stiffs whacked by the mob. This abandoned bathhouse in Illinois Beach State Park shows off some impressive mid-century modern style that still looks great after years of abandonment.

    abandoned-bathhouses-3b

    abandoned-bathhouses-3g

    abandoned-bathhouses-3c

    abandoned-bathhouses-3a

    Flickr user Eli Naeher (enn-here) visited the empty edifice in late October of 2013 to take these slightly eerie (oops, wrong lake!) images. Nice to know the state parks & rec folks are into graffiti remediation and care enough to advise park-goers of the chance of random asbestos.

    Next Page – Click Below to Read More:
    Scrubbed 12 Washed Up Washed Out Abandoned Bathhouses

    Share on Facebook


    [ By Steve in Abandoned Places & Architecture. ]

    [ WebUrbanist | Archives | Galleries | Privacy | TOS ]


    WebUrbanist

  • Mystery science theater: A look inside the Samsung NX3000

    A peek inside the Samsung NX3000

    When it was introduced in May 2014, the Samsung NX3000 didn’t exactly make waves in the camera industry. But it did provide an attractive 20MP sensor, articulated 3″ LCD and plenty of connectivity for a reasonable $ 520 all wrapped up in a super slim rangefinder-style ILC. Being curious about these kinds of things, we wanted to see how Samsung managed to wedge all of that tech into such a slender frame, and thanks to iFixit we can sit back at a safe distance and see how it’s made.

    A peek inside the Samsung NX3000

    Before proceeding with the disassembly, the camera battery must be taken out.

    A peek inside the Samsung NX3000

    If iFixit’s disassembly guides have taught us anything, it’s that cameras are held together with a metric ton of tiny screws. Not surprisingly, there are considerably fewer on the NX3000. Disassembly of the lens mount starts with the removal of four 7.3mm Phillips screws.

    A peek inside the Samsung NX3000

    With a few screws on the bottom, sides and hotshoe removed, the back panel can be eased away from the body…

    A peek inside the Samsung NX3000

    …And with a ribbon cable disconnected, the panel can be completely removed to reveal a cool blue motherboard.

    A peek inside the Samsung NX3000

    A pair of tweezers can be used to pluck the tripod mount right out of the camera.

    A peek inside the Samsung NX3000

    There are several ribbon cables to be removed before the sensor is free, but we think this is the coolest looking one.

    A peek inside the Samsung NX3000

    …And here’s the sensor module.

    A peek inside the Samsung NX3000

    With a couple more ribbon cables removed, the motherboard is ready to go too.

    A peek inside the Samsung NX3000

    The top panel can be freed with only a few more pieces to go.

    A peek inside the Samsung NX3000

    The button panel is one of the last pieces to be removed from the shell of the camera, also a striking blue color.

    A peek inside the Samsung NX3000

    And there you have it, the Samsung NX3000 inside and out.

    Articles: Digital Photography Review (dpreview.com)

  • 8 Things to Consider Before You Buy Your Next Lens

    How to buy a camera lens

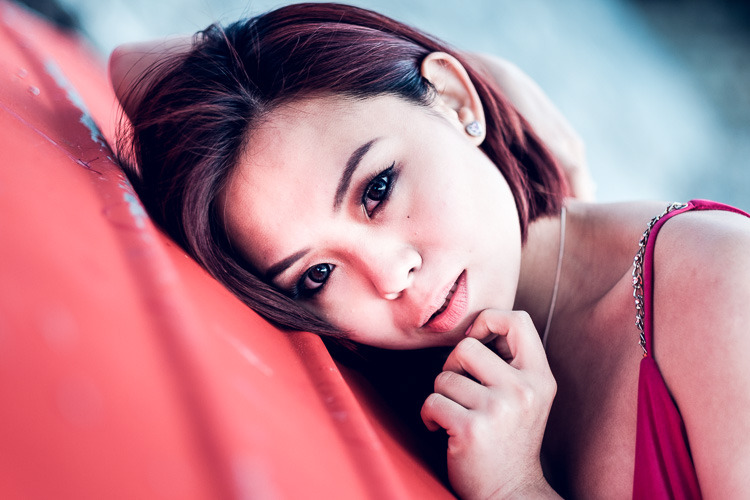
    Prime lenses are best for creating portraits like this one, taken with the aperture set to f/1.2 to blur the background.

    Are you thinking of buying a new lens for your camera? Stop, and read this article first.

    One of the hardest things to achieve when buying new camera gear is clarity. Why do you need a new lens, how much should you spend, and where does it fit into the big picture of your gear acquisition? Once you are clear on these points, it makes the process of deciding which lens (or lenses) to buy next much easier.

    Let’s look at eight things to consider before you buy that new lens:

    1. Budget – how much do you have to spend?

    Everybody’s budget is different, and the amount of money you have to spend determines which lenses come into consideration. But, no matter what your budget, hold that figure in mind while you read this article. You may see things in a different light afterward.

    My approach is to own as few, good quality lenses as possible. In other words – don’t over buy. Keep the big picture in mind. What lenses would you eventually like to own for your camera? How does your next purchase fit into this plan? Ideally, you should have a good idea of which lenses you need, and then you can plan accordingly.

    This type of thinking can lead to a big shift in what lenses you decide to buy. For example, a few years ago I became frustrated with the size and weight of my Canon system. I was also thinking ahead to some travel plans I had coming up, and realized it was important to keep my kit as lightweight as possible (hand luggage allowances are very low and strictly enforced in New Zealand airports). That led to the decision to switch to the Fujifilm X-Series system. I now have the lightweight kit required for traveling.

    2. APS-C or Full-frame?

    Most manufacturers offer both APS-C and full-frame cameras in their ranges. But this makes buying lenses even more confusing.

    Let’s say you own an APS-C camera. But at the back of your mind you think you might one day buy a full-frame body. That raises the question – do you buy a lens that works on APS-C bodies only (the advantage being that it is probably smaller and lighter than a lens that would fit a full-frame camera) or one that fits a full-frame body as well (which will probably be larger and more expensive)?

    Tricky question to answer, isn’t it? And that’s not even taking into account the difference that sensor makes to the lens’s angle of view.

    Ideally, you should decide when you buy your first camera body whether it should be APS-C or full-frame, then stick to the same sensor size in the future. It greatly simplifies the lens buying process, and eliminates a lot of confusion.
    How to buy a camera lens

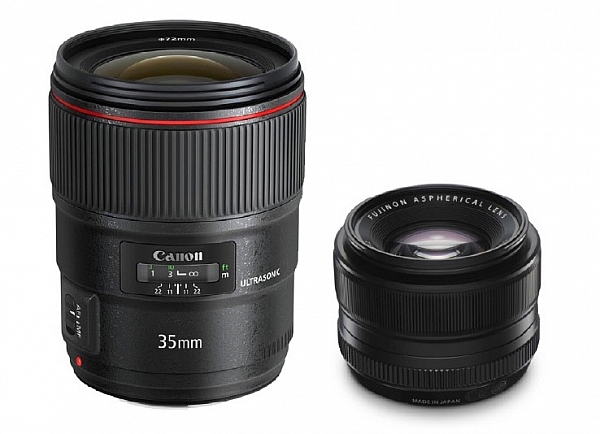
    What do these two lenses have in common? They are both 35mm f/1.4 lenses. The Canon one (left) is much bigger than the Fujifilm lens (right) because it is made to fit a full-frame camera. This is a good example of how sensor size, affects lens size.

    3. Don’t fall into the focal length trap

    The focal length trap is the belief that you need zoom lenses that cover every conceivable focal length. For example, if you start off with an 18-55mm kit lens, then buy a telephoto zoom, you might feel that you need one that starts from 55mm so that you don’t miss out on any focal lengths in between.

    This simply is not true. The next point explains the way you should be thinking about lenses.

    4. What subjects are you going to photograph?

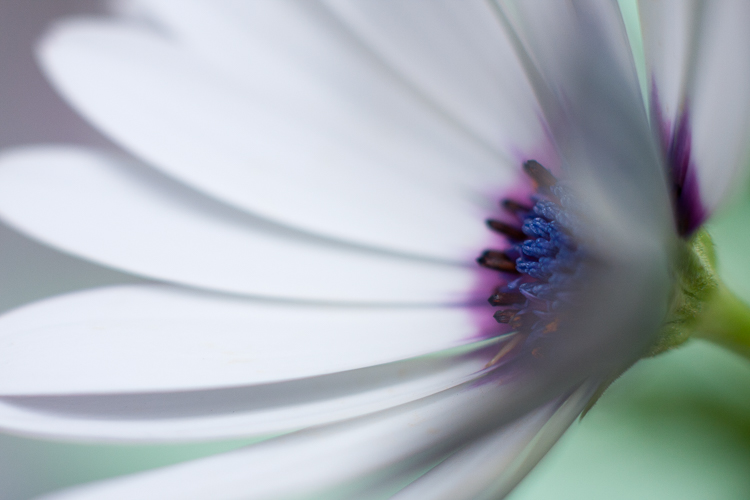
    Continuing with the 18-55mm kit lens example, you may find yourself considering the following second lenses: a 50mm prime as a portrait lens (giving you the benefit of high quality imaging and wide apertures), or a macro lens for taking close-up photos of insects and flowers, or wide-angle zoom for landscape photography, or a super-telephoto for wildlife and sports photography.

    The key point here is that lens choice is related to subject. The subject always comes first. Once you know what you are going to photograph, you can choose the best lens (or lenses) for the job. Focal length is a secondary consideration.

    In other words, don’t buy a lens because you think you should own it, buy it because you actually need it.
    How to buy a camera lens

    5. Should you buy a zoom or a prime lens?

    The benefit of zoom lenses is convenience. If you are a wedding photographer it is much easier to zoom from a wide-angle to a telephoto when you need to, than it is to change lenses. If you are a landscape photographer it is easier to use a wide-angle zoom to frame the scene precisely, than it is to change prime lenses (or it may not be possible to stand where you need to get the shot).

    The benefits of prime lenses are image quality and wider apertures. Compare an 18-55mm kit lens (typical maximum aperture f/5.6) with a 50mm prime with maximum aperture of f/1.4. There’s a four stop difference 16 times more light) between f/1.4 and f5.6, which helps you take photos with blurred backgrounds, and also to shoot in low light conditions, without raising the ISO too much. That’s why a 50mm prime is a better portrait lens than the 18-55mm kit lens (taking us back to the point about lens choice being driven by subject, not focal length).

    Some photographers prefer primes, others zooms – thinking about your priorities will help you decide which is best for you.

    For example, if you are a landscape photographer who always shoots at f/8, f/11, or f/16 then the wider apertures that prime lenses have are of little use to you, and a zoom may be a better choice.
    How to buy a camera lens

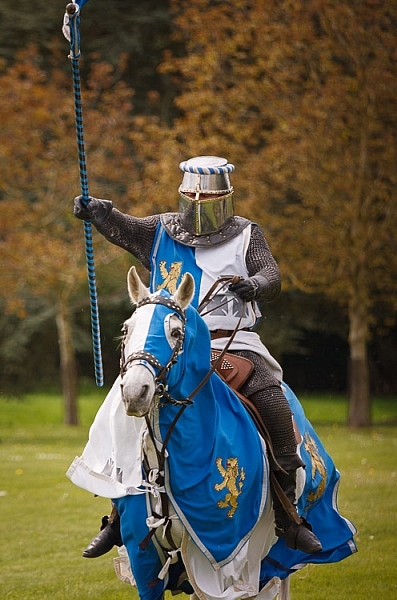
    Action photos require a telephoto lens and a camera with a good autofocus system capable of tracking moving subjects. A zoom will help you frame the subject accurately.

    6. Don’t forget about weight and size

    Think about the weight and size of your lenses carefully. After all, you are the one who is going to be carrying them around.

    But there is another thing you should also think about when it comes to size, and that is filters. You can save a lot of money on filters by buying smaller lenses. If you’re curious to see how much, do a search for circular polarizing filters and compare the prices of the same filter in 58mm and 77mm sizes. If you need to buy a lot of filters (landscape photographers take note) then you can potentially save hundreds of dollars by buying a smaller (the diameter of the lens or filter size is also smaller) lens.
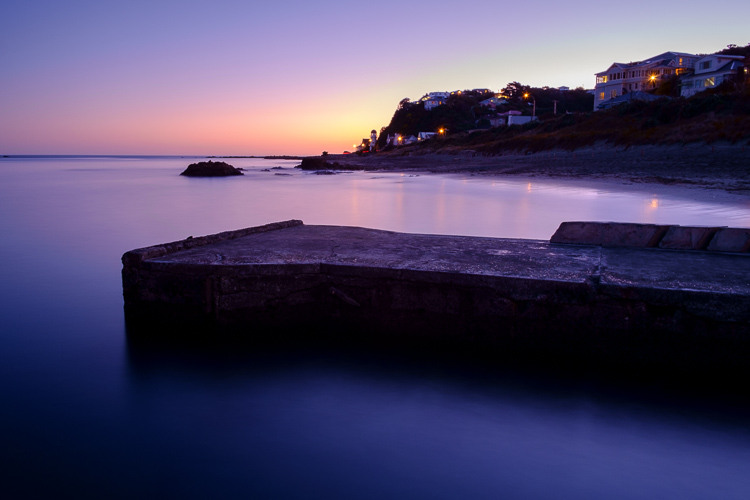
    How to buy a camera lens

    Wide-angle zooms are ideal for landscape photos and will help you take photos like this. Bear in mind that smaller lenses also require smaller (and less expensive) filters.

    7. Build quality, weather proofing and autofocus

    Most manufacturers have inexpensive, middle range, and expensive or high end lenses. Inexpensive lenses may seem like a bargain at the time, but they won’t be built as well as more expensive ones, and they may also have inferior (i.e. slower and noisier) autofocus motors.

    At the other end of the scale expensive lenses tend to be built well, use good quality autofocus lenses (i.e. faster and quicker) and may also be weatherproofed (important if you take photos in bad weather or dusty conditions).

    Bear these points in mind when considering a lens. Don’t forget to ask how well the lens is built, whether it is weatherproofed, and the speed and quality of the autofocus motor.
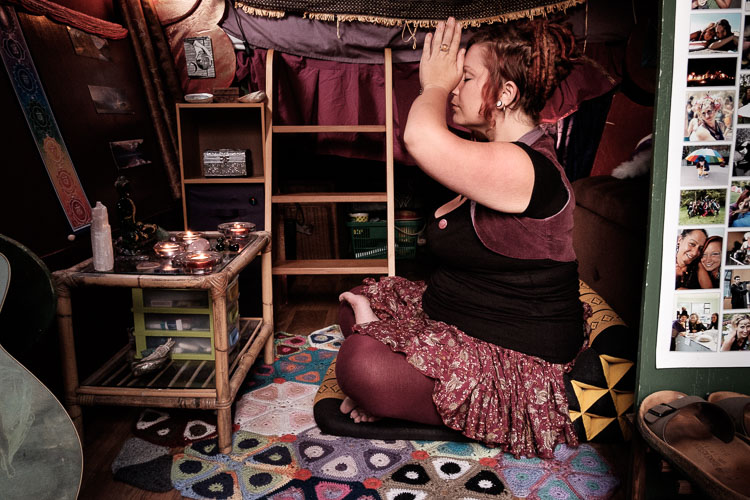
    How to buy a camera lens

    Wide-angle lenses are also helpful for taking photos indoors, where you may not have space to move back to use a longer focal length.

    8. Brand name or third party?

    You can often save money by buying a third-party lens for your camera, but in my opinion it is best to buy a lens made by your camera’s manufacturer whenever possible. Unless you have a specific reason to buy a third-party lens (usually because the type of lens you need isn’t made by your camera’s manufacturer) then stick with OEM (Original Equipment Manufacturer) lenses. They hold their value better, and autofocus performance is usually superior.

    Editor’s note: for a good discussion on that topic, head to: Brand Name Versus Third-Party Photography Gear: Which is better?

    How to buy a camera lens

    If street and candid photography is your thing, then consider buying smaller lenses to help you take photos like this, without being noticed.

    9. Image Stabilization*

    An Image Stabilizer is a motor inside the lens, that moves the elements in a way that compensates for the movement created by camera shake. It is given different names by different manufacturers (Nikon, for example, calls it Vibration Reduction). It helps you take photos in low light, using lower ISO settings or smaller apertures, than would otherwise be possible. Lenses with Image Stabilization cost more than their non-stabilized counterparts, so think carefully about whether or not you need it, before paying the extra money.

    * Some manufacturers, like Sony and Pentax, build Image Stabilization into the camera body, not the lenses.

    Hopefully these points will help you decide which lens to buy next for your camera. If you have any questions about lenses let us know in the comments and I will do my best to answer.


    Mastering Lenses

    If you want to know more about buying and using lenses then please check out my ebook Mastering Lenses: A Photographer’s Guide to Creating Beautiful Photos With Any Lens.

    googletag.cmd.push(function() {
    tablet_slots.push( googletag.defineSlot( “/1005424/_dPSv4_tab-all-article-bottom_(300×250)”, [300, 250], “pb-ad-78623” ).addService( googletag.pubads() ) ); } );

    googletag.cmd.push(function() {
    mobile_slots.push( googletag.defineSlot( “/1005424/_dPSv4_mob-all-article-bottom_(300×250)”, [300, 250], “pb-ad-78158” ).addService( googletag.pubads() ) ); } );

    The post 8 Things to Consider Before You Buy Your Next Lens by Andrew S. Gibson appeared first on Digital Photography School.


    Digital Photography School
  • The Winner of $1000 from our 101 Landscape Lightroom Presets Competition is….

    Recently we launched 101 Landscape Lightroom Presets product. As part of the launch we put everyone who purchased a copy into the draw to win $ 1000 in camera gear. Those who purchased the bundle (101 Lightroom Presets and 101 Landscape Lightroom Presets) received 2 entries.

    The winner of this competition is Terrence Jones

    Congratulations – we’ve just emailed you with details of how we’ll get you your prize and can’t wait to see what you buy!

    landscape-lightroom-presets

    Thanks everyone else for picking up a copy of the the presets packs – we’ve received some amazing feedback and appreciate you supporting dPS with your purchase.

    googletag.cmd.push(function() {
    tablet_slots.push( googletag.defineSlot( “/1005424/_dPSv4_tab-all-article-bottom_(300×250)”, [300, 250], “pb-ad-78623” ).addService( googletag.pubads() ) ); } );

    googletag.cmd.push(function() {
    mobile_slots.push( googletag.defineSlot( “/1005424/_dPSv4_mob-all-article-bottom_(300×250)”, [300, 250], “pb-ad-78158” ).addService( googletag.pubads() ) ); } );

    The post The Winner of $ 1000 from our 101 Landscape Lightroom Presets Competition is…. by Darlene Hildebrandt appeared first on Digital Photography School.


    Digital Photography School

  • How to Enhance Urban Night Photographs Using Luminosity Masks in Photoshop

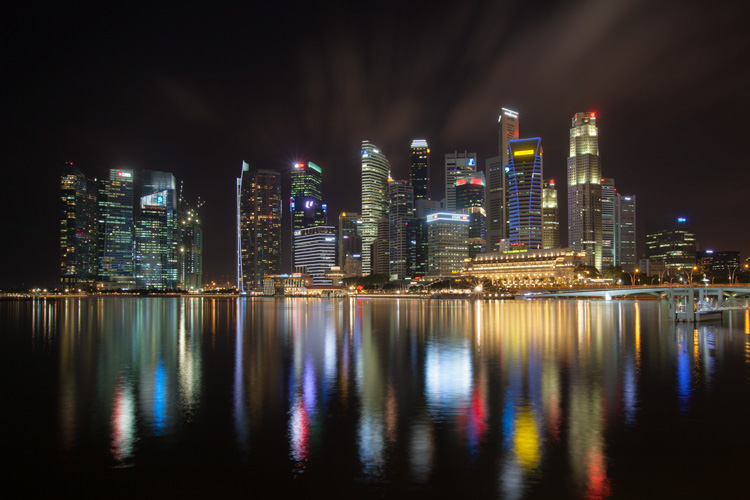
    As the sun sets on a city’s skyline, thousands of lights come flooding the concrete jungle, turning every urban scene into a photographer’s paradise. Every corner around the city suddenly seems too irresistible not to be photographed.

    Image 01

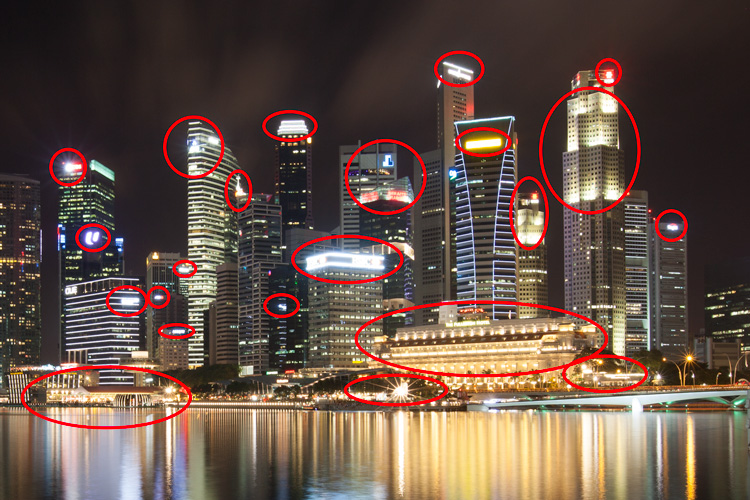
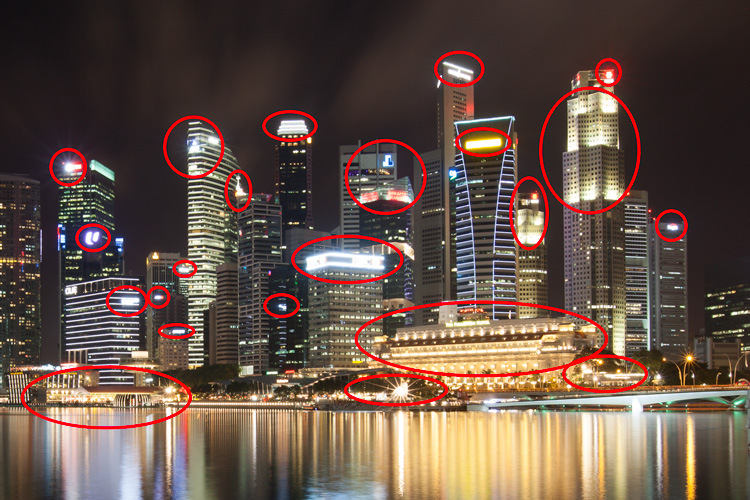
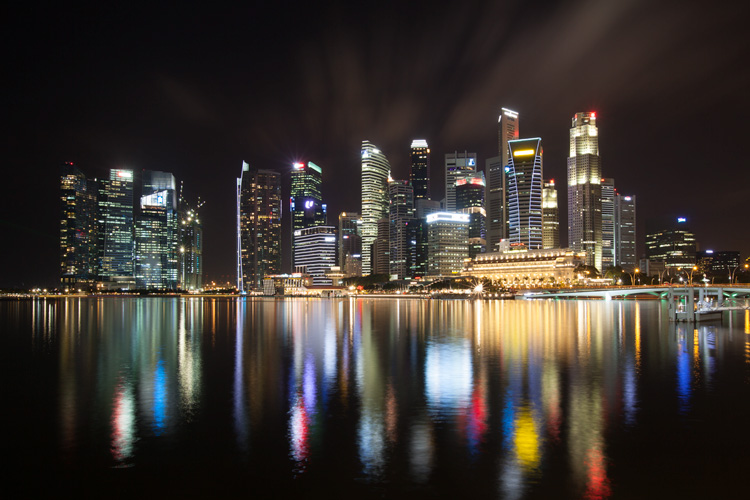
    Urban night shots is probably one of the most common photos taken at night. The way most people shoot cityscapes at night is to keep the camera still, press the trigger, and snap the shot. The result is often an uninspired image, with overexposed highlights due to the long exposure. This problem can be fixed by blending multiple exposures, to recover details in the highlights with luminosity masks.

    Image 02

    Overexposure of highlights circles in red.

    Using Luminosity Masks is a way of making a selection based on the luminosity (or brightness) value of the pixels. The main advantage of luminosity masks over other selection tools is its ability to feather the edges, which makes the transition seamless. One of the earliest articles detailing how luminosity masks works was published by Tony Kuyper. You can learn more about luminosity masks here.

    In this tutorial, I will show you step by step, how you can recover detail in the highlights of your urban night shots, using luminosity masks in Photoshop. There are two parts to this: taking the multiple exposure, and editing them in Photoshop with luminosity masks.

    Part one: How to take multiple exposures

    • Step 1: You need a tripod, and a camera that has aperture priority and manual mode.
    • Step 2: Mount your camera on the tripod and compose your image. In aperture priority mode, set the aperture and ISO settings you want, and take a shot with the default metering mode (usually matrix metering).
    • Step 3: Review the image on the LCD screen and take note of the shutter speed. Switch your camera to manual mode and dial in the ISO, aperture, and shutter speed that you used for the first shot.
    • Step 4: Speed up your shutter speed by one stop and take a shot again. For example, if the initial shutter speed was 30 seconds, stopping up by one stop would be 15 seconds (the shutter speed halves).
    • Step 5: Repeat step 4 until you can see details in the highlights by zooming in on the LCD screen on your camera, and checking the histogram for clipped highlights (blinks).

    Tip: Use a remote release and/or enable mirror lockup (in a DSLR) to ensure the sharpness of your photos.

    Part two: Recovering the highlights using luminosity masks in Photoshop

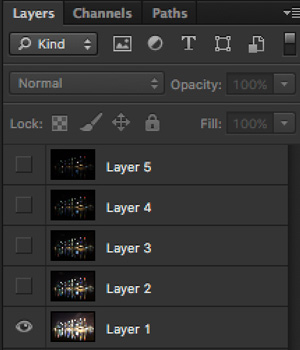
    Step 1: If you use Adobe Lightroom, select all the images you want to blend. Right click on the mouse, choose Edit in > Open as layers in Photoshop. Otherwise, you can open them individually in Photoshop, use the move tool and drag each image into a single file as layers.

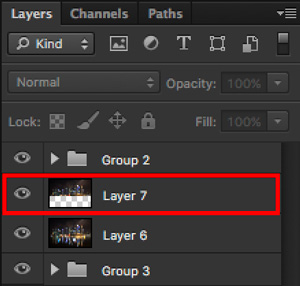
    Step 2: Make sure the images are arranged such that the brightest exposure is at the bottom of the layers. To make sure all images are absolutely aligned, select all layers, then go to Edit > Auto-Align Layers. You may have to crop the image a bit after alignment.

    Image 03

    The layers are arranged so that the brightest image is at the bottom.

    Step 3: Make sure you have luminosity masks Photoshop Actions to add and remove luminosity masks. If you don’t, you can download it here (the file is zipped, so make sure you unzip it first, then follow the instruction on how to install it here).

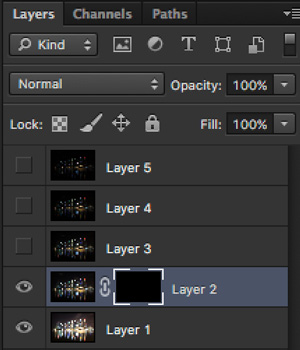
    Step 4: To start off, make all layers invisible except the bottom two (layer 1 and 2). You can do so by unchecking the eye icon next to each layer. Next, create a mask for Layer 2 and fill it with black.

    Image 04

    Step 4: Next, generate luminosity masks based on Layer 1 (the brightest exposure). To do that, select Layer 1 on the layers panel, and generate the luminosity mask with the Photoshop Action.

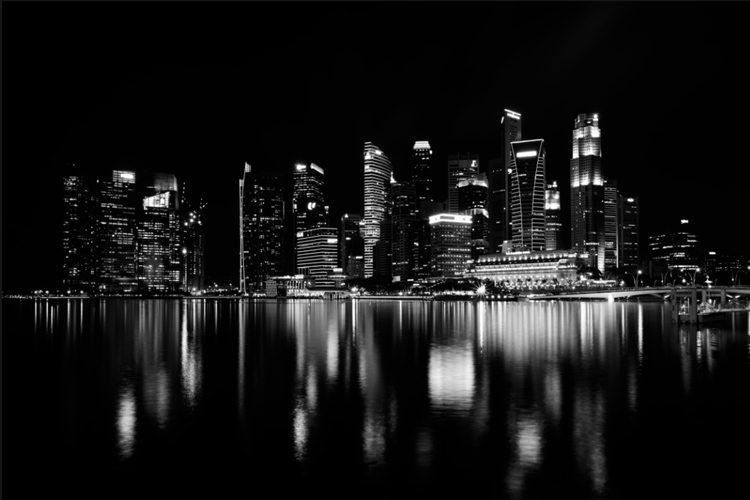
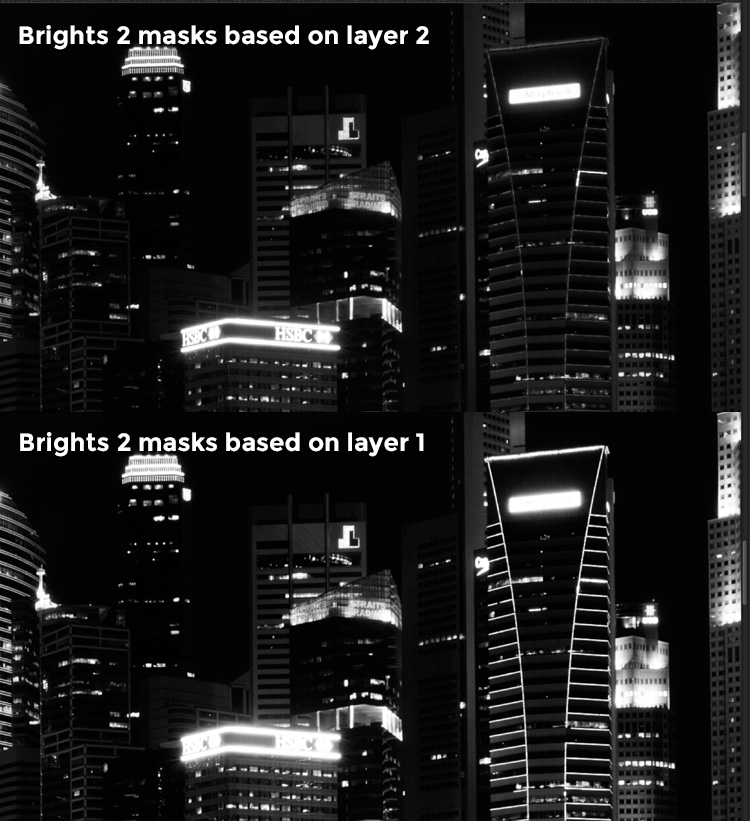
    Step 5: Go to Channels panel, select a Brights luminosity mask that targets just the highlights. In this case, Brights 2 seems like a good choice because it is not too restrictive and has good feathering on the edges.

    Image 05

    Step 6: Select Brights 2 luminosity mask by holding down CMD (Mac) or CTRL (Win) and left click on the mask. You should see marching ants appear on the image. Depending on your image, if you do see a pop-up window that says “Warning: No pixels are more than 50% selected…”, don’t worry about it and just click ok.

    Step 7: Go back to the layers panel and click on the mask on layer 2. Select the brush tool, set the opacity to 50%, color to white, and paint over the layer mask to blend the darker exposure (Layer 2) into the brighter exposure (Layer 1 below). Depending on your image, you can choose to paint just the brightest highlights or all of them. In this example, I chose to paint all the highlights. If you find the marching ants annoying, hit CMD (Mac) or CTRL (Win) + H key to hide them.

    Image 06

    Details in the highlights are gradually recovered.

    Step 8: Delete the luminosity masks generated previously because you now need luminosity masks based on the brightness of Layer 2, where you have just blended in the darker exposure. To do so, remove the current luminosity masks with the Photoshop Action.

    Step 9: Now select Layer 2 and generate luminosity masks with the Photoshop Action.

    Step 10: Select Layer 3, add a layer mask, and fill it with black.

    Step 11: Go to the Channels panel, select a brights mask that targets the highlights. In most cases, selecting the same mask should do the job. In this example, I have chosen the Brights 2 mask again.

    Image 07

    Comparison of Brights mask for Layer 1 and Layer 2.

    Step 12: Hold down CMD (Mac) or CTRL (Win) and click on Brights 2 mask to select once again. Go back to layers panel and click the mask on Layer 3, then use a white brush as before, and paint over the highlights again. You should see details being recovered gradually. At this stage, you should consider painting over the brightest highlights only instead of the whole image. In this example, I only painted the highlights as circles in the illustration below.

    Image 02

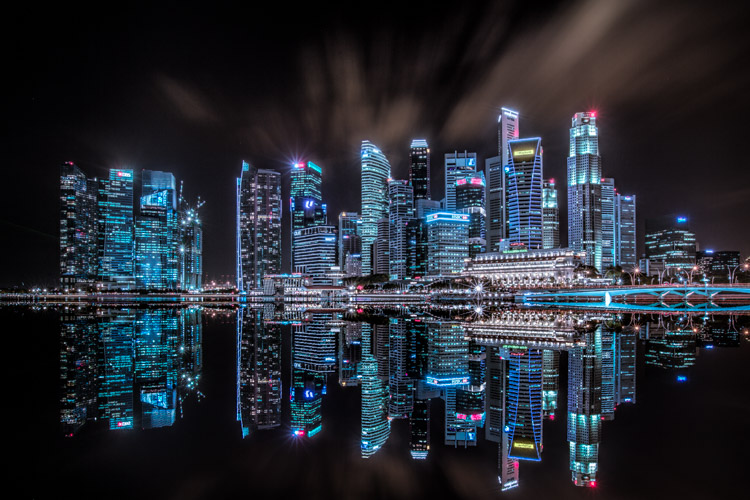
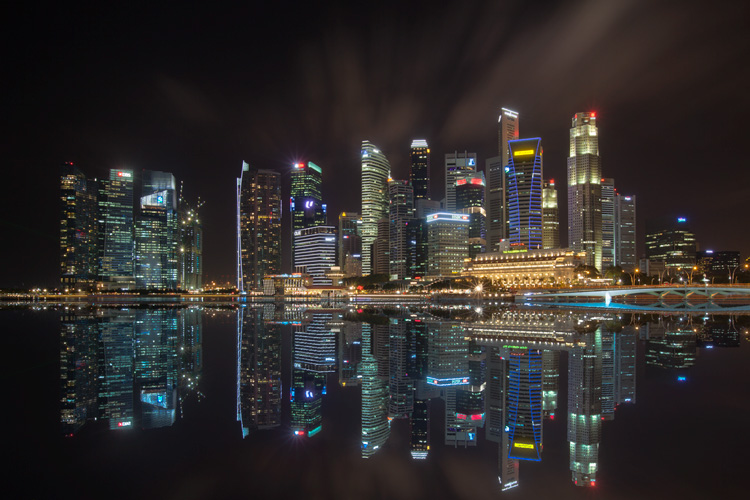
    Step 13: Repeat Steps 8 to 12 until you are done with all the layers. Your final image should have a more balanced exposure, with details in the highlights. You can then apply further tonal or color adjustments, and sharpening to your image.

    Image 08

    Final image.

    Bonus: Adding a reflection and color to the lights

    This involves a lot of editing, and may not be for everyone. For those of you who are into post-processing, you can clean up the image by removing unwanted objects, add a reflection, and change the color of the lights.

    Adding a reflection

    This only works if you have an empty foreground in your image like the example here.

    • Step 1: Use the rectangular marquee tool and make a selection of the city’s skyline. Then, copy and paste it as a new layer.
    Image 09

    Copy and paste the selection as a new layer.

    • Step 2: Select the layer of the copy, hold CMD (Mac) or CTRL (Win) + T to transform. Move your cursor to the image, right click and select > Flip Vertical. Use the move tool to position the flipped image lower to align the border.

    Image 10

    • Step 3: You can add a ripple effect to the reflection by going to the top menu and selecting Filter > Distort > Ripple. Keep the size of the ripple to medium, set the amount you like, and press ok.
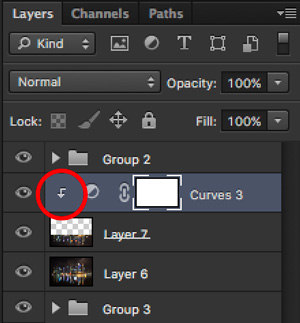
    • Step 4: Increase the contrast of the reflection by adding a curves adjustment layer, and clip it to the reflection layer only. To do that, right click on the curves layer and select Create Clipping Masks. You should see a little arrow on the curves layer pointing down at the layer below it. You can also reduce the opacity of the reflection layer if you like.
    image-11

    Clipping curves adjustment to the layer below.

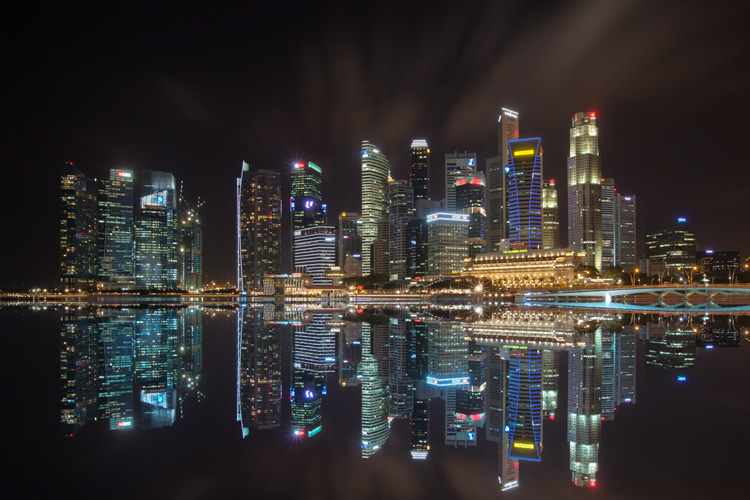
    Image 12
    Final image with reflection.

    Adding color to the lights

    • Step 1: You need a visible layer to begin with. If you don’t have one, you can go to the menu on the top and choose Layer > Merge Visible.
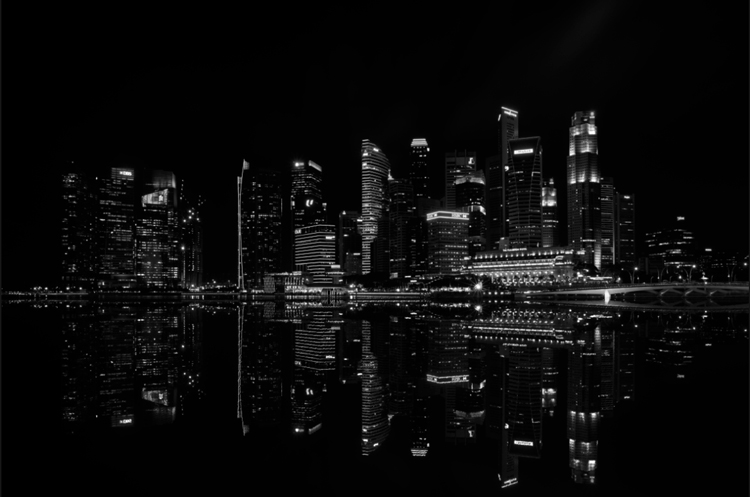
    • Step 2: Generate luminosity masks based on this layer. Remember to delete any luminosity masks you had before this.
    • Step 3: Select a brights luminosity masks that targets the highlights. In this example, I know from before that brights 2 mask works very well, so I’m going to choose it again. Select it by holding cmd (Mac) or ctrl (Win) + left click on your mouse.
    Image 13

    Brights 2 luminosity mask.

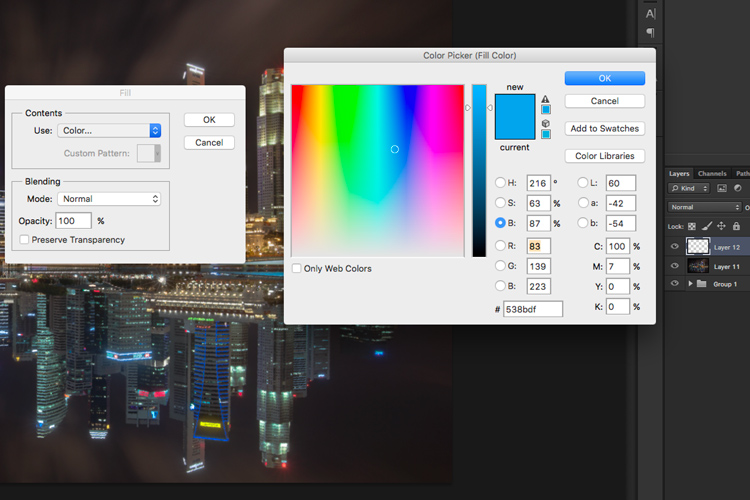
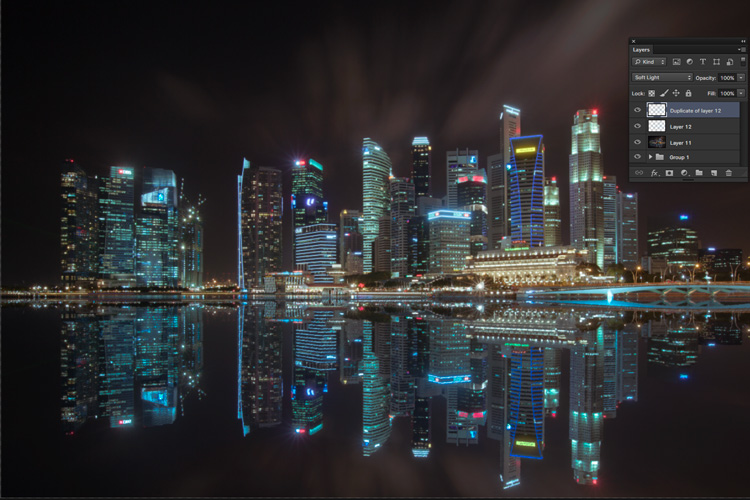
    • Step 4: Add a new layer, and change the blend mode to soft light. The selection should be automatically loaded onto this new layer already.
    • Step 5: Now fill the with the color of your choice by holding down Shift + Backspace, select a color, and press ok. You should now see the color of the lights have changed subtly.

    Image 14

    • Step 5: If you want the effect to be stronger, duplicate the layer once or twice until you like it.
    Image 15

    Duplicate the layer for a stronger effect.

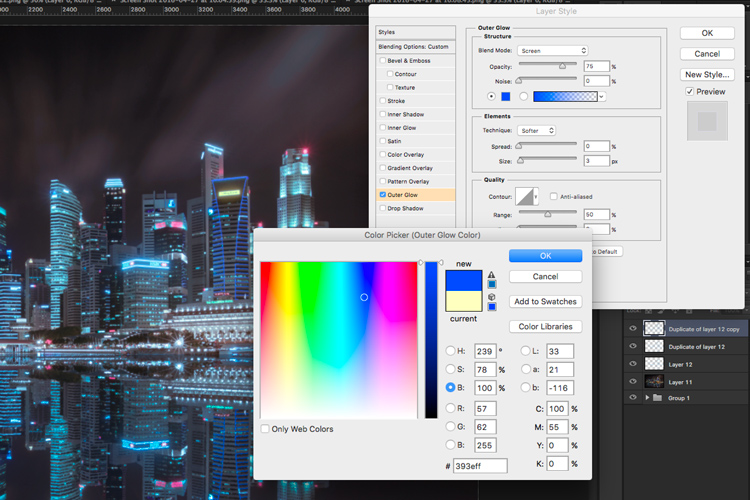
    • Step 6: The final step is what makes the lights glow. Double click on the top layer to bring up the layer style. Check the box for outer glow, and pick a color that is slightly darker than the one you have used before. Click ok and your done!
    Image 16

    Apply outer glow for the final touch.

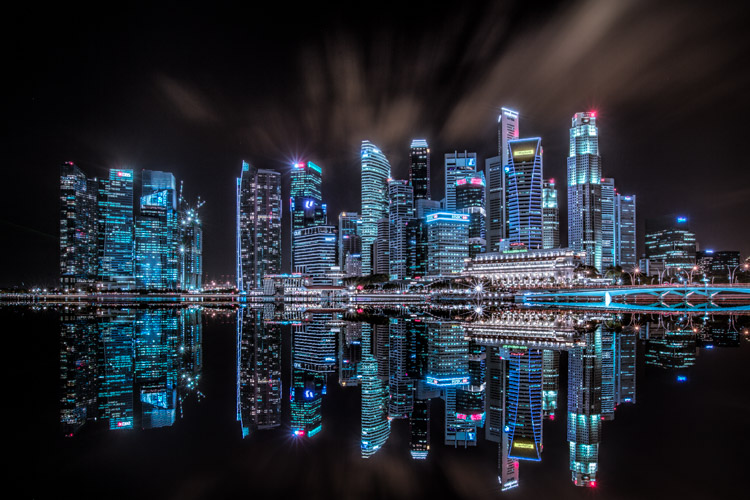
    Apply a few other tweaks and sharpening and you’ve got yourself a cool urban night cityscape!

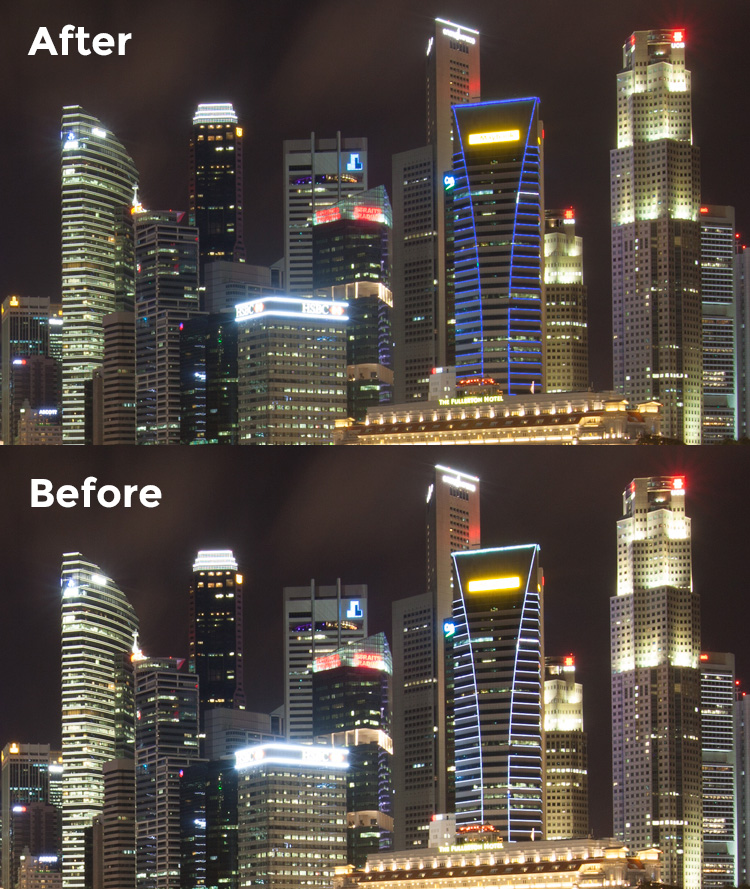
    Before

    Before

    Image 01

    After


    googletag.cmd.push(function() {
    tablet_slots.push( googletag.defineSlot( “/1005424/_dPSv4_tab-all-article-bottom_(300×250)”, [300, 250], “pb-ad-78623” ).addService( googletag.pubads() ) ); } );

    googletag.cmd.push(function() {
    mobile_slots.push( googletag.defineSlot( “/1005424/_dPSv4_mob-all-article-bottom_(300×250)”, [300, 250], “pb-ad-78158” ).addService( googletag.pubads() ) ); } );

    The post How to Enhance Urban Night Photographs Using Luminosity Masks in Photoshop by Yaopey Yong appeared first on Digital Photography School.


    Digital Photography School
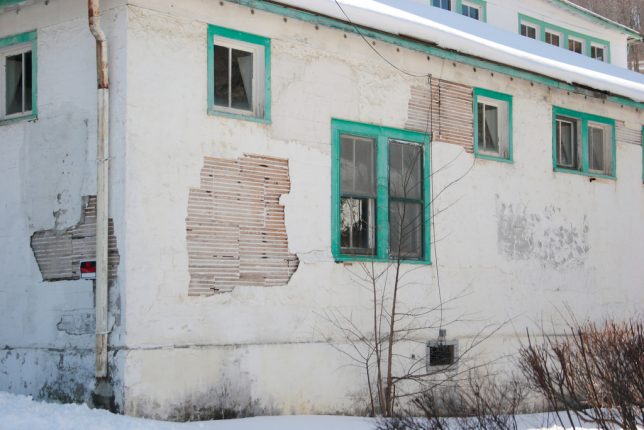
  • Space Age 3D Furniture: Skyscrapers & Rockets Support Stellar Tables

    [ By WebUrbanist in Design & Furniture & Decor. ]

    curved wave table

    Furniture designer and sculptor Stelios Mousarris has added a new twist to his latest 3D-printed creation, taking a leap from sweeping cityscapes to impromptu launch platforms with a spaceship-supported glass coffee table.

    rocket lift table

    rocket slice

    The Cyprus-based creator has “been collecting toys and action figures and anything nostalgic from my childhood until this day,” and wanted to recreate that sense of carefree creativity and imagination in this latest piece, turning toy-style rockets into the centerpiece of a clever table design.
    rocket table top

    rocket side table

    The table’s creation “combines various techniques from lathe to 3D printing, resin casting and traditional hand carved elements” while “each of the individual rockets remain unattached to the glass, allowing the user to generate their own desired structure and configuration. The table is designed to tap into the playful minds of nostalgic adults and children alike.”

    wave coffee table

    wood table detail

    wave table side

    wave city table

    wave wrapping city

    In his previous works, Mousarris has taken an inception-style approach to wrapping cities, turning their inverted grounds into the supports for coffee and dining tables (using raw wood or added glass to top them off, respectively). The meticulously-detailed buildings become a layer of urban decor, allowing the rest of the materials to remain minimalist in their expression.

    Share on Facebook


    [ By WebUrbanist in Design & Furniture & Decor. ]

    [ WebUrbanist | Archives | Galleries | Privacy | TOS ]


    WebUrbanist

  • Review: Panasonic Lumix DMC-GX85 impresses with image quality, versatility

    Key Features

    • 16MP Four Thirds MOS sensor
    • Electromagnetically driven shutter
    • Depth from Defocus AF
    • 2.76M-dot field sequential EVF
    • 1.04M-dot tilting touchscreen display
    • 4K video / photo
    • 5-axis image stabilization with Dual I.S.
    • Bouncable pop-up flash
    • Wi-Fi

    The Panasonic Lumix DMC-GX85 is a mid-range interchangeable lens camera sporting a 16MP Four Thirds sensor and 4K video capability. In markets outside of North America the GX85 is sold as the GX80; in Japan it is sold as the GX7 Mark II.

    Sliding in directly below the flagship GX8, the GX85 is targeted toward enthusiast photographers and videographers. It doesn’t use the new 20MP Four Thirds chip we saw in the GX8, instead it sticks with the familiar 16MP sensor used on many other Micro Four Thirds cameras. It also does not have the tilting EVF, weather-sealing or microphone input offered by the GX8. 

    Still, the GX85 shares many of its big brother’s features like 4K photo mode, Post Focus, Depth from Defocus AF, and Dual I.S.. It also has a redesigned shutter mechanism. Shutter-induced blur (‘shutter shock’) was an issue we encountered on the GX8, which used a motor and spring arrangement in its shutter mechanisms. The new electromagnetic shutter found in the GX85 resolves this problem.

    The GX85 also has no anti-aliasing filter, a first for Panasonic cameras. This should lead to better detail retention at the pixel level, but can also lead to moiré. However, Panasonic claims that the new Venus Engine image processor is specially tuned to combat moiré and false color and in use, we’ve found that it does so pretty well.

    Like the GX8, the GX85 offers Dual I.S., combining sensor-based image stabilization with lens-based IS. But unlike the GX8, which has 4-axis sensor IS, the GX85 offers 5-axis sensor IS with rotation correction. Another advantage over its big bro: the GX85 can also use Dual IS during 4K video capture, something that the GX8 cannot.

    Compared to its peers

      Panasonic GX85 Panasonic GX8 Panasonic GX7 Olympus PEN-F  Sony a6300
    Sensor 16.0MP Four Thirds CMOS  20.3MP Four Thirds CMOS 16.0MP Four Thirds CMOS  20.3MP Four Thirds CMOS  24.0MP APS-C CMOS
    Anti-aliasing filter  No  Yes Yes  No  Yes
    Image stabilization Sensor-shift (5-axis) + Dual I.S.
    Sensor-shift (4-axis) + Dual I.S. Sensor-shift (2-axis) Sensor-shift (5-axis) In-lens only
    AF system  49-pt CDAF 49-pt CDAF 23-pt CDAF 81-pt CDAF Hybrid AF
    (with 425 PDAF points)
    Flash x-sync  1/160 sec  1/250 sec   1/320 sec 1/250 sec  1/160 sec
    Burst rate
    (with C-AF)
     6  fps   6 fps 5 fps 5 fps   11 fps
    EVF res/type 2.76M-dot field sequential LCD 2.36M-dot tilting OLED 2.76M-dot tilting field sequential LCD 2.36M-dot fixed OLED 2.36M-dot fixed OLED
    EVF magnification  0.7X 0.77x  0.7x 0.62x  0.7x
    LCD type/res 3″ tilting touch 1.04M-dot LCD 3″ vari-angle touch
    1.04M-dot OLED
    3″ tilting touch
    1.04M-dot LCD
    3″ vari-angle touch
    1.04M-dot LCD

    3″ tilting
    921.6k-Dot  LCD

    Built-in flash  Yes  No  Yes No *  Yes
    Video 2160/30p @ 100Mbps 2160/30p @ 100Mbps 1080/60p @ 28Mbps 1080/60p @ 77Mbps  2160/30p @ 100Mbps
    Mic/headphone sockets No / No Yes / No No / No No / No Yes / No
    Weather-sealing No Yes No No  Yes
    Battery life  290 shots 330 shots 320 shots 330 shots 400 shots 
    Dimensions 122 x 71 x 44 mm 133 x 78 x 63mm 123 x 71 x 55mm 125 x 72 x 37mm 120 x 67 x 49 mm
    Weight (CIPA) 426 g 487 g 402 g  427 g 404 g
    * External flash included in box 

    It’s arguable whether the GX85 should be called the little brother of the GX8 or the true replacement to the GX7. And the different regional naming conventions for the GX85 only add to the confusion. The chart above seems to give support to both ways of looking at it: the GX85 uses the same field sequential EVF as the GX7 (although it doesn’t tilt), and what is presumably the same sensor (sans AA filter). And like the GX7, it lacks weather sealing and microphone/headphone ports but has a pop-up flash.

    However, aside from its sensor and EVF, the GX85 also shares a lot of core components and specs with the GX8, such as its 49-point AF system, 4K video capture and 6 fps burst with AF. So whichever way you view the GX85, it certainly stacks up nicely to its Panasonic peers, as well as to the competition.

    Part of the family: The GX85 (top) alongside its Lumix stablemates, the GX7 and GX8.

    Pricing and availability 

    Kitted with the collapsible 12-32mm F3.5-5.6 zoom lens, the GX85/GX80 will run you $ 799/£599/€699. In the UK and Europe it’s available body-only for £509/€599 and with both the 12-32mm F3.5-5.6 and a 35-100mm F4-5.6 for £729/€899.

    Articles: Digital Photography Review (dpreview.com)

  • Avast Photo Space lets you store more photos on your iPhone

    Software maker Avast is known by most users for its mobile and desktop anti-virus products, but now the company has launched an app with a totally different use case. Avast Photo Space allows you to increase the number of pictures you can store on your iPhone by up to 7 times. 

    It does so by reducing the resolution of the images that are stored on your device down to the resolution of the screen. At the same time, the app connects to your personal cloud service – currently Dropbox or Google Drive are supported –  where it stores the full-size versions. So you can always access the original files when needed, but still have a usable smaller image on your device. 

    Avast Photo Space also comes with its own camera app which automatically transfers, optimizes and syncs your images right at the point of capture, for a totally seamless user experience. Given the iPhone does not offer any local storage expansion options the app sounds like a good idea for those users who are constantly on the verge of running out of photo storage space and don’t rely much on image magnification while viewing. Avast Photo Space is now available as a free download from the Apple App Store. 

    Articles: Digital Photography Review (dpreview.com)

  • The good, the bad and the ugly of aerial photography – Part 1: Why shoot aerials?

    Man has always had the dream of flight – but so has the photographer. It’s a unique experience to shoot from the air, and it has some incredible benefits in many senses. But as one might discover, it often carries a number of problems and a hefty price tag. I personally started my romance with serious aerial photography about three years ago, and I’ve been hooked ever since. My experiences have mostly been amazing but admittedly not always so, and I’ve come to wonder what makes photography flights in different settings so… well, different.

    In this series of articles I’ll try to survey my own experience with aerial shooting, including the different aircrafts to shoot from, what equipment to use, what technicalities to put an emphasis on and of course, the prices. I’ll talk about some of my aerial shoots, and explain what distinguished them and what I learned. Aerial photography can be wonderful and exhilarating, but it can also be disappointing if you don’t know what you’re getting yourself into. I hope the following articles help with this.

    An aerial panorama of one of the most epic light shows I’ve ever seen. Wonderfully clear sun rays were peeking from between the thick cloud layer and the jagged mount Molhøgtinden and its surrounding peaks in the Lofoten Islands during my workshop there. I was stunned with excitement and couldn’t believe my eyes. After a few seconds I shook my head, picked my jaw up and went back to shooting. This image is the result.

    So what makes aerial photography so darn good? A great many things. First of all, it allows for a new – and extremely different – angle of shooting. There’s a huge difference in the angle of view when shooting from the ground, or even from a mountaintop, and when shooting from hundreds of meters above the landscape. The same scenery gains another dimension, and the viewer gets a much better understanding of the surroundings. Perspective deformations are also less pronounced since there’s less of a difference in distance to the subject’s different parts.

    An aerial shot of Deadvlei, Namibia. It’s incredible to realize that most of the clay pan is actually devoid of trees – which is hard to perceive when you’re down there.

    It can be claimed that only from the air, one can see the landscape for what it really is. Unseen parts of the setting can be exposed, for example ones that are obscured by mountains, and with good visibility, one can see and shoot much farther than from the ground. In the image below, shot from a helicopter in Holuhraun, Iceland, several of these advantages are demonstrated: first of all, when shooting from the ground, it was impossible to get a shot of the lava which includes the caldera itself. Secondly, this angle allows for inclusion of the lava river in the background, which contributes a great deal to the composition.

    In addition, some landscapes are hard to get to – not to mention shoot – from the ground, especially close enough to make them interesting. A good example of this is an erupting volcano. If the lava flow is strong, it can be impossible to go near the eruption point itself, but from the air, it can often be seen quite clearly.

    But it’s really not limited to volcanoes. Instead of traversing miles and miles on foot, camping, climbing and struggling, one might take a short flight, shoot a location and fly back in time for dinner. Sounds enticing, and it truly is. Moreover, it’s quite addictive, so much so that when visiting a new location, I often feel like I have to shoot it from the air, even if there isn’t much sense in it. One mustn’t forget that aerial photography is an experience to cherish, not to be taken for granted. Do it when you must, when it offers real benefits, and not just as a means to shoot without making an effort.

    The terminal of Ilulissat glacier, Greenland.

    In the next article in the series I’ll talk about the two most popular aircrafts for aerial photography.


    Erez Marom is a professional nature photographer, photography guide and traveler based in Israel. You can follow Erez’s work on Instagram, Facebook and 500px, and subscribe to his mailing list for updates.

    If you’d like to experience and shoot some of the most fascinating landscapes on earth with Erez as your guide, you’re welcome to take a look at his unique photography workshops around the world:

    White Wonderland – Lapland
    Land of Ice – Southern Iceland
    Winter Paradise – Northern Iceland
    Northern Spirits – The Lofoten Islands
    Giants of the Andes and Fitz Roy Hiking Annex – Patagonia
    Tales of Arctic Nights – Greenland
    Earth, Wind and Fire – Ethiopia

    Selected articles by Erez Marom:

    • Behind the Shot: Dark Matter
    • Mountain Magic: Shooting in the Lofoten Islands
    • Behind the Shot: Nautilus
    • Behind the Shot: Lost in Space
    • Behind the Shot: Spot the Shark
    • Quick Look: The Art of the Unforeground
    • Behind the Shot: Watery Grave
    • Whatever it Doesn’t Take
    • Winds of Change: Shooting changing landscapes
    • On the Importance of Naming Images
    • Hell on Earth: Shooting in the Danakil Depression
    • Parallelism in Landscape Photography

    Articles: Digital Photography Review (dpreview.com)

  • Study: Instagram interactions declining as user base grows

    User interactions on Instagram decreased an overall 33% from the first quarter of 2015 to the first quarter of 2016, according to social media analytics company Quintly. Video interactions decreased more substantially than image interactions, with video interactions down 39% and image interactions down 27%. The changes affected accounts with a high number of followers more so than accounts with less followers.

    The study is based on an analysis of 13,000 Instagram profiles, and considers both ‘likes’ and comments as forms of interaction. While the decrease in interactions is ‘tremendous,’ according to Quintly, it doesn’t necessarily indicate anything dire for the image-sharing app. Rather, the company speculates that a combination of increased posting frequencies among users and a growing user base has crowded users’ feeds while their interactions with the content remain relatively stable, causing a natural decrease in interactions.

    Additionally, Quintly points toward more brands joining Instagram as a potential cause, saying the brands may be alienating their followers with various advertising methods, causing the followers to interact less often. The company summarizes its findings, saying, ‘The takeaway should definitely not be that Instagram is losing traction but more that it starts to get harder to achieve success in the “fight for interactions” on increasingly fast timelines.’

    Via: Quartz

    Articles: Digital Photography Review (dpreview.com)