Blog

  • Bowens introduces Limelight Mosaic LED panels with better color accuracy

    UK lighting manufacturer Bowens has announced an update to its Limelite Mosaic LED panels that it claims is ‘significantly more colour accurate than previous models.’ The Mosaic2 panels boast a CRI and TLCI of 94 while the original models managed only 84, but the Mosaic2 panels are less powerful at 4000Lux@1m instead of up to 5200Lux@1m.

    The new panels come in Daylight and BiColour versions with the BiColour model offering temperatures of between 3000-5600K. The lights are dimmable from full power to 0% and Bowens says their cool running temperature makes them suitable for a wide range of applications including shooting food. Both panels can be controlled remotely via an external DMX (Digital Multiplex) mixer which allows multiple panels to be controlled at the same time.

    The daylight version will cost $ 834/£654 and the BiColour will be $ 1000/£835. For more information visit the Bowens website.


    Press release:

    Bowens launches groundbreaking Mosaic2 LED panels

    Limelite by Bowens has announced the launch of groundbreaking Mosaic2 LED panels – with ultra-high CRI 94/TLCI 94 light output.

    Available in Daylight (5600K) and BiColour (3000K-5000K) options, Mosaic2 uses 576 cutting edge high fidelity LEDs, dimmable from 100-0%, to create 1×1 panels that are extremely powerful and significantly more colour accurate than previous models.

    Alan Walmsley, Bowens sales and marketing director said: “Mosaic2 is a powerful addition to our comprehensive portfolio of light tools. These new units, which target the full gamut of photo and video enthusiasts as well as working professionals, embrace the rugged build-quality synonymous with all Limelite products. They are quick to set up and easy to use. This is a truly multi-purpose lighting solution providing feature rich LED panels suitable for small or large studios.”

    He added: “These metal-bodied panels, which weigh in at just 1.4kg, create high levels of soft, flattering light that can be further shaped and controlled with our comprehensive range of accessories.

    They are also an ideal choice for photographers working with babies, small children and animals who might be startled by flash lighting. And users shooting heat sensitive subjects such as food will benefit from Mosaic2’s cool-running operation.”

    The new panels, which will have an RRP of £654 (Daylight model) and £835 (Bi-Colour model), are also designed for video and broadcast work both in studio and on location (with optional battery mounting accessories)

    Tim Haskell, Limelite business development manager said: “Mosaic2 1×1 LED panels are used by leading broadcasters and global news gathering operations. Mosasic2 can be controlled remotely via an external DMX mixer and multiple panels can easily be linked and used as a single panel.”

    Mosaic2 key features:
    *Outstanding colour fidelity
    *Ultra-bright LEDs (up to 4000Lux@1m)
    * Exceptional build quality
    *Fully dimmable and user programmable
    *Pre-mounted AC adaptor and international cable kit (use anywhere in the world)
    *Wide range of light control, mounting and battery power accessories

    Pembrokeshire-based photographer and Panasonic GH camera ambassador Ross Grieve added: “I trialled the new Mosaic2 lights and they are superb. They are now my go-to panels for events and training programmed. I also use them as reflectors when I need more bounce. These panels are child’s play to use and with full control over colour temperature and brightness I have all the power and control I need.”
    bowens.co.uk

    Articles: Digital Photography Review (dpreview.com)

  • Slated for Greatness: 15 Innovative Modern Tile Designs

    [ By SA Rogers in Design & Fixtures & Interiors. ]

    modern tiles jungle

    With a history of use in human structures dating back to the 13th century BCE, decorative tilework has adapted along with our tastes and manufacturing abilities to become even more beautiful and versatile than ever before. Moving beyond colorful mosaics into the minimalism and multipurpose-loving 21st century, these beautiful and often surprisingly innovative modern-day spins on the age-old wall and floor covering expand into 3D textures, color-changing abilities and unusual materials.

    Modular Planter Tiles

    modern tiles modular planter 2

    modern tile modular planter 3

    These modular concrete tiles are designed specifically for vertical use on a wall, full of irregular organic cutouts that are ready to be planted. The triangle-shaped tiles by French designer Benjamin Pawlica can fit together in different ways to create mini planters of various sizes, and look cool even when there’s no greenery installed.

    Jungle Tile

    modern tiles jungle 2

    modern tile jungle 3

    Sometimes, the biggest impact is still made in a more conventional way, like this gorgeous series of murals painted onto the tile surfaces of Casa Cook Hotel in Greece. Artist Karina Eibatova created a custom jungle scene full of exotic animals and lush greenery, contrasting with the neutrals of the hotel decor.

    Tiles Made From Plastic Crates

    modern tile crate 1

    modern tile crate 2

    Would you ever think to notice that an ordinary polypropylene crate has a pretty cool geometric grid as the base of its design? Dutch designer Maaike Roozenburg did, and paid tribute to the structure by reproducing it on tile. “I wanted to show the clear and distinct aesthetics of mass-production by enhancing it with ‘classical’ ceramic techniques and materials. The behavior and ‘running’ of the glazes function as a dissonant on the crates’ structures and grids. Instead of putting industrial mass-production and ‘traditional’ crafts opposite each other I want to combine them and let them amplify and enrich each other, thus creating a parallel between used techniques and the design theme.”

    Tiles That Change Color with Exposure to Heat

    modern tile color changing 3

    modern tile color changing 2

    Hot water or even the touch of your hands and feet make these tiles from Moving Color shift hues, making any environment where they’re installed a dynamic, constantly changing space. Made of 20-80% recycled materials, the tiles change color in gradual steps through the color spectrum as they warm up for an iridescent rainbow effect.

    Cuidad Tile

    modern tiles cuidad 1

    modern tile cuidad 2

    modern tiles cuidad 3

    Inspired by Mexico City’s landscape, Nel Colectivo’s ‘Cuidad Tiles’ contain skyscraper-like elements that jut out from the urban grid. The tiles are made from fine-ground marble dust set in a cement mold using a hydraulic press, and some are different from others to create a varied, city-like pattern when put together.

    Next Page – Click Below to Read More:
    Slated For Greatness 15 Innovative Modern Tile Designs

    Share on Facebook


    [ By SA Rogers in Design & Fixtures & Interiors. ]

    [ WebUrbanist | Archives | Galleries | Privacy | TOS ]


    WebUrbanist

  • Meyer-Optik Goerlitz unveils titanium and gold-plated Trioplan 100mm F2.8 limited edition lenses

    $ (document).ready(function() { SampleGalleryV2({“containerId”:”embeddedSampleGallery_3987015483″,”galleryId”:”3987015483″,”isEmbeddedWidget”:true,”standalone”:false,”selectedImageIndex”:0,”startInCommentsView”:false,”isMobile”:false}) });

    Meyer-Optik Goerlitz recently announced a pair of limited edition Trioplan 100mm F2.8 ‘soap bubble’ lenses available for pre-order, one with an anodized titanium surface and the other plated with gold. The lenses were unveiled late last month to celebrate Trioplan’s 100th anniversary. The company is producing 100 units of the titanium version, as well as a very limited run of 10 ‘Golden Eye’ gold-plated units.

    The new limited edition version of the lens, save for the ten gold-plated units, features a titanium anodizing on the outer surface, making the lens harder than its aluminum counterpart while retaining the same resistance to high temperatures and corrosion. Thanks to this surface, the company says, ‘buyers will get a superior lens that is much less likely to show signs of age and wear.’

    Both versions of the lens feature the following specifications:

    • Optic construction as classic triplet (3 elements in 3 groups)
    • Focal distance: 100mm
    • Maximum aperture: continuous F2.8
    • Iris diaphragm with 15 aperture blades specifically constructed of steel segment belt and with special coating
    • View format: 24mm x 36mm (image circle diameter 44 mm)
    • View angle: 24°
    • Filter: 52 x 0.75 (mm)
    • Clip-on diameter: 54mm
    • Mounts: M42, Canon, Nikon, Fuji X, Sony-E, Micro Four Thirds

    Meyer-Optik is offering the titanium lens for $ 2499/€2499 and the Golden Eye lens for $ 3499/€3499; both are available to preorder on the company’s website.

    Via: PhotoRumors

    Articles: Digital Photography Review (dpreview.com)

  • Announcing the Winners of the Tamron Sunshine Photo Contest

    The winners of the Tamron Sunshine Photo Contest for a Tamron 28-300mm Di VC PZD lens, a Tamron SP 90mm F/2.8 Di VC USD lens, and a Tamron SP 70-300mm Di VC USD lens are:

    A huge thank you to everyone who entered our recent contest to win one of the following lens: a 28-300mm Di VC PZD lens, an SP 90mm F/2.8 Di VC USD lens or an SP 70-300mm Di VC USD lens from our friends at Tamron. This was a sunshine themed competition, and many of you shared your beautiful images, so we encourage everyone to go back and scroll the comments section to view these wonderful photos.

    Yet again, the response was absolutely AMAZING with over 285 entries! But now, on to the winners. Drumroll please, and the winners are:

    First Prize – a Tamron 28-300mm Di VC PZD: the winner is Graham P.
    Grand Prize 28300VCPZD

    Tamron 28-300mm Di VC PZD (model A010)- $ 849 value (For canon, Nikon or Sony cameras.)

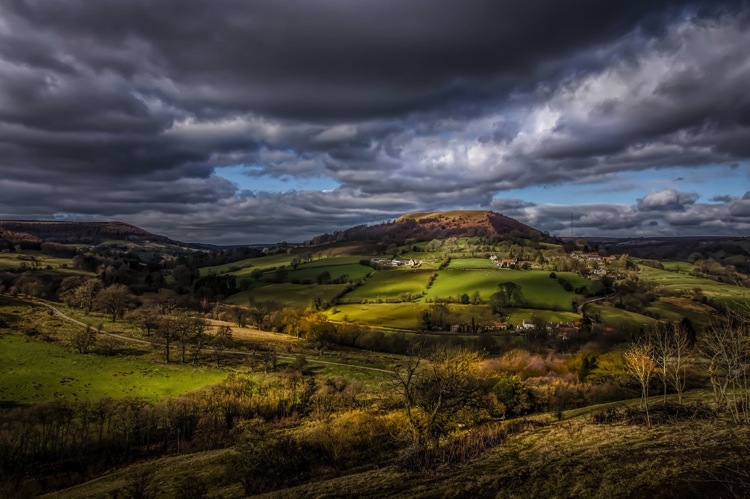
    Graham’s winning comment and image:

    It would be fantastic to win the Tamron 28 – 300 lens the need for a lighter kit as I am getting older is a must, this lens would not leave the camera and has all the versatility to capture everything from near to far in great detail and of course no more sensor dust from not switching lenses all the time. The image I have entered lookers great with the sun playing across the landscape.

    Graham P original

    Second Prize – Tamron SP 90mm F/2.8 Di VC USD: the winner is Annee.

    Second Prize SP 90mm

    Tamron SP 90mm F/2.8 Di VC USD (model F017-new) – $ 649 value (For canon, Nikon or Sony* cameras. *Sony mount model without VC)

    Annee’s winning comment and image:

    Wow! The new Tamron SP 90mm is a dream lens! I love bringing out details in wide landscapes but want to explore nature’s beauty at a more intimate level. I like to shoot into the sun and bright backgrounds but chromatic aberration and lens flare are problematic with my current lens. The optical construction of the new Tamron SP 90mm will be a major step forward for my art. I also love shooting from low angles where tripods are impossible. The enhanced VC functionality will help me achieve a steadier shot and the moisture-proof / dust-resistant qualities will be a blessing when I get a little too close to the ground! I’m always amazed at how little breeze is needed to move flowers and delicate objects out-of-focus. The increased focusing speed of the new Tamron SP 90mm combined with its large aperture will help me capture shots at the perfect moment.

    I could go on but, in short, this lens looks amazing! I know it will help me to hone my craft AND increase my passion for photography. I can’t wait to start playing with one!

    Annee original

    Third Prize – Tamron SP 70-300mm Di VC USD: the winner is Ron S.

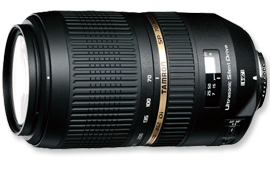
    Third Prize70300VC

    Tamron SP 70-300mm Di VC USD (model A005) – $ 449 value (For canon, Nikon or Sony cameras.)

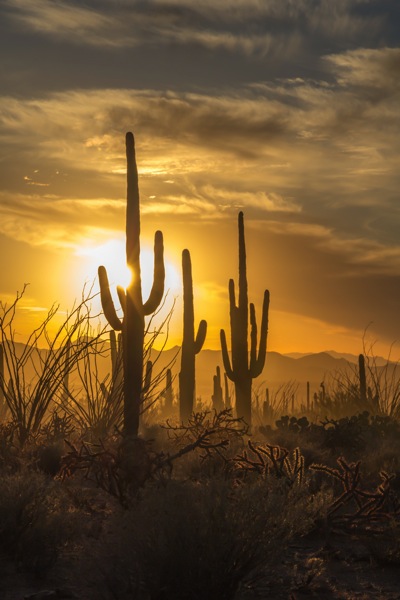
    Ron’s winning comment and image:

    I shot this sunrise from a life guards chair on Delray Beach in Florida. I was there well before sunrise, hoping to catch the sun breaking the horizon over the ocean, but the clouds were there too, blocking the sun. Finally, the clouds broke a bit, allowing the sun to come thru and the Rays to pinball off them, a more dramatic shot for sure than the one I had planned.

    I would use the telephoto zoom lens to give me more flexibility and reach with my travel photography and real close ups on the basketball court – I have season tickets for both the men’s and women’s at a local college and love sharing my amateur shots with the coach, players and college community via Instagram and Facebook.

    The macro lens would make my wife very happy – she’s an avid gardener but my photos don’t do her magnificent flowers justice. A first class macro lens would certainly help!

    I love that these lenses will fit my Sony NEX -6 e-mount, and, when the budget allows, A6000!
    Fingers crossed….

    Ron S original

    We were all thrilled with the entries: you tugged at our heartstrings, made us laugh, made us smile, but most importantly, you made us keep wanting to do more of what we are doing; providing you quality information and guidance to become a better photographer. We were so pleased to see that you came from every part of the world, young adults to grandparents, and everyone in between. Thank you all for your entries!

    Roadtrip ebook cover

    Now, for those of you that didn’t win, Tamron has invited ALL dPS readers download their 2015-2016 eBook Series! You can find those HERE!

    The winners will be emailed with details of how to collect their prizes. Please make sure to look for our email. Thank you again for all the wonderful submissions and to Tamron for sponsoring this competition.

    Tamron Rebates

    For all of you residing in the USA, when you do purchase your next Tamron Lens, make sure to take advantage of the rebates* up to $ 130 through June 30, 2016. Find additional information HERE!

    *Current rebate offers end June 30, 2016. US RESIDENTS ONLY.

    Tamron logo

    About Tamron

    Disclaimer: Tamron is a paid partner of dPS.

    googletag.cmd.push(function() {
    tablet_slots.push( googletag.defineSlot( “/1005424/_dPSv4_tab-all-article-bottom_(300×250)”, [300, 250], “pb-ad-78623” ).addService( googletag.pubads() ) ); } );

    googletag.cmd.push(function() {
    mobile_slots.push( googletag.defineSlot( “/1005424/_dPSv4_mob-all-article-bottom_(300×250)”, [300, 250], “pb-ad-78158” ).addService( googletag.pubads() ) ); } );

    The post Announcing the Winners of the Tamron Sunshine Photo Contest by Darlene Hildebrandt appeared first on Digital Photography School.


    Digital Photography School

  • 10 Pro Tips to Design a Killer Mood Board to Present Your Work

    When you’re working on a design or photography project for a client, a mood board can be one of the best ways to get your vision across. A mood board is essentially a collage of things that inspired you for this particular project. They can help you really nail down the look and feel of your work, and make sure Continue Reading

    The post 10 Pro Tips to Design a Killer Mood Board to Present Your Work appeared first on Photodoto.


    Photodoto

  • The Beginners Guide to Lightroom Presets

    Presets this and Presets that. It’s like the world has gone Lightroom Preset mad of late. Some people hate them, others rave about them! So where do you start? Well, the beginning is best really.

    When Lightroom was only a beta program (and for Mac only), one of the big features was that you could make changes to an image in the Develop Module, and save those settings to apply them to another image directly! They didn’t even have to be in the same shoot. (Lightroom organized by shoots then, not folders). Unlike Actions in Photoshop, the setting changes were immediate, and easy to undo. These were the first Presets. While they worked pretty much like Presets today, they weren’t as versatile as they are now.

    What are Lightroom Presets

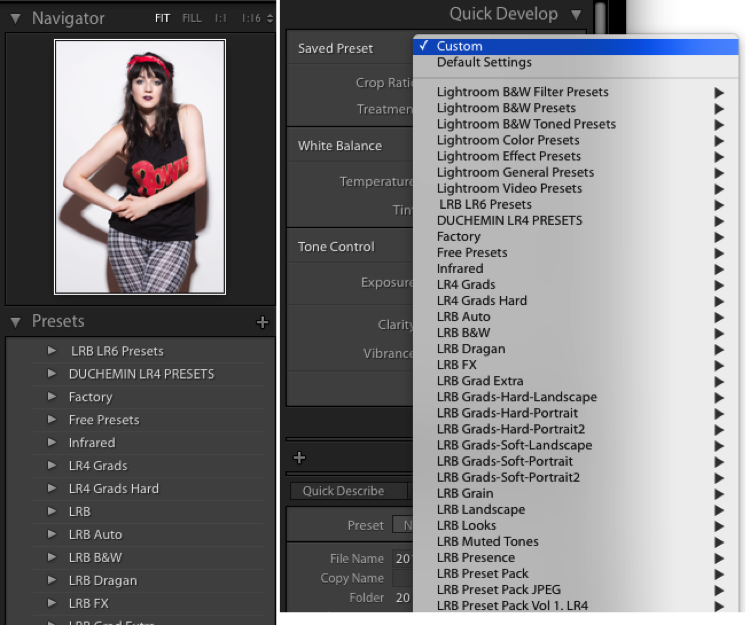
    Presets are files that allow Lightroom to apply particular Develop settings to an image. They appear in the Left Panel of the Develop Module in the Presets Panel. They’re also available in a drop down menu in the Quick Develop panel in Library.

    Presets1

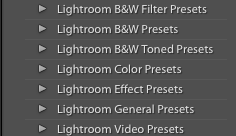
    Lightroom ships with a range of Presets, which are stored in folders based on the type of Preset within. This organization suggests a great way to store Presets: organize by what the preset does.

    Presets2

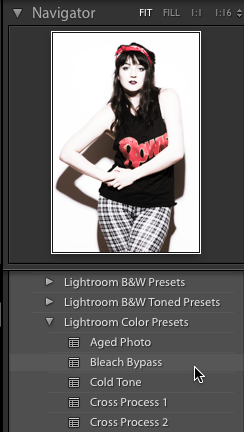
    With the Preset and Navigator panels open, hover over one of the default Presets (you may need to click on the folder triangle to open it). You should see the Navigator preview change to show what the preset would do to the image if you click and apply it. Now if only you could make the preview bigger!

    Presets3

    A preview of the preset will appear in the Navigator window top of the left side panel.

    Making your own Presets

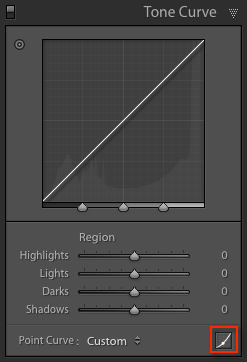
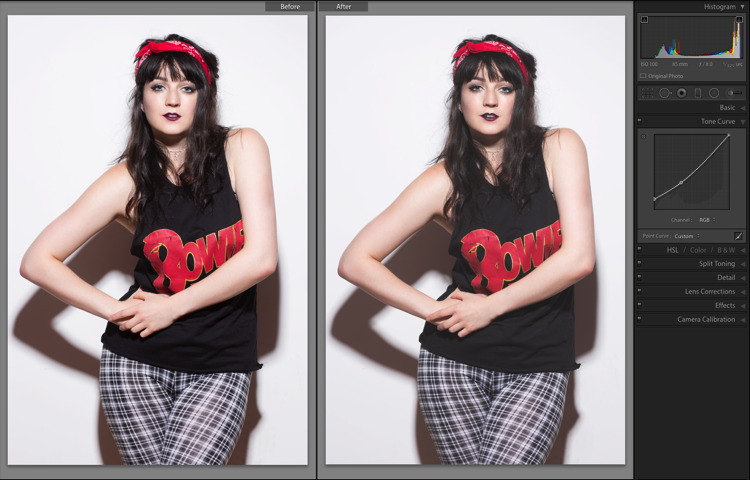
    You can get a handle on Presets by making them, exporting them, sharing them, and even importing Presets from other people. First you need to make changes to your image to be able to save a preset. You could start with a Tone Curve adjustment. First, go to the Tone Curve panel, and click on the Point Curve icon (indicated with the red box).

    Presets4

    Next, click about one third of the way from the bottom. Finally, click the square point on the bottom right of the box, then drag it up while holding the Shift key. The blacks in your image will fade to give a nice retro, matte-finish look. You can see the difference by pressing the Y key to see a before and after view.

    Presets5

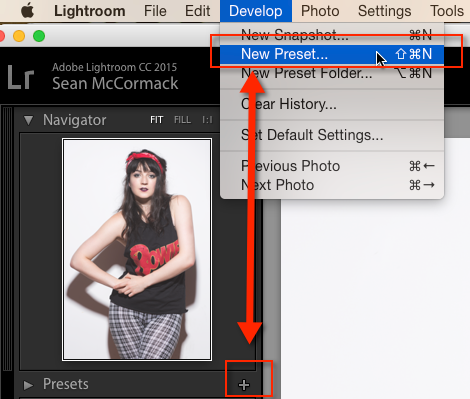
    To save this look to use again, go over to the Presets panel and click the plus (+) in the panel header. You can also choose New Preset in the Develop menu or use the keyboard shortcut: Shift + Control + N on PC, or Shift + Command + N on Mac. This opens the New Develop Preset dialog box, where you save your settings.

    Presets6

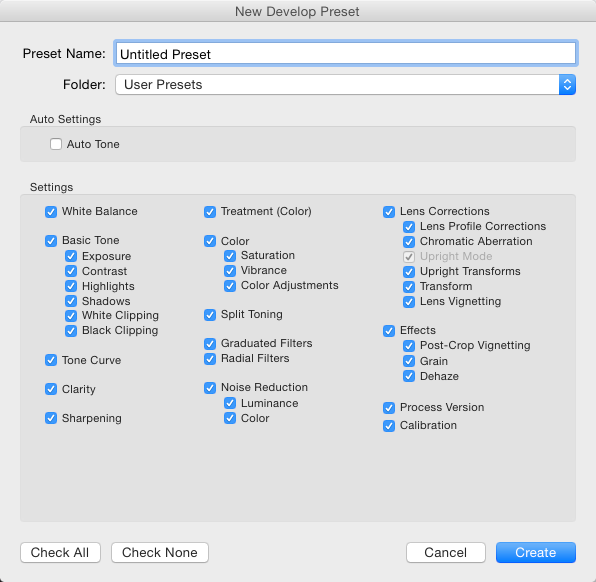
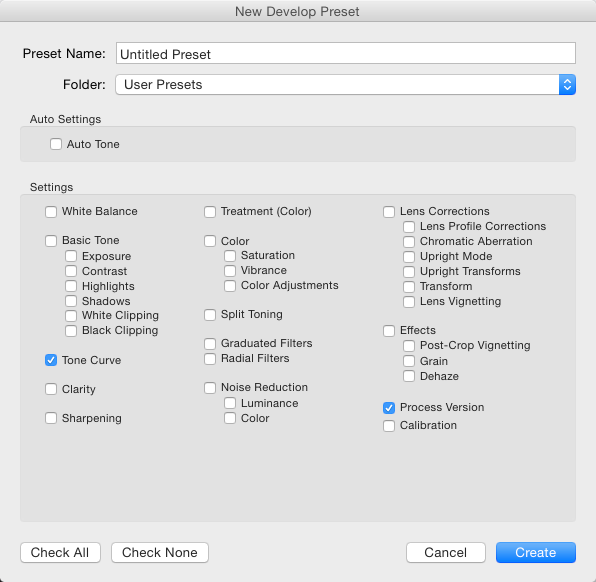
    This is a good time to talk about what to include when you save your Presets. You can just save everything into the Preset (which is the default). There’s no harm in that, but generally it means the preset will only work on images that look similar to the one you started with. It also means that preset will overwrite all develop settings in the image, so any other work you’ve done to the image will be lost.

    Presets7

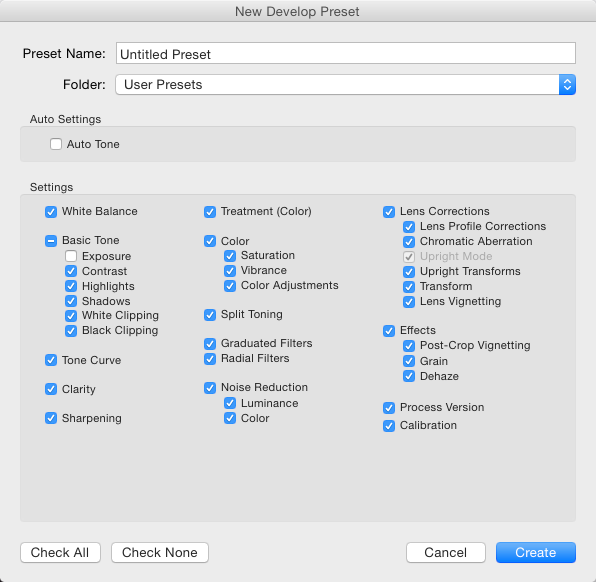
    But, there is a better way. The second option (besides saving all settings) is you exclude Exposure from your preset. This means any changes to the apparent brightness of the image you made remain intact. That’s a win straight away.

    Beginners Lightroom Presets8

    The third option you have, is to save only the settings that are making the change to the images. You’ve just used the Tone Curve here, so you could press the Check None button, and then tick Tone Curve, followed by Process Version – it’s best to always include that last one so that all the other settings apply correctly.

    Beginners Lightroom Presets 9

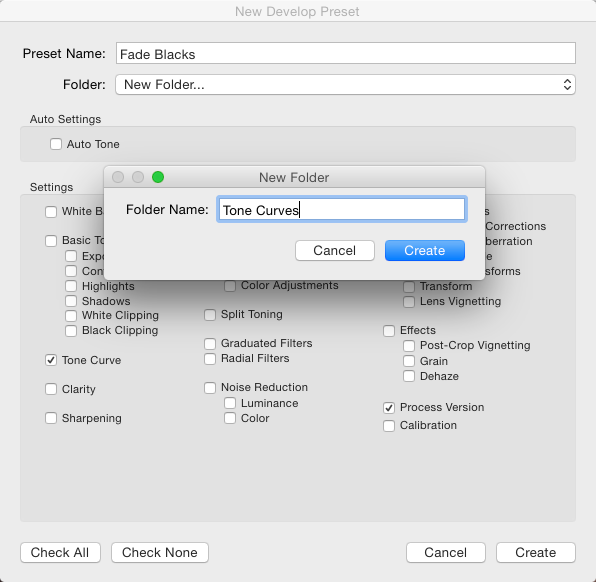
    For organization, you could also create create a new Folder for these Presets. To do that, click the Folder menu and choose New Folder at the top of the menu. Name the Folder Tone Curves. Finally, you can give the Preset a useable name. While flowery names might work for selling your Presets as artsy product, in reality, you’re better off using a name that reminds you what the Presets does. You could use Fade Blacks, or Lighten Blacks, for this one.

    Beginners Lightroom Presets 10

    Applying the preset to other images

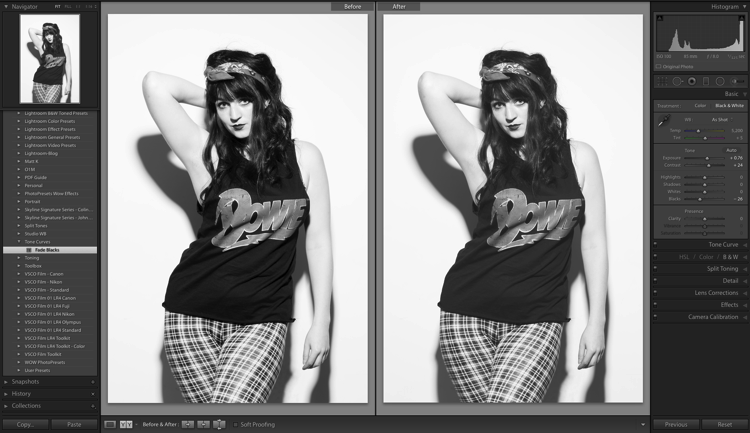
    This Preset can now be applied to any other image. You could test with an image that has other settings already applied, like a black and white photo for example. Notice how the image remains black and whie after applying the Preset? If you’d saved everything into the preset, the image would’ve turned back into color, because one of the options selected was the B&W Treatment.

    Beginners Lightroom Presets 11

    Sharing the preset with others

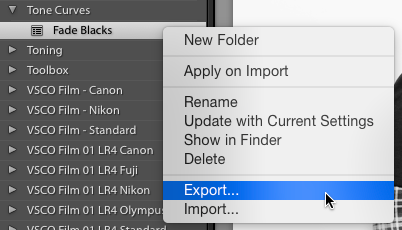
    You can also share this Preset by right clicking on it, and choosing Export. Notice that you can also choose Import from here (as well as Apply on Import) which is how you also get shared, or purchased Presets, into Lightroom. Apply on Import is different, and refers to when images are being Imported into Lightroom, selecting that will change the settings on each photo brought into Lightroom automatically. Also in this menu is, Update with Current Settings. This allows you to make changes to your settings, then save them to an existing preset instead of making a new one.

    Beginners Lightroom Presets 12

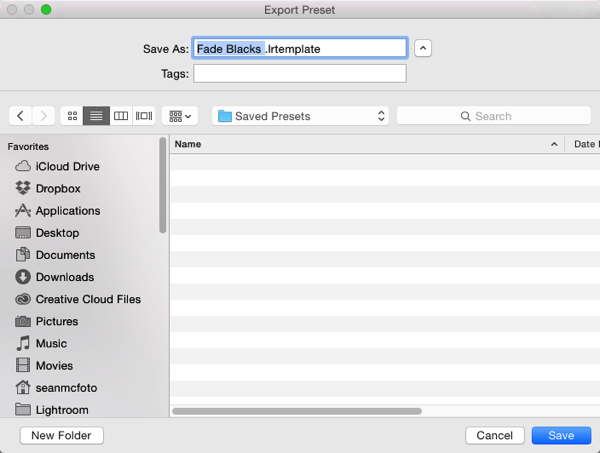
    Back to Export: When you click Export, you get an OS Save window. The suggested filename will be the name you gave the preset, followed by ‘.lrtemplate’, which is the required file extension for Presets. Save them somewhere useful, like a folder called Saved Presets.

    Beginners Lightroom Presets 13

    Where are your Presets stored?

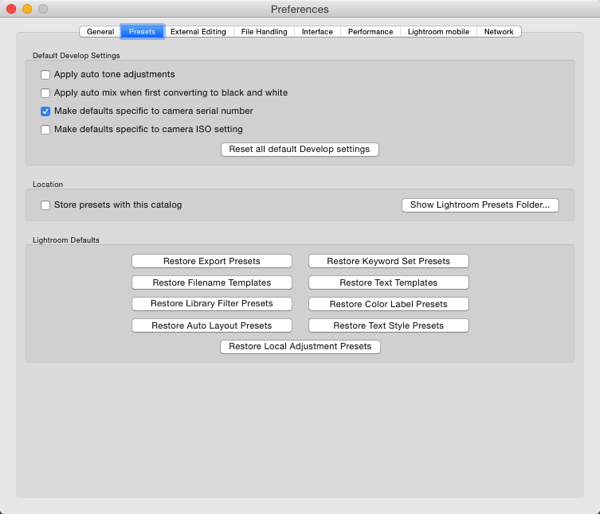
    You might be wondering where the Presets you haven’t exported are stored. Fortunately Lightroom does allow you access to them. You can get to them by opening Lightroom Preferences (which you’ll find in the Edit menu on PC, and the Lightroom menu on Mac). Click the Presets tab (in blue below) when the Preferences box opens. In the middle is a button that says Show Lightroom Presets Folder. If you click that a folder will open, with a subfolder called Lightroom selected. Open that folder to see all of Lightroom’s Presets and Templates folders for Develop, Slideshow, etc. The one you want is called Develop Presets.

    If you have a lot of downloaded or purchased Presets to add to Lightroom, it is quicker to open this folder, drag the new Presets into it (preferably in their own folder for organization) and then restart Lightroom to load them. Another way to get to a Preset is to use the Show in Finder/Explorer option from that right click menu earlier.

    Beginners Lightroom Presets 14

    The last thing worth a mention in this article is the Store presets with this catalog checkbox. This does what is says, but the practical reality is that it means if you then use another catalog, you don’t have access to your Presets. So in general I recommend not using that option.

    Hopefully now you know a lot more about Lightroom Presets than when you started. If you have any questions or comments please share them below.

    googletag.cmd.push(function() {
    tablet_slots.push( googletag.defineSlot( “/1005424/_dPSv4_tab-all-article-bottom_(300×250)”, [300, 250], “pb-ad-78623” ).addService( googletag.pubads() ) ); } );

    googletag.cmd.push(function() {
    mobile_slots.push( googletag.defineSlot( “/1005424/_dPSv4_mob-all-article-bottom_(300×250)”, [300, 250], “pb-ad-78158” ).addService( googletag.pubads() ) ); } );

    The post The Beginners Guide to Lightroom Presets by Sean McCormack appeared first on Digital Photography School.


    Digital Photography School

  • Great Gear that’s Back in Stock

    What did the camera gear say when it found itself in a pot of soup, again?

    We’re back in stock!

    A few of our favorite goodies are back in action in the Photojojo Shop. Grab ‘em while we’ve got ‘em!

    (…)
    Read the rest of Great Gear that’s Back in Stock (0 words)


    © laurel for Photojojo, 2016. |
    Permalink |
    No comment |
    Add to
    del.icio.us

    Post tags:


    Photojojo

  • Walk on Water: Christo Unfurls 1 Million Square Feet of Golden Cloth

    [ By WebUrbanist in Art & Installation & Sound. ]

    christo island view

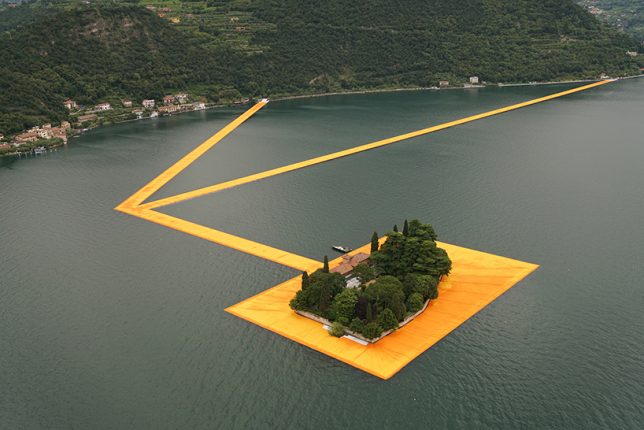
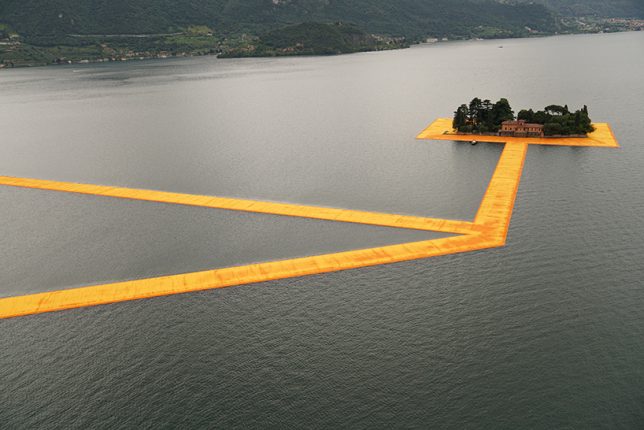
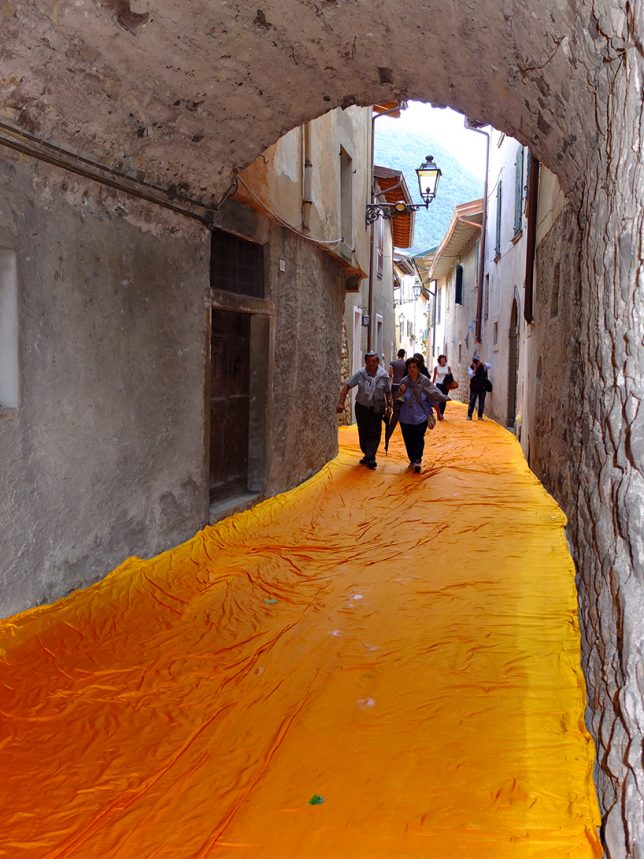
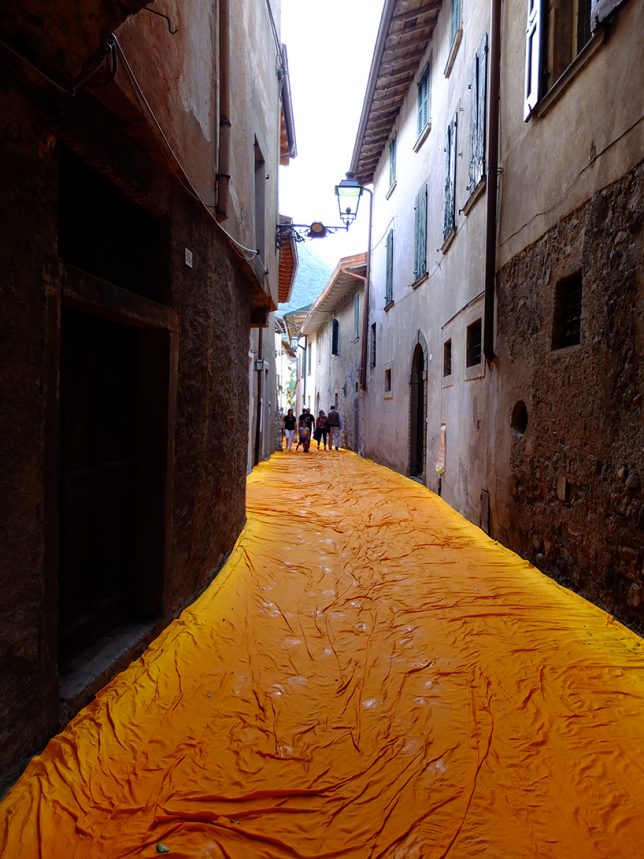
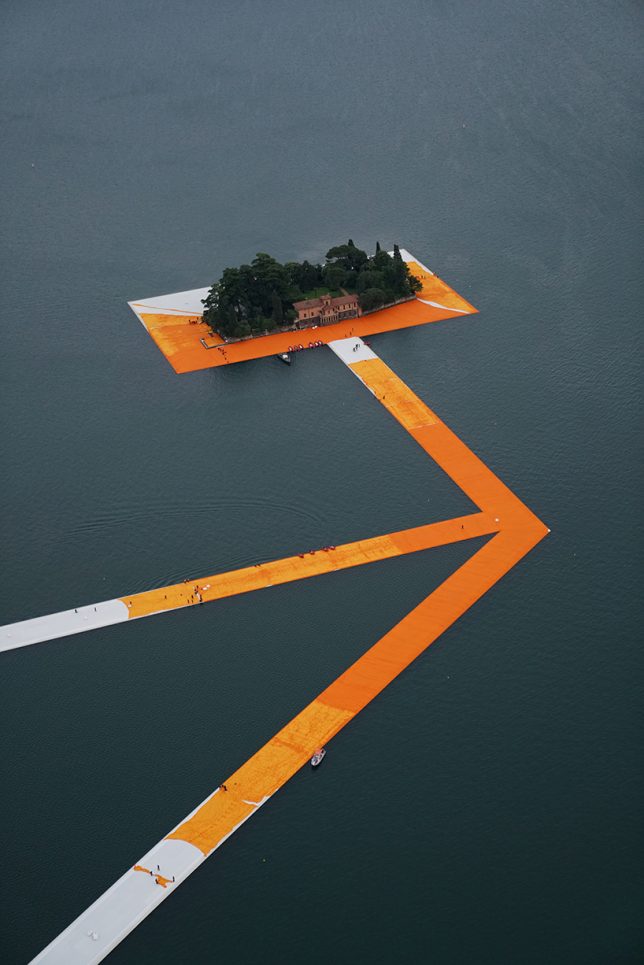
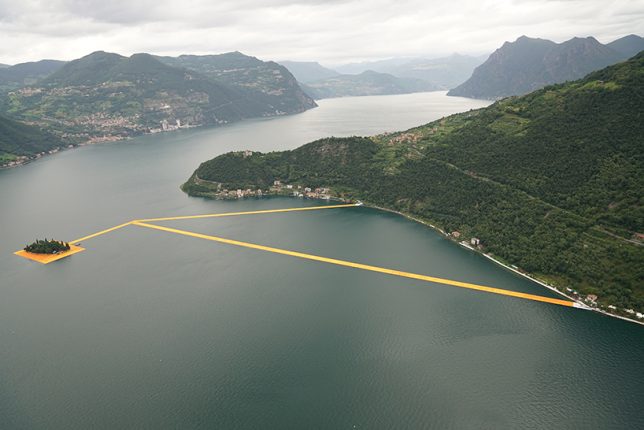
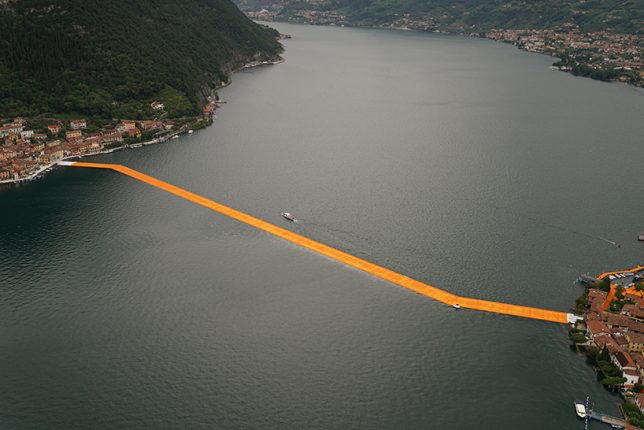
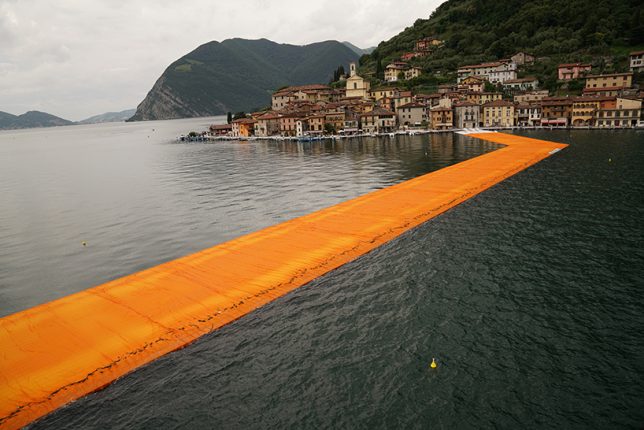
    Known for his work on large-scale art projects, including the world’s biggest interior art installation, artist’s latest piece features over 1,000,000 square feet (100,000 square meters) of shimmering yellow fabric, wrapped around floating docks that span for miles up to and across Lake Iseo in Italy.

    floating lake art

    christo aerial view

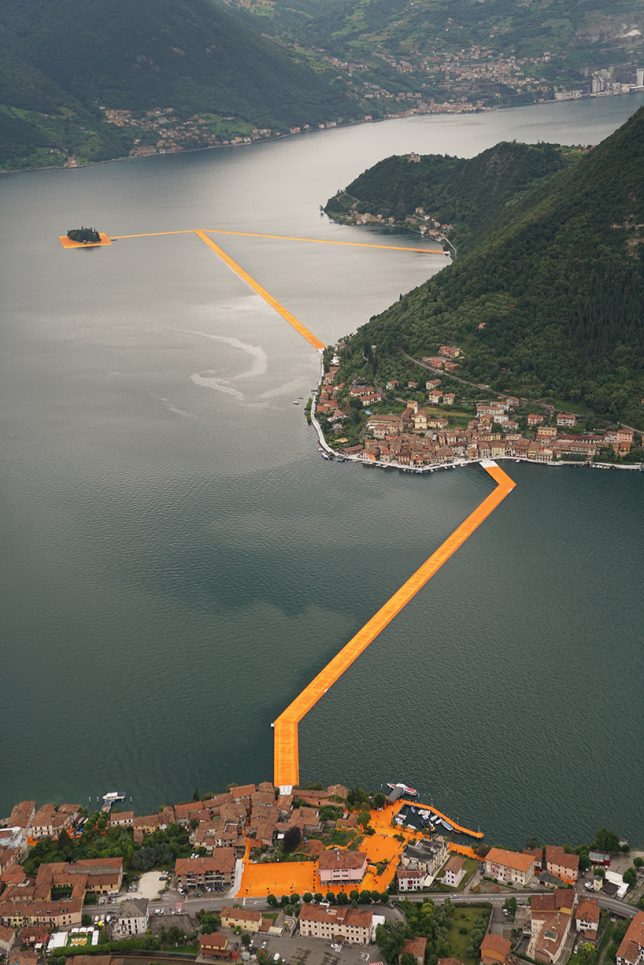
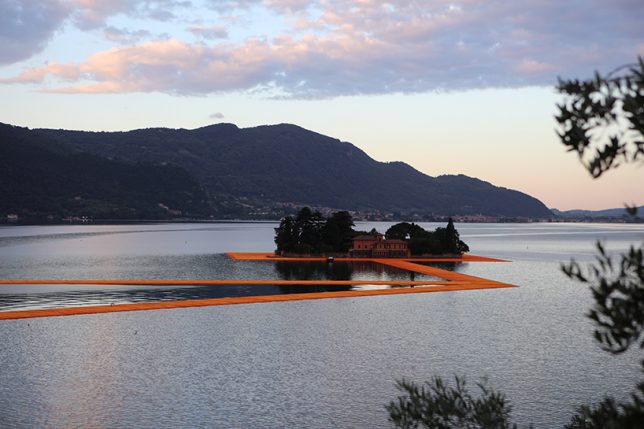
    Undulating with the waves, the Floating Piers project lets visitors walk between Sulzano, Monte Isola and to the island of San Paolo; the floating platforms are visible from surrounding mountains as well.

    christo golden path fabric

    christo streets alleys

    Christo conceived of the idea with his Jeanne-Claude as far back as the 1970s, exploring different potential venues for its installation. While Jeanne-Claude passed away in 2009, Christo has carried on the idea, and finally found a place for the temporary work in Northern Italy.

    christo unveiling

    christo day of

    Many works by this long-standing pair of ambitious artists were self-funded, in part through the sales of concept drawings and models in advance.

    christo floating path

    christo close up

    christo lake view

    “like all of our projects,” says Christo, “The Floating Piers absolutely free and accessible 24 hours a day, weather permitting. There are no tickets, no openings, no reservations and no owners. The Floating Piers are an extension of the street and belong to everyone.” The project opened this weekend and will run for just 16 days. Images by Wolfgang Volz.

    Share on Facebook


    [ By WebUrbanist in Art & Installation & Sound. ]

    [ WebUrbanist | Archives | Galleries | Privacy | TOS ]


    WebUrbanist

  • 2 Long Exposure Photography Hacks to Try if You Don’t Have an ND Filter

    We all love long exposures, well I personally do. They are a great way to create dynamism, movement, and add depth to your images.

    In this tutorial, I’ll show you two long exposure hacks that can be useful if your Neutral Density filters are not dark enough, if it’s too bright outside and you cannot get a long exposure, or if you simply don’t have any ND filters. Dark ND filters can be really expensive, so this is a good alternative.
    IMG 8076

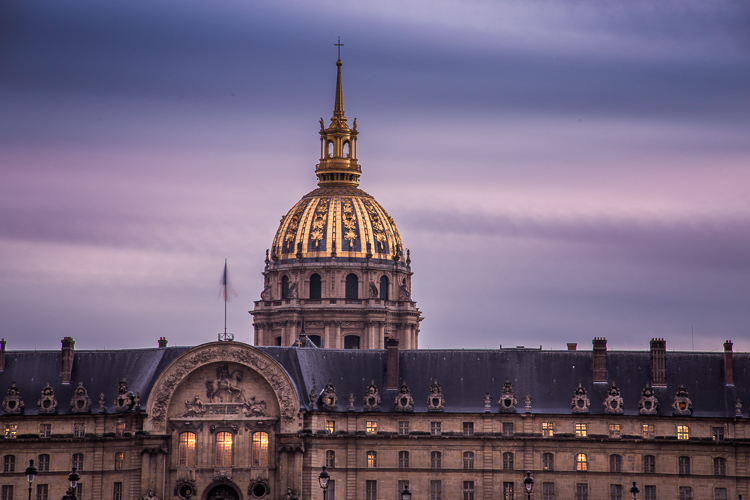
    Long exposures create this surreal, and yet very pleasing effect to give a WOW factor to your images. Whenever you take a photo at night you will automatically get a long exposure, unless you use a very high ISO. For this tutorial I am talking about long exposures during the daytime, which are a bit more complicated to achieve.

    The two hacks involves taking nine different images, and stacking them together. Now before I actually explain them, I will briefly give you the best camera settings and shooting conditions:

    Shooting and camera settings

    • You will ultimately get the best results if you shoot on a cloudy day with a lot of wind. Why? Because on a cloudy day you will get clouds, and the wind is going to give them movement, and that’s what you want – movement. On a cloudy day, you will also get the minimal amount of light to be able to extend your shutter time.
    • You absolutely need a tripod, first all of all because your images need to be aligned, and you want your images as sharp as possible. With a shutter speed slower than 1/60th, you will start to get blurry results without a tripod.
    • Use a cable release or a 2-second timer every time you take an image. This again is a great way to avoid camera shake and get sharp results.
    • Focus on your subject and put the lens to manual focus, before you start taking your images. DO NOT refocus between the nine shots you are going to take.
    • Use an ISO of 100. You are on a tripod, so you don’t really need a higher ISO.
    • Use a very small aperture, like f/22. This will cut down the light entering your camera as much as possible and with an ISO of 100, will help slow down the shutter speed.
    • Shoot one or two hours before sunset, then you will also have a minimal amount of light to extend your shutter speed even slower.
    • Use your ND filters if you have some. If your ND filters are very dark (10 stop for example) you won’t need these hacks because you will directly get long exposures. If your filters are not dark enough, I would still recommend using them even if you have a one second exposure.
    • I recommend exposing, and focusing before putting your ND filters on, because after that – well you won’t be able to see clearly.

    Hack #1 – multiple exposure mode

    The first hack consists of using the multi-exposure mode on your DSLR. If you do not have this mode, don’t worry the second hack works for all cameras. I personally use a Canon 6D, but this multi-exposure mode is mostly available for all sorts of advanced DSLRs.

    You will find this mode on your menu, you just need to enable it.
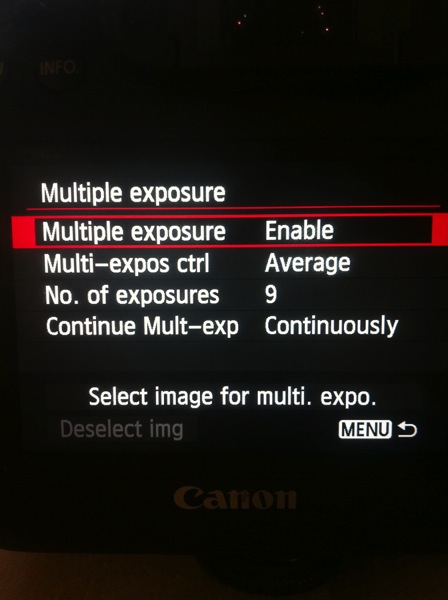
    IMAGE1

    For the settings:

    • Average for the Multi-expos ctrl option
    • Continuously for Continue Mult-exp setting

    You have the choice to pick how many exposures you want to shoot, the maximum will depend on your DSLR. I usually pick nine exposures to get as much movement on the clouds as I want.

    This mode will allow you to multiply your shutter speed by the number of exposures you shoot. For example, If you shoot a single image with an exposure of one second, you will get a total exposure of nine seconds if you shoot nine exposures. It works the same if you have an exposure of 15 seconds.

    With this mode, the camera will automatically stack the images together and give you one single image with all the cloud movement. This trick also works if you want some nice silky water.

    If the clouds are moving really fast, then I recommend waiting around two seconds before you take another shot. The main trick is to not have the clouds at the same position one shot after the other. If the clouds are moving very slowly then I recommend waiting around 10-15 seconds between shots.

    This mode will also tell you on your screen, how many images you have left to complete your multi-exposure.

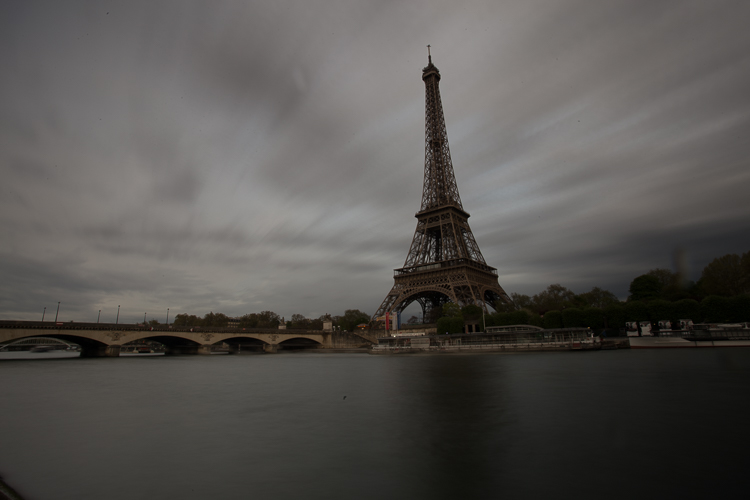
    This is an example of a long exposure I got using this method. My aperture was f/22, ISO 100, and I had a shutter speed of one second after using my ND filters. That wasn’t enough to get a long exposure with stretchy clouds, so I decided to use the multi-exposure mode. I took a total of nine shots, and you can see below the before and after using this mode. You can see that it does not only affect the clouds, my water looks nice and silky as well.
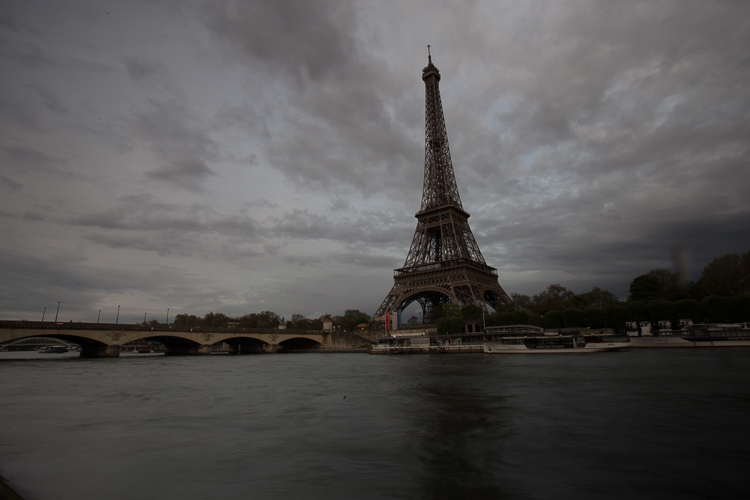
    IMAGE2

    Single image

    IMAGE3

    Nine shots using multi-exposure in-camera.
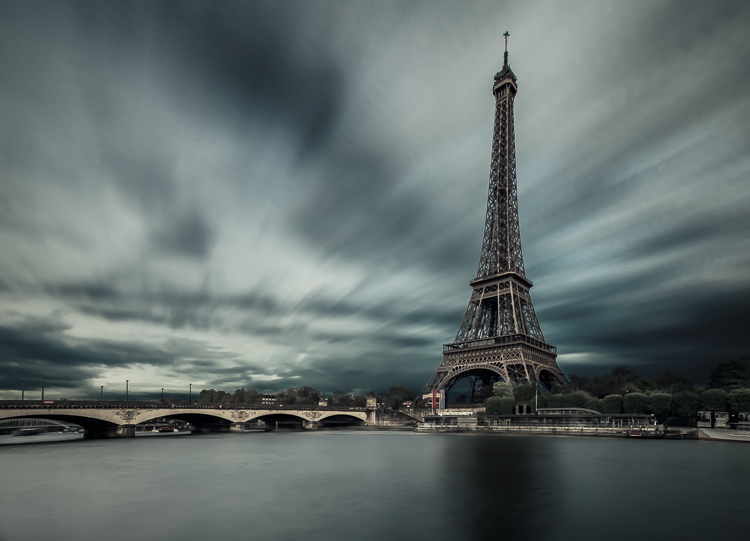
    IMAGE4

    After some retouching, I got this result!

    Hack #1 – multiple exposures merged in Photoshop

    The second hack consists of doing exactly the same thing but manually. If you are used to shooting time lapses, then this shouldn’t be too complicated to understand.

    The multi-exposure mode in-camera gives you automatically, and directly, the long exposure result in one image. For this hack, will shoot nine separate images, one after the other.

    You need to use the same camera settings I mentioned above (manual mode, manual focus, tripod, small aperture, ISO 100, release cable or 2-second timer). For the shooting conditions I would also recommend the same thing, and use ND filters if you have some.

    You will basically shoot a time lapse of nine images only. Do not forget to have an interval of 10 seconds minimum between each shots. This process can be quite boring. I personally use the magic lantern camera hack that has an intervalometer built inside the camera. I can then pick how long I want my interval to be between each shot, and the camera will automatically take an image every 10 seconds, for example, until I decide to stop.
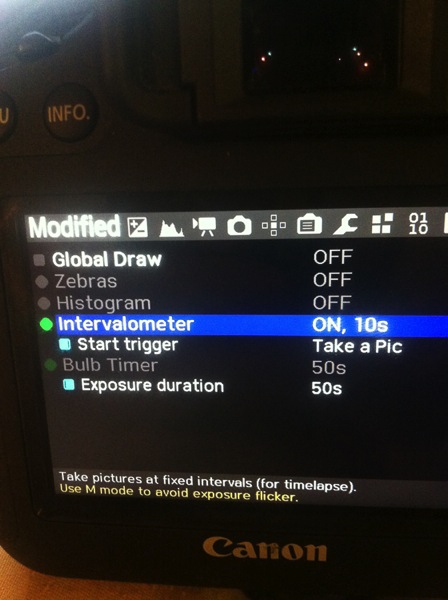
    IMAGE5

    You can buy an intervalometer or use the timer on your phone to count your intervals. It’s really up to you.

    Here’s an example of nine images I shot one after the other with an interval of 15 seconds between each. You can clearly see that the clouds are moving. For demonstration purposes, I have intentionally underexposed these shots.
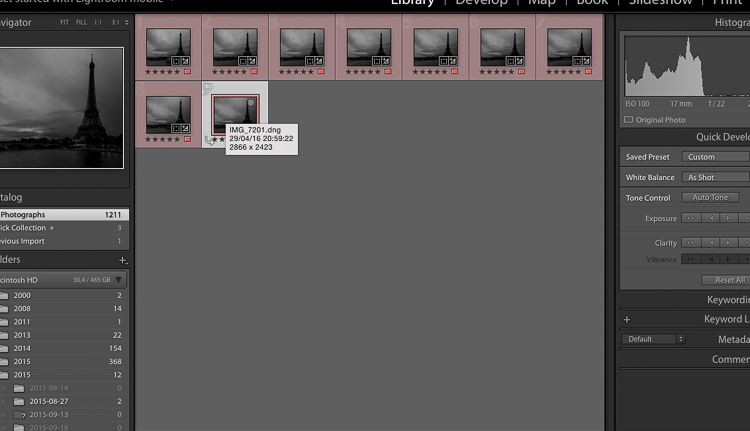
    IMAGE6

    So after you get all your images, import them into Photoshop as layers (from Bridge or Lightroom whatever fits with your workflow).
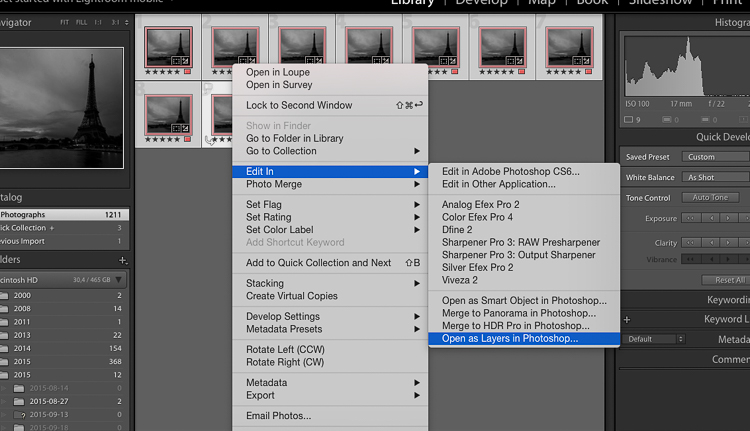
    IMAGE7

    Open as Layers in Photoshop after selecting the images in Lightroom.

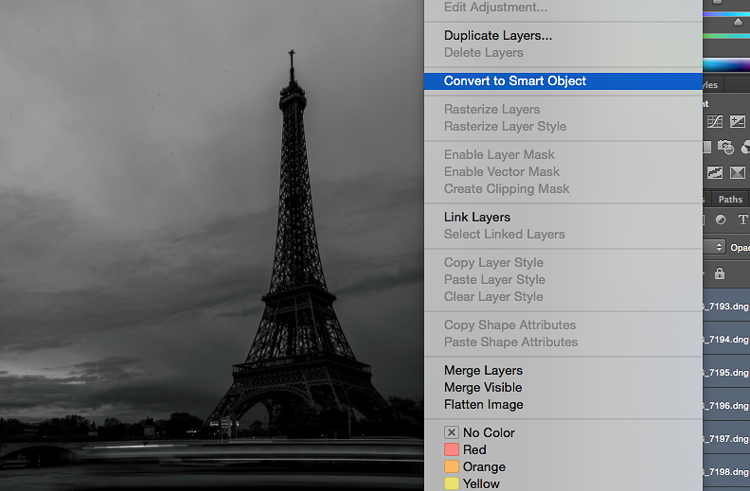
    Then next thing you want to do is to select all the layers, and create a smart object.
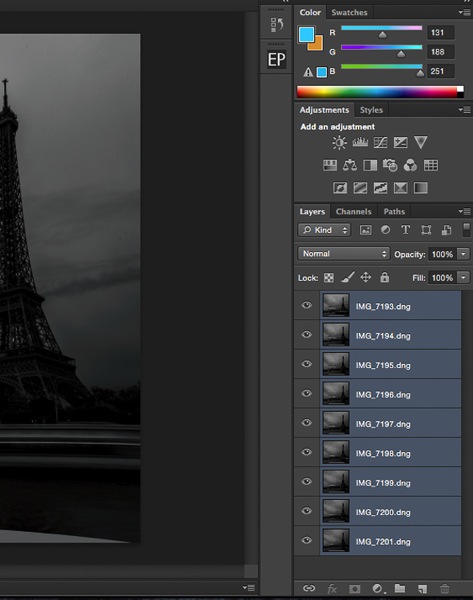
    IMAGE8

    IMAGE9

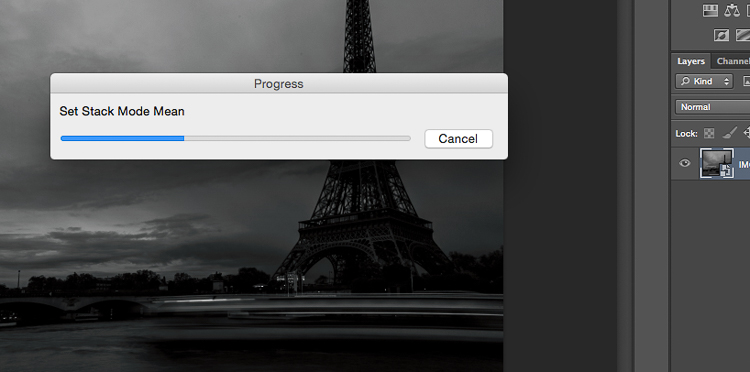
    After that go to Layers -> Smart Objects -> Stacking -> Mean.
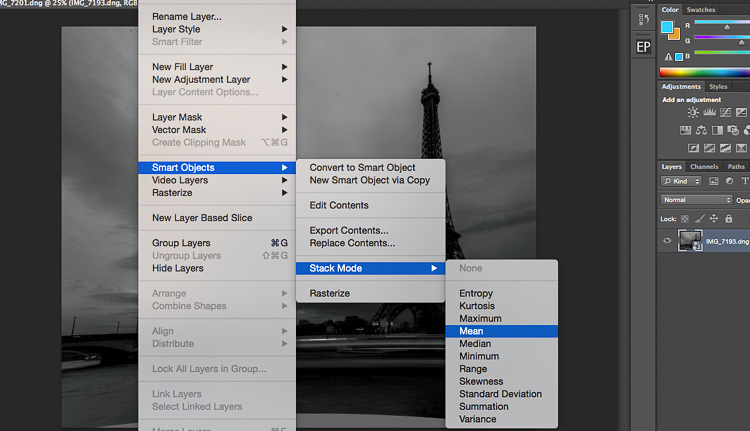
    IMAGE10

    IMAGE11

    Photoshop will create a nice long exposure now, combining all the layers.
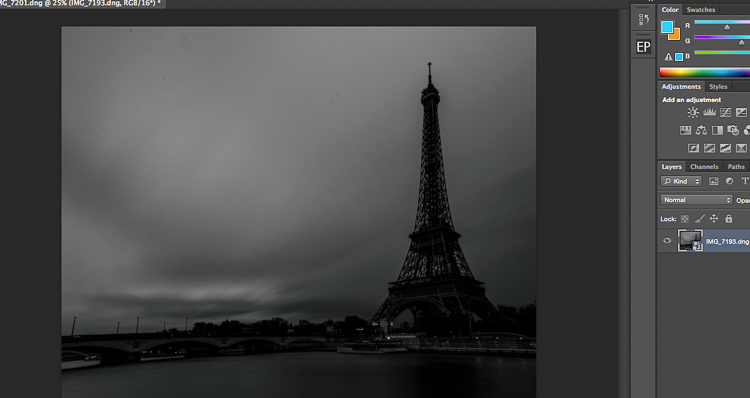
    IMAGE12

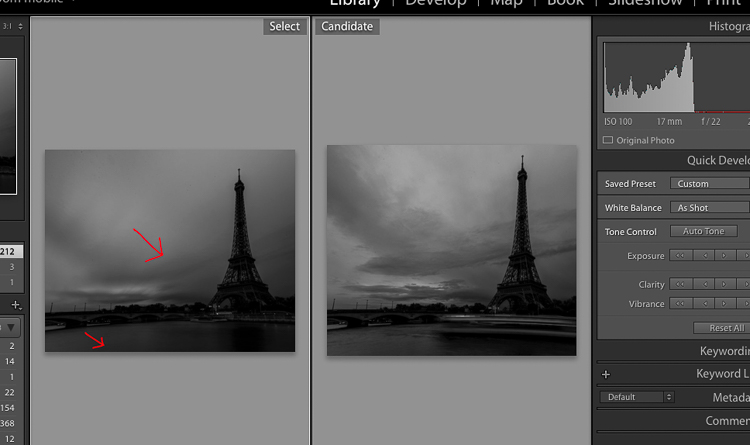
    Here’s the before and after:

    IMAGE13

    Before is on the right of a single image – after is on the left.

    Conclusion

    You don’t need super dark expensive filters to create long exposures. Of course, you will get the best results with them, but this is a pretty cool alternative. Now personally as a 19 year old student, I cannot spend a lot of money on gear, and so far these two hacks have worked perfectly for me.
    IMG_7663-Edit

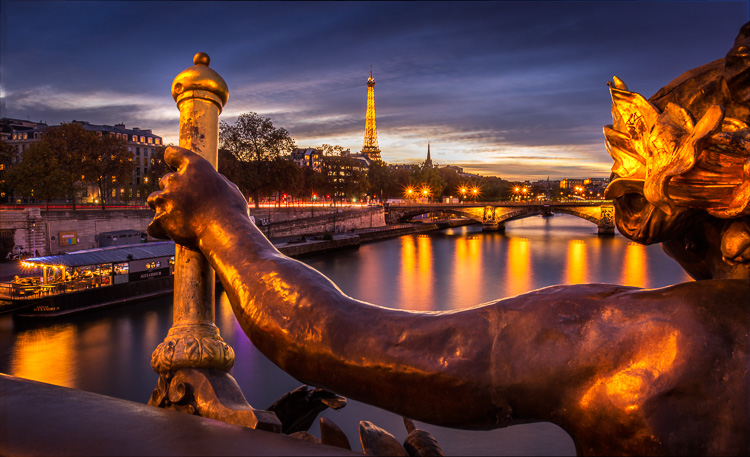
    Enjoy the art, and share your hacked long exposure images in the comments below. I’d love to see your results.

    googletag.cmd.push(function() {
    tablet_slots.push( googletag.defineSlot( “/1005424/_dPSv4_tab-all-article-bottom_(300×250)”, [300, 250], “pb-ad-78623” ).addService( googletag.pubads() ) ); } );

    googletag.cmd.push(function() {
    mobile_slots.push( googletag.defineSlot( “/1005424/_dPSv4_mob-all-article-bottom_(300×250)”, [300, 250], “pb-ad-78158” ).addService( googletag.pubads() ) ); } );

    The post 2 Long Exposure Photography Hacks to Try if You Don’t Have an ND Filter by Yacine Bessekhouad appeared first on Digital Photography School.


    Digital Photography School

  • 10 Tips for Great Butterfly Photos

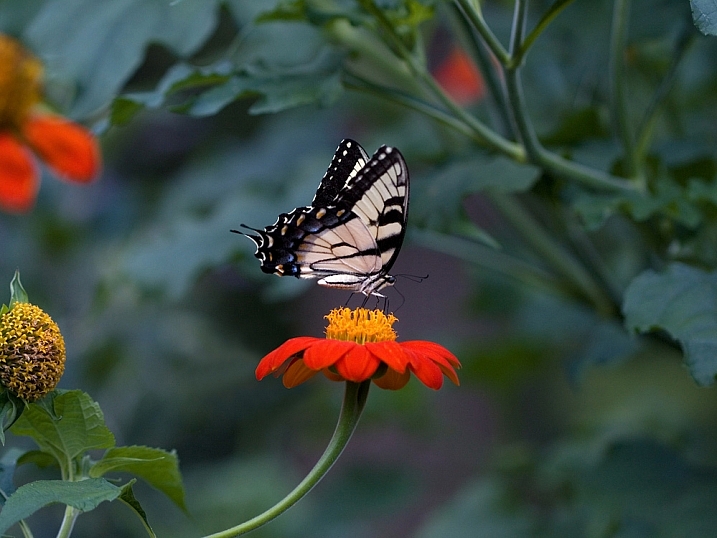
    Butterflies are wonderful subjects for photographs, but not always the easiest subject to shoot. You don’t have to wing it anymore, and let good shots be a product of chance. Follow these tips and you’ll come home with some great butterfly photos.
    how-to-photograph-butterflies

    1. Consider shooting with a telephoto macro lens

    To shoot close-ups of butterflies, you’ll want to use a telephoto macros lens. To get great shots, you need to get close to the butterfly, and having a 100mm or longer macro will help. If you don’t have a macro, don’t be discouraged, you can still make great shots with your zoom lens, you’ll just need to shoot more of the environment, but you can make beautiful images that way too.

    2. Find a location with flowering plants that attract butterflies

    how-to-photograph-butterflies2

    Specific plants, such as the butterfly bush, are known to attract butterflies. See if you can find a location in a park, zoo, or arboretum that has a flower garden with plants chosen specifically to attract butterflies. The more subjects you have to photograph, the better your chances are at nailing the perfect butterfly shot.

    3. Pick a spot and wait for the butterflies to come to you

    how-to-photograph-butterflies4

    Once you’ve found your garden, find an area that seems to have a lot of butterflies around. While photographing butterflies in flight seems like a great idea, it’s pretty difficult, and it will likely leave you frustrated.

    Take a minute or two and just observe. Butterflies seem to come back to the same flower over and over again. Just watch, then pick a flower and wait for the butterfly to come to you. I usually choose a flower that is in the shade. Harsh shadows take away from the beauty of the photograph. I also watch the background to make sure that it compliments the butterfly.

    4. Use a monopod or a tripodHow-to-shoot-butterflies1

    If you use a tripod, don’t lock it in. Leave the head loose, to give you some flexibility. I like using a tripod over a monopod for shooting butterflies. It helps me keep the camera in place and ready, and I can take my eye from the viewfinder as I watch and wait for them to come to my flower. Using a tripod also helps me to frame my photo ahead of time to keep the background very clean.

    5. Shoot in manual exposure mode

    In a situation like this, I prefer to shoot in manual mode. When I am focused on one particular area, the lighting, and therefore my exposure, isn’t going to change, or at least not very much. I like to shoot at least 1/500th of a second. I prefer to use a wide aperture for a narrow depth of field. But, if you are just starting out, give yourself a break by using an aperture that will give you more depth of field – f/8 would be a great starting point and you can adjust from there.

    how-to-photograph-butterflies5

    6. Focus on the butterfly’s eyes

    Some photographers like to focus on the wings, I choose to make sure the eye is as sharp as can be, and if the wings fall off focus a little bit, that’s okay. It’s easier to use a bigger depth of field, like f/8 or f/11, so I encourage you to try that first.

    I like to use a smaller f/stop in order to throw the background out of focus. It is much more challenging to shoot that way, but I like the effect it gives. It makes the butterfly really stand out from the background instead of blending in to its surroundings.

    7. Shoot the butterfly in profile

    how-to-photograph-butterflies6

    If you are using a larger aperture, and shallow depth of field – shoot the butterfly in profile. That way, you have more of the butterfly in focus. I also love to see how the antennae stands out from the background, and love the details of their legs. Yes, there is beauty in the wings, but there is also an awe in those tiny legs that support the butterfly, as well as its tendril. Look beyond the obvious, to details for outstanding photographs.

    8. Shoot tight as well as loose to capture the environment

    how-to-photograph-butterflies3

    Notice the differences between the photographs above and below. It’s the same species of butterfly, in the same field of flowers – but one shot is cropped tighter and one is framed looser, with more space around the butterfly. Both are successful. Take note in the top photograph, how the antennae are framed with the orange flower to make them stand out. If my angle had been such to have the darker green in the background, it may not have been as successful.

    Also note that the orange in the wings mimics the orange flowers. Shooting great butterfly shots goes beyond just taking sharp photographs of wings!

    how-to-photograph-butterflies7

    9. Break the profile rule (above)

    I love this photograph because it feels like this butterfly is moving forward, into a new place. The head is sharp and the lower wings fall out of focus due to the narrow depth of field, but in this case, it really works because it pulls out attention to the butterfly’s eyes, and into the photograph. It gives the viewer the feel of looking over the shoulder of the butterfly into some new place.

    how-to-photograph-butterflies8

    This photo is successful because it moves beyond recording what the wings look like and creates a mood and sense of movement and anticipation.

    10. Have patience and have fun!

    Beautiful butterfly photos take time and patience, but they are worth it. If you don’t get it your first time out, keep trying. It’s a great chance to hone your skills and you might get an amazing shot.

    Please share your questions and butterfly images below and also remember to post them on the weekly challenge: Butterflies and Bugs happening here.

    googletag.cmd.push(function() {
    tablet_slots.push( googletag.defineSlot( “/1005424/_dPSv4_tab-all-article-bottom_(300×250)”, [300, 250], “pb-ad-78623” ).addService( googletag.pubads() ) ); } );

    googletag.cmd.push(function() {
    mobile_slots.push( googletag.defineSlot( “/1005424/_dPSv4_mob-all-article-bottom_(300×250)”, [300, 250], “pb-ad-78158” ).addService( googletag.pubads() ) ); } );

    The post 10 Tips for Great Butterfly Photos by Vickie Lewis appeared first on Digital Photography School.


    Digital Photography School