Blog

  • Small in Japan: Tokyo’s Unique Museum of Miniature Architectural Models

    [ By WebUrbanist in Architecture & Public & Institutional. ]

    archidepot storage

    The first of its kind, this Japanese museum focuses exclusively on showcasing architectural models through rotating displays of miniatures, treating these crafted works as their own subset of art. The Archi-Depot in Tokyo is a huge warehouse space with 17-foot ceilings and a dazzling array of models from everyday architects as well as famous designers alike.

    model warehouse

    architectural models

    Each model comes with a QR code that provides information about the work, including blueprints, renderings and photographs of finished works as well as details about the architects.

    model shelves

    model storage

    Special lighting and climate control features help preserve and protect the models, just like art in an ordinary museum. The institution is as much oriented toward maintaining these works as it is toward displaying them.

    model mini

    model space japan

    These miniature buildings can be fantastic in their details and visual expression, but are often only seen behind closed doors in architecture firms. This museum takes these carefully-constructed works and puts them on public display.

    model city

    model figure gound

    Featured architects include Kengo Kuma, the designer selected to create the 2020 World Olympics Stadium, as well as Shigeru Ban, famous for his work with paper and cardboard.

    model visitor

    model racks

    Not all of the models represent buildings either under construction or already completed. Some feature conceptual pieces or draft works that for financial or other reasons will never be built. Shelf space is also rented out to architectural firms needing a place to store their models (and, of course, wanting to advertise their skills to a broader audience).

    model neat

    model making

    “Most architects have a store room full of lovely models that no one gets to see. But the situation is worse in offices in Japan, where space is really at a premium,” explained Klein Dytham co-founder Mark Dytham. “So this initiative is really brilliant – it’s a win-win for the architect and Archi-Depot. You rent a set of tall shelves, display your models on the lower shelves, and store the boxes and cases on the upper shelves. Hey presto, an instant architectural model museum with works by most of Japan’s leading architects.”

    Share on Facebook


    [ By WebUrbanist in Architecture & Public & Institutional. ]

    [ WebUrbanist | Archives | Galleries | Privacy | TOS ]


    WebUrbanist

  • Photokina 2016: Canon EOS M5 quick look video

    The Canon EOS M5 launches the M line of mirrorless cameras into greater significance than ever before. With abundant external controls, a mature touchscreen interface and extremely impressive Dual Pixel autofocus, it’s a camera we can’t help but like, even if we wish it had turned up to the mirrorless party a little earlier. And sure, it may not have headline features like 4K or high frame rate video, but Canon clearly knows how to make a camera that is both comfortable to hold and pleasing to use.

    We stopped by Canon’s stand at Photokina 2016 and talked with Canon product specialist Hin Pang to talk a little more about what makes the EOS M5 so likeable.

    Articles: Digital Photography Review (dpreview.com)

  • Getty Images and Instagram announce grant winners

    Getty Images Instagram Grant Winners Announced

    Photo by Girma Berta, @gboxcreative, Getty Images Instagram Grant Recipient 2016

    Getty Images and Instagram have announced the winners of the second annual Getty Images Instagram Grant, a program founded to support photographers using Instagram to document stories from underrepresented communities around the world.

    The three winners will receive grants of $ 10,000 and will also have their work exhibited at the Photoville photography festival in New York from September 21-25. Click through to learn about the recipients and to see their winning images.

    Christian Rodriguez

    Photo by Christian Rodriguez, @christian_foto, Getty Images Instagram Grant Recipient 2016

    Christian Rodriguez, a documentary photographer from Uruguay, received a grant for his project Teen Mom, which depicts teen pregnancy in Latin America. Directly impacted by teenage motherhood, Christian hopes to raise awareness of the issue and highlight its impact on local communities. He finds inspiration in the literary trend of magical realism and considers Instagram a powerful tool to gain feedback and information about the realities many teenagers are faced with.

    Christian Rodriguez

    Photo by Christian Rodriguez, @christian_foto, Getty Images Instagram Grant Recipient 2016

    Portrait of Graciela (13) , Norma (8) and Lupita (7) hiding behind their house in a small village called Ocotal Grande in Veracruz. They belong to the popoluca community. Popoluca is a Nahuatl term (meaning “gibberish, unintelligible speech”) given to various indigenous communities of southeastern Veracruz.

    Christian Rodriguez

    Photo by Christian Rodriguez, @christian_foto, Getty Images Instagram Grant Recipient 2016

    Gloria (13) belongs to the Mixe Community of Maluco, a small village in the north of the “Itsmo de Tehuantepec”, Oaxaca. She lives with her mother and 8 of her 10 siblings, who are between 4 and 20 years old. Gloria became mother at the age of 12, consequence of the constant sexual abuse of her father who has also attacked two of her sisters, aged 8 and 16.

    Christian Rodriguez

    Photo by Christian Rodriguez, @christian_foto, Getty Images Instagram Grant Recipient 2016

    Angela Mieres (15) hugs her sister Patricia during labor. Her boyfriend and father of the baby was shot dead 20 days before birth.

    Christian Rodriguez

    Photo by Christian Rodriguez, @christian_foto, Getty Images Instagram Grant Recipient 2016

    Micaela and her son, Franco. Micaela’s mother was, like her, a teenage mother.

    Ronny Sen

    Photo by Ronny Sen, @ronnysen, @whatdoestheendoftimelooklike, Getty Images Instagram Grant Recipient 2016

    Children wait for their parents to return from work, both of whom are coal pickers inside a coal mine in Jharia.

    Ronny Sen, from India, received a grant for his work documenting the fires that have burned for just over one hundred years in mineral-rich Jharia. A documentary photographer compelled to visually document his immediate reality, Ronny’s work uses both photography and videography to spotlight the plight of people who have been affected by big corporations and depicts survival in an apocalyptic-like landscape.

    Ronny Sen

    Photo by Ronny Sen, @ronnysen, @whatdoestheendoftimelooklike, Getty Images Instagram Grant Recipient 2016

    The wall of a broken temple in a village near a coal mine in Jharia. Due to the blasting and the underground fire lots of the buildings and houses in nearby villages are being destroyed.

    Ronny Sen

    Photo by Ronny Sen, @ronnysen, @whatdoestheendoftimelooklike, Getty Images Instagram Grant Recipient 2016

    A contractual labour inside one of the coal mines in Jharia. He will make two dollars after loading almost five trucks with coal in Jharia.

    Ronny Sen

    Photo by Ronny Sen, @ronnysen, @whatdoestheendoftimelooklike, Getty Images Instagram Grant Recipient 2016

    Coal scavengers work very early in the morning before the mine officials come inside the mines in Jharia.

    Girma Berta

    Photo by Girma Berta, @gboxcreative, Getty Images Instagram Grant Recipient 2016

    Girma Berta resides in Addis Ababa and uses his iPhone to capture the vibrant color and grunge of street life in the capital of Ethiopia. Girma uses his background in graphics and painting as a guide for lighting and composition, playing with colors and infusing street photography with fine art. Girma’s project, Moving Shadows, showcases local street scenes against backdrops of color. A member of @everydayafrica, he uses Instagram as a platform for self-expression and to share his work with the rest of the world. 

    Girma Berta

    Photo by Girma Berta, @gboxcreative, Getty Images Instagram Grant Recipient 2016

    Girma Berta

    Photo by Girma Berta, @gboxcreative, Getty Images Instagram Grant Recipient 2016

    Girma Berta

    Photo by Girma Berta, @gboxcreative, Getty Images Instagram Grant Recipient 2016

    Articles: Digital Photography Review (dpreview.com)

  • Urban Rigger: Floating Student Housing Made of Shipping Containers

    [ By SA Rogers in Architecture & Houses & Residential. ]

    floating-student-housing-1

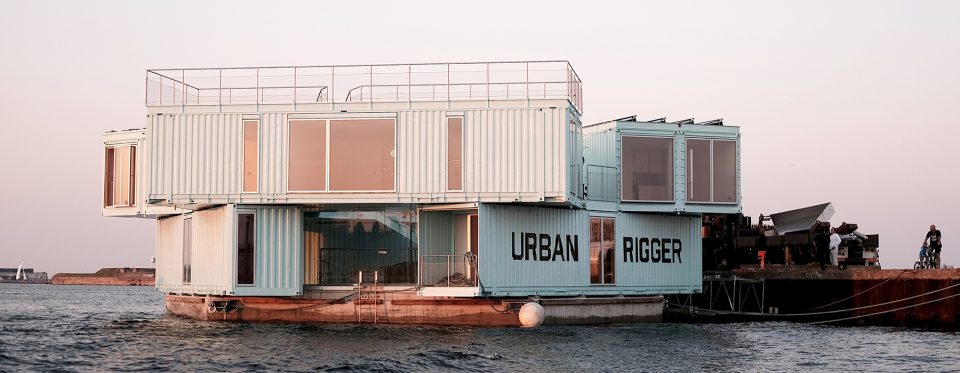
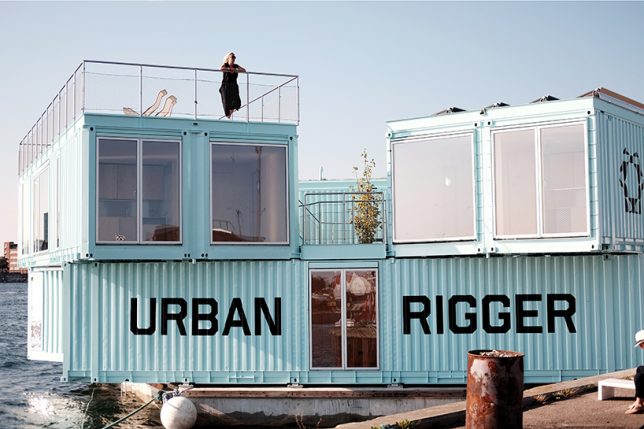
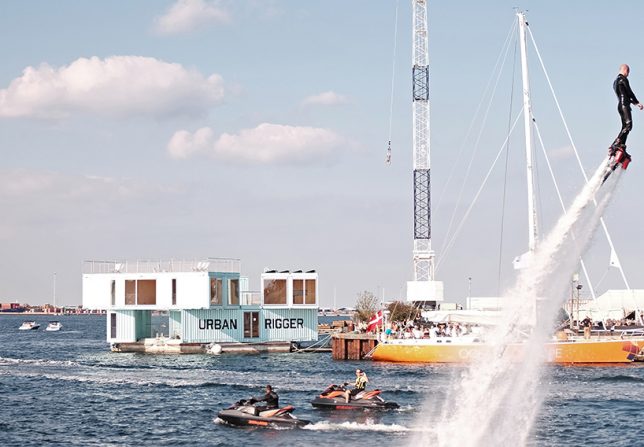
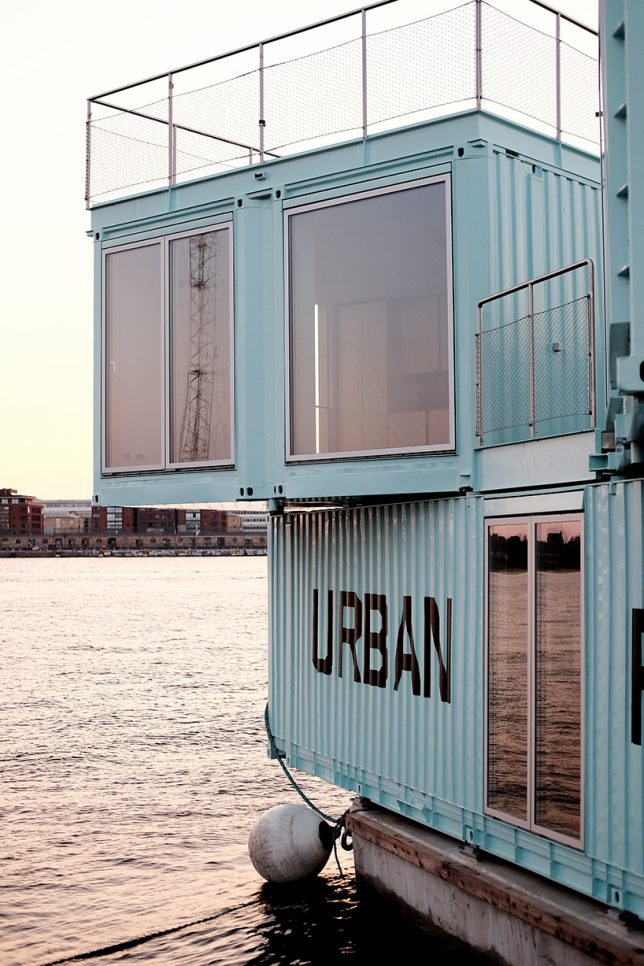
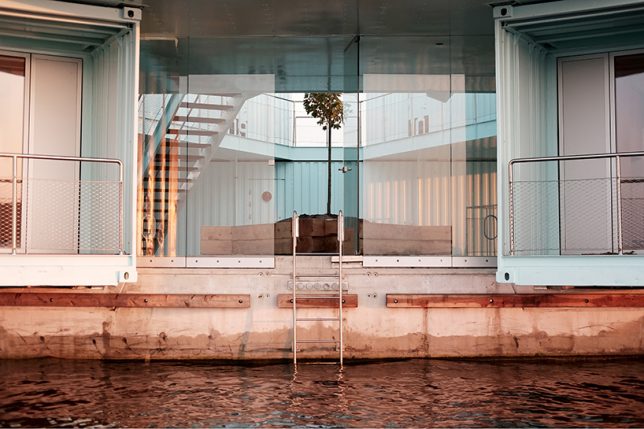
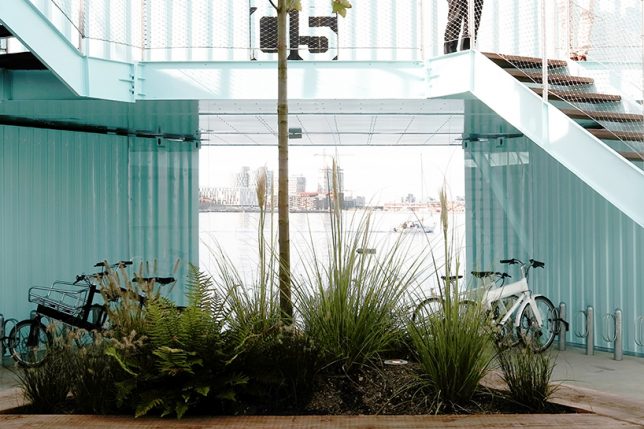
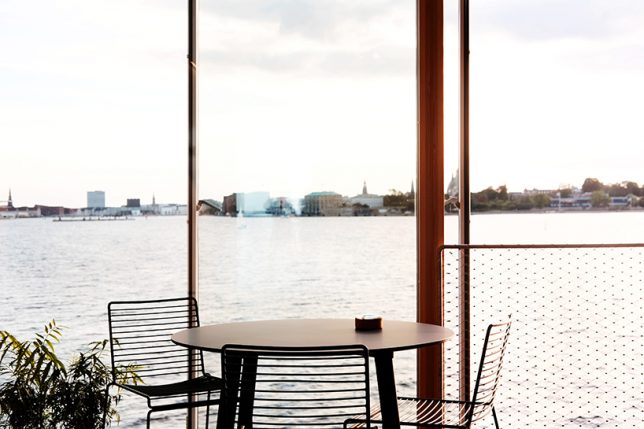
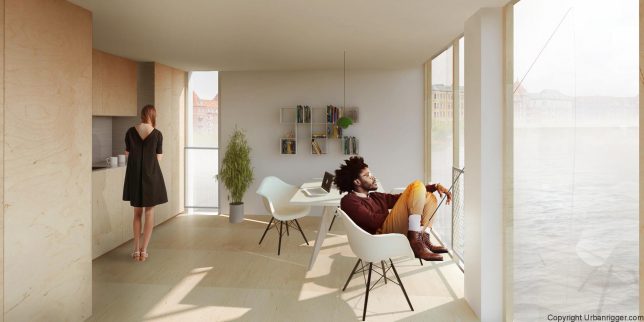
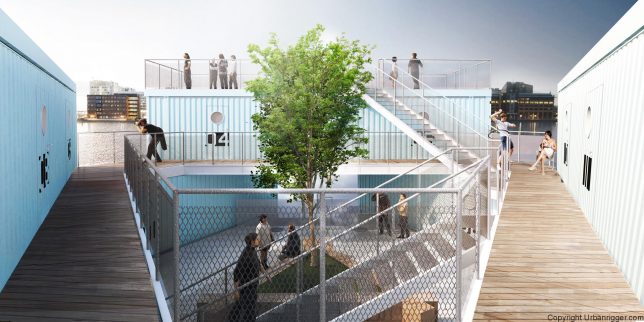
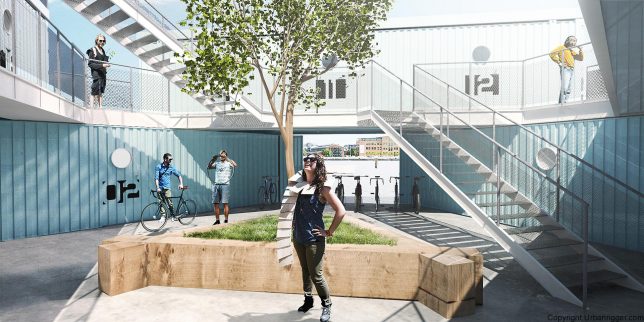
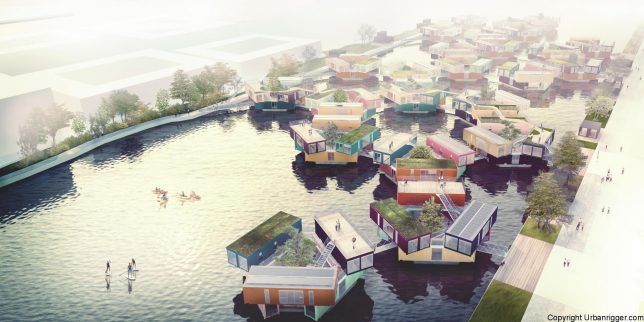
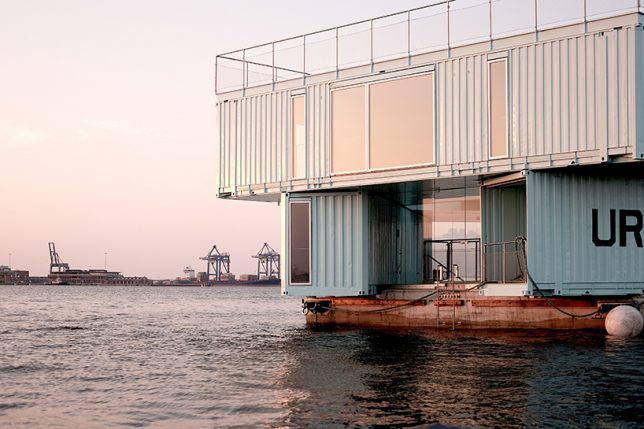
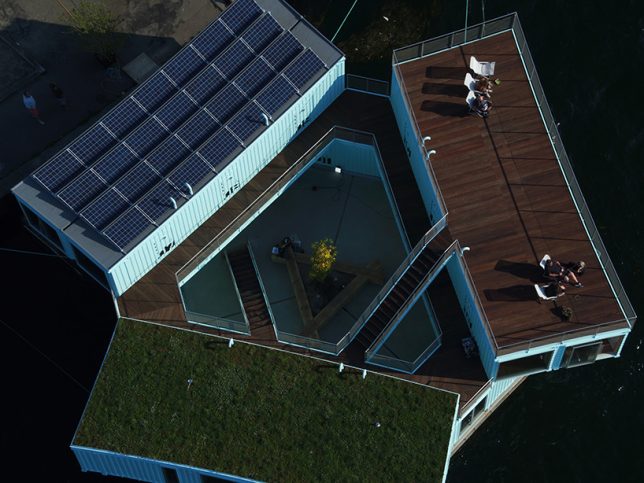
    This hexagonal floating student housing complex made of stacked reclaimed shipping containers is better than any dorm you could hope to live in. ‘Urban Rigger’ by Bjarke Ingels (BIG) creates a sustainable solution to the pressing need for additional accommodations for students in the city, providing 15 living spaces arranged around an internal courtyard. Completely carbon-neutral, the structures are solar-powered and make use of hydro source heating and low-energy pumps, and the first unit opened to the public on September 21st.

    floating-student-housing-4

    floating-student-housing-2

    floating-student-housing-3

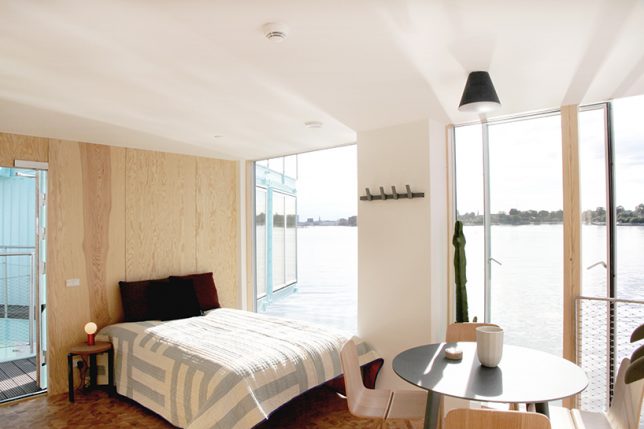
    Each apartment is available to college students at $ 600 per month and includes a private bedroom, bathroom and kitchen. Occupants get access to the courtyard as well as a kayak landing, bathing platform, barbecue area and roof terrace. The pontoon basement features storage zones and fully automated laundry. It’s a pretty sweet deal for students, who get to gaze out of giant windows at the sunset every evening and enjoy a water-centric lifestyle that most adults only dream about.

    floating-student-housing-5

    floating-student-housing-7

    floating-student-housing-8

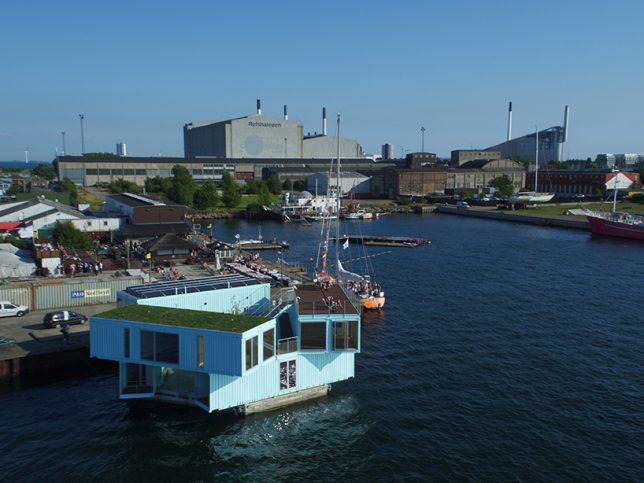
    Making use of the harbor ensures that students get to live close to the school, instead of far outside the city, where most affordable units are located. Eventually, BIG plans to create entire communities made up of multiple structures.

    floating-student-housing-9

    floating-student-housing-10

    urban-rigger-8

    “There are few strategies that allow cities to expand,” the architects explain. “Yet, Copenhagen’s harbor remains an underutilized and underdeveloped area at the heart of the city. By introducing a building typology optimized for harbor cities we can introduce a housing solution that will keep students at the heart of the city.”

    urban-rigger-9

    urban-rigger-10

    urban-rigger-11

    “Meanwhile, the standardized container system has been developed to allow goods to be transported by road, water or air, to anywhere in the world in a complex network of operators at a very low cots. By making use of the standard container system we are offered the framework of extremely flexible building typology.”

    floating-student-housing-6

    floating-student-housing-11

    “By stacking 9 container units in a circle, we can create 15 studio residences which frame a centralized winter garden; this is used as a common meeting place for students. The housing is also buoyant, like a boat, so that can be replicated in other harbor cities where affordable housing is needed, but space is limited.”

    Share on Facebook


    [ By SA Rogers in Architecture & Houses & Residential. ]

    [ WebUrbanist | Archives | Galleries | Privacy | TOS ]


    WebUrbanist

  • Foolography’s Unleashed is a tiny Bluetooth DSLR controller

    German company Foolography has launched a Kickstarter campaign for its latest product, the Unleashed smartphone DSLR remote control, and is showing a prototype device at its booth in Hall 4.1 at Photokina. The Unleashed is a tiny Bluetooth module that plugs into the USB and HDMI ports of your DSLR and allows you, via a dedicated app, to change camera settings, capture photos, record videos or create timelapses. You can also embed location information from the smartphone or an external GPS receiver in your images. 

    The Unleashed’s Bluetooth LE technology uses minimal power from the camera and does not require any charging. It automatically reconnects to the smartphone and, unlike Wi-Fi connected competitors, is always ready to be used. Its small dimensions mean that the camera hot shoe can be kept free and the Unleashed can stay on the camera at any time, even when in a bag or case.

    On the downside, Bluetooth LE does not provide enough bandwidth for the transmission of a live view image. However, the Unleashed extracts low resolution thumbnails that allow for basic checks of exposure and composition. The Foolography Unleashed Kickstarter campaign has already reached its funding goal but you can still pledge $ 129 to secure a device. Shipping is planned for June 2017. 

    Articles: Digital Photography Review (dpreview.com)

  • Lumulabs Lumu Power adds a light and color meter to your iPhone

    Lumulabs is showing off its new Lumu Power light and color temperature meter add-on for smartphones that was successfully funded through a Kickstarter campaign earlier this year. Attached to an iPhone, the Lumu Power can measure ambient light and flash output, as well as color temperature. It uses two sensors, one on each side of the half-dome design. A photodiode with CIE spectral luminous efficiency measures the light levels and a True Color sensor, which is compliant with the CIE 1931/DIN 5033 color standard, analyzes the color temperature. 

    The electronics are protected by a stainless steel housing and the device attaches to your Apple device via the Lighting connector. An Android version that uses a USB Type-C port is planned for next year.

    The diffusers are made from polycarbonate lexan, and like the original Lumu, the Lumu Power is controlled via a dedicated app. The latter is still in development but Lumulabs says new functions are added almost on a daily basis. Color temperature, illuminance flash output curve, flash duration and flash versus ambient light ratio are some of the functions that have already been implemented. You can pre-order now on the Lumu website for $ 229. Shipping is planned to start by the end of the month.

    Articles: Digital Photography Review (dpreview.com)

  • Palette offers physical controllers for your photo editing software

    In hall 4 at Photokina we had the chance to take a closer look at Palette’s system of customizable physical controllers for software, which started out as a crowdfunding project but have been available in retail for some time now. The system consists of a core unit with a small display and a range of buttons, dials and sliders that all come with a sturdy aluminum housing and attach to each other magnetically. 

    Palette can me made to work with any software but predefined setups are available for Adobe Photohop, Lightroom and other photo and video editing applications. You can switch between functions using buttons, or adjust parameters such as digital exposure compensation, contrast or hue with sliders or dials. Your personal profile can be created in the Palette app. Multiple profiles are supported for different users or workflows and the Palette application can be set to automatically switch profiles when the application focus on your computer changes. The Palette starter kit is available for $ 199 on the Palette website.

    Articles: Digital Photography Review (dpreview.com)

  • Rollei Actioncam 430 comes with 4K resolution and Full-HD slow motion

    Market leader GoPro launched its new action cam models at a Photokina event on Monday. Rollei already announced its latest top-end action camera about a month ago, but we just got the chance to look at the new device at the Rollei booth at Photokina.

    The Actioncam 430 offers impressive camera specs and can record 4K video at 30 fps, 2K at 60 fps, 120 fps at Full-HD resolution and up to 200 fps at 720p, allowing for the recording of high definition slow-motion footage. In stills mode the Sony image sensor captures 12MP photographs and the lens covers an angle of view of 180 degrees. Images can be framed and reviewed on a 2″ TFT display with a 320 x 240 pixel resolution and a status display at the front keeps you informed about current shooting mode, remaining recording time and battery status. 

    The Actioncam 430 can be remote-controlled via a mobile app and a wristband-style wireless remote, with a range of up to 15 meters, is included in the box as well. The Rollei is not waterproof but comes with a case that is recommended for depths of up to 40m/131ft. The camera is compatible with most GoPro accessories and available now in Europe for €249 (approximately $ 275). No information on availability in other regions has been announced yet.

    Articles: Digital Photography Review (dpreview.com)

  • Photokina 2016: Hands-on with Tamron’s SP 150-600mm F5-6.3 Di VC USD G2

    Hands-on with Tamron SP 150-600mm F5-6.3 Di VC USD G2

    Tamron’s new SP 150-600mm F5-6.3 Di VC USD G2 might look like little more than a refined version the previous 150-600mm, but the new version is actually a substantial redesign. 

    Hands-on with Tamron SP 150-600mm F5-6.3 Di VC USD G2

    The ‘G2’ in the name stands for second generation, reflecting several improvements to the design, including the now-standard SP level of build quality, and revamped Vibration Correction (VC) offering up to 4.5 stops of compensation. Optical construction comprises 21 elements in 13 groups, including three LD (Low Dispersion) lens elements.

    Hands-on with Tamron SP 150-600mm F5-6.3 Di VC USD G2

    Tamron’s ‘SP’ (Special Performance) designation is given only to the company’s highest-performing lenses, and the SP 150-600mm is the first zoom in Tamron’s new SP lineup. It is compatible with Tamron’s ‘TAP-in’ Console, which allows the lens to be customized to user preferences.

    Hands-on with Tamron SP 150-600mm F5-6.3 Di VC USD G2

    The 150-600mm has three VC settings, and one additional custom option (enabled via the Tap-In Console) activates Vibration Correction in video mode. This view also shows the rubber seal around the lens-mount, which keeps dust and moisture from getting into the camera. 

    Hands-on with Tamron SP 150-600mm F5-6.3 Di VC USD G2

    At full extension, the SP 150-600mm is a hefty lens, but the relatively small maximum aperture range keeps the deign relatively compact considering the telephoto reach. On an APS-C format camera, the effective focal length range increases to about 233-930mm equivalent. 

    Hands-on with Tamron SP 150-600mm F5-6.3 Di VC USD G2

    In addition to the main zoom lock, which prevents the zoom from extending beyond 150mm, a ‘Flex Zoom Lock’ mechanism has been added to keep the lens barrel fixed at any focal length of your choosing. 

    Hands-on with Tamron SP 150-600mm F5-6.3 Di VC USD G2

    The SP 150-600mm F5-6.3 Di VC USD G2 was launched alongside two new teleconverters. The 1.4X and 2X converters are moisture and dust-resistant, and turn the 150-600mm into a 210-840mm or 300-1200mm equivalent zoom on full-frame, respectively. 

    Articles: Digital Photography Review (dpreview.com)

  • How to Use 1 Natural Light Setup to Create 3 Different Portrait Looks

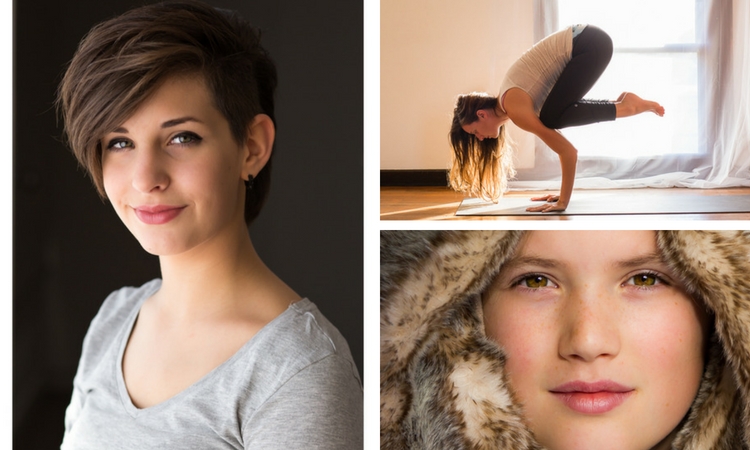
    As a portrait photographer, the majority of my work is shot on location. This can be outdoors or in my clients’ homes or places of business. I mostly shoot using natural light and have become adept at finding the best light source in any location as well as creating backgrounds that won’t interfere with the subjects. In this tutorial, I want to show you an easy, natural light portrait setup you can recreate in your own home. Simply by repositioning yourself and your model, you can create three distinctly different portraits from this one setup.
    one natural light setup - 3 looks

    No special lighting or fancy equipment is needed, and the techniques are straightforward and easy to master. Experiment to create different looks using various backdrops such as plain walls or sheets, or different outfits for your subject. You can also get different effects by changing your lens, distance to the subject, and experimenting with different apertures.

    Equipment

    Below is a list of the items I have used for this setup and suggested substitutes:

    • SHEER CURTAIN or FABRIC: You can buy a sheer curtain or length of fabric from any fabric or haberdashery store. I picked this one up from the clearance table at my local Spotlight store (Australia) for under $ 20.
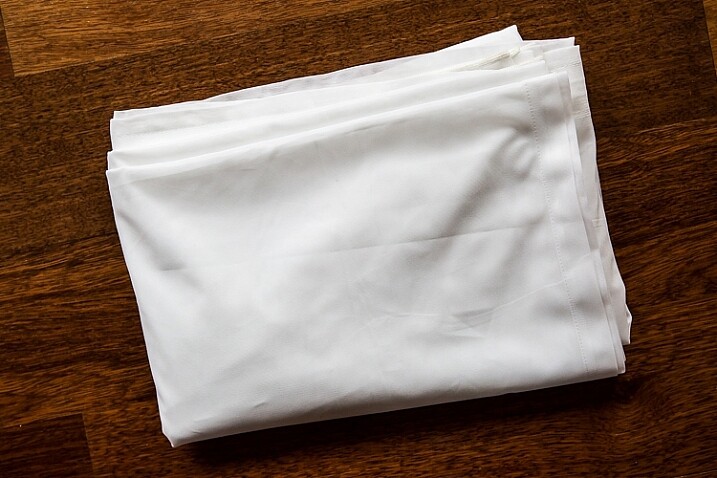
    Image showing basic natural light portrait setup using a white cloth

    A white sheer curtain or large sheet of sheer fabric will filter the window light.

    • REFLECTOR: I have a circular, five-way reflector that follows me everywhere. Each side has a different colour; white, silver, gold, and black, plus a diffuser. It folds into a neat little disc, is lightweight, and can be thrown into the back of my car. You will get endless use out of a portable reflector, and at around $ 30 from Amazon, it’s a worthwhile investment. However, if you don’t want to rush out and buy a reflector (or wait for your order to arrive before you start shooting) a large piece of white card, polystyrene, or foam board, will work equally well.
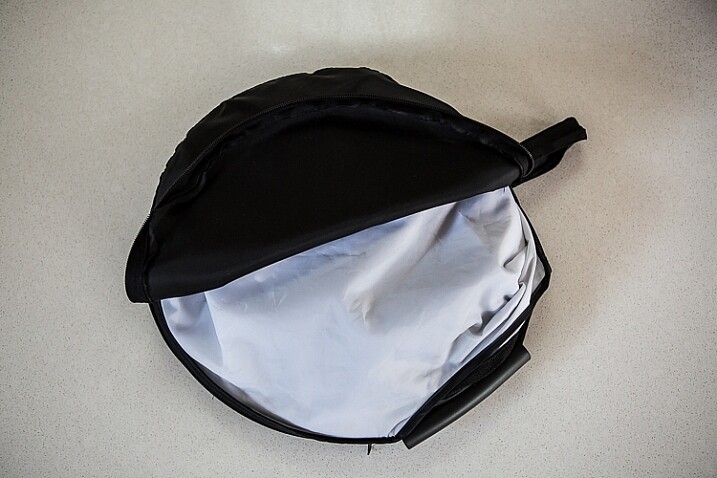
    Image showing basic natural light portrait set-up with a reflector

    This reflector was a great investment at around $ 30. It is lightweight and folds up compact to the size of a dinner plate.

    • BACKDROP CLAMPS: another Ebay or Amazon purchase, my backdrop clamps come in packs of 12 for under $ 20. These are infinitely useful for creating makeshift studios. In this instance, I used them to attach the sheer curtain to the rolled-up window blind. You can also use masking tape to stick the curtain directly onto the window, or use heavy-duty stationery clips.
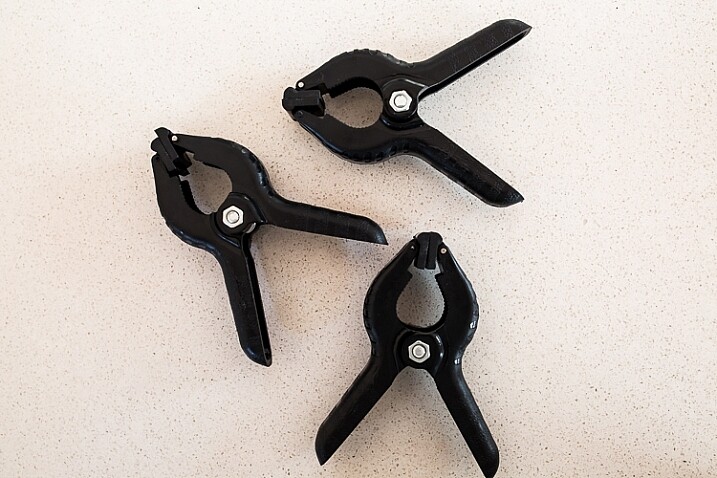
    clamps can be helpful for a natural light portrait setup

    Backdrop clamps can be purchased inexpensively from Ebay or Amazon and similar.

    Lens

    My favourite portraiture lens is the Canon EF 85mm f/1.8, but you can use a 50mm, a 100mm – whatever works in the space you have. A tighter space will require a shorter focal length.

    Basic portrait setup

    Look for a window or glass door with a good strong light source coming through, so that you can shoot at the lowest possible ISO. If the window has a sheer curtain, pull it across to filter the light. If there is no curtain, you can attach a piece of sheer fabric to the window using the backdrop clamps or masking tape.

    As you can see, the setup couldn’t be simpler. This is the corner of my living room, with sliding glass doors to the left of the shot. The strong afternoon light is filtered with a sheer curtain clipped to the bottom of the roller blinds. I have closed the curtains in the adjoining room to create a dark background for my subject. If your room layout doesn’t allow this, you can hang a sheet or large piece of coloured fabric behind your subject, or just use a plain wall.
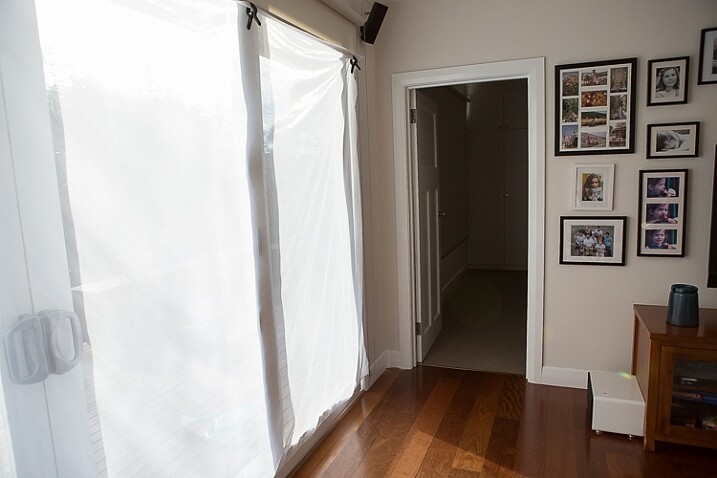
    natural light portrait setup background

    The setup couldn’t be simpler.

    As you can see in the setup below, I brought my model forward (away from the open door behind her). This is to ensure she has good light on her face, and that there is sufficient distance between her and the room behind her to make sure it is completely out of focus. In this pull-back shot, you can see some detail in the room behind her. However, in the first pair of portraits, further along, you can see no background detail. The room behind looks like a studio backdrop.

    Add a reflector

    If you are going to use a reflector, you’ll need someone to hold it for you. If there is no-one to help, try propping it on a chair. Let your creative photographer’s brain get to work and figure out a creative solution.
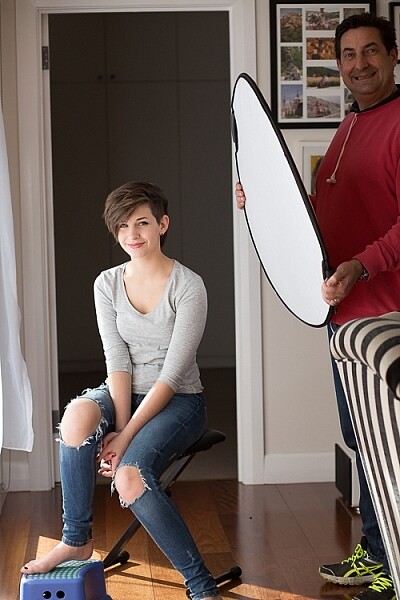
    natural light portrait setup reflector and assistant

    You’ll need an extra person to hold the reflector – in this case, my husband!

    Portrait #1: side lighting and a reflector

    This is my most-used natural light setup. Side lighting contours and shapes the face, and is flattering for most subjects. If your subject is male, or if you want to create a moodier portrait, you can try moving the reflector further away from your model or removing it altogether. This creates more contrast by increasing shadow on one side of the face.

    Your model can sit, stand, or even lie on the floor if the window is low enough. How you position your model’s face and body is up to you. To recreate the look below, your model’s face needs to be at a 90° angle to the main light source (the window). Her body turns 45º away from you. The door behind my model is opened and I darkened the background room to minimize distracting elements. Position the reflector on the shadowed side of her face, to bounce the light back and fill in the shadows

    In the photos below, the image on the left is shot without a reflector. The one on the right is shot with a reflector. The effect in this example is subtle because the light in this room is already balanced somewhat by small, high windows on the opposite wall to the main window. In the photo on the right, you can see how the reflector brightens the face and fills in the shadows, particularly the under-eye shadow of her left eye. It also brings out more detail and highlights in her hair and improves separation from the background.
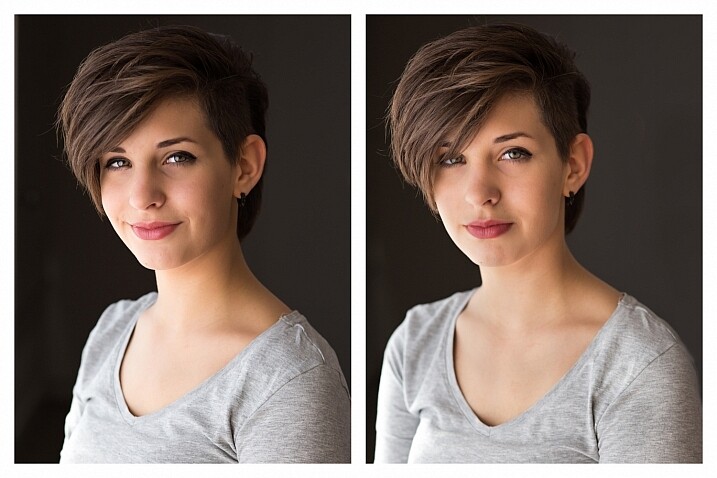
    natural light portrait setup with and without reflector

    Left (no reflector): ISO 320, f/4, 1/200th. Right (with reflector): ISO 320, f/4, 1/320th.

    Portrait #2: shooting into the backlight

    I love this technique for photographing women and girls. It creates soft, non-directional  lighting on the face, so is flattering to every age group. And the backlighting creates a gorgeous halo around the hair. This works especially well if the model wears her hair out, or wears a dress with some sheer elements – think darling little girls in fairy costumes and tutus!

    Technique for backlighting

    Using the same window setup as before, your model sits or stands with her back to the window. Position the reflector in front of her, bouncing the light back into her face. Your light meter will try to read the light coming from the window, and will underexpose your model’s face. You can obtain the correct exposure by getting in close to her face to set your exposure. You might also bracket your exposures and check the back of the camera until you’re happy with the result (review the histogram but note that the background area may show clipping – that’s okay). To get the exposure right on the face, you will lose detail in the background, which is the idea!
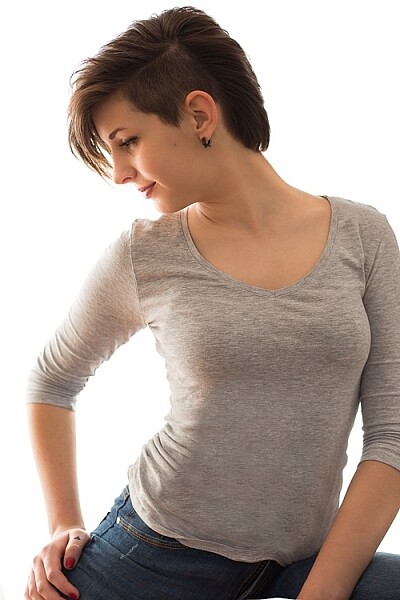
    natural light portrait setup backlighting

    ISO 320, f/4, 1/160th

    The photo below is a yoga instructor posing in front of a window on the floor of her studio. The backlighting is beautiful through her hair, and the warm tones of the timber floor reflect back on her skin to give her a golden hue. The lighting technique is identical to the previous photo. But in this photo, I have allowed the curtain and window to be visible as I think it adds something to the scene.
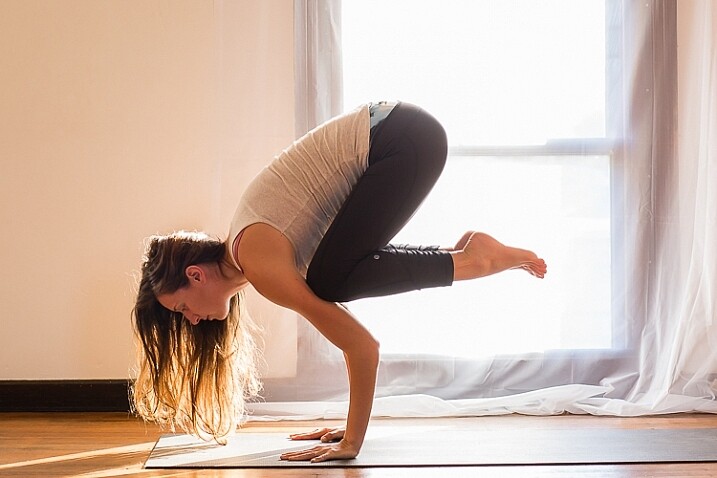
    natural light portrait setup backlighting

    ISO 500, f/5, 1/80th.

    Portrait #3: shooting with front-on light

    For this set-up, the sheer curtain remains in place. Your model faces the window, and you position yourself between your model and the window. If you are taking a wider shot than the example below, you may be able to bounce light into the back of her hair with a reflector.

    Frontal lighting removes virtually every shadow on the face. It brings out detail and colour in the eyes, and can be quite striking with the right subject. However, this technique is not for everyone. It can give the face a flat, two-dimensional appearance, and if the light source is too strong, your subject will squint. This lighting tends to highlight every imperfection, which is fine if your subject happens to be young and gorgeous. But, it can be too harsh for a mature model, or someone with a lot of blemishes.

    Examples of front lighting

    The photo below of a young girl snuggled into a faux-fur hood has been enduringly popular on my social media sites. It was shot using this lighting technique in warm, late-afternoon light.
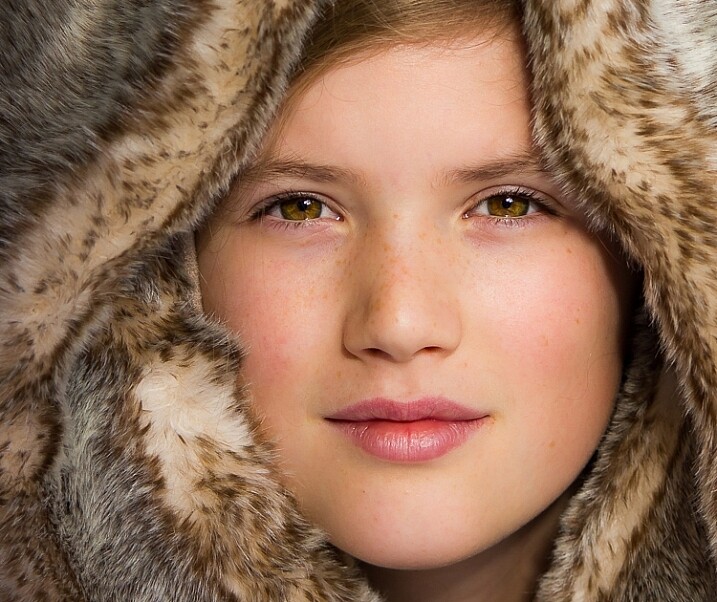
    natural light portrait setup front lighting

    ISO 400, f/4.5, 1/200th.

    The photo below of my daughter, sun-kissed after a day at the beach, was photographed with front-on lighting. As we were  on vacation and I didn’t have my usual bag of tricks at hand, I didn’t use a sheer curtain to filter the light. As you can see, the highlights are more pronounced than those in the first photo, but the effect is similar.
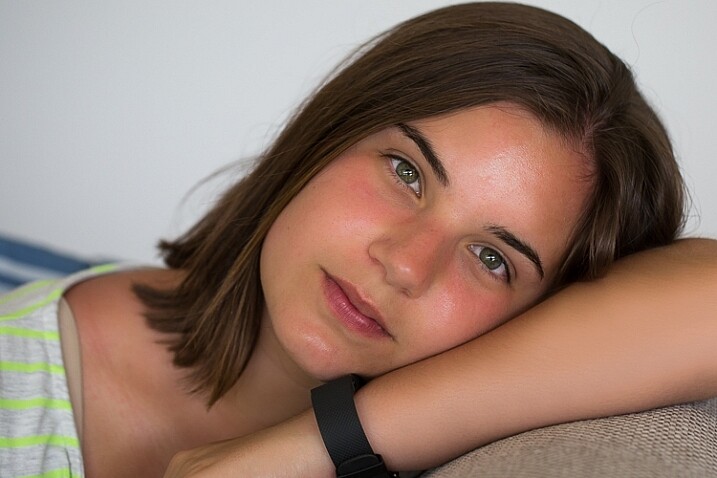
    natural light portrait setup front lighting

    ISO 250, f/3.5, 1/125th.

    Now it’s your turn

    I’d love to hear how you get on trying this setup at home. Please post any questions, comments or examples of your portraits in the comments section below.

    Don’t forget, there is also our dPS Facebook Group, which you can join to share your photos and get a critique from other dPS readers.

    googletag.cmd.push(function() {
    tablet_slots.push( googletag.defineSlot( “/1005424/_dPSv4_tab-all-article-bottom_(300×250)”, [300, 250], “pb-ad-78623” ).addService( googletag.pubads() ) ); } );

    googletag.cmd.push(function() {
    mobile_slots.push( googletag.defineSlot( “/1005424/_dPSv4_mob-all-article-bottom_(300×250)”, [300, 250], “pb-ad-78158” ).addService( googletag.pubads() ) ); } );

    The post How to Use 1 Natural Light Setup to Create 3 Different Portrait Looks by Karen Quist appeared first on Digital Photography School.


    Digital Photography School