Blog

  • Top 5 Nik Collection Filters to Improve Your Landscape Photos

    One of the best image editing programs available right now happens to be free. The Nik Collection by Google is a desktop photo editing software that was recently declared free of charge earlier this year. Today, the Nik Collection makes available over 55 filters that do everything from old camera and film simulation, to image sharpening, noise reduction, and basic retouching and correcting of photos. Of these many filters, there are 5 within the Color Efex Pro 4 toolset  that are particularly useful for landscape photos. This article will highlight these essential filters and why they are so valuable.

    Nik Collection Color Efex Pro free photo editing software

    Note that all tools and filters within the Nik Collection contain certain points that can be individually controlled to apply the filter effect as little, or as much, as you desire. You can also add the effects of several different filters, so be sure to play around with as many as possible to achieve the look you’re after.

    #1 – Pro Contrast Filter

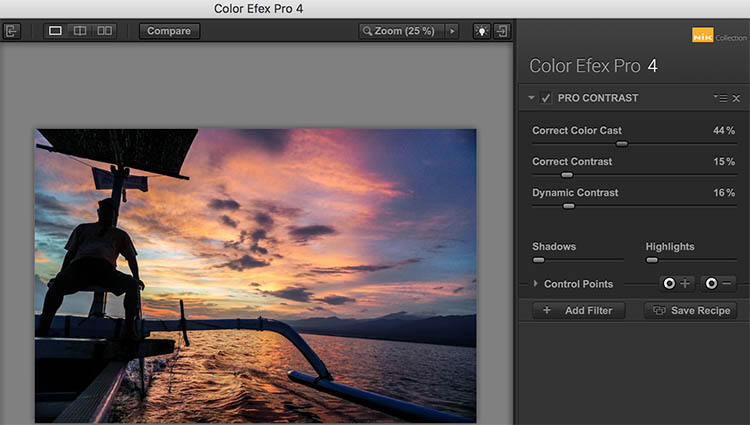
    Have a photo that needs higher levels of contrast without sacrificing detail? The Nik Pro Contrast filter tackles this problem with three filter settings that you can tinker with.

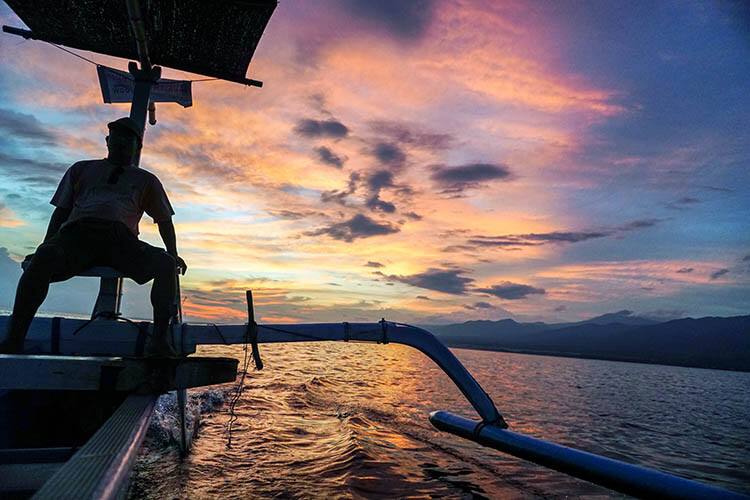
    1. Correct Color Cast reduces any inherent color cast in an image, such as the orange hue the sunrise casts onto the water below.
    2. Correct Contrast offers general contrast adjustment.
    3. Dynamic Contrast delivers the most pop by boosting contrast in flat areas of the photo. The latter feature is also demonstrated in the Polarization After photo below.
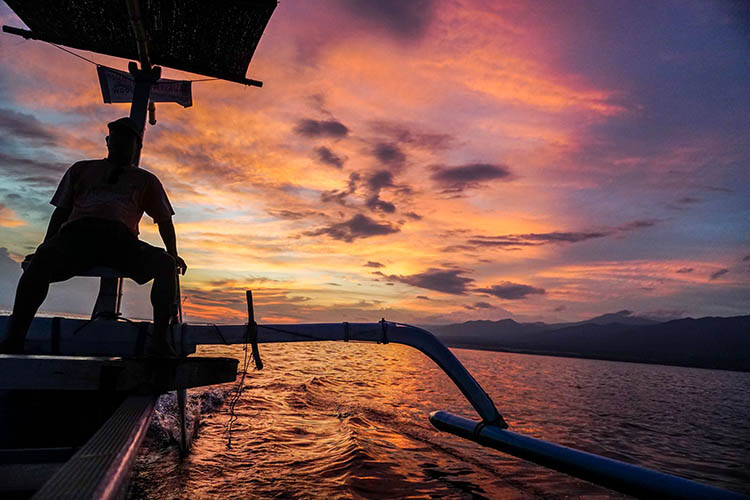
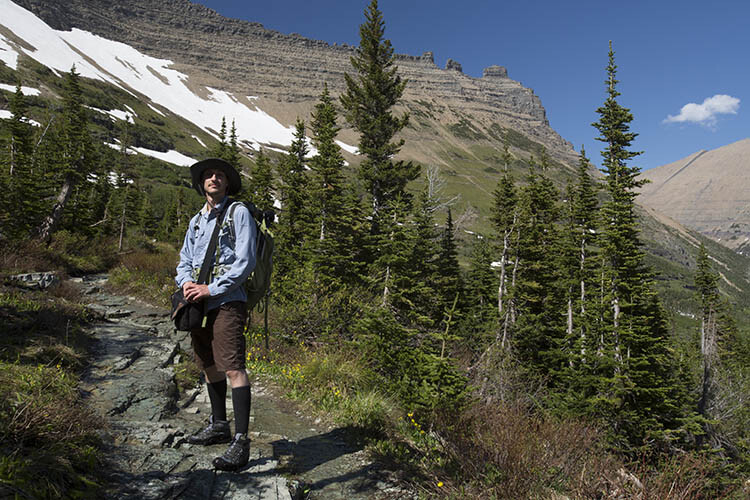
    Nik - Pro Contrast 1

    Before

    Nik - Pro Contrast 2

    After – with the Pro Contrast filter applied
    Nik - Pro Contrast

    #2 – Polarization Filter

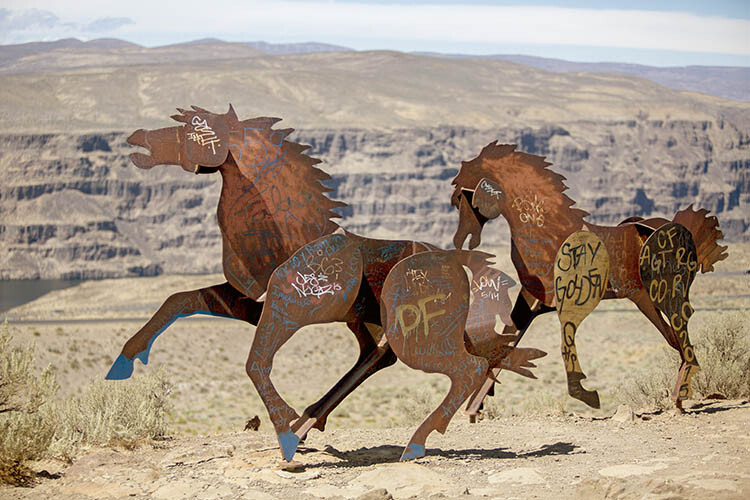
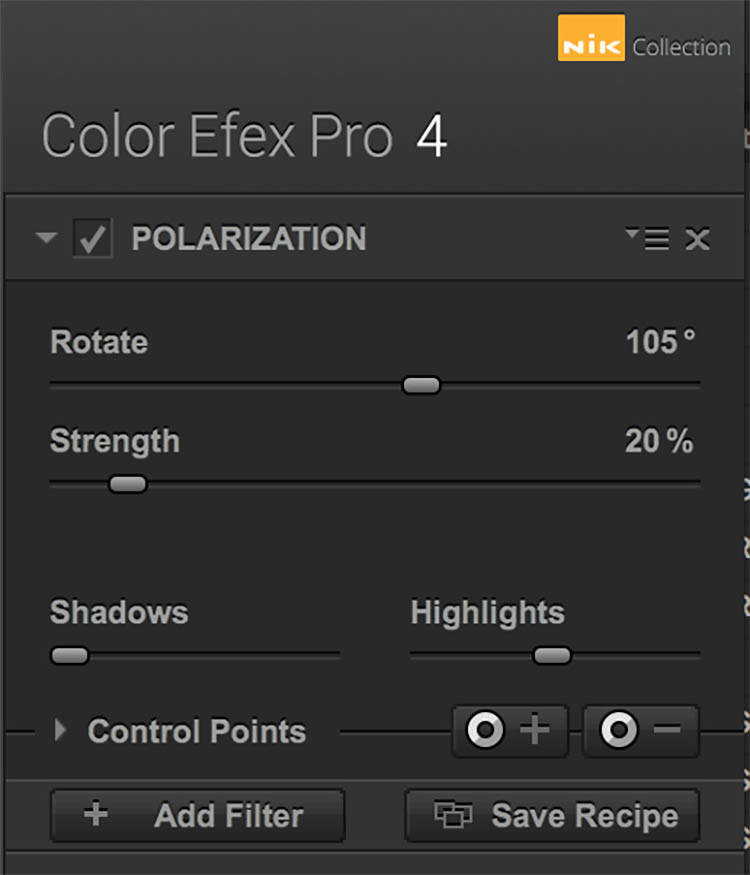
    For landscape photographers, the circular polarizer is a must-have glass filter that enhances blue skies and reduces water glare. It is often said that the effects of a polarizer can’t be replicated in post-production. But Color Efex Pro 4 offers a pretty impressive Polarization effect that can be applied to any photo, even if it was taken without a glass circular polarizer.

    There are two Polarization filter settings that can be tweaked: Rotate, which simulates the effect of physically rotating the glass filter in front of your lens, and Strength, which controls how much of the filter effect is applied.

    Nik - Polarizer 1

    Before

    Nik - Polarizer 2

    After – with Polarization and Pro Contrast filters applied.
    Nik - Polarizer

    #3 – Skylight Filter

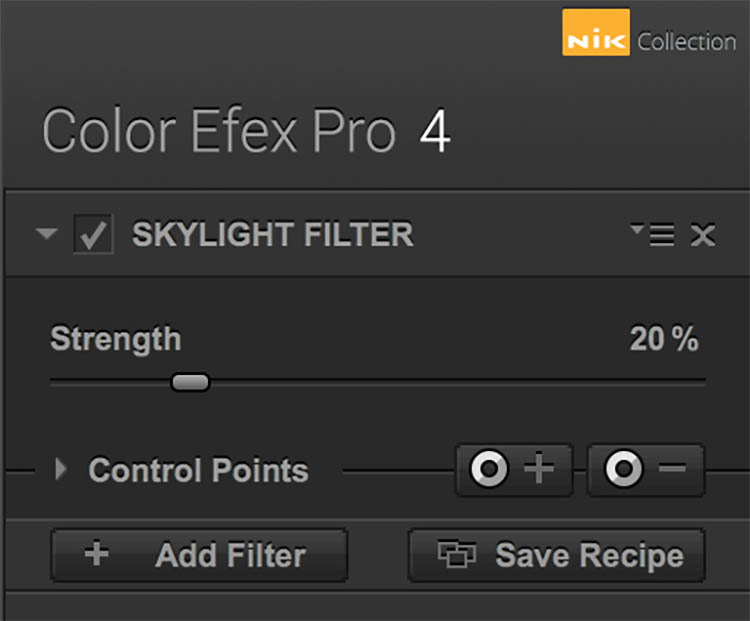
    This handy filter simulates a glass warming filter by removing any blue color cast and applying a warming effect to your photo. Control the strength of the filter to determine how much warmth is added.
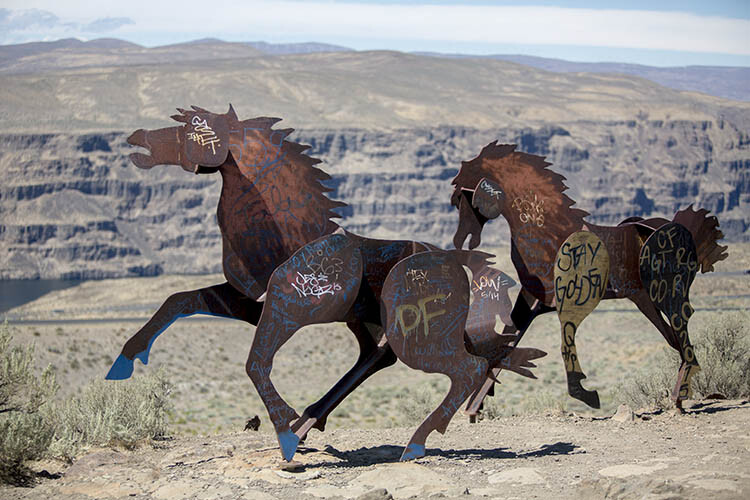
    Nik - Skylight 1

    Before

    Nik - Skylight 2

    After – with Skylight filter applied

    Nik - Skylight

    #4 – Graduated Neutral Density Filter

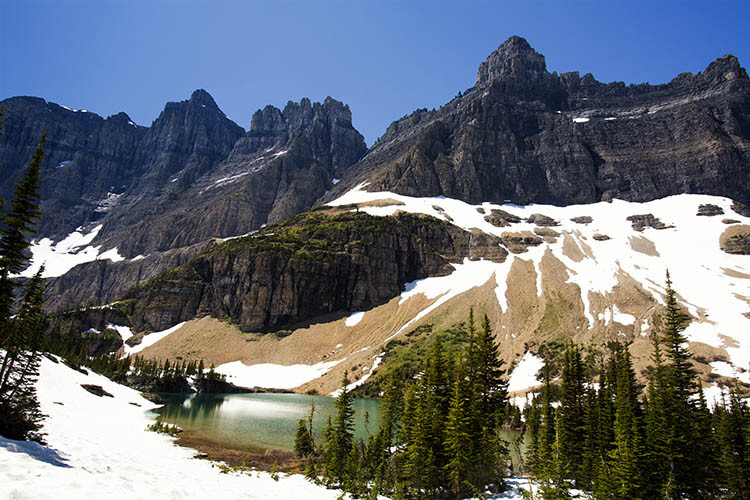
    Similar to the glass circular polarizer, the graduated neutral density filter is a staple among landscape photographers as it helps lighten or darken just a portion of an image. Think about a landscape with perfectly balanced land and blown out sky. That is a job for the graduated neutral density filter.

    There are five different settings to play with for this filter. Upper and Lower Tonality let you adjust the brightness of the top and bottom portions of the image, Vertical Shift controls the placement of the filter’s horizon, while Rotation adjusts the angle of the horizon filter. Finally, Blend helps integrate the filter effect in a more natural way.

    Nik - ND Grad 1

    Before

    Nik - ND Grad 2

    After – with Graduated Neutral Density filter applied.
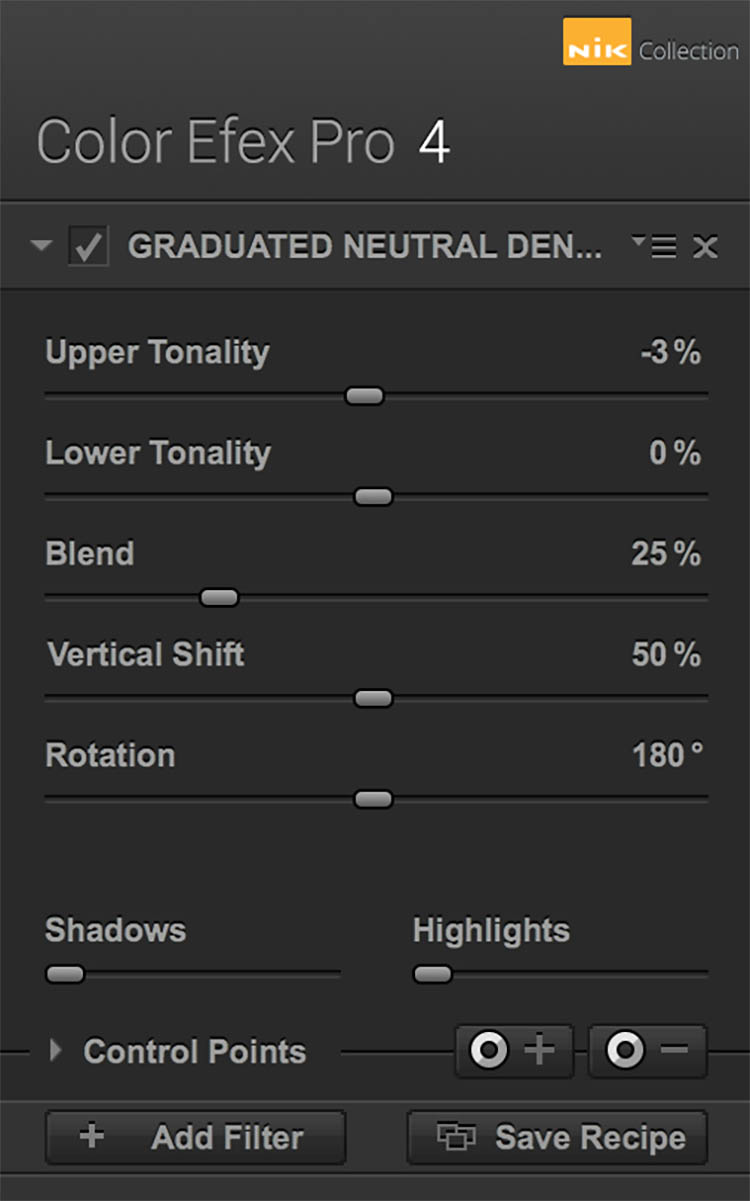
    Nik - ND Grad

    #5 – Reflector Efex

    Nik - Reflector FX 1

    Before

    The reflector is a favorite photographer’s tool that has also been simulated by a Color Efex Pro 4 filter. Use this filter to control light in your image and open up shadows.

    The Method setting allows you to choose from Gold (warm), Soft Gold (milder warm), and Silver (neutral) lighting colors. Light Intensity controls the amount of reflector light added, Light Falloff controls the abruptness of the lighting effect falloff, while Position controls where the falloff starts. Finally, Source Direction lets you choose where the reflector effect begins.
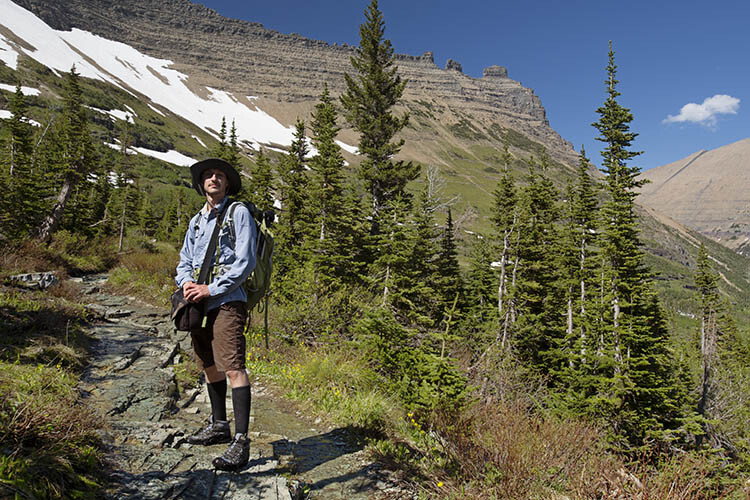
    Nik - Reflector FX 2

    After – with Reflector Efex Soft Gold filter applied.
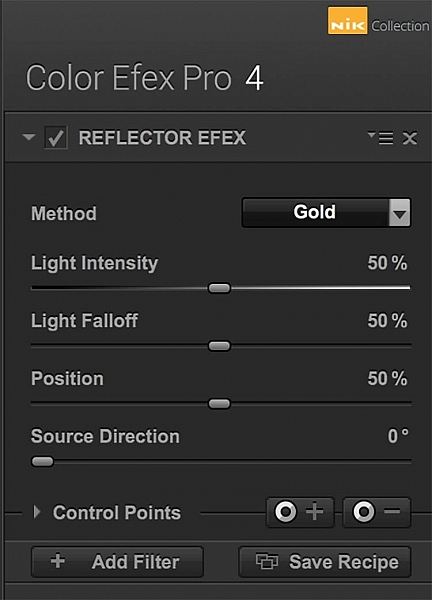
    Nik - Reflector FX

    Over to you

    There you have it! Five handy filters within the Nik Collection’s Color Efex Pro. It’s again worth noting that there are many more filters within the software, and each can add as subtle or dramatic an effect as you desire. At the very least, this photo editing software is available for free, so it’s worth trying out if you haven’t already.

    What are your most used filters within the Nik Collection for your landscape photos? Let me know in the comments below.

    googletag.cmd.push(function() {
    tablet_slots.push( googletag.defineSlot( “/1005424/_dPSv4_tab-all-article-bottom_(300×250)”, [300, 250], “pb-ad-78623” ).addService( googletag.pubads() ) ); } );

    googletag.cmd.push(function() {
    mobile_slots.push( googletag.defineSlot( “/1005424/_dPSv4_mob-all-article-bottom_(300×250)”, [300, 250], “pb-ad-78158” ).addService( googletag.pubads() ) ); } );

    The post Top 5 Nik Collection Filters to Improve Your Landscape Photos by Suzi Pratt appeared first on Digital Photography School.

    Digital Photography School

  • Photokina 2016: 360 and VR Capture Roundup Video

    In hall nine, which encompasses Photokina 2016’s ‘Futurezone,’ there are dozens of 360 and VR capture devices on display for attendees to ogle. There’s also plenty of people wearing VR headsets and appearing vaguely zombified to ogle, as well. So whether you think VR and 360 capture represent a future that’s dazzlingly bright or frighteningly dim, companies all over the world are jumping in with their own capture solutions. Heck, even Nikon’s joining the VR race. 

    Thankfully, DPReview contributor Lars Rehm has been making the rounds and has selected a handful of the most interesting devices on display in the Futurezone. Check them out in our roundup video.

    Articles: Digital Photography Review (dpreview.com)

  • Unnatural Wonders: Magical Surrealist Artwork Worthy of Dalí & Escher

    [ By WebUrbanist in Art & Drawing & Digital. ]

    roof-bricks

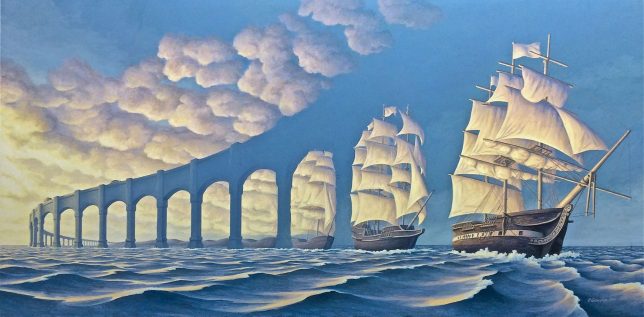
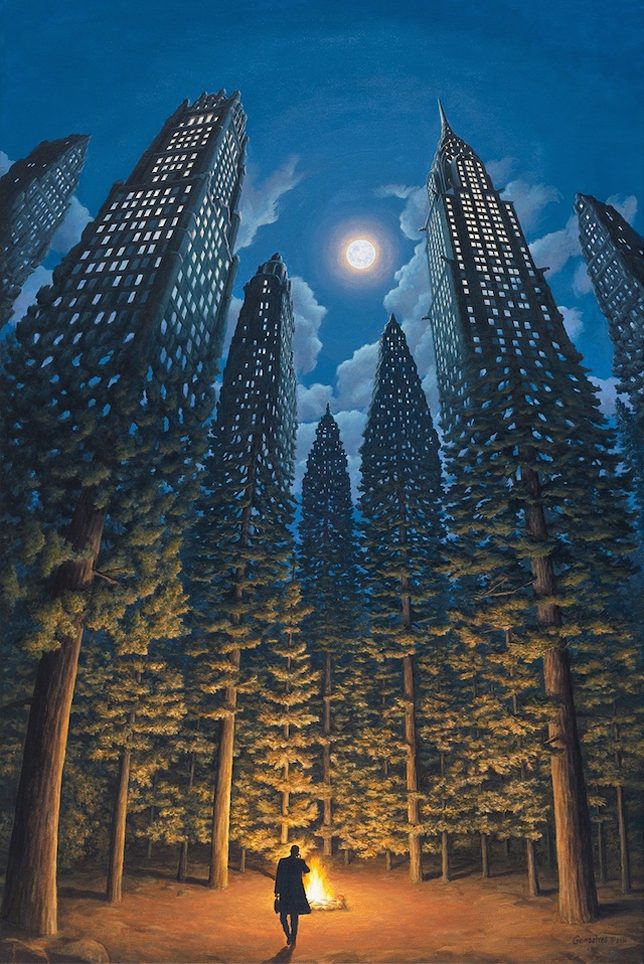
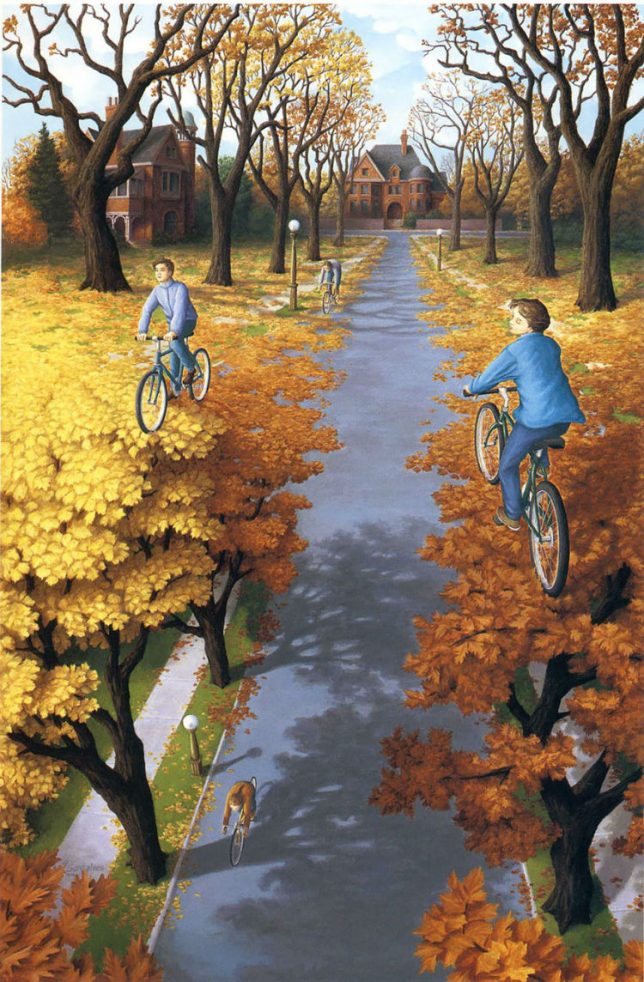
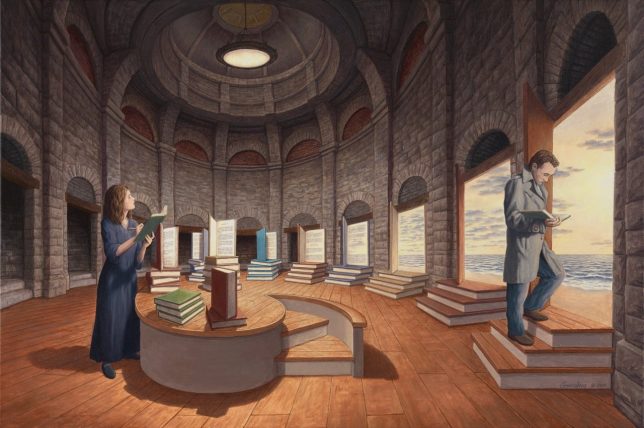
    In the same magic-realist vein as artistic giants like Salvador Dalí, M.C. Escher and Renê Margritte, Rob Gonsalves crafts elaborate and interconnected scenes that shift subtly to form remarkable illusions of dizzying depth and scale.

    magical-realism

    The 55-year-old Canadian of Portuguese descent takes settings that look ordinary at first glance, then layers and intersects them to form fantastic fictional realities. Many of his pieces tackle overlap, blurring the boundaries of natural and built environments, man-made and organic phenomena.

    night-skyscraper-trees

    Trees falling from the tree on a street form a canopy for a second, semi-secret world below. Books slowly turn into steps as they make their way around a domed library. Bricks become rooftops as children walk along a path. Skyscrapers morph into trees, blending nature and cities.

    trees-biking

    After college, Gonsalves worked as an architect and painted trompe-l’œil murals and theater sets on the side. As the popularity of his artistic works grew, he turned to painting as a profession.

    library-morph

    ocean-sky

    “Although Gonsalves’ work is often categorized as surrealistic, it differs because the images are deliberately planned and result from conscious thought. Ideas are largely generated by the external world and involve recognizable human activities, using carefully planned illusionist devices. Gonsalves injects a sense of magic into realistic scenes. As a result, the term “Magic Realism” describes his work accurately. His work is an attempt to represent human beings’ desire to believe the impossible, to be open to possibility.”

    Share on Facebook


    [ By WebUrbanist in Art & Drawing & Digital. ]

    [ WebUrbanist | Archives | Galleries | Privacy | TOS ]


    WebUrbanist

  • Pushing your Composition to the Edge

    The world is filled with photographs. I did a bit of research and found the following statistic. Researchers estimate that the average individual is now exposed to approximately 250 different images per day. It’s no secret that we are now inundated with visual stimulus. Everyone owns a camera and everyone is shooting images. In 1857 Francis Frith took photographs of the pyramids and the Sphinx. The general public was mesmerized by images of a faraway and exotic location. Today, if I search “Images of the Pyramids” I get 7 million results; everyone knows what the pyramids look like. This whole phenomenon translates into a challenge for photographers. How do you shoot something different and unique when the world uploads 1.8 billion photographs a day?

    Image 7

    There is no easy answer. I don’t know how many times I have heard someone say, “That’s a beautiful image of the shoreline. You are a really great photographer but take a look at this. I shot the same thing last year on vacation.” Some photographers may become frustrated with this occurrence, but perhaps we should look upon this as a challenge. What can you do to make your photographs more unique?

    Live on the edge – of composition

    We all want people to view our images and say, “That’s amazing! I’ve never seen that before!” It’s going to be tough but it’s worth a try. It’s time to push your composition skills to their limits. Consider using techniques or viewpoints that are a little unconventional. Try pushing the main subject of your composition towards the edge of your frame. Let’s consider this photograph of a kayaker.

    Image 1

    In this version, the image is composed using the rule of thirds. The scene has a pretty unique atmosphere as the sun struggles to break through the morning mist. Shouldn’t that be enough to make the viewer stop and take notice? It’s a beautiful image and it was a fantastic morning. I know people will love this image. But what if it was recomposed to push the kayaker to the edge of the frame? Does this make the image even more appealing? Consider the difference.

    Image 2

    This second image is cropped way down to illustrate a point. What did you look at first? Hopefully, your answer is the red light on the left of the frame and then your eye moved over the image to discover the kayaker. This technique is called “the delay” which means that the viewer is delayed by other details before focusing on the main subject. This means that the viewer notices the details in a much slower and more deliberate manner. You might even create the emotion of surprise when your viewer discovers the full extent of your composition. That’s a good thing. Creating emotions within the viewer ensures they will remember your image.

    When the rule of thirds is not the best choice

    Let’s take a look at another image. In this case the main subject, the flower bud, has been pushed right to the edge of the frame.

    Image 3 Image 4

    By placing the main subject closer to the edge of the frame you can create more tension within your image (above left). The image is certainly more dynamic and interesting than this conventional version which focuses on placing the flower bud along the rule of thirds (above right).

    In this shot of the boxer and his trainer I was disappointed and considered it a failure because it didn’t follow any of the rules of composition. The autofocus locked onto the training gloves, not the boxer. But after consultation with the magazine editor, he decided to use it because the angle was so unique. The composition told the story in a different way. Notice the trainer’s nose is just in view in the top corner. The editor loved that element and it sealed his choice.

    Image 5

    Sometimes you will be surprised by what works.

    Finding the right balance

    Of course, there are times when this technique doesn’t work and the resulting image just feels unbalanced and awkward. This image of a decaying pier in Lake Huron is a good example of when placing the subject close to the edge unbalances the shot.

    Image 6

    There’s just too much visual weight placed on the right side of the frame and the image is not successful. But that’s okay because at least something was learned about the importance of creating visual balance when pushing the subject matter to the very edge of the frame. Try to balance the weight of the object along the edge with the visual weight of the rest of the space.

    Conclusions

    Image 9

    However, you choose to compose your images the challenge will always be to create something unique that stands out from the crowd. The reality is the crowd of images is only going to get bigger.

    Are you up to the challenge? Are you willing to continue experimenting with the methods you use for composing your images? I say push things a little further each time you take a photograph and experiment with how you can use the edge of the image to create interest in your work.

    Please share your compose on the edge images and thoughts in the comments below.

    googletag.cmd.push(function() {
    tablet_slots.push( googletag.defineSlot( “/1005424/_dPSv4_tab-all-article-bottom_(300×250)”, [300, 250], “pb-ad-78623” ).addService( googletag.pubads() ) ); } );

    googletag.cmd.push(function() {
    mobile_slots.push( googletag.defineSlot( “/1005424/_dPSv4_mob-all-article-bottom_(300×250)”, [300, 250], “pb-ad-78158” ).addService( googletag.pubads() ) ); } );

    The post Pushing your Composition to the Edge by Erin Fitzgibbon appeared first on Digital Photography School.

    Digital Photography School

  • Photokina 2016: Hands-on with Laowa 15mm F2 FE and 7.5mm F2 MFT

    Photokina 2016: Hands-on with Laowa 15mm F2 FE and 7.5mm F2 MFT

    Venus Optics is showing off two brand new lenses at Photokina – the Laowa 15mm F2 FE for Sony E-mount and 7.5mm F2 MFT for Micro Four Thirds.

    Photokina 2016: Hands-on with Laowa 15mm F2 FE and 7.5mm F2 MFT

    The 15mm F2 is being billed as the world’s widest F2 lens, and Venus Optics claims that it is virtually distortion-free. Designed for Sony’s full-frame FE-mount A7-series, the new 15mm could prove very attractive to videographers, as well as stills photographers.

    Photokina 2016: Hands-on with Laowa 15mm F2 FE and 7.5mm F2 MFT

    The mount is fully mechanical, so don’t expect to get automatic aperture indexing or focal length reporting. As such, metering is limited to the stop-down method. Videographers will be used to this way of working.

    Photokina 2016: Hands-on with Laowa 15mm F2 FE and 7.5mm F2 MFT

    Here’s the 15mm F2 attached to a Sony A7R II. As you can see, it’s not a small lens, but actually balances very nicely with the camera. At 500g in weight (~1.1lb) it is substantial without being too heavy, in normal use. 

    Photokina 2016: Hands-on with Laowa 15mm F2 FE and 7.5mm F2 MFT

    The minimum focusing distance of the 15mm F2 is around 6 inches, which equates to a maximum reproduction ratio of 0.25X. Pricing has yet to be announced but the lens should become available in early 2017.

    Photokina 2016: Hands-on with Laowa 15mm F2 FE and 7.5mm F2 MFT

    Next up is the 7.5mm F2 MFT, for Micro Four Thirds mirrorless cameras. Designed to appeal especially to drone photographers this lens is absolutely tiny. Offering an equivalent focal length of 15mm, it weighs 170g (~0.4lb).

    Photokina 2016: Hands-on with Laowa 15mm F2 FE and 7.5mm F2 MFT

    Again, this is a fully mechanical mount with no electrical contact between camera and lens. 

    Photokina 2016: Hands-on with Laowa 15mm F2 FE and 7.5mm F2 MFT

    Interestingly, despite its ultra-wide focal length, the 7.5mm F2 can be used with screw-in filters (49mm) which could prove very handy to videographers who want to work with ND filters.

    Photokina 2016: Hands-on with Laowa 15mm F2 FE and 7.5mm F2 MFT

    As with the 15mm F2, the 7.5mm F2 will be available in early 2017, and no pricing information has yet been released.

    Articles: Digital Photography Review (dpreview.com)

  • Leica and Huawei to create joint R&D center

    Leica’s Dr. Andreas Kaufmann with Ren Zhengfei, founder of HUAWEI

    Camera manufacturer Leica and telecom brand Huawei have announced they are to create a research and development center so they can jointly work on optical and software systems. The Max Berek Innovation Lab will be established at Leica’s headquarters in Wetzlar, Germany, and will build on the relationship the two companies formed while producing the Huawei P9 and P9 Plus smartphones. There was some doubt about the level of Leica’s involvement in the P9 project, but Huawei clarified the extent of the German brand’s contribution in a statement in April.

    This next step of the partnership intends to push forward lens and software technology, according to Leica, with the aim of improving the image quality it’s possible to obtain from the tiny cameras that phones and other mobile devices use. The pair also state that they will work together on solutions for virtual reality, augmented reality and computer-based imaging, and that they will involve universities and other research establishments in their projects.

    The new research lab is named after optical engineer Max Berek, the man who developed the first lens for the Leica 35mm camera system. He joined Leitz the year after Oskar Barnack came to the company from Zeiss, and designed the 50mm F3.5 lens that was coupled with the Leica 1. The lens was named Elmax – E rnst L eitz Max and the 50mm focal length became the standard for the 135 format. The Elmax developed into the Elmar, a lens that Leica still uses today.

    For more information see the Leica and Huawei websites.

    Press release

    Leica Camera and HUAWEI Establish New R&D Centre

    ‘Max Berek Innovation Lab’ will conduct R&D in the fields of new optical systems, computational imaging, virtual reality and augmented reality

    HUAWEI and Leica Camera AG today announced that they have expanded their strategic collaboration with the establishment of a jointly operated research and innovation centre, the Max Berek Innovation Lab. The launch comes seven months after the public announcement of their long-term technology partnership in the field of optical engineering, and five months after the launch of the globally successful, multi-award winning HUAWEI P9 and P9 Plus smartphones.

    The new lab, located at Leica’s global HQ in Wetzlar, Germany, will drive further development of optical systems and software-based technologies to improve imaging quality in a wide range of photographic and mobile device applications. Additional outcomes will include the creation of computational imaging, augmented reality (AR) and virtual reality (VR) solutions. In addition to R&D resources from both companies, HUAWEI and Leica plan to collaborate with German and international universities and research institutions.

    The Lab’s establishment is the result of the vision and support of Dr. Andreas Kaufmann, majority shareholder and chairman of the advisory board of Leica Camera AG, and Ren Zhengfei, founder of HUAWEI.

    “With the founding of the Max Berek Innovation Lab, HUAWEI and Leica Camera AG are expanding the scope of their successful strategic relationship and are laying the foundation for close collaboration in research and development of ground-breaking technologies in the imaging segment,” emphasised Dr. Andreas Kaufmann.

    “In the future, over 90 per cent of the data traffic will be images and videos,” said Ren Zhengfei, founder of HUAWEI. “The Max Berek Innovation Lab provides the capacity to establish an even closer partnership with Leica, leading to continuous improvements in image and video quality. As a result, we will deliver the most advanced innovations in the smartphone camera market and bring greater value to consumers.”

    “HUAWEI and Leica share not only enormous innovation power and years of research experience, but also their dedication to providing the highest quality standards. The Max Berek Innovation Lab offers us a historic opportunity to unite the resources and extensive expertise of both companies to pioneer game-changing technologies,” confirmed Markus Limberger, Chief Operating Officer (COO) of Leica Camera AG and director of the Max Berek Innovation Lab.

    The R&D centre is named in memory of Max Berek (1886 – 1949), the German pioneer of microscopy and creator of the first Leica lenses. Berek was also responsible for the optical design of more than 20 lenses for the legendary 35mm camera, invented and built by Oskar Barnack. Thanks to the exceptional imaging performance and perfect harmonisation of the lenses, coupled with Barnack’s ingenious construction, Leica achieved worldwide success in 35mm photography.

    Articles: Digital Photography Review (dpreview.com)

  • Kúla Bebe is a 3D lens attachment for your smartphone

    Icelandic company Kúla is showing a pre-production version of its Bebe smartphone lens attachment at its Photokina booth. The Kúla Bebe allows for the capture of stereoscopic 3D images with any smartphone camera. It attaches to the device via a plastic clip and uses high-quality mirrors the capture the right and left eye view of your 3D image at the same time. Output images can be viewed on an included paper 3D stereoviewer that works with most smartphones or through the also included anaglyph glasses. 

    Kúla’s free app and the Kúlacode desktop application can convert the captured image to any 3D format for viewing on other devices. Kúla Bebe is the smaller sibling of the already available Kúla Deeper DSLR version of the device. The Bebe can currently be preordered for $ 79 on the Kula website and delivery is expected in spring 2017.

    Articles: Digital Photography Review (dpreview.com)

  • Flickr Marketplace image licensing program shuttered

    Flickr Marketplace, the property’s image licensing service, is being shuttered, with the company citing feedback about subpar service as the reason. Per the email being sent to existing Marketplace licensing program users, the full shutdown will take place over the next few months, with appropriate royalties still being paid out to contributors during that time. 

    Flickr confirmed to TechCrunch that the email is legitimate. In it, the company encourages users to complete an included survey that ‘could help shape possible decisions for any licensing opportunities in the future.’ However, no future plans have been stated, and Flickr Marketplace is effectively closed.

    Via: TechCrunch

    Articles: Digital Photography Review (dpreview.com)

  • Teardown reveals Sony image sensors in iPhone 7

    Patent and technology consultancy Chipworks has published its iPhone 7 teardown and reveals that front and rear image sensors on the new Apple models are supplied by market leader Sony. This is not too much of a surprise as earlier iPhone models used Sony sensors as well. In its report Chipworks doesn’t say which exact sensor model has been deployed in the rear camera but we know the 12MP chip uses the Exmor RS technology platform, a Bayer RGB color filter array and on-sensor phase detection. Its die size is 5.16 mm x 6.25 mm (32.3 mm2) as measured from the edges of the die stack. 

    On the FaceTime front camera the resolution has been increased to 7MP. The Sensor is also a second generation Sony Exmor RS model and measures 5.05 mm x 3.72 mm (18.8 mm2). Chipworks has not treated the larger iPhone 7 Plus model with its dual-camera to the teardown procedure yet, but we would expect both sensors in the dual-camera to come from Sony as well. For now you can find more technical detail in the iPhone 7 teardown on the Chipworks blog.

    Articles: Digital Photography Review (dpreview.com)

  • Weekly Photography Challenge – Silhouettes

    Let’s look at the definition of silhouette:

    screen-shot-2016-09-14-at-10-15-44-pm

    If you want to see some good examples have a look here:

    Weekly Photography – Silhouette

    Haricharan

    By Haricharan

    To complete your challenge this week to shoot a silhouette these articles may have some helpful tips for you:

    • 7 Steps to Create Street Photography Silhouettes
    • 5 Secrets to Create a Perfect Silhouette Portrait Outdoors
    • Create Powerful Silhouettes by Telling a Story
    • 5 Tips For Photographing Silhouettes
    Roberto Trombetta

    By Roberto Trombetta

    AdA Durden

    By AdA Durden

    Jeff S. PhotoArt At HDCanvas.ca

    By Jeff S. PhotoArt at HDCanvas.ca

    Share your images below:

    Simply upload your shot into the comment field (look for the little camera icon in the Disqus comments section) and they’ll get embedded for us all to see or if you’d prefer, upload them to your favourite photo sharing site and leave the link to them. Show me your best images in this week’s challenge. Sometimes it takes a while for an image to appear so be patient and try not to post the same image twice.

    Share in the dPS Facebook Group

    You can also share your images on the dPS Facebook group as the challenge is posted there each week as well.

    ???9? - Photographer No.9

    By ???9? – Photographer No.9

    Brian.abeling

    By brian.abeling

    googletag.cmd.push(function() {
    tablet_slots.push( googletag.defineSlot( “/1005424/_dPSv4_tab-all-article-bottom_(300×250)”, [300, 250], “pb-ad-78623” ).addService( googletag.pubads() ) ); } );

    googletag.cmd.push(function() {
    mobile_slots.push( googletag.defineSlot( “/1005424/_dPSv4_mob-all-article-bottom_(300×250)”, [300, 250], “pb-ad-78158” ).addService( googletag.pubads() ) ); } );

    The post Weekly Photography Challenge – Silhouettes by Darlene Hildebrandt appeared first on Digital Photography School.

    Digital Photography School