Blog

  • Sketch in 3D: Remarkable Drawing App Gives Doodles Depth & Dimension

    [ By WebUrbanist in Design & Graphics & Branding. ]

    3dsketched

    Programs like Sketchup have allowed amateur artists and architects to sculpt and design in three dimensions for years, but this app facilitates far more informal works that really look like sketches in 3D.

    Mental Canvas is part of a suite of software for Microsoft Surface that takes more conventional sketched forms and allows users to navigate and expand them in three-dimensional space, retaining the character of rough drawings.

    3d-drawing-tool

    The infinite-depth approach of this digital canvas software lets users zoom in and rotate their view, adding layers along the way and inspecting their work from various angles. The effect is remarkable as these illustrations show.

    drawing-tool-app

    From its creators: CAD modelling “comes at a cost. The cost is that one, you have to have a fully resolved three-dimensional model, even if it’s just a cube; second it’s very hard to edit a CAD model, it’s not fast and fluid like a sketch. At any given moment when you’re sketching, the designer or artist has full control over everything in that representation, but with a CAD model, that’s defined by the computer.”

    This clever approach liberates an artist from the ordinary constraints of a physical page or even a drawing tablet, letting them shape worlds that maintain the character of a sketch but can be used to tell and frame stories in new ways.

    3ddrawing

    As with programs like Sketchup, a bookmarking tool allows users to save and store various views then retrace their steps, creating potential for 3D storytelling. It also lets a user pick the perfect shot, navigating three-dimensional space to select an ideal perspective. A dynamic dial tool, meanwhile, lets the artist rotate between colors and line qualities without backing out of the drawing.

    As any good architect knows, an unfinished-looking drawing can be an asset: “A sketch has a quality when it’s unfinished; there’s so much possibility, there’s so much room for interpretation, and [Mental Canvas] expands the idea of a sketch. It makes it less flat. In architecture you always want that “Wow” design that gets everyone excited in the room, and [Mental Canvas] enhances it.”

    One can see a lot of similarities here between Mental Canvas and tools being developed for augmented and virtual reality platforms. In a way, this program closes the gap, allowing users with more ordinary tools, devices and interfaces to accomplish something wonderful in 3D space.

    Share on Facebook


    [ By WebUrbanist in Design & Graphics & Branding. ]

    [ WebUrbanist | Archives | Galleries | Privacy | TOS ]


    WebUrbanist

  • Sigma 12-24mm F4 DG HSM Art Lens Review

    The Sigma 12-24mm F4 DG HSM Art was first announced September 16th, 2016. This is Sigma’s widest zoom lens offering to date and joins Sigma’s growing list of Art lenses. The lens is priced at just under $ 1600, which makes it a fierce competitor to Canon’s EF 11-24mm F4L USM lens which is priced at just under $ 3,000.

    The Sigma is available in Canon, Nikon F (FX) and Sigma SA Bayonet mounts and will most likely appeal to landscape and architecture photographers that are looking for an extremely wide field-of-view (12mm gives around a 122° diagonal field of view).

    The looming question is: does the extreme difference in price effect the build quality and performance of the Sigma? In this review we will be looking at the Sigma’s performance and just how it stacks up against the Canon 11-24mm F4L.

    APS-C

    If you’re an APS-C shooter, the Sigma can be utilized on that platform with an equivalent focal length of 19-38mm and an equivalent aperture of F6.4. It’s worth noting however that Sigma already offers a considerably less expensive 10-20mm F3.5 which would be a 16-32mm F5.6 equivalent, which would be a much better wide-angle option. For this reason we’re not going to consider this lens for use on APS-C in this review.

    Sigma 12-24mm F4 DG HSM Art Headline Features

    • 12-24mm focal length
    • F4 maximum aperture
    • Ring-type Ultrasonic Focusing
    • Available in Canon EF, Nikon F (FX) and Sigma mounts

    Specifications Compared

      Sigma 12-24mm F4 DG HSM Art Canon EF 11-24mm F4L USM
    Price (MSRP) $ 1,599.00 $ 2,999.00
    Lens Type Wide-Angle Zoom Wide-Angle Zoom 
    Focal Length 12-24mm 11-24mm
    Filter Thread  None None (rear insert-type)
    Image Stabilization No No
    Lens Mount Canon, Nikon F (FX), Sigma SA Bayonet Canon EF
    Aperture Ring No No
    Maximum Aperture F4  F4 
    Minimum Aperture F22 F22
    Minimum Focus 0.24 m (9.45?) 0.28m (11″)
    Diaphragm Blades   9 (rounded) 9 (rounded)
    Elements   16 16
    Groups   11 11
    Special Elements/Coatings Super Multi-Layer Coating, F-Low Dispersion and aspherical elements, including an 80mm large-diameter molded glass aspherical element

    Super UD, UD, and 4 Aspherical Elements, SWC, Air Sphere, and Fluorine Coatings, Rear element fluorine coatings

    Autofocus Yes Yes
    Motor Type Ring-type Hypersonic Ultrasonic
    Full Time Manual Yes Yes
    Focus Method Internal Internal
    Distance Scale  Yes Yes
    DoF Scale No No
    Weather Sealing  Dust and Splash Proof Construction with rear rubber gasket Full Weather Sealing
    Zoom Method  Rotary (extending) Rotary (internal)
    Weight 1151g (2.54 lb) 1180g (2.60 lb)
    Dimensions 132mm (5.2″) x 102mm (4.0″) 132 mm (5.2?) x 108 mm (4.25?)
    Hood Included Yes (built in) Yes (built in)

    The Sigma and the Canon share a rather large number of the same features with respect to lens design. The main differences between the two lenses are highlighted in green. The Canon has a slight edge over the Sigma in terms of build quality with full weather sealing, where the Sigma offers a ‘moisture resistant’ rubber gasket on the lens mount and water-repellent coatings on the front and rear lens elements.

    Both lenses are very heavy and are nearly identical in size and shape, and both feature built-in lens hoods. Neither lens accepts standard screw type filters, but the Canon has a slot to accept rear gel filters. The Sigma has that familiar Art build that feels very robust in hand but lacks the same ‘sealed’ feeling that the Canon lens provides due to its water resistant external construction.

    The Canon has a slight advantage over the Sigma in terms of the zoom method as the Sigma has an external extending zoom whereas the Canon’s is internal. Being that the Sigma isn’t fully weather sealed this could be a weak point in the design in terms of moisture penetrating the lens during adverse or wet weather conditions. 

    With these specifications in mind, we will now be looking at how well the Sigma performs to determine how it fairs in our head-to-head comparison with the Canon 11-24mm F4L. 

    Articles: Digital Photography Review (dpreview.com)

  • Action-packed: Sony a6500 First Impressions

    Sony a6500 First Impressions

    by Dan Bracaglia

    ISO 200, 1/3200 sec at F4. Shot using the 70-200mm F2.8 G Master lens. JPEG edited to taste in Adobe Lightroom.

    I spent two and a half days shooting in Austin, Texas with the Sony a6500 on a Sony-sponsored press trip. This was the first time most journalists, including myself, had got a chance to put hands on the camera, let alone shoot with it. One of my favorite things about these trips is getting to talk to other writers to see how their experiences with the camera compare. While specific opinions on the a6500 varied, there was one aspect of the camera everyone seemed to agree on: the touchscreen on the a6500 is a letdown.

    Of course the addition of a touchscreen is not the only thing the a6500 has going for it, the camera also receives 5-axis in-body image stabilization, new menus, a deeper buffer and front-end LSI (which stands for Large Scale Integration – basically an additional chip providing more processing power). Not to mention it retains the 425-point on-sensor PDAF system, the same viewfinder, the same video specification and the same 8 fps burst rate (with Sony’s implementation of live view) as its mid-range sibling, the a6300 (11 fps with no live view).

    Usability and speed

    ISO 6400, 1/1000 sec at F2.2. Shot using the 85mm F1.4 G Master lens. JPEG edited to taste in Adobe Lightroom.

    We spent the first day shooting all sorts of fast action subjects, including basketball. I’ve shot a lot of college basketball games in my life (close 100) but this was the first time shooting a game using a mirrorless camera. And you know what? I really enjoyed it! I mainly stuck to the ‘wide’ AF area, though occasionally switched to the ‘Flexible Spot-M’ option. In both cases my hit rate was just as good as when using a sports-oriented DSLR: nearly all my shots were in focus! 

    I found the responsiveness of the shutter, from the time I pressed it, to the time the photo was taken, near instantaneous. And following the action at 8 fps was no problem, I didn’t notice any EVF lag (I switched the EVF refresh rate from it default of 60 fps to 120 fps).

    “My hit rate was just as good as when using a sports-oriented DSLR.”

    In the two days with the camera, Sony managed to cram in not only an opportunity to shoot basketball, but the chance to also shoot skateboarding, tennis, rodeo, lacrosse, live music and flying disk dogs. In each scenario, I walked away impressed with the hit rate. Simply put, for action photography the a6500’s AF system, fast burst rate and a deep buffer make it a very tempting/capable choice.

    This image was part of a 50+ photo burst. ISO 6400, 1/3200 sec at F4. Shot using the 85mm F1.4 G Master lens. JPEG edited to taste in Adobe Lightroom.

    Furthermore, while shooting long bursts, I almost never encountered a ‘Writing to memory card, unable to operate’ error screen, which is a breath of fresh air having used the a6300. Even after shooting a burst of 50 or so Raw+JPEG files, I was able to hit the playback button and see the most recent image to clear the buffer. The a6500 also features a buffer countdown in the upper left corner so that users know how many images are left before it’s fully cleared.

    New Menu

    Sony makes some of the most technically capable cameras on the market but the user experience has always been a bit rough around the edges. Of course many folks, by dedicating the time to learn and work around Sony’s peculiarities, they are able to tolerate any U.I. shortcomings and get the most out of these cameras. But for the rest of us, picking up a Sony for the first time can feel confusing, frustrating and uninspiring.

    Menu heads are now color-coded and there is a dedicated video menu.

    The a6500, with its new menu system and faster processing is a major step in the right direction for overall usability. Menu heads are color-coded and there is now a separate video menu. But there is no ‘My Menu’ style option for customizing a menu page, something offered by most other camera makers. To some degree, we’d have just preferred a customizable menu over Sony’s reorganization, to collate most-used menu items that still remain unassignable to the camera’s Fn menu.

    On a positive note, I encountered far fewer error screens than I’m used to when shooting with a Sony. Still, I did occasionally hit one. And there is nothing worse than trying to dial in a setting only to encounter an ‘Invalid operation,’ screen. Hey Sony, instead of tossing up an error, why not make a suggestion so that users know what settings to change to avoid more error messages (and include direct access to the setting that needs changing)?

    The touchscreen

    I had super high hopes going into this shooting experience that the a6500’s touchscreen was going to be awesome. It’s not. I owned an LG Dare cellphone in 2008 and the a6500’s touch implementation reminds me of that. It’s unresponsive when tapping and laggy when dragging one’s finger. Not only that, the touchscreen cannot be used for anything other than moving AF points and flipping through images in playback. How silly is that? Numerous times I found myself hitting the Fn.menu button and then tapping one of the icons on the screen, only for nothing to happen.

    Furthermore, the a6500 is a premium camera with a premium price point, but only one top plate control dial. A touchscreen is the perfect answer to a lack of physical control points, but by limiting its use, Sony shot themselves in the foot.

    “The touchscreen on the a6500 is the one feature of this camera that does not feel up to par with everything else.”

    Still, its encouraging to see touch capability make its way into this line of camera. No doubt Sony knows how to make a decent touchscreen: it manufactures smartphones for crying out loud, so here’s hoping the next generation actually nails the touchscreen. Because the touchscreen on the a6500 is the one feature of this camera that does not feel up to par with everything else.

    It’s not completely without merit though. I quite enjoyed using the flip-out screen at the skatepark we visited to get super low angles and the touchscreen allowed me to easily choose my point of focus. Still, the focus squares can be difficult to see in very bright or very dim light.

    ISO 640, 1/1600 sec at F5.6. Shot using the Somny 10-18mm F4 lens. JPEG edited to taste in Adobe Lightroom.

    Using the touchscreen as an AF touchpad was also a disappointing experience. The responsiveness is not fast enough, the points are hard to see and there is a noticeable delay when dragging one’s finger around (pretty much the same experience as just using the touchscreen).

    There are three touchpad area modes: ‘Whole Screen,’ ‘Right 1/2 Area’ and ‘Right 1/4 Area.’ The ‘area’ refers to which portion of the screen will activate touchpad AF and are meant to help avoid accidentally changing one’s AF point with say, your nose. When using ‘Right 1/2 Area’ for instance, only the upper half of the right side of the screen will engage the touchpad. And when using ‘Right 1/4 area’ only the upper quarter of the right side of the screen will engage the touchpad. Honestly, I was hard put to tell the difference between ‘Whole Screen’ and ‘Right 1/2 Area.’ Also when I put the camera in ‘Right 1/4 Area’ I found it nearly impossible to get the touchscreen to work at all!

    I also found it pretty difficult, though possible, to use touchpad AF when shooting through my left eye. There is an option to turn the touchpad off when shooting vertically, so as to not change one’s AF point with their nose. But seeing how unresponsive the touchscreen is, I never ran into this issue. I guess that’s one plus of the lack of responsiveness. Users can choose whether to just use the touchscreen, just the touchpad, both or neither.

    Using the Touchscreen during video capture

    Like all Sonys, the ‘Lock-on AF’ area modes are greyed-out when shooting video. And as such, there is no intuitive way to tap-to-track when recording video. You can track (though not tap) by assigning a button to toggle ‘Center Lock-on AF’ on and off. But shooting video this way is pretty annoying as you must wait until your subject is dead center to begin tracking. Also the ‘Center Lock-on AF’ option seems to use an older tracking algorithm.

    In the ‘Wide’ AF area mode, if you tap the screen, it turns on something called ‘Spot AF,’ which just maintains focus on the chosen point. Based on this video by cinema5D, I’m convinced there is some way to use touch-to-track in video mode. I have a hunch that if you turn ‘Spot AF’ off in the menu and tap the screen, it may engage tracking. I’ll have to wait until we get the camera into the office to confirm this, but either way, engaging tap-to-track in video mode is far from intuitive and the exclusion of lock-on AF area modes in video is inexcusable at this point.

    Image Stabilization

    ISO 3200 1/2 sec at F4.5. Shot using the 24mm F1.8 Zeiss lens. JPEG edited to taste in Adobe Lightroom.

    It’s exciting to see image stabilization make its way into Sony’s APS-C mirrorless line. Initial impressions using image stabilization to shoot stills are positive. The above image was shot at 1/2 sec using the 24mm F1.8 lens. Ordinarily I could probably hold a shot steady, with no IS, down to about 1/30, maybe on a good day, 1/25 sec. So right there we’re seeing a nearly 4-stop advantage using IS at a normal-ish equiv. focal length.

    Using IS while recording video made it easier to shoot hand-held at wide to normal focal lengths, like in the clip above. However at longer focal lengths the IS system is very jumpy. You can see an example of that in the clip below.

    Having just finished testing video IS on both the Panasonic FZ2500 and Panasonic G85, I’m not all the impressed with the Sony’s video IS performance. Of course both the cameras mentioned use smaller sensor, which in theory should be easier to move around. But more to the point, those cameras offer something the a6500 does not: an option to combine mechanical IS with electronic (digital) IS. Although digital IS tends to slightly crop (and then upscale) footage and therefore costs some image quality, it can lead to impressively glidecam-esque footage.

    Physical Improvements over the a6300

    The a6500 (left) features two top plate custom keys and toothier dials compared to the a6300. The battery door on the a6500 (left) has also been redesigned. It seems less flimsy than that on the a6300. The camera also gains a deeper grip.

    The a6500 gains some very minor physical improvements over the more basic model, including an additional top plate custom function (C2) button. The C1 button has moved to the top shelf, and is now eminently more usable than the one that provided almost no haptic feedback on the a6300. A comfier grip, more similar to that offered on the a7 II models. The control and mode dial also have a nicer tooth to them and the bottom battery door has been redesigned and now feels more secure.

    The Takeaway

    Make no mistake, the Sony a6500 is a very good camera. It’s lightweight, fast and capable. Still, I can’t help but think Sony may have benefited holding off on the release to spend more time refining it. After all, it is the company’s top tier APS-C mirrorless offering (this despite one top plate control dial). Because some aspects of the camera operation just feel unrefined.

    For instance, when shooting 4K video, the screen automatically dims. There is no way to use the ‘Sunny Weather’ option: it’s simply greyed out. This makes the a6500 nearly impossible to use in bright sunlight while shooting 4K video with the LCD. And I’m told the reason is to mitigate overheating, which seems like a thoughtless fix to a known issue, and one that creates a new issue entirely. 

    I always close with a rock and roll shot: ISO 1600, 1/800 sec at F2.2. Shot using the 85mm F1.4 G Master lens. JPEG edited to taste in Adobe Lightroom.

    The image stabilization is useful when shooting stills, but initial impressions in video mode have us less impressed. The new LSI processor goes a long way to making the a6500 a more usable camera than the a6300. The buffer depth, while we have yet to fully max it out, is impressive. And the camera does not lock users out of settings while the buffer clears. The new menus are also a step in the right direction. Still, there is room for improvement in terms of organization of items and adding a customizable page.

    Two days shooting with it proved to me that the a6500 is the most usable Sony APS-C camera on the market and certainly a refinement over the mid-level a6300. I was impressed at how capable it is for sports and action (almost no noticeable EVF lag) and it can certainly capture some lovely-looking 4K video (just watch out for rolling shutter). But the touchscreen, one of the main things you get for the extra $ 400 over the a6300, is simply not good enough. And for that reason I didn’t love the a6500, but I did like it.

    Articles: Digital Photography Review (dpreview.com)

  • LensRentals tests the Nikon 70-200mm F2.8 FL ED

    Sarah McAlexander, Lensrentals.com, 2016

    Our friends at LensRentals have acquired a supply of Nikon’s new 70-200mm F2.8E FL ED AF-S VR. Nikon’s PR department has been making big claims about this third generation of its workhorse zoom, so Roger Cicala et al. have done us all a kindness by putting it on their optical bench and publishing the results. 

    While he finds a bit of sharpness gained at the wide and long end of the range, Cicala is most impressed with performance at 135mm, calling it ‘night and day’ compared to its predecessor. 

    Take a look at the full blog post for all of the test results, and yes – even a comparison against Canon’s 70-200mm F2.8L IS II USM.

    Articles: Digital Photography Review (dpreview.com)

  • On Assignment: Alley Cat

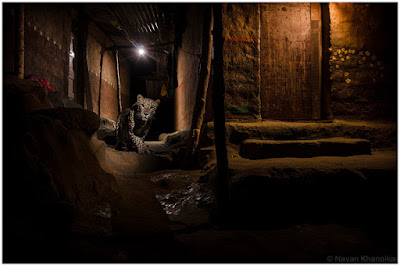
    When Indian photographer (and Strobist reader) Nayan Khanolkar first graced the halls of Lighting 101 as a newb in 2010, he hardly could have known what just the next few years would have in store for him.

    Fast forward to 2016, when he finds himself setting up his Nikon D7000 and a few speedlights in a local alley in suburban Mumbai to capture one of the apparently free-roaming leopards that frequent the area.

    Curiosity piqued? Good. Read on…Read more »
    Strobist

  • DIY Photography Hacks and Accessories You Can Make at Home

    Everyone loves buying new gear, but not the bills that go with it. So why not try making some of your own accessories? Here are three videos that will give you some ideas for DIY photography hacks you can make at home.

    some-diy-photography-hacks-and-accessories-you-can-make-at-home

    This first one is from the guys over at COOPH (Cooperative of Photography). They present for you:

    9 Easy Tricks and Hacks to Up Your DIY Photography Game

    I won’t give it all away, you have to watch the video. But they make some pretty cool stuff including a bokeh wall, a shower curtain diffuser, and a pinhole camera.

    6 DIY Filters from Sony

    Sony brings us six ways to make DIY filters to soften and shape the light. These are fun!

    And finally, . . .

    7 Tricks everyone with a camera should know

    googletag.cmd.push(function() {
    tablet_slots.push( googletag.defineSlot( “/1005424/_dPSv4_tab-all-article-bottom_(300×250)”, [300, 250], “pb-ad-78623” ).addService( googletag.pubads() ) ); } );

    googletag.cmd.push(function() {
    mobile_slots.push( googletag.defineSlot( “/1005424/_dPSv4_mob-all-article-bottom_(300×250)”, [300, 250], “pb-ad-78158” ).addService( googletag.pubads() ) ); } );

    The post DIY Photography Hacks and Accessories You Can Make at Home by Darlene Hildebrandt appeared first on Digital Photography School.


    Digital Photography School

  • Art Hacker: Famous Masterpieces Recreated with Painted Human Bodies

    [ By SA Rogers in Art & Photography & Video. ]

    liu-bolin-guernica

    Chinese body painting artist Liu Bolin explores the concept of ‘art hacking’ through reinterpreting two of the world’s most famous paintings with human figures as canvases, and manipulating image search results on Google and Baidu to replace the originals with his own. Dozens of painstakingly painted human bodies faithfully recreate both Leonardo da Vinci’s Mona Lisa and Pablo Picasso’s Guernica with all subjects remaining perfectly still to complete the illusion for a photo.

    liu-bolin-guernica-detail

    The two works of art are juxtaposed with an image depicting the devastating Tianjin explosion at a container storage station in 2015, and large-scale prints of the three photographs are currently on display at Klein Sun Gallery as part of the Art Hacker exhibition. Neon signs hung throughout the space display URLs so visitors can see the internet ‘hacking’ aspect of the show.

    liu-bolin-mona-lisa

    liu-bolin-mona-lisa-2

    Bolin is best known for his ‘disappearing acts’ carried out through camouflaging himself and additional models into urban environments around the world. This is his first foray into the digital realm, but the questions he raises in his work continue to work within similar themes.

    liu-bolin-tianjin-explosions

    liu-bolin-tianjin-explosions-detail

    “Recreating the imagery of human suffering and devastation of war symbolized in the painting Guernica, Liu Bolin’s relives the history of the Spanish civil war, making a plea for humanity and freedom,” says the Klein Sun Gallery in a statement about the exhibition. “In Mona Lisa (2016), Liu Bolin imbeds himself into the masterpiece as well as its historical legacy. Touching upon the fact that the world was stolen from the Louvre more than 100 years ago, Liu Bolin aims to reenact the ‘disappearing and reappearing’ of the work through techniques behind the network.”

    “Provocatively challenging the viewer to question what is above and beneath the surface, the work intends to reflect upon the complex relationship between the past and present, the reality and the illusion, as well as individuality and history.”

    Share on Facebook


    [ By SA Rogers in Art & Photography & Video. ]

    [ WebUrbanist | Archives | Galleries | Privacy | TOS ]


    WebUrbanist

  • Panasonic Lumix DMC-LX10/LX15 Review

    The Panasonic Lumix DMC-LX10 (LX15 in some markets) is a 20MP large-sensor compact with a bright (F1.4-2.8), 24-72mm equivalent zoom lens. Which is to say, it’s a very capable pocket camera. And, being a Panasonic, it has video specs and clever video-based features to back up its stills capabilities.

    Panasonic’s LX cameras have always had the enthusiast in mind, built around larger-than-average sensors with short but bright lenses and as many direct controls as can sensibly be fitted onto a pocketable camera body. They helped reinvigorate the enthusiast compact sector and prompted a series of imitators before the much larger sensor of Sony’s RX100 rendered them irrelevant.

    Key specifications

    • 20MP 1″-type CMOS sensor
    • 24-72mm equivalent F1.4-2.8 zoom
    • 7 fps continuous shooting with autofocus
    • 4K video at up to 30p
    • 5-axis, digital and optical stabilization in 1080 video
    • 4K Photo mode
    • Post Focus and Focus Stacking modes

    The LX10 is Panasonic’s first direct response to the big-sensored Sonys. The company has already built an excellent series of compacts that address every other niche you can think of: the long zoom stills/video FZ1000 and FZ2500, a large sensor ZS100 version of their well respected travel zoom series, and a larger sensor photographer’s camera, the LX100. But the LX10 is a head-to-head competitor for Sony’s pocket wonders.

    The approach is a little different: unlike the RX100 III and IV, the LX10 doesn’t have a viewfinder. Instead, it offers a touchscreen interface and a screen that can be tilted upwards. In many respects, the LX10 is a logical post-1″ successor to the last of the smaller sensor models: the LX7.

    The camera also offers Panasonic’s 4K Photo mode, which offers a series of ways of specifying when the camera should capture a video clip from which stills can then be extracted. It also has Panasonic’s Post Focus mode that captures a video clip of the camera racking focus, so you can choose to grab the frame with optimal focus, after the fact.

    Compared with its peers

    The LX10 means there are now three brands building small cameras with 1″-type sensors and short, bright zooms (and Nikon promising a comparable ‘DL’ model at some point). We’ve also included the LX10’s big brother, the LX100 in this comparison, just to show what you get if you have room to carry its additional size.

      Panasonic
    LX10
    Sony
    DSC-RX100 IV
    Canon G7X
    Mark II
    Panasonic
    LX100
    MSRP $ 699 $ 999 $ 699 $ 899
    Sensor area 116 mm2 116 mm2 116 mm2 180 mm2
    Lens range (equiv) 24-72mm 24-70mm 24-100mm 24-75mm
    Aperture range F1.4-2.8 F1.8-2.8 F1.8-2.8 F1.7-2.8
    Control dials Aperture ring
    Command dial
    Lens ring (stepless)
    Lens ring (stepless)
    Four-way/dial

    Lens ring
    (stepped/
    stepless)
    Exposure Comp
    Four-way/dial

    Aperture ring
    Shutter dial
    Exposure Comp
    Lens ring (stepless)
    Four-way/dial
    Viewfinder No  2.36M-dot No 2.76M-dot
    equiv.*
    Rear screen Tilt up
    Touchscreen
    Tilt up/down Tilt up/down
    Touchscreen
    Fixed
    Video capability 4K/30p
    1080/120p**
    4K/30p
    1080/120p
    1080/60p 4K/30p
    1080/60p
    Built-in ND Filter No Yes
    (Auto for stills)
    Yes
    (Auto for stills)
    No
    Flash Built-in pop-up (bounceable) Built-in pop-up
    (bounceable)
    Built-in pop-up
    (bounceable)
    Clip-on hotshoe flash
    Battery life (CIPA) 260 280
    (230 with EVF)
    265 300
    (270 with EVF)
    Dimensions
    mm (in)
    105 x 61 x 42
    (4.1 x 2.4 x 1.7)
    102 x 58 x 41
    (4.0 x 2.3 x 1.6)
    106 x 61 x 42
    (4.2 x 2.4 x 1.7)
    115 x 66 x 55
    (4.5 x 2.6 x 2.2)

    *The LX100 uses a field-sequential display that updates red, green and blue information in sequence and, as such, does not require three dots to make up each three-color ‘pixel.’
    **1080/120p is a dedicated high speed video mode, with limited control.

    Equivalent apertures

    The chart below breaks down the equivalent aperture for each camera, as you work your way through the zoom range. Our article here explains the concept of equivalence, but at a high level all you need to know is that the lower the line is on the graph below, the blurrier the backgrounds you’ll be able to get and, typically, the better the overall low-light performance.

    LensEquivalentApertures([“Equivalent focal length (mm)”,”Panasonic LX100″,”Sony RX100 IV”,”Canon G7 X II”,”Panasonic LX10″], [[24,3.7434,”Panasonic LX100 at 24mm: F3.7″,4.90909090909091,”Sony RX100 IV at 24mm: F4.9″,4.90909090909091,”Canon G7 X II at 24mm: F4.9″,3.8181818181818183,”Panasonic LX10 at 24mm: F3.8″],[25,3.9636,”Panasonic LX100 at 25mm: F4.0″,5.454545454545455,”Sony RX100 IV at 25mm: F5.5″,null,””,4.0909090909090917,”Panasonic LX10 at 25mm: F4.1″],[26,4.1838,”Panasonic LX100 at 26mm: F4.2″,6.0000000000000009,”Sony RX100 IV at 26mm: F6.0″,null,””,4.90909090909091,”Panasonic LX10 at 26mm: F4.9″],[27,4.404,”Panasonic LX100 at 27mm: F4.4″,null,””,null,””,5.454545454545455,”Panasonic LX10 at 27mm: F5.5″],[28,4.6242,”Panasonic LX100 at 28mm: F4.6″,6.8181818181818183,”Sony RX100 IV at 28mm: F6.8″,null,””,6.0000000000000009,”Panasonic LX10 at 28mm: F6.0″],[29,null,””,null,””,null,””,6.8181818181818183,”Panasonic LX10 at 29mm: F6.8″],[30,4.8444,”Panasonic LX100 at 30mm: F4.8″,null,””,null,””,null,””],[31,null,””,null,””,null,””,7.6363636363636367,”Panasonic LX10 at 31mm: F7.6″],[32,null,””,7.6363636363636367,”Sony RX100 IV at 32mm: F7.6″,6.0000000000000009,”Canon G7 X II at 32mm: F6.0″,null,””],[34,5.0645999999999995,”Panasonic LX100 at 34mm: F5.1″,null,””,null,””,null,””],[37,5.2848,”Panasonic LX100 at 37mm: F5.3″,null,””,null,””,null,””],[39,null,””,null,””,6.8181818181818183,”Canon G7 X II at 39mm: F6.8″,null,””],[41,5.505,”Panasonic LX100 at 41mm: F5.5″,null,””,null,””,null,””],[44,5.7252,”Panasonic LX100 at 44mm: F5.7″,null,””,null,””,null,””],[52,6.1655999999999995,”Panasonic LX100 at 52mm: F6.2″,null,””,null,””,null,””],[54,null,””,null,””,7.6363636363636367,”Canon G7 X II at 54mm: F7.6″,null,””],[70,null,””,7.6363636363636367,”Sony RX100 IV at 70mm: F7.6″,null,””,null,””],[72,null,””,null,””,null,””,7.6363636363636367,”Panasonic LX10 at 72mm: F7.6″],[75,6.1655999999999995,”Panasonic LX100 at 75mm: F6.2″,null,””,null,””,null,””],[100,null,””,null,””,7.6363636363636367,”Canon G7 X II at 100mm: F7.6″,null,””]])

    Just as the specs suggest, the LX10’s lens is broadly similar to that of the Sony RX100 III and IV. It’s 2/3EV brighter at first but by 30mm equivalent they’re both already down to F2.8 (F7.6 equiv). So although it should offer a similar performance to its big brother, the LX100, at wide angle, the bigger camera maintains an advantage across the rest of its zoom range.

    Articles: Digital Photography Review (dpreview.com)

  • How to do Light Painting by Rotating the Camera

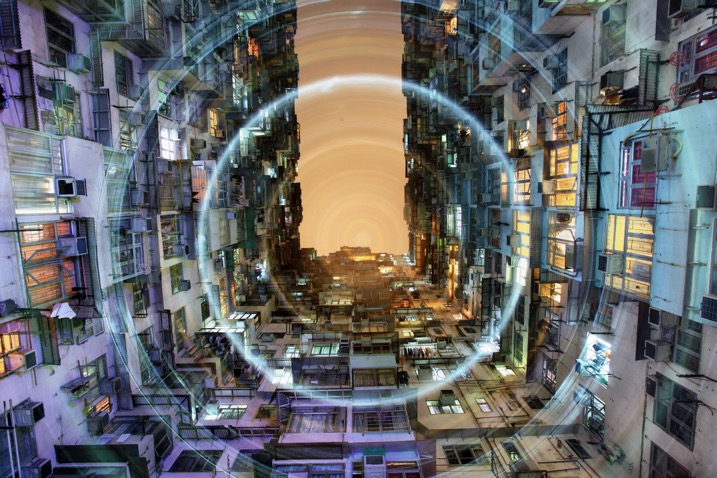
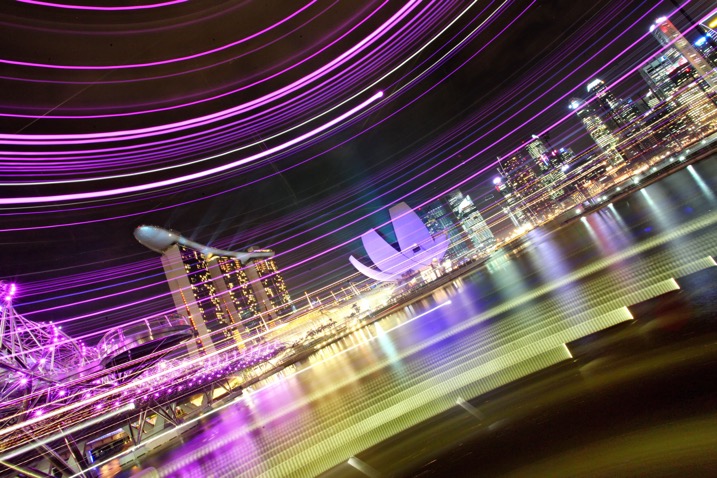
    Circular lines are a great way to draw your viewer into the photo. The animation artists knew what they were doing with the Looney Tunes design. A similar effect is possible in photography through a process known as kinetic light painting. This technique involves moving the camera around in front of stationary lights, creating a pattern in your photo. If you use camera rotation you can create circular light lines.

    rotation-light-painting11

    This photograph in Hong Kong has been taken many times now, the use of rotation during the long exposure gives the photo a different aesthetic.

    How to take rotation light painting photos

    1. Scout a location which has lots of light, you are looking for tall buildings or big architectural structures.
    2. Set up the camera on a tripod, looking straight up. You can set the camera at an angle between 45 degrees to straight up. The worm’s eye view works very well for this technique.
    3. Choose a wide-angle lens, or even a fish-eye for this photo. A kit lens will work but use the widest focal length.
    4. Now compose your photograph, and focus the image. Use an angle finder or live view to help you do this.
    5. Make a mental note of the position of your camera on the tripod, if your tripod head shows the number of degrees of rotation jot this number down. The aim is to rotate the tripod head, starting and finishing in the same position.
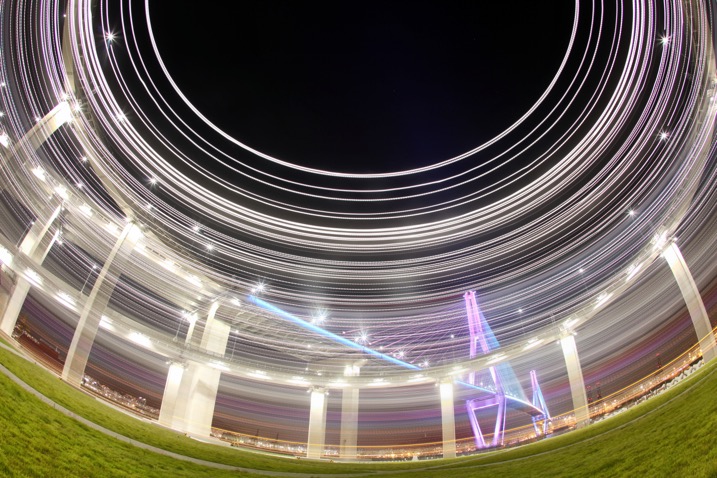
    A bridge in Busan is photographed using a fish-eye lens in conjunction with kinetic light painting. A shallower angle was used here, perhaps around 45 degrees.

    A bridge in Busan is photographed using a fish-eye lens in conjunction with kinetic light painting. A shallower angle was used here, perhaps around 45 degrees.

    A bridge in Busan is photographed using a fish-eye lens in conjunction with kinetic light painting. A shallower angle was used here, perhaps around 45 degrees.

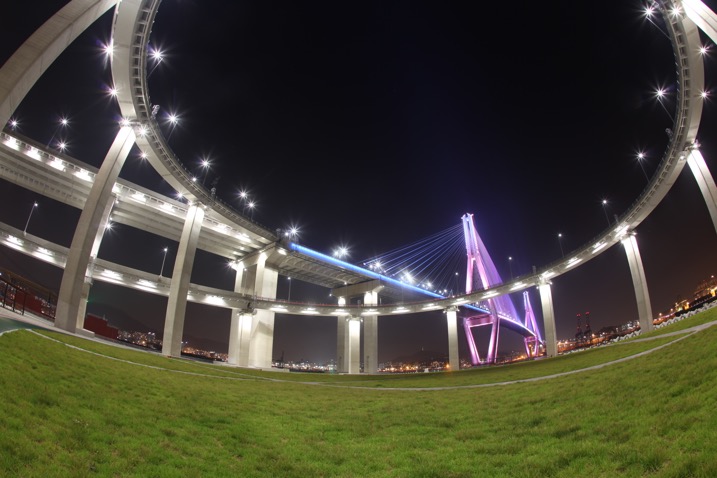
    The same scene without the rotation.

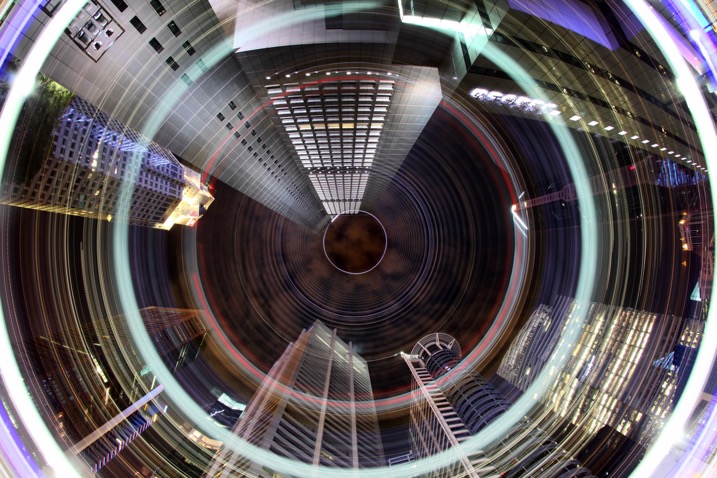
    The CBD area of Singapore has many locations where a worms eye view looks good. The light rotation adds an extra element to this photo.

    The CBD area of Singapore has many locations where a worm’s eye view looks good. The light rotation adds an extra element to this photo.

    1. Set the camera to expose for 30 seconds, and adjust the aperture and ISO to get the correct exposure value in the photo. The exposure value should be 0 or +1, this is because you’ll lose some of the light exposing the buildings during the light painting.
    2. Use the camera’s self-timer to start the exposure, and set it to 10 seconds.
    3. Start to rotate the camera around the axis of the tripod just before the exposure begins. The rotation has to me smooth, and last for between two and five seconds.
    4. Make sure you finish the rotation at the same position where you started by watching the degrees of rotation on your tripod.
    5. The camera then has around 25 seconds to capture the structures in your scene.
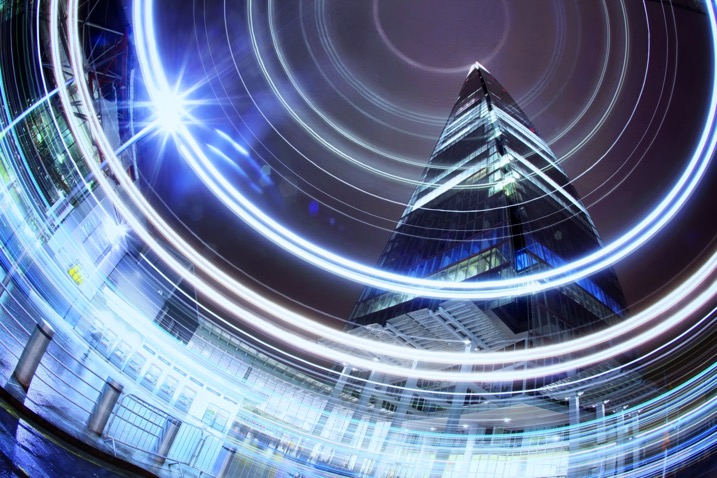
    Using a more horizontal angle allows you to paint light through the scene, again this is a unique way of capturing the iconic Singapore skyline.

    Using a more horizontal angle allows you to paint light through the scene, again this is a unique way of capturing the iconic Singapore skyline.

    If you prefer to see how this is done visually, watched the video below:

    Why use circular light painting?

    Those who like long exposure will know about light painting, though not everyone is familiar with kinetic light painting. Getting great photos requires a bit of experimentation, hence the need to try out new techniques from time to time.

    Kinetic light painting is a great way of creating dynamic photos, which have a futuristic feel. The image you take is likely to be from a worm’s eye view, in an urban setting. Therefore using a technique that adds lights and patterns to your scene can look good. You will also find that many people have already taken photos from the most popular locations. So techniques like this allow you to give your photo a different slant.

    rotation-light-painting13

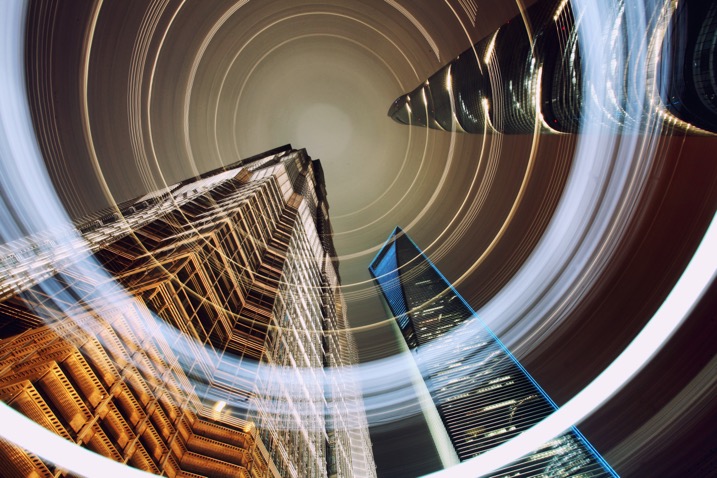
    The light patterns in this photo have given this scene a lot of energy. A slightly shallower angle than straight up was used here.

    rotation-light-painting12

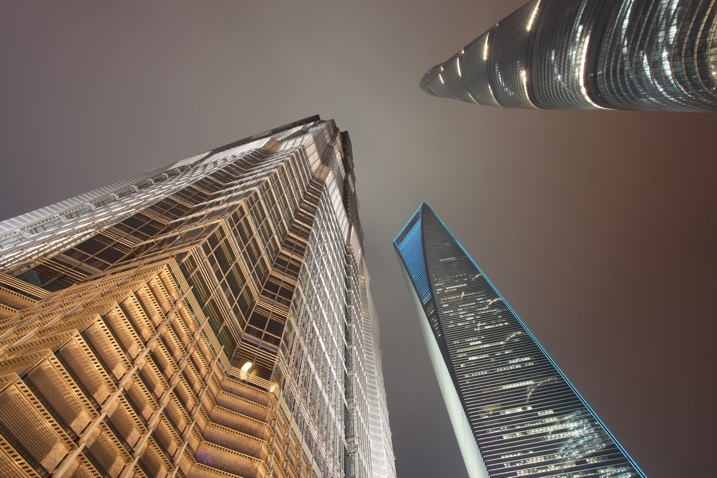
    This is a worm’s eye view of the same skyscrapers in Shanghai, without using any light painting.

    rotation-light-painting04

    Where can I try this technique?

    The best place to try this type of technique is near skyscrapers, though if you don’t have any near you then tall apartment buildings can work as well. Any tall architectural structure that’s lit could work for you, as long as you can get underneath it, and it shows in the frame with a wide angle lens.

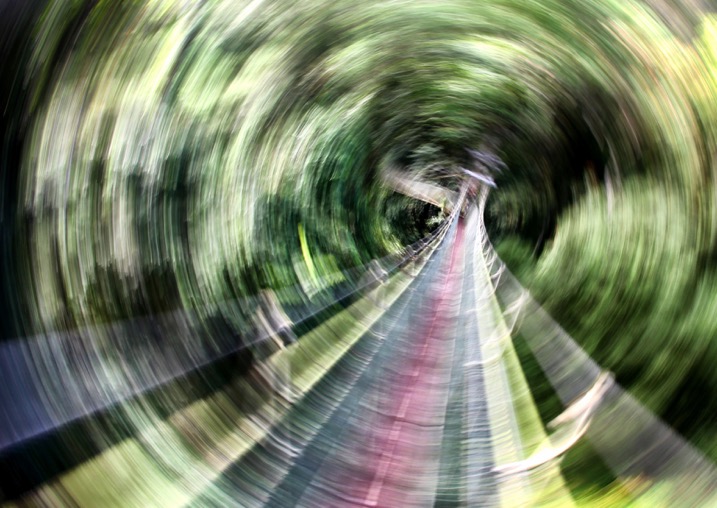
    You don’t live in the city? No problem you can head to your nearest forest and use the trees in place of skyscrapers. If you use trees the shot will be daytime, and you’ll be painting the sunlight shining through the leaf canopy. There may be too much light during the day to make a long exposure; therefore consider using an ND filter to reduce the amount of light coming into the camera.

    It's possible to use this technique under, or in this case in a leaf canopy. This is the Jungle at Mulu national park, Malaysia.

    It’s possible to use this technique under, or in this case in, a leaf canopy. This is the Jungle at Mulu national park, Malaysia.

    Another photo from the super trees in Singapore, this time aiming strait up.

    Another photo from the super trees in Singapore, this time aiming straight up.

    rotation-light-painting01

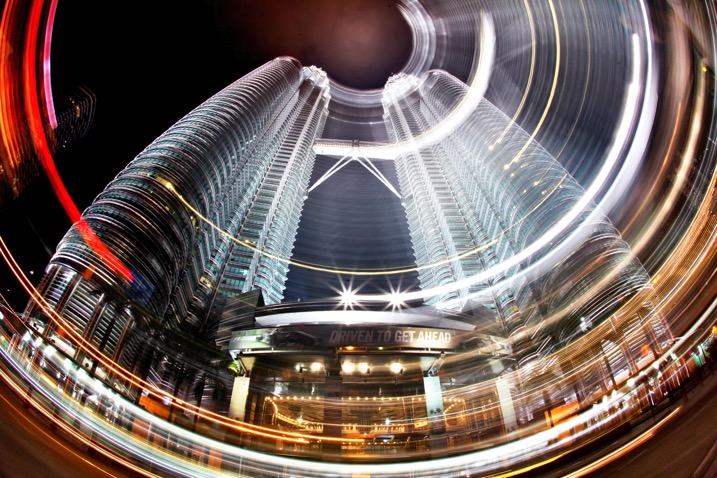
    Malaysia’s Petronas twin towers, partial rotation.

    Get kinetic, and get light painting!

    It’s a great idea to experiment with photography. Trying out long exposure techniques such as this one will only improve your work. It can help you to get unique images that other people won’t have seen; therefore you’ll generate a lot more interest in your work. Having a tripod, and access to a city is really a prerequisite of a style like this one. I look forward to seeing your work. If you have any other idea’s of how you can light paint using your camera please share them in the comments section below.

    I look forward to seeing your work. If you have any other idea’s of how you can light paint using your camera please share them in the comments section below.

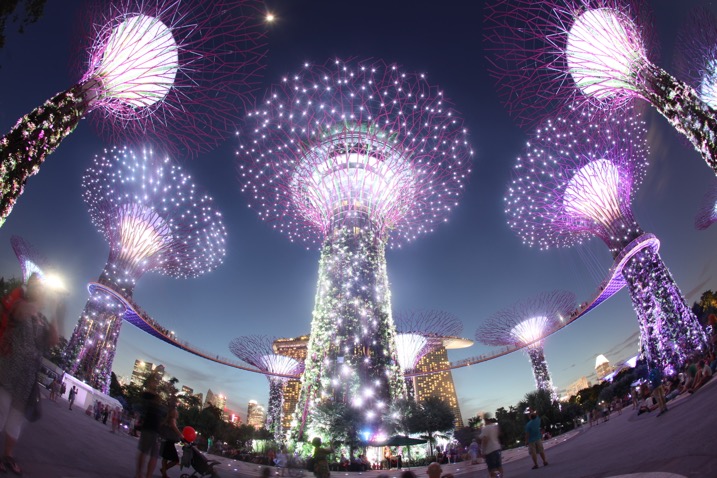
    Scene without rotation.

    Scene without rotation.

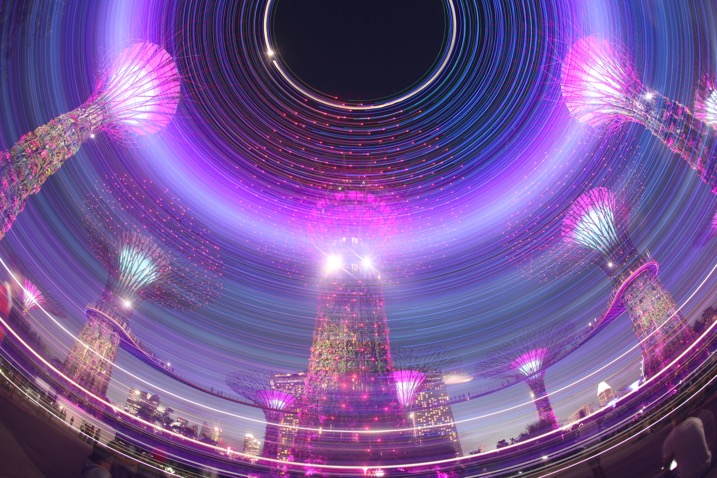
    The super trees found in Singapore's garden by the bay make a great subject for kinetic light painting as they have so many lights.

    The super trees found in Singapore’s garden by the bay make a great subject for kinetic light painting as they have so many lights.

    googletag.cmd.push(function() {
    tablet_slots.push( googletag.defineSlot( “/1005424/_dPSv4_tab-all-article-bottom_(300×250)”, [300, 250], “pb-ad-78623” ).addService( googletag.pubads() ) ); } );

    googletag.cmd.push(function() {
    mobile_slots.push( googletag.defineSlot( “/1005424/_dPSv4_mob-all-article-bottom_(300×250)”, [300, 250], “pb-ad-78158” ).addService( googletag.pubads() ) ); } );

    The post How to do Light Painting by Rotating the Camera by Simon Bond appeared first on Digital Photography School.


    Digital Photography School

  • GoPro compensates Karma drone users with free HERO5 cam for recall

    At the beginning of November action-cam maker GoPro announced a recall of its new Karma drone after a small number of the approximately 2500 units sold lost power during operation. GoPro stressed that even those users whose drones appeared to be operating normally should stop using them immediately. 

    Now at least US buyers of the Karma will receive some sort of compensation for going through the troubles of returning the drone and having to find a replacement. GoPro is offering American Karma buyers a free HERO5 Black action cam once they return the drone and all accessories. Presumably, apart from making customers happy, this move should also speed up the return process and ensure as many of the faulty drones as possible make it back to GoPro. The company says it is planning to start shipping the Karma again as soon as the issue is resolved.

    Articles: Digital Photography Review (dpreview.com)